

Page 1

◆
User’s Guide
Management
®
Software
AT-S26
FOR USE WITH THE AT-9006T, AT-9006SX/SC, AND
AT-9006LX/SC GIGABIT ETHERNET SWITCH
PRODUCTS
VERSION 2.0.1
PN 613-10852-00 Rev B
Page 2

Copyright 2000 Allied Telesyn International, Corp.
960 Stewart Drive Suite B, Sunnyvale, CA 94085 USA
All rights reserved. No part of this publication may be reproduced without prior written permission from Allied Telesyn International,
Corp.
CentreCom is a registered trademark of Allied Telesyn International, Corp.
Netscape Navigator is a registered trademark of Netscape Communications Corporation. All other product names, company names,
logos or other designations mentioned herein are trademarks or registered trademarks of their respective owners.
Allied Telesyn International, Corp. reserves the right to make changes in specifications and other information contained in this
document without prior written notice. The information provided herein is subject to change without notice. In no event shall Allied
Telesyn International, Corp. be liable for any incidental, specia l, indirect, or consequential damages whatsoever, including but not
limited to lost profits, arising out of or related to this manual or the information contained herein, even if Allied Telesyn International,
Corp. has been advised of, known, or should have known, the possibility of such damages.
Page 3

Table of Contents
Table of Contents .................................................................................................................................................................................................3
Preface ......................................................................................................................................................................................................................9
Supported Platform s .............................................................................................................................................................................................9
Purpose of This Guide ................................................. ........................................................................................................................................11
How This Guide is Organized ...........................................................................................................................................................................12
Document Conventions ....................................................................................................................................................................................13
Where to Find Web-based Guides .................................................................................................................................................................14
Contacting Allied Tele syn .................................................................................................................................................................................15
Online Support..............................................................................................................................................................................................15
Technical Support and Services..............................................................................................................................................................15
Technical Support E-mail Addresses.....................................................................................................................................................15
Returning Products .............................................................................................................................................................................................16
FTP Server ...............................................................................................................................................................................................................17
For Sales or Corporate Information ...............................................................................................................................................................18
Tell Us What You Think ......................................................................................................................................................................................19
Chapter 1
Getting Started ...................................................................................................................................................................................................21
Overview .................................................................................................................................................................................................................22
Starting a Local Omega Session Using the RS232 Port ..........................................................................................................................23
Omega Main Menu......................................................................................................................................................................................24
Using the Terminal Interf ace........................ ........................................................................... .................................................................25
Quitting from a Local Session............. .....................................................................................................................................................27
Starting an Omega Session from a Web Browser .....................................................................................................................................28
Managed Switch...........................................................................................................................................................................................30
Omega Main Menu Window............... .................................................. ......................... ..........................................................................30
Web Links........................................................................................................................................................................................................31
Browser Tools.................................................................................................................................................................................................31
Quitting an Omega Session from a Web Browser ............................................................................................................................32
Starting a Remote Omega Session with Telnet or an SNMP Management Program ..................................................................33
Connecting to a Remote Switch .....................................................................................................................................................................34
Menu Tree ...............................................................................................................................................................................................................35
3
Page 4

Chapter 2
Managing a Switch ...........................................................................................................................................................................................41
Configuring the Switch IP Parameters .........................................................................................................................................................42
Setting IP Parameters.............................................................. ...................................................................................................................43
Configuring the Spanning Tree Protocol ....................................................................................................................................................47
Activating or Deactivating STP and Configuring the Port Parameters....................................................................................48
Configuring STP Parameters....................................................................................................................................................................50
Enabling or Disabling IGMP Snooping ........................................................................................................................................................52
Naming a Switch ..................................................................................................................................................................................................54
Resetting a Switch ...............................................................................................................................................................................................55
Reassigning the Default Sett i ngs fo r th e Switc h ... ............................................................................ .......................................................56
Configuring the RS232 Port ............................................................................................................................................................................. 57
Running Diagnostics ..........................................................................................................................................................................................59
Displaying the Activity Monitor .....................................................................................................................................................................61
Pinging a Device ..................................................................................................................................................................................................62
Chapter 3
Configuring the Ports .....................................................................................................................................................................................65
Displaying Port Status ........................................................................................................................................................................................ 66
Configuring Port Parameters ..........................................................................................................................................................................68
Creating a Port Trunk .........................................................................................................................................................................................71
Guidelines.......................................................................................................................................................................................................71
Creating a Port Trunk .................................................................................................................................................................................72
Deleting a Port Trunk ......................... .... .................................................. .... ..............................................................................................73
Configuring Port Mirroring ..............................................................................................................................................................................74
Enabling Port Mirroring.............................................................................................................................................................................74
Disabling Port Mirroring............ .... .................................................. .... ......................................................................................................75
Configuring Port Security .................................................................................................................................................................................76
Chapter 4
Configuring the MAC Address Table ....................................................................................................................................................... 79
MAC Address Table .............................................................................................................................................................................................81
Displaying the MAC Address Table.......................................................................................................................................................82
Displaying the MAC Addresses of a Port.............................................................................................................................................83
Displaying the Port Number of a MAC Address................................................................................................................................84
Clearing All Dynamic MAC Addresses..................................................................................................................................................85
Changing the Aging Time of the MAC Address Table....................................................................................................................85
Static MAC Address Table .................................................................................................................................................................................86
Displaying the Static MAC Address Table...........................................................................................................................................86
Adding Addresses to the Static MAC Address Table ....... ...............................................................................................................87
Deleting Addresses from the Static MAC Address Table...............................................................................................................88
Clearing the Static MAC Address Table ...............................................................................................................................................89
Multicast Address ................................................................................................................................................................................................90
Configuring a Multicast Address............................................................................................................................................................90
Changing a Multicast Port Assignment...............................................................................................................................................92
Deleting a Multicast Address...................................................................................................................................................................92
Chapter 5
Configuring Virtual LANs and Quality of Service ..............................................................................................................................93
Overview ................ ............ ............ ................. ............ ................. ............ ................. ..............................................................................................94
Port-Based VLANs........................................................................................................................................................................................95
VLAN Tagging......................................................................................................... ......................................................................................96
Creating a New Port-based or Tagged VLAN ..........................................................................................................................................102
Phase 1...........................................................................................................................................................................................................102
Phase 2...........................................................................................................................................................................................................105
Phase 3...........................................................................................................................................................................................................106
4
Page 5

AT-S26 Version 2.0.1 User’s Guide
Verifying the VLAN Configuration.......................................................................................................................................................107
Creating an Example VLAN ............................................................................................................................................................................108
Phase 1..........................................................................................................................................................................................................108
Phase 2..........................................................................................................................................................................................................109
Phase 3..........................................................................................................................................................................................................109
Modifying a Port-based or Tagged VLAN .................................................................................................................................................111
Phase 1..........................................................................................................................................................................................................111
Phase 2..........................................................................................................................................................................................................112
Phase 3..........................................................................................................................................................................................................112
Deleting a Port-based or Tagged VLAN ....................................................................................................................................................113
Phase 1..........................................................................................................................................................................................................113
Phase 2..........................................................................................................................................................................................................113
Assigning the CPU Management Port to a VLAN ..................................................................................................................................115
Configuring Port Priority Queueing ...........................................................................................................................................................116
Configuring Switch Priority Queuing .........................................................................................................................................................118
Chapter 6
Displaying Ethernet Statistics ..................................................................................................................................................................121
Displaying Statistics for Received Frames ................................................................................................................................................122
Displaying Statistics for Transmitted Frames ..........................................................................................................................................125
Displaying RMON Statistics for a Switch ...................................................................................................................................................127
Displaying RMON Statistics for a Port ........................................................................................................................................................128
Resetting the Statistics Counters ................................................................................................................................................................129
Interpreting the Graphs ..................................................................................................................................................................................130
Chapter 7
Configuring the Omega Interface ...........................................................................................................................................................131
Creating an Omega Password ............................. .... .....................................................................................................................................132
Specifying a Timeout Value ...........................................................................................................................................................................134
Enabling and Disabling the Access Methods ..........................................................................................................................................135
Chapter 8
Upgrading Switch Software and Configuration Files ...................................................................................................................137
Upgrading the Switch Software ..................................................................................................................................................................137
Using XModem to Upgrade the Switch Software..........................................................................................................................138
Using TFTP to Upgrade Softwa re.........................................................................................................................................................139
Using Omega to Upgrade Additiona l Switches .... .... .................................................. .... ...................... .................................................140
Downloading Software to One Switch..............................................................................................................................................140
Downloading Software to All Switches.............................................................................................................................................141
Uploading and Downloading System Configuration Files ................................................................................................................142
Appendix A
AT-S26 Default Settings ..............................................................................................................................................................................143
Appendix B
Spanning Tree Protocol Concepts ..........................................................................................................................................................145
Spanning Tree Protocol Features ................................................................................................................................................................146
Spanning Tree Protocol Parameters ..........................................................................................................................................................147
Spanning Tree Protocol Operation .............................................................................................................................................................148
Appendix C
Supported Platforms ....................................................................................................................................................................................151
Index .....................................................................................................................................................................................................................153
5
Page 6

Page 7

List of Figures
Chapter 1
Getting Started
Figure 1: Omega Main Menu from a Local Session ..................................................................................................................................24
Figure 2: Entering a Switch’s IP Address in the URL Field ......................................................................................................................28
Figure 3: Initial Omega Window Display from a Web Browser ............................................................................................................29
Figure 4: Omega Main Menu from a Web Browser ..................................................................................................................................30
Figure 5: Active Menu Option ..........................................................................................................................................................................31
Figure 6: Entry Field .............................................................................................................................................................................................31
Figure 7: Omega Main Menu Tree ..................................................................................................................................................................38
Chapter 2
Managing a Switch
Figure 8: System Configuration Menu ..........................................................................................................................................................43
Figure 9: IP Parameters Window .....................................................................................................................................................................43
Figure 10: DHCP Selections ..............................................................................................................................................................................45
Figure 11: Bridging Menu ..................................................................................................................................................................................48
Figure 12: Port Parameters for the Spanning Tree Protocol .................................................................................................................48
Figure 13: STP Port Parameters Window .....................................................................................................................................................49
Figure 14: Setting STP Port Parameters Window ......................................................................................................................................49
Figure 15: Spanning Tree Parameters Window .........................................................................................................................................50
Figure 16: Switch Configuration Menu ........................................................................................................................................................52
Figure 17: IGMP Configuration Menu ...........................................................................................................................................................53
Figure 18: Administration menu .....................................................................................................................................................................55
Figure 19: Terminal Configuration Window ...............................................................................................................................................57
Figure 20: Sample Diagnostics Window ......................................................................................................................................................60
Figure 21: Activity Monitor ...............................................................................................................................................................................61
Figure 22: Ping Window .....................................................................................................................................................................................62
Figure 23: Ping Results Example .....................................................................................................................................................................62
Chapter 3
Configuring the Ports
Figure 24: Port Status Window ........................................................................................................................................................................66
Figure 25: Port Configuration Window ........................................................................................................................................................68
Figure 26: Port Mirroring Window .................................................................................................................................................................74
Figure 27: Source and Destination Port Mirror Prompts ........................................................................................................................75
Figure 28: Port Security Menu .........................................................................................................................................................................76
Figure 29: Port Security Prompts ....................................................................................................................................................................77
7
Page 8

List of Figures
Chapter 4
Configuring the MAC Address Table
Figure 30: MAC Address Menu .......................................................................................................................................................................82
Figure 31: MAC Address Table ........................................................................................................................................................................82
Figure 32: MAC Address Table Per Port Window .....................................................................................................................................83
Figure 33: MAC Address Prompt ....................................................................................................................................................................84
Figure 34: MAC Address by Port Window ................................................................................................................................................... 84
Figure 35: Static MAC Address Table Window ..........................................................................................................................................86
Figure 36: Static MAC Addresses Per Port Window .................................................................................................................................87
Figure 37: Adding a Static MAC Address Window ................................................................................................................................... 87
Figure 38: Deleting a Static MAC Address Window ................................................................................................................................88
Figure 39: Multicast Address Menu ...............................................................................................................................................................90
Figure 40: Adding a Multicast Address Window ......................................................................................................................................91
Figure 41: Deleting a Multicast Address Window ....................................................................................................................................92
Chapter 5
Configuring Virtual LANs and Quality of Service
Figure 42: VLAN Port-Based Example ...........................................................................................................................................................95
Figure 43: VLAN Tagging Example ................................................................................................................................................................99
Figure 44: Virtual LAN/QoS Menu ................................................................................................................................................................102
Figure 45: VLANs Window ..............................................................................................................................................................................103
Figure 46: New VLAN Configuration Window .........................................................................................................................................103
Figure 47: VLAN Configuration Window for the Default VLAN .........................................................................................................105
Figure 48: Port to VLAN Configuration Window ....................................................................................................................................106
Figure 49: Port Priority Setting Window ....................................................................................................................................................117
Figure 50: Priority Weight Configuration Window ................................................................................................................................119
Chapter 6
Displaying Ethernet Statistics
Figure 51: Graph of Received Frames, Switch Level .............................................................................................................................122
Figure 52: Graph of a Port’s Received Frames .........................................................................................................................................124
Figure 53: Sample Graph of a Single Frame Type on All Ports ..........................................................................................................124
Figure 54: Sample Graph of Transmitted Frames Window ................................................................................................................125
Figure 55: RMON Statistics Graph Window ..............................................................................................................................................127
Figure 56: Sample RMON Statistics Graph for a Port ............................................................................................................................128
Chapter 7
Configuring the Omega Interface
Figure 57: Omega Options Window ...........................................................................................................................................................132
8
Page 9

Preface
This guide contains instructions on how to use the AT-S26
Version 2.0.1 management software and the Omega management
interface to manage and configure your AT-9006T, AT-9006SX/SC, and
AT-9006LX/SC Series Gigabit Ethernet Switches.
Supported Platforms
Version 2.0.1 of the AT-S26 management software is supported on the
following Allied Telesyn Gigabit Ethernet switches:
❑
AT-9006T
❑
AT-9006SX/SC
❑
AT-9006LX/SC
Version 2.0.1 of the AT-S26 management software supports the
following expansion modules:
❑
AT-A14 100/1000Base-T (RJ-45) Expansion Module
❑
AT-A15/SX 1000Base-SX (SC) Expansion Module
❑
AT-A15/LX 1000Base-SL (SC) Expansion Module
❑
AT-A16 100Base-FX (VF-45) Expansion Module
❑
AT-A17 100Base-FX (SC) Expansion Module
❑
AT-A18 10/100Base-TX (RJ-45) Expansion Module
❑
AT-A19 100Base-FX (MT-RJ) Expansion Module
9
Page 10

❑
AT-A24/SX 1000Base-SX (MT-RJ) Expansion Module
❑
AT-A24/LX 1000Base-LX (MT-RJ) Expansion Module
Note
Refer to Appendix C for additional information on the switches and
expansion modules supported by this version of the AT-S26
management software.
10
Page 11

Purpose of This Guide
This guide is intended for network administrators who are responsible
for managing the switches. Network administrators should be familiar
with Ethernet switches, Ethernet and Fast Ethernet technology,
bridging, and the Spanning Tree Protocol (STP).
AT-S26 Version 2.0.1 User’s Guide
11
Page 12

How This Guide is Organized
This guide contains the following chapters and appendices:
Chapter 1, Getting Started, explains how to start an Omega session.
This chapter also describes the Omega Main Menu and how to navigate
around the various menus.
Chapter 2, Managing a Switch, describes how to configure the IP
parameters for a switch, how to set the spanning tree protocol
parameters, and more.
Chapter 3, Configuring the Ports, explains how to set the port
parameters, create port mirrors and port trunks, and configure port
security.
Chapter 4, Configuring the MAC Address Table, contains the
procedures for displaying the MAC address table, viewing and changing
the static MAC address table, and configuring multicast addresses.
Chapter 5, Configuring Virtual LANs and Quality of Service, contains
background information on the different types of VLANs that are
supported by the switch. The chapter also contains the procedures for
creating and modifying VLANs and how to configure the Prior ity
Queueing feature.
Chapter 6, Displaying Ethernet Statistics, explains how to view switch-
level and port-level performance statistics.
Chapter 7, Configuring the Omega Interface, contains the procedures
for assigning the Omega interface a password and for disabling the
various access methods.
Chapter 8, Upgrading Switch Software and Configuration Files,
explains how to download new AT-S26 software onto the switches in
your network.
Appendix A, AT-S26 Default Settings, lists the factory default settings
for the switch and the management software.
Appendix B, Spanning Tree Concepts, briefly describes the spanning
tree protocol as implemented by Allied Telesyn for the switch.
Appendix C, Supported Platforms, lists the basic specifications of the
Fast Ethernet switches and optional expansion modules supported by
this version of the AT-S26 software.
Index, at the end of this guide, is organized according to subject matter.
12
Page 13
Document Conventions
This guide uses several conventions that you should become familiar
with first before you begin to install the product.
Note
Notes provide additional information.
Warning
Warnings inform you that performing or omitting a specific action
may result in bodily injury.
Caution
Cautions inform you that performing or omitting a specific action
may result in equipment damage or loss of data.
AT-S26 Version 2.0.1 User’s Guide
13
Page 14

Where to Find Web-based Guides
The Allied Telesyn web site at www.alliedtelesyn.com offers you an easy
way to access the most recent documentation and technical information
for all of our products.
There are several manuals that you will need in order to manage your
Ethernet switch. The following manual contains the hardware
installation instructions for the switch. You can obtain this manual from
the Allied Telesyn web site:
❑
AT-9006T, AT-9006SX/SC, and AT-9006LX/SC Installation
Guide,
PN 613-10851-00
The following manual is shipped with the switch and contains an
abbreviated version of the installation instructions:
❑
AT-9006T, AT-9006SX/SC, and AT-9006LX/SC Quick Install
Guide,
PN 613-10853-00
14
Page 15

Contacting Allied Telesyn
You can contact Allied Telesyn technical support by telephone, fax or
e-mail. You can also contact technical support online through our web
site.
AT-S26 Version 2.0.1 User’s Guide
Online Support
Technical
Support and
Services
You can request technical support online by filling out the Online
Technical Support Form at www.alliedtelesyn.com/forms/support.htm.
Americas
United States, Canada, Mexico,
Central America, South America
Tel: 1 (800) 428-4835, option 4
Fax: 1 (503) 639-3176
Asia
Singapore, Taiwan, Thailand, Malaysia,
Indonesia, Korea, Philippines, China,
India, Hong Kong
Tel: (+65) 381-5612
Fax: (+65) 383-3830
Australia
Tel: 1 (800) 000-880
Fax: (+61) 2-9438-4966
France
France, Belgium, Luxembourg,
The Netherlands, Middle East,
Africa
Tel: (+33) 0-1-60-92-1 5-25
Fax: (+33) 0-1-69-28-3 7-49
Germany
Germany, Switzerland, Austria, Eastern
Europe
Tel: (+49) 0130/83-56-66
Fax: (+49) 30-435-900- 115
Italy
Italy, Spain, Portugal , Gr eece, Turkey, Israel
Tel: (+39) 02-41-30-41
Fax: (+39) 02-41-30-41 -00
Japan
Tel: (+81) 3-3443-5640
Fax: (+81) 3-3443-2443
United Kingdom
United Kingdom, Denmark, Norway,
Sweden, Finland
Tel: (+0044) 1235-442500
Fax: (+44) 1-235-442680
Technical
Support E-mail
Addresses
United States and Canada
TS1@alliedtelesyn.com
Latin America, Mexico, Puerto Rico, Caribbean, and Virgin Islands
latin_america@alliedtelesyn.com
United Kingdom, Sweden, Norway, Denmark, and Finland
support_europe@alliedtelesyn.com
15
Page 16

Returning Products
Products for return or repair must first be assigned a Return Materials
Authorization (RMA) number. A product sent to Allied Telesyn without a
RMA number will be returned to the sender at the sender’s expense.
To obtain an RMA number, contact Allied Telesyn’s Technical Support at
one of the following locations:
North America
2124 Zanker Road
San Jose, CA 95131
Tel: 1-800-428-4835, opt ion 4
Fax: 1-503-639-3716
Latin America, the Caribbean,
Virgin Islands
Tel: international code + 425-481-3852
Fax: international code + 425- 483-9458
European Customer Support Centre
10/11 Bridgemead Close
Westmead Industrial Estate
Swindon, Wiltsh ir e SN5 7YT
England
Tel: +44-1793-501401
Fax: +44-1793-431099
Mexico and Puerto Rico
Tel: 1-800-424-5012, ext 3852 or
1-800-424-4284, ext 3852
Mexico only: 95-800-424-5012, ext 3852
Fax: international c ode + 425-489-9191
16
Page 17

FTP Server
AT-S26 Version 2.0.1 User’s Guide
If you need a device driver for an Allied Telesyn device and you know the
name of the driver, you can download the software by connecting
directly to our FTP server at ftp://gateway.centre.com.
At login, enter ‘anonymous’. Enter your e-mail address for the password
as requested by the server at login.
17
Page 18

For Sales or Corporate Information
Allied Telesyn International, Corp.
19800 North Creek Parkway, Suite 200
Bothell, WA 98011
Tel: 1 (425) 487-8880
Fax: 1 (425) 489-9191
Allied Telesyn International, Corp.
960 Stewart Drive, Suite B
Sunnyvale, CA 94085
Tel: 1 (800) 424-4284 (USA and Canada)
Fax: 1 (408) 736-0100
18
Page 19

Tell Us What You Think
If you have any comments or suggestions on how w e might improve this
or other Allied Telesyn documents, please fill out the Send Us Feedback
Form at www.alliedtelesyn.com/forms/feedback.htm.
AT-S26 Version 2.0.1 User’s Guide
19
Page 20

Page 21

Chapter 1
Getting Started
This chapter provides an overview of the Omega management interface
and contains the different procedures for starting an Omega
management session. The sections in this chapter include:
❑ Starting a Local Omega Session Using th e RS232 Port on page
23
❑ Starting an Omega Session from a Web Browser on page 28
❑ Starting a Remote Omega Session with Telnet or an SNMP
Management Program on page 33
❑ Connecting to a Remote Switch on page 34
This chapter also contains a section titled Menu Tree on page 35. This
section lists each Omega menu selection and the page number in this
guide where the selection is explained.
21
Page 22

Getting Started
Overview
The Omega interface simplifies the task of managing your Allied Telesyn
AT-9006T, AT-9006SX/SC, and AT-9006LX/SC Series Gigabit Ethernet
switches. This menu-oriented interface, which comes pre-installed on
the switch along with the AT-S26 software, enables you to configure and
manage all of the switch parameters, such as the IP address, the gateway
address, and the subnet mask of the switch. You also use the interface to
create virtual LANs, view performance statistics, and configure the ports.
There are three different ways that you can access the Omega
management interface to configure and manage a switch. They are:
❑ Using the RS232 port on the front panel of the switch. This creates
a Local Omega session.
❑ Using a web browser, such as Netscape Navigator.
❑ Using Telnet.
You can also manage a switch using a SNMP program, such as HP
Openview; however, this method does not use the Omega interface.
The different sections in this chapter contain procedures on how to start
an Omega management session for each method. The chapter also
describes the Omega Main Menu and how to move through the
different menu selections.
22
Page 23

Starting a Local Omega Session Using the RS232 Port
This section contains the procedure for starting a local Omega session by
connecting a terminal to the RS232 port on the switch.
Note
If you are managing the switch in a TCP/IP environment and you are
configuring the IP parameters for the first time, you must access the
Omega program locally using this procedure and either manually
assign the switch an IP address and a subnet mask or activate the
dynamic host configuration protocol (DHCP) option so that the
switch is automatically assigned an IP address from a DHCP or
BOOTP server.
To start a local Omega session, perform the following procedure:
1. Connect a terminal or PC to the RS232 port on the switch.
2. Configure the terminal or terminal emulation program as follows:
AT-S26 Version 2.0.1 User’s Guide
❑ Baud rate: 9600
❑ Data bits: 8
❑ Parity: None
❑ Stop bits: 1
❑ Flow con t ro l: None
Note
The default settings for the Omega’s terminal interface are for a DEC
VT100 or ANSI terminal, or an equivalent terminal emulation
program. Once you have started an Omega session, you can change
these values. For instructions, refer to the section Configuring the
RS232 Port on page 57.
3. Press the <Return> key.
4. If prompted for a password, enter the password for the Omega
interface. The default is no password. You can later configure a
password. For instructions, refer to Chapter 7, Configuring the
Omega Interf a c e .
The Omega Main Menu is displayed. Refer to the next section for a
description of the menu.
23
Page 24

Getting Started
Omega Main
Menu
Figure 1 illustrates the Omega Main Menu.
Allied Telesyn AT-9006SX/SC Ethernet Switch 2.0.1
Main Menu
Port status and configuration
Ethernet statistics
Administration
System configuration
Traffic/Port Mirroring
Virtual LANs/QoS
Bridging
MAC Address Table
Quit
Figure 1 Omega Main Menu from a Local Session
24
Page 25

AT-S26 Version 2.0.1 User’s Guide
Using the
Terminal
Interface
This section explains how to move around the menus using different
terminal interface s.
If you are using a DEC VT100 or ANSI (the default) terminal configuration,
refer to the table below for instructions on how to move through and
select menu selections:
When directed to You must
Select an option Highlight the option by pressing the Up ( ↑ )
or Down ( ↓ ) arrow key; then press <Return>
or
Type the first character of the desired option
at the prompt and press <Return>.
If two or more options have matching initial
characters, type the initial characters until the
option you want is highlighted; then press
<Return>.
Enter information (for
example, the IP
address of a switch)
Return to the previous
screen
Type the information and press <Return>.
Select the “Return” option at the bottom of
the menu
or
Press <Esc>.
25
Page 26

Getting Started
The table below shows you how to move through and select menu
selections if you are using a generic (dumb) terminal configuration:
When directed You must
To select an option Type the first character of the option you
want and then press <Return>.
If two or more options hav e mat ching initial
characters, type enough characters for
Omega to distinguish your choice from the
other options; then press <Return>. To
guide you, the characters you must type are
in uppercase.
For example:
Mirroring configuration
MAC Address Table
If options on a list are preceded by numbers
(1:, 2:, 3:, etc.) or letters (A:, B:, C:, etc.), type
the number or letter corresponding to your
choice at the prompt; then press <Return>.
To enter information
(for example, the IP
Type the correct information at the prompt
and press <Return>.
address of a switch)
To return to the
Press <Return> after making an entr y.
previous screen
Activated options in menus are preceded with a > symbol. In the
following example, the first option is activated:
> Enable this port
Disable this port
When you press <Return> to select a field in which you can enter a value,
the -> symbol is displayed. For example:
System name: ->
26
The -> symbol indicates that you can enter a new value for the
parameter or change the existing value. Once you have entered a value,
press <Return>. To delete an existing value to a parameter without
assigning a new value, type a space and press <Return>. Parameter
changes are activated on the switch immediately.
Page 27

AT-S26 Version 2.0.1 User’s Guide
Quitting from a
Local Session
To quit a local Omega session, select Quit from the Main Menu.
If you do not quit Omega from a local session, remote Telnet sessions to
the switch will be blocked.
27
Page 28

Getting Started
Starting an Omega Session from a Web Browser
This section contains the procedure for starting an Omega session from
a web browser.
Note
You cannot use a web browser to manage an AT-9006 switch if the
switch is part of a non-TCP/IP network.
Before you can manage the switch in a TCP/IP environment with a web
browser, the switch must have an IP address and subnet mask. Initially,
these two parameters can only be set through the RS232 port on the
switch and a local Omega session. For instructions on establishing a local
management session, refer to Starting a Local Omega Session Using
the RS232 Port on page 23 for instructions.
To start an Omega session from a web browser, perform the following
procedure:
1. Start your web browser.
2. Enter the IP address of the switch you want to manage in the URL field
of the browser, as shown in Figure 2:
Switch’s IP Addr ess
Note
If the PC with the browser is connected directly to the switch or is on
the same side of a firewall as the switch, you must configure your
browser’s network options not to use any proxies. Consult your web
browser’s documentation on how to configure the browser not to
use proxies.
Figure 2 Entering a Switch’s IP Address in the URL Field
28
Page 29
Links to
Allied
Telesyn
Internet Web Pages
AT-S26 Version 2.0.1 User’s Guide
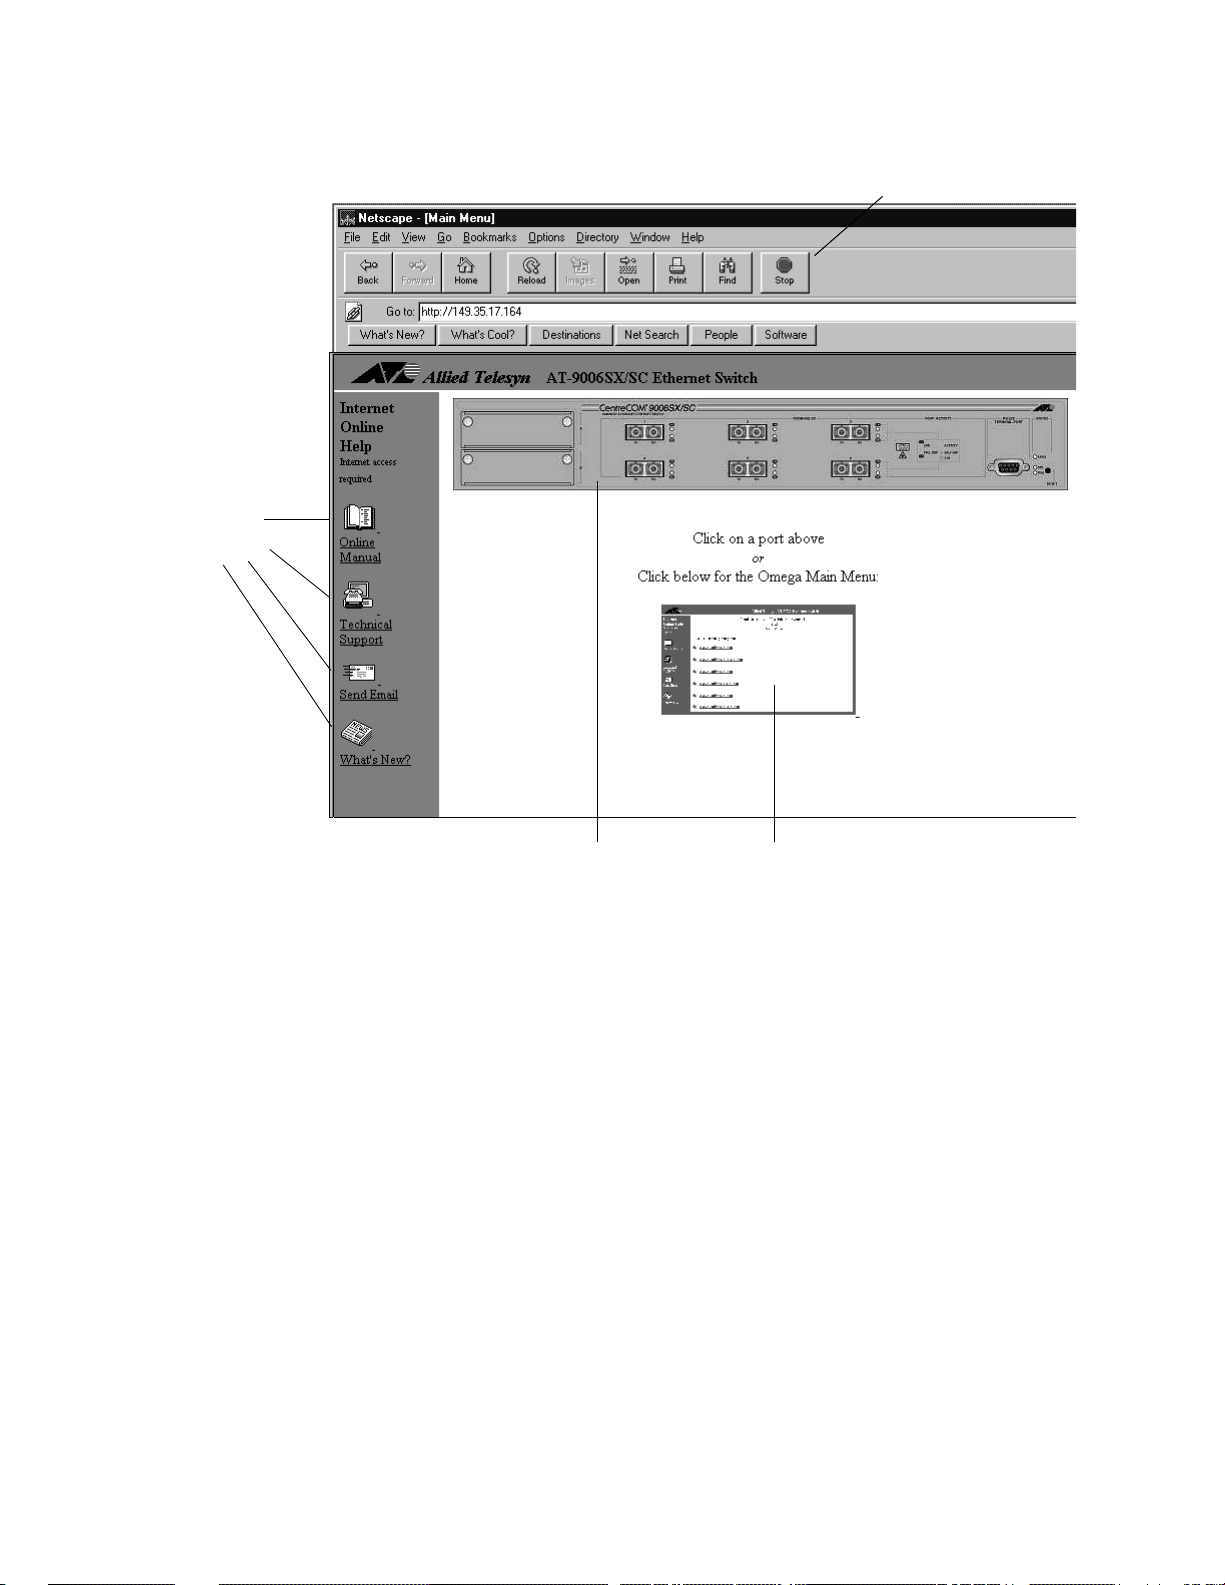
The window shown in Figure 3 is displayed.
Netscape Navigator’s Tool bar
Managed Switch
Main Menu Window
Figure 3 Initial Omega Window Display from a Web Browser
This window contains the fo llowing sections:
❑ Managed Switch
❑ Main Menu
❑ Web Links
29
Page 30
Getting Started
Managed Switch
Omega Main
Menu Window
At the top of the window is a graphical imagge of the switch that you are
currently managing. (The display will not include any optional expansion
modules that might be installed in the unit.)
You can click on different areas of the image to display different Omega
windows. Clicking on a port displays the configuration window for that
port, which you use to set the port parameters. Clicking on the RS232
port displays the configuration window for the terminal port. Finally,
clicking on the switch chassis displays a window that lists the status of
the ports on the switch.
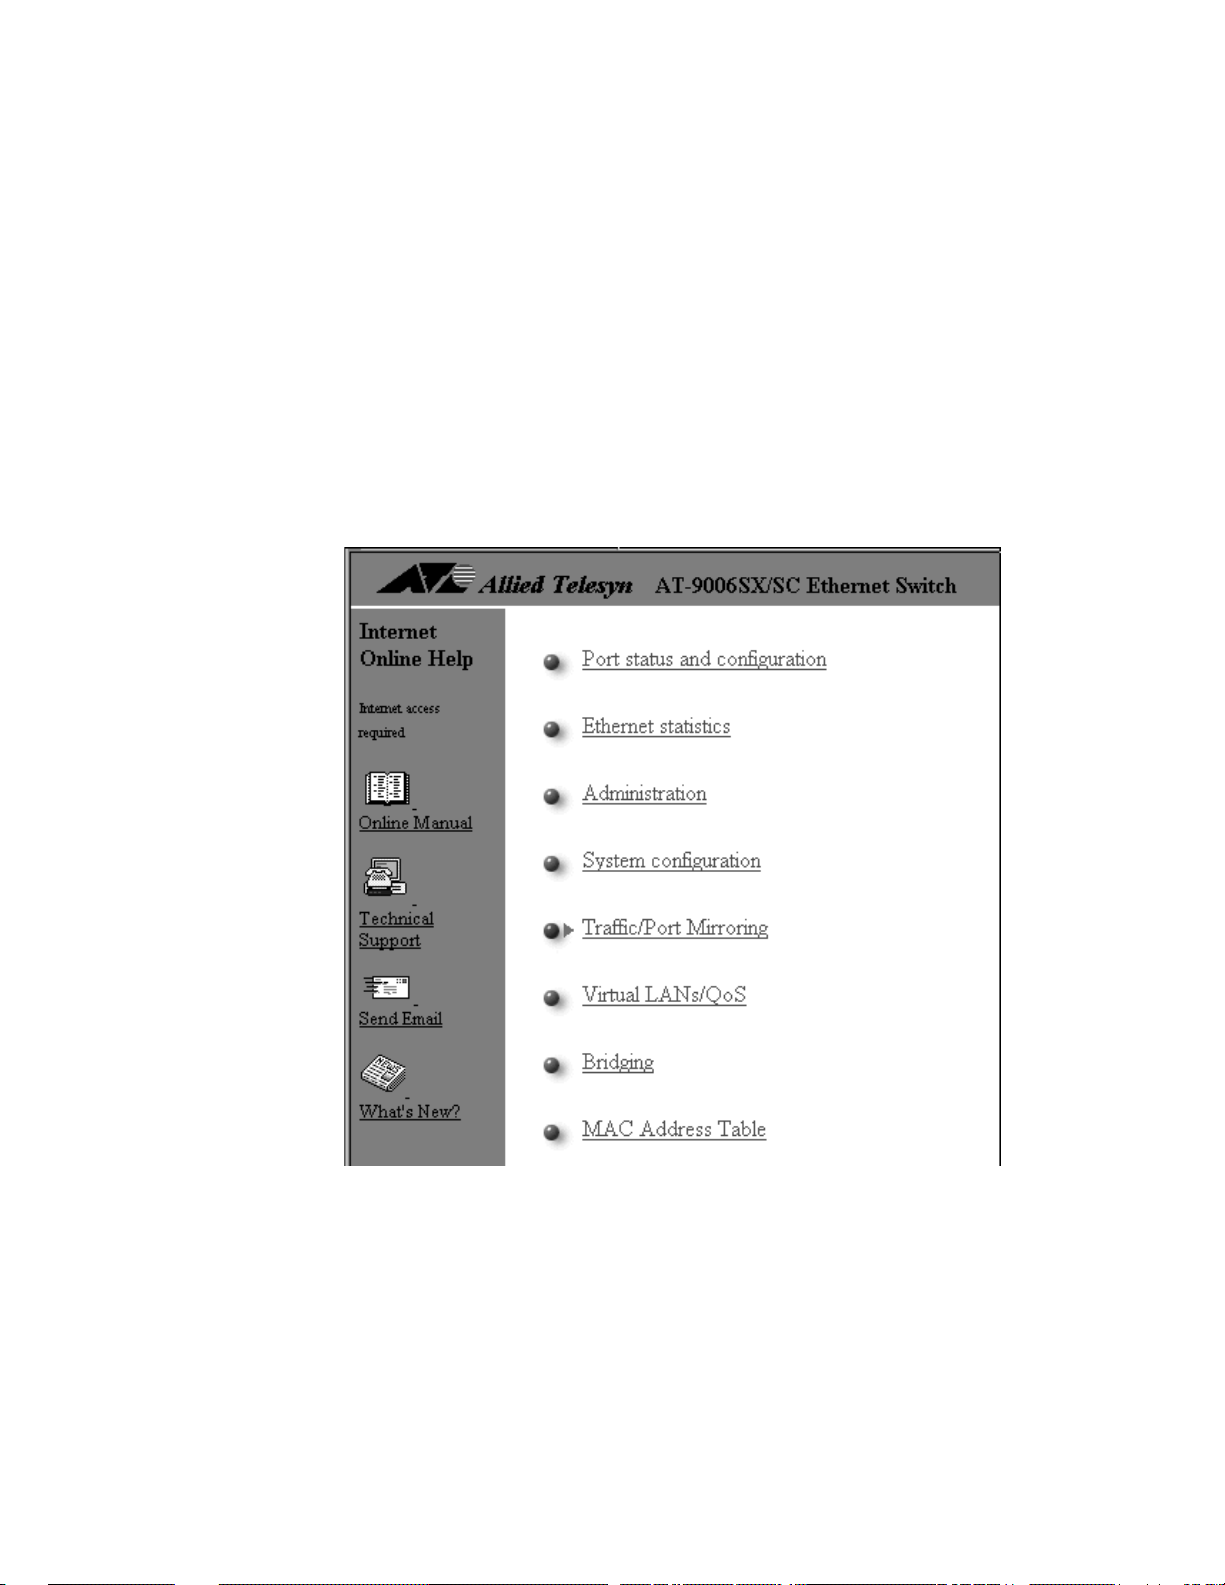
The Main Menu window contains the Omega menus. This window is
displayed in a reduced format when you first start an Omega session
from a web browser. To enlarge it, click on the window. Figure 4 is an
example of the Omega Main Menu.
30
Figure 4 Omega Main Menu from a Web Browser
Page 31

AT-S26 Version 2.0.1 User’s Guide
Selecting Menu Options and Changing Parameters
Activated options on the switch are preceded with a ! symbol. In the
following example, the first option is activated:
Figure 5 Active Menu Option
Options in which you can provide a value contain an entry field and the
two buttons Enter and Reset, as shown in the following example:
Figure 6 Entry Field
After entering a new value, click Enter or press <Return> to send the new
parameter setting to the switch. Changes to parameters are activated
immediately on the switch.
Web Links
Browser Tools
Clicking the Reset button queries the switch for the current parameter
setting and displays the settin g in the entry field.
The left portion of the window contains links that take you automatically
to relevant web pages at the Allied Telesyn web site.
The Online Manual link takes you to Allied Telesyn’s technical
communications web page, where you can download product
documentation in PDF format.
The Technical Support link takes you to Allied Telesyn’s Technical
Support web page, where you can learn about the company’s support
services.
The Send Email link allows you to submit feedback, questions, or any
other information to Allied Telesyn.
The What’s New? link takes you to a web page that describes Allied
Telesyn’s latest product offerings.
You can use the browser tools to move around the Omega menus.
Selecting Back on your browser’s toolbar returns you to the previous
display. You can also use the browser’s bookmark feature on frequentlyused views to bypass the Omega menu hierarchies.
31
Page 32

Getting Started
Quitting an
Omega Session
from a Web
Browser
To exit from a web-based Omega session, simply quit the browser. Once
you start an Omega session through a browser, the session remains
active even if you link to other sites. You can return to the Omega web
pages anytime as long as you do not quit the browser.
32
Page 33

AT-S26 Version 2.0.1 User’s Guide
Starting a Remote Omega Session with Telnet or an SNMP Management Prog r am
A switch can be managed with the Telnet program or with an SNMP
management program, such as HP Openview. This type of switch
management is referred to as remote management.
If the switch is in a TCP/IP environment, remote management is possible
only after the switch has been assigned an IP address and subnet mask.
Initially, this is accomplished by managing the switch locally through the
RS232 port.
Starting a Telnet management session involves specifying the IP address
of the switch with the Telnet utility. You then enter the Omega
password, if one has been assigned, after which the Omega main menu
is displayed. For instructions on using the Telnet utility, refer to the
documentation that came with the utility.
For non-IP environments, you can use MAC addresses to connect to
remote Allied Telesyn switches as long as there are no routers between
the two switches.
It is important to note that you can have only one Telnet session
operating at any one time. The session can be either inbound or
outbound. If you have an inbound session to Omega, you do not have
the option of starting a new session (outbound connection). Therefore, if
you are already using Telnet, the Omega menu selection Connect to a
remote system will not be available (de scr ibed in d eta il in Connecting to
a Remote Switch on page 34). In addition, a local RS232 connection
blocks a Telnet session and vice versa.
If you are currently in a Telnet session, you must disconnect Telnet after
quitting Omega. Otherwise, future Telnet sessions to the switch will be
blocked. You can configure a timeout value so that the switch
automatically disconnects Telnet sessions after a period of inactivity.
Refer to Specifying a Ti m eout Value on page 134.
Note
For a description of the Omega main menu, refer to the section
Omega Main Menu on page 24.
If you intend to manage the switch from a management station using an
SNMP management program, you need to load the switch’s
Management Information Base (MIB) file onto the management station.
(The MIB file is available from the Allied Telesyn web site.) This requires
that you use a MIB compiler to compile the file. To load the MIB file onto
a management station, follow the instructions included with your MIB
compiler.
33
Page 34

Getting Started
Connecting to a Remote Switch
If you are managing a switch locally (that is, through the RS232 port on
the switch), you can connect to another switch through the Omega
interface and so be able to manage the remote switch, without having
to end your local session. To connect to a remote switch from a local
session, perform the following procedure:
1. From the Omega Main Menu, select Administration.
The Administrator menu is displayed.
2. Select Connect to remote system.
3. Specify the remote switch to be managed using one of the following
methods:
❑ Switch IP address, in the format x.x.x.x
❑ Switch Ethernet (or MA C) address, in the format xxxxxx xxxxxx
The switch MAC address is printed above the RS232 management
port on the switch front panel.
Once the information is validated and the connection to the remote
switch is opened, you immediately get the remote switch Omega
Main Menu. You can then use the Omega program to configure the
remote switch and run diagnostics.
The only option not available on the remote switch is Connect to a
remote system from the Administration menu.
4. Select Quit from the Main Menu when you are finished managing the
remote switch.
After you have ended the session with the remote switch, your
Omega session with the local switch is reactivated.
Note
It is important that you select Quit after the Omega session.
Otherwise, you might block other sessions or software downloads
via the network to the remote switch.
34
Page 35

Menu Tree
AT-S26 Version 2.0.1 User’s Guide
Table 1 lists the menu options in the Omega interface.
Table 1 Omega Menu Selections
Main Menu
Selection
Menu Selection Page Function
Port Status And Configuration
Port number 66, 68 Displays and configures the parameter
Ethernet Statistics
Transmit statistics 125 Displays statistics on the number of
Individual port
overview
RMON statistics 127 Displays RMON statistics for the entire
Port RMON statistics 128 Displays RMON statistics by port.
Zero all statistic
counters on the entire
system
settings for the ports on the switch.
frames transmitted by a port or the
switch.
122,
125
Displays the received and transmitted
frame statistics for a specific port.
switch.
129 Returns the statistic counters in a switch
to 0 (zero).
Administration
Update software in
another system
Broadcast updated
software to all systems
140 Downloads the switch software from one
switch to another switch.
141 Downloads the switch software from one
switch to all the other switches in the
network.
XModem software
update to this system
138 Downloads the AT-S26 software onto the
switch using XModem. Only available via a
local session.
Connect to a remote
system
34 Enables you to connect to and manage
another switch while running a local
management session on a switch. Only
available via a local session.
Ping a remote system 62 Tests the connectivity to another network
node.
35
Page 36

Getting Started
Table 1 Omega Menu Selections (Continued)
Main Menu
Selection
Menu Selection Page Function
Activity monitor 61 Displays the activity monitor for the
Diagnostics 59 Performs a series of diagnostic tests on
Reset and restart the
system
System Configurat io n
System name 54 Assigns a name to a switch.
Default aging time 85 Sets the aging time for the MAC address
Omega Options 132,
IP Parameters 42 Configures the IP parameters for the
switch.
the switch.
55 Resets the switch.
table.
Configures the Omega security features,
134,
135
such as the Omega password and the
timeout value.
switch, such as the IP address, subnet
mask, and gateway address.
Security / source
address table
Terminal configuration 57 Adjusts the settings for the RS232
System swit ch
configuration
Traffic/Port Mirroring
Enable 74 Enables port mirroring on the switch.
Disable 75 Disables port mirroring on the switch.
Virtual LANs/QoS
Virtual LAN definitions 102,
76 Sets port security.
management port.
52, 71 Enables and disables IGMP snooping on
the switch. Also creates port trunks.
Displays a list of the VLANs existing on a
108,
108,
switch. Also creates and deletes virtual
LANs.
111
36
Page 37

Table 1 Omega Menu Selections (Continued)
AT-S26 Version 2.0.1 User’s Guide
Main Menu
Selection
Bridging
Menu Selection Page Function
Port to VLAN
configuration
106,
109,
112
Changes an untagged port’s VID (PVID)
number to match the VLAN ID (VID)
number.
Assign port priority 116 Assigns a port priority to a port on a
switch, which can override the tag priority
in a frame.
Priority Weight
configuration
Assign Management
Port to VLAN
Spanning tree
parameters
Port spanning tree
configuration
118 Select the priority weight mode for the
switch.
115 Assigns the CPU Management Port to a
VLAN.
50 Configures the spanning tree parameters
for a switch.
48 Configures the spanning tree parameters
for the individual ports on a switch.
MAC Address Table
Show all MAC
addresses
By port MAC addresses 83 Displays the MAC addresses learned on a
Get port from MAC
address
Clear dynamic MAC
addresses
All static MAC
addresses
Per port static MAC
address
Multicast addresses 90, 92, 92Displays the multicast addresses of a
82 Displays a l l th e MAC ad dr e sses lea rn ed b y
the ports on a switch.
particular port on a switch.
84 Displays the port number on which a
specific MAC address was learned.
85 Clears all learned MAC addresses from the
MAC address table.
86 Displays all the entries in the static MAC
address table of a switch.
87, 88 Adds and deletes addresses from the
static MAC address table.
switch. Also creates and deletes multicast
addresses.
37
Page 38

Getting Started
Table 1 Omega Menu Selections (Continued)
Main Menu
Selection
Port status and
configuration
Port number
Receive Statistics
Graph (web
Omega only)
Enable this port
Disable (partition)
this port
Auto negotiate
Full duplex
Half duplex
Backpressure
No backpressure
Menu Selection Page Function
Clear static MAC table 89 Clears all entries from the static MAC
address table of a switch.
The Figure 7 show the menu selection arrangement.
Ethernet Statistics
Receive Statistics
Graph
(all ports)
Individual port
overview . . .
Zero all statistics
counters on the
entire syste m
Transmitted frames
statistics
Individual port
overview
Zero all statistics
counters on the
entire system
Administration
Update Software in
another system
Broadcast updated
Software to
all systems
Xmodem
Connect to a
remote system
Ping a remote
system
Activity monitor
System
Configuration
System name
Default
aging time
Omega Options
IP parameters
Security / source
address table
Terminal
configuration
38
Flow control
No flow control
Discard broadcas t
packets
Global configuratio n
Port name
RMON Statistics
Zero all statistics
counters on
entire system
Port RMON Stati stics
Zero all statistics
counters on
entire system
Diagnostics
Reset and restart
the System
Figure 7 Omega Main Menu Tree
System switch
configuration
Page 39

AT-S26 Version 2.0.1 User’s Guide
Traffic/Port Mirroring
Enable/Disable
port mirroring
Virtual LANs/QoS
Virtual LAN
definitions
Port to VLAN
configuration
Assign port
priority
Priority weight
configuration
Assign Management
Port to VLAN
Bridging
Spanning tree
parameters
Port spanning
tree configuration
Enable spanning
tree by port
Enable spanning
tree for all ports
Disable spanning
tree for all ports
MAC Address
Table
Show all MAC
addresses
By port MAC
addresses
Get port from
MAC address
Clear dynamic
MAC address
All static MAC
address
Per port static
MAC addresses
Multicast
addresses
Clear static MAC
table
Figure 7 Omega Main Menu Tree (continued)
39
Page 40

Page 41

Chapter 2
Managing a Switch
This chapter contains the following procedures:
❑ Configuring the Switch IP Parameters on page 42
❑ Configuring the Spanning Tree Protocol on page 47
❑ Enabling or Disabling IGMP Snooping on page 52
❑ Naming a Switch on page 54
❑ Resetting a Switch on page 55
❑ Reassigning the Default Settings for the Switch on page 56
❑ Configuring the RS232 Port on page 57
❑ Running Diagnostics on page 59
❑ Displaying the Activity Monitor on page 61
❑ Pinging a Device on page 62
41
Page 42

Managing a Sw itch
Configuring the Switch IP Parameters
If the AT-9006 Series Switch is in a TCP/IP network and you want to
manage the switch remotely, such as with a Telnet utility or a web
browser, you must assign the switch a set of IP parameters, such as a
unique IP address and a subnet mask. You can assign these parameters
either one of two ways:
❑ Manually using the Omega interface
❑ Automatically using a BootP or DHCP server.
If you have a BootP or DHCP server on your network, the switch can
automatically obtain its IP parameters from the server during startups. In
this case, you simply connect the switch to the network. The function of
the BootP or DHCP utility within an IP server is to provide IP parameters,
including an IP address, to the switch. Whenever you reset or power
cycle the switch, the switch transmits a request packet to the server
every three seconds to obtain the required IP parameters.
The switch makes three request attempts. If the requesting switch does
not receive a BootP or DHCP response after the third request, it will
operate with a computed pseudo IP address based on the switch’s MAC
address.
If the switch receives a response from the BootP or DHCP server, the
switch extracts the IP address, subnet mask, and gateway/router address
and uses these parameters to configure itself until the next power-on or
reset. Additionally, if the BootP response packet specifies a filename and
a server address, then the switch sends a request to the server using the
specified filename. This initiates a download of the operating software
and allows you to maintain the downloaded software on your server.
42
Page 43

AT-S26 Version 2.0.1 User’s Guide
Setting IP
Parameters
To set the IP parameters for the switch using the Omega management
interface, perform the following procedure:
1. From the Omega Main Menu, select System Configuration.
The System Configuration menu shown in Figure 8 is displayed.
System Configuration Menu
System name Null (not configured)
Default Aging Time 300
Omega Options
IP parameters
Security / Source Address Table
Terminal configuration
System Switch configurations
Return to Main Menu ...
Figure 8 System Configuration Menu
2. Select IP Parameters.
The IP Parameters window shown in Figure 9 is displayed.
IP address: 0.0.0.0
Subnet mask: 0.0.0.0
Gateway address: Null (not configured)
Domain Name Server: Null (not configured)
Default Domain Name: Null (not configured)
Manager address: Null (not configured)
Manager address: Null (not configured)
Manager address: Null (not configured)
Manager address: Null (not configured)
DHCP configuration:
Download Password: *****
Config Download Password: ******
Get community string: public
Set community string: private
Trap community string: public
Location: Null (not configured)
Contact: Null (not configured)
Return to System Configuration Menu ...
Figure 9 IP Parameters Window
43
Page 44

Managing a Sw itch
3. Enter or change the parameters in the window as desired. Changes to
the parameters are activated immediately on the switch.
Note
If you are configuring the switch for the first time and the switch is
in a TCP/IP network, you must assign the switch an IP address and
subnet mask. These are the minimum parameters that you must
specify for a newly installed Ethernet switch in a TCP/IP network if
you intend to manage the switch using Telnet or a web browser.
You can either assign these IP parameters manually or you can
activate the DHCP option so that the switch obtains its IP
configuration automatically from a DHCP or BootP server.
The parameters in the IP Parameters window are described below:
IP address
This parameter specifies the IP address of the switch.
Subnet mask
This parameter specifies the subnet mask for the switch.
Gateway address
This is the default router IP address. This address is required if you
intend to manage the switch from a management station separated
from the switch by a router.
Domain name server (DNS)
This is the DNS IP address. This address is required if you are using this
service.
Default domain nam e
This is the domain name to which the switch belongs. This is
recommended if you are using DNS services.
Manager address
You can enter up to four IP addresses of network management
stations that will receive SNMP traps from the switch. The addresses
are optional.
44
Page 45

AT-S26 Version 2.0.1 User’s Guide
DHCP Configuration
You can use this selection to configure the switch to obtain its IP
address from a DHCP server. When you select this option, the
prompts in Figure 10 are displayed.
Enable DHCP function
> Disable DHCP function
(This setting will be effective after rebooting
system.)
Return to IP Parameters Window ...
Figure 10 DHCP Selections
If you select Enable DHCP function, the switch will obtain its IP address
from a DHCP server on the network. If you select Disable DHCP
function, you must assign the IP address manually. The default for this
setting is disabled.
A change to the DHCP setting does not take affect on the switch until
the unit is reset.
Download passwor d
This password is required when downloading AT-S26 image files from
one AT-9006 switch to another switch. The default password is
ATS26, displayed as a series of asterisks. You can keep the default or
change it. A switch can only accept software downloads from another
switch of the same product series and if their download passwords
are the same. The software automatically searches for this password
during downloads without requiring you to enter it.
This password is also used as the destination filename when you are
using TFTP to update the AT-S26 firmware. For instructions on how to
download the firmware onto a swi tch, refer to Chapter 8, Upgrading
Switch Software and Configuration Files.
Note
This password is different from the Omega password. The Omega
password prevents unauthorized individuals from using the Omega
interface to change switch configuration settings. For instructions
on setting the Omega password, refer to Chapter 7, Configuring
the Omega Interface.
45
Page 46

Managing a Sw itch
Config download password
This password is used when downloading configuration files from
one AT-9006 switch to another switc h. The default password is config
(all lowercase). The Omega interface displays the password as a series
of asterisks.
For instructions on how to download a configuration file onto a
switch, refer to Chapter 8, Upgrading Switch Software and
Configurati on Files.
SNMP Community strings
The following default community strings are provided:
Get - public
Set - private
Trap - public
Location
You can enter a text string to indicate the physical location of the
switch, (for example, First Floor, Lab.)
Contact
You can enter a text string to indicate the name, phone number, and
other information to help identify the person responsible for
managing the switch.
4. After you have adjusted the parameters, return to the Main Menu.
46
Page 47

Configuring the Spanning Tree Protocol
The Spanning Tree Protocol (STP) prevents data loops when multiple or
redundant paths exist in extended LANs.
Each switch or bridge in a spanning tree domain will:
❑ Determine the best single route to a destination device.
❑ Update other bridges with topology information by periodically
sending Bridge Protocol Data Units (BPDUs).
Once the STP parameters have been configured, br idges can make a
determination on the best single path to a destination within a given
LAN. A formula determines the amount of time it takes for the topology
to reconfigure, depending upon the spanning tree values you use. Refer
to the IEEE specification for details.
Most users generally keep the default STP parameters to allow bridges to
reconfigure themselves automatically if the topology changes or if
bridges become disabled.
AT-S26 Version 2.0.1 User’s Guide
For a brief overview of STP, go to Appendix B, Spanning Tree
Concepts.
Caution
STP on a switch is disabled by default. If you enable STP, the switch
provides default STP parameters that are adequate for most
networks. Changing them without prior experience and an
understanding of how STP works might have a negative effect on
your network.
47
Page 48

Managing a Sw itch
Activating or
Deactivating STP
and Configuring
the Port
Parameters
The Omega program allows you activate and deactivate STP on a per
port basis. You can also adjust the STP parameters for each port. To
configure the protocol parameters for the individual ports on a switch,
perform the following procedure:
1. From the Omega Main Menu, select Bridging.
The Bridging menu shown in Figure 11 is displayed.
Bridge Menu
Spanning tree parameters
Port spanning tree configuration
Return to Main Menu ...
Figure 11 Bridging Menu
2. Select Port spann i ng tree c onfig uration.
The Port Parameters for the Spanning Tree Protocol window shown in
Figure 12 is displayed. The window lists the ports on the switch and
the current STP parameter settings for the ports.
Port Priority Cost
1: -- -2: -- -3: -- -4: -- -5: -- -6: -- --
Enable Spanning Tree for All Ports
Disable Spanning Tree for All Ports
Return to Bridge Menu ...
Figure 12 Port Parameters for the Spanning Tree Protocol
3. To enable or disable STP for all the ports on the switch, select either
Enable Spanning Tree for all Ports or Disable Sp an ning Tree for all Ports.
If you enable STP on the ports, the Omega interface sets each port to
the default values of 128 for the port priority and 1 for the port cost.
4. To enable or disable STP for a particular port, select the port.
48
Page 49

AT-S26 Version 2.0.1 User’s Guide
The STP Port Parameters window in Figure 13 is displayed.
Bridge Menu
Port 1
Enable Spanning Tree
> Disable Spanning tree
Return to Previous menu...
Figure 13 STP Port Parameters Window
If STP is already activated on the port, the port’s STP parameters are
also displayed, as shown in Figure 14.
Bridge Menu
Port 1
> Enable Spanning Tree
Disable Spanning Tree
Priority: 128
Cost: 1
Return to Previous menu...
Figure 14 Setting STP Port Parameters Window
5. To enable STP on the port, select Enable Spanning Tree. To disable STP
on the port, select Disable Spann ing Tr ee.
6. Change the priority and port cost parameters for the ports as desired.
The options are described below.
Priority
The parameter is used as a tie breaker when two or more ports are
determined to have equal cost to the root bridge. The range is 0-255
and the default value is 128.
Cost
The spanning tree algorithm uses the cost parameter to decide which
port provides the lowest cost path to the root bridge for that LAN.
Higher port costs are associated with ports of lower bandwidth, and
vice versa. The range is 1 to 65535. The default values are 1 for a 1
Gbps port, 10 for a 100 Mbps port, and 100 for a 10 Mbps port.
7. After you have adjusted the settings, return to the Main Menu.
49
Page 50

Managing a Sw itch
Configuring STP
Parameters
Bridge Identifier (MAC Address : Priority) Spanning Tree not enabled)
Root Bridge Identifier (MAC Address : Priority) Spanning Tree not enabled)
Cost to the Root (Spanning Tree not enabled)
Port closest to the Root (Spanning Tree not enabled)
Max Age (Spanning Tree not enabled)
Forwarding Delay (Spanning Tree not enabled)
Bridge Priority 32768
Max age time: 20
Hello time: 2
Forwarding delay: 15
Return to Bridge Menu ...
To configure the STP parameters for the switch, perform the following
procedure:
1. From the Omega Main Menu, select Bridging.
The Bridging menu in Figure 11 on page 48 is displayed.
2. Select Spanning tree parameters.
The Spanning Tree Parameters window in Figure 15 is displayed.
Bridge Configuration Menu
Figure 15 Spanning Tree Parameters Window
3. Adjust the settings as desired. The options are described below.
Bridge Priority
This parameter can be from 0 (zero) to 65535, with 0 being the highest
priority. The 2-byte bridge priority number is concatenated to the
bridge’s 6-byte MAC address. Bridges use t his n umber to determine
the root bridge for a loop-free implementation. If bridges happen to
have equal priority values, the bridge with the numerically lowest
MAC address becomes the root bridge. When the root bridge
malfunctions, the bridge with the next priority number (or the next
lowest MAC address) automatically takes over as the root bridge.
Max Age Time
The aging time can be from 6 to 40 seconds. The default is 20 seconds.
All bridges in a bridged LAN use this aging time to test the age of
stored configuration messages called bridge protocol data units
(BPDUs). For example, if you use the default 20, all bridges delete
current configuration messages after 20 seconds.
The aging time for BPDUs is different from the aging time used by the
MAC address table.
50
Page 51

AT-S26 Version 2.0.1 User’s Guide
Hello Time
Hello time can be from 1 to 10 seconds, with 2 seconds as the default.
Bridges use this parameter to determine the time interval between
generating and sending configuration messages.
Forwarding Delay
The default is 15 seconds. The time in dicates the waiting period
before a bridge changes to a new state, for example, becomes the
new root bridge after the topology changes. If the bridge transitions
too soon, not all links may have yet adapted to the change; therefore,
loops may result.
Caution
You should consult the IEEE 802.1d standard before changing the
Max Age Time, the Hello Time, and the Forwarding Delay
parameters.
4. After you have adjusted the settings, return to the Main Menu.
51
Page 52

Managing a Sw itch
Enabling or Disabling IGMP Snooping
The Ethernet switch supports the Internet Group Management Protocol
(IGMP) snooping feature to take advantage of performance
improvements provided by IP multicasting. Allied Telesyn AT-S26
implementation supports IGMP Version 1.
Through the IGMP snooping feature, the switch obtains information
about multicast groups by looking at IGMP packets sent from hosts and
routers, and also by looking at Distance Vector Multicast Routing
Protocol (DVMRP) packets. IGMP packets provide information about
nodes joining multicast groups, while DVMRP packets provide
information about delivery paths. With this information, the switch
builds membership groups of ports for each IP multicast address.
To enable or disable IGMP snooping, perform the following procedure:
1. From the Omega Main Menu, select System configuration.
The System Configuration menu shown in Figure 8 on page 43 is
displayed.
2. From the System Configuration menu, select System switch
configuration.
The System Switch Configuration menu in is displayed.
System Switch Configuration Menu
IGMP Snooping configuration
Port Trunking in the 10/100M Speed Port
Return to System Configuration Menu...
Figure 16 Switch Configuration Menu
Note
The menu selection Port Trunking in the 10/100M Speed Port is
available only if the switch contains an expansion module that has
multiple 100 Mbps or 10/100 Mbps ports. For information on port
trunking, re fer to Chapter 3, Configuring the Ports.
52
Page 53

AT-S26 Version 2.0.1 User’s Guide
3. From the System Configuration window, select IGMP Snooping
Configuration.
The IGMP Configuration menu in Figure 17 is displayed.
IGMP Snooping Configuration Menu
IGMP Snooping
> No IGMP Snooping
IGMP Snooping Aging Time (Minutes): 5
Return to System Switch Configuration Menu...
Figure 17 IGMP Configuration Menu
4. Select IGMP snooping to activate the option or No IGMP snooping to
deactivate IGMP snooping.
5. If desired, you can change the IGMP sn ooping aging time by selecting
the IGMP Snooping Aging Time parameter. This value, which is
specified in minutes, determines the permitted intervals between
report messages from the multicast clients.
6. Return to the Main Menu.
53
Page 54

Managing a Sw itch
Naming a Switch
This procedure assigns a name to the switch. The name is displayed in all
Omega windows when you manage the switch. This can make it easier
for you to identify the switches in your network when you configure and
monitor them with Omega.
1. From the Omega Main Menu, select System Configuration.
The System Configuration menu shown in Figure 8 on page 43 is
displayed.
2. In the System name entry field, enter a unique name of up to 20
characters.
The switch name must be unique within the subnet.
If the switch already has a name that you want to delete without
entering a new name, delete the existing name and enter a space
character.
Note
If you are running Omega from a web browser, select the System
name menu option and enter the name in the prompt.
3. Return to the Main Menu.
The new name is displayed at the top of every Omega screen.
54
Page 55

Resetting a Switch
AT-S26 Version 2.0.1 User’s Guide
This procedure explains how to reset a switch using the Omega
interface. You might need to reset the switch to resolve an error
condition or after you have made a configuration change to the switch
that requires resetting the device to activate the change.
You can also reset a switch by pressing the Reset button, located on the
front panel of the switch, with a small pointed object, such as a ballpoint
pen. You can also reset the switch by unplugging the switch’s power
cord from the power source and plugging it back in.
To reset a switch using the Omega interface, perform the following
procedure:
1. From the Omega Main Menu, select Administration.
The Administration menu in Figure 18 displays.
Administration Menu
Update software in another system
Broadcast updated software to all systems
XModem software update to this system
Connect to a remote system
Ping a remote system
Activity monitor
Diagnostics
Reset and restart the system
Return to Main Menu ...
Figure 18 Administration menu
Note
The menu selections XModem software update to this system and
Connect to a remote system in the Administration menu are available
only from a local Omega session.
2. Select Reset and restart the system.
A prompt is displayed aski ng you to confirm the command.
3. Select Yes to reset the switch or No to cancel the command.
The switch will reset itself. The switch runs a series of self-tests that
take approximately 30 seconds to complete. During the tests, the
Fault LED on the front of the switches flashes. Once the tests are
completed, the Fault LED will remain OFF.
55
Page 56

Managing a Sw itch
Reassigning the Default Settings for the Switch
This procedure explains how to reset the switch settings to the factory
default settings, listed in Appendix A. This procedure can only be
performed locally through the RS232 port on the switch.
Warning
This procedure should be performed with caution. Resetting a
switch to its default settings deletes all existing settings, including
the IP address of the switch and the port settings. Any defined
VLANs also are deleted, and all ports are returned to the Default
VLAN.
To reset the switch settings to the factory default settings, perform the
following procedure:
1. Attach a terminal to the RS232 port on the front panel of the switch
and begin the terminal emulation program.
2. Press the Reset button on the switch.
3. Immediately press any key when you see the following prompt:
Hit any key to run diagnostics or to reload
system software.
A menu displays.
4. Select D from the menu. The following warning message displays:
WARNING: This will erase all current
configuration data!
Continue? Y/N
5. Type Y for yes.
The system displays the following prompt:
All configuration data has been reset to factory
default values.
6. Type B to boot the switch software.
The switch performs a series of diagnostic self-test. The Fault LED on
the front panel of the switch flashes during the self-tests. After the
switch has completed its self-test, reinitialized the management
software, and rebooted, you must reassign an IP address to the switch
if the device is in TCP/IP network.
56
Page 57

Configuring the RS232 Port
The default settings for the RS232 port on the front panel of the Ethernet
switch are as follows:
❑ Baud rate: 9600
❑ Data bits: 8
❑ Parity: None
❑ Stop bits: 1
❑ Flow con t ro l: None
To change the settings for the RS232 port, perform the following
procedure:
1. From the Omega Main Menu, select System Configuration.
The System Configuration menu in Figure 8 on page 43 is displayed.
AT-S26 Version 2.0.1 User’s Guide
2. From the System Configuration menu, select Terminal Configuration.
The Terminal Configuration win dow in Figure 19 is displayed.
Terminal Configuration Menu
> VT100-compatible / ANSI
Generic “dumb” terminal
> 8 data bits
7 data bits
> 1 stop bit
2 stop bits
> No parity
Odd parity
Even parity
> Full duplex (echo)
Half duplex (no echo)
Data rate (“baud” rate) ...
Return to System Configuration Menu ...
Figure 19 Terminal Configuration Window
57
Page 58

Managing a Sw itch
If you are running the Omega session from a web browser, you can
display the Terminal Configuration window by clicking on the RS232
port in the graphical display of the switch.
3. Adjust the settings as desired. The parameters are described below.
8 data bits
7 data bits
The default is 8 data bits.
1 stop bit
2 stop bits
The default is 1 stop bit.
No parity
Odd parity
Even parity
The default is no parity.
Full-duplex (echo)
Half-duplex (no echo)
These two selections control the duplex mode of the port. The port
can operate in full-duplex mode, meaning it can send and receive
data simultaneously, or half-duplex mode, meaning the port can
either send or receive data, but not both at the same time. The default
is full-duplex.
Data rate (“baud” rate)
This selection allows you to specify the speed of the port. When you
select this option, the Omega program displays a list of possible baud
rates. Possible baud rates are:
❑ 19200 bps
❑ 9600 bps (recommended setting for fixed baud rate)
❑ 4800 bps
❑ 2400 bps
❑ 1200 bps
❑ 600 bps
❑ 300 bps
❑ 150 bps
❑ 75 bps
❑ Automatic baud rate detection.
The default is Automatic baud rate detection.
58
4. Return to the Main Menu.
Page 59

Running Diagnostics
The Omega interface has an option for running diagnostic self-tests on
the switch. The program reports on the operating status o f the following
switch components:
The tests also display the following information:
AT-S26 Version 2.0.1 User’s Guide
❑ Flash PROM
❑ RAM
❑ Serial interface
❑ Main power supply
❑ Redundant power supply
❑ Redundant power supply, if installed
❑ Operating temperature
❑ AT-S26 version number
❑ Switch MAC address
❑ Running time
Note
Running the diagnostic tests will not disrupt the network operations
of the switch.
To run the self-diagnostics program on the switch, perform the
following procedure:
1. From the Omega Main Menu, select Administration.
2. From the Administration menu, select Diagnostics.
59
Page 60

Managing a Sw itch
The tests take only a second or two to complete. The results are
displayed in the Diagnostics window. Figure 20 is an example of the
window.
Allied Telesyn AT-9006SX/SC Ethernet Switch
MAC Address 00A0D2 2A0000, Uplink A: Not present, Uplink B: Not present
AT-S26 Ethernet Switch Software: Version 2.0.1 000413
Running 15 minutes, 8 seconds
Diagnostic Results:
Flash PROM Good
RAM Good
Serial Interface Good
System 3.3V power: 3.3 V
System 5V power: 4.9 V
System 12V power: 12.1V
Redundant Power Supply Is not present
Fan #1 3901 RPM
Fan #2 3994 RPM
Temperature (Celsius): 28 C
Hit any key to continue ... _
Figure 20 Sample Diagnostics Window
The Flash PROM, RAM, and Serial Interface test results are given as
Good or Failed.
3. Return to the Main Menu.
60
Page 61

Displaying the Activity Monitor
The Activity Monitor is useful in troubleshooting or in monitoring switch
activity. To display the Activity Monitor, perform the following
procedure:
1. From the Omega Main Menu, select Administration.
2. From the Administration menu, select Activity monitor.
The Activity Monitor for the switch displays. The example shown in
Figure 21 shows the results of a ping command.
Pinging: [Host 149.35.17.164, delay 1.000]
Ping 149.35.17.164 #1 ok, RTT 0.000 seconds
Ping 149.35.17.164 #2 ok, RTT 0.000 seconds
Ping 149.35.17.164 #3 ok, RTT 0.000 seconds
.
.
.
[Finished]
AT-S26 Version 2.0.1 User’s Guide
Activity Monitor
(hit Return to resume the previous menu)
Figure 21 Activity Monitor
3. Return to the Main Menu.
61
Page 62

Managing a Sw itch
Pinging a Device
The ping command allows you to test if an end system can be reached
by sending it an Internet control message protocol (ICMP) echo request.
If the system is connected to the network and operating, it sends a reply
to the requesting system.
To ping another device, perform the following procedure:
1. From the Omega Main Menu, select Administration.
2. From the Administration menu, select Ping a remote system.
The Ping window in Figure 22 displays.
Please enter station to ping:
The system may be identified by name (‘name’),
by IP address (128.2.3.4), or by Ethernet address (0000F4 123456).
Note: Ping will repeat until a key is hit
->
Figure 22 Ping Window
3. Specify the device to ping using one of the following methods:
❑ By its IP address, in the format x.x.x.x
❑ By its Ethernet (or MAC) address, in the format xxxxxx xxxxxx
The switch MAC address is printed above the switch RS232
management port on the front panel.
The activity monitor reports the results of the ping command. Figure
23 is an example.
Activity Monitor
Pinging: [Host 149.35.17.164, delay 1.000]
Ping 149.35.17.164 #1 ok, RTT 0.000 seconds
Ping 149.35.17.164 #2 ok, RTT 0.000 seconds
Ping 149.35.17.164 #3 ok, RTT 0.000 seconds
.
.
.
[Finished]
62
(hit Return to resume the previous menu)
Figure 23 Ping Results Example
Page 63

AT-S26 Version 2.0.1 User’s Guide
Performing a ping command from a web-based Omega session stops
after a set number of ping attempts. Performing a ping command
from a local or remote Omega session continues until you stop it.
4. Return to the Main Menu.
63
Page 64

Page 65

Chapter 3
Configuring the Ports
The procedures in this chapter allow you to view and change the
parameter settings for the individual ports on a switch. This chapter also
describes port trunking, port mirroring, and port security.
This chapter contains the following procedures:
❑ Displaying Port Status on page 66
❑ Configuring Port Parameters on page 68
❑ Creating a Port Trunk on page 71
❑ Configuring Port Mirroring on page 74
❑ Configuring Port Security on page 76
65
Page 66

Configuring the Ports
Displaying Port Status
The Port Status window displays the current operating status of all the
ports on the switch, including the ports on any expansion modules, if
installed. The window allows you to quickly ascertain the operating
status of the ports by displaying a variety of information, such as
whether a link exists between the ports and the end nodes, and whether
any of the ports have been manually disabled.
To display the status of the ports on a switch, perform the following
procedure:
1. From the Omega Main Menu, select Port Status and Configuration.
The Port Status window in Figure 24 is di splayed.
Port Link Status Mode
1: Online 1000M Enabled Auto negotiate
2: Online 1000M Enabled Auto negotiate
3: Online 1000M Enabled Auto negotiate
4: Online 1000M Enabled Auto negotiate
5: Online 1000M Enabled Auto negotiate
6: Online 1000M Enabled Auto negotiate
Return to Main Menu ...
Port Status Menu
Figure 24 Port Status Window
The Port Status window contains the following information:
Port
This column displays the number and name of each port, if you have
assigned names. You can assign names to the ports to make them
easier to identify. For instructions on assigning port names, refer to
the section Configuring Port Parameters on page 68.
The standard six ports that come with the AT-9006 switch are
numbered 1 through 6. The numbering for ports on any expan sion
modules start with 7. For example, if both slots contained an
expansion module, each with one port, the port on the expansion
module in slot A would be port 7 and the port on the expansion
module in expansion slot B would be port 8.
Link
This column indicates whether there is an active connection between
a port and the device connected to the port. Offline indicates that
there is no link, while Online indicates that there is a link. If a port is
online, this column will also specify the operating speed of the port.
66
Page 67

AT-S26 Version 2.0.1 User’s Guide
Status
This column indicates whether a port is enabled or disabled. For
instructions on how to manually disable or enable a port, refer to the
section Configuring Port Parameters on page 68.
Mode
This column indicates the duplex mode of the ports. Possible values
are auto-negotiate, full-duplex, or half-duplex. For instructions on
how to manually set the duplex mode of a port, refer to the section
Configuring Port Parameters on page 68.
2. Return to the Main Menu.
67
Page 68

Configuring the Ports
Configuring Port Parameters
This section contains the procedure for configuring the parameters for
the individual ports on a switch. Port parameters that you can change
include duplex mode, flow control, back pressure, and port speed.
To view and configure the parameter settings for the ports, perform the
following procedure:
1. From the Omega Main Menu, select Port Status and Configuration.
The Port Status window in Figure 24 on page 66 is displayed.
2. Select the port to be configured.
The Port Configuration window in Figure 25 is displayed.
> Enable this port
Disable (partition) this port
> Auto negotiate
Full duplex
Half duplex
Backpressure enabled (Half Duplex)
> No backpressure
Flow control (Full Duplex)
> No flow control
Global config
Discard broadcast packets
> Regular forwarding of broadcasts
Port Configuration Menu
Port 1
Port name
Return to Port Status Menu ...
Figure 25 Port Configuration Window
If you are running the Omega interface from a web browser, you can
display this window by clicking on a port in the graphical switch
image.
3. Adjust the options as desired.
Any changes to the port settings are activated immediately on the
port. The options are described below.
68
Page 69

AT-S26 Version 2.0.1 User’s Guide
Receive Statistics Graph
This option displays performanc e statistics for the port, speci fically
the number and types of frames and errors that have occurred on the
port. For further information on port statistics, refer to Chapter 6,
Displaying Ethern e t Stat istics.
This option is not available from a Telnet or local session.
Enable this port
Disable (partition) this port
These selections allow you to manually disable a port in the switch so
that it no longer receives or sends packets. You might want to disable
a port and prevent packets from being forwarded if a problem occurs
with the node or cable connected to the port. Once the problem has
been fixed, you can enable the port again to resume normal
operation. You can also disable an unused port to secure it from
unauthorized connections. Enable is the default for all ports.
Auto-negotiate
Full-duplex
Half-duplex
These three selections control the duplex mode of the port. Fullduplex means that the port can both send and receive data
simultaneously. You can select this setting for a port if you know that
the device connected to the port supports full-duplex.
Half-duplex means the port can send or receive data, but not both at
the same time. Use this setting if you know that the device connected
to the port supports half-duplex mode.
Auto-negotiate means that the port negotiates with the connected
device to automatically configure to the highest common setting.
This setting eliminates the need to reconfigure the port if you change
the type of device connected to the port. Both end devices need to be
auto-negotiation compliant (802.3u) for the best possible
performance settings. If a connected device is not compliant, it
should only be configured for half-duplex. Auto-negotiate is the
default for all ports.
69
Page 70

Configuring the Ports
Backpressure enabled (half-duplex)
No backpressure
Backpressure applies only to ports operating in half-duplex mode.
Backpressure is useful when the port input buffer is running low on
memory resources. In the switch, outbound packets are traversing a
single uplink port. When a switch detects that a port input buffer is
nearly full, it simulates a collision so that the sending node will defer
transmission. The sending node will retry transmissions according to
the Ethernet back-off algorithm. Once switch resources are available
again, the switch stops sending the collision signal and the sending
nodes can freely transmit packets.
Flow control (full- dup lex)
No flow control
Flow control applies only to ports operating in full-duplex mode. It
works for full duplex ports the same way as backpressure does for
half-duplex ports except that the switch uses a special pause packet
instead of a jam signal. The pause packet notifies the other node to
stop transmitting for a specified period of time.
Global configuration
This option saves you from having to enter the same configurations
on every port. If you select this option, any settings you entered on a
port are copied to all the station ports on the switch (but not ports on
any optional expansion modules).
Discard broadcast packets
Regular forwarding of broadcasts
With this option, you can decide whether the switch forwards
broadcast packets or not.
Port name
The port name field is used to assign a name to the port. Naming ports
can make it easier for you to identify the various ports. A name can
have up to 20 characters. An example is Sales - cube 223.
4. Return to the Main Menu.
70
Page 71

Creating a Port Trunk
If your Gigabit Switch contains an expansion module that has multiple
100 Mbps or 10/100 Mbps ports, you can create a port trunk. A port trunk
is an economical way for you to increase the bandwidth between the
switch and another network device, such as a server, router, workstation,
or another switch. A port trunk is two or more data ports that have been
grouped together to increase the bandwidth between the switch and a
network node by functioning as one logical path. This increase in
bandwidth can prove useful in situations where a single connection
between the switch and a node is insufficient to handle the traffic load.
Despite the software configuration and physical connections, there are
no data loops in a port trunk. The port trunk always sends packets from a
particular source to a particular destination over the same link within the
trunk. A single link is designated for flooding broadcasts and packets of
unknown destination.
AT-S26 Version 2.0.1 User’s Guide
Note
Port trunking is only supported on expansion modules that feature
multiple 100 Mbps or 10/100 Mbps ports, such as the AT-A18
module. Port trunking is not supported on the six 1000 Mbps ports
on the base unit of the AT-9006SX/SC or AT-9006LX/SC Gigabit
Switches or the six 100/1000 Mbps ports on the base unit of the
AT-9006T Gigabit Switch.
Guidelines
When creating a port trunk, be sure to observe the following guidelines:
Guideline 1: Selecting the Number of Ports in a Trunk
A port trunk must consist of 2 or 4 ports.
Guideline 2: Using Ports from the Same Expansion Module
The ports selected to be a port trunk must be from the same expansion
module in the switch.
Guideline 3: Using Consecutive Ports
The ports of a trunk must be consecutive. For example, you could use
ports 7 and 8 as a port trunk because the ports are consecutive.
Guideline 4: Creating Only One Trunk Per Expansion Module
Each expansion module can support only one trunk.
71
Page 72

Configuring the Ports
Guideline 5: Maintaining Cabling Sequence Based on Port Number
When cabling a trunk, it is important that the order of the connections
be identical on both nodes. The lowest numbered port in a trunk on one
device must be connected to the lowest numbered port of the trunk on
the other device, the next lowest numbered port must be connected to
the next lowest numbered port on the other device, and so on.
Guideline 6: Configuring the Port Parameters of a Port Trunk
The ports in a trunk automatically assume the same configuration (such
as VLAN membership) as the configuration of the lowest numbered port.
For example, if you create a trunk consisting of ports 7 and 8, port 7 is
the master port and its configuration is propagated to port 8. As long as
the ports are configured as a trunk, you must not change any of the
attributes of any ports that might conflict with the settings of the master
port.
Creating a Port
Trunk
This section contains the procedure for creating a port trunk.
Caution
Do not connect the cables to the port trunk on the switch until after
you have created the port trunk. Connecting the cables prior to
creating the trunk will result in data loops in your network topology.
To create a port trunk, perform the following procedure:
1. From the Omega Main Menu, select System configuration.
The System Configuration menu in Figure 8 on page 43 is displayed.
2. Select System switch configu ration.
The System switch configuration menu in Figure 16 on page 52 is
displayed.
3. Select Port Trunking in the 10/ 100M Sp eed Port.
4. Specify the ports that will be the port trunk and press <Return>. You
can use either of the following formats to enter the port numbers:
72
Single, consecutive ports (for example, 7,8)
Range of ports (for example, 7-10)
5. Return to the Main Menu.
6. To confirm the creation of a port trunk, select Port status and
configuration from the Omega main menu to display a list of ports. All
of the ports in a port trunk are automatically assigned the name
“Trunk” along with a number to help identify the port trunk.
Page 73

AT-S26 Version 2.0.1 User’s Guide
7. Return to the Main Menu.
8. Connect the port trunks on the switch to the end device, being sure
to follow the guidelines discussed earlier in this chapter.
Deleting a Port
Trunk
To delete a port trunk, perform the following procedure.
1. Disconnect the cables from the port trunk on the switch.
Caution
Disconnect the cables from the port trunk on the switch before you
delete the port trunk. Deleting the trunk before you have
disconnected the cables will create data loops in your network.
2. From the Omega Main Menu, select System configuration.
The System Configuration menu is displayed.
3. Select System switch configu ration.
The System switch configuration menu in Figure 16 on page 51 is
displayed.
4. Select Port Trunking in the 10/ 100M Sp eed Port.
5. Do one of the following:
Web-based Omega session: Delete the port numbers and select Enter
or press <Return>.
Local Omega session: Enter a space in place of the port numbers and
press Enter.
The port trunk is now deleted.
6. Return to the Main Menu.
7. To confirm the deletion of a port trunk, select Port status and
configuration from the Omega main menu to display a list of ports.
The label “Trunk” should no longer appear next to the ports of the
port trunk.
73
Page 74

Configuring the Ports
Configuring Port Mirroring
Port mirroring allows you to monitor the traffic on a port by having both
the receive and transmit traffic on a port copied to another port on the
switch. By connecting a network analyzer to the other port, you can
monitor the traffic.
The port to be monitored is referred to as the source port. The port that
will function as the mirror port is referred to as the destination port.
When selecting your source and destination ports, observe the following
guidelines.
❑ The destination port cannot be used by a network node, such as a
workstation or server.
❑ Both the source and destination ports must be on the same
switch.
❑ You cannot monitor more than one port on a switch at a time.
Enabling Port
Mirroring
To enable port mirroring, perform the following procedure:
1. From the Omega Main Menu, select Traffic/Port Mirroring.
The Port Mirroring window in Figure 26 is displayed.
Port Mirroring Configuration
Port mirroring state:
Enabled
> Disabled
Note: Both transmit and receive activity will be mirrored.
Return to Main Menu ...
Figure 26 Port Mirroring Window
74
Page 75

2. Select Enabled.
The window in Figure 27 is displayed.
Port Mirroring Configuration
Port mirroring state:
> Enabled
Disabled
Source port: Null (not configured)
Destination port: Null (not configured)
Note: Both transmit and receive activity will be mirrored.
Return to Main Menu ...
Figure 27 Source and Destination Port Mirror Prompts
AT-S26 Version 2.0.1 User’s Guide
Disabling Port
Mirroring
3. Select Source Port.
A window displays listing the ports on the switch.
4. Select the port to be monitored.
5. If you are running a web-based Omega session, return to the window
containing the prompts in Figure 27.
6. Select Destination Port .
Again, a window is displayed listing the ports on the switch.
7. Select the port where the network analyzer will be connected.
The two ports are now configured for port mirroring.
8. Return to the Main Menu.
9. Connect a device, such as a network analyzer, to the destination port
or use a remote monitoring program to view the mirrored traffic.
To disable port mirroring on the switch, perform the following
procedure:
1. From the Omega Main Menu, select Traffic/Port Mirroring.
The Port Mirroring window in Figure 26 is displayed.
2. Select Disabled.
The port mirroring feature is now disabled on the switch.
3. Return to the Main Menu.
75
Page 76

Configuring the Ports
Configuring Port Security
The switch features two levels of port security that you can use to
enhance network security. These levels allow you to control network
access by limiting the number of MAC addresses that are learned on the
ports on the switch. The levels are as follows:
Limited - The ports will continue to learn new MAC addresses up to a
user defined maximum limit.
Secure - The ports will immediately stop learning new MAC addresses,
limiting network access only to those nodes whose MAC addresses have
already been learned.
Note
This port security feature does not apply to ports on any expansion
modules that m ight be installed in the switch.
To set the port security level for the ports on the switch, perform the
following procedure:
1. From the Omega Main Menu, select System Configuration.
The System Configuration menu in Figure 8 on page 43 is displayed.
2. Select Security/Source Add ress Tab le.
The following window is displayed:
Source Address Learning Mode:
> Automatic: source address learning enabled; no intruder protection
Limited: intruder protection when port MAC address limit exceeded
Secure: source address table locked; intruder protection enabled
Security object port ALL
Config MAC address limit per port
Return to System Configuration Menu ...
Figure 28 Port Security Menu
3. Select the desired port security level. The levels are described below:
Automatic
This selection disables port security. With this option activated, the
switch will not restrict the number of MAC addresses that are learned
on the switch ports. This is the default setting.
76
Page 77

AT-S26 Version 2.0.1 User’s Guide
Limited
This selection activates a limited version of port security. With this
level selected, the switch will continue to learn MAC addresses for
each port up to a user defined maximum number. Once the
maximum number has been reached on a port, any frames received
on the port from a source with a new MAC addresses will be
discarded.
Note
Selecting this security level deletes all static MAC addresses. You
must reenter the static addresses. All static MAC addresses are
included in the count of maximum addresses that can be learned by
a port.
If you activate this security level, select the Config MAC address limit
per port option to display a list of the ports on the switch. In the list,
select a port and specify the maximum number of MAC addresses
that you want the port to be able to learn. The permitted range is 0 to
255. Specifying 0 (zero) means that the port will not stop learning
addresses. The default is 0.
Selecting this security level also displays the following prompts:
Intruder Protection:
Transmit an SNMP trap if an intruder is detected
> No SNMP trap if an intruder is detected
Disable the port if an intruder is detected
> Port state is unchanged if an intruder is detected
Return to System Configuration Menu ...
Figure 29 Port Security Prompts
These prompts allow you to control how the switch will respond
when a port exceeds the specified number of MAC addresses. You can
instruct the switch to send an SNMP trap to the management station,
disable the port, or both.
Secure
This option causes the switch to immediately stop learning new MAC
addresses on all or selected ports. Any frames received on a port from
a source with a new MAC address will be discarded. Existing static
MAC addresses are retained and are used in determining which
addresses are accepted by a port. However, you cannot add new
static addresses to ports with this level of security.
77
Page 78

Configuring the Ports
Activating this security level requires that you first specify the ports
that are to have this level of security. This is done by entering the
ports in the Security object port field. The ports can be entered as a
range (e.g., 2-5) or individually (e.g., 2,4,6). After specifying the ports,
select the Secure level from the Port Security menu.
Ports not specified as having the Secure level will default to the
Automatic security level. For example, if you were to activate the
Secure level on only ports 1 and 2, the switch would stop learning
MAC address on those two ports, but would continue to learn
addresses on the remaining ports.
As with the Limited security level, you can also use the Port Security
prompts to control how the switch will respond in the event new MAC
addresses are received by a port. You can instruct the switch to send
a SNMP trap to a management station or disable the port.
Note
A new security level takes affect immediately on a switch once
selected.
4. Once you have selected the desired level of port security, return to
the Omega main menu.
78
Page 79

Chapter 4
Configuring the MAC Address Table
This chapter describes the MAC address table and the static MAC
address table. The chapter explains how to view the MAC addresses and
how to add and delete entries from the static table.
Procedures relating to the MAC address table include the following:
❑ Displaying the MAC Address Table on page 82
❑ Displaying the MAC Addresse s of a Port on page 83
❑ Displaying the Port Number of a MAC Address on page 84
❑ Clearing All Dynamic MAC Addresses on page 85
❑ Changing the Aging Time of the MAC Address Table on page
85
Procedures relating to the static MAC address table include the
following:
❑ Displaying the Static MAC Address Table on page 86
❑ Adding Addresses to the Stati c MAC Address Tab le on page 87
❑ Deleting Addresses from the Static MAC Address Table on
page 88
❑ Clearing the Static MAC Address Table on page 89
79
Page 80

Configuring the MAC Address Table
This chapter also contains in str uc t ion s on how to co nfi g ure mult ic ast
addresses for the ports of a switch. Procedures relating to multicast
addresses include the following:
❑ Configuring a Multicast Address on page 90
❑ Changing a Multicast Port Assignment on page 92
❑ Deleting a Multicast Address on page 92
80
Page 81

MAC Address Table
The MAC address table (also referred to as the forwarding table) is a
snapshot of the source MAC addresses that a switch has learned and
stored in its volatile memory. When a frame is received by a port on a
switch, the source address of the frame is inspected to determine
whether or not the address is already in the table. If it is not, the switch
adds the address to the table.
Each AT-9006 Series switch maintains its own MAC address table. Each
table can hold up to 8,000 addresses. To prevent the table from
becoming filled with addresses of devices that have become inactive
and are no longer sending frames, MAC address are periodically deleted
from the table. An address is deleted if a MAC address in the table does
not reappear on any port after a specified period of time has elapsed.
The default time period is 300 seconds (5 minutes). This aging time is
configurable, as explained in the procedure Changing the Aging Time
of the MAC Address Table on page 85.
AT-S26 Version 2.0.1 User’s Guide
If you reset the switch or remove power, the table is cleared but
immediately gets updated as soon as the switch is operational and the
ports start to detect MAC addresses in incoming packets.
Each switch also maintains a static MAC address table. This table
contains MAC addresses that are entered manually and are not aged out
after a period of time. The only way that a static address is removed is if it
is manually deleted from the table. When you enter a static address, you
specify the port when the node with the address is connected. Each
switch is responsible for maintaining its own static MAC address table.
Note
The MAC address for an AT-9006 Series switch is provided on the
MAC address label directly above the RS232 management port on
the switch front panel. You can also determine the MAC address by
running the switch diagnostics program, as explained in Chapter 2,
Managing a Switch.
81
Page 82

Configuring the MAC Address Table
Displaying the
MAC Address
Table
To display the MAC address table for a switch, perform the following
procedure:
1. From the Omega Main Menu, select MAC Address Table.
The MAC Address menu in Figure 30 is displayed.
MAC Address Menu
Show all MAC addresses
By port MAC addresses
Get Port From MAC Address
Clear dynamic MAC table
--- Static addresses display and configuration ---
All static MAC addresses
Per port static MAC addresses
Multicast addresses
Clear static MAC table
Return to Main Menu ...
Figure 30 MAC Address Menu
2. Select Show all MAC addresses.
The MAC Addresses window is displayed. An example is shown in
Figure 31.
MAC Address Table
MAC Addresses
MAC Address Port VLAN
00000C 938CDC Port 4 - Accounting1 Default VLAN
0000C0 334CE6 Port 4 - Accounting1 Default VLAN
0000F4 A40D7D Port 4 - Accounting1 Default VLAN
0000F4 A98B40 Port 4 - Accounting1 Default VLAN
0000F4 C89DCD Port 4 - Accounting1 Default VLAN
00A0C9 0300F4 Port 4 - Accounting1 Default VLAN
00A0C9 0825AE Port 4 - Accounting1 Default VLAN
00A0CC 3E2463 Port 4 - Accounting1 Default VLAN
00A0D2 18180B Port 4 - Accounting1 Default VLAN
00A0D2 53E346 6 Default VLAN
00A0D2 BD01C7 Port 4 - Accounting1 Default VLAN
82
Return to MAC Address Menu ...
Figure 31 MAC Address Table
Page 83

AT-S26 Version 2.0.1 User’s Guide
The table lists each MAC address that the switch has learned, the
number or name of the port on which the MAC address was detected,
and the VLAN to which the port belongs.
The Refresh button queries the switch for the latest MAC address
information and updates the window.
3. Return to the Main Menu.
Displaying the
MAC Addresses
of a Port
In addition to displaying all of the MAC addresses stored in the switch,
you can also display the MAC addresses associated with a specific port.
This allows you to easily determine the MAC addresses of the devices
connected to a port on the switch.
To display the MAC addresses of the devices connected to a port on the
switch, perform the following procedure:
1. From the Omega Main Menu, select MAC Address Table.
The MAC Address menu shown in Figure 30 is displayed.
2. Select By port MAC addresses.
A list of the ports on the switch is displayed.
3. Select the desired port number from the list.
The MAC Address Table Per Port window is displayed. The window
contains the MAC addresses that have been detected on the selected
port. Figure 32 is an example of the window.
MAC Address Table
Port 5
MAC Addresses
MAC Address VLAN MAC Address VLAN
00000C 4ACA6B Default VLAN 00000C 938CD9 Default VLAN
0000F4 A23192 Default VLAN 0000F4 A40F4B Default VLAN
0000F4 A411A0 Default VLAN 0000F4 A411AD Default VLAN
Return to Port Selection Menu ...
Figure 32 MAC Address Table Per Port Window
4. Return to the Main Menu.
83
Page 84

Configuring the MAC Address Table
Displaying the
Port Number of a
MAC Address
The Omega interface allows you to determine the port on which a MAC
address is located by specifying the address. This feature is useful in
determining the port that a particular device is connected to on the
switch.
To display the port number for a specific MAC address, perform the
following procedure:
1. From the Omega Main Menu, select MAC Address Table.
2. Select Get Port Fr om MAC Address.
The MAC Address prompt shown in Figure 33 is displayed.
MAC Address 0000F4 334CE5
Return to MAC Address Menu ...
Figure 33 MAC Address Prompt
3. Enter the source MAC address in the MAC Address field. Press
<Return>.
Enter the MAC address in the following format:
XXXXXX XXXXXX
The screen displays a window that contains the port on which the
MAC address was learned. Figure 34 is an exa m ple of the window.
Port VLAN
6 Default VLAN
Return to Main Menu
Figure 34 MAC Address by Port Window
4. Return to the Main Menu.
84
Page 85

AT-S26 Version 2.0.1 User’s Guide
Clearing All
Dynamic MAC
Addresses
Changing the
Aging Time of the
MAC Address
Table
To clear all of the learned MAC addresses from the MAC address table,
perform the following procedure:
1. From the Omega Main Menu, select MAC Address Table.
2. Select Clear dynamic MAC table.
Confirmation prompts are displayed.
3. Select Yes to clear the table or No to cancel the procedure.
If you select Yes, all MAC addresses are deleted from the switch’s
dynamic MAC address table.
4. Return to the Main Menu.
If a switch detects a packet with a new source MAC address, the switch
stores the MAC address in its address table. This means the switch has
learned about the device that sent packets to the switch. The MAC
address table is updated as new MAC addresses are detected. If a MAC
address listed in the address table does not appear on any port after a
specified period of time, the switch deletes that address from the table.
The default aging time is 300 seconds.
To specify a new aging time for the MAC address table, perform the
following procedure:
1. From the Omega Main Menu, select System Configuration.
The System Configuration menu in Figure 8 on page 43 is displayed.
2. Enter a new value (in seconds) in the Default Aging Time entry field.
The default is 300 seconds. The maximum value is 999 seconds.
Note
Entering a value of 0 (zero) deactivates the MAC aging time
parameter. MAC addresses continue to be added to the table until
the table is full. Once the table is full, any frame with a new MAC
address will be flooded to all appropriate ports.
3. Return to the Main Menu.
85
Page 86

Configuring the MAC Address Table
Static MAC Address Table
The static MAC table contains a list of the MAC addresses that have been
entered manually. You can use the table to specify the MAC addresses of
devices that are connected to ports that might not be learned via the
dynamic learning process of the switch. Entering static MAC addresses
ensures that certain devices have access to the switch ports, because
aging time, power failures, or switch resets do not affect the static MAC
table. Each switch maintains its own sta tic address table.
Displaying the
Static MAC
Address Table
To display the static address table for a switch, perform the following
procedure:
1. From the Omega Main Menu, select MAC Address Table.
The MAC Address Table menu in Figure 30 is displayed.
2. Select All static MAC addresses.
The screen displays previously-added static MAC addresses, their
ports, and the VLANs to which the ports belong. The display is for
viewing purposes only. Figure 35 is an example of the table:
Static MAC Address Table
MAC Addresses
MAC Address Port VLAN
00000C 938CDC Port 4 - Accounting1 Default VLAN
0000C0 334CE6 1 Default VLAN
00A0D2 18180B 3 Default VLAN
Figure 35 Static MAC Address Table Window
86
3. Return to the Main Menu.
Page 87

AT-S26 Version 2.0.1 User’s Guide
Adding Addresses
to the Stati c MA C
Address Table
To add MAC addresses to the static MAC address table, perform the
following procedure:
1. Compile a list of the MAC addresses of the devices to be added to the
table.
2. From the Omega Main Menu, select MAC Address Table.
The MAC Address Table menu shown in Figure 30 is displayed.
3. Select Per port stati c MAC addresses.
A list of the ports on the switch is displayed.
4. Select the port where you want to add the static MAC address.
The window in Figure 36 is displayed. The window lists the static
addresses already defined for the selected port.
Add MAC Address Menu
Port 5
MAC Addresses
MAC Address VLAN MAC Address VLAN
Add MAC address
Delete MAC address
Return to Port Selection Menu ....
Figure 36 Static MAC Addresses Per Port Window
5. Select Add MAC Address.
The window in Figure 37 is displayed. You use this window to specify
the MAC address of the device you want to allow access to the port,
as well as the name of the VLAN to which the port belongs.
Add MAC Address Menu
MAC Addresses
MAC Address VLAN MAC Address VLAN
VLAN Name: Default VLAN
MAC address: Null (not configured)
Return to Add MAC Address Menu ...
Figure 37 Adding a Static MAC Address Window
87
Page 88

Configuring the MAC Address Table
6. In the VLAN Name field, specify the VLAN to which the port belongs.
The default is Default VLAN.
7. In the MAC Address field, enter the static MAC address of the device
to have access to the port.
The address should be entered in the following format:
XXXXXX XXXXXX
You can configure only one static MAC address per port.
A confirmation screen is displayed.
8. Press <Return>.
The address is added to the static MAC address table.
9. Return to the Main Menu.
10. If desired, perform the procedure Displaying the Stati c M AC
Address Table on page 86 to view the updated table.
Deleting
Addresses from
the Static MAC
Address Table
To delete an address from the static MAC address table, perform the
following procedure:
1. From the Omega Main Menu, select MAC Address Table.
The MAC Address Table menu in Figure 30 is displayed.
2. Select Per port static MAC addresses.
A list of the ports on the switch is displayed.
3. Select the port containing the static MAC address to be deleted.
The window in Figure 36 on page 87 is displayed.
4. Select Delete MAC address.
The window in Figure 38 is displayed. You use this window to specify
the static MAC address to be deleted.
MAC Addresses
MAC Address VLAN MAC Address VLAN
00A0D2 18180B Default VLAN
88
VLAN Name: Default VLAN
MAC address: Null (not configured)
Return to Add MAC Address Menu ...
Figure 38 Deleting a Static MAC Address Window
Page 89

AT-S26 Version 2.0.1 User’s Guide
5. In the VLAN Name field, enter the name of the VLAN to which the port
belongs.
6. In the MAC Address field, enter the MAC address to be deleted from
the static table.
A confirmation screen is displayed.
7. Press <Return>.
The address is deleted from the static MAC address table.
8. Return to the Main Menu.
9. If desired, perform the procedure Displaying the St atic MAC
Address Table on page 86 to view the updated table.
Clearing the
Static MAC
Address Table
To clear all addresses from the static MAC address table for a switch,
perform the following procedure:
1. From the Omega Main Menu, select MAC Address Table.
The MAC Address Table menu shown in Figure 30 on page 82 is
displayed.
2. Select Clear static MAC table.
A confirmation screen is displayed.
3. Select Yes to confirm or No to cancel the procedure.
If you select Yes, all of the static address entries are deleted from the
switch.
4. Return to the Main Menu.
89
Page 90

Configuring the MAC Address Table
Multicast Address
A multicast is a special form of broadcast where copies of a packet are
delivered to a specific group of end stations. This differs from a
broadcast, which is a transmission that sends copies of a packet to all
end stations on the network.
A multicast address is a destination address. Configuring a multicast
address allows you to restrict certain packets to a specific group of ports.
For example, you might use this feature to restrict the number of end
stations that are to receive packets from a server running special
applications.
You can configure ten multicast addresses per switch.
Configuring a
Multicast Address
To enter a multicast address into the MAC address table of a switch,
perform the following procedure:
1. From the Omega Main Menu, select MAC Address Table.
The MAC Address Table menu is displayed.
2. Select Multicast addresses.
The Multicast Address Menu shown in Figure 39 is displayed.
Add MAC Address Menu
MAC Addresses
MAC Address Multicast Packet Ports VLAN
Add MAC address
Delete MAC address
Return to Add MAC Address Menu ...
90
Figure 39 Multicast Address Menu
Page 91

AT-S26 Version 2.0.1 User’s Guide
3. Select Add MAC addr ess .
The Adding a Multicast Address window in Figure 40 is displayed.
Add MAC Address Menu
MAC Addresses
MAC Address Multicast Packet Ports VLAN
VLAN Name: Default VLAN
MAC address: Null (not configured)
Ports for multicast Null (not configured)
(Example: 1,3,8-14, or all)
Return to Add MAC Address Menu ...
Figure 40 Adding a Multicast Address Window
4. In the VLAN Name field, enter the name of the VLAN to receive the
multicast frames. Select Enter.
5. In the MAC Address field, enter the MAC address of the multicast
stream. Select Enter.
6. In the Ports for Multicast field, enter one or more port numbers that
are members of the specified VLAN and that are to receive the
multicast packets from the device. Select Enter.
You can use one of the following formats to specify the port numbers:
Single port (for example, 1)
Several ports separated by a comma (for example, 3, 5, 6)
Range of ports (for example, 2-4)
All ports by entering the word “all”.
You can combine these different formats in a single line.
A port can have more than one multicast address associated with it.
The number of multicast addresses you can configure is limited to ten
per switch.
Omega confirms a successful operation with the message MAC
address added and the MAC address.
7. Return to the Main Menu.
91
Page 92

Configuring the MAC Address Table
Changing a
Multicast Port
Assignment
Deleting a
Multicast Address
To add or remove ports from a multicast MAC address assignment, reenter the multicast MAC address and the new port assignments by
performing the instruction in the previous section. This will overwrite
the old port assignments with the new port information.
To delete a multicast address from the MAC address table, perform the
following procedure:
1. From the Omega Main Menu, select MAC Address Table.
The MAC Address Table menu is displayed.
2. Select Multicast addresses.
The menu in Figure 39 on page 90 is displayed.
3. Select Delete MAC Address.
The Deleting a Multicast Address window is displayed.
MAC Addresses
MAC Address Multicast Packet Ports
00A0D2 18180C 6
VLAN Name: Default VLAN
MAC address: Null (not configured)
Figure 41 Deleting a Multicast Address Window
4. In the VLAN Name field, enter the name of the VLAN from which the
multicast address is to be deleted.
5. In the MAC Address field, enter the MAC address to be deleted. Select
Enter.
The multicast address is now deleted.
6. Return to the Main Menu.
92
Page 93

Chapter 5
Configuring Virtual LANs and Quality of Service
This chapter contains the following sections:
❑ Overview on page 94
❑ Creating a New Port-based or Tagged VLAN on page 102
❑ Creating an Example VLAN on page 108
❑ Modifying a Port-based or Tagged VLAN on page 111
❑ Deleting a Port-based or Tagged VLAN on page 113
❑ Configuring Port Priority Queueing on page 116
This chapter explains the Allied Telesyn implementation of the VLAN
and Quality of Service (QoS) features for the AT-9006 Ethernet switch. An
Allied Telesyn Ethernet switch can support up to 254 port-based VLANs
with 802.1Q Virtual LAN (VLAN) tagging.
By default, an AT-9006 Series Switch has one pre-defined VLAN. The
name of this VLAN is Default VLAN. All of the ports on the switch are
configured as untagged (port-based) members of this VLAN. In most
situations, you will probably find this single broadcast domain and the
default QoS settings acceptable and will not need to modify the switch
VLAN and QoS settings.
Note
You should use caution when using the Spanning Tree Protocol
(STP) and VLANs. The switch has only one spanning tree domain.
93
Page 94

Configuring Virtual LANs and Quality of Service
Overview
As the size and traffic on Ethernet networks have grown, new methods
have been needed for segmenting the network to improve network
performance and speed. One of the principal methods for improving
network performance is through the use of VLANs. The VLAN feature
allows you to segment your network through software management by
creating subnetworks. The use of VLANs allow you to group the
workstations, servers, and other networking equipment connected to
your switches into logical workgroups. These VLAN groupings can be
based on similar data needs or security requirements.
When networking devices, such as workstations and servers, are
grouped into a VLAN, data is exchanged between only those members
of the group. In more basic terms, just as switches separate collision
domains, VLANs separate broadcast domains.
Each VLAN constitutes one broadcast domain; therefore, frames are not
permitted to cross a VLAN boundary. This allows for several VLAN-based
broadcast domains to exist on the same switch.
Other advantages of VLANs include:
" You can group workstations logically or functionally, regardless of
their physical location on the network.
" You can change VLAN memberships anytime by software
configuration without moving the workstations physically, or
change group memberships by simply moving a cable from one
port to another.
" With VLAN tagging, the ability to group workstations into logical
work groups is more versatile . Network servers or other network
resources can be shared without loss of data isolation or security.
" With VLAN tagging, one port on a switch can be configured to be
an uplink to another 802.1Q-compatible switch. This one port can
be configured to carry traffic from all VLANs configured on the
switch. (With port-based VLANs, one uplink port is required for
each VLAN in order to uplink VLANs in other switches.)
The Fast Ethernet switches are capable of supporting two types of
VLANs:
" Port-based VLANs
94
" Tagged VLANs
Both types of VLAN s are d escribed in the following sections.
Page 95

AT-S26 Version 2.0.1 User’s Guide
Port-Based
VLANs
AT-9006SX/SC
Ethernet Switch
Port-based VLANs are logical groupings of ports. Any devices connected
to the member ports share a common broadcast domain. The traffic
within a VLAN is forwarded only to the member ports.
As a frame enters a port, an ID for that port VLAN is associated with the
frame. This VLAN ID (VID) is used to forward the frame only to the port
or ports in the same VLAN (i.e., ports having the same VID).
When you create a new VLAN and give the VLAN a VID, each member
port Port VLAN ID (PVID) is set equal to the VID of the given VLAN
group through the Port to VLAN Configuration menu.
Port-based VLANs belong to separate broadcast domains; therefore, a
router is required to transfer the frames among the various VLANs.
Port-based VLAN Example
Figure 42 is an example of two port-based VLANs in an AT-9006SX/SC
switch. The example illustrates the two VLANs Sales and Production.
AT-8224XL Switches
with AT-A15 Modules
8324SL
CentreCOM
10BASE-T / 100BASE-TX
AT-STACK1SL
FAST ETHERNET SWITCH
ACTIVITY
LINK
A
FULL DUP
COL
HALF DUP
B
CentreCOM
AT-STACK1SL
ACTIVITY
LINK
A
FULL DUP
COL
HALF DUP
B
1X 3X 5X 7X
2X 4X 6X 8X
10BASE-T / 100BASE-TX
FAST ETHERNET SWITCH
1X 3X 5X 7X
2X 4X 6X 8X
10BASE-T / 100BASE-TX
9X 11X 13X 15X
10X 12X 14X 16X
8324SL
10BASE-T / 100BASE-TX
9X 11X 13X 15X
10X 12X 14X 16X
Sales VLAN
(PVID 2)
17X 19X 21X 23X
18X 20X 22X 24X
17X 19X 21X 23X
18X 20X 22X 24X
PORT ACTIVITY
L/A
100M LINK / ACTIVITY 10M LINK / ACTIVITY
D/C
FULL DUP
1234567891011121314151617181920212223
L/A
D/C
L/A
D/C
PORT ACTIVITY
L/A
100M LINK / ACTIVITY 10M LINK / ACTIVITY
D/C
FULL DUP
1234567891011121314151617181920212223
L/A
D/C
L/A
D/C
AT-8224XL Switches
with AT-A15 Modules
8324SL
CentreCOM
10BASE-T / 100BASE-TX
AT-STACK1SL
FAST ETHERNET SWITCH
ACTIVITY
LINK
A
1X 3X 5X 7X
STATUS
RS-232
TERMINAL PORT
HALF DUP/
COL
FAULT
RPS
PWR
24
RESET
STATUS
RS-232
TERMINAL PORT
HALF DUP/
COL
FAULT
RPS
PWR
24
RESET
FULL DUP
COL
HALF DUP
B
2X 4X 6X 8X
CentreCOM
10BASE-T / 100BASE-TX
AT-STACK1SL
FAST ETHERNET SWITCH
ACTIVITY
LINK
A
FULL DUP
COL
HALF DUP
B
1X 3X 5X 7X
2X 4X 6X 8X
10BASE-T / 100BASE-TX
9X 11X 13X 15X
17X 19X 21X 23X
L/A
100M LINK / ACTIVITY 10M LINK / ACTIVITY
D/C
FULL DUP
1234567891011121314151617181920212223
L/A
D/C
L/A
18X 20X 22X 24X
17X 19X 21X 23X
18X 20X 22X 24X
D/C
L/A
100M LINK / ACTIVITY 10M LINK / ACTIVITY
D/C
FULL DUP
1234567891011121314151617181920212223
L/A
D/C
L/A
D/C
10X 12X 14X 16X
8324SL
10BASE-T / 100BASE-TX
9X 11X 13X 15X
10X 12X 14X 16X
STATUS
RS-232
PORT ACTIVITY
TERMINAL PORT
HALF DUP/
COL
FAULT
RPS
PWR
24
RESET
STATUS
RS-232
PORT ACTIVITY
TERMINAL PORT
HALF DUP/
COL
FAULT
RPS
PWR
24
RESET
Production VLAN
Router
(PVID 3)
Figure 42 VLAN Port-Based Example
95
Page 96

Configuring Virtual LANs and Quality of Service
The table below lists the ports assignments for the Sales and Production
VLANs:
Figure 42 VLAN
Example
Sales VLAN (PVID 2)
Production VLAN
(PVID 3)
AT-9006SX/SC switch 1, 2, 4 3, 5, 6
The movement of traffic between the two VLANs is accomplished with a
router. The router has one connection to each VLAN. One router
interface is connected to port 2 on the switch; this port is a member of
the Sales VLAN. Another router interface is connected to port 5; this port
is a member of the Production VLAN.
There are, however, several drawbacks to port-based VLANs:
❑ It is not easy to share network resources, such as servers and
printers, across multiple VLANs. A router must be added to the
network to provide a means for interconnecting the port-based
VLANs.
❑ The introduction of a router into your network could create
security issues from unauthorized access to your network.
❑ A VLAN that spans several switches will require a port on each
switch for the interconnection of the various parts of the VLAN.
For example, a VLAN that spans three switches would require one
port on each switch just to interconnect the various sections of
the VLAN. In network configurations where there are many
individual VLANs that span switches, many ports can end up
being used ineffectively just to interconnect the various VLANs.
VLAN Tagging
96
With VLAN tagging, you can easily share network resources and at the
same time retain the security found in port-based VLANs. And when
propagating the different VLANs throughout the network, you only
need one port-per-switch to trunk all VLANs from one switch to another
switch across one physical link.
For these and other reasons, the IEEE developed addi tions to the 802
standards to accommodate VLAN tagging, the 802.1Q and 802.3ac
standards. VLAN tagging allows the user to define a VID for a given VLAN
traffic flow, and then use this VID to switch the traffic throughout the
network. This means that the user can have a device connected to a
switch port that can accept traffic from one or more VLANs.
Page 97

AT-S26 Version 2.0.1 User’s Guide
The ability to allow a port to forward traffic from many VLANs instead of
only one (as in port-based VLANs) allows the user to overcome the portbased limitations mentioned above. A server can now be configured to
accept the traffic from many different VLANs, and then return data to the
various VLANs without mixing or leaking data into the wrong VLANs.
Now when propagating VLANs across the network you can use one port
per switch for connecting all VLANs on the switch to another 802.1Qbased switch.
IEEE 802.1Q Standard
This flexibility comes from the ability to included a VLAN tag, in the form
of a VID, to an Ethernet frame, and the ability of NICs, switches, and
routers to act upon these VIDs (802.1Q).
The 802.3ac standard deals with the addition of 4 bytes to the original
802.3 frame. This means that while the minimum frame size is still 64
bytes, the maximum allowable frame size has been increased to 1522
bytes. These four bytes are inserted between the destination MAC
address field and Length/Type field and include the following
information.
Length/Type field (2 bytes): The Length/Type field of a tagged MAC
frame always uses the Type interpretation, and contains the 802.1Q Tag
Protocol Type: 0x81-00.
Tag Control Information field (2 bytes): The Tag Control Information field
is subdivided as follows:
a. A 3-bit User Priority field.
b. A Canonical Format Indicator (CFI) of 1 bit.
c. A 12-bit VLAN Identifier or VID.
The VID is the information that is used by the switch to forward the
frame to the appropriate VLANs. For further explanation of the function
and use of the other data fields, please consult the IEEE 802.1Q standard.
The 802.1Q standard deals with how this tagging information is used to
forward the traffic throughout the switch.
The handling of frames tagged with VIDs coming into a port is
straightforward. If the incoming frame’s VID tag matches one of the VIDs
of a VLAN that the port is a tagged member of, the frame will be
accepted and forwarded to the appropriate ports. If the frame’s VID does
not match any of the VLANs that the port is a member of, the frame will
be dropped.
97
Page 98

Configuring Virtual LANs and Quality of Service
If the connected device is a legacy device (i.e., a device that does not
support or act upon VLAN tagging), there are addition methods for
handling the frame.
As described in the port-based VLAN section, an untagged in com ing
frame needs to have a VID inserted or associated with it so that the
frame can be properly forwarded throughout switch. Consequently,
each port is required to have a VLAN tag associated with it; this portbased tag is referred to as the Port VLAN ID or PVID. The port PVID
value is inserted into the frame and is used as the frame VID as the frame
is passed through the switching system.
The port PVID assignment enables legacy (non-802.1Q compliant)
devices connected to the switch to take advantage of the VLAN and QoS
capabilities of the switch.
Note
Ports can be tagged members of multiple VLANs. This means that
the port can be configured to accept and forward traffic flows from
multiple VLANs (i.e., the port will recognize multiple VIDs).
Note
The CPU management port of this switch is a legacy device. It
cannot interpret VLAN tags. The management agent responds only
to communications from devices that are located within the same
VLAN, defined by the management port PVID.
98
Page 99

AT-9006SX/SC
Switch (Top)
Accounting VLAN (PVID 2)
AT-S26 Version 2.0.1 User’s Guide
VLAN Tagging Example
Figure 43 illustrates how tagged ports can be used to interconnect IEEE
802.1Q-based products. The example uses tagged ports to provide an
uplink between two AT-9006SX/SC switches. A tagged port is also used
to connect an IEEE 802.1Q compliant server to a switch so that the server
can be shared among multiple VLANs without the need for a router.
Port 5
Manufacturing VL AN (PVID 3)
AT-8224XL Sw i t c h es
with AT-A15 Modules
8324SL
CentreCOM
10BASE-T / 100BASE-TX
AT-STACK1SL
FAST ETHERNET SWITCH
ACTIVITY
LINK
A
1X 3X 5X 7X
FULL DUP
COL
HALF DUP
B
2X 4X 6X 8X
8324SL
CentreCOM
10BASE-T / 100BASE-TX
AT-STACK1SL
FAST ETHERNET SWITCH
ACTIVITY
LINK
A
1X 3X 5X 7X
FULL DUP
COL
HALF DUP
B
2X 4X 6X 8X
AT-9006SX/SC
Switch (Bottom)
AT-STACK1SL
COL
AT-STACK1SL
COL
10BASE-T / 100BASE-TX
9X 11X 13X 15X
10X 12X 14X 16X
10BASE-T / 100BASE-TX
9X 11X 13X 15X
10X 12X 14X 16X
17X 19X 21X 23X
18X 20X 22X 24X
17X 19X 21X 23X
18X 20X 22X 24X
PORT ACTIVITY
L/A
100M LINK / ACTIVITY 10M LINK / ACTIVITY
D/C
FULL DUP
1234567891011121314151617181920212223
L/A
D/C
L/A
D/C
PORT ACTIVITY
L/A
100M LINK / ACTIVITY 10M LINK / ACTIVITY
D/C
FULL DUP
1234567891011121314151617181920212223
L/A
D/C
L/A
D/C
HALF DUP/
COL
HALF DUP/
COL
AT-8224XL Sw it c h es
with AT-A15 Modules
8324SL
CentreCOM
10BASE-T / 100BASE-TX
FAST ETHERNET SWITCH
ACTIVITY
LINK
A
FULL DUP
HALF DUP
B
CentreCOM
10BASE-T / 100BASE-TX
FAST ETHERNET SWITCH
ACTIVITY
LINK
A
FULL DUP
HALF DUP
B
1X 3X 5X 7X
2X 4X 6X 8X
1X 3X 5X 7X
2X 4X 6X 8X
10BASE-T / 100BASE-TX
9X 11X 13X 15X
17X 19X 21X 23X
10X 12X 14X 16X
18X 20X 22X 24X
8324SL
10BASE-T / 100BASE-TX
9X 11X 13X 15X
17X 19X 21X 23X
10X 12X 14X 16X
18X 20X 22X 24X
AT-8224XL Switch es
with AT-A15 Modules
8324SL
CentreCOM
10BASE-T / 100BASE-TX
AT-STACK1SL
FAST ETHERNET SWITCH
ACTIVITY
LINK
A
FULL DUP
COL
STATUS
RS-232
TERMINAL PORT
FAULT
RPS
PWR
24
RESET
STATUS
RS-232
TERMINAL PORT
FAULT
RPS
PWR
24
RESET
Port 2
HALF DUP
B
AT-STACK1SL
ACTIVITY
LINK
A
FULL DUP
COL
HALF DUP
B
1X 3X 5X 7X
2X 4X 6X 8X
CentreCOM
10BASE-T / 100BASE-TX
FAST ETHERNET SWITCH
1X 3X 5X 7X
2X 4X 6X 8X
10BASE-T / 100BASE-TX
9X 11X 13X 15X
17X 19X 21X 23X
L/A
100M LINK / ACTIVITY 10M LINK / ACTIVITY
D/C
FULL DUP
1234567891011121314151617181920212223
L/A
D/C
L/A
18X 20X 22X 24X
17X 19X 21X 23X
18X 20X 22X 24X
D/C
L/A
100M LINK / ACTIVITY 10M LINK / ACTIVITY
D/C
FULL DUP
1234567891011121314151617181920212223
L/A
D/C
L/A
D/C
10X 12X 14X 16X
8324SL
10BASE-T / 100BASE-TX
9X 11X 13X 15X
10X 12X 14X 16X
STATUS
RS-232
PORT ACTIVITY
TERMINAL PORT
HALF DUP/
COL
FAULT
RPS
PWR
24
RESET
STATUS
RS-232
PORT ACTIVITY
TERMINAL PORT
HALF DUP/
COL
FAULT
RPS
PWR
24
RESET
IEEE 802.3Q
Compliant Server
with AT-2970 Gigabit NIC
Port 2
Legacy Server
L/A
D/C
L/A
D/C
FAULT
RPS
PWR
24
RESET
AT-8224XL Switch
STATUS
RS-232
PORT ACTIVITY
TERMINAL PORT
L/A
100M LINK / ACTIVITY 10M LINK / ACTIVITY
D/C
HALF DUP/
COL
FULL DUP
1234567891011121314151617181920212223
with AT-A15 Module
STATUS
RS-232
PORT ACTIVITY
L/A
100M LINK / ACTIVITY 10M LINK / ACTIVITY
D/C
FULL DUP
1234567891011121314151617181920212223
L/A
D/C
L/A
D/C
TERMINAL PORT
HALF DUP/
COL
FAULT
RPS
PWR
24
RESET
AT-STACK1SL
8324SL
CentreCOM
10BASE-T / 100BASE-TX
FAST ETHERNET SWITCH
ACTIVITY
LINK
A
1X 3X 5X 7X
FULL DUP
COL
HALF DUP
B
2X 4X 6X 8X
10BASE-T / 100BASE-TX
9X 11X 13X 15X
10X 12X 14X 16X
17X 19X 21X 23X
18X 20X 22X 24X
L/A
100M LINK / ACTIVITY 10M LINK / ACTIVITY
D/C
FULL DUP
1234567891011121314151617181920212223
L/A
D/C
L/A
D/C
STATUS
RS-232
PORT ACTIVITY
TERMINAL PORT
HALF DUP/
COL
FAULT
RPS
PWR
24
RESET
Engineering VLAN (PVID 4)
Manufacturing VLAN (PVID 3)
Figure 43 VLAN Tagging Example
99
Page 100

Configuring Virtual LANs and Quality of Service
The VLANs and port assignments for the top AT-9006SX/SC Gigabit
Switch in Figure 43 are listed in Table 2.
Table 2 VLAN Tagging Example Port Assignments, Top Switch
VLAN Example
Top AT-9006SX/SC
Switch
Accounting VLAN
(VID 2)
Untagged
Ports
Tagged
Ports
Manufacturing
VLAN (VID 3)
Untagged
Ports
Tagged
Ports
Engineering VLAN
(VID 4)
Untagged
Port
Tagged
Port
1, 4 2, 5 3, 6 2, 5 2, 5
The Accounting VLAN, assigned a VID value of 2, contains two untagged
ports, ports 1 and 4, which connect to the AT-8224XL Fast Ethernet
Switches. The VLAN also has two tagged ports, Port 2 and Port 5. Port 5
functions as the uplink port to the bottom AT-9006SX/SC switch, while
Port 2 provides a connection to an IEEE 802.1Q compliant server capable
of handing tagged frames, thereby enabling the server to be a
simultaneous member of multiple VLANs.
The Manufacturing VLAN has two untagged ports, ports 3 and 6, which
connect the Gigabit Switch to two AT-8224XL switches, as well as two
tagged ports, ports 2 and 5, which provide the same functions as in the
Accounting VLAN.
Alos included in the top Gigabit Switch is a Engineering VLAN with the
VID of 4. It consists of just two ports, tagged ports 2 and 5. Port 2 is
connected to the IEEE 802.1Q compliant server and Port 5 is the uplink
port. This VLAN will enable the Engineering VLAN on the bottom Gigabit
Switch to access the shared server along with the other VLANs.
The VLANs and port assignments for the bottom AT-9006SX/SC switch
are listed in Table 3.
Table 3 VLAN Tagging Example Port Assignments, Bottom Switch
VLAN Example
Bottom AT-9006SX/SC
Engineering VLAN
(VID 4)
Untagged
Ports
Tagged
Ports
1, 4 2 3, 6 2
Manufacturing
VLAN (VID 6)
Untagged
Ports
Tagged
Ports
Switch
100
 Loading...