

Allflex USA 930042 Users Manual
Allflex ISO Compatible RF/ID Compact Reader
Model No. RS200-V2
User Manual
(Rev C June 2006 / Software V2.06)
These instructions guide the user through the basic setup, configuration, and operation
of the Allflex Compact Reader, Model RS200-V2, an RF/ID scanner capable of
reading and displaying ISO HDX and FDX-B type transponder identification codes.
Unpacking
The Compact Reader is shipped in a box with this instruction guide, one 9 volt alkaline
battery, and a protective carrying case. Remove the reader and battery from the box,
and follow the directions contained in this guide for battery installation, setup, and
operating instructions. Transponders (not supplied with Reader) are helpful in
verifying the configuration and operation procedures described in this guide.
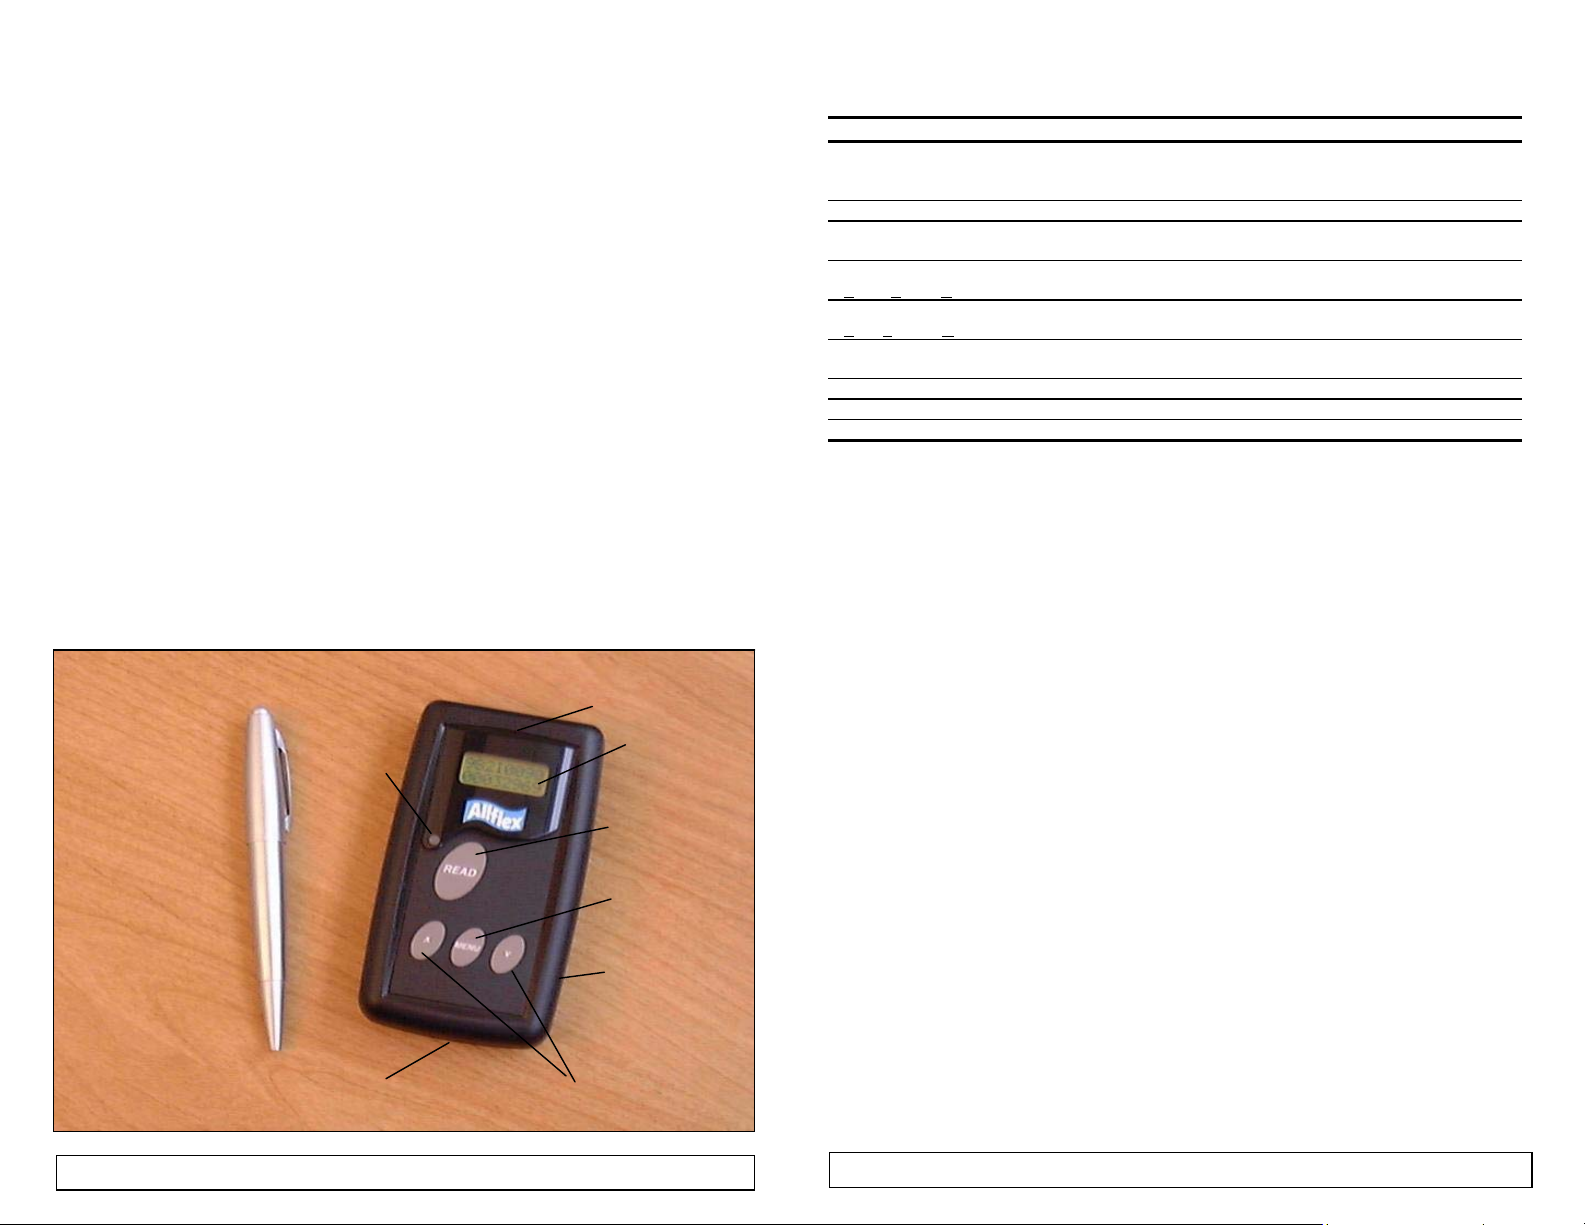
Compact Reader User Interface
The figure below illustrates the Compact Reader’s features that are instructive to its
operation and use. Each feature and its corresponding function are described in the
accompanying Table 1 on the following page.
Figure 1 - Compact Reader Features and User Interface
Red LED
BATTERY
COMPARTMENT
ANTENNA
2x8 LCD
READ
MENU
ENCLOSURE
SCROLL UP
SCROLL DN
Table 1 - Compact Reader Features and Descriptions of Use
Feature/Item Description of Use
READ Button Turns Reader ON from OFF state
MENU Button Activates Options Menu / Selects Options Menu Category
SCROLL UP/SCROLL
DOWN Buttons
2x8 Character LCD
(
Liquid Crystal Display)
Red LED Indicator
Light Emitting Diode)
(
Antenna Coil Transponder coil axis should be coaxial or parallel to Reader antenna axis
Battery Compartment Accepts single 9 volt alkaline or nickel-cadmium battery (bottom)
Equipment Label Provides model, serial number, and agency certification notices (bottom)
Enclosure Compact ergonomic case
Activates transponder reading from ON state
Selects certain option alternatives in Options Menu
Navigates Options Menu
(Press both buttons simultaneously to turn off unit)
Displays transponder ID Code information, Reader status, and Options
Menu selections
Lights when valid transponder ID Codes are detected
(optionally lights with Options Menu selections)
for maximum reading distance (mounted inside enclosure – see Figure 3)
Setup
The Compact Reader requires only installation of the 9 volt battery in order to begin
reading transponders. The Reader also permits the user to configure several options
that control its functions and ID code presentation format.
Battery Installation Instructions
The Compact Reader is supplied with one 9 volt alkaline type disposable battery. A
variety of battery technologies, both disposable and rechargeable types, can be used.
Table 2 lists one manufacturer’s compatible battery types, and the estimated service
life each type will provide in use with the Compact Reader.
To install or replace the battery (ensure Reader is turned off before proceeding):
• Turn the Reader over so that the equipment label is visible. Push down gently on
the small ribbed spot just beneath the label and push laterally away from the label.
• When the battery compartment cover has slid open approximately 10mm, it can be
removed from the channel in which it fits to expose the battery compartment.
• Install the 9 volt battery observing the polarity orientation etching which appears
in the bottom of the enclosure.
Note: Incorrect installation of the battery will not damage the reader. However, the Reader will
fail to operate unless the battery polarity is correctly oriented.
Reposition the battery compartment cover and snap it into the chann el approximately
10mm from the closed position. Once in the channel, press down gently on the ribbed
spot and slide the cover back into the fully closed position.
1
2
Note: FDX-B reading distance performance may be slightly less when a nickel cadmium type
battery is installed in the reader. Both HDX and FDX-B reading distance will gradually
deteriorate as any type battery is discharged through normal use. The Compact Reader provides
a Low Battery indication on its LCD display when the battery requires charging or replacement.
Note: Rechargeable batteries must be charged in compatible external charging apparatus.
Note: Actual number of transponder reads per battery life will vary with the pattern of use of
the Reader. Numbers shown in Table 2 are based on 1 second scan intervals to level at which
HDX transponder read distance is diminished to approximately 1/2 initial distance.
Note: When battery life has been exhausted to a point at which battery replacement is required,
the LCD readout will indicate “LOW BATTERY / POWERING DOWN” and will automatically
turn off.
Table 2 - Recommended Battery Types (all Eveready/Energizer®)
Type Number Chemistry Capacity mAH Est. No. of Reads
1222 (Heavy Duty) Zinc-Manganese < 50 300
522 Alkaline 600 10,000
L522 Lithium 1200 20,000
CH22 * Nickel-Cadmium 120 3,000
Note: Nickel Cadmium is rechargeable battery type.
Operating and Using the Compact Reader
Activating the Compact Reader
After installing the battery, the Compact Reader is ready for use. The Reader is
activated from its normally OFF state by pressing the READ button for about 1
second. Upon depression of this button, the Reader is turned ON, and an indication of
this state is enunciated by momentary flashing of the red LED visual indicator, beeping
of the audible indicator, and displaying of READER READY on its LCD indicator.
Note: If the LAST TAG option in the Options Menu has been set ON, and a transponder has
been previously read, the LCD indicator will show the ID code number of the last transponder
tag that was read.
Reading a Transponder Tag
The Reader is immediately ready for use once it is turned on. Transponder scanning is
performed by pressing the READ button. If the READ button is pressed momentarily,
scanning will be active for a default interval of 3 seconds. If a transponder is detected
during this time, its ID code will be displayed on the LCD, and the LED indicator will
flash once, and the audible beeper will beep once. If the same ID code is read
repetitively, the LED and beeper will flash and beep twice. If no transponder is
detected after 3 seconds of scanning, the LCD will indicate NO TAG FOUND, and
scanning will cease. Pressing READ again initiates the scanning sequence.
Alternately, the READ button may be pressed continuously until the tag is read.
Scanning automatically stops upon ID code acquisition, and the READ button must be
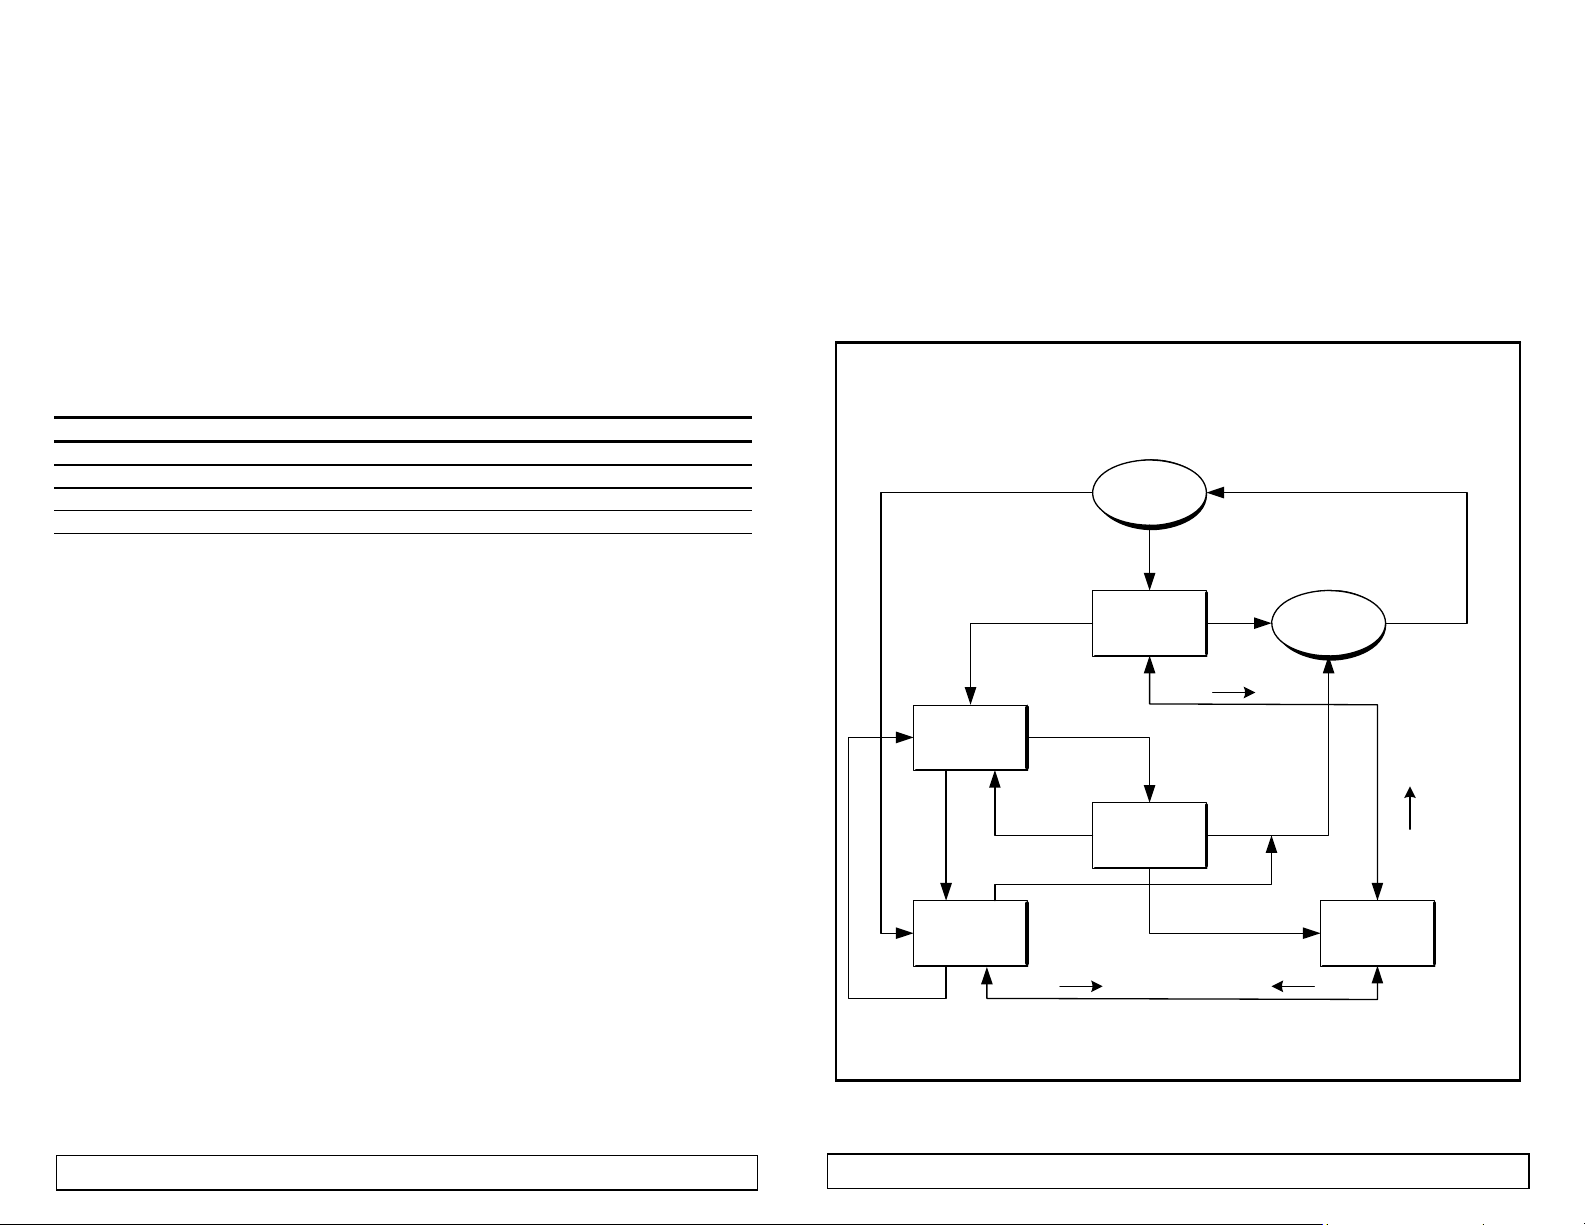
released and pressed again to perform a subsequent reading operation. See Figure 2
for a graphical illustration of the Compact Reader’s operating sequence.
Note: The battery is checked each time the reader is powered on. If the battery life is nearing
its end, a LOW BATTERY indication will automatically appear on the LCD indicator. If the
battery has become severely discharged, the Reader will fail to power up altogether.
Note: The Compact Reader turns itself off automatically after 30 seconds (or the user selected
Options Menu alternative time). The Reader can be turned off manually by simultaneously
pressing the SCROLL UP and SCROLL DOWN keys.
Figure 2 - Compact Reader Functional Sequence
Compact Reader State Diagram
TAG ID
(3 SEC
TIMEOUT)
READ
POWER ON
(RESET)
(LAST TAG = OFF)
READ
READER
READY
MENU
NO TAG
FOUND
MENU
30 SEC
TIMEOUT
30 SEC
TIMEOUT
READER
OFF
OPTIONS
(5 SEC TIM EOUT)
READ
READ
(5 SEC TIM EOUT)
MENU
READ
(LAST TAG = ON)
READ
READING
( ( ) )
TAG ID
FOUND
982 0000
00031277
READ READ
MENU
NOT FOUND
30 SEC
TIMEOUT
3
4
 Loading...