


Installation Instructions
Original Instructions
PanelView Plus 7 Standard Terminals
Mounting Levers
Catalog Number
Top ic Pag e
Summary of Changes 1
Prepare for Panel Mounting 2
Mounting Lever Orientation and Lock Sequence 3
Mount the Terminal in a Panel 3
Apply the Static Discharge Warning Label 6
Additional Resources 6
2711P-RMCS
Summary of Changes
This publication contains new and updated information as indicated in the following table.
Topic Page
Added a Table of Contents and Summary of Changes. 1
Added instructions on how to apply the static discharge warning label. 6

PanelView Plus 7 Standard Terminals Mounting Levers
16
1
2
3
4
5
6
Prepare for Panel Mounting
ATTENTION:
• Disconnect all electrical power from the panel before making the panel cutout.
• Make sure the area around the panel cutout is clear and that the panel is clean of any debris, oil,
or other chemicals.
• Make sure that metal cuttings do not enter any components that are already installed in the
panel and that the edges of the cutout have no burrs or sharp edges.
• Failure to follow these warnings can result in personal injury or damage to panel components.
IMPORTANT See the PanelView™ Plus 7 Standard Terminals User Manual, publication 2711P-UM007, for
complete installation instructions.
Mounting levers insert into the slots around the bezel to secure the terminal in the panel. The
number of mounting levers varies by terminal size. Each slot has six notches with alignment
marks that are locking positions for a mounting lever. The thickness of the panel in which you
mount the terminal determines the locking position that is required to maintain NEMA, UL
Type, and IP seals.
Mounting Lever Lock Position
Mounting Slot
Mounting Lever
Lock Position
1 1.50…2.01 mm (0.060…0.079 in.) 16
2 2.03…2.64 mm (0.080…0.104 in.) 14
3 2.67…3.15 mm (0.105…0.124 in.) 12
4 3.17…3.66 mm (0.125…0.144 in.) 10
5 3.68…4.16 mm (0.145…0.164 in.) 8/9
6 4.19…4.80 mm (0.165…0.188 in.) 7
Panel Thickness Range
Typic al
Gauge
2 Rockwell Automation Publication 2711P-IN032B-EN-P - February 2020

PanelView Plus 7 Standard Terminals Mounting Levers
The box indicates that the mounting levers must be
rotated in the orientation that is shown to avoid
interference with ports and cables.
Mounting Lever Orientation and Lock Sequence
IMPORTANT The mounting lever orientations that are shown are required to maintain NEMA, UL Type, and
IP seals. If you require a NEMA, UL Type, or IP seal, do not use a mounting lever in a different
orientation than shown.
2
1
4
24
8
6
4
24
31
9-in.
4.3 in.
2
3
5
7
6
7
5
5.7 in.
3
942
10.4- and 12.1-in.
10 13
5
1
6
11
8
9
6
31
6.5-in.
6482
Mount the Terminal in a Panel
Follow these steps to mount the terminal in a panel cutout.
1. Use the cutout template that is shipped with your terminal to mark the cutout
dimensions and cut the hole in the panel.
2. Verify the sealing gasket is present on the terminal.
This gasket forms a compression type seal. Do not use sealing compounds.
3. Center the terminal in the panel cutout.
15-in.
7153
5
10
12
Rockwell Automation Publication 2711P-IN032B-EN-P - February 2020 3
PanelView Plus 7 Standard Terminals Mounting Levers
16
16
TIP
The mounting levers for PanelView Plus 7 standard
terminals are gray, similar to the color of the bezel.
Do not use black mounting levers; they are not
compatible with PanelView Plus 7 standard terminals.
1 6
6
32
TIP
Use an erasable marker or grease pencil to mark
the alignment marks for visibility of the slot
positions and to mark the final lock position.
6
TIP
The mounting levers are designed to break off the
pin if they are over torqued. This helps to prevent
damage to the bezel. If a pin is broken, turn the
mounting lever around and use the other pin to
continue the installation. See Mounting Lever
Orientation and Lock Sequence on page 3 for
restric tions.
4. Secure the terminal in the panel.
a. Verify the orientation of the mounting levers.
The direction that you rotate each mounting lever is different for each terminal size.
See Mounting Lever Orientation and Lock Sequence
on page 3.
IMPORTANT Use catalog number 2711P-RMCS mounting levers for PanelView Plus 7 standard terminals. Do
not use these mounting levers with any other PanelView Plus terminals.
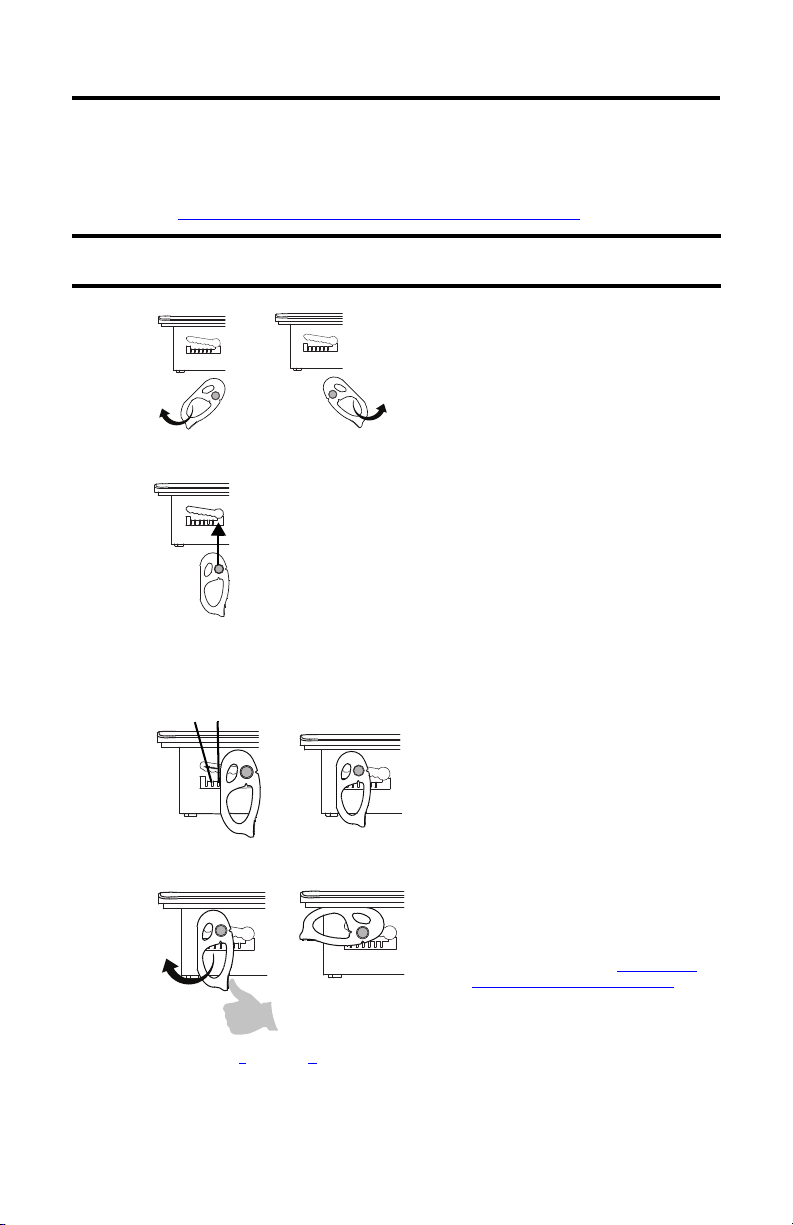
b. Hold the first mounting lever in the locking sequence vertical to the slot and insert
its knob into the large end of the slot.
c. Slide the mounting lever to a notch that is one or two positions greater than the final
locking position for your panel thickness.
If the final locking position is 1, slide the mounting lever to position 2 or 3.
1
d. Rotate the mounting lever until its flat side comes in contact with the panel.
6
1
e. Repeat steps a
4 Rockwell Automation Publication 2711P-IN032B-EN-P - February 2020
through d for the remaining mounting levers.

PanelView Plus 7 Standard Terminals Mounting Levers
6
1
6
66
The notch on the outside of mounting lever shows its locked position.
This view shows the mounting levers locked in position 1.
5. Adjust each mounting lever to its final position by using the locking sequence in
Mounting Lever Orientation and Lock Sequence on page 3.
a. Unlock mounting lever one in the sequence
by rotating it away from the bezel.
b. With the mounting lever positioned
vertically to the slot, slide the mounting
lever to its final locking position as
determined by Mounting Lever Lock Position on page 2.
c. Carefully rotate the mounting lever back toward panel.
d. Repeat steps a
through c to lock the remaining mounting levers in the final position.
6. Inspect all mounting levers to make sure each lever is in the correct locked position.
IMPORTANT All mounting levers must be in the correct and same locked position to provide an adequate
gasket seal between the terminal and the panel. Rockwell Automation assumes no
responsibility for water or chemical damage to the terminal or other equipment within the
enclosure because of improper installation.
Rockwell Automation Publication 2711P-IN032B-EN-P - February 2020 5
PanelView Plus 7 Standard Terminals Mounting Levers
IMPORTANT
Apply the Static Discharge Warning Label
Rockwell Automation recommends applying the static discharge warning label for all
hazardous location applications according to the instructions below. If the intended application
requires ATEX or IECEx certification, the static discharge warning label MUST be applied
according to the instructions below.
A static discharge warning label is included in the box with the PanelView Plus 7 Standard
terminal. If required for your installation, this label must be affixed to the panel in a location that
is visible to the operator.
Follow these steps to apply the static discharge warning label.
1. Identify a location for the static discharge warning label that is visible to the operator
during operation.
2. Clean the desired install location with isopropyl alcohol.
3. Remove the backing from the static discharge warning label and apply the label to the
desired location.
4. Verify that operator visibility to the static discharge warning label is not obstructed at
any time during operation.
Additional Resources
These documents contain additional information concerning related products from Rockwell
Automation.
Resource Description
PanelView Plus 7 Standard Terminals User Manual,
publication 2711P-UM007
You can view or download publications at http://www.rockwellautomation.com/literature/
order paper copies of technical documentation, contact your local Allen-Bradley distributor or
Rockwell Automation sales representative.
6 Rockwell Automation Publication 2711P-IN032B-EN-P - February 2020
Provides details on how to install, configure, and operate the PanelView
Plus 7 standard terminals.
. To

Notes:
PanelView Plus 7 Standard Terminals Mounting Levers
Rockwell Automation Publication 2711P-IN032B-EN-P - February 2020 7

Rockwell Automation maintains current product environmental information on its website at
*PN-573164*
PN-573164
http://www.rockwellautomation.com/rockwellautomation/about-us/sustainability-ethics/product-environmental-compliance.page
Allen-Bradley, PanelView, Rockwell Automation, and Rockwell Software are trademarks of Rockwell Automation, Inc.
Trademarks not belonging to Rockwell Automation are property of thei r respective companies.
Rockwell Otomasyon Ticaret A.Ş., Kar Plaza İş Merkezi E Blok Kat:6 34752 İçerenköy, İstanbul, Tel: +90 (216) 5698400
Publication 2711P-IN032B-EN-P - February 2020
Supersedes publication 2711P-IN032A-EN-P - July 2014 Copyright © 2020 Rockwell Automation, Inc. All rights reserved. Printed in Japan.
.
 Loading...