

Page 1

User Manual
Original Instructions
PanelView Plus 7 Standard Terminals
Catalog Numbers 2711P-T4W21D8S, 2711P-T4W22D8S, 2711P-T4W21D8S-B, 2711P-T4W22D8S-B, 2711P-T6C21D8S,
2711P-T6C22D8S, 2711P-T6C21D8S-B, 2711P-T6C22D8S-B, 2711P-T7C21D8S, 2711P-T7C22D8S, 2711P-T7C21D8S-B,
2711P-T7C22D8S-B, 2711P-T9W21D8S, 2711P-T9W22D8S, 2711P-T9W21D8S-B, 2711P-T9W22D8S-B, 2711P-T10C21D8S,
2711P-T10C22D8S, 2711P-T10C21D8S-B, 2711P-T10C22D8S-B, 2711P-T12W21D8S, 2711P-T12W22D8S, 2711PT12W21D8S-B, 2711P-T12W22D8S-B, 2711P-T15C21D8S, 2711P-T15C22D8S, 2711P-T15C21D8S-B, 2711P-T15C22D8S-B
Page 2

Important User Information
Read this document and the documents listed in the additional resources section about installation, configuration, and
operation of this equipment before you install, configure, operate, or maintain this product. Users are required to
familiarize themselves with installation and wiring instructions in addition to requirements of all applicable codes, laws,
and standards.
Activities including installation, adjustments, putting into service, use, assembly, disassembly, and maintenance are
required to be carried out by suitably trained personnel in accordance with applicable code of practice.
If this equipment is used in a manner not specified by the manufacturer, the protection provided by the equipment may
be impaired.
In no event will Rockwell Automation, Inc. be responsible or liable for indirect or consequential damages resulting from
the use or application of this equipment.
The examples and diagrams in this manual are included solely for illustrative purposes. Because of the many variables and
requirements associated with any particular installation, Rockwell Automation, Inc. cannot assume responsibility or
liability for actual use based on the examples and diagrams.
No patent liability is assumed by Rockwell Automation, Inc. with respect to use of information, circuits, equipment, or
software described in this manual.
Reproduction of the contents of this manual, in whole or in part, without written permission of Rockwell Automation,
Inc., is prohibited.
Throughout this manual, when necessary, we use notes to make you aware of safety considerations.
WARNING: Identifies information about practices or circumstances that can cause an explosion in a hazardous environment,
which may lead to personal injury or death, property damage, or economic loss.
ATTENTION: Identifies information about practices or circumstances that can lead to personal injury or death, property
damage, or economic loss. Attentions help you identify a hazard, avoid a hazard, and recognize the consequence.
IMPORTANT Identifies information that is critical for successful application and understanding of the product.
Labels may also be on or inside the equipment to provide specific precautions.
SHOCK HAZARD: Labels may be on or inside the equipment, for example, a drive or motor, to alert people that dangerous
voltage may be present.
BURN HAZARD: Labels may be on or inside the equipment, for example, a drive or motor, to alert people that surfaces may
reach dangerous temperatures.
ARC FLASH HAZARD: Labels may be on or inside the equipment, for example, a motor control center, to alert people to
potential Arc Flash. Arc Flash will cause severe injury or death. Wear proper Personal Protective Equipment (PPE). Follow ALL
Regulatory requirements for safe work practices and for Personal Protective Equipment (PPE).
Page 3

Table of Contents
Preface . . . . . . . . . . . . . . . . . . . . . . . . . . . . . . . . . . . . . . . . . . . . . . . . . . . . . . . .7
Summary of Changes . . . . . . . . . . . . . . . . . . . . . . . . . . . . . . . . . . . . . . . . . . . 7
Package Contents . . . . . . . . . . . . . . . . . . . . . . . . . . . . . . . . . . . . . . . . . . . . . . 7
Product Release Notes . . . . . . . . . . . . . . . . . . . . . . . . . . . . . . . . . . . . . . . . . . 8
Additional Resources . . . . . . . . . . . . . . . . . . . . . . . . . . . . . . . . . . . . . . . . . . . 9
Chapter 1
Overview About the PanelView Plus 7 Standard Terminals. . . . . . . . . . . . . . . . . 11
Hardware Features . . . . . . . . . . . . . . . . . . . . . . . . . . . . . . . . . . . . . . . . . . . . 12
Operator Control . . . . . . . . . . . . . . . . . . . . . . . . . . . . . . . . . . . . . . . . . . . . . 13
Software Support. . . . . . . . . . . . . . . . . . . . . . . . . . . . . . . . . . . . . . . . . . . . . . 13
PanelView Plus 7 Standard Applications . . . . . . . . . . . . . . . . . . . . . . . . 14
Windows CE Operating System . . . . . . . . . . . . . . . . . . . . . . . . . . . . . . . . 14
Open Versus Closed System. . . . . . . . . . . . . . . . . . . . . . . . . . . . . . . . . . . . 14
Desktop Access . . . . . . . . . . . . . . . . . . . . . . . . . . . . . . . . . . . . . . . . . . . . . . . 15
Start-up Options . . . . . . . . . . . . . . . . . . . . . . . . . . . . . . . . . . . . . . . . . . . . . . 15
EtherNet/IP Communication. . . . . . . . . . . . . . . . . . . . . . . . . . . . . . . . . . 15
Typical Configuration . . . . . . . . . . . . . . . . . . . . . . . . . . . . . . . . . . . . . . . . . 15
Catalog Number Explanation . . . . . . . . . . . . . . . . . . . . . . . . . . . . . . . . . . 16
Product Selections. . . . . . . . . . . . . . . . . . . . . . . . . . . . . . . . . . . . . . . . . . . . . 16
Accessories . . . . . . . . . . . . . . . . . . . . . . . . . . . . . . . . . . . . . . . . . . . . . . . . . . . 17
Ethernet Cables . . . . . . . . . . . . . . . . . . . . . . . . . . . . . . . . . . . . . . . . . . . . . . . 18
Chapter 2
Install the PanelView Plus 7
Standard Terminal
Hazardous Locations . . . . . . . . . . . . . . . . . . . . . . . . . . . . . . . . . . . . . . . . . . 21
Considerations for Mounting . . . . . . . . . . . . . . . . . . . . . . . . . . . . . . . . . . 24
Clearances for Mounting . . . . . . . . . . . . . . . . . . . . . . . . . . . . . . . . . . . . . . 24
Panel Guidelines . . . . . . . . . . . . . . . . . . . . . . . . . . . . . . . . . . . . . . . . . . . . . . 24
Panel Cutout Dimensions. . . . . . . . . . . . . . . . . . . . . . . . . . . . . . . . . . . . . . 25
Prepare for Panel Mounting. . . . . . . . . . . . . . . . . . . . . . . . . . . . . . . . . . . . 26
Mount the Terminal in a Panel . . . . . . . . . . . . . . . . . . . . . . . . . . . . . . . . . 30
Apply the Static Discharge Warning Label . . . . . . . . . . . . . . . . . . . . . . 34
Remove and Replace Power Terminal Block . . . . . . . . . . . . . . . . . . . . . 35
Connect Power . . . . . . . . . . . . . . . . . . . . . . . . . . . . . . . . . . . . . . . . . . . . . . . 36
Connect to a Network. . . . . . . . . . . . . . . . . . . . . . . . . . . . . . . . . . . . . . . . . 37
Ethernet Ports. . . . . . . . . . . . . . . . . . . . . . . . . . . . . . . . . . . . . . . . . . . . . 37
Device Level Ring Network Topology. . . . . . . . . . . . . . . . . . . . . . . 38
Linear Network Topology. . . . . . . . . . . . . . . . . . . . . . . . . . . . . . . . . . 39
Star Network Topology . . . . . . . . . . . . . . . . . . . . . . . . . . . . . . . . . . . . 40
Initial Startup. . . . . . . . . . . . . . . . . . . . . . . . . . . . . . . . . . . . . . . . . . . . . . . . . 41
Reset the Terminal . . . . . . . . . . . . . . . . . . . . . . . . . . . . . . . . . . . . . . . . . . . . 41
Chapter 3
Configure Terminal Settings FactoryTalk View ME Station. . . . . . . . . . . . . . . . . . . . . . . . . . . . . . . . . . 43
Terminal Settings . . . . . . . . . . . . . . . . . . . . . . . . . . . . . . . . . . . . . . . . . . . . . 45
Soft Keyboard. . . . . . . . . . . . . . . . . . . . . . . . . . . . . . . . . . . . . . . . . . . . . . . . . 46
Rockwell Automation Publication 2711P-UM007F-EN-P - February 2020 3
Page 4

Table of Contents
Load and Run an Application . . . . . . . . . . . . . . . . . . . . . . . . . . . . . . . . . . 47
Desktop Access. . . . . . . . . . . . . . . . . . . . . . . . . . . . . . . . . . . . . . . . . . . . . . . . 48
Enable Desktop Access . . . . . . . . . . . . . . . . . . . . . . . . . . . . . . . . . . . . . 48
Disable Desktop Access . . . . . . . . . . . . . . . . . . . . . . . . . . . . . . . . . . . . 49
Set a Desktop Password . . . . . . . . . . . . . . . . . . . . . . . . . . . . . . . . . . . . 51
Reset the Desktop Password . . . . . . . . . . . . . . . . . . . . . . . . . . . . . . . . 52
Configure Start-up Options . . . . . . . . . . . . . . . . . . . . . . . . . . . . . . . . . . . . 53
Disable FactoryTalk View ME Station on Startup . . . . . . . . . . . . 53
Enter Configuration Mode on Startup . . . . . . . . . . . . . . . . . . . . . . 54
Run the Loaded Application on Startup . . . . . . . . . . . . . . . . . . . . . 55
Configure Controller Address . . . . . . . . . . . . . . . . . . . . . . . . . . . . . . . . . . 56
Configure Ethernet Settings. . . . . . . . . . . . . . . . . . . . . . . . . . . . . . . . . . . . 56
Set the Ethernet Address of the Terminal . . . . . . . . . . . . . . . . . . . . 57
Set the Ethernet Link Speed . . . . . . . . . . . . . . . . . . . . . . . . . . . . . . . . 58
Configure the Ethernet Ports . . . . . . . . . . . . . . . . . . . . . . . . . . . . . . . 58
Name the Server Addresses . . . . . . . . . . . . . . . . . . . . . . . . . . . . . . . . . 59
Modify Device Name of Terminal . . . . . . . . . . . . . . . . . . . . . . . . . . . . . . 60
Copy Files on Terminal . . . . . . . . . . . . . . . . . . . . . . . . . . . . . . . . . . . . . . . . 61
Delete Files from Terminal. . . . . . . . . . . . . . . . . . . . . . . . . . . . . . . . . . . . . 62
Delete Log Files . . . . . . . . . . . . . . . . . . . . . . . . . . . . . . . . . . . . . . . . . . . 62
Display Settings . . . . . . . . . . . . . . . . . . . . . . . . . . . . . . . . . . . . . . . . . . . . . . . 63
Adjust Display Intensity. . . . . . . . . . . . . . . . . . . . . . . . . . . . . . . . . . . . 63
Configure the Screen Saver . . . . . . . . . . . . . . . . . . . . . . . . . . . . . . . . . 64
Disable the Screen Cursor . . . . . . . . . . . . . . . . . . . . . . . . . . . . . . . . . . 64
Input Device Settings . . . . . . . . . . . . . . . . . . . . . . . . . . . . . . . . . . . . . . . . . . 65
Calibrate the Touch Screen. . . . . . . . . . . . . . . . . . . . . . . . . . . . . . . . . 65
Set the Double-tap Sensitivity for a Touch Screen . . . . . . . . . . . . 66
Change the Popup for String Entry. . . . . . . . . . . . . . . . . . . . . . . . . . 66
Configure Print Options. . . . . . . . . . . . . . . . . . . . . . . . . . . . . . . . . . . . . . . 67
Configure Diagnostics . . . . . . . . . . . . . . . . . . . . . . . . . . . . . . . . . . . . . . . . . 69
Check Integrity of Application Files . . . . . . . . . . . . . . . . . . . . . . . . . . . . 70
View and Clear the System Event Log . . . . . . . . . . . . . . . . . . . . . . . . . . . 71
Enable or Disable the Alarm Display . . . . . . . . . . . . . . . . . . . . . . . . . . . . 71
Display System Information. . . . . . . . . . . . . . . . . . . . . . . . . . . . . . . . . . . . 72
View Terminal Information . . . . . . . . . . . . . . . . . . . . . . . . . . . . . . . . 72
View FactoryTalk View ME Station Information. . . . . . . . . . . . . 74
Time and Date Settings . . . . . . . . . . . . . . . . . . . . . . . . . . . . . . . . . . . . . . . . 75
Change the Time Zone on the Terminal. . . . . . . . . . . . . . . . . . . . . 75
Change the Current Date on the Terminal . . . . . . . . . . . . . . . . . . 76
Change the Current Time on the Terminal . . . . . . . . . . . . . . . . . . 76
Regional Settings . . . . . . . . . . . . . . . . . . . . . . . . . . . . . . . . . . . . . . . . . . . . . . 77
Change the Decimal Separator. . . . . . . . . . . . . . . . . . . . . . . . . . . . . . 77
Change the Time Format for a Language . . . . . . . . . . . . . . . . . . . . 78
Change the Short Date Format for a Language . . . . . . . . . . . . . . . 79
Change the Long Date Format for a Language. . . . . . . . . . . . . . . . 79
4 Rockwell Automation Publication 2711P-UM007F-EN-P - February 2020
Page 5

Table of Contents
Chapter 4
Windows Operating System Operating System Features. . . . . . . . . . . . . . . . . . . . . . . . . . . . . . . . . . . . . 81
Application Support. . . . . . . . . . . . . . . . . . . . . . . . . . . . . . . . . . . . . . . 82
Scripting Support . . . . . . . . . . . . . . . . . . . . . . . . . . . . . . . . . . . . . . . . . 82
Network Support. . . . . . . . . . . . . . . . . . . . . . . . . . . . . . . . . . . . . . . . . . 82
Server Support . . . . . . . . . . . . . . . . . . . . . . . . . . . . . . . . . . . . . . . . . . . . 83
Windows Explorer . . . . . . . . . . . . . . . . . . . . . . . . . . . . . . . . . . . . . . . . . . . . 84
Taskbar . . . . . . . . . . . . . . . . . . . . . . . . . . . . . . . . . . . . . . . . . . . . . . . . . . . . . . 84
Soft Input Panels. . . . . . . . . . . . . . . . . . . . . . . . . . . . . . . . . . . . . . . . . . . . . . 84
Windows Control Panel . . . . . . . . . . . . . . . . . . . . . . . . . . . . . . . . . . . . . . . 85
Backup and Restore . . . . . . . . . . . . . . . . . . . . . . . . . . . . . . . . . . . . . . . . . . . 86
Perform a Backup . . . . . . . . . . . . . . . . . . . . . . . . . . . . . . . . . . . . . . . . . 86
Restore a Back-up Image . . . . . . . . . . . . . . . . . . . . . . . . . . . . . . . . . . . 88
Display Properties. . . . . . . . . . . . . . . . . . . . . . . . . . . . . . . . . . . . . . . . . . . . . 90
Desktop Background . . . . . . . . . . . . . . . . . . . . . . . . . . . . . . . . . . . . . . 90
Desktop Appearance. . . . . . . . . . . . . . . . . . . . . . . . . . . . . . . . . . . . . . . 90
Backlight Intensity . . . . . . . . . . . . . . . . . . . . . . . . . . . . . . . . . . . . . . . . 90
Screen Saver . . . . . . . . . . . . . . . . . . . . . . . . . . . . . . . . . . . . . . . . . . . . . . 91
Cursor. . . . . . . . . . . . . . . . . . . . . . . . . . . . . . . . . . . . . . . . . . . . . . . . . . . . 91
Screen Rotation . . . . . . . . . . . . . . . . . . . . . . . . . . . . . . . . . . . . . . . . . . . 91
Hardware Monitor. . . . . . . . . . . . . . . . . . . . . . . . . . . . . . . . . . . . . . . . . . . . 92
Processes. . . . . . . . . . . . . . . . . . . . . . . . . . . . . . . . . . . . . . . . . . . . . . . . . . 92
System Event Log . . . . . . . . . . . . . . . . . . . . . . . . . . . . . . . . . . . . . . . . . 92
Monitors . . . . . . . . . . . . . . . . . . . . . . . . . . . . . . . . . . . . . . . . . . . . . . . . . 93
Logo Manager . . . . . . . . . . . . . . . . . . . . . . . . . . . . . . . . . . . . . . . . . . . . . . . . 94
User Accounts . . . . . . . . . . . . . . . . . . . . . . . . . . . . . . . . . . . . . . . . . . . . . . . . 96
Services. . . . . . . . . . . . . . . . . . . . . . . . . . . . . . . . . . . . . . . . . . . . . . . . . . . . . . . 98
Network Server Configuration . . . . . . . . . . . . . . . . . . . . . . . . . . . . . . . . . 98
VNC Server Configuration . . . . . . . . . . . . . . . . . . . . . . . . . . . . . . . . 98
Web Server Configuration . . . . . . . . . . . . . . . . . . . . . . . . . . . . . . . . 106
FTP Server Configuration . . . . . . . . . . . . . . . . . . . . . . . . . . . . . . . . 107
File Server . . . . . . . . . . . . . . . . . . . . . . . . . . . . . . . . . . . . . . . . . . . . . . . 110
KEPServer Configuration. . . . . . . . . . . . . . . . . . . . . . . . . . . . . . . . . 111
System Information . . . . . . . . . . . . . . . . . . . . . . . . . . . . . . . . . . . . . . . . . . 111
General Information. . . . . . . . . . . . . . . . . . . . . . . . . . . . . . . . . . . . . . 111
Startup Options. . . . . . . . . . . . . . . . . . . . . . . . . . . . . . . . . . . . . . . . . . 111
Device Name. . . . . . . . . . . . . . . . . . . . . . . . . . . . .
Touch Properties . . . . . . . . . . . . . . . . . . . . . . . . . . . . . . . . . . . . . . . . . . . . 115
Calibration . . . . . . . . . . . . . . . . . . . . . . . . . . . . . . . . . . . . . . . . . . . . . . 115
Double-Tap. . . . . . . . . . . . . . . . . . . . . . . . . . . . . . . . . . . . . . . . . . . . . . 115
PDF Reader . . . . . . . . . . . . . . . . . . . . . . . . . . . . . . . . . . . . . . . . . . . . . . . . . 116
Command Prompt Parameters . . . . . . . . . . . . . . . . . . . . . . . . . . . . 117
. . . . . . . . . . . . . . . . 114
Chapter 5
Install and Replace Components Connect to USB Ports. . . . . . . . . . . . . . . . . . . . . . . . . . . . . . . . . . . . . . . . 120
USB Cables . . . . . . . . . . . . . . . . . . . . . . . . . . . . . . . . . . . . . . . . . . . . . . 121
Rockwell Automation Publication 2711P-UM007F-EN-P - February 2020 5
Page 6

Table of Contents
Install a USB Printer. . . . . . . . . . . . . . . . . . . . . . . . . . . . . . . . . . . . . . . . . . 121
Plug-and-Play Installation . . . . . . . . . . . . . . . . . . . . . . . . . . . . . . . . . 121
Manual Printer Installation. . . . . . . . . . . . . . . . . . . . . . . . . . . . . . . . 123
Insert an SD Card . . . . . . . . . . . . . . . . . . . . . . . . . . . . . . . . . . . . . . . . . . . . 123
Replace the Battery . . . . . . . . . . . . . . . . . . . . . . . . . . . . . . . . . . . . . . . . . . . 125
Install a Protective Overlay . . . . . . . . . . . . . . . . . . . . . . . . . . . . . . . . . . . . 127
Clean the Overlay . . . . . . . . . . . . . . . . . . . . . . . . . . . . . . . . . . . . . . . . 128
Remove the Overlay . . . . . . . . . . . . . . . . . . . . . . . . . . . . . . . . . . . . . . 128
Chapter 6
Update Firmware Terminal Firmware. . . . . . . . . . . . . . . . . . . . . . . . . . . . . . . . . . . . . . . . . . . 129
Download Firmware Files . . . . . . . . . . . . . . . . . . . . . . . . . . . . . . . . . . . . . 130
Firmware Upgrade Wizard . . . . . . . . . . . . . . . . . . . . . . . . . . . . . . . . . . . . 131
Upgrade the Terminal Firmware from a Storage Device. . . . . . . . . . 131
Create a Firmware Upgrade Card . . . . . . . . . . . . . . . . . . . . . . . . . . 131
Upgrade Terminal Firmware by Using a Firmware Upgrade Card.
134
Upgrade Terminal Firmware over the Network . . . . . . . . . . . . . . . . . 135
Chapter 7
Troubleshooting View System Information . . . . . . . . . . . . . . . . . . . . . . . . . . . . . . . . . . . . . 139
Status Indicators . . . . . . . . . . . . . . . . . . . . . . . . . . . . . . . . . . . . . . . . . . . . . 140
Terminal Does Not Start Up . . . . . . . . . . . . . . . . . . . . . . . . . . . . . . . . . . 140
Terminal Restarts Intermittently . . . . . . . . . . . . . . . . . . . . . . . . . . . . . . 141
Touch Screen Issues . . . . . . . . . . . . . . . . . . . . . . . . . . . . . . . . . . . . . . . . . . 141
Display Issues . . . . . . . . . . . . . . . . . . . . . . . . . . . . . . . . . . . . . . . . . . . . . . . . 142
Ethernet Issues . . . . . . . . . . . . . . . . . . . . . . . . . . . . . . . . . . . . . . . . . . . . . . . 143
Performance Is Slow . . . . . . . . . . . . . . . . . . . . . . . . . . . . . . . . . . . . . . . . . . 143
Resistance to Chemicals. . . . . . . . . . . . . . . . . . . . . . . . . . . . . . . . . . . . . . . 143
Clean the Display . . . . . . . . . . . . . . . . . . . . . . . . . . . . . . . . . . . . . . . . . . . . 144
Remove Paint and Grease . . . . . . . . . . . . . . . . . . . . . . . . . . . . . . . . . 144
Equipment Wash Downs. . . . . . . . . . . . . . . . . . . . . . . . . . . . . . . . . . 144
Ship the Terminal . . . . . . . . . . . . . . . . . . . . . . . . . . . . . . . . . . . . . . . . . . . . 145
Maintenance Mode Operations. . . . . . . . . . . . . . . . . . . . . . . . . . . . . . . . 145
Appendix A
Fonts Resident on Terminal TrueType Fonts. . . . . . . . . . . . . . . . . . . . . . . . . . . . . . . . . . . . . . . . . . . . . . 147
Index . . . . . . . . . . . . . . . . . . . . . . . . . . . . . . . . . . . . . . . . . . . . . . . . . . . . . . . 151
6 Rockwell Automation Publication 2711P-UM007F-EN-P - February 2020
Page 7

Preface
This manual describes how to install, configure, operate, and troubleshoot the
PanelView™ Plus 7 Standard terminals. It does not provide procedures on how
to create applications that run on the terminals or ladder logic that runs in the
controller.
Other tasks to perform include:
• Create a human machine interface (HMI) application for the terminal
by using FactoryTalk® View Machine Edition (ME) software, version 7.0
or later.
• Create ladder logic for the controller by using the Studio 5000 Logix
Designer® application.
Summary of Changes
Package Contents
This manual contains new and updated information as indicated in the
following table.
Top ic Pag es
Updated the screen and alarm counts for the PanelView Plus 7 Standard terminals. 11, 14
Updated the ATEX, IECEx, and INMETRO information in the Certifications table. 19, 21…23
Added catalog numbers for the new SDHC cards. 17
Added instructions on how to apply the static discharge warning label. 34
This product is shipped with the following items:
• PanelView Plus 7 Standard terminal with FactoryTalk View ME Station
runtime software installed and activated
• Mounting levers for panel installation
• Removable power terminal block
• Secure Digital (SD) card cover
• Product information
• Cutout template
•China RoHS information
• Product Feature Notice
Rockwell Automation Publication 2711P-UM007F-EN-P - February 2020 7
Page 8

Preface
Product Release Notes
Product release notes are available online within the Product Compatibility
and Download Center.
1. From the Quick Links list on http://www.ab.com
Compatibility and Download Center.
2. From the Compatibility Scenarios tab or the Get Downloads tab, search
for and choose your product.
, choose Product
3. Click the download icon to access product release notes.
8 Rockwell Automation Publication 2711P-UM007F-EN-P - February 2020
Page 9

Preface
Additional Resources
These documents contain additional information concerning related products
from Rockwell Automation.
Resource Description
PanelView Plus 7 Standard Terminals Technical Data,
publication 2711P-TD008
Industrial Automation Wiring and Grounding Guidelines,
publication 1770-4.1
EtherNet/IP Embedded Switch Technology Application
Guide, publication ENET-AP005
Safety Guidelines for the Application, Installation, and
Maintenance of Solid-State Controls, publication SGI-1.1
Guidelines for Handling Lithium Batteries Technical Data,
publication AG-5. 4
Product Certifications website, rok.auto/certifications
Provides technical specifications, environmental specific ations, and certifications for the PanelView Plus 7 Standard
terminals.
Provides general guidelines for installing a Rockwell Automation industrial system.
Provides information on how to install, configure, and maintain linear and Device Level Ring (DLR) networks using
Rockwell Automation® EtherNet/IP devices with embedded switch technology.
Provides general guidelines for the application, installation, and maintenance of solid-state control in the form of
individual devices or packaged assemblies that use solid-state components.
Provides guidelines to store, handle, install, and dispose of lithium batteries.
Provides declarations of conformity, certificates, and other certification details.
You can view or download publications at
http://www.rockwellautomation.com/global/literature-library/overview.page
.
Rockwell Automation Publication 2711P-UM007F-EN-P - February 2020 9
Page 10

Preface
Notes:
10 Rockwell Automation Publication 2711P-UM007F-EN-P - February 2020
Page 11

Chapter 1
Overview
Topic Page Topic Page
About the PanelView Plus 7 Standard Terminals 11 Start-up Options 15
Hardware Features 12 EtherNet/IP Communication 15
Operator Control 13 Typical Configuration 15
Software Support 13 Catalog Number Explanation 16
Windows CE Operating System 14 Product Selections 16
Open Versus Closed System 14 Accessories 17
Desktop Access 15 Ethernet Cables 18
About the PanelView Plus 7 Standard Terminals
The PanelView™ Plus 7 Standard terminals are operator interface devices. They
monitor and control devices that are attached to ControlLogix® 5570 and
CompactLogix™ 5370 controllers on an EtherNet/IP™ network. Animated
graphic and text displays provide operators a view into the operating state of a
machine or process. Operators interact with the control system by using touch
screen input.
The PanelView Plus 7 Standard terminals include these features:
• Terminal functionality permits connection to 1 controller, up to 100
screens, and up to 500 alarms.
• FactoryTalk® View Machine Edition software provides a familiar
environment for creating HMI applications.
• Windows CE operating system with desktop access for configuration
and third-party applications.
• Ethernet communication that supports Device Level Ring (DLR),
linear, and star network topology.
• PDF viewer to access PDF files that are stored on the terminal.
• More screen options including 4-in., 6-in., 7-in., 9-in., 10-in., 12-in., and
15-in. terminals.
Rockwell Automation Publication 2711P-UM007F-EN-P - February 2020 11
Page 12

Chapter 1 Overview
16
2
3
4
5
6
8
9
7
1
3
2
5
6
4
7
324
Terminals with one Ethernet port.
Terminals with dual Ethernet
ports.
Throughout this user manual, illustrations show the
terminals with dual Ethernet ports.
• Widescreen on three sizes, 4-in., 9-in., and 12-in. terminals.
• Greater screen resolution.
• Terminals are available with Allen-Bradley® branding, or with no
branding for customers that want to put their own branding around the
terminal.
• Certifications including Class I, Div. 2; Class II, Div. 2; Class III;
ATEX, IECEx, and INMETRO Zones 2 and 22.
Hardware Features
16
The PanelView Plus 7 Standard terminal features fixed-hardware
configurations in a range of display sizes with touch screen input.
Table 1 - Hardware Features
Item Feature Description
1 Display/Touch screen TFT color graphic display with a touch screen in a range of sizes:
2 Power 24V DC nom (18…30V DC) nonisolated power input
3Ethernet port
(1 or 2)
4 Mounting slots Mounting levers insert into the slots to mount device in a panel or enclosure. The number of slots varies by terminal size.
5 Universal serial bus (USB)
host port
6 USB device port One USB 2.0 high-speed (type B) device port for connecting a host computer.
12 Rockwell Automation Publication 2711P-UM007F-EN-P - February 2020
• 4.3-in. wide screen touch (WQVGA)
•5.7-in. touch (VGA)
•6.5-in. touch (VGA)
• 9.0-in. wide screen touch (WVGA)
• 10.4-in. touch (SVGA)
• 12.1-in. wide screen with touch (WXGA)
• 15.0-in. touch (XGA)
• One 10/100Base-T, Auto MDI/MDI-X, Ethernet port for controller communication and IEEE 1588 support for synchronization of
network-connected devices .
• Two 10/100Base-T, Auto MDI/MDI-X, Ethernet ports for controller communication that supports Device Level Ring (DLR) network
topology.
One USB 2.0 high-speed (type A) host port.
Page 13

Table 1 - Hardware Features
Item Feature Description
7SD card slot and
protecti ve cover
8 Battery Battery cover provides access to the lithium battery for replacement.
9 Status indicators Status indicators on the back of the terminal provide status and fault conditions.
• One SD card slot supports catalog number 1784-SDx hot-swappable SD cards for external storage.
• IMPORTANT: ATEX and INMETRO installations:
– Protective cover secures the S D card in the slot, and is required for ATEX, INMETRO, and hazardous location installations.
– See Insert an SD Card
on page 123 for hot-swapping, ATEX, INMETRO, and hazardous location warnings.
Overview Chapter 1
Operator Control
All terminals have a color display with a touch screen for operator control. The
resistive touch screen provides accurate, reliable, and durable touch control for
industrial applications.
ATT EN TI ON : The touch screen accepts input from a finger, stylus, or gloved
hand for operation in dry or wet environments.
The plastic stylus must have a minimum tip radius of 1.3 mm (0.051 in.).
Any other object or tool can damage the touch screen.
Do not conduct multiple operations simultaneously; it can result in unintended
operation. Touch only one operating element on the touch screen with one
finger, at one time.
TIP At runtime, a virtual keyboard or numeric keypad opens on terminal
screens for data entry.
The touch screen supports touch gestures to interact with screen elements
during runtime. Use only these touch gestures on the touch screen:
• Ta p – Briefly touch the target on the terminal screen with your
fingertip.
• Double-tap – Touch the target on the terminal screen twice quickly
with your fingertip.
• Drag – Touch the target on the terminal screen and move your fingertip
across the screen.
• Long press – Touch and hold the target on the terminal screen for
several seconds.
Software Support
For a list of actions you can perform by using touch gestures, refer to the
FactoryTalk View ME help.
IMPORTANT It is the responsibility of the customer to be sure that any third-party
software, updates, patches, or firmware that is installed is free of malicious
bugs, spyware, and so on.
Rockwell Automation Publication 2711P-UM007F-EN-P - February 2020 13
Page 14

Chapter 1 Overview
Table 2 - PanelView Plus 7 Standard Software Support
Software Description Version
FactoryTalk View ME Station Runtime environment of terminal:
• Runs FactoryTalk View ME applications.
• Provides options to view and configure terminal settings.
Machine Edition Station is preloaded on each terminal and does not require activation.
FactoryTalk View Studio for Machine Edition Software for developing the HMI applications that run on terminal. This software does not run on the
terminal. The HMI applications that are created in this software are loaded onto the terminal.
FactoryTalk ViewPoint A web server application that lets remote users access and control the HMI application that runs on a
terminal by using an internet browser.
A license is embedded with each terminal that suppor ts a client connection to a terminal.
7.0 or later
7.0 or later
1.2 or later
PanelView Plus 7 Standard Applications
Windows CE Operating System
PanelView Plus 7 Standard Machine Edition applications are restricted to these
applications:
• Maximum of 100 screens.
• Maximum of 500 alarm messages.
• One connection or shortcut to a controller by using either RSLinx®
Enterprise or KEPServer Enterprise software.
• Only Ethernet communication is supported.
If RSLinx Enterprise software is used, then Ethernet drivers are
supported.
The terminals run the Windows CE operating system. These devices run HMI
applications and offer a desktop with these capabilities:
• File transfer protocol (FTP) server
• Virtual network computing (VNC) client and server
•ActiveX controls – Refer toView FactoryTalk View ME Station
Information on page 74 to view a list of ActiveX controls installed on
terminal.
TIP For a complete list of ActiveX controls, go to http://
www.rockwellautomation.com/knowledgebase and search the
Knowledgebase for keywords ‘ActiveX Support for PanelView Plus
Ter m in a ls ’.
•PDF reader
•Third-party device support
Open Versus Closed System
You can configure a terminal to run an open or closed desktop environment:
• An open system launches the Windows desktop on startup.
• A closed system launches a FactoryTalk View ME application or
FactoryTalk View ME Station on startup. Desktop access is restricted.
All terminals are shipped as closed systems.
14 Rockwell Automation Publication 2711P-UM007F-EN-P - February 2020
Page 15

Overview Chapter 1
Desktop Access
Start-up Options
You can allow or restrict access to the Windows desktop on the terminal. From
the desktop, you can perform system and control panel operations or run thirdparty applications. You can even allow access temporarily to perform specific
tasks, then disable desktop access to prevent unauthorized changes.
TIP All terminals are shipped with desktop access disabled.
Refer to Desktop Access
access.
The terminal can perform one of three actions at startup:
• Launch a FactoryTalk View ME HMI application.
• Launch FactoryTalk View ME Station in Configuration mode. This
mode lets you configure terminal settings and start-up options, load
applications to run, and enable or disable desktop access.
• Launch the Windows desktop.
The factory default state and start-up option after a firmware update is to
launch the terminal in Configuration mode. Refer to Configure Start-up
Options on page 53 for details on how to change the start-up option.
on page 48 for details on how to modify desktop
EtherNet/IP Communication
Typical Configuration
PanelView Plus 7 Standard terminals communicate with ControlLogix 5570
and CompactLogix 5370 controllers over an EtherNet/IP connection.
Traditional DLR, linear, and star network topologies are supported. See these
topics for examples:
• Device Level Ring Network Topology
• Linear Network Topology on page 39
• Star Network Topology on page 40
on page 38
Rockwell Automation Publication 2711P-UM007F-EN-P - February 2020 15
Page 16

Chapter 1 Overview
Catalog Number Explanation
Bulletin Input Type Display Size Display Type Network Power Operating
|| | | | |||
2711P- T = Touch 4 = 4.3-in. C = Color 21 = Single Ethernet port D = DC 8 = Windows CE S = Standard
6 = 5.7-in. W = Wide aspect-ratio color 22 = Embedded switch/DLR
7 = 6.5-in.
9 = 9.0-in.
10 = 10.4-in.
12 = 12.1-in.
15 = 15.0-in.
(1) The standard models support the Windows CE version 6.0 operating system with an FTP server, VNC client server, ActiveX controls, and PDF reader.
Product Selections
See the table for an explanation of the terminal catalog number.
Model - Option
System
Ta b l e 3 provides a description of the product selections.
(1)
- B = No brand
label
Table 3 - PanelView Plus 7 Standard Terminals Product Selections
(1)
Cat. No.
Touch Screen Size Type Aspect
2711P-T4W21D8S 4.3-in. WQVGA
2711P-T4W22D8S •
2711P-T6C21D8S 5.7-in. VGA
2711P-T6C22D8S •
2711P-T7C21D8S 6.5-in. VGA
2711P-T7C22D8S •
2711P-T9W21D8S 9.0-in. WVGA
2711P-T9W22D8S •
2711P-T10C21D8S 10.4-in. SVGA
2711P-T10C22D8S •
2711P-T12W21D8S 12.1-in. WXGA
2711P-T12W22D8S •
2711P-T15C21D8S 15.0-in. XGA
2711P-T15C22D8S •
(1) Add -B to the end of a catalog number to order a terminal without the Allen-Bradley logo and product identification; for example, 2711P-T9W21D8S-B.
Display Input
Ratio
16:9 480 x 272 DC • 512 MB 512 MB nonvolatile
TFT color
4:3 640 x 480 •
TFT color
4:3 640 x 480 •
TFT color
5:3 800 x 480 •
TFT color
4:3 800 x 600 •
TFT color
16:10 1280 x 800 •
TFT color
4:3 1024 x 768 •
TFT color
Pixels
(W x H)
Power
Ethernet Ports Memory
Single DLR RAM Nonvolatile
memory
(Approx. 80 MB free
user memory)
16 Rockwell Automation Publication 2711P-UM007F-EN-P - February 2020
Page 17

Overview Chapter 1
Accessories
Ta b l e 4 through Ta b l e 9 list accessories for the PanelView Plus 7 Standard
terminals.
Table 4 - Protective Overlays
Cat. No. Display S ize Touch Input Quantity
2711P-RGT4S 4.3-in. • 3
2711P-RGT6S 5.7-in. • 3
2711P-RGT7SP 6.5-in. • 3
2711P-RGT9SP 9.0-in. • 3
2711P-RGT10SP 10.4-in. • 3
2711P-RGT12SP 12.1-in. • 3
2711P-RGT15SP 15-in. • 3
Table 5 - Power Supplies and Power Terminal Blocks
Cat. No. Description Quantity
1606-XLP95E DIN-rail power supply, 24…28V DC output voltage, 95 W 1
1606-XLP100E DIN-rail power supply, 24…28V DC output voltage, 100 W 1
2711P-RSACDIN DIN-rail power supply, AC-to-DC, 85…265V AC, 47…63 Hz 1
2711P-RTBDSP 3-pin DC power terminal block (black with white labels for +, –, and GND) 10
Table 6 - Mounting Hardware
Cat. No. Description Quantity
2711P-RMCS
(1) Catalog number 2711P-RMCS mounting levers are for use only with PanelView Plus 7 Standard terminals. Do not use these
Table 7 - SD Ca rds
Cat. No. Description Quantity
1784-SD1 1 GB SD card 1
1784-SD2 2 GB SD card 1
1784-SDHC8 8 GB High Capacity SD card 1
1784-SDHC32 32 GB High Capacity SD card 1
2711C-RCSD USB to SD adapter for SD card 1
2711P-RCKS SD cover replacement 3
(1) To reduce the chance of corruption when using SD Cards or USB drives with the terminal, Rockwell Automation recommends
(1)
mounting levers with any other PanelView Plus terminals. Do not use black mounting levers; they are not compatible with
PanelView Plus 7 Standard terminals.
that you use SD Card catalog numbers 1784-SD1 or 1784-SD2.
Mounting levers (gray) 12
(1)
Table 8 - USB Programming Cable
Cat. No. Description Length
6189V-USBCBL2 Programming ca ble that connects the device port of the terminal to a
USB host port of a computer
1.8 m (5.9 ft)
Rockwell Automation Publication 2711P-UM007F-EN-P - February 2020 17
Page 18

Chapter 1 Overview
Table 9 - Battery Replacement
Cat. No. Description Quantity
2711P-RY2032 Lithium coin-cell battery, CR2032 equivalent 1
2711P-RYKS Battery cover replacement 3
Ethernet Cables
See the Industrial Ethernet Media Brochure, publication 1585-BR001B, for
recommended Ethernet cables and media solutions.
See the USB to Serial Adapter Quick Start Guide, publication
GMSC10-QS003
, for information on USB to serial port adapters.
18 Rockwell Automation Publication 2711P-UM007F-EN-P - February 2020
Page 19

Chapter 2
Install the PanelView Plus 7 Standard Terminal
Top ic P ag e
Hazardous Locations 21
Considerations for Mounting 24
Clearances for Mounting 24
Panel Guidelines 24
Panel Cutout Dimensions 25
Prepare for Panel Mounting 26
Mount the Terminal in a Panel 30
Apply the Static Discharge Warning Label 34
Remove and Replace Power Terminal Block 35
Connect Powe r 36
Connect to a Network 37
Initial Startup 41
Reset the Terminal 41
ATE X:
EN 60079-0, EN 60079-7,
EN 60079-11, and EN 60079-31
II 3 GD
Ex ec ic IIC T4 Gc
Ex ic IIC T4 Gc
Ex tc IIIC T135 °C (275 °F) Dc IP66
Tamb = 0 …55 °C (32…131 °F)
DEMKO 14 ATEX 1302X
ATT EN TI ON : Do not use a PanelView™ Plus 7 Standard terminal for
emergency stops or other controls critical to the safety of personnel or
equipment. Use separate hard-wired operator interface devices that do not
depend on solid-state electronics.
The equipment meets the requirements of the standards and ratings that are
listed in Ta b l e 1 0
Table 10 - ATEX and INMETRO Ratings
IECEx:
IEC 60079-0; IEC 60079-7; IEC 60079-11;
and IEC 60079-31
II 3 GD
Ex ec ic IIC T4 Gc2
Ex tc IIIC T135 °C (275 °F) Dc IP66
Tamb = 0 °C… +55 °C (32 °F…131 °F)
IECEx UL 20.0046X
.
INMETRO:
ABNT NBR IEC 60079-0;
ABNT NBR IEC 60079-11;
ABNT NBR IEC 60079-8;
e ABNT NBR IEC 60079-31
Ex ec ic IIC T4 Gc
Ex ic IIC T4 Gc
Ex tc IIIC T135 °C (275 °F) Dc IP66
Tamb = 0 …55 °C (32…131 °F)
UL-BR 14.0716X
CCC Ex
GB 3836.1-2010; GB 3836.3-2010;
GB 3836.4-2010; GB 12476.1-2013;
GB 12476.5-2013
Ex ec ic IIC T4 Gc
Ex tc IIIC T135 °C (275 °F) Dc IP66
Tamb = 0 °C…+55 °C (32 °F…131 °F)
Rockwell Automation Publication 2711P-UM007F-EN-P - February 2020 19
Page 20

Chapter 2 Install the PanelView Plus 7 Standard Terminal
ATTENTION: Environment and Enclosure
This equipment is intended for use in a Pollution Degree 2 industrial environment, in overvoltage Category II applications (as
defined in IEC 60664-1), at altitudes up to 2000 m (6561 ft) without derating.
The terminals are intended for use with programmable logic controllers.
This equipment is considered Group 1, Class A industrial equipment according to IEC CISPR 11. Without appropriate precautions,
there may be difficulties with electromagnetic compatibility in residential and other environments due to conducted or radiated
disturbances.
Korean Radio Wave Suitability Registration - When so marked this equipment is registered for Electromagnetic
Conformity Registration as business equipment (A), not home equipment. Sellers or users are required to take
caution in this regard.
이 기기는 업무용 (A 급 ) 전자파적합기기로서 판 매자 또는 사용자는 이 점을 주의하시기 바라
며 , 가정외의 지역에서 사용하는 것을 목적으 로 합니다 .
This equipment is supplied as open-type equipment. It must be mounted within an enclosure that is suitably designed for those
specific environmental conditions that will be present and appropriately designed to prevent personal injury resulting from
accessibility to live parts. The interior of the enclosure must be accessible only by the use of a tool. The terminals meet specified
NEMA, UL Type, and IEC ratings only when mounted in a panel or enclosure with the equivalent rating. Subsequent sections of
this publication may contain additional information regarding specific enclosure type ratings that are required to comply with
certain product safety certifications.
In addition to this publication, see the following:
• Industrial Automation Wiring and Grounding Guidelines, publication 1770-4.1
• NEMA 250 and IEC 60529, as applicable, for explanations of the degrees of protection provided by different types of
enclosure
, for additional installation requirements
ATTENTION: Wiring and Safety Guidelines
Use publication NFPA 70E, Electrical Safety Requirements for Employee Workplaces, IEC 60364 Electrical Installations in
Buildings, or other applicable wiring safety requirements for the country of installation when wiring the devices. In addition to
the NFPA guidelines, here are some other guidelines to follow:
• Employ only qualified electricians to wire the device in accordance with local, state, and national codes.
• Connect the device and other similar electronic equipment to its own branch circuit.
• Protect the input power by a fuse or circuit breaker rated at no more than 15 A.
• Route incoming power to the device by a separate path from the communication lines.
• Cross power and communication lines at right angles if they must cross.
• Communication lines can be installed in the same conduit as low-level DC I/O lines (less than 10V).
• Shield and ground cables appropriately to avoid electromagnetic interference (EMI). Grounding minimizes noise from EMI
and is a safety measure in electrical installations.
For more information on grounding recommendations, refer to the National Electrical Code published by the National Fire
Protection Association.
20 Rockwell Automation Publication 2711P-UM007F-EN-P - February 2020
Page 21

Install the PanelView Plus 7 Standard Terminal Chapter 2
Hazardous Locations
WARNING: EXPLOSION HAZARD
The following information applies when operating this equipment in hazardous locations.
This equipment is suitable for use in Class I, Division 2, Groups A, B, C and D; Class II, Division 2, Groups F and G; Class III
hazardous locations and nonhazardous locations only.
• Do not disconnect equipment unless power has been removed or the area is known to be nonhazardous.
• Do not disconnect connections to this equipment unless power has been removed or the area is known to be nonhazardous.
Secure any external connections that mate to this equipment by using screws sliding latches, threaded connectors, or other
means provided with this product.
• When installed in a hazardous location, do not open the enclosure, connect or disconnect equipment unless the area is
known to be non-hazardous.
• Substitution of components can impair suitability for Class I, Division 2.
• Peripheral equipment must be suitable for the location where it is used.
• All wiring must be in accord ance with Cl ass I, Division 2, Class II, Division 2, or Class III wiring methods of Ar ticles 501, 502 or
503, as appropriate, of the National Electrical Code and/or in accordance with Section 18-1J2 of the Canadian Electrical
Code, and in accordance with the authority having jurisdiction.
• When used in Class II and Class III hazardous locations these products must be installed in a dust tight enclosure in
accordance with Articles 502 and 503 of the National Electrical Code.
• For IECEx, ATEX, and INMETRO Zone 2 applications, transient protection shall be provided that is set at a level not exceeding
140% of the peak rated voltage value at the supply terminals to the equipment.
• For IECEx, ATEX, and INMETRO applications, mount the display in environments not subject to UV light exposure.
• USB device port is for maintenance use only, it is not to be used during normal operation of the device.
• Install the display in the cutout of an enclosure by using the provided clamps to compress the bezel gasket to form a seal
against the panel. The gasket seal is permanent for the installation.
• Use field/power wiring that is rated to a minimum of 90 °C (194 °F).
• Install the display in a location that minimizes the risk of impact from other objects. Do not drop, jolt, or impact the display
during installation.
• Mount the display through an enclosure wall with a minimum ingress protection rating of IP54 (Zone 2 applications) and
IP6X (Zone 22 applications), and in an overall environment not exceeding Pollution Degree 2 as defined in IEC 60664-1. The
enclosure must meet Zone 2 and/or Zone 22 ATEX/IECEx requirements depending on area of installation.
The following information applies when operating this equipment in
hazardous locations.
When marked, these products are suitable for use in Class I, Division 2,
Groups A, B, C and D; Class II, Division 2, Groups F and G; Class III
hazardous locations and nonhazardous locations only. Each product is supplied
with markings on the rating nameplate indicating the hazardous location
temperature code. When combining products within a system, the most
adverse temperature code (lowest ‘T’ number) can be used to help determine
the overall temperature code of the system. Combinations of equipment in
your system are subject to investigation by the local authority having
jurisdiction at the time of installation.
Rockwell Automation Publication 2711P-UM007F-EN-P - February 2020 21
Page 22

Chapter 2 Install the PanelView Plus 7 Standard Terminal
AVERTISSEMENT : RISQUE D’ EXPLOSION
Les informations suivantes s'appliquent lorsque cet équipement fonctionne dans des zones dangereuses.
Cet équipement est utilisable uniquement en Classe I, Division 2, Groupes A, B, C et D ; Classe II, Division 2, Groupes F et G ; Classe
III dangereux et non dangereux.
• Couper le courant ou s'assurer que la zone est classée non dangereuse avant de débrancher l'équipement.
• Couper le courant ou s'assurer que la zone est classée non dangereuse avant de débrancher les connexions de l'équipement.
Fixer tous les connecteurs externes reliés à cet équipement à l'aide de vis, loquets coulissants, connecteurs filetés ou autres
moyens fournis avec ce produit.
• Lorsqu'il est installé dans une zone dangereuse, n'ouvrez pas le boîtier, ne connectez ou déconnectez pas l'équipement à
moins que la zone ne soit connue pour être non dangereuse.
• La substitution de composants peut rendre cet équipement impropre à une utilisation en Classe I, Division 2.
• Les équipements périphériques doivent convenir à l'environnement dans lequel ils sont utilisés.
• Tous les systèmes de câblage doivent être de Classe I, Division 2, Classe II, Division 2, ou Classe III conformément aux
méthodes de câblage indiquées dans les Articles 501, 502 ou 503 du Code Electrique National (National Electrical Code) et/ou
conformément à la Section 18-1J2 du Canadian Electrical Code (Code Electrique Canadien), et en fonction de l'autorité de
juridiction.
• Quand ces produits sont utilisés dans des environnements dangereux de Classe II et Classe III, ils doivent être installés dans
une enceinte étanche aux poussières conformément aux Articles 502 et 503 du Code Electrique National (National Electrical
Code).
• Pour les applications en Zone 2 IECEx, ATEX et INMETRO, une protection contre les transitoires sera fournie pour limiter les
surtensions transitoires à 140 % de la tension de crête assignée au niveau des bornes d'alimentation de l'équipement.
• Pour les applications IECEx, ATEX et INMETRO, installer l'afficheur dans des environnements non exposés aux rayonnements
ultraviolets.
• Le port pour dispositif USB est destiné à la maintenance uniquement, il ne doit pas être utilisé pendant le fonctionnement
normal du dispositif.
• Installer l'afficheur dans la découpe d'une enceinte en utilisant les fixations fournies pour comprimer le joint de
l'encadrement et assurer l'étanchéité avec la paroi. L'étanchéité du joint doit être permanente pour l'installation.
• Utiliser un câblage de terrain/d'alimentation normalisé pour une température minimum de 90°C (194°F).
• Installer l'afficheur dans un emplacement qui minimise le risque de choc par d'autres objets. Pendant l'installation,
l'afficheur ne doit pas tomber, subir des secousses ou des chocs.
• Monter l’écran dans la paroi d’un boîtier ayant un indice de protection minimum IP54 (applications de la zone 2) et IP6X
(applications de la zone 22), et dans un environnement global ne dépassant pas le degré de pollution 2, tel que défini dans la
norme IEC 60664-1. Le boîtier doit répondre aux exigences de la zone 2 et/ou de la zone 22 ATEX/ IECEx, selon la zone
d’installation.
Informations sur l'utilisation de cet équipement en environnements dangereux:
Les produits marqués "CL I, DIV 2, GP A, B, C, D" ne conviennent qu'à une
utilisation en environnements de Classe I, Division 2, Groupes A, B, C et D ;
Classe II, Division 2, Groupes F et G ; Classe III dangereux et non dangereux.
Chaque produit est livré avec des marquages sur sa plaque d'identification qui
indiquent le code de température pour les environnements dangereux. Lorsque
plusieurs produits sont combinés dans un système, le code de température le
plus défavorable (code de température le plus faible) peut être utilisé pour
déterminer le code de température global du système. Les combinaisons
d'équipements dans le système sont sujettes à inspection par les autorités locales
qualifiées au moment de l'installation.
22 Rockwell Automation Publication 2711P-UM007F-EN-P - February 2020
Page 23

Install the PanelView Plus 7 Standard Terminal Chapter 2
As informações a seguir aplicam-se ao operar este equipamento em áreas
classificadas.
Os produtos marcados com “CL I, DIV 2, GP A, B, C, D” são adequados
somente para utilização em áreas classificadas de Classe I, Divisão 2, Grupos A,
B, C e D e em áreas não classificadas. Cada produto é fornecido com marcações
na placa de identificação de classificação que indicam o código de temperatura
da área classificada. Ao combinar produtos em um sistema, o código de
temperatura mais adverso (número ‘T’ mais baixo) pode ser usado para ajudar a
determinar o código de temperatura geral do sistema. As combinações de
equipamentos em seu sistema estão sujeitas à fiscalização das autoridades locais
com jurisdição no momento da instalação.
ATENÇÃO: Risco de explosão
As informações a seguir aplicam-se ao operar este equipamento em áreas classificadas.
Este equipamento é adequado para utilização em áreas classificadas de Classe I, Divisão 2, Grupos A, B, C e D; Classe II, Divisão 2,
Grupos F e G; e Classe III, bem como em áreas não classificadas.
• Não desconecte o equipamento, a não ser que a alimentação tenha sido removida ou a área seja conhecida como não
classificada.
• Não desligue as conexões deste equipamento, a não ser que a alimentação tenha sido removida ou a área seja conhecida
como não classificada. Proteja quaisquer conexões externas a este equipamento utilizando as travas deslizantes, os
conectores com rosca ou outros meios fornecidos com este produto.
• Não abra o invólucro quando instalado em área classificada. Não conecte ou desconecte o equipamento a menos que a área
seja conhecida como área não-classificada.
• A substituição dos componentes pode prejudicar a adequação para a Classe I, Divisão 2.
• Os equipamentos periféricos devem ser adequados para o local onde são utilizados.
• Toda a fiação deve estar em conformidade com os métodos de fiação de Classe I, Divisão 2, Classe II, Divisão 2 ou Classe III do
artigo 501, 502 ou 503 do Código Elétrico Nacional e/ou em conformidade com a Seção 18-1J2 do Código Elétrico Canadense
e em conformidade com a autoridade que tiver jurisdição.
• Quando usados nas áreas classificadas de Classe II e Classe III, esses produtos devem ser instalados em um compartimento
estanque ao pó, de acordo com os artigos 502 e 503 do Código Elétrico Nacional.
• Para aplicações em zona 2 IECEx, ATEX e INMETRO, deverá ser fornecida limitação transiente na aplicação que limitar as
sobretensões transientes a não mais do que 140% acima da tensão aplicada.
• Para aplicações IECEx, ATEX e INMETRO, instale a tela em ambientes onde a luz ultravioleta (UV) não possa influenciar as
partes não metálicas.
• A porta para dispositivo USB destina-se apenas para manutenção e não deve ser utilizada durante a operação normal do
dispositivo.
• Instale a tela no recorte de um gabinete utilizando os grampos fornecidos para comprimir a junta da moldura e formar uma
vedação contra o painel. A junta de vedação é permanente para a instalação.
• Utilize fiação de campo/alimentação que seja classificada para um mínimo de 90 °C (194 °F).
• Instale a tela em um local que minimize o risco de impacto de outros objetos. Não derrube, bata ou cause impacto na tela
durante a instalação.
• O display deve ser montado em um invólucro com grau de proteção mínimo IP54 quando instalado em áreas que requerem
EPL Gc (Zona 2), e IP6X para EPL Dc (Zona 22). O ambiente da instalação não pode exceder Grau de Poluição 2 conforme
definido pela IEC 60664-1. O invólucro deve ser devidamente certificado e atender aos requisitos para EPL Gc (Zona 2) e / ou
EPL Dc (Zona 22), dependendo da instalação.
The terminals have a temperature code of T4 when operating in a
55 °C (131 °F)
maximum ambient temperature. Do not install product in environments where
atmospheric gases have ignition temperatures less than 135 °C (275 °F).
Rockwell Automation Publication 2711P-UM007F-EN-P - February 2020 23
Page 24

Chapter 2 Install the PanelView Plus 7 Standard Terminal
Considerations for Mounting
Clearances for Mounting
Consider the following items when mounting the terminal:
• Typically, the terminal mounts on the vertical surface of a panel or
enclosure, at a 0° angle, just below eye level.
• Mount the terminal at a height suitable for most operators.
• Mount the terminal in an area that has good lighting.
• Do not mount the terminal where it is exposed to direct sunlight.
Plan for adequate space around the terminal and inside the enclosure for
ventilation and cables. Consider the heat produced by other devices in the
enclosure. The ambient temperature around the terminal must be 0…55 °C
(32…131 °F).
Table 11 - Minimum Required Clearances
Product Area Min Clearance
Top 51 mm (2 in.)
Bottom 51 mm (2 in.)
Side 25 mm (1 in.) on side without an SD card
51 mm (2 in.) on side with SD card
Back 0 mm (0 in.)
Panel Guidelines
Mount the terminals in the door or wall of a NEMA, UL Type, or IP rated
enclosure:
• The enclosure must be of type IP20 or greater protection.
• Panels must have a minimum thickness of 1.5…4.8 mm
(0.060…0.188 in.)
• The material strength and stiffness of the panel must be sufficient to
hold the terminal and maintain an appropriate seal against water and
dust.
• The panel surface must be flat and free of imperfections to maintain an
adequate seal, and NEMA, UL Type, and IP ratings.
.
24 Rockwell Automation Publication 2711P-UM007F-EN-P - February 2020
Page 25

Install the PanelView Plus 7 Standard Terminal Chapter 2
Panel Cutout Dimensions
Use the template that is shipped with your terminal to mark the cutout
dimensions.
Table 12 - Panel Cutout Dimensions - PanelView Plus 7 Standard Terminals
Terminal Size Input Type Height, mm (in.) Width, mm (in.)
4.3-in. Touch 92 (3.62) 117 (4.61)
5.7-in. Touch 123 (4.84) 156 (6.14)
6.5-in. Touch 142 (5.59) 184 (7.24)
9.0-in. Touch 162 (6.38) 252 (9.92)
10.4-in. Touch 224 (8.82) 269 (10.59)
12.1-in. Touch 218 (8.58) 312 (12.28)
15.0-in. Touch 290 (11.42) 353 (13.90)
Rockwell Automation Publication 2711P-UM007F-EN-P - February 2020 25
Page 26

Chapter 2 Install the PanelView Plus 7 Standard Terminal
Alignment Marks
Notch
Prepare for Panel Mounting
Before mounting a terminal in a panel, read this section and the entire
installation procedure on page 30
.
IMPORTANT Use catalog number 2711P-RMCS mounting levers (gray) for PanelView
Plus 7 Standard terminals. Do not use these mounting levers with any other
PanelView Plus terminals. Do not use black mounting levers; they are not
compatible with PanelView Plus 7 Standard terminals.
Mounting levers insert into the slots around the bezel to secure the terminal in
the panel. The number of mounting levers varies by terminal size.
Each slot has six notches with alignment marks that are locking positions for a
mounting lever. The thickness of the panel that you mount the terminal in
determines the locking position that is required to maintain a NEMA, UL
Type, and IP seal.
Table 13 - Mounting Lever Locking Positions
Mounting Slot
1
2
3
4
5
6
16
Mounting
Lever Lock
Posit ion
1
2
3
4
5
6
Panel Thickness Range
1.50…2.01 mm (0.060…0.079 in.) 16
2.03…2.64 mm (0.08…0.104 in.) 14
2.67…3.15 mm (0.105…0.124 in.) 12
3.17…3.66 mm (0.125…0.144 in.) 10
3.68…4.16 mm (0.145…0.164 in.) 8/9
4.19…4.80 mm (0.165…0.188 in.) 7
Typic al
Gauge
Always orient a mounting lever vertically before inserting it into a slot. This
method is the only way to slide the mounting lever knob within the slot for
positioning. After sliding the mounting lever to a specific notch, rotate the
mounting lever toward the panel to lock it in position. The flat side of the
mounting lever must come into contact with the panel.
26 Rockwell Automation Publication 2711P-UM007F-EN-P - February 2020
Page 27

Install the PanelView Plus 7 Standard Terminal Chapter 2
16 1
Flat Side
Knob on reverse side of
mounting lever inserts
into large end of slot.
12 3 4
Inner notch on mounting lever
shows current lever position.
You can use an erasable marker or grease pencil to mark the alignment
marks below the slot for visibility of slot positions.
6
3
2
6
Initially, you secure the terminal in the panel by sliding each mounting lever to
a position that is one or two notches greater than the final lock position. For
example, if the final lock position is 1, slide each mounting lever to position 2
or 3. Follow the sequence specific to the terminal size shown in Figure 2 on
page 29.
TIP If the lock position is 6, slide the mounting lever to the large end of the slot
or insertion hole.
1
Figure 1 on page 28
shows the mounting lever orientation and locking
1
sequence for a 5.7-in. and 10.4-in. terminal. See Figure 2 on page 29
sequence and mounting lever orientations for all terminals.
6
for locking
Rockwell Automation Publication 2711P-UM007F-EN-P - February 2020 27
Page 28

Chapter 2 Install the PanelView Plus 7 Standard Terminal
The notch shows the locked position.
3101
2
9
4
8
6
7
5
1
3
42
5
6
All mounting levers are locked in position 1.This is appropriate for a
panel thickness of 1.50…2.01 mm (0.060…0.079 in.).
Figure 1 - Mounting Levers Shown in Locked Position
28 Rockwell Automation Publication 2711P-UM007F-EN-P - February 2020
Page 29

Install the PanelView Plus 7 Standard Terminal Chapter 2
24
6
5
9.0-in. Touch - 8 Levers
3
1
4.3-in. Touch - 4 Levers
5.7-in. Touch - 6 Levers
5
24
8
6.5-in. Touch - 6 Levers
7
6
3
1
2
3
4
3
1
2
4
6
5
1
10
3
29 4
7
5
6
8
10.4-in. and 12.1-in. Touch - 10 Levers
The box indicates that the levers must be rotated in the
orientation that is shown to avoid interference with
ports and cables.
1
IMPORTANT: The mounting lever orientations that are shown are required to maintain
NEMA, UL Type, and IP seals. If you require a NEMA, UL Type, or IP seal, do not use a
mounting lever in another orientation than shown.
15-in. Touch - 12 Levers
11
9
10
12
7
3
5
1
268
4
Figure 2 - Mounting Lever Orientation and Lock Sequence
16
16
Rockwell Automation Publication 2711P-UM007F-EN-P - February 2020 29
Page 30

Chapter 2 Install the PanelView Plus 7 Standard Terminal
Gasket
Mount the Terminal in a Panel
The terminals were designed for single-person installation. No tools are
required to mount the terminal. Some tools are required to make the panel
cutout.
Follows these steps to mount the terminal in a panel.
ATT EN TI ON :
Disconnect all electrical power from the panel before making the panel cutout.
Make sure that the area around the panel cutout is clear and that the panel is
clean of any debris, oil, or other chemicals.
Make sure that metal cuttings do not enter any components that are already
installed in the panel and that the edges of the cutout have no burrs or sharp
edges.
Failure to follow these warnings can result in personal injury or damage to
panel components.
1. Use the cutout dimensions on page 25
2. Verify that the sealing gasket is present on the terminal.
This gasket forms a compression-type seal. Do not use sealing
compounds.
to cut an opening in the panel.
3. Center the terminal in the panel cutout.
4. See Table 13 on page 26
levers for the panel thickness.
5. See Figure 2 on page 29
and lock sequence for your terminal size.
to get the final lock position of the mounting
to determine the mounting lever orientations
30 Rockwell Automation Publication 2711P-UM007F-EN-P - February 2020
Page 31

Install the PanelView Plus 7 Standard Terminal Chapter 2
16
16
1 6
6
3
2
6. Secure the terminal in the panel.
TIP The mounting levers for PanelView Plus 7 Standard terminals are gray,
similar to the color of the bezel (catalog number 2711P-RMCS).
Do not use black mounting levers; they are not compatible with PanelView
Plus 7 Standard terminals.
a. Verify the orientation of the mounting lever.
The direction that you rotate each mounting lever is different for
each terminal size.
b. Hold the first mounting lever in the locking sequence vertical to the
slot and insert its knob into the large end of the slot.
c. Slide the mounting lever to a notch that is one or two positions
greater than the final locking position for your panel thickness.
If the final locking position is 1, slide the mounting lever to position 2
or 3.
1
TIP To mark the alignment marks for visibility of the slot positions and
to mark the final lock position, use an erasable marker or grease
pencil.
Rockwell Automation Publication 2711P-UM007F-EN-P - February 2020 31
Page 32

Chapter 2 Install the PanelView Plus 7 Standard Terminal
1
6
d. Rotate the mounting lever until its flat side comes in contact with the
panel.
IMPORTANT Do not use tools or excessive force to rotate the mounting lever. The
mounting levers are rotated and secured by hand.
TIP A broken mounting lever does not damage the terminal.
If a mounting lever is over torqued, the lever is designed to break
off the pin. This breakage helps to prevent damage to the
terminal bezel. If a pin is broken, turn the mounting lever over
and use the other pin to continue the installation. See Figure 2 on
page 29 for details and restrictions.
6
e. Repeat steps a
through d for the remaining mounting levers.
7. Adjust each mounting lever to its final position by using the same
locking sequence in Figure 2 on page 29
.
a. Unlock mounting lever one in the sequence by rotating it away from
the bezel.
b. With the mounting lever positioned vertically to the slot, slide the
mounting lever to the final locking position in Table 13 on page 26
c. Carefully rotate the mounting lever back toward panel.
d. Repeat steps a
through c to lock the remaining mounting levers in
their final position.
.
32 Rockwell Automation Publication 2711P-UM007F-EN-P - February 2020
Page 33

Install the PanelView Plus 7 Standard Terminal Chapter 2
6
1
Terminal with dual Ethernet
ports shown.
8. To make sure each is in the correct locked position, inspect all mounting
levers.
ATTENTION: All mounting levers must be in the correct locked
position and follow the correct lever installation sequence to provide
an adequate gasket seal between the terminal and the panel.
Rockwell Automation assumes no responsibility for water or
chemical damage to the terminal or other equipment within the
enclosure because of improper installation.
The notch on the outside of mounting lever shows its locked position.
This view shows that the mounting levers are locked in position 1.
66
6
Rockwell Automation Publication 2711P-UM007F-EN-P - February 2020 33
Page 34

Chapter 2 Install the PanelView Plus 7 Standard Terminal
Apply the Static Discharge Warning Label
IMPORTANT Rockwell Automation recommends applying the static discharge warning
label for all hazardous location applications according to the instructions
below. If the intended application requires ATEX or IECEx certification, the
static discharge warning label MUST be applied according to the instructions
below.
A static discharge warning label is included in the box with the PanelView Plus
7 Standard terminal. If required for your installation, this label must be affixed
to the panel in a location that is visible to the operator.
Follow these steps to apply the static discharge warning label.
1. Identify a location for the static discharge warning label that is visible to
the operator during operation.
2. Clean the desired install location with isopropyl alcohol.
3. Remove the backing from the static discharge warning label and apply
the label to the desired location.
4. Verify that operator visibility to the static discharge warning label is not
obstructed at any time during operation.
34 Rockwell Automation Publication 2711P-UM007F-EN-P - February 2020
Page 35

Install the PanelView Plus 7 Standard Terminal Chapter 2
6
66
Terminal with dual Ethernet
ports shown.
Remove and Replace Power Terminal Block
The product has a three-pin terminal block for power connections. You can
remove the terminal block for ease of installation, wiring, and maintenance.
WARNING: Explosion Hazard
If you connect or disconnect wiring while the power is on, an electric arc can
occur. This arc can cause an explosion in hazardous location installations. Make
sure that the power is off and the area is nonhazardous before proceeding.
Failure to turn power off can result in electrical shock or damage to the
terminal.
Use a 0.6 x 3.5-mm flat blade screwdriver for terminal block wiring.
Table 14 - Wire Specifications for Power Input Terminal Block
Wire Type Dual-wire Size
Stranded or solid
Cu 90 °C (194 °F)
(1) Two-wire maximum per terminal.
0.3…1.3 mm
22…16 AWG
(1)
Single-wire Size Strip Length Screw Torque
2
0.3…2.1 mm
(22…14 AWG)
2
7 mm (0.28 in.) 0.56 N•m (5.0 lb•in)
To remove the power terminal block, follow these steps.
1. Loosen the two screws that secure the terminal block.
2. Gently pull the terminal block away from the connector.
To install the power terminal block, follow these steps.
1. Press the terminal block onto the connector until seated.
ATTENTION: Do not use excessive force to press the DC terminal
block into position. The DC terminal block is keyed to fit the DC
connector. If the terminal block does not fit into the connector, verify
that you have the correct DC terminal block. See Table 5 on page 17
2. Tighten the two screws that secure the terminal block to the connector.
.
Rockwell Automation Publication 2711P-UM007F-EN-P - February 2020 35
Page 36

Chapter 2 Install the PanelView Plus 7 Standard Terminal
7 mm
20 mm
GNDDC+ DC–
Terminal with dual Ethernet
ports shown.
Connect Power
The terminals have a 24-V DC non-isolated power supply at these power
ratings:
• 24V DC nominal (18…30V DC)
• 35 W maximum (1.46A at 24V DC)
ATT EN TI ON : The power supply is internally protected against reverse
polarity. Connecting DC+ or DC- to the earth ground terminal can damage
the terminal. Connecting AC power, or more than 30V DC, can also damage
the terminal.
The terminals support operation from a safety extra low voltage (SELV) or
protective extra-low voltage (PELV) 24V DC power supply. Supported power
supplies include catalog numbers 1606-XLP95E, 1606-XLP100E, and
2711P-RSACDIN.
ATT EN TI ON : Use a SELV or PELV supply as required by local wiring codes for
your installation. The SELV and PELV power sources provide protection so
that under normal and single fault conditions, the voltage between
conductors and earth ground does not exceed a safe value.
To power the terminal from the same power source as other equipment, use a
DC power bus.
To connect the operator terminal to a DC power source, follow these steps.
1. Verify that the wiring is not connected to a power source.
2. Strip 7 mm (0.28 in.) of insulation from your power supply wires.
3. Secure the DC power wires to the marked terminals (+ and –) on the
terminal block.
6
66
4. Secure the earth ground wire to the GND terminal on the terminal
block.
The GND terminal must be connected to a low-impedance earth
ground.
36 Rockwell Automation Publication 2711P-UM007F-EN-P - February 2020
Page 37

Install the PanelView Plus 7 Standard Terminal Chapter 2
Link 2 Link 1
Terminal with dual Ethernet
ports shown.
6
66
Ethernet Ports
Link 1
Link 2
ATTENTION: The earth ground connection to ground is mandatory.
This connection is required for noise immunity, reliability, and
Electromagnetic Compliance (EMC) with the European Union (EU)
EMC Directive for CE marking conformance. This connection is
required for safety by Underwriters Laboratory (UL).
IMPORTANT Secure the power cable to prevent these actions:
• Vibration at the connector.
• Pulling when the panel door is opened and closed, or when
personnel are working inside the panel.
5. Apply power to the operator terminal.
Connect to a Network
The Ethernet port or ports connect to controllers on an EtherNet/IP™
network by using standard Ethernet connections. These types of networks are
supported:
• Device Level Ring Network Topology
on page 38
• Linear Network Topology on page 39
• Star Network Topology on page 40
Each of these EtherNet/IP network topologies supports applications that use
Integrated Motion over an EtherNet/IP network, if necessary. See the
EtherNet/IP Embedded Switch Technology Application Technique,
publication ENET-AP005
, for more information.
IMPORTANT Terminals can have dual Ethernet ports, but only one device IP address.
Ethernet Ports
The Ethernet ports have one or two 10/100Base-T connectors for network
communication and supports MDI/MDI-X connections and DLR network
topology as indicated by the DLR network icon.
The terminal connects to an EtherNet/IP network by using a CAT5, CAT5E,
or CAT6 twisted-pair, Ethernet cable with RJ45 connectors.
Rockwell Automation Publication 2711P-UM007F-EN-P - February 2020 37
Page 38

Chapter 2 Install the PanelView Plus 7 Standard Terminal
1
8
Yel lo w
Status
Indicator
Green
Status
Indicator
IMPORTANT To help prevent accidental disconnection of the Ethernet cable, follow these
steps:
• To minimize vibration at the connector, and reduce the chance that
personnel working inside the panel can accidentally disconnect the
cable, secure the Ethernet cable.
• To prevent pulling on the cable when the panel door is opened and
closed, do not install the Ethernet cable too tightly. Leave some slack in
the cable.
The maximum cable length between the Ethernet ports and a 10/100Base-T
port on an Ethernet hub (without repeaters or fiber) is 100 m (328 ft).
WARNING: Do not connect or disconnect any communication cable with
power applied to this device or any device on the network. An electric arc
can cause an explosion in hazardous location installations. Make sure that
the power is off or the area is nonhazardous before proceeding.
Table 15 - Ethernet Connector Pinout
Connector Pin Pin Name
View of RJ45
Conne ctor
1TD+
2TD-
3RD+
4Unused
5Unused
6RD-
7Unused
8Unused
Shield connection No direct connection
(AC coupled to chassis GND)
The Ethernet port has two indicators that provide the status of activity.
Table 16 - Ethernet Status Indicators
Indicator Color Description
Link integrity Green On, when a link is present.
Activity Yellow Blinks when activity is detected on Ethernet link.
Device Level Ring Network Topology
A DLR network is a single-fault tolerant ring network that is intended for the
interconnection of automation devices. This topology is also implemented at
the device level. No additional switches are required.
TIP A DLR network has supervisor nodes and ring nodes. The PanelView Plus 7
Standard terminal operates only as a ring node on the network.
38 Rockwell Automation Publication 2711P-UM007F-EN-P - February 2020
Page 39

Install the PanelView Plus 7 Standard Terminal Chapter 2
1794-AENTR FLEX™ I/O Adapter
with FLEX I/O Modules
1734-AENTR POINT I/O™ Adapter
with POINT I/O Modules
Kinetix® 6500 Drives
with Motors
PowerFlex® 755 Drive Connected
Via a 1783-ETAP EtherNet/IP Tap
1769-L18ERM-BB1B Control System
Computer Connected Via a
1783-ETAP EtherNet/IP Tap
1756-ControlLogix Controller
PanelView Plus 7 Standard
Terminal Connected Via Two
Ethernet Ports
Only PanelView Plus 7 standard terminals with two Ethernet ports, for
example, catalog number 2711P-T10C22D8S, operate on a DLR network.
DLR network topologies automatically convert to linear network topologies
when a fault is detected. The conversion to the new network topology
maintains communication of data on the network. The fault condition is
typically detected and corrected.
For more information on DLR network topology, refer to EtherNet/IP
Embedded Switch Technology Application Guide, publication ENET-AP005
Figure 3 - PanelView Plus 7 Standard Terminal in a DLR Network
.
Linear Network Topology
A linear network topology is a collection of devices that are daisy-chained
together across an EtherNet/IP network. Devices that can connect to a linear
network topology use embedded switch technology to eliminate the need for a
separate switch, as required in Star network topologies.
TIP The PanelView Plus 7 Standard terminal with one Ethernet port can be
attached only at the ends of the linear network.
Rockwell Automation Publication 2711P-UM007F-EN-P - February 2020 39
Page 40

Chapter 2 Install the PanelView Plus 7 Standard Terminal
P
a
n
e
l
V
i
e
w
P
l
u
s
7
S
t
a
n
d
a
r
d
T
e
r
mi
n
a
l
Kinetix 350 Drive Connected
Via a 1783-ETAP EtherNet/IP Tap
Kinetix 350 Drive Connected
Via a 1783-ETAP EtherNet/IP Tap
1769-L27ERM-QBFC1B
Control Sy stem
1794-AENTR FLEX I/O Adapter
with FLEX I/O Modules
1734-AENTR POINT I/O Adapter
with POINT I/O Modules
Compu ter
Comput er
Stratix 6000™ Switch
1734-AENTR POINT I/O Adapter
with POINT I/O Modules
Kinetix 350 Drive
Kinetix 350 Drive
1769-L27ERM-QBFC1B
Control System
PanelView Plus 7 Standard Terminal
Figure 4 - PanelView Plus 7 Standard Terminal at the End of a Linear Network
Star Network Topology
A star network topology is a traditional EtherNet/IP network that has
multiple devices that are connected to each other via an Ethernet switch.
Figure 5 - PanelView Plus 7 Standard Terminal Connected Via a Stratix 6000 Switch
40 Rockwell Automation Publication 2711P-UM007F-EN-P - February 2020
Page 41

Install the PanelView Plus 7 Standard Terminal Chapter 2
Initial Startup
The first time that you start the system, the terminal goes through its start-up
sequence and launches FactoryTalk® View ME Station in Configuration mode.
To change the action that occurs at startup, press Terminal Settings, then tap
Startup Options. You can configure one of these options:
• Launch a FactoryTalk View ME HMI application.
• Launch FactoryTalk View ME Station in Configuration mode (default).
• Launch the Windows desktop.
Reset the Terminal
EXAMPLE Terminals are initially shipped with desktop access disabled. You can
configure your terminal to allow desktop access.
For more information on how to change the start-up option and desktop
access, see Chapter 3
There are several ways to restart the terminal without having to disconnect and
reapply power:
• From FactoryTalk View ME Station Configuration Mode, tap Reset.
• From the terminal desktop Start Menu, choose Programs>Restart
System.
• To access Maintenance Mode, follow these steps.
a. Plug in a USB keyboard.
b. Press and hold the white box that appears in the bottom left corner
when the terminal is booting up.
Refer to Maintenance Mode Operations
restart the terminal from Maintenance Mode.
, Configure Terminal Settings.
on page 145 for details on how to
Rockwell Automation Publication 2711P-UM007F-EN-P - February 2020 41
Page 42

Chapter 2 Install the PanelView Plus 7 Standard Terminal
Notes:
42 Rockwell Automation Publication 2711P-UM007F-EN-P - February 2020
Page 43

Chapter 3
Configure Terminal Settings
Topic Page Topic Page
FactoryTalk View ME Station 43 Display Settings 63
Terminal Settings 45 Input Device Settings 65
Soft Keyboard 46 Configure Print Options 67
Load and Run an Application 47 Configure Diagnostics 69
Desktop Access 48 Check Integrity of Application Files 70
Configure Start-up Options 53 View and Clear the System Event Log 71
Configure Controller Address 56 Enable or Disable the Alarm Display 71
Configure Ethernet Settings 56 Display System Information 72
Modify Device Name of Terminal 60 Time and Date Settings 75
Copy Files on Terminal 61 Regional Settings 77
Delete Files from Terminal 62
FactoryTalk View ME Station
FactoryTalk® View ME Station is the runtime environment of the terminal.
This environment lets you configure start-up options, load and run HMI
applications, adjust terminal settings, access the Windows desktop, and
perform other terminal operations.
When you reset the terminal, one of these actions occurs depending on the
configured start-up option:
• FactoryTalk View ME Station launches in Configuration mode. This
mode is the initial default.
• FactoryTalk View ME .mer application runs.
• Windows desktop launches.
IMPORTANT • To access Configuration mode from an HMI application on the terminal,
press Goto Configuration Mode. This button is added to application
screens in FactoryTalk View Studio software during application
development. The application stops running but is still loaded.
• If your application does not have a Goto Configuration Mode button,
refer to Enter Configuration Mode on Startup
on page 54 for details on
how to access Configuration mode.
• To access Configuration mode from the Windows desktop, double-click
the FTViewME Station icon .
Rockwell Automation Publication 2711P-UM007F-EN-P - February 2020 43
Page 44

Chapter 3 Configure Terminal Settings
Figure 6 - FactoryTalk View ME Station Dialog Box
Table 17 - Terminal Operations
Press To
Load Application [F1] Open a dialog box where you select a .mer application to load in the
Run Application [F2] Run the .mer application that is loaded in the terminal.
Application Settings [F3] Open a menu of application-specific settings, such as device shortcuts
Terminal Settings [F4] Open a menu of options to modify terminal settings.
Delete Log Files Before Running [F5] Toggle between Yes and No.
Reset [F7] Reset the terminal and launch an HMI application, FactoryTalk View
Exit [F8] Exit FactoryTalk View ME Station. If desktop access is allowed, you can
Device, IP Addr, Subnet
(display o nly)
device. You must load an application before you can run it.
The name of the loaded application appears under Current
Application.
defined for the loaded .mer application. Device shortcuts are
read-on ly.
For example, CLX is the device shortcut for a ControlLogix® controller.
• Select Yes to delete all data log files, alarm history, and alarm
status files before running the application.
• Select No to run the application without deleting log files.
ME Station software, or the Windows desktop. The action that occurs
depends on the configured startup-option.
access the desktop.
Identifies the device name, IP address, and subnet of the terminal on a
connected Ethernet network.
The network information is updated every 60 seconds. If the terminal
is disconnected from the network, the IP address and subnet appear
as 0.0.0.0.
44 Rockwell Automation Publication 2711P-UM007F-EN-P - February 2020
Page 45

Configure Terminal Settings Chapter 3
Terminal Settings
The terminal has settings that you can adjust that are not specific to the
application.
1. Press Terminal Settings from the FactoryTalk View ME Station dialog
box.
2. Select an option by touching the up and down cursors.
3. Press Enter to access selected function.
Table 18 - Terminal Settings
Select This Option If You Want To
Alarms Close the alarm display on the terminal when an operator acknowledges the newest alarm. By default, the alarm display is closed.
Diagnostics Setup Edit the location where diagnostic messages are saved and determine what kind of messages are saved.
Display Adjust the brightness of the display, configure the screen saver, and enable/disable the touch screen cursor.
Desktop Access Setup Allow or restrict access to the desktop. Set or reset the desktop password.
File Management Copy application files and font files to the terminal, an SD card, or a USB drive. You can also delete application files, log files, and font
Font Linking Link a font file to a base font loaded on the terminal.
Input Devices Configure settings for the keypad, attached keyboard, mouse, or touch screen, including touch screen calibration . You can also choose
File Integrity Check Check the integrity of the .mer application file and runtime files by logging details to a file integrity check log. You can view and clear
Networks and Communications Configure Ethernet and other communication settings for an application.
Print Setup Configure settings that are used to print displays, alarm messages, or diagnostics messages that the application generates.
Startup Options Specify whether the terminal launches the desktop, an application, or FactoryTalk View ME Station Configuration mode on startup.
System Event Log Display system events, and clear events from the log.
System Information Display power, battery, and memory details for the terminal. You can also view the firmware revision for FactoryTalk View ME Station,
Time/Date/Regional Settings Set the date, time, language, and numeric format that is used by terminal and applications.
files.
between a pop-up character input or pop-up keyboard for string input.
this log at any time.
and other software that is loaded on the terminal. Technical support information.
Rockwell Automation Publication 2711P-UM007F-EN-P - February 2020 45
Page 46

Chapter 3 Configure Terminal Settings
Soft Keyboard
When you activate a data entry field on the terminal, a keyboard opens. For
fields that require only numeric values, 0…9 and the decimal is enabled.
Table 19 - Soft Keyboard Controls
Select this key: To:
SHF Switch keys between their shifted and unshifted state.
CAP Switch between lowercase and uppercase characters.
SPACE Enter a space between characters in the display area.
Backspace Delete the previous character (to the left of the cursor) in the display area.
Select Enter a selected character into the display area.
Left, right, up, down arrow Select the character to the left, right, above, or below the currently selected
character.
Enter Accept the entered characters and return to the previous dialog box.
ESC Cancel the current operation and return to the previous dialog box.
Follow these steps to enter characters in the display area above the keyboard:
1. Select a character on the keyboard by touching a key.
2. Press Enter when done to exit the keyboard.
46 Rockwell Automation Publication 2711P-UM007F-EN-P - February 2020
Page 47

Configure Terminal Settings Chapter 3
Load and Run an Application
To run a FactoryTalk View ME .mer application on the terminal, you must first
load the application. You can load the application from internal storage
(nonvolatile memory) in the terminal, an SD card, or a USB drive.
Follow these steps to load and run an application on the terminal.
1. Press Load Application from the FactoryTalk View ME Station dialog
box.
2. To select the location of the file to load, press Source:
• Internal Storage – nonvolatile memory of the terminal.
• External Storage 1 – an SD card is loaded in the card slot.
• External Storage 2 – a USB drive is loaded in the USB host port.
TIP The path for Machine Edition files on the terminal is
My Device\Application Data\Rockwell Software\RSViewME\Runtime.
The path for Machine Edition files on the SD card or USB drive is
\Rockwell Software\RSViewME\Runtime.
3. To select a .mer file from the list, use the up and down cursor keys.
4. To load the selected application, press Load.
You are asked if you want to replace the current communication settings
of the terminal with the settings defined in the application.
5. Select Yes or No.
• To use the communication settings in the application, select Yes.
The application settings replace the communication settings that are
configured for the terminal.
• To use the communication settings of the terminal, select No.
The application loads and its name appears at the top of the FactoryTalk
View ME Station dialog box.
6. To run the application that loaded, press Run Application on the
FactoryTalk View ME Station dialog box.
Rockwell Automation Publication 2711P-UM007F-EN-P - February 2020 47
Page 48

Chapter 3 Configure Terminal Settings
TIP Applications generate log files. You can delete log files from the FactoryTalk
View ME Station dialog box before running the application. Delete log files
to reclaim memory in the terminal.
Refer to Run the Loaded Application on Startup
on page 55 to set the
application to run on startup or reset.
Desktop Access
You can allow or restrict access to the desktop on the terminal. From the
desktop, you can perform system and control panel operations. You can allow
access temporarily, then disable desktop access to prevent unauthorized
changes.
TIP Terminals are shipped from the factory with desktop access disabled.
With restricted access, you must enter a password to access the desktop. Each
terminal has a default password and a challenge question.
Default Password Credentials Values
Password password (case sensitive)
Challenge question What is the opposite of lock?
Challenge answer unlock (case sensitive)
IMPORTANT Rockwell Automation recommends that you change the default password
and challenge question and answer to something unique for your
installation.
Enable Desktop Access
Follow these steps to enable desktop access.
1. Press Terminal Settings, then choose Desktop Access Setup.
2. To select Allow, press Desktop Access.
The Enter Password dialog box opens.
Each time that you change desktop access from disallow to allow, you
must first enter a password. The initial default password is ‘password’.
3. To type the password, then press Enter, press Password.
4. To return to Desktop Access Management, press Enter again.
48 Rockwell Automation Publication 2711P-UM007F-EN-P - February 2020
Page 49

Configure Terminal Settings Chapter 3
Notice the password is no longer set.
5. To exit terminal settings and return to the FactoryTalk View ME Station
dialog box, press OK to exit Desktop Access Management, then Close.
6. To access the desktop, press Exit.
When desktop access is enabled, you are not required to enter a
password.
Disable Desktop Access
IMPORTANT To restrict desktop access, the start-up option must be set to either Go to
Configuration Mode or Run Current Application. See page 53
To restrict desktop access requires that you define a desktop password and
challenge question:
• The password lets you access the desktop from FactoryTalk View ME
Station when pressing Exit.
• The challenge question and response lets you change the password with
the Reset function.
Follow these steps to disable desktop access.
1. Press Terminal Settings, then choose Desktop Access Setup.
2. Press Desktop Access and select Disallow.
for details.
The Set Password button is enabled.
Rockwell Automation Publication 2711P-UM007F-EN-P - February 2020 49
Page 50

Chapter 3 Configure Terminal Settings
IMPORTANT If an error message displays, you can change the startup option to
Go to Configuration Mode or Run Current Application.
You cannot restrict access to the desktop if Startup Options is
configured for Do not start FactoryTalk View ME Station.
3. Refer to Set a Desktop Password on page 51 to define a new password
and challenge question.
50 Rockwell Automation Publication 2711P-UM007F-EN-P - February 2020
Page 51

Configure Terminal Settings Chapter 3
Set a Desktop Password
IMPORTANT When you restrict access to the desktop, you must define a new password
and challenge question.
Follow these steps to define a new desktop password.
1. Press Set Password.
The Desktop Access Set Password dialog box opens.
2. Press Set Password, enter an 8…20 character password, then press Enter.
IMPORTANT You must correctly enter this password before accessing the
desktop.
3. Press Set Challenge to enter a challenge question that you must correctly
respond to when resetting the desktop password.
4. Press Set Response to enter a response to the challenge question, then
press Enter.
5. Press OK.
The Desktop Access Management Dialog shows that a password and
challenge question are set.
6. Press OK to return to terminal settings.
IMPORTANT Secure your password and challenge question for future use. To clear and
reset the password, you must correctly respond to the challenge question. If
you forget the response, the only way to clear the password is to restore the
factory default settings on the terminal. See Factory defa ult
on page 145.
Rockwell Automation Publication 2711P-UM007F-EN-P - February 2020 51
Page 52

Chapter 3 Configure Terminal Settings
Reset the Desktop Password
To clear and change the current password, you must correctly respond to the
current challenge question. If you do not remember the response, you must
restore the terminal to its factory defaults. Refer to Maintenance Mode
Operations on page 145.
IMPORTANT You can reset the password and challenge questions if access to the desktop
is restricted or set to disallow.
Follow these steps to reset the desktop password.
1. Press Reset Password from the Desktop Access Management dialog box.
2. Press Answer Challenge and enter the correct response to the current
challenge question.
3. Press Clear Password to clear the current password and challenge
question.
The dialog box shows the updated status of the password and challenge
information.
4. Press Close.
5. Refer to Set a Desktop Password
on page 51 to set a new password and
challenge question.
After clearing the password, you must set a new desktop password or
change the desktop access to ‘Allow’.
52 Rockwell Automation Publication 2711P-UM007F-EN-P - February 2020
Page 53

Configure Terminal Settings Chapter 3
Configure Start-up Options
You can specify what action the terminal takes on startup or a reset.
This Start-up Option Performs This Action Typical System
Do not start FactoryTalk View
ME Station
Go to Configuration Mode Launches FactoryTalk View ME Station in Configuration
Run Current Application Runs the FactoryTalk View ME application that is loaded in
Launches the Windows desktop on startup. Open
Closed
mode on startup. This mode is the initial, factory default
setting.
Closed
the terminal on startup.
IMPORTANT When desktop access is restricted, the start-up option must be set to Run
Current Application or Go to Configuration Mode (default). See page 48
details on how to allow or restrict desktop access.
Disable FactoryTalk View ME Station on Startup
To launch the desktop on startup, you must disable FactoryTalk View ME
Station.
TIP You can also launch the desktop by pressing Exit on the FactoryTalk View
ME Station dialog box.
for
Follow these steps to disable FactoryTalk View ME Station on startup.
1. Press Terminal Settings, then choose Startup Options.
2. Press On Startup until ‘Do not start FactoryTalk View ME Station’ is
selected.
TIP Desktop access must be set to allow or you get a warning. See
enable desktop access on page 48
.
3. Press OK.
Rockwell Automation Publication 2711P-UM007F-EN-P - February 2020 53
Page 54

Chapter 3 Configure Terminal Settings
Enter Configuration Mode on Startup
Follow these steps to launch FactoryTalk View ME Station in Configuration
mode on startup.
1. Press Terminal Settings, then choose Startup Options.
2. To select Go to Configuration Mode, press On Startup.
3. To view or change optional settings, press Configuration Mode Options.
4. To specify whether you want to load the current application on startup,
press Load Current Application.
5. To specify what configuration settings are used when the loaded
application is run, press Replace RSLinx® Enterprise Communications:
• To use the RSLinx communication settings in the terminal, select
No.
• To replace the terminal settings with the communication settings in
the application, select Yes. Any changes to RSLinx device addresses or
driver properties on the terminal are lost.
6. To return to the previous dialog box, press OK.
7. To return to terminal settings, press OK.
54 Rockwell Automation Publication 2711P-UM007F-EN-P - February 2020
Page 55

Configure Terminal Settings Chapter 3
Run the Loaded Application on Startup
Follow these steps to run the FactoryTalk View .mer application that is loaded
in the terminal on startup.
1. Press Terminal Settings, then choose Startup Options.
2. To select Run Current Application, press On Startup.
3. To view or change optional settings, press Run Options.
If the application is not loaded, the options are disabled.
4. Press Replace RSLinx Enterprise Communications to specify what
configuration settings are used when running the application:
• To use the RSLinx communication settings in the terminal, select
No.
• To replace the terminal settings with the communication settings in
the application, select Yes. Any changes to RSLinx device addresses or
driver properties on the terminal are lost.
5. To specify what action to take with the log files on startup, press Delete
Log Files On Every Power Cycle:
• To delete all log files (data, alarm history, alarm status) generated by
the terminal before running the application, select Yes. The files are
deleted from the system default location.
• To retain all log files, select No.
6. To return to the previous dialog box, press OK.
7. To return to terminal settings, press OK.
Rockwell Automation Publication 2711P-UM007F-EN-P - February 2020 55
Page 56

Chapter 3 Configure Terminal Settings
Configure Controller Address
To configure communication information for your application and controller,
use RSLinx Enterprise software.
TIP You can also configure communication information for your application
and controller by using FactoryTalk View Studio software.
To edit the device address of the controller, follow these steps.
1. Press Terminal Settings, then choose Networks and
Communications>RSLinx Enterprise Communications.
Configure Ethernet Settings
2. Select the controller in the tree.
3. To view the device name and current address, press Edit Device.
4. To modify the address, press Device Address.
The input panel opens with the current address.
5. Enter the address in the input panel and press Enter.
6. Press OK.
Updates do not take effect until the terminal is restarted.
The terminal has a built-in Ethernet driver. You can modify the following
Ethernet information for your device:
• IP address of terminal on network, including link speed
• Device name that identifies terminal on network
• User name and password to access network resources
• Enable or disable either Ethernet port to configure for DLR, star, or
linear network topologies
56 Rockwell Automation Publication 2711P-UM007F-EN-P - February 2020
Page 57

Configure Terminal Settings Chapter 3
Set the Ethernet Address of the Terminal
Some networks automatically assign an IP address to Ethernet devices if
dynamic host configuration protocol (DHCP) is enabled. If DHCP is
disabled, you can manually enter an IP address.
To view or enter an IP address for your terminal, follow these steps.
1. Press Terminal Settings, then choose Networks and
Communications>Network Connections>Network Adapters.
2. To view or modify the IP address, press IP Address.
3. To enable or disable DHCP assignment of addresses, press Use DHCP.
• If DHCP is enabled or set to Yes, IP addresses are automatically
assigned to newly attached devices on the network.
• If DHCP is disabled or set to No, you can manually enter the IP
address. Press IP Address, Subnet Mask, and Gateway to enter IP
formatted addresses.
TIP • IP Address – The format of the IP address is xxx.xxx.xxx.xxx; for
example, 192.168.124.96. The first set of decimal numbers is in the
range 1…255; the last three sets are in the range 0…255. The default
is 000.000.000.000.
• Subnet Mask – Address must be identical to the server subnet mask.
• Gateway – optional address.
• MAC ID – read-only field.
4. Press OK when done.
If prompted, reset the device from the FactoryTalk View ME Station
dialog box.
5. Press Close.
Rockwell Automation Publication 2711P-UM007F-EN-P - February 2020 57
Page 58

Chapter 3 Configure Terminal Settings
Set the Ethernet Link Speed
You can change the rate and mode for how data is transmitted on the Ethernet
network. The default setting is Auto. The Auto option automatically
configures the speed of the device to match the speed on the local network.
TIP The Auto option is preferred because it determines the actual speed and
duplex setting of the connected device on the Ethernet network.
If you select a manual option, make sure that the speed and duplex setting
for the connected device on the Ethernet network is identical. If the
settings are not identical, there can be decreased network performance
and errors.
1. Press Terminal Settings, then choose Networks and
Communications>Network Connections>Network Adapters.
2. To access the Ethernet link settings, press Settings.
3. To change the rate that data is transmitted at over the Ethernet network,
press Ethernet Configuration.
4. To return to the Network Adapters dialog box, press OK.
Configure the Ethernet Ports
To configure the Ethernet ports of the terminal, follow these steps.
1. Press Terminal Settings, then choose Networks and
Communications>Network Connections>Network Adapters.
2. To access the Ethernet link settings, press Settings.
3. To enable or disable the ports that you want to use for your network
configuration, press Ethernet Link1 and Ethernet Link2.
58 Rockwell Automation Publication 2711P-UM007F-EN-P - February 2020
Page 59

Configure Terminal Settings Chapter 3
4. To select Auto, press Ethernet Configuration.
5. To save the configuration, press OK.
6. For the changes to take effect, restart the terminal.
You can also configure the Ethernet ports as a system default for a closed
system. See Configure the Ethernet Ports
on page 113.
Name the Server Addresses
You can name the server addresses for the EtherNet/IP network adapter. These
addresses are automatically assigned if DHCP is enabled for the adapter.
1. Press Terminal Settings, then choose Networks and
Communications>Network Connections>Network Adapters.
2. Press Name Servers.
3. To enter a corresponding name server address, press a button.
4. Press OK when done.
Rockwell Automation Publication 2711P-UM007F-EN-P - February 2020 59
Page 60

Chapter 3 Configure Terminal Settings
Modify Device Name of Termina l
Each terminal has a unique name that identifies it on the network.
1. Press Terminal Settings, then choose Networks and
Communications>Network Connections>Device Name.
2. To edit the default device name, press Device Name.
TIP The device name has 1…15 characters:
• The first character must be an upper or lowercase letter a…z, A…Z.
• The other characters can be a…z, A…Z, 0…9, or - (hyphen).
3. To modify the description for the device, press Device Description.
TIP The description is a maximum of 50 characters. The default description is
Rockwell Automation plus the device catalog number.
4. Press OK.
60 Rockwell Automation Publication 2711P-UM007F-EN-P - February 2020
Page 61

Configure Terminal Settings Chapter 3
Copy Files on Terminal
You can copy FactoryTalk View ME .mer application files or font files between
nonvolatile memory of the terminal and a USB drive, or SD card.
1. Press Terminal Settings, then choose File Management>Copy
Files>Copy Applications or Copy Fonts.
2. To select the location of the file you want to copy, press Source:
• Internal Storage – nonvolatile memory of the terminal.
• External Storage 1 – SD card that is loaded in card slot of terminal.
• External Storage 2 – USB drive that is loaded in USB host port of
terminal.
3. Select a file that appears in the list for the selected storage area.
4. Press Destination on the same dialog box.
5. To select the storage location to copy the file, press Destination.
The destination must be different than the source location.
6. To copy the selected file to the target location, press Copy.
If the file exists, you are asked if it is okay to overwrite the file. Respond
by selecting Yes or No.
TIP If you are saving files to the terminal, be sure to save the .mer files to
My Device\Application Data\Rockwell Software\RSViewME\Runtime\
and save font files to \Rockwell Software\RSViewME\Fonts\.
Rockwell Automation Publication 2711P-UM007F-EN-P - February 2020 61
Page 62

Chapter 3 Configure Terminal Settings
Delete Files from Terminal
You can delete FactoryTalk View ME application .mer files or font files that
reside in nonvolatile memory of the terminal, a USB drive, or an SD card.
1. Press Terminal Settings, then choose File Management>Delete
Files>Delete Applications or Delete Fonts.
2. To select the storage location of the application or font file you want to
delete, press Source:
• Internal Storage – nonvolatile memory of the terminal.
• External Storage 1 – SD card that is loaded in card slot of terminal.
• External Storage 2 – USB drive that is loaded in USB host port of
terminal.
3. Select a file that appears in the list for the selected storage area.
4. Press Delete.
5. Select Yes or No when asked if you want to delete the selected
application or font file.
Delete Log Files
You can delete log files, alarm history files, and alarm status files from the
System Default location of the terminal. The application generates the files
during runtime.
1. Press Terminal Settings>File Management>Delete Files>Delete Log
Files.
You are asked to confirm the deletion of the files.
Do you want to delete the FactoryTalk View ME Station Log Files?
2. Select Yes or No.
Log files not in the System Default location are not deleted.
62 Rockwell Automation Publication 2711P-UM007F-EN-P - February 2020
Page 63

Configure Terminal Settings Chapter 3
Display Settings
For the terminal display, you can change its brightness, configure the screen
saver, or disable the screen cursor.
Adjust Display Intensity
You can adjust the intensity of the backlight in 10% increments from 1…100%.
At 0%, the backlight is minimally visible. You can use the default intensity of
100% or adjust the intensity for runtime operations.
1. Press Terminal Settings, then choose Display>Display Intensity.
2. To switch between Default intensity and Runtime intensity, press
Startup Intensity.
• If you select Runtime, the start-up screens use the runtime intensity.
• If you select Default, the start-up screens use the default setting of
100%.
3. Increase or decrease the intensity for runtime operations by pressing the
up or down cursors.
4. Press OK when done to save changes.
Rockwell Automation Publication 2711P-UM007F-EN-P - February 2020 63
Page 64

Chapter 3 Configure Terminal Settings
Configure the Screen Saver
A screen saver image appears on the terminal display when no user activity is
sensed for a certain time. The default idle time is 10 minutes. You can adjust
the idle time and intensity level of the screen saver, disable the screen saver, or
disable the screen saver image.
1. Press Terminal Settings, then choose Display>Screen Saver.
2. To change the idle period for activating the screen saver, press Screen
Saver.
To disable the screen saver, select Disabled.
3. To increase or decrease the brightness intensity of the screen saver, press
the up and down cursors.
4. To access the screen saver image setting, press Advanced Settings.
a. To disable or enable the current screen saver, press Screen Saver
Image. See page 91
image.
b. To return to the Screen Saver dialog box, press OK.
5. To exit and return to terminal settings, press OK.
for details on how to change the screen saver
Disable the Screen Cursor
The terminal has a screen cursor that you can disable or enable.
1. Press Terminal Settings, then choose Display>Cursor.
2. To disable or enable the cursor, press Enable Cursor.
3. To exit and return to terminal settings, press OK.
64 Rockwell Automation Publication 2711P-UM007F-EN-P - February 2020
Page 65

Configure Terminal Settings Chapter 3
Carefully press and briefly hold stylus on the center of the target.
Repeat as the target moves around the screen.
Input Device Settings
You can adjust settings for input devices that are used by the terminal including
the touch screen and string entry popup.
Calibrate the Touch Screen
To calibrate the touch screen, follow these steps.
IMPORTANT Use a plastic stylus with a minimum tip radius of 1.3 mm (0.051 in.) A
stylus is more precise than a finger and also protects the screen.
1. Press Terminal Settings, then choose Input Devices>Touch
Screen>Calibration.
2. Follow the instructions on the screen.
When the calibration is complete, a message appears to indicate the
measurement of new calibration settings. You can do one of the
following:
• To register saved data, press the screen.
• To cancel saved data and keep the current settings, wait for 30
seconds.
Rockwell Automation Publication 2711P-UM007F-EN-P - February 2020 65
Page 66

Chapter 3 Configure Terminal Settings
Set the Double-tap Sensitivity for a Touch Screen
You can set and test the sensitivity of both speed and physical distance between
touch screen presses.
TIP The process is identical to set and test the sensitivity of mouse clicks. To
adjust the sensitivity of mouse clicks, press Terminal Settings, then choose
Input Devices>Mouse.
1. Press Terminal Settings, then choose Input Devices>Touch
Screen>Double Tap Sensitivity.
2. To set the sensitivity of touch screen presses, double-tap Set.
3. To test the sensitivity of touch screen presses, double-tap Test.
The Test button reverses its foreground and background colors.
4. Press OK when done.
Change the Popup for String Entry
You can use a string popup for character input instead of the popup keyboard
or input panel.
1. Press Terminal Settings, then choose Input Devices>String Popup.
2. To select the preferred method for character input, press ‘Invoke pop-up
character input instead of pop-up keyboard’.
3. Press OK.
66 Rockwell Automation Publication 2711P-UM007F-EN-P - February 2020
Page 67
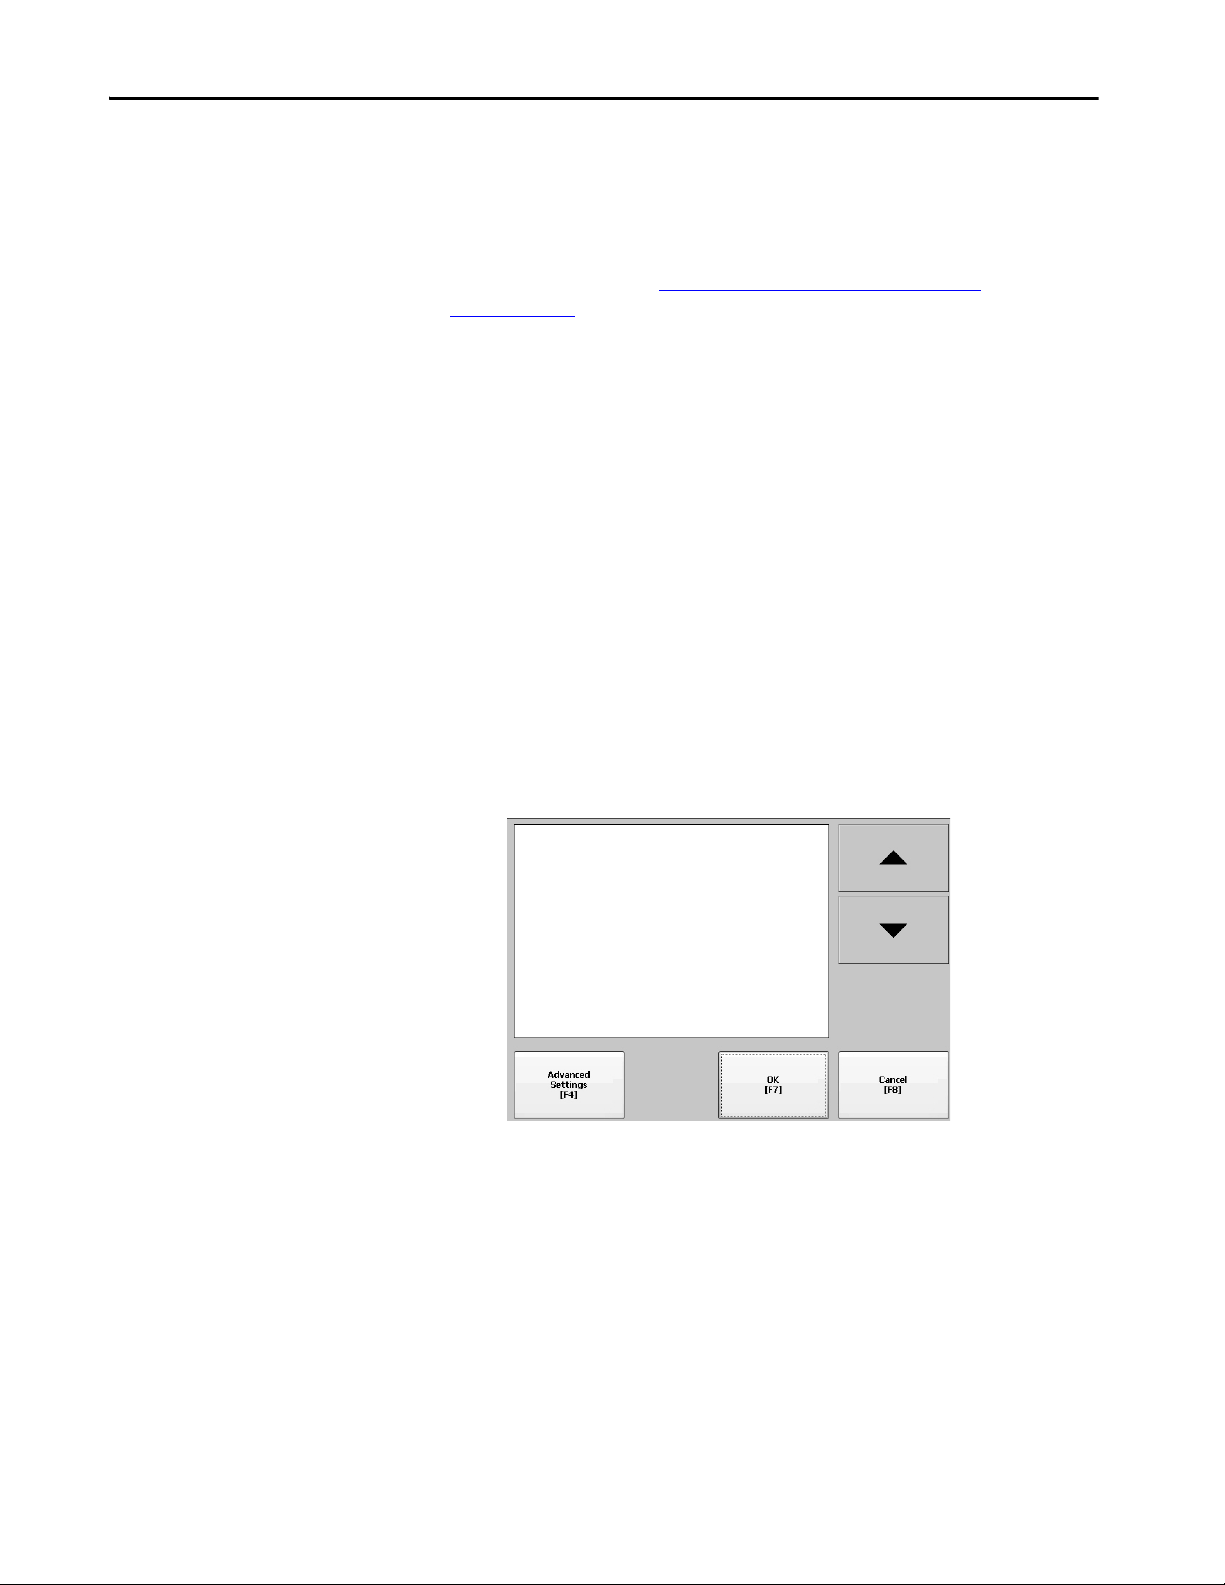
Configure Terminal Settings Chapter 3
Configure Print Options
You can configure settings for print displays, alarm messages, or diagnostic
messages from FactoryTalk View ME applications. The setup for print displays
and messages is the same. Advanced settings are different.
PanelView Plus 7 Standard terminals support selected printers. For a list of
supported printers, go to http://www.rockwellautomation.com/
knowledgebase and search the Knowledgebase for keywords ‘Printers
Supported on PanelView Plus’.
Printer installation is plug-and-play. Supported printers are automatically
mapped to the appropriate driver. Printers that do not configure automatically
to the appropriate driver can be installed manually.
Follow these steps to access the print setup.
1. Press Terminal Settings, then choose a Print Setup> option:
• Alarm Print Setup
•Diagnostic Setup
•Display Print Setup
The Print Setup dialog box shows installed printers that are available to
the FactoryTalk View ME application. The list of printers that shows
depends on what printers you install.
The terminals are not shipped with pre-configured printers so initially
the dialog box is empty.
2. Select an installed printer.
TIP The printer that you select must be in the control panel Printers applet.
A failed attempt to install a printer is reported in the system event log.
Use the control panel in Windows Explorer to install a printer that does not
install automatically.
Rockwell Automation Publication 2711P-UM007F-EN-P - February 2020 67
Page 68

Chapter 3 Configure Terminal Settings
3. To access these options, press Advanced Settings:
• Options for print displays include print orientation, draft mode, and
color.
• Options for print diagnostic and alarm messages determine when to
print messages that are sent to the network or USB port.
Print Messages After Default Value Example
Specified number of messages 60 messages When the queue has 60 messages, the messages are printed regardless of
500 messages or timeout period, whichever is
first
Specified number of messages or timeout pe riod,
whichever is first.
168 hours (7 days) If the queue has 350 messages after 168 hours, the 350 messages are
60 messages
168 hours (7 days)
how long they have been in the queue.
You can change the number of messages.
printed.
You can change the timeout period.
If the queue has 60 messages after 24 hours, then the 60 messages are
printed.
You can change the number of messages and the timeout period.
For example, the number of messages is set to 75 and the timeout period is
set to 48 hours.
• If the queue has 75 messages after 24 hours, then the 75 messages are
printed before the set timeout of 48 hours.
• If the queue has 15 messages after 48 hours, the 15 messages are printed
after the set timeout period.
4. Press OK when done.
5. To return to terminal settings, press OK.
68 Rockwell Automation Publication 2711P-UM007F-EN-P - February 2020
Page 69

Configure Terminal Settings Chapter 3
Configure Diagnostics
You can log diagnostics to a remote computer for troubleshooting.
To configure and forward diagnostics to a computer, follow these steps.
1. Press Terminal Settings, then choose Diagnostic Setup.
A list of diagnostic nodes appears.
TIP To access Remote Log or Message Routing setup, select the node
then press Edit.
The Remote Log destination forwards messages to a Windows computer that
runs diagnostics. The IP address and port number identify the computer.
Field Descripti on Valid Values
Address IP address of the remote Windows computer. xxx.xxx.xxx.xxx
Port The port that is used to communicate with the remote Windows computer. 4445 (default)
Select Message Routing to access the following dialog boxes:
•Remote Log
• FactoryTalk View Diagnostics List
Each dialog box shows a list of messages that can be sent to a destination.
Cursor to a message, then press On/Off to enable or disable the message.
Messages with checked boxes are enabled. Messages with cleared boxes are
disabled.
Audit Message Logging lets you log messages as Audit or Information.
Rockwell Automation Publication 2711P-UM007F-EN-P - February 2020 69
Page 70

Chapter 3 Configure Terminal Settings
Check Integrity of Application Files
It is good practice to check the integrity of the .mer application that is loaded
in the terminal and the runtime files. Errors, warnings, and information
messages are logged to a file. You can view the log and clear items from the log.
TIP Runtime files enable applications to run on the terminal. If the terminal is
not functioning correctly, a review of the logs can identify an error in a
runtime file.
1. Press Terminal Settings, then choose File Integrity Check.
2. Press either of the Enable options to disable integrity checks of the .mer
application or the runtime files.
Integrity checks are automatically performed on the application .mer file
and runtime files. If you disable either of these functions, the files are not
checked and the log file is not updated.
3. Press OK to save changes.
Follow these steps to view the log generated by runtime files.
1. Press View Log from the File Integrity Check dialog box.
2. To display details for that event, select an event and press More Details.
3. To clear all details from the log, press Clear All.
4. To return to previous dialog box, press Close.
70 Rockwell Automation Publication 2711P-UM007F-EN-P - February 2020
Page 71

Configure Terminal Settings Chapter 3
View and Clear the System Event Log
The System Event Log displays warnings, errors, and events logged by the
terminal. The log provides a time stamp of when each event occurred and text
that describe the event. If the event log is full when a new event occurs, the
oldest entry is removed to accommodate the new event.
1. Press Terminal Settings>System Event Log.
2. To display details for the event, select an event then press More Details.
3. To clear all events in the log, press Clear All.
Enable or Disable the Alarm Display
4. Press Close.
The terminal displays each alarm as it occurs in the alarm display or alarm
banner. When the operator acknowledges the most recent alarm, the alarm
display closes or remains open. The default is to close the alarm display.
1. Press Terminal Settings, then choose Alarms.
2. To toggle between Yes or No, press ‘Close Alarm Display When Newest
Alarm Acknowledged’.
• Yes closes the alarm display when the newest alarm is acknowledged.
• No leaves the alarm display open when newest alarm is
acknowledged.
3. Press OK.
Rockwell Automation Publication 2711P-UM007F-EN-P - February 2020 71
Page 72

Chapter 3 Configure Terminal Settings
Display System Information
You can view terminal and firmware revision information for software that is
installed on a terminal.
View Terminal Information
You can view the following information:
•Total power on time in minutes
• Battery voltage and state
• Memory that is allocated and in use
• Random access memory (RAM) usage during runtime
To view status information for your terminal, follow these steps.
1. Press Terminal Settings, then choose System Information>Terminal
Information.
.
• Battery voltage must be at least 2.75V DC.
Battery State Description
GOOD Good battery condition.
FAILING Low battery. Replace the battery.
BAD Battery is missing or bad. Replace the battery.
72 Rockwell Automation Publication 2711P-UM007F-EN-P - February 2020
Page 73

Configure Terminal Settings Chapter 3
2. To view information for the Program RAM and Available Flash
(nonvolatile) memory, press Memory Allocation.
3. To return to previous dialog box, press Close.
4. To view the RAM used by the application at runtime, press Runtime
RAM Usage.
This information can be helpful if you are troubleshooting problems
that are related to RAM usage.
5. To return to the previous dialog, press OK.
6. Press Close until you return to terminal settings.
Rockwell Automation Publication 2711P-UM007F-EN-P - February 2020 73
Page 74

Chapter 3 Configure Terminal Settings
View FactoryTalk View ME Station Information
You can view firmware and version information for components that are
installed on your terminal and access technical support information.
1. Press Terminal Settings, then choose System Information>About
FactoryTalk View ME Station.
2. To display the support phone number and website, press Technical
Support.
3. Press Close until you return to terminal settings.
74 Rockwell Automation Publication 2711P-UM007F-EN-P - February 2020
Page 75

Configure Terminal Settings Chapter 3
Time and Date Settings
You can change the time zone, date, time, and regional settings for terminal
operations.
TIP Set the time zone before you change the current date and time on the
terminal.
Change the Time Zone on the Terminal
You can view or modify the current time zone on the terminal. Time zones are
installed with the operating system. A change to the time zone adjusts the
current time and date to match the time zone.
The clock records the time when files are created or modified on the terminal.
You can change the time and time zone.
1. Select Terminal Settings, then choose Time/Date/Regional
Settings>Time Zone.
2. Press the up or down cursor to select a time zone.
Daylight Saving Time is enabled for all time zones except Japanese
(Japan does not support Daylight Saving Time). The clock is adjusted
automatically when Daylight Saving Time changes.
3. Optionally, press Use Daylight Savings to enable or disable Daylight
Saving Time for a time zone.
Changes are not permanent until you close the Time Zone dialog box.
4. Press Close when done.
5. To return to the previous dialog box, press OK.
Rockwell Automation Publication 2711P-UM007F-EN-P - February 2020 75
Page 76
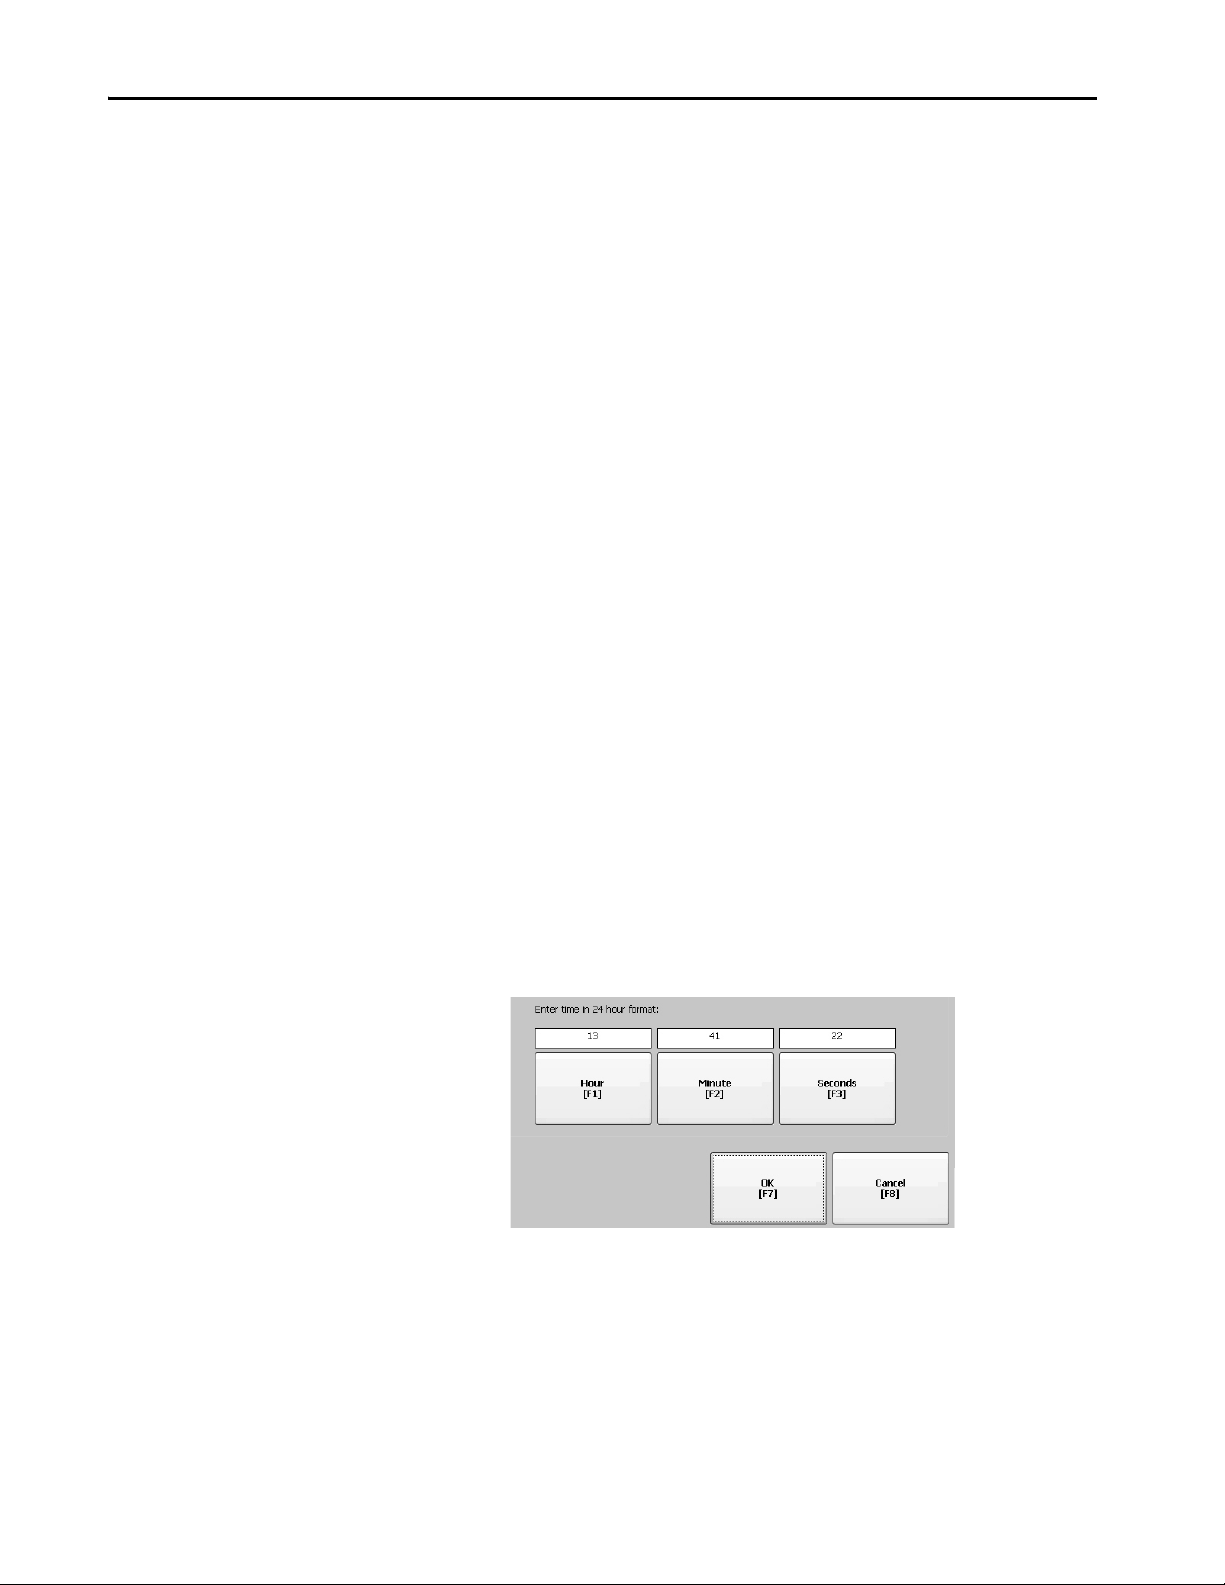
Chapter 3 Configure Terminal Settings
Change the Current Date on the Terminal
To adjust the date on the terminal, follow these steps.
1. Select Terminal Settings, then choose Time/Date/Regional
Settings>Date.
2. Press Year, Month, and Day to change the current values above the
button:
• Year is four digits in the range 1980…2099
• Month is in the range 1…12
• Day is in the range 1…31 and validated by month
3. Press OK when done.
Change the Current Time on the Terminal
To adjust the time on the terminal, follow these steps.
1. Select Terminal Settings, then choose Time/Date/Regional
Settings>Time.
2. To change the current values, press Hour, Minute, and Seconds:
• Hour range is 0…23 (24-hour format)
• Minute and second range is 0…59
3. Press OK when done.
76 Rockwell Automation Publication 2711P-UM007F-EN-P - February 2020
Page 77

Configure Terminal Settings Chapter 3
Regional Settings
You can change the display format for dates, times, and numerics to match the
standards of a country or region. Languages are installed with the operating
system. Before changing regional settings, you must select a language.
To select a language that is installed on the terminal, follow these steps.
1. Select Terminal Settings, then choose Time/Date/Regional
Settings>Language.
2. Select a language by pressing the up and down cursors.
3. Press OK.
The selected language shows under Current Language on the Regional
Settings dialog box.
Change the Decimal Separator
You can change the decimal separator that is used in numeric formats for the
selected language. The default separator is a period.
1. Select Terminal Settings, then choose Time/Date/Regional
Settings>Numeric Format.
The default separator is shown.
2. Enter a maximum of three characters for the new separator.
3. Press OK.
Rockwell Automation Publication 2711P-UM007F-EN-P - February 2020 77
Page 78

Chapter 3 Configure Terminal Settings
Change the Time Format for a Language
To change the format of the time for the selected language, follow these steps.
1. Select Terminal Settings, then choose Time/Date/Regional
Settings>Time Format.
The current time appears in the selected format.
2. To adjust the formats, press the appropriate selections.
The sample format changes as you make selections.
Field Description Example
Time For mat
12-hour
Time For mat
24-hour
AM Symbol Characters to indicate AM. If the time format is set to a
PM Symbol Characters to indicate PM. If the time format is set to a
Separator Characters that separate fields in time format. : (default)
h:mm:ss tt (default)
h = 12-hour time display, no leading zero
tt = AM or PM symbol
hh:mm:ss tt
hh = 12-hour time display with a lead zero
tt = AM or PM symbol
H:mm:ss
H = 24-hour time display, no leading zero
HH:mm:ss
HH = 24-hour time display with a lead zero
12-hour time display (h:mm:ss tt or hh:mm:ss tt), you
can modify the AM symbol.
12-hour time display (h:mm:ss tt or hh:mm:ss tt), you
can modify the PM symbol.
7:23:02 AM or 1:13:31 PM
11:43:59 AM
07:23:02 AM or 01:13:31 PM
11:43:59 PM
7:03:42 or 1:13:32
23:43:59
07:03:42 or 01:13:22
23:43:59
AM (default)
12 character max
PM (default)
12 character max
3 character max
3. Press OK.
78 Rockwell Automation Publication 2711P-UM007F-EN-P - February 2020
Page 79

Configure Terminal Settings Chapter 3
Change the Short Date Format for a Language
To change the short date format for the selected language, follow these steps.
1. Select Terminal Settings, then choose Time/Date/Regional
Settings>Regional Settings>Short Date Format.
2. To change the short date format, press Format.
The date updates in the Sample area as you change formats.
3. To change the character between date elements, press Separator.
The separator can be three characters. The default separator is – or /.
4. Press OK when done.
Change the Long Date Format for a Language
To change the long date format for the selected language, follow these steps.
1. Select Terminal Settings, then choose Time/Date/Regional
Settings>Regional Settings>Long Date Format.
2. To change the long date format, press Format.
The date updates in the Sample area as you change formats.
3. Press OK when done.
Rockwell Automation Publication 2711P-UM007F-EN-P - February 2020 79
Page 80

Chapter 3 Configure Terminal Settings
Notes:
80 Rockwell Automation Publication 2711P-UM007F-EN-P - February 2020
Page 81

Windows Operating System
Top ic P age
Operating System Features 81
Windows Explorer 84
Tas kb ar 84
Soft Input Panels 84
Windows Control Panel 85
Backup and Restore 86
Display Properties 90
Hardware Monitor 92
Logo Manager 94
User Accounts 96
Services 98
Network Server Configuration 98
System In formation 111
Touch Properties 115
PDF Reader 116
Chapter 4
Operating System Features
The PanelView™ Plus 7 terminal runs the Microsoft Windows CE version 6.0
operating system (OS) providing the following features:
•Command shell
• Command processor
•Console window
• Windows Explorer shell
•Common dialog box
•Control panel
•Network user interface
• Soft keyboard input panels
•PDF reader
• Mouse and touch screen support with right-click support.
TIP Touch the screen for 1 second or longer for a right-click.
Rockwell Automation Publication 2711P-UM007F-EN-P - February 2020 81
Page 82

Chapter 4 Windows Operating System
• VNC server and client viewer
IMPORTANT The terminal distributes two VNC client viewers:
• Vncviewer.exe is in the /Windows folder on the terminal
desktop. To connect to, view, and control a PanelView Plus 7
terminal, deploy this viewer to a personal computer.
• Another viewer on the terminal lets you establish a VNC
connection to another PanelView Plus 7 terminal. To access this
viewer, click Start>Programs>VNC Viewer.
Application Support
The Windows CE operating system provides the following application
support:
• .NET Compact Framework, version 3.5 or later
• C++ libraries and runtimes
• Component services DCOM/COM/OLE
• Message queueing MSMQ
• MSXML, version 3.0 or later
• Microsoft foundation classes (MFC) for devices, version 9.0 or later
• Active template library (ATL)
•ActiveSync
• Cabinet (CAB) file installer/uninstaller
• ToolHelp application programming interface (API)
• Error reports (generator, transfer driver, control panel)
Scripting Support
The Windows CE operating system supports these scripting features:
• Batch/Command (BAT and CMD files)
• CS-Script
•JScript
Network Support
The Windows CE 6.0 operating system supports these network features:
•Winsock support
• Network utilities – ipconfig, ping, route
• Network driver architecture (NDIS)
•Windows networking API/Redirector
• Wired Local Area Network (LAN), 802.3, 802.5
82 Rockwell Automation Publication 2711P-UM007F-EN-P - February 2020
Page 83

Windows Operating System Chapter 4
Server Support
Ta b l e 2 0 lists the servers that support the Windows CE 6.0 operating system.
Table 20 - Windows CE 6.0 Server Support
Server
Web server Enabled The web server de livers content, such as web pages, by using the HTTP protocol
FTP server Enabled File transfer protocol (FTP) is a standard network protocol that is used to
UPnP server Enabled Universal plug and play (UPnP) is a set of networking protocols that lets devices
File server Disabled A network protocol that provides shared access to files, printers, serial ports,
VNC server Disabled Virtual network computing (VNC) is remote-control software that makes it
View Point
server
Default
State
Enabled A web server application that provides remote users access via a web browser
Description
over the web.
exchange files over the Internet (TCP/IP-based network).
install and connect to a network.
and miscellaneous communication between computers on a network.
possible to control another computer over a network connection. Keystrokes
and mouse clicks are transmitted from one computer to another, over a
network.
to the FactoryTalk® View ME HMI application that is running on the terminal.
ViewPoint software is a Rockwell Automation® product.
Rockwell Automation Publication 2711P-UM007F-EN-P - February 2020 83
Page 84

Chapter 4 Windows Operating System
Windows Explorer
Taskbar
From the desktop, you can access Windows Explorer in several ways:
• Double-click the My Device icon.
• Choose Start>Programs>Windows Explorer.
A few folders contain items specific to the PanelView Plus 7 Standard terminal.
Folder Content
Application data Contains FactoryTalk View ME application files.
Path: \Application Data\Rockwell Software\RSViewME\Runtime
VFS (virtual file system) Contains firmware files and backup/restore files for the current system image.
Paths: \VFS\Platform Firmware and \VFS\Backup & Restore
From the taskbar, you can access the Start menu, device IP information, the
current language and time, input panels, and open programs.
Soft Input Panels
To turn the taskbar on or off, choose Start>Settings>Taskbar and Start Menu,
then clear or check the Auto Hide checkbox.
TIP Touch the bottom of the display to recover the taskbar when in Auto Hide
mode.
The operating system offers different input panels for entering data. You can
access these input panels from the taskbar or the control panel. From the
taskbar, click the input panel icon and choose the onboard keyboard that you
want to use:
• CHT Chajei IM (Chinese)
• CHT Phonetic IM (Chinese)
•Keyboard (small keyboard)
• LargeKB (large keyboard)
• MS Kana IM (Japanese)
• MS Roma IM (Japanese)
• Hide Input Panel (closes the keyboard)
TIP The input panel icon changes depending on which input panel you select.
84 Rockwell Automation Publication 2711P-UM007F-EN-P - February 2020
Page 85

Windows Operating System Chapter 4
Windows Control Panel
Applications in the Windows control panel let you view and configure system
and terminal settings. For example, you can monitor hardware performance,
calibrate the touch screen, or adjust screen saver settings.
TIP Most terminal settings are also available in FactoryTalk View ME Station
Configuration mode.
The language of the control panel applications is based on the language set for
the operating system. English is the default.
You can access the control panel in several ways:
• Choose Start>Settings>Control Panel.
• Open My Device on the desktop, then double-click Control Panel.
This chapter covers control panel applications specific to the
terminal.
TIP From the View menu, you can change the size of the icons or see a brief
description of each.
TIP Many control panel applications have scroll bars to view information on a
smaller display, however, most examples show the full view for clarity.
Rockwell Automation Publication 2711P-UM007F-EN-P - February 2020 85
Page 86

Chapter 4 Windows Operating System
Backup and Restore
The Backup and Restore application lets you copy the current system image on
the terminal, then restore that image to the same terminal or other terminals.
This function is useful if you want to clone a system image to multiple
terminals.
TIP You can back up a system image to a USB drive or SD card. Rockwell
Automation recommends using a USB drive or SD card with a minimum of
1 GB of available space. For applications with a large file system, use a
minimum of 2 GB of available space.
A typical backup includes the following:
•File system
• Firmware image
•Windows registry
• Optional user configuration data
You can include user configuration data in the backup by selecting the
Advanced Network & Display Settings checkbox in the Backup & Restore
dialog box.
Table 21 - Advanced Network and Display Settings
Setting Description
Ethernet network • DHCP-enabled or fixed IP address
•Primary and secondary DNS
•Primary and secondary WNS
• Speed and duplex s ettings
USB network USB IP address and subnet mask, Gateway, DHCP-enabled or fixed IP address
Network Device name
Display • Display brightness
• Screen saver dimmer timeout
Perform a Backup
Follow these steps to perform a backup.
1. Insert a USB drive or SD card into the appropriate slot on the terminal.
2. In the control panel, double-click the Backup & Restore icon.
3. Click browse ... on the Backup tab.
86 Rockwell Automation Publication 2711P-UM007F-EN-P - February 2020
Page 87

4. Select the target location for the back-up file:
• USB Storage if you are using a USB drive
• Storage Card2 if you are using an SD card
5. Type a name for the back-up file.
Back-up files have the .pvb file type.
6. Click OK.
Windows Operating System Chapter 4
7. Click Backup to start the process.
A progress bar shows the status of the operation. The backup can take a
few minutes. You receive notification when the backup completes.
8. Click OK.
If the file exists, you are asked if you want to overwrite the current file.
9. To close the Backup & Restore dialog box, click Exit.
TIP You can verify the .pvb file was successfully created when you double-click
My Device and select the target location for the backup. If the .pvb file was
not successfully created, use a USB drive or SD card with more available
space.
Rockwell Automation recommends using a USB drive or SD card with a
minimum of 1 GB of available space. For applications with a large file
system, use a minimum of 2 GB of available space.
Rockwell Automation Publication 2711P-UM007F-EN-P - February 2020 87
Page 88

Chapter 4 Windows Operating System
Restore a Back-up Image
Follow these steps to restore or clone a back-up image to storage device.
1. Insert the USB drive or SD card into the appropriate slot of the target
device.
2. In the control panel, double-click Backup & Restore.
3. Click the Restore tab.
4. To select the back-up file to restore, click … (browse).
5. Select the location of the back-up file:
• USB Storage if you are using a USB drive
• StorageCard2 if you are using an SD card
6. Select the .pvb back-up file to restore.
7. Click OK.
8. Click Restore.
The restore automatically includes advanced network and display
settings if you selected this option when performing the backup.
9. To start the restore process, click Yes.
88 Rockwell Automation Publication 2711P-UM007F-EN-P - February 2020
Page 89

Windows Operating System Chapter 4
The terminal starts the restore process that takes a few minutes.
IMPORTANT Do not remove the USB drive, SD card, or power off the terminal during a
restore. This action can corrupt the firmware.
If the restore fails, reset the terminal from the maintenance menu.
Refer to Maintenance Mode Operations
on page 145 for details.
When the restore completes successfully, the terminal restarts.
Rockwell Automation Publication 2711P-UM007F-EN-P - February 2020 89
Page 90

Chapter 4 Windows Operating System
Display Properties
Use Display Properties to control the desktop background image and
appearance, the brightness of the backlight, and screen saver settings.
Desktop Background
The Background tab in Display Properties controls the background bitmap on
the desktop. The default bitmap is ‘abclocknight’.
You can select another image from the pull-down menu or browse the system
for a bitmap image. Some custom images are in the \Windows folder.
Desktop Appearance
The Appearance tab in Display Properties controls the visual style and colors of
the desktop and other window elements.
Two custom schemes and images provide for day or night viewing. When you
change schemes, remember to change the image on the background tab.
Scheme Desktop Color Background Logo
AB Day Blue ablclockday
AB Night Black abclocknight
Backlight Intensity
The Backlight tab in Display Properties lets you set the brightness level of the
display between 1…100%. At 1%, the display is minimally visible.
90 Rockwell Automation Publication 2711P-UM007F-EN-P - February 2020
Page 91

Windows Operating System Chapter 4
After you change the screen rotation, you
have to calibrate the touch screen.
1. Plug in a USB mouse to the terminal.
2. Restart the terminal.
3. To calibrate the touch screen, use the
mouse.
4. See Calibrate the Touch Screen
on
page 65 for calibration details.
Screen Saver
The screen saver extends the life of the display. When the terminal is idle for a
continuous period, the screen saver dims the backlight and displays a moving
image. When deactivated, the display brightness returns to its normal level.
The Screen Saver tab in Display Properties lets you perform these actions:
• Change the idle timeout for the screen saver. The default is 10 minutes.
When the screen saver activates, the dimmer controls the backlight
intensity. You set the brightness of the dimmer in range 0…100%. The
default intensity is 10%. At 0%, the backlight is minimally visible.
• Browse the system for another screen saver bitmap. The default screen
saver is SSFloat.bmp. Click Add or Remove to change screen saver
bitmap. The system recognizes bitmaps in the \Windows folder. Only
one bitmap is supported.
• Disable the screen saver by clearing the ‘Start screen saver after’
checkbox.
Cursor
The Advanced tab in Display Properties lets you enable or disable the visible
cursor that you see on the display. The cursor is visible by default.
Screen Rotation
The Advanced tab in Display Properties lets you rotate the screen on the
terminal. The default is 0°.
Rockwell Automation Publication 2711P-UM007F-EN-P - February 2020 91
Page 92
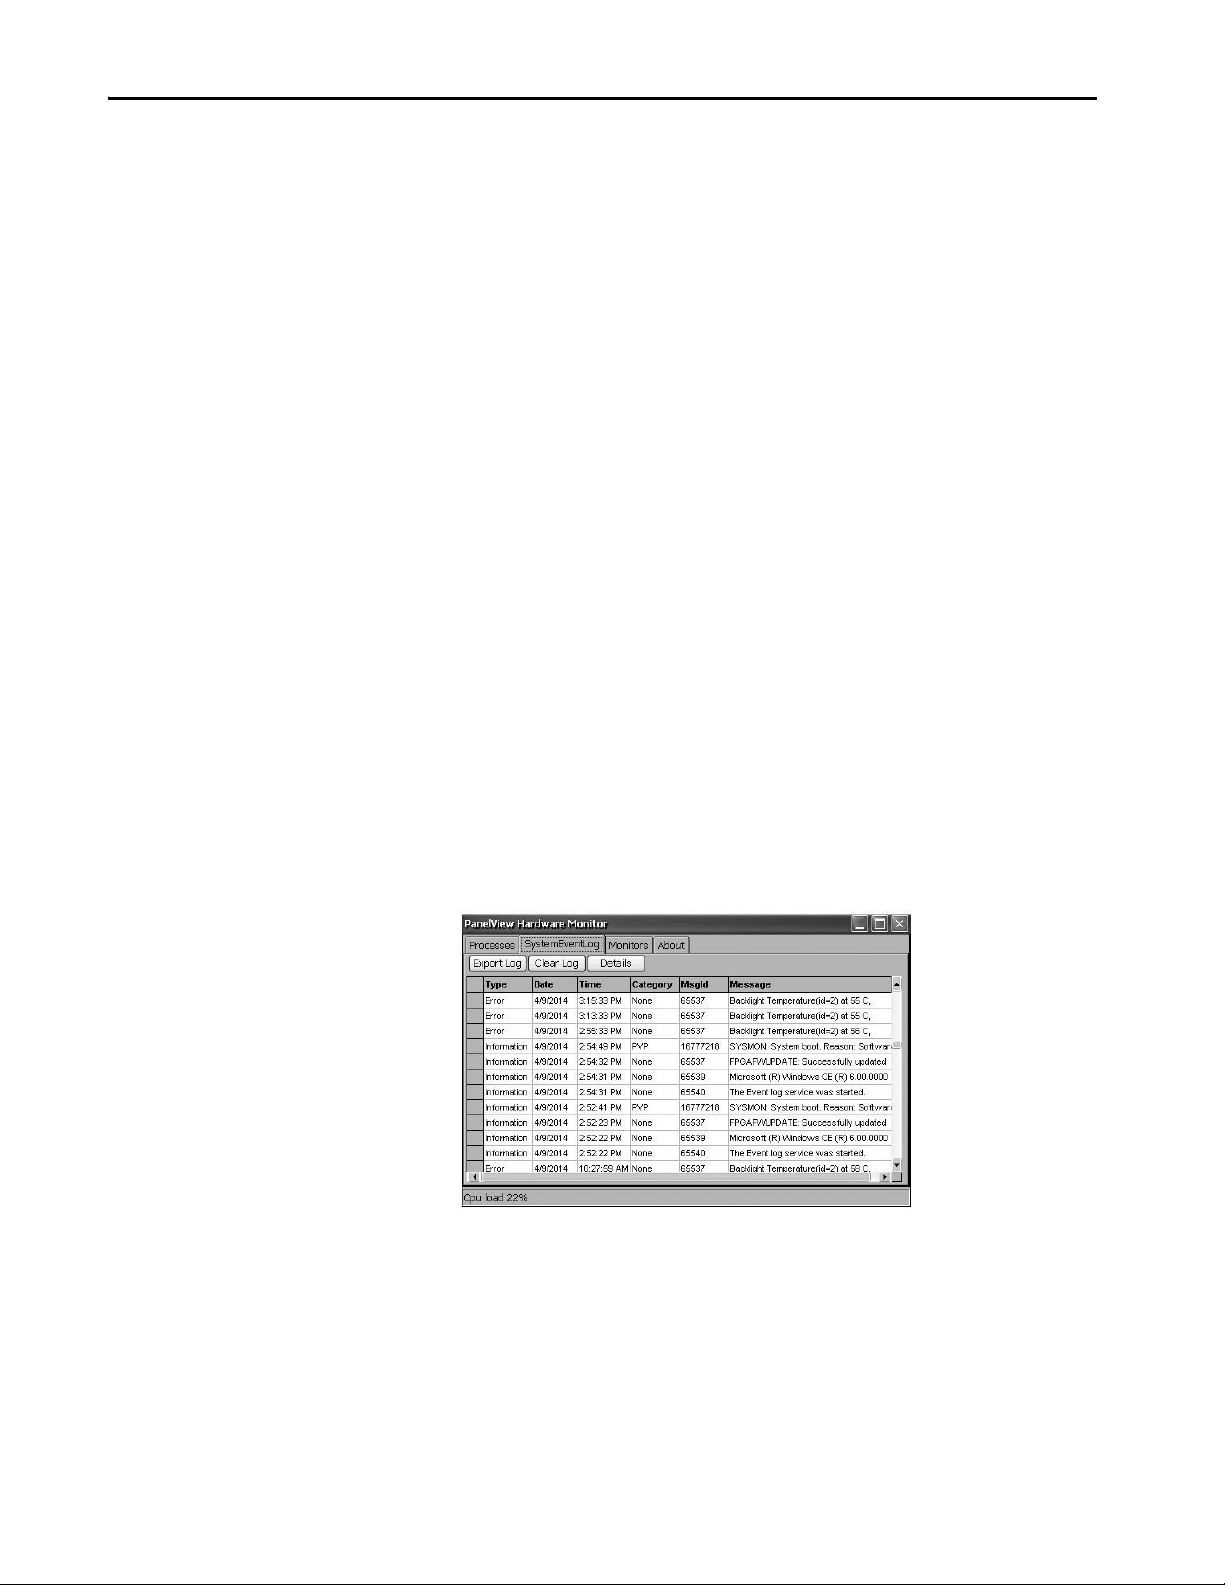
Chapter 4 Windows Operating System
Hardware Monitor
The Hardware Monitor provides status and troubleshooting information for
the terminal. You can view running processes, system event log, battery
voltages, current temperature, CPU load, and memory load.
Processes
The Processes tab in the Hardware Monitor shows all processes running on the
terminal and memory usage of each process.
System Event Log
The System Event Log in the Hardware Monitor shows warnings, errors, and
events that the terminal logs.
The log provides a date and time stamp of each event and text that describes the
event. The maximum size of the log is 1 MB, approximately 4,000 records. If
the log exceeds 1 MB, the oldest 512K of information is removed. You can
perform the following operations on the log file:
• Press Export Log to export the log file to a CSV file (*.csv) in the
\Windows folder. The default file name is SystemLog.csv.
• To clear all events from the log, press Clear Log.
• To view more details on a selected event, press Details.
92 Rockwell Automation Publication 2711P-UM007F-EN-P - February 2020
Page 93
Windows Operating System Chapter 4
Monitors
The Monitors tab in the Hardware Monitor provides continuous voltage,
temperature, and load information for the terminal.
Battery Voltage
The Monitors tab gives a visual status and voltage reading of the battery for the
real-time clock. The battery voltage is read at power-up.
Table 22 - Battery Conditions
Condition Battery
Depleted Less than 2.0V indicates a dead battery or no power.
Low 2.0…2.74V
Normal 2.75V or higher
An event is logged to the system event log for a low or depleted battery.
Temperatures
The Monitors tab gives a visual status and reading of the current CPU, logic
board, and display temperature. The temperature updates every ten minutes.
Table 23 - Temperature Conditions
Condition Temperature
Low –
Normal 25…94 °C (77…201 °F)
High 95 °C (203 °F) and higher
An event is logged to the system event log for a failed temperature sensor.
IMPORTANT A high temperature condition causes an automatic restart attempt. Restart
attempts continue indefinitely until the system is cool enough to resume
normal operation. High temperature conditions are logged to the system
event log.
Rockwell Automation Publication 2711P-UM007F-EN-P - February 2020 93
Page 94

Chapter 4 Windows Operating System
Logo Manager
Use the Logo Manager to change the logo that appears on the splash screen at
startup and the default screen saver image. The default splash-screen image is
the Allen-Bradley logo (ablogo.bmp).
The logo can be a .bmp, .jpg, .gif, or .png image. A 90 x 90 pixel, 16-bit color
image provides the best results.
Before applying the new logo, you can do the following:
• Preview the logo on the splash screen.
• Resize image to fit the fixed area of the splash screen.
To apply a new logo the splash screen and the screen saver, follow these steps.
1. Double-click Logo Manager in the control panel.
The Logo Manager opens with the current logo.
2. Click Load.
3. Select the location of the new image you want to load:
•A folder on the terminal.
• Storage Card2 – SD card
•USB Storage – USB drive
4. Select the image file that you want to load.
5. Verify that the file type is correct.
6. Click OK.
94 Rockwell Automation Publication 2711P-UM007F-EN-P - February 2020
Page 95

Windows Operating System Chapter 4
The new logo appears in the Logo Manager dialog box.
7. Check ‘Preview entire screen’ to view the logo on the splash screen.
If the logo is truncated or too small, check ‘Stretch/shrink image to fit’
to resize the logo to fit the area.
8. If satisfied with the preview, click Apply.
A dialog box confirms that the splash screen was updated. The default
screen saver, ssfloat.bmp, is updated with the new image.
9. To close the Logo Manager, click OK, then click Exit.
Rockwell Automation Publication 2711P-UM007F-EN-P - February 2020 95
Page 96

Chapter 4 Windows Operating System
User Accounts
User Accounts let you configure NT LAN manager (NTLM) user accounts to
authenticate client connections when using the FTP, web, and file servers. A
user account consists of a user name and a password.
TIP NTLM is the security protocol that provides authentication, integrity, and
confidentiality to users on Windows operating systems. NTLM is still
included to support Windows 2000, 2002, and 2003 server systems.
Follow these steps to add a user account.
1. Double-click User Accounts in the control panel.
2. Click in the user name field and type a name.
3. To clear the field and type a password, click in the Password field.
Asterisks display as you type the password.
4. Reenter the password in the Confirm pwd field.
5. Click Add User.
6. Click OK to acknowledge the new user account.
The new user name is added to the list.
7. Repeat steps 1
96 Rockwell Automation Publication 2711P-UM007F-EN-P - February 2020
through 6 to add additional user accounts.
Page 97

8. When done, click X to close the dialog box.
To remove a user account, follow these steps.
1. Select a name from the user name list.
2. Click Remove User.
Windows Operating System Chapter 4
3. To confirm the removal of the selected user account, click Yes.
The user account list is permanently deleted from the list.
4. To close the User Account Manager, click X.
TIP Users who are entered in authentication lists of FTP, web, or file server
configurations are removed when user accounts are deleted.
Rockwell Automation Publication 2711P-UM007F-EN-P - February 2020 97
Page 98

Chapter 4 Windows Operating System
Services
The Services application shows servers the PanelView Plus 7 Standard terminal
supports. You can enable (start) or disable (stop) each server.
The buttons are color-coded:
• Green indicates that the server is running and automatically started at
system startup.
• Red indicates that the server is not running.
• Gray indicates that the server is not available on the terminal.
To enable or disable a server, press the corresponding button and the color
changes accordingly.
Network Server Configuration
The Network Server Configuration application configures settings for VNC,
FTP, web, Kepware, and file server activities on an Ethernet network.
VNC Server Configuration
The terminal provides two VNC client viewers:
• Vncviewer.exe is in the /Windows folder on the terminal desktop. You
can deploy this viewer to a personal computer to connect to, view, and
control a PanelView Plus 7 terminal. See these sections for details:
– VNC Connection Requiring a Password for View-only Operations
on page 99
– VNC Connection with Separate Passwords for View and Control
Operations on page 100
• Another viewer on the terminal lets you establish a VNC connection to
another PanelView Plus 7 terminal. To access this viewer, click
Start>Programs>VNC Viewer. See these sections for details:
– Establish a VNC Connection Between a Local Terminal and a
Remote Terminal on page 102
– Close a VNC Connection to a Remote Terminal on page 104
– Make a New VNC Connection to a Remote Terminal on page 104
– Transfer Files Between a Local and a Remote Terminal on page 105
98 Rockwell Automation Publication 2711P-UM007F-EN-P - February 2020
Page 99

Windows Operating System Chapter 4
The VNC Server tab in the Network Server Configuration dialog box
configures settings for a client device to view or control the terminal over a
VNC connection.
TIP Click OK in the title bar of the dialog box to apply new settings. You are
asked if you want to restart the service immediately.
Table 24 - VNC Server Parameters
VNC Parameter Description Default
General
View Only (no remote
control)
Security
Enable security Check this option to require password protection for VNC connections to the terminal. When checked, you must enter a
Password Specifies a password that you must enter when establishing a VNC connection to control terminal displays. S elect the
View-only password Specifies a password that you must enter when establishing a VNC connection to view terminal displays. Select the box,
Check this option to let users view terminal displays over a VNC connection.
If you uncheck View Only, you can control and view terminal displays over a VNC connection.
If security is disabled, you are not required to enter a password when connecting to the terminal.
valid password before viewing or controlling terminal displays.
If you enable security, you must supply a password for one of these parameters:
• Password - for control and view operations
• View-only password - for view only operations
box, then type a password in the field at the bottom of the dialog box. The password is a maximum of seven characters.
Password p rotection is required to co ntrol terminal displays if :
• View Only is unchecked (allows control access)
• Security is enabled
then type a password in the field at the bottom of the dialog box. The password is a maximum of seven characters.
TIP: If you uncheck the View Only parameter, you have control and view access to the terminal. With control access
enabled, you can restrict one or more users to view-only access by providing a View-only password.
View-only password protection is required to view terminal displays if security is enabled:
• View Only is checked or unchecked
• Security is enabled
Enabled for view only
Disabled (unchecked)
No password
No password
VNC Connection Requiring a Password for View-only Operations
The default VNC configuration enables view-only access to the terminal
without requiring a password. This configuration requires the VNC viewer
that you copy from your terminal to a computer.
TIP Copy vncviewer.exe, in the /Windows folder on the terminal, to your
computer and install the TightVNC software.
To configure a VNC connection that requires a password to view terminal
displays, follow these steps.
1. From the control panel, click Server Config.
Rockwell Automation Publication 2711P-UM007F-EN-P - February 2020 99
Page 100

Chapter 4 Windows Operating System
2. On the VNC Server tab, check the following:
• View only (no remote control)
• Enable security
3. Select View-only password, then enter a seven-character password in the
field that opens.
4. Click OK, then restart the server when prompted to apply new settings.
Follow these steps to launch a VNC connection to view terminal operations.
1. On your computer, choose Start>Programs>TightVNC>TightVNC
Viewer.
2. Enter the IP address of your terminal and click Connect.
TIP Click the network connection icon in the system tray to view the IP
address of the terminal.
3. Enter the View-only password that is defined on the terminal and click
OK.
The PanelView VNC Server opens the current view of the terminal on
your desktop. You can view but not control terminal operations.
4. When finished, close the PanelView VNC Server.
VNC Connection with Separate Passwords for View and Control Operations
You can configure the VNC server to require separate passwords for view-only
and control operations. This example uses the VNC viewer that is deployed to
a computer to connect to the terminal.
TIP Copy vncviewer.exe, in the /Windows folder on the terminal, to your
computer and install the TightVNC software.
100 Rockwell Automation Publication 2711P-UM007F-EN-P - February 2020
 Loading...