

TECHNICAL MANUAL
Montage- en service-instructies
Assembly and Service manual
Montage- und Wartungsanleitung
Notice de montage et d'entretien
Instrukcja monta
Montaggio e manutenzione
u i obs ugi
Salsa 10
Salsa 12
document: TMBS030
art.: 382215
init: 9501
rev.: 2002/03
NEDERLANDS
MONTAGE
3.
Verwijder de beschermfolie van de
acrylplaat.
Controleer of de spanning ter plekke
overeenkomt met die op het
typeplaatje.
Steek daarna de
geaarde
Uw apparaat is nu klaar voor gebruik.
wandkontaktdoos.
stekker in een
GEBRUIK
1.
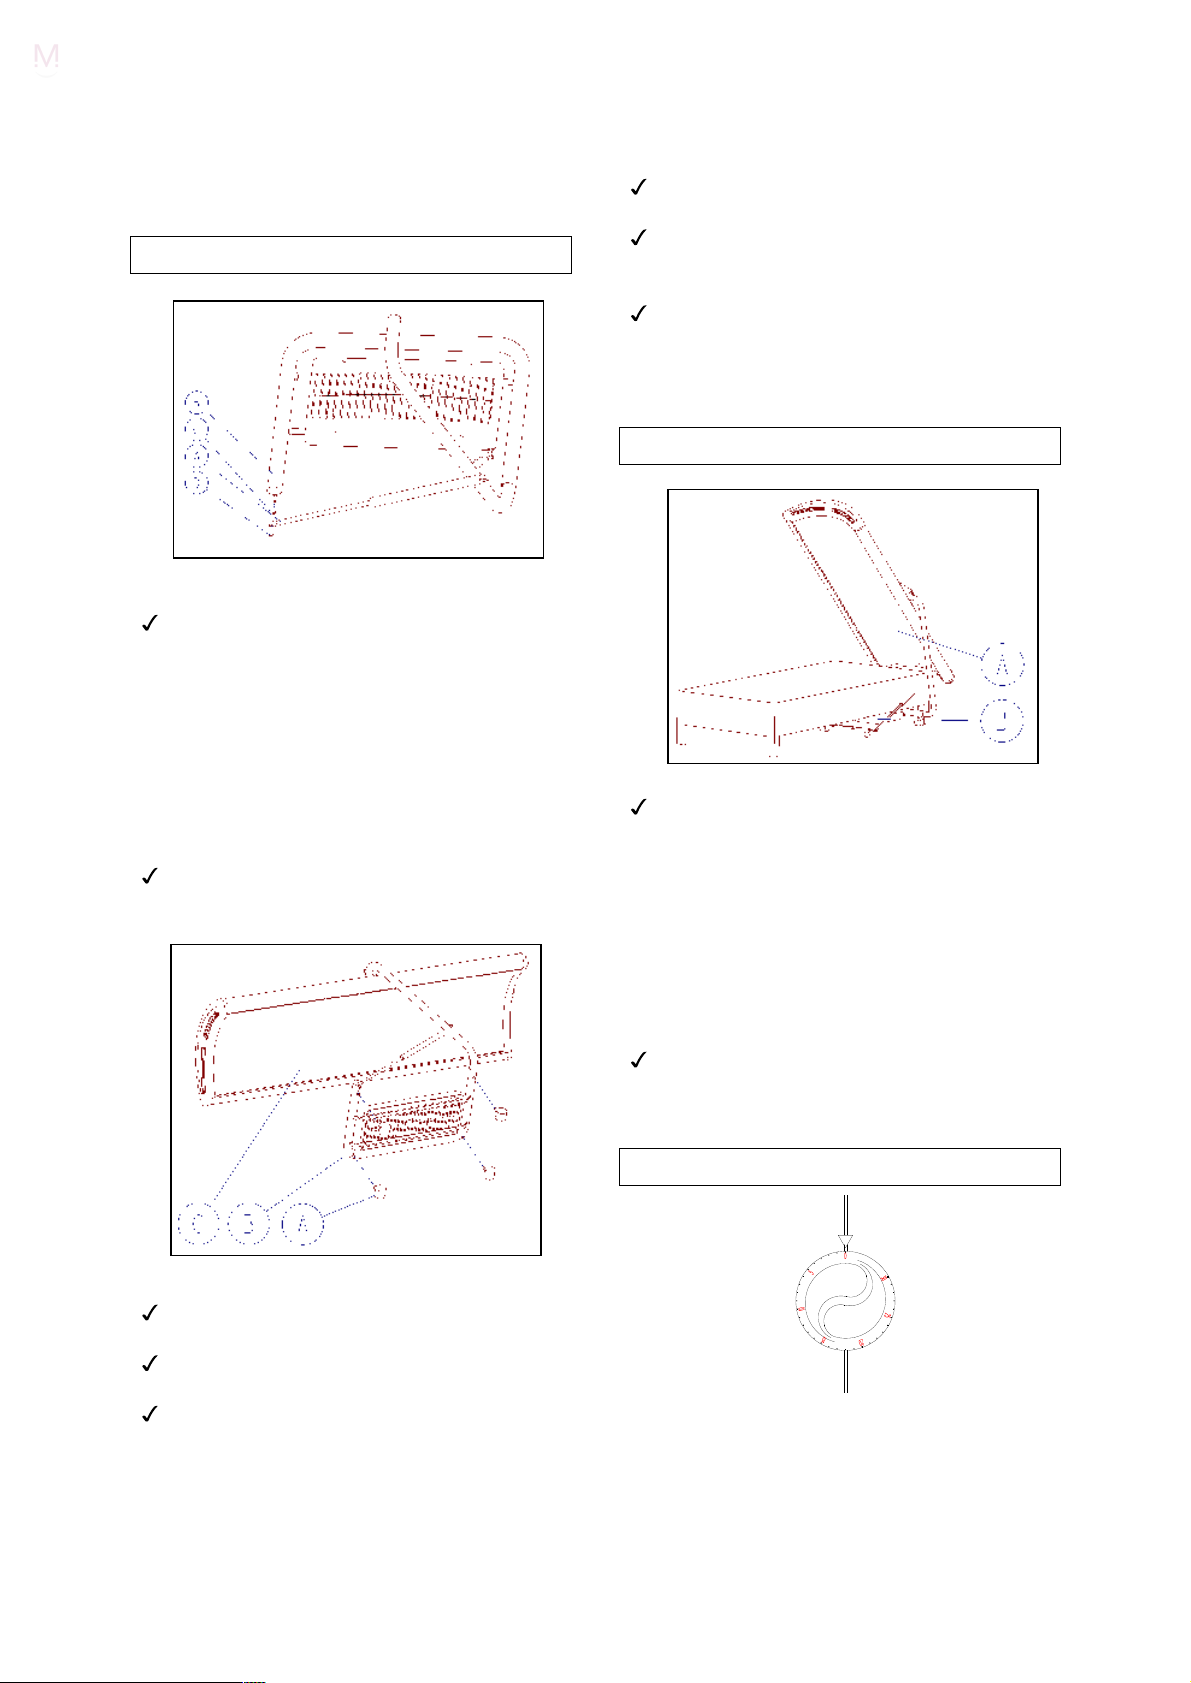
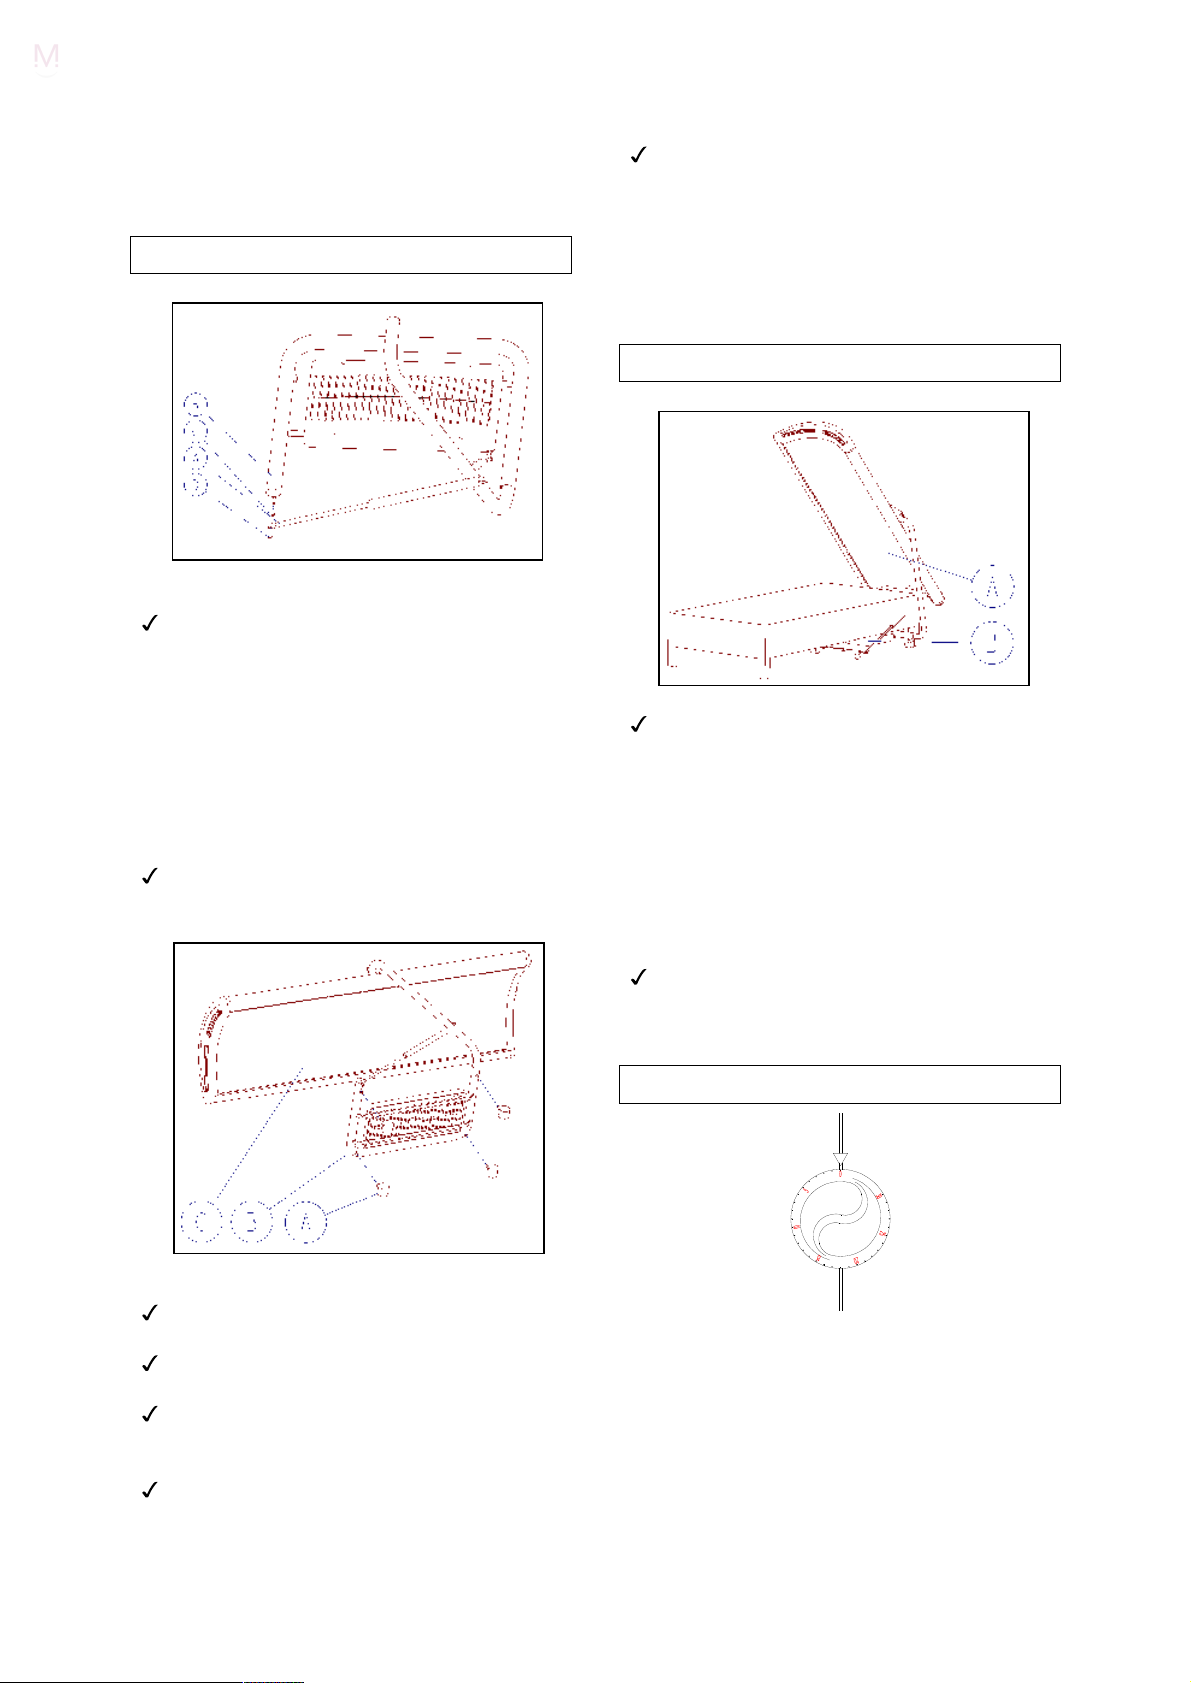
Bevestig de gasdrukveer (A) aan het
statief (B) met behulp van de kunststof
ring (C) en de borgveer (D).
LET OP:
helemaal aangedrukt te worden. Een
eenmaal aangebrachte borgveer mag niet
verwijderd worden. De borgveer is slechts
éénmaal te gebruiken.
de borgveer dient goed en
Pak de hemel aan beide zijden in het
midden vast en til de hemel omhoog.
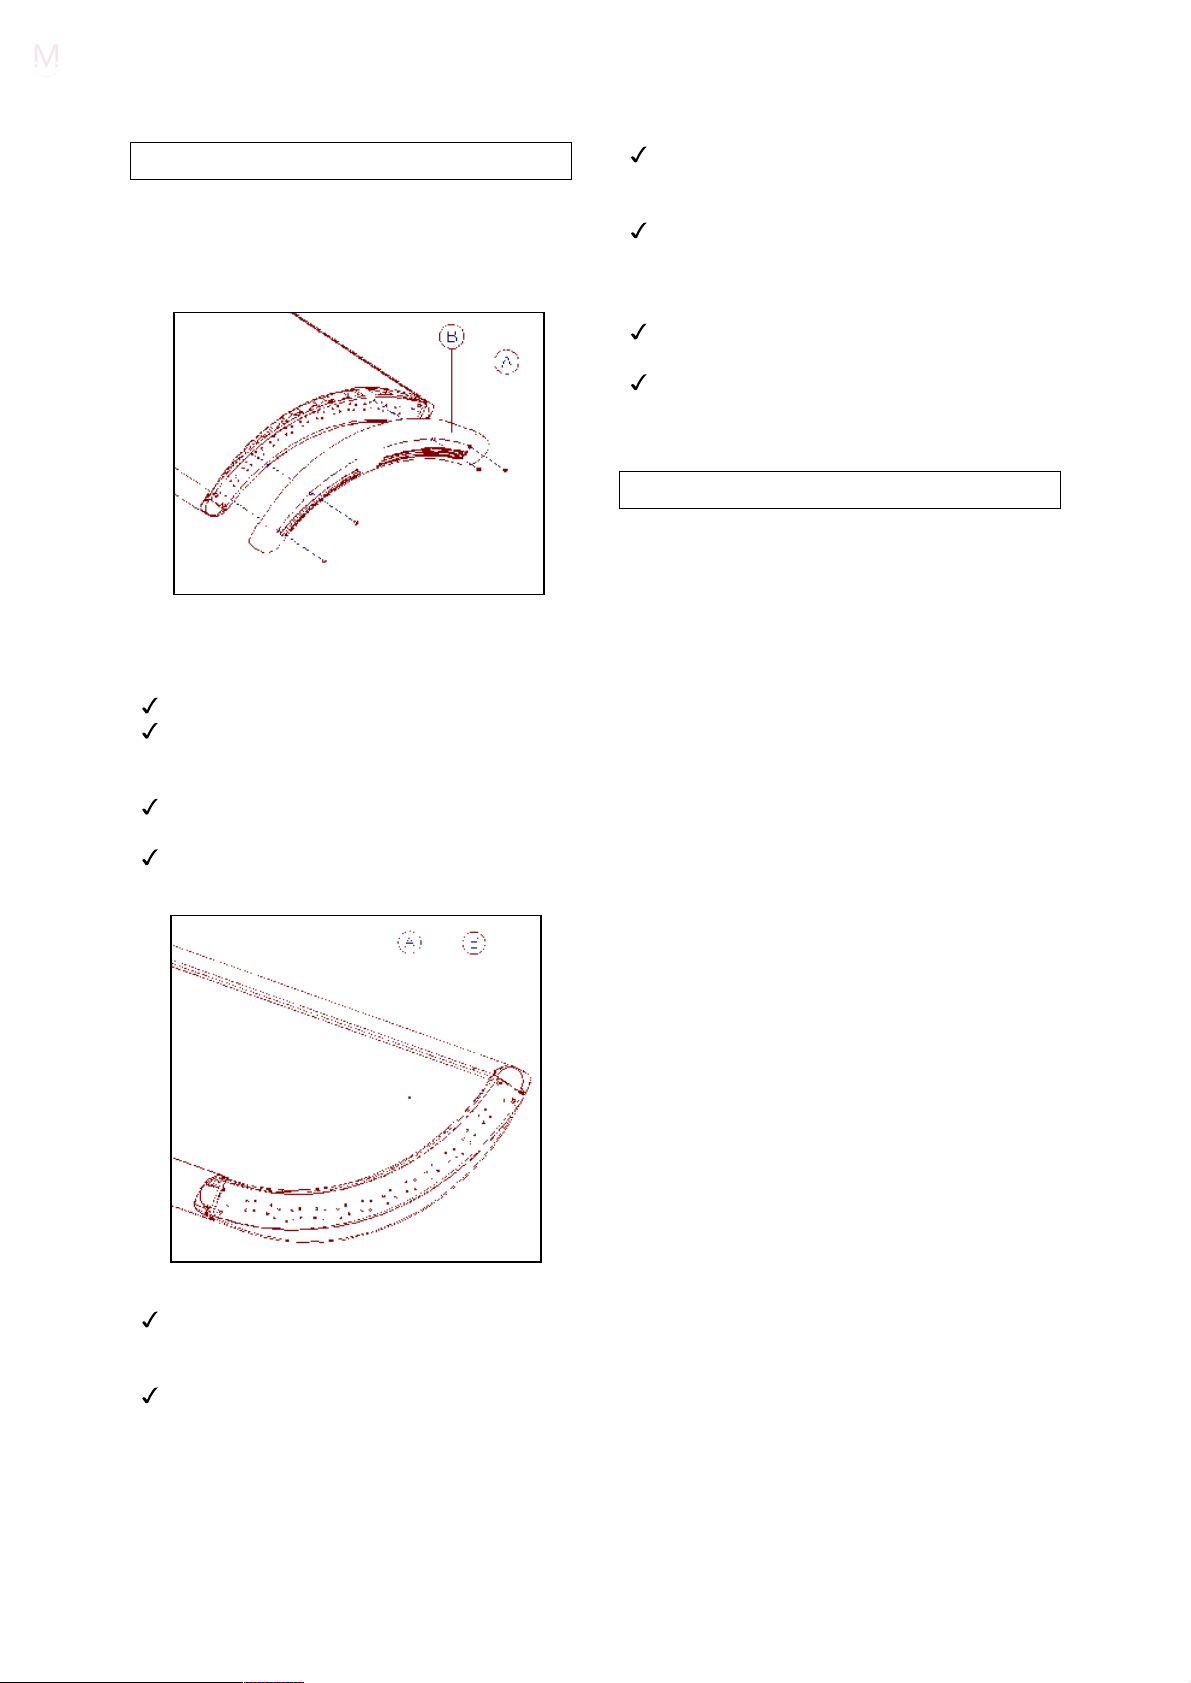
Rij
het apparaat (A) in verticale stand
naar het voeteneind van het bed, of
plaats het apparaat voor een stoel.
Zorg ervoor dat u het apparaat altijd op
een vlakke ondergrond plaatst.
LET OP:
mogen nooit door enig voorwerp worden
afgedekt.
Pak de hemel aan beide zijden vast en
trek de
de sleuven van de VSA-kar (B)
hemel naar u toe.
BEDIENING
2.
Kantel nu het apparaat zodanig dat
deze met de voorzijde op de grond ligt.
Bevestig
onderkant van het statief (B).
Zet de hemel (C) nu terug op het
statief.
de
zwenkwielen
(A) aan de
U kunt de timer op het gewenste aantal
minuten instellen door hem rechtsom te
draaien.
Na het verstrijken van de tijd schakelt de
timer automatisch uit. Wilt u uw apparaat
eerder uitschakelen dan draait u de timer
linksom naar nul.
ACRYLPLAAT
Het uitnemen van de acrylplaat dient alleen
verricht te worden als het apparaat zich op
kamertemperatuur bevindt.
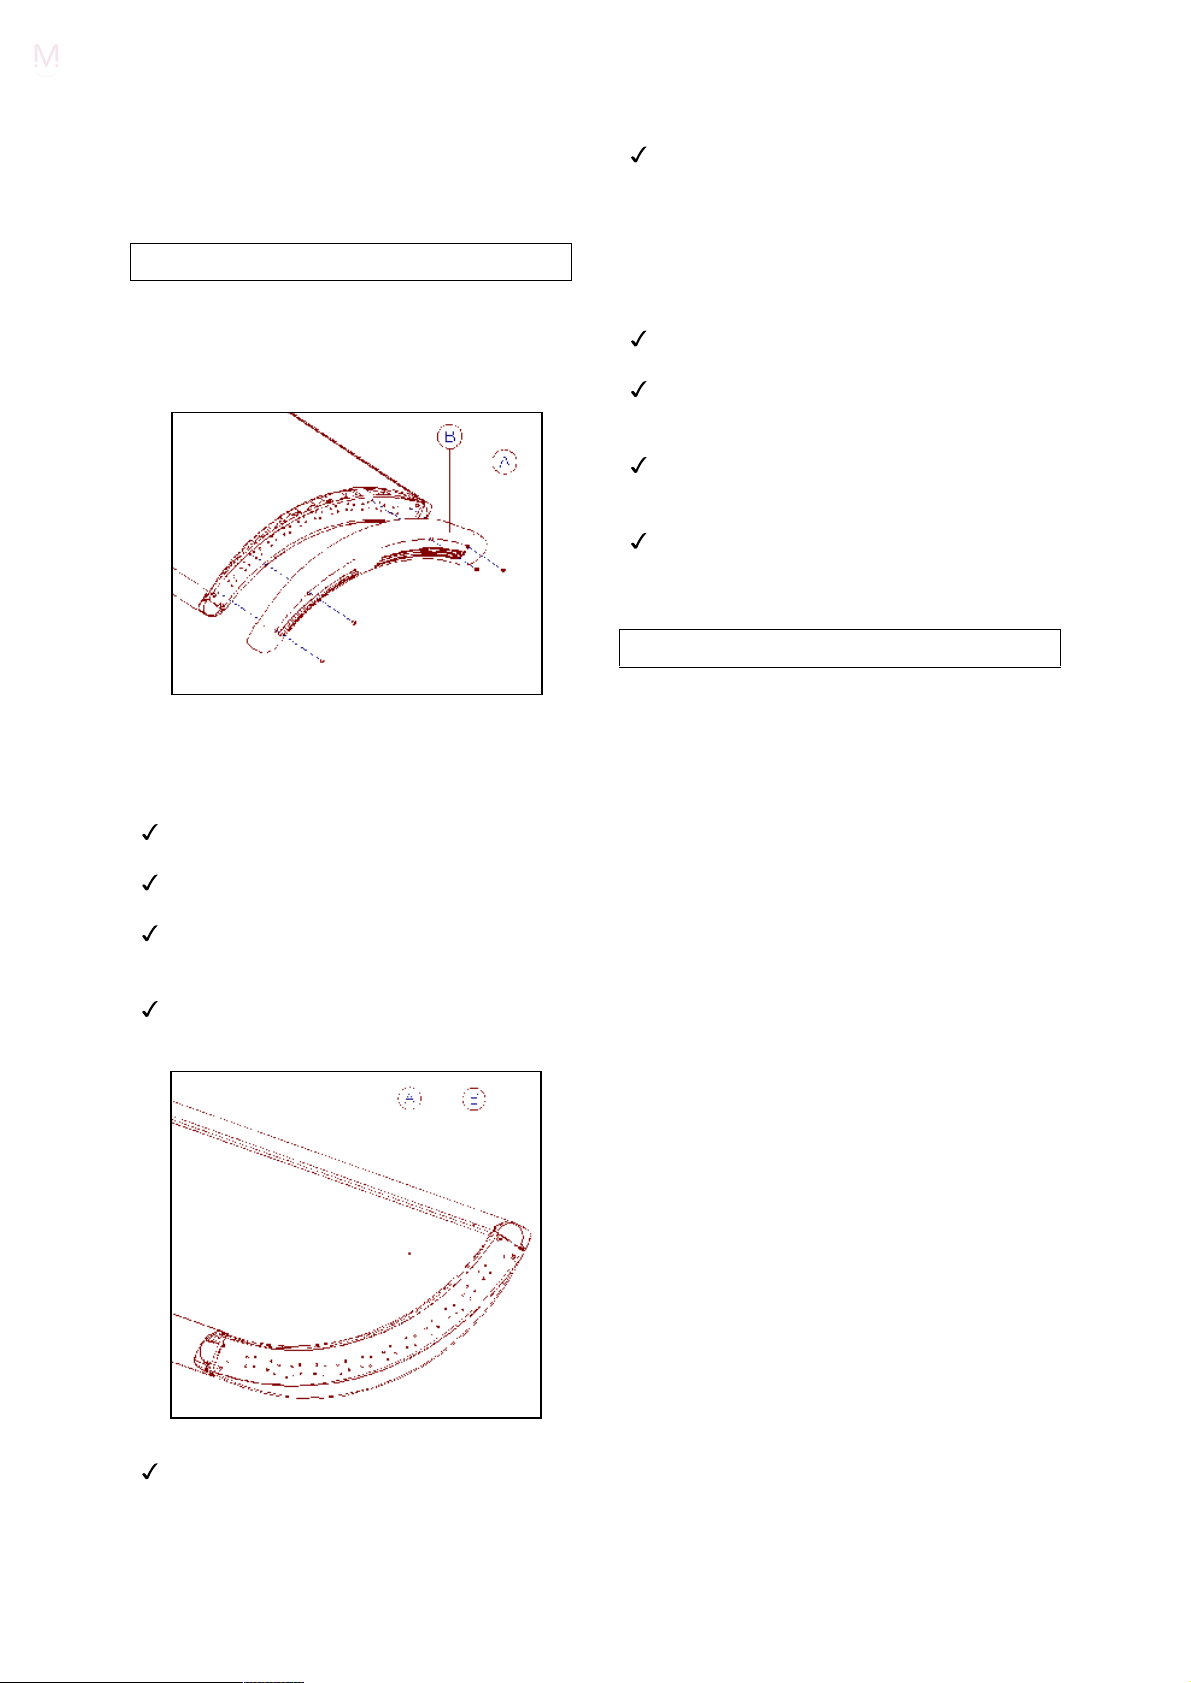
1.
Wanneer u de acrylplaat wilt uitnemen,
dient u de volgende handelingen te
verrichten:
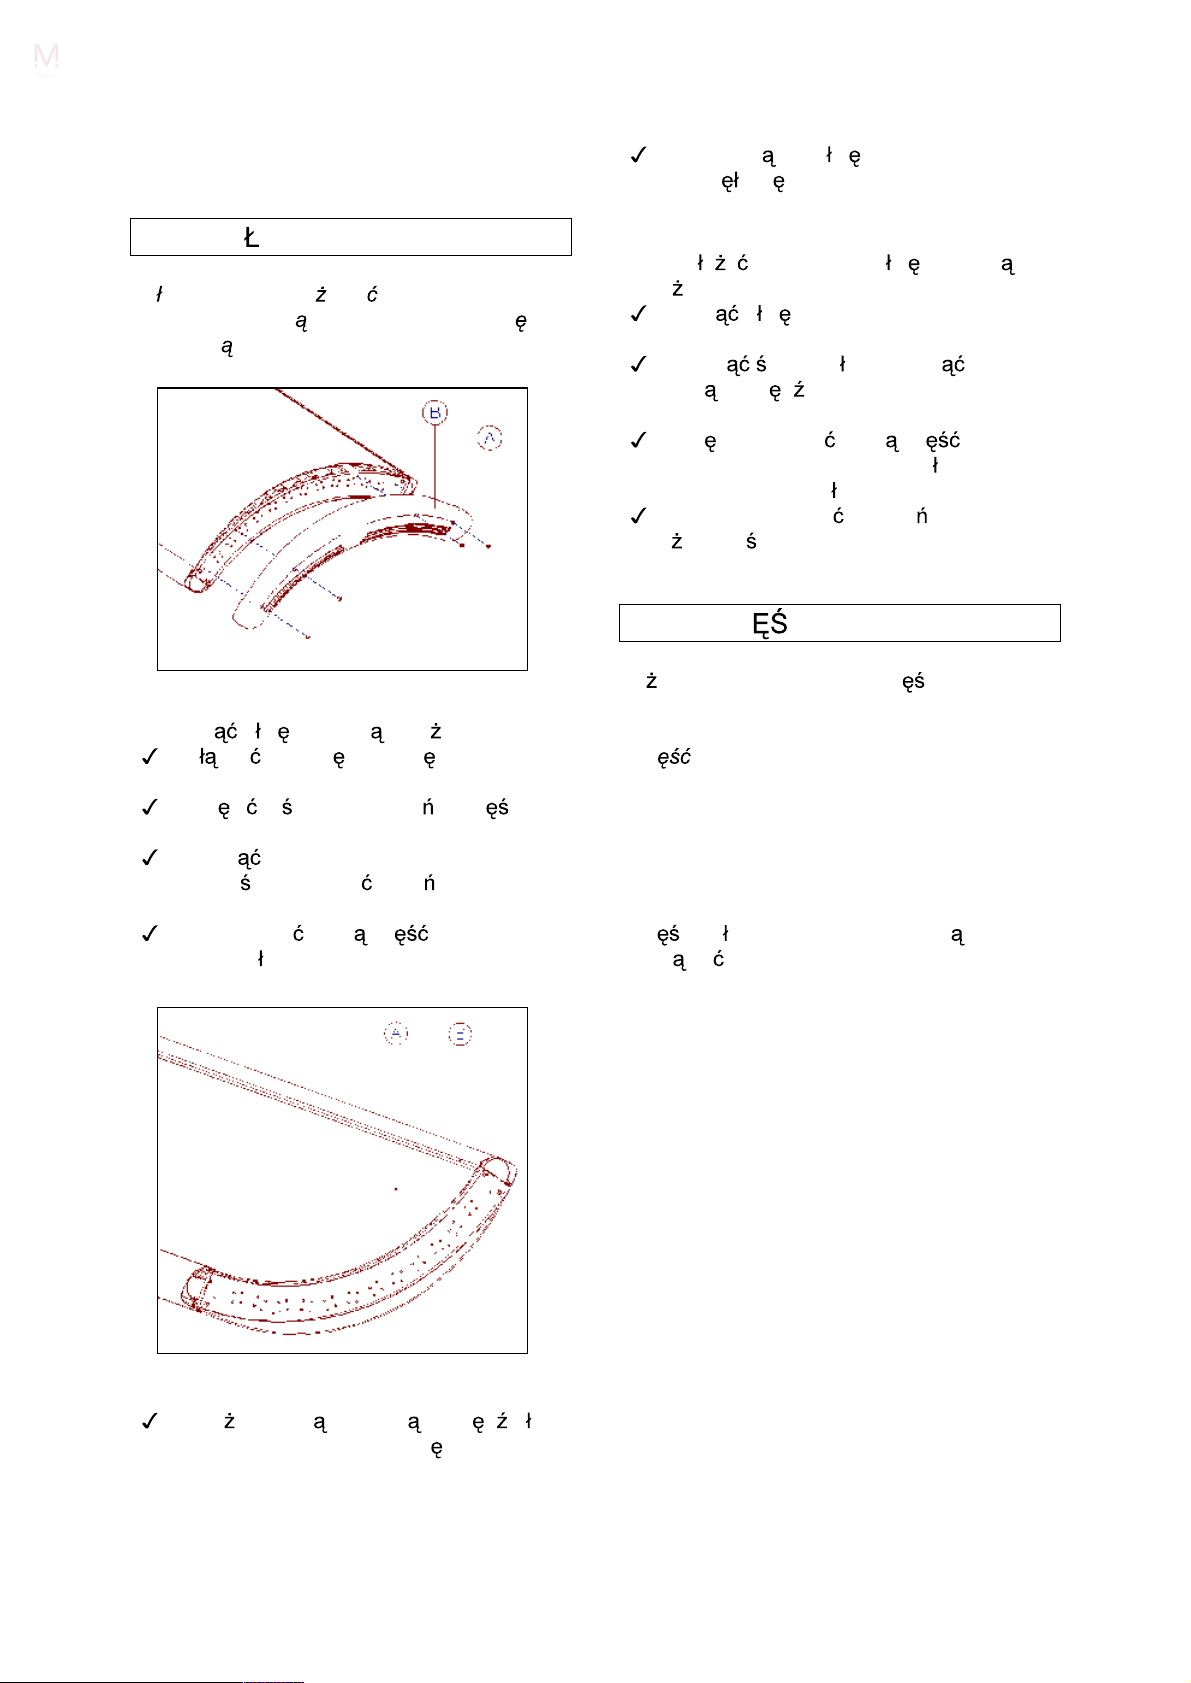
Haal de
wandcontactdoos.
Draai de 4 schroeven (A) van het
kopschot (B) los.
Schuif het kopschot uit de hemel.
Herhaal deze handeling bij het
kopschot aan de andere
Draai de hemel nu geheel rond zodat
de lampen aan de bovenzijde zitten.
stekker
uit de
zijde.
Trek nu de acrylplaat naar u toe zodat
deze loskomt uit het profiel aan de
andere zijde.
3.
Het monteren van de acrylplaat vereist de
volgende handelingen:
Schuif de acrylplaat aan één zijde in de
gleuf van het kunststof profiel.
Druk in het midden op de acrylplaat en
schuif aan de andere zijde de acrylplaat
in de gleuf van het kunststof profiel.
Draai vervolgens de hemel geheel rond
zodat de lampen weer aan de
onderzijde zitten.
Monteer nu beide kopschotten met de 4
schroeven.
ONDERDELEN
Gebruik alleen originele Alisun-onderdelen:
Onderdeel
Brilliant
GoldSun
Reflektor Salsa 10/12
Timer
Het vervangen van het netsnoer van dit
apparaat mag alleen door geautoriseerd
personeel gebeuren.
Sun plus XT 100W
DuoTan®
Professional 100W
Art.nr.
350377
350366
332220
355005
2.
Trek de acrylplaat (A) aan één zijde
voorzichtig los uit het kunststof profiel
(B).
ENGLISH
ASSEMBLY
Check if the voltage rating of your
facilities corresponds with the rating on
the type
the power cord into a grounded wall
socket.
Your unit is now ready for use.
label
.Then insert the plug of
USAGE
1.
Fasten the gas absorber (A) to the
stand (B) by means of the plastic
washer (C) and the locking spring (D).
NOTE:
pushed in properly, as far as it will go. Once
fitted, a locking spring should not be
removed. A locking spring can only be used
once.
The locking spring should be
Grasp the canopy on either side of the
centre
, then lift it upwards.
Wheel the equipment (A) (in a vertical
position), to the foot of the bed or place
it in front of a chair. See to it that the
equipment is always located on a flat
surface.
NOTE:
(incorporating ballast) must not become
covered by any foreign objects.
the slots of the wheeled base (B)
Grasp the canopy on either side and
pull it towards you.
OPERATION
2.
Now tilt the equipment such that its
front surface is on the floor.
Fasten the swivel casters (A) to the
bottom of the stand (B).
Now replace the canopy (C) on the
stand.
Remove the protective plastic from the
acrylic sheet.
You can set the timer to the required
number of minutes by turning it clockwise.
After the time has expired the timer will
switch off automatically. If you want to
switch off your unit sooner, the timer should
be turned anti-clockwise to the zero
position.

ACRYLIC SHEET
The acrylic sheet should only be removed
when the equipment is at room
temperature.
1.
Should you need to remove the acrylic
sheet, you must proceed as follows:
Remove the plug from the power
socket.
Unscrew the 4 screws (A) in the end
piece (B).
Slide the end piece out of the canopy.
Repeat this procedure with the end
piece at the other end of the equipment.
Now rotate the canopy as far as it will
go, so that the lamps are facing
upwards.
3.
When replacing the acrylic sheet, proceed
as follows:
Slide the acrylic sheet into the groove in
the plastic profile at one side.
Press down on the centre of the acrylic
sheet then slide its free edge into the
groove in the plastic profile on the other
side.
Next rotate the canopy all the way
back, such that the lamps are facing
downwards again.
Now fit both end pieces using the 4
screws.
PARTS
Use only original Alisun replacement parts:
Part
Brilliant
GoldSun
Reflector Salsa 10/12
Timer
This equipment's mains lead may only be
replaced by
Sun plus XT 100W
DuoTan®
Professional 100W
authorized
personnel.
Art.no.
350377
350366
332220
355005
2.
Carefully free one side of the acrylic
sheet (A) by pulling it out of the plastic
profile (B).
Now pull the acrylic sheet towards you
such that it slides out of the plastic
profile at the other side.

DEUTSCH
MONTAGE
1.
Befestigen Sie die Gasdruckfeder (A)
mit Hilfe der Kunststoff Unterlegscheibe
(C) und der Sicherungsring (D) am
Stativ (B).
ACHTUNG:
und vollständig anzudrücken. Ein einmal
angebrachter Sicherungsring darf nicht
entfernt werden. Der Sicherungsring darf
nur einmal benutzt werden.
Fassen Sie den Himmel an beiden
Seiten in der Mitte an, und heben Sie
ihn hoch.
Der Sicherungsring ist kräftig
3.
Entfernen Sie die Schutzfolie von der
Acrylplatte.
Kontrollieren Sie ob die Netzspannung
übereinstimmt mit der Angabe auf dem
Typenschild.
Stecken Sie erst dann den Stecker von
der Anschlußschnur in die geerdete
Kontaktdose.
Ihr Apparat ist nun gebrauchsfertig.
GEBRAUCH
Fahren Sie das Gerät (A) in
senkrechtem Zustand zum Fußende
des Bettes, oder stellen Sie das Gerät
vor einen Stuhl. Achten Sie darauf, daß
Sie das Gerät immer auf einen ebenen
Boden stellen.
2.
Kippen Sie das Gerät jetzt so, daß es
mit der Vorderseite auf dem Boden
liegt.
Befestigen Sie die Rollen (A) an der
Unterseite des Stativs (B).
Setzen Sie den Himmel (C) jetzt wieder
auf das Stativ.
ACHTUNG:
Vorschaltgeräts (B) dürfen nie durch irgend
einen Gegenstand abgedeckt werden.
Fassen Sie den Himmel an beiden
Seiten an, und ziehen Sie ihn zu sich
hin.
Sie können die Zeituhr einstellen indem Sie
den Minutenzeiger nach rechts drehen.
Die Schlitze des
BEDIENUNG

Sobald die eingestellte Zeit abgelaufen ist,
schaltet die Uhr automatisch ab. Wollen Sie
das Gerät früher abschalten, drehen Sie
dann den Minutenzeiger nach links auf null.
ACRYLPLATTE
Die Acrylplatte ist nur bei Zimmertemperatur
des Geräts herauszunehmen.
1.
Zum Herausnehmen der Acrylplatte
müssen Sie wie folgt handeln:
Ziehen Sie den Netzstecker.
Lösen Sie die vier Schrauben (A) des
Seitenteils (B).
Schieben Sie das Seitenteil aus dem
Himmel. Verfahren Sie mit dem
Seitenteil an der anderen Seite des
Geräts ebenso.
Den Himmel jetzt ganz umdrehen, so
daß sich die Röhren an der Oberseite
befinden.
Ziehen Sie die Acrylplatte jetzt zu sich
hin, so daß sich diese auf der anderen
Seite aus dem Profil löst.
3.
Um die Acrylplatte wieder zu befestigen,
sind die folgenden Schritte nötig:
Die Acrylplatte auf einer Seite in die Nut
des Kunststoffprofils schieben.
In der Mitte auf die Acrylplatte drücken
und an der anderen Seite die
Acrylplatte in die Nut des
Kunststoffprofils schieben.
Dann den Himmel wieder ganz
umdrehen, so daß sich die Röhren
wieder an der Unterseite befinden.
Die beiden Seitenteile jetzt mit Hilfe der
vier Schrauben befestigen.
ERSATZTEILE
Verwenden Sie nur Alisun-Originalteile:
Ersatzteil
Brilliant
GoldSun
Reflektor Salsa 10/12
Zeituhr
Das Netzanschlußkabel dieses Geräts darf
nur von ausgewiesenem Personal ersetzt
werden.
Sun plus XT 100W
DuoTan®
Professional 100W
Art.nr.
350377
350366
332220
355005
2.
Die Acrylplatte (A) an einer Seite
vorsichtig aus dem Kunststoffprofil (B)
ziehen.

FRANÇAIS
ASSEMBLAGE
Enlevez la feuille de protection de la
plaque acrylique.
Vérifiez la conformité du voltage à la
norme indiquée.
Branchez ensuite sur une prise de terre
murale. Votre solarium est prêt à être
utilisé.
MANIEMENT
1.
Fixez le vérin à air comprimé (A) au
pied de support (B) à l'aide de la
rondelle plastique (C) et del ressort de
blocage (D).
ATTENTION:
être bien comprimé, jusqu'à la fin. Ne
retirez pas un ressort de blocage déjà
installé. Un ressort de blocage ne s'utilise
qu'une seule fois.
Attrapez le ciel des deux côtés du
milieu et relevez-le.
Le ressort de blocage doit
Faites rouler le ciel (A) en position
verticale vers le côté pieds du lit, ou
placez le ciel devant une chaise. Veillez
à ce qu'il repose toujours sur une
surface plane.
ATTENTION:
fentes du chariot ballast (B).
Attrapez le ciel des deux côtés et tirezle vers vous.
ne recouvrez jamais les
FONCTIONNEMENT
2.
Faites basculer l'appareil de façon à ce
qu'il repose par terre sur sa face avant.
Fixez les roulettes pivotantes (A) sous
le pied de support (B).
Replacez le ciel (C) sur le pied de
support.
3.
Vous choississez votre temps d'exposition
en tournant le bouton vers la droite.
Après le temps écoulé le solarium s'étient
automatiquement. Si vous souhaitez
interrompre la scéance avant la fin de la
programmation, tournez le bouton vers la
gauche jusqu'au "0".
PLAQUE ACRYLIQUE
Avant de retirer le panneau acrylique, vous
assurer que l'appareil est à température
ambiante.
1.
Si vous souhaitez enlever la plaque
acrylique, procédez comme suit:
Débranchez le ciel.
Dévissez les 4 vis (A) du panneau
terminal (B) et retirez-le en le faisant
coulisser.
Procédez de même pour l'autre
panneau terminal.
Imprimez une rotation complète au ciel
pour présenter les lampes vers le haut.
Introduisez d'un côté la plaque
acrylique dans le creux du profil
plastique et faites-la glisser.
Appuyez légèrement sur le milieu de la
plaque acrylique et introduisez-la de
l'autre côté dans le creux du profil
plastique.
Retournez le ciel pour présenter les
lampes vers le banc.
Montez les deux panneaux terminaux
et vissez à l'aide des 4 vis.
PIECES
Utilisez uniquement des pièces d'origine
Alisun:
Pièce
Brilliant
GoldSun
Réflecteur Salsa 10/12
Temps
Le remplacement du fil de raccordement
réseau de cet appareil devra être effectué
uniquement par des personnes qualifiées.
Sun plus XT 100W
DuoTan®
Professional 100W
Art.no.
350377
350366
332220
355005
2.
Tirez délicatement d'un côté sur la
plaque acrylique (A) pour l'enlever du
profil plastique (B).
Tirez la plaque acrylique vers vous pour
la retirer du profil de l'autre côté.
3.
Pour remonter la plaque acrylique,
procédez comme suit:

Polski
MONTA
Sprawd , czy napi cie zasilania sieci
do twojego urz dzenia odpowiada
napi ciu na tabliczce znamionowej.
Je li tak, w ó wtyczk kabla
zasilaj cego do gniazdka wtyczkowego
z bolcem.
Twoje urz
u ytku.
dzenie jest teraz gotowe do
USTAWIENIE
1.
Zamocuj si ownik (A) do stela a podstawy (B) za pomoc plastikowej
uszczelki (C) i spr ystej zawleczki
blokuj cej (D).
UWAGA: Zawleczka
odpowiednio
o ona, nie
za
Zawleczka
Uchwy górn cz od strony
zewn trznej i podnie do góry.
wci ni ta, a do
powinna
mo
spr ysta
by
e by uyta
musi
oporu.
ruszana.
tylko
raz.
by
Raz
Przyci gnij urz dzenie (A) (w pozycji
pionowej) do podstawy ó ka lub
umie je z przodu fotela. Uwa aj, aby
urz dzenie by o umieszczone zawsze
na p askiej powierzchni.
UWAGA:
(B) (zwieraj
zosta zasoni te.
Chwy górn cz za drug stron i
przyci gnij do siebie.
Otwory w podstawie z kó
cej d awiki lamp) nie mog
OBS UGA
kami
2.
Teraz przechyl ca o tak, aby przód
urz dzenia znalaz si na pod odze.
Przymocuj kó ka (A) do dolnej cz ci
stela a - podstawy (B).
Teraz za ó górn cz (C) na stela
podstaw .
Zdejmij foli ochronn z p yty akrylowej.
Mo esz nastawi
ilo
minut
przez
zgodnie z
Po
up
wy
zechcesz
obróci
kierunkiem
yni ciu
czy
pokrt o w
nastawionego
lampy
wy czy je wcze niej,
zegar/minutnik na
obrócenie
automatycznie.
kierunku
pokr t a
wskazówek zegara.
czasu
przeciwnym do
dan
zegar
Je li
musisz
ruchu
zerowej.
P yta
wtedy,
pokojow .
Aby zdj pyt akrylow naley:
wskazówek zegara do
P YTA AKRYLOWA
akrylowa
kiedy
Od czy wtyczk od napi cia
zasilania.
Odkr ci 4 ruby (A) w ko cu cz ci
(B).
Wysun koniec z czaszy. Te same
czynno ci powtórzy w ko cu z drugiej
strony.
Teraz obróci górn cz tak, aby
lampy by y zwrócone ku górze.
mo e by
dzenie ma temperatur
urz
1.
pozycji
zdejmowana
tylko
Teraz poci gnij p yt do siebie tak, aby
wysun a si z plastikowego profilu po
drugiej stronie.
3.
Aby za o y z powrotem p yt akrylow
nale y:
Wsun pyt w rowek w plastikowym
profilu z jednej strony.
Nacisn rodek p yty i wsun jej
woln kraw d w rowek w plastikowym
profilu z drugiej strony.
Nast pnie obróci górn cz z
powrotem tak, aby lampy by y
skierowane do do
Teraz zamocowa oba ko ce przy
u yciu 4 rub.
CZ CI ZAMIENNE
U ywaj
zamiennych
Cz
Brilliant
GoldSun
Reflektor Salsa
Zegar/minutnik
Cz
mog by
przedstawicieli
firmowego
tylko
oryginalnych
produkcji
Sun plus XT 100W
DuoTan®
Professional 100W
10/12
ci uk adów
wymieniane
autoryzowanego
u.
firmy ALISUN:
zasilania
tylko
cz ci
Numer
350377
350366
332220
355005
tego
urz dzenia
przez
katalogowy
serwisu
2.
Ostro nie wyci gnij jedn kraw d pyty
akrylowej (A) przez wysuni cie jej z
plastikowego profilu (B).

ITALIANO
ASSEMBLAGGIO
3.
Togliere la
lastra
Controllare
etichetta
sull
della
Inserire la
Ora
il solarium è pronto per
acrilica
vostra
spina
plastica
trasparente.
che
il
dati
corrisponda a
presa
nella
UTILIZZO
protettiva
voltaggio
elettrica.
presa
dalla
indicato
quello
di
corrente.
l uso.
1.
Quando si apre l imballo la base dello
stativo è posta in alto sopra la lastra
acrilica
Fissare la
(B)
interponendo
plastica (C) e
cappuccio
NOTA BENE: il cappuccio bloccante (D)
deve essere premuto con forza fino in
fondo
. Una volta inserito il cappuccio non
può essere più tolto.
Girare
manopola timer verso
pompa a gas (A)
il
distanziatore
inserendo per ultimo
bloccante (D).
il solarium
di
allo
lato con la
il
pavimento
stativo
di
il
Spostare
verticale)
un
divano o
solarium
piana.
NOTA:
della base dello stativo
trasformatori non siano chiuse da
alcunchè
Una
da
entrambi I
il solarium (A) (in
ai
piedi
del
lettino.
sia
sempre
Fare attenzione che le fessure
volta
sdraiati,
ACCENSIONE
afferrare
lati e
Controllare
su
(B)
tirarlo verso
posizione
letto o
di
una
superficie
, contenente i
il solarium
fronte
che
di
sé.
a
il
Fissare
stativo (B).
Ora
le
posizionare
2.
ruote (A)
il solarium (C) in
alla base
dello
piedi.
Impostare il tempo desiderato in minuti
ruotando la manopola in senso orario.
Alla fine di questo tempo il solarium si
spegne automaticamente. Se volete
interrompere anticipatamente la seduta,
ruotate veso sinistra la manopola sino alla
posizione
0 .

LASTRA ACRILICA
La lastra acrilica può essere rimossa solo
quando l
ambiente
Per rimuovere la lastra acrilica procedete
nel modo seguente:
staccare la
corrente.
Svitare
(B) e rimuoverlo.
procedura
Ora
tubi
apparecchio è a temperatura
.
1.
spina
dalla
le 4
ruotate
siano
viti (A)
dall
il solarium in
rivolti verso
dal
Ripetere la
altra
parte
presa
fianco ad
l
di
stessa
del solarium.
modo
alto.
arco
che I
3.
Per rimontare la lastra acrilica procedere nel
modo seguente:
Far
scivolare la
scanalatura
lato.
Premere
scivolare
scanalatura
dall
Ruotare
siano
Ora
con le 4
Usate solo ricambi originali Alisun:
Pezzi di ricambio
Tubi:
-
Brilliant
-
GoldSun
Lastra Riflettente Salsa
Timer
sul
il
altro
lato.
il solarium in
rivolti verso
fissare
viti.
Sun plus XT 100W
DuoTan®
Professional 100W
lastra
acrilica nella
del
profilo
centro
lato
ancora
del
profilo
entrambi i fianchi ad
RICAMBI
della
il
basso.
modo
di
plastica
lastra e far
libero nella
di
plastica
che I
Art.no.
350377
350366
332220
355005
da un
tubi
arco
Liberare con
lastra
profilo
Ora
così
acrilica
di
plastica (B).
tirare la
che
esca
2.
attenzione
(A)
tirandola
lastra
acrilica verso
fuori
anche
un
lato
fuori
dall
della
dal
di sé
altro
La base dello stativo può essere aperta sola
da personale specializzato.
lato.
 Loading...