


Caffettiera
9090
ANATOMIA DELLA CAFFETTIERA ALESSI.
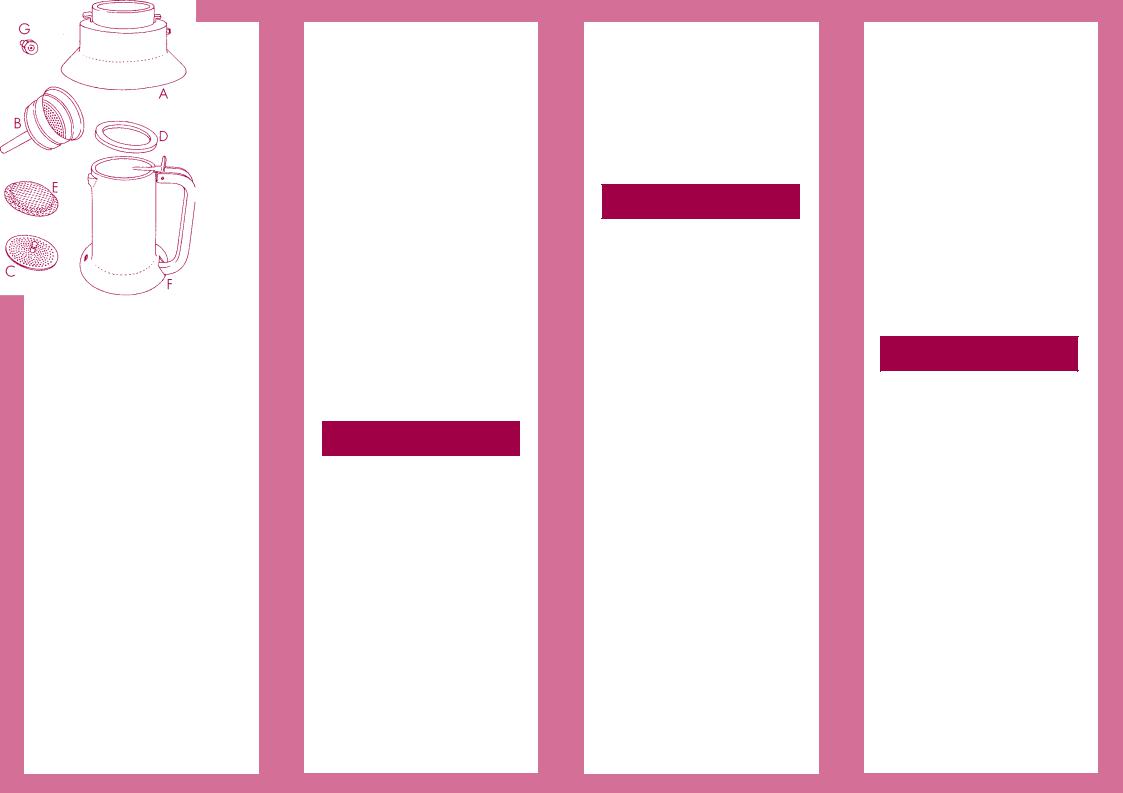
La caffettiera Alessi è realizzata interamente in acciaio inossidabile 18/10 lucido o colorato in nero con resine siliconiche. Si presenta in quattro capacità: cl. 50 per dieci tazze con filtro riduttore per sei tazze, cl. 30 per sei tazze con filtro riduttore per tre tazze, cl. 15 per tre tazze con filtro riduttore per una tazza, e cl. 7 per una tazza. E disegnata da Richard Sapper ed è coperta da 5 brevetti di utilità, e un brevetto come modello ornamentale. E composta dai seguenti pezzi separati:
ACaldaietta
BFiltro ad imbuto
CFiltro riduttore
DGuarnizione in gomma alimentare
EMicrofiltro superiore
FContenitore superiore con colonnina interna per l'uscita del caffè, coperchio e manico in acciaio inossidabile
GValvola di sicurezza in ottone
I codici degli accessori sono:
|
10 tazze |
6 tazze |
B |
17611/F |
17602/F |
C |
17611/R |
17602/R |
D |
29643 |
29640 |
E |
17612 |
17603 |
G |
19660 |
19660 |
|
3 tazze |
1 tazza |
B |
17605/F |
17608 |
C |
17605/R |
|
D |
29641 |
29642 |
E |
17606 |
17609 |
G |
19660 |
19660 |
I pezzi B, C, D, E e G sono considerati ricambi. Per questo, in caso di smarrimento o di usura, potete acquistare un nuovo pezzo dal vostro negoziante, citando il relativo numero di codice espresso qui sopra.
Le caratteristiche principali della caffettiera, oltre alla forma troncoconica con base allargata che favorisce il massimo sfruttamento della fonte di calore e quindi un minor impiego di corrente o di gas, sono il becco antigoccia, la chiusura a leva e il manico in acciaio inossidabile lavorato antisdrucciolo.
Come una buona caffettiera può fare un buon caffè.
APPENA ACQUISTATA, la caffettiera va lavata bene all'interno usando un detersivo normale.
Fate alcuni caffè a perdere, utilizzando i fondi, così da togliere alle varie parti della caffettiera il sapore metallico.
RIEMPITE LA CALDAIETTA alla base con acqua fredda, badando a non farle superare il bordo inferiore della valvola di sicurezza (Fig. 1). Inserite nella caldaietta il filtro ad imbuto.
RIEMPITELO DI CAFFÈ macinato, senza premere troppo. Il caffé non deve essere macinato troppo fine (fig. 2). Allo stesso modo è sconsigliabile aggiungere al caffè, estratti, cacao, o altre sostanze con grana troppo fine che potrebbero otturare il microfiltro superiore. L'acqua, bollendo, deve poter passare attraverso il caffè senza fatica, ma lentamente, impregnandosi di tutto il sapore.
CONTROLLATE che la piastrina filtro e la guarnizione si trovino esattamente nelle loro sedi, all'interno del contenitore superiore (fig. 3).
SE VOLETE utilizzare la caffettiera da 6 tazze per ottenere solo tre tazze, allora inserite nel filtro il riduttore (fig. 4) e mettete acqua solamente fino a raggiungere la fine del tronco di cono della caldaietta. Se invece, usando la caffettiera da 10 tazze volete fare solo sei tazze di caffè oppure usando la caffettiera da 3 tazze volete fare una sola tazza di caffè, dopo aver inserito il riduttore, graduate l'acqua fino alla tacca interna del parafiamma.
La chiusura a leva, esclusiva della caffettiera Alessi.
AGGANCIATE IL CONTENITORE SUPERIORE A QUELLO INFERIORE, facendo combaciare il foro praticato alla base del contenitore superiore con il piccolo dente situato sul collo della caldaietta, sopra la valvola di sicurezza. Operate, successivamente, una pressione decisa sul manico per agganciarlo, a sua volta, al grande dente, posto sul collo della caldaietta dalla parte opposta rispetto al dente piccolo. Il manico è agganciato a fondo quando il perno inferiore dello stesso scompare all'interno del corpo della caffettiera (fig 5). Ora la caffettiera Alessi è ermeticamente chiusa. La chiusura a leva, esclusiva della caffettiera Alessi, assicura una chiusura perfetta con un solo, elementare movimento.
METTETE LA CAFFETTIERA sulla fonte di calore. Raccomandiamo di tenere la fiamma molto bassa, più bassa possibile. E un accorgimento utile sia per la buona conservazione della guarnizione in gomma sia per evitare che, nella versione lucida, l'acciaio della caldaietta si annerisca in modo antiestetico. L'ideale, per un caffè fatto con la caffettiera Alessi, è il calore della piastra elettrica (fig. 6). Lasciate aperto il coperchio della caffettiera (fig. 7) per tutto il tempo di ebollizione: eviterete, così, che il vapore acqueo che si forma durante il bollore annacqui il caffè.
Appena il caffè, sgor-gando dalla colonnina centrale del contenitore superiore, lo avrà riempito, togliete la caffettiera dal fuoco.
MESCOLATE PIANO, con un cucchiaino, il caffè, in modo che il caffè sgorgato per primo, più denso, si mescoli con quello meno denso, sgorgato successivamente (fig. 8). Versate nelle tazzine. Lo speciale becco tronco è stato disegnato in modo da "tagliare" la goccia (A) e da evitare gli inconvenienti tipici delle normali caffettiere (B) (fig. 9). Dopo l'uso, non bisogna aprire la caffettiera prima di averla debitamente raffreddata.
TERMINATO L'USO, lavate la caffettiera con un detersivo normale o, anche, con sola acqua. Non utilizzate la lavastoviglie per la pulizia della caffettiera verniciata. Per quella lucida, se usate la lavastoviglie, abbiate cura di togliere la guarnizione in gomma, che non sopporta le alte temperature. Per la pulizia della parte esterna non utilizzate detersivi contenenti abrasivi che danneggerebbero la finitura superficiale.
ATTENZIONE: pulite periodicamente in modo accurato l'interno della colonnina, l'imbuto, la piastrina filtro, la guarnizione in gomma e la loro sede. Sostituite le parti eventualmente usurate. Ricordate inoltre che lasciare la caffettiera con la caldaietta senza più acqua su una fonte di calore causerà alla stessa danni irreparabili.
La caffettiera Alessi è garantita.
La garanzia contro i difetti di fabbricazione delle parti che costituiscono il corpo della caffettiera Alessi è illimitata nel tempo. Questa garanzia non si estende ai ricambi e non è valida nel caso di uso non corrispondente alle istruzioni. Per questo, vi invitiamo a seguire le istruzioni d'uso.

Fig. 1
Fig. 7
Fig. 4
Fig. 8
Fig. 2
Fig. 5
Fig. 3 |
Fig. 6 |
Fig. 9 |
28882 Crusinallo (VB) Italia |
|
|
|
tel. 0323 868611 fax 0323 641605 |
|
|
|
www.alessi.com |
Coffee maker 9090
THE ANATOMY OF THE ALESSI ESPRESSO COFFEE MAKER. The Alessi espresso coffee maker is
made entirely of 18/10 stainless steel, polished or coated with black silicone resins. It is available in four sizes: the 50-cl size for ten cups, with an insertable reducer filter formaking six cups, the 30-cl size for six cups, with a reducer filter for three cups, the 15-cl size for three cups, with a reducer filter for one cup and 7-cl size for one cup only. The Coffee Maker designed by Richard Sapper,is covered by 5 patents in respect of its use, and one patent in respect of its aesthetic qualities. It consists of the following separate pieces:
ABoiler, or lower port
BFilter-funnel
CReducer-filter
DWasher of special rubber
EUpper or micro-filter
FUpper container, with internal column for piping the coffee into the container, stainless steel lid and handle
GBrass safety-valve
Code numbers of the spare parts are the following:
|
10 cups |
6 cups |
B |
17611/F |
17602/F |
C |
l761l/R |
17602/R |
D |
29643 |
29640 |
E |
17612 |
17603 |
C |
19660 |
19660 |
|
3 cups |
1 cup |
B |
17605/F |
17608 |
C |
17605/R |
|
D |
29641 |
29642 |
E |
17606 |
17609 |
G |
19660 |
19660 |
Pieces B, C, D, E and G are treated as spares.That is, if any of them gets lost or worn out, you can buy a new one from your dealer, by quoting the
appropriate code number given above. The main characteristics of the Coffee Maker, apart from its upwardtapering shape with the wide base for maximum utilisation of the heat source, and therefore lower electricity or gas consumption are the non-drip spout, the lever-type closure, and the stainless steel non-slip handle.
How a good espresso coffee maker can make a good espresso.
WHEN YOU HAVE BOUGHT your Coffee Maker, you should wash it well inside using an ordinary detergent.
Then make coffee a few times, using the same grounds, just to "run the Coffee Maker in" and give all the parts a smell of coffee. Now, you can fill the boiler with cold water, taking care not to go above the lower edge of the safety-valve (Fig. 1). Place the filter-funnel in the boiler.
FILL IT WITH GROUND COFFEE, without pressing it down too much. The coffee must not be ground to thin (fig. 2). Also avoid addition of any extracts, cocoa or any other fine-grained stuffs, which could stop up the upper microfilter.
BE SURE that the micro-filter plate and the washer are fitting snugly underneath the upper container (fig. 3).
TO MAKE ONLY THREE CUPS in the six-cup Coffee Maker, put in the reducer-filter (fig. 4) , and fill the boiler with water up to the point where the side ceases to slope. If, on the other hand, using the ten-cup Coffee Maker, you only wish to make six cups, or using the three-cup size, you only wish to make one cup, then insert the reducerfilter and fill the boiler with water only up to the first notch.
The lever-type closure, exclusive feature of the Alessi coffee maker.
HOOK, THE UPPER CONTAINER ON TO THE LOWER ONE by fitting the hole in the base of the upper container over the lug projecting from the neck of the boiler, above the safetyvalve. Then press down hard on the handle so that it, too, clicks on to the larger lug, on the opposite side of the boiler neck.The handle is deeply hooked when the lower pivot on the bottom disappears into the body of the Coffee Maker (fig 5). Now the Alessi Coffee Maker is hermetically closed. The levertype closure, which is an exclusive feature of the Alessi Coffee Maker, ensures a perfect seal with just one simple movement.
NOW PUT THE COFFEE MAKER on the heat.We recommend as slow a flame as possible, in order to ensure long life to the rubber washer and to prevent, in the polished version, the stainless steel of the boiler becoming black and ugly. The best coffee from the Alessi Coffee Maker is obtained on the electrical plate (fig. 6). Leave the lid open while the coffee is bubbling up (fig. 7); in this way you will prevent the steam from condensing and diluting the coffee. As soon as the coffee has finished bubbling out of the central column in the upper container, take the Coffee Maker off the flame.
STIR THE COFFEE SLOWLY with a spoon, so that the first part of the coffee to ooze out, which is more concentrated, is mixed with the weaker (fig. 8), last part Pour into cups. The special short spout has been designed so as to "cut off" the drips (A), thus eliminating a
typical nuisance of ordinary Coffee Makers (B) (fig. 9). Never open the Coffee Maker when hot, but cool it before.
AFTER USE, wash the Coffee Maker with a normal detergent or even with water plain. Do not wash the black pieces in the dishwasher. Should you put the polished ones, be sure you first remove the rubber washer, which will not stand high temperatures. Do not use abrasive detergents to clean the outside; they will damage the surface finish.
IMPORTANT: clean the inside of the column, the funnel, the filter plate, the rubber washer and their seats thoroughly at regular intervals and replace any worn parts. Remember that leaving the pot on the heat with no water in the bottom will cause irreparable damage.
The Alessi espresso coffee maker is guaranteed.
An unlimited guarantee covers any manufacturing defects in the parts forming the main body of the Alessi Espresso Coffee Maker.
This guarantee, however, does not extend to the spares, not it is valid if the user does not follow the instructions.
We therefore recommend that the instructions be carefully observed.
 Loading...