

Page 1
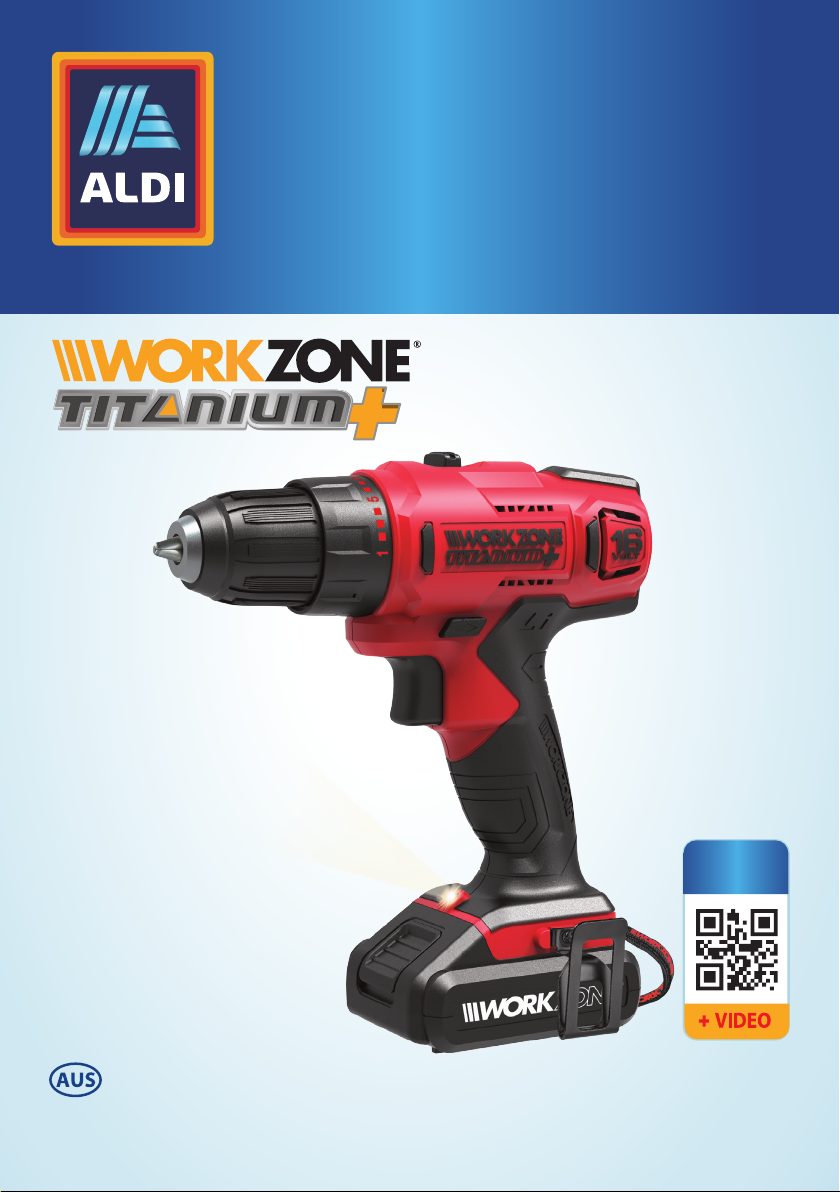
User Manual
Original Instruction
1956
16V LITHIUMION
CORDLESS DRILL
WITH 2 X BATTERIES
Ensure you keep your manual in a safe place for future
reference.
Product
Info
https://help.tools/
Read all safety warnings and all instructions
thoroughly before operating this product.
IM Ed4 05/2019
Page 2

QR codes take you where you want to go
quicky and easily
Whether you require product information, spare parts or accessories,
details on warranties or aftersales service, or if you want to watch a
product demonstration video, our QR codes will take you there in no time
at all.
What is a QR code?
A QR-code (QR=Quick Response) is a type of matrix that can be read with
a smartphone camera and that contains a link to a website or contact
details, for example.
Advantage: You are not required to manually enter a website address or
contact details.
How it works
To scan the QR code, all you need is a smartphone with QR codes reader
software and an Internet connection*. This type of software can be
downloaded for free from your smartphone’s app store.
Try it out now
Just scan the QR code with your smartphone and nd out more about the
Aldi product you have
purchased*.
Product
Info
* Depending on your tari you may be charged for the connection.
Page 3

Contents
Pack contents / parts 2
Description of symbols 3
General safety warning 4
Additional safety instructions for your Battery Charger 10
Component List 12
Important information – Product care 13
Assembly 14
Fitting and removing the battery pack, and battery charging 14
Operation 15
2 Speed Gearbox 15
Using the Drill/driver 16
Drill/driver overload 16
Temperature cut out 17
Low voltage cut out 17
Ambient temperature ranges 17
Forward/reverse switch 18
Adjustable torque 18
When using the drill/driver for drilling 18
Inserting and removing bits 18
Drill/driving 19
Drill/driving plastics and plastic coated chipboard 19
Drill/driving wood 19
All drill/driving operations 19
LED work light 20
Chuck replacement 20
Accessories 21
Side Belt clip 21
Carry Strap 21
Maintenance 21
Cleaning 22
Warranty 22
Environmental protection 22
What your 5 year warranty means 23
Service Support 23
Accessories & After Sales Parts 23
Troubleshooting 24
Technical Specications 26
Page 4

2
Pack contents / parts
Congratulations on the purchase of your Workzone® Titanium 16V
Lithium-Ion Cordless Drill. When you open your packaging, rst remove all
items and check there are no parts damaged or missing. If you nd anything
wrong, do not operate the product until the parts have been replaced or the
fault has been rectied. Failure to do so could result in serious personal injury.
NOTE: First time users or inexperienced operators pay particular attention to
the operation of the 16V Lithium-Ion Cordless Drill, including details of starting
and stopping and correct use of the 16V Lithium-Ion Cordless Drill on pages
15-21, as well as the maintenance instructions on page 22.
Intended use of the 16V Lithium-Ion Cordless Drill
NOTE: This product is for private domestic DIY use only.
It is not suitable for commercial, industrial or trade use.
This drill/driver is mainly used for drill/driving in wood or metal sheet,
and screwdriving.
Use the tool and accessories only for intended applications.
Contents of carton
1 x 16V Lithium-Ion Cordless Drill
2 x 16V Lithium-Ion Batteries
1 x Fast Charger
1 x Carry Strap (tted)
1 x Side Belt Clip + assembly screw
(not tted)
2
1 x Instruction manual
1 x Warranty Certicate
1 x Quick Start Guide
Page 5
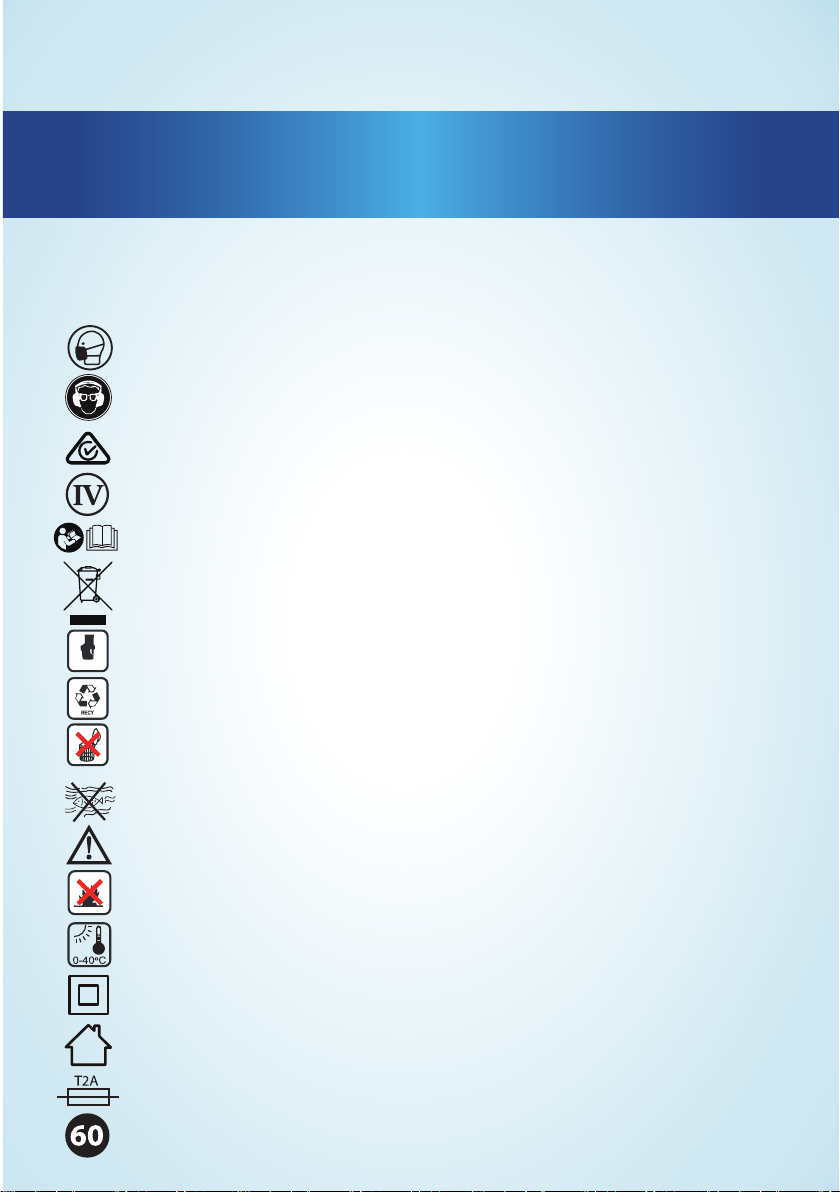
Description of symbols
The instruction manual, rating plate, or on the product itself, may show
these symbols. These represent important information about the product or
instructions on its use.
Wear breathing protection
Wear eye protection.
Wear ear protectors when impact drilling.
Exposure to noise can cause hearing loss.
Regulatory Compliance Mark. Appliance complies with
requirements of electrical approval & EMC in Australia.
Meps.
3
Li-iON
Read the instruction manual.
Waste electrical products should not
be disposed of with household waste.
Lithium-Ion Battery
Li ion Battery recycle.
Do Not dispose of in household waste.
Do not put in water.
Caution/Warning:
Read all safety warnings and all instructions.
Do not crush, disassemble, short terminals or dispose in re;
there is a risk of burns explosion or re.
Do not charge the battery pack if the ambient temperature is less than 0°C
or greater than 40°C.
Double insulated for additional protection.
Indoor use.
2A Fuse.
60 Month Warranty
3
Page 6

4
General safety warnings
General Power Tool Safety Warnings
WARNING: Read all Safety warnings, instructions, illustrations and
specications provided with this power tool. Failure to follow all instructions listed
below may result in electric shock, re and/or serious injury.
Save all warnings and instructions for future reference.
The term “power tool” in the warnings refers to your mains-operated (corded) power
tool or battery-operated (cordless) power tool.
1) Work area safety
a) Keep work area clean and well lit. Cluttered or dark areas invite accidents.
b) Do not operate power tools in explosive atmospheres, such as in the
presence of ammable liquids, gases or dust. Power tools create sparks which
may ignite the dust or fumes.
c) Keep children and bystanders away while operating a power tool. Distractions
can cause you to lose control.
2) Electrical safety
a) Power tool plugs must match the outlet. Never modify the plug in any way.
Do not use any adapter plugs with earthed (grounded) power tools. Unmodied
plugs and matching outlets will reduce risk of electric shock.
b) Avoid body contact with earthed or grounded surfaces, such as pipes,
radiators, ranges and refrigerators. There is an increased risk of electric shock if
your body is earthed or grounded.
c) Do not expose power tools to rain or wet conditions. Water entering a power
tool will increase the risk of electric shock.
d) Do not abuse the cord. Never use the cord for carrying, pulling or unplugging
the power tool. Keep cord away from heat, oil, sharp edges or moving parts.
Damaged or entangled cords increase the risk of electric shock.
e) When operating a power tool outdoors, use an extension cord suitable for
outdoor use. Use of a cord suitable for outdoor use reduces the risk of electric
shock.
f) If operating a power tool in a damp location is unavoidable, use a residual
current device (RCD) protected supply. Use of an RCD reduces the risk of electric
shock.
4
Page 7

General safety warnings
3) Personal safety
a) Stay alert, watch what you are doing and use common sense when operating
a power tool. Do not use a power tool while you are tired or under the inuence
of drugs, alcohol or medication. A moment of inattention while operating power
tools may result in serious personal injury.
b) Use personal protective equipment. Always wear eye protection. Protective
equipment such as dust mask, non-skid safety shoes, hard hat, or hearing
protection used for appropriate conditions will reduce personal injuries.
c) Prevent unintentional starting. Ensure the switch is in the o-position before
connecting to power source and/or battery pack, picking up or carrying the tool.
Carrying power tools with your nger on the switch or energising power tools that
have the switch on invites accidents.
d) Remove any adjusting key or wrench before turning the power tool on. A
wrench or a key left attached to a rotating part of the power tool may result in
personal injury.
e) Do not overreach. Keep proper footing and balance at all times. This enables
better control of the power tool in unexpected situations.
f) Dress properly. Do not wear loose clothing or jewellery. Keep your hair and
clothing away from moving parts. Loose clothes, jewellery or long hair can be
caught in moving parts.
g) If devices are provided for the connection of dust extraction and collection
facilities, ensure these are connected and properly used. Use of dust collection
can reduce dust-related hazards.
h) Do not let familiarity gained from frequent use of tools allow you to become
complacent and ignore tool safety principles. A careless action can cause
severe injury within a fraction of a second.
5
4) Power tool use and care
a) Do not force the power tool. Use the correct power tool for your application.
The correct power tool will do the job better and safer at the rate for which it was
designed.
b) Do not use the power tool if the switch does not turn it on and o. Any power
tool that cannot be controlled with the switch is dangerous and must be repaired.
c) Disconnect the plug from the power source and/or remove the battery pack,
5
Page 8

6
General safety warnings
if detachable, from the power tool before making any adjustments, changing
accessories, or storing power tools. Such preventive safety measures reduce the
risk of starting the power tool accidentally.
d) Store idle power tools out of the reach of children and do not allow persons
unfamiliar with the power tool or these instructions to operate the power
tool. Power tools are dangerous in the hands of untrained users.
e) Maintain power tools and accessories. Check for misalignment or binding
of moving parts, breakage of parts and any other condition that may aect the
power tool’s operation. If damaged, have the power tool repaired before use.
Many accidents are caused by poorly maintained power tools.
f) Keep cutting tools sharp and clean. Properly maintained cutting tools with
sharp cutting edges are less likely to bind and are easier to control.
g) Use the power tool, accessories and tool bits etc. in accordance with these
instructions, taking into account the working conditions and the work to be
performed. Use of the power tool for operations dierent from those intended
could result in a hazardous situation.
h) Keep handles and grasping surfaces dry, clean and free from oil and grease.
Slippery handles and grasping surfaces do not allow for safe handling and control
of the tool in unexpected situations.
5) Battery tool use and care
a) Recharge only with the charger specied by the manufacturer. A charger that
is suitable for one type of battery pack may create a risk of re when used with
another battery pack.
b) Use power tools only with specically designated battery packs. Use of any
other battery packs may create a risk of injury and re.
c) When battery pack is not in use, keep it away from other metal objects, like
paper clips, coins, keys, nails, screws or other small metal objects, that can make a
connection from one terminal to another. Shorting the battery terminals together
may cause burns or a re.
d) Under abusive conditions, liquid may be ejected from the battery; avoid
contact. If contact accidentally occurs, ush with water. If liquid contacts eyes,
additionally seek medical help. Liquid ejected from the battery may cause
irritation or burns.
6
Page 9

General safety warnings
e) Do not use a battery pack or tool that is damaged or modied. Damaged or
modied batteries may exhibit unpredictable behaviour resulting in re, explosion
or risk of injury.
f) Do not expose a battery pack or tool to re or excessive temperature.
Exposure to re or temperature above 130 °C may cause explosion.
g) Follow all charging instructions and do not charge the battery pack or
tool outside the temperature range specied in the instructions. Charging
improperly or at temperatures outside the specied range may damage the
battery and increase the risk of re.
6) Service
a) Have your power tool serviced by a qualied repair person using only
identical replacement parts. This will ensure that the safety of the power tool is
maintained.
b) Never service damaged battery packs. Service of battery packs should only be
performed by the manufacturer or authorized service providers.
7
Drill safety warnings
1 ) Safety instructions for all operations
a) Hold the power tool by insulated gripping surfaces, when performing an
operation where the cutting accessory or fasteners may contact hidden
wiring or its own cord. Cutting accessory or fasteners contacting a “live” wire may
make exposed metal parts of the power tool “live” and could give the operator an
electric shock.
2) Safety instructions when using long drill bits
a) Never operate at higher speed than the maximum speed rating of the drill
bit. At higher speeds, the bit is likely to bend if allowed to rotate freely without
contacting the workpiece, resulting in personal injury.
b) Always start drilling at low speed and with the bit tip in contact with the
workpiece. At higher speeds, the bit is likely to bend if allowed to rotate freely
without contacting the workpiece, resulting in personal injury.
c) Apply pressure only in direct line with the bit and do not apply excessive
pressure. Bits can bend causing breakage or loss of control, resulting in personal
injury.
7
Page 10

8
General safety warnings
Screwdriver and impact wrench safety warning
1. Hold power tool by insulated gripping surfaces, when performing an
operation where the fastener may contact hidden wiring. Fasteners contacting
a “live” wire may make exposed metal parts of the power tool “live” and could give
the operator an electric shock.
Safety notes for battery/charger
Safety Warnings for battery pack
a) Do not dismantle, open or shred cells or battery pack.
b) Do not short-circuit a battery pack. Do not store battery packs haphazardly
in a box or drawer where they may short-circuit each other or be shortcircuited by conductive materials. When battery pack is not in use, keep it away
from other metal objects, like paper clips, coins, keys, nails, screws or other small
metal objects, that can make a connection from one terminal to another. Shorting
the battery terminals together may cause burns or a re.
c) Do not expose battery pack to heat or re. Avoid storage in direct sunlight.
d) Do not subject battery pack to mechanical shock.
e) In the event of battery leaking, do not allow the liquid to come into contact
with the skin or eyes. If contact has been made, wash the aected area with
copious amounts of water and seek medical advice.
f) Seek medical advice immediately if a cell or battery pack has been
swallowed.
g) Keep battery pack clean and dry.
h) Wipe the battery pack terminals with a clean dry cloth if they become dirty.
i) Battery pack needs to be charged before use. Always refer to this instruction
and use the correct charging procedure.
j) Do not maintain battery pack on charge when not in use.
k) After extended periods of storage, it may be necessary to charge and
discharge the battery pack several times to obtain maximum performance.
l) Battery pack gives its best performance when it is operated at normal room
temperature (20 °C ± 5 °C).
m) When disposing of battery packs, keep battery packs of dierent
electrochemical systems separate from each other.
n) Recharge only with the charger specied by POSITEC. Do not use any charger
other than that specically provided for use with the equipment. A charger
8
Page 11

General safety warnings
that is suitable for one type of battery pack may create a risk of re when used
with another battery pack.
o) Do not use any battery pack which is not designed for use with the
equipment.
p) Keep battery pack out of the reach of children.
q) Retain the original product literature for future reference.
r) Remove the battery from the equipment when not in use.
s) Dispose of properly.
t) Do not mix cells of dierent manufacture, capacity, size or type within a
device.
u) Do not remove battery pack from its original packaging until required for use.
v) Observe the plus (+) and minus (–) marks on the battery and ensure correct
use.
General Safety Warnings for battery charger
WARNING: Read all safety warnings and all instructions. Failure to follow the
warnings and instructions may result in electric shock, re and/or serious injury.
Save all warnings and instructions for future reference.
- This appliance is not intended for use by persons (including children) with reduced
physical, sensory or mental capabilities, or lack of experience and knowledge, unless
they have been given supervision or instruction concerning use of the appliance by a
person responsible for their safety.
- Children should be supervised to ensure that they do not play with the appliance.
If the supply cord is damaged, it must be replaced by the manufacturer, its service
agent or similarly qualied persons in order to avoid a hazard.
9
9
Page 12

10
Additional safety instructions for your
Battery Charger
Additional safety instructions for your Battery Charger
1. Before charging, read the instructions.
2. For charge Li-ion battery pack only.
3. Do not charge a leaking battery.
4. Do not use chargers for works other than those for which they are designed.
5. Before charging, ensure your charger is matching the local AC supply.
6. The charging device must be protected from moisture.
7. Do not use the charging device in the open.
8. Do not short out the contacts of battery or charger.
9. Respect the polarity “+/-“ when charging.
10.Do not open the unit and keep out of the reach of children.
11.Do not charge the batteries of other manufactures or ill-suited models.
12.Ensure that the connection between the battery charger and battery is correctly
positioned and is not obstructed by foreign bodies.
13. Keep battery charger’s slots are free of foreign objects and protect against dirt and
humidity. Store in a dry and frost-free place.
14. When charging batteries, ensure that the battery charger is in a well-ventilated
area and away from inammable materials. Batteries can get hot during charging.
Do not overcharge any batteries. Ensure that batteries and chargers are not left
unsupervised during charging.
15. Do not recharge non-rechargeable batteries, as they can overheat and break.
16. Longer life and better performance can be obtained if the battery pack is charged
when the air temperature is between 18
pack in air temperatures below 0
prevent serious damage to the battery pack.
17. Charge only battery pack/s of the same model provided by the manufacturer and
of models recommended by manufacturer.
o
o
C and 24oC. Do not charge the battery
C, or above 40oC. This is important as it can
10
Page 13

Additional safety instructions for your
Battery Charger
NOTE: This unit may not be used by people (including children) with reduced
physical, sensory or mental capacities, with a lack of experience and without
the appropriate knowledge, unless they are supervised by someone who is
responsible for their safety or have been instructed by such a person with
regard to how the unit is to be operated.
Children should be supervised to ensure that they do not play with
the device.
Wear eye protection.
Wear ear protectors when impact drilling.
Exposure to noise can cause hearing loss.
11
11
Page 14
AUS
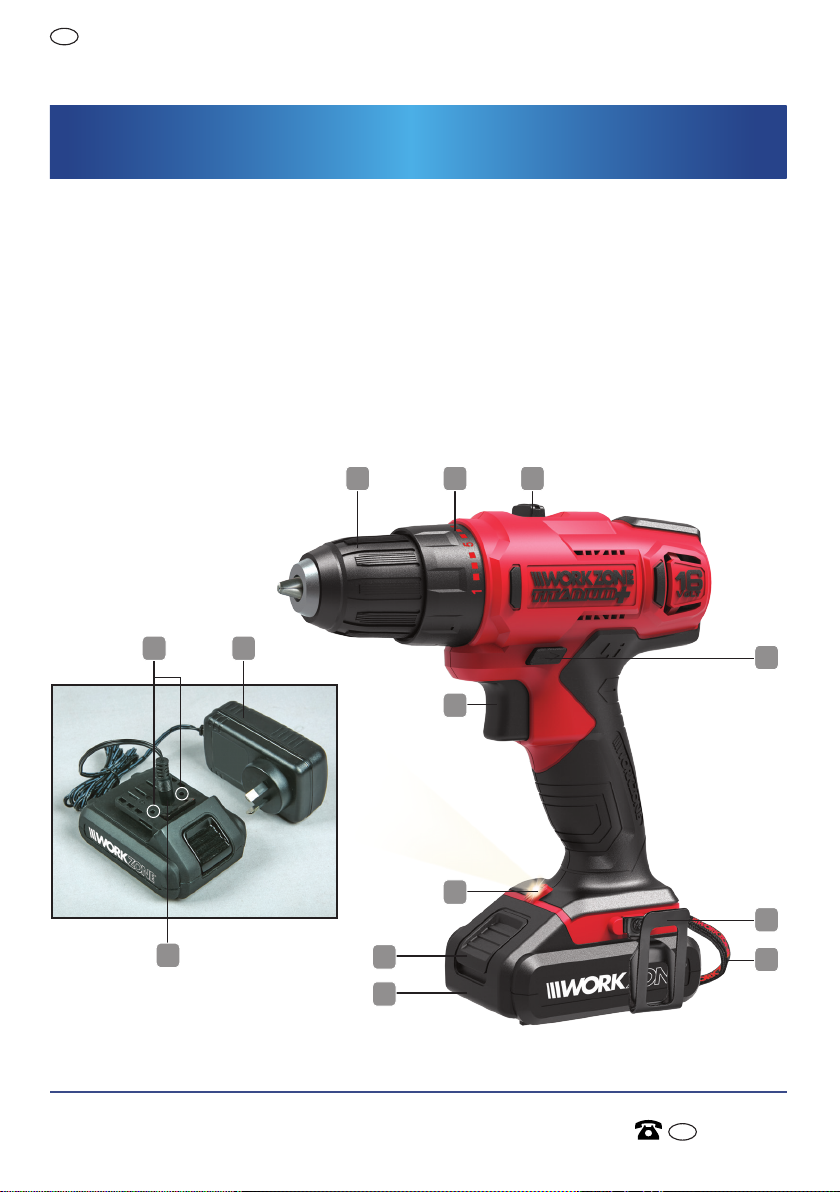
Component List
Component List
16V Lithium-ion Cordless Drill
1. Drill/Driver chuck
2. Torque setting/ collar
3. Two speed high /low gear selector
4. Side Belt Clip (not tted)
5. Forward/Reverse & Lock control/switch
6. LED work light
7. Variable speed, On/O trigger switch for
drill, brake, light control
1
1011
8. Rechargeable battery
9. Battery release tab
10. Battery charger
11. Battery charger indicator lights
12. Battery charge port
13. Carry Strap
2 3
5
7
12
12
e-mail: [email protected]
6
4
9
13
8
AFTER SALES SUPPORT
AUS
1300 889 028
(toll free)MODEL No.: CDT214XA • 05/2019 • 1956
Page 15

16V Lithium-ion Cordless Drill
Product Care
Important information – Product care
This drill/driver uses Lithium Ion Battery Cells. Care MUST be taken to ensure
both the safety and life of the pack is maintained. Ensure you have read all of
the safety notes in the previous pages before using the drill/driver.
Treat the battery pack with care and within the guidelines of this manual.
If the pack does become immersed in water or any uids, or is subject to
a severe drop or it does not operate within the guidelines of this manual,
immediately STOP using the battery pack and have it checked.
During operation avoid overloading the drill/driver. If the drill/driver is
overloaded it will automatically STOP. Overloading may occur for a number
of reasons including when the drill/driver is pushed too hard or when using
a drill/driver bit or attachment greater than what is specied. If you do
overload the drill/driver during operation refer to the “Overload” section in
this manual.
NOTE: When the battery of the drill/driver is at the lower end of the charge,
the drill/driver is more susceptible to the overload condition.
Running the drill/driver at close to maximum load, or continual resetting
of the overload will cause the battery pack to overheat. When a preset cell
temperature is detected, the battery pack will automatically STOP operating
and will not restart until the battery pack has cooled to a safe level.
In this condition, DO NOT force cool the pack by placing in a freezer or
similar device. Refer to the “Overload” section in this manual.
Another feature of the drill/driver/battery pack is the low voltage cut out
feature. This feature operates when the voltage drops below a preset value.
When this occurs the tool will automatically stop operating. To correct the
situation you need to either insert another charged battery into the drill/
driver or recharge the existing battery, and then proceed with the drill/
driving application.
NOTE: Attempting to restart the tool in this condition without either
recharging the battery or installing a battery with charge will lead to drill/
driver restarting and then stopping again after only a few seconds of operation.
These safety devices have been tted for the safety, reliability and life of the
tool.
AUS
AFTER SALES SUPPORT
AUS
(toll free) MODEL No.: CDT214XA • 05/2019 • 1956
1300 889 028
e-mail: [email protected]
13
Page 16
AUS
Assembly
16V Lithium-ion Cordless Drill
Assembly
Fitting and removing the battery pack, and battery charging
IMPORTANT. Before attempting to charge the battery, check the battery
charger (10) to ensure it matches the battery supplied.
Only use the provided battery charger for use with the batteries supplied.
Do not use any other charger. Using other chargers will damage the batteries.
CAUTION! The battery (8) may require charging at rst use. A full charge will
require approximately 1 hour, or until fully charged as indicated by the green
light on the battery charger (10).
CAUTION! The working temperature of the charging operation is 0°C to 40°C.
WARNING: When the battery charge runs out after continuous use or
exposure to direct sunglight or heat, allow time for the battery to cool
down before re-charging to achieve full charge.
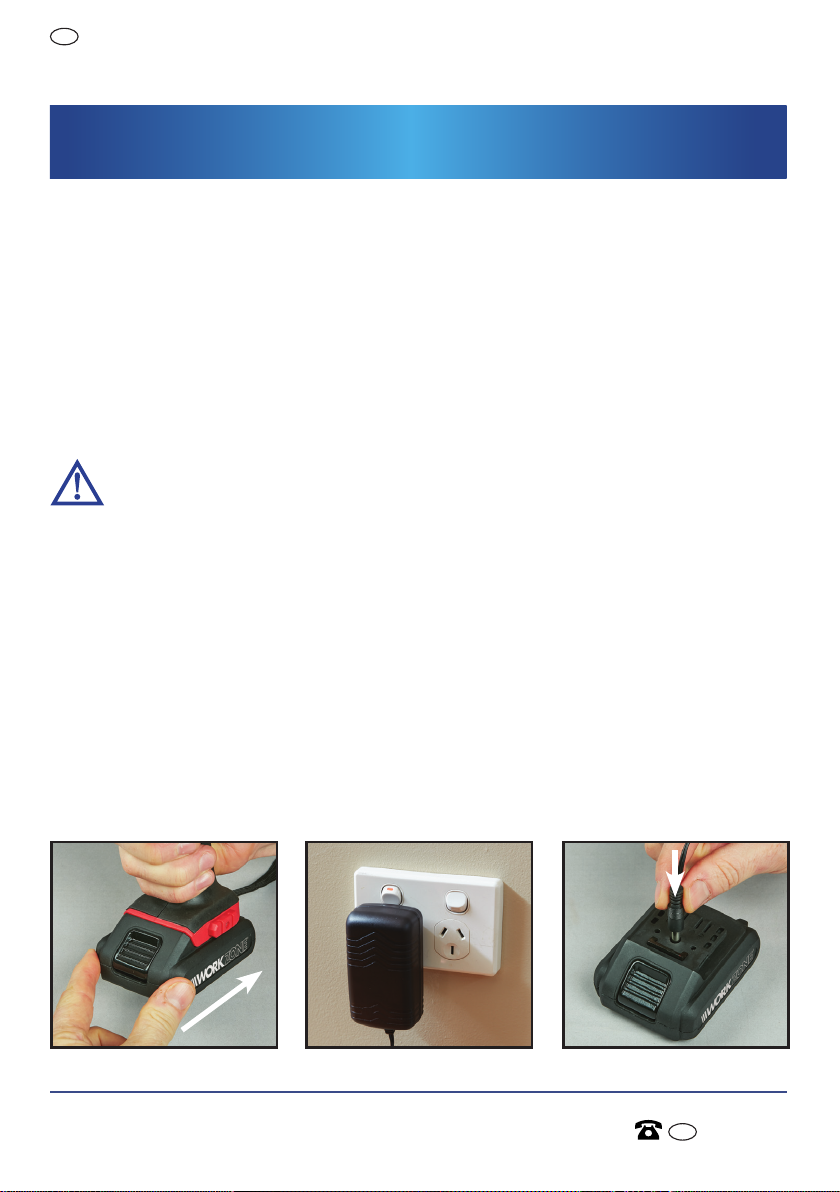
1. Connect the battery (8) to the drill by aligning the guiding rails on the
bottom of the drill body with those on the battery (8). A “click” will indicate
the battery is secured to the drill body (Fig A).
2. To disconnect the battery (8), click on the battery release tab (9) and pull the
battery (8) forwards towards the front of the drill.
3. To start the charging process, connect the battery charger (10) in to a 240V
mains power outlet (Fig B).
4. Connect the battery charger (10) lead in to battery charger port (12) (Fig C).
A. B. C.
“CLICK”
14
e-mail: [email protected]
AFTER SALES SUPPORT
AUS
1300 889 028
(toll free)MODEL No.: CDT214XA • 05/2019 • 1956
Page 17
16V Lithium-ion Cordless Drill
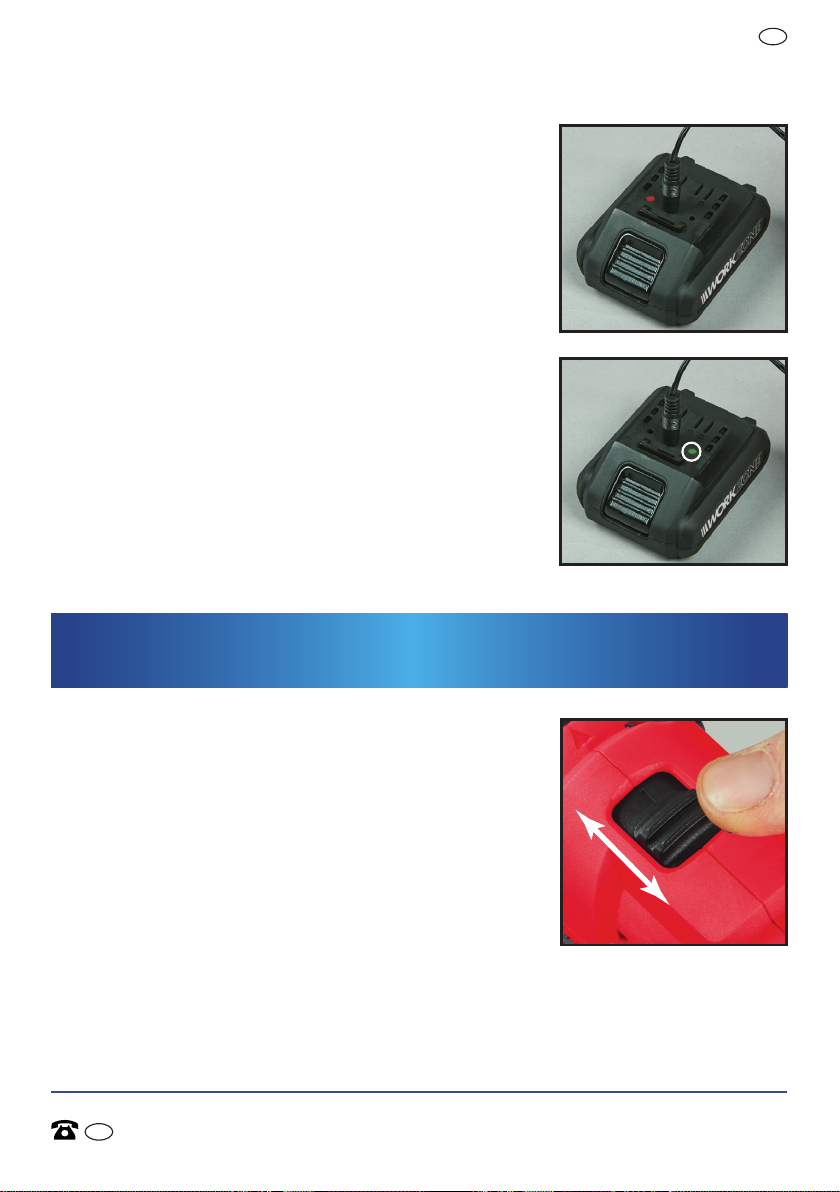
5. When viewing the battery from the front, the
battery charger indicator light (11) to the left of
the battery charge port (12), and below the “+”
symbol will change to “red” to indicate the power
is on, and the battery is in the charging process
(Fig D).
6. When viewing the battery from the front, when
the battery charger indicator light (11) to the right
of the battery charge port (12) and below the
“-” symbol turns to “green”, the battery (8) is fully
charged (Fig E).
Disconnect the battery charger (10) lead from the
battery charger port (12), re-connect the battery
(8) onto the drill/driver and it is ready for use.
NOTE: The power to the charger should be
turned o when unattended, with or without a
battery inserted.
AUS
Operation
D.
E.
Operation
2 Speed gearbox
The 2 Speed Gearbox allows you to select a gear
with the optimum speed and torque to suit the
application.
NOTE: When changing the drill/driver selector
ensure the drill/driver is not operating.
1. To select the LOW gear (low speed, high torque
setting), push the gear selector (3) forwards,
towards the chuck at the front of the drill/driver.
The number “1” will be displayed (Fig F).
2. To select the HIGH gear (high speed, low torque
setting), push the gear selector (3) backwards,
towards the rear of the drill/driver. The number “2” will be displayed.
AFTER SALES SUPPORT
AUS
(toll free) MODEL No.: CDT214XA • 05/2019 • 1956
1300 889 028
F.
1
2
The picture here shows the gear
selector forward so the drill/driver is
in Low speed, with the number “1”
displayed.
15
e-mail: [email protected]
Page 18
AUS
Operation
16V Lithium-ion Cordless Drill
Using the drill/driver
Trigger switch
G.
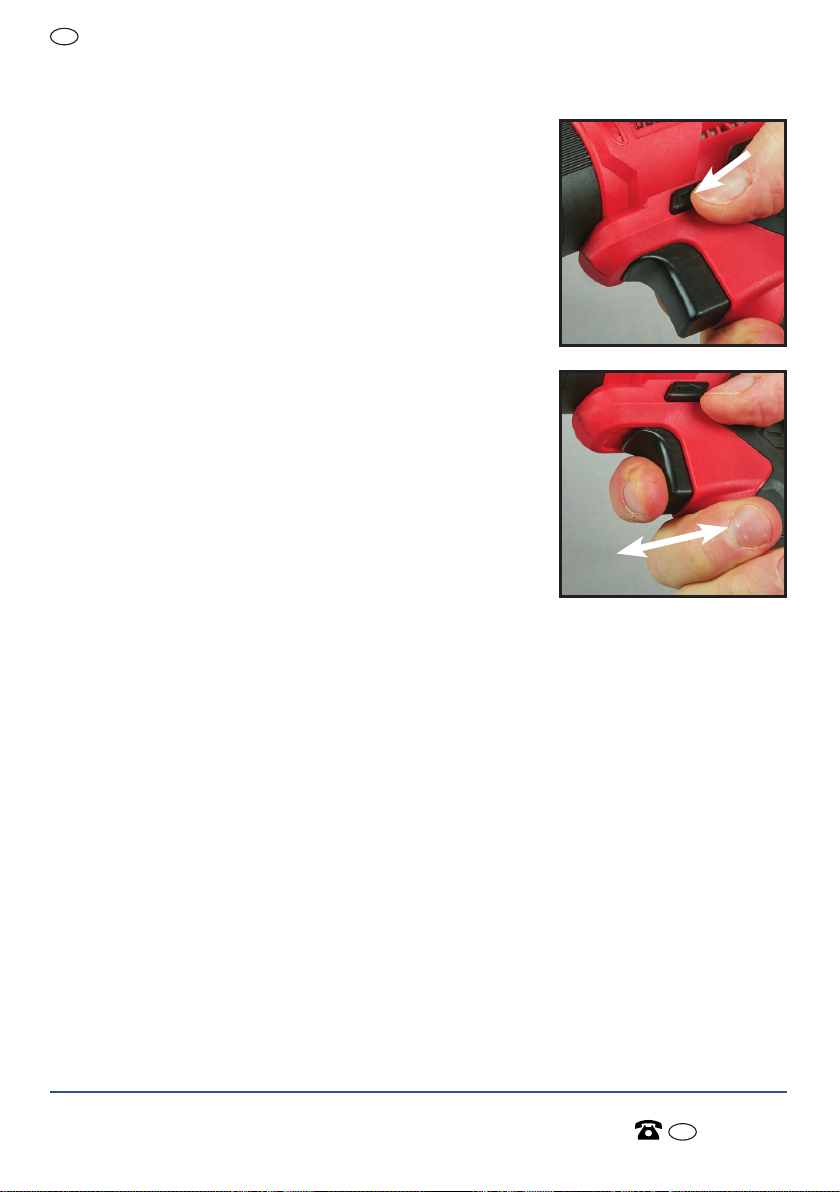
1. Use the forward/reverse switch (5) to select the
direction of rotation (Fig G), then pull the trigger (7)
(Fig H). This trigger switch is an electronic variable
speed control which enables the user to vary the
speed continuously.
The speed varies according to how far the trigger
switch is depressed.
The further it is depressed the faster the chuck will
H.
rotate and the lighter it is depressed, the slower it
will rotate.
2. To stop the drill/driver, release the trigger switch (7).
NOTE: The variable speed control tted to this drill/
driver is NOT intended to be used for long periods
of time during the operation of the task being
performed. Use the variable speed to start drill/
driving and screwing tasks, and then fully depress
the trigger once the task has started.
CAUTION. Extended use of the variable speed under load will overload and then
permanently damage the speed control.
Drill/driver Overload
This drill/driver is tted with an overload protection. If the drill/driver is excessively
forced, or the task being performed is too great for the drill/ driver, the drill/driver will
automatically go into an overload mode. When the drill/driver goes into overload, the
drill/driver will automatically and suddenly STOP. To reset the overload, simply release
the trigger. When the trigger is pressed again, the drill/driver will restart. Resume work
after the overload has been reset, but reduce the load by using a smaller drill/driver
bit or re-sharpen the existing drill/driver bit and reduce the amount of force placed
on the drill/driver. If the drill/driver is set to High speed on the gear selector, consider
changing to low speed selection.
16
e-mail: [email protected]
AFTER SALES SUPPORT
AUS
1300 889 028
(toll free)MODEL No.: CDT214XA • 05/2019 • 1956
Page 19

AUS
16V Lithium-ion Cordless Drill
Operation
CAUTION. Do not continue to overload the drill/driver and constantly reset the
overload. Doing this will cause the battery cells to over heat.
Temperature cut out
If the drill/driver is constantly overloaded, or the drill/driver is used constantly at
maximum rating in high ambient conditions, the battery cells may overheat causing
the battery pack to shut down.
When this occurs you will need to allow the battery cells to cool.
NOTE: The drill/driver will not restart until the battery pack has cooled. To reduce the
temperature of the cells remove the battery pack from the drill/driver and place the
battery pack in a free air environment, out of direct sunlight or any other heat source.
DO NOT force cool the pack in any way. Do not place in refrigerators or freezers.
When the battery pack has cooled down it can again be used to operate the
drill/driver, as long as the load or the conditions causing the original excessive
temperature has been corrected.
Low voltage cut out
The battery pack used on this tool is tted with a low voltage cut out feature within
the circuitry.
The low voltage cut out feature operates when the voltage drops below a preset
value. This feature automatically stops the drill/driver from operating (similar to that
of the overload condition). When this condition occurs you will need to either insert
another battery into the drill/driver or recharge the existing battery.
The low voltage cut out feature has been added to maximise the life of the battery
cells in the battery (8). When this occurs, recharge the battery pack by following the
battery charging section in this manual.
NOTE: Attempting to restart the tool without either recharging the battery or
installing another battery (with charge) will lead to drill/driver restarting and then
stopping again, after only a few seconds of operation.
Ambient temperature ranges
o
The ambient temperature range for tool, battery use and storage is 0
C-45oC.
The recommended ambient temperature range for the charging system during
o
charging is 0
AFTER SALES SUPPORT
AUS
(toll free) MODEL No.: CDT214XA • 05/2019 • 1956
C-40oC.
1300 889 028
17
e-mail: [email protected]
Page 20
AUS
Operation
16V Lithium-ion Cordless Drill
Forward/reverse switch
NOTE: You can only change the direction of rotation of the drill/driver using the
forward/reverse switch (5) when the trigger (7) is NOT depressed.
This switch will allow you to change the direction of the motor while the trigger
switch is not depressed.
Drill/driving uses the forward mode. The reverse mode is intended for the removal of
screws and assisting to remove jammed drill/driver bits.
When the forward/reverse switch (5) is in the middle position, the drill is in the lock
position and will not function.
Adjustable torque
This drill/driver is equipped with 21 torque settings plus 1 x drill setting.
The torque settings are controlled and adjusted by the torque setting collar (2).
When using the drill/driver for drilling
1. When using the drilling function the torque control has
no eect to the output of the drill.
The drill function is used when using the drill to
drill holes in metal, non ferrous material, wood, plastic
and similar materials.
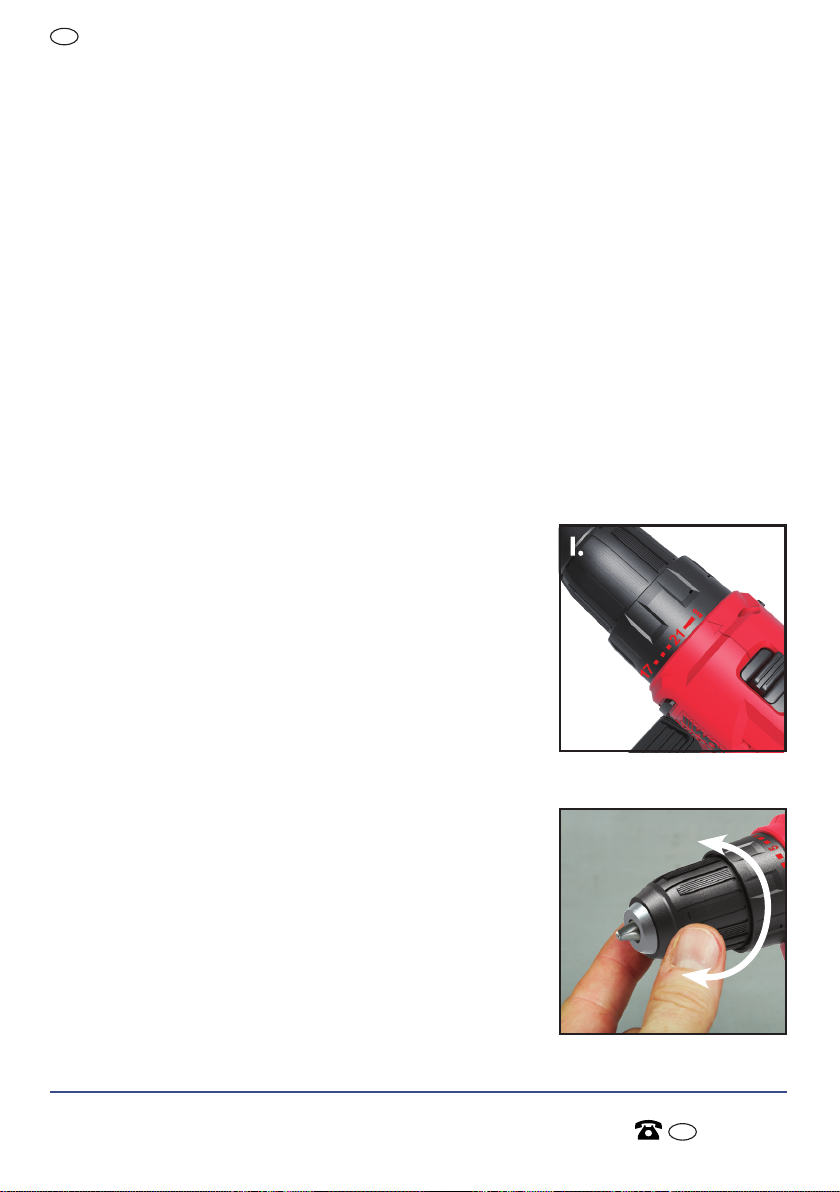
Rotate the function selection collar so the symbol
of the drill bit aligns with the triangular indicator on
the top of the drill housing (Fig I).
Inserting and removing bits
This drill/driver has a keyless chuck, which means that a
chuck key is not needed to
secure a bit in the drill/driver.
1. Open the chuck (1) by unscrewing it in an anticlockwise direction, holding the drill/ driver as shown
(Fig J).
Do this suciently enough to allow the drill/ driver bit
18
e-mail: [email protected]
J.
OPEN
CLOSE
AFTER SALES SUPPORT
AUS
1300 889 028
(toll free)MODEL No.: CDT214XA • 05/2019 • 1956
Page 21

AUS
16V Lithium-ion Cordless Drill
Operation
to enter the jaws of the chuck.
2. Ensure the drill/driver bit is fully inserted, so that the chuck jaws grip the straight
section of the bit. Rotate the chuck clock-wise until the jaws tighten on the drill/
driver bit.
The collar of the chuck needs to be tightened rmly to ensure the drill/driver bit is
held securely.
To remove the drill/driver bit, rotate the chuck sharply in an anticlockwise
direction, suciently enough to allow the drill/driver bit to be removed.
NOTE: This device is tted with spindle lock and the chuck is a one handed
operation.
Drill/driving
Drill/driving metals
• Always clamp sheet metal.
• Support thin metal with a block of wood to avoid distorting it.
• Use a punch to mark the centre of the hole.
• Use a suitable lubricant for the material you are working on.
USE: FOR:
Oil Steel
Turpentine or paran Aluminium
Do not lubricate Brass, copper or cast iron
Do not lubricate Concrete based material
Drill/driving plastics and plastic coated chipboard
• Use high speed drill/driver bits
• See drill/driving wood below
Drill/driving wood
• Clamp a piece of scrap wood to the back of your work to prevent splintering.
All drill/driving operations
• Mark o the centre of the hole using a centre punch or nail
• Don’t force the drill/driver, let it work at its own pace.
AFTER SALES SUPPORT
AUS
(toll free) MODEL No.: CDT214XA • 05/2019 • 1956
1300 889 028
e-mail: [email protected]
19
Page 22

AUS
Operation
16V Lithium-ion Cordless Drill
• Keep the drill/driver bit sharp.
• Reduce pressure, as the drill/driver is about to break through the item being
drilled/drivered.
LED work light
When the unit is switched on, the LED work light (6) also comes on to ensure better
vision and to make working in dark areas more safe.
The working light goes out when the On/O switch (7) is released.
CAUTION! LED is laser class 1!
Do not look directly into the laser as this may result in damage to the eyes.
Chuck replacement
The chucks of reversible drill/drivers are always xed by a screw with a lefthand
thread. The screw, which is located in the centre of the chuck, must be removed
before the chuck can be removed. To remove the screw, turn it in a clockwise
direction. The chuck can now be removed by unscrewing it anti-clockwise. If you have
trouble removing the chuck take the drill/driver to your nearest authorised service
centre for chuck replacement.
CAUTION. Always ensure that the drill/driver is switched o and the battery pack is
removed before making any adjustments.
20
e-mail: [email protected]
AFTER SALES SUPPORT
AUS
1300 889 028
(toll free)MODEL No.: CDT214XA • 05/2019 • 1956
Page 23
16V Lithium-ion Cordless Drill
Accessories
Side Belt Clip
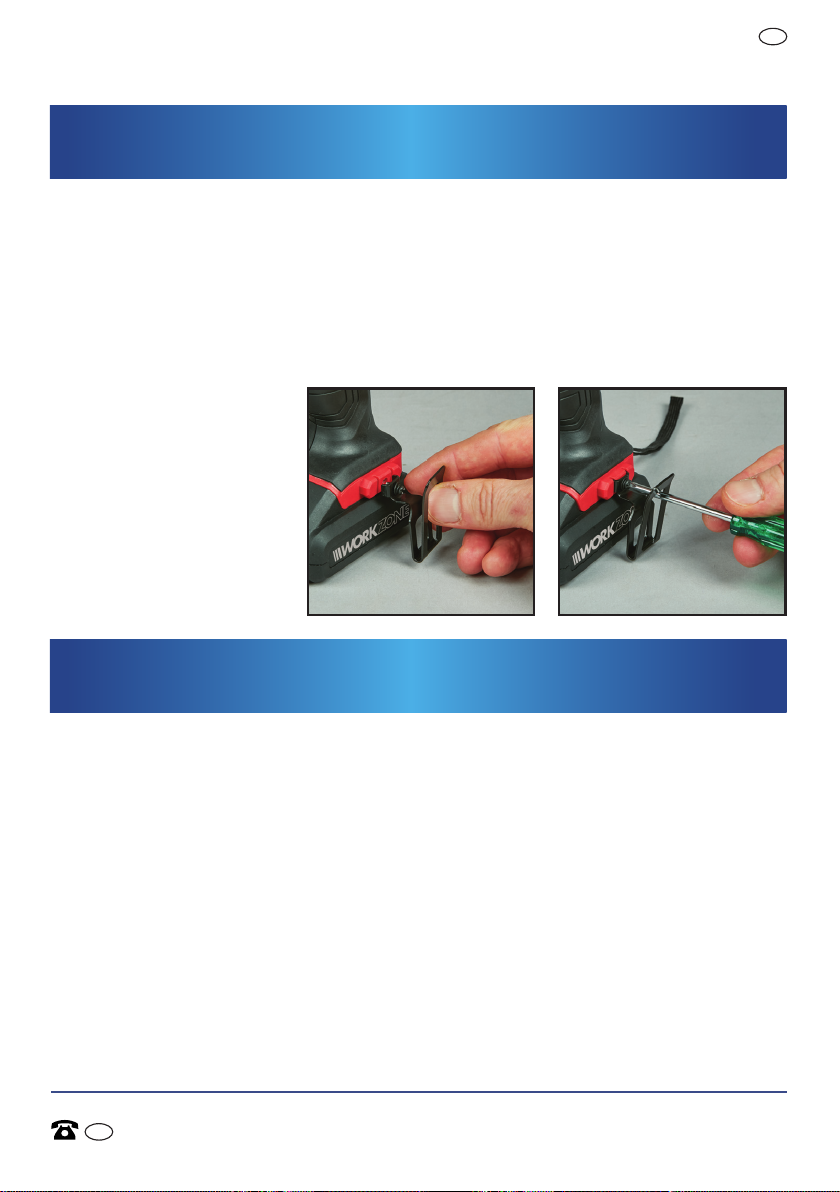
1. The side belt clip (4) is used to assist to clip the tool to your waist belt while
working. To install, insert the assembly screw through the belt hook screw hole
(Fig K), and using a Philips head screwdriver (not supplied), tighten the screw by
turning in a clockwise direction (Fig L).
NOTE: The belt clip (4) can be assembled onto either side of the drill
AUS
Operation
Carry Strap
K. L.
A carry strap (13) is included
on the drill and is already
tted for convenience.
Maintenance
To maintain capacity, recharge the battery every two months. Store only fully charged
batteries.
They should therefore be recharged from time to time. The place of storage must be
dry; the ambient temperature must not fall below 0°C or rise above 45°C.
CAUTION! Electrical and battery operated units that no longer work should not
be disposed of in the household waste! They are to be collected separately, in
accordance with your local waste disposal regulations.
ATTENTION! Batteries must be removed from battery powered tools and disposed of
separately in accordance with relevant waste battery regulations.
Batteries must never be disposed of with domestic waste!
Please discard power tools no longer usable at a local collection point.
Collection and disposal of packaging materials separately by types complying with
local rules and regulations. For details, please contact your local council.
AFTER SALES SUPPORT
AUS
(toll free) MODEL No.: CDT214XA • 05/2019 • 1956
1300 889 028
e-mail: [email protected]
21
Page 24

AUS
Warranty
16V Lithium-ion Cordless Drill
Cleaning
Clean the case only with a damp cloth. DO NOT use solvents when cleaning plastic
parts. Plastics are susceptible to damage from various types of commercial solvents
and may be damaged by their use. Use a clean cloth to remove dirt, dust, oil, grease
etc, then dry well.
Warranty
Your new Workzone® Titanium 16V Lithium-Ion Cordless Drill will more than satisfy
your expectations.
It has been manufactured under stringent Workzone® Quality Standards to meet
superior performance criteria.
You will nd your new 16V Lithium-Ion Cordless Drill easy and safe to operate, and,
with proper care, it will give you many years of dependable service.
CAUTION. Carefully read through this entire instruction manual before using your
new Workzone® Titanium 16V Lithium-Ion Cordless Drill.
Take special care to heed the Cautions and Warnings.
Your Workzone® Titanium 16V Lithium-Ion Cordless Drill has many features that will
make your job faster and easier. Safety, performance, and dependability have been
given top priority in the development of this 16V Lithium-Ion Cordless Drill, making it
easy to maintain and operate.
Use only Workzone® Titanium replacement parts for your product.
Non-conforming parts or modications made to parts will void your warranty.
Environmental protection
Recycle unwanted materials instead of disposing of them as waste.
All tools, hoses and packaging should be sorted, taken to the local
recycling centre and disposed of in an environmentally safe way.
22
e-mail: [email protected]
AFTER SALES SUPPORT
AUS
1300 889 028
(toll free)MODEL No.: CDT214XA • 05/2019 • 1956
Page 25
AUS
16V Lithium-ion Cordless Drill
Warranty
What your 5 year warranty means
Great care has gone into the manufacture of this product and it should therefore
provide you with years of good service when used properly.
In the event of product failure within its intended use over the course of the rst 5
years after the date of purchase, we will remedy the problem as quickly as possible
once it has been brought to our attention. In the unlikely event of such an occurrence,
or if you require any information about the product please contact us via our after
sales support services, details of which can be found in this manual and on the
product itself.
After Sales Support TEL: 1300 889 028
Service Support
If you have any issues with the operation of your product, please call us on
1300 889 028 for advice, or email us at [email protected]
Accessories and After Sales Parts
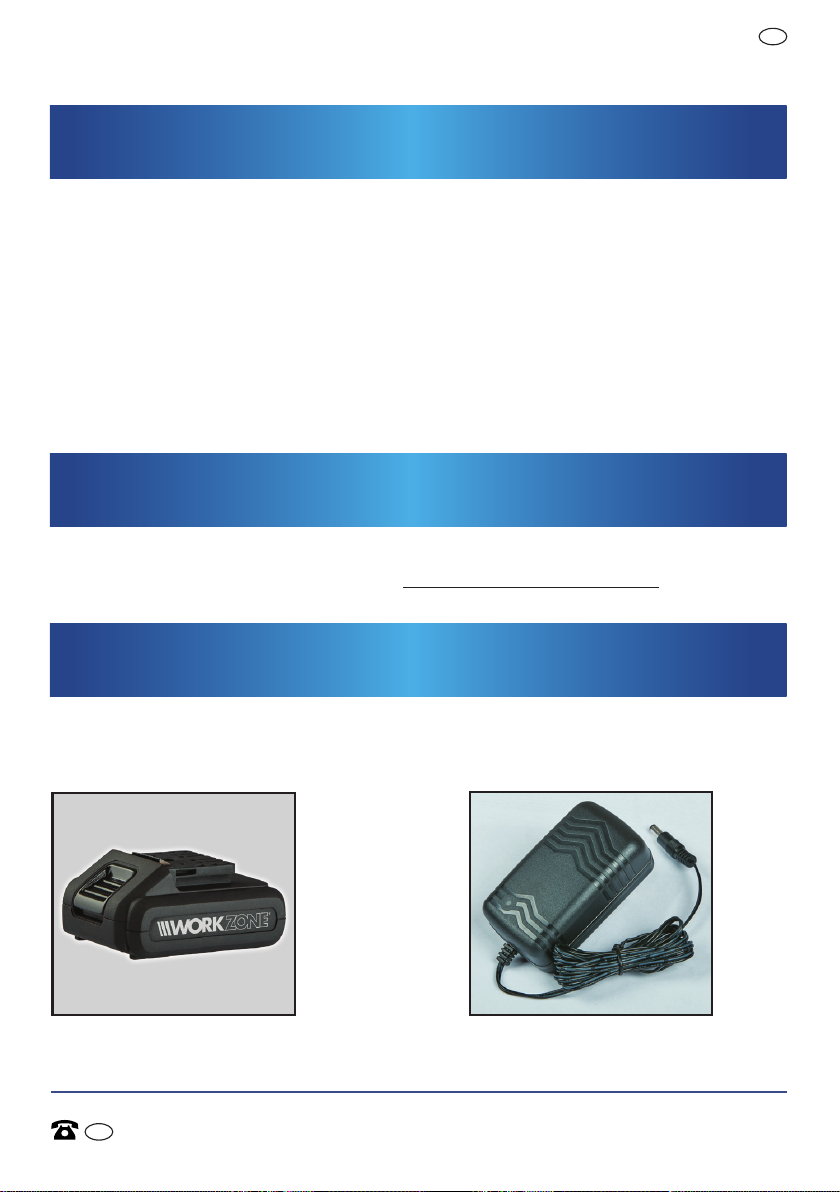
The following accessories are available for purchase by visiting https://help.tools/
or calling our customer service hotline on: 1300 889 028
1. 1956-16V - 16V Lithium-Ion
Battery
AFTER SALES SUPPORT
AUS
(toll free) MODEL No.: CDT214XA • 05/2019 • 1956
1300 889 028
2. 1956-CH - 16V Battery Charger
(JLH291751700S)
23
e-mail: [email protected]
Page 26

AUS
Troubleshooting
16V Lithium-ion Cordless Drill
Troubleshooting
FAQ/Troubleshooting
Do I need to charge the battery before use?
Yes, new battery packs are usually shipped in a below full charge condition and should be fully
charged before use. It takes approx. 1 hour to fully charge your new battery.
Follow the section in this manual on the details to charge the battery (8). If the charger (10) is
connected to the battery (8) and the green charge indicator light is on and the red light does not
come on, then the battery (8) may already be charged. This does NOT indicate a fault. In this case,
t the battery (8) into the drill and run for approx 3- 5 minutes. Then remove the battery (8) from
the drill reconnect to the battery charger (10). The red light should illuminate. Charge the battery
(8) until the green light comes on.
Follow the full section “Battery Charging “ in this manual on page 14-15.
Charging of batteries should not be undertaken casually. Through the charging cycle the
condition of the battery pack should be monitored and the charge cycle turned o at
completion or at the end of the recommended time.
How do I obtain the best life for the battery?
- Never allow the drill to come to a complete stand still before recharging. The battery should
be placed on charge whenever the battery is noticeably running down or the drill no longer
performs a task it previously performed.
- Avoid allowing lose items like screws or nails etc. to be stored with battery packs as these or
similar items can short battery packs and cause a re or explosion.
- Always unplug the battery charger (10) when not in use and store in a dry secure place.
- Avoid charging or storing your battery in temperatures below 0ºC and above 45ºC.
How do I use the 2 gears on the drill?
To select the LOW gear (low speed, high torque setting), push the gear selector forward, towards
the chuck. The number “1” will be displayed.
To select the HIGH gear (high speed, low torque setting), push the gear selector backwards. The
number “2” will be displayed.
NOTE: The gears cannot be changed if the variable speed / on o trigger (7) is depressed.
24
e-mail: [email protected]
AFTER SALES SUPPORT
AUS
1300 889 028
(toll free)MODEL No.: CDT214XA • 05/2019 • 1956
Page 27

16V Lithium-ion Cordless Drill
Trouble Shooting Specications
How do I adjust the torque?
To adjust the torque setting you rotate the torque collar (2). The higher the number, the higher
the torque setting collar.
Controlling the torque allows for better control when using the drill/driver on specic add
screwing tasks and assists in preventing over-fastening and over-tightening.
For setting the torque position, rst select a low setting on the torque collar (2) and align the
selected symbol with the triangular indicator on the top of the drill/driver.
Slowly increase the torque setting to the desired level. It is suggested to test the setting on scrap
material rst.
How do I select drill function?
When using the drilling function the torque control has no eect to the output of the drill. The
drill function is used when using the drill to drill holes in metal, non ferrous material, wood, plastic
and similar materials. Rotate the function selection collar so the symbol of the drill bit aligns with
the triangular indicator on the top of the drill housing.
What is the function of the Forward / Reverse switch?
This switch (5) will allow you to change the direction of the motor while the trigger switch is not
depressed.
Drill/driving uses the forward mode. The reverse mode is intended for the removal of screws and
assisting to remove jammed drill/driver bits.
AUS
What do I do if I have an issue with my drill?
If you have any issues with your drill/driver, please contact our Customer Service line on
1300 889 028.
AFTER SALES SUPPORT
AUS
(toll free) MODEL No.: CDT214XA • 05/2019 • 1956
1300 889 028
e-mail: [email protected]
25
Page 28
AUS
Specications
16V Lithium-ion Cordless Drill
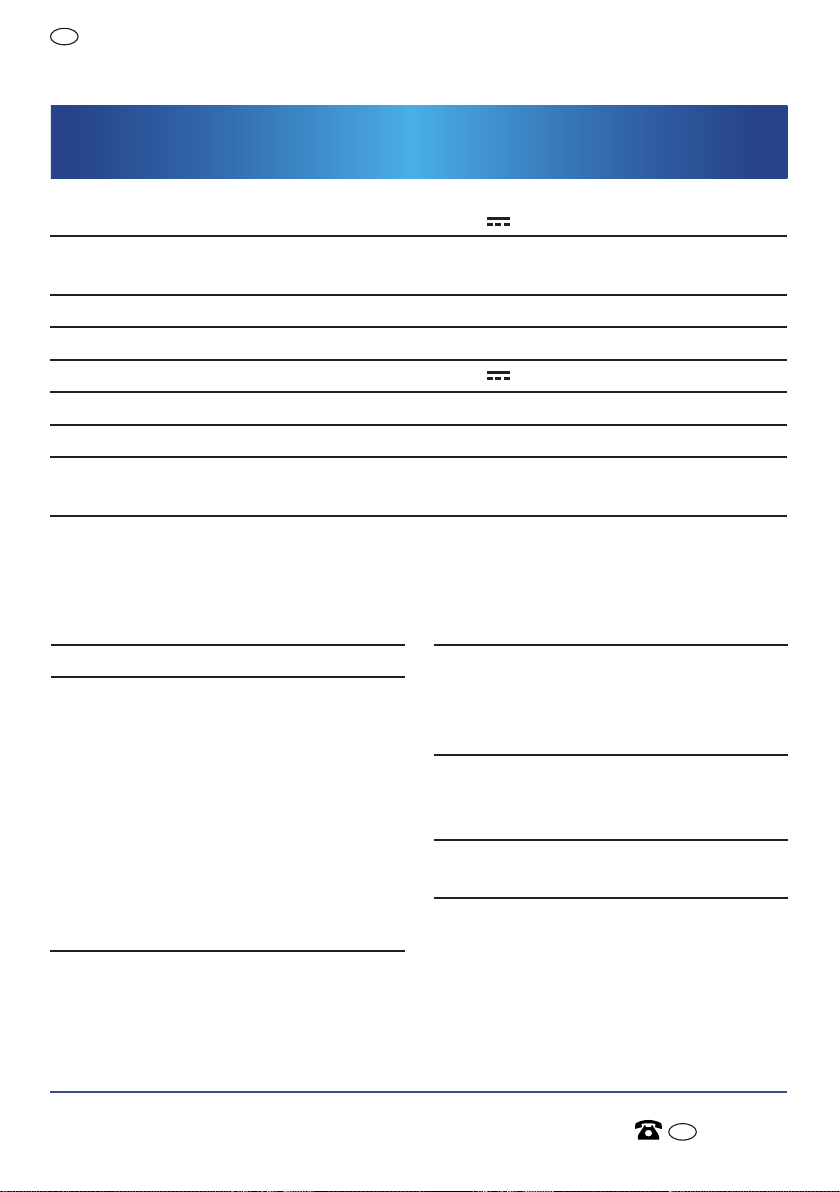
Technical Specications
Motor: 16 V
Low speed:
High speed:
Max. Torque: 25Nm
Chuck: 10mm Keyless
Battery (Model#: ABP1415MA): 16 V
Charger: Model: JLH291751700S
Charging time: Ready for use in 1 Hour
Product Dimensions: 19.5 x 7.5 x 21cm (L x W x H)
n0-Lo = 0 – 400 /min
n0-Hi = 0 – 1500 /min
1.5Ah/Li-Ion
(Drill/driver with battery pack tted)
This product complies with:
1. Charger:
IEC60335-1
IEC60335-2-29
AS/NZS60335.1
AS/NZS60335.2.29
EMC
EN 55014-1
EN 55014-2
EN 61000-3-2
EN 61000-3-3
26
e-mail: [email protected]
2. Drill:
IEC 62841-1
IEC 62841-2-1
AS/NZS 62841.1
AS/NZS 62841.2.1
EMC:
EN 55014-1
EN 55014-2
3. Battery:
IEC62133-2:2017
AFTER SALES SUPPORT
AUS
1300 889 028
(toll free)MODEL No.: CDT214XA • 05/2019 • 1956
Page 29

Page 30

Page 31

Page 32

ALDI guarantees that our exclusive brand products are developed to
our stringent quality Specications. If you are not entirely satised with this
product, please return it to your nearest ALDI store, within 60 days from the date
of purchase, for a full refund or replacement, or take advantage of our after sales
support by calling the supplier’s Customer Service Hotline.
AUS
Made in China
Workzone® Titanium is a registered trademark of ALDI Stores
DISTRIBUTED BY:
ALDI STORES
1 SARGENTS ROAD
MINCHINBURY NSW 2770
www.aldi.com.au
1300 889 028 (toll free)
e-mail: [email protected]
MODEL No.: CDT214XA • 05/2019 1956
 Loading...