

User manual
Manuel de l’utilisateur
KLR33688B
It is important to read this instruction book prior to using your new product for the rst time.
Il est important de lire ce manuel d’utilisation avant l’utilisation initiale de ce nouveau produit.
EN - FR

Safety Precautions
FCC INFORMATION
This device complies with Part 15 of the FCC
rules. Operation is subject to the following two
conditions:
(1) This device may not cause harmful
interference, and (2) This device must accept
any interference received, including interference
that may cause undesired operation.
NOTE: This equipment has been tested and
found to comply with the limits for a Class B digital
device, pursuant to part 15 of the FCC Rules.
These limits are designed to provide reasonable
protection against harmful interference in a
residential installation. This equipment generates,
uses, and can radiate radio frequency energy
and, if not installed and used in accordance with
the instructions, may cause harmful interference
to radio communications. However, there is no
guarantee that interference will not occur in a
particular installation. If this equipment does
cause harmful interference to radio or television
reception, which can be determined by turning
the equipment off and on, the user is encouraged
to try to correct the interference by one or more
of the following measures:
• Reorient or relocate the receiving antenna.
• Increase the separation between the
equipment and receiver.
• Connect the equipment into an outlet on a
circuit different from that to which the receiver
is connected.
• Consult the dealer or an experienced radio/TV
technician for help.
such as newspaper, table-cloths, curtains, etc.
• No naked ame sources such as lighted
candles should be placed on the unit.
ON SAFETY
• Disconnect the AC adapter immediately if
liquid spills into or onto the unit, or if an object
falls into the unit. The unit should not be used
until service by a qualied service personnel is
completed.
• The unit shall not be exposed to dripping or
splashing and that no objects lled with liquid,
such as vases, shall be placed on the unit.
ON USE
Never use the unit where it would be subject to:
- Heat sources such as radiators or air ducts.
- Direct sunlight.
FOR CUSTOMERS IN CANADA
This apparatus complies with the Class B
limits for radio noise emission set out in radio
interference regulations.
CAN ICES-3 (B) / NMB-3 (B)
This device complies with Industry Canada
Licence-exempt RSS-210. Operation is
subject to the following two conditions: (1)
this device may not cause interference, and
(2) this device must accept any interference,
including interference that may cause undesired
operation of the device.
WARNING:
• Changes or modications to this unit not
expressly approved by the party responsible
for compliance could void the user’s authority
to operate the equipment.
• The AC adapter is used as disconnect device
and it should remain readily operable during
intended used. In order to disconnect the unit
from the mains completely, the AC adapter
should be disconnected from the mains socket
outlet completely.
• The AC adapter of unit should not be
obstructed OR should be easily accessed
during intended use.
• Minimum 10 cm (4 inches) distances around
the unit for sufcient ventilations.
• The ventilation should not be impeded by
covering the ventilation openings with items
EN - FR - 2
CAUTION
TO REDUCE THE RISK OF FIRE, DO NOT
PLACE ANY HEATING OR COOKING
APPARATUS BENEATH THIS UNIT.
Mounting Instructions
TOOLS NEEDED:
1) Electric drill with 1/4” bit;
2) Phillips-head (cross style) screwdriver.
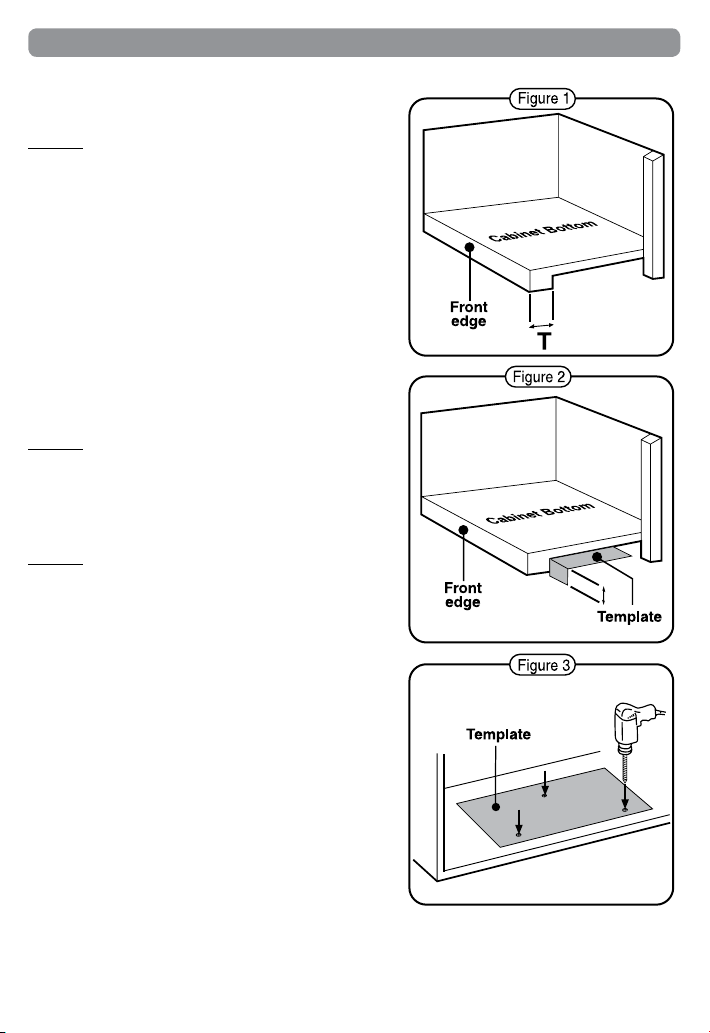
STEP 1
If your cabinet does NOT have an overhang:
a) Place the Mounting Template in the desired location
inside or underneath the cabinet (whichever has less
obstructions, and will be easier for you to reach to drill
holes), ush with the front edge of the cabinet and
tape it down. Go to STEP 2.
If your cabinet DOES have an overhang:
a) Measure the thickness “T” of the cabinet overhang
(see Figure 1).
b) Fold the Mounting Template along the guideline that
is closest to the thickness of your cabinet overhang.
c) Tape Mounting Template to the underside of the
cabinet with the folded portion of the Mounting
Template ush up against the cabinet overhang (see
Figure 2). Go to STEP 2.
STEP 2
Use an electric drill with a ¼” drill bit (not included) to drill
all three holes marked on the Mounting Template (see
Figure 3). To reduce splintering, place a small piece of
masking tape over each hole location before drilling. Go
to STEP 3.
STEP 3
If your cabinet does NOT have an overhang:
a) SIX screws are included with this unit, but you will
only need three of them. Select the screw length
which will go completely through your cabinet bottom,
and provide at least 3/8” of thread to screw into the
unit.
b) Insert the three selected screws through each hole
from the inside of the cabinet going down (see Figure
4).
Warning:
Please follow the steps below for proper mounting:
1. We recommend you install the 3 screws using
hand tools. Do not use power tools because high
torque can damage the threads on the main unit.
2. Please hold and support the unit before you insert
any of the screws.
3. First mount 2 screws on opposite corners of the
unit.
c) Hold the unit up against the bottom of the cabinet, and align the three holes on the top of the unit
with the screws. Partially tighten each screw, but do not fully tighten the screws until all of them
have been started.
d) Gently tighten each screw until they are rmly holding the unit in place.
EN - FR - 3

If your cabinet DOES have an overhang:
a) SIX screws are included with this unit, but you will only
need three of them. Select the screw length which
will go completely through your cabinet bottom, and
extend at least 3/8” past the bottom of your cabinet
overhang.
b) This unit includes two sets of three spacers of various
lengths. The spacers can be put together to form longer
spacers to accommodate various cabinet overhang
thicknesses. Determine the best combination of
spacers which is equal to or longer than the cabinet
overhang thickness.
c) Insert the three selected screws through each hole
from the inside of the cabinet going down (see Figure
5).
Warning:
Please follow the steps below for proper mounting:
1. We recommend you install the 3 screws using hand
tools. Do not use power tools because high torque
can damage the threads on the main unit.
2. Please hold and support the unit before you insert
any of the screws.
3. Mount 2 screws on the corners of the unit rst.
4. Do not reverse the spacer.
d) Hold each screw head down and push the unit and
spacers onto the screws, then hold the unit up until
spacers are rmly against the bottom of the cabinet
(and fully nested within each other if you are using
multiple spacers for each screw).
e) Partially tighten each screw, but do not fully tighten the
screws until all of them have been started (see Figure
6).
f) Gently tighten each screw until they are rmly holding
the unit in place. The top front edge of the unit should
clear the overhang.
MOUNTING SUGGESTIONS
1) If your cabinet has obstructions inside it which prevent
you from using the template, cut out the corresponding
area on the template, but do NOT cut out or through
the screw holes.
2) If your cabinet has obstructions underneath it, which
will interfere with the mounting of the unit, remove the
obstruction before mounting the unit, or nd another
location to mount the unit.
3) It is recommended that you wear safety glasses while drilling to prevent eye injuries.
4) For wood cabinets, you may want to mark the hole locations with a nail, pressed gently but rmly
into the wood so that a slight impression is made. This will also help keep the drill bit centered in
the right location.
5) Hold the drill rmly against the cabinet to keep the drill from “walking”.
EN - FR - 4

Accessories
Please locate the included accessories.
AC power adapter................................. x 1
Mounting template ................................ x 1
1.06” (27mm) spacers .......................... x 3
0.57” (14.4mm) spacers ....................... x 3
#M5 x 69mm screws............................. x 3
#M5 x 40mm screws............................. x 3
Power Supply
USING THE AC ADAPTER
Using an AC adapter other than the one
supplied with the unit may damage the unit.
Caution:
• Before use, ensure the rated voltage of the
adapter matches your local voltage.
• The included AC adapter is for use with this
unit only. Do not use it with other equipment.
• If you are not going to use the unit for a long
time, disconnect the AC adapter from the wall
outlet.
• Whenever the AC adapter is plugged in to
a wall outlet, the AC adapter will draw some
power, even when the unit is turned off.
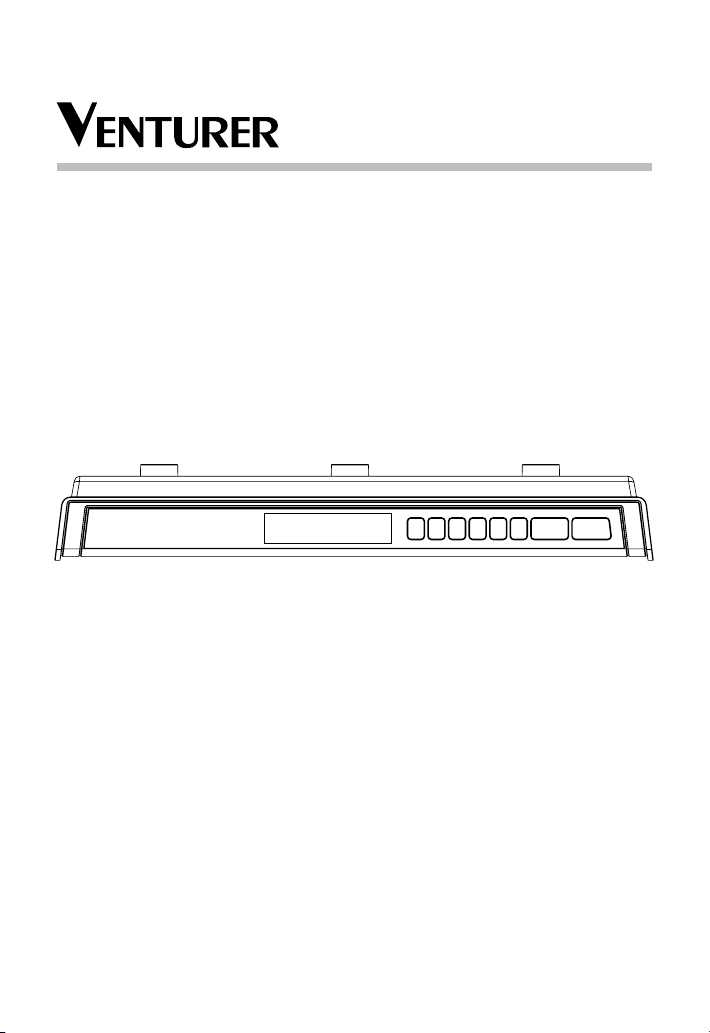
Location of Controls
1. LED Display
2. ON/OFF button
3. FM button
4. PAIR button
5. TIMER button
6. PLAY/PAUSE MEM button
7. PRESET / SET TIME button
8. SKIP / TUNE button
HOUR / MIN button
9. VOLUME UP/DOWN button
10. DC IN jack
EN - FR - 5
Setting the Clock
1. In STANDBY mode, press and hold the
button, the hour digits blink.
2. Press (HOUR) and (MIN) buttons to
adjust the hour.
3. Press button to conrm hour. Minute
digits blink.
4. Press (HOUR) and (MIN) buttons to
adjust the minute.
5. Press button again to conrm the clock.
6. PM LED indicator will illuminate if it is in PM
time.
Bluetooth Pairing
Before Bluetooth pairing, you should turn on the
Bluetooth function of your other device (such
as, mobile phone with Bluetooth function).
1. Press
button on the
unit to select
Bluetooth
mode.
2. On your device (mobile phone, MP3 player,
etc.), select KLR33688B from the list of
available Bluetooth connections.
Note: If your Bluetooth device (such as,
mobile phone) requires a password while
pairing, please enter 4-digit number: 0000.
• If the Bluetooth pairing is successful, a
beep will be heard and the
indicator will illuminate.
• If the Bluetooth pairing is unsuccessful, the
Bluetooth indicator will blink at slow speed.
Please try again.
TO DISCONNECT THE CURRENTLY PAIRED
DEVICE
1. On your currently paired and connected
device, select KLR33688B from the list and
disconnect it. or
2. turn off the connected device.
ENJOY THE MUSIC THROUGH BLUETOOTH
• Press to begin or pause playback
• Press / to select a specic track
Bluetooth

Setting the Cooking Timer
1. Press the
button, “90” is
shown and timer
LED indicator ashes.
2. To set timer from 1-99 minutes, you can
either:
a. press the
preset time. 90, 75, 60, 45, 30, 15, 10
minutes will be shown, or
b. press and hold the / buttons to
fast forward/reverse the timer.
3. Once it reaches to your desired time, leave
the
seconds, then it will turn to solid, timer is set.
button repeatedly to select
TIMER indicator ashes for a few
Listening to the Radio
1. Press the button.
2. Press or buttons to tune in to a
desired station.
3. Press the or button to obtain the
desired volume level.
4. If you are in BT mode, press button once
to switch to radio mode.
SEARCHING FOR A STATION
AUTOMATICALLY
• Press and hold the / buttons until
the tuner starts searching for a station, then
release. After nding a clear station, the
search stops automatically.
Note: The search may not stop at a station
with a very weak signal. To improve the radio
reception, fully unwind the FM antenna wire and
place it in the position that sounds best.
4. When the preset time elapses, the ALARM
will sound.
5. Press the
on, the display will show the remaining time.
Note: Do not press any buttons within 5 seconds
after setting the cooking time, otherwise the
cooking timer will be cancelled.
button any time during timer is
CANCELLING THE COOKING TIMER
• You can cancel the timer anytime by pressing
button until the timer shows “00” and
the
the LED indicator turn off.
PRESETTING STATIONS
The unit can store a total of 20 FM stations in
memory. Presetting allows you to tune in to a
station directly.
A. Presetting Stations Manually
1. Tune in to a desired station (see previous
section).
2. Press the button. The preset number will
blink on the display.
3. Press the / buttons repeatedly to
select the preset number you desire.
4. Press the button again to store it in
memory.
5. Repeat steps 1-4 to store other stations.
B. Presetting Stations Automatically
Press and hold the button, the unit will tune
in to stations one by one and will stop until all 20
stations are preset and stored.
Troubleshooting Guide
Poor FM reception
• Make sure FM antenna wire is fully extended.
• Electrical interference in your kitchen may
cause poor reception. Try to install the unit
away from them (especially those with
motors and transformers).
Clock does not show the correct time
• There has been an electrical power
interruption. Set the clock again.
EN - FR - 6
Bluetooth device does not pair with this unit
• Make sure your Bluetooth device is working
properly.
• Reset the bluetooth connection by turning off
and on your connecting device, and this unit.

Consignes de Sécurité
RENSEIGNEMENTS FCC
Cet appareil est conforme à la section 15 des
règles de la FCC. Son fonctionnement est
soumis aux deux conditions suivantes :
(1)Cet appareil ne doit pas causer des
interférences gênantes, et (2)Cet appareil doit
tolérer toute interférence reçue, y compris
celles susceptibles de causer un mauvais
fonctionnement.
REMARQUE: Cet appareil a été soumis à des
tests et s’est révélé en conformité avec les
limites pour un appareil numérique de classe B,
conformément à la section 15 des règles de la
FCC. Ces limites ont pour but d’assurer une
protection raisonnable contre les interférences
gênantes dans un emplacement résidentiel.
Cet appareil génère, utilise et peut émettre
des fréquences radioélectriques, et s’il n’est
pas installé et utilisé selon les instructions, il
peut causer des interférences nuisibles aux
radiocommunications; cependant, il n’y a pas de
garantie que des interférences ne se produiront
pas dans un lieu donné. Si cet appareil cause
des interférences nuisibles à la réception de
la radio ou de la télévision, ce qui peut être
déterminé en mettant l’appareil en et hors
circuit, nous conseillons à l’utilisateur l’une ou
plusieurs des mesures correctives suivantes :
• Réorientez ou changez l’emplacement de
l’antenne de réception.
• Augmentez la séparation entre l’appareil et le
récepteur.
• Branchez l’appareil dans une prise sur
un circuit différent de celui sur lequel le
récepteur est branché.
• Adressez-vous au dépositaire ou à un
technicien qualié de radio/téléviseur pour
obtenir de l’aide.
Avertissement :
• Des changements ou modications apportés
à cet appareil, non approuvés expressément
par les responsables de la conformité,
peuvent ôter à l’utilisateur le droit d’utiliser
cet appareil.
• L’adaptateur CA sert de dispositif de
débranchement et il doit rester à portée
de la main durant l’utilisation de l’appareil.
Pour déconnecter complètement l’appareil
de l’alimentation secteur, il faut débrancher
l’adaptateur CA de la prise de courant CA.
• L’adaptateur CA doît être à portée de la main
OU sans obstruction durant l’utilisation de
EN - FR - 7
l’appareil.
• Il faut un espace libre minimum de 10 cm (4
po) autour de l’appareil pour une ventilation
adéquate.
• Pour assurer une bonne ventilation, il ne faut
pas couvrir les orices d’aération avec des
articles tels que journaux, nappes, rideaux,
etc.
• Ne placez aucune source de amme nue,
telle une bougie allumée sur l’appareil.
SÉCURITÉ
• Si un objet ou du liquide pénètre dans
l’appareil, débranchez-le de la source
d’alimentation et faites vérier l’appareil par
un personnel qualié avant de continuer à
utiliser l’appareil.
• N’exposez pas l’appareil à des gouttes ou
des éclaboussures et ne placez aucun objet
rempli de liquide, tel un vase, sur l’appareil.
UTILISATION
N’utilisez jamais l’appareil là où il serait soumis
à:
- Des sources de chaleur, telles radiateurs ou
conduits d’air.
- La lumière directe du soleil.
POUR LES CLIENTS AU CANADA
Cet appareil est en conformité avec les limites de
classe B concernant les bruits radioélectriques
énoncés dans le règlement sur le brouillage
radioélectrique.
CAN ICES-3(B) / NMB-3(B)
Le présent appareil est conforme aux CNR
d’Industrie Canada applicables aux appareils
radio exempts de licence. L’exploitation est
autorisée aux deux conditions suivantes :
(1) l’appareil ne doit pas produire de brouillage,
et (2) l’utilisateur de l’appareil doit accepter
tout brouillage radioélectrique subi, même si le
brouillage est susceptible d’en compromettre le
fonctionnement.
PRÉCAUTION:
POUR RÉDUIRE LES RISQUES
D’INCENDIE, NE PLACEZ AUCUN
APPAREIL DE CHAUFFAGE OU
DE CUISSON SOUS CE HAUTPARLEUR.

Instructions de montage
OUTILS NÉCESSAIRES:
1) Perceuse électrique et foret 1/4 po;
2) tournevis à lame Phillips (en croix).
ÉTAPE 1
Armoire SANS bord en saillie:
a) Placez le gabarit de pose à l’endroit désiré, à l’intérieur
ou sous l’armoire (là où l’accès est le plus facile pour
percer des trous), af eurant avec le bord avant de
l’armoire et maintenez-le avec du ruban adhésif.
Passez à L’ÉTAPE2.
Armoire AVEC bord en saillie:
a) Mesurez l’épaisseur «T» du bord en saillie de l’armoire
(voyez croquis 1).
b) Pliez le gabarit de montage le long de la ligneguide
la plus proche de l’épaisseur du bord en saillie de
l’armoire.
c) Posez le gabarit de montage sur le dessous de
l’armoire, la portion pliée du gabarit de montage af
eurant avec le bord en saillie de l’armoire (voyez
croquis 2). Passez à L’ÉTAPE2.
ÉTAPE 2
À l’aide d’une perceuse électrique munie d’un foret de
¼ po (non compris) percez les quatre trous indiqués sur
le gabarit de montage (voyez croquis 3). Pour éviter le
risque d’éclats, collez un petit morceau de ruban-cache
sur l’emplacement de chaque trou avant le perçage.
Passez à L’ÉTAPE3.
ÉTAPE 3
Armoire SANS bord en saillie:
a) Six vis sont comprises avec l’appareil, mais vous
n’en utiliserez que trois. Choisissez les vis assez
longues pour les enfoncer complètement dans le fond
de l’armoire et laisser dépasser un let de 3/8 po
minimum pour les visser dans l’appareil.
b) Insérez les quatre vis choisies dans chaque trou en
allant de l’intérieur de l’armoire vers l’extérieur (voyez
croquis 4).
AVERTISSEMENT:
Veuillez suivre les étapes ci-dessous pour une pose
appropriée:
1. Nous conseillons de poser les 3 vis avec un outil à
main. N’utilisez pas un outil électrique car un couple
élevé peut endommager les lets sur l’appareil.
2. Veuillez tenir et soutenir l’appareil avant d’insérer
chacune des vis.
3. Posez les 2 premières vis sur 2 coins diamétricalement opposés de l’appareil.
c) Maintenez l’appareil contre le dessous de l’armoire et faites coïncider les quatre trous sur le
dessus de l’appareil avec les vis. Vissez chaque vis partiellement jusqu’à ce que toutes les vis
soient légèrement vissées.
d) Resserrez délicatement chaque vis jusqu’à ce que l’appareil soit bien maintenu en place.
EN - FR - 8

Armoire AVEC bord en saillie:
a) Six vis sont comprises avec l’appareil, mais vous n’en
utiliserez que quatre. Choisissez les vis assez longues
pour les enfoncer complètement dans le fond de
l’armoire et pour que la tige dépasse le bord en saillie
au bas de l’armoire d’au moins 3/8 po.
b) Cet appareil comporte trois jeux de quatre cales
d’espacement de longueurs variées; elles peuvent
s’ajouter les unes aux autres pour convenir aux
différentes épaisseurs de bords en saillie d’armoires.
Déterminez l’agencement optimal de cales
d’espacement égal ou supérieur à l’épaisseur du bord
en saillie de l’armoire.
c) Insérez les quatre vis choisies dans chaque trou en
allant de l’intérieur de l’armoire vers l’extérieur (voyez
croquis 5).
AVERTISSEMENT:
Veuillez suivre les étapes ci-dessous pour une pose
appropriée:
1. Nous conseillons de poser les 3 vis avec un outil à
main. N’utilisez pas un outil électrique car un couple
élevé peut endommager les lets sur l’appareil.
2. Veuillez tenir et soutenir l’appareil avant d’insérer
chacune des vis.
3. Posez les 2 premières vis sur 2 coins
diamétricalement opposés de l’appareil.
4. N’intervertissez pas la cale d’espacement.
d) Tenez chaque vis, la tête vers le bas, et placez
l’appareil et les cales d’espacement sur les vis,
puis maintenez l’appareil jusqu’à ce que les cales
d’espacement soient bien calées contre le dessous de
l’armoire (et bien emboîtées les unes contre les autres
si vous utilisez plusieurs cales pour chaque vis).
e) Vissez chaque vis partiellement jusqu’à ce que toutes
les vis soient légèrement vissées.(voyez croquis 6).
f) Resserrez délicatement chaque vis jusqu’à ce que
l’appareil soit bien maintenu en place. Il faut un
dégagement entre le bord supérieur avant de l’appareil
et le bord en saillie.
INSTRUCTIONS DE MONTAGE
1) S’il y a des obstacles à l’intérieur de votre armoire qui
empêchent d’utiliser le gabarit, découpez la portion du
gabarit inutilisable, mais NE coupez PAS les trous de
vis.
2) S’il y a des obstacles sous votre armoire qui gêneraient la pose de l’appareil, retirez les obstacles
avant la pose ou trouvez un autre emplacement pour l’appareil.
3) Il est conseillé de porter des lunettes de sécurité durant le perçage pour éviter une blessure aux
yeux.
4) Pour les armoires en bois, vous pouvez faire un repère de l’emplacement des trous avec un clou
en l’enfonçant soigneusement mais fermement dans le bois pour créer une légère dépression.
Ceci aidera aussi à maintenir le foret de perceuse centré au bon endroit.
5) Tenez la perceuse fermement contre l’armoire pour l’empêcher de déraper.
EN - FR - 9

Accessoires
Veuillez vérier et identier les accessoires
compris.
Adaptateurs de courant CA ......................x 1
Gabarit de montage ..................................x 1
Cales d’espacement 1,06 po (27 mm)......x 3
Cales d’espacement 0,57 po (14, 4 mm)..x 3
Vis no M 5 x 69 mm ..................................x 3
Vis no M 5 x 40 mm ..................................x 3
Source D’alimentation
UTILISATION DE L’ADAPTATEUR CA
L’utilisation d’un adaptateur CA autre que celui
fourni avec l’appareil risque d’endommager ce
dernier.
Mise en garde :
• En tout premier lieu, vériez si la tension
indiquée pour l’adaptateur correspond à votre
tension locale.
• L’adaptateur CA compris est destiné
uniquement à cet appareil. Ne l’utilisez pas
pour un autre appareil.
• Si vous n’allez pas utiliser l’appareil pendant
une longue période de temps, débranchez
l’adaptateur CA de la prise murale.
• Lorsque l’adaptateur CA est branché dans
une prise murale, un courant électrique est
acheminé à la barre de son, même s’il est mis
hors circuit.
Emplacement des commandes
VUE AVANT
VUE ARRIÈRE
1. Afchage à DEL
2. Touche EN/HORS CIRCUIT (ON/OFF)
3. Touche FM
4. Touche de jumelage (PAIR)
5. Touche de la minuterie (TIMER)
6. Touche de lecture/pause et mém. (PLAY/
PAUSE MEM)
7. Touche de préréglage/réglage (PRESET/
SET TIME)
8. Touche d’omission/syntonisation (SKIP/
TUNE)
Touche des heures/minutes (HOUR/MIN)
9. Touche de réglage du VOLUME
10. Prise DC IN (alimentation CC)
EN - FR - 10
Réglage de l’horloge
1. Abaissez et maintenez la touche jusqu’à
ce que les chiffres des heures clignotent.
2. Abaissez les touches (HEURES) et
(MIN) pour régler l’heure.
3. Abaissez la touche pour conrmer
l’heure. Les chiffres des minutes clignotent.
4. Abaissez les touches (HEURES) et
(MIN) pour régler les minutes.
5. Abaissez de nouveau la touche pour
conrmer le réglage.
6. Le témoin à DEL PM s’illumine s’il s’agit de
l’après-midi.

Jumelage avec un appareil Bluetooth
Avant de jumeler le haut-parleur avec un
appareil Bluetooth, activez la fonction Bluetooth
de cet autre appareil (téléphone cellulaire à
fonction Bluetooth, par ex.).
1. Abaissez la touche du haut-parleur pour
choisir le mode Bluetooth.
2. Sur votre appareil (téléphone cellulaire,
lecteur MP3, etc.), choisissez KLR33688B
dans la liste des connexions Bluetooth
disponibles.
Remarque: Si votre appareil Bluetooth
(téléphone cellulaire, par ex.) demande un
mot de passe pendant le jumelage, entrez le
numéro à 4 chiffres « 0000 ».
• Si le jumelage avec l’appareil Bluetooth
réussit, vous entendrez un signal sonore
et le témoin Bluetooth s’illuminera.
• Si le jumelage avec l’appareil Bluetooth
est un échec, le témoin Bluetooth se
mettra à clignoter lentement. Réessayez
le jumelage.
Réglage de la minuterie de cuisson
1. Abaissez la
touche
90 » s’afche et
le témoin à DEL de la minuterie se met à
clignoter.
2. Pour régler la minuterie de 1 à 99 minutes,
vous pouvez :
a. Abaisser plusieurs fois la touche
choisir la durée préréglée. Vous verrez
s’afcher 90, 75, 60, 45, 30, 15 ou 10
minutes. ou
b. Abaisser et maintenir les touches /
un retour arrière rapide de la minuterie.
3. Lorsque la durée souhaitée s’afche, le
témoin à DEL clignote pendant quelques
secondes. Lorsqu’il s’illumine en continu, la
minuterie est réglée.
4. Lorsque la durée est atteinte, l’ALARME
retentit.
. «
pour
pour effectuer une avance rapide ou
POUR DÉCONNECTER L’APPAREIL
JUMELÉ
1. Sur votre appareil jumelé et connecté,
choisissez KLR33688B dans la liste et
déconnectez-le.
ou
2. Mettez l’appareil connecté hors circuit.
POUR ÉCOUTER DE LA MUSIQUE PAR
FONCTION BLUETOOTH
• Abaissez pour commencer la lecture ou
mettre en pause.
• Abaissez / pour choisir une piste
spécique.
5. À tout moment, vous pouvez abaisser
la touche
fonctionne pour que l’écran afche la durée
restante.
Remarque : N’abaissez aucune touche dans
les 5 secondes qui suivent le réglage de la
minuterie de cuisson, sinon le réglage sera
annulé.
pendant que la minuterie
ANNULATION DE LA MINUTERIE DE
CUISSON
• Vous pouvez annuler la minuterie à tout
moment en abaissant la touche
ce que la minuterie afche « 00 » et que le
témoin à DEL s’éteigne.
jusqu’à
EN - FR - 11

Pour Écouter la radio
1. Abaissez la touche .
2. Abaissez les touches ou pour choisir
la station souhaitée.
3. Abaissez la touche ou pour régler le
volume sonore.
4. Si vous êtes en mode BT, abaissez la touche
une fois pour choisir le mode radio.
POUR LANCER LA RECHERCHE
AUTOMATIQUE DE STATIONS
• Abaissez et maintenez les touches /
jusqu’à ce que le syntoniseur commence
à chercher une station. Relâchez la
touche. Lorsque le syntoniseur trouve
une station claire, la recherche s’arrête
automatiquement.
Remarque: Il se peut que la recherche ne
s’arrête pas si la station émet un signal très
faible. Pour améliorer la réception radio,
déployez entièrement l’antenne FM laire et
placez-la dans la position où la réception est la
meilleure.
Guide de dépannage
PRÉRÉGLAGE DES STATIONS
Le haut-parleur peut mémoriser en tout 20
stations FM. Le préréglage vous permet
d’écouter directement une station donnée.
A. Préréglage manuel des stations
1. Choisissez la station souhaitée (voir section
précédente).*
2. Abaissez la touche . Le numéro préréglé
se met à clignoter sur l’écran.
3. Abaissez plusieurs fois la touche /
pour choisir le numéro préréglé que vous
souhaitez.
4. Abaissez de nouveau la touche pour la
mémoriser.
5. Répétez les étapes 1 à 4 pour mémoriser
d’autres stations.
B. Préréglage automatique des stations
Abaissez et maintenez la touche . Le haut-
parleur balayera les stations l’une après l’autre
et s’arrêtera lorsque les 20 stations seront
préréglées et mémorisées.
Mauvaise réception FM
• Vériez que l’antenne FM laire est
entièrement déployée.
• Des interférences électriques dans votre
cuisine peuvent être à l’origine de la
mauvaise réception. Essayez d’installer
le haut-parleur à l’écart de ces appareils
(et plus particulièrement ceux équipés de
moteurs et de transformateurs).
L’horloge afche une heure incorrecte
• Une panne de courant s’est produite. Réglez
de nouveau l’horloge.
EN - FR - 12
Impossible de jumeler des appareils Bluetooth
au haut-parleur
• Vériez que votre appareil Bluetooth
fonctionne correctement.
• Réinitialisez la connexion Bluetooth en
mettant hors circuit puis en circuit votre
appareil connecté, ainsi que le haut-parleur.
 Loading...