

Page 1
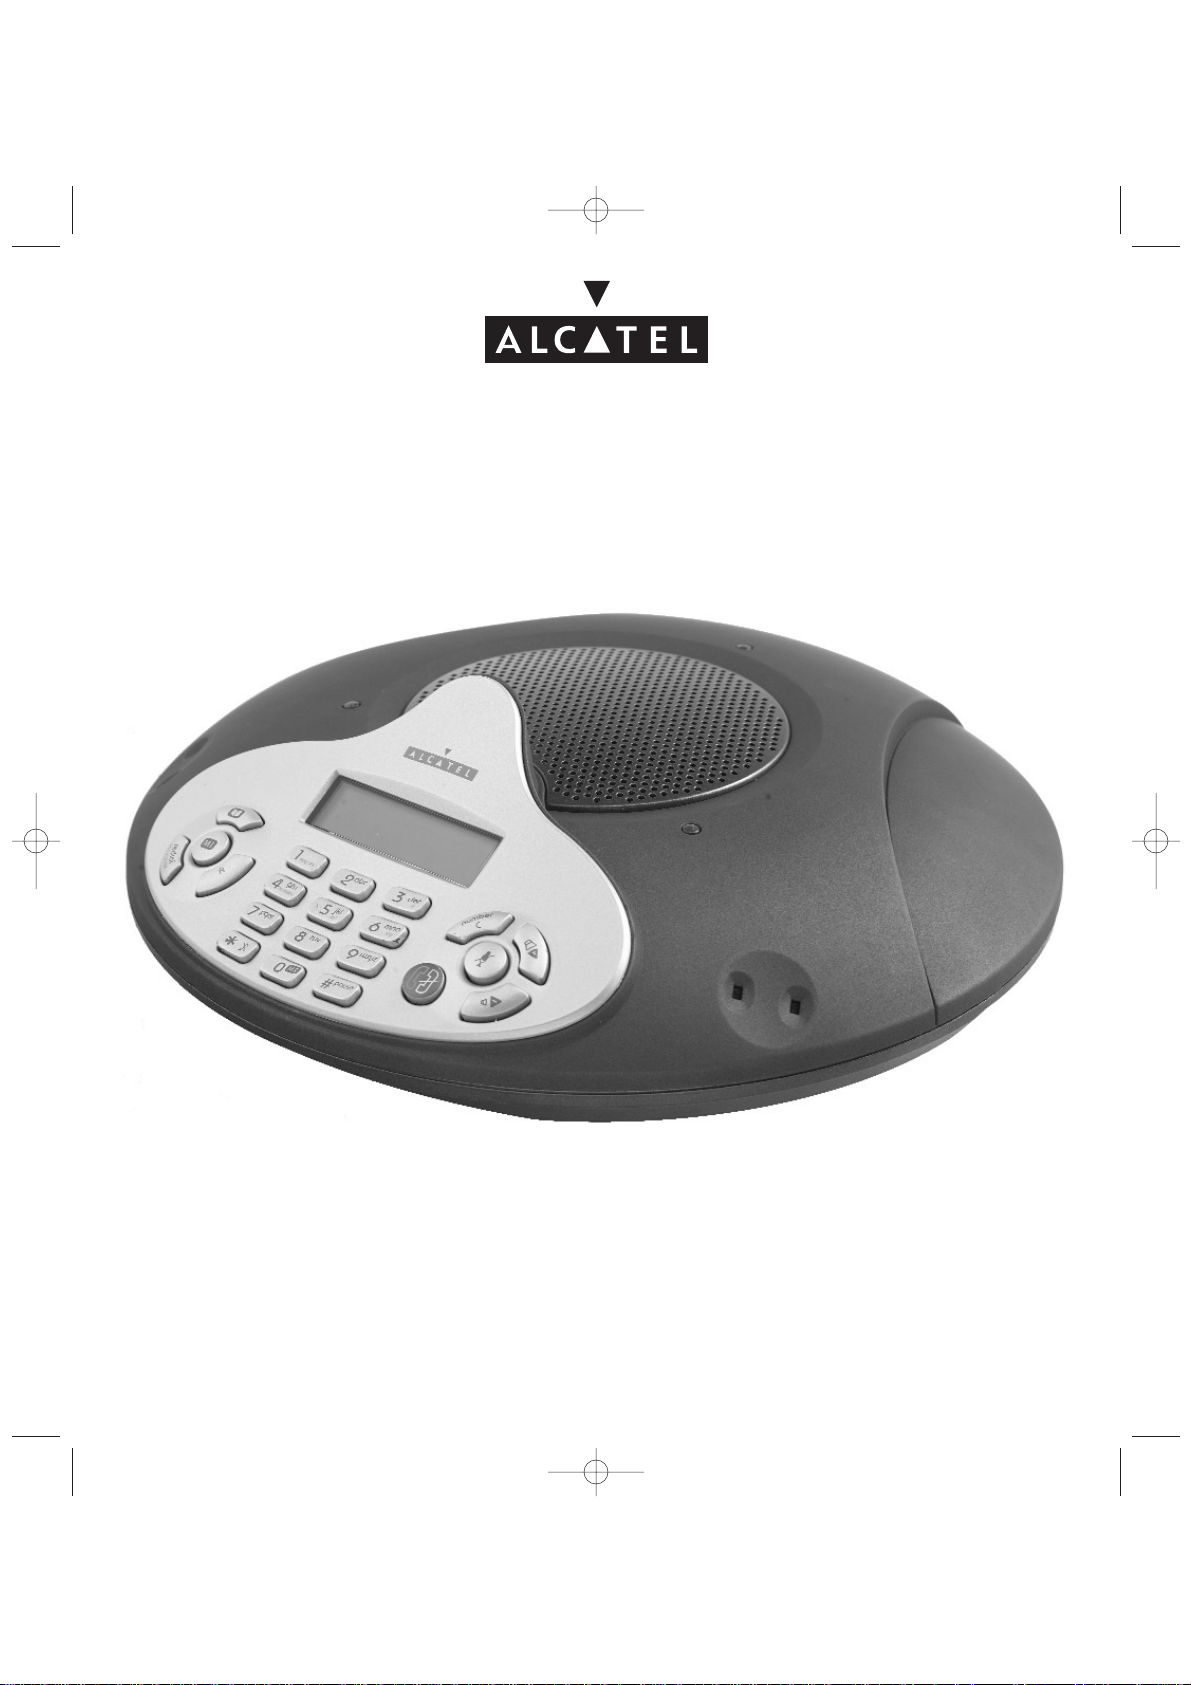
Versatis Conference
Guide d’utilisation / User Guide / Benutzerhandbuch
Manual del usuario / Manuale d'uso
Guia de utilização / Gebruiksaanwijzing
Versatis_Conference_fr.qxd 31/03/2005 16:20 Page 1
Page 2

2
Versatis_Conference_fr.qxd 31/03/2005 16:20 Page 2
Page 3
3
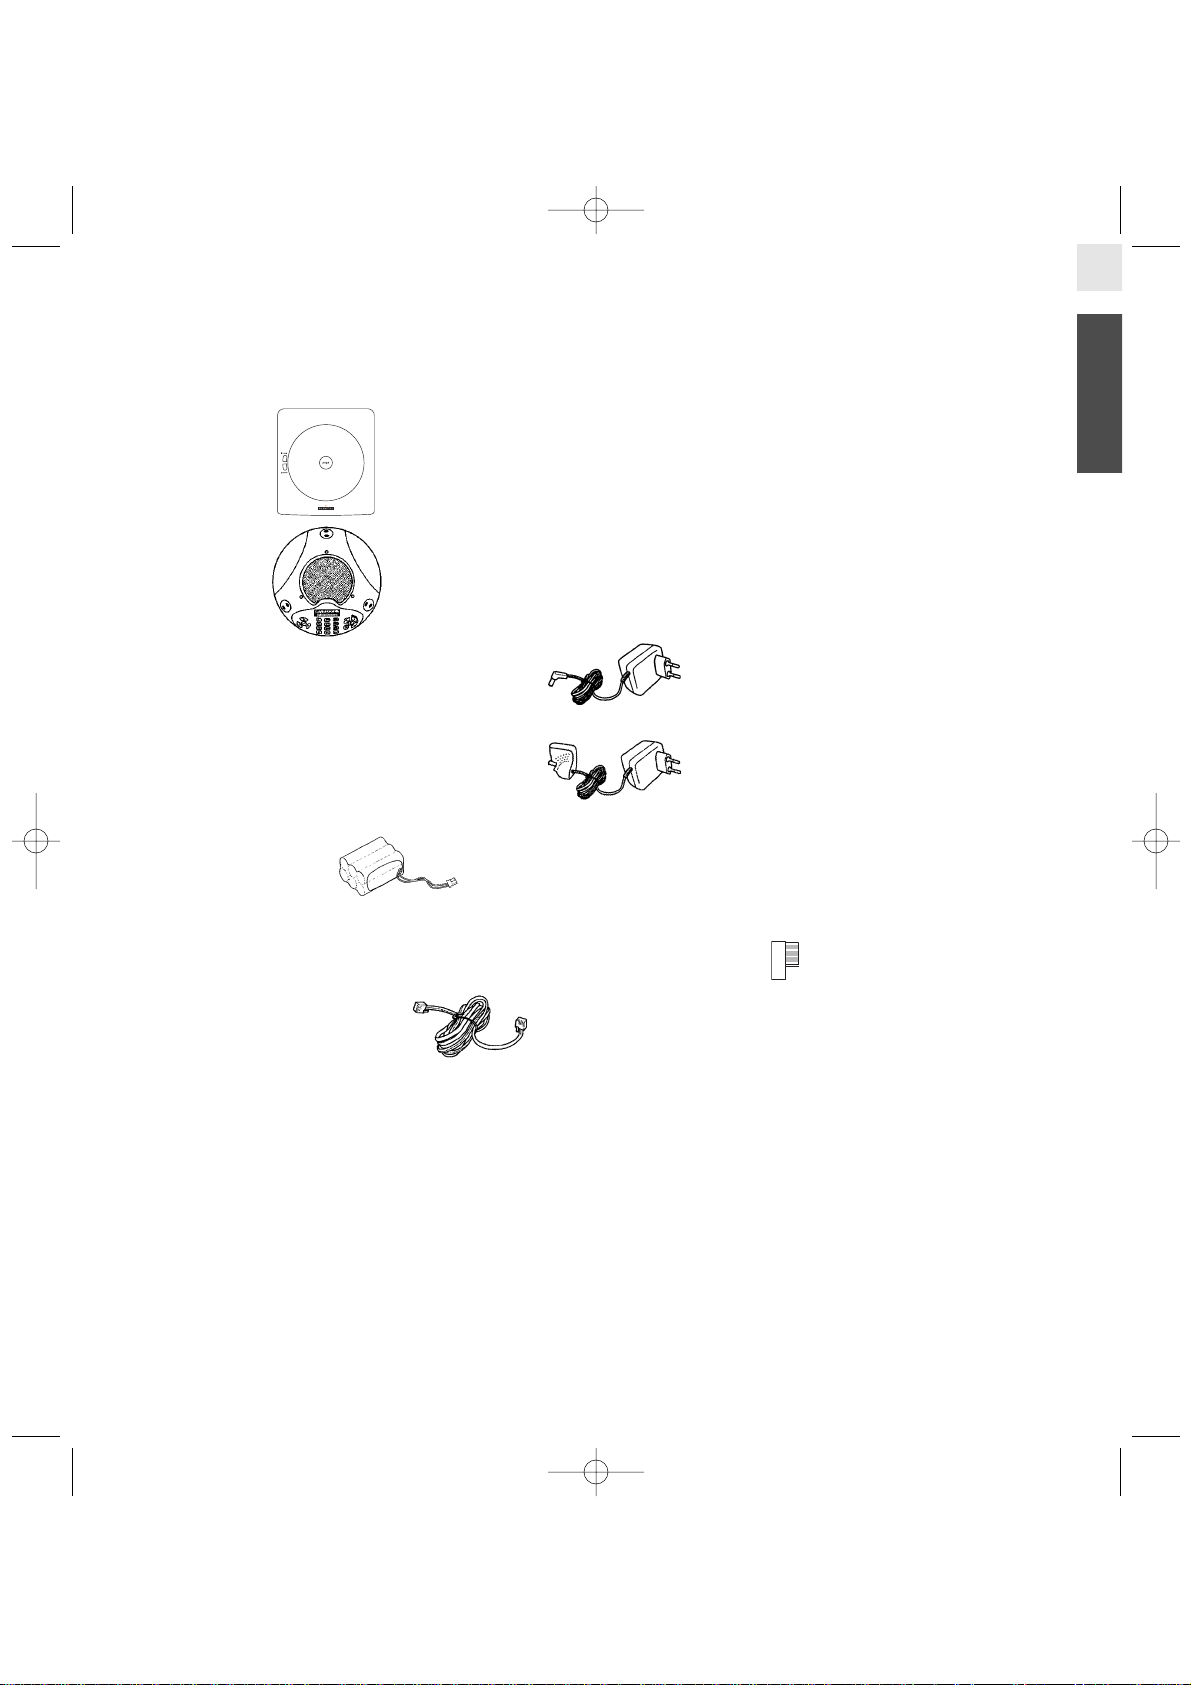
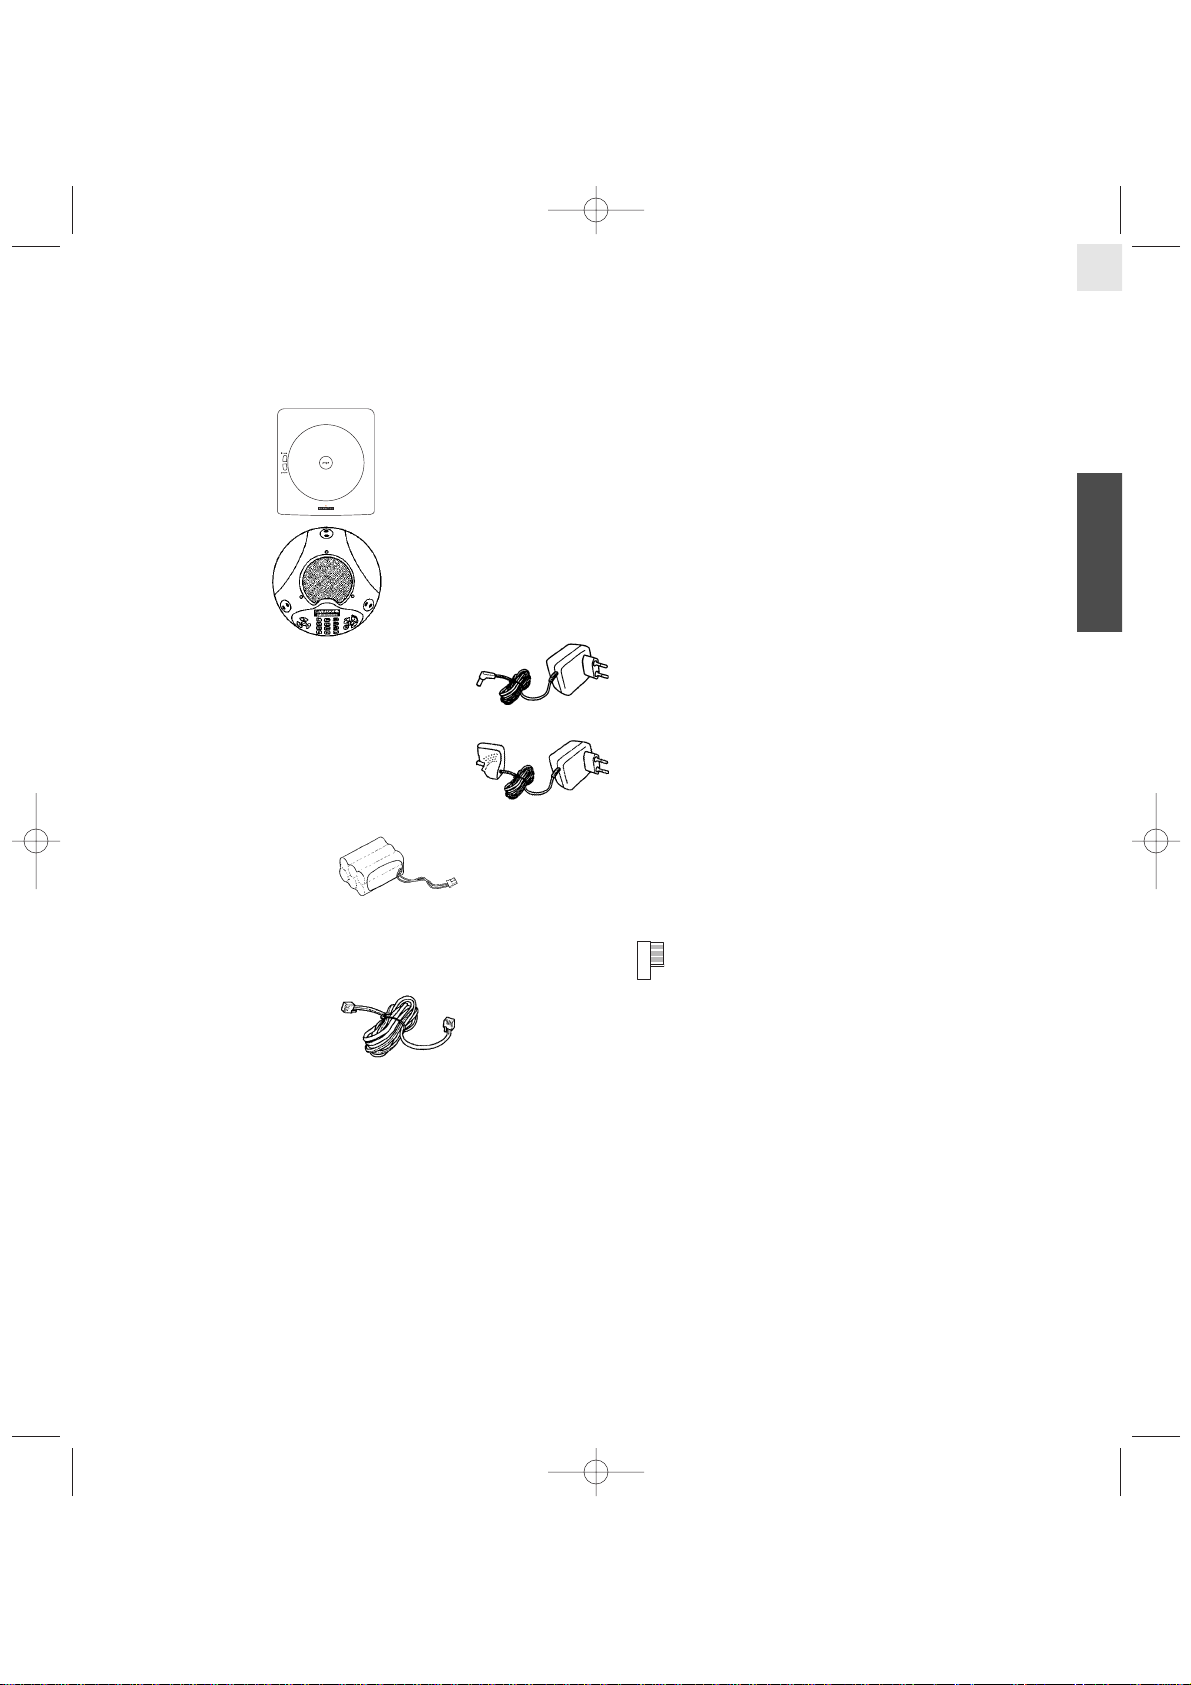
L'emballage contient les éléments suivants :
− une base
− un poste
− un adaptateur secteur 230 V à brancher sur la base
− un adaptateur secteur 230 V à brancher sur le poste
− un pack de batteries
− une fiche de conversion pour la connexion au réseau de télécommunications français
− un câble de connexion téléphonique
− un guide d'utilisation.
Pour connaître l'essentiel de votre VERSATIS Conference, nous vous suggérons de lire attentivement ce guide.
Français
Versatis_Conference_fr.qxd 31/03/2005 16:20 Page 3
Page 4

4
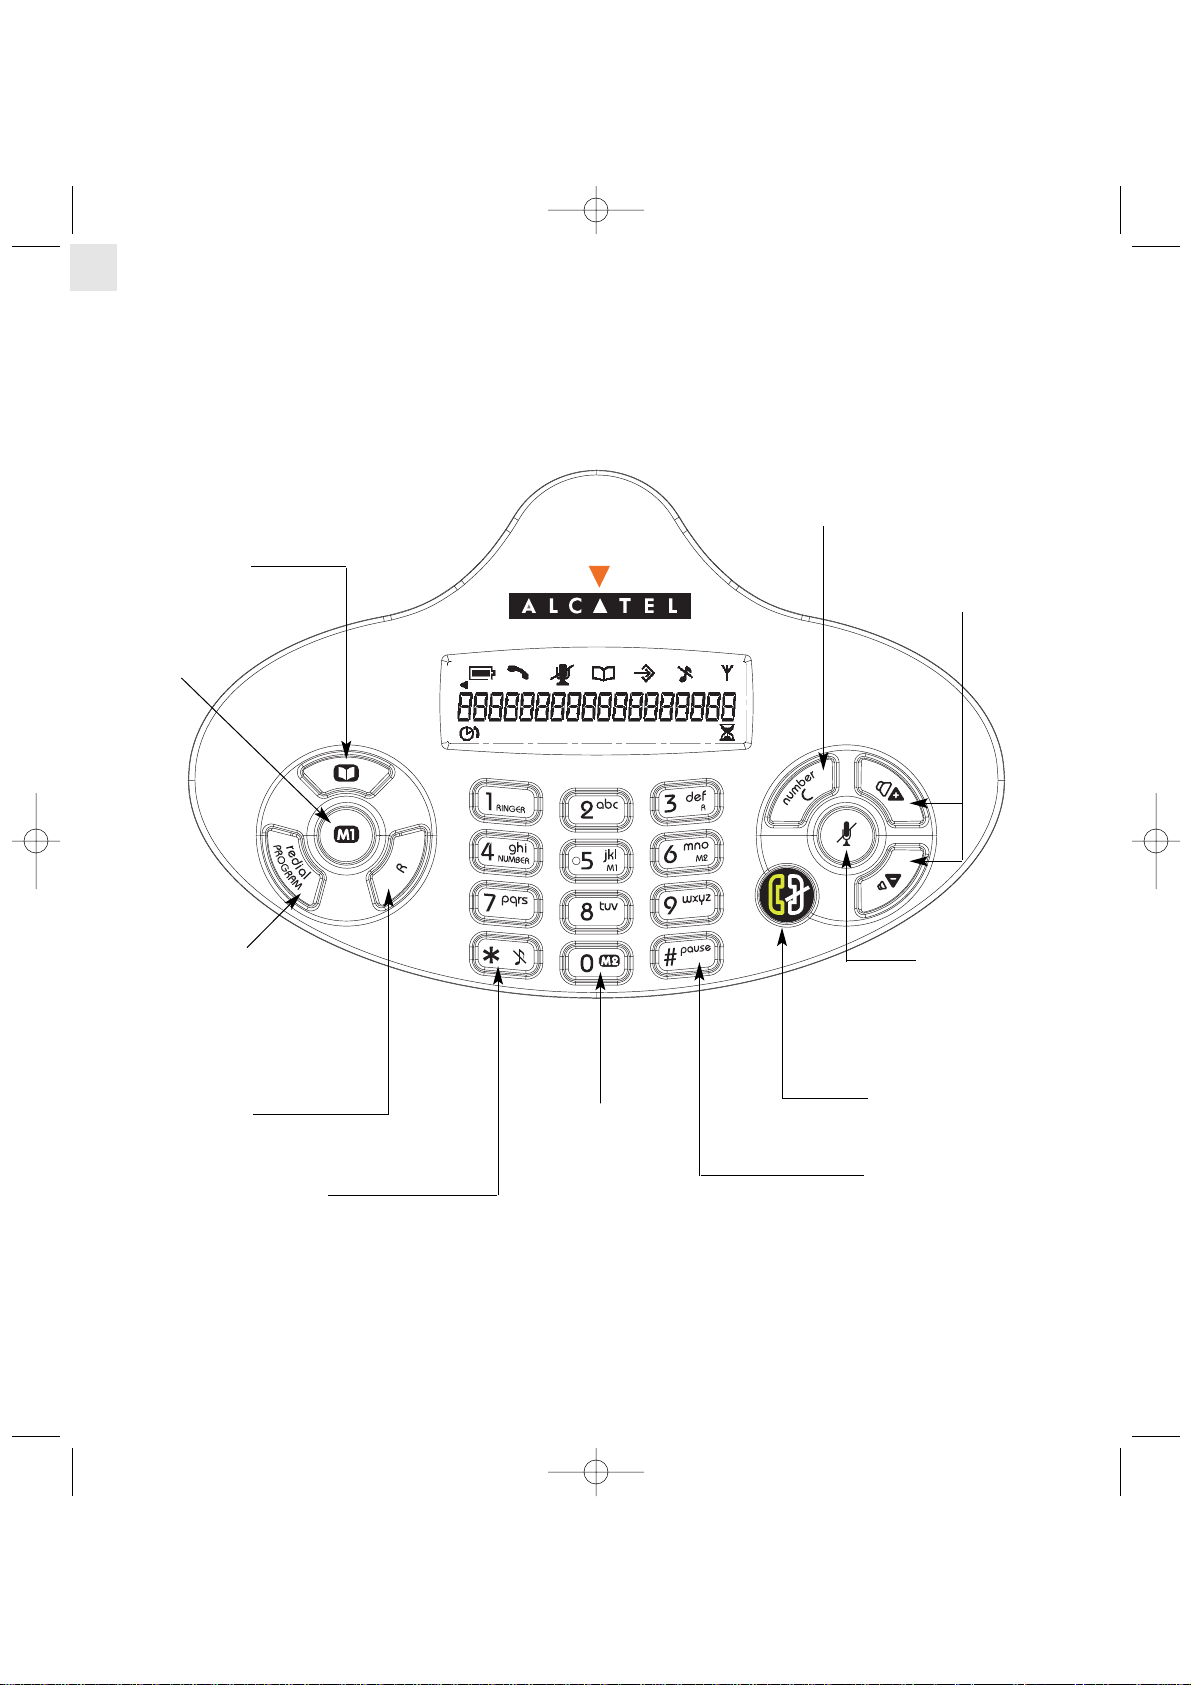
- Répertoire
- Accès au répertoire
Touche d'accès
direct M1
- Effacer un chiffre
- Quitter le mode programmation, répertoire ou
renumérotation
- Supprimer l'ensemble du numéro (appui long)
- Revenir en mode veille (appui long)
Touche d'accès
direct M2
(appui long)
Accès aux services de
l'opérateur ou du PABX
- Accès au dernier numéro
composé
- Accès au mode
programmation (appui long)
Augmenter ou diminuer le
volume de la sonnerie et
du haut-parleur
Décrocher / Raccrocher
Activer / Désactiver le
microphone pendant un
appel (fonction Secret)
Activer / Désactiver la sonnerie
(appui long)
Insérer une pause
(appui long)
Les touches du poste
Versatis_Conference_fr.qxd 31/03/2005 16:20 Page 4
Page 5
5
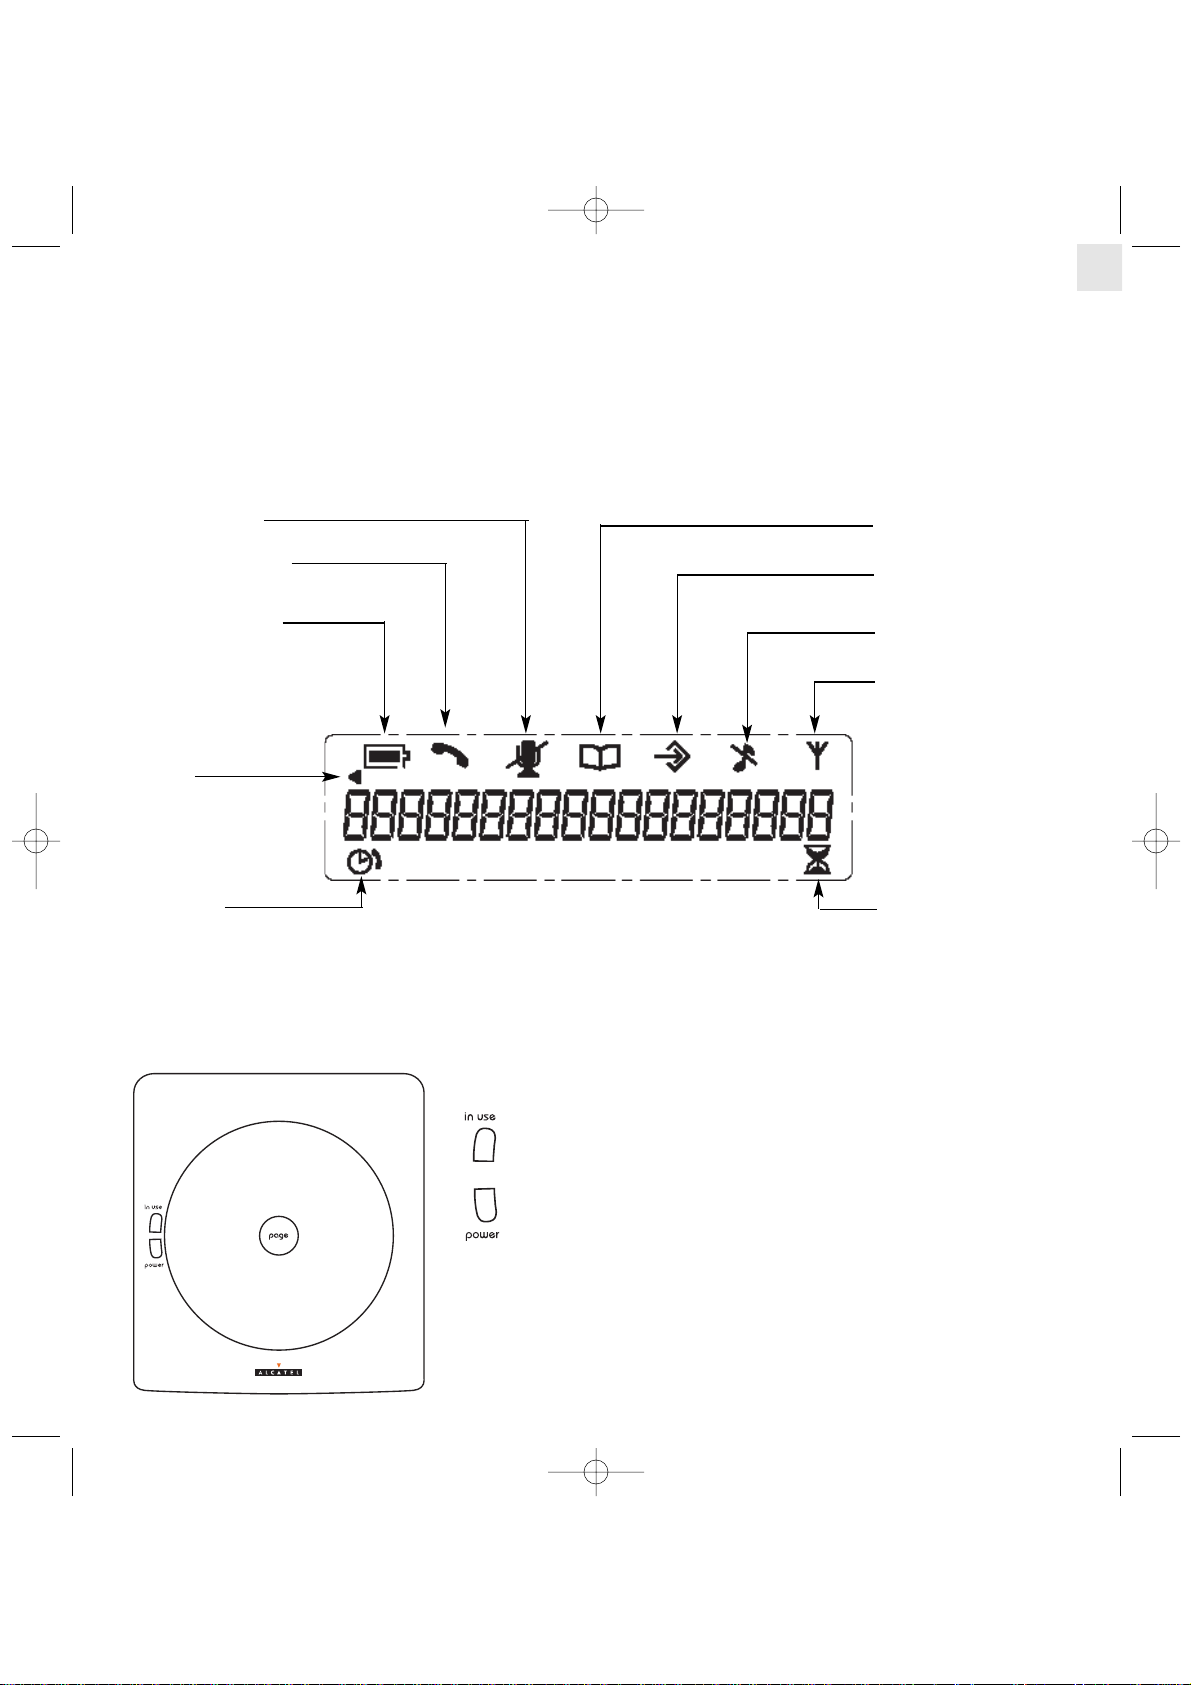
L'écran du poste
Le VERSATIS Conference possède un afficheur de deux lignes :
− 1 ligne d'icônes
− 1 ligne de 18 caractères
Niveau de charge de la
batterie :
- clignote lorsque la batterie
doit être rechargée
- s'anime lors du chargement
Communication en cours
Secret (micro coupé)
Sonnerie désactivée
Répertoire
Qualité de réception
Programmation
Défilement
Indicateur d'autonomie de la
batterie
Durée de
communication
Les témoins lumineux :
(Vert) In Use Clignote en cas de réception d'un appel entrant et reste
allumé lorsque le téléphone est en cours de
communication
(Rouge) Power Reste allumé en permanence lorsque la base est
raccordée à son alimentation
Page :
l Appuyer sur "PAGE" pour localiser le poste (en cas d'oubli de l'endroit où il se
trouve)
Prise d'enregistrement Jack 2,5 mm (sur le côté, à gauche sur le schéma)
La base
Versatis_Conference_fr.qxd 31/03/2005 16:20 Page 5
Page 6

LES TOUCHES DU POSTE . . . . . . . . . . . . . . . . . . . . . . . . . . . . . . . . . . . . . . . . . . . . . . . . . . . . . . . . . . . . . . . . . . . . . . . . . 4
LA BASE . . . . . . . . . . . . . . . . . . . . . . . . . . . . . . . . . . . . . . . . . . . . . . . . . . . . . . . . . . . . . . . . . . . . . . . . . . . . . . . . . . . . . . . 5
L'ÉCRAN DU POSTE . . . . . . . . . . . . . . . . . . . . . . . . . . . . . . . . . . . . . . . . . . . . . . . . . . . . . . . . . . . . . . . . . . . . . . . . . . . . . 5
1. VOTRE POSTE D'AUDIOCONFÉRENCE . . . . . . . . . . . . . . . . . . . . . . . . . . . . . . . . . . . . . . . . . . . . . . . . . . . . . . . . . 7
1.1 Le VERSATIS Conference . . . . . . . . . . . . . . . . . . . . . . . . . . . . . . . . . . . . . . . . . . . . . . . . . . . . . . . . . . . . . . . . . . . . . 7
1.2 Précautions d'emploi . . . . . . . . . . . . . . . . . . . . . . . . . . . . . . . . . . . . . . . . . . . . . . . . . . . . . . . . . . . . . . . . . . . . . . . . . 7
1.3 Précautions relatives au pack de batteries . . . . . . . . . . . . . . . . . . . . . . . . . . . . . . . . . . . . . . . . . . . . . . . . . . . . . . . . . 7
2. INSTALLATION . . . . . . . . . . . . . . . . . . . . . . . . . . . . . . . . . . . . . . . . . . . . . . . . . . . . . . . . . . . . . . . . . . . . . . . . . . . . . 8
2.1 Installer la base . . . . . . . . . . . . . . . . . . . . . . . . . . . . . . . . . . . . . . . . . . . . . . . . . . . . . . . . . . . . . . . . . . . . . . . . . . . . 8
2.2 Installer le poste . . . . . . . . . . . . . . . . . . . . . . . . . . . . . . . . . . . . . . . . . . . . . . . . . . . . . . . . . . . . . . . . . . . . . . . . . . . . 9
2.3 Chargement du poste . . . . . . . . . . . . . . . . . . . . . . . . . . . . . . . . . . . . . . . . . . . . . . . . . . . . . . . . . . . . . . . . . . . . . . . . 9
2.4 Recommandations à suivre pour obtenir des performances maximales . . . . . . . . . . . . . . . . . . . . . . . . . . . . . . . . . . . 9
3. FONCTIONS DE BASE . . . . . . . . . . . . . . . . . . . . . . . . . . . . . . . . . . . . . . . . . . . . . . . . . . . . . . . . . . . . . . . . . . . . . . . 10
3.1 Recevoir un appel . . . . . . . . . . . . . . . . . . . . . . . . . . . . . . . . . . . . . . . . . . . . . . . . . . . . . . . . . . . . . . . . . . . . . . . . . . . 10
3.2 Appeler . . . . . . . . . . . . . . . . . . . . . . . . . . . . . . . . . . . . . . . . . . . . . . . . . . . . . . . . . . . . . . . . . . . . . . . . . . . . . . . . . . . 10
3.3 Rappeler le dernier numéro composé (bis) . . . . . . . . . . . . . . . . . . . . . . . . . . . . . . . . . . . . . . . . . . . . . . . . . . . . . . . . . 11
3.4 Touches d'accès direct . . . . . . . . . . . . . . . . . . . . . . . . . . . . . . . . . . . . . . . . . . . . . . . . . . . . . . . . . . . . . . . . . . . . . . . 11
4. FONCTIONS ACCESSIBLES PENDANT LES APPELS . . . . . . . . . . . . . . . . . . . . . . . . . . . . . . . . . . . . . . . . . . . . . . 12
4.1 Réglage du volume du haut-parleur . . . . . . . . . . . . . . . . . . . . . . . . . . . . . . . . . . . . . . . . . . . . . . . . . . . . . . . . . . . . . . 12
4.2 Fonction secret . . . . . . . . . . . . . . . . . . . . . . . . . . . . . . . . . . . . . . . . . . . . . . . . . . . . . . . . . . . . . . . . . . . . . . . . . . . . . 12
4.3 Touche R . . . . . . . . . . . . . . . . . . . . . . . . . . . . . . . . . . . . . . . . . . . . . . . . . . . . . . . . . . . . . . . . . . . . . . . . . . . . . . . . . . 12
4.4 Affichage du numéro du poste . . . . . . . . . . . . . . . . . . . . . . . . . . . . . . . . . . . . . . . . . . . . . . . . . . . . . . . . . . . . . . . . . . 12
5. PROGRAMMATION . . . . . . . . . . . . . . . . . . . . . . . . . . . . . . . . . . . . . . . . . . . . . . . . . . . . . . . . . . . . . . . . . . . . . . . . . 13
5.1 Programmation de la sonnerie . . . . . . . . . . . . . . . . . . . . . . . . . . . . . . . . . . . . . . . . . . . . . . . . . . . . . . . . . . . . . . . . . . 13
5.2 Programmation d'un numéro dans le répertoire . . . . . . . . . . . . . . . . . . . . . . . . . . . . . . . . . . . . . . . . . . . . . . . . . . . . . 13
5.3 Programmation de la touche R (coupure calibrée / flashing) . . . . . . . . . . . . . . . . . . . . . . . . . . . . . . . . . . . . . . . . . . . . 14
5.4 Programmation du numéro de téléphone du VERSATIS Conference . . . . . . . . . . . . . . . . . . . . . . . . . . . . . . . . . . . . . 14
5.5 Programmation de la touche d'accès direct M1 . . . . . . . . . . . . . . . . . . . . . . . . . . . . . . . . . . . . . . . . . . . . . . . . . . . . . 15
5.6 Programmation de la touche d'accès direct M2 . . . . . . . . . . . . . . . . . . . . . . . . . . . . . . . . . . . . . . . . . . . . . . . . . . . . . 15
5.7 Restauration des paramètres par défaut . . . . . . . . . . . . . . . . . . . . . . . . . . . . . . . . . . . . . . . . . . . . . . . . . . . . . . . . . . 16
6. FONCTIONS SUPPLÉMENTAIRES . . . . . . . . . . . . . . . . . . . . . . . . . . . . . . . . . . . . . . . . . . . . . . . . . . . . . . . . . . . . . 16
6.1 Enregistrement des appels . . . . . . . . . . . . . . . . . . . . . . . . . . . . . . . . . . . . . . . . . . . . . . . . . . . . . . . . . . . . . . . . . . . . 16
6.2 Localisation du poste (fonction recherche du poste) . . . . . . . . . . . . . . . . . . . . . . . . . . . . . . . . . . . . . . . . . . . . . . . . . . 16
7. VALEURS PAR DÉFAUT . . . . . . . . . . . . . . . . . . . . . . . . . . . . . . . . . . . . . . . . . . . . . . . . . . . . . . . . . . . . . . . . . . . . . 17
8. EN CAS DE PROBLÈME ... . . . . . . . . . . . . . . . . . . . . . . . . . . . . . . . . . . . . . . . . . . . . . . . . . . . . . . . . . . . . . . . . . . . 18
9. CARACTÉRISTIQUES TECHNIQUES . . . . . . . . . . . . . . . . . . . . . . . . . . . . . . . . . . . . . . . . . . . . . . . . . . . . . . . . . . . 19
10. GARANTIE . . . . . . . . . . . . . . . . . . . . . . . . . . . . . . . . . . . . . . . . . . . . . . . . . . . . . . . . . . . . . . . . . . . . . . . . . . . . . . . . 20
11. SECURITE . . . . . . . . . . . . . . . . . . . . . . . . . . . . . . . . . . . . . . . . . . . . . . . . . . . . . . . . . . . . . . . . . . . . . . . . . . . . . . . . 21
12. ENVIRONNEMENT . . . . . . . . . . . . . . . . . . . . . . . . . . . . . . . . . . . . . . . . . . . . . . . . . . . . . . . . . . . . . . . . . . . . . . . . . . 21
13. DECLARATION DE CONFORMITE . . . . . . . . . . . . . . . . . . . . . . . . . . . . . . . . . . . . . . . . . . . . . . . . . . . . . . . . . . . . . . 22
6
Versatis_Conference_fr.qxd 31/03/2005 16:20 Page 6
Page 7

1. VOTRE POSTE D'AUDIOCONFÉRENCE
1.1 LE VERSATIS CONFÉRENCE
Le VERSATIS Conference est conçu pour répondre à tous vos besoins en matière de communication téléphonique ; il vous permet
de mener des réunions avec une grande facilité d'utilisation tout en bénéficiant de la meilleure qualité sonore possible.
La technologie sans fil DECT™* offre la possibilité d'utiliser votre système de conférence dans une pièce différente de votre accès
téléphonique.
1.2 PRÉCAUTIONS D'EMPLOI
Le VERSATIS Conference est un équipement agréé à la norme DECT™*, destiné à émettre et à recevoir des communications
téléphoniques. Il a été conçu et fabriqué pour être raccordé au réseau de télécommunications public européen ou derrière un
autocommutateur privé.
Ce téléphone nécessite une alimentation électrique pour fonctionner.
Comme pour toute liaison radio, la qualité de vos communications dépend de la position de la base, du poste et de son environnement.
Le VERSATIS Conference doit être placé à l'écart de toute zone de chaleur excessive (radiateurs, soleil...) et protégé des vibrations
et de la poussière. Attention, ne jamais mettre le téléphone en contact avec de l'eau ou d'autres liquides ou aérosols.
Pour limiter les risques d'interférences et favoriser la qualité de la réception, éviter en particulier d'installer la base à proximité
immédiate : d'une fenêtre, d'une masse métallique, d'une surface en béton armé, d'une télévision, d'une chaîne Hi-Fi, d'un minitel,
d'une lampe halogène, d'un tube fluorescent, d'une centrale d'alarme, d'un four à micro-ondes, de plaques chauffantes halogènes, d'un
ordinateur, d'un modem ADSL, etc.
Pour nettoyer votre poste et votre base, utiliser un chiffon antistatique légèrement humecté d'eau.
1.3 PRÉCAUTIONS RELATIVES AU PACK DE BATTERIES
* DECT est une marque déposée par ETSI.
!
Utiliser uniquement un pack de batteries rechargeable de caractéristiques identiques à celui fourni avec le produit.
L'utilisation de piles non rechargeables ou non conformes aux modèles préconisés risque d'endommager le produit
(se référer au chapitre "Caractéristiques techniques").
En cas de non-respect de cette recommandation, la responsabilité du constructeur ne pourra être engagée.
Le pack de batteries peut se fendre ou couler s'il est mal inséré, ouvert ou exposé à la chaleur.
Ne pas jeter le pack de batteries dans un feu : risque d'explosion.
7
Versatis_Conference_fr.qxd 31/03/2005 16:20 Page 7
Page 8

8
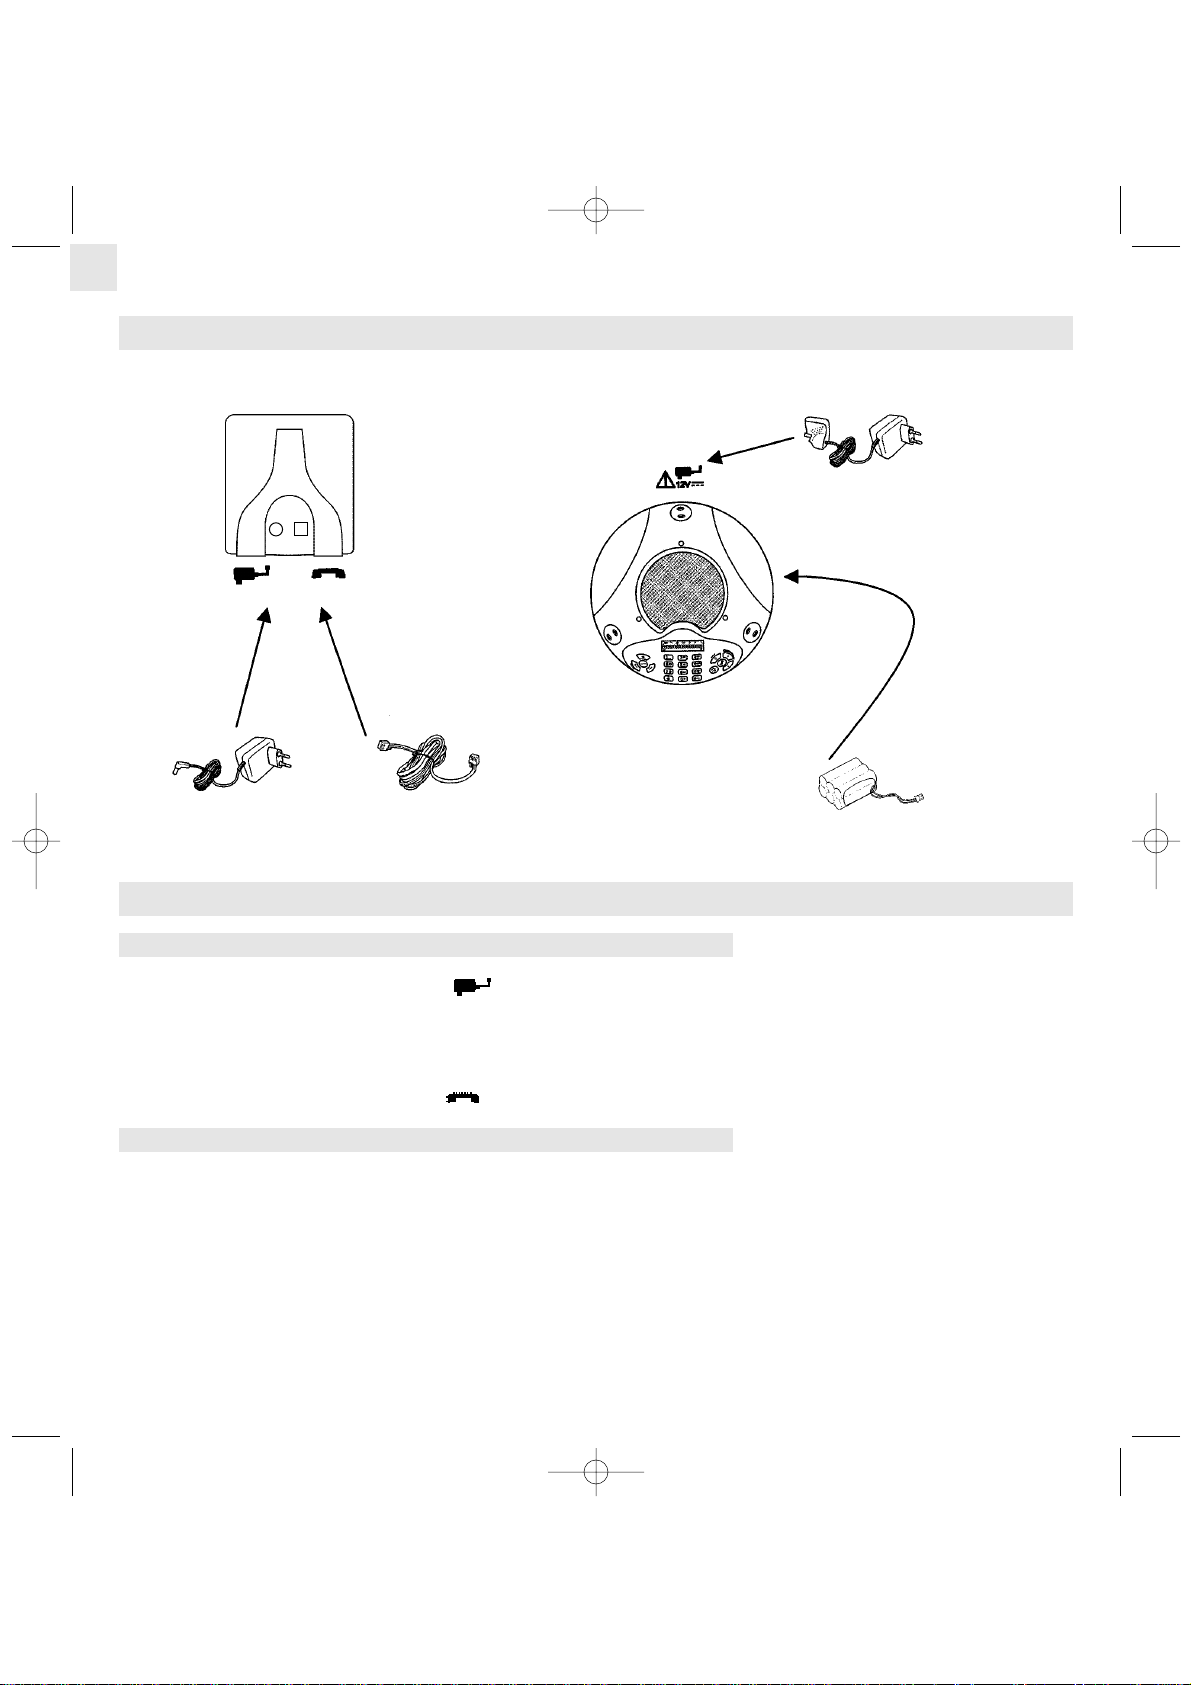
2. INSTALLATION
Base Poste
l Installer la base et le poste sur une surface plane et stable.
2.1 INSTALLER LA BASE
2.1.1 Raccorder la base
l Brancher le cordon d'alimentation électrique de la base à la prise située au dos de la base.
l Connecter l'adaptateur secteur à une prise électrique 230 V / 50 Hz.
"
Le voyant lumineux rouge d'alimentation de la base s'allume.
l Brancher l'une des extrémités du câble téléphonique à la prise située au dos de la base et l'autre extrémité à la prise
téléphonique.
2.1.2 Fixation murale (optionnel)
Pour fixer la base sur le mur, suivre la procédure indiquée ci-dessous.
l Vérifier que la base n'est pas trop éloignée d'une prise électrique et veiller à ne pas endommager les câbles électriques dissimulés
dans le mur.
l Percer trois trous comme indiqué sur le gabarit figurant à la page 143 de ce guide.
l Insérer trois vis (non fournies) dans les trous de perçage. Laisser les têtes de vis dépasser d'environ 3 mm.
l Accrocher la base sur les têtes de vis.
Versatis_Conference_fr.qxd 31/03/2005 16:20 Page 8
Page 9
2.2 INSTALLER LE POSTE
2.2.1 Insérer le pack de batteries
l Ouvrir tout d'abord la trappe située sous le poste.
l Mettre en place le pack de batteries (7,2V 1800 mAh) dans le compartiment situé sous le poste en vérifiant que la fiche et le
connecteur sont correctement alignés.
l Remettre la trappe de la batterie en place.
2.2.2 Raccorder le poste au secteur
l Brancher le cordon d'alimentation du poste dans la prise située à l'arrière du poste.
l Brancher l'adaptateur secteur à une prise électrique 230 V / 50 Hz.
Avant la première utilisation, nous vous conseillons de laisser le poste en charge pendant 24 heures, afin d'optimiser les performances
et la durée de vie du pack de batteries.
2.3 CHARGEMENT DU POSTE
Si l'icône de la batterie clignote ou que les témoins lumineux sur le poste sont rouges et clignotent régulièrement en cours de
communication, le poste doit être rechargé.
l Pour recharger le poste, brancher l'adaptateur secteur 230 V au poste. La batterie est chargée quand l'icône de batterie s'arrête de
clignoter.
l Pour vérifier l'association du poste à la base, prendre la ligne .
"
La tonalité confirme que le poste fonctionne.
l Vérifier que le symbole est bien affiché sans clignoter.
Lorsque le poste est complètement déchargé, il se peut que l'écran ne se rallume qu'après quelques minutes, une fois l'adaptateur
secteur branché.
2.4 RECOMMANDATIONS À SUIVRE POUR OBTENIR DES PERFORMANCES MAXIMALES
Installer le téléphone d'audioconférence dans un endroit calme.
Ne pas placer le poste à plus de 50 mètres de la base.
Ne pas déplacer le poste pendant un appel.
9
Versatis_Conference_fr.qxd 31/03/2005 16:20 Page 9
Page 10
10
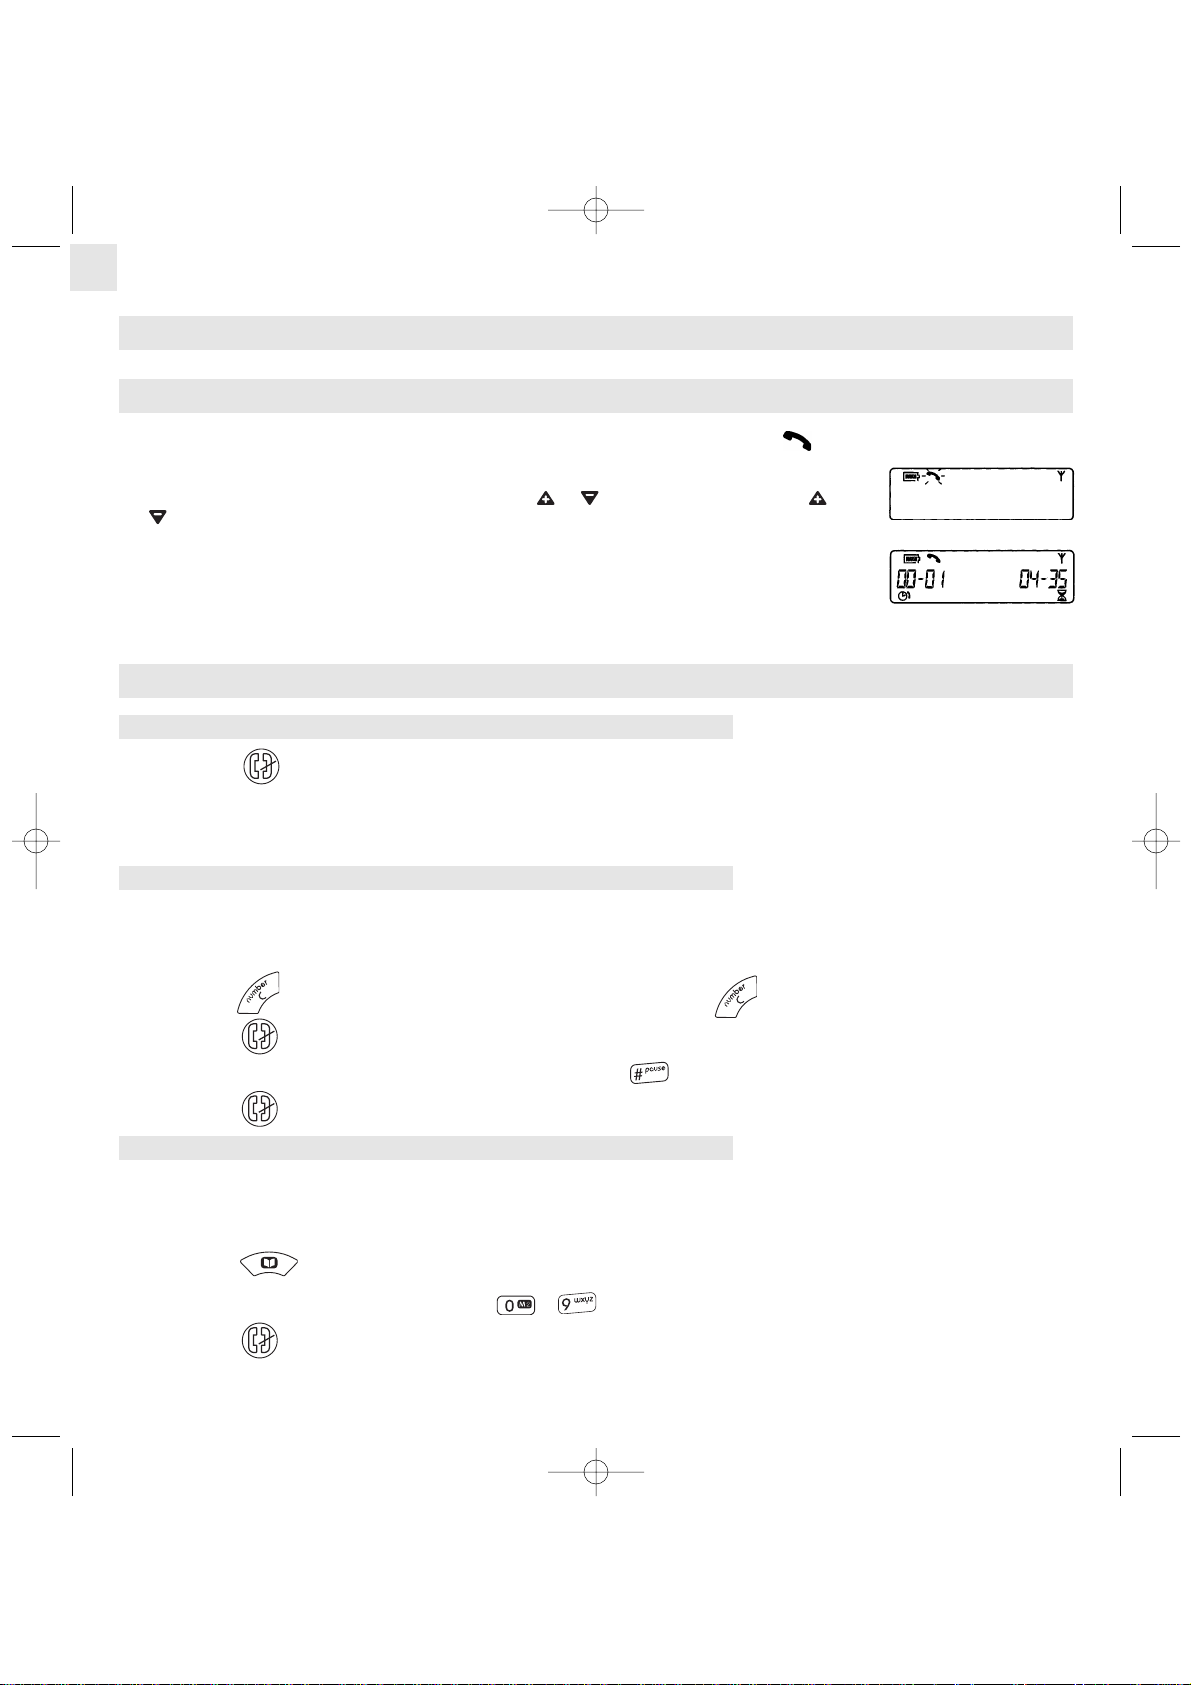
3. FONCTIONS DE BASE
3.1 RECEVOIR UN APPEL
En cas d'appel entrant, les témoins lumineux verts sur la base et le poste clignotent. L'icône clignote sur l'écran et la sonnerie du
poste retentit.
l Appuyer sur n'importe quelle touche (sauf les touches et ) pour répondre (les touches et
permettent seulement d'augmenter ou de diminuer le volume de la sonnerie).
La durée de communication, située à gauche sur l'écran, affiche la durée de l'appel en cours sous le
format MM-SS (minutes et secondes).
Le compteur situé à droite sur l'écran affiche l'autonomie de la batterie avant recharge, au format
HH-MM (heures et minutes).
3.2 APPELER
3.2.1 Numérotation directe
l Appuyer sur .
l Composer le numéro à appeler.
Nota : Le nombre total de chiffres composant le numéro à appeler n'est pas limité.
3.2.2 Pré-numérotation
Avec la pré-numérotation vous pouvez entrer et modifier un numéro avant de lancer l'appel.
l Composer un numéro (44 chiffres maximum).
l Appuyer sur pour effacer le dernier chiffre tapé ou faire un appui long sur pour effacer tous les chiffres tapés.
l Appuyer sur pour lancer l'appel.
Nota : Dans les 2 cas, pour insérer une pause, faire un appui long sur . Le symbole "P" s'affiche.
l Appuyer sur pour raccrocher en fin de communication.
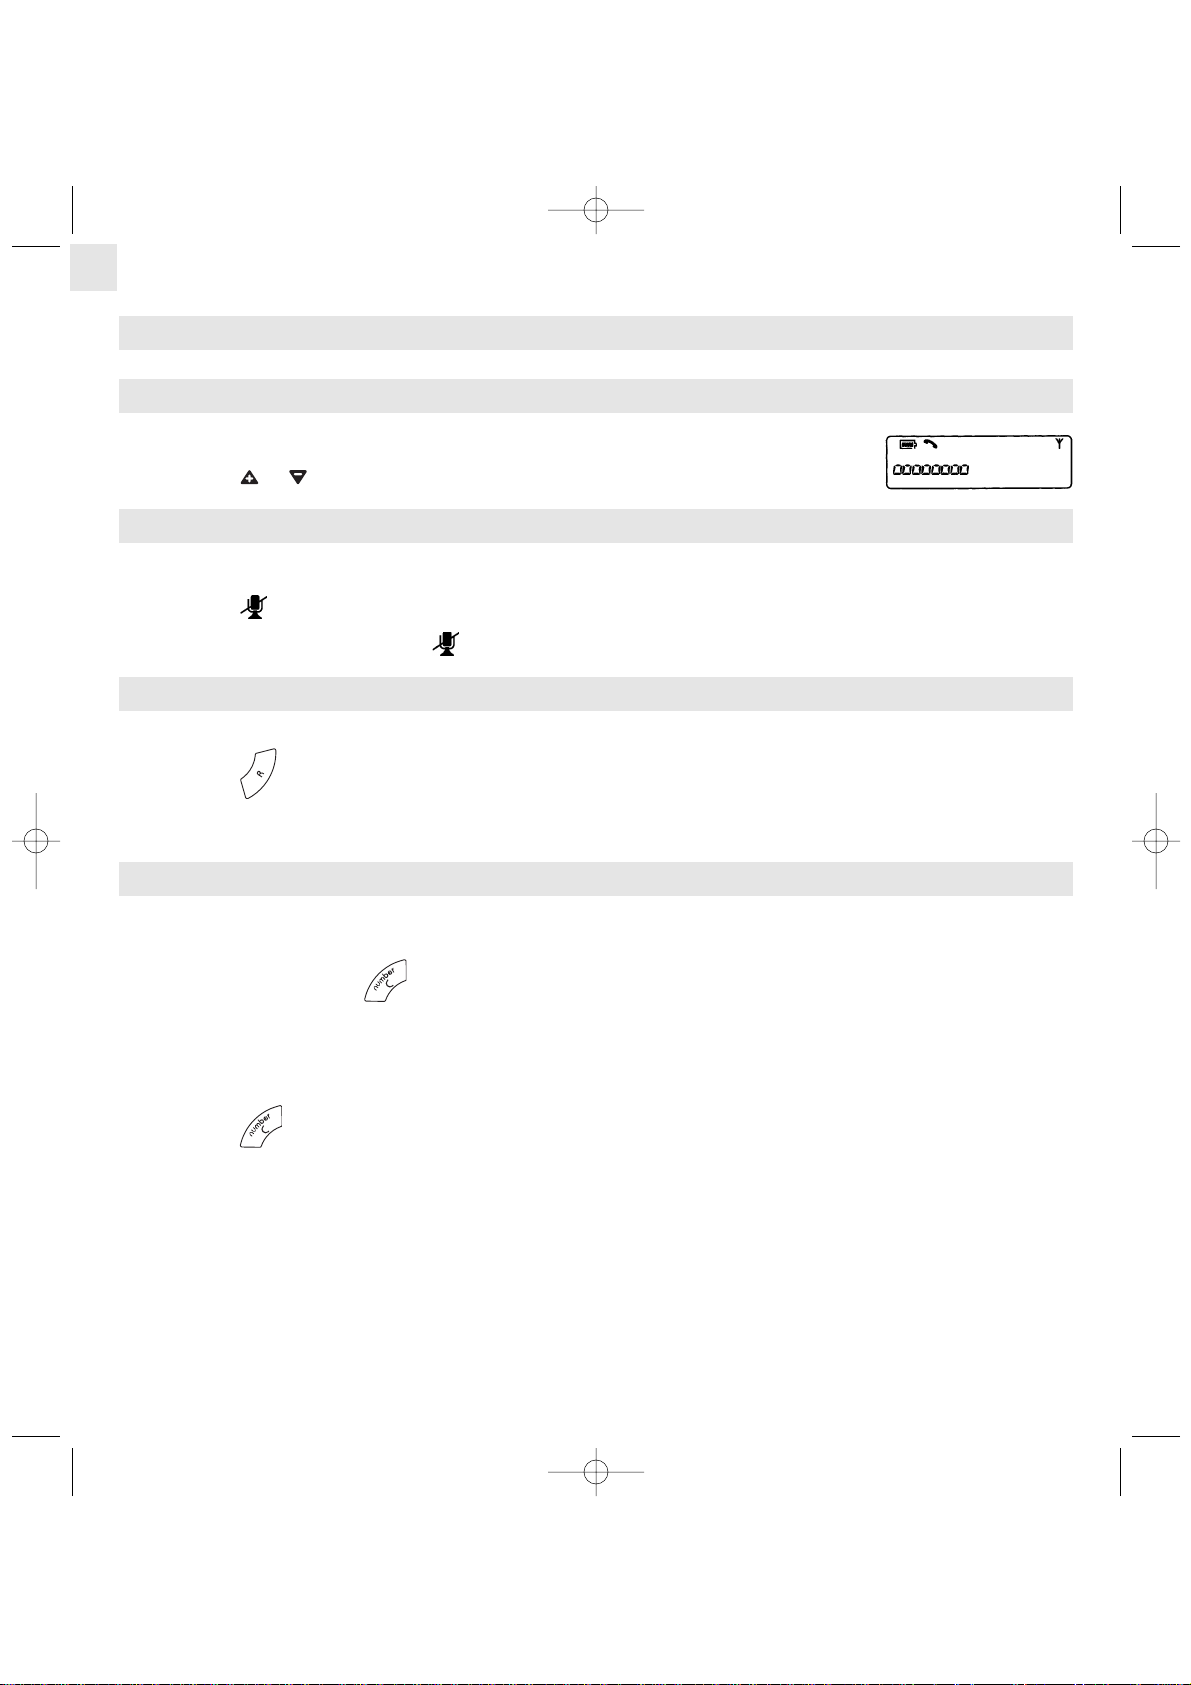
3.2.3 Votre répertoire
Vous disposez d'un répertoire de 10 numéros que vous pouvez utiliser en numérotation directe ou en pré-numérotation. Pour obtenir
des informations sur la mémorisation et la modification des numéros du répertoire, se reporter à la section de programmation (voir § 5.2
"Programmation d'un numéro dans le répertoire").
l Appuyer sur .
l Appuyer sur une touche du pavé numérique (de à ) pour afficher l'entrée du répertoire correspondante.
l Appuyer sur pour lancer l'appel.
Versatis_Conference_fr.qxd 31/03/2005 16:21 Page 10
Page 11
3.3 RAPPELER LE DERNIER NUMÉRO COMPOSÉ (BIS)
La fonction "Redial" permet de rappeler le dernier numéro composé.
Numérotation directe :
l Appuyer sur .
l Appuyer sur .
"
Le dernier numéro composé sera alors automatiquement recomposé.
Pré-numérotation :
l Appuyer sur .
"
Le dernier numéro composé s'affiche.
l Appuyer sur pour composer ce numéro.
3.4 TOUCHES D'ACCÈS DIRECT
La numérotation rapide permet d'appeler des numéros pré-programmés sur simple pression d'une touche. Avant d'utiliser ces touches,
vérifier que vous les avez bien configurées.
Pour obtenir des informations sur la mémorisation et la modification des numéros des touches d'accès direct, se reporter à la section
de programmation (voir § 5.5 et 5.6).
3.4.1 Touche d'accès direct M1
l En mode veille, appuyer sur .
"
Le numéro programmé s'affiche et est automatiquement composé.
l Appuyer sur pour raccrocher.
3.4.2 Touche d'accès direct M2
l En mode veille, faire un appui long sur .
"
Le numéro programmé s'affiche et est automatiquement composé.
l Appuyer sur pour raccrocher.
11
Versatis_Conference_fr.qxd 31/03/2005 16:21 Page 11
Page 12
4. FONCTIONS ACCESSIBLES PENDANT LES APPELS
4.1 RÉGLAGE DU VOLUME DU HAUT-PARLEUR
16 niveaux de volume sont disponibles pour le haut-parleur.
l Appuyer sur ou pour régler le volume du haut-parleur pendant un appel.
4.2 FONCTION SECRET
Lorsque la fonction Secret est activée, le microphone du poste est coupé.
l Appuyer sur pour activer ou désactiver la fonction Secret.
Lorsque l'appel est en mode Secret, l'icône s'allume ; les témoins lumineux sur le poste deviennent rouges et clignotent lentement.
4.3 TOUCHE R
Une coupure calibrée (Flash) peut être envoyée pendant un appel.
l Appuyer sur afin d'accéder aux services supplémentaires fournis par l'opérateur ou le PABX.
Pour obtenir des informations sur la modification de la longueur du temps de flashing, se reporter au chapitre 5.3. "Programmation de
la touche R (coupure calibrée / Flashing)".
4.4 AFFICHAGE DU NUMÉRO DU POSTE
Le numéro du poste peut être affiché pendant un appel. Au préalable, vérifier que vous avez bien configuré cette fonction (voir § 5.4
"Programmation du numéro de téléphone du VERSATIS Conference").
l En cours d'appel, appuyer sur .
"
Le numéro du téléphone s'affiche alors (s'il a été programmé).
"
L'écran revient à l'écran précédent après 10 secondes.
ou
l Appuyer sur pour faire disparaître le numéro de l'écran et revenir à l'écran de la durée de communication.
12
Versatis_Conference_fr.qxd 31/03/2005 16:21 Page 12
Page 13
5. PROGRAMMATION
5.1 PROGRAMMATION DE LA SONNERIE
5.1.1 Volume de la sonnerie
l Appuyer sur ou lorsque le téléphone sonne.
5.1.2 Mélodie
l En mode veille, faire un appui long sur .
"
Vous entrez en mode "Programmation".
"
L'icône apparaît.
l Appuyer sur pour sélectionner la programmation de la mélodie et valider avec .
"
Le numéro de mélodie s'affiche.
l Appuyer sur une touche de à pour sélectionner la mélodie de sonnerie correspondante et valider avec .
l Appuyer sur pour sortir.
5.2 PROGRAMMATION D'UN NUMÉRO DANS LE RÉPERTOIRE
Le répertoire peut mémoriser jusqu'à 10 numéros. Les numéros mémorisés ne peuvent comprendre plus de 44 chiffres. L'entrée d'un
nouveau numéro dans l'un des dix enregistrements du répertoire entraîne l'écrasement automatique du numéro mémorisé
précédemment dans cet emplacement.
l En mode veille, composer le numéro à enregistrer (44 chiffres maximum).
l Appui long sur .
"
Vous entrez en mode "Programmation du répertoire".
"
Les icônes et s'affichent.
l Appuyer sur une touche du pavé numérique (de à ) pour attribuer un chiffre au numéro programmé dans le répertoire.
l Appuyer de nouveau sur pour confirmer.
"
Une tonalité de confirmation retentit.
"
L'écran revient ensuite au mode repos.
Nota : − Appuyer sur à tout moment pour abandonner la saisie dans le répertoire et revenir au mode repos.
− Faire un appui long sur pour insérer une pause lors de la numérotation.
13
Versatis_Conference_fr.qxd 31/03/2005 16:21 Page 13
Page 14
5.3 PROGRAMMATION DE LA TOUCHE R (COUPURE CALIBRÉE / FLASHING)
Afin d'accéder aux services supplémentaires fournis par l'opérateur ou le PABX, vous devez régler le temps de flashing de votre
VERSATIS Conference.
Les valeurs disponibles sont 100 ms, 270 ms, 500 ms et 800 ms.
l En mode veille, faire un appui long sur .
"
Vous entrez en mode "Programmation du répertoire".
"
L'icône apparaît.
l Appuyer sur pour sélectionner la programmation de la durée du temps de flashing.
"
La durée actuelle s'affiche.
l Appuyer de nouveau sur pour sélectionner la programmation de la durée du temps de flashing.
"
La sélection actuelle se met à clignoter.
l Appuyer alors sur la touche correspondant au temps de flashing désiré (de à ) :
l Appuyer de nouveau sur pour confirmer la sélection.
l Appuyer sur pour sortir.
5.4 PROGRAMMATION DU NUMÉRO DE TÉLÉPHONE DU VERSATIS CONFERENCE
Le VERSATIS Conference étant destiné à être utilisé par différentes personnes, il est intéressant d'indiquer aux utilisateurs le numéro
de téléphone sur lequel est branché le VERSATIS Conference.
l En mode veille, faire un appui long sur .
"
Vous entrez en mode Programmation.
l Appuyer sur pour sélectionner la programmation du numéro du téléphone du VERSATIS Conference.
"
Le numéro actuel s'affiche s'il a été programmé, sinon l'écran reste vierge.
l Appuyer de nouveau sur pour confirmer la sélection de la programmation du numéro du téléphone.
"
Le numéro actuel clignote.
Touche Durée (ms)
100 (valeur par défaut)
270
500
800
14
Versatis_Conference_fr.qxd 31/03/2005 16:21 Page 14
Page 15
l Appuyer sur pour effacer les chiffres du numéro actuel un par un ou faire un appui long sur pour effacer l'ensemble du
numéro.
l Appuyer de nouveau sur pour confirmer la modification.
l Appuyer sur pour sortir.
5.5 PROGRAMMATION DE LA TOUCHE D'ACCÈS DIRECT M1
l En mode veille, appui long sur .
"
L'icône apparaît.
l Appuyer sur pour sélectionner la programmation de la touche d'accès direct M1.
"
L'écran affiche le numéro actuel (s'il a été programmé) ; sinon l'écran reste vierge.
l Appuyer de nouveau sur pour confirmer la sélection de la programmation de la touche d'accès direct M1.
"
Le numéro actuel clignote.
l Appuyer sur pour effacer les chiffres du numéro actuel un par un ou faire un appui long sur pour effacer l'ensemble du
numéro.
l Composer le numéro de téléphone.
l Appuyer sur pour confirmer la modification.
l Appuyer sur pour sortir.
5.6 PROGRAMMATION DE LA TOUCHE D'ACCÈS DIRECT M2
l En mode veille, faire un appui long sur .
"
L'icône apparaît.
l Appuyer sur pour sélectionner la programmation de la touche d'accès direct M2.
"
L'écran affiche le numéro actuel (s'il a été programmé) ; sinon l'écran reste vierge.
l Appuyer de nouveau sur pour confirmer la sélection de la programmation de la touche d'accès direct M2.
"
Le numéro actuel clignote.
l Appuyer sur pour effacer les chiffres du numéro actuel un par un ou faire un appui long sur pour effacer l'ensemble du
numéro.
l Composer le numéro de téléphone.
l Appuyer sur pour confirmer la modification.
l Appuyer sur pour sortir.
15
Versatis_Conference_fr.qxd 31/03/2005 16:21 Page 15
Page 16
5.7 RESTAURATION DES PARAMÈTRES PAR DÉFAUT
l En mode veille, faire un appui long sur .
"
L'icône apparaît.
l Faire un appui long sur la touche pour restaurer les paramètres par défaut du téléphone.
"
L'écran affiche les caractères suivants : .
l Appuyer de nouveau sur pour confirmer la sélection de la restauration des paramètres par défaut.
l Appuyer sur pour sortir.
!
Attention, cette procédure effacera l'ensemble du répertoire, le numéro du dernier appel reçu et les numéros des
touches d'accès direct.
Pour connaître la valeur de tous les paramètres d'usine, se reporter à la section "Valeurs par défaut" (voir § 7).
6. FONCTIONS SUPPLÉMENTAIRES
6.1 ENREGISTREMENT DES APPELS
Pour enregistrer les appels, brancher un enregistreur externe dans la prise jack d'enregistrement 2,5 mm située sur le côté de la base.
6.2 LOCALISATION DU POSTE (FONCTION RECHERCHE DU POSTE)
Vous avez égaré votre poste ?
l Appuyer sur le bouton de recherche situé sur la base du téléphone pour localiser le poste.
"
Le poste sonne pendant 30 secondes.
l Appuyer sur n'importe quelle touche du poste pour arrêter la sonnerie.
16
Versatis_Conference_fr.qxd 31/03/2005 16:21 Page 16
Page 17
7. VALEURS PAR DÉFAUT
Fonction Paramètre usine par défaut
Volume du haut-parleur Niveau 5
Volume de la sonnerie Volume 5
Mélodie de sonnerie Mélodie 1
Durée du temps de flashing 100 ms
Bis Vide
Répertoire Vide
Numéro du téléphone du poste Vide
Touche d’accès direct M1 Vide
Touche d’accès direct M2 Vide
17
Versatis_Conference_fr.qxd 31/03/2005 16:21 Page 17
Page 18
8. EN CAS DE PROBLÈME ...
D'une manière générale, en cas de problème, retirer le pack de batteries du poste et débrancher l'alimentation électrique de la base.
Attendre environ 1 minute, puis rebrancher la base et réinsérer le pack de batteries dans le poste.
Toutefois, si le problème persiste, une assistance téléphonique est à votre disposition au numéro suivant : 0820 820 217 du lundi au
samedi de 8 h 00 à 19 h 00 (appel facturé selon le tarif en vigueur).
Le magasin où vous avez acheté votre téléphone est également en mesure de vous renseigner et d'assurer le service après-vente.
Problèmes Causes Solutions
Le poste n’est pas alimenté. Vérifiez que le pack de batteries est
correctement positionné.
L’afficheur est éteint.
Le pack de batteries est déchargé. Rebranchez l’adaptateur secteur du
poste sur le poste pour recharger le
pack de batteries.
Le poste est hors de portée de la base. Rapprochez le poste de la base.
Le pack de batteries est déchargé. Branchez l’adaptateur secteur sur le
poste pour recharger le pack de
batteries.
Vous n’avez pas la tonalité.
L’appareil n’est pas branché au réseau
téléphonique.
Vérifiez le branchement de la prise
téléphonique.
Le poste est hors de portée de la base
ou dans un environnement perturbé.
Rapprochez le poste de la base.La qualité audio est mauvaise ou se
dégrade en cours de communication.
Vous avez l’ADSL. Branchez un filtre ADSL agréé entre la
prise téléphonique et la prise murale.
Votre correspondant ne vous entend
pas.
Le micro est coupé et la fonction Secret
est activée.
Reportez-vous au paragraphe 4.2
"Fonction Secret".
Le poste ne sonne pas. La sonnerie est coupée. Reportez-vous au paragraphe 5.1.1
"Volume de la sonnerie".
L'adaptateur secteur du poste n'est pas
branché.
Vérifiez le branchement de l’alimentation
électrique au secteur 230 V / 50 Hz.
Le pack de batteries est toujours
déchargé après plusieurs heures de
charge.
Le pack de batteries du poste est
défectueux
Adressez-vous à votre revendeur pour
vous procurer un nouveau pack de
batteries.
18
Versatis_Conference_fr.qxd 31/03/2005 16:21 Page 18
Page 19
9. CARACTÉRISTIQUES TECHNIQUES
* Variable en fonction de l'environnement.
** Dépendant de la charge initiale des batteries.
Portée en champ libre Jusqu’à 300 mètres *
Portée en intérieur Jusqu’à 50 mètres *
6 heures en conversation **Autonomie du poste
(valeurs moyennes)
80 heures en veille **
Poids du poste : 2,1 kg avec les batteries
Poids de la base : 162 g
Raccordement électrique /
Adaptateur secteur
Entrée Base: AC 230V/50 Hz
Sortie Base : DC 7 V/400 mA
Entrée Poste : AC 230V/50 Hz
Sortie Poste : DC 12 V/1500 mA
Courant alternatif monophasé à l'exclusion des installations IT définies dans la
norme EN60950.
Attention, la tension du réseau est classée dangereuse selon les critères de la
même norme.
Raccordement téléphonique Appareil destiné à être branché sur une ligne téléphonique analogique classée
TRT3 (tension de réseau de télécommunications) au sens de la norme
EN60950.
Batteries rechargeables du poste 1.2 V / 1800 mAh/Ni-MH AA x 6
Température de fonctionnement de + 5 à + 40° C
19
Versatis_Conference_fr.qxd 31/03/2005 16:21 Page 19
Page 20

10. GARANTIE
Nous vous rappelons que le VERSATIS Conference est un équipement agréé conformément à la réglementation européenne, attesté
par le marquage .
Vous bénéficiez d'une garantie légale sur ce produit et pour toute information relative à cette garantie, veuillez vous adresser à votre
revendeur.
Indépendamment de la garantie légale dont le produit bénéficie, le revendeur garantit la conformité des produits à leurs spécifications
techniques pendant une durée de douze (12) mois, pièces et main d'oeuvre, à compter de la date figurant sur la preuve d'achat du
produit. Il vous appartient donc de conserver votre facture ou votre ticket de caisse précisant la date d'achat du produit et le nom du
revendeur. Néanmoins, si la garantie légale en vigueur dans votre pays excède douze (12) mois, la garantie légale est alors seule
applicable. La pièce ou le produit non conforme sera réparé ou remplacé sans frais, par une pièce ou un produit identique ou au moins
équivalent en termes de fonctionnalité et de performance. Si la réparation ou le remplacement s'avéraient impossibles, le produit vous
serait remboursé.
Le produit ou la pièce de rechange, qui peuvent être neufs ou reconditionnés, sont garantis soit pour une période de trois mois à
compter de la réparation, soit jusqu'à la fin de la période de garantie initiale si cette dernière est supérieure à trois mois. Toute pièce
ou produit renvoyé et remplacé devient la propriété du constructeur.
Toutefois, la présente garantie est exclue dans les cas suivants :
− une installation ou une utilisation non conforme aux instructions figurant dans ce guide ;
− un mauvais branchement ou une utilisation anormale du produit, notamment avec des accessoires non prévus à cet effet ;
− une usure normale ;
− le non respect des normes techniques et de sécurité en vigueur dans la zone géographique d'utilisation ;
− produits ayant subi un choc ou une chute ;
− produits détériorés par la foudre, une surtension électrique, une source de chaleur ou ses rayonnements, un dégât des eaux, l'ex-
position à des conditions d'humidité excessive, ou toute autre cause extérieure au produit ;
− un entretien défectueux, une négligence ;
− une intervention, une modification ou une réparation effectuée par une personne non agréée par le constructeur ou le revendeur.
SOUS RESERVE DES DISPOSITIONS LEGALES, TOUTES GARANTIES AUTRES QUE CELLES DECRITES AUX PRESENTES
SONT EXPRESSEMENT EXCLUES.
20
Versatis_Conference_fr.qxd 31/03/2005 16:21 Page 20
Page 21

11. SECURITE
En cas de danger, l'adaptateur secteur sert de dispositif de sectionnement de l'alimentation 230 V. Il doit donc être installé, par
précaution, près de l'appareil et être facilement accessible.
Pour couper le dispositif de la source d'alimentation primaire, l'adaptateur secteur doit être débranché de la prise 230 V AC 50 Hz.
En cas de défaillance de l'adaptateur secteur, ce dernier doit être remplacé par un modèle identique.
En l'absence d'alimentation secteur ou en cas de coupure secteur, les postes utilisant des combinés sans fil ne sont plus fonctionnels.
Vous ne pourrez pas passer ou recevoir des appels en cas d'urgence.
Pour cette raison, il est recommandé d'utiliser en complément un poste téléphonique conventionnel ne nécessitant pas de courant
secteur.
!
Ne pas utiliser votre poste téléphonique pour signaler une fuite de gaz à proximité de cette fuite.
En cas d'orage, il est préconisé de ne pas utiliser cet appareil.
12. ENVIRONNEMENT
Les batteries usagées doivent être éliminées conformément à la réglementation en vigueur sur la protection de
l'environnement. Vous devez rapporter vos batteries à votre revendeur ou les déposer dans un centre de récupération
réservé à cet effet.
Ne tentez pas d'ouvrir les batteries qui contiennent des substances chimiques. En cas de fuite, évitez le contact avec les
muqueuses (la peau, les yeux, la bouche). Le cas échéant, rincez la partie atteinte plusieurs minutes à l'eau courante.
Nettoyez le produit à l'aide de papier absorbant ou d'un chiffon sec et contactez votre revendeur pour changer vos batteries.
La mise au rebut définitive du VERSATIS Conference doit être effectuée conformément aux lois et réglementations en
vigueur.
21
Versatis_Conference_fr.qxd 31/03/2005 16:21 Page 21
Page 22
13. DECLARATION DE CONFORMITE
Par la présente Thomson Telecom déclare que le VERSATIS Conference est conforme aux exigences essentielles et autres
dispositions pertinentes de la directive 1999/5/CE.
22
Versatis_Conference_fr.qxd 31/03/2005 16:21 Page 22
Page 23
23
The package should contain the following:
− a base
− a Pod
− a 230V mains adapter for the base
− a 230V mains adapter for the Pod
− a battery pack
− a conversion plug for connection to the French telephone network
− a phone connection cable
− a user guide.
Please read this guide carefully to get to know the main features of your VERSATIS Conference.
English
Versatis_Conference_uk.qxd 31/03/2005 16:03 Page 23
Page 24
24
- Phone book
- Open phone book
Speed dial
memory M1
- Erase a digit
- Quit programming mode, phone book or redial
operation
- Delete entire number (press and hold)
- Return to Standby (press and hold)
Speed dial memory
M2
(press and hold)
Access to operator
or PABX services
- Redial last number
- Enter programming mode
(press and hold)
Ringer / speaker
volume control
Take line / Hang up
Mute / Unmute
microphone during call
(Mute function)
Ringer on/off (press and hold)
Insert pause
(press and hold)
Pod keys
Versatis_Conference_uk.qxd 31/03/2005 16:03 Page 24
Page 25

25
Pod display
The VERSATIS Conference has a two-line display:
− 1 line of icons
− 1 line of 18 characters
Battery charge level:
- flashes when battery
needs recharging
- animates when charging
Call in progress
Mute (microphone off)
Ringer off
Phone book
Reception quality
Programming
Scroll
Battery life indicator
Call duration
Base LEDs:
(Green) In Use Flashes when an incoming call is received and stays on
when the phone is in use
(Red) Power Stays on continuously when the base is connected to its
power supply
Page:
l Press "PAGE" to locate the Pod (if you can't remember where you left it)
2.5mm recording jack (side of base, to the left in the diagram view)
Base
Versatis_Conference_uk.qxd 31/03/2005 16:03 Page 25
Page 26

POD KEYS . . . . . . . . . . . . . . . . . . . . . . . . . . . . . . . . . . . . . . . . . . . . . . . . . . . . . . . . . . . . . . . . . . . . . . . . . . . . . . . . . . . . . 24
BASE . . . . . . . . . . . . . . . . . . . . . . . . . . . . . . . . . . . . . . . . . . . . . . . . . . . . . . . . . . . . . . . . . . . . . . . . . . . . . . . . . . . . . . . . . 25
POD DISPLAY . . . . . . . . . . . . . . . . . . . . . . . . . . . . . . . . . . . . . . . . . . . . . . . . . . . . . . . . . . . . . . . . . . . . . . . . . . . . . . . . . . 25
1. YOUR AUDIOCONFERENCE TELEPHONE . . . . . . . . . . . . . . . . . . . . . . . . . . . . . . . . . . . . . . . . . . . . . . . . . . . . . . . 27
1.1 The VERSATIS Conference . . . . . . . . . . . . . . . . . . . . . . . . . . . . . . . . . . . . . . . . . . . . . . . . . . . . . . . . . . . . . . . . . . . . 27
1.2 Precautions . . . . . . . . . . . . . . . . . . . . . . . . . . . . . . . . . . . . . . . . . . . . . . . . . . . . . . . . . . . . . . . . . . . . . . . . . . . . . . . . 27
1.3 Battery precautions . . . . . . . . . . . . . . . . . . . . . . . . . . . . . . . . . . . . . . . . . . . . . . . . . . . . . . . . . . . . . . . . . . . . . . . . . . . 27
2. INSTALLATION . . . . . . . . . . . . . . . . . . . . . . . . . . . . . . . . . . . . . . . . . . . . . . . . . . . . . . . . . . . . . . . . . . . . . . . . . . . . . 28
2.1 Installing the base . . . . . . . . . . . . . . . . . . . . . . . . . . . . . . . . . . . . . . . . . . . . . . . . . . . . . . . . . . . . . . . . . . . . . . . . . . . 28
2.2 Installing the Pod . . . . . . . . . . . . . . . . . . . . . . . . . . . . . . . . . . . . . . . . . . . . . . . . . . . . . . . . . . . . . . . . . . . . . . . . . . . . 29
2.3 Charging the Pod . . . . . . . . . . . . . . . . . . . . . . . . . . . . . . . . . . . . . . . . . . . . . . . . . . . . . . . . . . . . . . . . . . . . . . . . . . . . 29
2.4 For maximum performance . . . . . . . . . . . . . . . . . . . . . . . . . . . . . . . . . . . . . . . . . . . . . . . . . . . . . . . . . . . . . . . . . . . . . 29
3. BASIC FUNCTIONS . . . . . . . . . . . . . . . . . . . . . . . . . . . . . . . . . . . . . . . . . . . . . . . . . . . . . . . . . . . . . . . . . . . . . . . . . . 30
3.1 Answering calls . . . . . . . . . . . . . . . . . . . . . . . . . . . . . . . . . . . . . . . . . . . . . . . . . . . . . . . . . . . . . . . . . . . . . . . . . . . . . 30
3.2 Making calls . . . . . . . . . . . . . . . . . . . . . . . . . . . . . . . . . . . . . . . . . . . . . . . . . . . . . . . . . . . . . . . . . . . . . . . . . . . . . . . . 30
3.3 Redial . . . . . . . . . . . . . . . . . . . . . . . . . . . . . . . . . . . . . . . . . . . . . . . . . . . . . . . . . . . . . . . . . . . . . . . . . . . . . . . . . . . . . 31
3.4 Speed dialling . . . . . . . . . . . . . . . . . . . . . . . . . . . . . . . . . . . . . . . . . . . . . . . . . . . . . . . . . . . . . . . . . . . . . . . . . . . . . . . 31
4. FEATURES AVAILABLE DURING CALLS . . . . . . . . . . . . . . . . . . . . . . . . . . . . . . . . . . . . . . . . . . . . . . . . . . . . . . . . . 32
4.1 Adjust speaker volume . . . . . . . . . . . . . . . . . . . . . . . . . . . . . . . . . . . . . . . . . . . . . . . . . . . . . . . . . . . . . . . . . . . . . . . . 32
4.2 Mute function . . . . . . . . . . . . . . . . . . . . . . . . . . . . . . . . . . . . . . . . . . . . . . . . . . . . . . . . . . . . . . . . . . . . . . . . . . . . . . . 32
4.3 R key . . . . . . . . . . . . . . . . . . . . . . . . . . . . . . . . . . . . . . . . . . . . . . . . . . . . . . . . . . . . . . . . . . . . . . . . . . . . . . . . . . . . . 32
4.4 Display Pod number . . . . . . . . . . . . . . . . . . . . . . . . . . . . . . . . . . . . . . . . . . . . . . . . . . . . . . . . . . . . . . . . . . . . . . . . . . 32
5. PROGRAMMING . . . . . . . . . . . . . . . . . . . . . . . . . . . . . . . . . . . . . . . . . . . . . . . . . . . . . . . . . . . . . . . . . . . . . . . . . . . . 33
5.1 Programming the ringer . . . . . . . . . . . . . . . . . . . . . . . . . . . . . . . . . . . . . . . . . . . . . . . . . . . . . . . . . . . . . . . . . . . . . . . 33
5.2 Adding a number to the phone book . . . . . . . . . . . . . . . . . . . . . . . . . . . . . . . . . . . . . . . . . . . . . . . . . . . . . . . . . . . . . . 33
5.3 Programming the R (Flash) key . . . . . . . . . . . . . . . . . . . . . . . . . . . . . . . . . . . . . . . . . . . . . . . . . . . . . . . . . . . . . . . . . 34
5.4 Programming the VERSATIS Conference telephone number . . . . . . . . . . . . . . . . . . . . . . . . . . . . . . . . . . . . . . . . . . . . 34
5.5 Programming speed dial memory M1 . . . . . . . . . . . . . . . . . . . . . . . . . . . . . . . . . . . . . . . . . . . . . . . . . . . . . . . . . . . . . 35
5.6 Programming speed dial memory M2 . . . . . . . . . . . . . . . . . . . . . . . . . . . . . . . . . . . . . . . . . . . . . . . . . . . . . . . . . . . . . 35
5.7 Restoring the default settings . . . . . . . . . . . . . . . . . . . . . . . . . . . . . . . . . . . . . . . . . . . . . . . . . . . . . . . . . . . . . . . . . . . 36
6. ADDITIONAL FEATURES . . . . . . . . . . . . . . . . . . . . . . . . . . . . . . . . . . . . . . . . . . . . . . . . . . . . . . . . . . . . . . . . . . . . . 36
6.1 Call recording . . . . . . . . . . . . . . . . . . . . . . . . . . . . . . . . . . . . . . . . . . . . . . . . . . . . . . . . . . . . . . . . . . . . . . . . . . . . . . . 36
6.2 Locating the Pod (paging function) . . . . . . . . . . . . . . . . . . . . . . . . . . . . . . . . . . . . . . . . . . . . . . . . . . . . . . . . . . . . . . . 36
7. DEFAULT VALUES . . . . . . . . . . . . . . . . . . . . . . . . . . . . . . . . . . . . . . . . . . . . . . . . . . . . . . . . . . . . . . . . . . . . . . . . . . 37
8. TROUBLESHOOTING . . . . . . . . . . . . . . . . . . . . . . . . . . . . . . . . . . . . . . . . . . . . . . . . . . . . . . . . . . . . . . . . . . . . . . . . 38
9. TECHNICAL SPECIFICATIONS . . . . . . . . . . . . . . . . . . . . . . . . . . . . . . . . . . . . . . . . . . . . . . . . . . . . . . . . . . . . . . . . . 39
10. WARRANTY . . . . . . . . . . . . . . . . . . . . . . . . . . . . . . . . . . . . . . . . . . . . . . . . . . . . . . . . . . . . . . . . . . . . . . . . . . . . . . . 40
11. SAFETY . . . . . . . . . . . . . . . . . . . . . . . . . . . . . . . . . . . . . . . . . . . . . . . . . . . . . . . . . . . . . . . . . . . . . . . . . . . . . . . . . . . 41
12. ENVIRONMENT . . . . . . . . . . . . . . . . . . . . . . . . . . . . . . . . . . . . . . . . . . . . . . . . . . . . . . . . . . . . . . . . . . . . . . . . . . . . . 41
13. DECLARATION OF CONFORMITY . . . . . . . . . . . . . . . . . . . . . . . . . . . . . . . . . . . . . . . . . . . . . . . . . . . . . . . . . . . . . . 42
26
Versatis_Conference_uk.qxd 31/03/2005 16:03 Page 26
Page 27

1. YOUR AUDIOCONFERENCE TELEPHONE
1.1 THE VERSATIS CONFERENCE
The VERSATIS Conference is designed to meet all your telephone communication needs. It combines optimal sound quality with
pushbutton ease of use for all your conference calls.
With its cordless DECT™* technology, your conference system can be used in a room other than the one where your telephone
connection is located.
1.2 PRECAUTIONS
The VERSATIS Conference is compliant with the DECT™* standard. It is designed to transmit and receive telephone calls and be
connected to the European public switched telephone network or behind a PBX.
This phone requires an electrical power supply in order to function.
As with any radio link, the quality of communication depends on the location and environment of the base and the Pod.
The VERSATIS Conference must be kept away from sources of excessive heat (radiators, direct sunlight, etc.) and protected against
vibrations and dust. Never allow your phone to come into contact with water or other liquids, or with aerosols.
To reduce the risk of interference and optimise reception, take particular care to keep it away from the immediate vicinity of windows,
large metal objects, reinforced concrete, televisions, music centres, halogen lamps or heating devices, fluorescent lighting, burglar
alarms, microwave ovens, computers, ADSL modems, etc.
To clean your phone, use a lightly moistened antistatic cloth.
1.3 BATTERY PRECAUTIONS
* DECT is a trademark of ETSI.
!
Only use a rechargeable battery pack with exactly the same specifications as the pack supplied with the product.
Using non-rechargeable or non-conforming batteries can damage the product (see the "Technical Specifications"
chapter).
Failure to comply with this recommendation will invalidate the manufacturer's warranty.
The batteries could split or leak if incorrectly inserted, opened or exposed to heat.
Never dispose of the battery pack in a fire: it could explode
27
Versatis_Conference_uk.qxd 31/03/2005 16:03 Page 27
Page 28
28
2. INSTALLATION
Base Pod
l Place the base and Pod units on a flat, stable surface.
2.1 INSTALLING THE BASE
2.1.1 Connecting the base
l Plug the base power supply cable into the socket at the back of the base.
l Connect the mains adapter to a 230 V / 50 Hz electrical socket.
"
The red power indicator on the base should light up.
l Plug one end of the phone cable into the socket at the back of the base, and the other into the phone line socket.
2.1.2 Wall mounting (optional)
To wall-mount the base, follow this procedure:
l Make sure that the base unit is not too far from a power socket and that you do not drill through any electrical wiring concealed in
the wall.
l Drill three holes using the template provided on page 143 of this guide.
l Insert three screws (not supplied) into the holes. Leave the screw heads approximately 3 mm proud of the wall.
l Slide the base unit down over the screw heads.
Versatis_Conference_uk.qxd 31/03/2005 16:03 Page 28
Page 29

2.2 INSTALLING THE POD
2.2.1 Inserting the battery pack
l Open the battery compartment under the Pod.
l Insert the battery pack (7.2V 1800mAh), ensuring that the plug and connector are correctly aligned.
l Replace the battery cover.
2.2.2 Connecting the Pod to the mains
l Plug the Pod power supply cable into the socket at the rear of the Pod.
l Connect the mains adapter to a 230V / 50Hz electrical socket.
Before using the Pod for the first time, we recommend that you leave it to charge up for 24 hours in order to optimise the performance
and longevity of the battery pack.
2.3 CHARGING THE POD
If the battery icon flashes or the LEDs on the Pod flash RED periodically during a call, the Pod needs recharging.
l To recharge, plug the 230V mains adapter into the Pod. The battery is charged when the battery icon stops flashing.
l To check that the Pod is registered on the base, press to take the line.
"
If you hear the dial tone, the Pod is working.
l Check that the symbol is full on (not flashing).
When the Pod battery is completely flat, it may take several minutes for the display to light up after you plug in the mains adapter.
2.4 FOR MAXIMUM PERFORMANCE
Install your conference phone in a quiet location.
Keep the Pod within 50 metres of the base.
Do not move the Pod during calls.
29
Versatis_Conference_uk.qxd 31/03/2005 16:03 Page 29
Page 30

30
3. BASIC FUNCTIONS
3.1 ANSWERING CALLS
When there is an incoming call, the green LEDs on the base and the Pod flash. The icon flashes on the display and you hear the
Pod ring tone.
l Press any key (except the and ) to answer (the and keys simply increase or decrease
the ringer volume).
The call timer on the left of the screen displays the duration of the current call in MM:SS (minutes and
seconds) format.
The battery timer on the right of the screen displays the remaining battery life in HH:MM (hours and
minutes) format.
3.2 MAKING CALLS
3.2.1 Direct dialling
l Press .
l Dial the number you want to call.
NB: There is no limit on the total number of digits dialled.
3.2.2 Pre-dialling
With the pre-dialling feature you can key in and, if necessary, modify the number before activating the line.
l Dial a number (max. 44 digits).
l Press to clear the last digit entered, or press and hold to delete the entire string of digits.
l Press to initiate the call.
NB: Whether using pre-dialling or direct dialling, if you want to insert a pause, press and hold . The symbol "P" appears.
l Press to hang up at the end of the call.
3.2.3 Your phone book
The 10-number phone book can be used in direct dialling or pre-dialling mode. See the programming section (5.2 "Adding a number
to the phone book") for details of how to store and edit numbers in the phone book.
l Press .
l Press any key from to display the corresponding phone book entry.
l Press to initiate the call.
Versatis_Conference_uk.qxd 31/03/2005 16:03 Page 30
Page 31

3.3 REDIAL
Redial allows you to make another call to the last number dialled.
Direct dialling:
l Press .
l Press .
"
The last number dialled is automatically re-dialled.
Pre-dialling:
l Press .
"
The last number dialled is displayed.
l Press to dial the number.
3.4 SPEED DIALLING
Speed dialling allows you to call pre-programmed phone numbers by pressing a single key. Before using these keys, make sure they
have been correctly programmed.
See the programming section (5.5 and 5.6) for details of how to store and edit speed dial numbers.
3.4.1 Speed dial memory M1
l In Standby mode, press .
"
The programmed number is displayed and dialled automatically.
l Press to hang up.
3.4.2 Speed dial memory M2
l In Standby mode, press and hold .
"
The programmed number is displayed and dialled automatically.
l Press to hang up.
31
Versatis_Conference_uk.qxd 31/03/2005 16:03 Page 31
Page 32

4. FEATURES AVAILABLE DURING CALLS
4.1 ADJUST SPEAKER VOLUME
There are 16 different speaker volume levels.
l Press or to adjust the speaker volume during a call.
4.2 MUTE FUNCTION
When the Mute function is activated, the microphone in the Pod is cut off.
l Press to mute or un-mute a call.
When the call is muted, the icon lights up, and the Pod LEDs switch to red and flash slowly.
4.3 R KEY
A "flash" signal can be sent during a call.
l Press to access additional services provided by your operator or PBX.
See chapter 5.3. "Programming the R (Flash) key" for information on how to adjust the flash time.
4.4 DISPLAY POD NUMBER
The telephone number of the Pod can be displayed for reference during a call. First, check that this function has been correctly
configured (see 5.4 "Programming the VERSATIS Conference telephone number").
l During a call, press .
"
The telephone number is displayed (if programmed).
"
The display reverts to its previous state after 10 seconds.
or
l Press to clear the number from the display and return to the call timer.
32
Versatis_Conference_uk.qxd 31/03/2005 16:03 Page 32
Page 33

5. PROGRAMMING
5.1 PROGRAMMING THE RINGER
5.1.1 Ring volume
l Press or when the phone is ringing.
5.1.2 Ring tone
l In Standby mode, press and hold .
"
This takes you into "Programming" mode.
"
The icon appears.
l Press to select ring tone programming and press to confirm.
"
The number of the ring tone is displayed.
l Press any key from to to select the corresponding ring tone, and press .to confirm
l Press to exit.
5.2 ADDING A NUMBER TO THE PHONE BOOK
Your phone book can store up to 10 numbers. Each number can contain up to 44 digits. Entering a new number into one of the ten
memories automatically overwrites the previous number stored in that location.
l In Standby mode, dial the number to be stored (max. 44 digits).
l Press and hold .
"
This takes you into "Phone book programming" mode.
"
The icons and appear.
l Press any key from to ] to assign a one-digit code to the newly stored number.
l Press again to confirm.
"
You should hear a confirmation tone.
"
The display returns to Standby.
NB: − Press at any time to abandon the new phone book entry and return to Standby.
− Press and hold to insert a pause when dialling.
33
Versatis_Conference_uk.qxd 31/03/2005 16:03 Page 33
Page 34

5.3 PROGRAMMING THE R (FLASH) KEY
To access the additional services offered by your operator or PABX, you need to set the flash time on your VERSATIS Conference.
The available settings are 100ms, 270ms, 500ms and 800ms.
l In Standby mode, press and hold .
"
This takes you into "Phone book programming" mode.
"
The icon appears.
l Press to select flash time programming.
"
The current setting is displayed.
l Press again to select flash time programming.
"
The current selection starts to flash.
l Press the key corresponding to the desired flash time (from to ):
l Press again to confirm the selection.
l Press to exit.
5.4 PROGRAMMING THE VERSATIS CONFERENCE TELEPHONE NUMBER
The VERSATIS Conference is designed to be used by any number of persons. It is therefore useful to indicate to the users the
telephone number corresponding to the VERSATIS Conference.
l In Standby mode, press and hold .
"
This takes you into programming mode.
l Press to select VERSATIS Conference phone number programming.
"
If programmed, the current number is displayed; otherwise the display remains blank.
l Press again to confirm the phone number programming selection.
"
The current number flashes.
Key Flash time (ms)
100 (default value)
270
500
800
34
Versatis_Conference_uk.qxd 31/03/2005 16:03 Page 34
Page 35

l Press to erase the digits of the current number one by one, or press and hold to clear the entire number.
l Press again to confirm the changes.
l Press to exit.
5.5 PROGRAMMING SPEED DIAL MEMORY M1
l In Standby mode, press and hold .
"
The icon appears.
l Press to select speed dial memory M1 programming.
"
If programmed, the current number is displayed; otherwise the display remains blank.
l Press again to confirm the speed dial memory M1 programming selection.
"
The current number flashes.
l Press to erase the digits of the current number one by one, or press and hold to clear the entire number.
l Dial the number.
l Press to confirm the changes.
l Press to exit.
5.6 PROGRAMMING SPEED DIAL MEMORY M2
l In Standby mode, press and hold .
"
The icon appears.
l Press to select speed dial memory M2 programming.
"
If programmed, the current number is displayed; otherwise the display remains blank.
l Press again to confirm the speed dial memory M2 programming selection.
"
The current number flashes.
l Press to erase the digits of the current number one by one, or press and hold to clear the entire number.
l Dial the number.
l Press to confirm the changes.
l Press to exit.
35
Versatis_Conference_uk.qxd 31/03/2005 16:04 Page 35
Page 36

5.7 RESTORING THE DEFAULT SETTINGS
l In Standby mode, press and hold .
"
The icon appears.
l Press and hold to return the phone to its default settings.
"
The display now shows: .
l Press again to confirm the restore selection.
l Press to exit.
!
Caution: this procedure will erase the entire phone book, the last call memory, and the speed dial settings.
See section 7 "Default values" for the full list of factory settings.
6. ADDITIONAL FEATURES
6.1 CALL RECORDING
Calls can be recorded by connecting an external recorder to the 2.5 mm recorder jack on the side of the base unit.
6.2 LOCATING THE POD (PAGING FUNCTION)
Can't find the Pod?
l Press the search button on the base unit to locate the Pod.
"
The Pod will ring for 30 seconds.
l Press any key on the Pod to stop it ringing.
36
Versatis_Conference_uk.qxd 31/03/2005 16:04 Page 36
Page 37

7. DEFAULT VALUES
Function
Default factory setting
Speaker volume
Level 5
Ring volume
Volume 5
Ring tone
Ring tone 1
Flash time
100 ms
Redial
Empty
Phone book
Empty
Pod telephone number
Empty
Speed dial memory M1
Empty
Speed dial memory M2
Empty
37
Versatis_Conference_uk.qxd 31/03/2005 16:04 Page 37
Page 38

8. TROUBLESHOOTING
If a problem arises, try this first: remove the battery pack from the Pod and disconnect the power supply from the base. Wait for about
1 minute, then reconnect the base and reinsert the battery pack into the Pod.
If the problem still persists, you can call the hotline on 02 07 867 00 16 from Monday to Saturday, 8 a.m. to 7 p.m. (calls are billed at
current rates).
The store where you bought your telephone is also able to provide information and after-sales service.
Problems Causes Solutions
The Pod is not powered up. Check that the battery pack is positioned
correctly.
Nothing appears on the display.
The battery pack is flat. Reconnect the mains adapter to the Pod
to recharge the battery pack.
The Pod is out of range of the base. Move the Pod nearer to the base.
The battery pack is flat. Reconnect the mains adapter to the Pod
to recharge the battery pack.
There is no dial tone.
The device is not connected to the
telephone network.
Check the phone socket connection.
You are out of range of the base, or
picking up interference.
Move the Pod nearer to the base.The reception quality is poor or
deteriorates during a call.
You have ADSL. Connect an approved ADSL filter
between the phone connector and the
wall socket.
Your correspondent can't hear you. The microphone is off: the Mute function
is active.
See Section 4.2 "Mute function".
The Pod doesn't ring. The ringer is off. See Section 5.1.1 "Ring volume".
The Pod mains adapter is disconnected. Check the connection to the 230V /
50Hz mains power supply.
The battery pack is still flat after several
hours on charge.
The Pod battery pack is defective. Ask your reseller to supply you with a
new battery pack.
38
Versatis_Conference_uk.qxd 31/03/2005 16:04 Page 38
Page 39

9. TECHNICAL SPECIFICATIONS
* Values may vary according to environment.
** Depends on initial battery charge.
Free field range Up to 300 meters *
Indoor range Up to 50 meters *
6 hours talktime **Pod battery life
(average values)
80 hours standby **
Weight of Pod: 2.1 kg including batteries
Weight of base: 162 g
Electrical connection /
Mains adapter
Base input: AC 230V/50 Hz
Base output: DC 7 V/400 mA
Pod input: AC 230V/50 Hz
Pod output: DC 12 V/1500 mA
Single-phase AC, excluding IT installations defined by the EN 60950 standard.
Caution: the network voltage is classified as a hazard by the criteria of this
standard.
Telephone connection Appliance designed for connection to an analogue telephone line class TRT3
(telecommunications network voltage) as defined by standard EN 60950.
Rechargeable batteries for Pod 1.2 V / 1800 mAh/Ni-MH AA x 6
Operating temperature from + 5 to + 40°C
39
Versatis_Conference_uk.qxd 31/03/2005 16:04 Page 39
Page 40

10. WARRANTY
The VERSATIS Conference is approved in compliance with European regulations, as certified by the mark.
This product is covered by a legal warranty. For all information concerning this warranty, please contact your reseller.
Regardless of the legal warranty covering the product, the reseller guarantees conformity of the products with their technical
specifications for a period of twelve (12) months, parts and labour, starting from the date appearing on the proof of purchase of the
product. You should therefore retain your invoice or till receipt specifying the date of purchase of the product and the name of the
reseller. However, if the legal warranty applicable in your country exceeds twelve (12) months, the legal warranty alone then applies.
The non-conforming part or product will be repaired or replaced free of charge by an identical part or product or one that is equivalent
or superior in terms of functionality and performance. If it proves impossible to repair or replace the item, the product will be reimbursed.
Replacement parts or products - which may be either new or refurbished - are guaranteed either for three months from the date of repair
or until the end of the initial warranty period, whichever is the longer. Products and parts that have been returned and replaced become
the property of the manufacturer.
However, this warranty does not apply in the following cases:
− installation or use in a way that fails to comply with the instructions contained in this guide;
− incorrect connection or non-standard use of the product, notably with accessories not designed for the purpose;
− normal wear and tear;
− failure to comply with the technical and safety standards prevailing in the state or country of use;
− devices subjected to shocks or falls;
− devices damaged by lightning, voltage surge, heat sources or radiation therefrom, water, exposure to excessive humidity, or any
other cause external to the product itself;
− negligence or poor maintenance;
− maintenance or repair of the product by persons not authorised by the manufacturer or reseller.
UNLESS OTHERWISE STIPULATED BY LAW, ALL WARRANTIES OTHER THAN THOSE MENTIONED HEREIN ARE EXPRESSLY
EXCLUDED.
40
Versatis_Conference_uk.qxd 31/03/2005 16:04 Page 40
Page 41

11. SAFETY
In the event of danger, the mains adapter acts as an isolating device from the 230V supply. It should therefore, as a precaution, be
installed close to the appliance and be easily accessible.
To isolate the device from the primary power source, the mains adapter must be removed from the 230V AC 50 Hz outlet.
If the mains adapter fails, it must be replaced by an identical model.
If not connected to the mains power or if there is a mains power failure, installations with cordless phones will no longer work.
You will then be unable to make or receive calls in the event of an emergency.
This is why we recommend that you also have a conventional (with no mains connection) telephone as a backup.
!
Do not use the Pod to notify a gas leak when you are in the vicinity of the leak.
It is recommended that you avoid using this device during electrical storms.
12. ENVIRONMENT
Used phone batteries must be disposed of in compliance with current environmental protection regulations. You should return
your batteries to your reseller or dispose of them in an approved recycling centre.
Do not attempt to open the batteries, as they contain chemical substances. In the event of leakage, avoid contact with the
skin, eyes and mouth. In the event of contact, rinse the affected part for several minutes in running water.
Clean the product with absorbent paper or a dry cloth and contact your reseller for replacement batteries.
At the end of its life, the VERSATIS Conference must be disposed of in compliance with current environmental protection
regulations.
41
Versatis_Conference_uk.qxd 31/03/2005 16:04 Page 41
Page 42

13. DECLARATION OF CONFORMITY
Thomson Telecom hereby declares that the VERSATIS Conference conforms to the essential requirements and other applicable
provisions of European directive 1999/5/EC.
42
Versatis_Conference_uk.qxd 31/03/2005 16:04 Page 42
Page 43

43
Die Verpackung enthält folgende Elemente:
− eine Basisstation
− ein Pod
− einen an die Basisstation anzuschließenden Netzadapter 230 V
− einen an das Pod anzuschließenden Netzadapter 230 V
− ein Akku-Pack
− einen Umwandlungsstecker für den Anschluss an das französische Telekommunikationsnetz
− ein Telefonkabel
− ein Benutzerhandbuch.
Wir raten Ihnen, dieses Handbuch aufmerksam durchzulesen, denn Sie finden darin die wichtigsten Informationen über Ihr Telefon
VERSATIS Conference.
Deutsch
Versatis_Conference_de.qxd 31/03/2005 15:59 Page 43
Page 44

44
- Telefonbuch
- Zugang zum Telefonbuch
Kurzwahltaste M1
- Eine Ziffer löschen
- Den Programmiermodus, das Telefonbuch
oder die Wahlwiederholung verlassen
- Löschen der gesamten Nummer (langer
Tastendruck)
- Zurück zum Bereitschaftszustand (langer
Tastendruck)
Kurzwahltaste M2
(langer
Tastendruck)
Zugang zu den Diensten des
Netzbetreibers oder der
privaten Nebenstellenanlage
(PABX)
- Zugriff auf die zuletzt
gewählte Nummer
- Zugang zum
Programmiermodus (langer
Tastendruck)
Die Lautstärke des Ruftons
oder des Lautsprechers
erhöhen oder verringern
Abnehmen/Auflegen
Mikrofon während eines
Anrufs ein-/ausschalten
(Stummschalten)
Rufton aktivieren/deaktivieren
(langer Tastendruck)
Pause einfügen (langer
Tastendruck)
Tasten des Pod
Versatis_Conference_de.qxd 31/03/2005 15:59 Page 44
Page 45

45
Display des Pod
Das Telefon VERSATIS Conference besitzt ein zweizeiliges Display:
− 1 Symbolzeile
− 1 Zeile mit 18 Zeichen
Ladezustand des Akkus:
- blinkt, wenn der Akku geladen
werden muss
- bewegt sich während des
Ladevorgangs
Im Gespräch
Stummschalten (Mikrofon ausschalten)
Rufton deaktiviert
Telefonbuch
Empfangsqualität
Programmierung
Blättern
Anzeige der
Betriebsbereitschaft des
Akkus
Gesprächsdauer
Leuchtanzeigen:
(Grün) In Use Blinkt, wenn ein Anruf eingeht, und leuchtet während eines
Gesprächs
(Rot) Power Leuchtet permanent, wenn die Basisstation an das
Stromnetz angeschlossen ist
Page:
l Drücken Sie auf „PAGE", um das Pod zu suchen (falls Sie vergessen haben, wo Sie
es abgelegt haben)
Jack-Aufnahmebuchse 2,5 mm (auf dem Schema an der linken Seite)
Basisstation
Versatis_Conference_de.qxd 31/03/2005 15:59 Page 45
Page 46

TASTEN DES POD . . . . . . . . . . . . . . . . . . . . . . . . . . . . . . . . . . . . . . . . . . . . . . . . . . . . . . . . . . . . . . . . . . . . . . . . . . . . . . . 44
BASISSTATION . . . . . . . . . . . . . . . . . . . . . . . . . . . . . . . . . . . . . . . . . . . . . . . . . . . . . . . . . . . . . . . . . . . . . . . . . . . . . . . . . . 45
DISPLAY DES POD . . . . . . . . . . . . . . . . . . . . . . . . . . . . . . . . . . . . . . . . . . . . . . . . . . . . . . . . . . . . . . . . . . . . . . . . . . . . . . 45
1. IHR AUDIOKONFERENZ-SYSTEM . . . . . . . . . . . . . . . . . . . . . . . . . . . . . . . . . . . . . . . . . . . . . . . . . . . . . . . . . . . . . . 47
1.1 Das Telefon VERSATIS Conference . . . . . . . . . . . . . . . . . . . . . . . . . . . . . . . . . . . . . . . . . . . . . . . . . . . . . . . . . . . . . . 47
1.2 Vorsichtsmassnahmen . . . . . . . . . . . . . . . . . . . . . . . . . . . . . . . . . . . . . . . . . . . . . . . . . . . . . . . . . . . . . . . . . . . . . . . . 47
1.3 Vorsichtsmassnahmen bezüglich des Akkupacks . . . . . . . . . . . . . . . . . . . . . . . . . . . . . . . . . . . . . . . . . . . . . . . . . . . . 47
2. ERSTE VERWENDUNG . . . . . . . . . . . . . . . . . . . . . . . . . . . . . . . . . . . . . . . . . . . . . . . . . . . . . . . . . . . . . . . . . . . . . . . 48
2.1 Basisstation installieren . . . . . . . . . . . . . . . . . . . . . . . . . . . . . . . . . . . . . . . . . . . . . . . . . . . . . . . . . . . . . . . . . . . . . . . 48
2.2 Pod installieren . . . . . . . . . . . . . . . . . . . . . . . . . . . . . . . . . . . . . . . . . . . . . . . . . . . . . . . . . . . . . . . . . . . . . . . . . . . . . . 49
2.3 Das Pod laden . . . . . . . . . . . . . . . . . . . . . . . . . . . . . . . . . . . . . . . . . . . . . . . . . . . . . . . . . . . . . . . . . . . . . . . . . . . . . . 49
2.4 Empfehlungen zur Optimierung der Leistung des Audiokonferenz-Systems . . . . . . . . . . . . . . . . . . . . . . . . . . . . . . . . . 49
3. BASISFUNKTIONEN . . . . . . . . . . . . . . . . . . . . . . . . . . . . . . . . . . . . . . . . . . . . . . . . . . . . . . . . . . . . . . . . . . . . . . . . . 50
3.1 Anruf entgegennehmen . . . . . . . . . . . . . . . . . . . . . . . . . . . . . . . . . . . . . . . . . . . . . . . . . . . . . . . . . . . . . . . . . . . . . . . 50
3.2 Anruf tätigen . . . . . . . . . . . . . . . . . . . . . . . . . . . . . . . . . . . . . . . . . . . . . . . . . . . . . . . . . . . . . . . . . . . . . . . . . . . . . . . . 50
3.3 Die zuletzt gewählte Nummer erneut wählen (Wahlwiederholung) . . . . . . . . . . . . . . . . . . . . . . . . . . . . . . . . . . . . . . . . 51
3.4 Kurzwahltasten . . . . . . . . . . . . . . . . . . . . . . . . . . . . . . . . . . . . . . . . . . . . . . . . . . . . . . . . . . . . . . . . . . . . . . . . . . . . . . 51
4. WÄHREND DES GESPRÄCHS ZUGÄNGLICHE FUNKTIONEN . . . . . . . . . . . . . . . . . . . . . . . . . . . . . . . . . . . . . . . . 52
4.1 Lautstärke des Lautsprechers einstellen . . . . . . . . . . . . . . . . . . . . . . . . . . . . . . . . . . . . . . . . . . . . . . . . . . . . . . . . . . . 52
4.2 Stummschalten . . . . . . . . . . . . . . . . . . . . . . . . . . . . . . . . . . . . . . . . . . . . . . . . . . . . . . . . . . . . . . . . . . . . . . . . . . . . . . 52
4.3 Taste R . . . . . . . . . . . . . . . . . . . . . . . . . . . . . . . . . . . . . . . . . . . . . . . . . . . . . . . . . . . . . . . . . . . . . . . . . . . . . . . . . . . 52
4.4 Telefonnummer des Pod anzeigen . . . . . . . . . . . . . . . . . . . . . . . . . . . . . . . . . . . . . . . . . . . . . . . . . . . . . . . . . . . . . . . 52
5. PERSÖNLICHE GESTALTUNG . . . . . . . . . . . . . . . . . . . . . . . . . . . . . . . . . . . . . . . . . . . . . . . . . . . . . . . . . . . . . . . . . 53
5.1 Rufton einstellen . . . . . . . . . . . . . . . . . . . . . . . . . . . . . . . . . . . . . . . . . . . . . . . . . . . . . . . . . . . . . . . . . . . . . . . . . . . . . 53
5.2 Eine Nummer im Telefonbuch speichern . . . . . . . . . . . . . . . . . . . . . . . . . . . . . . . . . . . . . . . . . . . . . . . . . . . . . . . . . . . 53
5.3 Taste R programmieren (Flashzeit) . . . . . . . . . . . . . . . . . . . . . . . . . . . . . . . . . . . . . . . . . . . . . . . . . . . . . . . . . . . . . . . 54
5.4 Telefonnummer des VERSATIS Conference programmieren . . . . . . . . . . . . . . . . . . . . . . . . . . . . . . . . . . . . . . . . . . . . 54
5.5 Kurzwahltaste M1 programmieren . . . . . . . . . . . . . . . . . . . . . . . . . . . . . . . . . . . . . . . . . . . . . . . . . . . . . . . . . . . . . . . 55
5.6 Kurzwahltaste M2 programmieren . . . . . . . . . . . . . . . . . . . . . . . . . . . . . . . . . . . . . . . . . . . . . . . . . . . . . . . . . . . . . . . . 55
5.7 Telefon auf Werkseinstellungen zurücksetzen . . . . . . . . . . . . . . . . . . . . . . . . . . . . . . . . . . . . . . . . . . . . . . . . . . . . . . . 56
6. ZUSATZFUNKTIONEN . . . . . . . . . . . . . . . . . . . . . . . . . . . . . . . . . . . . . . . . . . . . . . . . . . . . . . . . . . . . . . . . . . . . . . . . 56
6.1 Anrufe aufzeichnen . . . . . . . . . . . . . . . . . . . . . . . . . . . . . . . . . . . . . . . . . . . . . . . . . . . . . . . . . . . . . . . . . . . . . . . . . . . 56
6.2 Pod suchen (Paging) . . . . . . . . . . . . . . . . . . . . . . . . . . . . . . . . . . . . . . . . . . . . . . . . . . . . . . . . . . . . . . . . . . . . . . . . . 56
7. WERKSEINSTELLUNGEN . . . . . . . . . . . . . . . . . . . . . . . . . . . . . . . . . . . . . . . . . . . . . . . . . . . . . . . . . . . . . . . . . . . . . 57
8. VORGEHEN BEI STÖRUNGEN ... . . . . . . . . . . . . . . . . . . . . . . . . . . . . . . . . . . . . . . . . . . . . . . . . . . . . . . . . . . . . . . . 58
9. TECHNISCHE DATEN . . . . . . . . . . . . . . . . . . . . . . . . . . . . . . . . . . . . . . . . . . . . . . . . . . . . . . . . . . . . . . . . . . . . . . . . 59
10. GARANTIE / GEWÄHRLEISTUNG . . . . . . . . . . . . . . . . . . . . . . . . . . . . . . . . . . . . . . . . . . . . . . . . . . . . . . . . . . . . . . 60
11. SICHERHEIT . . . . . . . . . . . . . . . . . . . . . . . . . . . . . . . . . . . . . . . . . . . . . . . . . . . . . . . . . . . . . . . . . . . . . . . . . . . . . . . 61
12. UMWELTSCHUTZ . . . . . . . . . . . . . . . . . . . . . . . . . . . . . . . . . . . . . . . . . . . . . . . . . . . . . . . . . . . . . . . . . . . . . . . . . . . 61
13. KONFORMITÄTSERKLÄRUNG . . . . . . . . . . . . . . . . . . . . . . . . . . . . . . . . . . . . . . . . . . . . . . . . . . . . . . . . . . . . . . . . . 62
46
Versatis_Conference_de.qxd 31/03/2005 15:59 Page 46
Page 47

1. IHR AUDIOKONFERENZ-SYSTEM
1.1 DAS TELEFON VERSATIS CONFERENCE
Das Telefon VERSATIS Conference wurde dafür konzipiert, alle Ihre Telefonkommunikationserfordernisse abzudecken. Mit diesem
Gerät können Sie mit bestmöglicher Tonqualität sehr einfach Audiokonferenzen führen.
Die schnurlose Technologie DECT™* ermöglicht es Ihnen, Ihr Audiokonferenz-System in einem anderen Raum zu benutzen als in dem
Raum, in dem sich der Telefonanschluss befindet.
1.2 VORSICHTSMASSNAHMEN
Ihr Telefon VERSATIS Conference ist ein Gerät, das die Bedingungen der Norm DECT™* erfüllt. Es ist für den Ein- und Ausgang von
Anrufen konzipiert und für den Anschluss an das öffentliche Telefonnetz in Europa oder in einer privaten Nebenstellenanlage konzipiert
und hergestellt.
Das Telefon benötigt eine Stromversorgung, um funktionieren zu können.
Wie bei allen Funkverbindungen ist auch in diesem Fall die Qualität der Telefongespräche vom Standort der Basisstation, des Pod und
von ihrer Umgebung abhängig.
Das Telefon VERSATIS Conference ist vor großer Hitze (Heizkörper, direkte Sonneneinstrahlung usw.) sowie vor Erschütterungen und
Staub zu schützen. Achtung: Das Telefon darf nicht mit Wasser, anderen Flüssigkeiten oder Gasen in Kontakt kommen.
Zur Vermeidung von Störungen und um eine gute Empfangsqualität zu garantieren, müssen Sie vor allem auf einen ausreichenden
Abstand der Basisstation zu Fenstern, Metallmassen, Stahlbeton, Fernsehgeräten, Hi-Fi-Anlagen, Halogenlampen, Leuchtstoffröhren,
Alarmanlagen, Mikrowellengeräten, Cerankochfeldern, Computern, ADSL-Modems usw. achten.
Reinigen Sie Ihr Telefon mit einem leicht angefeuchteten Antistatiktuch.
1.3 VORSICHTSMASSNAHMEN BEZÜGLICH DES AKKUPACKS
* DECT ist ein eingetragenes Warenzeichen von ETSI.
!
Verwenden Sie nur aufladbare Akkupacks mit denselben technischen Daten wie die mit dem Gerät gelieferten Akkus.
Die Verwendung von Einwegbatterien oder nicht konformen Akkus kann zu einer Beschädigung des Geräts führen
(vgl. "Technische Daten").
Bei Nichteinhaltung dieser Empfehlung übernimmt der Hersteller keine Haftung.
Der Akkupack kann aufbrechen oder auslaufen, wenn er nicht richtig eingesetzt bzw. geöffnet oder zu starker Hitze
ausgesetzt wird.
Den Akkupack nicht in offenes Feuer werfen: Explosionsgefahr!
47
Versatis_Conference_de.qxd 31/03/2005 15:59 Page 47
Page 48

48
2. ERSTE VERWENDUNG
Basisstation Pod
l Die Basisstation und das Pod auf eine ebene, stabile Fläche stellen.
2.1 BASISSTATION INSTALLIEREN
2.1.1 Basisstation anschließen
l Schließen Sie das Netzkabel der Basisstation an die Buchse auf der Rückseite der Basisstation an.
l Schließen Sie den Netzadapter an eine Steckdose 230 V / 50 Hz an.
"
Die rote Stromversorgungsanzeige auf der Basisstation leuchtet.
l Schließen Sie ein Ende des Telefonkabels an die Buchse auf der Rückseite der Basisstation und das andere an die Wand-
Telefonsteckdose an.
2.1.2 Wandbefestigung (optional)
Um die Basisstation an der Wand zu befestigen, folgendermaßen vorgehen.
l Vergewissern Sie sich, dass die Basisstation nicht zu weit von einer Steckdose entfernt ist und achten Sie darauf, in der Wand
verlaufende Stromkabel nicht zu beschädigen.
l Bohren Sie drei Löcher (wie in der Schablone auf Seite 143 dieses Handbuchs angegeben).
l Führen Sie in die Bohrlöcher drei Schrauben ein (nicht im Lieferumfang enthalten). Lassen Sie die Schraubenköpfe ca. 3 mm aus
der Wand herausstehen.
l Hängen Sie die Bassistation an die Schraubenköpfe.
Versatis_Conference_de.qxd 31/03/2005 15:59 Page 48
Page 49

2.2 POD INSTALLIEREN
2.2.1 Akkus einlegen
l Öffnen Sie das Akkufach unter dem Pod.
l Legen Sie den Akkupack (7,2V 1800 mAh) in das Akkufach unter dem Pod ein, wobei Sie darauf achten müssen, den Stecker richtig
in die Buchse einzustecken.
l Schließen Sie das Akkufach wieder.
2.2.2 Das Pod an das Stromnetz anschließen
l Schließen Sie das Stromkabel des Pod an die Buchse auf der Rückseite des Pod an.
l Schließen Sie den Netzadapter an eine Steckdose 230 V / 50 Hz an.
Wir raten Ihnen, das Pod vor der ersten Verwendung 24 Stunden lang auf der Basisstation aufliegen zu lassen, um die Leistung und
die Lebensdauer der Akkus zu optimieren.
2.3 DAS POD LADEN
Wenn das Akkusymbol blinkt oder die Leuchtanzeigen am Pod rot sind und im Gespräch regelmäßig blinken, muss das Pod aufgeladen
werden.
l Um das Pod aufzuladen, den 230V-Netzadapter an das Pod anschließen. Der Akku ist aufgeladen, wenn das Akkusymbol nicht
mehr blinkt.
l Vergewissern Sie sich durch das Belegen der Leitung , dass das Pod an seiner Basisstation angemeldet ist.
"
Das Freizeichen bestätigt, dass das Pod funktioniert.
l Vergewissern Sie sich, dass das Symbol nicht blinkend angezeigt wird.
Wenn das Pod vollkommen entladen ist, kann es sein, dass sich das Display des Pod erst einige Minuten nach dem Anschließen des
Netzadapters einschaltet.
2.4 EMPFEHLUNGEN ZUR OPTIMIERUNG DER LEISTUNG DES AUDIOKONFERENZ-SYSTEMS
Schließen Sie das Audiokonferenz-System an einem ruhigen Ort an.
Entfernen Sie das Pod höchstens 50 m von seiner Basisstation.
Bewegen Sie das Pod während des Gesprächs nicht.
49
Versatis_Conference_de.qxd 31/03/2005 15:59 Page 49
Page 50

50
3. BASISFUNKTIONEN
3.1 ANRUF ENTGEGENNEHMEN
Wenn ein Anruf eingeht, blinken die grünen Leuchtanzeigen auf der Basisstation und am Pod. Das Symbol blinkt am Display und
der Rufton ertönt am Pod.
l Drücken Sie auf eine beliebige Taste (außer auf die Tasten und ), um den Anruf
entgegenzunehmen (die Tasten und dienen lediglich zur Erhöhung oder Verringerung der
Ruftonlautstärke).
Die Dauer des laufenden Gesprächs wird links am Display im Format MM-SS (Minuten und Sekunden)
angezeigt.
Der Zähler rechts am Display zeigt die Betriebsbereitschaft des Akkus vor dem Aufladen im Format
HH-MM (Stunden und Minuten) an.
3.2 ANRUF TÄTIGEN
3.2.1 Direktwahl
l Drücken Sie .
l Geben Sie die Rufnummer ein.
Hinweis: Die Gesamtzahl der Ziffern, aus der eine Telefonnummer bestehen kann, ist nicht begrenzt.
3.2.2 Rufnummer eingeben
Mit dieser Option haben Sie die Möglichkeit, die Rufnummer einzugeben und zu ändern, bevor Sie den Anruf tätigen.
l Wählen Sie die Nummer (max. 44 Ziffern).
l Drücken Sie , um die zuletzt eingegebene Ziffer zu löschen, oder führen Sie einen langen Tastendruck auf aus, um die
gesamte Rufnummer zu löschen.
l Drücken Sie , um die Verbindung herzustellen.
Hinweis: Um eine Pause einzufügen, in beiden Fällen einen langen Tastendruck auf ausüben. Das Symbol "P" wird angezeigt.
l Drücken Sie , um am Ende des Gesprächs aufzulegen.
3.2.3 Telefonbuch
Sie verfügen über ein Telefonbuch mit 10 Nummern, das Sie über Direktwahl oder im Modus "Rufnummer eingeben" benutzen können.
Informationen über die Speicherung der Telefonnummern und die Änderung der gespeicherten Nummern finden Sie im
Programmierabschnitt (vgl. Abschnitt 5.2 "Eine Nummer im Telefonbuch speichern").
l Drücken Sie .
l Drücken Sie eine Taste des Ziffernfeldes (von bis ), um den entsprechenden Telefonbucheintrag aufzurufen.
l Drücken Sie , um die Verbindung herzustellen.
Versatis_Conference_de.qxd 31/03/2005 15:59 Page 50
Page 51

3.3 DIE ZULETZT GEWÄHLTE NUMMER ERNEUT WÄHLEN (WAHLWIEDERHOLUNG)
Die Funktion "Redial" ermöglicht es, die zuletzt gewählte Nummer erneut zu wählen.
Direktwahl:
l Drücken Sie .
l Drücken Sie .
"
Die zuletzt gewählte Nummer wird automatisch erneut gewählt.
Rufnummer eingeben:
l Drücken Sie .
"
Die zuletzt gewählte Nummer wird angezeigt.
l Drücken Sie , um diese Nummer zu wählen.
3.4 KURZWAHLTASTEN
Die Kurzwahltasten ermöglichen es, vorprogrammierte Telefonnummern durch das Drücken einer einzigen Taste zu wählen.
Vergewissern Sie sich, dass Sie diese Tasten konfiguriert haben, bevor Sie sie benutzen.
Informationen über das Speichern und Ändern der Kurzwahlnummern finden Sie im Programmierabschnitt (vgl. Abschnitte 5.5 und 5.6).
3.4.1 Kurzwahltaste M1
l Drücken Sie im Bereitschaftszustand .
"
Die programmierte Nummer wird angezeigt und automatisch gewählt.
l Drücken Sie , um aufzulegen.
3.4.2 Kurzwahltaste M2
l Führen Sie im Bereitschaftszustand einen langen Tastendruck auf aus.
"
Die programmierte Nummer wird angezeigt und automatisch gewählt.
l Drücken Sie , um aufzulegen.
51
Versatis_Conference_de.qxd 31/03/2005 15:59 Page 51
Page 52

4. WÄHREND DES GESPRÄCHS ZUGÄNGLICHE FUNKTIONEN
4.1 LAUTSTÄRKE DES LAUTSPRECHERS EINSTELLEN
Für den Lautsprecher stehen 16 Lautstärkestufen zur Verfügung.
l Drücken Sie bzw. , um die Lautstärke des Lautsprechers während eines Gesprächs
einzustellen.
4.2 STUMMSCHALTEN
Wenn das Stummschalten aktiviert ist, ist das Mikrofon des Pod ausgeschaltet.
l Drücken Sie , um das Stummschalten zu aktivieren oder zu deaktivieren.
Wenn das Stummschalten während eines Anrufs aktiviert ist, leuchtet das Symbol ; die Leuchtanzeigen am Pod werden rot und
blinken langsam.
4.3 TASTE R
Während eines Gesprächs kann eine Rückfrage (Flash) gesandt werden.
l Drücken Sie , um auf die vom Netzbetreiber oder von der privaten Nebenstellenanlage angebotenen Zusatzdienste
zuzugreifen.
Informationen über die Änderung der Flashzeit finden Sie im Abschnitt 5.3. "Taste R programmieren (Flashzeit)".
4.4 TELEFONNUMMER DES POD ANZEIGEN
Die Telefonnummer des Pod kann während eines Gesprächs angezeigt werden. Vergewissern Sie sich zuvor, dass Sie diese Funktion
konfiguriert haben (vgl. Abschnitt 5.4 "Telefonnummer des VERSATIS Conference programmieren").
l Drücken Sie während des Gesprächs .
"
Die Telefonnummer wird angezeigt (wenn sie zuvor einprogrammiert wurde).
"
Das Display kehrt nach 10 Sekunden zum vorherigen Bildschirm zurück.
oder
l Drücken Sie , um die Nummer vom Display zu löschen und zum Bildschirm mit der Gesprächsdauer zurückzukehren.
52
Versatis_Conference_de.qxd 31/03/2005 15:59 Page 52
Page 53

5. PERSÖNLICHE GESTALTUNG
5.1 RUFTON EINSTELLEN
5.1.1 Ruftonlautstärke
l Drücken Sie oder , um die Ruftonlautstärke einzustellen, während das Telefon klingelt..
5.1.2 Ruftonmelodie
l Im Bereitschaftszustand einen langen Tastendruck auf ausführen.
"
Sie gehen in den Modus "Persönliche Gestaltung" über.
"
Das Symbol erscheint.
l Drücken Sie , um die Einstellung der Melodie auszuwählen, und bestätigen Sie mit .
"
Die Nummer der Melodie wird angezeigt.
l Drücken Sie eine Taste von bis , um die entsprechende Ruftonmelodie auszuwählen, und bestätigen Sie mit .
l Drücken Sie , um die Einstellung zu verlassen.
5.2 EINE NUMMER IM TELEFONBUCH SPEICHERN
Im Telefonbuch können bis zu 10 Nummern gespeichert werden. Die gespeicherten Nummern können max. 44 Ziffern lang sein. Wenn
in einen der zehn Telefonbucheinträge eine neue Nummer eingegeben wird, wird die zuvor in diesem Eintrag gespeicherte Nummer
automatisch überschrieben.
l Im Bereitschaftszustand die zu speichernde Nummer eingeben (max. 44 Ziffern).
l Führen Sie einen langen Tastendruck auf aus.
"
Sie gehen in den Modus "Persönliche Gestaltung des Telefonbuchs" über.
"
Die Symbole und werden angezeigt.
l Drücken Sie eine Taste des Ziffernblocks (von bis ), um der im Telefonbuch gespeicherten Telefonnummer eine Ziffer
(Telefonbucheintrag) zuzuweisen.
l Drücken Sie erneut , um den Eintrag zu bestätigen.
"
Es ertönt ein Bestätigungssignal.
"
Das Display kehrt in den Bereitschaftszustand zurück.
Hinweis: − Sie können jederzeit drücken, um die Eingabe in das Telefonbuch abzubrechen und in den Bereitschaftszustand
zurückzukehren.
− Führen Sie einen langen Tastendruck auf aus, um in die Nummernwahl eine Pause einzufügen.
53
Versatis_Conference_de.qxd 31/03/2005 16:00 Page 53
Page 54

5.3 TASTE R PROGRAMMIEREN (FLASHZEIT)
Um auf die vom Netzbetreiber oder der privaten Nebenstellenanlage angebotenen Zusatzdienste zuzugreifen, müssen Sie die
Flashzeit Ihres Telefons VERSATIS Conference einstellen.
Die verfügbaren Werte sind 100 ms, 270 ms, 500 ms und 800 ms.
l Führen Sie im Bereitschaftszustand einen langen Tastendruck auf .
"
Sie gehen in den Modus "Persönliche Gestaltung des Telefonbuchs" über.
"
Das Symbol erscheint.
l Drücken Sie , um die Programmierung der Flashzeit auszuwählen.
"
Die aktuelle Flashzeit wird angezeigt.
l Drücken Sie erneut , um die Programmierung der Flashzeit auszuwählen.
"
Die aktuelle Flashzeit fängt an zu blinken.
l Drücken Sie auf die Taste, die der gewünschten Flashzeit entspricht (von bis ):
l Drücken Sie erneut auf , um die Auswahl zu bestätigen.
l Drücken Sie , um die Einstellung zu verlassen.
5.4 TELEFONNUMMER DES VERSATIS CONFERENCE PROGRAMMIEREN
Da das Telefon VERSATIS Conference für die Benutzung durch verschiedene Personen konzipiert ist, kann es hilfreich sein, den
Benutzern die Telefonnummer des VERSATIS Conference anzuzeigen.
l Führen Sie im Bereitschaftszustand einen langen Tastendruck auf aus.
"
Sie gehen in den Modus "Persönliche Gestaltung" über.
l Drücken Sie , um die Programmierung der Telefonnummer des VERSATIS Conference auszuwählen.
"
Die aktuelle Nummer wird angezeigt (wenn sie programmiert wurde); anderenfalls bleibt das Display leer.
l Drücken Sie erneut , um die Auswahl der Programmierung der Telefonnummer zu bestätigen.
"
Die aktuelle Nummer blinkt.
Taste Flashzeit (ms)
100 (Standardwert)
270
500
800
54
Versatis_Conference_de.qxd 31/03/2005 16:00 Page 54
Page 55

l Drücken Sie , um die Ziffern der aktuellen Nummer einzeln zu löschen, oder führen Sie einen langen Tastendruck auf
aus, um die gesamte Nummer zu löschen.
l Drücken Sie erneut , um die Änderung zu bestätigen.
l Drücken Sie , um die Einstellung zu verlassen.
5.5 KURZWAHLTASTE M1 PROGRAMMIEREN
l Führen Sie im Bereitschaftszustand einen langen Tastendruck auf aus.
"
Das Symbol erscheint.
l Drücken Sie , um die Programmierung der Kurzwahltaste M1 auszuwählen.
"
Am Display wird die aktuelle Nummer angezeigt (wenn eine Nummer programmiert wurde); anderenfalls bleibt das Display leer.
l Drücken Sie erneut , um die Auswahl der Programmierung der Kurzwahltaste M1 zu bestätigen.
"
Die aktuelle Nummer blinkt.
l Drücken Sie , um die Ziffern der aktuellen Nummer einzeln zu löschen, oder führen Sie einen langen Tastendruck auf
aus, um die gesamte Nummer zu löschen.
l Geben Sie die neue Telefonnummer ein.
l Drücken Sie , um die Änderung zu bestätigen.
l Drücken Sie , um die Einstellung zu verlassen.
5.6 KURZWAHLTASTE M2 PROGRAMMIEREN
l Führen Sie im Bereitschaftszustand einen langen Tastendruck auf aus.
"
Das Symbol erscheint.
l Drücken Sie , um die Programmierung der Kurzwahltaste M2 auszuwählen.
"
Am Display wird die aktuelle Nummer angezeigt (wenn eine Nummer programmiert wurde); anderenfalls bleibt das Display leer.
l Drücken Sie erneut , um die Auswahl der Programmierung der Kurzwahltaste M2 zu bestätigen.
"
Die aktuelle Nummer blinkt.
l Drücken Sie , um die Ziffern der aktuellen Nummer einzeln zu löschen, oder führen Sie einen langen Tastendruck auf
aus, um die gesamte Nummer zu löschen.
l Geben Sie die neue Telefonnummer ein.
l Drücken Sie , um die Änderung zu bestätigen.
l Drücken Sie , um die Einstellung zu verlassen.
55
Versatis_Conference_de.qxd 31/03/2005 16:00 Page 55
Page 56

5.7 TELEFON AUF WERKSEINSTELLUNGEN ZURÜCKSETZEN
l Führen Sie im Bereitschaftszustand einen langen Tastendruck auf aus.
"
Das Symbol erscheint.
l Führen Sie einen langen Tastendruck auf aus, um zu den Werkseinstellungen zurückzukehren.
"
Am Display wird angezeigt: .
l Drücken Sie erneut , um die Rückkehr zu den Werkseinstellungen zu bestätigen.
l Drücken Sie , um die Einstellung zu verlassen.
!
Achtung: Dieser Vorgang löscht alle Einträge im Telefonbuch, die Nummer des zuletzt erhaltenen Anrufs und die
Kurzwahlnummern.
Die Werte aller Werkseinstellungen erfahren Sie in Abschnitt 7 "Werkseinstellungen".
6. ZUSATZFUNKTIONEN
6.1 ANRUFE AUFZEICHNEN
Um die Anrufe aufzuzeichnen, an die an der Seite der Basisstation befindliche 2,5 mm Jack-Aufzeichnungsbuchse ein externes
Aufnahmegerät anschließen.
6.2 POD SUCHEN (PAGING)
Sie wissen nicht, wo Sie Ihr Pod abgelegt haben?
l Drücken Sie die Suchtaste an der Basisstation des Telefons, um das Pod zu suchen.
"
Das Pod klingelt 30 Sekunden lang.
l Drücken Sie auf eine beliebige Taste des Pod, um den Klingelton zu stoppen.
56
Versatis_Conference_de.qxd 31/03/2005 16:00 Page 56
Page 57

7. WERKSEINSTELLUNGEN
Funktion Standardeinstellungen
Lautsprecherlautstärke Stufe 5
Ruftonlautstärke Stufe 5
Ruftonmelodie Melodie 1
Flashzeit 100 ms
Wahlwiederholung Leer
Telefonbuch Leer
Telefonnummer des Pod Leer
Kurzwahltaste M1 Leer
Kurzwahltaste M2 Leer
57
Versatis_Conference_de.qxd 31/03/2005 16:00 Page 57
Page 58

8. VORGEHEN BEI STÖRUNGEN ...
Im Fall einer Störung sollten Sie zunächst die Akkus aus dem Pod herausnehmen und die Basisstation vom Netz trennen. Warten Sie
ca. 1 Minute, bevor Sie die Basisstation wieder anschließen und die Akkus wieder in das Pod einlegen.
Sollte das Problem weiterhin auftreten, können Sie unsere Hotline unter folgender Nummer erreichen: 069-95307575. Montags bis
samstags von 8 bis 19 Uhr (entsprechend geltenden Tarifen gebührenpflichtig).
Die Verkaufsstelle, in der Sie Ihr Telefon erworben haben, kann Sie ebenfalls informieren und den Kundendienst übernehmen.
Störung Ursache Lösung
Das Pod ist nicht mit Energie versorgt. Überprüfen Sie, ob die Akkus richtig
eingelegt sind.
Das Display leuchtet nicht.
Die Akkus sind leer. Schließen Sie den Netzadapter des Pod
am Pod an, um die Akkus aufzuladen.
Das Pod ist zu weit von seiner
Basisstation entfernt.
Nähern Sie das Pod der Basisstation an.
Die Akkus sind leer. Schließen Sie den Netzadapter des Pod
am Pod an, um die Akkus aufzuladen.
Sie hören kein Freizeichen.
Das Gerät ist nicht an das Telefonnetz
angeschlossen.
Überprüfen Sie den Anschluss der
Telefonleitung.
Das Pod befindet sich außerhalb der
Reichweite der Basisstation oder in einer
Umgebung mit Störquellen.
Nähern Sie das Pod der Basisstation an.
Die Empfangsqualität ist schlecht oder
verschlechtert sich während des
Gesprächs.
Sie haben ADSL. Schließen Sie zwischen dem
Telefonanschluss und der TelefonWandsteckdose einen zugelassenen
ADSL-Filter an.
Ihr Gesprächspartner hört Sie nicht. Das Mikrofon ist abgeschaltet, die
Stummschaltung wurde aktiviert.
Siehe Abschnitt 4.2 "Stummschalten“.
Das Telefon klingelt nicht. Der Rufton wurde ausgeschaltet. Siehe Abschnitt 5.1.1 "Ruftonlautstärke".
Der Netzadapter des Pod ist nicht
angeschlossen.
Überprüfen Sie den Anschluss des
Netzkabels an das Stromnetz 230 V /
50 Hz.
Die Akkus sind nach mehreren Stunden
Ladezeit nicht aufgeladen.
Die Akkus des Pod sind defekt. Kaufen Sie bei Ihrem Händler neue
Akkus.
58
Versatis_Conference_de.qxd 31/03/2005 16:00 Page 58
Page 59

9. TECHNISCHE DATEN
* Je nach Umgebungsbedingungen.
** Unverbindliche Angaben, je nach Ladezustand der Akkus.
Reichweite im Freien Bis 300 m *
Reichweite in Gebäuden Bis 50 m *
6 Stunden im Gespräch **Betriebsbereitschaft des Pod
(Durchschnittswerte)
80 Stunden im Bereitschaftszustand **
Gewicht des Pod 2,1 kg mit den Akkus
Gewicht der Basisstation 162 g
Netzanschluss/Netzadapter Eingang Basisstation: AC 230V/50 Hz
Ausgang Basisstation: DC 7 V/400 mA
Eingang Pod: AC 230V/50 Hz
Ausgang Pod: DC 12 V/1500 mA
Einphasiger Wechselstrom, außer bei IT-Installationen gemäß der Norm
EN60950.
Achtung: Die Netzspannung wird nach den Kriterien dieser Norm als gefährlich
eingestuft.
Telefonanschluss Apparat, der an eine analoge Telefonleitung TRT3 (Spannung des
Telekommunikationsnetzes) gemäß der Norm EN 60950 angeschlossen wird.
Aufladbare Akkus des Pod 1,2 V / 1800 mAh/Ni-MH AA x 6
Betriebstemperatur von + 5 bis + 40° C
59
Versatis_Conference_de.qxd 31/03/2005 16:00 Page 59
Page 60

10. GARANTIE / GEWÄHRLEISTUNG
Wir erinnern daran, dass Ihr Telefon VERSATIS Conference nach den europäischen Bestimmungen zugelassen ist, was durch die CEKennzeichnung bescheinigt wird .
Es gilt die gesetzliche Gewährleistung. Informationen erhalten Sie bei Ihrer Verkaufsstelle.
Neben der gesetzlichen Gewährleistung bietet der Händler für die Dauer von zwölf (12) Monaten ab Übergabe der Ware (Datum auf
dem Verkaufsnachweis) eine Herstellergarantie für die Übereinstimmung der Produkte mit ihren technischen Spezifikationen. Sie
müssen also den Verkaufsbeleg (Quittung) mit dem Namen der Verkaufsstelle sorgfältig aufbewahren. Sollte die gesetzliche Garantie
in Ihrem Land zwölf (12) Monate überschreiten, gilt nur die gesetzliche Garantie. Ein nicht konformes Teil oder Produkt wird kostenlos
repariert oder durch ein konformes Teil oder Produkt ersetzt bzw. durch ein Teil oder Produkt, das dem gekauften im Hinblick auf
Funktion oder Leistungsfähigkeit entspricht. Wenn die Reparatur oder der Ersatz nicht möglich sind, wird der Kaufpreis zurückerstattet.
Für das ersetzte Produkt oder Teil, das entweder neu oder aufgearbeitet sein kann, wird entweder für einen Zeitraum von 3 Monaten
ab dem Reparatur/Austauschdatum oder bis zum Ende des verbleibenden Garantiezeitraums, wenn dieser länger als 3 Monate ist, die
Gewährleistung übernommen. Jedes zurückgegebene oder ersetzte Teil oder Produkt wird Eigentum des Herstellers.
In folgenden Fällen ist die vorliegende Garantie/Gewährleistung jedoch ausgeschlossen:
− Installation oder Verwendung, die den Anweisungen des vorliegenden Benutzerhandbuchs nicht entspricht;
− Fehlerhafter Anschluss oder abnormale Verwendung des Produkts, insbesondere mit Zubehör, das nicht für die Verwendung mit dem
Produkt geeignet ist;
− Abnormale Abnutzung;
− Nichteinhaltung der im geografischen Benutzungsgebiet geltenden technischen Normen und Sicherheitsvorschriften;
− Produkte, die heruntergefallen sind oder Stößen ausgesetzt wurden;
− Schäden durch Blitzschlag, Überspannungen, eine Wärmequelle oder dessen Ausstrahlungen, Wasserschäden, zu hohe
Feuchtigkeit und jede andere produktexterne Ursache;
− Falsche Wartung, Nachlässigkeit;
− Eingriffe, Änderungen oder Reparaturen am Gerät, die von einer Person ausgeführt wurden, welche vom Hersteller oder der
Verkaufsstelle nicht dazu berechtigt ist.
VORBEHALTLICH DER GESETZLICHEN BESTIMMUNGEN GELTEN KEINE ANDEREN ALS DIE HIER GENANNTEN
GARANTIE/GEWÄHRLEISTUNGSBEDINGUNGEN.
60
Versatis_Conference_de.qxd 31/03/2005 16:00 Page 60
Page 61

11. SICHERHEIT
Bei Gefahr dient das Netzteil zur Trennung von der Stromversorgung 230 V. Das Netzteil muss aus Sicherheitsgründen in der Nähe
des Gerätes eingesteckt sein und leicht zugänglich sein.
Um das Gerät vom Netz zu trennen, den Netzadapter aus der Steckdose 230 V AC / 50 Hz herausziehen.
Ein beschädigtes Netzteil muss durch ein identisches Modell ersetzt werden.
Ohne Netzteil oder bei Stromausfall sind Geräte, die schnurlose Mobilteile verwenden, nicht funktionsfähig.
Sie können in diesem Fall keine Notrufe tätigen oder empfangen.
Aus diesem Grund wird empfohlen, zusätzlich einen herkömmlichen Telefonapparat zu verwenden, für den kein Netzanschluss
erforderlich ist.
!
Das Gerät nicht in der Nähe eines undichten Gasrohrs in Betrieb nehmen.
Es wird geraten, das Gerät bei Gewitter nicht zu benutzen.
12. UMWELTSCHUTZ
Die Akkus müssen nach den gesetzlichen Umweltbestimmungen entsorgt werden. Als Verbraucher sind Sie gesetzlich dazu
verpflichtet, gebrauchte Akkus zurückzugeben. Sie können Ihre alten Akkus an Ihre Verkaufsstelle zurückgeben oder bei den
öffentlichen Sammelstellen in Ihrer Gemeinde abgeben.
Öffnen Sie keine Batterien, die chemische Stoffe enthalten. Bei auslaufenden Batterien unbedingt den Kontakt mit Haut,
Augen und Mund vermeiden. Bei versehentlichem Kontakt die Stelle mehrere Minuten lang unter fließendes Wasser halten.
Reinigen Sie das Gerät mit einem Küchentuch oder einem trockenen Tuch und wenden Sie sich für das Auswechseln der
Batterien an Ihre Verkaufsstelle.
Die endgültige Entsorgung des VERSATIS Conference muss in Übereinstimmung mit den geltenden Vorschriften erfolgen.
61
Versatis_Conference_de.qxd 31/03/2005 16:00 Page 61
Page 62

13. KONFORMITÄTSERKLÄRUNG
Wir, Thomson Telecom, erklären hiermit, dass das Produkt VERSATIS Conference mit den wesentlichen Anforderungen und anderen
einschlägigen Bestimmungen der Richtlinie 1999/5/CE übereinstimmt.
62
Versatis_Conference_de.qxd 31/03/2005 16:00 Page 62
Page 63

63
El embalaje contiene los elementos siguientes:
− la base
− el teléfono
− el adaptador de red eléctrica 230 V a conectar en la base
− el adaptador de red eléctrica 230 V a conectar en el teléfono
− el pack de baterías
− el enchufe de conversión para conectar a la red de telecomunicaciones francesa
− el cable de conexión telefónica
− el manual del usuario.
Para conocer lo esencial del teléfono VERSATIS Conference, le sugerimos que lea cuidadosamente esta guía.
Español
Versatis_Conference_sp.qxd 31/03/2005 16:06 Page 63
Page 64

64
- Agenda
- Acceso a la agenda
Tecla de acceso
directo M1
- Borrar una cifra
- Salir del modo programación, agenda o volver
a marcar
- Eliminar el conjunto del número
(pulsación larga)
- Regresar al modo espera (pulsación larga)
Tecla de acceso
directo M2
(pulsación larga)
Acceso a los servicios del
operador o de la centralita
telefónica privada
- Acceso al último número
marcado
- Acceso al modo
programación
(pulsación larga)
Aumentar o disminuir el
volumen del timbre y del
altavoz
Descolgar/Colgar
Activar/Desactivar el
micrófono durante una
llamada
(función Secreto)
Activar/Desactivar el timbre
(pulsación larga)
Insertar una pausa
(pulsación larga)
Teclas del teléfono
Versatis_Conference_sp.qxd 31/03/2005 16:06 Page 64
Page 65

65
Pantalla del teléfono
El teléfono VERSATIS Conference posee una pantalla de dos líneas:
− 1 línea de iconos
− 1 línea de 18 caracteres
Nivel de carga de la
batería:
- parpadea cuando se debe
recargar la batería
- parpadea durante la carga
Llamada en curso
Secreto (micrófono desactivado)
Timbre desactivado
Agenda
Calidad de recepción
Programación
Desfile
Indicador de autonomía de
la batería
Tiempo de
comunicación
Indicadores luminosos:
(Verde) In Use Parpadea en caso de recepción de una llamante entrante
y permanece encendido cuando el teléfono está en curso
de comunicación
(Rojo) Power Permanece encendido permanentemente cuando la base
está conectada a su alimentador eléctrico.
Page:
l Pulsar "PAGE" para localizar el aparato (en caso de olvidar el lugar donde se
encuentra)
Enchufe Jack 2,5 mm de registro (en el costado, a la izquierda en el esquema)
La base
Versatis_Conference_sp.qxd 31/03/2005 16:07 Page 65
Page 66

TECLAS DEL TELÉFONO . . . . . . . . . . . . . . . . . . . . . . . . . . . . . . . . . . . . . . . . . . . . . . . . . . . . . . . . . . . . . . . . . . . . . . . . . . 64
LA BASE . . . . . . . . . . . . . . . . . . . . . . . . . . . . . . . . . . . . . . . . . . . . . . . . . . . . . . . . . . . . . . . . . . . . . . . . . . . . . . . . . . . . . . . 65
PANTALLA DEL TELÉFONO . . . . . . . . . . . . . . . . . . . . . . . . . . . . . . . . . . . . . . . . . . . . . . . . . . . . . . . . . . . . . . . . . . . . . . . 65
1. SU TELÉFONO DE AUDIOCONFERENCIA . . . . . . . . . . . . . . . . . . . . . . . . . . . . . . . . . . . . . . . . . . . . . . . . . . . . . . . . 67
1.1 VERSATIS Conference . . . . . . . . . . . . . . . . . . . . . . . . . . . . . . . . . . . . . . . . . . . . . . . . . . . . . . . . . . . . . . . . . . . . . . . . 67
1.2 Precauciones de uso . . . . . . . . . . . . . . . . . . . . . . . . . . . . . . . . . . . . . . . . . . . . . . . . . . . . . . . . . . . . . . . . . . . . . . . . . 67
1.3 Precauciones relativas al pack de baterías . . . . . . . . . . . . . . . . . . . . . . . . . . . . . . . . . . . . . . . . . . . . . . . . . . . . . . . . . 67
2. INSTALACIÓN . . . . . . . . . . . . . . . . . . . . . . . . . . . . . . . . . . . . . . . . . . . . . . . . . . . . . . . . . . . . . . . . . . . . . . . . . . . . . . 68
2.1 Instalar la base . . . . . . . . . . . . . . . . . . . . . . . . . . . . . . . . . . . . . . . . . . . . . . . . . . . . . . . . . . . . . . . . . . . . . . . . . . . . . . 68
2.2 Instalar el teléfono . . . . . . . . . . . . . . . . . . . . . . . . . . . . . . . . . . . . . . . . . . . . . . . . . . . . . . . . . . . . . . . . . . . . . . . . . . . 69
2.3 Cargar el teléfono . . . . . . . . . . . . . . . . . . . . . . . . . . . . . . . . . . . . . . . . . . . . . . . . . . . . . . . . . . . . . . . . . . . . . . . . . . . . 69
2.4 Recomendaciones a seguir para obtener mejores prestaciones técnicas . . . . . . . . . . . . . . . . . . . . . . . . . . . . . . . . . . . 69
3. FUNCIONES DE BASE . . . . . . . . . . . . . . . . . . . . . . . . . . . . . . . . . . . . . . . . . . . . . . . . . . . . . . . . . . . . . . . . . . . . . . . 70
3.1 Recibir una llamada . . . . . . . . . . . . . . . . . . . . . . . . . . . . . . . . . . . . . . . . . . . . . . . . . . . . . . . . . . . . . . . . . . . . . . . . . . 70
3.2 Llamar . . . . . . . . . . . . . . . . . . . . . . . . . . . . . . . . . . . . . . . . . . . . . . . . . . . . . . . . . . . . . . . . . . . . . . . . . . . . . . . . . . . . 70
3.3 Rellamar el último número marcado (repetición) . . . . . . . . . . . . . . . . . . . . . . . . . . . . . . . . . . . . . . . . . . . . . . . . . . . . . 71
3.4 Teclas de acceso directo . . . . . . . . . . . . . . . . . . . . . . . . . . . . . . . . . . . . . . . . . . . . . . . . . . . . . . . . . . . . . . . . . . . . . . 71
4. FUNCIONES ACCESIBLES DURANTE LAS LLAMADAS . . . . . . . . . . . . . . . . . . . . . . . . . . . . . . . . . . . . . . . . . . . . . 72
4.1 Ajustar el volumen del altavoz . . . . . . . . . . . . . . . . . . . . . . . . . . . . . . . . . . . . . . . . . . . . . . . . . . . . . . . . . . . . . . . . . . 72
4.2 Función secreto . . . . . . . . . . . . . . . . . . . . . . . . . . . . . . . . . . . . . . . . . . . . . . . . . . . . . . . . . . . . . . . . . . . . . . . . . . . . . 72
4.3 Tecla R . . . . . . . . . . . . . . . . . . . . . . . . . . . . . . . . . . . . . . . . . . . . . . . . . . . . . . . . . . . . . . . . . . . . . . . . . . . . . . . . . . . . 72
4.4 Visualizar el número del teléfono . . . . . . . . . . . . . . . . . . . . . . . . . . . . . . . . . . . . . . . . . . . . . . . . . . . . . . . . . . . . . . . . 72
5. PROGRAMACIÓN . . . . . . . . . . . . . . . . . . . . . . . . . . . . . . . . . . . . . . . . . . . . . . . . . . . . . . . . . . . . . . . . . . . . . . . . . . . 73
5.1 Programar el timbre . . . . . . . . . . . . . . . . . . . . . . . . . . . . . . . . . . . . . . . . . . . . . . . . . . . . . . . . . . . . . . . . . . . . . . . . . . 73
5.2 Programar un número en la agenda . . . . . . . . . . . . . . . . . . . . . . . . . . . . . . . . . . . . . . . . . . . . . . . . . . . . . . . . . . . . . . 73
5.3 Programar la tecla R (corte calibrado / flashing) . . . . . . . . . . . . . . . . . . . . . . . . . . . . . . . . . . . . . . . . . . . . . . . . . . . . . 74
5.4 Programar el número de teléfono del VERSATIS Conference . . . . . . . . . . . . . . . . . . . . . . . . . . . . . . . . . . . . . . . . . . . 74
5.5 Programar la tecla de acceso directo M1 . . . . . . . . . . . . . . . . . . . . . . . . . . . . . . . . . . . . . . . . . . . . . . . . . . . . . . . . . . 75
5.6 Programar la tecla de acceso directo M2 . . . . . . . . . . . . . . . . . . . . . . . . . . . . . . . . . . . . . . . . . . . . . . . . . . . . . . . . . . 75
5.7 Restaurar los parámetros por defecto . . . . . . . . . . . . . . . . . . . . . . . . . . . . . . . . . . . . . . . . . . . . . . . . . . . . . . . . . . . . . 76
6. FUNCIONES EXTRAS . . . . . . . . . . . . . . . . . . . . . . . . . . . . . . . . . . . . . . . . . . . . . . . . . . . . . . . . . . . . . . . . . . . . . . . . 76
6.1 Guardar las llamadas . . . . . . . . . . . . . . . . . . . . . . . . . . . . . . . . . . . . . . . . . . . . . . . . . . . . . . . . . . . . . . . . . . . . . . . . . 76
6.2 Localizar el teléfono (función búsqueda del teléfono) . . . . . . . . . . . . . . . . . . . . . . . . . . . . . . . . . . . . . . . . . . . . . . . . . 76
7. VALORES POR DEFECTO . . . . . . . . . . . . . . . . . . . . . . . . . . . . . . . . . . . . . . . . . . . . . . . . . . . . . . . . . . . . . . . . . . . . 77
8. EN CASO DE INCIDENTES… . . . . . . . . . . . . . . . . . . . . . . . . . . . . . . . . . . . . . . . . . . . . . . . . . . . . . . . . . . . . . . . . . . 78
9. CARACTERÍSTICAS TÉCNICAS . . . . . . . . . . . . . . . . . . . . . . . . . . . . . . . . . . . . . . . . . . . . . . . . . . . . . . . . . . . . . . . . 79
10. GARANTÍA . . . . . . . . . . . . . . . . . . . . . . . . . . . . . . . . . . . . . . . . . . . . . . . . . . . . . . . . . . . . . . . . . . . . . . . . . . . . . . . . 80
11. SEGURIDAD . . . . . . . . . . . . . . . . . . . . . . . . . . . . . . . . . . . . . . . . . . . . . . . . . . . . . . . . . . . . . . . . . . . . . . . . . . . . . . . 81
12. MEDIO AMBIENTE . . . . . . . . . . . . . . . . . . . . . . . . . . . . . . . . . . . . . . . . . . . . . . . . . . . . . . . . . . . . . . . . . . . . . . . . . . 81
13. DECLARACIÓN DE CONFORMIDAD . . . . . . . . . . . . . . . . . . . . . . . . . . . . . . . . . . . . . . . . . . . . . . . . . . . . . . . . . . . . 82
66
Versatis_Conference_sp.qxd 31/03/2005 16:07 Page 66
Page 67

1. SU TELÉFONO DE AUDIOCONFERENCIA
1.1 VERSATIS CONFERENCE
El teléfono VERSATIS Conference ha sido diseñado para responder a todas sus exigencias en materia de comunicación telefónica,
le permite llevar a cabo reuniones con una gran facilidad de utilización beneficiando de la mejor calidad sonora posible.
La tecnología inalámbrica DECT™* ofrece la posibilidad de utilizar su sistema de conferencia en una pieza diferente de su acceso
telefónico.
1.2 PRECAUCIONES DE USO
El VERSATIS Conference es un equipo homologado conforme a la norma DECT™*, destinado a recibir y a emitir comunicaciones
telefónicas. Ha sido diseñado y fabricado para conectarse a la red de telecomunicaciones pública europea o detrás de una centralita
telefónica privada.
Este teléfono necesita una alimentación eléctrica para funcionar.
Al igual que para cualquier enlace radio, la calidad de sus comunicaciones depende de la posición de la base, del teléfono y de su
entorno.
El teléfono VERSATIS Conference debe mantenerse alejado de fuentes de calor excesivo (radiadores, luz solar, etc.) y protegido
contra vibraciones y polvo. Cuidado, no deje nunca que su teléfono entre en contacto con el agua u otros líquidos o con aerosoles.
Para reducir el riesgo de interferencia y optimizar la calidad de la recepción, evite instalar la base a proximidad de: ventanas, grandes
objetos metálicos, superficies de hormigón armado, televisiones, cadenas de sonido, reproductores de video y DVD, lámparas
halógenas, tubos fluorescentes, centrales de alarma, hornos microondas, placas eléctricas halógenas, ordenadores, módem ADSL,
etc.
Para limpiar su teléfono, use un paño antiestático ligeramente humedecido.
1.3 PRECAUCIONES RELATIVAS AL PACK DE BATERÍAS
* DECT es una marca registrada por ETSI.
¡ Utilizar únicamente un pack de baterías recargables de características similares al suministrado con el producto.
El uso de baterías no recargables o no conformes a los modelos recomendados puede averiar el producto (remitirse al capítulo "Características técnicas").
No respetar estas recomendaciones invalida la garantía del fabricante.
El pack de baterías puede dañarse si están mal insertadas, abiertas o expuestas al calor.
No tirar las baterías al fuego: se corre el riesgo de una explosión.
!
67
Versatis_Conference_sp.qxd 31/03/2005 16:07 Page 67
Page 68

68
2. INSTALACIÓN
Base Teléfono
l Instalar la base y el teléfono en una superficie plana y estable.
2.1 INSTALAR LA BASE
2.1.1 Conectar la base
l Conectar el cable de red eléctrica de la base a la toma situada en la parte posterior de la base.
l Conectar el adaptador de tensión a una toma eléctrica 230 V / 50 Hz.
"
Se enciende el indicador luminoso rojo de alimentación de la base.
l Conectar uno de los extremos del cable telefónico a la toma situada en la parte posterior de la base y el otro extremo a la
toma telefónica.
2.1.2 Fijación mural (facultativo)
Para fijar la base a la pared, seguir las instrucciones siguientes.
l Verificar que la base no esté demasiado alejada de una toma eléctrica y tratar de no dañar los cables eléctricos disimulados en la
pared.
l Perforar tres orificios tal y como se indica en el modelo que figura en la página 143 de este manual.
l Insertar tres tornillos (no suministrados) en los orificios de perforación. Dejar que las cabezas de tornillos rebasen
aproximadamente 3 mm.
l Cuelgue la base en las cabezas de tornillos.
Versatis_Conference_sp.qxd 31/03/2005 16:07 Page 68
Page 69

2.2 INSTALAR EL TELÉFONO
2.2.1 Insertar el pack de baterías
l Primero abrir el alojamiento para baterías situado debajo del teléfono.
l Colocar el pack de baterías (7,2V 1800 mAh) en el alojamiento situado debajo del teléfono verificando que el enchufe y el conector
estén correctamente alineados.
l Volver a poner en su lugar el alojamiento para baterías.
2.2.2 Conectar el teléfono a la red eléctrica
l Conectar el cable de alimentación del teléfono en la toma situada en la parte posterior del teléfono.
l Conectar el adaptador de tensión a una toma eléctrica 230 V / 50 Hz.
Antes de la primera utilización de su aparato, le aconsejamos dejar el teléfono cargándose durante 24 horas para optimizar las
cualidades técnicas y la duración de vida del pack de baterías.
2.3 CARGAR EL TELÉFONO
Si el icono de la batería parpadea o si los indicadores luminosos en el teléfono están rojos y parpadean regularmente durante la
llamada, entonces el teléfono debe volverse a cargar.
l Para volver a cargar el teléfono, conectar al teléfono el adaptador de red eléctrica 230 V. La batería está cargada cuando el icono
de batería deja de parpadear.
l Para verificar la asociación del teléfono a la base, tomar la línea .
"
El tono confirma que el teléfono funciona.
l Verificar que el símbolo se visualiza sin parpadear.
Cuando el teléfono está completamente descargado, pueda ser que la pantalla se encienda solamente tras algunos minutos, una vez
que se haya conectado el adaptador de red eléctrica.
2.4 RECOMENDACIONES A SEGUIR PARA OBTENER MEJORES PRESTACIONES TÉCNICAS
Instalar el teléfono de audioconferencia en un lugar calmo.
No situar el teléfono a más de 50 metros de la base.
No desplazar el teléfono durante una llamada.
69
Versatis_Conference_sp.qxd 31/03/2005 16:07 Page 69
Page 70

70
3. FUNCIONES DE BASE
3.1 RECIBIR UNA LLAMADA
En caso de llamada entrante, los indicadores luminosos verdes de la base y del teléfono parpadean. El icono parpadea en la
pantalla y el timbre del teléfono suena.
l Pulsar cualquier tecla (salvo las teclas y ) para responder (las teclas y sólo permiten
aumentar o disminuir el volumen del timbre).
El tiempo de comunicación, situado a la izquierda de la pantalla, visualiza la duración de la llamada en
curso con el formato MM-SS (minutos y segundos).
El contador situado a la derecha de la pantalla visualiza la autonomía de la batería antes de la recarga
con el formato HH-MM (horas y minutos).
3.2 LLAMAR
3.2.1 Marcación directa
l Pulsar .
l Marcar el número a llamar.
Nota: El número total de cifras que componen el número a llamar no está limitado.
3.2.2 Premarcación
Esta modalidad permite introducir y modificar un número antes de realizar la llamada.
l Marcar un número (máximo 44 cifras).
l Pulsar para borrar la última cifra marcada o efectuar una pulsación larga sobre para borrar todas las cifras marcadas.
l Pulsar la tecla para iniciar la llamada.
Nota: En ambos casos, para insertar una pausa, efectuar una pulsación larga sobre . Se visualiza el símbolo "P".
l Pulsar para colgar al final de la comunicación.
3.2.3 Su agenda
Dispone de una agenda de 10 números que puede utilizar tanto en marcación directa como en premarcación. Para obtener la
información necesaria sobre la memorización y la modificación de los números de la agenda, remitirse a la sección de programación
(véase § 5.2 "Programar un número en la agenda").
l Pulsar .
l Pulsar sobre una tecla del teclado numérico (de a ) para visualizar la entrada de la agenda correspondiente.
l Pulsar la tecla para iniciar la llamada.
Versatis_Conference_sp.qxd 31/03/2005 16:07 Page 70
Page 71

3.3 RELLAMAR EL ÚLTIMO NÚMERO MARCADO (REPETICIÓN)
La función "Redial" permite rellanar el último número marcado.
Marcación directa:
l Pulsar .
l Pulsar .
"
El último número marcado se marcará automáticamente.
Premarcación:
l Pulsar .
"
Se visualiza el último número marcado.
l Pulsar para marcar este número.
3.4 TECLAS DE ACCESO DIRECTO
La marcación rápida permite llamar números preprogramados pulsando simplemente una tecla. Antes de utilizar estas teclas, verificar
que las ha configurado correctamente.
Para obtener la información necesaria sobre la memorización y la modificación de los números de las teclas de acceso directo,
remitirse a la sección de programación (véase § 5.5 y 5.6).
3.4.1 Tecla de acceso directo M1
l En modo espera, pulsar .
"
Se visualiza el número programado y se marca automáticamente.
l Pulsar para colgar.
3.4.2 Tecla de acceso directo M2
l En modo espera, efectuar una pulsación larga sobre .
"
Se visualiza el número programado y se marca automáticamente.
l Pulsar para colgar.
71
Versatis_Conference_sp.qxd 31/03/2005 16:07 Page 71
Page 72

4. FUNCIONES ACCESIBLES DURANTE LAS LLAMADAS
4.1 AJUSTAR EL VOLUMEN DEL ALTAVOZ
Para el altavoz, tiene la posibilidad de elegir entre 16 niveles de volumen.
l Pulsar o para ajustar el volumen del altavoz durante una llamada.
4.2 FUNCIÓN SECRETO
El micrófono está apagado cuando la función Secreto está activada.
l Pulsar para activar o desactivar la función Secreto.
Cuando la llamada está en modo Secreto, se enciende el icono ; los indicadores luminosos en el teléfono están rojos y parpadean
lentamente.
4.3 TECLA R
Durante una llamada, se puede enviar un corte calibrado (Flash).
l Pulsar para acceder a los servicios extras suministrados por el operador o la centralita telefónica privada.
Para obtener información sobre la modificación de la longitud del tiempo de flashing, remitirse al capítulo 5.3. "Programar la tecla R
(corte calibrado / Flashing)".
4.4 VISUALIZAR EL NÚMERO DEL TELÉFONO
El número del teléfono se puede visualizar durante una llamada. Verificar previamente que ha configurado correctamente esta función
(véase § 5.4 "Programar el número de teléfono del VERSATIS Conference").
l Durante la llamada, pulsar .
"
Se visualiza el número del teléfono (si se ha programado).
"
La pantalla vuelve a la pantalla anterior tras 10 segundos.
o
l Pulsar para que desaparezca el número de la pantalla y volver a la pantalla del tiempo de comunicación.
72
Versatis_Conference_sp.qxd 31/03/2005 16:07 Page 72
Page 73

5. PROGRAMACIÓN
5.1 PROGRAMAR EL TIMBRE
5.1.1 Volumen del timbre
l Pulsar o cuando suena el teléfono.
5.1.2 Melodía
l En modo espera, efectuar una pulsación larga sobre .
"
Entre al modo "Programación".
"
Aparece el icono .
l Pulsar para seleccionar la programación de la melodía y validar con .
"
Se visualiza el número de melodía.
l Pulsar una tecla de a para seleccionar la melodía de timbre correspondiente y validar con .
l Pulsar para salir.
5.2 PROGRAMAR UN NÚMERO EN LA AGENDA
La agenda puede memorizar hasta 10 números. Los números memorizados no pueden comprender más de 44 cifras. La entrada de
un nuevo número en uno de los diez registros de la agenda borra automáticamente el número memorizado anteriormente en este
emplazamiento.
l En modo espera, marcar el número que se debe guardar (máximo 44 cifras).
l Efectuar una pulsación larga sobre .
"
Entre al modo "Programación de la agenda".
"
Se visualizan los iconos y .
l Pulsar sobre una tecla del teclado numérico (de a ) para atribuir una cifra al número programado en la agenda.
l Pulsar nuevamente sobre para confirmar.
"
Se escucha un tono de confirmación.
"
La pantalla vuelve a modo espera.
Nota: − Pulsar en cualquier momento para abandonar la entrada en la agenda y regresar al modo reposo.
− Efectuar una pulsación larga sobre para insertar una pausa durante la marcación.
73
Versatis_Conference_sp.qxd 31/03/2005 16:07 Page 73
Page 74

5.3 PROGRAMAR LA TECLA R (CORTE CALIBRADO / FLASHING)
Para acceder a los servicios extras suministrados por el operador o la centralita telefónica privada, debe ajustar el tiempo de flashing
de su VERSATIS Conference.
Los valores disponibles son 100 ms, 270 ms, 500 ms y 800 ms.
l En modo espera, efectuar una pulsación larga sobre .
"
Entre al modo "Programación de la agenda".
"
Aparece el icono .
l Pulsar para seleccionar la programación de la duración del tiempo de flashing.
"
Se visualiza la duración actual.
l Pulsar nuevamente para seleccionar la programación de la duración del tiempo de flashing.
"
La selección actual comienza a parpadear.
l Pulsar la tecla correspondiente al tiempo de flashing deseado (de a ):
l Pulsar nuevamente sobre para confirmar la selección.
l Pulsar para salir.
5.4 PROGRAMAR EL NÚMERO DE TELÉFONO DEL VERSATIS CONFERENCE
El teléfono VERSATIS Conference está destinado para ser utilizado por diferentes personas por lo tanto, se requiere indicar a los
usuarios el número de teléfono en el cual está conectado el VERSATIS Conference.
l En modo espera, efectuar una pulsación larga sobre .
"
Entre al modo Programación.
l Pulsar para seleccionar la programación del número del teléfono del VERSATIS Conference.
"
Se visualiza el número actual, si éste se ha programado, de lo contrario, la pantalla permanece en blanco.
l Pulsar nuevamente para confirmar la selección de la programación del número del teléfono.
"
El número actual parpadea.
Tecla
Duración (ms)
100 (valor por defecto)
270
500
800
74
Versatis_Conference_sp.qxd 31/03/2005 16:07 Page 74
Page 75

l Pulsar para borrar las cifras del número actual uno a uno o efectuar una pulsación larga sobre para borrar el número.
l Pulsar nuevamente sobre para confirmar la modificación.
l Pulsar para salir.
5.5 PROGRAMAR LA TECLA DE ACCESO DIRECTO M1
l En modo espera, efectuar una pulsación larga sobre .
"
Aparece el icono .
l Pulsar para seleccionar la programación de la tecla de acceso directo M1.
"
Se visualiza el número actual, (si éste se ha programado), de lo contrario, la pantalla permanece en blanco.
l Pulsar nuevamente para confirmar la selección de la programación de la tecla de acceso directo M1.
"
El número actual parpadea.
l Pulsar para borrar las cifras del número actual uno a uno o efectuar una pulsación larga sobre para borrar el número.
l Marcar el número de teléfono.
l Pulsar para confirmar la modificación.
l Pulsar para salir.
5.6 PROGRAMAR LA TECLA DE ACCESO DIRECTO M2
l En modo espera, efectuar una pulsación larga sobre .
"
Aparece el icono .
l Pulsar para seleccionar la programación de la tecla de acceso directo M2.
"
Se visualiza el número actual, (si éste se ha programado), de lo contrario, la pantalla permanece en blanco.
l Pulsar nuevamente para confirmar la selección de la programación de la tecla de acceso directo M2.
"
El número actual parpadea.
l Pulsar para borrar las cifras del número actual uno por uno o efectuar una pulsación larga sobre para borrar el número.
l Marcar el número de teléfono.
l Pulsar para confirmar la modificación.
l Pulsar para salir.
75
Versatis_Conference_sp.qxd 31/03/2005 16:07 Page 75
Page 76

5.7 RESTAURAR LOS PARÁMETROS POR DEFECTO
l En modo espera, efectuar una pulsación larga sobre .
"
Aparece el icono .
l Efectuar una pulsación larga sobre la tecla para restaurar los parámetros por defecto del teléfono.
"
La pantalla visualiza los caracteres siguientes: .
l Pulsar nuevamente para confirmar la selección de la restauración de los parámetros por defecto.
l Pulsar para salir.
¡
Cuidado, este procedimiento borrará el conjunto de la agenda, el número de la última llamada recibida y los números
de las teclas de acceso directo.
!
Para conocer el valor de todos los parámetros de configuración de fábrica, remitirse a la sección "Valores por defecto" (véase § 7).
6. FUNCIONES EXTRAS
6.1 GUARDAR LAS LLAMADAS
Para guardar las llamadas, conectar una grabadora externa en la toma jack de registro 2,5 mm situada en el costado de la base.
6.2 LOCALIZAR EL TELÉFONO (FUNCIÓN BÚSQUEDA DEL TELÉFONO)
¿Ha perdido su teléfono?
l Pulsar el botón de búsqueda situado sobre la base para localizar el teléfono.
"
El aparato timbra durante 30 segundos.
l Pulsar cualquier tecla del teléfono para detener el timbre.
76
Versatis_Conference_sp.qxd 31/03/2005 16:07 Page 76
Page 77

7. VALORES POR DEFECTO
Función Parámetro de fábrica por defecto
Volumen del altavoz Nivel 5
Volumen del timbre Volumen 5
Melodía de timbre Melodía 1
Duración del tiempo de flashing 100 ms
Repetición Vacía
Agenda Vacía
Número del teléfono del aparato Vacía
Tecla de acceso directo M1 Vacía
Tecla de acceso directo M2 Vacía
77
Versatis_Conference_sp.qxd 31/03/2005 16:07 Page 77
Page 78

8. EN CASO DE INCIDENTES…
Generalmente, si se presenta un problema, retirar el pack de baterías del teléfono y desconectar la alimentación eléctrica de la base.
Esperar aproximadamente 1 minuto, luego volver a conectar la base y volver a insertar el pack de baterías en el teléfono.
Sin embargo, si el problema persiste, llame a nuestra línea de atención al cliente al número siguiente: 917 547 060 de lunes a sábado
de 8.00 h a 19.00 h (llamada facturada según la tarifa en vigor).
La tienda donde ha comprado su teléfono también puede aconsejarle y proporcionarle soporte posventa.
Problemas
Causas
Soluciones
El teléfono no está alimentado.
Verifique que el pack de baterías está
correctamente colocado.
Se apaga la pantalla.
El pack de baterías está descargado.
Vuelve a conectar el adaptador de red
eléctrica del teléfono en el aparato para
recargar el pack de baterías.
El teléfono está fuera del rango de la
base.
Acerque el teléfono a la base.
El pack de baterías está descargado.
Conecte el adaptador de red eléctrica en
el aparato para recargar el pack de
baterías.
No hay tono.
El aparato no está conectado a la red
telefónica.
Verifique la conexión de la toma
telefónica.
El teléfono está fuera del rango de la
base o en un entorno con mucha
interferencia.
Acerque el teléfono a la base.
La calidad audio no es buena o se
deteriora durante una llamada.
Tiene ADSL.
Conecte un filtro ADSL homologado
entre la toma telefónica y el enchufe
mural.
Su interlocutor no puede oírle.
El auricular está apagado y la función
Secreto está activa.
Consulte 4.2 "Función Secreto".
El teléfono no suena.
El timbre se ha desactivado.
Consulte 5.1.1. "Volumen del timbre".
El adaptador de red eléctrica del
teléfono no está conectado.
Verifique la conexión de la alimentación
eléctrica a la red eléctrica 230 V / 50 Hz.
El pack de baterías sigue descargado
incluso después de varias horas de
carga.
El pack de baterías del teléfono está
defectuoso.
Consulte con su Distribuidor para
obtener un nuevo pack de baterías.
78
Versatis_Conference_sp.qxd 31/03/2005 16:07 Page 78
Page 79

9. CARACTERÍSTICAS TÉCNICAS
* Variable en función del entorno.
** Dependiente de la carga inicial de las baterías.
Alcance en campo libre
Hasta 300 metros *
Alcance en interior
Hasta 50 metros *
6 horas en conversación **
Autonomía del teléfono
(valores promedios)
80 horas en espera **
Peso del teléfono
2,1 kg con las baterías
Peso de la base
162 g
Conexión eléctrica/
Adaptador alimentación de red
Entrada Base: ca 230V/50 Hz
Salida Base: cc 7 V/400 mA
Entrada Teléfono: ca 230V/50 Hz
Salida Teléfono: cc 12 V/1500 mA
Corriente alterna monofásica a exclusión de las instalaciones IT definidas en la
norma EN 60950.
Cuidado, la tensión de la red es clasificada peligrosa según los criterios de la
misma norma.
Conexión telefónica
Aparato destinado a conectarse en una línea telefónica analógica clasificada
TRT3 (tensión de red de telecomunicaciones) en el sentido de la norma
EN 60950.
Baterías recargables del teléfono
1,2 V / 1800 mAh/Ni-MH AA x 6
Temperatura de funcionamiento
de + 5 a + 40° C
79
Versatis_Conference_sp.qxd 31/03/2005 16:07 Page 79
Page 80

10. GARANTÍA
Le recordamos que el teléfono VERSATIS Conference es un equipo homologado de conformidad con la reglamentación europea,
certificado por la marca .
Este producto está cubierto por una garantía legal y para cualquier información relativa sobre esta garantía, por favor contacte con los
establecimientos de su distribuidor.
El distribuidor garantiza la conformidad de los productos con sus especificaciones técnicas durante un periodo de doce (12) meses,
piezas y mano de obra, a partir de la fecha que figura en el documento que atesta la compra del producto. Por lo tanto, guarde su
factura o registro de caja donde se indica la fecha de compra del producto y el nombre del distribuidor. No obstante, si la garantía legal
en vigor en su país excede doce (12) meses, se aplicará la garantía legal. La pieza o producto no conforme se reparará o reemplazará
sin coste alguno por una pieza o producto idéntico o que al menos asegure funciones y un rendimiento equivalente. Si la reparación
o la sustitución no se pueden realizar, se reembolsará el coste del producto.
La sustitución del producto o pieza de recambio que puede ser nuevo o completamente reparado, se garantiza por un periodo de tres
meses a partir de la fecha de reparación o hasta el final del periodo de garantía inicial si ésta supera los tres meses. Toda pieza o
producto devuelto y sustituido pasan a ser propiedad del fabricante.
No obstante, la presente garantía no se aplica en los casos siguientes:
− instalación o utilización no conforme con las instrucciones dadas en este manual,
− conexión incorrecta o uso inadecuado del producto, en particular, con accesorios no previstos para este propósito,
− desgaste normal,
− el no respeto de las normas técnicas y de seguridad vigentes en la zona geográfica de utilización,
− productos que hayan experimentado choques o caídas,
− productos deteriorados por rayos, sobretensión eléctrica, fuente de calor o sus radiaciones, daño causado por el agua, exposición
a condiciones de humedad excesiva o cualquier otra causa externa al producto,
− utilización incorrecta, acto de negligencia,
− intervención, modificación o reparación realizadas por una persona no homologada por el fabricante o distribuidor.
A RESERVA DE LAS DISPOSICIONES LEGALES, SE EXCLUYEN ESPECIFICAMENTE TODAS LAS GARANTIAS DIFERENTES
DE LAS DESCRITAS EN ESTE APARTADO.
80
Versatis_Conference_sp.qxd 31/03/2005 16:07 Page 80
Page 81

11. SEGURIDAD
En caso de peligro, el adaptador de alimentación de red sirve de dispositivo de desconexión de la alimentación 230 V. Por lo tanto,
este adaptador de alimentación de red se debe instalar cerca del aparato y ser fácilmente accesible.
Para cortar el dispositivo de la fuente de alimentación primaria, el adaptador de alimentación de red se debe desconectar de la toma
230 Vca 50 Hz.
En caso de fallo del adaptador de alimentación de red, este último debe ser reemplazado por un modelo idéntico.
En ausencia de red de distribución eléctrica o en caso de corte de tensión, las instalaciones con teléfonos inalámbricos no funcionarán.
Usted no podrá llamar ni recibir llamadas en caso de emergencia.
Debido a ello, se recomienda utilizar un aparato telefónico suplementario convencional que no requiera de corriente eléctrica.
¡ No utilice su aparato telefónico para avisar de un escape de gas si está próximo al foco del escape.
!
En caso de tormenta, le recomendamos que no utilice este aparato.
12. MEDIO AMBIENTE
Las baterías usadas del teléfono se deberán eliminar de conformidad con la reglamentación en vigor sobre la protección del
medio ambiente. Debe llevar sus baterías a su revendedor o depositarlas en un centro de recuperación reservado a este
efecto.
No trate de abrir las baterías que contienen sustancias químicas. En caso de derrame de fluido de una batería, evite el
contacto con las mucosas (piel, ojos y boca). En caso de contacto con el producto, aclare con agua el área afectada durante
varios minutos.
Limpie el fluido con papel absorbente o un paño seco y contacte con su distribuidor para reemplazar las baterías.
El desecho definitivo del teléfono VERSATIS Conference debe efectuarse de conformidad con las leyes y reglamentaciones
vigentes.
81
Versatis_Conference_sp.qxd 31/03/2005 16:07 Page 81
Page 82

13. DECLARACIÓN DE CONFORMIDAD
Thomson Telecom declara que el teléfono VERSATIS Conference cumple con los requisitos esenciales y a otras disposiciones
pertinentes de la directiva 1999/5/CE.
82
Versatis_Conference_sp.qxd 31/03/2005 16:07 Page 82
Page 83

83
L'imballaggio contiene i seguenti elementi:
− una base
− un apparecchio
− un adattatore di rete 230 V da collegare alla base
− un adattatore di rete 230 V da collegare all'apparecchio
− le pile
− una presa per la connessione alla rete di telecomunicazioni francese
− un cavo per la connessione telefonica
− un manuale d'uso.
Per conoscere le funzionalità di base del vostro VERSATIS Conference, vi consigliamo di leggere con attenzione questo manuale.
Italiano
Versatis_Conference_it.qxd 31/03/2005 16:09 Page 83
Page 84

84
- Rubrica
- Accesso alla rubrica
Tasto di accesso
diretto M1
- Cancellare un numero
- Uscire dalla modalità programmazione, rubrica
o riselezione
- Cancellare tutto il numero (pressione lunga)
- Ritornare in stand-by (pressione lunga)
Tasto di
accesso diretto M2
(pressione lunga)
Accesso ai servizi
dell'operatore o del PBX
- Accesso all'ultimo numero
composto
- Accesso alla modalità
programmazione
(pressione lunga)
Aumentare o diminuire il
volume della suoneria e
dell'altoparlante
Sganciare / Riagganciare
Attivare / Disattivare il
microfono per una
chiamata (funzione Mute)
Attivare / Disattivare la suoneria
(pressione lunga)
Inserire una pausa
(pressione lunga)
I tasti dell'apparecchio
Versatis_Conference_it.qxd 31/03/2005 16:09 Page 84
Page 85

85
Il display dell'apparecchio
Il VERSATIS Conference ha un display di due righe:
− 1 riga d'icone
− 1 riga di 18 caratteri
Livello di carica della batteria:
- lampeggia quando la batteria
deve essere ricaricata
- si anima durante la ricarica
Comunicazione in corso
Mute (microfono disattivato)
Suoneria disattivata
Rubrica
Qualità di ricezione
Programmazione
Scorrimento
Indicatore d'autonomia della
batteria
Durata della
comunicazione
Le spie:
(Verde) In Use Lampeggia in caso di ricezione di una chiamata e rimane
accesa quando si è in comunicazione
(Rosso) Power Rimane permanentemente accesa quando la base è
collegata alla sua alimentazione
Paging:
l Premere il tasto "PAGE" per localizzare l'apparecchio (se non vi ricordate più dove
avete lasciato l'apparecchio)
Presa jack 2,5 mm di registrazione (sul lato, a sinistra sullo schema)
La base
Versatis_Conference_it.qxd 31/03/2005 16:09 Page 85
Page 86

I TASTI DELL'APPARECCHIO . . . . . . . . . . . . . . . . . . . . . . . . . . . . . . . . . . . . . . . . . . . . . . . . . . . . . . . . . . . . . . . . . . . . . . 84
LA BASE . . . . . . . . . . . . . . . . . . . . . . . . . . . . . . . . . . . . . . . . . . . . . . . . . . . . . . . . . . . . . . . . . . . . . . . . . . . . . . . . . . . . . . . 85
IL DISPLAY DELL'APPARECCHIO . . . . . . . . . . . . . . . . . . . . . . . . . . . . . . . . . . . . . . . . . . . . . . . . . . . . . . . . . . . . . . . . . . . 85
1. IL VOSTRO APPARECCHIO DI AUDIOCONFERENZA . . . . . . . . . . . . . . . . . . . . . . . . . . . . . . . . . . . . . . . . . . . . . . . 87
1.1 Il VERSATIS Conference . . . . . . . . . . . . . . . . . . . . . . . . . . . . . . . . . . . . . . . . . . . . . . . . . . . . . . . . . . . . . . . . . . . . . . 87
1.2 Precauzioni d'uso . . . . . . . . . . . . . . . . . . . . . . . . . . . . . . . . . . . . . . . . . . . . . . . . . . . . . . . . . . . . . . . . . . . . . . . . . . . . 87
1.3 Precauzioni relative alle batterie . . . . . . . . . . . . . . . . . . . . . . . . . . . . . . . . . . . . . . . . . . . . . . . . . . . . . . . . . . . . . . . . . 87
2. INSTALLAZIONE . . . . . . . . . . . . . . . . . . . . . . . . . . . . . . . . . . . . . . . . . . . . . . . . . . . . . . . . . . . . . . . . . . . . . . . . . . . . 88
2.1 Installazione della base . . . . . . . . . . . . . . . . . . . . . . . . . . . . . . . . . . . . . . . . . . . . . . . . . . . . . . . . . . . . . . . . . . . . . . . 88
2.2 Installazione dell'apparecchio . . . . . . . . . . . . . . . . . . . . . . . . . . . . . . . . . . . . . . . . . . . . . . . . . . . . . . . . . . . . . . . . . . . 89
2.3 Messa in carica dell'apparecchio . . . . . . . . . . . . . . . . . . . . . . . . . . . . . . . . . . . . . . . . . . . . . . . . . . . . . . . . . . . . . . . . . 89
2.4 Raccomandazioni da seguire per ottenere le migliori prestazioni . . . . . . . . . . . . . . . . . . . . . . . . . . . . . . . . . . . . . . . . . 89
3. FUNZIONI DI BASE . . . . . . . . . . . . . . . . . . . . . . . . . . . . . . . . . . . . . . . . . . . . . . . . . . . . . . . . . . . . . . . . . . . . . . . . . . 90
3.1 Ricevere una chiamata . . . . . . . . . . . . . . . . . . . . . . . . . . . . . . . . . . . . . . . . . . . . . . . . . . . . . . . . . . . . . . . . . . . . . . . . 90
3.2 Chiamare . . . . . . . . . . . . . . . . . . . . . . . . . . . . . . . . . . . . . . . . . . . . . . . . . . . . . . . . . . . . . . . . . . . . . . . . . . . . . . . . . . 90
3.3 Richiamare l'ultimo numero chiamato (bis) . . . . . . . . . . . . . . . . . . . . . . . . . . . . . . . . . . . . . . . . . . . . . . . . . . . . . . . . . 91
3.4 Tasti d'accesso diretto . . . . . . . . . . . . . . . . . . . . . . . . . . . . . . . . . . . . . . . . . . . . . . . . . . . . . . . . . . . . . . . . . . . . . . . . 91
4. FUNZIONI ACCESSIBILI DURANTE LE CHIAMATE . . . . . . . . . . . . . . . . . . . . . . . . . . . . . . . . . . . . . . . . . . . . . . . . . 92
4.1 Regolare il volume dell'altoparlante . . . . . . . . . . . . . . . . . . . . . . . . . . . . . . . . . . . . . . . . . . . . . . . . . . . . . . . . . . . . . . . 92
4.2 Funzione Mute . . . . . . . . . . . . . . . . . . . . . . . . . . . . . . . . . . . . . . . . . . . . . . . . . . . . . . . . . . . . . . . . . . . . . . . . . . . . . . 92
4.3 Tasto R . . . . . . . . . . . . . . . . . . . . . . . . . . . . . . . . . . . . . . . . . . . . . . . . . . . . . . . . . . . . . . . . . . . . . . . . . . . . . . . . . . . 92
4.4 Visualizzare il numero dell'apparecchio . . . . . . . . . . . . . . . . . . . . . . . . . . . . . . . . . . . . . . . . . . . . . . . . . . . . . . . . . . . . 92
5. PROGRAMMAZIONE . . . . . . . . . . . . . . . . . . . . . . . . . . . . . . . . . . . . . . . . . . . . . . . . . . . . . . . . . . . . . . . . . . . . . . . . . 93
5.1 Programmare la suoneria . . . . . . . . . . . . . . . . . . . . . . . . . . . . . . . . . . . . . . . . . . . . . . . . . . . . . . . . . . . . . . . . . . . . . . 93
5.2 Programmare un numero nella rubrica . . . . . . . . . . . . . . . . . . . . . . . . . . . . . . . . . . . . . . . . . . . . . . . . . . . . . . . . . . . . 93
5.3 Programmare il tasto R (interruzione calibrata / flashing) . . . . . . . . . . . . . . . . . . . . . . . . . . . . . . . . . . . . . . . . . . . . . . . 94
5.4 Programmare il numero di telefono del VERSATIS Conference . . . . . . . . . . . . . . . . . . . . . . . . . . . . . . . . . . . . . . . . . . 94
5.5 Programmare il tasto di accesso diretto M1 . . . . . . . . . . . . . . . . . . . . . . . . . . . . . . . . . . . . . . . . . . . . . . . . . . . . . . . . . 95
5.6 Programmare il tasto di accesso diretto M2 . . . . . . . . . . . . . . . . . . . . . . . . . . . . . . . . . . . . . . . . . . . . . . . . . . . . . . . . . 95
5.7 Ripristinare i parametri predefiniti . . . . . . . . . . . . . . . . . . . . . . . . . . . . . . . . . . . . . . . . . . . . . . . . . . . . . . . . . . . . . . . . 96
6. FUNZIONI SUPPLEMENTARI . . . . . . . . . . . . . . . . . . . . . . . . . . . . . . . . . . . . . . . . . . . . . . . . . . . . . . . . . . . . . . . . . . 96
6.1 Registrare le chiamate . . . . . . . . . . . . . . . . . . . . . . . . . . . . . . . . . . . . . . . . . . . . . . . . . . . . . . . . . . . . . . . . . . . . . . . . 96
6.2 Localizzare l'apparecchio (funzione di ricerca dell'apparecchio) . . . . . . . . . . . . . . . . . . . . . . . . . . . . . . . . . . . . . . . . . . 96
7. VALORI PREDEFINITI . . . . . . . . . . . . . . . . . . . . . . . . . . . . . . . . . . . . . . . . . . . . . . . . . . . . . . . . . . . . . . . . . . . . . . . . 97
8. RISOLUZIONE DEI PROBLEMI ... . . . . . . . . . . . . . . . . . . . . . . . . . . . . . . . . . . . . . . . . . . . . . . . . . . . . . . . . . . . . . . . 98
9. CARATTERISTICHE TECNICHE . . . . . . . . . . . . . . . . . . . . . . . . . . . . . . . . . . . . . . . . . . . . . . . . . . . . . . . . . . . . . . . . 99
10. GARANZIA . . . . . . . . . . . . . . . . . . . . . . . . . . . . . . . . . . . . . . . . . . . . . . . . . . . . . . . . . . . . . . . . . . . . . . . . . . . . . . . . 100
11. SICUREZZA . . . . . . . . . . . . . . . . . . . . . . . . . . . . . . . . . . . . . . . . . . . . . . . . . . . . . . . . . . . . . . . . . . . . . . . . . . . . . . . . 101
12. AMBIENTE . . . . . . . . . . . . . . . . . . . . . . . . . . . . . . . . . . . . . . . . . . . . . . . . . . . . . . . . . . . . . . . . . . . . . . . . . . . . . . . . 101
13. DICHIARAZIONE DI CONFORMITÀ . . . . . . . . . . . . . . . . . . . . . . . . . . . . . . . . . . . . . . . . . . . . . . . . . . . . . . . . . . . . . 102
86
Versatis_Conference_it.qxd 31/03/2005 16:09 Page 86
Page 87

1. IL VOSTRO APPARECCHIO DI AUDIOCONFERENZA
1.1 IL VERSATIS CONFERENCE
Il VERSATIS Conference è progettato per soddisfare tutte le vostre esigenze in materia di comunicazioni telefoniche; vi consente di
organizzare riunioni con estrema facilità di utilizzo beneficiando al tempo stesso della migliore qualità sonora possibile.
La tecnologia cordless DECT™* offre la possibilità di utilizzare il vostro sistema di conferenza anche in una stanza dove non avete la
presa telefonica.
1.2 PRECAUZIONI D'USO
Il VERSATIS Conference è un apparecchio conforme alla norma DECT™*, destinato a emettere e a ricevere comunicazioni
telefoniche. È stato progettato e fabbricato per essere collegato a una rete di telecomunicazioni pubbliche europea o a un sistema
telefonico privato.
Questo telefono necessita per funzionare di un alimentatore elettrico.
Come per qualsiasi collegamento radio, la qualità delle vostre comunicazioni dipende dalla posizione della base, dell'apparecchio e del
suo ambiente.
Il VERSATIS Conference deve essere posto lontano da qualsiasi fonte di calore eccessiva (radiatori, sole...) e deve essere protetto
dalle vibrazioni e dalla polvere. Attenzione, non mettete mai il vostro apparecchio a contatto con acqua o con altri liquidi o spray.
Per limitare i rischi d'interferenza e avere una migliore qualità di ricezione, evitare in particolar modo d'installare la base nei pressi di
una finestra, di una massa metallica, di una superficie in cemento armato, di una televisione, di un Hi-Fi, di una lampada alogena, di
un tubo fluorescente, di una centrale d'allarme, di un forno a microonde, di piastre alogene, di un computer, di un modem ADSL, ecc.
Per pulire il vostro apparecchio e la sua base, utilizzare uno straccio antistatico leggermente inumidito con acqua.
1.3 PRECAUZIONI RELATIVE ALLE BATTERIE
* DECT è un marchio depositato da ETSI.
!
Utilizzare unicamente pile ricaricabili con caratteristiche identiche a quelle fornite con l'apparecchio.
L'uso di pile non ricaricabili o non conformi ai modelli indicati rischierebbe di danneggiare l'apparecchio (riferirsi al
capitolo "Caratteristiche tecniche").
Nel caso di mancato rispetto di questa raccomandazione, il costruttore non potrà essere ritenuto responsabile.
Le pile si possono crepare o far fuoriuscire liquido se vengono inserite male, aperte o esposte a una fonte di calore.
Non gettare le pile nel fuoco per rischio d'esplosione.
87
Versatis_Conference_it.qxd 31/03/2005 16:09 Page 87
Page 88

88
2. INSTALLAZIONE
Base Apparecchio
l Installare la base e l'apparecchio su una superficie piana e stabile.
2.1 INSTALLAZIONE DELLA BASE
2.1.1 Collegare la base
l Collegare il cavo di alimentazione elettrica della base alla presa situata nella parte posteriore della base.
l Collegare l'adattatore di rete a una presa elettrica 230 V / 50 Hz.
"
La spia luminosa rossa di alimentazione della base si accende.
l Collegare una delle estremità del cavo telefonico alla presa situata sulla parte posteriore della base e l'altra estremità alla
presa del telefono.
2.1.2 Fissaggio a parete (opzionale)
Per fissare la base sulla parete, seguire la procedura indicata a seguito.
l Verificare che la base non sia troppo lontana da una presa elettrica e fare attenzione a non danneggiare i cavi elettrici che si trovano
nel muro.
l Forare tre buchi come indicato sulla sagoma che si trova alla pagina 143 di questo manuale.
l Inserire tre viti (non fornite) nei fori. Lasciare fuoriuscire le teste delle viti di circa 3 mm.
l Agganciare la base sulle teste delle viti.
Versatis_Conference_it.qxd 31/03/2005 16:09 Page 88
Page 89

2.2 INSTALLAZIONE DELL'APPARECCHIO
2.2.1 Inserimento delle pile
l Aprire il vano situato sotto l'apparecchio.
l Inserire le pile (7,2V 1800 mAh) nel compartimento situato sotto l'apparecchio verificando che la presa del telefono e il connettore
siano allineati correttamente.
l Rimettere la mascherina per chiudere il vano.
2.2.2 Collegare l'apparecchio alla rete
l Inserire il cordone di alimentazione dell'apparecchio nella presa posta dietro l'apparecchio.
l Collegare l'adattatore di rete a una presa elettrica 230 V / 50 Hz.
La prima volta che mettete in carica l'apparecchio, vi consigliamo di lasciarlo in carica per 24 ore per poter ottimizzare le prestazioni e
la durata delle pile.
2.3 MESSA IN CARICA DELL'APPARECCHIO
Se l'icona della batteria lampeggia o se le spie sull'apparecchio sono rosse e lampeggiano regolarmente durante una comunicazione,
significa che l'apparecchio deve essere rimesso in carica.
l Per ricaricare l'apparecchio, collegare l'adattatore di rete 230 V all'apparecchio. La batteria è carica quando l'icona della batteria
smette di lampeggiare.
l Per verificare che l'apparecchio sia ben associato alla base, prendere la linea .
"
La tonalità conferma che il telefono funziona.
l Verificare che il simbolo sia fisso nel display.
Quando l'apparecchio è completamente scarico, è possibile che il display, dopo aver collegato l'adattatore di rete, si accenda solo dopo
alcuni minuti.
2.4 RACCOMANDAZIONI DA SEGUIRE PER OTTENERE LE MIGLIORI PRESTAZIONI
Installare il telefono d'audioconferenza in un luogo calmo.
Non porre l'apparecchio a più di 50 metri dalla base.
Non spostare l'apparecchio durante una chiamata.
89
Versatis_Conference_it.qxd 31/03/2005 16:09 Page 89
Page 90

90
3. FUNZIONI DI BASE
3.1 RICEVERE UNA CHIAMATA
Nel caso di una chiamata in arrivo, le spie verdi sulla base e sull'apparecchio lampeggiano. L'icona lampeggia sul display e la
suoneria dell'apparecchio squilla.
l Premere un tasto qualsiasi (tranne i tasti e ) per rispondere (i tasti e permettono
unicamente di aumentare o di diminuire il volume della suoneria).
La durata di comunicazione, situata a sinistra sul display, indica la durata della chiamata in corso nel
formato MM-SS (minuti e secondi).
Il contatore posto a destra sul display indica l'autonomia della batteria prima della ricarica, nel formato
OO-MM (ore e minuti).
3.2 CHIAMARE
3.2.1 Selezione diretta
l Premere il tasto .
l Comporre il numero da chiamare.
Nota: Il numero totale di cifre che compongono il numero da chiamare non è limitato.
3.2.2 Pre-selezione
Con la pre-selezione potete inserire e modificare un numero prima d'inoltrare una chiamata.
l Comporre un numero (44 cifre al massimo).
l Premere il tasto per cancellare l'ultima cifra digitata o premere con pressione lunga il tasto per cancellare tutto il
numero.
l Premere il tasto per inoltrare la chiamata.
Nota: In entrambi i casi, per inserire una pausa, premere il tasto (pressione lunga). Si visualizza il simbolo "P".
l Premere il tasto per riagganciare alla fine della comunicazione.
3.2.3 La vostra rubrica
L'apparecchio dispone di una rubrica di 10 numeri che potete utilizzare in selezione diretta o in pre-selezione. Per ottenere informazioni
sulla memorizzazione e la modifica dei numeri della rubrica, riferirsi alla sezione sulla programmazione (si veda il § 5.2 "Programmare
un numero nella rubrica").
l Premere il tasto .
l Premere un tasto della tastiera numerica (da a ) per visualizzare la voce della rubrica corrispondente.
l Premere il tasto per inoltrare la chiamata.
Versatis_Conference_it.qxd 31/03/2005 16:10 Page 90
Page 91

3.3 RICHIAMARE L'ULTIMO NUMERO CHIAMATO (BIS)
La funzione "Redial" permette di richiamare l'ultimo numero chiamato.
Selezione diretta:
l Premere il tasto .
l Premere il tasto .
"
Verrà quindi automaticamente chiamato l'ultimo numero composto.
Pre-selezione:
l Premere il tasto .
"
Si visualizza l'ultimo numero chiamato.
l Premere il tasto per comporre questo numero.
3.4 TASTI D'ACCESSO DIRETTO
La selezione rapida permette di chiamare dei numeri pre-programmati semplicemente premendo un tasto. Prima di utilizzare questi
tasti, verificare di averli configurati correttamente.
Per ottenere delle informazioni sulla memorizzazione e la modifica dei tasti di accesso diretto, riferirsi alla sezione sulla
programmazione (si vedano i § 5.5 e 5.6).
3.4.1 Tasto di accesso diretto M1
l In stand-by, premere il tasto .
"
Il numero programmato si visualizza e viene chiamato automaticamente.
l Premere il tasto per riagganciare.
3.4.2 Tasto di accesso diretto M2
l In stand-by, premere il tasto .
"
Il numero programmato si visualizza e viene chiamato automaticamente.
l Premere il tasto per riagganciare.
91
Versatis_Conference_it.qxd 31/03/2005 16:10 Page 91
Page 92

4. FUNZIONI ACCESSIBILI DURANTE LE CHIAMATE
4.1 REGOLARE IL VOLUME DELL'ALTOPARLANTE
Sono disponibili 16 livelli di volume per l'altoparlante.
l Premere il tasto o per regolare il volume dell'altoparlante durante una chiamata.
4.2 FUNZIONE MUTE
Quando la funzione Mute è attivata, il microfono dell'apparecchio è disattivato.
l Premere il tasto per attivare o disattivare la funzione Mute.
Quando la chiamata è in modalità Mute, si accende l'icona ; le spie sull'apparecchio diventano rosse e lampeggiano lentamente.
4.3 TASTO R
Un'interruzione calibrata (flashing) può essere inviata durante una chiamata.
l Premere il tasto per accedere ai servizi supplementari forniti dall'operatore o dal PBX.
Per ottenere delle informazioni sulla modifica della lunghezza del tempo di flashing, riferirsi al capitolo 5.3. "Programmare il tasto R
(interruzione calibrata / Flashing)".
4.4 VISUALIZZARE IL NUMERO DELL'APPARECCHIO
Il numero dell'apparecchio può essere visualizzato durante una chiamata. Verificare prima di aver ben configurato questa funzione (si
veda il § 5.4 "Programmare il numero di telefono del VERSATIS Conference").
l Durante la chiamata, premere il tasto .
"
Si visualizza quindi il numero del telefono (se è stato programmato).
"
Il display ritorna alla schermata precedente dopo 10 secondi.
oppure
l Premere il tasto per far sparire il numero dal display e ritornare alla schermata della durata di comunicazione.
92
Versatis_Conference_it.qxd 31/03/2005 16:10 Page 92
Page 93

5. PROGRAMMAZIONE
5.1 PROGRAMMARE LA SUONERIA
5.1.1 Volume della suoneria
l Premere il tasto o quando suona il telefono.
5.1.2 Melodia
l In stand-by, premere il tasto (pressione lunga).
"
In questo modo entrate in modalità "Programmazione".
"
Si visualizza l'icona .
l Premere il tasto per selezionare la programmazione della melodia e convalidare con .
"
Si visualizza il numero della melodia.
l Premere uno dei tasti da a per selezionare la melodia di suoneria corrispondente e convalidare con .
l Premere il tasto per uscire.
5.2 PROGRAMMARE UN NUMERO NELLA RUBRICA
Le rubrica può memorizzare fino a 10 numeri. I numeri memorizzati non possono comprendere più di 44 cifre. Se si inserisce un nuovo
numero in uno dei 10 posti della rubrica riservati alla registrazione, si provoca automaticamente l'eliminazione del numero memorizzato
precedentemente in questo posto.
l In stand-by, comporre il numero da registrare (44 cifre al massimo).
l Premere il tasto .
"
In questo modo entrate in modalità "Programmazione della rubrica".
"
Le icone e si visualizzano.
l Premere un tasto della tastiera numerica (da a ) per attribuire una cifra al numero programmato nella rubrica.
l Premere nuovamente il tasto per convalidare.
"
Si sente una tonalità di conferma.
"
In seguito il display ritorna in stand-by.
Nota: − Premere il tasto in qualsiasi momento per abbandonare l'inserimento nella rubrica e ritornare in stand-by.
− Premere con pressione lunga il tasto per inserire una pausa durante la selezione.
93
Versatis_Conference_it.qxd 31/03/2005 16:10 Page 93
Page 94

5.3 PROGRAMMARE IL TASTO R (INTERRUZIONE CALIBRATA / FLASHING)
Per accedere ai servizi supplementari forniti dall'operatore o dal PBX, dovete regolare il tempo di flashing del vostro VERSATIS
Conference.
I valori disponibili sono 100 ms, 270 ms, 500 ms e 800 ms.
l In stand-by premere il tasto (pressione lunga).
"
In questo modo entrate in modalità "Programmazione della rubrica".
"
Si visualizza l'icona .
l Premere il tasto per selezionare la programmazione della durata di tempo di flashing.
"
Si visualizza la durata del momento.
l Premere di nuovo il tasto per selezionare la programmazione della durata del tempo di flashing.
"
La selezione del momento si mette a lampeggiare.
l Premere il tasto che corrisponde al tempo di flashing desiderato (da a ):
l Premere nuovamente il tasto per confermare la selezione.
l Premere il tasto per uscire.
5.4 PROGRAMMARE IL NUMERO DI TELEFONO DEL VERSATIS CONFERENCE
Dato che il VERSATIS Conference è destinato ad essere utilizzato da varie persone, conviene indicare agli utilizzatori il numero di
telefono sul quale è collegato il VERSATIS Conference.
l In stand-by il tasto (pressione lunga).
"
In questo modo entrate in modalità Programmazione.
l Premere il tasto per selezionare la programmazione del numero di telefono del VERSATIS Conference.
"
Si visualizza il numero del momento se è stato programmato, altrimenti il display rimane vuoto.
l Premere nuovamente il tasto per confermare la selezione della programmazione del numero del telefono.
"
Il numero del momento si mette a lampeggiare.
Tasto
Durata (ms)
100 (valore predefinito)
270
500
800
94
Versatis_Conference_it.qxd 31/03/2005 16:10 Page 94
Page 95

l Premere il tasto per cancellare le cifre del numero del momento una ad una oppure premere con pressione lunga il tasto
per cancellare il numero in una sola volta.
l Premere di nuovo il tasto per confermare la modifica.
l Premere per uscire.
5.5 PROGRAMMARE IL TASTO DI ACCESSO DIRETTO M1
l In stand-by premere il tasto (pressione lunga).
"
Si visualizza l'icona .
l Premere il tasto per selezionare la programmazione del tasto di accesso diretto M1.
"
Sul display si visualizza il numero del momento (se è stato programmato); altrimenti il display rimane vuoto.
l Premere di nuovo il tasto per confermare la selezione della programmazione del tasto di accesso diretto M1.
"
Il numero del momento lampeggia.
l Premere il tasto per cancellare le cifre del numero del momento una ad una oppure premere con pressione lunga il tasto
per cancellare il numero in una sola volta.
l Comporre il numero di telefono.
l Premere il tasto per confermare la modifica.
l Premere il tasto per uscire.
5.6 PROGRAMMARE IL TASTO DI ACCESSO DIRETTO M2
l In stand-by premere il tasto (pressione lunga).
"
Si visualizza l'icona .
l Premere il tasto per selezionare la programmazione del tasto di accesso diretto M2.
"
Sul display si visualizza il numero del momento (se è stato programmato); altrimenti il display rimane vuoto.
l Premere di nuovo il tasto per confermare la selezione della programmazione del tasto di accesso diretto M2.
"
Il numero del momento lampeggia.
l Premere il tasto per cancellare le cifre del numero del momento una ad una oppure premere con pressione lunga il tasto
per cancellare il numero in una sola volta.
l Comporre il numero di telefono.
l Premere il tasto per confermare la modifica.
l Premere il tasto per uscire.
95
Versatis_Conference_it.qxd 31/03/2005 16:10 Page 95
Page 96

5.7 RIPRISTINARE I PARAMETRI PREDEFINITI
l In stand-by premere il tasto (pressione lunga).
"
Si visualizza l'icona .
l Premere con pressione lunga il tasto per ripristinare i parametri predefiniti del telefono.
"
Il display visualizza i caratteri seguenti: .
l Premere di nuovo il tasto per confermare la selezione del ripristino dei parametri predefiniti.
l Premere il tasto per uscire.
!
Attenzione, questa procedura cancellerà tutta la rubrica, il numero dell'ultima chiamata ricevuta e i numeri dei tasti di
accesso diretto.
Per conoscere il valore di tutti i parametri preimpostati in fabbrica, riferirsi alla sezione "Valori predefiniti" (si veda il § 7).
6. FUNZIONI SUPPLEMENTARI
6.1 REGISTRARE LE CHIAMATE
Per registrare le chiamate, collegare un registratore esterno nella presa jack di registrazione da 2,5 mm posta sul lato della base.
6.2 LOCALIZZARE L'APPARECCHIO (FUNZIONE DI RICERCA DELL'APPARECCHIO)
Non vi ricordate più dove avete lasciato l'apparecchio?
l Premere il pulsante di ricerca situato sulla base del telefono per localizzare l'apparecchio.
"
L'apparecchio suona per 30 secondi.
l Premere un tasto qualsiasi dell'apparecchio per far smettere la suoneria.
96
Versatis_Conference_it.qxd 31/03/2005 16:10 Page 96
Page 97

7. VALORI PREDEFINITI
Funzione
Parametro preimpostato in fabbrica
Volume dell’altoparlante
Livello 5
Volume della suoneria
Volume 5
Melodia della suoneria
Melodia 1
Durata del tempo di flashing
100 ms
Bis
Vuoto
Rubrica
Vuoto
Numero di telefono dell’apparecchio
Vuoto
Tasto di accesso diretto M1
Vuoto
Tasto di accesso diretto M2
Vuoto
97
Versatis_Conference_it.qxd 31/03/2005 16:10 Page 97
Page 98

8. RISOLUZIONE DEI PROBLEMI ...
In generale, se si riscontra un problema, togliere le pile dall'apparecchio e scollegare l'alimentazione elettrica della base. Attendere
circa 1 minuto, ricollegare la base e inserire nuovamente le pile nell'apparecchio.
Tuttavia, se il problema persiste, potete chiamare l'assistenza telefonica al numero seguente: 02 7541 98 02 dal lunedì al sabato dalle
8 alle 19 (chiamata fatturata in base alla tariffa in vigore).
Il negozio dove avete acquistato il telefono è anche in grado d'informarvi e di garantire il servizio assistenza.
Problemi
Cause
Soluzioni
L’apparecchio non è collegato.
Verificare che le pile siano posizionate
correttamente.
Il display non è illuminato.
Le pile sono scariche.
Ricollegare l’adattatore di rete
all’apparecchio per ricaricare le pile.
L’apparecchio è fuori portata della base.
Avvicinate l’apparecchio alla base.
Le pile sono scariche.
Ricollegare l’adattatore di rete
all’apparecchio per ricaricare le pile.
Non avete la tonalità.
L’apparecchio non è collegato alla rete
telefonica.
Verificare il collegamento della presa del
telefono.
Siete fuori portata della base o in un
ambiente con perturbazioni.
Avvicinate l’apparecchio alla base.
La qualità audio non è buona o peggiora
durante la comunicazione.
Avete l’ADSL.
Collegate un filtro ADSL accreditato tra
la presa del telefono e la presa a parete.
Il vostro interlocutore non vi sente.
Il microfono è disattivato e la funzione
Mute è attivata.
Riferirsi al paragrafo 4.2 "Funzione
Mute".
L’apparecchio non suona.
La suoneria è spenta.
Riferirsi al paragrafo 5.1.1 "Volume della
suoneria".
L'adattatore di rete non è collegato.
Verificare il collegamento alla presa
elettrica 230 V / 50 Hz.
Le pile sono sempre scariche dopo più
ore di carica.
Le pile dell’apparecchio sono difettose.
Rivolgetevi al vostro rivenditore per
procurarvi delle pile nuove.
98
Versatis_Conference_it.qxd 31/03/2005 16:10 Page 98
Page 99

9. CARATTERISTICHE TECNICHE
* Variabile a seconda dell'ambiente.
** A seconda della carica iniziale delle pile.
Portata in campo libero
Fino a 300 metri *
Portata all’interno
Fino a 50 metri *
6 ore in conversazione **
Autonomia dell’apparecchio
(valori medi)
80 ore in stand-by **
Peso dell’apparecchio
2,1 kg con le pile
Peso della base:
162 g
Collegamento elettrico /
Adattatore di rete
Ingresso base: AC 230V/50 Hz
Uscita base: DC 7 V/400 mA
Ingresso apparecchio: AC 230V/50 Hz
Uscita apparecchio: DC 12 V/1500 mA
Corrente alternata monofase ad esclusione delle installazioni IT definite nella
norma EN60950.
Attenzione, la tensione della rete è classificata pericolosa in base ai criteri della
stessa norma.
Collegamento telefonico
Apparecchio destinato ad essere collegato a una linea telefonica analogica
classificata TRT3 (tensione di rete di telecomunicazioni) ai sensi della norma
EN60950.
Pile ricaricabili dell’apparecchio
1.2 V / 1800 mAh/Ni-MH AA x 6
Temperatura di funzionamento
da + 5 a + 40° C
99
Versatis_Conference_it.qxd 31/03/2005 16:10 Page 99
Page 100

10. GARANZIA
Vi ricordiamo che il VERSATIS Conference è un apparecchio accreditato conforme alla regolamentazione europea, certificato dal
marchio .
L'apparecchio è coperto dalla garanzia legale. Per qualsiasi informazione riguardo detta garanzia, contattare il vostro rivenditore.
Oltre alla garanzia legale, il rivenditore garantisce la conformità dei prodotti alle specifiche tecniche per un periodo di dodici (12) mesi,
per i pezzi e la manodopera, dalla data di acquisto che figura sullo scontrino. Siete quindi tenuti a conservare la fattura o lo scontrino
che precisano la data di acquisto del prodotto ed il nome del rivenditore. Tuttavia, se la garanzia legale in vigore nel vostro paese è
superiore a dodici (12) mesi, verrà applicata unicamente la garanzia legale. Il pezzo o prodotto non conformi verranno riparati o
sostituiti gratuitamente con un pezzo o un prodotto identici o che forniscano funzioni e prestazioni identiche. Se la riparazione o la
sostituzione dovessero rivelarsi impossibili, il costo del prodotto vi sarà rimborsato.
Il pezzo o il prodotto di sostituzione, che potranno essere nuovi o revisionati, saranno garantiti per un periodo di tre mesi dalla data di
riparazione, oppure per il periodo restante fino al termine della garanzia iniziale se detto periodo è superiore a tre mesi. Tutti i pezzi o
prodotti restituiti diventano di proprietà del fabbricante.
La presente garanzia non è applicabile in caso di:
− installazione o uso non conforme alle istruzioni fornite in questo manuale;
− connessione scorretta o uso anomalo dell'apparecchio, in particolare con accessori non forniti a questo scopo;
− usura normale;
− il mancato rispetto delle norme tecniche e di sicurezza in vigore nella zona geografica d'utilizzo;
− apparecchio danneggiato da urti o cadute;
− prodotti deteriorati da fulmini, da sovratensioni elettriche, una fonte diretta o irradiata di calore, contatto con un liquido, esposizione
eccessiva all'umidità o qualsiasi altra causa esterna al prodotto;
− manutenzione errata o negligenza;
− intervento, modifiche o riparazioni effettuate da un tecnico non accreditato dal fabbricante o dal rivenditore.
CON RISERVA DELLE DISPOSIZIONI DI LEGGE, TUTTE LE GARANZIE CHE NON RIENTRANO ALL'INTERNO DI QUELLE
DESCRITTE QUI SOPRA SONO ESCLUSE.
100
Versatis_Conference_it.qxd 31/03/2005 16:10 Page 100
 Loading...