

Page 1
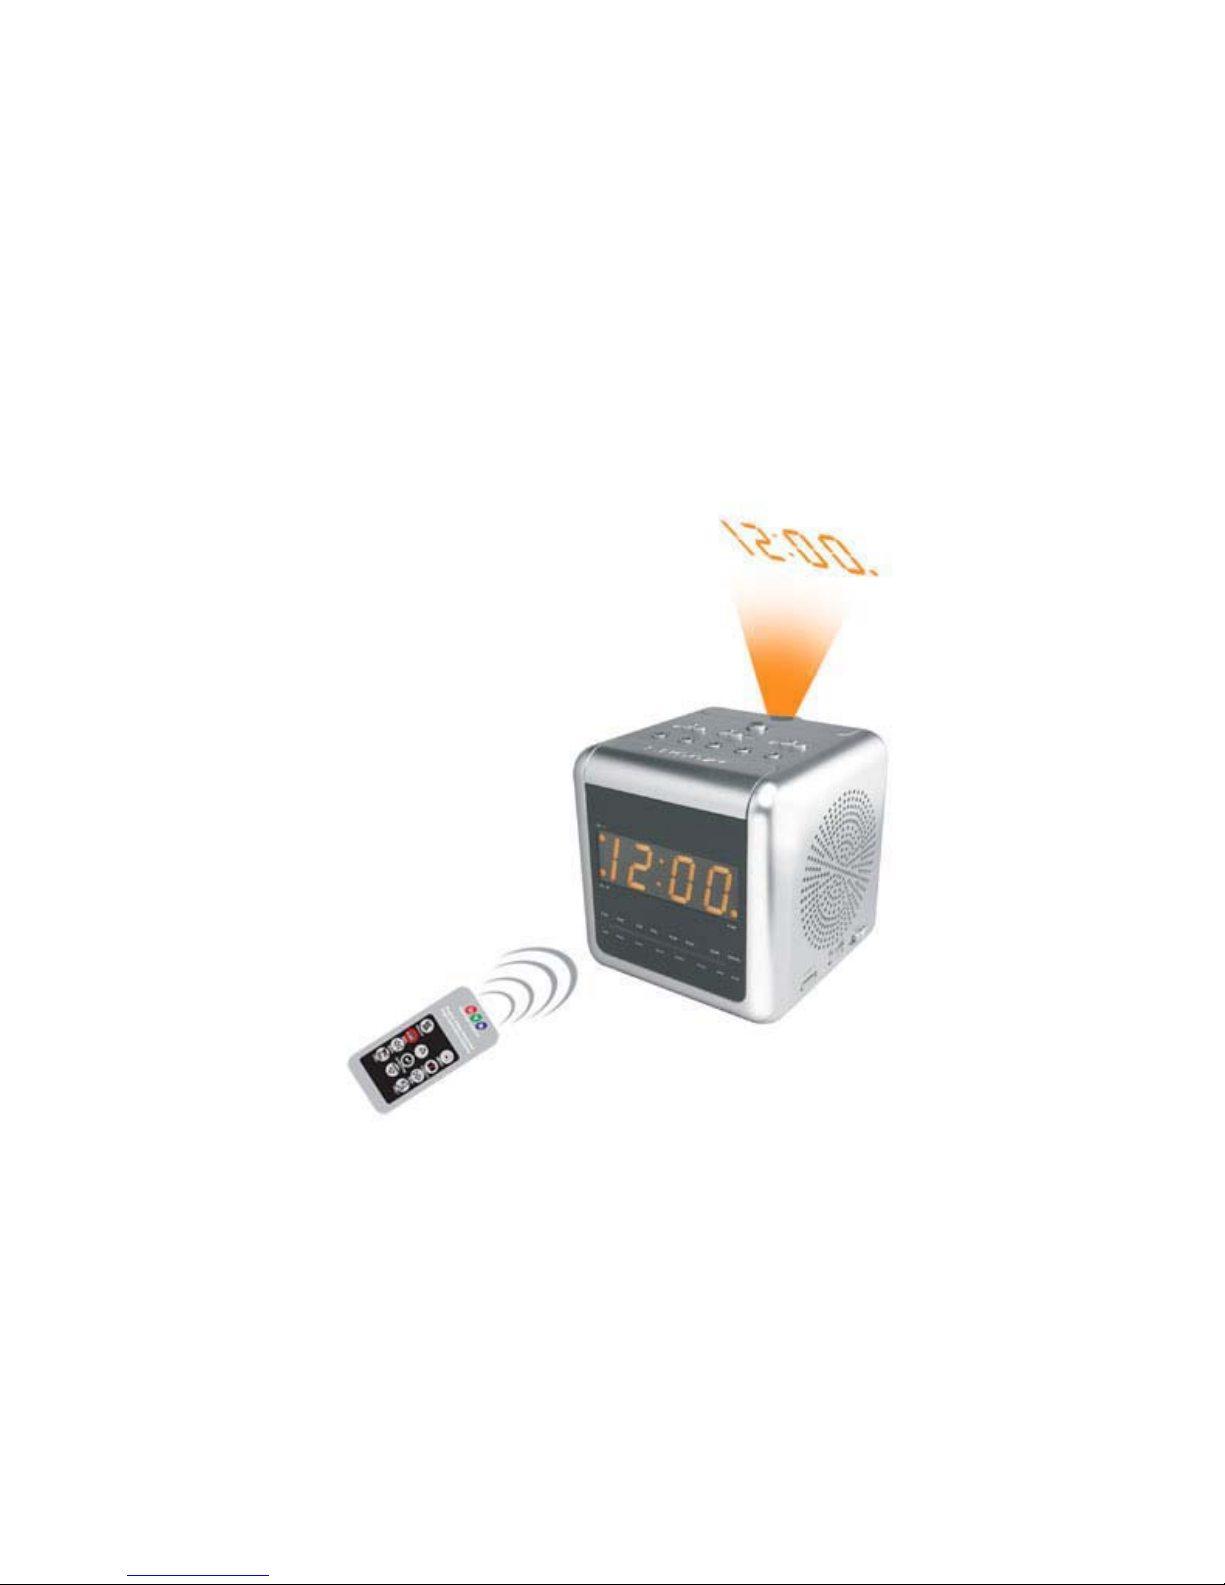
ALC PDR
Portable Digital Recorder
User Manual
Page 2
Package …………………………………………………
Specification .. ………… …………………………………… …………
Recording Capacity Estimator .. ………… ……………………………
CHAPTER 1 - Appearance & Installation
1-1 Appearance Introduction
1-2 IR Remote controller introduction …… ………
1-3 Camera installation ……………………………
1-4 External Trigger installation ………………
1-5 Monitor / earphone installation ………………
1-6 SD memory card installation ………………
1-7 Power adaptor and power on ………………
CHAPTER 2 - System configuration
2-1 Screen information
2-2 System setting ………………………………
…………………………
……………………
CHAPTER 3 - Recording and Playback
3-1 Photo capture and video recording
3-2 Playback ………………………………………
PDVR Main Unit 1 IR Remote Control 1
Power Supply
A / V In DC Out Cable
Height leveling screws x2 SD Card x 1
…………
1 User Guide 1
1 A / V Output Cable 1
1
Page 3
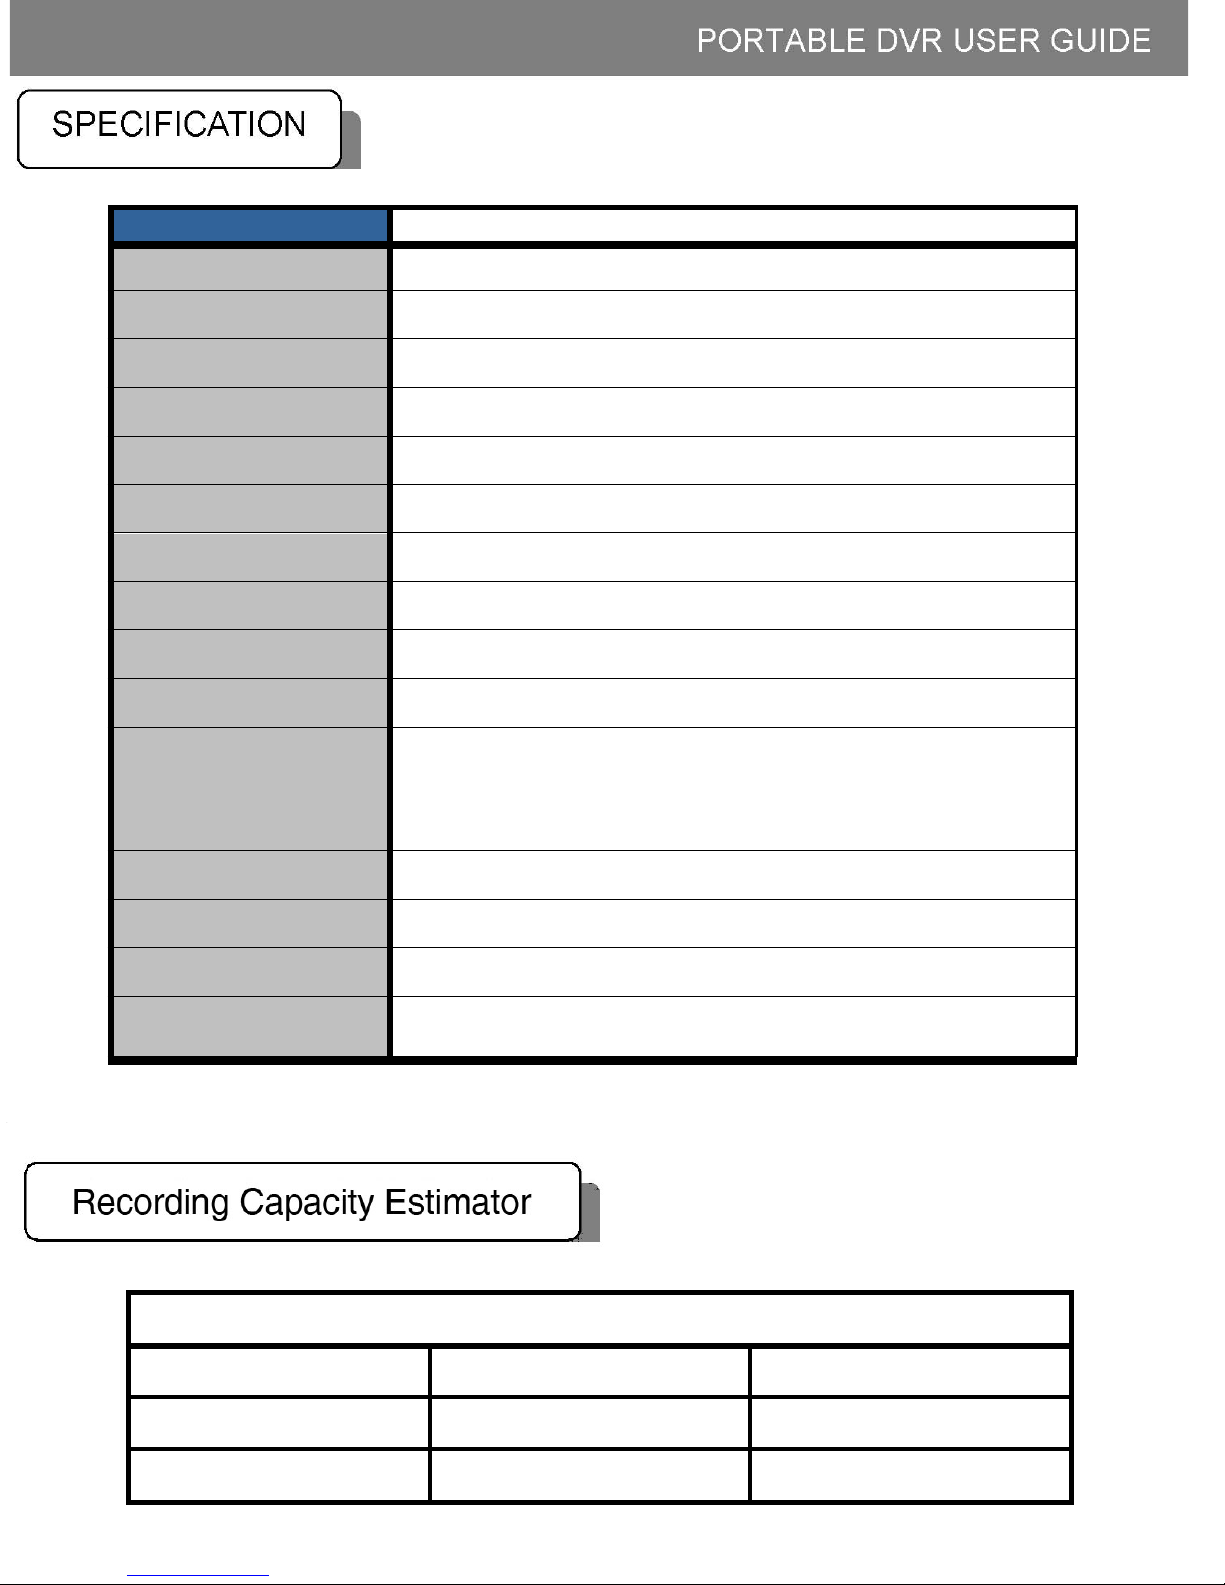
Model Number
SD Card Size Video Photos
1GB
390min (±10%) 23200pics(±10%)
2GB
750min (±10%) 46400pics(±10%)
4GB
1350min (±10%) 95000pics(±10%)
Alarm Clock Portable DVR
Compression
Storage Device
Image Resolution
Video Playback
Photo Display
Audio / Video Input
Audio / Video Output
Display
Video System
Status Indicator
Power Sources
PDR100M PDR50M
MPEG4
External SD Card of Any Size
Record:320 × 240 MPEG4 ,Snapshot: 320 × 240 JPEG
NTSC:30fps/sec , PAL: 25fps/sec. (ASF file format)
JPEG format 640×480
4 pins connector (with DC power for camera)
Composite AV output × 1 (Phone Jack 3.5mm)
2.0” TFT LCD
NTSC / PAL
LED × 1 ᧤Power x Recording᧥
Internal: Rechargeable Li-lon Batteries (3.7V, 2000mA)
External: 12V DC power adaptor External: 5V DC power
adaptor
Power Consumption
Dimension
Operation
Compression
Temperature
Typical 300mA (±5%)
120mm (L) x 120mm (W) x 120mm(H)
-10°C ~ 55°C
30 degree / 10 meter (38KHz carrier / 3.3V)
2
Page 4
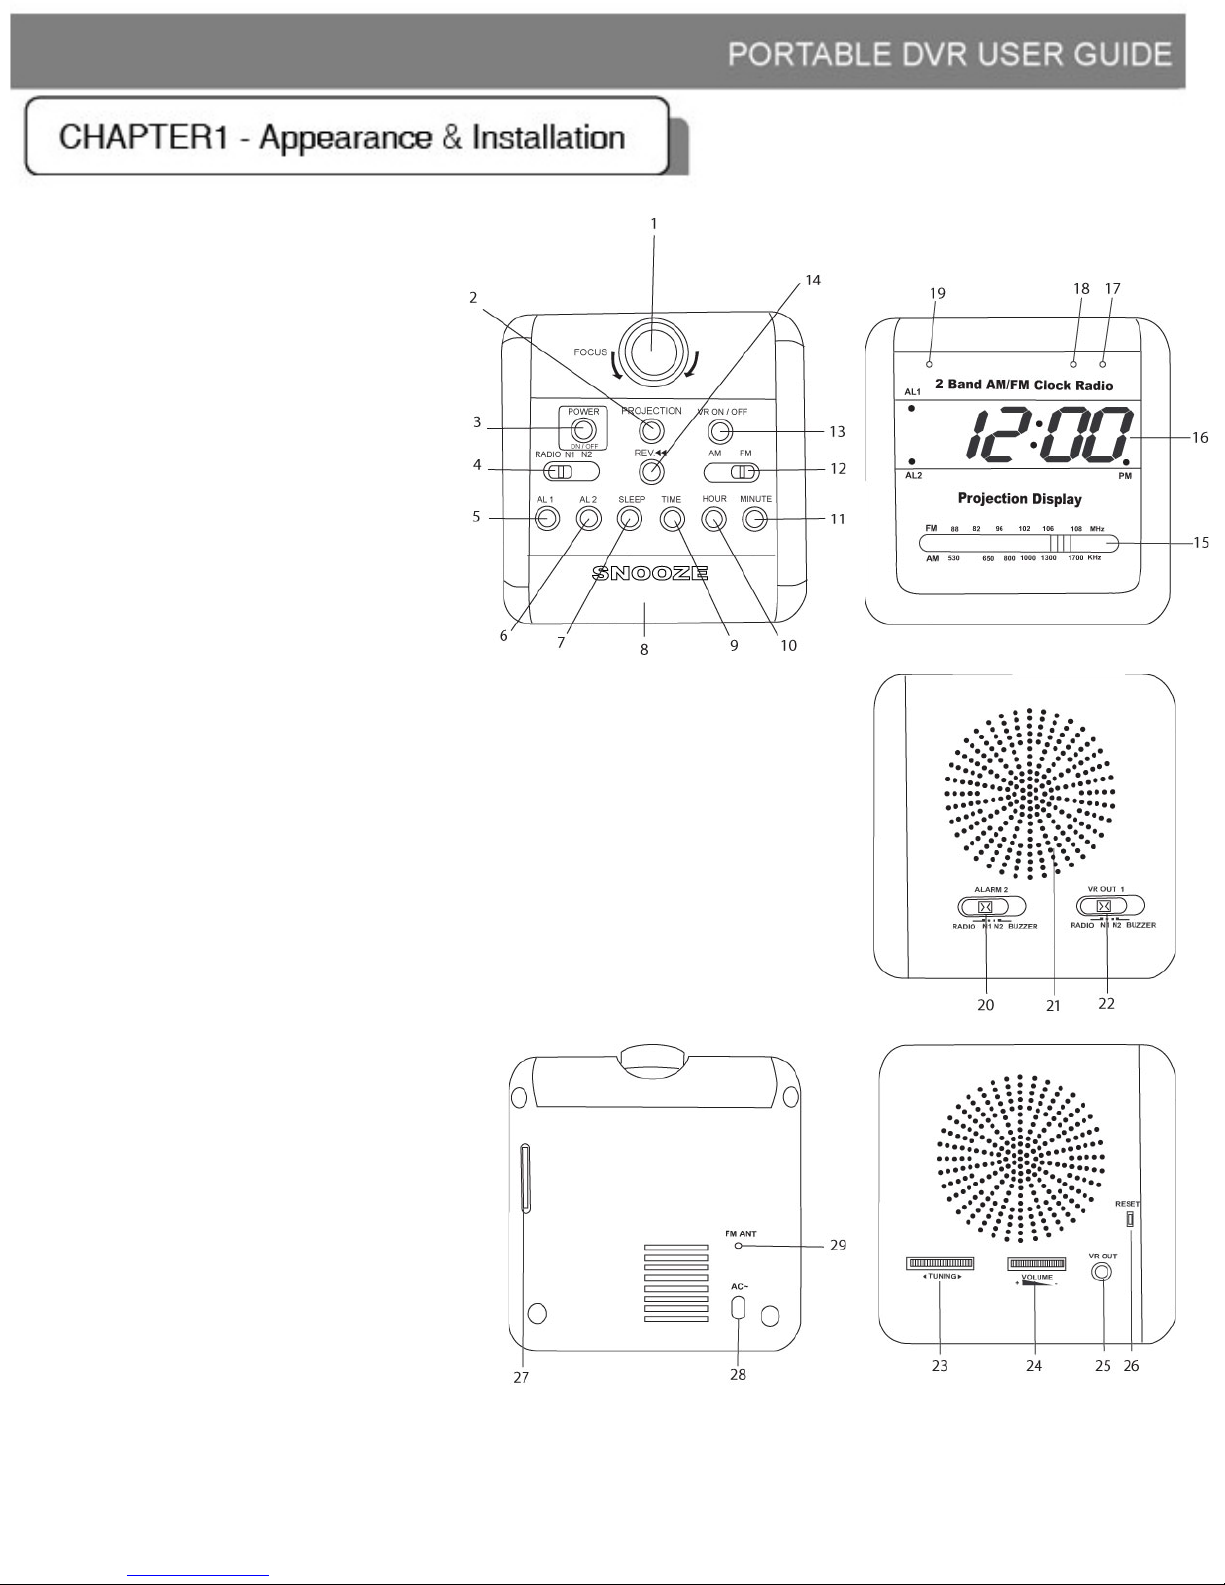
1. Projection Lamp
2. Projection ON/OFF Button
3. Power ON/OFF
4. Radio/N1/N2 Band
5. Alarm 1 Button
6. Alarm 2 Button
7. Sleep Button
8. Snooze Button
9. Time Button
10. Hour Button
11. Minute Button
12. AM/FM Button
13. VR ON/OFF Button:
- DVR ON/OFF
14. REV. Button
- Projection Display mirror button
15. AM/FM scale
16. LCD Display
17. RC IR Sensor
18. Camera
19. DVR Power Led
- When Green (ON)
- When Flashing Orange/Green (REC)
20. Alarm 2 Wake Button
21. Speaker
22. Alarm 1 Wake Button
23. Radio Tuning
24. Volume
25. VR out (A/V Out)
26. Reset Button
27. SD Card Slot
28. AC Cord
29. FM Antenna
3
Page 5
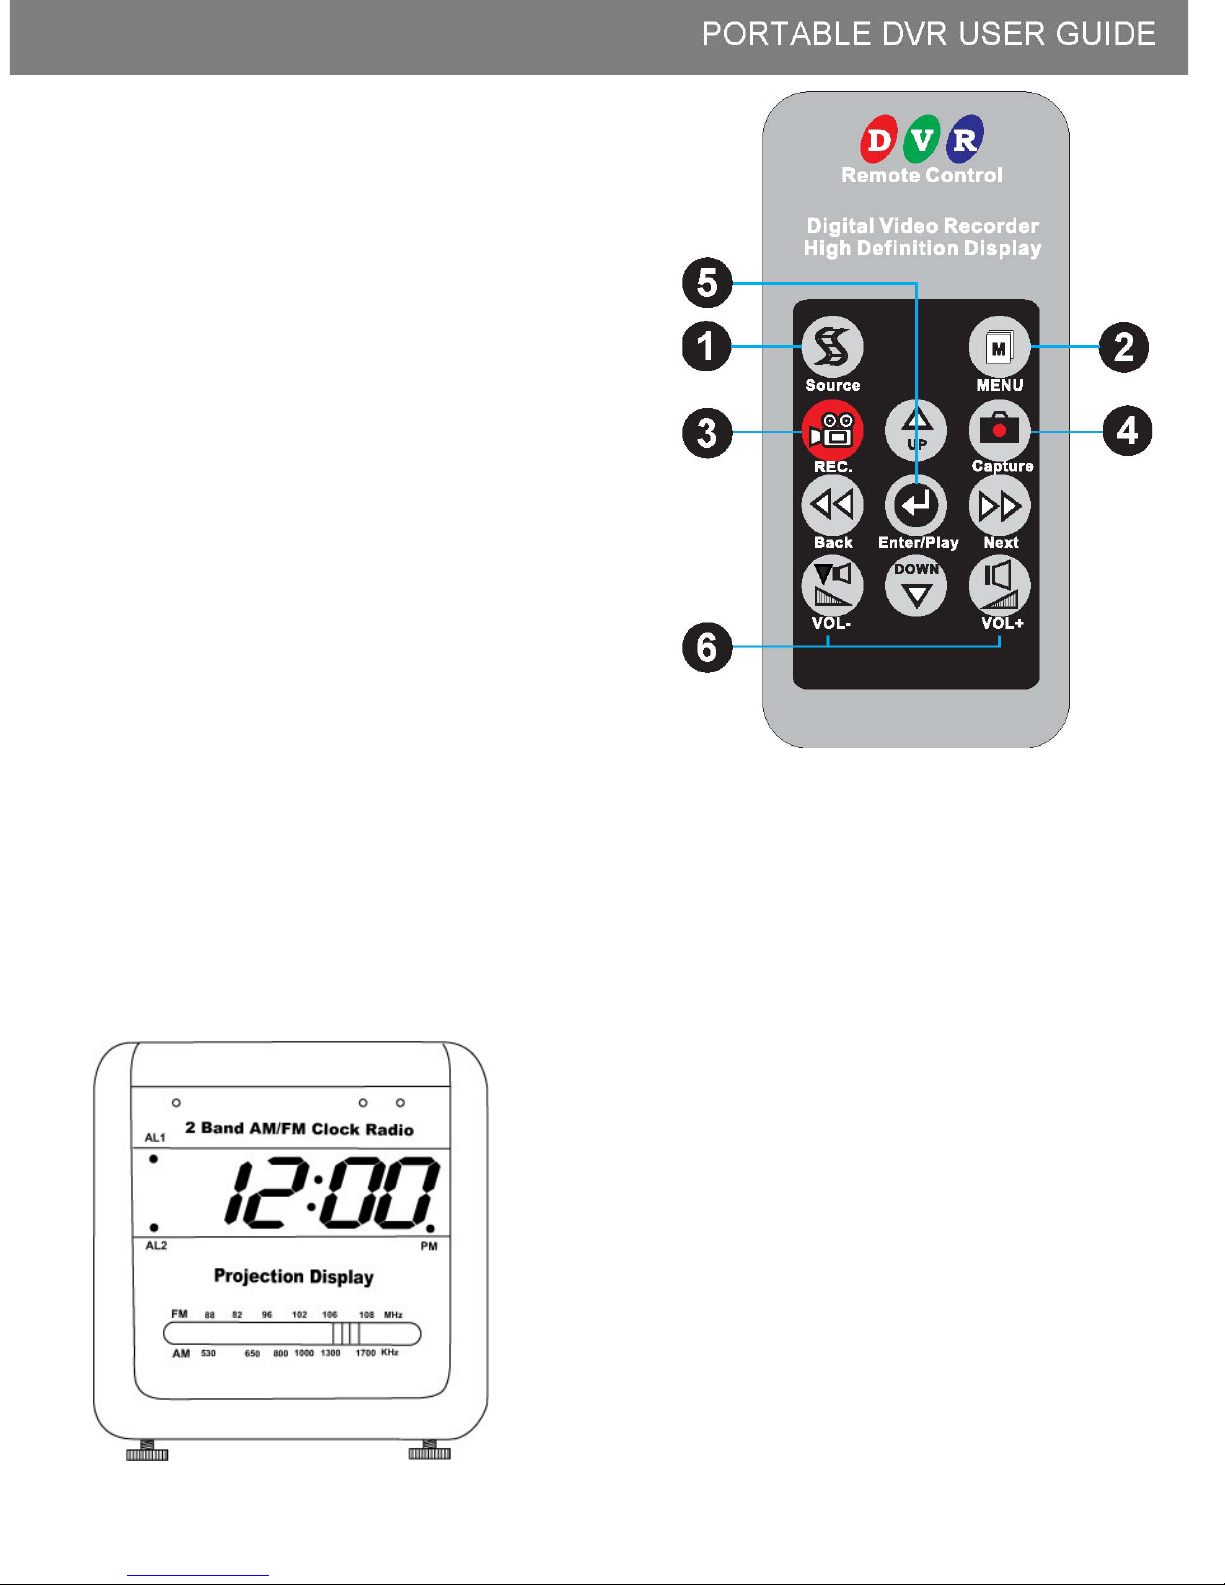
1-2 IR Remote Control
1- Source:
Video Source selection
2- Menu:
System Menu
3- REC
Recording Button
4- Capture
Picture Capture Button
5- Enter Button
Enter / Play Function
1-3 Camera
To use the camera simply push the VR ON/OFF.
To record, use your remote control REC Button.
The light will be flashing Green/Orange when recording.
Adjust the height by using screws:
4
Page 6
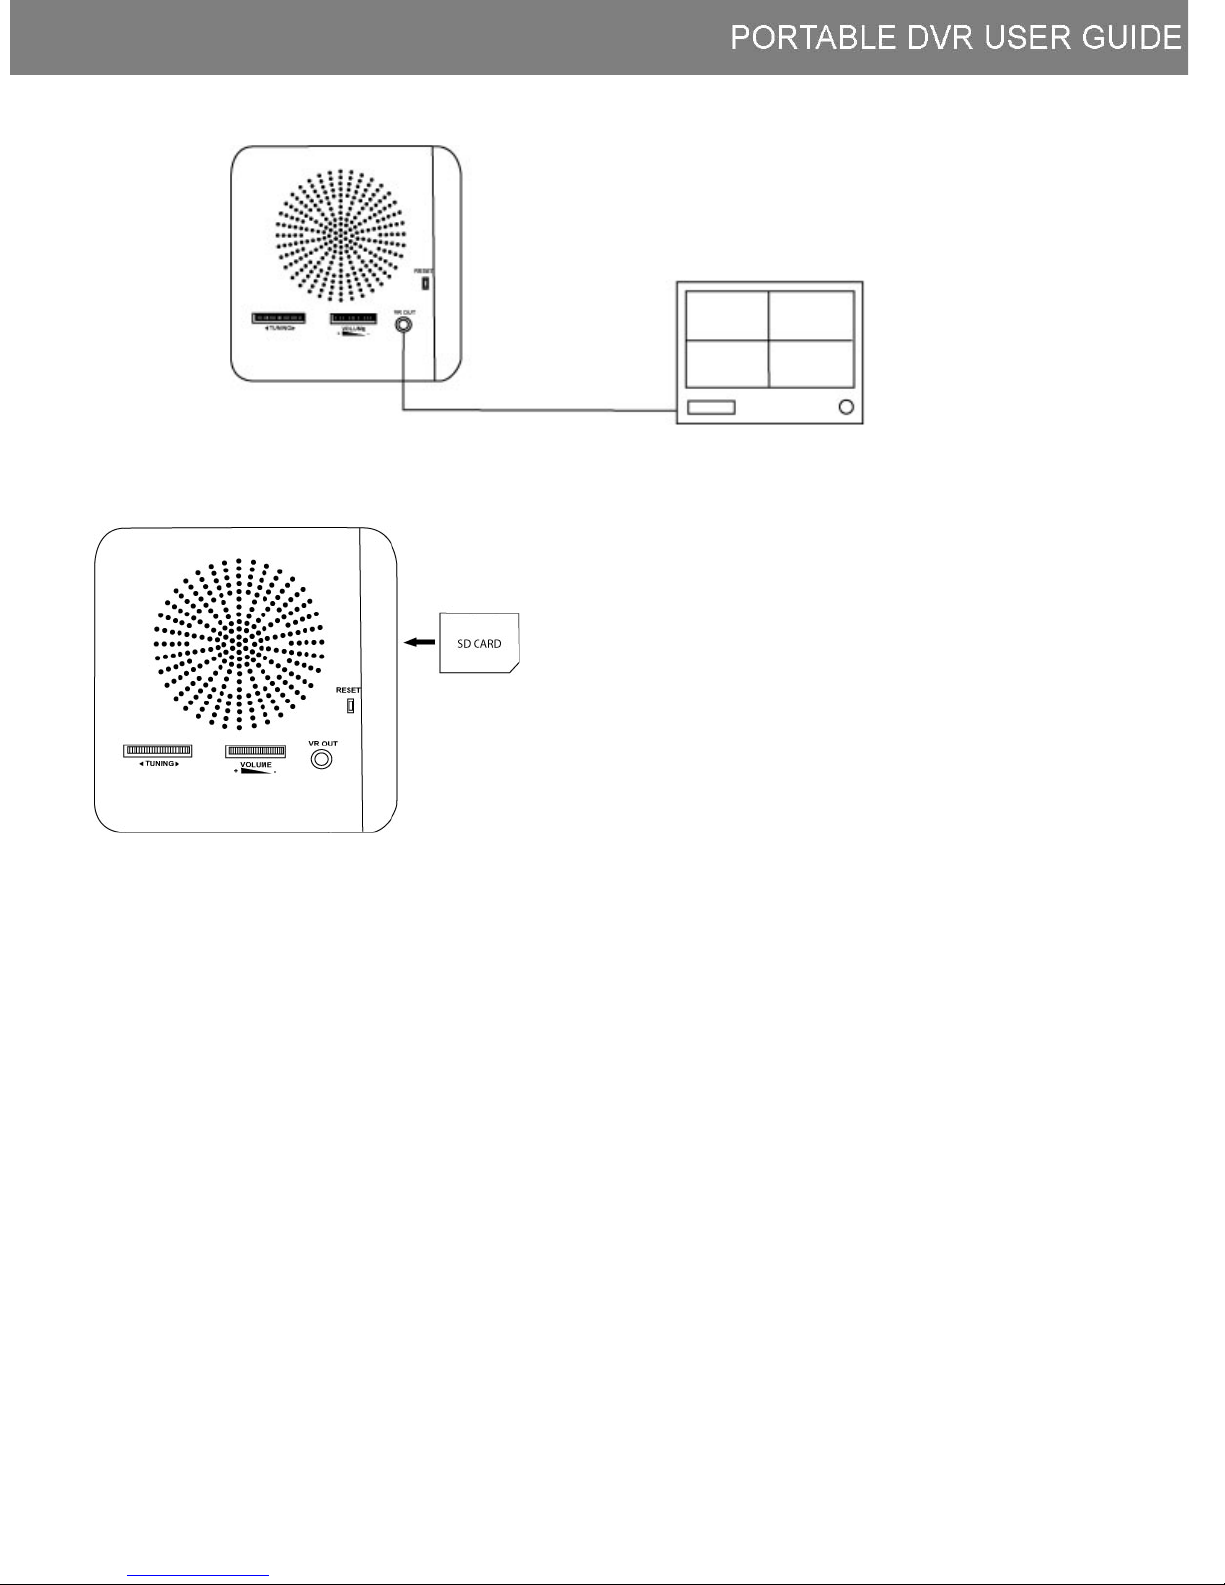
1-4 Monitor / earphone installation
VR OUT : Connect to the external monitor and earphone.
1-6 SD memory card installation
Please make sure the SD card is in the correct direction before plug-in.
5
Page 7
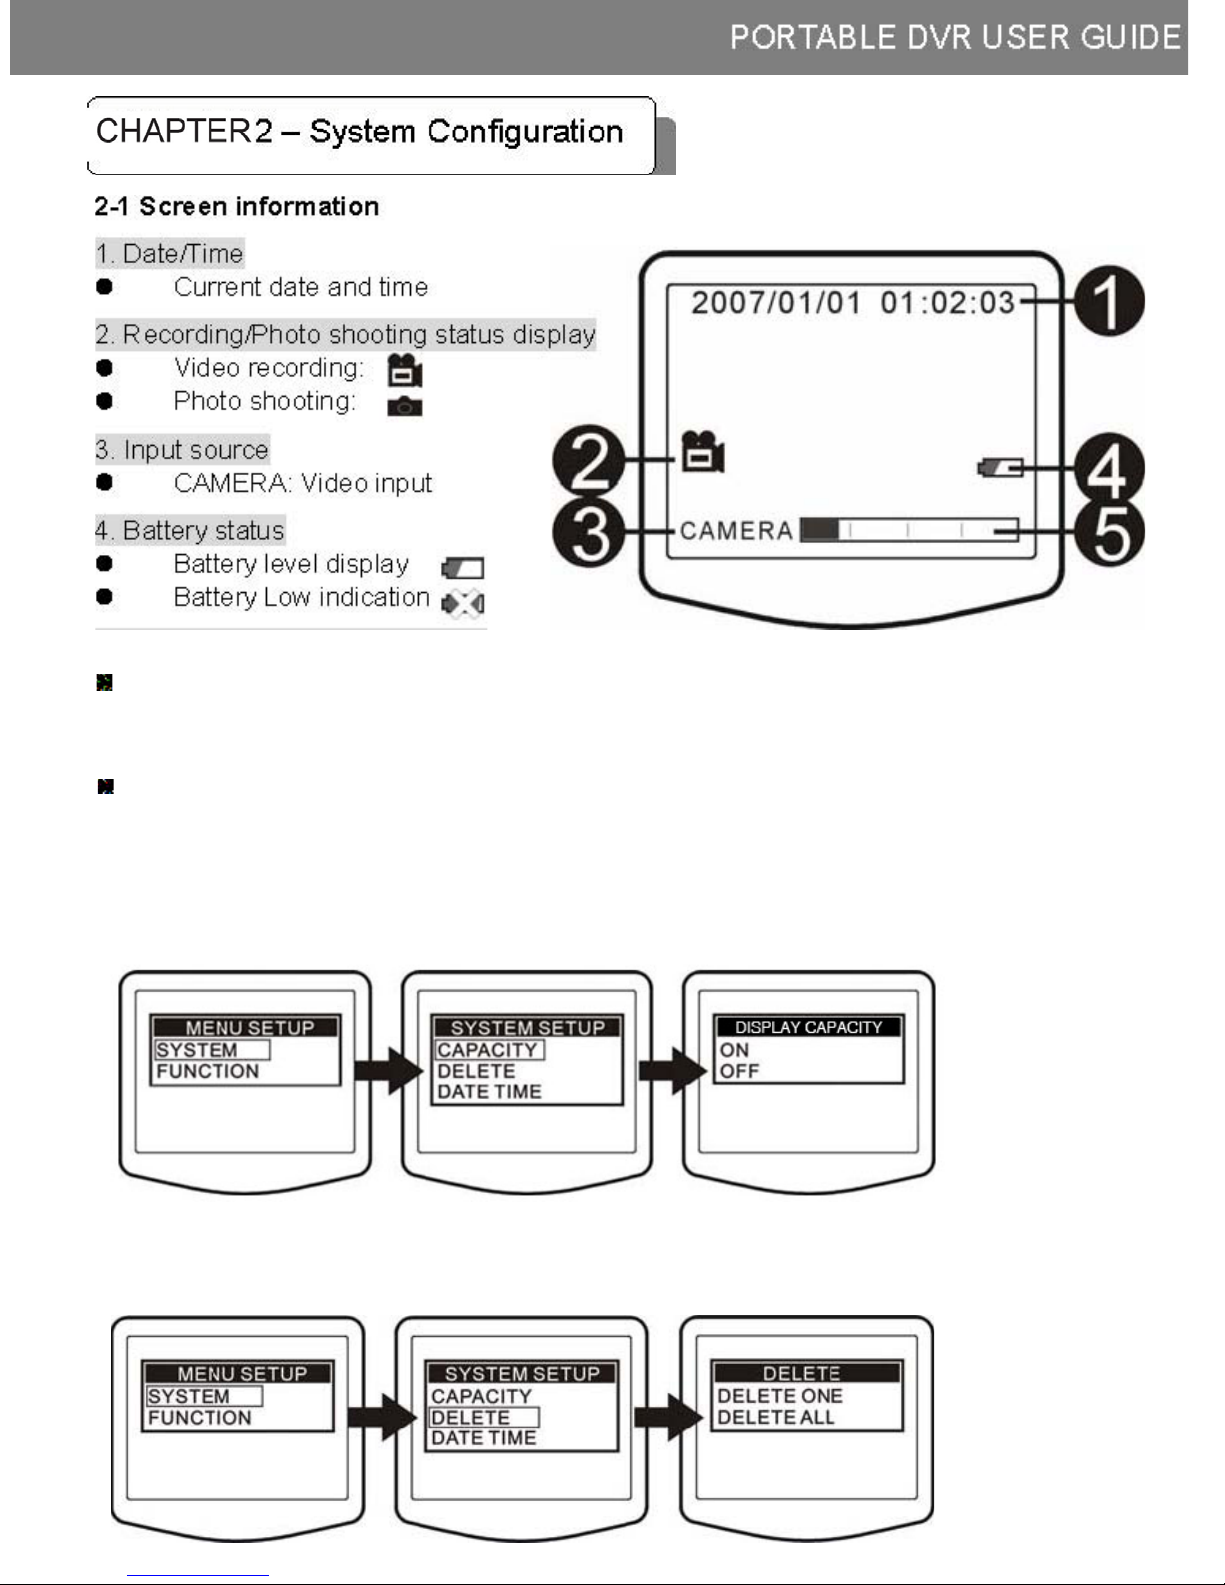
5. Storage capacity status display
SD card storage level display
2-2 System setting
Press MENU button on control panel or remote controller.
2-2-1 Capacity display on/off.
- SYSTEM > CAPACITY > ON - Display Capacity
- SYSTEM > CAPACITY > OFF – Do not Display Capacity
2-2-2 Delete Records
- SYSTEM > DELETE > ONE – Delete the selected records
- SYSTEM > DELETE > ALL – Delete all the records
6
Page 8
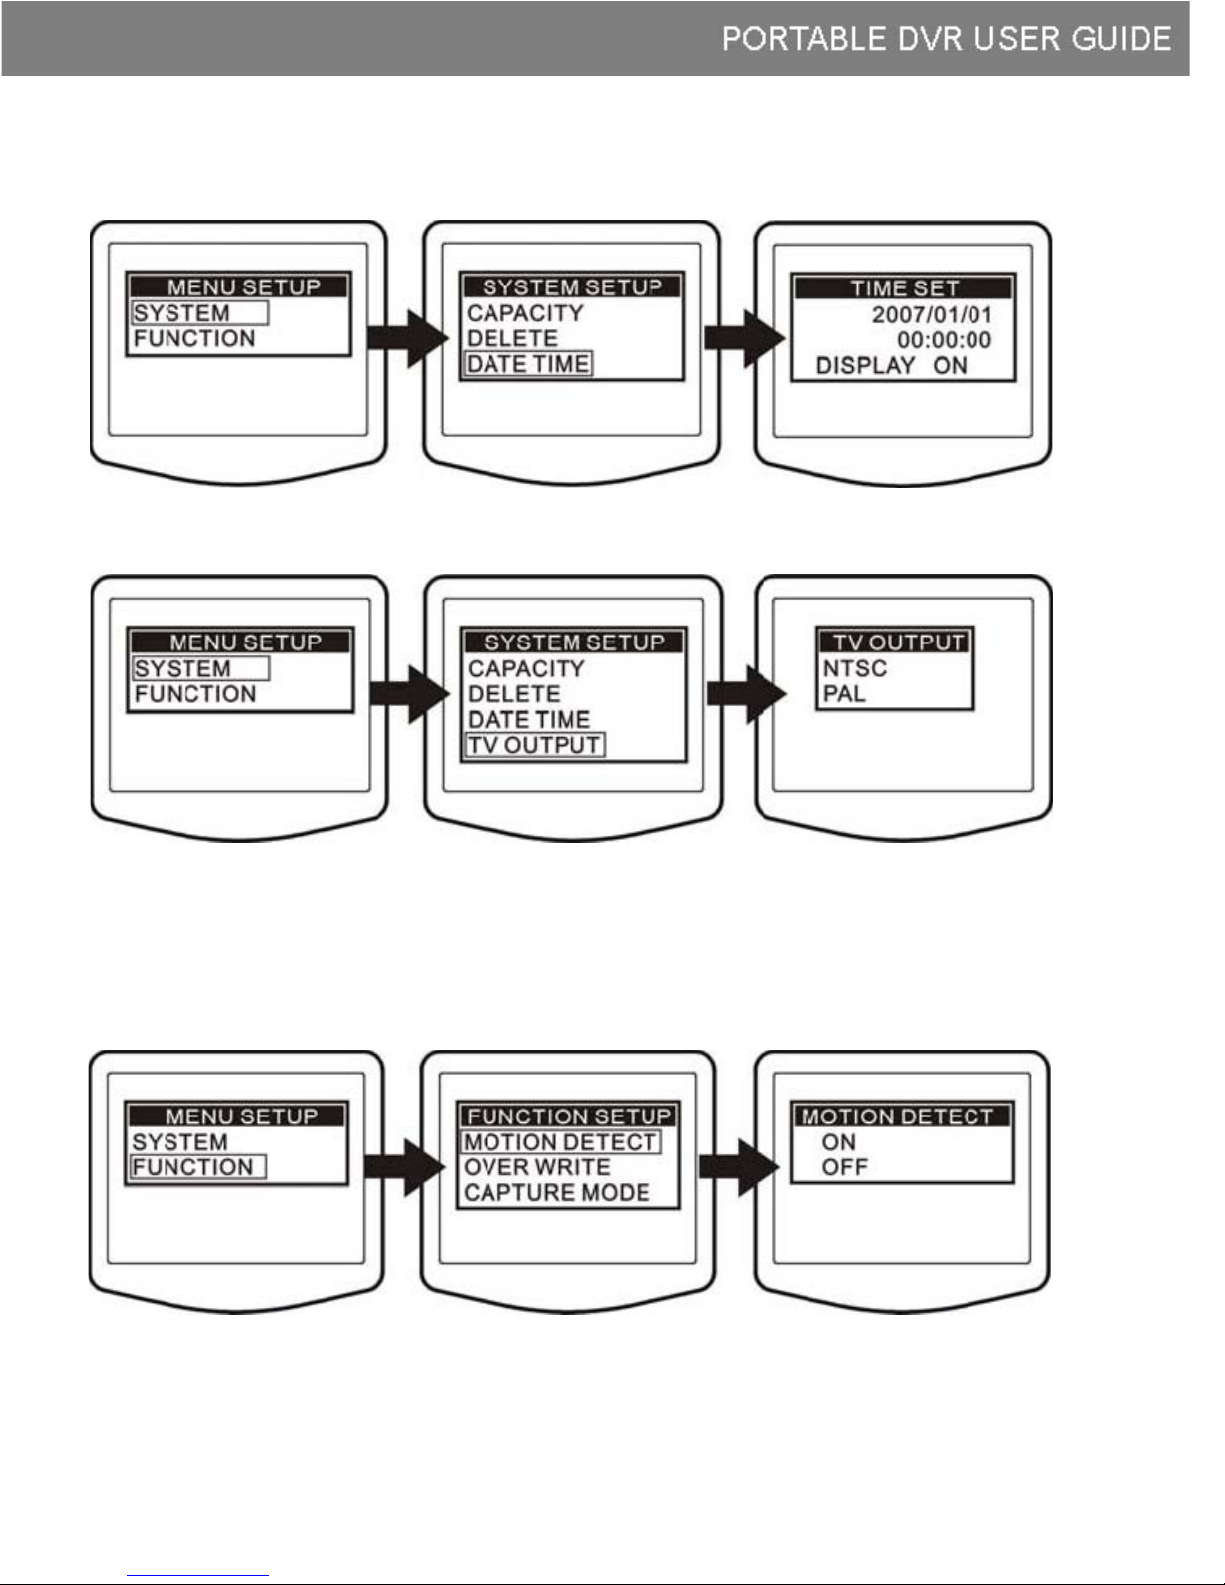
2-2-3 Time Setup
- SYSTEM > DATE TIME – Date and time adjustment
- SYSTEM > DISPLAY ON – Date and Time display ON/OFF Setting
Select options by using LEFT/RIGHT Arrows on the Remote Control and adjust
values using UP/DOWN.
- Select video system for AV OUT.
2-2-5 Motion Detection FUNCTION
- FUNCTION > MOTION DETECT > ON/OFF
7
Page 9
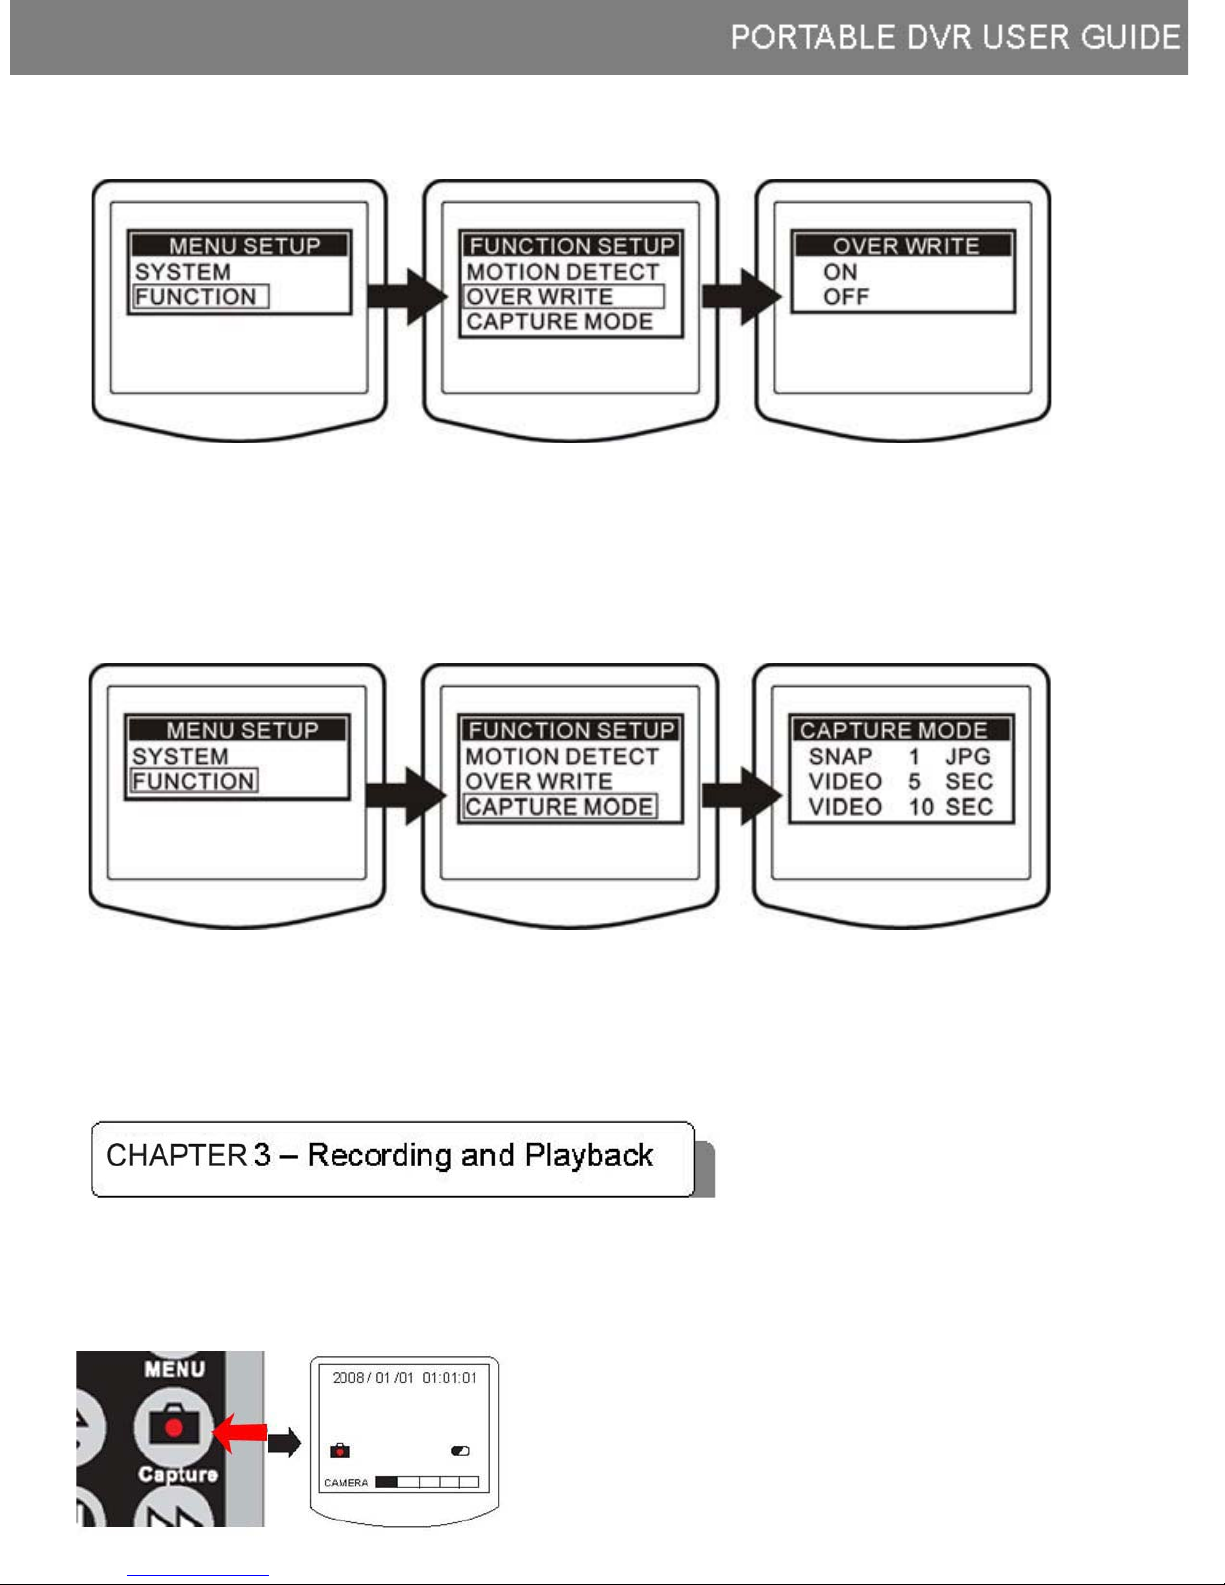
2-2-6 Overwrite recording
J
a
y
FUNCTION> OVER WRITE> ON/OFF
OVER WRITE ON -
Recorded
video will be overwritten.
OVER WRITE OFF - Recording will stop when SD card reaches full capacity.
FUNCTION CAPTURE MODE
Select the recording mode when motion triggered. SNAP 1 JPG: Capture a single
PG photo when motion detect function is triggered. VIDEO 5 SEC: Record video for
5 seconds when motion detect function is triggered. VIDEO 10 SEC: Record video
for 10 seconds when motion detect function is triggered.
3-1 Photo capture and video recording When the camera is connected,
ou can capture photos or record the video.
Photo capture
Press “CAPTURE” to take
JPG Snapshot
8
Page 10
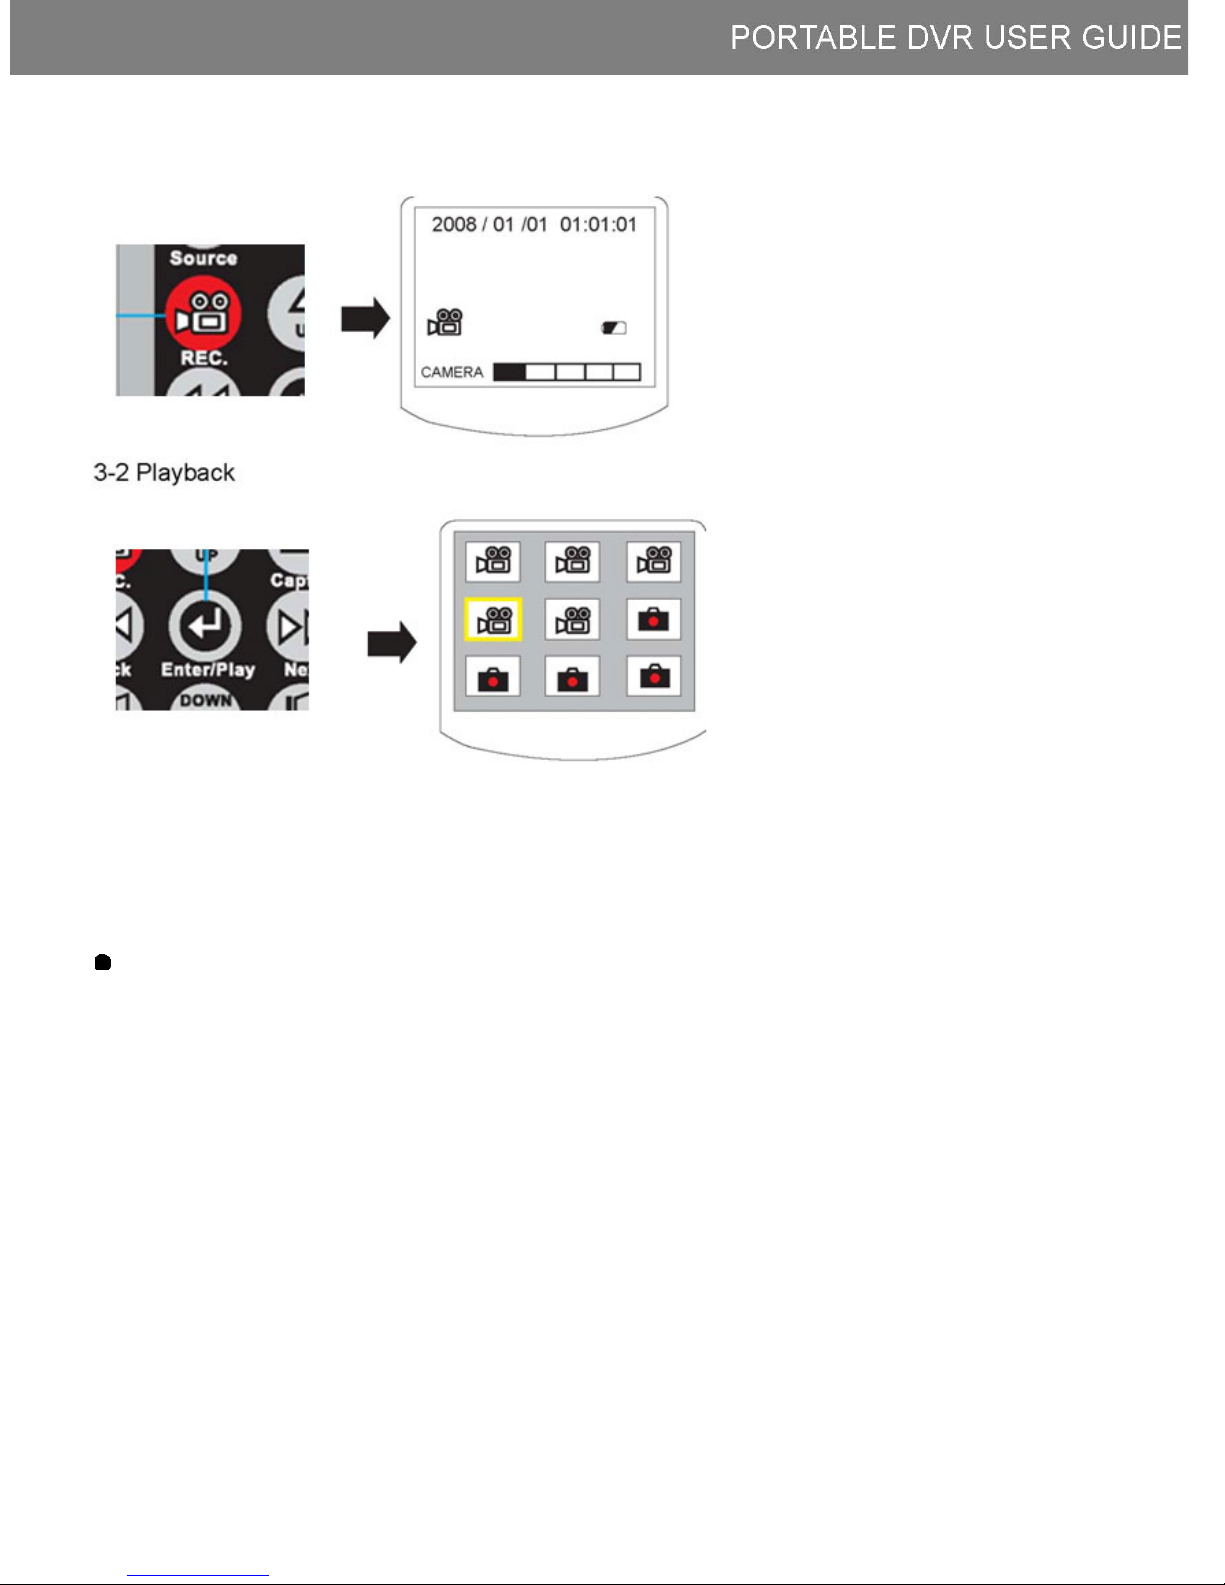
Video recording
T
-Press “REC” to start recording
and press “REC” again to stop
recording.
-Please stop recording before
pressing "MENU" to enter System
setup menu.
-On Live Display , press left/right/down to enter Playback menu.
hen, press up/ down to change page and press left/ right to select a file.
After the file selected:
-Press “ENTER” to play
the video or display
photo.
-Press “MENU” for signal
file deleting process
-Press “CAPTURE” to go
back to live display.
- Video files can be
viewed at “Windows
Media player” on PC.
9
 Loading...