

Page 1
Tectalk Worker
Bedienungsanleitung
i
Page 2

SICHERHEITSVORKEHRUNGEN
1. Wenden Sie sich für eine Reparatur nur an qualifizierte Techniker.
2. Zerlegen oder modifizieren Sie den Transceiver in keinem Fall.
3. Setzen Sie den Transceiver nicht über einen längeren Zeitraum dem direkten Sonnenlicht oder
extremer Hitze aus.
4. Stellen Sie den Transceiver auf keine instabile Oberfläche.
5. Halten Sie den Transceiver fern von Staub, Feuchtigkeit und Wasser.
6. Betreiben Sie den Transceiver nicht und laden Sie den Akku nicht unter explosiven
Bedingungen.
ii
Page 3

INHALTSVERZEICHNIS
SICHERHEITSVORKEHRUNGEN .................................................................................................. ii
INHALTSVERZEICHNIS .................................................................................................................. iii
AUSPACKEN UND ÜBERPRÜFEN DER GERÄTE ........................................................................ 1
MITGELIEFERTES ZUBEHÖR ........................................................................................................ 1
LADEN DES LI-IONEN-AKKUS ....................................................................................................... 1
EINSETZEN/ENTFERNEN DES AKKUS ......................................................................................... 2
VORSICHT: ...................................................................................................................................... 2
ANBRINGEN DES GÜRTELCLIPS ................................................................................................. 2
ANSCHLUSS DES LAUTSPRECHERMIKROFONS ....................................................................... 2
TASTEN, KNÖPFE UND FUNKTIONEN ......................................................................................... 3
BETRIEB .......................................................................................................................................... 3
ZUSÄTZLICHE FUNKTIONEN ........................................................................................................ 4
RAUSCHUNTERDRÜCKUNG ..................................................................................................... 4
TIME-OUT-TIMER (TOT) .............................................................................................................. 4
SCAN ............................................................................................................................................ 4
SPRACHANKÜNDIGUNG ............................................................................................................ 4
VOX (SPRACHGESTEUERTE ÜBERTRAGUNG) ...................................................................... 4
AUTOMATISCHER AKKUSPARMODUS ..................................................................................... 5
BATTERIESTANDSMELDUNG .................................................................................................... 5
MONITOR ..................................................................................................................................... 5
SPERRE FÜR BELEGTE KANÄLE (BUSY CHANNEL LOCKOUT - BCL) .................................. 5
CTCSS/DCS ................................................................................................................................. 5
TECHNISCHE DATEN ..................................................................................................................... 6
FEHLERBEHEBUNGSANLEITUNG ................................................................................................ 6
iii
Page 4
AUSPACKEN UND ÜBERPRÜFEN DER GERÄTE
Packen Sie den Transceiver vorsichtig aus. Wir empfehlen, die gelieferten Gegenstände mit der
folgenden Tabelle abzugleichen, bevor Sie das Verpackungsmaterial entsorgen. Sollten
Gegenstände fehlen oder während des Versands beschädigt worden sein, so kontaktieren Sie
bitte umgehend den Händler.
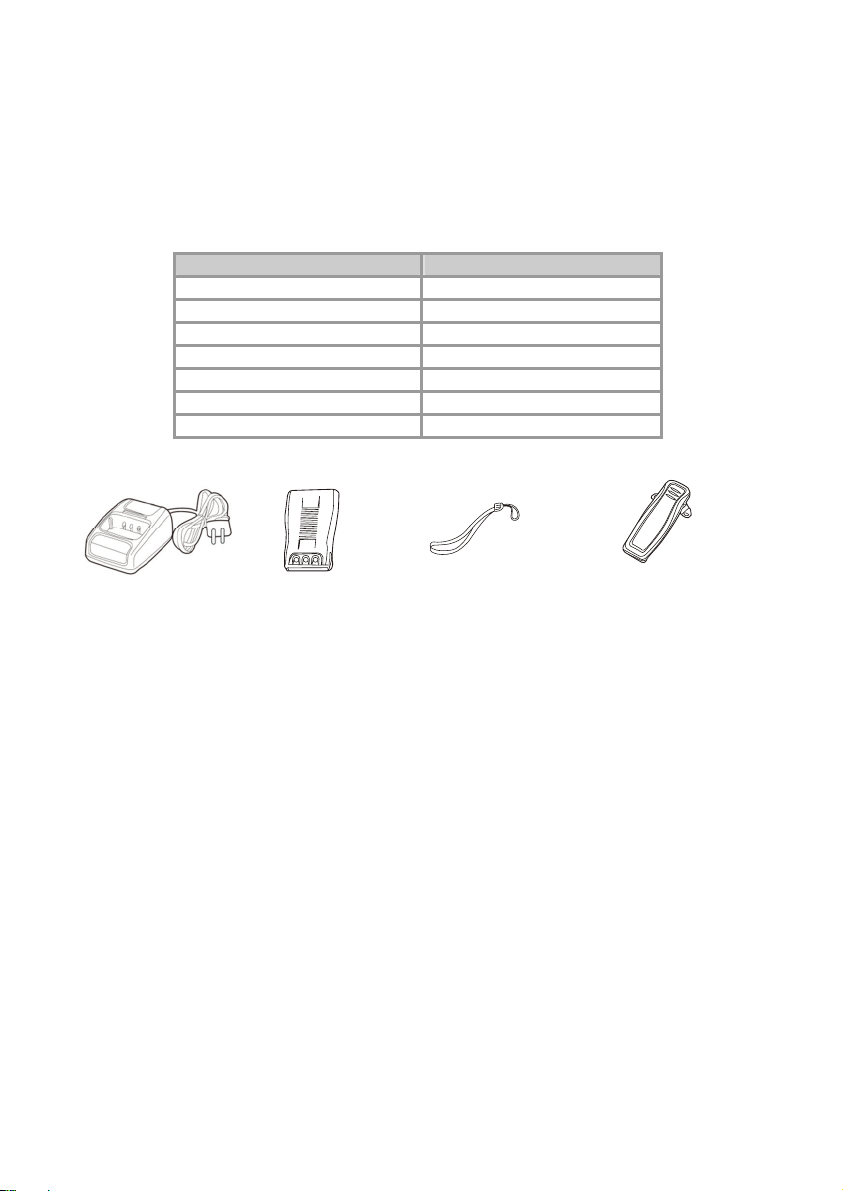
MITGELIEFERTES ZUBEHÖR
Bezeichnung Anzahl
Koffer 1
Funkgerät 2
Lautsprechermikrofon 2
Ladegerät 2
Akku 2
Handschlaufe 2
Gürtelclip 2
Benutzerhandbuch 1
Ladegerät Akku Handschlaufe Gürtelclip
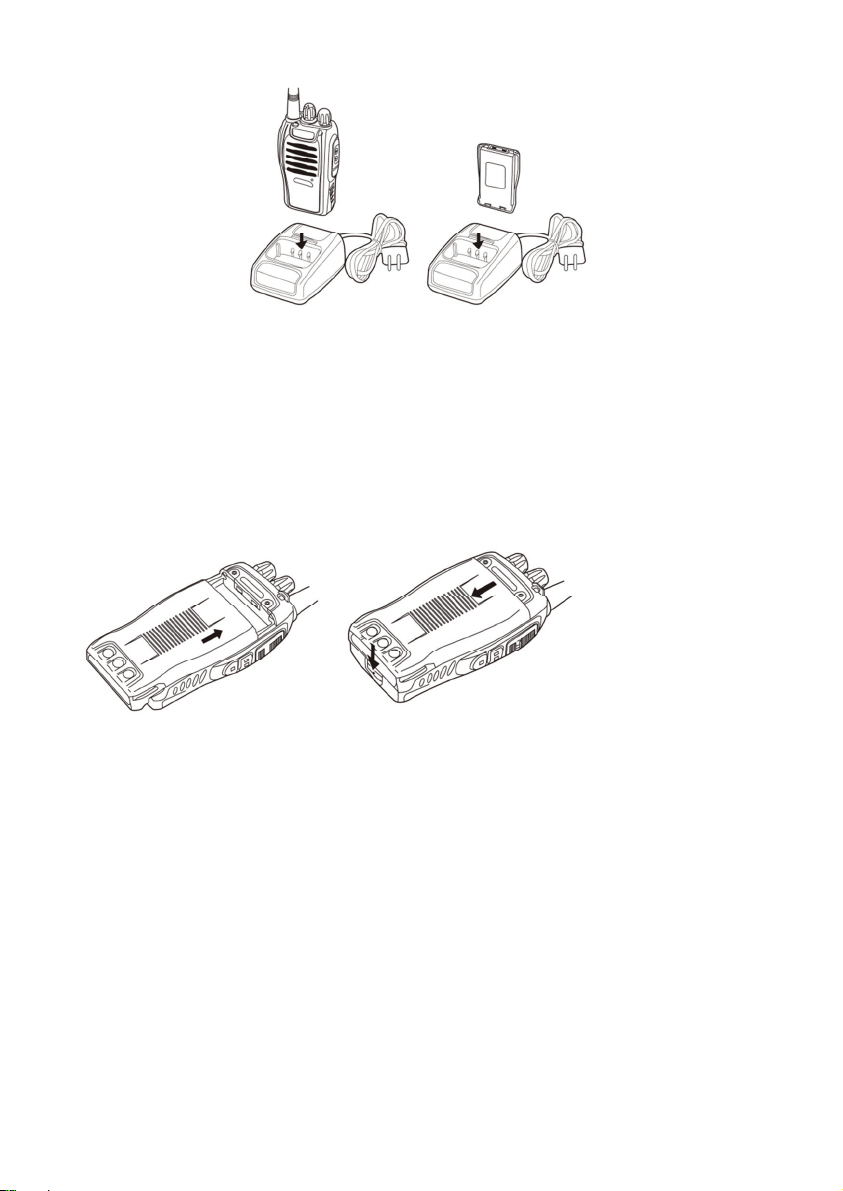
LADEN DES LI-IONEN-AKKUS
Bitte laden Sie den neuen Akku vor Gebrauch auf.
Hinweis: Ein neuer oder (über mehrere Monate) eingelagerter Akku erreicht seine volle Kapazität
nicht mit der ersten Aufladung. Erst nach dem zweiten oder dritten Auf- und Entladen erreicht er
seine volle Kapazität.
BEFOLGEN SIE EINFACH DIE FOLGENDEN ANWEISUNGEN
Stecken Sie das Netzteil in eine Steckdose.
Stecken Sie den Transceiver oder den Akku in die Ladestation.
Stellen Sie sicher, dass die Batteriekontakte richtig mit der Ladestation verbunden sind.
Während des Ladevorgangs leuchtet die Anzeigenleuchte rot.
Nach ca. 3 Stunden leuchtet die LED-Anzeigenleuchte grün. Dies bedeutet, dass der
Akku nun vollständig geladen ist. Nehmen Sie nun den Akku oder den Transceiver aus
der Ladestation.
1
Page 5
HINWEIS:
Laden Sie einen Akku nicht erneut auf, wenn er bereits vollständig aufgeladen ist. Hierdurch kann
die Lebensdauer des Akkus verkürzt oder der Akku beschädigt werden.
EINSETZEN/ENTFERNEN DES AKKUS
Die Nutzungsdauer des mitgelieferten Akkus beträgt ca. 8 Stunden. Dieser Wert basiert auf 5 %
Übertragung, 5 % Empfang und 90 % Standby (standardmäßiger Dienstzyklus). Siehe folgende
Abbildungen:
VORSICHT:
Schließen Sie die Kontakte des Akkus nicht kurz und werfen Sie den Akku nicht ins
Feuer.
Zerlegen Sie den Akku nicht eigenhändig.
Bevor Sie einen Akku austauschen oder wenn Sie einen Ersatzakku mitführen,
verwenden Sie bitte Klebeband, um die Akkukontakte vor jeglichen Kurzschlüssen
während des Transports zu verhindern. In Flugzeugen dürfen Ersatzakkus lediglich im
Handgepäck und niemals in dem im Vorfeld abgegebenen Gepäck mitgeführt werden.
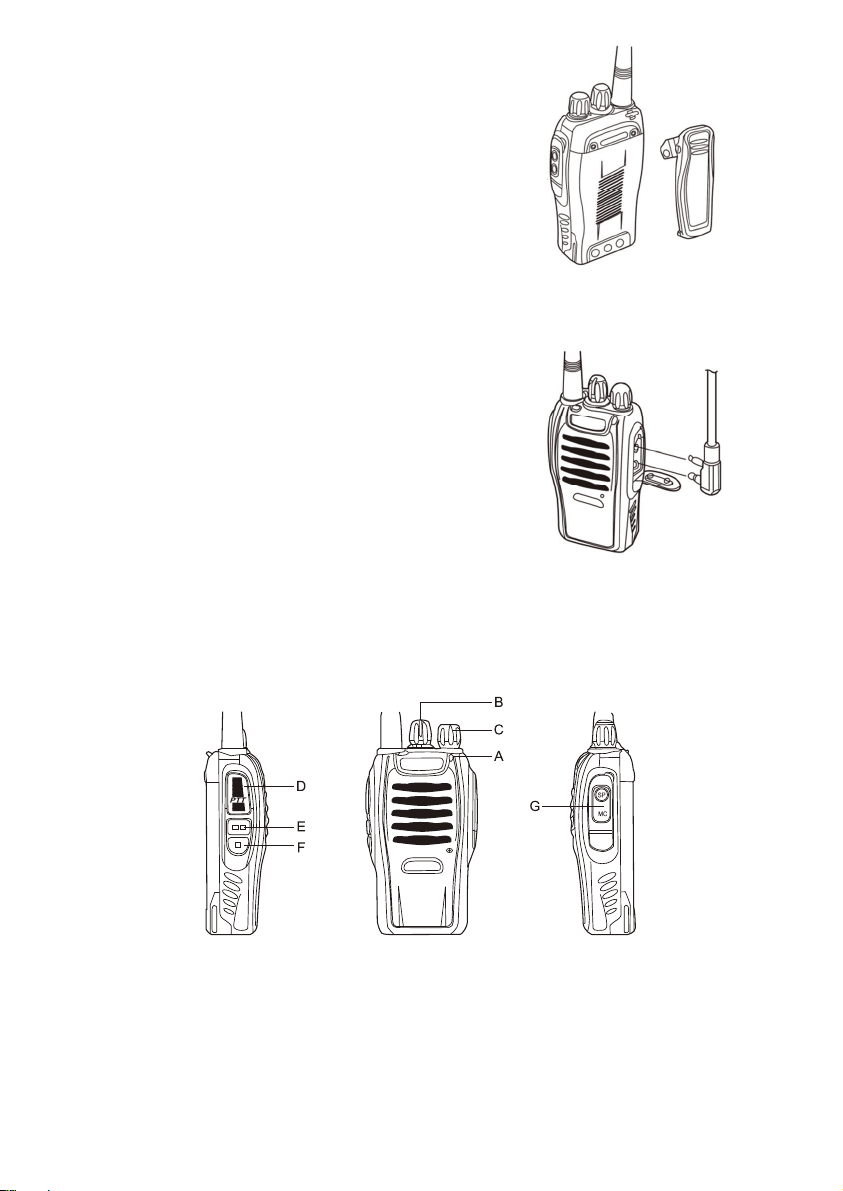
ANBRINGEN DES GÜRTELCLIPS
Sollte der Gürtelclip nicht angebracht sein, so kann die Stelle,
an der dieser befestigt wird, während einer durchgehenden
Übertragung oder bei hohen Temperaturen heiß werden.
ANSCHLUSS DES
LAUTSPRECHERMIKROFONS
Stecken Sie den Stecker des Lautsprechermikrofons in die
Lautsprecher-/Mikrofonbuchse des Transceivers.
HINWEIS:
Der Transceiver ist bei der Nutzung eines externen
Lautsprechers/Mikrofons nicht vollkommen wasserbeständig.
Setzen Sie die Gummiabdeckung auf die Buchsen, wenn der
externe Kopfhörer nicht benutzt wird.
2
Page 6
TASTEN, KNÖPFE UND FUNKTIONEN
A. LED-Anzeigenleuchte — Die LED-Anzeigenleuchte leuchtet während der Übertragung
durchgehend rot. Die LED-Anzeigenleuchte leuchtet im Empfangsmodus grün.
B. Kanalwahlschalter — Drehen, um einen Kanal zwischen CH 1 und CH 16 einzustellen. Die
Kanäle sind von Werk aus vorprogrammiert und können von einem PC-Programmierer
geändert werden (wenden Sie sich an einen Service-Techniker oder Vertriebshändler).
C. HAUPTSCHALTER/LAUTSTÄRKENREGLER
Im Uhrzeigersinn drehen, um den Transceiver einzuschalten und drehen, um die Lautstärke
einzustellen. Bis zum Anschlag im Gegenuhrzeigersinn drehen, um das Gerät auszuschalten.
D. PTT (PUSH-TO-TALK)-TASTE
Drücken Sie die PTT-Taste und sprechen Sie anschließend in das Mikrofon, um eine Station
anzurufen. Lassen Sie die PTT-Taste los, um zu hören.
E. MONITOR-TASTE
Drücken und gedrückt halten (= Rauschunterdrückung AUS), um das Hintergrundgeräusch zu
hören. Loslassen, um in den normalen Betrieb zu wechseln.
F. TASCHENLAMPENTASTE — Einfach drücken, um die Taschenlampe zu aktivieren.
G. LAUTSPRECHER/MIKROFON — Die Buchsen befinden sich unterhalb der Gummiabdeckung
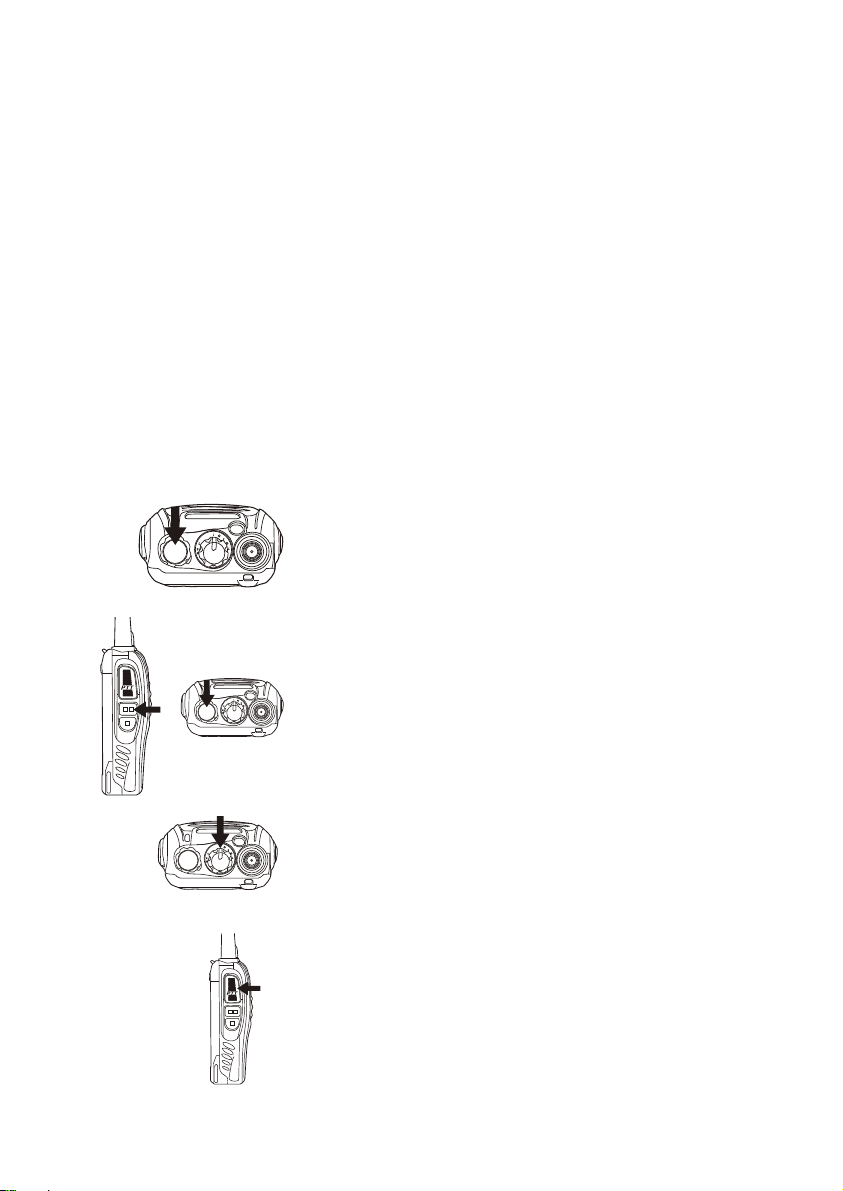
BETRIEB
EIN-/AUSSCHALTEN
Drehen Sie den Hauptschalter/Lautstärkenregler im Uhrzeigersinn. Es
ertönen ein Piepton und eine Sprachansage. Hierdurch wird angezeigt,
dass der Transceiver eingeschaltet ist.
EINSTELLEN DER LAUTSTÄRKE
Halten Sie die Überwachungstaste gedrückt, um den Audio-Pegel zu
hören, während Sie den Hauptschalter/Lautstärkenregler drehen. Drehen
Sie den Knopf im Uhrzeigersinn, um die Lautstärke zu erhöhen, und im
Gegenuhrzeigersinn, um die Lautstärke zu verringern.
EINEN KANAL AUSWÄHLEN
Drehen Sie den Kanalwahlschalter, um den gewünschten Kanal
einzustellen. Die Kanäle sind von Werk aus mit 8 PMR 446-Kanälen + 8
unterschiedlichen CTCSS-Code-/PMR 446-Kanalkombinationen
voreingestellt.
3
Page 7

ÜBERTRAGUNG
Drücken und halten Sie die PTT-Taste zur Übertragung gedrückt und
sprechen Sie mit normaler Stimme und mit einem Abstand von ca. 5 10 cm zum Mund in das Mikrofon. Die LED-Anzeigenleuchte leuchtet
während der Übertragung durchgehend rot.
ZUSÄTZLICHE FUNKTIONEN
RAUSCHUNTERDRÜCKUNG
Der Zweck der Rauschunterdrückung besteht darin, die Lautsprecher stumm zu schalten, wenn
kein Signal vorhanden ist (Rauschunterdrückung AUS). Mit der richtig eingestellten
Rauschunterdrückung hören Sie nur einen Ton, wenn Sie tatsächlich Signale empfangen
(Rauschunterdrückung EIN). Die Rauschunterdrückung kann über die PC-ProgrammierungsSoftware eingestellt werden (wenden Sie sich an einen Service-Techniker oder Vertriebshändler).
TIME-OUT-TIMER (TOT)
Der Zweck des Time-Out-Timers besteht darin, zu verhindern, dass ein Anrufer einen Kanal über
einen längeren Zeitraum nutzt, was zu einem Schaden durch Wärmeerzeugung führen oder
andere Kanalbenutzer stören kann. Der integrierte Time-Out-Timer begrenzt jede
Übertragungsdauer auf eine bestimmte Zeit. Überschreitet die Übertragungsdauer die von Ihnen
eingestellte Zeit, dann ertönt ein Warnton (Zeiteinstellung abhängig von der PC-Programmierung).
Sie müssen die PTT-Taste loslassen und können anschließend wieder übertragen.
Standardmäßig ist der Time-Out-Timer auf 5 Minuten eingestellt.
SCAN
Der Scan kann zur freihändigen Überwachung von mehreren Frequenzen nützlich sind. Die ScanFunktion ist nur verfügbar, wenn diese von einem Service-Techniker oder Vertriebshändler mithilfe
der PC-Software aktiviert wurde.
Der Transceiver stellt den Scan bei der Frequenz (oder auf dem Speicherkanal) ein, bei
der ein Signal empfangen wird. Anschließend wird der Scan fortgesetzt oder eingestellt.
Wenn weniger als zwei Kanäle programmiert sind, kann kein Scan durchgeführt werden.
Drücken Sie auf Kanal 16 die PTT- und MONI-Taste. Hierdurch wird die SCAN-Funktion
ein- oder ausgeschaltet.
SPRACHANKÜNDIGUNG
Die Sprachankündigung kann per PC-Software ein- oder ausgeschaltet werden.
Drücken Sie auf Kanal 10 die PTT- und MONI-Taste. Schalten Sie anschließend den
Transceiver ein. Die Sprachaufforderung kann aktiviert oder deaktiviert werden.
Drücken Sie auf Kanal 15 die PTT- und MONI-Taste. Schalten Sie anschließend den
Transceiver ein, um eine andere Sprachaufforderungssprache zu wählen.
VOX (SPRACHGESTEUERTE ÜBERTRAGUNG)
VOX ersetzt die Notwendigkeit, die PTT-Taste bei jeder Übertragung zu drücken. Der Transceiver
schaltet automatisch in den Übertragungsmodus, wenn das VOX-System erkennt, dass Sie in das
Mikrofon sprechen.
Wenn die VOX-Funktion aktiviert ist, können Sie die VOX-Signalverstärkung einstellen.
4
Page 8

Hierdurch erkennt der Transceiver den Tonpegel. Dies erfolgt über die
Programmierungs-Software.
Wenn das Mikrofon zu empfindlich ist, beginnt der Transceiver möglicherweise bereits
mit einer Übertragung, wenn lediglich einige Hintergrundgeräusche zu vernehmen sind.
Wenn die Empfindlichkeit zu gering ist, erkennt das Mikrofon Ihre Stimme nicht, wenn
Sie sprechen. Achten Sie darauf, die VOX-Signalverstärkung auf eine angemessene
Empfindlichkeit einzustellen, um eine reibungslose Übertragung zu ermöglichen.
Drücken Sie auf Kanal 1 - 5 die MONI- und PTT-Taste. Schalten Sie anschließend den
Transceiver ein, um die VOX-Funktionen ein-/auszuschalten.
AUTOMATISCHER AKKUSPARMODUS
Die Akkusparfunktion senkt den Stromverbrauch, wenn über einen bestimmten Zeitraum kein
Signal empfangen und das Gerät nicht benutzt wird (keine Tasten gedrückt, keine Schalter
gedreht).
Wenn über 10 Sekunden kein Kanal belegt und das Gerät nicht benutzt wird, wird der
Akkusparmodus aktiviert.
Wenn ein Signal empfangen oder das Gerät benutzt wird, wird der Akkusparmodus deaktiviert.
BATTERIESTANDSMELDUNG
Die Batteriestandmeldung erinnert Sie daran, den Akku aufzuladen, wenn dieser verbraucht ist.
Wenn der Akku zu schwach ist, ertönt ein Warnton und die LED-Anzeigeleuchte blinkt rot. Bitte
laden Sie den Akku auf oder tauschen Sie ihn aus.
MONITOR
Wenn Sie empfangen und kein Signal vorhanden ist, können die Lautsprecher über die
Rauschunterdrückungsfunktion stummgeschaltet werden. Dadurch hören Sie kein
Hintergrundgeräusch. Wenn Sie die Rauschunterdrückungsfunktion ausschalten möchten,
drücken und halten Sie die MONI-Taste gedrückt. Dies ist sehr nützlich, wenn Sie den
Lautstärkenpegel einstellen und schwache Signale empfangen möchten.
SPERRE FÜR BELEGTE KANÄLE (BUSY CHANNEL LOCKOUT - BCL)
Die Sperrfunktion für belegte Kanäle kann über die PC-Programmierungs-Software für jeden
Kanal ein-/ausgeschaltet werden.
Wenn sie aktiviert ist, verhindert BCL, dass Sie andere Parteien unterbrechen, die den gleichen
von Ihnen ausgewählten Kanal nutzen. Wenn Sie die PTT-Taste drücken, während der Kanal
genutzt wird, sendet Ihr Transceiver einen Warnton aus und die Übertragung wird unterbunden
(Sie können nicht übertragen). Lassen Sie die PTT-Taste los, um den Warnton zu deaktivieren
und in den Empfangsmodus zurückzukehren.
CTCSS/DCS
(abhängig von der Programmierung oder der Standardeinstellung)
CTCSS (Continuous Tone CodedSquelch System)/ DCS (Digital CodedSquelch)
Möglicherweise möchten Sie Anrufe nur von bestimmten Personen oder Gruppen empfangen.
Benutzen Sie in diesem Fall den selektiven Anruf, der es Ihnen ermöglicht, unerwünschte Anrufe
von anderen Personen, die die gleiche Frequenz nutzen, zu ignorieren.
CTCSS ist ein Unterschallton und kann zwischen 01 und 38 eingestellt werden, während DCS ein
digitales System zwischen 39 und 83 auf der Code-Liste ist.
Das Gerät wird mit vorkonfigurierter CTCSS-Codierung auf den Kanälen 09 bis 16 geliefert. Die
Kanäle sind nur mit dem gleichen Gerätetyp kompatibel, während CH 1 bis CH 8 mit allen
5
Page 9
PMR 446-Geräten auf dem Markt kompatibel sind.
HINWEIS:
Über CTCSS und DCS ist Ihre Unterhaltung nicht privat und verschlüsselt. Es verhindert lediglich,
dass Sie unerwünschte Unterhaltungen hören müssen.
TECHNISCHE DATEN
Technische
Parameter
Frequenzbereich 446,0 - 446,1 MHz / 400 - 470 MHz programmierbar
Funknennleistung ≤ 0,5 W ERP (EN 300 296-2 Standard für PMR 446)
Kanalkapazität 16 (von Werk aus 8 offene PMR 446 + CTCSS-codierte PMR 446-
Kanäle)
Betriebsspannung 3,7 V
Maße 115 mm x 60 mm x 33 mm
Gewicht 150g
HINWEISE:
Alle technischen Daten können ohne Ankündigung geändert werden.
Mithilfe der PC-Programmierungs-Software kann das Gerät auf speziell zugewiesenen
Frequenzen außerhalb des standardmäßigen PMR 446-Frequenzbereichs senden. Bitte beachten
Sie, dass der Benutzer für die Nutzung von anderen Frequenzen außerhalb des PMR 446Bereichs möglicherweise eine spezielle Lizenz von den lokalen Funkkommunikationsbehörden für
ein gewerblich genutztes PMR-Gerät benötigt.
PMR 446 ist in allen europäischen Ländern erlaubt und durch die Beschlüsse des ECC/CEPT zur
freien Nutzung freigegeben.
Wir erklären hiermit, dass unser Gerät den europäischen Richtlinien (R&TTE LVD und EMC) und
Normen (EN 300 296-2 V.1.3.1 und EN 301 489-05 V. 1.3.1) für PMR-/PMR 446-Geräte entspricht.
Sie finden die aktuelle Konformitätserklärung unter http://service.alan-electronics.de
© Alan Electronics GmbH
FEHLERBEHEBUNGSANLEITUNG
PROBLEM ANLEITUNG
1. Prüfen Sie das Ladegerät und den richtigen Einsatz des
Akkus.
Kein Strom oder Gerät schaltet
sich nach kurzer Zeit ab
Ich kann nicht mit anderen
Gruppenmitgliedern
kommunizieren.
Sie können die Stimme von
anderen Benutzern hören,
2. Reinigen Sie die Batteriekontakte.
3. Tauschen Sie den Akku durch einen vollständig
aufgeladenen oder neuen Akku aus.
4. Schlechte Akkukapazität: Akku defekt oder am Ende seiner
Lebensdauer, Akku austauschen.
1. Überprüfen Sie, ob die Kanalfrequenz und das CTCSS mit
jener der gesamten Gruppe übereinstimmt. Wenn Sie die
standardmäßige Programmierung nutzen, ist dies automatisch
der Fall, wenn alle Mitglieder Ihrer Gruppe den gleichen Kanal
zwischen 1 und 16 nutzen.
2. Die anderen Gruppenmitglieder befinden sich nicht
innerhalb der Reichweite.
Ihr Gerät ist auf einen Kanal zwischen 1 und 8 eingestellt
(offener PMR 446-Dienst ohne Codierung), während Ihre
6
Page 10

diese können Sie jedoch nicht
hören
Andere hören meine Stimme,
jedoch nur mit
Unterbrechungen
Ich höre zu viele
gruppenfremde Stationen
Service-Anschrift
Hotline und Garantiefragen
Partner einen Kanal zwischen 9 und 16 nutzen.
Bitte wechseln Sie auf den gleichen Kanal, den Ihre Partner
nutzen.
1. Zu schwaches Signal - zu weit entfernt
2. Externes Mikrofon defekt? Bitte lassen Sie dies von einem
Service-Techniker überprüfen.
1. Eine andere Gruppe nutzt den gleichen Kanal - wechseln
Sie den Kanal
2. Sie nutzen einen Kanal zwischen CH 1 und CH 8. Bitte
wählen Sie einen Kanal zwischen CH 9 und CH 16 für Ihre
Gruppe.
Was kann ich tun, wenn mein Gerät nicht wie vorgesehen
funktioniert, nachdem ich alles auf seine Richtigkeit überprüft
habe?
Bitte kontaktieren Sie zuerst unsere Service-Hotline
telefonisch oder per E-Mail. Aus Erfahrung wissen wir, dass
viele Probleme bereits mit einem einfachen Telefonanruf bei
unseren Service-Experten gelöst werden können.
Sollte eine Reparatur oder ein Austausch im Rahmen der
zweijährigen Garantie erforderlich sein, so senden Sie das
Gerät bitte direkt an unser zugelassenes Service-Center,
zusammen mit einem Kaufbeleg und einer Beschreibung Ihres
Problems.
Kunden in Deutschland wenden sich bitte an:
PST Professional Support Technologies GmbH
Breitscheider Weg 117 a
D-40885 Ratingen
E-Mail: alan-service@ps-tech.de
Hotline: 01805 012204 (14 Cent/min aus dem dt. Festnetz,
max. 0,42 Euro/Min. aus dem Mobilfunknetz)
Wenn Sie das Gerät in einem anderen Land erworben haben,
dann kontaktieren Sie bitte Ihren Vertriebshändler vor Ort.
7
Page 11
Tectalk Worker
User Manual
i
Page 12

SAFETY PRECAUTIONS
• Refer service to qualified technicians only.
• Do not disassemble or modify the transceiver for any reason.
• Do not expose the transceiver under direct sunlight long time or to extremely hot
condition.
• Do not place the transceiver on any unstable surface.
• Keep the transceiver out of dust, moisture, and water.
• Do not operate the transceiver or charge the battery pack under explosive
conditions.
INDEX
UNPACKING AND CHECKING EQUIPMENTS ....................................................................... 1
SUPPLIED ACCESSORIES ..................................................................................................... 1
CHARGING THE LI-ION BATTERY PACK .............................................................................. 1
INSTALLING / REMOVING THE BATTERY PACK .................................................................. 2
CAUTION: ................................................................................................................................ 2
INSTALLING THE BELT CLIP .................................................................................................. 3
INSTALLING THE SUPPLIED SPEAKER/MICROPHONE ..................................................... 3
BUTTONS, KNOBS and FUNCTIONS .................................................................................... 3
OPERATION ............................................................................................................................ 4
ADDITIONAL FUNCTIONS ...................................................................................................... 5
SPECIFICATIONS ................................................................................................................... 7
CONFORMITY DECLARATION ............................................................................................... 7
TROUBLESHOOTING GUIDE ................................................................................................. 8
ii
Page 13
UNPACKING AND CHECKING EQUIPMENTS
Carefully unpack the transceiver. We recommend that you identify the items listed in the following
table before discarding the packing material. If any items are missing or have been damaged
during shipment, please contact the dealers immediately.
SUPPLIED ACCESSORIES
Item Name Quantity
Charger 2
Battery 2
Handstrap 2
Belt Clip 2
Speaker Microphone 2
User's Manual 1
Suitcase 1
Charger Battery Handstrap Belt Clip
CHARGING THE LI-ION BATTERY PACK
Please charge the new battery pack before using it.
Note: A new or stored (more than two months) battery pack will not reach its full capacity with the
first charging. After 2 or 3 times charging and discharging, it will reach it´s full capacity.
JUST SEE THE FOLLOWING INSTRUCTIONS
1. Plug the adapter into an electric socket.
2. lnsert the transceiver or battery into the drop-in charging tray.
3. Ensure that the battery's contacts connect with the drop-in charging tray properly, while the
charging is taking place, the light will glow red.
4. After about 3 hours charging, the LED indicator will light green which means, that the battery is
now fully charged. Now remove the battery or the transceiver from the drop-in charging tray.
1
Page 14
NOTE:
Do not recharge any battery pack once more if it is already fully charged. Doing so often may
cause the life of the battery pack to shorten or the battery pack may be damaged.
INSTALLING / REMOVING THE BATTERY PACK
The usage time of the supplied Battery Pack is about 8 hours, which is based upon 5% transmit,
5% receive and 90% standby (standard duty cycle). See following images:
CAUTION:
• Do not short-circuit the terminals of the battery or throw the battery into the fire.
• Do not disassemble the battery pack yourself.
• Before you replace a battery, or before you transport a spare battery, please use
adhesive tape to protect the battery contacts against any short circuit during
transportation. In airplanes, it is only allowed to transport spare batteries in the cabin
luggage, never in the previously checked- in luggage.
2
Page 15
INSTALLING THE BELT CLIP
If the belt clip is not installed, its mounting location may get hot
during continuous transmission or under heated environment.
INSTALLING THE SUPPLIED
SPEAKER/MICROPHONE
Insert the speaker/microphone plugs into the speaker/ mic
sockets of the transceiver.
NOTE:
The transceiver is not fully water resistant when using external
speaker/microphone. Insert rubber cover to the sockets if the
external headset is not used. Other microphones may be used
as well, please make sure to use only accessory items with
“Kenwood”-style wiring.
BUTTONS, KNOBS and FUNCTIONS
A. Led Indicator — The LED lights continuously red while transmitting. The LED will be green
while in reception mode.
B. Channel Switch — Rotate to select the channel between CH 1 and 16. Channels are factory
pre-programmed and can be modified by PC programmer (ask service engineer or distributor)
3
Page 16
C. POWER SWITCH/VOLUME CONTROL
Turn clockwise to switch the transceiver ON and rotate to adjust the volume. Turn fully
counterclockwise to switch the radio OFF.
D. PTT (PUSH-TO-TALK) BUTTON
Press PTT button, then speak into the microphone to call a station. Release the PTT for
listening.
E. MONITOR BUTTON
Press and hold ( = squelch OFF) to hear the background noise; Release to return to normal
operation.
F. TORCH LIGHT KEY - Just press to activate the torch light.
G. SPEAKER/MICROPHONE - Sockets are below the rubber cover
OPERATION
SWITCHING POWER ON/OFF
Turn the power switch/volume control clockwise.
You will hear a beep and voice announcement,
indicating that the transceiver is ON.
ADJUSTING THE VOLUME
Hold Monitor button down to listen to audio level
while rotating the Power switch/Volume control.
Rotate clockwise to increase and
counterclockwise to decrease volume.
SELECTING A CHANNEL
Turn the channel switch to select your desired
channel. The channels are factory preset with 8
PMR 446 channels + 8 different CTCSS code /
PMR 446 channel combinations
TRANSMITTING
To transmit, press and hold [PTT] and speak into
the microphone with normal voice and about 5-10
cm distance from the mouth. The LED indicator
lights continuously red when transmitting.
4
Page 17

ADDITIONAL FUNCTIONS
SQUELCH LEVEL
The purpose of Squelch is to mute the speaker when no signals are present (Squelch OFF). With
the squelch level correctly set, you will hear sound only while actually receiving signals (Squelch
ON). The squelch level can be adjusted via PC programming software (ask service technician or
distributor).
TIME-OUT TIMER (TOT)
The purpose of the Time-out Timer is to prevent any caller from using a channel for an extended
period of time which will cause thermal damage or may disturb other channel users. The built-in
Time-out Timer limits each transmission time to a certain time. When the transmission time
exceeds the timer you set, an alert tone will sound (timing depends on PC programming). Then
you have to release the PTT and are able to transmit again. Per default the Time-out Timer is set
to 5 minutes.
SCAN
Scan may be useful for hands-free monitoring of several frequencies. Scan function is only
possible when enabled by PC software by service technician or distributor.
• The transceiver stops scanning at the frequency (or memory
channel) where a signal is detected. It then continues or stops
scanning.
• lf there are less than 2 channels programmed, it can not scan.
• On channel 16, press PTT and MONI key, it will turn on SCAN,
or turn off the SCAN.
VOICE Announcement
• Voice Announcement ON/OFF can be set via PC software.
• On channel 10, press PTT and MONI key, then switch on the transceiver, Voice Prompt
can be cancelled or activated.
• On channel 15, press PTT and MONI key, then switch on the transceiver to choose
different voice prompt languages.
VOX (Voice Operated Transmission)
VOX eliminates the necessity of pressing the PTT each time you want to transmit. The transceiver
automatically switches to Transmission Mode when the VOX circuitry senses that you have
started to speak into the microphone.
• When operating the VOX function, you can set the VOX Gain level which allows the
transceiver to recognize the sound levels. This can be done via the programming
software
5
Page 18

• lf the microphone is too sensitive, the transceiver can begin transmitting already when
there is only some noise in the background.
• lf it is not sensitive enough, it will not pick up your voice when you start speaking. Be
sure to adjust the VOX Gain level to an appropriate sensitivity to allow smooth
transmission.
• On channel 1-5, press and hold the MONI and PTT, then switch on the transceiver, thus
to activate the VOX functions ON/OFF.
Automatic Battery Save circuit
The battery save function will decrease the amount of power used when a signal is not being
received and no operations are being performed (no keys are being pressed, and no switches are
being turned for a certain time).
While the channel is not busy and no operation is performed for more than 10 seconds, Battery
Save turns ON.
When a signal is received or an operation is performed, Battery Saver turns OFF.
BATTERY LOW ALERT
Battery Low Alert reminds you to recharge the battery when it becomes discharged.
When the battery power is very low, an alert tone will sound and the LED indicator will blink red.
Please recharge or replace the battery pack.
MONITOR
When you are receiving and no signals are present, the squelch function can mute the speaker,
so you can not hear the background noise. If you want to switch the squelch function OFF, press
and hold [MONI] button. It is very helpful when you want to adjust the volume level and receive
weak signals.
BUSY CHANNEL LOCK-OUT (BCL)
Busy Channel Lock-out function can be turned ON/OFF with PC program software on every
channel.
When activated, BCL prevents you from interfering with other parties who may be using the same
channel that you selected. Pressing the PTT switch while the channel is in use will cause your
transceiver to emit an alert tone and transmission will be inhibited (you cannot transmit). Release
the PTT switch to stop the tone and return to receive mode.
CTCSS/DCS (depends on PC programming or default setting)
CTCSS (Continuous Tone Coded Squelch System) / (Digital Coded Squelch)
You may sometimes want to hear calls from only specific persons or groups. In this case, use the
selective call which allows you to ignore unwanted calls from other persons who are using the
same frequency.
6
Page 19

CTCSS is a sub-audible tone and is selectable from 01-38 while DCS is a digital system between
39 or 83 of the code list.
The radio comes preconfigured with CTCSS coding on CH numbers 09 to 16. These channel
numbers are only compatible to the same radio type, while CH 1 to CH 8 are compatible with all
PMR 446 radios on the market.
NOTE:
CTCSS and DCS do not cause your conversation to be private and scrambled. It only relieves you
from listening to unwanted conversations.
SPECIFICATIONS
Technical parameters
Frequency Range 446.0-446.1 MHz / 400-470 MHz
programmable
RF Rated Power ≤0.5 W ERP (EN 300 296-2
Standard for PMR 446)
Channel Capacity 16 (8 open PMR 446 + CTCSS
Operated Voltage 3. 7V
Dimensions 115mm X 60mm X 33mm
Weight 150g
coded PMR 446 channels per
factory default)
NOTES:
All specifications are subject to change without notice.
Using the PC programming software may allow the radio to transmit on specially assigned
frequencies outside the PMR 446 standard frequency range. Please note that for using other
frequencies outside the PMR 446 scope, user may need a special license as business PMR radio
from the local radio communications authorities.
PMR 446 is allowed in all European countries and is covered by ECC / CEPT decisions for free
use.
CONFORMITY DECLARATION
We declare herewith that our radio corresponds to the European
Directives (R&TTE, LVD and EMC) and Standards (EN 300 296-2
V.1.3.1 and EN 301 489-05 V. 1.3.1) issued for PMR / PMR 446 radio.
The actual Declaration of Conformity may be downloaded any time from
http://service.alan-electronics.de
7
Page 20

TROUBLESHOOTING GUIDE
PROBLEM GUIDE
1. Check charger and correct battery installation.
No Power or radio
switches off after short
time
I cannot communicate
with other group
members.
You can hear the voice
from other users, but
they cannot hear you
Others hear my voice
with interruptions only
I hear too many stations
from outside my group
Service address
Hotline and Warranty
matters
© Alan Electronics GmbH 2012
2. Clean battery contacts (Important!)
3. Replace battery by fully charged or a new battery.
4. Battery capacity poor: battery defective or at end of lifetime,
replace battery.
1. Verify, that the channel frequency and the CTCSS are the
same in the whole group. If you use factory default
programming, this is automatically ok if all members of your
group use the same channel number between 1 and 16.
2. The other group members are not within the radio coverage.
Your radio is tuned to a channel number between 1 and 8
(open PMR 446 service without codes) and your partners are
using a channel between 9 and 16.
Please change your setting to exactly the same number as the
partners are using.
1. Too weak signal- too far away
2. External mic defective ? Please let service technician check.
1. Another Group is using the same channel number – change
channel
2. You are using numbers between CH 1 and CH 8. Please
select a number between CH 9 and CH 16 for your group.
What can I do if my radio does not work as intended after I
checked everything already?
Please contact our service Hotline by phone or e-mail first.
Our experience shows, that many problems can be solved
already by a simple phone call with our service specialists.
If a repair or warranty exchange during the European 2 years
warranty period should be necessary, please send the radio
directly to our authorized service center, together with a proof
of purchase and a description of Your problem.
Customers in Germany please contact:
PST professional support technologies GmbH
Breitscheider Weg 117 a
D- 40885 Ratingen
e-mail: alan-service@ps-tech.de
Hotline 01805 012204 (14 cents/min from German fixed
network, max. 0.42 Euro/min from mobile networks.
If you purchased the radio in any other country, please contact
your local distributor.
8
Page 21

Tectalk Worker
Guide d'utilisation
i
Page 22

CONSIGNES DE SÉCURITÉ
• Ne confiez tout entretien qu’à des techniciens qualifiés.
• Ne démontez pas et ne modifiez pas l'émetteur-récepteur pour aucune raison.
• N’exposez pas l'émetteur-récepteur pendant une longue période à lumière directe du
soleil ou à des conditions d’extrême chaleur.
• Ne placez pas l'émetteur-récepteur sur une surface instable.
• N’exposez pas l'émetteur-récepteur à la poussière, l'humidité et l'eau.
• N’utilisez pas l'émetteur-récepteur et ne rechargez la batterie dans des conditions
explosives.
INDEX
INDEX .............................................................................................................................................. ii
DEBALLAGE ET VERIFICATION DES EQUIPEMENTS ................................................................. 1
ACCESSOIRES FOURNIS .............................................................................................................. 1
CHARGER LA BATTERIE LI-ION .................................................................................................... 1
INSTALLATION / RETRAIT DE LA BATTERIE ................................................................................ 2
ATTENTION : ................................................................................................................................... 2
INSTALLATION DE LA PINCE DE CEINTURE ................................................................................ 3
INSTALLATION D'UN HAUT-PARLEUR / MICROPHONE .............................................................. 3
TOUCHES, BOUTONS et FONCTIONS .......................................................................................... 3
UTILISATION ................................................................................................................................... 4
AUTRES FONCTIONS .................................................................................................................... 5
SPECIFICATIONS ............................................................................................................................ 7
DECLARATION CE .......................................................................................................................... 7
GUIDE DE DÉPANNAGE................................................................................................................. 8
ii
Page 23

DEBALLAGE ET VERIFICATION DES EQUIPEMENTS
Déballez l'émetteur-récepteur avec précaution. Nous vous recommandons d'identifier les éléments
listés dans le tableau suivant avant de jeter l'emballage. Contactez immédiatement le revendeur si
des articles sont manquants ou ont été endommagés durant le transport.
ACCESSOIRES FOURNIS
Nom de l'article Quantité
Chargeur 2
Batterie 2
Dragonne 2
Pince pour ceinture 2
Guide d'utilisation 1
Chargeur Batterie Dragonne Pince pour ceinture
CHARGER LA BATTERIE LI-ION
il faut charger la nouvelle batterie avant de l'utiliser.
Remarque : Une batterie nouvelle ou stockée (plus de deux mois) n’atteint pas sa pleine capacité
avec la première charge. Elle n’atteint sa pleine capacité qu’après 2 ou 3 cycles de
charge/décharge.
IL SUFFIT DE SUIVRE LES INSTRUCTIONS CI-DESSOUS
• Branchez l'adaptateur dans une prise électrique.
• Insérez l'émetteur-récepteur ou la batterie dans le logement de charge.
• Veillez à ce que les contacts de la batterie soient correctement en contact avec ceux du
logement de charge ; le voyant s'allume en rouge pendant la charge.
• Après 3 heures de charge, le voyant s'allume en vert indiquant que la batterie est
complètement chargée. Retirez la batterie ou l'émetteur-récepteur du logement de charge.
1
Page 24

Remarque :
Ne rechargez pas une batterie qui est déjà complètement chargée. Souvent cela peut réduire la
durée de vie de la batterie ou l’endommager.
INSTALLATION / RETRAIT DE LA BATTERIE
Le temps d'utilisation de la batterie fournie est d'environ 8 heures, sur la base de 5% de
transmission, 5% de réception et 90% de veille (cycle standard). Voir les images suivantes :
ATTENTION :
• Ne court-circuitez pas les bornes de la batterie et ne jetez celle-ci au feu.
• Ne démontez pas la batterie vous-même.
• Avant de remplacer une batterie, ou avant de transporter une batterie de rechange,
utilisez du ruban adhésif pour protéger les contacts de la batterie pour éviter tout courtcircuit pendant le transport. Dans les avions, les batteries de rechange sont seulement
autorisées dans les bagages de cabine, jamais dans les bagages enregistrés.
2
Page 25

INSTALLATION DE LA PINCE DE CEINTURE
Si la pince de ceinture n'est pas installée, sa position de
montage peut devenir chaude pendant la transmission en
continu ou dans un environnement de grande chaleur.
INSTALLATION D'UN HAUT-PARLEUR /
MICROPHONE
Insérez la fiche du haut-parleur / microphone dans la prise
haut-parleur / micro de l'émetteur-récepteur.
Remarque :
L'émetteur-récepteur n'est pas entièrement résistant à l'eau
lorsqu’il est utilisé avec un haut-parleur / microphone externe.
Mettez le couvercle en caoutchouc dans les prises si le
casque externe n'est pas utilisé.
TOUCHES, BOUTONS et FONCTIONS
A. Voyant — rouge fixe pendant l'émission. Vert pendant la réception.
B. Sélecteur de canal - Tournez pour sélectionner un canal entre 1 et 16. Les canaux sont
préprogrammés en usine et peuvent être modifiés par un programmeur PC (demandez l’avis
d’un technicien ou d’un distributeur)
C. INTERRUPTEUR D’ALIMENTATION / CONTROL DE VOLUME
3
Page 26

Tournez dans le sens horaire pour allumer l'émetteur-récepteur et tournez pour régler le volume.
Tournez complètement dans le sens antihoraire pour éteindre la radio.
D. BOUTON PTT (PUSH-TO-TALK)
Appuyez sur le bouton PTT, puis parlez dans le microphone pour appeler une station. Relâchez
le bouton PTT pour écouter.
E. BOUTON MONITOR
Maintenez appuyé (= silencieux désactivé) pour entendre le bruit de fond ; relâchez pour
retourner au fonctionnement normal.
F. TOUCHE LAMPE TORCHE — Il suffit d'appuyer pour allumer la lampe torche.
G. HAUT-PARLEUR/MICROPHONE — les prises sont en dessous du couvercle en caoutchouc
UTILISATION
ALLUMER/ÉTEINDRE
Allumer/contrôle du volume dans le sens horaire.
Vous entendrez un bip et une annonce vocale
indiquant que l'émetteur-récepteur est allumé.
REGLAGE DU VOLUME
Maintenez appuyé le bouton Monitor pour écouter
le niveau audio tout en faisant tourner le bouton
d'alimentation/control du volume. Tournez dans le
sens horaire pour augmenter le volume et dans le
sens antihoraire pour diminuer le volume.
SÉLECTION D'UN CANAL
Tournez le sélecteur de canal pour sélectionner
un canal. Les canaux sont préréglés en usine
avec 8 canaux PMR 446 + 8 combinaisons de
codes CTCSS / canaux PMR 446 différents.
TRANSMISSION
Pour transmettre, maintenez appuyée la touche
[PTT] et parlez dans le microphone avec une voix
normale à une distance de 5-10 cm de la bouche.
Le voyant est rouge pendant la transmission.
4
Page 27

AUTRES FONCTIONS
NIVEAU SQUELCH
Le but du Squelch (silencieux) est de couper le haut-parleur lorsqu’aucun signal n'est présent
(squelch désactivé). Avec un niveau de silencieux correctement réglé, vous entendrez un son
uniquement lorsque vous recevez un signal (squelch activé). Le niveau du silencieux peut être réglé
par un logiciel de programmation PC (demandez l’avis d’un technicien ou d’un distributeur).
TIME-OUT TIMER (TOT) (minuteur dépassement de temps)
Le but de la fonction « Time-out Timer » est d'éviter qu'un appelant utilise un canal pendant une
longue période pouvant entrainer une surchauffe de l'appareil ou la perturbation des utilisateurs des
autres canaux. Le « Time-out Timer » intégré limite le temps de chaque transmission. Lorsque le
temps de transmission est supérieur au temps défini, une tonalité d'alerte se déclenche (le temps
est réglé par programmation PC). Vous devez relâcher le bouton PTT pour pouvoir transmettre de
nouveau. Par défaut, le temps du « Time-out Timer » est fixé à 5 minutes.
RECHERCHE
La recherche peut être utile pour le contrôle mains-libres de plusieurs fréquences. La fonction
recherche n'est possible que lorsqu'elle est activée par le logiciel PC par un technicien ou un
distributeur.
• L'émetteur-récepteur interrompt la recherche à la
fréquence (ou canal mémoire) où un signal est détecté.
Il continue ou arrête la recherche.
• S’il y a moins de 2 canaux programmés, il ne peut pas rechercher.
• Sur le canal 16, appuyez sur PTT et MONI, il active ou
désactiver la recherche.
ANNONCE VOCALE
• l'annonce vocale peut être activée/désactivée par le logiciel PC.
• Sur le canal 10, appuyez sur PTT et MONI, puis allumez l'émetteur-récepteur, l’invite
vocale peut être annulé ou activé.
• Sur le canal 15, appuyez sur PTT et MONI, puis allumez l'émetteur-récepteur pour choisir
différentes langues vocales.
VOX (Voice Operated Transmission)
VOX élimine la nécessité d'appuyer sur le bouton PTT à chaque transmission. L'émetteur-récepteur
passe automatiquement en mode de transmission lorsque le circuit VOX détecte que vous avez
commencé à parler dans le microphone.
• Lorsque vous utilisez la fonction VOX, vous pouvez définir le niveau de gain VOX qui
5
Page 28

permet à l'émetteur-récepteur de reconnaître les niveaux sonores. Cela peut être effectué
par le logiciel de programmation
• Si le microphone est trop sensible, l'émetteur-récepteur peut commencer à transmettre
quand le bruit de fond est faible.
• S’il n'est pas assez sensible, il ne capte pas votre voix lorsque vous commencez à parler.
Veillez à ce régler le niveau de gain VOX à une sensibilité appropriée pour permettre une
transmission en douceur.
• Sur le canal 1-5, maintenez appuyée MONI et PTT, puis allumez l'émetteur-récepteur,
pour activer/désactiver les fonctions VOX.
Circuit d’économie de la batterie
La fonction Economie de la batterie diminue la quantité d'énergie utilisée lorsqu’aucun signal n'est
reçu et qu'aucune opération n'est effectuée (pas de touches appuyées ou boutons tournés pendant
un certain temps).
Si le canal n'est pas occupé et qu'aucune opération n'est effectuée pendant plus de 10 secondes, le
mode Economie de batterie sera activé.
Lorsqu’un signal est reçu ou une opération est effectuée, le mode Economie de batterie sera
désactivé.
ALERTE batterie FAIBLE
L'alerte Batterie faible vous rappelle de recharger la batterie quand elle est déchargée.
Lorsque la batterie est très faible, une tonalité d'avertissement est émise et le voyant se met à
clignoter en rouge. Il faut alors recharger ou remplacer la batterie.
MONITEUR
Lors d’une réception en l’absence de signal, la fonction squelch peut couper le son du haut-parleur
de manière à ne pas entendre le bruit de fond. Maintenez appuyée la touche [MONI] pour
désactiver la fonction squelch. Ceci est particulièrement utile lorsque vous voulez régler le volume
et recevoir des signaux faibles.
CANAL OCCUPÉ BLOQUÉ (BCL)
La fonction BCL (CANAL OCCUPÉ BLOQUÉ) peut être activée/désactivée pour chaque canal avec
un logiciel PC.
Lorsqu'elle est activée, la fonction BCL vous empêche d'interférer avec d'autres usagers du même
canal que vous avez sélectionné. En appuyant sur le bouton PTT alors que le canal est utilisé, votre
émetteur-récepteur émet une tonalité d'alerte et de transmission sera interdite (vous ne pouvez pas
transmettre). Relâchez le bouton PTT pour arrêter la tonalité et retourner en mode réception.
6
Page 29

CTCSS/DCS (dépend de la programmation PC ou du réglage par défaut)
CTCSS (Continuous Tone Coded Squelch System (système de squelch à tonalités codées))/
(Digital Coded Squelch (Squelch à codage numérique))
Parfois vous ne souhaitez entendre que les appels de personnes ou groupes spécifiques. Dans ce
cas, utilisez l'appel sélectif qui vous permet d'ignorer les appels indésirables des autres personnes
qui utilisent la même fréquence.
CTCSS est une tonalité sous-audible et est sélectionnable de 01 à 38 alors que DCS est un
système numérique entre 39 ou 83 de la liste des codes.
La radio est livrée préconfigurée avec le codage CTCSS pour les canaux 09 à 16. Ces numéros de
canaux ne sont compatibles qu’avec le même type de radio, alors que les canaux 1 à 8 sont
compatibles avec toutes les radios PMR 446 du marché.
Remarque :
CTCSS et DCS ne permettent pas des conversations privées et brouillées. Il vous évite simplement
d'écouter des conversations indésirables.
SPECIFICATIONS
Paramètres techniques
Gamme de fréquence 446,0-446,1 MHz / 400-470MHz
programmable
Puissance nominale RF ≤0,5 W ERP (EN 300 296-2
Standard pour PMR 446)
Capacité de canaux 16 (8 PMR 446 ouvert + canaux
PMR 446 codés CTCSS par
défaut)
Tension de
3,7V
fonctionnement
Dimensions 115mm X 60mm X 33mm
Poids 150g
Remarque :
Toutes les spécifications peuvent être modifiées sans préavis.
Avec l’utilisation de logiciel de programmation PC, la radio peut émettre à des fréquences spécialement affectées
en dehors de la gamme de fréquences standard PMR 446. Il convient de noter que pour utiliser d'autres
fréquences en dehors de la portée PMR 446, l'utilisateur peut nécessiter d'une licence spéciale des autorités
locales en tant que radio PMR professionnelle.
PMR 446 peut être utilisé dans tous les pays européens et est couvert par les décisions ECC / CEPT pour une
utilisation gratuite.
DECLARATION CE
Par la présente, nous déclarons que notre radio satisfait aux directives européennes
(R & TTE, LVD et EMC) et normes (EN 300 296-2 V.1.3.1 et EN 301 489-05 V.1.3.1)
émises pour les radios PMR/PMR 446. La véritable Déclaration de conformité peut
être téléchargées à tout moment à partir de http://service.alan-electronics.de
© Alan Electronics GmbH
7
Page 30

GUIDE DE DÉPANNAGE
PROBLEME GUIDE
1. Vérifiez le chargeur et l’installation correcte de la batterie.
Pas d'alimentation ou
la radio s'éteint après
un court moment
Je ne peux pas
communiquer avec les
autres membres du
groupe.
Vous pouvez entendre
les autres utilisateurs,
mais ils ne peuvent pas
vous entendre
D'autres m’entendent
avec des interruptions
J'entends trop de
stations en dehors de
mon groupe
Adresse de service
Hotline et questions de
garantie
2. Nettoyez les contacts de la batterie
3. Remplacez la batterie par une batterie complètement chargée
ou par une nouvelle batterie.
4. Faible capacité de la batterie : la batterie est défectueuse ou à
la fin de sa durée de vie, remplacez la batterie.
1. Vérifiez que la fréquence du canal et le CTCSS sont les mêmes
pour tout le groupe. Si vous utilisez la programmation par défaut,
ceci fonctionne correctement si tous les membres du groupe
utilisent le même numéro de canal entre 1 et 16.
2. Les autres membres du groupe ne sont pas dans la zone
couverte par la radio.
Votre radio est réglée sur un numéro de canal entre 1 et 8 (service
PMR 446 ouvert sans codes) et vos correspondants utilisent un
canal entre 9 et 16.
Réglez vos paramètres exactement sur ceux de vos
correspondants.
1. Signal trop faible, trop loin
2. Micro externe défectueux ? Faites-le contrôler par un
technicien.
1. Un autre groupe utilise le même numéro de canal - changez de
canal
2. Vous utilisez des nombres compris entre CH 1 et CH 8.
Sélectionnez un nombre compris entre CH 9 et CH 16 pour votre
groupe.
Que puis-je faire si ma radio ne fonctionne pas comme prévu
après avoir tout vérifié ?
Commencez par contacter notre service Hotline par téléphone ou
par e-mail. Notre expérience montre que plusieurs problèmes
peuvent être résolus par un simple appel téléphonique avec nos
spécialistes de service.
Si une réparation ou une garantie d’échange au cours de la
période de garantie européenne 2 ans s’avère nécessaire,
envoyez la radio directement à notre centre de service agréé
accompagnée d’une preuve d'achat et une description du
problème.
Les clients en Allemagne peuvent contacter :
PST professional supporttechnologies GmbH
Breitscheider Weg 117 a
D-40885 Ratingen
e-mail: alan-service@ps-tech.de
Hotline: 01805 012204 (14 centimes/minute pour le réseau fixe
allemand, max. 0,42 euro/minute pour les réseaux mobiles.)
Contactez votre distributeur local si vous avez acheté la radio
dans un autre pays.
8
Page 31

Tectalk Worker
Manuale dell'utente
i
Page 32

PRECAUZIONI DI SICUREZZA
1. Per assistenza rivolgersi soltanto a tecnici qualificati.
2. Non smontare né modificare il ricetrasmettitore per alcun motivo.
3. Non esporre il ricetrasmettitore a raggi solari per lungo tempo o a condizioni di estremo calore.
4. Non posizionare il ricetrasmettitore su una superficie instabile.
5. Tenere il ricetrasmettitore privo di polvere, umidità e acqua.
6. Non utilizzare il ricetrasmettitore o caricare la batteria in condizioni esplosive.
ii
Page 33

INDICE
PRECAUZIONI DI SICUREZZA ....................................................................................................... II
INDICE ............................................................................................................................................ III
RIMOZIONE DELLA CONFEZIONE E CONTROLLO DEI DISPOSITIVI ........................................ 1
ACCESSORI IN DOTAZIONE .......................................................................................................... 1
RICARICA DELLA BATTERIA AGLI IONI DI LITIO .......................................................................... 1
INSTALLAZIONE/RIMOZIONE DELLA BATTERIA .......................................................................... 2
ATTENZIONE: .................................................................................................................................. 2
INSTALLAZIONE DELLA CLIP PER CINTURA ............................................................................... 2
INSTALLAZIONE DI ALTOPARLANTE/MICROFONO OPZIONALE ............................................... 2
PULSANTI, MANOPOLE E FUNZIONI ............................................................................................ 3
FUNZIONAMENTO .......................................................................................................................... 3
FUNZIONI AGGIUNTIVE ................................................................................................................. 4
LIVELLO SQUELCH ..................................................................................................................... 4
TIME-OUT TIMER (TOT) .............................................................................................................. 4
SCAN ............................................................................................................................................ 4
MESSAGGIO VOCALE ................................................................................................................ 4
VOX (VOICE OPERATED TRANSMISSION) ............................................................................... 5
CIRCUITO RISPARMIO BATTERIA AUTOMATICO ..................................................................... 5
AVVISO LIVELLO BATTERIA BASSO ......................................................................................... 5
MONITOR ..................................................................................................................................... 5
BUSY CHANNEL LOCK-OUT (BCL) ............................................................................................ 5
CTCSS/DCS ................................................................................................................................. 6
SPECIFICHE TECNICHE ................................................................................................................ 6
GUIDA ALLA RISOLUZIONE DEI PROBLEMI ................................................................................. 7
iii
Page 34

RIMOZIONE DELLA CONFEZIONE E CONTROLLO DEI DISPOSITIVI
Rimuovere con cautela il ricetrasmettitore dalla confezione. Si raccomanda di identificare gli
elementi elencati nella tabella seguente prima di gettare il materiale di imballaggio. Se qualche
elemento dovesse mancare o essere stato danneggiato durante il trasporto, contattare
immediatamente il rivenditore.
ACCESSORI IN DOTAZIONE
Nome oggetto Quantità
Valigia 1
Radio 2
Cuffietta 2
Caricabatterie 2
Batteria 2
Cinghia mano 2
Clip per cintura 2
Manuale d'uso 1
Caricabatterie Batteria Cinghia mano Clip per cintura
RICARICA DELLA BATTERIA AGLI IONI DI LITIO
Caricare la batteria nuova prima dell'uso.
Nota: Una batteria nuova o non utilizzata (per più di due mesi) non raggiungerà la sua piena
capacità alla prima ricarica. Dopo 2 o 3 cicli di carica e scarica, essa raggiungerà la sua piena
capacità.
BASTA SEGUIRE LE SEGUENTI ISTRUZIONI
Collegare l'adattatore alla presa elettrica.
Inserire il ricetrasmettitore o la batteria nel vano di carica.
Assicurarsi che i contatti della batteria siano collegati correttamente la vano di carica,
durante la carica la spia sarà rossa.
Dopo circa 3 ore di carica, l'indicatore LED diventerà verde indicando che la batteria è
completamente carica. Ora rimuovere la batteria o il ricetrasmettitore dal vano di carica.
1
Page 35

NOTA:
Non caricare la batteria nuovamente se è già completamente carica. Se ciò viene fatto troppo
spesso può causare una riduzione della vita della batteria o danneggiare la batteria.
INSTALLAZIONE/RIMOZIONE DELLA BATTERIA
La durata della batteria fornita è di circa 8 ore, suddivise in un 5% di trasmissione, 5% di ricezione e
90% di standby (ciclo di lavoro standard). Si vedano le seguenti immagini:
ATTENZIONE:
Non mettere in cortocircuito i terminali della batteria o gettare la batteria nel fuoco.
Non smontare la batteria da soli.
Prima di sostituire la batteria, o prima del trasporto a un punto di raccolta delle batterie,
utilizzare del nastro adesivo per proteggere la batteria da cortocircuito durante il trasporto.
Negli aerei, è consentito trasportare batterie di ricambio solo nella stiva, non nel bagaglio
a mano.
INSTALLAZIONE DELLA CLIP PER CINTURA
Se la clip per cintura non è installata, la sua posizione di
montaggio più diventare calda durante la trasmissione continua
o in condizioni ambientali calde.
INSTALLAZIONE DI
ALTOPARLANTE/MICROFONO OPZIONALE
Inserire gli spinotti dell'altoparlante/microfono nelle prese
speaker/mic del ricetrasmettitore.
NOTA:
Il ricetrasmettitore non è completmente impermeabile quando
si utilizza un altoparlante/microfono esterno. Inserire la
copertura di gomma in tutte le prese se non si utilizza
l'auricolare esterno.
2
Page 36

PULSANTI, MANOPOLE E FUNZIONI
A. Indicatore LED — Il LED si accende di continuo rosso durante la trasmissione. Il LED diventa
verde in modalità ricezione.
B. Interruttore canale — Ruotare per selezionare il canale tra CH 1 e 16. I canali sono pre-
programmati di fabbrica e possono essere modificati dal programmatore PC (chiedere al tecnico
dell'assistenza o al distributore)
C. INTERRUTTORE ALIMENTAZIONE/CONTROLLO VOLUME
Ruotare in senso orario per accedere il sistema il ricetrasmettitore e girare per regolare il volume.
Ruotare completamente in senso antiorario per spegnere la radio.
D. PULSANTE PTT (PUSH-TO-TALK)
Premere il pulsante PTT, quindi parlare al microfono per chiamare una stazione. Rilasciare il PTT
per ascoltare.
E. PULSANTE MONITOR
Premere e tenere premuto (= squelch OFF) per ascoltare il rumore di fondo; rilasciare per
tornare al funzionamento normale.
F. TASTO TORCIA — Premere per attivare la torcia.
G. ALTOPARLANTE/MICROFONO — Le prese sono sotto la copertura di gomma
FUNZIONAMENTO
ACCENSIONE/SPEGNIMENTO
Ruotare l'interruttore di alimentazione/il controllo del volume in senso orario.
Si sentirà un beep e un messaggio vocale, che indica che il ricetrasmettitore
è ON.
REGOLAZIONE DEL VOLUME
Tenere premuto il pulsante Monitor per ascoltare il livello audio durante la
rotazione dell'interruttore di alimentazione/controllo del volume. Ruotare in
senso orario per aumentare e in senso antiorario per diminuire il volume.
SELEZIONE DI UN CANALE
Ruotare l'interruttore del canale per selezionare il canale desiderato. I canali
sono preimpostati di fabbrica con 8 canali PMR 446 + 8 diverse
combinazioni di canali codice CTCSS / PMR 446.
3
Page 37

TRASMISSIONE
Per trasmettere, premere e tenere premuto [PTT] e parlare al microfono con
voce normale e a una distanza di circa 5-10 cm dalla bocca. L'indicatore
LED si accende di continuo rosso durante la trasmissione.
FUNZIONI AGGIUNTIVE
LIVELLO SQUELCH
Lo scopo dello Squelch è quello di silenziare l'altoparlante quando non è presente alcun segnale
(Squelch OFF). Con il livello di squelch impostato correttamente, si ascolterà l'audio solo mentre si
sta ricevendo il segnale (Squelch ON). Il livello di squelch può essere regolato mediante il software
di programmazione del PC (chiedere al tecnico dell'assistenza o al distributore).
TIME-OUT TIMER (TOT)
Lo scopo del Time-out Timer è quello di evitare che qualsiasi chiamante utilizzi un canale per un
periodo prolungato provocando danni termici o disturbando altri utenti del canale. Il Time-out Timer
limita il tempo di ciascuna trasmissione a un tempo determinato. Quando il tempo di trasmissione
superera il tempo impostato dal timer, viene emesso un segnale di allarme (la temporizzazione
dipende dalla programmazione del PC). Quindi si deve rilasciare il PTT ed essere nuovamente in
grado di trasmettere. Come impostazione predefinita il Time-out Timer è impostato a 5 minuti.
SCAN
La funzione Scan può essere utile per il monitoraggio a mani libere di più frequenze. Questa
funzione è possibile solo quando attivata dal software del PC dal tecnico dell'assistenza o dal
distributore.
Il ricetrasmettitore interrompe la scansione alla
frequenza (o canale di memoria) in cui è rilevato un
segnale. Esso poi continua o interrompe la scansione.
Se ci sono meno di 2 canali programmati, non può essere effettata la scansione.
Sul canale 16, premere il tasto PTT e MONI key, ciò
attiva o interrompe la funzione SCAN.
Messaggio vocale
L'attivazione/disattivazione del messaggio vocale può essere impostata mediante il
software PC.
Sul canale 10, premere il tasto PTT e MONI key, quindi accendere il ricetrasmettitore, il
messaggio vocale può essere cancellato o attivato.
Sul canale 15, premere il tasto PTT e MONI key, quindi accendere il ricetrasmettitore per
scegliere una lingua diversa del messaggio vocale.
4
Page 38

VOX (Voice Operated Transmission)
VOX elimina la necessità di premere il PTT ogni volta che si vuole trasmettere. Il ricetrasmettitore
passa automaticamente alla modalità di trasmissione quando il circuito VOX rileva che si è iniziato a
parlare al microfono.
Quando si utilizza la funzione VOX, è possibile impostare il livello di guadagno VOX che
consente al ricetrasmettitore di riconoscere i livelli di suono. Ciò può essere effettuato
mediante il software di programmazione.
Se il microfono è troppo sensibile, il ricetrasmettitore può iniziare a trasmettere già
quando ci sono solo dei rumori di fondo.
Se non è sensibile abbastanza, non rileverà la voce quando si inizia a parlare. Assicurarsi
di regolare il livello di guadagno Vox a una sensibilità appropriata per consentire la
corretta trasmissione.
Sul canale 1-5, premere e tenere premuto MONI e PTT, poi accendere il ricetrasmettitore,
quindi attivare il funzionamento del VOX.
Circuito risparmio batteria automatico
La funzione di risparmio della batteria riduce la quantità di corrente utilizzata quando non si ricevono
segnali e non è effettuata alcuna operazione (non è premuto alcun tasto e nessun interruttore è
azionato per un dato periodo di tempo).
Quando il canale non è occupato e non è effettuata alcuna operazione per più di 10 secondi, il
risparmio della batteria si attiva.
Se un segnale è ricevuto o un'operazione è effettuata, il risparmio della batteria si disattiva.
AVVISO LIVELLO BATTERIA BASSO
L'avviso livello batteria basso ricorda di ricaricare la batteria quando si scarica.
Quando il livello della batteria è basso, un segnale di allarme suona e l'indicatore LED lampeggia
rosso. Caricare o sostituire la batteria.
MONITOR
Quando si sta ricevendo e non sono presenti segnali, la funzione squelch può silenziare
l'altoparlante, in modo da non sentire rumori di fondo. Se si vuole disattivare la funzione squelch,
premere e tenere premuto il pulsante [MONI]. È molto utile quando si vuole regolare il livello del
volume e ricevere segnali deboli.
BUSY CHANNEL LOCK-OUT (BCL)
La funzione Busy Channel Lock-out può essere attivata/disattivata con il software del programma
del PC su ogni canale.
Quando attivata, BCL previene dalle interferenze di altri che possono utilizzare lo stesso canale che
avete selezionato. La pressione del tasto PTT mentre il canale è in uso provocherà l'emissione da
parte del ricetrasmettitore di un segnale di allerta e la trasmissione sarà bloccata (non è possibile
trasmettere). Rilasciare il pulsante PTT per interrompere il segnale e ritornare alla modalità di
ricezione.
5
Page 39

CTCSS/DCS
(a seconda della programmazione del PC e delle impostazioni predefinite)
CTCSS (Continuous Tone Coded Squelch System)/ (Digital Coded Squelch)
A volte si può desiderare di ascoltare chiamate solo da gruppi/persone specifici. In questo caso,
utilizzare la chiamata selettiva che consente di ignorare le chiamate indesiderate di altre persone
che stanno utilizzando la stessa frequenza.
CTCSS è tono impercettibile ed è selezionabile da 01-38, mentre il DCS è un sistema digitale tra 39
o 83 della lista dei codici.
La radio è fornita preconfigurata con codifica CTCSS su CH da 09 a 16. Questa numeri di canale
sono solo compatibili con lo stesso tipo di radio, mentre i CH 1 a CH 8 sono compatibili con tutte le
radio PMR 446 sul mercato.
NOTA:
CTCSS e DCS non rendono la conversazione privata e contesa. Permette solo di evitare l'ascolto di
conversazioni non desiderate.
SPECIFICHE TECNICHE
Parametri tecnici
Intervallo di
frequenza
Potenza nominale
RF
Capacità canale 16 (8 aperti PMR 446 + CTCSS codificati PMR 446 per
Tensione operativa 3,7V
Dimensioni 115mm X 60mm X 33mm
Peso 150g
NOTE:
Tutte le specifiche tecniche sono soggette a modifica senza alcun preavviso.
L'uso del software di programmazione del PC consente alla radio di trasmettere su frequenze
assegnate in modo specifico oltre all'intervallo di frequenza standard di PMR 446. Si noti che per
utilizzare altre frequenze oltre quelle previste per PMR 446, l'utente necessita di una licenza
speciale per radio PMR commerciali rilasciata dalle autorità delle comunicazioni.
PMR 446 è autorizzato in tutti i paesi Europei ed è coperto dalle disposizioni ECC / CEPT per il
libero utilizzo.
Con al presente si dichiara che la nostra radio è conforme alle Direttive Europee (R&TTE, LVD e
EMC) e agli Standard (EN 300 296-2 V.1.3.1 e EN 301 489-05 V. 1.3.1) emanati per radio PMR /
PMR 446. La presente Dichiarazione di Conformità può essere scaricata in qualsiasi momento dal
sito http://service.alan-electronics.de
© Alan Electronics GmbH
446.0-446.1 MHz / 400-470MHz programmabile
≤0.5 W ERP (EN 300 296-2 Standard per PMR 446)
impostazione di fabbrica)
6
Page 40

GUIDA ALLA RISOLUZIONE DEI PROBLEMI
PROBLEMA GUIDA
1. Controllare l'alimentatore e correggere l'installazione della
batteria.
Nessuna alimentazione o la
radio non si spegne in breve
tempo.
Impossibile comunicare con
altri membri del gruppo.
È possibile ascoltare la voce
degli altri utenti, ma essi non
possono ascoltare la vostra.
Altri ascoltano la mia voce
solo con interruzioni
Ascolto troppe stazioni
esterne al mio gruppo
Indirizzo assistenza
Numero verde e questioni
relative alla garanzia
2. Pulire i contatti della batteria.
3. Sostituire la batteria con una completamente carica o con una
nuova.
4. Capacità batteria scarsa: batteria difettosa o alla fine del suo
ciclo di vita, sostituire la batteria.
1. Verificare che la frequenza del canale e il CTCSS siano gli stessi
per tutto il gruppo. Se si usa una programmazione predefinita di
fabbrica, ciò è automaticamente ok se tutti i membri del gruppo
utilizzano lo stesso numero di canale tra 1 e 16.
2. Gli altri membri del gruppo non sono entro la copertura della
radio.
La radio è sintonizzata su un numero di canale tra 1 e 8 (aprire
servizio PMR 446 senza codici) e i vostri partner stanno utilizzando
un canale tra 9 e 16.
Cambiare le impostazioni allo stesso numero utilizzato dagli altri
partner.
1. Segnale troppo debole - troppo lontano
2. Microfono esterno difettoso? Far controllare dal tecnico
dell'assistenza.
1. Un altro gruppo sta usando lo stesso numero di canale –
cambiare canale
2. Si stanno usando numeri tra CH 1 e CH 8. Selezionare un
numero tra CH 9 e CH 16 per il proprio gruppo.
Cosa posso far se la mia radio non funziona come previsto dopo
aver verificato tutto?
Prima contattare il Numero Verde della nostra assistenza per
telefono o inviare una e-mail. La nostra esperienza mostra che
molti problemi possono essere già risolti con una semplice
telefonata ai tecnici della nostra assistenza.
Se è necessaria una riparazione o una sostituzione in garanzia nel
periodo della garanzia Europea di 2 anni, inviare la radio
direttamente a un centro assistenza autorizzato, insieme alla prova
di acquisto e una descrizione del problema.
I clienti in Germania devono contattare:
PST professional supporttechnologies GmbH
Breitscheider Weg 117 a
D-40885 Ratingen
e-mail: alan-service@ps-tech.de
Numero Verde: 01805 012204 (14 cent/min da rete fissa
tedesca, max. 0,42 Euro/min da reti mobili.)
Se si è acquistata al radio in altri paesi, contattare il distributore
locale.
7
Page 41

Tectalk Worker
Manual de Usuario
i
Page 42

PRECAUCIONES DE SEGURIDAD
1. Remita las reparaciones a técnicos calificados solamente.
2. No desarme ni modifique el transceptor por ningún motivo.
3. No exponga el transceptor a luz solar directa por un período prolongado ni a calor extremo.
4. No coloque el transceptor sobre una superficie inestable.
5. Mantenga el transceptor lejos del polvo, de la humedad y del agua.
6. No opere el transceptor ni cambie el conjunto de baterías cuando haya riesgo de explosión.
ii
Page 43

CONTENIDO
CONTENIDO ................................................................................................................................... III
DESEMPAQUE Y VERIFICACIÓN DE EQUIPOS ........................................................................... 1
ACCESORIOS PROPORCIONADOS ............................................................................................. 1
CARGA DEL CONJUNTO DE BATERÍAS DE IONES DE LITIO ..................................................... 1
INSTALACIÓN/EXTRACCIÓN DE CONJUNTO DE BATERÍAS ..................................................... 2
PRECAUCIÓN: ................................................................................................................................ 2
INSTALACIÓN DEL SUJETADOR DE CINTURÓN ......................................................................... 2
INSTALACIÓN DE UN ALTAVOZ/MICRÓFONO ............................................................................. 2
BOTONES, PERILLAS Y FUNCIONES ........................................................................................... 3
FUNCIONAMIENTO ......................................................................................................................... 3
FUNCIONES ADICIONALES ........................................................................................................... 4
NIVEL DE SILENCIADOR ............................................................................................................ 4
TEMPORIZADOR DE APAGADO (TOT) ...................................................................................... 4
BÚSQUEDA ................................................................................................................................. 4
ANUNCIO DE VOZ ....................................................................................................................... 4
VOX (TRANSMISIÓN OPERADA POR VOZ) .............................................................................. 5
CIRCUITO DE AHORRO DE BATERÍA AUTOMÁTICO ............................................................... 5
ALERTA DE BATERÍA BAJA ........................................................................................................ 5
MONITOR ..................................................................................................................................... 5
BLOQUEO DE CANALES OCUPADOS (BCL) ............................................................................ 5
CTCSS/DCS (DEPENDE DE LA PROGRAMACIÓN DE PC O DE LA CONFIGURACIÓN POR
DEFECTO) ................................................................................................................................... 6
ESPECIFICACIONES ...................................................................................................................... 6
GUÍA DE SOLUCIÓN DE PROBLEMAS ......................................................................................... 7
iii
Page 44

DESEMPAQUE Y VERIFICACIÓN DE EQUIPOS
Desempaque el transceptor con cuidado. Le recomendamos identificar los artículos enumerados
en la siguiente tabla antes de desechar el material de embalaje. Si hay artículos faltantes o que
se hayan dañado durante el envío, tenga a bien ponerse en contacto con los distribuidores de
inmediato.
ACCESORIOS PROPORCIONADOS
Nombre de artículo Cantidad
Maleta 1
Radio 2
Auricular con micrófono 2
Cargador 2
Batería 2
Correa de mano 2
Sujetador de cinturón 2
Manual de usuario 1
Cargador Batería Correa de mano Sujetador de cinturón
CARGA DEL CONJUNTO DE BATERÍAS DE IONES DE LITIO
Cargue el nuevo conjunto de baterías antes de usarlo.
Nota: Un conjunto de baterías nuevo o almacenado (por más de dos meses) no alcanzará su
capacidad total con la primera carga. Después de cargarlo y de descargarlo 2 o 3 veces, éste
alcanzará su capacidad total.
SÓLO VEA LAS SIGUIENTES INSTRUCCIONES
Conecte el adaptador en una salida eléctrica.
lnserte el transceptor o la batería dentro del cargador de pie.
Asegúrese de que los contactos de la batería se conecten con el cargador de pie
correctamente. Mientras se esté realizando la carga, la luz se pondrá roja.
Después de aproximadamente 3 horas de carga, el indicador LED se pondrá verde, lo
que significa que la batería ya está completamente cargada. Ahora quite la batería o el
transceptor del cargador de pie.
1
Page 45

NOTA:
No recargue el conjunto de baterías otra vez si ya está completamente cargado. Hacerlo con
frecuencia puede acortar la vida útil del conjunto de baterías o puede dañarlo.
INSTALACIÓN/EXTRACCIÓN DE CONJUNTO DE BATERÍAS
El tiempo de uso del conjunto de baterías proporcionado es de aproximadamente 8 horas, lo que
se basa en 5% de transmisión, 5% de recepción y 90% de tiempo en espera (ciclo de trabajo
estándar). Vea las siguientes ilustraciones:
PRECAUCIÓN:
1. No corte el circuito de las terminales de la batería ni arroje la batería al fuego.
2. No desarme el conjunto de baterías usted mismo.
3. Antes de cambiar una batería o de transportar una batería de repuesto, utilice una cinta
adhesiva para proteger los contactos de la batería contra corto circuitos durante el transporte.
En aviones, sólo se permite transportar baterías de repuesto en el equipaje de mano, nunca en
el equipaje previamente registrado.
INSTALACIÓN DEL SUJETADOR DE CINTURÓN
Si el sujetador de cinturón no está instalado, su ubicación de
montaje puede calentarse durante una transmisión continua o
en un ambiente calefaccionado.
INSTALACIÓN DE UN ALTAVOZ/MICRÓFONO
Inserte los conectores del altavoz/micrófono dentro de las
conexiones del altavoz/micrófono del transceptor.
NOTA:
El transceptor no es completamente resistente al agua cuando
se utiliza el altavoz/micrófono externo. Inserte la cubierta de
goma en las conexiones si el auricular externo no se utiliza.
2
Page 46

BOTONES, PERILLAS Y FUNCIONES
A. Indicador Led — El LED siempre estará rojo mientras esté transmitiendo. El LED estará
verde mientras esté en modo de recepción.
B. Interruptor de canales — Gire para seleccionar el canal entre CH 1 y 16. Los canales están
programados de fábrica y pueden ser modificados por un programador de PC (consulte con un
ingeniero de mantenimiento o con un distribuidor).
C. INTERRUPTOR DE ALIMENTACIÓN/CONTROL DE VOLUMEN
Gire en sentido de las agujas del reloj para encender el transceptor y gire para ajustar el
volumen. Gire completamente en sentido contrario a las agujas del reloj para apagar la radio.
D. BOTÓN PTT (PULSAR PARA HABLAR)
Pulse el botón PTT, luego hable en el micrófono para llamar a una estación. Libere el PTT
para escuchar.
E. BOTÓN MONITOR
Pulse y mantenga pulsado (=silenciador APAGADO) para escuchar el ruido de fondo. Libere
para volver al funcionamiento normal.
F. TECLA LUZ DE LINTERNA — Sólo pulse para activar la luz de la linterna.
G. ALTAVOZ/MICRÓFONO — Las conexiones se encuentran debajo de la cubierta de goma.
FUNCIONAMIENTO
ENCENDIDO/APAGADO
Gire el interruptor de alimentación/control de volumen en sentido de las
agujas del reloj. Escuchará un pitido y un anuncio de voz que indicará que
el transceptor está ENCENDIDO.
AJUSTE DE VOLUMEN
Mantenga el botón Monitor pulsado para escuchar el nivel de audio
mientras gira el interruptor de alimentación/control de volumen. Gire en
sentido de las agujas del reloj para subir el volumen y en sentido contrario
a las agujas del reloj para bajarlo.
SELECCIÓN DE UN CANAL
Gire el interruptor de canales para seleccionar el canal deseado. Los
canales están preconfigurados de fábrica con 8 canales PMR 446 + 8
combinaciones código CTCSS/canal PMR 446 diferentes.
3
Page 47

TRANSMISIÓN
Para transmitir, pulse y mantenga pulsado [PTT], y hable en el micrófono
con voz normal y a aproximadamente 5-10 cm de distancia de la boca. El
indicador LED siempre estará rojo mientras esté transmitiendo.
FUNCIONES ADICIONALES
NIVEL DE SILENCIADOR
El objetivo del Squelch (silenciador) es silenciar el altavoz cuando no haya señales presentes
(silenciador APAGADO). Con el nivel de silenciador correctamente configurado, sólo escuchará
sonido mientras se estén recibiendo señales efectivamente (silenciador ENCENDIDO). Se puede
ajustar el nivel del silenciador por medio de un software de programación de PC (consulte a un
técnico de mantenimiento o a un distribuidor).
TEMPORIZADOR DE APAGADO (TOT)
El objetivo del Time-out Timer (temporizador de apagado) es evitar que la persona que llama
utilice un canal por un período prolongado, lo que causará daño térmico o puede molestar a otros
usuarios que realicen llamadas. El Time-out Timer integrado limita cada tiempo de transmisión a
un tiempo determinado. Cuando el tiempo de transmisión supere el temporizador que haya
configurado, un tono de alerta sonará (el tiempo depende de la programación de PC). Luego,
tiene que liberar el PTT y podrá transmitir otra vez. El Time-out Timer está configurado en 5
minutos por defecto.
BÚSQUEDA
Scan puede ser útil para el control manos libres de varias frecuencias. La función Scan sólo es
viable cuando haya sido activada a través de un software para PC por un técnico de
mantenimiento o por un distribuidor.
El transceptor detiene la búsqueda en la frecuencia (o
canal de memoria) donde se detecte una señal.
Luego continúa o detiene la búsqueda.
Si hay menos de 2 canales programados, no se puede hacer la búsqueda.
En el canal 16, pulse PTT y la tecla MONI. Esto
activará o desactivará la función SCAN.
Anuncio de voz
El ENCENDIDO/APAGADO del Voice Announcement (anuncio de voz) se puede
configurar por medio de un software para PC.
En el canal 10, pulse PTT y la tecla MONI. Luego, encienda el transceptor. El aviso de
voz puede cancelarse o activarse.
En el canal 15, pulse PTT y la tecla MONI. Luego, encienda el transceptor para elegir
diferentes idiomas para el aviso de voz.
4
Page 48

VOX (Transmisión operada por voz)
VOX elimina la necesidad de pulsar el PTT cada vez que desee realizar una transmisión. El
transceptor automáticamente cambia a Transmission Mode (modo Transmisión) cuando los
circuitos VOX detecten que ha comenzado a hablar en el micrófono.
Al operar la función VOX, puede configurar Vox Gain Level (nivel de ganancia VOX)
que le permite al transceptor reconocer los niveles de sonido. Esto puede hacerse por
medio del software de programación.
Si el micrófono es demasiado sensible, el transceptor ya puede comenzar a transmitir
cuando sólo haya algo de ruido de fondo.
Si no es lo suficientemente sensible, no asimilará su voz cuando comience a hablar.
Asegúrese de ajustar el nivel de ganancia VOX en un nivel de sensibilidad adecuado
para permitir una transmisión fluida.
En los canales 1-5, pulse y mantenga pulsado MONI y PTT. Luego, encienda el
transceptor a fin de activar el ENCENDIDO/APAGADO de las funciones VOX.
Circuito de ahorro de batería automático
La función Battery Save (ahorro de batería) disminuirá la cantidad de energía utilizada cuando no
se reciba ninguna señal y no se estén realizando operaciones (no se esté pulsado ninguna tecla
ni se activen interruptores durante un período determinado).
Mientras el canal no esté ocupado y no se realice ninguna operación por más de 10 segundos,
Battery Save se activará.
Cuando se reciba una señal o se realice una operación, Battery Save se apagará.
ALERTA DE BATERÍA BAJA
El Battery Low Alert (alerta de batería baja) le recuerda recargar la batería cuando ésta se
descarga.
Cuando la energía de la batería sea muy baja, un tono de alerta sonará, y el indicador LED
parpadeará en color rojo. Recargue o cambie el conjunto de baterías.
MONITOR
Cuando esté recibiendo y no haya señales presentes, la función Squelch puede silenciar el
altavoz para no escuchar ruido de fondo. Si desea apagar la función Squelch, pulse el botón
[MONI] y manténgalo pulsado. Es muy útil cuando desee ajustar el nivel de volumen y recibir
señales débiles.
BLOQUEO DE CANALES OCUPADOS (BCL)
La función Busy Channel Lock-out (bloqueo de canales ocupados) puede encenderse/apagarse
con programas para PC en cada canal.
Cuando se activa, el BCL le impide interferir con otras partes que puedan estar utilizando el
mismo canal que usted seleccionó. Pulsar el interruptor PTT mientras el canal esté en uso hará
que su transceptor emita un tono de alerta, y se inhibirá la transmisión (usted no podrá transmitir).
Libere el interruptor PTT para detener el tono y vuelva al modo de recepción.
5
Page 49

CTCSS/DCS (depende de la programación de PC o de la configuración por defecto)
CTCSS (Sistema silenciador codificado por tono continuo)/(Silenciador codificado digital)
A veces puede querer escuchar llamadas sólo de personas o de grupos específicos. En este caso,
utilice la llamada selectiva que le permite ignorar las llamadas no deseadas de otras personas
que estén usando la misma frecuencia.
CTCSS es un tono subaudible y se puede seleccionar desde 01-38, mientras que DCS es un
sistema digital entre 39 u 83 de la lista de códigos.
La radio viene preconfigurada con codificación CTCSS en números de canales del 09 al 16 Estos
números de canales sólo son compatibles con el mismo tipo de radio, mientras que CH 1 al CH 8
son compatibles con todas las radios PMR 446 en el mercado.
NOTA:
CTCSS y DCS no hacen que su conversación sea privada y codificada. Sólo lo libera de
escuchar conversaciones no deseadas.
ESPECIFICACIONES
Parámetros técnicos
Rango de frecuencia 446,0 - 446,1 MHz/400 - 470MHz,
Potencia nominal RF ≤0,5 W ERP (EN 300 296-2
Capacidad de canales 16 (8 PMR 446 abiertos + canales
Tensión operada 3,7V
Dimensiones 115 mm X 60 mm X 33 mm
Peso 150 g
NOTAS:
Todas las especificaciones están sujetas a modificaciones sin aviso.
El uso del software de programación para PC puede permitir que la radio transmita en
frecuencias especialmente asignadas fuera del rango de frecuencia estándar PMR 446. Tenga en
cuenta que para usar otras frecuencias fuera del alcance de PMR 446, el usuario necesita una
licencia especial como radio PMR de negocios de las autoridades locales de comunicación por
radio.
PMR 446 se permite en todos los países europeos y está cubierto por decisiones ECC/CEPT
para uso gratuito.
Declaramos que nuestra radio cumple con Directivas Europeas (R&TTE, LVD y EMC) y con
Estándares (EN 300 296-2 V.1.3.1 y EN 301 489-05 V.1.3.1) emitidos para radio PMR/PMR 446.
La Declaración de Conformidad puede descargarse en cualquier momento del sitio
http://service.alan-electronics.de
© Alan Electronics GmbH
programable
estándar para PMR 446)
PMR 446 codificados CTCSS
preconfigurados de fábrica)
6
Page 50

GUÍA DE SOLUCIÓN DE PROBLEMAS
PROBLEMA GUÍA
1. Compruebe el cargador y la correcta instalación de la batería.
No hay energía o la
radio se apaga después
de un breve período
No puedo comunicarme
con otros integrantes del
grupo.
Puede escuchar la voz
de otros usuarios, pero
ellos no pueden
escucharlo.
Otros escuchan mi voz
con interrupciones
solamente
Escucho demasiadas
estaciones desde fuera
de mi grupo
Dirección de
mantenimiento
Línea de asistencia
técnica y garantía
2. Limpie los contactos de la batería.
3. Cambie la batería por una batería completamente cargada o por
una nueva.
4. Capacidad escasa de batería: batería defectuosa o al final de la
vida útil, cambie la batería.
1. Verifique que la frecuencia de canales y que el CTCSS sean los
mismos en todo el grupo. Si utiliza la programación por defecto de
fábrica, esto es automáticamente correcto si todos los integrantes de
su grupo utilizan el mismo número de canal entre 1 y 16.
2. Los otros integrantes del grupo no están dentro de la cobertura de
la radio.
Su radio está sintonizada en un número de canal entre el 1 y el 8
(servicio PMR 445 abierto sin códigos), y sus socios están usando un
canal entre 9 y 16.
Cambie su configuración a exactamente el mismo número que el que
los socios estén usando.
1. Señal demasiado débil – demasiado lejos
2. ¿Micrófono externo defectuoso? Deje que los técnicos de
mantenimiento realicen una verificación.
1. Otro grupo está usando el mismo número de canal – cambie el
canal
2. Está utilizando números entre CH 1 y CH 8. Seleccione un número
entre CH 9 y CH 16 para su grupo.
¿Qué puedo hacer si mi radio no funciona como está previsto
después de haber verificado todo?
Primero, póngase en contacto con nuestra línea de asistencia técnica
para mantenimiento por teléfono o por medio de un correo
electrónico. Nuestra experiencia comprueba que muchos problemas
pueden resolverse por medio de un simple llamado telefónico a
nuestros especialistas en mantenimiento.
Si fuera necesaria una reparación o un cambio por garantía durante
el período de 2 años de garantía europeo, envíe la radio
directamente a nuestro centro de mantenimiento autorizado, junto
con un comprobante de compra y una descripción de su problema.
Los clientes en Alemania tengan a bien ponerse en contacto con:
PST professional supporttechnologies GmbH
Breitscheider Weg 117 a
D-40885 Ratingen
Correo electrónico: alan-service@ps-tech.de
Línea de asistencia técnica: 01805 012204 (14
centavos/minuto desde una red fija de Alemania; máximo 0,42
Euros/minuto desde redes móviles.)
Si adquirió la radio en otro país, póngase en contacto con su
distribuidor local.
7
Page 51

Notes:
Page 52

© 2012 Alan Electronics GmbH, Daimlerstr. 1 k, D- 63303 Dreieich
www.alan-electronics.de
 Loading...