

Page 1
Tectalk Fun
Multilingual
User Manual
Page 2

Page 3
PMR 446 FUNKHANDY ALBRECHT TECTALK FUN
Lautstärkepegel/Kanalnummer kann
vom Benutzer zwischen 1 und 8
Bei entladenen Akkus ist es möglich, auch
aufgeladen
,
Wenn das Gerät längere Zeit nicht benutzt
wird, entfernen Sie die Batterien oder
Abb. 1 Abb. 2
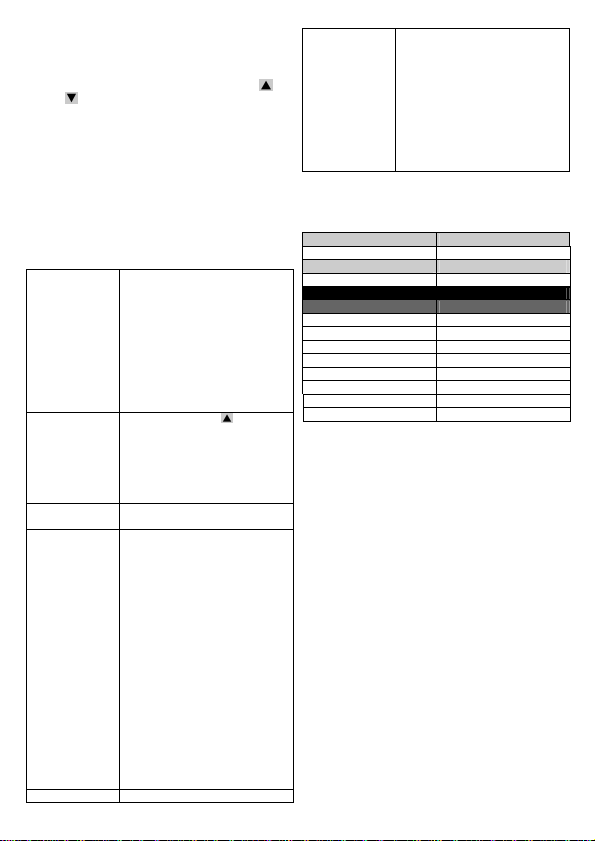
Anzeige
Anzeige „niedrige
Leistung“
Anzeige
Handbuch und Bedienungsanleitung
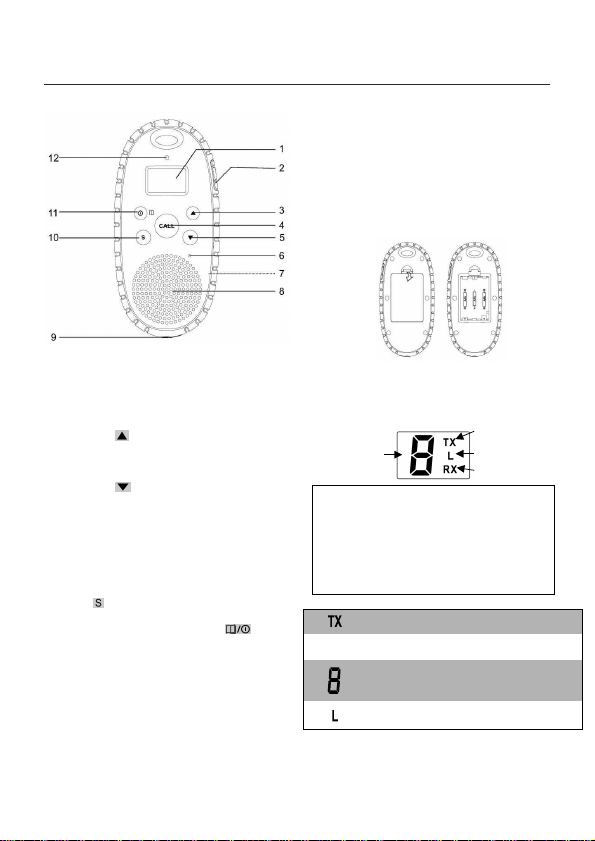
Bedienungselemente des PMR 446
Funkhandys
1. LCD Anzeige: Informiert über den aktuellen
Kanal und zeigt Funkzustands-Symbole an.
2. PUSH TO TALK (PTT)-Taste: Zum Senden
drücken.
3. Aufwärts -Taste (Lautstärke/Kanal):
Erhöhen der Lautstärke und Kanalwechsel.
4. CALL (Ruftaste): Drücken, um Ruftöne zu
übermitteln.
5. Abwärts -Taste (Lautstärke/Kanal):
Verringern der Lautstärke und Kanalwechsel.
6. Mikrofon.
7. Batteriefach (auf der Rückseite): Nimmt 3 x
1,5V Alkali-Batterien oder Ni-MH-Akkus
(wiederaufladbar) auf (Batterien nicht
mitgeliefert).
8. Lautsprecher.
9. 6V DC-Buchse für Ladegerät
10. Scan -Taste: Zum Starten des
Kanal-Suchlaufs 1 Sek. gedrückt halten.
11. Menü/Power On/Off (Ein/Aus) -Taste:
Gedrückt halten, um das Gerät ein- oder
auszuschalten. Mit einem kurzen Tastendruck
können die Kanäle gewechselt, hohe/niedrige
Leistung ausgewählt und die Monitorfunktion
aktiviert werden, um auch schwache Signale
noch empfangen zu können.
12. TX (Sende)-LED: Leuchtet während dem
Senden rot.
Blinkt alle 15 Sekunden rot auf, um
anzuzeigen, falls die Batterie erschöpft ist.
Leuchtet grün, wenn das Ladegerät
angeschlossen wurde.
Batterien / Akkus einlegen:
1. Drücken Sie die Batteriefach-Arretierung auf
der Rückseite (s. Abbildung 1) und entfernen
Sie den Deckel vom Batteriefach (s.
Abbildung 2).
2. Setzen Sie 3 x 1,2V „AAA“ Ni-MH-Akkus wie
angezeigt ein (Akkus nicht mitgeliefert).
3. Setzen Sie den Deckel wieder
auf das Batteriefach.
LCD-Anzeige:
Kanalnummer/
Lautstärkepegel
normale Alkaline-Batterien zu verwenden.
Aber diese dürfen nicht
werden. Anderenfalls besteht FeuerExplosions- und Verletzungsgefahr!.
Leuchtet im Sendebetrieb.
Leuchtet während des Empfangs.
RX
eingestellt werden.
Leuchtet, wenn „niedrige Leistung“
gewählt wurde.
Sende-
Empfangs-
Page 4

Einschalten des Geräts:
Halten Sie die Taste gedrückt. Das Gerät
„piept“ mit einem Doppelsignalton und die
LCD-Anzeige zeigt kurz einen Testscreen an.
Ausschalten des Geräts:
Halten Sie die Taste gedrückt. Das Gerät
„piept“ mit einem Signalton und die LCD-Anzeige
erlischt.
Einstellen der Lautstärke:
Zum Erhöhen der Lautstärke drücken Sie die
Aufwärts -Taste.
Zum Verringern der Lautstärke drücken Sie
die Abwärts -Taste.
Die Lautstärke wird durch eine Zahl von 1 bis
8 auf dem LCD-Bildschirm angezeigt.
Signal empfangen:
Wenn das Gerät eingeschaltet ist und nicht
gesendet wird, befindet es sich im
Empfangsmodus. Wenn Sie ein Signal auf dem
eingestellten Kanal empfangen, wird das
RX-Symbol angezeigt (Weitere Einzelheiten
siehe „LCD-Anzeige“) und die rote LED leuchtet
auf.
Signal senden:
1. Prüfen Sie zuerst, ob jemand bereits auf dem
Kanal sendet. SENDEN Sie NICHT, wenn
jemand auf dem Kanal spricht. Halten Sie die
Sendetaste (genannt PTT-Taste) zum Senden
gedrückt. Die TX-LED leuchtet rot und das
TX-Symbol erscheint auf dem Display. Halten
Sie das Gerät aufrecht und das Mikrophon 5
bis 8 Zentimeter vom Mund entfernt.
2. Sprechen Sie in einem normalen Ton,
während Sie die PTT-Taste gedrückt halten.
3. Lassen sie die PTT-Taste nach dem Senden
los.
HINWEIS: Damit andere Personen Ihre
Nachricht empfangen können, müssen diese sich
auf dem gleichen Kanal befinden. Schlagen Sie
im Abschnitt „Kanalwahl“ für weitere Einzelheiten
nach.
Inbetriebnahme / Kanalwahl:
Das Funkhandy verfügt über 8 Kanäle. Wechseln
des Kanals:
1. Drücken Sie einmal die
eingestellte Kanal blinkt auf der
LCD-Anzeige.
2. Während die Kanalnummer blinkt:
Drücken Sie die Aufwärts -Taste für
einen höheren Kanal.
Drücken Sie die Abwärts -Taste für
einen niedrigeren Kanal.
Der Kanal wechselt von 1 zu 8, bzw. von 8
zu 1.
3. Drücken sie die PTT-Taste zur Bestätigung
des gewählten Kanals. Das Gerät kehrt in den
-Taste. Der
Normalbetrieb zurück.
HINWEIS: Schlagen Sie im Abschnitt
„Kanaltabelle“ dieser Bedienungsanleitung für
eine detaillierte Frequenzliste nach.
Hohe/ niedrige Leistung wählen:
1. Drücken Sie zweimal die Taste , um das
Menü „hohe/ niedrige Leistung“ aufzurufen.
2. Wählen Sie mit der „ / ”-Taste den
Leistungspegel. Die LCD-Anzeige zeigt „L“ an,
wenn eine geringe Leistung gewählt wurde.
Geringe Leistung verlängert die Lebensdauer
der Batterie, verringert aber die
Sendereichweite.
Monitor:
Sie können die Monitorfunktion zum Mithören
von schwachen Signalen auf dem aktuellen
Kanal einsetzen.
1. Drücken Sie dreimal die -Taste, um die
Funktion einzuschalten.
2. Erneutes Drücken der -Taste schaltet die
Funktion aus.
Beachten Sie, dass bei eingeschalteter Funktion
Rauschen zu hören ist, wenn niemand sendet!
Automatische Stromsparfunktion:
6 Sekunden nach der letzten Aktion aktiviert das
Funkhandy automatisch den Stromsparmodus.
Die Lebensdauer der Batterien wird durch diese
Funktion erheblich verlängert. Das Funkhandy ist
aber auch in diesem Modus noch
empfangsbereit!
Anzeige „Batterie leer“:
Wenn die Akkus im Gerät leer werden, ertönt ein
Signalton und die rote LED blinkt alle 15
Sekunden einmal auf. Laden Sie die Akkus so
bald wie möglich auf, oder wechseln Sie den
Batteriesatz.
Kanalsuchlauf:
Der Kanalsuchlauf sucht in einer Endlosschleife
aktive Signale auf den Kanälen 1 bis 8. Drücken
Sie die -Taste etwa 1 Sekunde, um den
Kanalsuchlauf zu aktivieren.
1. Während des Suchvorgangs haben Sie
folgende Möglichkeiten:
Halten Sie die Taste
wird der Scanvorgang beendet und zum
ursprünglichen Kanal zurückgekehrt.
Drücken Sie die PTT-Taste zum Beenden
des Suchlaufs und Senden auf dem
ursprünglichen Kanal.
Drücken Sie die Call (Ruf)-Taste. Dadurch
wird der Suchlauf beendet und es wird ein
Rufton auf dem ursprünglichen Kanal
übertragen.
2. Wird ein aktives Signal erkannt, hält der
gedrückt. Damit
Page 5
Suchlauf an. Sie haben folgende Optionen:
hängt von Gelände und
Halten Sie die Taste gedrückt.
Dadurch wird der Suchlauf beendet und
das Gerät kehrt zum ursprünglichen Kanal
zurück.
Drücken Sie die PTT-Taste, um auf dem
aktuellen Kanal zu antworten. Der
Suchlauf wird dadurch beendet.
Drücken Sie die Call (Ruf)-Taste, um
einen Rufton zu übertragen und den
Suchlauf abzubrechen.
Um einen erkannten Kanal zu
überspringen, drücken Sie die oder
-Taste. Der Suchlauf wird dadurch
fortgesetzt.
Signaltöne senden:
Sie können Signaltöne senden, um der
Gegenstation zu melden, dass Sie sie
kontaktieren möchten. Sie können diese Töne
auch zum Kennzeichnen des Gesprächsbeginns
und –endes benutzen.
Drücken Sie die Call (Ruf)-Taste, um einen
Signalton zu übertragen. Die rote LED leuchtet
auf und das TX-Symbol wird angezeigt.
Störungserkennung
SYMPTOM ABHILFE
Kein Strom Akkus/ Batterien
Empfang ist
leise
Kein
Kanalwechsel
möglich
Reichweite ist
beschränkt
überprüfen. Sind sie richtig
eingelegt?
Die Batterien können
entladen sein.
Laden Sie die 3 x
„AAA“ Ni-MH Akkus. Wenn
das nicht möglich ist,
verwenden Sie
Alkali-Batterien aus dem
Supermarkt (diese dürfen
Sie aber nicht aufladen).
Zum Erhöhen der
Lautstärke drücken Sie die
Aufwärts -Taste
Das empfangene Signal
kann schwach und/oder der
Sender außer Reichweite
sein. Verwenden Sie in
diesem Fall die
Monitor-Funktion.
Die Akkus bzw. Batterien
können leer sein.
Die Akkus bzw. Batterien
können leer sein.
Ersetzen Sie die Batterien
/Akkus, wenn der Signalton
für leere Batterien ertönt.
Die maximale Reichweite
Umgebung ab. Offenes
Gelände erlaubt die beste
Reichweite. Stahl- und
Betonkonstruktionen,
Bäume und der Gebrauch in
Gebäuden oder
Fahrzeugen schränken die
Reichweite erheblich ein.
Das Tragen des Geräts am
Körper, z.B. in den Taschen
oder am Gürtel, verringert
die Reichweite. Suchen Sie
ggf. einen anderen Standort
für Ihr Gerät (z.B. frei am
Ton wird
verzerrt
Spezifikationen
Verfügbare Kanäle
Ausgangsleistung (TX) 0.5 W
Batteriebetriebsdauer
Reichweite Bis zu 5 km
Kanalnummer
HINWEIS: Die maximale Reichweite hängt von
Gelände und Umgebung ab.
Optionales Zubehör:
Steckerlader 230V. Artikel-Nummer: 29699
Fenster).
Wenn Sie Senden,
sprechen Sie in einem
normalen Ton. Sprechen
Sie 5 bis 10 Zentimeter vom
Mikrofon entfernt.
Regeln sie die Lautstärke
beim Empfang auf ein
angenehmes Niveau.
Die Gegenstation ist zu weit
entfernt. Hindernisse stören
die Übermittlung. Die
Reichweite beträgt ungefähr
5 km in freiem Gelände.
8 Kanäle
30 Stunden (typisch)
Kanaltabelle
1 446,00625
2 446,01875
3 446,03125
4 446,04375
5 446,05625
6 446,06875
7 446,08125
8 446,09375
Frequenz (MHz)
Page 6

Wichtige Informationen zu Ihrem Gerät
Wir sind verpflichtet, jedem Gerät Informationen
über die Entsorgung, über die gesetzlichen
Gewährleistungsbestimmungen und die EG
Konformitätserklärungen mit Hinweisen über das
Benutzen der Geräte in den verschiedenen
Ländern beizufügen.
Sie finden daher diese Informationen im
folgenden Text.
Gesetzliche Gewährleistung von 2
Jahren nach Kaufdatum
Der Verkäufer dieses Geräts gewährt Ihnen eine
gesetzliche Gewährleistung von zwei Jahren
nach Kaufdatum des Geräts. Diese
Gewährleistung umfasst alle Fehler, die durch
defekte Bauteile oder fehlerhafte Funktionen
innerhalb der Gewährleistungsfrist auftreten
sollten, nicht jedoch Fehler, die auf normaler
Abnutzung beruhen, wie z.B. verbrauchte Akkus,
Kratzer im Display, Gehäusedefekte,
abgebrochene Antennen, sowie Defekte durch
äußere Einwirkung, wie Korrosion,
Überspannung durch unsachgemäße externe
Spannungsversorgung oder Verwendung
ungeeigneten Zubehörs. Ebenso sind Fehler von
der Gewährleistung ausgeschlossen, die auf
nicht bestimmungsgemäßen Umgang mit dem
Gerät beruhen.
Bitte wenden Sie sich bei Gewährleistungsansprüchen zunächst unmittelbar an
den Händler, bei dem Sie das Gerät erworben
haben, oder auch gleich an unseren
Servicepartner. Der Händler wird Ihr Gerät
entweder reparieren oder austauschen, oder er
wird Ihnen eine für das Gerät spezialisierte
Serviceadresse nennen.
Falls Sie Ihr Gerät einschicken, vergessen Sie
Ihre Kaufquittung als Nachweis über das
Kaufdatum nicht und beschreiben Sie bitte den
aufgetretenen Fehler möglichst genau.
Elektroschrottgesetz und Recycling
Europäische Gesetze verbieten das
Entsorgen von defekten oder nicht mehr
brauchbaren Geräten über den
Hausmüll. Sollten Sie eines Tages Ihr
Gerät entsorgen wollen, dann geben Sie
es bitte nur bei den überall eingerichteten
kommunalen Sammelstellen zum Recycling ab.
Dieses Sammelsystem wird von der Industrie
finanziert und sichert auch die umweltgerechte
Entsorgung und das Recycling wertvoller
Rohstoffe.
Serviceanschrift und technische
Hotline
PST professional support technologies
GmbH
Breitscheider Weg 117a
40885 Ratingen
Die Servicehotline ist unter 01805-012204 (14
Cent p. Minute) bzw. per e-mail unter
alan-service@ps-tech.de
Bevor Sie bei einem Problem ein vermeintlich
defektes Gerät zurückschicken, können Sie Zeit
und Versandkosten sparen, indem Sie zunächst
ein paar einfache Tests durchführen, oder lassen
Sie sich per Hotline helfen.
© 2011 Alan Electronics GmbH
erreichbar.
Page 7
PMR 446 COMMUNICATOR MODEL TECTALK FUN
Volume level/Channel Number
changes from 1 to 8 as selected
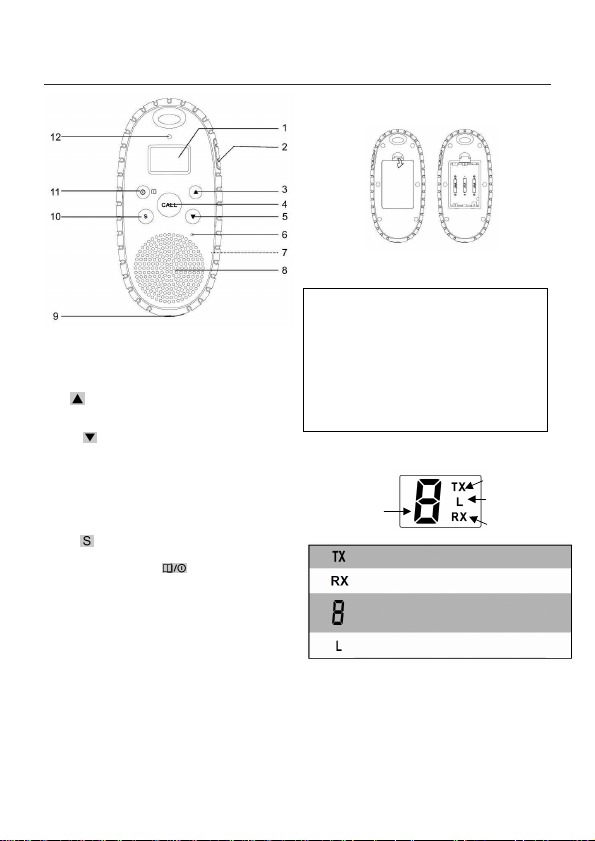
Lights up in Transmission mode
TX Icon
Low
Power
RX Icon
Channel Number
Lights up if low power is
In case the NiMH batteries become empty,
and no other NiMH batteries are available,
al AAA type
alkaline batteries from a supermarket as
to
charge this kind of batteries. Otherwise
there may be a risk of fire, explosion or
Remove batteries from the unit if the unit
Fig. 1 Fig. 2
Lights up in Receiving mode
USER MANUAL AND OPERATING INSTRUCTIONS
batteries (not included) as shown.
3. Reinstall the battery door into position.
Communicator Controls
1. LCD Screen: Displays current channel
selection and other radio status symbols.
2. PUSH TO TALK (PTT) button: Press to
transmit.
3. Up button (Volume/Channel): Press to
adjust volume level and change channels.
4. Call button: Press to transmit Call Tones.
5. Down button (Volume/Channel): Press to
adjust volume level and change channels.
6. Microphone.
7. Battery Compartment (Located on the rear):
Houses 3 x AAA alkaline or Ni-MH
rechargeable batteries( not included).
8. Speaker.
9. 6V DC charger jack
10. Scan button: Press and hold 1 sec. for
channel scanning.
11. Menu/Power (on/off) button: Press and
hold the button to turn your unit ON/OFF.
Short pressing allows you to change channels,
select high/low power and to activate the
monitor function which helps to tune in and
hold onto weak signal.
12. TX (Transmission) LED indicator: Illuminates
red when transmitting.
Lights up RED once every 15 seconds to
indicate that the battery is low on power.
Lights up GREEN once the charger gets
connected.
Battery Installation:
1. Release the battery door located on the
rear side of the unit (see Figure 1) and
remove it (See Figure 2).
2. Install 3 x 1.2 V AAA Ni-MH rechargeable
it is possible to use norm
well. But you must make sure not
even injuries.
will not be used for a longer period of time.
LCD Screen:
/Volume Level
Icon
by user
selected
Page 8

Turning the Unit ON:
Press and hold the button. The unit will
“beep” with dual tone and the LCD SCREEN will
briefly display a SELF-TEST Screen.
Turning the Unit OFF:
Press and hold the button. The unit will
“beep” with a signal tone and the LCD screen will
turn blank.
Adjust Speaker Volume:
1. Press the Up button to increase the
speaker volume.
2. Press the Down button to decrease the
speaker volume.
3. The speaker volume level is indicated by the
number 1 to 8 displayed on the LCD Screen.
Receiving a Signal:
The unit is continuously in the RECEIVE mode
when the unit is ON and not transmitting. When
you receive a signal on the current channel, the
RX icon is displayed. (See “LCD SCREEN” for
details) and the red LED indicator lights up.
Transmitting a Signal:
1. First of all check if someone is already
transmitting on the channel. Don’t TRANSMIT
if someone is talking on the channel. Press
and hold the Transmit button (known also as
PTT) to TRANSMIT. The TX LED indicator will
light up in red and the TX icon will be
displayed. Hold the unit in a vertical position
with the microphone 2 to 3 inches from the
mouth.
2. While holding the PTT button, speak into the
unit using a normal tone of voice.
3. Release the PTT button when you have
finished transmitting.
NOTE: In order for other people to receive your
transmission, they must also be on the same
channel you are currently using. Refer to the
“Changing Channels” section for more
information.
Operation
Changing Channels:
The PMR 446 COMMUNICATOR has 8 available
channels. To change channels:
1. Press the
channel number flashes on the
LCD Screen.
2. While the channel number is flashing:
Press the Up button to move to a
higher channel.
Press the Down button to move to a
lower channel.
The channel changes from 1 to 8, or from
8 to 1.
3. Press the PTT button to confirm the selected
button once. The current
channel and return to the
NORMAL mode.
NOTE: Refer to the “Channel Table” section of
this user manual for detailed frequency listings.
High/Low power selection:
1. Press twice to enter the High/Low
power menu.
2. Press / button to select the power
level. The LCD panel indicate “L”
when low power is selected. Low power
extends the battery life but reduces the talking
range.
Monitor:
You can use the MONITOR feature to check for
weak signals in the current
channel.
1. Press the button 3 times to activate this
function.
2. Press the button again to deactivate the
function.
Automatic Power Save Feature:
6 seconds after the last operation the PMR
enters the power saving mode automatically. The
life of the batteries is extended by that feature.
The PMR is still able to receive transmission in
this mode.
Low Battery Alert:
When the batteries in the unit are low on power,
an alert tone will be heard and the red LED will
light up once every 15 seconds. Recharge
batteries as soon as possible.
Channel Scan:
CHANNEL SCAN performs searches for active
signals in an endless loop from
1 to 8. You activate this by pressing the
button for about 1 second.
1. During the scanning process you can:
Press and hold the button. This will
end the scanning process and return to
the original channel.
Press the PTT button to stop the scanning
process and transmit on the original
channel.
Press the Call button. This will stop the
scanning and transmit the Call tone on the
original channel.
3. When an active signal is detected CHANNEL
SCAN pauses. And you have following
options:
Press and hold the
stop the scanning and the radio will return
to the original channel.
Press the PTT button to talk back on the
button. This will
Page 9
current channel. This will stop the
button to
maximum range will
If you are transmitting speak
scanning process.
Press the Call button to transmit the Call
tone and stop the scanning.
To skip the detected channel press or
. This will continue the scanning
process.
Sending Call Tones
You can use CALL TONES to alert the other
when you are attempting to contact them. You
can also use CALL TONES to signal the
beginning or the end of a transmission. Press the
Call button to start the transmission of the Call
tone. The red LED will light up and the TX icon is
displayed.
Troubleshooting
No power Check batteries. Ensure
Reception is
weak
Cannot change
channels
Range is limited Batteries may be weak.
Sound distortion
that the batteries are
installed properly.
The batteries may be weak.
Recharge the 3 x AAA
Ni-MH rechargeable
batteries. Or if this is not
possible use Alkaline
batteries (but never charge
them!).
Press the Up
increase Volume.
The receiving signal may be
weak and/or out of range.
If this happens, use the
MONITOR function.
The batteries may be weak.
Replace with new batteries
if there is low battery alert
tone.
The
vary depending on terrain
and environment.
Open fields provide the
maximum range, while
steel/concrete structures,
heavy foliage and use in
buildings and in vehicles
may limit the range
significantly.
Wearing the radio close to
the body, such as in a
pocket or on a belt, will
decrease range; change the
location of the radio, for
example near to a window.
problems in a normal tone of voice. 2
Specifications
Channels available
Output Power (TX) 0.5 W
Battery Life
Range Max. 5 km
Channel number
NOTE: The maximum transmission range will
vary depending on terrain and environment.
Optional Accessory:
Wall charger. Order number: 29699
to 3 inches away from the
MICROPHONE.
If you are receiving lower
the volume to a comfortable
level.
Radios too far apart.
Obstacles interfere with
transmission. Talk range is
up to 5 Km in clear
unobstructed conditions
8 Channels
30 hours (typical)
Channel table
1 446,00625
2 446,01875
3 446,03125
4 446,04375
5 446,05625
6 446,06875
7 446,08125
8 446,09375
Frequency (MHz)
Page 10

Important Information
We are legally obliged to include disposal and
warranty information as well as EU declaration of
conformity with the use instructions in different
countries for every unit.
Please find this information on the following
pages.
2-Year Warranty From Date Of
Purchase
The manufacturer/retailer guarantees this
product for two years from date of purchase. This
warranty includes all malfunctions caused by
defective components or incorrect functions
within the warranty period excluding wear and
tear, such as exhausted batteries, scratches on
the display, defective casing, broken antenna and
defects due to external effects such as corrosion,
over voltage through improper external power
supply or the use of unsuitable accessories.
Defects due to unintended use are also excluded
from the warranty.
Please contact your local dealer for warranty
claims. The dealer will repair or exchange the
product or forward it to an authorized service
center.
You can also contact our service partner directly.
Please include your proof of purchase with the
product and describe the malfunction as clearly
as possible.
WEEE And Recycling
The European laws do not allow any
more the disposal of old or defective
electric or electronic devices with the
household waste. Return your product to
a municipal collection point for recycling
to dispose of it. This system is financed by the
industry and ensures environmentally
responsible disposal and the recycling of
valuable raw materials.
Service Address And Technical Hotline
(for units sold in Germany)
PST professional support technologies GmbH
Breitscheider Weg 117a
D - 40885 Ratingen
Contact our service hotline by phone
01805-012204 (14 cent/minute from German
fixed network) or e-mail at
alan-service@ps-tech.de.
Before returning a product check in chapter
“Troubleshooting” for some easy steps and tests
or contact our hotline.
© 2011 Alan Electronics GmbH
Page 11

APPAREIL DE COMMUNICATION MODELE TECTALK FUN
TX
change de 1 à 8 par
S'allume lorsque puissance
Mais il faut veiller à
Cela représente un risque
Retirez les piles si
vous n'allez pas utiliser l'appareil pendant une
MANUEL D'UTILISATION ET DE FONCTIONNEMENT
Commandes de l'appareil de
communication
1. Ecran LCD: Affiche le canal en cours et
d'autres symboles d'état de la radio.
2. Touche messagerie instantanée vocale (MIV)
Appuyez pour transmettre
3. Touche vers le haut
Appuyez sur pour régler le volume et changer
de canal.
4. Touche d'appel: Appuyez dessus pour
transmettre des tonalités d'appel.
5. Touche vers le bas
Appuyez sur pour régler le volume et changer
de canal.
6. Microphone.
7. Compartiment pour piles (situé à l'arrière) : 3
piles AAA alcalines ou Ni-MH rechargeables
(non fournies).
8. Haut-parleur.
9. Prise 6V CC pour chargeur
10. Touche balayage
pendant 1 sec. pour le balayage des canaux.
11. Touche Menu/alimentation (marche/arrêt)
: Maintenez appuyée pour
allumer/éteindre votre unité ON/OFF. Une
pression brève vous permet de changer de
canal, sélectionner haute/faible puissance et
d'activer la fonction de contrôle qui permet de
capter et de retenir un signal faible.
12. Voyant TX (Transmission): S'allume rouge lors
de la transmission. S'allume en rouge une fois
toutes les 15 secondes pour indiquer que la
batterie est faible. S'allume en vert lorsque le
chargeur est connecté.
.
(Volume/Canal) :
(Volume/Canal) :
: Maintenez appuyée
Installation des piles :
1. Libérez la porte du compartiment pour piles
situé sur la face arrière de l'appareil (voir
Figure 1) et retirez-le (voir Figure 2).
2. Installez 3 piles AAA 1,2 V Ni-MH
rechargeables (non fournies) comme illustré.
3. Remettez en place la porte du compartiment
pour piles.
Dans le cas où les piles sont faibles, on peut
utiliser des piles alcalines.
ne pas les charger.
d'incendie ou d'explosion.
Figure 1 Figure 2
longue durée.
Ecran LCD :
Numéro de canal/
Niveau de volume
Icône
Icône Piles
faibles
Icône RX
S'allume en mode Transmission
S'allume en mode Réception
Niveau de volume/Numéro de
canal
l'utilisateur
faible est sélectionnée
Page 12

Allumer l'unité:
Maintenez appuyée la touche . L'unité émet
un "bip" avec double tonalité et l'écran LCD
affiche brièvement un écran Auto-test.
Éteindre l'unité:
Maintenez appuyée la touche . L'unité émet
un "bip" avec un signal de tonalité et l'écran LCD
s'éteint.
Régler le volume du haut-parleur :
1. Appuyez sur la touche pour augmenter le
volume.
2. Appuyez sur la touche pour baisser le
volume.
3. Le niveau de volume du haut-parleur est
indiqué par le nombre 1 à 8 affiché à l'écran
LCD.
Recevoir un signal:
L'unité est en permanence dans le mode
réception lorsque l'appareil est allumé et non en
transmission. Lorsque vous recevez un signal sur
le canal courant, l'icône RX s'affiche. (Voir
"ECRAN LCD" pour plus de détails) et le voyant
rouge s'allume.
Émettre un signal:
1. Vérifiez tout d'abord si quelqu'un est déjà en
train d'émettre sur le canal. Ne pas émettre si
quelqu'un est en train de parler sur le canal.
Maintenez appuyée la touche PTT bouton
pour émettre. Le voyant TX s'allume en rouge
et l'icône TX sera affiché. Tenez l'appareil
dans une position verticale, le micro doit être
de 2 à 7 cm de la bouche.
2. Tout en maintenant la touche PTT appuyée,
parlez en utilisant un ton de voix normal.
3. Relâchez la touche PTT lorsque vous aurez
terminé d'émettre.
REMARQUE:
Pour que d'autres personnes puissent recevoir
votre transmission, elles doivent aussi être sur le
même canal que vous utilisez actuellement.
Reportez-vous à la section "Changer de canal"
pour plus d'informations.
Fonctionnement
Changer de canal :
Le communicateur dispose de 8 canaux. Pour
changer de canal :
1. Appuyez une fois sur la touche . Le
numéro de canal se met à clignoter sur l'écran
LCD.
2. Pendant que le numéro de canal clignote :
Appuyez sur pour passer à un autre
canal de rang plus élevé.
Appuyez sur pour passer à un autre
canal de rang moins élevé.
Le canal change de 1 à 8 ou de 8 à 1.
3. Appuyez sur la touche PTT pour confirmer le
canal sélectionné et retourner au mode
NORMAL.
REMARQUE : Reportez-vous à la section "Table
des canaux" dans ce manuel pour la liste
détaillée des fréquences.
Sélection de puissance Elevée/faible:
Appuyez deux fois sur pour entrer dans le
menu puissance Elevée/faible.
Appuyez sur / pour sélectionner le niveau
de puissance. L'écran LCD indique "L" lorsque la
puissance faible est sélectionnée. L'option
puissance faible prolonge la vie des piles, mais
réduit la portée des transmissions.
Moniteur:
Vous pouvez utiliser la fonction MONITOR pour
rechercher les signaux faibles dans le canal
courant.
1. Appuyez trois fois sur pour activer cette
fonction.
2. Appuyez de nouveau sur la touche pour
désactiver cette fonction.
Économie d'énergie automatique:
6 secondes après la dernière opération, le
talkie-walkie entre automatiquement dans le
mode économie d'énergie. La durée de vie des
piles est prolongée par cette fonctionnalité. Le
talkie-walkie peut encore recevoir dans ce mode.
Alerte piles faibles:
Lorsque les piles dans l'unité sont faibles, un
signal sonore se fera entendre et le voyant rouge
s'allume une fois toutes les 15 secondes.
Rechargez les piles dès que possible.
Recherche des canaux:
CHANNEL SCAN effectue une recherche de
canaux actifs dans une boucle sans fin de 1 à 8.
1. Pendant la recherche, vous pouvez :
Maintenez appuyée la touche . Cela
arrêtera la recherche, et le système
retourne au canal initial.
Appuyez sur la touche PTT pour arrêter la
recherche et transmettre sur le canal
initial.Appuyez sur la touche d'appel Call.
Cela arrête la recherche et transmet la
tonalité d'appel sur le canal initial.
3. Lorsqu'un signal actif est détecté la recherche
de canaux est suspendue. Et vous avez les
options suivantes :
Maintenez appuyée la touche
arrêtera la recherche et la radio retourne
au canal initial.
Appuyez sur la touche PTT pour répondre
sur le canal actuel. Cela arrêtera la
recherche.
. Cela
Page 13

Appuyez sur la touche d'appel pour
Appuyez sur la touche
transmettre la tonalité d'appel et d'arrêter
la recherche.
Pour ignorer le canal détecté appuyez sur
ou . Cela va continuer le processus
de recherche.
Envoi de tonalités d'appel
Vous pouvez utiliser des tonalités d'appel pour
alerter les autres lorsque vous tentez de les
contacter. Vous pouvez également utiliser des
tonalités d'appel CALL TONES pour signaler le
début ou la fin d'une transmission.
Appuyez sur la touche d'appel Call pour
commencer la transmission de la tonalité d'appel.
Le voyant rouge s'allume et l'icône TX est affiché.
Dépannage
Pas de courant Vérifiez les piles. Vérifiez
La réception est
faible.
Impossible de
changer de
Canal
La portée
estlimitée.
que les piles sont installées
correctement.
Les piles peuvent être
faibles.
Rechargez les 3 piles AAA
Ni-MH rechargeables. Si ce
n'est possible, utilisez des
piles Alcalines.
pour augmenter le
volume.
Le signal de réception est
peut être faible et/ou hors
de portée.
Si cela se produit, utilisez la
fonction MONITOR.
Les piles peuvent être
faibles.
Les piles peuvent être
faibles.
Les remplacer avec des
piles neuves s'il ya un signal
sonore l'alerte.
La portée de transmission
maximale peut varier en
fonction du terrain et de
l'environnement.
Les espaces ouverts offrent
la portée maximale, alors
que les structures en
acier/béton, les feuillages
denses et l'utilisation dans
des bâtiments et dans des
véhicules peut limiter
considérablement la portée.
Le port de la radio près du
corps, comme dans une
poche ou accroché à une
ceinture, diminuera la
portée; changez
Problèmes de
distorsion de
son
Spécifications
Canaux disponibles
Puissance de sortie
(TX)
Autonomie des piles r
Portée max. 5 Km
CHANNEL NUMBER
REMARQUE : La portée de transmission
maximale peut varier en fonction du terrain et de
l'environnement.
Optionnel accessoires:
Chargeur. Numéro d’article: 29699
l'emplacement de la radio.
Si vous transmettez de la
voix d'un ton normal. 2 à 3
pouces du microphone.
Si vous recevez, baissez le
volume à un niveau
confortable.
Des obstacles entravent la
transmission. La portée de
conversation est de 5 km
dans des conditions
dégagées et sans
obstruction.
8
0.5 W
30 Heures (en général)
TABLE DES CANAUX
1 446,00625
2 446,01875
3 446,03125
4 446,04375
5 446,05625
6 446,06875
7 446,08125
8 446,09375
FREQUENCY (MHz)
Page 14

Information importante
Nous sommes légalement tenus d'inclure les
dispositions et les informations de garantie et la
déclaration de conformité de l'UE avec le mode
d'emploi de chaque unité, et ce dans la langue de
chaque pays.
Veuillez trouvez ces informations dans les pages
suivantes.
Deux ans de garantie à compter de la
date d’achat
Le Fabricant/revendeur garantit ce produit pour
deux ans à compter de la date d’achat. Cette
garantie couvre tout dysfonctionnement dû à une
défaillance des composants ou à des fonctions
incorrectes pendant la période de la garantie à
l'exception des pièces d’usure, telles que
batteries, égratignures de l'écran, défectuosité du
boîtier, rupture de l'antenne et les défaillances
dues à des raisons extérieures telles que
corrosion, surtension à cause d'une source
d'alimentation externe inappropriée ou l'utilisation
d'accessoires inadéquats. La garantie ne couvre
pas les défaillances dues à un usage non
prévu.Contactez votre revendeur local pour
réclamation sous garantie. Le revendeur
réparera/remplacera ou envoie le produit à un
centre de service agréé.
Vous pouvez également contacter directement
notre station de réparation agrée. Incluez la
preuve d'achat avec le produit et décrivez
l'anomalie de la façon la plus précise.
Déchets d'Equipements Electriques et
Electroniques (DEEE) et recyclage
La loi Européennes ne permet pas la
mise au rebus des équipements
électriques et électroniques usagés avec
les ordures ménagères. Ramenez votre
produit à un centre de collecte municipal
pour être recyclé. Ce système de collecte est
financé par les industriels pour garantir
l’élimination respectueuse de l’environnement et
le recyclage de matières premières précieuses.
Adresse du service d'assistance
téléphonique (en Allemagne)
PST professional support technologies
GmbH
Breitscheider Weg 117a
40885 Ratingen
Contactez notre service d'assistance
téléphonique par téléphone au
(14 cent/minute en Allemagne seulement) ou par
courriel au
Avant de retourner le produit consultez le
chapitre “Dépannage” pour vous aidera à
effectuer certains tests faciles, sinon contactez
notre service d'assistance téléphonique.
© 2011 Alan Electronics GmbH
01805-012204
alan-service@ps-tech.de
.
Page 15

EG Konformitätserklärung
Art. 3
Finnland, Frankreich, Griechenland,
Liechtenstein, Litauen, Luxemburg, Malta,
len, Portugal, Rumänien, San Marino, der
Hiemit erklären wir, dass unser Produkt:
PMR 446 Handfunkgerät " Tectalk Fun "
unseren technischen Konstruktionsunterkagen und Prüfberichten entspricht, sowie die wesentlichen
Anforderungen der R& TTE Richtlinie der Europäischen Union 1999/5/EC, herausgegeben am 9.3.
1999, erfüllt. Gemäß Anhang III der R&TTE Richtlinie wurden die folgenden harmonisierten Normen
und wesentlichen Funktestreihen, veröffentlicht im Amtsblatt der Europäischen Gemeinschaften,
zur Beurteilung der Konformität unseres Produkts herangezogen:
Funk- und Spektrum Parameter (Produktstandard) : EN 300 296-2 V 1.2.1
Elektromagnetische Verträglichkeit EMV: EN301 489-1 V1.8.1, EN 301 489-5 V 1.3.1
Elektrische Sicherheit (ohne Anwendung der Spannungsgrenzen nach
Das Produkt ist zur Benutzung in folgenden EU bzw. nicht EU-Staaten
vorgesehen:
Belgien, Bulgarien, Dänemark, Deutschland, Estland,
Großbritannien, Irland, Island, Italien, Lettland,
den Niederlanden, Norwegen, Österreich, Po
Slowakischen Republik, Slowenien, Spanien, Schweden, der Schweiz, der Tschechischen
Republik und Zypern.
"Alan Electronics GmbH declara, bajo su responsabilidad, que este aparato cumple con lo dispuesto
en la Directiva 99/05/CE, del Parlamento Europeo y del Consejo de 9 de marzo de 1999, transpuesta
a la legislacion espanola mediante el Real Decreto 1890/2000, de 20 de noviembre"
Inverkehrbringer dieses Produkts:
Name: Alan Electronics GmbH
Anschrift : Daimlerstr. 1 k
Kontaktperson: Dipl.-Phys. Wolfgang Schnorrenberg
(1) (a) der R&TTE Richtlinie): EN60950-1 : 2006
D-63303 Dreieich
Alan
Electronics GmbH
Datum: 08. 09. 2010
Wolfgang Schnorrenberg
Page 16

este aparato cumple con lo dispuesto
Declaration of Conformity
Herewith we declare that our product:
PMR 446 transceiver " Tectalk Fun "
corresponds to our Technical Construction Files and Test Reports and is conform to all
relevant essential requirements of the R&TTE-Directive 1999/5/EC, issued March 9, 1999.
According to Annex III of the R&TTE Directive the following harmonized standards and
essential radio test suites, published in the "Official Journal" of the European communities,
have been used to demonstrate the conformity of the product:
Radio and Spectrum engineering parameters: EN 300 296-2 V 1.2.1
Electromagnetic Compatibility EMC: EN301 489-1 V1.8.1, EN 301 489-5 V 1.3.1
Electrical safety (without application of voltage limits according to Art. 3
The product is intended to be used in following European (EU and non EU) countries:
Austria, Bulgaria, Belgium,Cyprus, Czech Republic, Denmark, Estonia, Finland, France,
Germany, Greece, Hungary, Iceland, Ireland, Italy, Latvia, Liechtenstein, Lithuania, Luxembourg,
Malta, Netherlands, Norway, Poland, Portugal, Romania, San Marino, Slovak Republic, Slovenia,
Spain, Sweden, Switzerland and United Kingdom.
"Alan Electronics GmbH declara, bajo su responsabilidad, que
en la Directiva 99/05/CE, del Parlamento Europeo y del Consejo de 9 de marzo de 1999, transpuesta
a la legislacion espanola mediante el Real Decreto 1890/2000, de 20 de noviembre"
Company, placing the product on the market:
Name: ALAN Electronics GmbH
Address: Daimlerstr. 1 k
Contact person: Dipl.-Phys. Wolfgang Schnorrenberg
(1) (a) of R&TTE Directive): EN 60 950-1 : 2006
D-63303 Dreieich
Alan
Electronics GmbH
Date: 08. 09. 2010
Wolfgang Schnorrenberg
Page 17

Tectalk Fun
Manuale d’ Uso
Page 18

Page 19

RICETRASMETTITORE PMR446 MODELLO TECTALK FUN
Appare quando è attivata la bassa potenza
Potreste ferirvi o causare
batterie dalla radio se
MANUALE D’USO
Si illumina di rosso ogni 15 secondi per
indicare che le batterie si stanno scaricando.
Si illumina di verde quando il caricatore è
collegato alla radio.
Installazione delle batterie:
1. Sganciate il coperchio del vano batterie sul
retro della radio (Figura 1) e rimuovetelo
(Figura 2).
2. Inserite 3 batterie
ricaricabili AAA 1.2V
Ni-MH (opzionali).
3. Agganciate
nuovamente il
coperchio vano
Comandi
1. Display LCD: Visualizza lo stato operativo
dell’apparato.
2. TASTO PTT
3. TASTO (Volume/Canale): Premerlo per
regolare il volume e cambiare canale.
4. Call – Tasto chiamata: Premerlo per inviare i
toni di chiamata.
5. TASTO (Volume/ Canale): Premerlo per
regolare il volume e cambiare canale.
6. Microfono.
7. Vano batterie (sul retro): Inserite 3 batterie
AAA alcaline o ricaricabili Ni-MH. Le batterie
sono opzionali.
8. Altoparlante
9. Presa di ricarica 6V CD
10. TASTO
11. TASTO Menu/Power (on/off) : Tenete
12. LED TX-RX (Trasmissione-Ricezione): il led
(Scan): tenete premuto 1 secondo
per iniziare la scansione canali.
premuto il tasto per accendere/spegnere
l’apparato. Una breve pressione permette il
cambio dei canali, la selezione dell’alta/bassa
potenza e di attivare la funzione monitor.
si illumina di rosso durante la trasmissione e
la ricezione.
batterie.
Si possono utilizzare anche batterie AAA alcaline
ma ricordatevi di non caricarle, queste batterie
non sono ricaricabili!
esplosioni! Rimuovete le
questa non viene utilizzata per lungo tempo.
Display LCD
Canale / Livello
volume
Si illumina durante la trasmissione
Si illumina durante la ricezione
Livello del volume/numero del canale (1 - 8)
Figura 1 Figura 2
Indicatore di
trasmissione
Indicatore di
bassa potenza
Indicatore di
ricezione
Page 20

Accensione
Tenete premuto il tasto . La radio emette
due beep e il display esegue un veloce auto test.
Spegnimento
Tenete premuto il tasto . Il Tectalk emette
un beep e il display si spegne.
Regolazione del volume dell’altoparlante
• Premete il tasto per aumentare il
volume.
•
Premete per ridurlo.
• Il livello del volume è indicato sul display
da un numero compreso tra 1 e 8.
Ricezione di un segnale
L’apparato è costantemente in ricezione quando
è acceso e non state trasmettendo.
Quando si riceve un segnale, l’icona RX viene
visualizzata sul display e il led si illumina di rosso.
Trasmissione
• Innanzitutto controllate che nessuno stia
trasmettendo sul canale in uso. Per
trasmettere tenete premuto il tasto PTT.
L’indicatore di trasmissione si accende di
rosso e sul display compare l’icona TX.
Parlate con tono normale ad una distanza
di circa 5cm dal microfono.
• Rilasciate il tasto al termine della
conversazione.
NOTA: Il vostro interlocutore deve essere
sintonizzato sul vostro stesso canale!
Selezione di un canale
I ricetrasmettitori PMR446 hanno 8 canali
disponibili. Per selezionare un canale:
1. Premere il tasto . Il canale in uso
lampeggia sul display.
2. In questo momento:
Premete il tasto per spostarsi ad un
canale superiore o
canale inferiore.
Si può scegliere un canale da 1 a 8.
3. Premendo il PTT si conferma il canale
selezionato e si ritorna alla modalità normale.
NOTA: Fate riferimento alla “Tabella canali” per
verificare la corrispondenza canale/frequenza.
Selezionare l’alta/bassa potenza
• Premete per selezionare il menu
alta/bassa Potenza (High/Low power).
•
Utilizzate i tasti / per scegliere il
livello desiderato. Se selezionate la bassa
potenza, sul display compare “L”. La
bassa potenza riduce il consumo delle
batterie ma limita la portata dell’apparato.
Monitor
La funzione MONITOR permette di rilevare i
segnali deboli sul canale in uso.
• Premete il tasto 3 volte per attivarla.
• Premete di nuovo per disattivare
la funzione.
Risparmio energia
Se l’apparato non riceve segnali per più di 6
secondi, si attiva automaticamente la funzione di
risparmio energia, che consente di ridurre i
consumi delle batterie.
La radio comunque rimane in modalità ricezione.
Segnale di batteria scarica
Quando le batterie si stanno scaricando, viene
emesso un tono di avviso e il led rosso
lampeggia ogni 15 secondi. Ricaricate le batterie.
Scansione dei canali
Questa funzione esegue la scansione degli 8
canali e in presenza di un segnale in ricezione si
arresta. La scansione si attiva premendo il tasto
per 1 secondo.
1. Durante la scansione si può:
per selezionare un
Page 21

essere debole o fuori portata.
scariche.
distanza di 5 cm dal microfono.
Le radio sono troppo lontane
Tenere premuto il tasto per terminare la
scansione e ritornare al canale
precedentemente utilizzato.
Premere il PTT per interrompere la
scansione e trasmettere sul canale
precedentemente utilizzato.
Premere il tasto CALL per terminare la
scansione e trasmettere il tono di
chiamata sul canale d’origine.
2. In presenza di un segnale, la scansione si
arresta. Ora avete le seguenti opzioni:
Tenete premuto il tasto per terminare
la scansione e ritornare al canale
precedentemente utilizzato.
Premete il tasto PTT per trasmettere sul
canale precedentemente in uso. Questo
interrompe la scansione.
Premete il tasto Call per trasmettere il tono
di chiamata ed interrompere la scansione.
Premete i tasti o per saltare i
canali rilevati; in questo modo la
scansione continua.
Inviare i toni di chiamata
I toni di chiamata sono utili per avvisare gli altri
utenti (sintonizzati sullo stesso canale) che
stiamo trasmettendo.
Si possono anche utilizzare per segnalare
l’inizio o il termine della trasmissione.
Quando si preme il tasto Call il led rosso
lampeggia e sul display viene visualizzata
l’icona TX.
Risoluzione dei problemi
PROBLEMA SOLUZIONE
Nessuna
potenza
erogata
Controllate le batterie e
assicuratevi che siano state
installate correttamente.
Le batterie sono scariche.
Ricaricate le 3 batterie
ricaricabili Ni-MH o utilizzate
quelle alcaline (non sono
ricaricabili!!)
La ricezione
è debole.
Non si riesce
a cambiare
canale
La portata
è limitata
Problemi
di distorsione
audio.
Specifiche tecniche
Canali 8
Potenza d’uscita (TX) 0.5W
Autonomia delle batterie 30 ore
(Ciclo di utilizzo 5/5/90)
Portata max. 5 Km
Canali MHz
NOTA: Le prestazioni dei ricetrasmettitori dipendono
dalle condizioni ambientali ed atmosferiche.
Premete il tasto per
aumentare il volume.
Il segnale di ricezione può
In questo caso, attivate la
funzione Monitor.
La batterie potrebbero essere
Le batterie possono essere
scariche.
Sostituite le batterie se viene
emesso il tono di batteria
scarica.
La portata massima dipende
Trasmettete con un tono
normale di voce ad una
Se state ricevendo, abbassate
il volume.
1 446.00625
2 446.01875
3 446.03125
4 446.04375
5 446.05625
6 446.06875
7 446.08125
8 446.09375
Page 22

Informazione importante
Come da disposizioni di legge, includiamo la
dichiarazione di conformità, informazioni
riguardanti l’utilizzo dei PMR446 in Europa, la
garanzia ed il riciclo degli apparati.
Garanzia Europea biennale
La durata della garanzia è di 24 mesi a
decorrere dalla data di acquisto o dalla data
della ricevuta rilasciata dal rivenditore. La
garanzia non sarà applicata in caso di prodotto
o parte di esso che, a giudizio della Società, sia
rimasto danneggiato a causa di uso improprio o
non corretto, negligenza, incidente, o nel caso
in cui siano state rimosse o non siano leggibili
le targhette con il numero di serie e/o il codice a
barre applicati dalla Casa costruttrice. La
garanzia non si applica ad accessori o a
problemi causati dall’utilizzo di parti non
originali o comunque non preventivamente
autorizzate come batterie, alimentatori esterni,
nonché danni per sovratensioni causate da
alimentatori esterni, lampade, antenne rotte,
clip da cintura rotte, display e cabinet esterno
rotto o danneggiato.
Contattate il vostro distributore o rivenditore.
L’apparato verrà riparato o sostituito od inviato
ad un centro assistenza autorizzato.
Informazioni sul riciclo degli apparati
elettronici
Il simbolo del cassonetto barrato
riportato sull’apparecchiatura indica
che il prodotto alla fine della propria
vita utile deve essere raccolto
separatamente dagli altri rifiuti. L’utente dovrà,
pertanto, conferire l’apparecchiatura giunta a
fine vita agli idonei centri di raccolta
differenziata dei rifiuti elettronici ed
elettrotecnici, oppure riconsegnarla al
rivenditore al momento dell’acquisto di una
nuova apparecchiatura di tipo equivalente, in
ragione di uno a uno. L’adeguata raccolta
differenziata per l’avvio successivo
dell’apparecchiatura dismessa al riciclaggio, al
trattamento e allo smaltimento ambientalmente
compatibile contribuisce ad evitare possibili
effetti negativi sull’ambiente e sulla salute e
favorisce il riciclo dei materiali di cui è
composta l’apparecchiatura.
.
© 2011 Alan Electronics GmbH
Page 23

Tectalk Fun
Manual de Usuario
Multilingüe
Page 24

MANUAL DE USUARIO E INSTRUCCIONES DE FUNCIONAMIENTO
Nivel de volumen/Número de
canal. Cambia de 1 a 8 según se
Icono TX
En caso de que las baterías se descarguen
y no tenemos otras baterías de NiMH, es
zar pilas alcalinas del mismo
tipo, pero tiene que asegurarse que NO
pone a cargar estas pilas ya que puede
haber riesgo de fuego, explosión y
Retire las baterías de la radio si no se va a
INTERCOMUNICADOR PMR 446 TECTALK FUN
2. Instalar 3 baterías recargables de Ni-MH del
tipo AAA 1.2 V (no incluidas) como se
muestra.
3. Colocar la tapa en su posición.
Controles
1. Display LCD: Muestra el canal actual y otros
símbolos del estado de la radio.
2. Tecla PUSH TO TALK (PTT): Pulsar para
transmitir.
3. Tecla Up (Volumen/Canal): Pulse para
ajustar el nivel de volumen y cambiar el canal.
4. Tecla Call: Pulse para enviar tonos de
llamada.
5. Tecla Down (Volumen/Canal): Pulse para
ajustar el nivel de volumen y cambiar el canal.
6. Micrófono.
7. Compartimento de Baterías (parte posterior):
Para 3 pilas alcalinas o baterías recargables
Ni-MH tipo AAA (no incluidas).
8. Altavoz.
9. Jack de carga 6V DC.
10. Tecla Scan : Pulse y mantenga durante 1
segundo para exploración de canales.
11. Tecla Menu/Power (on/off) : Pulse y
mantenga pulsada la tecla para
encender/apagarla radio. Una pulsación corta
permite cambiar canales, seleccionar
alta/baja potencia y activar la función monitor
que ayuda a buscar señales fuertes.
12. LED indicador de Transmisión: Se ilumina en
rojo cuando transmitimos.
Si la batería está baja se ilumina cada 15
segundos.
Se ilumina en verde cuando el cargador está
conectado.
Instalación de las Baterías:
1. Retirar la tapa de baterías localizada en la
parte trasera (ver figura 1) y retirarla (ver
figura 2).
posible utili
lesiones.
utilizar durante un largo periodo de tiempo.
Display LCD:
Nivel de Volumen
/Canal
Fig. 1 Fig. 2
Icono
potencia baja
Icono RX
Se enciende en transmisión
Se enciende en recepción
seleccione
Se enciende si se selecciona
potencia baja
Page 25

Encender la radio:
Pulse y mantenga pulsada la tecla . La radio
emitirá un pitido de doble tono y el display hará
un breve auto-test.
Apagar la radio:
Pulse y mantenga pulsada la tecla . La radio
emitirá un pitido y el display se apagará.
Ajuste de Volumen:
1. Pulse la tecla para aumentar el volumen
del altavoz.
2. Pulse la tecla
del altavoz.
3. El nivel de volumen se indica en display
mediante números del 1 al 8.
Recepción:
Cuando de enciende la radio y no se transmite,
está continuamente en modo recepción. Cuando
se recibe una señal, el símbolo RX se enciende
en el display (ver “Display LCD” para más
detalles) y se enciende el LED en color rojo.
Transmisión:
1. Antes de nada mire si hay alguien
transmitiendo en el mismo canal. Si es así
NO transmita. Mantenga pulsada la tecla de
transmisión PTT para transmitir. El indicador
LED se enciende en rojo y en el display se
ilumina el símbolo TX. Mantenga la radio en
posición vertical y a unos 10cm. de la boca.
2. Mientras mantiene pulsado el PTT, hable con
un tono normal de voz.
3. Suelte el PTT cuando haya finalizado la
transmisión.
NOTA: Para que otros usuarios reciban su
transmisión, deben de estar en el mismo canal
en el que usted está transmitiendo. Vea la
sección “Cambio de Canal” para más
información.
Cambio de Canal:
La radio tiene 8 canales disponibles. Para
cambiarlos:
1. Pulse una vez la tecla
canal en uso parpadea en el display.
2. Mientras el número de canal parpadea:
Pulse la tecla
más alto.
Pulse la tecla
más bajo.
Los canales cambian de 1 a 8, o de 8 a 1.
3. Pulse la tecla PTT para confirmar el nuevo
canal seleccionado y volver al modo normal.
NOTA: Vea la sección “Tabla de Canales” de
este manual para ver la lista se frecuencias.
Selección de Potencia
1. Pulse la tecla dos veces para entrar al
para disminuir el volumen
. El número del
para cambiar a un canal
para cambiar a un canal
menú de potencia.
2. Pulse las teclas
nivel de potencia. El display indica “L” cuando
se selecciona potencia baja. La potencia baja
prolonga la vida de las baterías, pero reduce
el rango de distancia.
Monitor:
Puede utilizar la función MONITOR para
chequear señales en el canal en uso.
1. Pulse la tecla
función.
2. Pulse de nuevo la tecla
la función.
Ahorro de Baterías
6 segundos después de la última operación, la
radio entra automáticamente en modo de ahorro
de batería. Con esta función se prolonga la vida
de las baterías. La radio permanece a la escucha
para recibir cualquier transmisión.
Aviso de Batería Baja:
Cuando las baterías de la radio están demasiado
bajas, se escucha un tono de alerta y el indicador
LED parpadea en rojo una vez cada 15
segundos. En este caso, recargue las baterías lo
antes posible.
Scanner:
Esta función permite explorar en un lazo sin fin
los canales para encontrar señales activas. La
función se activa pulsando la tecla
segundo.
1. Durante la exploración usted puede:
Volver a pulsar la tecla
exploración y volver al canal original.
Pulsar la tecla PTT para detener la
exploración y transmitir en el canal
original.
Pulsar la tecla de llamada y enviar un tono
de llamada en el canal original.
2. Cuando durante la exploración se detecta un
canal activo, la exploración se detiene y tiene
las siguientes opciones:
Pulsar la tecla
exploración y volver al canal original.
Pulsar la tecla PTT para transmitir en el
canal detectado. Esta acción detiene el
proceso de exploración.
Pulsar la tecla Call para enviar un tono de
llamada y detener la exploración.
Para saltar el canal activo detectado y
continuar la exploración, pulse las teclas
o .
Tonos de Llamada
Puede utilizar los tonos de llamada para avisar a
/ para seleccionar el
3 veces para activar la
para desactivar
durante 1
para detener la
para detener la
Page 26

los otros usuarios cuando intente contactar con
Asegúrese de que están
Recargue las 3 baterías y si
no es posible, utiliza pilas
alcalinas, pero NUNCA las
para subir
La señal recibida puede ser
a
Las baterías pueden estar
Cambie las baterías si hay
tono de alerta de batería
El alcance máximo
depende del terreno y del
abierto permite un
alcance máximo, mientras
que las estructuras de
acero y hormigón, los
bosques frondosos y el uso
dentro de vehículos puede
Tener la radio cerca del
cuerpo, como en un bolsillo
o en el cinturón, puede
e; cambie
la localización de la radio,
por ejemplo cerca de una
Al transmitir hable en un
tono normal a unos 10 cm.
En recepción, ajuste el
volumen a un nivel
Las radios están muy lejos.
s interfieren la
transmisión. Muévase a un
ellos. También puede utilizar los tonos para
indicar el comienzo o el final de una transmisión.
Pulse la tecla de llamada para comenzar la
transmisión del tono de llamada. El LED rojo se
enciende y el símbolo TX aparece en el display.
Solución de Problemas
La radio no se
enciende
Recepción débil Pulse la tecla
No se puede
cambiar de
canal
Alcance
limitado
Verifique las baterías.
instaladas correctamente.
Las baterías están bajas.
ponga a cargar.
el volumen.
débil y/o fuera de rango.
Si ocurre esto, utilice l
función MONITOR.
Las baterías pueden estar
bajas.
bajas.
baja.
ambiente.
El campo
limitar el alcance.
Especificaciones
Cales disponibles
Potencia de salida TX 0.5 W
Autonomia de baterías
Alcance Max. 5 km
Número de canal
1 446,00625
2 446,01875
3 446,03125
4 446,04375
5 446,05625
6 446,06875
7 446,08125
Accesorio Opcional:
Cargador de pared. Código: 29699
8 446,09375
8 Canales
30 hours (aprox.)
Tabla de Canales
Frecuencia (MHz)
Sonido
distrosionado
reducir el alcanc
ventana.
de la radio.
agradable.
Los obstáculo
lugar mas despejado.
Page 27

Información Importante
Estamos legalmente obligados a incluirán cada
aparato información sobre disposiciones y
garantía, así como la declaración de conformidad
con el manual de usuario multilingüe.
Busque dicha información en las siguientes
páginas.
2 Años de Garantía desde la Fecha de
Compra
El fabricante/ distribuidos garantiza este aparato
durante 2 años a partir de la fecha de compra. La
garantía cubre todo mal funcionamiento debido a
componentes originales defectuosos o
funcionamiento incorrecto excluyendo el
desgaste por su uso, baterías agotadas, rayas
en el display, carcasas rotas, antenas rotas y
defectos debidos a efectos externos como
corrosión, sobre voltaje por medio de una fuente
externa o por el uso de accesorios indebidos.
Los defectos debidos a un uso indebido también
están excluidos de la garantía.
En caso de avería, contacte con su distribuidor.
Él enviará el aparato al SAT de ALAN.
Incluya la factura de compra y una descripción,
lo más exacta posible, del defecto que ha
observado.
Reciclado de Equipo Electrónicos
Las leyes europeas no permiten que los
equipos eléctricos y electrónicos de
desecho se tiren a la basura orgánica.
Desde que las industrias han
comenzado a financiar el reciclaje de
basura electrónica, debemos tirar los equipos
desechados en los puntos verdes instalados a tal
propósito.
Servicio de Asistencia Técnica
ALAN Communications
C/ Cobalt, 48
08940 – Cornella de Llobregat (Barcelona)
Tel: 908 48 78 Fax: 933779155
info@alan.es
© 2011 Alan Electronics GmbH
Page 28

Por la presente declaramos que nuestro producto:
corresponde a nuestros Expedientes Técnicos de Fabricación y Test Reports y es conforme a todos
los requerimientos esenciales de la directiva R&TTE 1999/5/EC, publicada el 9 de marzo de 1999.
De acuerdo al Anexo III de la directiva R&TTE los siguientes estándares harmonizados y radio test
esenciales, publicados en el "Official Journal" de la Unión Europea, se han utilizado para demostrar
la conformidad de este producto:
El producto está diseñado para ser utilizado en los siguientes países Europeos:
Austria, Bulgaria, Bélgica, Chipre, República Checa, Dinamarca, Estonia, Finlandia, Francia,
Alemania, Grecia, Hungría, Islandia, Irlanda, Italia, Letonia, Liechtenstein, Lituania, Luxemburgo,
Malta, Holanda, Noruega, Polonia, Portugal, Rumania, San Marino, República Eslovaquia,
Eslovenia, España, Suecia, Suiza y Reino Unido.
"Alan Electronics GmbH declara, bajo su responsabilidad, que este aparato cumple con lo dispuesto en
la Directiva 99/05/CE, del Parlamento Europeo y del Consejo de 9 de marzo de 1999, transpuesta a la
legislacion espanola mediante el Real Decreto 1890/2000, de 20 de noviembre"
Empresa que pone el producto en el mercado:
Alan Electronics GmbH
Date: 08. 09. 2010
EN 300 296-2 V 1.2.1 ; EN301 489-1 V1.8.1 ;, EN 301 489-5 V 1.3.1
Seguridad eléctrica (sin aplicación de límites de voltaje de acuerdo al Art. 3
Declaration of Conformity
Transceptor PMR 446 " Tectalk Fun "
(1) (a) de la directiva R&TTE): EN 60 950-1 : 2006
Wolfgang Schnorrenberg
Alan Electronics GmbH
 Loading...