

Page 1
AL-DTM-III
ALARM LOCK
345 Bayview Avenue
Amityville, New York 11701
For Sales and Repairs, (800) 645-9445
For Technical Service, (800) 645-9440
Data Transfer Modules allow the transfer of lock programs and other data between DL-Windows software and Alarm Lock locking devices. The improved DTM-III allows for more locks to be stored per account, both within DL-Windows and within the DTM-III itself. These
instructions will allow you to configure for the improved DTM-III operation.
DTM's that start up with the message "Alarm Lock DTM-II-III, V1.XX" will operate in both the DTM-II and DTM-III modes. Units
configured to operate in DTM-III mode will display "DTM-III" when prompting users to enter Lock Mode. The DTM-III mode is required for
DL-Windows 3.5.3 operation, and likewise DL-Windows 3.5.3 is required for use with DTM-III mode. Note: If you are unsure about your
version of DL-Windows, version numbers can be found in the DL-Windows Help, About screen. Products shipped as DTM-III have been
factory configured for DTM-III mode ON and Door Select Mode OFF.
SETUP & CONFIGURATION INSTRUCTIONS
© ALARM LOCK 2005 Publicly traded on NASDAQ Symbol: NSSC
WI1443A 10/05
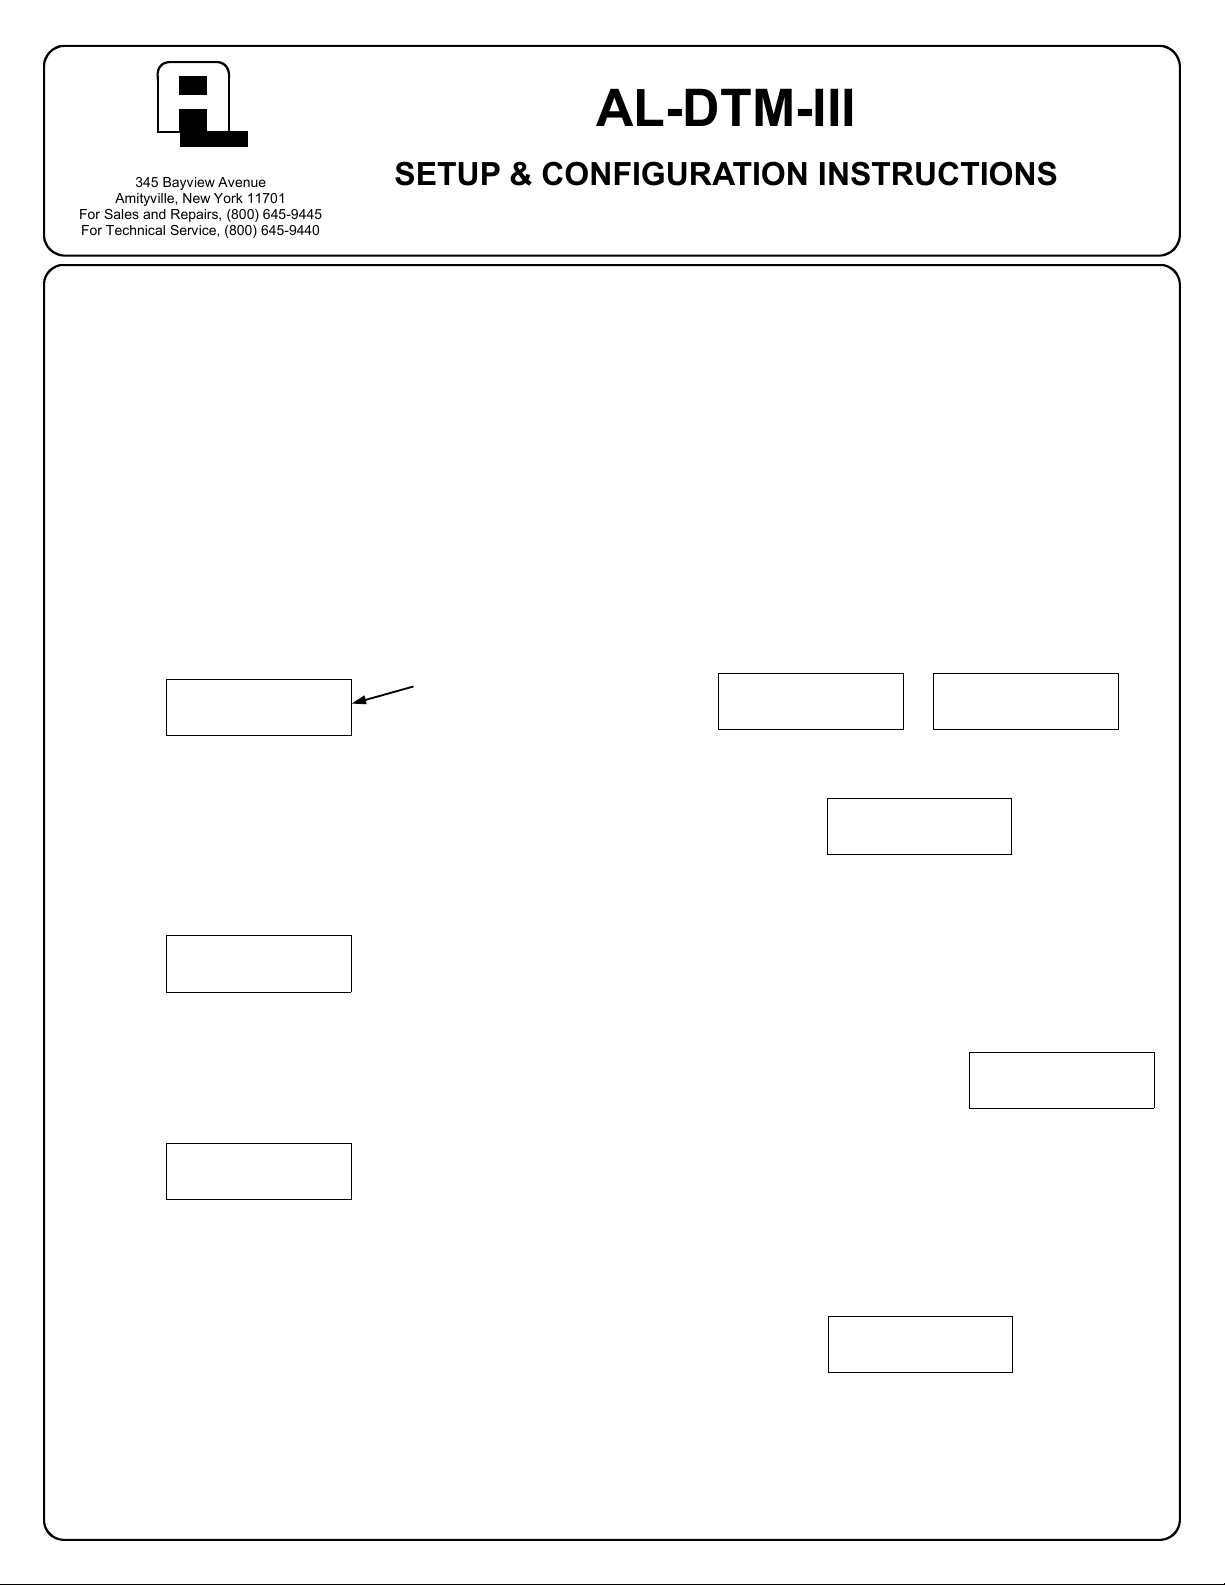
AL-DTM-III SETUP
Configure the internal DTM software for DTM-III operation:
1. From the Power On or PC Comm. mode, press and
HOLD both the left and green buttons on the DTM.
After several messages appear, release the buttons
when the display reads:
ENTERING
CONFIG/TEST MODE
2. When the display reads "CONFIG. LANGUAGE", the
DTM has entered its configuration and self-test
mode.
3. Press and release the green button once and the display will read "CONFIG FOR DTM-III MODE".
4. Press and HOLD the green button until the DTM
beeps--release the button and the display reads:
DTM-III MODE=OFF
ON OFF EXIT
The top line of the display indicates that DTM-III
mode is currently off; the bottom line corresponds to
the three buttons on the DTM.
Therefore, to activate DTM-III operation, press the
left button. The top line of the display will now read:
DTM-III MODE=ON
ON OFF EXIT
(Note: If using DL-Windows versions earlier than
3.5.3, you must press the center button to keep
DTM-III operation off--thus retaining DTM-II operation).
5. Press the green button to exit this sequence. "TASK
ENDING!" will appear briefly. The DTM will proceed
directly to "Door Selection Mode" as described in the
next section.
Release the
buttons when
displayed
ENABLE DOOR SELECTION MODE
Door Selection Mode is only needed if performing
initial lock programming using DL-Windows 3.5.3.
See the DL-Windows User's Guide OI237 for more
information about Door Selection Mode.
1. When configuring to allow Door Select Mode, the display will switch between the following:
2. Press and HOLD the green button until the DTM
beeps--release the button and the DTM will display:
The top line of the display indicates that Door Select
mode is currently off; the bottom line corresponds to
the three buttons on the DTM.
Therefore, if using DL-Windows Version 3.5.3 or later
and you wish to use the AL-DTM-III to provide initial
programming to existing locks, press the left button
(selecting "ON") to enable DOOR SELECT Mode.
The top line of the display will
now read:
(Note: You may press the
center button to keep Door Select mode off, provided
all system locks are already enrolled in the DLWindows 3.5.3 program. See the DL-Windows User
Guide for details regarding Door Select mode).
3. Press and release the green button (again and
again) until the DTM Displays:
4. Press and hold the green button until the DTM
Beeps. The DTM will perform a brief power control
test (TEST RUNNING!) and then shut down within 5
seconds.
CONFIG. DOOR
SELECT MODE
DOOR SELECT= OFF
ON OFF EXIT
Hold Button=Run,
Press=Next Test
Sleep Then
Power Down.
DOOR SELECT= ON
ON OFF EXIT
(over →)
Page 2
DOOR SELECTION OVERVIEW
Door Numbers and Lock ID's
Prior to DL-Windows v3.5.3, Door Numbers were
used to ensure that each physical lock was correctly
matched to its corresponding data when programmed.
Door Numbers were programmable via the lock key-
pad via Function 59 (for locks without keypads, such
as the PL3000, Door Numbers were selected either
by a DL-Windows equipped PC or by the Door Select
function of an AL-DTM-II. See WI1280 for more infor-
mation).
With DL-Windows v3.5.3 or later, the concept of a
Door Number has been discontinued in favor of a new
system of LockID's. With LockID's, changing the Door
Number at the keypad via Function 59 is ignored by
DL-Windows, and the ONLY way to ensure the cor-
rect physical locks are properly matched to their cor-
responding data is to either:
• use DL Windows v3.5.3 to program the locks, thus
updating the locks with the new "LockID" system,
--or--
• use an AL-DTM-III and its Door Select Mode to
provide the full lock program (which includes the
LockID).
Note: The DTM displays the word "Door" and not
"LockID" when referring to door numbers. In the
DTM, both words are equivalent.
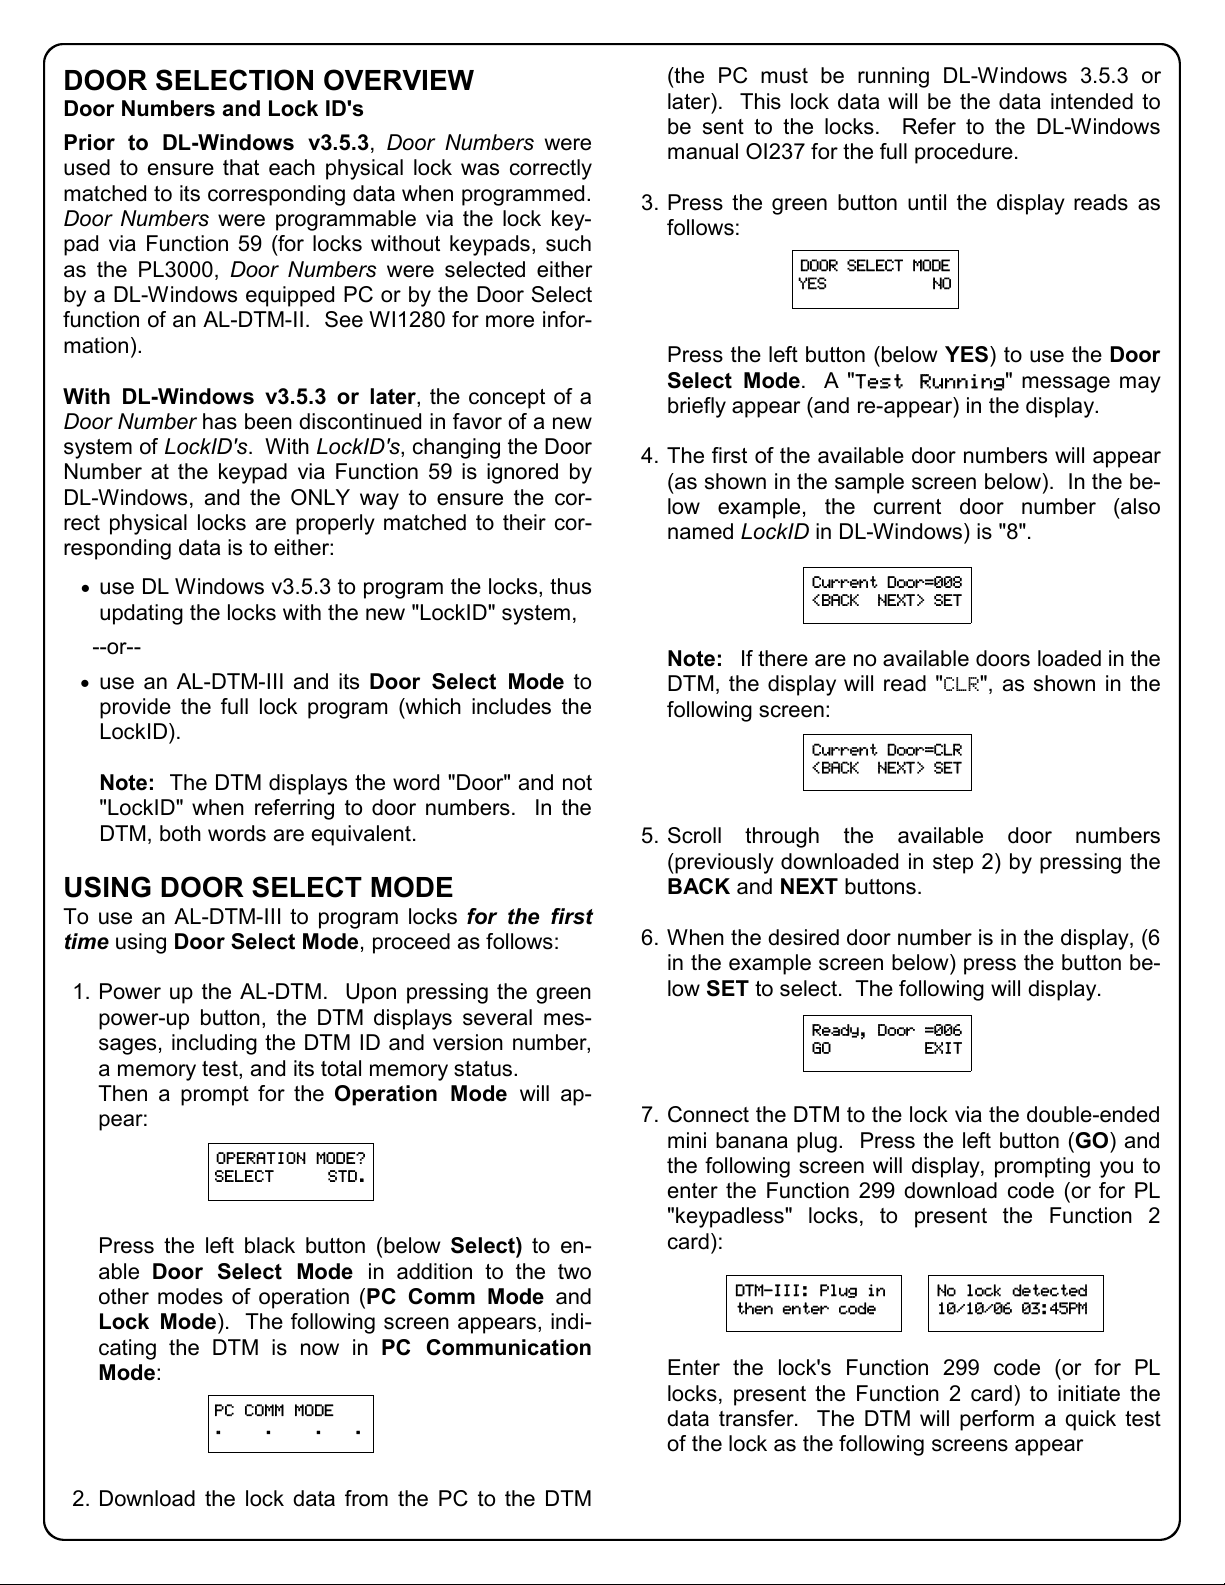
USING DOOR SELECT MODE
To use an AL-DTM-III to program locks for the first
time using Door Select Mode, proceed as follows:
1. Power up the AL-DTM. Upon pressing the green
power-up button, the DTM displays several mes-
sages, including the DTM ID and version number,
a memory test, and its total memory status.
Then a prompt for the Operation Mode will ap-
pear:
Press the left black button (below Select) to en-
able Door Select Mode in addition to the two
other modes of operation (PC Comm Mode and
Lock Mode). The following screen appears, indi-
cating the DTM is now in PC Communication
Mode:
2. Download the lock data from the PC to the DTM
OPERATION MODE?
SELECT STD.
PC COMM MODE
. . . .
(the PC must be running DL-Windows 3.5.3 or
later). This lock data will be the data intended to
be sent to the locks. Refer to the DL-Windows
manual OI237 for the full procedure.
3. Press the green button until the display reads as
follows:
DOOR SELECT MODE
YES NO
Press the left button (below YES) to use the Door
Select Mode. A "Test Running" message may
briefly appear (and re-appear) in the display.
4. The first of the available door numbers will appear
(as shown in the sample screen below). In the be-
low example, the current door number (also
named LockID in DL-Windows) is "8".
Current Door=008
<BACK NEXT> SET
Note: If there are no available doors loaded in the
DTM, the display will read "CLR", as shown in the
following screen:
Current Door=CLR
<BACK NEXT> SET
5. Scroll through the available door numbers
(previously downloaded in step 2) by pressing the
BACK and NEXT buttons.
6. When the desired door number is in the display, (6
in the example screen below) press the button be-
low SET to select. The following will display.
Ready, Door =006
GO EXIT
7. Connect the DTM to the lock via the double-ended
mini banana plug. Press the left button (GO) and
the following screen will display, prompting you to
enter the Function 299 download code (or for PL
"keypadless" locks, to present the Function 2
card):
DTM-III: Plug in
then enter code
No lock detected
10/10/06 03:45PM
Enter the lock's Function 299 code (or for PL
locks, present the Function 2 card) to initiate the
data transfer. The DTM will perform a quick test
of the lock as the following screens appear
Page 3
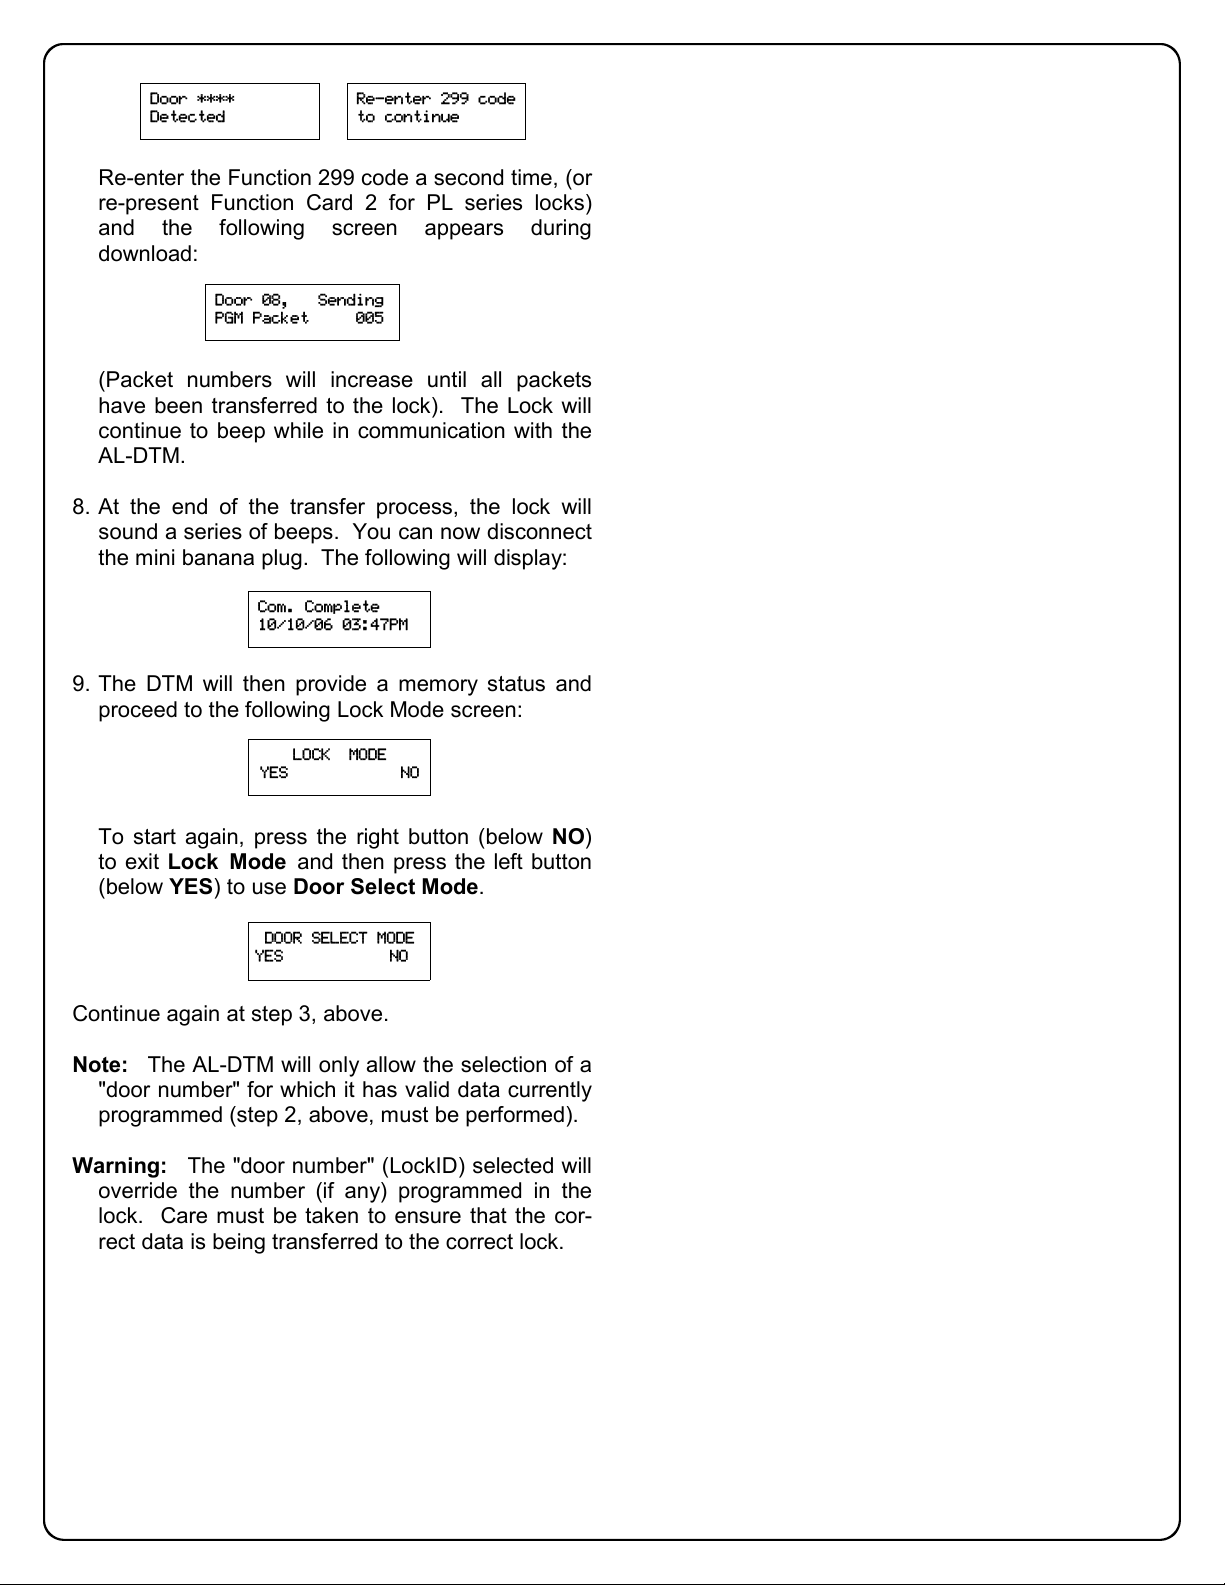
Door ****
Detected
Re-enter 299 code
to continue
Re-enter the Function 299 code a second time, (or
re-present Function Card 2 for PL series locks)
and the following screen appears during
download:
Door 08, Sending
PGM Packet 005
(Packet numbers will increase until all packets
have been transferred to the lock). The Lock will
continue to beep while in communication with the
AL-DTM.
8. At the end of the transfer process, the lock will
sound a series of beeps. You can now disconnect
the mini banana plug. The following will display:
Com. Complete
10/10/06 03:47PM
9. The DTM will then provide a memory status and
proceed to the following Lock Mode screen:
LOCK MODE
YES NO
To start again, press the right button (below NO)
to exit Lock Mode and then press the left button
(below YES) to use Door Select Mode.
DOOR SELECT MODE
YES NO
Continue again at step 3, above.
Note: The AL-DTM will only allow the selection of a
"door number" for which it has valid data currently
programmed (step 2, above, must be performed).
Warning: The "door number" (LockID) selected will
override the number (if any) programmed in the
lock. Care must be taken to ensure that the cor-
rect data is being transferred to the correct lock.
Page 4

ALARM LOCK LIMITED WARRANTY
ALARM LOCK SECURITY SYSTEMS, INC. (ALARM
LOCK) warrants its products to be free from
manufacturing defects in materials and workmanship for
24 months following the date of manufacture. ALARM
LOCK will, within said period, at its option, repair or
replace any product failing to operate correctly without
charge to the original purchaser or user.
This warranty shall not apply to any equipment, or
any part thereof, which has been repaired by others,
improperly installed, improperly used, abused, altered,
damaged, subjected to acts of God, or on which any
serial numbers have been altered, defaced or removed.
Seller will not be responsible for any dismantling or
reinstallation charges.
THERE ARE NO WARRANTIES, EXPRESS OR
IMPLIED, WHICH EXTEND BEYOND THE
DESCRIPTION ON THE FACE HEREOF. THERE IS
NO EXPRESS OR IMPLIED WARRANTY OF
MERCHANTABILITY OR A WARRANTY OF FITNESS
FOR A PARTICULAR PURPOSE. ADDITIONALLY,
THIS WARRANTY IS IN LIEU OF ALL OTHER
OBLIGATIONS OR LIABILITIES ON THE PART OF
ALARM LOCK.
Any action for breach of warranty, including but not
limited to any implied warranty of merchantability, must
be brought within the six months following the end of the
warranty period.
IN NO CASE SHALL ALARM LOCK BE LIABLE TO
ANYONE FOR ANY CONSEQUENTIAL OR
INCIDENTAL DAMAGES FOR BREACH OF THIS OR
ANY OTHER WARRANTY, EXPRESS OR IMPLIED,
EVEN IF THE LOSS OR DAMAGE IS CAUSED BY
THE SELLER'S OWN NEGLIGENCE OR FAULT.
In case of defect, contact the security professional
who installed and maintains your security system. In
order to exercise the warranty, the product must be
returned by the security professional, shipping costs
prepaid and insured to ALARM LOCK. After repair or
replacement, ALARM LOCK assumes the cost of
returning products under warranty. ALARM LOCK shall
have no obligation under this warranty, or otherwise, if
the product has been repaired by others, improperly
installed, improperly used, abused, altered, damaged,
subjected to accident, nuisance, flood, fire or acts of
God, or on which any serial numbers have been altered,
defaced or removed. ALARM LOCK will not be
responsible for any dismantling, reassembly or
reinstallation charges.
This warranty contains the entire warranty. It is the
sole warranty and any prior agreements or
representations, whether oral or written, are either
merged herein or are expressly canceled. ALARM
LOCK neither assumes, nor authorizes any other person
purporting to act on its behalf to modify, to change, or to
assume for it, any other warranty or liability concerning
its products.
In no event shall ALARM LOCK be liable for an
amount in excess of ALARM LOCK's original selling
price of the product, for any loss or damage, whether
direct, indirect, incidental, consequential, or otherwise
arising out of any failure of the product. Seller's warranty,
as hereinabove set forth, shall not be enlarged,
diminished or affected by and no obligation or liability
shall arise or grow out of Seller's rendering of technical
advice or service in connection with Buyer's order of the
goods furnished hereunder.
ALARM LOCK RECOMMENDS THAT THE ENTIRE
SYSTEM BE COMPLETELY TESTED WEEKLY.
Warning: Despite frequent testing, and due to, but not
limited to, any or all of the following; criminal tampering,
electrical or communications disruption, it is possible for
the system to fail to perform as expected. ALARM LOCK
does not represent that the product/system may not be
compromised or circumvented; or that the product or
system will prevent any personal injury or property loss
by burglary, robbery, fire or otherwise; nor that the
product or system will in all cases provide adequate
warning or protection. A properly installed and
maintained alarm may only reduce risk of burglary,
robbery, fire or otherwise but it is not insurance or a
guarantee that these events will not occur.
CONSEQUENTLY, SELLER SHALL HAVE NO
LIABILITY FOR ANY PERSONAL INJURY,
PROPERTY DAMAGE, OR OTHER LOSS BASED ON
A CLAIM THE PRODUCT FAILED TO GIVE
WARNING. Therefore, the installer should in turn advise
the consumer to take any and all precautions for his or
her safety including, but not limited to, fleeing the
premises and calling police or fire department, in order to
mitigate the possibilities of harm and/or damage.
ALARM LOCK is not an insurer of either the property
or safety of the user's family or employees, and limits its
liability for any loss or damage including incidental or
consequential damages to ALARM LOCK's original
selling price of the product regardless of the cause of
such loss or damage.
Some states do not allow limitations on how long an
implied warranty lasts or do not allow the exclusion or
limitation of incidental or consequential damages, or
differentiate in their treatment of limitations of liability for
ordinary or gross negligence, so the above limitations or
exclusions may not apply to you. This Warranty gives
you specific legal rights and you may also have other
rights which vary from state to state.
 Loading...