

Alarm.Com MyQ Installation Manual
Copyright © 2014 Alarm.com | www.alarm.com | v2.0
LiftMaster MyQ® | Installation Guide
MyQ® Garage Universal Retrofit
INSTALLATION GUIDE
1 – Getting Started
Things You’ll Need
1)
Ladder
2)
IMPORTANT: Sufficient Wi-Fi signal in the garage
-See troubleshooting section for weak signal strength remedies
3)
Wi-Fi network name and password
4)
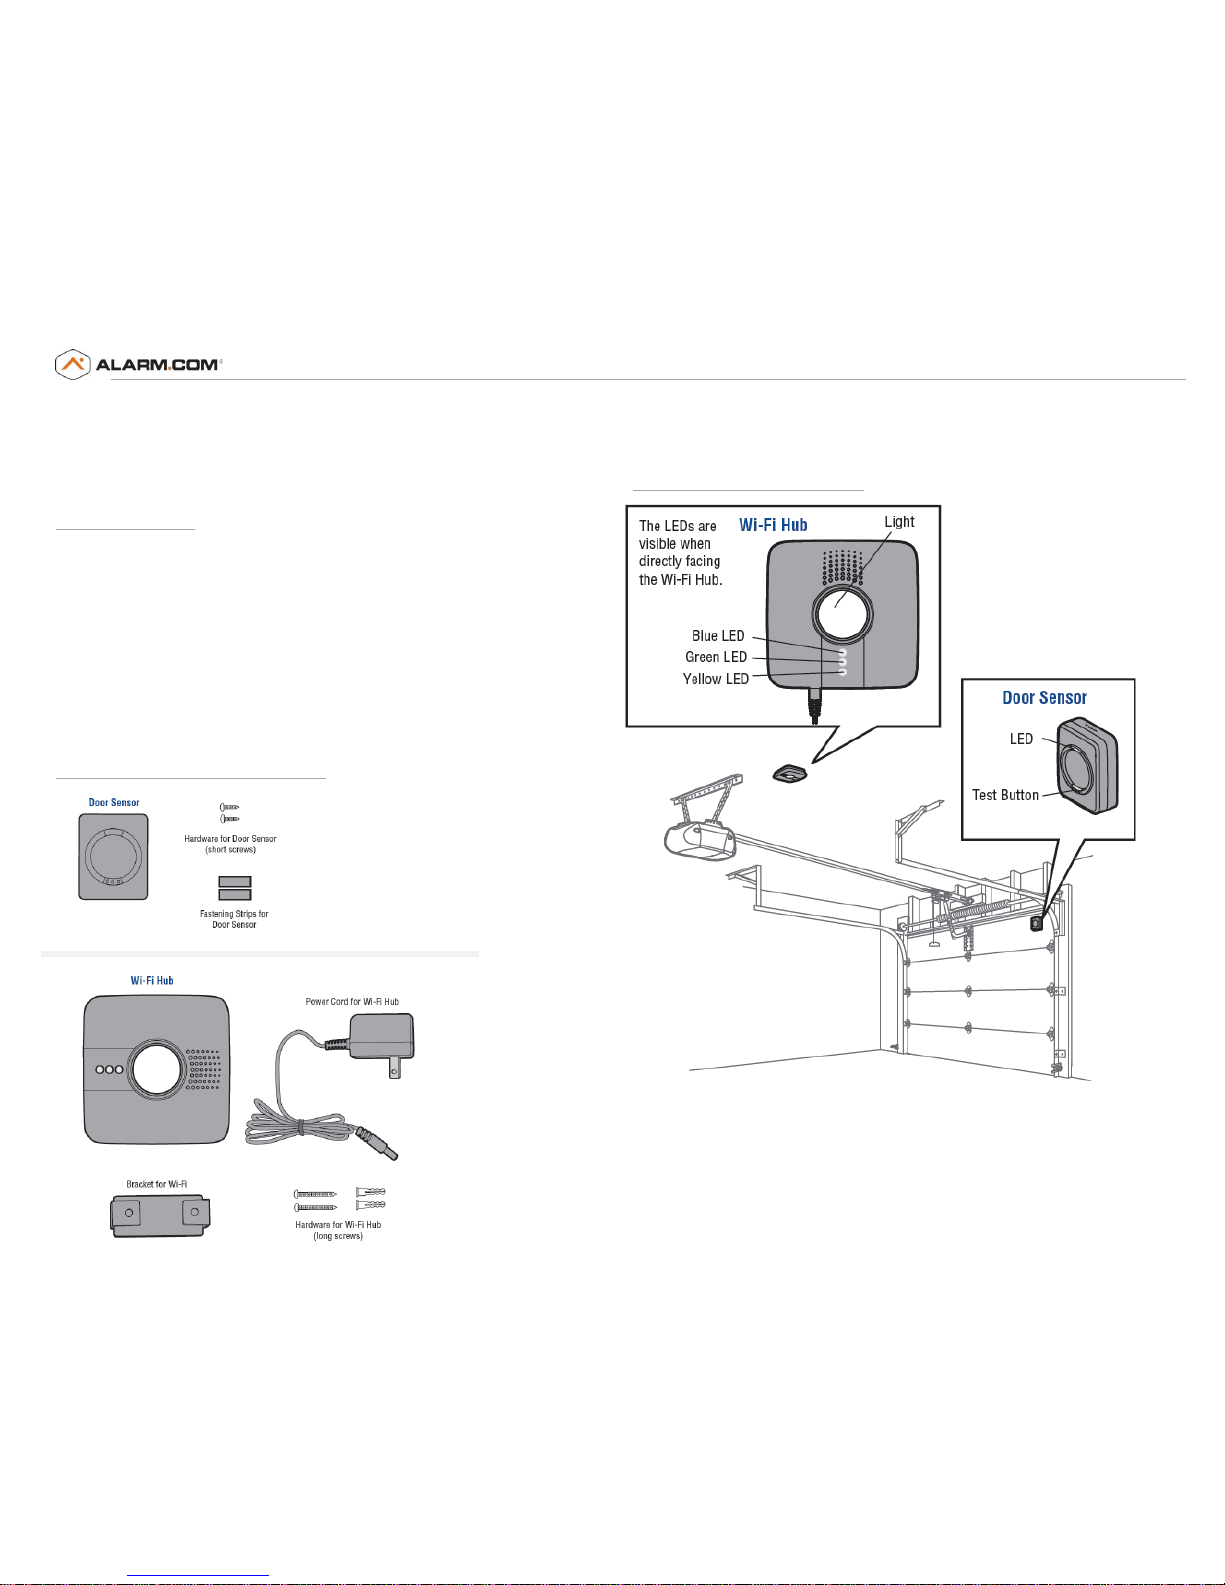
MyQ® Garage Universal Garage Door Controller
-Wifi Hub (Gateway- Supports up to 16 MyQ® devices)
-Door Sensor (Each Hub will support 2 door sensors)
5)
Compatible garage door opener (See Appendix)
6)
Dealer Site or Customer Site access through a laptop, tablet, or mobile
device
In the MyQ® Garage Box You’ll Find
Reference: Together in Garage
Copyright © 2014 Alarm.com | www.alarm.com | v2.0
LiftMaster MyQ® | Installation Guide
2 - Install Hardware
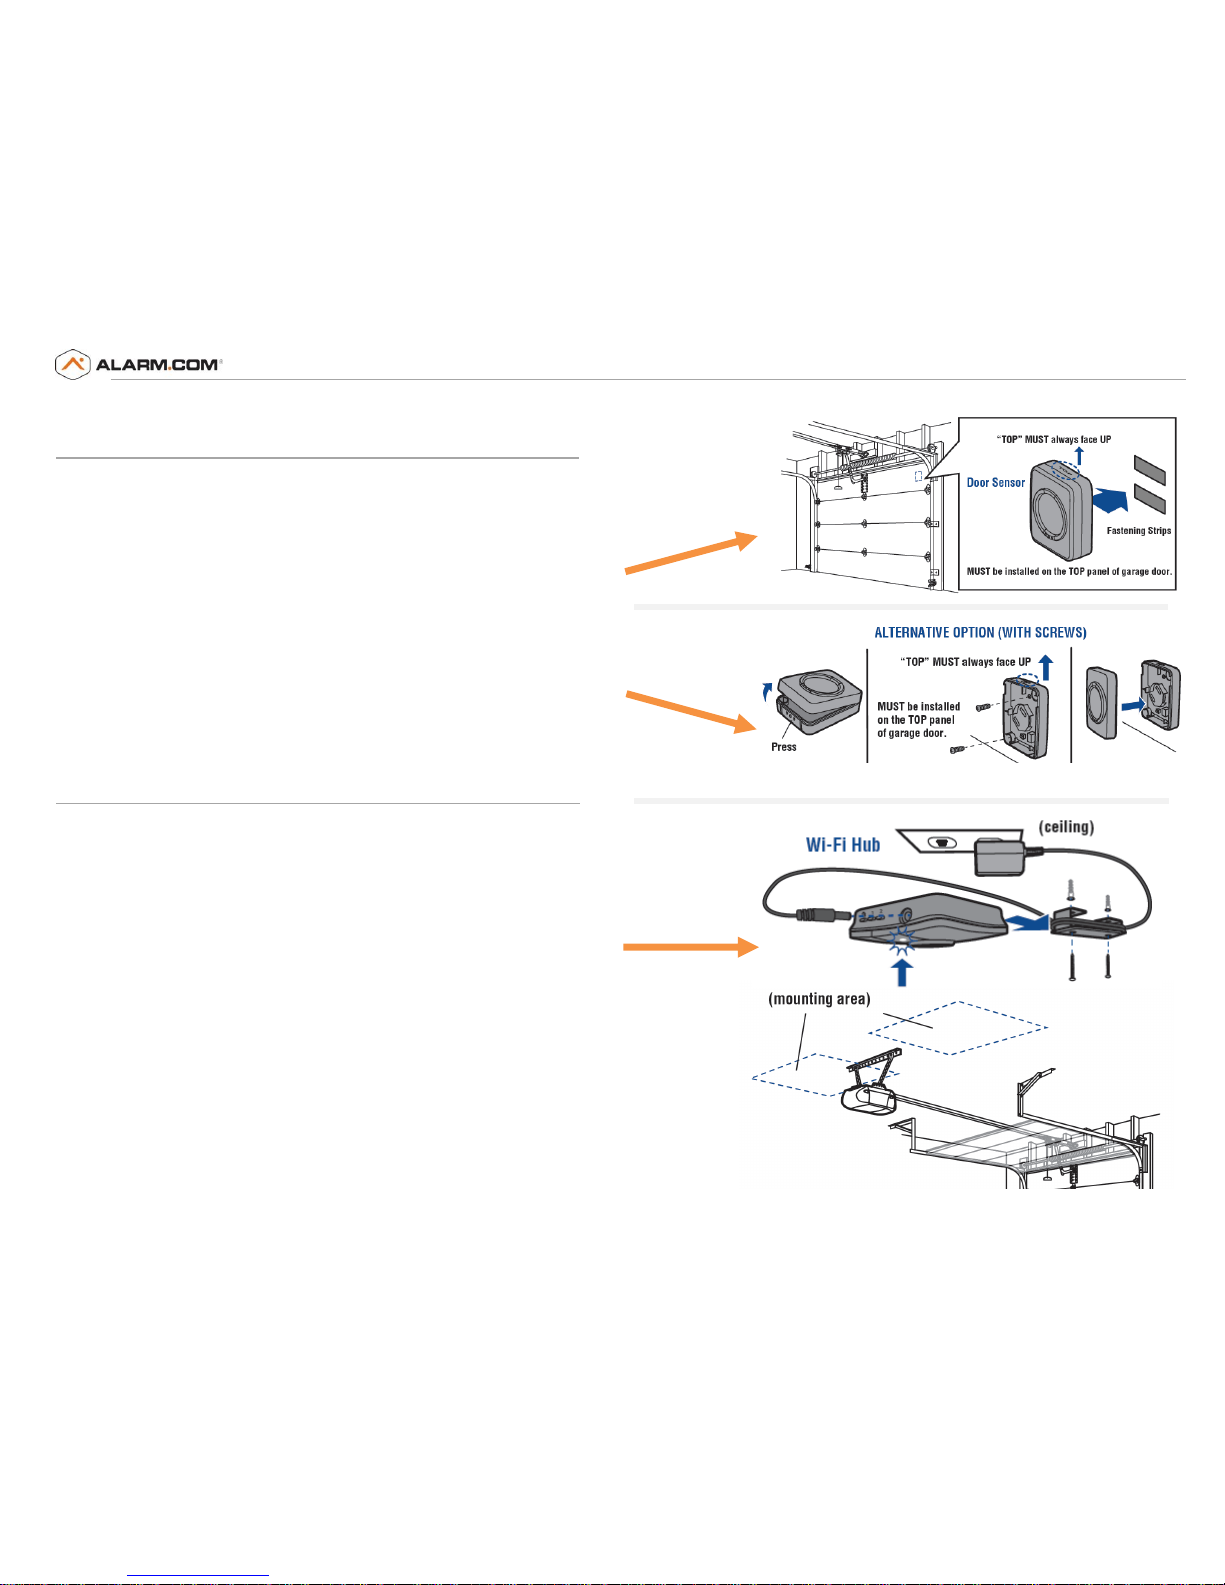
Install Door Sensor
This device will communicate the state of the door (open or closed) to the
Wi-Fi Hub and must be mounted prior to step 4.
A) To install, position the door sensor vertically and attach to a clean,
dry location on the top panel of the garage door with fastening
strips (provided).
OR
B) Press in the bottom of the door sensor and remove the front cover.
Position the door sensor vertically and attach to the top panel of the
garage door with screws (provided). Replace the front cover.
Mount the Wi-Fi Hub
Optional: Final positioning can wait until after setup is
complete.
1) Install the bracket for Wi-Fi Hub on the ceiling near the garage door
opener. Use the bracket as a template and mark holes for the bracket. Be
sure the Wi-Fi Hub is visible when standing in the doorway of the garage,
so that users can see the flashing light when the door is closing.
2) Slide the Wi-Fi Hub on to the bracket.
3) Connect to AC power.
4) The LEDs will blink momentarily indicating a successful power up.
Note: MyQ® technology has a range of 1,500 feet (open field).
Copyright © 2014 Alarm.com | www.alarm.com | v2.0
LiftMaster MyQ® | Installation Guide
3 - Setup Wi-Fi on the MyQ® Garage Wi-Fi Hub
Method 1: Using Internet Connected Device
1)
Make note of the home Wi-Fi’s network name and its associated security
key/password.
2)
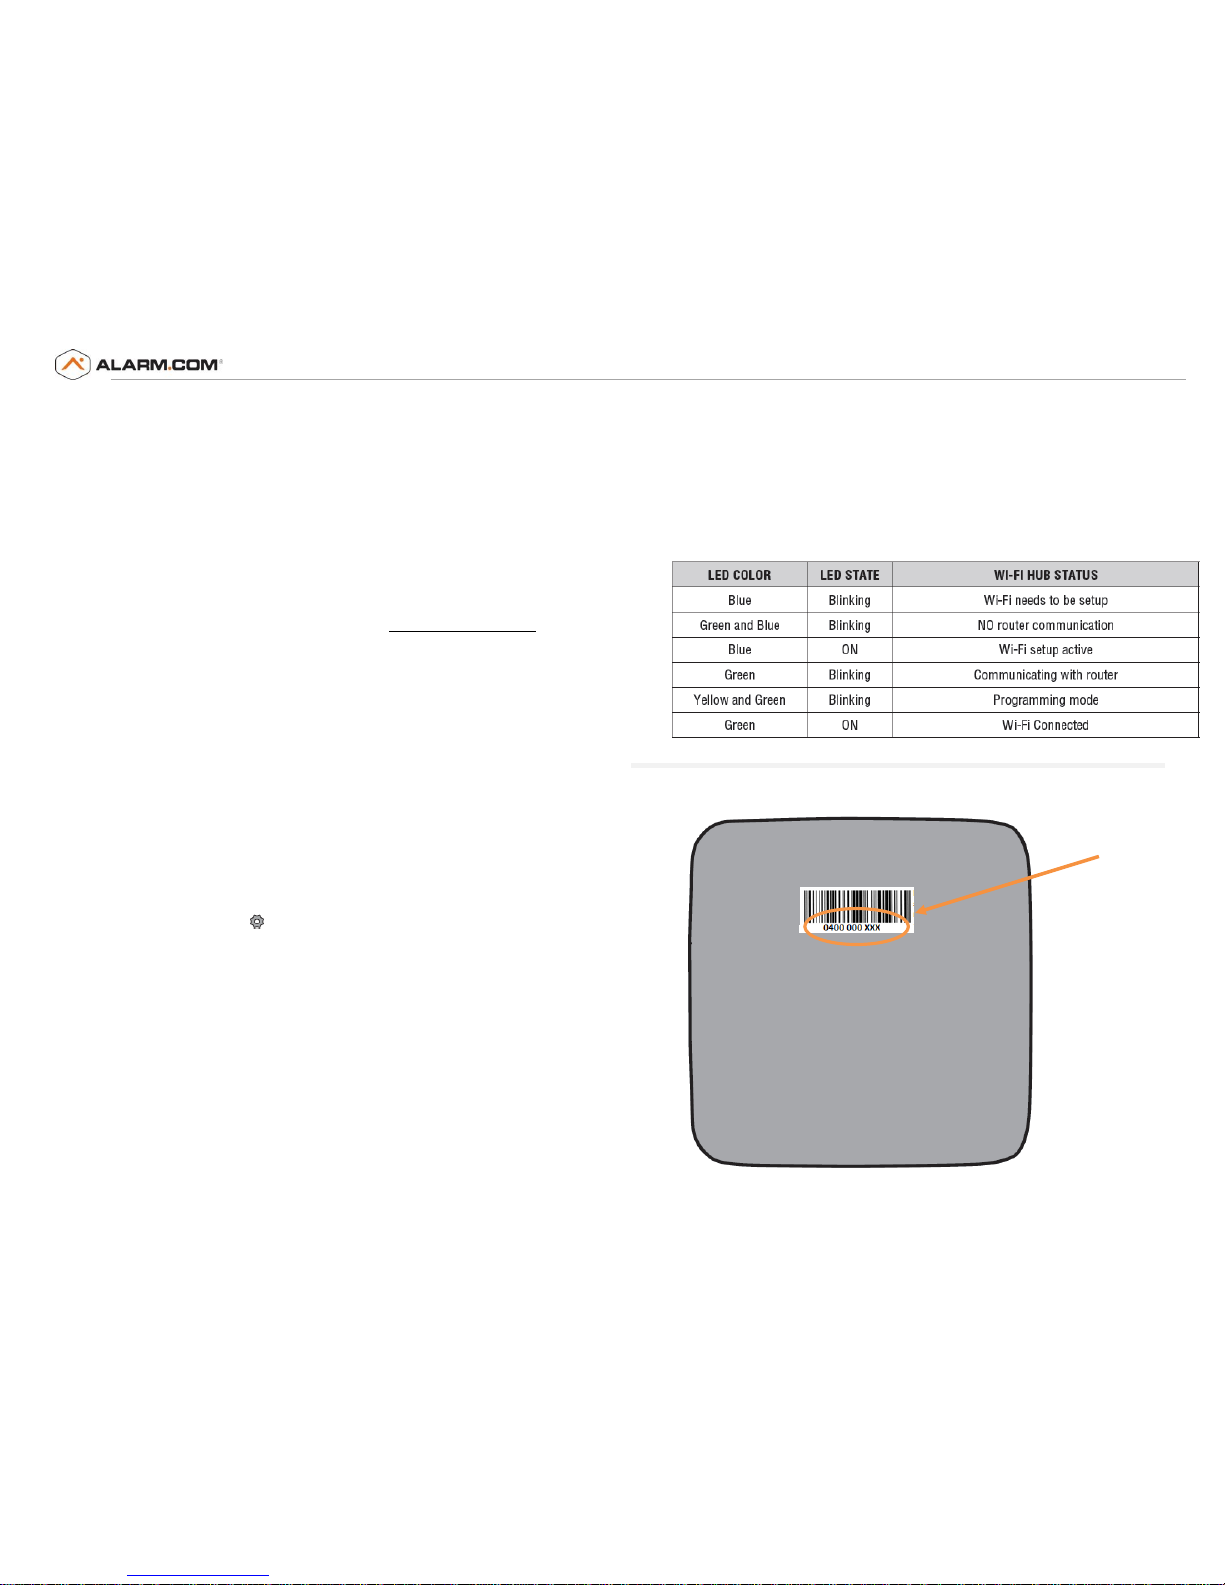
Plug in the Wi-Fi Hub. The Blue LED will blink.
3)
Make sure internet connected device’s Wi-Fi settings are on.
4)
Locate the list of available Wi-Fi networks and select “MyQ-nnn” network.
“nnn” is the last 3 digits of the Wi-Fi Hub’s serial number.
5)
Launch the device’s web browser and type “setup.myqhome.com” into
the web browser’s address bar. If unable to load try using a different
browser.
6)
Follow the steps in the MyQ® Wi-Fi Setup page to complete the setup.
You will be required to enter the Wi-Fi name and password for the home
network.
7)
When prompted, do not install the MyQ® Garage app. When the LED light
is solid green, Wi-Fi connection has been established and you may close
the internet browser.
Method 2: Using WPS
1)
Put the Hub into WPS mode: With Hub powered and Blue LED blinking,
press/release the Hub’s BUTTON. The Hub’s Blue LED will turn on solid.
2)
Within one minute, press/release the WPS button on the router.
3)
Within a few minutes, the Hub will connect to the network and the Green
LED will turn on solid indicating successful connection.
Note: See troubleshooting for an alternative method using Bluetooth enabled
device.
LED Indicators:
Back of Wi-Fi Hub:
Serial #
 Loading...