

Page 1

1
Dual-network Wired&wireless LCD Alarm System User Manual
Table of Contents
1 Features and Technical Parameter……………………………………………………………………Page 2
2 Zone Types and Definitions…………………………………..……………………………………… .Page 2
3 Modes of arming……………………….…………………..……………………………………………Page 2
4 Alarm Host Details……………………….…………………..…………………………………………Page 3
5 Shortcut Keys and Prompt tone……………………………………………………………………….Page 4
6 Time, Date, Week setting ….…………………..………………………………………………………Page 4
7 Alarm Phone No. Setting….…………………..………………………………………………………..Page 4
8 SMS Information Setting….…………………..…………………………………………………………Page 5
8.1 AC Power off or recover inform
8.2 Arm or Disarm inform
8.3 PSTN off inform
8.4 Alarm Host Back-up Battery Low Level Inform
9 Record Setting….…………………..………………………………………………………………….Page 5
10 Arm Delay Setting….…………………..………………………………………………………………Page5
11 Alarm Delay Setting….…………………..……………………………………………………………Page 5
12 Alarm Buzzer Sound Time Setting….…………………..……………………………………………Page5
13 Activate and Disable Alarm Buzzer.…………………..……………………………………………..Page 5
14 Prompt Tone ON/Off…………………..………………………………………………………………Page5
15 Call In Ring Setting…………………..………………………………………………………………..Page 6
16 Program and Delete Wireless Sensors……….……..………………………………………………Page 6
17 Zone Attribute Setting……….……..…………………………………………………………………..Page 6
17.1 “Activate” or “Deactivate” the zone
17.2 Change Sensors Name
17.3 Alarm Delay On or Off
18 Central Monitoring Center Upload…….……..………………………………………………………..Page 8
19 User password Setting….……..……………………………………………………………………….Page 8
20 Program Password Setting….……..…………………………………………………………………..Page 9
21 Program Password Recover.……..……………………………………………………………………Page 9
22 Alarm Host Reset.……..………………………………………………………………………………..Page 9
23 Arm/disarm via SMS…………………………………………………………………………………….Page 10
24 Arm/disarm via Call……………………………………………………………………………………. Page 10
25 Sensors Code and Name Table………………………………………………………………………..Page 7--8
Page 2

2
Ⅰ、Features
1. Touch keypad; Big LCD displays(Capacitive touch screen times,New experience)
2. GSM+PSTN dual network. If PSTN is disable, it will switch to GSM automatically
3. Calendar+5 alarm call(SMS) No.+1 alarm center call No.+1 alarm SMS No.+ 10S record+ Arm Delay + Alarm Delay +
Alarm Beep Setting+ Call-in time setting+ Wireless Program+ Zone Attribute Setting+ User password + Program
Password + Reset +100 Alarm History and Status History
4. 30 wireless zones + 8 wired zones, every zone attribute, name, bypass, alarm delay, intelligent door sensor function,
beep indication could do free setting.
5. Alarm Inform Mode: PSTN Call, GSM Call, GSM SMS
6. Alarm SMS include alarm zone and sensors name
7. Work with Contact ID protocol(alarm information, status information, AC power off and recover, Low voltage, test)
8. Support wireless “ding-dong” doorbell function
Ⅱ、Technical parameter
1. Working power: AC=100~230V, DC=12V 1A
2. Static current:<35mA (when not charging) Alarm current:<120mA
3. Built-in Li-Ion backup battery: 3.7V 800mAH(rechargeable), Standby: around 24 hours, Full charging time: 8hours
4. 2-Band GSM: GSM900/1800Mhz(4-Band is optional: 850/900/1800/1900Mhz)
5. GSM transmit power: 2W
6. Receiving and emitting range: >100m(non-block)
7. Working condition: Temperature: -10ºC ~ 70ºC Humidity:5%~80%
Ⅲ、Zone types and definitions
1. Zone types: Perimeter zone, Motion zone, Emergency zone
2. Definitions:
Perimeter zone: Detecting the space like doors, windows, etc., generally use wireless door magnet sensors and
wireless curtain PIR sensors
Motion zone: Detecting the space like living room, aisles and bedrooms, etc., generally use wireless wide-angle
PIR sensors.
Emergency zone: Detecting the space like Emergency area (such as emergency distress, medical rescue, gas
leakage and fire alarm, etc., this zone keep 24-hour monitoring status automatically. Generally use panic button,
wireless gas sensors and wireless smoke sensors.
Ⅳ、Modes of arming
1. “Away Arm” mode:Once any detectors in perimeter zones or motion zones get triggered, the host will alarm
immediately and meantime dial “#” automatically.
2. “Home Arm” mode:Once any detectors in perimeter zones get triggered, the host will alarm immediately and
meantime dial “#” automatically. It will not alarm if any detectors in the motion zone are triggered.
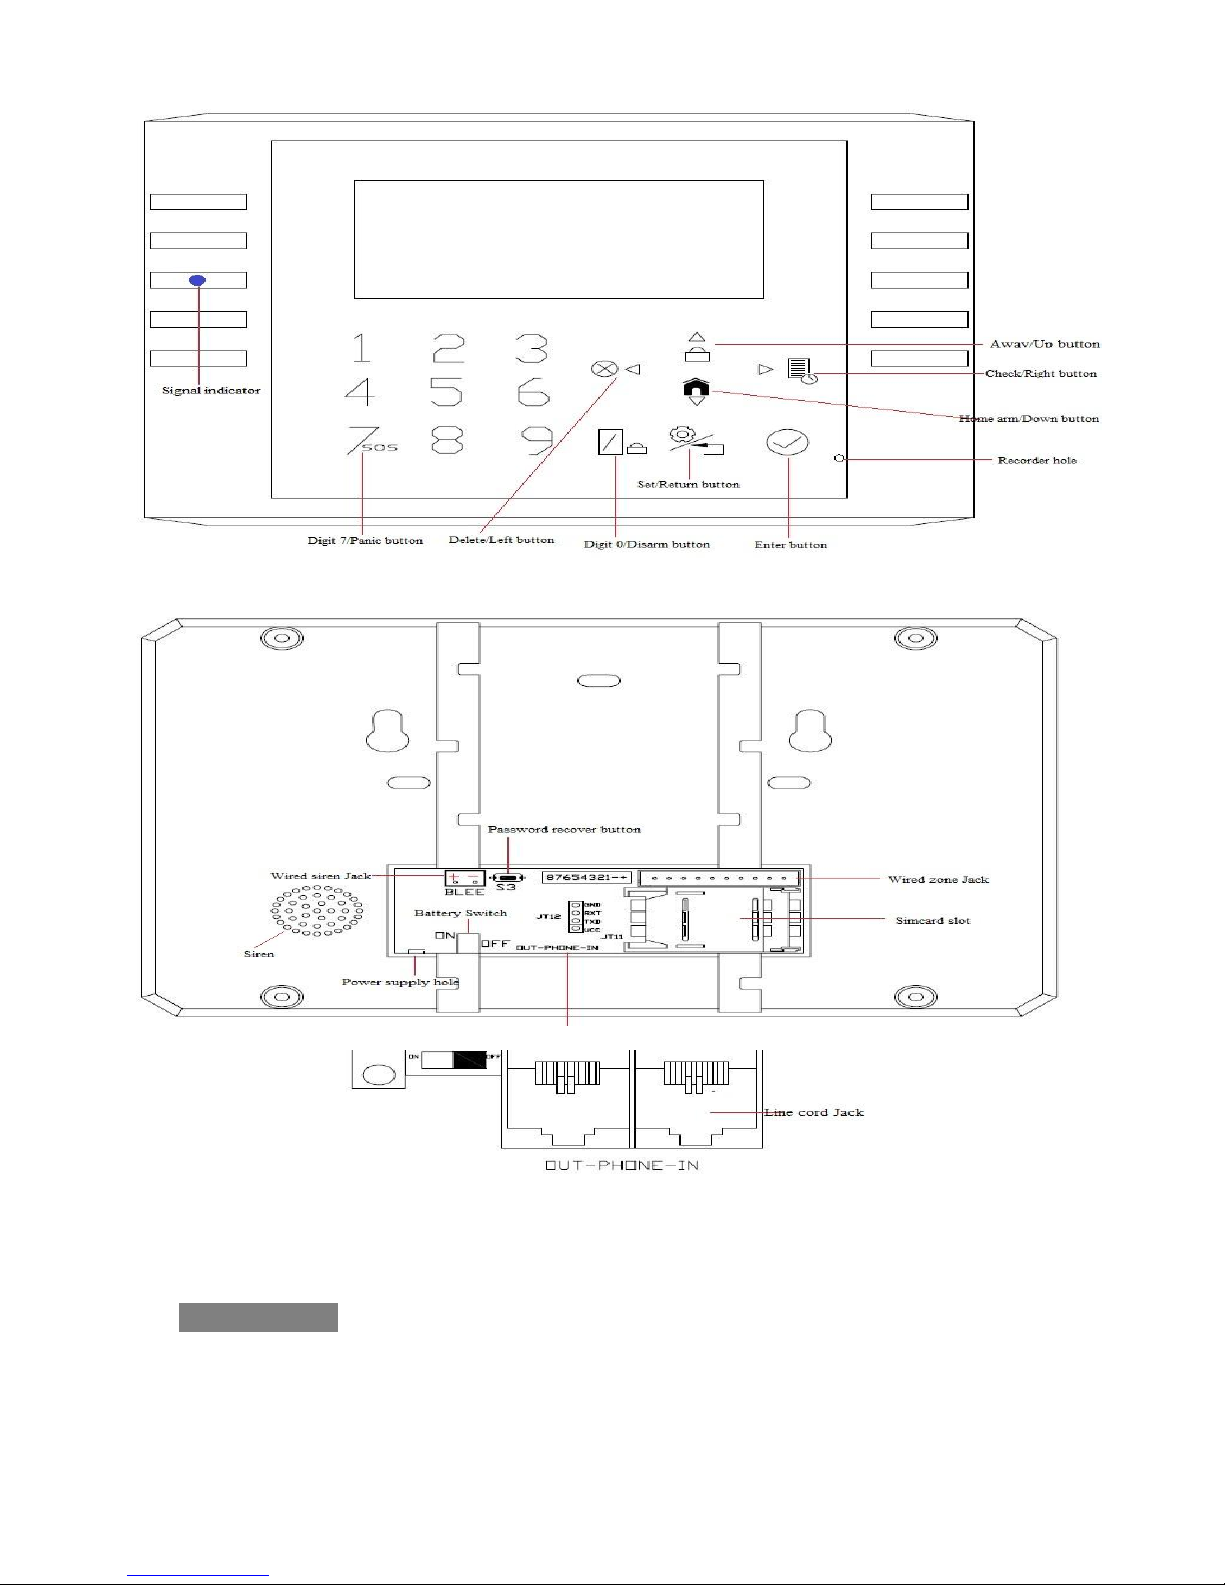
Ⅴ、Alarm Host Details
Page 3
3
Alarm Host Fron
Alarm Host Backside
Ⅵ、LED Indicators
Left Blue LED:GSM Signal indicator
Quick flash: No signal or the SIM Card don’t fix properly
Slow flash : get signal, under workin
Page 4
4
Ⅶ、Shortcut Keys
●Under standby, press “ ”, away arm activate
●Under standby, press “ ”, home arm activate
●Under standby, press “ ”+Password+” ”, disarm activate(User Password Default:1111)
●Under standby, press “ ” to check alarm or status history. Press “ ” to change pages
●Under standby, press “SOS” for 2 second, emergency alarm activate
Ⅷ、Prompt tone
●Press any buttons--- one short tone
●Arm--- one short tone
●Away arm delay--- one short tone every second
●Alarm delay--- one short tone every second
●Disarm--- two short tone
●Phone line disable--- two short tone every 30 second(Phone line disable tone ON)。
●AC power off and recover---- one short tone
●Battery low voltage and recover ---- one short tone
●Call to metal box alarm host via GSM network--- one short tone every 3 second
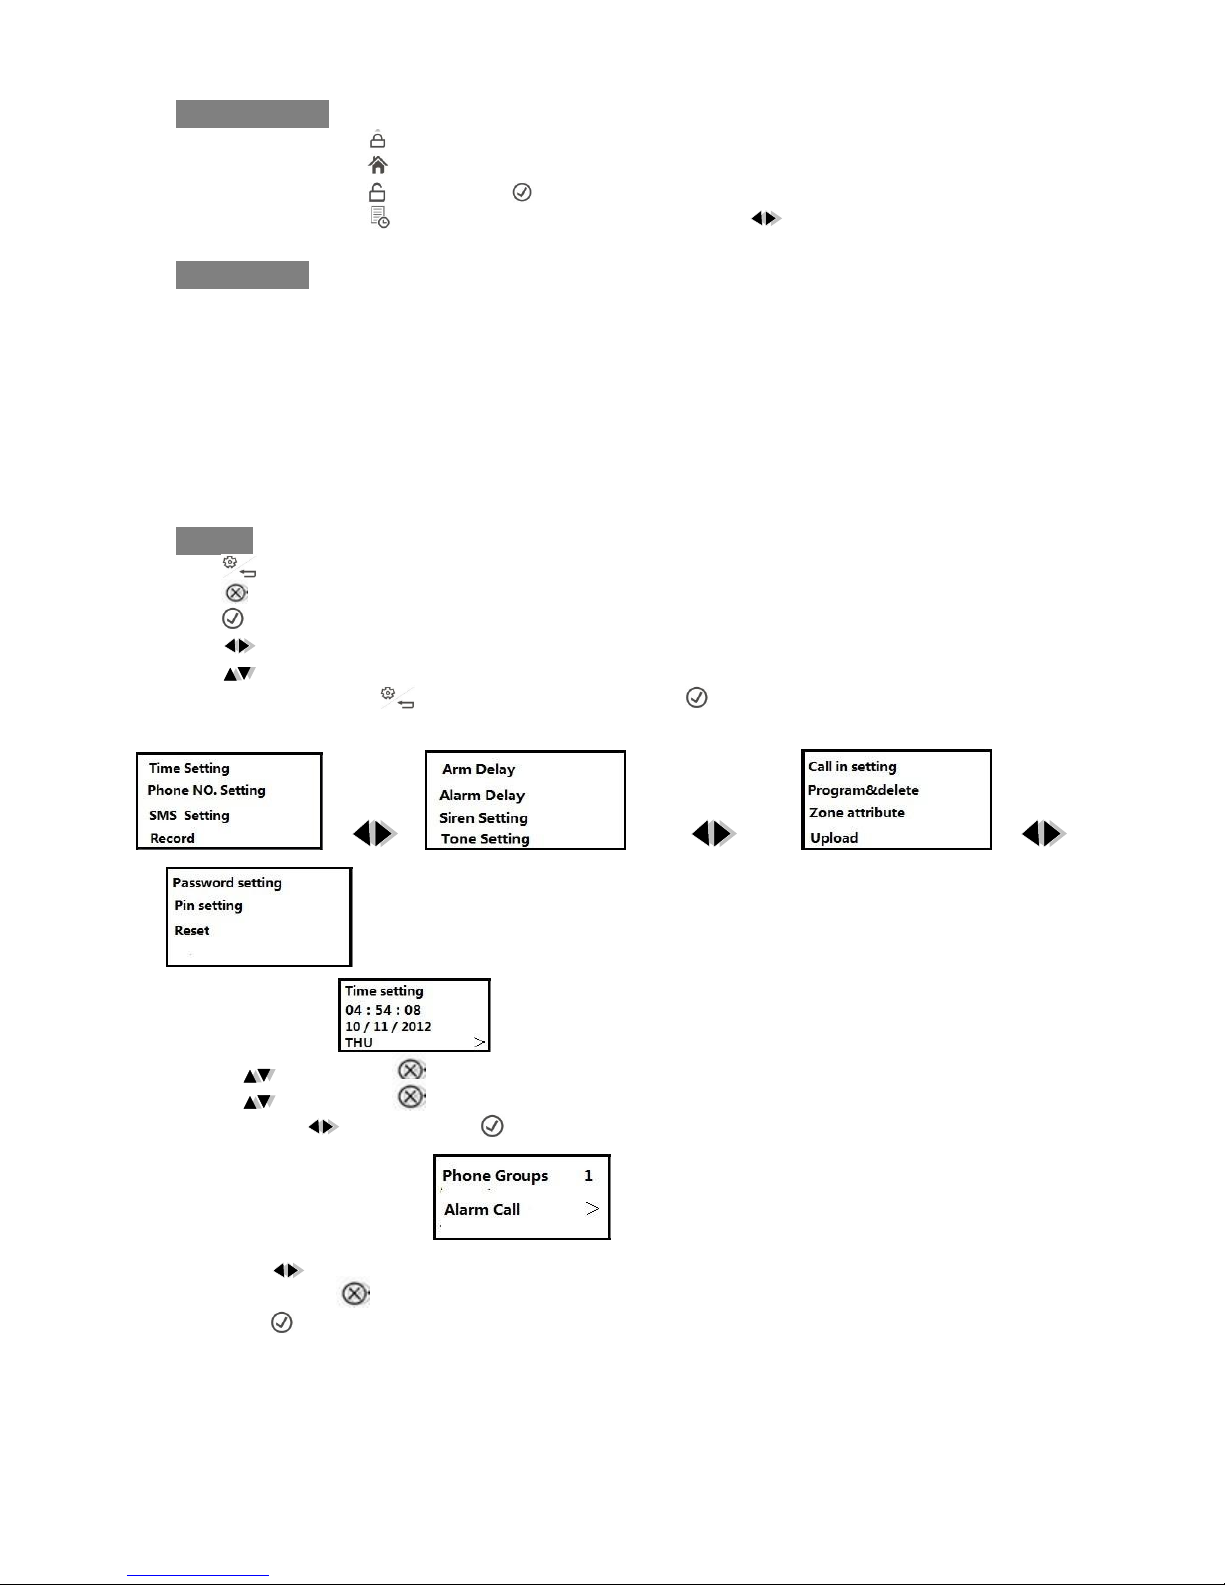
Ⅸ、Setting
“ ”--- Returns to the previous menu
“ ”--- Delete function
“ ”--- Enter function
“ ”--- Page turn
“ ”--- Menu selection
Enter setting menus: +Program Password(Default:1234)+
A short tone prompt when press the keys every time. Without any press in 30second,it will turn to standby menu.
9.1【Time setting】:
a. Press “ ” to select and “ ” to delete the original data, and enter new time(XXhour, XXminute, XXsecond)
b. Press “ ” to select and “ ” to delete the original date, and enter new date(XXmonth, XXday, 20XXyear)
c. Press“▼”,and “ ” select the week, to confirm all settings
9.2【Alarm Phone No. Setting】:
a. to select Alarm Call or Alarm SMS
b. “▼”and “ ”delete the data, and enter new phone No
c. to save, and come to next phone no setting
Total is 5 groups alarm phone numbers. Every group phone number input max. 15 bytes.
Page 5

5
9.3【SMS Setting】:
a. “ ” delete the original phone number, enter your new phone No. to save(only for SMS, no call)
b. to select “AC Power off or recover inform”, and choose “Yes” or “No”. to save
c. to select “Arm or Disarm inform”, and choose “Yes” or “No”. to save
d. to select “PSTN off inform”, and choose “Yes” or “No”. to save
e. to select “Alarm Host Back-up Battery Low Level Inform”, and choose “Yes” or “No”. to save
Total is 1 group alarm phone number, max. 15 bytes. All default settings is No
9.4【Record】:
to select on, and record under the microphone for 10S, to save
9.5【Arm Delay】:
“Delete” the original setting, and enter new time(0 to 59S), to save. Default is 10S
9.6【Alarm Delay】:
“Delete” the original setting, and enter new time(0 to 59S), to save. Default is 10S
9.7【Siren Setting】:
a. “ Delete” the original setting, and enter new time(0 to 59min), to save. Default is 1 minute
b. to choose alarm buzzer on or off (“Yes” or “No”). to save. Default is “Yes”
9.8【Tone Setting】:
a. PSTN off tone: to choose “Yes” or “No”. to save. Default is “No”
Page 6

6
b. Arm or disarm internal siren: to choose “Yes” or “No”. to save. Default is “No”
c. Arm or disarm wireless siren : to choose “Yes” or “No”. to save. Default is “No”
Note that the wireless siren max. sound time is 59 minute
9.9【Call In Setting】:
a. PSTN Phone No: “ Delete” the original setting, and enter ring (1 to 9), to save. Default is 6 ring
b. GSM Phone No: “ Delete” the original setting, and enter right (1 to 9), to save. Default is 3 ring
9.10【 Program & delete 】:
a. Program:” Delete” the zone No, enter new zone No.”▼” ----“Program”----“ ”----trigger sensors or
remote controls twice-----“Success” or “Failure”
b. Delete:” Delete” the zone No, enter new zone No.”▼” ----“Delete”----“ ”-----“Success”
00 zone for remote controls, max. program 10 remote controls or wireless keypads,1 to 30 zones for wireless
sensors. Every zone program 4 sensors max. If delete one zone sensors, all sensors will be delete in this zone.
9.11【Zone attribute】:
a. Delete the zone number, enter new zone number, Press to enter submenu
b. “ ”--- “Activate” or “Deactivate” (Default, please check table 2)
c. “▼”--- “ ”--- “Zone Type”: Perimeter zone, Motion zone, Emergency zone (Default, please check table
2)
d. “▼”--- “ ”--- “Sensor Type” (Default, please check table 2)
e. “▼”--- “ ”--- “Alarm Delay on or off”(Default, please check table 2)
Finally to save all settings
Zone
Number
Zone
Type
Sensor Type
Applicable sensor names
00
——
Wireless remote
Wireless remote & Wireless Keypad
01~ 10
Emergency zone
Wireless sensors
Wireless Smoke Alarm,
Wireless Gas Alarm& Panic button etc.
11 ~ 20
Perimeter zone
Wireless Door/Window Sensor &
Wireless Curtain PIR etc.
21 ~ 30
Motion zone
Wireless Wide-Angle PIR Motion Sensor etc.
31~38
31,32,33 are Perimeter zone
are Motion zone
are Emergency zone
Wired sensor
(see table of wired sensors code)
Default setting before shipment:
Wireless sensors
Wireless remote
Wireless
door sensor
Wireless
wide-angle
PIR sensor
Wireless gas
sensor
Wireless
smoke sensor
Page 7

7
Zone Number
00
12
21
01
02
Sensor
Code
Menu Name
CID Code
CID Name
00
Medical Alarm
E100
Medical Alarm
01
Emergency
E121
emergency alarm
02
Emergency(
E120
emergency alarm
03
Fire Alarm
E110
fire alarm
04
Smoke Alarm(
E111
smoke alarm
05
Kitchen
E130
burglar alarm
06
Gas Leak Alarm
E112
gas alarm
07
Tamper Alarm
E137
tamper alarm
08
Heat Alarm
E158
heat alarm
05
1st group zone
E131
1st group zone
06
Door
E134
2nd group zone
07
Front Door
E134
2nd group zone
08
Back Door
E134
2nd group zone
09
Side Door
E134
2nd group zone
10
Window
E131
1st group zone
11
Glass Break
E131
1st group zone
16
Shock Detection(
E130
burglar alarm
17
2nd group zone
E132
internal zone
12
Garage
E130
burglar alarm
13
Motion
E132
internal zone
14
Family Room
E130
burglar alarm
15
Bedroom
E130
burglar alarm
22
Sanctum alarm
E130
internal zone
23
Others
E140
normal alarm
24
Doorbell
Table 1
Wire
less
zone
01
02
03
04
05
06
07
08
09
10
Type
Defa
ult
Alar
m
Delay
Code 00
medical
00
medic
al
01
emer
gency
02
emerge
ncy
03
fire
03
fire
04
kitchen
11
glass
11 glass
16
tamp
er
24
hour
On
Off
Wire
less
zone
11
12
13
14
15
16
17
18
19
20
Type
Defa
ult
Alar
m
Delay
Cod
e
06 Door
Sensor
06
Door
07
Front
08 Back
Door
09 Side
Door
10
Window
10
Window
11
Glass
12 Car
House
051st
group
zone
1st
group
zone
on
off
Page 8

8
Sensor
Door
Wire
less
zone
21
22
23
24
25
26
27
28
29
30
Type
Defa
ult
Alar
m
Delay
Cod
e
13 PIR
13
PIR
12
PIR
14
Drawing
Room
14
Drawing
Room
15
Bedroom
15
Bedroom
15
Bedro
om
12 Car
House
17
Doorb
ell
2nd
group
zone
on
0ff
Wire
zone
31
32
33
34
35
36
37
38
Type
Defa
ult
Alarm Delay
Code 06 Door
Sensor
051st
group
zone
051st
group
zone
13 PIR
13 PIR
00
Emergen
cy
03 Fire
04
Kitche
n
31/32/33(1st
group zone)
34/35 (2nd
group zone)
36/37/38(24
hour)
off
0ff
Table 2
9.12【Upload】:
a. CMS phone No setting: to delete the original CMS phone No., and enter new phone No.(Max.15
digit), to save.
b. User code setting: delete the original code(from 0001 to 9999), and enter new user code., to
save. Default is 0001.
c. Arm/disarm upload: “ ”--- “Yes” or “No”, to save.
d. AC power failure or recover upload: “ ”--- “Yes” or “No”, to save.
e. Alarm host battery low level or recover upload: “ ”--- “Yes” or “No”, to save.
f. Accessories’ battery low level or recover upload: “ ”--- “Yes” or “No”, to save.
g. Manual test upload: “ ”--- “Yes” or “No”, to save and start test.
h. Periodic test upload: delete the original time (from 00010 to99999), and enter new time, to save.
If enter 00000, mean will not upload
( c, d, e, f, g default is “No”)
9.13【 password setting】:
Delete the original password, and enter new password (4 digits),delete and enter again to confirm the new password. to
save. Default is 1111
Page 9

9
9.14【Pin setting】:
Delete the original password, and enter new password(4 digits),delete and enter again to confirm the new password. to
save. Default is 1234
9.15【Reset】:
Reset: “ ”--- “Yes” or “No”, to save. After reset all information will recover to default setting, include
alarm phone No., SMS information setting, arm delay setting, zone attribute, delete all sensors, Central
Monitoring Center Upload. User Password:1111 and program password:1234
Note that if finish the setting, press ”ESC” to exit. If don’t operate within 30S,it will exit automatically.
Program Password Reset: Press key button on backside of alarm host for 5second and you will hear 2S long tone, the
program password return to 1234
Ⅹ、Others
●SMS information setting: for details, please check menu setting
a. Delete the original phone number, enter your new phone No. to save. It’s not alarm phone No.
b. AC Power off or recover inform, if it’s on, after 8 second AC power off, it will send SMS “XXXX Alarm
System AC Power Fail” to user. If the AC power recover for over 30 second, it will send SMS “XXXX Alarm
System AC Power On”.
c. Arm or Disarm inform, if it’s on and user arm or home arm the system, it will send SMS “XXXX Alarm
System Arm”. If disarm, it will send SMS “XXXX Alarm System Disarm”
d. PSTN off inform, if it’s on, after 5 second PSTN fail, it will send SMS “XXXX Alarm System PSTN Fail”
e. Alarm Host Back-up Battery Low Level Inform, if it’s on, after 8 second, it will send SMS “XXXX Alarm
System Back-up Battery Low” to user.
f. Accessories Battery Low Level Inform, if it’s on ,when accessories at low level battery, it will send SMS
“XXXX Alarm System Accessories Back-up Battery Low” to user.
Note:XXXX mean user code. You could change user code in Central Monitoring Center Upload
●How to work with CID CMS? For details, ”Setting”-----“Central Monitoring Center Upload”
g. CMS phone No setting: Delete the original CMS phone No., and enter new phone No., to save.
h. User code setting: Delete the original code(from 0001 to 9999), and enter new user code., to save.
i. Alarm upload: if the alarm host alarm, it will upload the alarm information automatically
j. Arm/disarm upload: “ ”--- “Yes” or “No”, to save.
k. AC power failure or recover upload: “ ”--- “Yes” or “No”, to save.
l. Alarm host battery low level or recover upload: “ ”--- “Yes” or “No”, to save.
m. Accessories’ battery low level or recover upload: “ ”--- “Yes” or “No”, to save.
n. Manual test upload: “ ”--- “Yes” or “No”, to save and start test.
o. Periodic test upload: Delete the original time(from 00010 to99999), and enter new time, to save.If
enter 00000, mean will not upload
(c,d,e,f,g default is “No”)
Upload to CID via PSTN network, if alarm, will upload to CID CMS firstly, and then personal alarm phone No.
●Details of alarm call, call answer and alarm SMS:
Page 10

10
If start alarm:
a. The alarm host will dial CID CMS to upload alarm information firstly via PSTN
b. And then dial and send SMS to personal phone No’s in queue. If the PSTN and GSM are available, PSTN
own priority. This mean will call via PSTN and send SMS via GSM. The SMS content is “XX zone YYYY is
alarming”. XX mean zone No. YYYY mean sensors name, for details please check table one
c. Answer the alarm call, you will hear the record. And press “4” to enter monitoring, press “5” to listen record
again, press “*” to end the call and finish dialing.
If the you answer the CMS phone no, the above operation is unavailable.
d. If without press “4” and “5” to operate, it will call all phone numbers for three times and end.
●How to arm/disarm via SMS:
a. Arm Away: send “User password+1” to alarm host GSM phone no. If success, you will receive a SMS(arm
successfully) from alarm host.
b. Disarm: send “User password+0” to alarm host GSM phone no. If success, you will receive a SMS(disarm
successfully) from alarm host.
●How to program one-way keypad: Program the wireless keypad into 00 zone, you could use the keypad to away arm,
home arm, disarm, emergency.
●How to program two-way keypad: Program the wireless keypad into 00 zone and program alarm host into wireless keypad,
you could use the keypad to away arm, home arm, disarm, emergency. At the same time the keypad will show alarm host
status.
●How to program doorbell: Program the doorbell into any zone(default is 30
th
zone) and the zone sensor code should be 24.
Press doorbell two time to program. And alarm host will effect three “Dingdong” when you press doorbell.
●How to program wireless siren: make wireless siren into program status, press “SOS” key of alarm host panel for two time.
The wireless siren will effect five flashes if success.
●How to arm/disarm: remote control, main keypad, call, SMS, wireless keypad
●How to operate remotely via call:
Call the alarm host, you will hear one tone:
a. Enter “user password+#”,you will hear one tone again
Press 1: Away Arm
Press 2: Home Arm
Press 3: Disarm
Press 4: Monitoring for 15S
Press 5: listen record for 15S
Press *: end call
b. Without any operation, after 20S, it will end the call automatically
● Alarm priority: if the PSTN cable is under calling and the system start alarm, it will end the normal call, and start alarm
calling.
● How to cancel the accessory battery low level notice: Press “ ” to check and cancel the notice.
十一、Wired zones:
How to connect N.C detectors:
Activate Sensors Alarm Host Passive Sensors Alarm Host
How to connect N.O detectors:
Page 11

11
Activate Sensors Alarm Host Passive Sensors Alarm Host
Note:V1 mean +12V power source, A1 mean 31 to 38 zone.
. Understanding of Basic Accessories (Wireless)
Wireless Remote
Features:
To control the alarm host to arm and disarm.
With the emergency key for urgent help.
Specifications:
Operating power: 27A 12V alkaline battery
Emitting distance: ≥100m (in open area)
Service life: ≤1 year
Program sensor / Delete sensor
a. Porgam sensor
1.1、【 SET + Progarmming code + “▲▼”to choose“Program&delete” + ENT + press“Delete/Left button + input YY+
“▲▼” to choose Program + ENT】( LCD screen would say“programming”);
1.2、Trigger door sensor 2 times,alarm host panel would say“study successfully”, press“ENT”, and it means succefully
in setting。
1.3、“ Y Y”: means zone number with 2 digits, can be from 00
b、Delete sensor
1. 1、【 SET + Progarmming code + “▲▼”to choose“Program&delete” + ENT + press“Delete/Left button + input YY+
“▲▼”to choose Delete + ENT】( LCD screen would say“Success”); it means succefully in deleting。
1.2、“ Y Y”: means zone number with 2 digits, can be from 00
Wireless Intelligent Door Sensor
Features:
Generally set as Perimeter zone.
If any door or window is opened, it will transmit the alarm signals to the alarm host.
Specifications:
Operating power: 23A 12V alkaline battery
Frequency: 433MHZ
Emitting distance: ≥100m (in open area)
Service life: ≤1 year
Alarm Distance: <4cm
Away
Disarm
Home
Emergency
Page 12

12
Program sensor / Delete sensor
a. Porgam sensor
1.1、【 SET + Progarmming code + “▲▼”to choose“Program&delete” + ENT + press“Delete/Left button + input YY+
“▲▼” to choose Program + ENT】( LCD screen would say“programming”);
1.2、Trigger door sensor 2 times,alarm host panel would say“study successfully”, press“ENT”, and it means succefully
in setting。
1.3、“ Y Y”: means zone number with 2 digits, can be from 11~20
b、Delete sensor
1. 1、【 SET + Progarmming code + “▲▼”to choose“Program&delete” + ENT + press“Delete/Left button + input YY+
“▲▼”to choose Delete + ENT】( LCD screen would say“Success”); it means succefully in deleting。
1.2、“ Y Y”: means zone number with 2 digits, can be from 11~20
Wireless wide-angle PIR Sensor
Features:
Mainly monitor and control indoor space, generally set as Motion zone.
When human body enters into etecting area, the sensor will transmit alarm signals to the alarm host.
Specifications:
Operating power: 9V alkaline battery
Emitting distance: ≥100m (in open area)
Service life: ≤1 year
Detecting distance: 110° 10×10m
Program sensor / Delete sensor
a. Porgam sensor
1.1、【 SET + Progarmming code + “▲▼”to choose“Program&delete” + ENT + press“Delete/Left button
+ input YY+“▲▼” to choose Program + ENT】( LCD screen would say“programming”);
1.2、Trigger door sensor 2 times,alarm host panel would say“study successfully”, press“ENT”, and
it means succefully in setting。
1.3、“ Y Y”: means zone number with 2 digits, can be from 21~30
b、Delete sensor
1. 1、【 SET + Progarmming code + “▲▼”to choose“Program&delete” + ENT + press“Delete/Left button
+ input YY+“▲▼”to choose Delete + ENT】( LCD screen would say“Success”); it means
succefully in deleting。
1.2、“ Y Y”: means zone number with 2 digits, can be from 21~30
8 Troubleshooting
Troubleshooting
Reasons
Methods
● Can not dial for alarm
●No arming
●Alerting phone unsetted
●Parts improperly installed, distance
too far away,code no match
●Do arming operation
●Re-set according to the specification ●Coordinating
the location of parts,re-coding
Page 13

13
●SIM card not found,GSM not
dialing out or no SMS sent
●SIM card unloaded
●SIM requires a password to dial
●GSM signal not good
●SIM card contact points not good
●Voice calling disable
●SMS message disable
●SIM card is a pre-paid type of card
and no enough deposit
●Closed the SMS messages function
●Install SIM card
●Cancel the password of SIM
●Change place of alarm panel to test signal
●Change other SIM for trial
●Make sure voice calling and SMS messaging are
enabled
●Re-fill the SIM card deposit
●Open the SMS messages function
●Can not long-distance
operation
●Password input wrongly
●Retry password or reset password
●No record indication when
alerting
●Voice message not recorded
●Record voice message
●Remote controller out of order
●Coding unmatched with the panel
● Insufficient battery power
● Battery pieces poor contact or
corroded
●Voltage unmatched with panel
●Re-learn the remote control
●Change battery to correct type
●Polish the surface of contact of battery
●Contact the local dealer to change the matched remote
controller
●Infrared detector out of order
● Low power
●Change to the same type battery
●The transmission distance of
detector to panel shorten
● A nearby emitter is sending code
●Panel receiver stoppage
●Standby battery of the host
insufficient
●Move one detector next to panel and try
●Identify the interfering source and eliminate it
●Check Panel power whether plugged well
 Loading...