


OPERATING INSTRUCTIONS
AVLCD37700-HDS
32" LCD TV COLOUR TELEVISION

Contents
Safety Precautions .................................2
Features ...............................................4
Preparation .............................................5
Installation Of The TFT TV To
The Wall (optional) ...............................5
Brick Wall..............................................5
Composite walls .................................. 5
LCDTV ..................................................... 7
Remote Control Buttons ......................... 9
Before Switching On Your TV............... 1 0
Power Connection..............................10
ConnectionsTo TheAerialInputSocket . 10
How To Connect Other Devices .........10
Inserting Batteries In The Remote
Control Handset .................................10
Switching The TV ON/OFF ..................... 10
To switch the TV on:............................10
To switch the TV off: ............................10
Initial Settings ....................................... 11
InitialAPS (Automatic
Programming System) ....................... 11
Operating The TV.................................. 11
Operatingwiththe buttonsontheTVset .. 11
Operating With Remote Control ......... 11
Menu System ........................................ 12
Picture menu ......................................12
Sound menu .......................................13
Feature menu .....................................14
Install menu .......................................15
Program menu ...................................16
Source menu......................................17
Other Features...................................... 17
TVStatus.............................................17
Mute Indicator .....................................17
Freeze Picture.....................................17
Zoom Modes ......................................18
Teletext .................................................. 19
To Operate Teletext.............................19
To Select A Page Of Teletext ...............19
To Select Index Page..........................19
To SelectTeletextWithATVProgramme.19
To Select Double Height Text .............19
To Reveal “Concealed” Information ...19
To StopAutomatic Page Change........19
To SelectA Subcode Page .................19
To Exit Teletext ....................................20
To Display The Time ..........................20
Fastext................................................20
Connect Peripheral Equipment ............20
High Definition....................................20
Via The Scart ......................................20
ViaAerial Input ....................................20
Decoder..............................................21
TVAnd Video Recorder.......................21
Playback NTSC ..................................21
Copy Facility .......................................21
Search For And Store The Test
Signal Of The Video Recorder............21
Camera And Camcorder ....................21
To Connect to S-Video Input...............21
Connect The Decoder To The Video
Recorder.............................................21
Connecting Headphones...................21
Aerial Connection ................................. 2 2
Specifications .......................................24
Important Instruction ............................25
ENG-37700W-1062UK-37 INCH 17MB15 OEM-(WO VGA-WO PIP)(HD READY)-50092400.p65 06.09.2006, 15:481
-1-

SafetyPrecautions
Please read the following recommended
safetyprecautions carefully for yoursafety
1. Power Source
The set should be operated only from a 230240V AC, 50 Hz. outlet. Ensure you select the
correctvoltage settingforyourconvenience.
2. Power Cord
Do not place the set,a piece of furniture,etc.
on the power cord(mains lead) or pinch the
cord.Handle the power cord by the plug.Do
not pull out the plug by tugging the cord and
never touch the power cord when your
hands are wet as this could cause a short
circuit or electric shock.Never make a knot in
the cord or tie it with other cord.The power
cord should be placed in such a way that
they are notlikely to be stepped on.
A damaged power cord can cause fire or
give you an electric shock. Whenit is damaged and need to be changed, it should be
done by qualified personel.
3. Moisture and Water
Do not use this equipment in a humid and
damp place (avoid the bathroom, the sink in
the kitchen, and near the washing machine).
Do not expose this equipment to rain or water, as this may be dangerous and do not
place objects filled with liquids,such as
flower vases on top of the set. Avoid from
dripping or splashing.
If any solidobject or liquid falls intothe cabinet,
unplugthe set and haveit checked by qualified
personnelbeforeoperating itanyfurther.
4. Cleaning
Before cleaning, disconnect the mains supply. Do not use chemical cleaning agents.
Use a dry duster. For sticky stains, use a
damp cloth with a mild detergent.
5. Ventilation
The slots and openings on the back cover
are intended for ventilation and to ensure reliable operation. To prevent overheating,
these openings must not be blocked or covered in anyway.
6.Heat and Flames
In the case of a Thunderstorm, or when leaving the Tv for long periods, disconnect the
Aerial lead (if outdoor) and the mains supply
to prevent power surges damaging the Tv.
7. Lightning
In case of storm and lightning or when going on holiday, disconnect the power cord
from the wall outlet.
8. Replacement Part
When replacement parts are required, be sure
the service technician has used replacement
parts which are specified by the manufacturer
or have the same specifications as the original one. Unauthorised substitutions may result infire, electrical shock,orother hazards.
9 . Servicing
Please refer all servicing to qualified personnel. Do not remove the cover yourself as
this may result in an electric shock.
WARNING: When the device is not in use
for a long time, disconnect from power.
Instructions for waste disposal:
• Packaging and packaging aids are recyclable and should principally be recycled.
Packaging materials, such as foil bag, must
be kept away from children.
Remote Control Batteries
When batteries are exhausted do not throw
in the domestic waste. Contact the local
waste authority.
Do NOT break open or throw on a fire, they
may cause injury or damage.
• Cold cathode fluoresant lamp in LCD PANEL
contains a small amount of mercury, please followlocal ordinates or regulations for disposal.
•The mains plug is used to disconnect the TV
from the mains and therefore it shall remain
readily operable.
Warning: To prevent injury, this device must
be securely attached to the floor/wall in accordance with the installation instrutions.
-2-
ENG-37700W-1062UK-37 INCH 17MB15 OEM-(WO VGA-WO PIP)(HD READY)-50092400.p65 06.09.2006, 15:482

"The LCD panel is veryhigh technologyprod-
Surelyconnect
theground wire.
uct with about a million thin film transistors,
giving you fine picture details. Occasionally, a
few non-active pixels may appear on the
screen as a fixed point of blue, green or red.
Please note that this does not affect the performance of your product."
Correct disposal of this Product
(Waste Electrical & Electronic Equipment (WEEE)
The crossed out "Wheelie bin" is intended to show that this appliance
must not be placed with ordinary household waste at the end of its useful
life. To prevent possible harm to the environment or human health from
uncontrolled waste disposal, please keep separate from other household
waste and recycle it responsibly to promote the sustainable reuse of ma-
terial resources.
Household users should contact either the retailer where you purchased the product, or
their local government office for details of where and how you can take this item for envi-
ronmentally safe re-cycling.
Business users should contact their supplier and check the terms and conditions of the pur-
chase contract. This product must not be mixed with other commercial wastes for disposal
The lightning flash with arrowhead symbol, within an equilateral triangle, is intended to alert the user to the presence of un-insulated "dangerous voltage"
within the products enclosure that may be of sufficient magnitude to constitute a
risk of electric shock tothepersons.
The exclamation point within an equilateral triangle is intend to alert the
user to the presence of important operating and maintenance (servicing)
instructions in the literature accompanying the appliance.
Be sure to ground the connection properly.
Connect the ground terminal of TV with the ground terminal provided
at the power outlet using the enclosed power cord. If theprovided plug
does not fit your outlet, consult an electrician for replacement
of the obsolete outlet.
-3-
ENG-37700W-1062UK-37 INCH 17MB15 OEM-(WO VGA-WO PIP)(HD READY)-50092400.p65 06.09.2006, 15:483

Features
• Remote controlled colour television.
• 100 programmes from VHF, UHF bands or
cable channels can be preset.
• It can tune cable channels.
• Controlling the TV is very easy by its menu
driven system.
• It has 2 Scart sockets for external devices
(such as video, video games, audio set,
etc.)
• Stereo sound system (German+Nicam).
• Full function Teletext .
Fastext (1000Pages), TOP text.
• Headphone connection.
• Direct channel access.
•A.P.S. (Automatic ProgrammingSystem).
• All programmes can be named.
• Forward or backward automatic tuning.
• Sleeptimer.
• ChildLock.
• Automatic sound mute when no transmission.
• NTSC Playback.
•AV inand S-VHS in are available.
• It has an HDMI connector for Digital Video
and Audio. This connection is also designed to accept High Definition signals.
•AVL (AutomaticVolume Limiting)
• When no valid signal is detected, after 5
minutes the TV switches itself automatically
to stand-by mode.
• StereoPCAudioInput
• PLL (FrequencySearch)
•3D Comb Filter
ENG-37700W-1062UK-37 INCH 17MB15 OEM-(WO VGA-WO PIP)(HD READY)-50092400.p65 06.09.2006, 15:484
-4-

Preparation
FIGURE 1
FOOTASSEMBLY
Install Display on solid horizontal surface such as a table or desk.
For ventilation, leave a space of at least 10 cm free all around the set. To prevent any fault
and unsafe situations, please do not place any objects on top of the set.
This apparatus can be used in tropical and/or moderate climates.
Installation Of The TFT TV To The Wall (optional)
1- To install the TFT TV on the wall, first of all, foot assembly should be removed. (Figure 1).
Unscrewthe 3 screws (M4 x 6) that attachthe foot assembly to the TFTpanel and remove the
foot assembly from the TFT panel.
2- Place the 4 Plastic stepped spacers "smaller diameter towards the TV" in the holes and
attach with (6 x 23mm) screws.
BrickWall
TFTPANEL
SCREWHOLES
1- Decide where you want to place the
Tv. Fix the stencil to the wall and level
using a spirit level or other tool.
2- Mark the mounting holes carefully,
and drill the holes with a small
masonary pilot drill.
3- Now drill the correct size holes for
the wall plugs.
4- Place the frame to the wall and fix with
8 4 x 30mm screws.
5- Place the Tv onto theframe and ensure it
isfixedfirmly.Note DoNOT walk away from
the TVuntil you are sureit is held firmly.
Composite walls
Because the support uprights in the composite wall will not be aligned with the holes in the
mounting frame, it is wise to seek professional help. Do NOT rely on Plastic wall plugs.
Akura do NOT accept responsibility for damage caused to person or property by poorly
fitted wall mountings.
-5-
ENG-37700W-1062UK-37 INCH 17MB15 OEM-(WO VGA-WO PIP)(HD READY)-50092400.p65 06.09.2006, 15:485

ENG-37700W-1062UK-37 INCH 17MB15 OEM-(WO VGA-WO PIP)(HD READY)-50092400.p65 06.09.2006, 15:496
-6-
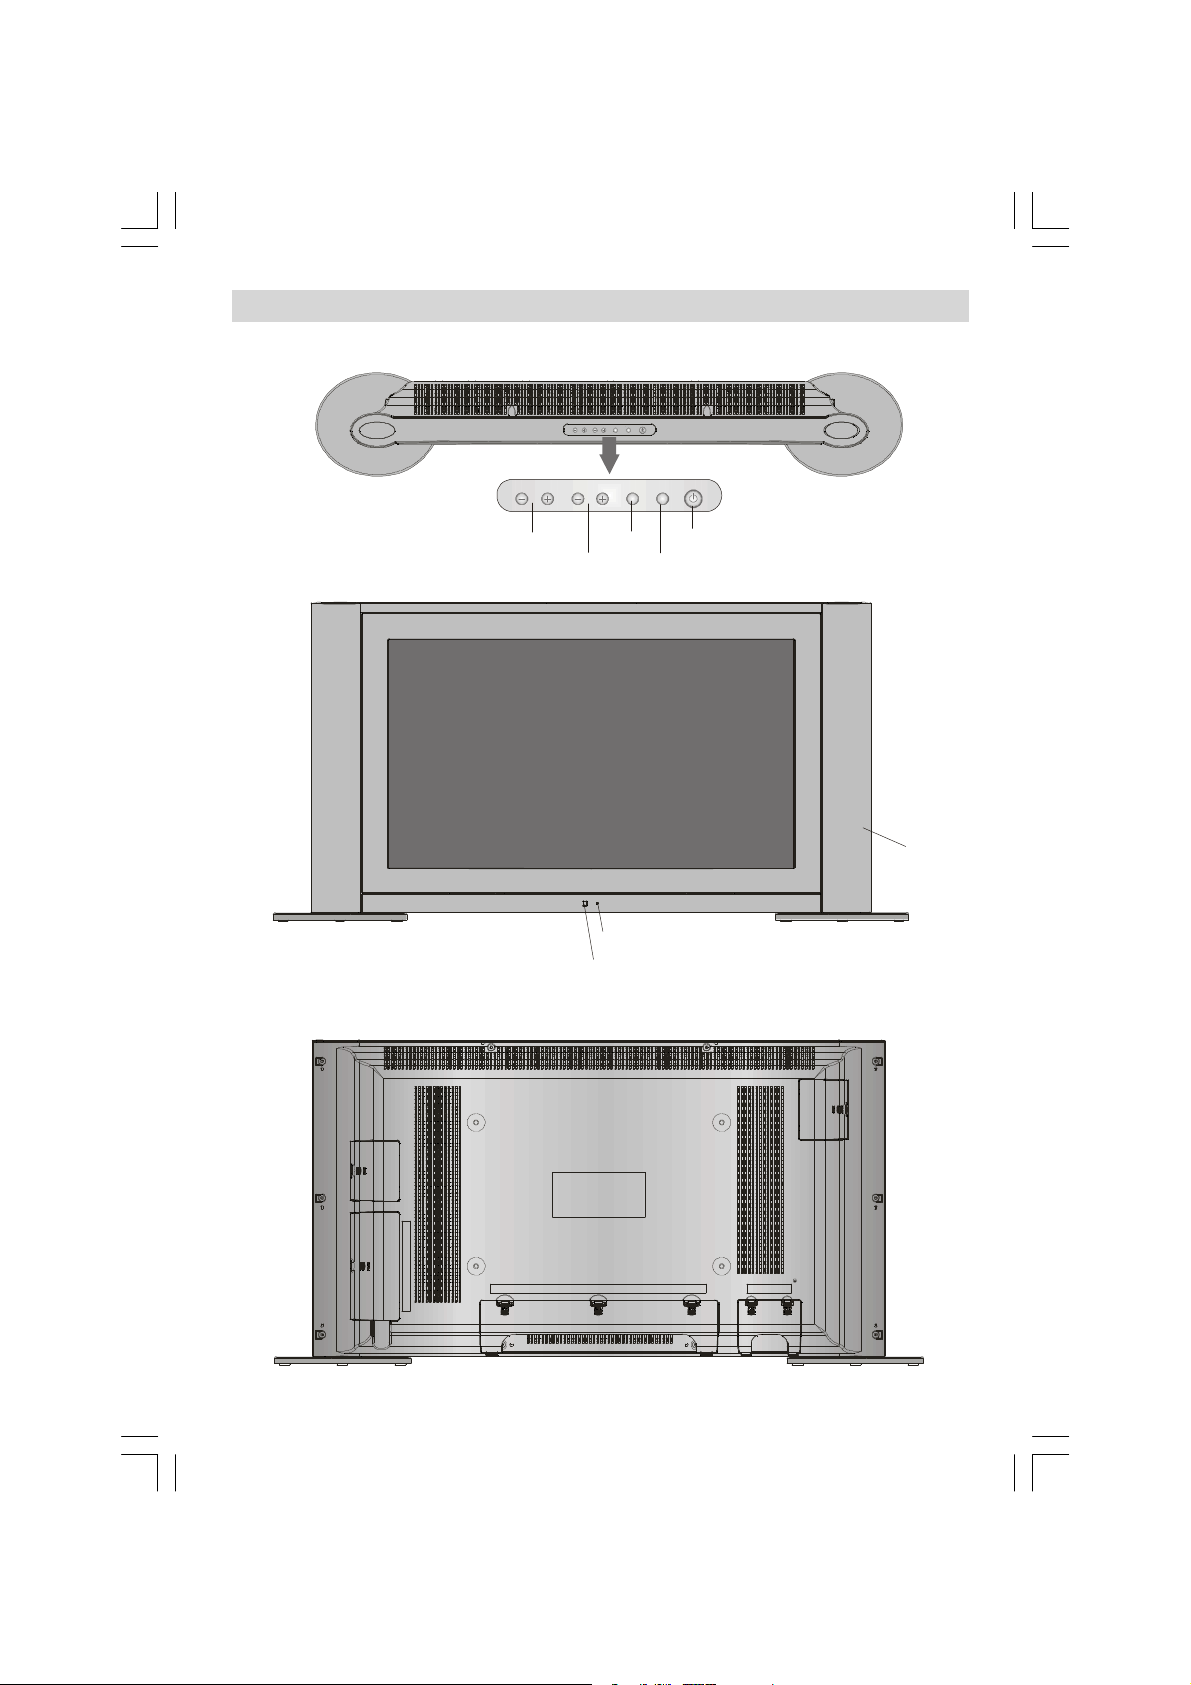
FRONTVIEW
LED
- VOLUME +
LCD TV
MENUP/CHVOLUME
MENUP/CHVOLUME
MENU
POWER
ON/OFF
SPEAKER
REARVIEW
ENG-37700W-1062UK-37 INCH 17MB15 OEM-(WO VGA-WO PIP)(HD READY)-50092400.p65 06.09.2006, 15:497
-7-

S-Video Input EXT-4S
VideoInput
Audio Inputss
EXT-4
Headphone
Component Video (YPbPr) Inputs
Component Audio Inputss
HDMI Input(EXT-5)
Scart1 (EXT-1)
Scart2 (EXT-2)
Aerial
PCAudio Input
Power cord input
PowerOn/Off switch
EXT-3
AC~50 Hz
POWER
ENG-37700W-1062UK-37 INCH 17MB15 OEM-(WO VGA-WO PIP)(HD READY)-50092400.p65 06.09.2006, 15:508
-8-

RemoteControlButtons
0
GUIDE
GHI
DTV
Signal Indicator
= Cursor Up
= Stand By
= Cursor Right
OK = Okay, StillPicture
= Cursor Down
0 - 9 = Direct Programme
-/-- / EXIT = No Function
P + = Programme Up
P - = Programme Down
I-II = Mono/Stereo- DualA-B
TV
= TV/ Quit Menu
AV
= Source Select
= Time / Subpage
/ = Mix/No Function
= Update / No Function
/ GUIDE = IndexPage
/ PC = Reveal / No Function
BLUE / INSTALL = Install Menu
YELLOW / FEATURE=Feature Menu
GREEN / PICTURE = PictureMenu
RED / SOUND =Sound Menu
/WIDE / = Wide (Zoom Modes)
/ Expand
= Hold
= Teletext
PP = Picture Mode Selection
(Natural, Cinema, Dynamic)
V - = Volume Down
V+ = Volume Up
P<P = Previous Programme
M = Main Menu
= CursorLeft
= Mute
M
1
4
JKL MNO
7
STU VWX YZ
P<P
+
PP
DEF
-/--
-
I II
PC
OK
-9-
ENG-37700W-1062UK-37 INCH 17MB15 OEM-(WO VGA-WO PIP)(HD READY)-50092400.p65 06.09.2006, 15:509

BeforeSwitching OnYourTV
Power Connection
IMPORTANT: The TV set is designed to op-
erateon230-240V AC, 50 Hz.
•Afterunpacking,allowtheTVsetto reachthe
ambient room temperature before you connect the set to the mains.
Connections To The Aerial Input
Socket
CABLE TV
VHF/UHF
REAR OF THE TV
•Connect theaerial to theaerialsocket on the
Tv, you may also connect a VCRor otherbox
at the same time.
How To Connect Other Devices
IMPORTANT: Switch off the TV before con-
nectingany externaldevice.
Sockets for external connections are at the
rear side of the TV. For connection of other
devices via Scart refer to the manuals of the
related devices.
Inserting Batteries In The Remote
Control Handset
• Remove the battery cover located on the
back of the handset by gently pulling down-
wards from the indicated part.
• Inserttwo AA/R6 orequivalenttypebatteries
inside. Place the batteries in the right directions.
• Replace the battery cover.
NOTE: Remove the batteries from remote
control handset when it is not to be used for
a long period.Otherwise it can be damaged
due to any leakage of batteries.
Switching TheTV ON/OFF
To switch the TV on:
Your TV will switch on in two steps:
1- Connect the power supply cord to the sys-
tem. Press Power On/Off switch “
cated by the mains input socket. Then the
TV switches itself to stand-by mode and
the LED on the front of the TV becomes
RED.
2- To switch on the TV from stand-by mode
either:
Press a digit button on the remote control so
that a programme number is selected,
or,
Press “
top of the TVor press the “
button on the remote control, so that last
mode switched off is selected.
By either method the TV will switch on and
the LED is GREEN.
”, "+P/CH" or "P/CH-" button at the
”, “- P” or “P +”
To switch the TV off:
• Press the “ (stand-by)” button on the remote control,so the TV will switch to standby mode andtheLED willbecomeRED.
To power down the TV completely, press
On/Offswitch“
or,
Unplug the power cord from the mains
socket.
”,
” lo-
ENG-37700W-1062UK-37 INCH 17MB15 OEM-(WO VGA-WO PIP)(HD READY)-50092400.p65 06.09.2006, 15:5010
- 10-

InitialSettings
Cancel
Cancel
Initial APS(Automatic Programming
System)
The following menu will be displayed on the
screen when you turn your TV on for the first
time. APS, searches and sorts all channels
and stores them automatically on your TV,
ac cor ding to th e t ran s mis sion of
programme systems in your area.
AUTO PROGRAM
Language
Country
PLEASE CHECK ANTENNA CABLE
AUTO. PROGRAMMING SYSTEM
First of allchooseLanguage and Country by
using
fect the sort process in APS. To start APS,
pressthe RED or “OK” button.
After APS is finalized, the programme table
will appearon the screen. In the programme
table you will see the programme numbers
and names assigned to the programmes.
If you do not accept the locations and / or the
programme names of programmes, you
can change them from the Program Menu.
(See page 15)
/and
UK - I 155,25 Mhz
01 - C-01
/
buttons. This will af-
APS is running...
Operating The TV
You can operate yourTVusingboth the remote
control handset and thebuttons on the set.
Operating with the buttons on the
TV set
Volume setting and programme selection
can be made by using the buttons on the
controlpanelat thetopof the TV.
Volume Setting
Press the"VOLUME -" buttonto decreasevol-
ume or the "+ VOLUME" button to increase
volume, so a volume level scale (slider) will be
displayed at the bottom ofthescreen.
Programme Selecting
Press the "+P/CH" button to select the next
programme or the "P/CH-" button to select
the previous programme.
Entering The Menu
Press the “MENU” button on the control
panel at thetop of the TV to enter the menu.
"+P/CH" / "PCH-" and "VOLUME -" / "+
VOLUME" buttons on the TV are used as
navigation buttons in the menu.
AV Mode
Press the "TV / AV" button on the control
panelat thetop of the TV to switchyourTV to
EXT modes.
Operating With Remote Control
The remote control handset of your TV is designed to control all the functions of your TV.
The functions will be described in accordance with the menu system of your TV.
Functions of the menu system are described in Menu System section.
Volume Setting
Press the “V +” button to increase volume.
Press the “- V” button to decrease volume.
A volume level scale (slider) will be displayed at the bottom of the screen.
Programme Selecting
(Previous or next programme)
• Press the “- P” buttonto selectthe previous
programme.
- 11-
ENG-37700W-1062UK-37 INCH 17MB15 OEM-(WO VGA-WO PIP)(HD READY)-50092400.p65 06.09.2006, 15:5011

• Press the “P +” button to select the next
programme.
Programme Selecting (direct access):
Press digit buttons on the remote control
handset to select programmes between 0
and 9. The TV will switch to the selected
programme after a short delay.
• For a two digitprogramme number enter the
second digit after pressing the first digit
within 2 seconds.
MenuSystem
Your TV has been designed with a menu
system to provide easy manipulation of a
multifunction system.
Press the “M” button to enter the menu.
Press
then
You can access the menus directly by pressing the coloured buttons on the remotecontrol:
Red Button Sound Menu
Green Button Picture Menu
Yellow Button Feature Menu
Blue Button Install Menu
• Pressthe “M” or
Picture menu
By pressing
Picture menu appears on the screen.
/
button to select a menu title and
/
button to select a menu item and
/
or “OK” button toenter the menu item.
button to return to the
previous menu.
/
button, select the first icon.
Contrast
Reset
PAL 50Hz
62
24
10
32
Off
Off
Off
Mode
/
By pressing
Press
/
button to choose one of these
button, select Mode.
options:Natural, Cinema and Dynamic.
Contrast
/
By pressing
Press
button to increase contrast. Press
button, select Contrast.
button to decrease contrast. Contrast level
can be adjusted between 0 and 63.
Brightness
By pressing
Press
/button, select Brightness.
button to increase brightness. Press
button to decrease brightness. Brightness
level can be adjusted between 0 and 63.
Sharpness
/
By pressing
ness. Press
ness. Press
button, select Sharp-
button to increase sharp-
button to decrease sharpness. Sharpness level can be adjusted between 0 and 31.
Colour
By pressing
Press
/button, select Colour.
button to increase colour. Press
button to decrease colour. Colour level can
be adjusted between 0 and 99.
Hue
This item is displayed in picture menu when
the TV receives an NTSC signal. By pressing
/
button, select Hue. Press
to increase hue level. Press
button
button to decrease hue level. Hue level can be adjusted
between -31 and 31.
Colour Temp
By pressing
Temp. Press
/button, select Colour
/
button to choose one of
these options:Cool, Normal and Warm.
Noise Reduction
This item is used to reduce the image noise
andimprovethe picturequality at weaksignals.
By pressing
duction. Press
/
button, select Noise Re-
/
button to set Noise re-
duction leveltoOff, Low, Medium or High.
- 12-
ENG-37700W-1062UK-37 INCH 17MB15 OEM-(WO VGA-WO PIP)(HD READY)-50092400.p65 06.09.2006, 15:5012

Film Mode
Dynamic Bass
SOUND
Equalizer
10kHz
0
0
0
0
/
Films are recorded at a different number of
frames per second to normal television
programmes.
By pressing
Press
/
button,selectFilm Mode.
/
button to set this feature On or
Off. Turn thisfeature on when you are watching films to see the fast motion scenes
clearly.
3D Comb
3D Comb is used to improve colour transitions and colour qualityof pictures.
By pressing
Press
/
button, select 3D Comb.
/
button to set this feature On or
Off.
Reset
/
By pressing
Press
/
or “OK” button to reset the picture
button, select Reset.
modes to factory default settings.
Sound menu
By pressing
icon. Sound menu appears on the screen.
Balance
AVL
Effect
/
button, select the second
10
0
Equalizer
By pressing
Press
/
button, select Equalizer.
/
or “OK” button to enter equalizer
menu.
0
500Hz
1.5kHz
5kHz
In equalizer menu the sound mode can be
changed to User, Pop, Rock, Jazz, Flat and
Classic by pressing
button. Equalizer
menu settings can be changed only when
Sound Mode is User. Select the desired frequency by
crease the frequency gain by pressing
/
button and increase or de-
/
button.
Press the “M” button to return to the previ-
ous menu.
Balance
By pressing
Press
right. Press
/
button, select Balance.
button to increase balance to the
button to increase balance to
the left. Balance level can be adjusted between -31 and 31.
Headphone
Volume
/
By pressing
Press
Press
button to increase volume level.
button to decrease volume level.
button, select Volume.
Volume level can be adjusted between 0
and 63.
ENG-37700W-1062UK-37 INCH 17MB15 OEM-(WO VGA-WO PIP)(HD READY)-50092400.p65 06.09.2006, 15:5013
By pressing
phone. Press
hedphone menu.
- 13-
/
button, select Head-
/
or “OK” button to enter

Headphone
Volume
Sound Mode
Balance
10
0
volume
By pressing
Press
Press
/
button, select Volume.
button to increase hp volume level.
button to decrease hp volume level.
Headphone volume level can be adjusted
between 0 and 63.
sound mode
Bypressing
Press
/
button,selectSound Mode.
/
button to changesoundmode.
Sound mode is used to identify sound mode of
the headphone andcanbesettomono, stereo,
dual a ordual b according tothetransmission.
balance
By pressing
Press
right. Press
/
button, select Balance.
button to increase balance to the
button to decrease balance to
the left. Balance level can be adjusted between -31 and 31.
Press the “M” button to return to the previous menu.
Sound Mode
By pressing
Mode. Press
/
button, select Sound
/
buttontochange the mode.
YoucanselectMono, Stereo, Dual A or Dual
B mode, only if the selected channel sup-
ports that mode.
In case of bilingual broadcast (Dual Sound),
you can select original or dubbed language
using mode option.
AVL
Automatic Volume Limiting (AVL) function
adjusts the sound to obtain fixed output level
between programs, having different sound
levels.
Pressing
/
button will turn this feature on
oroff.
Effect
You can use this feature to switch the sound
effect on or off. If the current sound system is
Mono and the sound effect is switched on,
then the sound will be heard as if it is Ste-
reo. If the current sound system is Stereo,
switching this effect on will give a more spatialeffect.
Pressing
/
button will turn this feature on
oroff.
Dynamic Bass
Dynamic Bass is used to increase bass effectof theTV set.
By pressing
Bass. By pressing
/
button, select Dynamic
/
button set Dynamic
bass to Low, High or Off. It is not recommended to select High if listening at high
volume levels.
Feature menu
By pressing
Feature menu appears on the screen.
Sleep Timer
Child Lock
Language
Ext-2 Out
/
button, select the third icon.
FEATURE
English
EXT - 1
Panoramic
Translucent
30 sec
Off
Off
On
West
- 14-
ENG-37700W-1062UK-37 INCH 17MB15 OEM-(WO VGA-WO PIP)(HD READY)-50092400.p65 06.09.2006, 15:5014

Sleep Timer
/
By pressing
Timer. The timer can be programmed between Off and 2 hours in steps of 10 minutes by pressing
is activated, at the end of the selected time,
the TV automatically goes into stand-by
mode.
Child Lock
You can use this feature to prevent children
from turning the TV on or changing
programmes or adjustments etc. without re-
mote control.
The child lock feature can be set by
ton to either On or Off. When Off is selected,
there will be no difference in the operation of
your TV. When On is selected, the TV can
only be controlled by the remote control
handset. In this case the control panel buttons, except the Power on/off button, at the
rear side of the TV will not work. If one of
these buttons is pressed, “Child Lock On”
will be displayed on the screen.
Language
By pressing
By pressing
language.
/
button, select Sleep
/
button. If sleep timer
/
but-
/button, select Language.
button, you can select the
Blue Background
You cansetthe TVto automaticallychangetoa
blue screen if the signal is weak or absent, or
whenthereisnoinputfromanexternaldevice.
The Blue Background feature can be turned
on or off by pressing
Menu Background
By pressing
Background. You can change menu background to Translucent or Opaque by press-
ing
/
button.
Menu Timeout
By pressing
Timeout. Press
timeout to 15 sec, 30 sec or 60 sec.
Teletext Language
By pressing
Language. Press
Teletext Language to West, East, Cyrillic,
Turk/Gre or Arabic. This will normally be set
to West for WesternEurope.
/button.
/
button, select Menu
/
button, select Menu
/
button to change menu
/button, select Teletext
/
button to change
Install menu
By pressing
icon. Install menu appears on the screen.
/
button, select the fourth
Ext-2 Out
/
By pressing
You can set Ext-2 Out to TV, EXT-1, EXT-3,
EXT-4 or EXT-5 bypressing
Note: Only audio output is available for EXT3 and EXT-5. The other options have both
audio and video outputs.
Default Zoom
By pressing
Zoom. You can set Default Zoom to Panoramic, 4:3 or 14:9 Zoom by pressing
button.
If there is no WSS or aspect ratio (picture
size) information and zoom mode is selected as Auto by pressing the “WIDE” button, then the zoom mode will automatically
change to Default Zoom setting. See also
Zoom Modes on page 17.
ENG-37700W-1062UK-37 INCH 17MB15 OEM-(WO VGA-WO PIP)(HD READY)-50092400.p65 06.09.2006, 15:5015
button, select Ext-2 Out.
/
button.
/
button, select Default
/
Program
By pressing
Press
number. You can also enter a number via
- 15-
/
button, select Program.
/
button to select the program

digit buttons on the remote control. There
are 100 program storage between 0 and 99.
Band
Band can be selected either "C" or "S" using
the
/
buttons. "C" is used for "Off Air"
signals. "S" is used for cable connections.
Channel
/
Channel can be changed by
button or
Digit Buttons.
Colour System
/
By pressing
System. Press
button, select Colour
/
button to change the
colour system to PAL, SECAM, PAL60 or
AUTO.
If Sound System is set to I, SECAM is not
available for the Colour System.
Note: In EXT mode, you can choose NTSC
3.58 and NTSC 4.43 as well.
Sound System
By pressing the
Sound System. Press the
/
buttons, select
/
buttons to
select the Sound system. BG "Western
Europe", DK "Eastern Europe", I "UK only" L
and LP "France".
FineTune
By pressing
Press
/
button, select Fine Tune.
/
button to adjust the tuning.
Search
/
By pressing
Press
/
button to start program search-
button, select Search.
ing. The searching will stop when a signal is
found. You can also enter a frequency value
directly by pressing the digit buttons.
VCR (Video Cassette Recorder)
• This item can be seen in all modes except
EXT-3 and EXT-5.
• If you want to watch a VCR sourcefrom one
of these modes, then it will be better to set
VCR mode“on”. For this, while the cursor is
on this item press the
/buttons to set it
“On”.
• If you want to watch a DVD , then you must
set this item “Off”.
Store Program
By pressing
gram. Press
/
button, select Store Pro-
/
or “OK” button to store the
adjustments. “Program Stored” will be displayed on the screen.
Program menu
By pressing/
Program menu appears on the screen.
By moving the cursor in four directions you
can reach 20 programmes in the same
page. You can scroll the pages up or down
by pressing the navigation buttons to see all
the programmes in TV mode (except the AV
mode).
By cursor action, programme selection is
done automatically.
Name:
To change the name of a decided
programme, select the programme and
press the RED button.
The first letter of the selected name starts to
blink. Press
ter and
/
By pressing the RED button, you can store
the name.
button, select the fifth icon.
11 C - 43
12 C - 64
13 C - 68
16 -- - - 17 -- - - 18 -- - - -
19 -- - - 20 -- - - -
APS
/
button to change that let-
button to select the other letters.
ENG-37700W-1062UK-37 INCH 17MB15 OEM-(WO VGA-WO PIP)(HD READY)-50092400.p65 06.09.2006, 15:5016
- 16-

Insert:
WARNING!
UK
Cancel
Cancel
Select the programme which you want to insert by navigation buttons. Press the
GREEN button. By navigation buttons move
the selected programme to the decided
programme space and press the GREEN
button again.
Delete:
To delete a programme, press the YELLOW
button. Pressing the YELLOW button again
erases the selected programme from the
programme list, and the programmes below
shift one up.
APS (Automatic Programming System)
When you press the BLUE button for APS,
the following warning screen will be displayed.
Source menu
By pressing
icon. Source menu appears on the screen.
EXT - 2
EXT - 3
EXT - 4
EXT - 4S
EXT - 5
In source menu, highlight a source by
pressing
mode by pressing
/
button, select the sixth
/
button and switch to that
/
or “OK”button.
Other Features
TV Status
All prestoredprograms
will be deleted
Press the BLUE button to cancel APS if you
do not want to delete your existing
programme list.
To continue APS, first select the country by
pressing
/
button and then press the
RED or “OK” button.
APS is running...
UK - I 155,25 Mhz
01 - C-01
After APS is finalized, the programme table
will appearon the screen.
ENG-37700W-1062UK-37 INCH 17MB15 OEM-(WO VGA-WO PIP)(HD READY)-50092400.p65 06.09.2006, 15:5017
Programme Number, Programme Name,
Sound Indicator and Zoom Mode are dis-
played on the upper right side of the screen
when a new programme is entered,
ton is pressed.
Mute Indicator
It is placed in the upper left side of the
screen when enabled.
To cancel mute, there are two alternatives;
the first one is pressing the
button and
the second one is increasing/decreasing
the volume level.
Freeze Picture
You can freeze the picture on the screen by
pressing the OK button.
- 17-
TV
but-

Zoom Modes
Zoom mode can be changed by pressing
theWIDE button.You can change the screen
size according to the picture aspect ratio.
Select the optimum one from the following
ZOOM modes.
Auto:
When aWSS (Wide Screen Signalling) sig-
nal, which shows the aspect ratio of the pic-
ture, is included in the broadcast signal or
the signal from an external device, the TV
automatically changes the ZOOM mode according to the WSS signal.
• When theAUTO modedoesnotfunction correctly due to poor WSS signal quality or
when you wantto changethe ZOOM mode,
change to another ZOOM mode manually.
Full:
This uniformly stretches the left and right
sides of a normal picture (4:3 aspect ratio)
to fill the wide TV screen.
“Default Zoom” Modes:
4:3
Use to view a normal picture (4:3 aspect ratio) as this is its original shape.
14:9 Zoom:
This zooms up the wide picture (14:9 aspect
ratio) to the upper and lower limits of the
screen.
Panoramic:
This stretches the left and right sides of a
normal picture (4:3 aspect ratio) to fill the
screen, without making the picture appear
unnatural.
• For 16:9 aspect ratio pictures that have been
squeezed into a normal picture (4:3 aspect
ratio), use the Full mode to restore the picture to its original shape.
Cinema:
This zooms up the wide picture (16:9 aspect
ratio) to the fullscreen.
16:9 Subtitle:
This zooms up the wide picture (16:9 aspect
ratio) with subtitles to the full screen.
ENG-37700W-1062UK-37 INCH 17MB15 OEM-(WO VGA-WO PIP)(HD READY)-50092400.p65 06.09.2006, 15:5018
The top and bottom of the picture are slightly
cutoff.
Note:
If using the HDMI input you cannot force the
screen aspect ratio. The picture size is controlled by the programme suppliers.
- 18-

Teletext
GUIDE
Teletext is an information system that displays text on your TV screen. Using the Teletext information system you can view a page
of information on a subject that is available
in the list of contents (index).
To Operate Teletext
• Select a TV station where Teletext is being
transmitted.
• Pressthe
tents (index) is displayed on the screen.
To Select A Page Of Teletext
• Press the appropriate digit buttons for the
required Teletext page number.
The selected page number is displayed in
the top left corner of the screen. The Teletext
page counter searches until the selected
page number is located, the desired page is
then displayed on the screen.
• Press the
Teletext screen forward one page at a time.
• Press the
text screen backward one page at a time.
To Select Index Page
• To select the page number of theindex(generally page 100), press the
To Select Teletext With A TV
Programme
• Pressthe button. Thetext is now superimposed over the programme on the screen.
• Press the
Teletext page.
button. Usually the list of con-
AV
PC
WIDE
or “P +” button to move the
or “- P”button to move the Tele-
button.
button again to return to the
To Select Double Height Text
• Press the button forthe top halfof the information page to be displayed in double
height text.
• Press the
button again for the bottom half
of the information page to be displayed in
double height text.
• Press the
button once more for the full
page of normal heighttext.
To Reveal “Concealed” Information
• Pressing the button once will reveal answers on a quiz or games page.
• Pressing the
button again will conceal
the revealed answers.
To Stop Automatic Page Change
The teletext page you have selected may
contain more information than what is on the
screen; the rest of the information will be
displayed after a period of time.
• Press the
button to stop the automatic
page change.
• Pressthe button again to allowthe next
page to be displayed.
To Select A Subcode Page
Subcode pages are subsections of long
Teletext pages that can only be displayed on
the screen one section at a time.
• Select the required Teletext page.
• Press the
• Select the required subcode page number
by pressing four digit buttons (e.g. 0001).
• If the selectedsubcode page is not displayed
in a short time, press the
programme will be displayed on the screen.
• Teletext page number will be displayed on
the upper left corner of the screen when the
selected page is found.
• Press the
Teletext page.
- 19-
button.
button. TV
button to display the selected
ENG-37700W-1062UK-37 INCH 17MB15 OEM-(WO VGA-WO PIP)(HD READY)-50092400.p65 06.09.2006, 15:5019

To Exit Teletext
• Press the button. The screen will switch
to TV mode.
To Display The Time
• While watching a TV programme with Teletext transmission press the
current timeinformation,captured fromTeletext will be displayed on the screen.
• If the programme being watched does not
have Teletext transmission, no information
will be displayed.
button. The
If TOP text transmission is not available, in
case of operation of these commands,
wraparound occurs. For example page 100
appears to be one greater than page 199.
ConnectPeripheral
Equipment
There is a wide range of audio and video
equipmentthat can be connected to yourTV.
The following connection diagrams show you
where the different (Optional) equipment
shouldbe connected at the rear sideof theTV.
Fastext
Your TV supports the 1000 page Teletext system. When the page number of any of the
1000 pages in memory is entered, the system
will not search for the requested page; instead
it will display the page automatically. If the requested page is not in memory, the system
will search for the requested page number
and save the 1000 pages including the requestedpageintomemory afterfinding it.
• Press the
screen forward one page at a time.
• Press the
screen backward one page at a time.
For Fastext
The subject-heading for the information may
have a particular colour.
•Pressan appropriateRED,GREEN,YELLOW
or BLUE button in order to reach the relevant
page quickly.
For TOP text
TOP text mode of operation will be activated
automatically according to the transmission.
• If TOP text transmission is present, colour
coded buttons will appearin status row.
• If TOP text transmission is not present, status row will not appear.
The subject-heading for information may be
located in coloured box.
In Top mode the
quest the next or previous page respectively.
button to move the Teletext
button to move the Teletext
orcommands will re-
High Definition
Your LCD Television is capable of displaying High Definition pictures from devices
such as a High Definition Satellite Receiver
or DVD Player. These devices must be connected via the HDMI socket (EXT-5) or Component Socket (EXT-3). These sockets can
accept either 720p or 1080i signals.
Note: For proper connection of a device to
HDMI input of your TV via using a DVI-toHDMI cable, use PC Audio In input for sound
connection.
Via The Scart
LCD TV has 2 Scart sockets. If you want to
connect peripherals (e.g. video, decoder,
etc.) which have Scart sockets to the TV, use
SCART 1 orSCART 2.
If an external device is connected via the
Scart sockets, the TV will be switched to AV
mode automatically.
• Do not connect Digital Set Top Box devices
via Scart 1. UseScart2.
Via Aerial Input
If you wantto connectto yourTV, peripherals
like video recorders or decoders, but the device you want to connect does not have a
Scart socket, you should connect it to the
Aerial inputof the TV.
If the VCR is connected via Aerial input it
is suggested to use Programme 0.
ENG-37700W-1062UK-37 INCH 17MB15 OEM-(WO VGA-WO PIP)(HD READY)-50092400.p65 06.09.2006, 15:5020
- 20-

Decoder
Cable TV offers you a wide choice of
programmes. Most of them are free, others
are to be paid for by the viewer. This means
that you will need to subscribe to the broadcasting organisation whose programmes
you wish to receive. This organisation will
supply you a corresponding decoder unit to
allow the programmes to be unscrambled.
For further information ask your dealer. See
also the booklet supplied with your decoder.
Connect a decoder with an aerial socket
to the TV
• Connect the aerial cable.
Connect a decoder without an aerial
socket to the TV
• Connect the decoder to the TV with a Scart
cable toSCART 1.
TV And Video Recorder
• Connect the aerial cables.
Better picture quality can be obtained if you
alsoconnect a Scart cable toSCART sockets.
Playback NTSC
To use this option you can;
• Connect an NTSC VCR player to a Scart
socket at the rear side of the TV.
•Connect anNTSCVCRplayer toRCAJacks
at the sideof the TV.
Then, press
source.
AV
button to select appropriate
CopyFacility
Source selection for VCR recording.
• Select Feature menu.
• Select Ext-2 Out bypressing
• Select a source to copy the picture from that
source.
/
button.
Search For And Store The Test
Signal Of The Video Recorder
• Unplug the aerial cable from the aerial
socket of your video recorder.
• Switchon your TVand putthe video recorder
on the test signal. (See the booklet for your
video recorder.)
•Enter the Install menu and select search.
• Search for the test signal of your video recorder in the same way as you searched
for and stored theTV signals.Storethe test
signal under programme number 0.
• Replace the aerial cable in the aerial socket
ofyour video recorderonce you have stored
the test signal.
Camera And Camcorder
To Connect To AV Input
Connect your camera or camcorder to AV
(EXT-4) input at therightsideof the TV.
• Connectyour equipmenttotheTV viaVIDEO
(yellow),AUDIO R (red)andAUDIO L (white)
inputs. You mustconnectthe jacks to the input using the same colour.
To Connect to S-Video Input
Connect your camera or camcorder S-Video
output to the input at therear of theTv.
Connect the equipment to the Tv via the
S-Video input and audio input via the input
AV-2. Use a S-Video lead and RCA (phono)
lead.
Connect The Decoder To The
Video Recorder
Some video recorders have a special Scart
socket for decoder.
• Connect a Scart cable to theScartsocket of
your decoder and to the special Scart
socket of your video recorder. Refer to the
bookletof your video recorder.
• To connect your video recorderto theTV, refer to the TV and Video Recorder section.
If you want to connect more equipment to
yourTV, consult your dealer.
Connecting Headphones
Use the stereo headphone socket at the
rightside of the TV, to connect headphones.
- 21-
ENG-37700W-1062UK-37 INCH 17MB15 OEM-(WO VGA-WO PIP)(HD READY)-50092400.p65 06.09.2006, 15:5021

Aerial Connection
...or through a satellite decoder...
RF Lead to
OUT
Headphone
Outdoor Aerial Connection
Round 75 ohm coaxial cable
75
Rear of TV
ConnectPeripheral Equipment
either connect the aerial straigh tto your TV...
wall
Aerial(RF)
socket
Lead
Aerial(RF) Socket
...or through a VCR and satellite decoder.
LCD TV
RF Lead from
VCR to TV
RF Lead
from VCR to
Satellite
Aerial
ANT.IN
RF Lead to
Aerial
ANT.IN
• Scart Lead to
TV VCR
AV-1
AV-2
on T V.EXT-1
...or connect the aerial through a VCR...
LCDTV
(RF) connector
lead VCR to TV
Aerial (RF) Sock et VCR
wall
RF Lead from
Satellite to TV
ANT.IN
EXT-1 on TV.
TV VCR
Aerial
socket
Aerial (RF)
Lead
Aerial
VCR
Aerial (RF) Socket
AV-1
AV-2
...or through a DVD Player...
LCD TV
EXT-1on TV.
- 22-
ENG-37700W-1062UK-37 INCH 17MB15 OEM-(WO VGA-WO PIP)(HD READY)-50092400.p65 06.09.2006, 15:5022

Trouble Shooting Guide
If you experience problems please consult the guide below before calling the Technical Help Line.
Symptom Possible cause Reme dy
Set Dead.No led lit. Power not connected to the Tv
Set Dead.Standbyled litred. Tvis in standby mode. See page 9
No picture. Standby led out. Set switched toAVwith no input.
Poor Noisyor ghosting picture Poor aerial signal.
Signal Ok but Fixed Ghost on
screen.
No sound.
Teletextpoor Poor signal See advice about aerials
No Remote Control functions
Animage mayhave been burn
on the screen.
Muteturned on. Check mute is turned off
External amplifier turned off Check external amplifier settings.
Exhausted batteries Replace the batteries see page 9
Objects in line of sight
Ensure all connecting leads are
fitted firmlyand the power switch
is turned on.
Select TVinput.
Switch AVsource On
Ifusing an indoor aerial,havean
external aerial fitted.
Disconnect anyother items using
the same aerial.
See page 15 “Screen Wipe”
Remove anyobjects in the path of
the sensor of the Tv
If you are still having difficulty please call the Technical help line. Ring 01422 203676
(Normal rates apply).
OpeninghoursMon-Fri8 am – 8pm. Sat 9 am – 4pm. Sun 11am– 4pm “Bank holidays as Sun”
Care of the Screen.
Do NOT use any solvents or abrasive cleaners on the screen. You may damage the invisible
coating. If the screen is dirty youmay usea soft cloth and mild detergent.
- 23-
ENG-37700W-1062UK-37 INCH 17MB15 OEM-(WO VGA-WO PIP)(HD READY)-50092400.p65 06.09.2006, 15:5023

Specifications
TVBROADCASTING
PAL/SECAMB/GD/KK' I/I'L/L'
RECEIVINGCHANNELS
VHF(BAND I/III)
UHF (BANDU)
HYPERBAND
CABLETV (S1-S20/ S21-S41)
NUMBER OF PRESETCHANNELS 100
CHANNELINDICATOR
On Screen Display
RFAERIAL INPUT
75 Ohm (unbalanced)
OPERATINGVOLTAGE
230-240VAC, 50 Hz.
AUDIO
German + Nicam Stereo
AUDIOOUTPUT POWER (W
) (%10 THD)
RMS.
2 x 8
POWERCONSUMPTION (W)
180 W
2,3 W (Stand-by)
PANEL
16:9 display, 37” Screen Size
DIMENSIONS (mm)
626
615
Weight (kg)
27.5
23.9
D L H
230
110
1250
1073
Toimprove the product, the Technical
specification maybe changed without notice.
ENG-37700W-1062UK-37 INCH 17MB15 OEM-(WO VGA-WO PIP)(HD READY)-50092400.p65 12.09.2006, 19:4524
With foot
- 24-

ImportantInstruction
For your own safety read following instruction carefully before attempting to connect this unit
to the mains supply.
MAINS (AC) OPERATION
The wires in the mains lead are coloured in accordance with the following code :
GREEN
&
YELLOW
(Earth)
BLUE
(Neutral)
IMPORTANT
As the colours of the wires in the mains lead of this appliance may not correspond with
the coloured markings identifying the terminals in your plug, proceed as follows:
The wire which is coloured green and yellow must be connected to the terminal which
is marked with the letter E, or by the earth symbol, or coloured green or green and
yellow.
The wire which is coloured blue or black must be connected to the terminal which is
marked with the letter N or coloured Black.
The wire which is coloured brown or red must be connected to the terminal which is
marked with the letter L or coloured Red.
For continued protection against risk of fire, replace only with same type and rating of
fuse(ASTA approved 5A250VACfuse).
(If approved by the qualifiedTV service personel,13A fuse may also be used)
If your product is fitted with a moulded plug which requires replacement please cut off
and dispose of safely, then rewire as shown above.
FUSE
BROWN
(Live)
CAUTION
TO PREVENT ELECTRIC SHOCK DISCONNECT FROM THE MAINS BEFORE
REMOVINGCOVER.NO USERSERVICEABLE PARTSINSIDE. REFERSERVICINGTO
QUALIFIEDSERVICE PERSONNEL.
SAFETY PRECAUTION
THISEQUIPMENT MUST BE DISCONNECTEDFROMTHE MAINS WHEN NOTIN USE.
DONOTALLOW THISUNITTOBE EXPOSEDTORAIN OR MOISTURE.
- 25-
ENG-37700W-1062UK-37 INCH 17MB15 OEM-(WO VGA-WO PIP)(HD READY)-50092400.p65 06.09.2006, 15:5025
 Loading...