

Page 1
19"WIDE SCREEN LCD TV/DVB Freeview
ATL1930W-ID
Page 2

Page 3

Safety Information…………………………………………..…1
1.Product Features…………………………………………….3
2.Accessories… …………… …………… …………… ……….. 3
3.Front View…………………………………………………….4
4.Rear View……………………………………………………..5
5.Remote Control………………………………………………6
6.Basic Installation…………………………………………….8
7.TV OSD Menu………………………………………………..9
7.1 Picture Menu…………………………………………..…9
7.2 Sound Menu……………………………………………..10
7.3 Channel Menu…………………………………………...11
7.4 Function Menu…………………………………………..12
7.5 PC Menu………………………………………………….13
8. DVB Main Features..................................................14
9. DVB Getting Started.................................................15
10. DVB Operation......................................................17
11. DVB Basic Functions.............................................25
12. User Help Guide………………………………………….26
13.Technical Specifications…………………………………27
Mains Plug wiring…………………………….………………28
Wall bracket mounting instructions………………………....28
Page 4
Safety Information
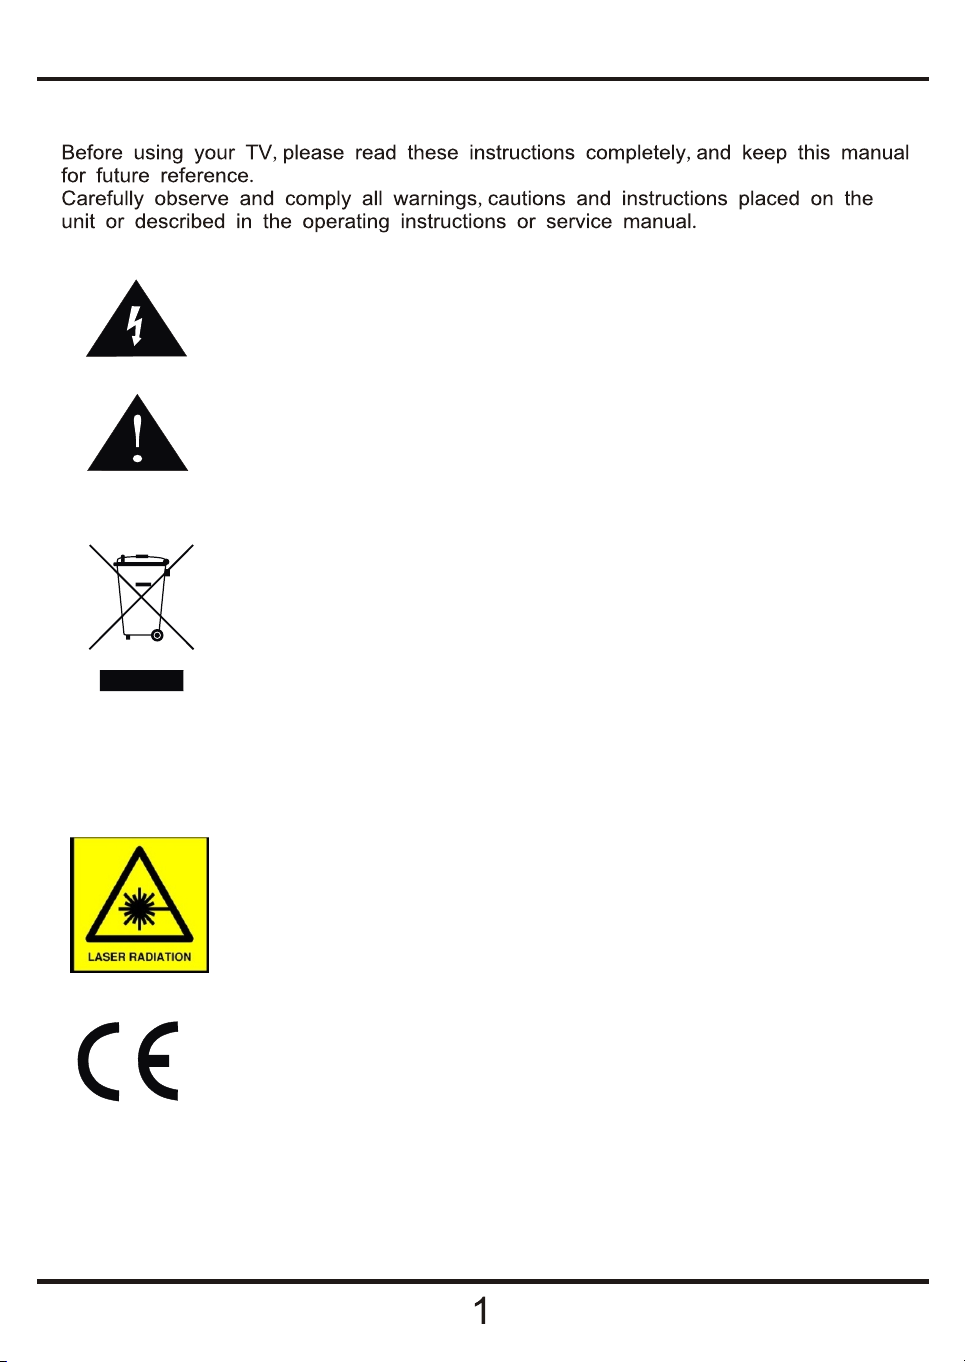
The lightening flash with arrowhead symbol, within an equilateral triangle, is
intended to alert the user to the presence of un-insulated “dangerous
voltage” within the products enclosure that may be of sufficient magnitude
to constitute a risk of electric shock to the persons.
The exclamation point within an equilateral triangle is intend to alert the user
to the presence of important operating and maintenance (servicing)
instructions in the literature accompanying the appliance.
Correct disposal of this Product
(Waste Electrical & Electronic Equipment (WEEE)
The crossed out “Wheelie bin” is intended to show that this appliance must not
be placed with ordinary household waste at the end of its useful life. To prevent
possible harm to the environment or human health from uncontrolled waste
disposal, please keep separate from other household waste and recycle it
responsibly to promote the sustainable reuse of material resources.
Household users should contact either the retailer where you purchased the
product, or their local government office for details of where and how you can
take this item for environmentally safe re-cycling.
Business users should contact their supplier and check the terms and conditions
of the purchase contract. This product must not be mixed with other
commercial wastes for disposal
1. THIS LABEL IS ATTACHED TO THE PLACE AS ILLUSTRATED TO INFORM
THAT THE APPARATUS CONTAINS A LASER COMPONENT.
2. THE WARNING LABEL INFORMING OF RADIATION IS PLACED INSIDE
THEn UNIT. AS SHOWN IN THE ILLUSTRATION. TO WARN AGAINST
FURTHER MEASURES ON THE UNIT. THE EQUIPMENT CONTAINS A
LASER RADIATING LASER RAYS ACCORDING THE LIMIT OF LASER
PRODUCT OF CLASS
This unit complines with European safety and electrical interference directives.
Page 5
Safety Information cont.
Do not place the TV on an unstable surface, it may tip over and cause injury or
damage to the LCD screen.
Do not place the TV in a cabinet where airflow is restricted, ensure the ventilation
holes are not covered to prevent overheating. Do NOT cover the DC mains
adaptor, this will feel warm to the touch and must be allowed to radiate the heat.
Do not use the TV in wet or damp conditions, if water or liquids are allowed to
enter the case, disconnect the power and call the Technical Help line. Do not
handle the TV or Power adaptor with wet hands.
During an Electrical storm or when going on holiday, disconnect from the mains
supply and aerial (if external or rooftop).
Do not place heavy objects on the mains lead or DC supply lead, do not place
where they can be stepped on, cut or damaged. If the leads do become damaged
please call the Technical Help Line for advice.
Do not drop or damage the TV. If the casing becomes damaged it may cause a
safety issue, Do not open the case or Power adaptor, you risk a severe electric
shock, injury or death. Do not drop objects into the TV ventilation slots or DVD disc
slot. Should an object enter the TV, contact the Technical Help Line for advice.
Do not place the TV near heat sources such as radiators or direct sunlight
Cleaning the TV. Disconnect from the supply before cleaning. Do NOT use petrol
based or chemical cleaning fluids. You may wipe with a soft damp cloth. For
stubborn sticky dirt use a dilute detergent solution..
LCD Screen. Do NOT use chemical solvents on the screen surface, sticky finger
marks must only be removed with a dilute detergent solution. Occasionally one
or two bright dots may be seen on the screen, this is not considered a fault.
Page 6
1.Product Features
- Inputs : Tun er, Scart, VGA, CVBS (vide o), Audio , PC Audio
- TV Systems : PAL (B/G ,I,D/K). SECAM (B/G,D /K,L) for UK use PAL “I”.
- Freevie w (Digital) and Analog Tuners.
- Memory. Up to 200 ch annels m ay be stored
- No Signal ( TV) Auto standby.
- Timer func tions
- Program me exchange (swap)
- Power req uirements (DC 12V 5 A (60W).
- LCD Scree n 1440 x 900 pixels
- Tuning Ran ge VHF / UHF 48 Mhz 847 Mhz
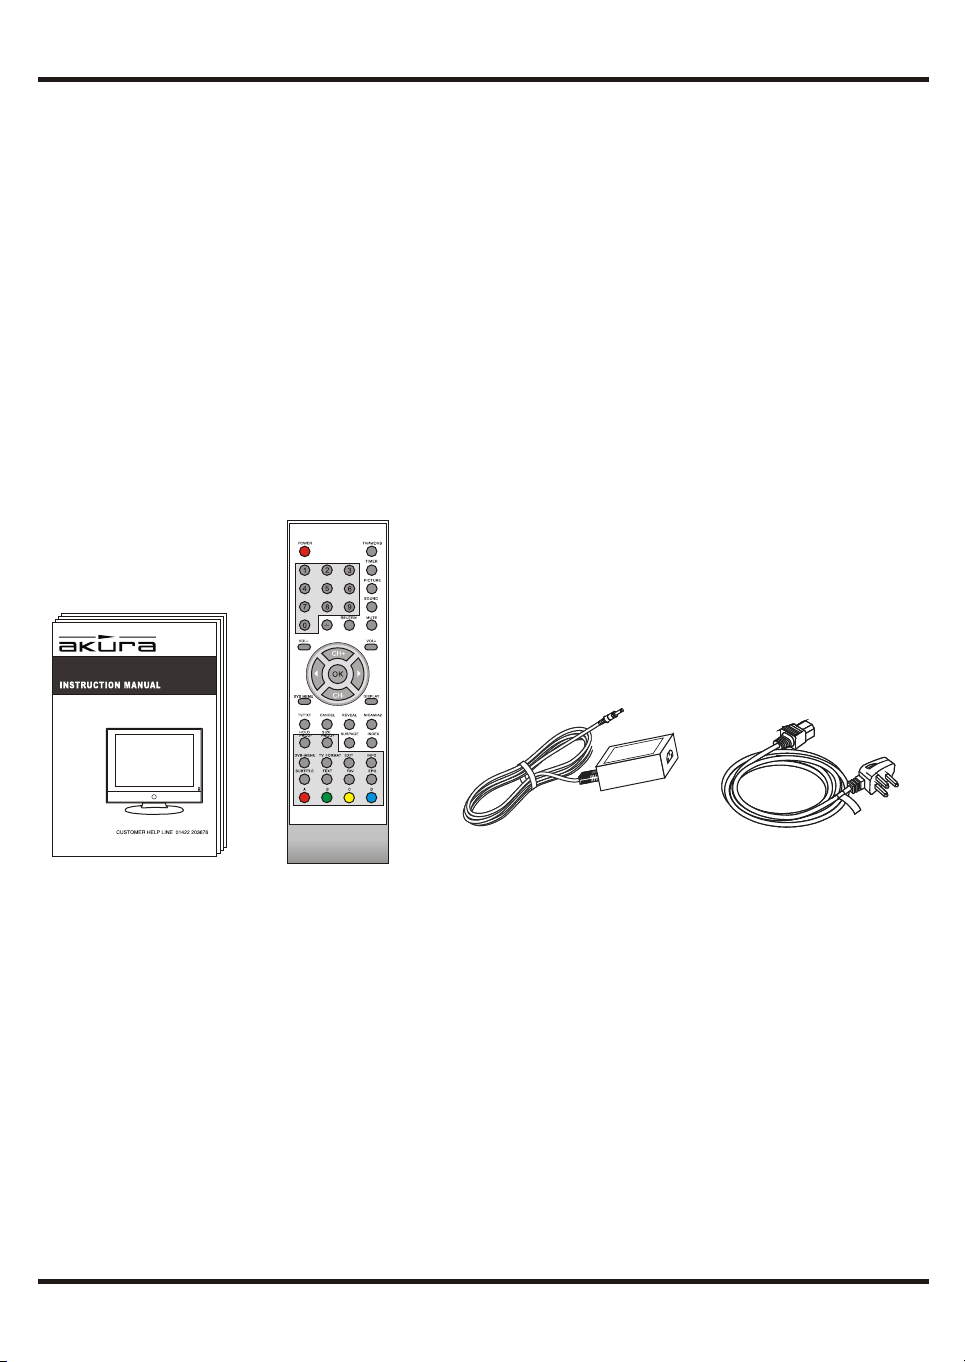
2.Accessories
19"WIDE SCREEN LCD TV/DVB COMBO
ATL1 93 0W- ID
Users' Manual Remote Control Adapter Adapter Cable
3
Page 7
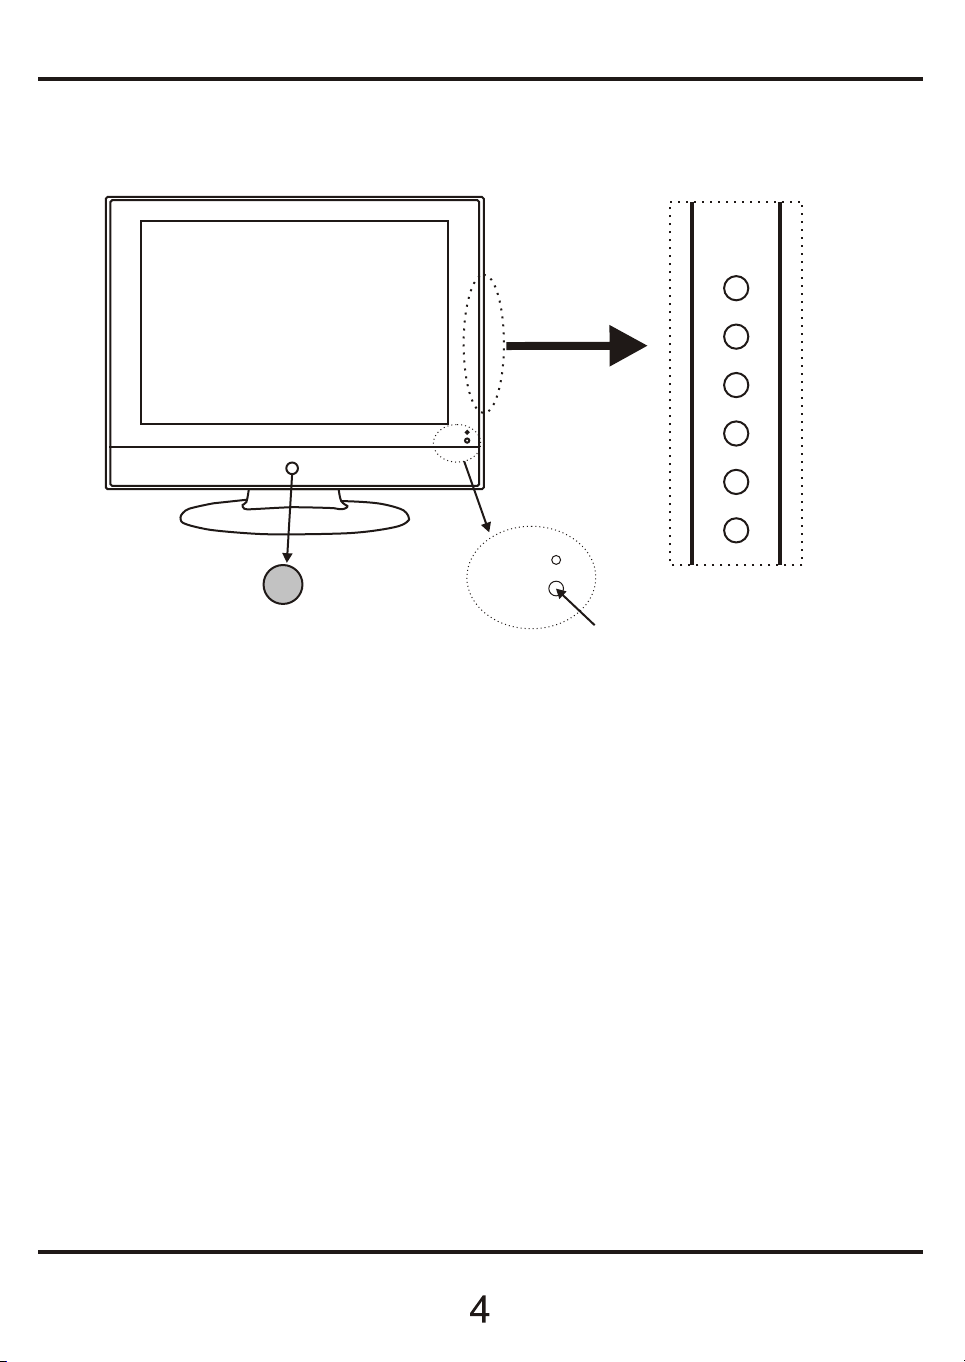
3.Front View
MENU
CH-
CH+
VOL-
VOL+
TV/AV
Led Indic ator
Power
Remote control window
(keep clear)
1(IR)Infrared Receiver:Receives IR signals from the remote control.
(Power on/Standby)LED Indicator: Press POWER to turn on and off.
Indicator on(Red) Standby mode
Indicator on(Green) Power on mode
The effective range of the I/R signal is approx 3 metres and an angle of +/- 30 deg.
2 The functions of the buttons are described as below:
MENU: Press to display the OSD menu, Press again to exit the menu.
CH-/CH+: Press to scan through channels. When pressing and holding down either button
user can scan channels quickly.
They are also can be used to move down/up in the OSD menu screen.
VOL-/VOL+: Press to adjust the volume.
they are also can be used to move left/right in the OSD menu screen.
VOL+ button can be used to skip forward to next menu.
TV/AV: Press to select the source: TV,AV,DVB,PC,SCART
Power: Turn on/off the TV set.
Page 8
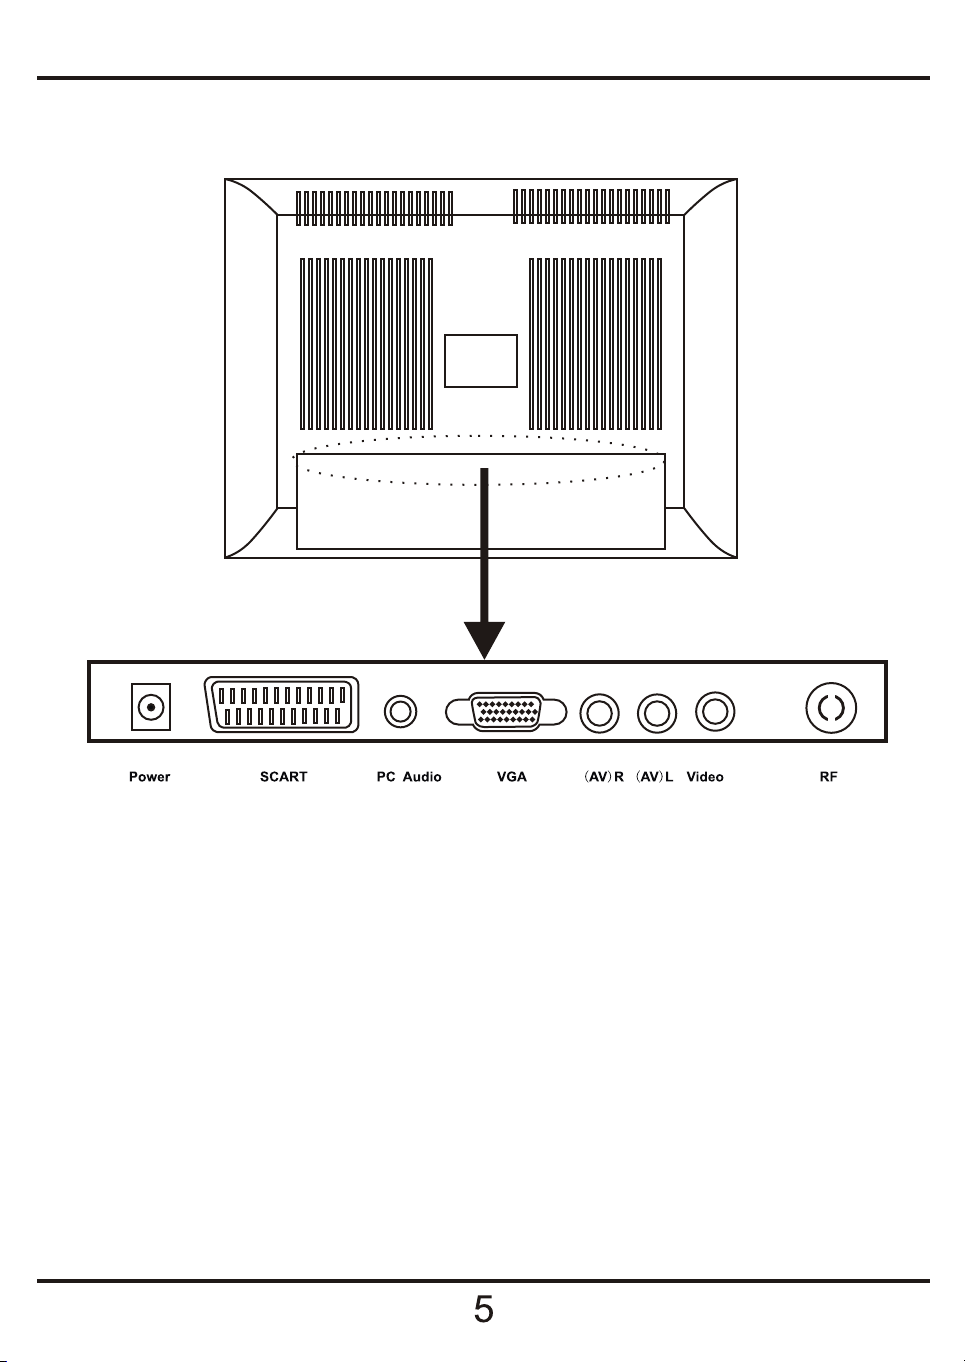
4.Rear View
Power : Connection to Power adaptor.
SCART : Composite video and Audio input from VCR or other devices.
PC Audio : Audio connection from PC.
VGA : PC Monitor display input. Connect to your Pc Mini D15 pin connector.
AV-R,AV-L (Phono): Right and Left Audio input from other sources such as Camcorder.
Video : CVBS video input from other sources such as Camcorder.
RF : Tuner / Antenna RF input.
Page 9
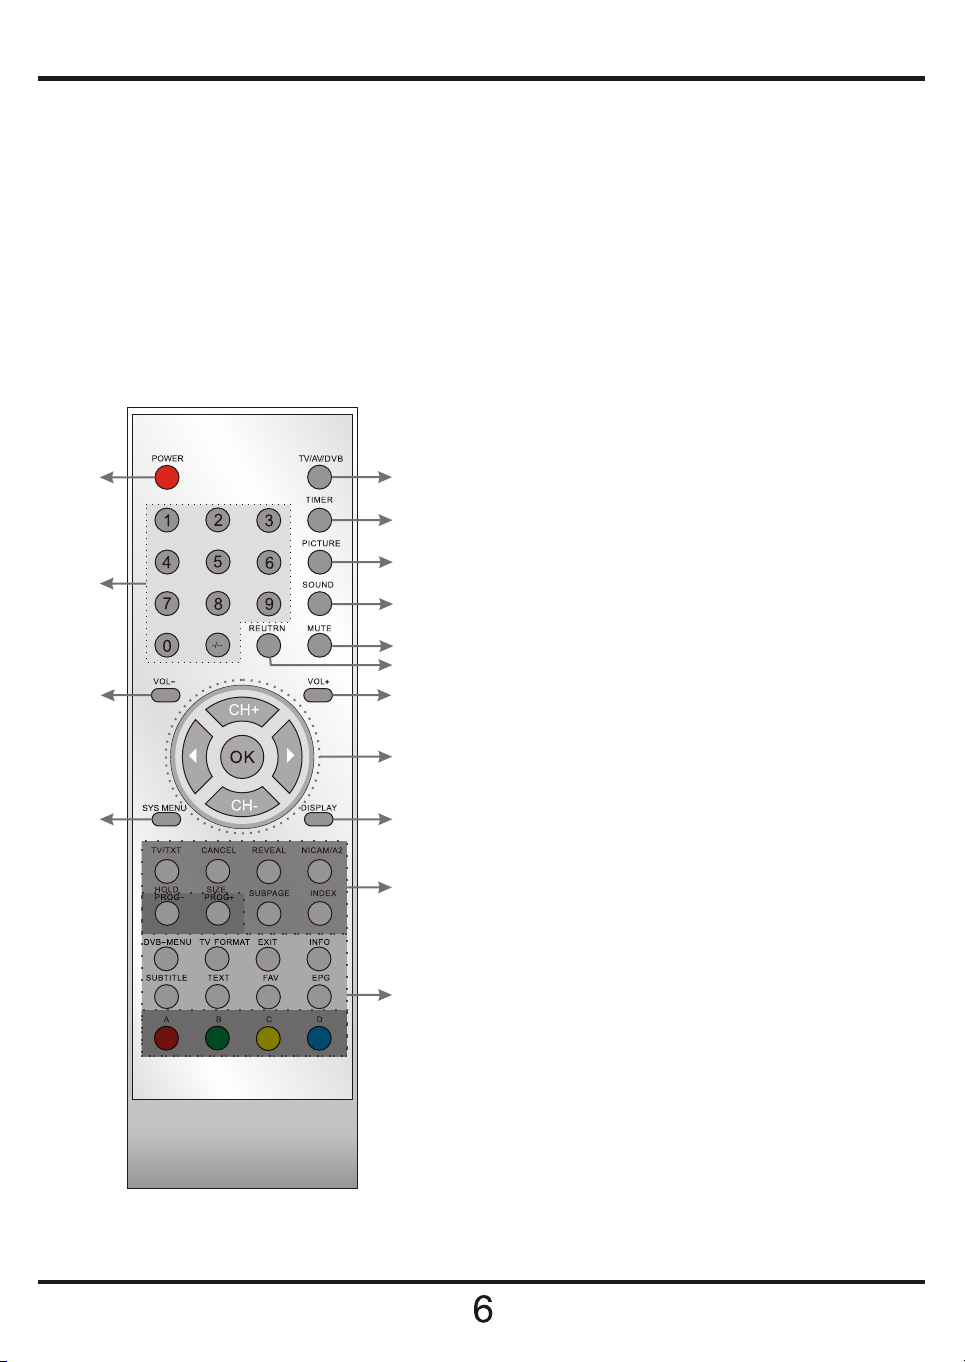
5. Remote control
Note:
1. Fit two AA batteries, making sure that they are the correct way round, as marked on the case.
2. Aim the remote control at the window to keep the right side of the screen, and keep the window
clear at all times.
3. Do not press the buttons on the remote control too quickly-allow time for the set to respond.
Battery Disposal.
When the batteries are exhausted and need replacing, do NOT break open or throw on a fire.
Contact your local waste authority for disposal instructions, do not throw in the domestic waste.
12
1
6
2
3
1. POWER: turn on or off the TV.
2. TV/AV/DVB: input source select.
4
3. TIMER: shutdown timer.
4. PICTURE: select the picture mode:
5
User,Normal, Soft or Vivid.
7
5. SOUND: select the sound mode:
8
User, Normal, News and Movie.
9
10
6. 11. 0-9,-/--: choose channel directly.
Number buttons for DVB.
11
7. MUTE: silence.
8. RETURN: go back to play the last channel.
9/10. VOL+/-: adjust the volume.
13
11. CH+/-: scan through channels.
CH+/-,cursor left/right:
14
Cursor buttons in TV menu.
OK: CONFIRM BUTTON for OSD menu.
12. SYS-MENU: TV system setup menu.
13. DISPLAY: display
15
( ).
14 Buttons for Teletext see next page
. ( )
15 Buttons for DVB see next page
. ( )
be used in DVD or TV mode
current mode
Page 10
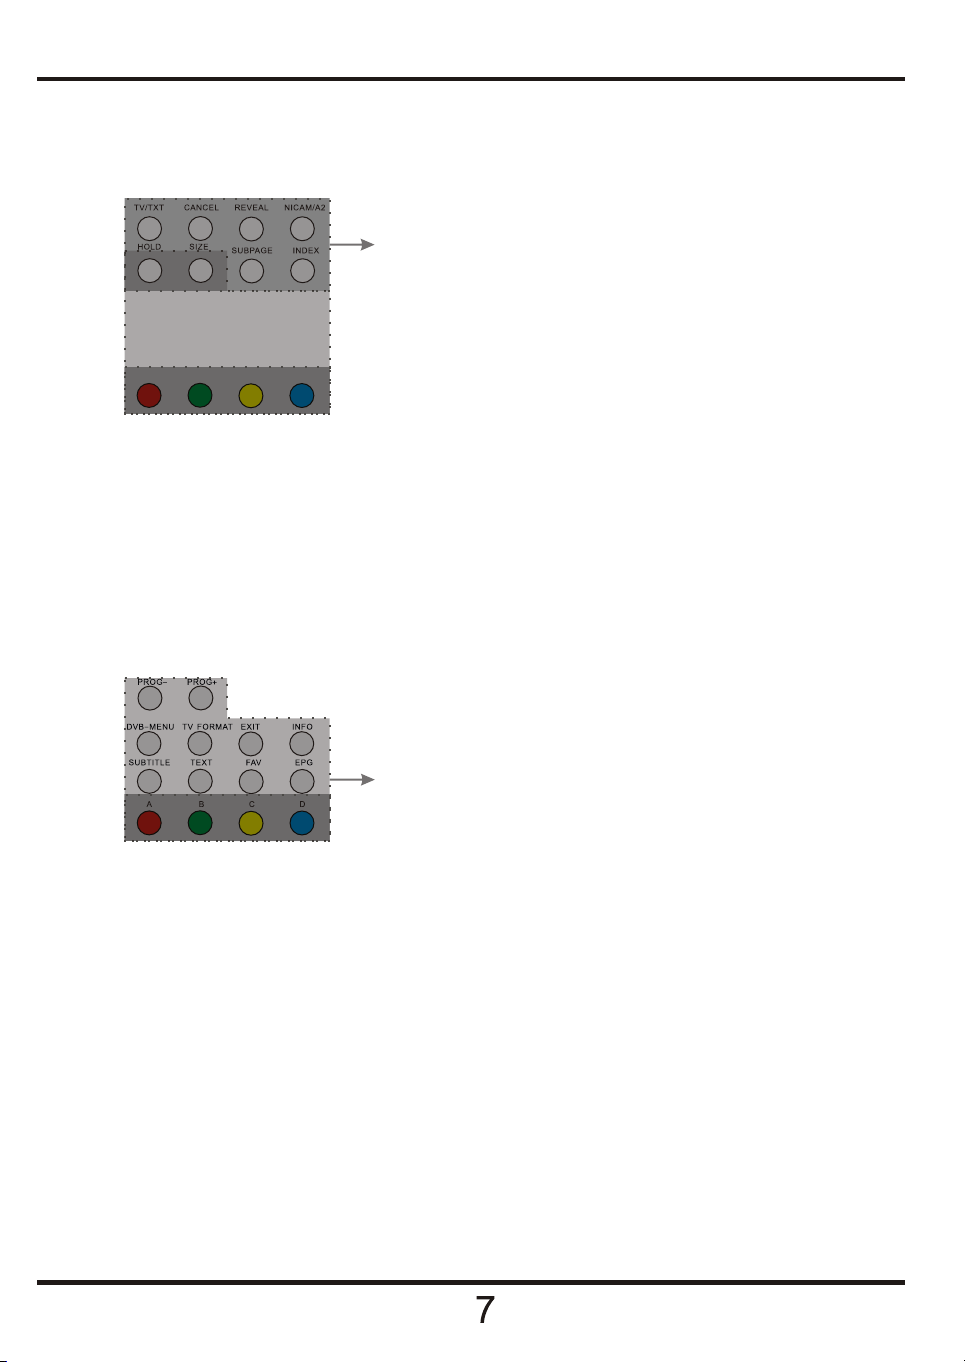
14.Buttons for Teletext
TV/TXT: turn off/on Teletext.
CANCEL: cancel Teletext.
14
REVEAL: reveal any hidden text.
NICAM/A2: NICAM.
HOLD: hold or carry on the current subpage.
SIZE: press to see top half of page double size.
Press again to see the bottom half of page
double size.
Press again for normal size.
SUBPAGE: press to subpage, again to cancel.
INDEX: go to index.
Colour buttons: short cuts-follow the coloured
links in the text.
15.Buttons for DVB functions
PROG+/-: DVB Program+/-.
DVB-MENU: to display the main menu on the screen or
return to the screen from a menu screen.
TV FORMAT: to change aspect screen ratio 4:3,16:9.
EXIT: to return to the previous menu and screen.
INFO: means information. To display brief information
15
concerning the current channel you are viewing.
SUBTITLE: to switch the dialogue at the bottom of
the screen.
TEXT: to view the teletext broadcasting program.
FAV: means favorite. To display the favorite channel list
defined by you.
EPG: to show the electronic program guide during
no-menu state only.
A B C D: this keys are effective only combining with
MHEG5 and extended EPG schedule MHEG5
applications.
11. CH+/-,Cursor buttons: Cursor buttons used in menu.
OK: CONFIRM BUTTON.
Page 11
Analog
1.Connect the Power adaptor to the DC input socket and the Aerial lead to the TV Tuner input.
2.To turn ON, press the “Power Button”.
3.Press the TV/AV button on the TV or Remote Control, the source menu
will display on the screen (see picture right). Use the CH+/- buttons to select
the source, press CURSOR RIGHT button to confirm.
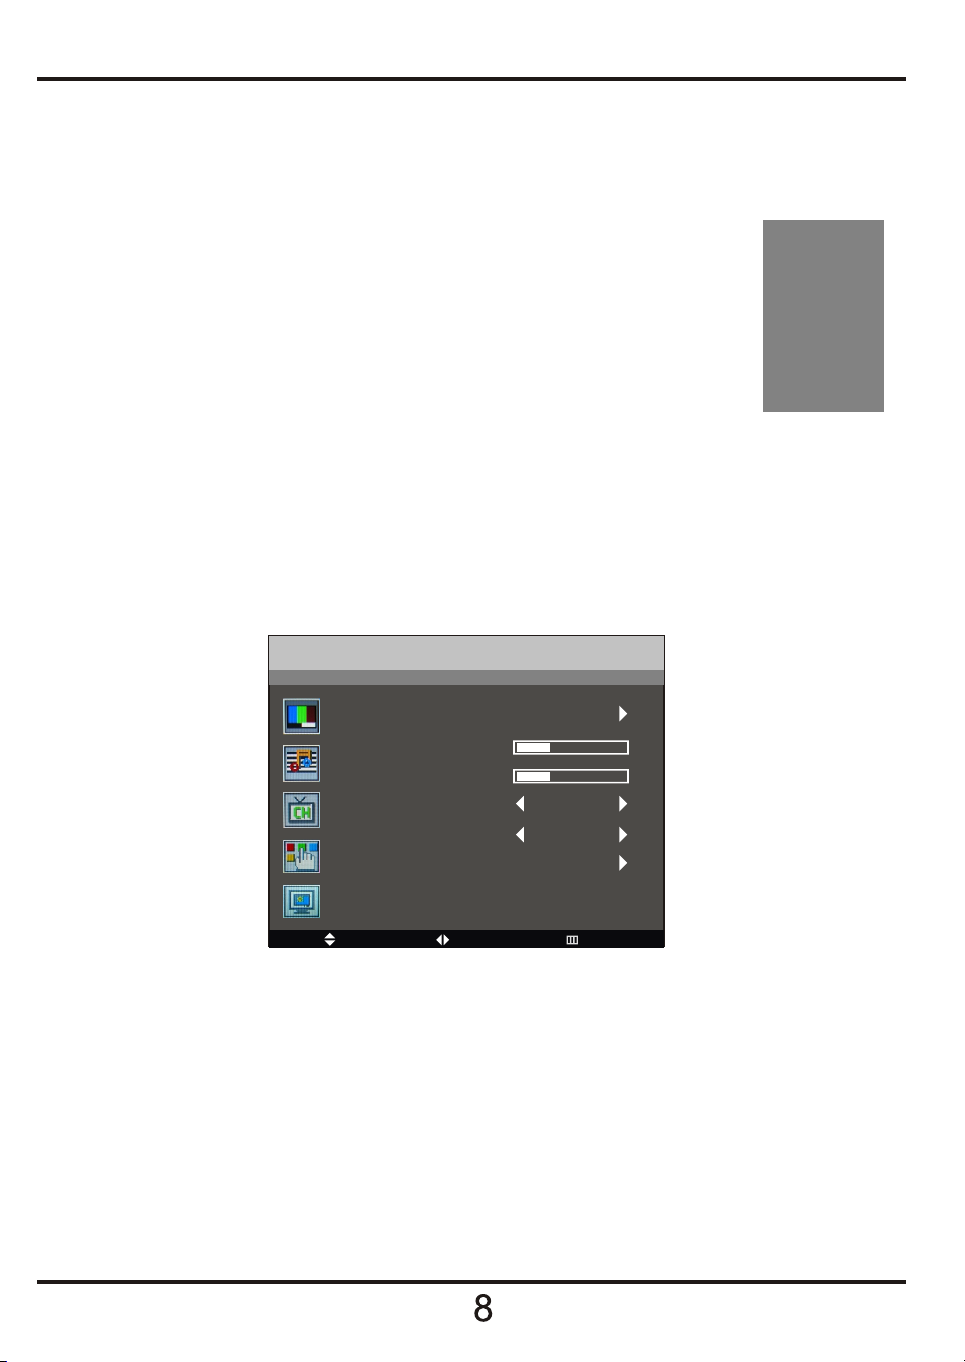
4.Press the MENU button on the TV or the MENU button on the remote control,
the screen will display the OSD menu, press the CH+/- button to select the
third menu Channel (see picture below)press the CURSOR RIGHT button to
enter the menu, press CH+/- buttons to select the item“Auto Tune”.
Press the CURSOR RIGHT button, the TV will start to search from the lowest frequency
upwards. When a station is found it will be stored automatically in the “First” location, further
received stations will be stored in order. When Auto Tune is completed the TV will display the
first station received. In most cases the stations stored will not be in Channel Order i.e. BBC1
will not be in Location “1”. To move the stations into the correct locations you will need to use
“Channel Swap” see page 12.
Note when Auto Tune starts, to stop it press MENU, otherwise leave to complete the search.
Chan ne l
Auto Tune
Manual Tune
Fine Tune
Skip
Sound.SYS
Channel Swap
Off
I
TV
AV
DVB
SCART
PC
Mov e Selec t Exit
PC
1.Connect the T to the PC using a 15pin VGA lead (not supplied) and Audio to the PC audio
socket
2.Press the TV/AV button to display the source menu, use the CH+/- buttons to select PC and
press CURSOR RIGHT button to confirm. The T will now display the signals from the PC.
V
You may need to adjust the PC to the TV. See page 13
( )
V
DVB operation(see page 14)
Page 12
7. TV OSD menu
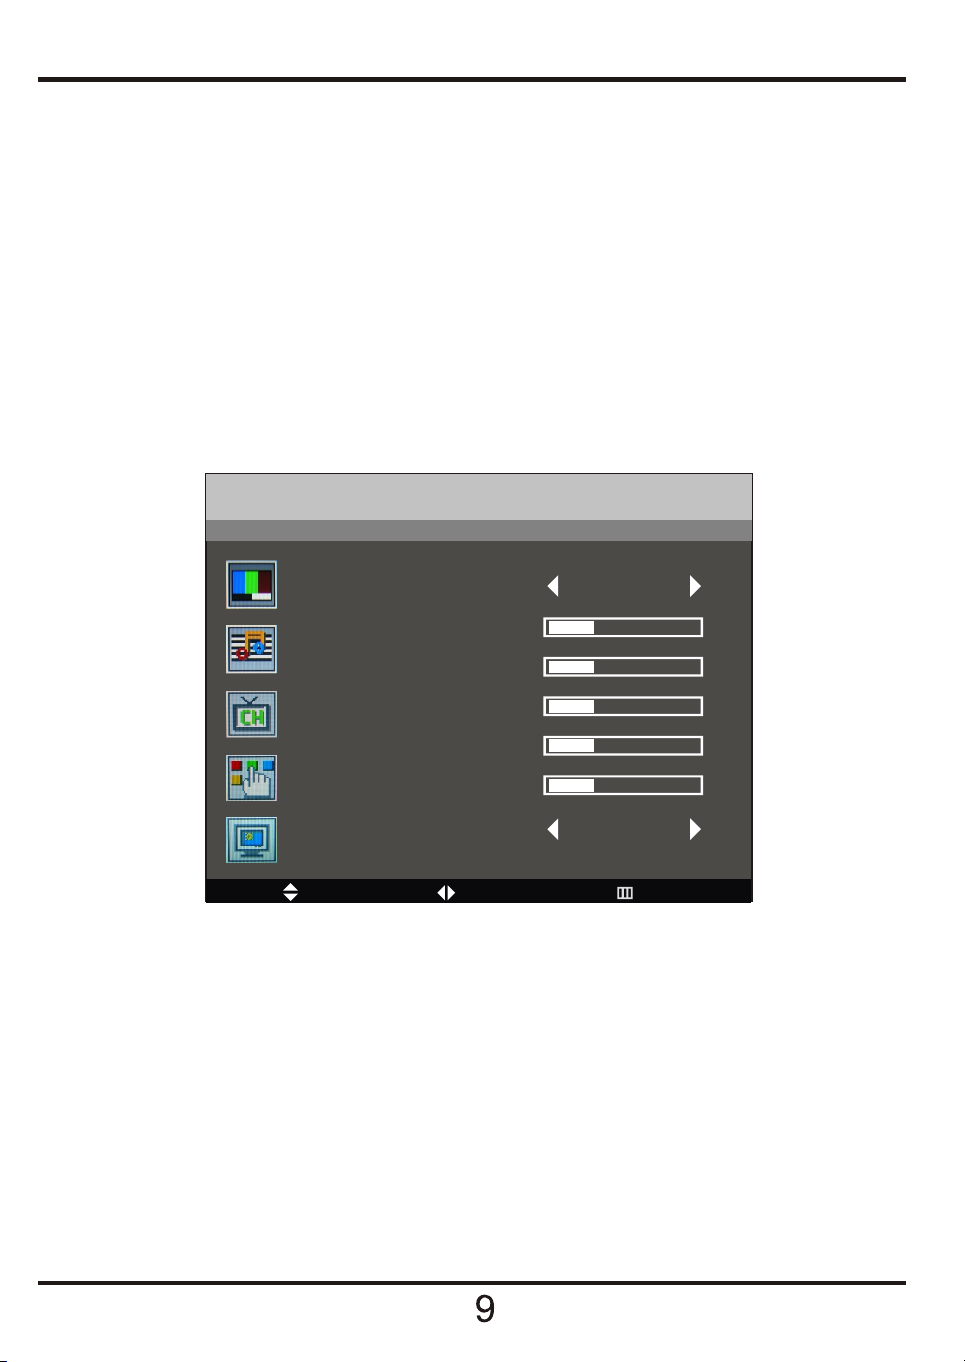
Press the MENU button on the remote control, the screen will display the OSD menu,
press the CH+/- button to select the main menu(there are five main menu:Picture,Sound,Channel
Function and PC), and press the button to enter the main menu you select,
press CH+/- button to select the item of the main menu, press button to
select, adjust or enter a submenu.
Note Items highlighted in the Menu's may be adjusted. Items “greyed” out are not available.
7.1 Picture menu
CURSOR RIGHT
CURSOR LEFT/RIGHT
Picture
Picture Mode
Normal
Brightness
Contrast
Saturation
Sharpness
Hue
Scale FULL
Move S ele ct Ex it
Picture Mode: select the picture display mode----User, Normal, Soft, Vivid.
You can also use the PICTURE button on the remote control to select.
Brightness: adjust the brightness of the picture.
Contrast: adjust the contrast of the picture.
Saturation. Adjusts the Colour depth (contrast)
Sharpness: adjust the sharpness of the picture.
Hue: adjust the hue of the picture(only used in the mode of NTSC).
Scale: exchange the 16:10 and 4:3 picture mode.
Note: when you are in the mode of PC, you can only adjust the brightness and contrast .
Page 13
7.2 Sound menu
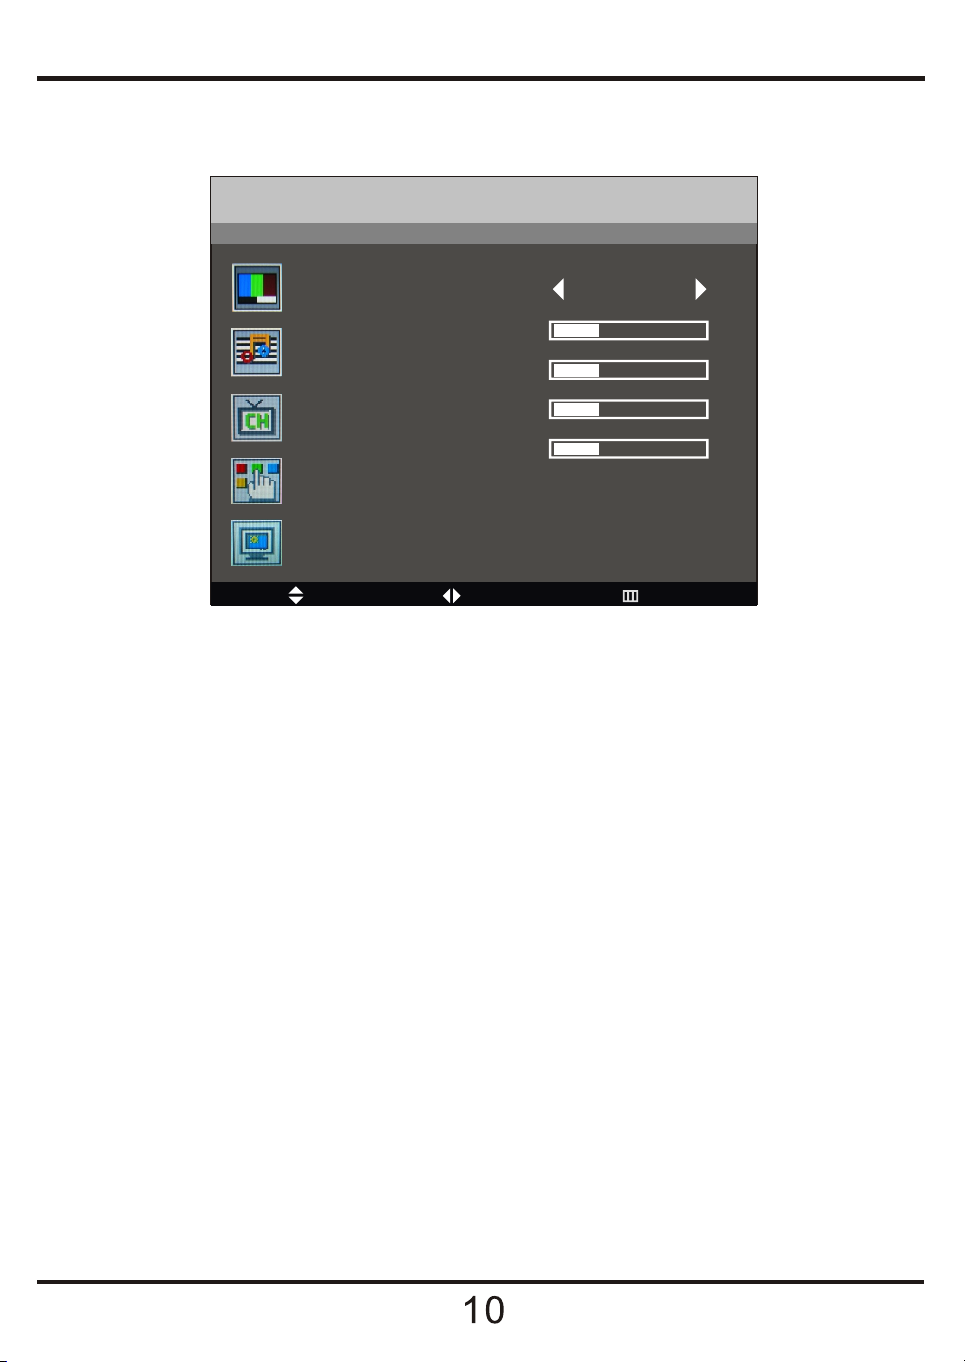
Sound
Sound Mode
Normal
Volume
Bass
Treble
Balance
Move S ele ct Ex it
Sound Mode: select the sound mode----User, Normal, Movie, News.
You can also use the SOUND button on the remote control to select.
Volume: adjust the volume of the sound.
You can also use the VOL+/- button on the remote control or TV set to adjust the volume.
Bass: adjust the bass of the sound.
Treble: adjust the treble of the sound.
Balance: adjust the balance of the sound.
Page 14
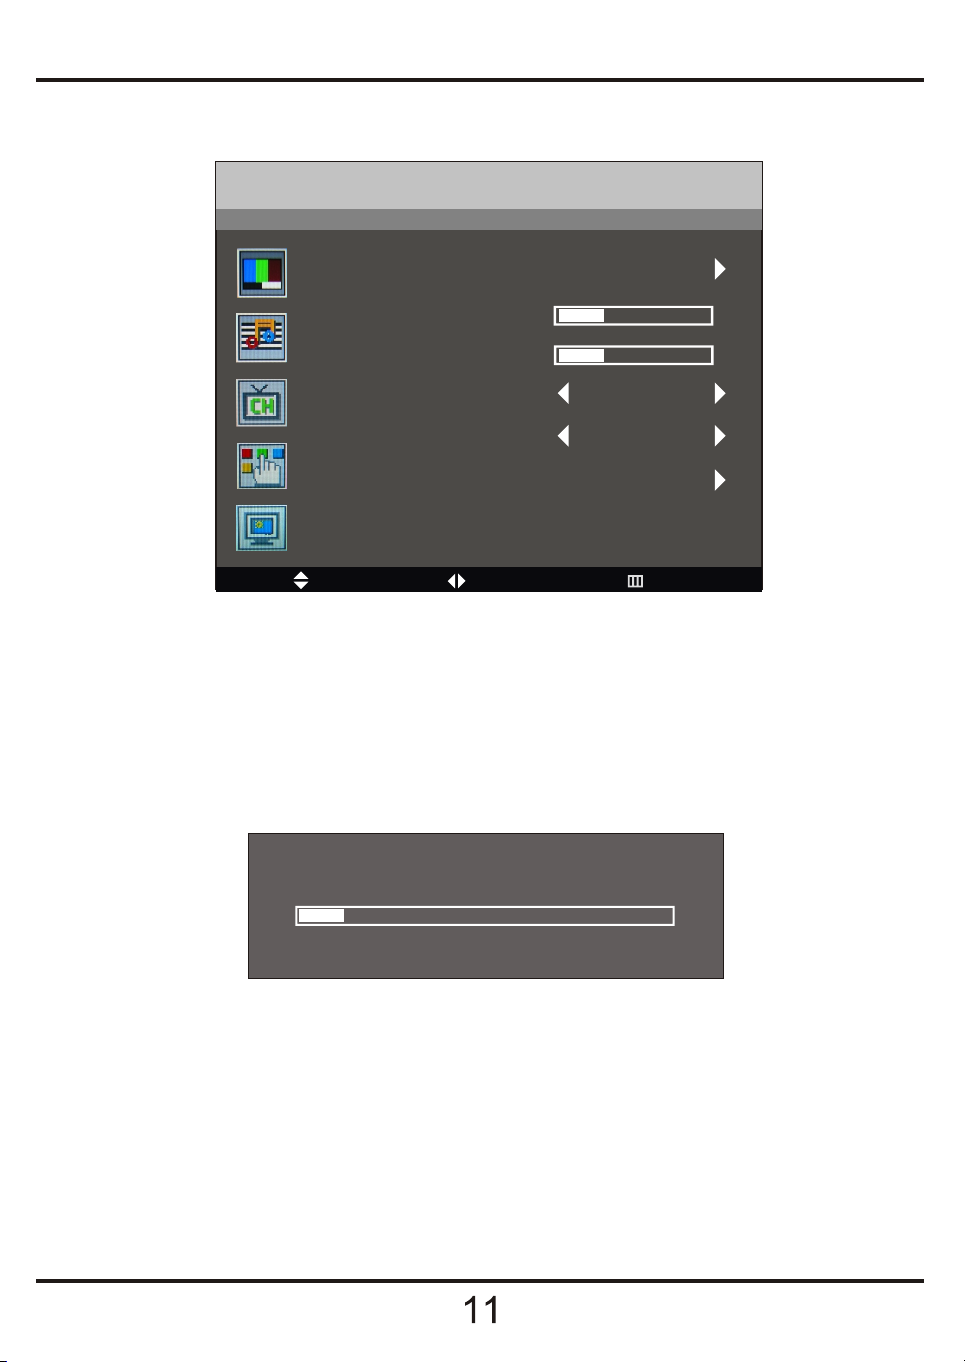
7.3 Channel Menu (The menu is only used in TV mode)
Channel
Auto Tune
Manual Tune
Fine Tune
Skip
Sound.SYS
Off
I
Channel Swap
Move S ele ct Ex it
Auto Tune. Press the CURSOR RIGHT button, the TV will start to search from the lowest
frequency up- wards. When a station is found it will be stored automatically in the “First” location,
further received stations will be stored in order. When Auto Tune is completed the TV will display
the first station received. In most cases the stations stored will not be in Channel Order i.e. BBC1
will not be in Location “1”. To move the stations into the correct locations you will need to use
“Channel Swap” see page 12.
Note when Auto Tune starts, to stop it press MENU, otherwise leave to complete the search.
Auto Tune
0
140. 1 5MHz VH F L
Manual Tune: press CURSOR LEFT button to search forwards, and press CURSOR RIGHT button
to search backwards. When a station found, it will be stored automatically.
Fine Tune : press the CURSOR LEFT button to tune upwards and press CURSOR RIGHT to tune
downwards. (Normally fine tune will not be necessary).
Skip. Some received channels may be unwanted, they may be noisy or weak stations from another
area, to remove these from the list select “Skip” . When skip is selected for a particular channel,
that channel is “Skipped” when using the CH+/- buttons. You may still select using the “Numeric”
buttons.
Sound SYS. This is used to select the “sound system” for the particular country or area. In the UK
it must be set as “I”. In Western Europe use “B/G”, Eastern Europe use “D/K”, in certain areas of
France use “L”.
Page 15
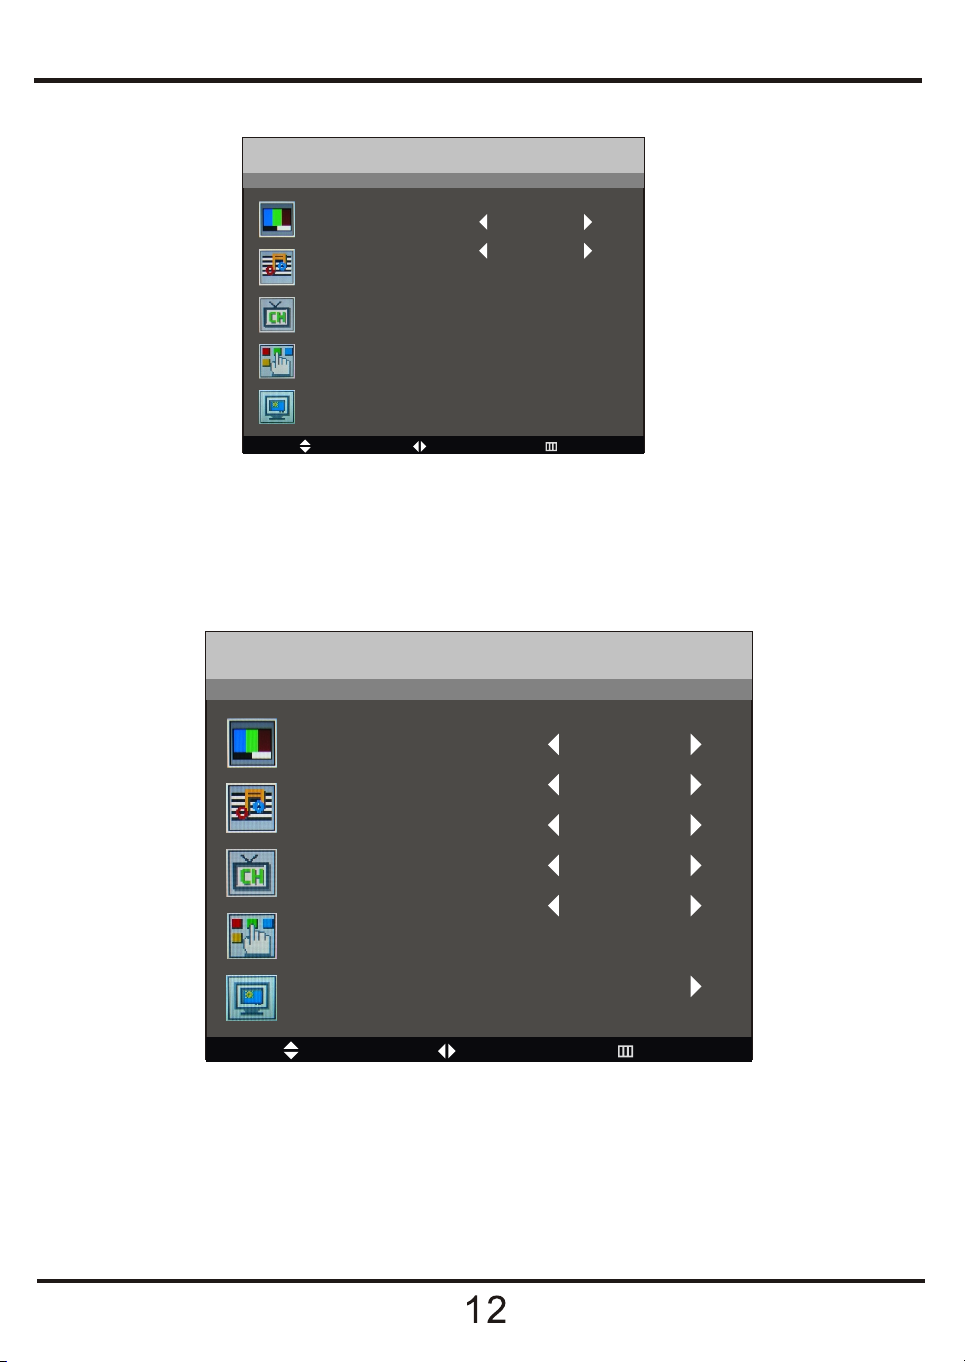
Channel Swap: press the VOL+ button to enter the swap menu as the following picture.
Chan nel
Channel1
Channel2
Swap
Mov e Selec t Exit
Use the CH+/- buttons to select “Channel 1”. Use the CURSOR LEFT/RIGHT buttons to Locate
BBC1, “it is useful to have a current copy of a TV guide to hand”. Select “Channel 2”, use the
CURSOR LEFT/RIGHT buttons to select “1”. Then select “Swap” and press CURSOR RIGHT
to swap the TV will revert to “menu”. Press CURSOR RIGHT to continue by putting BBC2 in 2,
ITV in 3, CH4 in 4 and CH5 in 5. Other channels may be numbered as required.
3
4
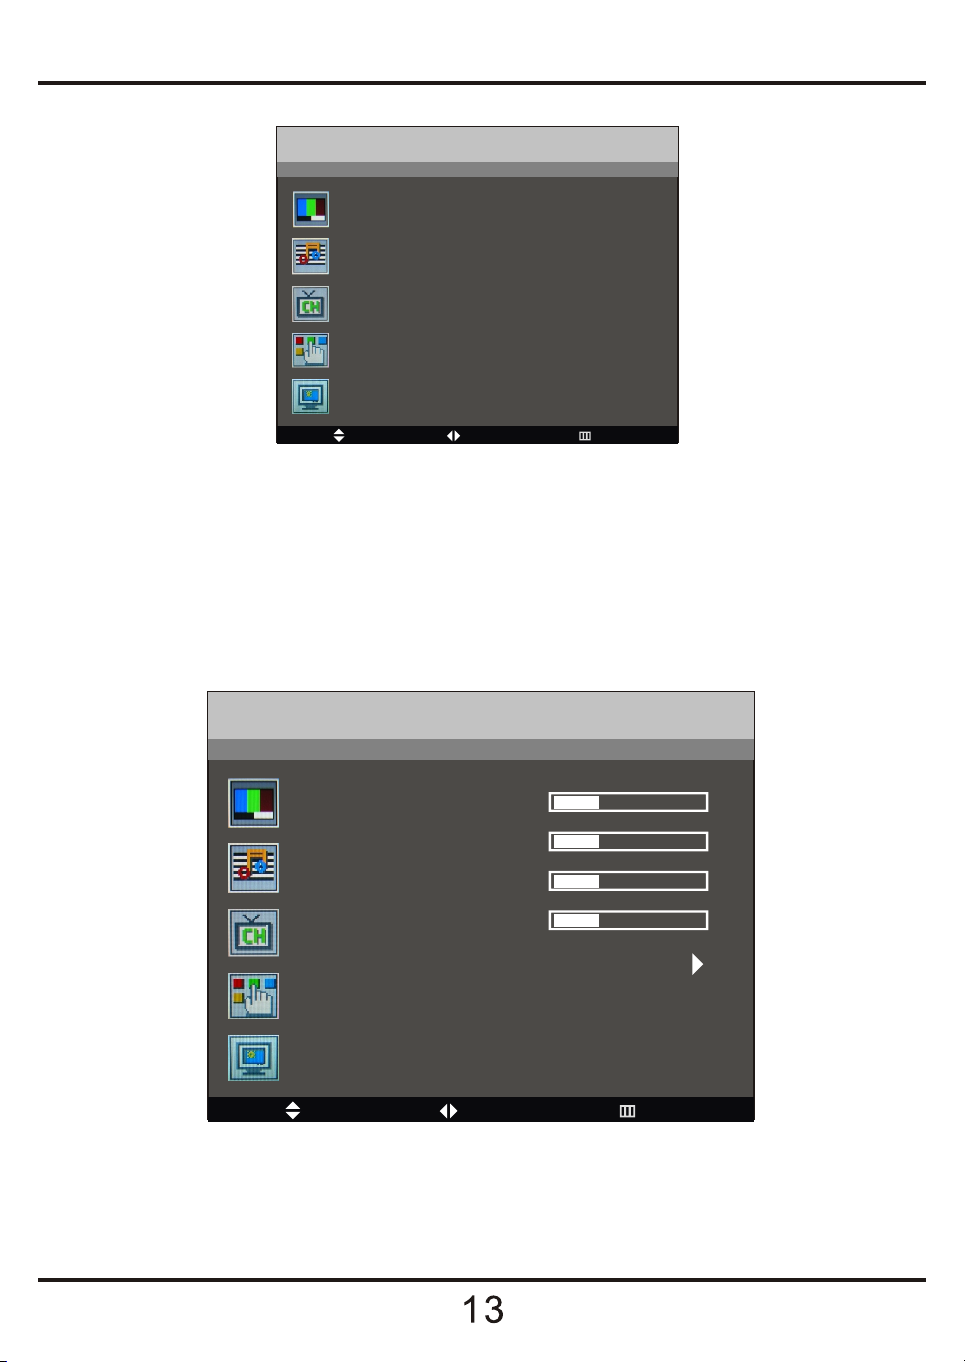
7.4 Function menu
Function
Language
Blue Back
English
on
TXT Language
Color Temp.
DNR
WEST
User
Normal
Reset
Timer
Move S ele ct Ex it
Language: Selects the OSD Language.
Blue Back. Select On or Off, this turns the background to Blue under no signal conditions.
TXT Language. Selects the Teletext language Chose “West” for normal viewing.
Color Temp. Adjusts the colour temperature. You may select Cool, Warm, Normal or User.
User allows you to set the Red, Green and Blue individually.
DNR:press the to choose "Normal" or "Strong" to reduce picture interference.CURSOR LEFT/RIGHT
Reset. Select “Reset” and press CURSOR RIGHT to reset all analog settings to “Factory Default”
Page 16
Timer: press the VOL+ button to enter the timer menu as the following picture.
Chan nel
CURRENT
TURN OFF
TURN ON
TURN ON PROGRAM
Mov e Selec t Exit
You MUST set the Select Current Time by pressing the CH+/- buttons, to select the “HOURS”
press CURSOR RIGHT and CH+/- to change the time. Press CURSOR RIGHT to select
“MINUTES” and CH+/- buttons to set the time.
To set the “OFF” and “ON” times Select using the CH+/CH- buttons, set the times required as you
did setting the time. If you want the Tv to switch to a particular station select “TURN ON
PROGRAMME” using the CH+/- buttons and change using the CURSOR LEFT/RIGHT buttons,
the TV will then switch at the requested time.
00:00
_ _:_ _
_ _:_ _
1
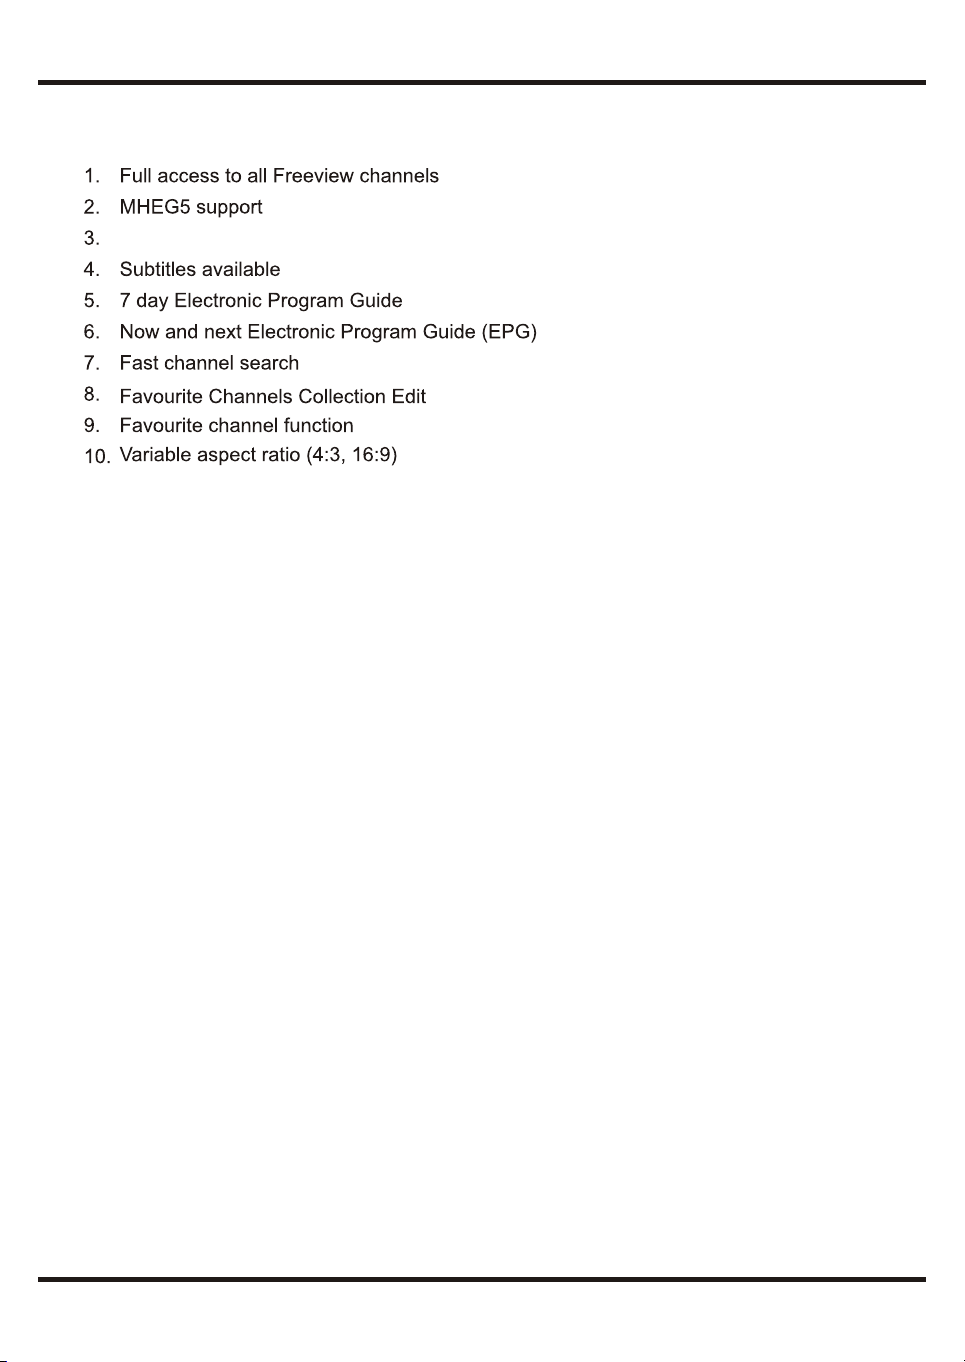
7.5 PC menu( )This menu can only be used in PC Mode
PC
Clock
Phase
H.Position
V.Position
Auto
Move S ele ct Ex it
Clock: adjust the pixel clock frequency, until the image size is maximized for the screen.
Phase: adjust the phase of the ADC sampling clock relative to the sync signal, until a stable
image is obtained.
H/V. Position: adjust the transverse/vertical position of the screen.
Auto: press the button to setup the parameter of the screen automatically.CURSOR RIGHT
Page 17
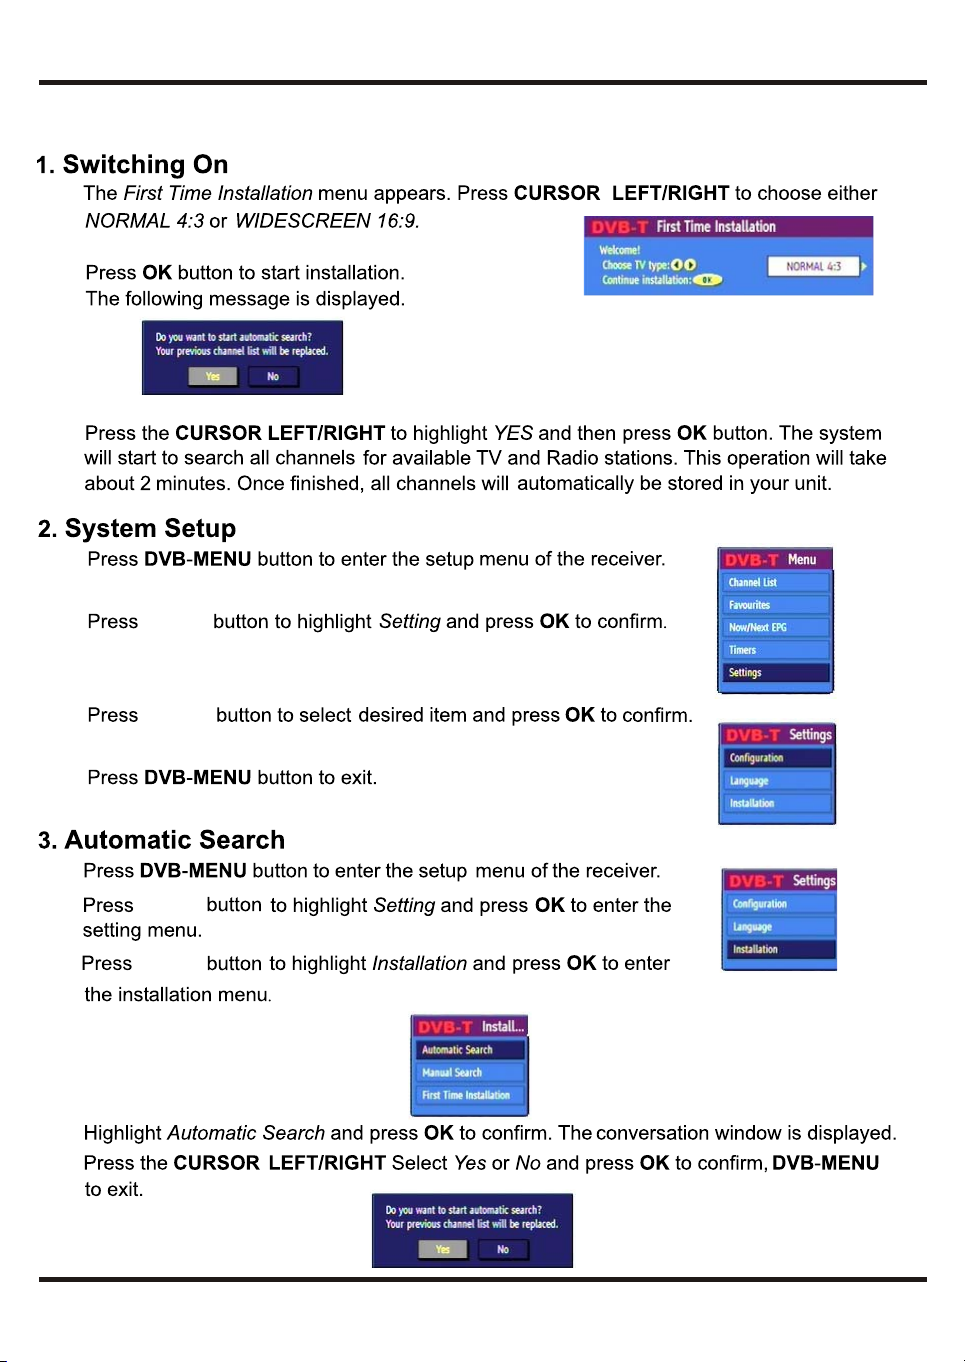
8. DVB Main Features
UHF Tuning
14
Page 18
9. DVB Getting Started
CH+/-
CH+/-
CH+/-
CH+/-
15
Page 19
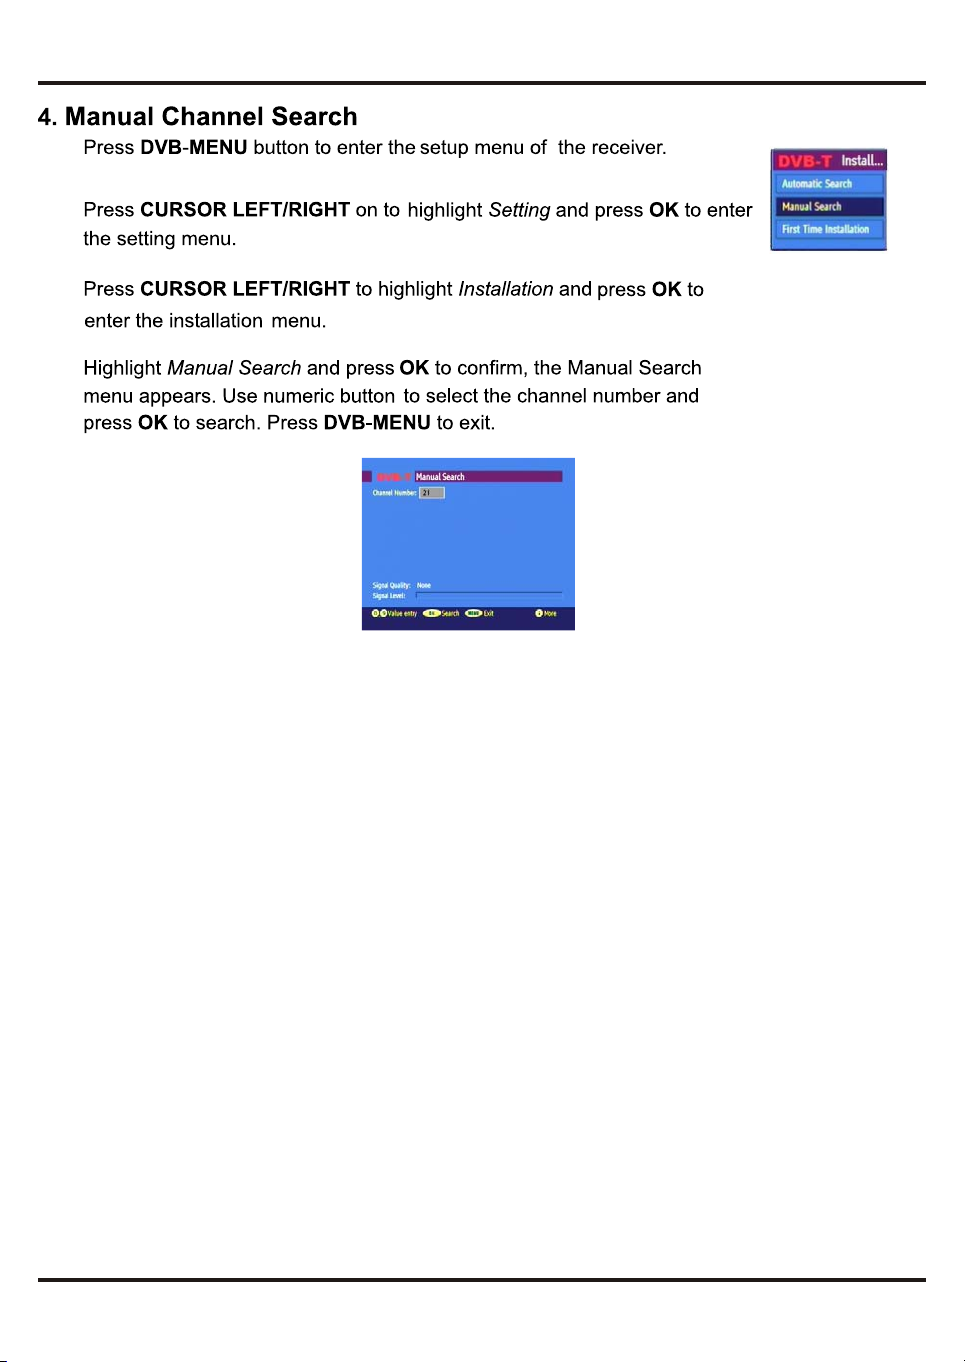
16
Page 20
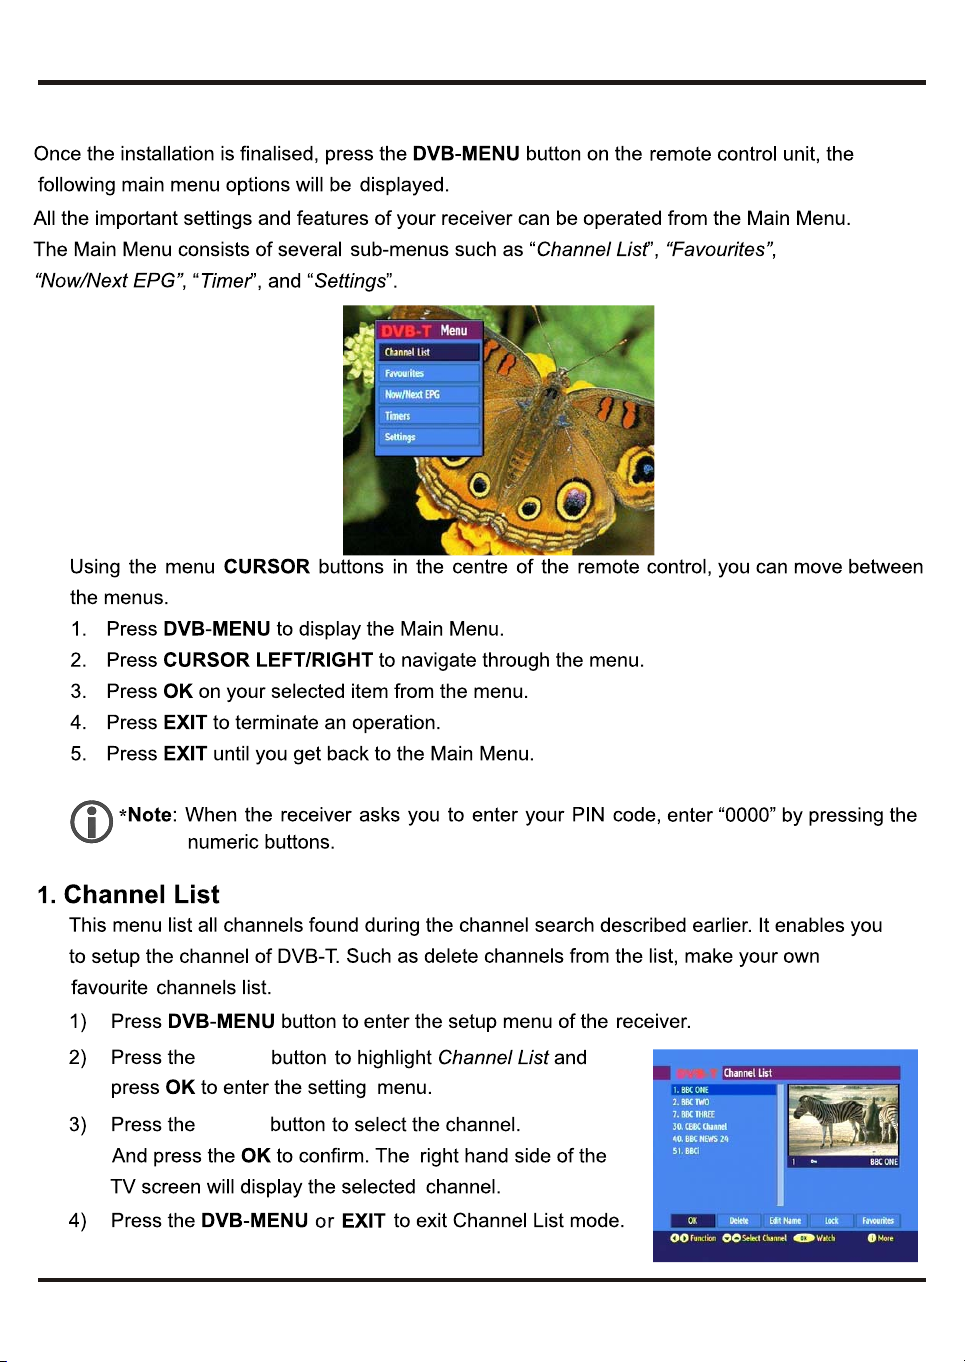
10. DVB Operation
CH+/-
CH+/-
17
Page 21
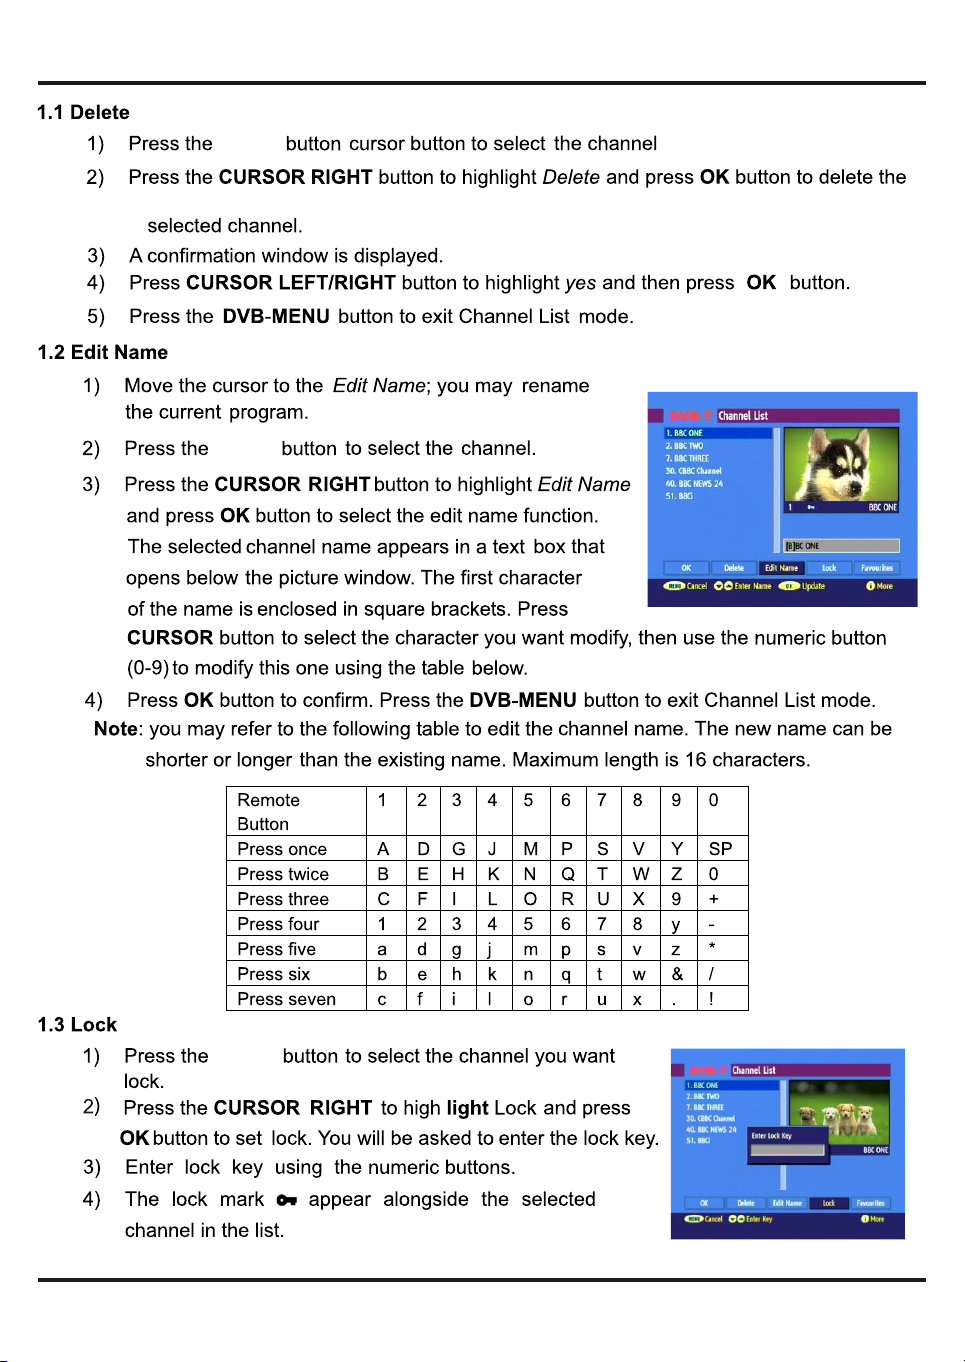
CH+/-
CH+/-
CH+/-
18
Page 22
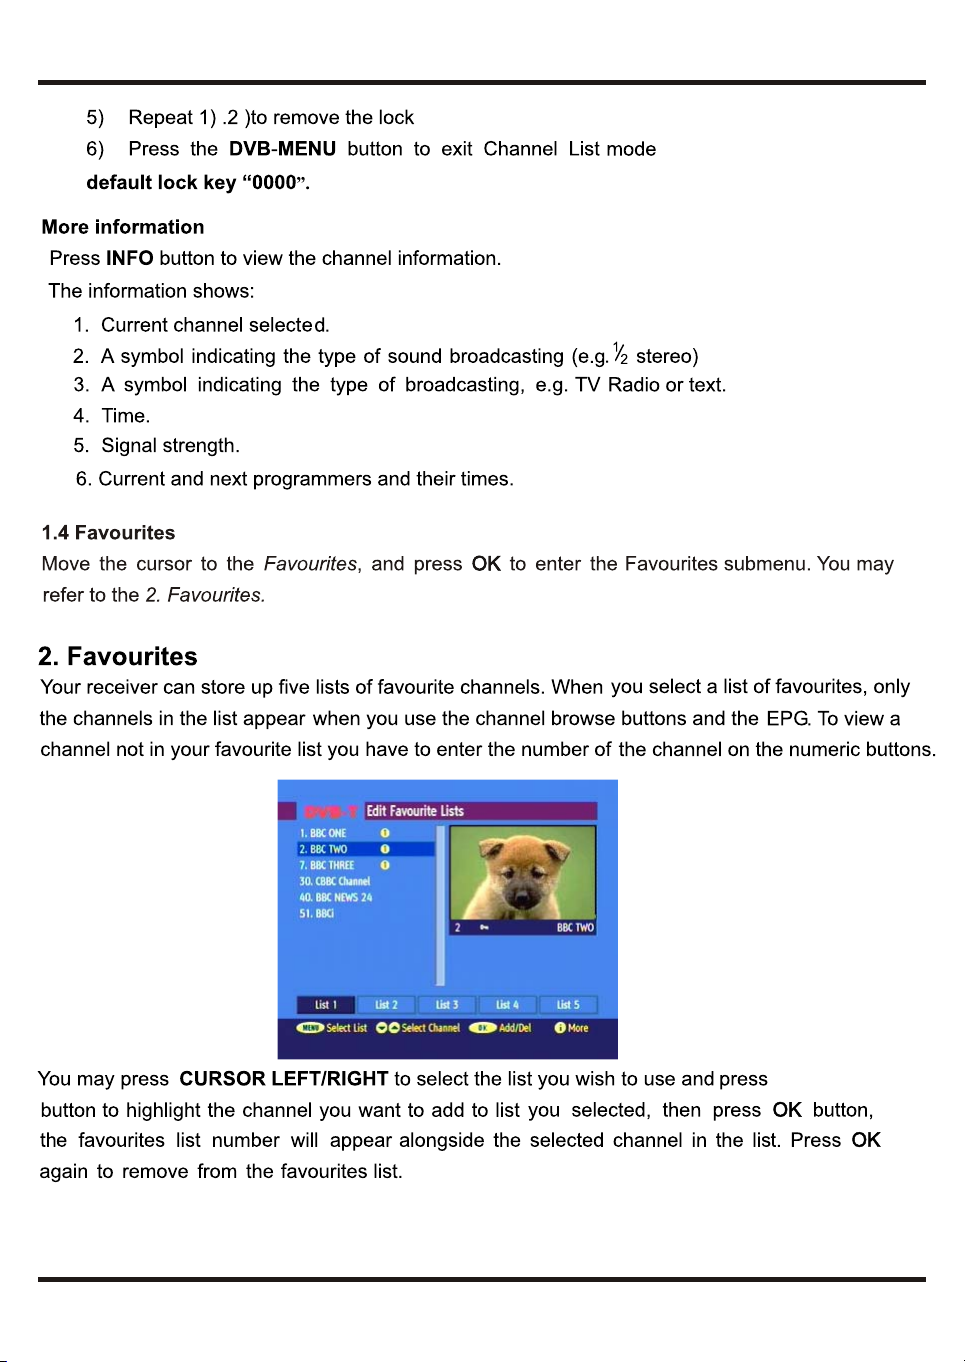
19
CH+/-
Page 23
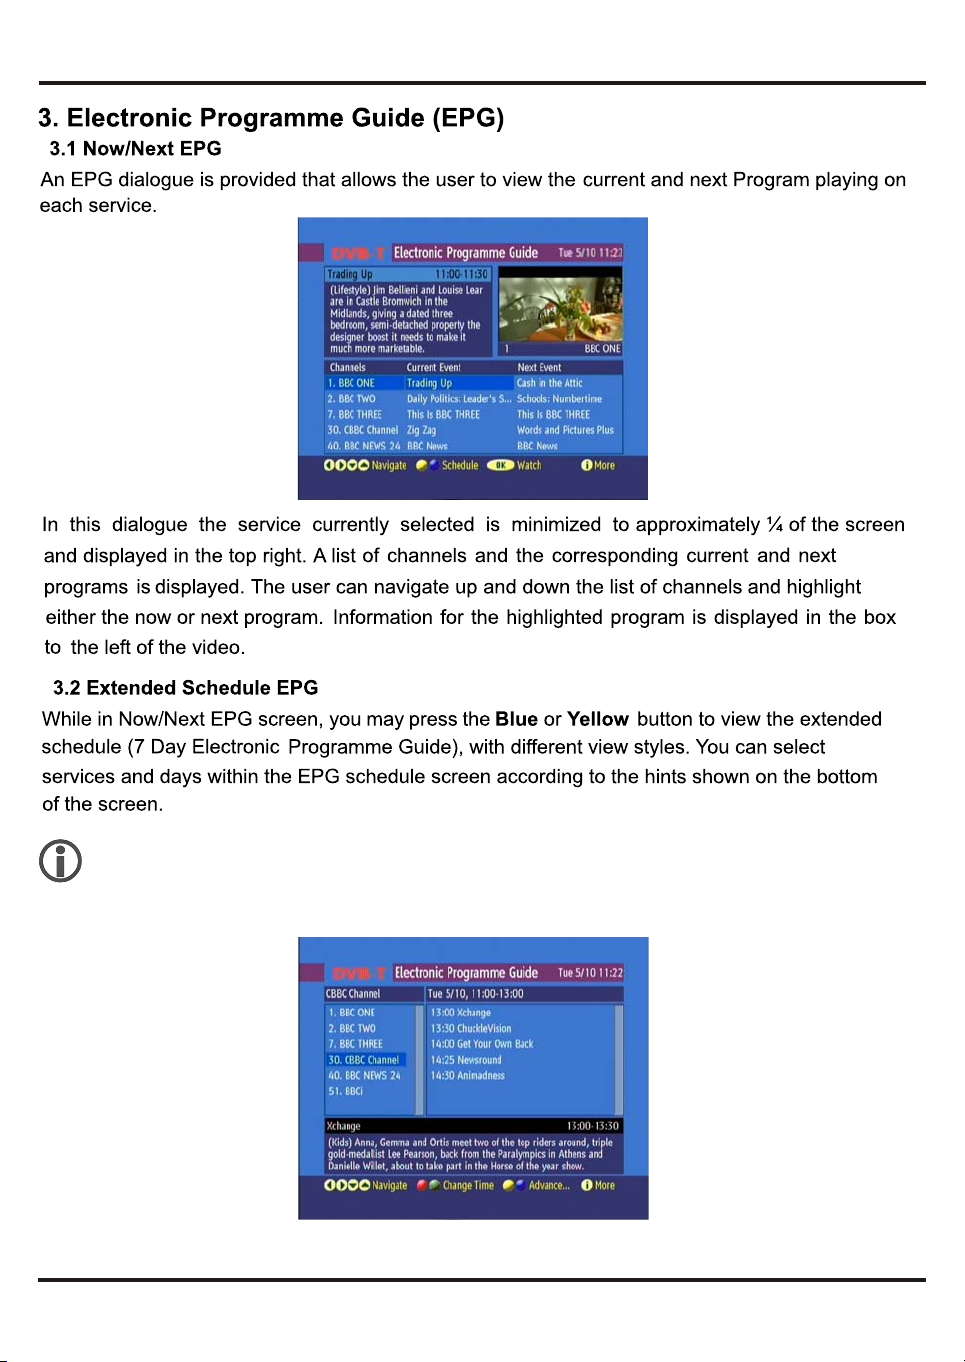
Note : This EPG function is applicable only if the broadcasting station transmits the
related signals
20
Page 24
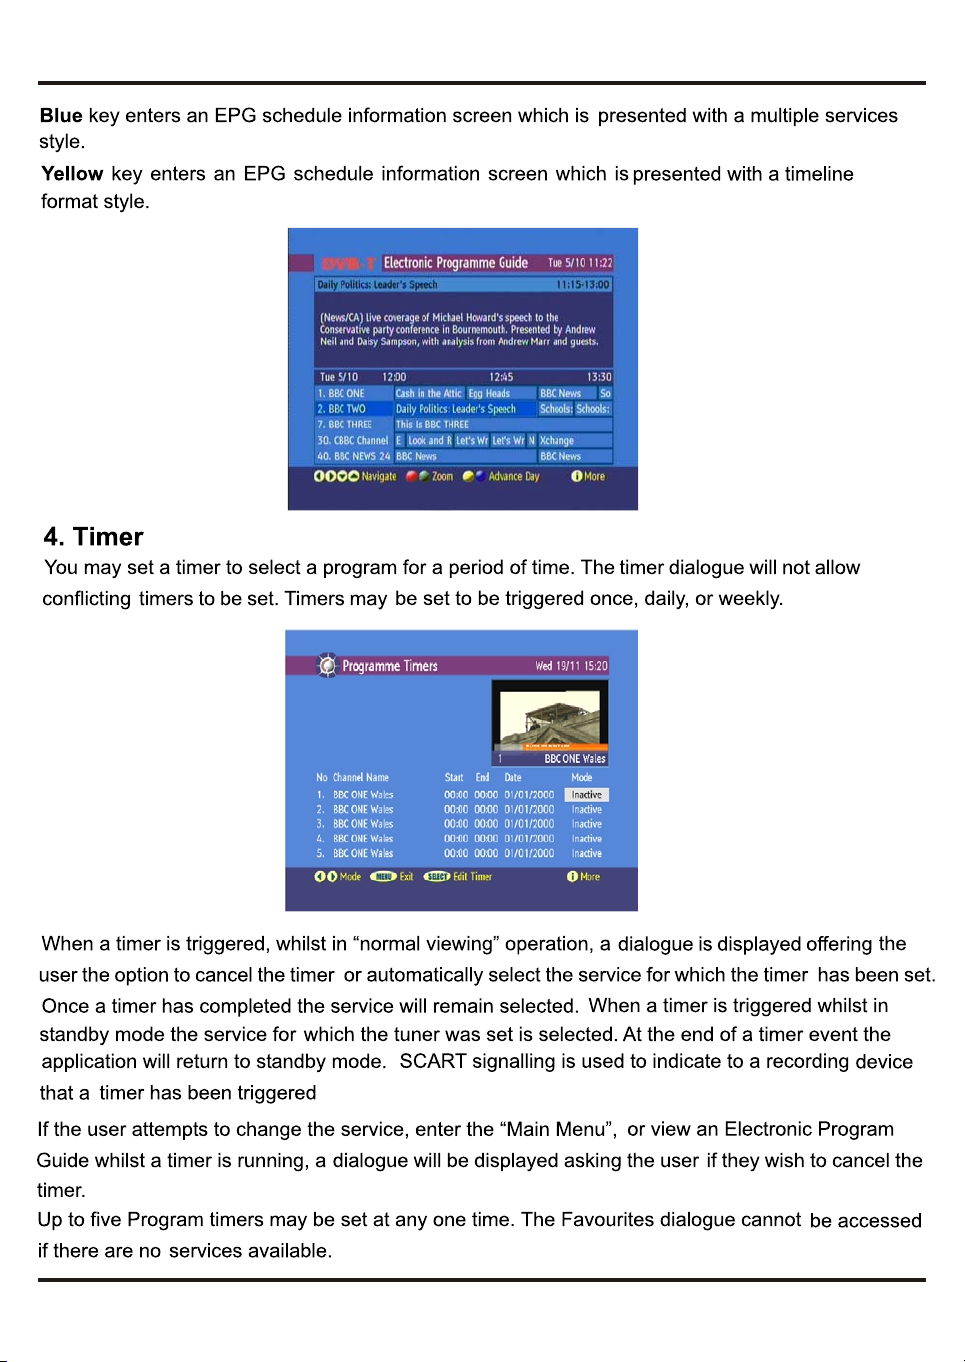
21
Page 25
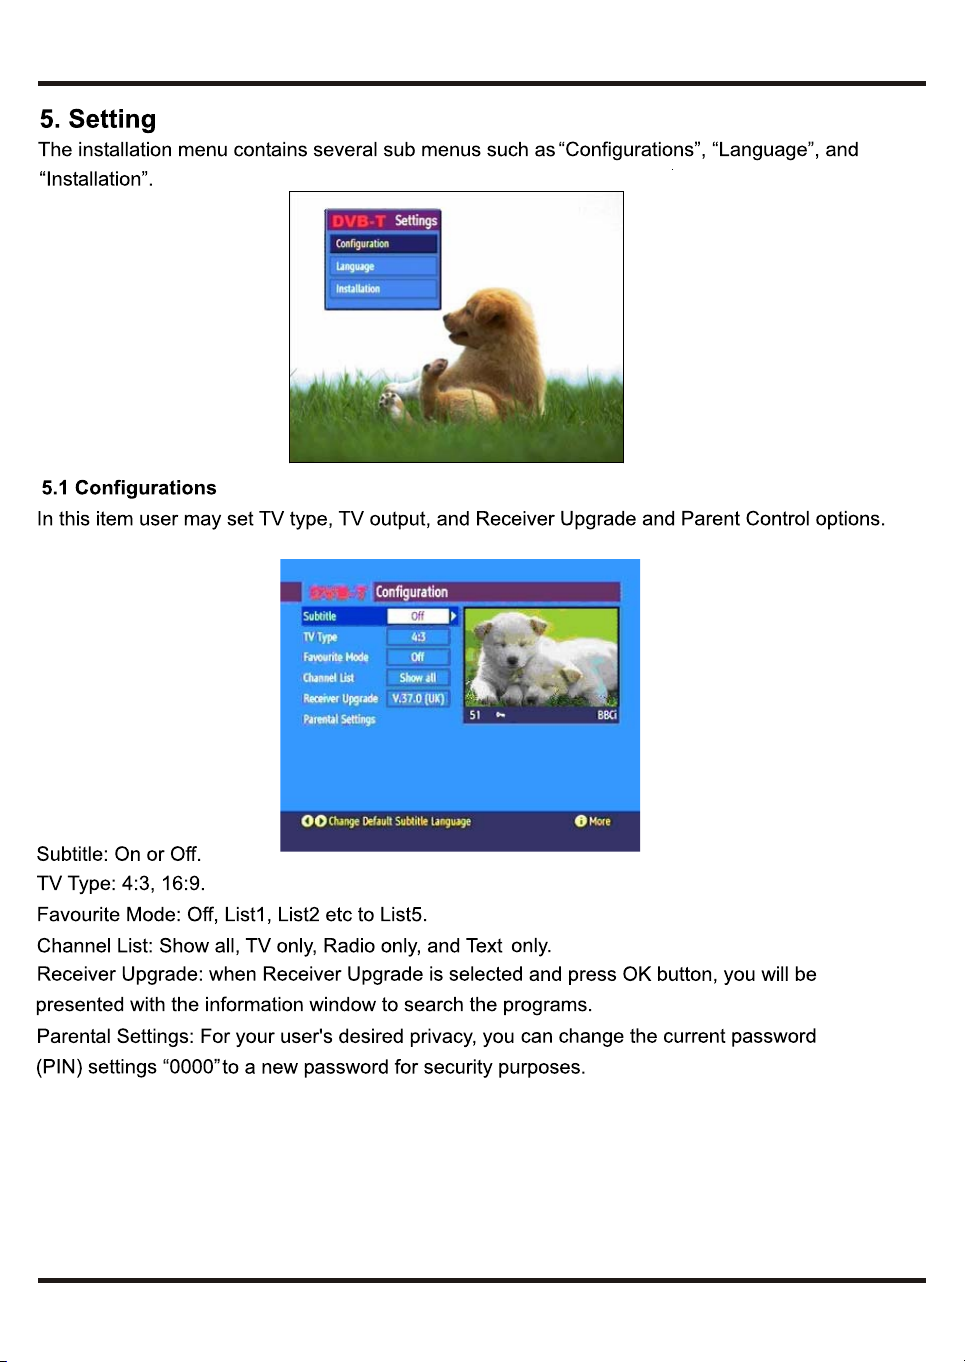
22
Page 26
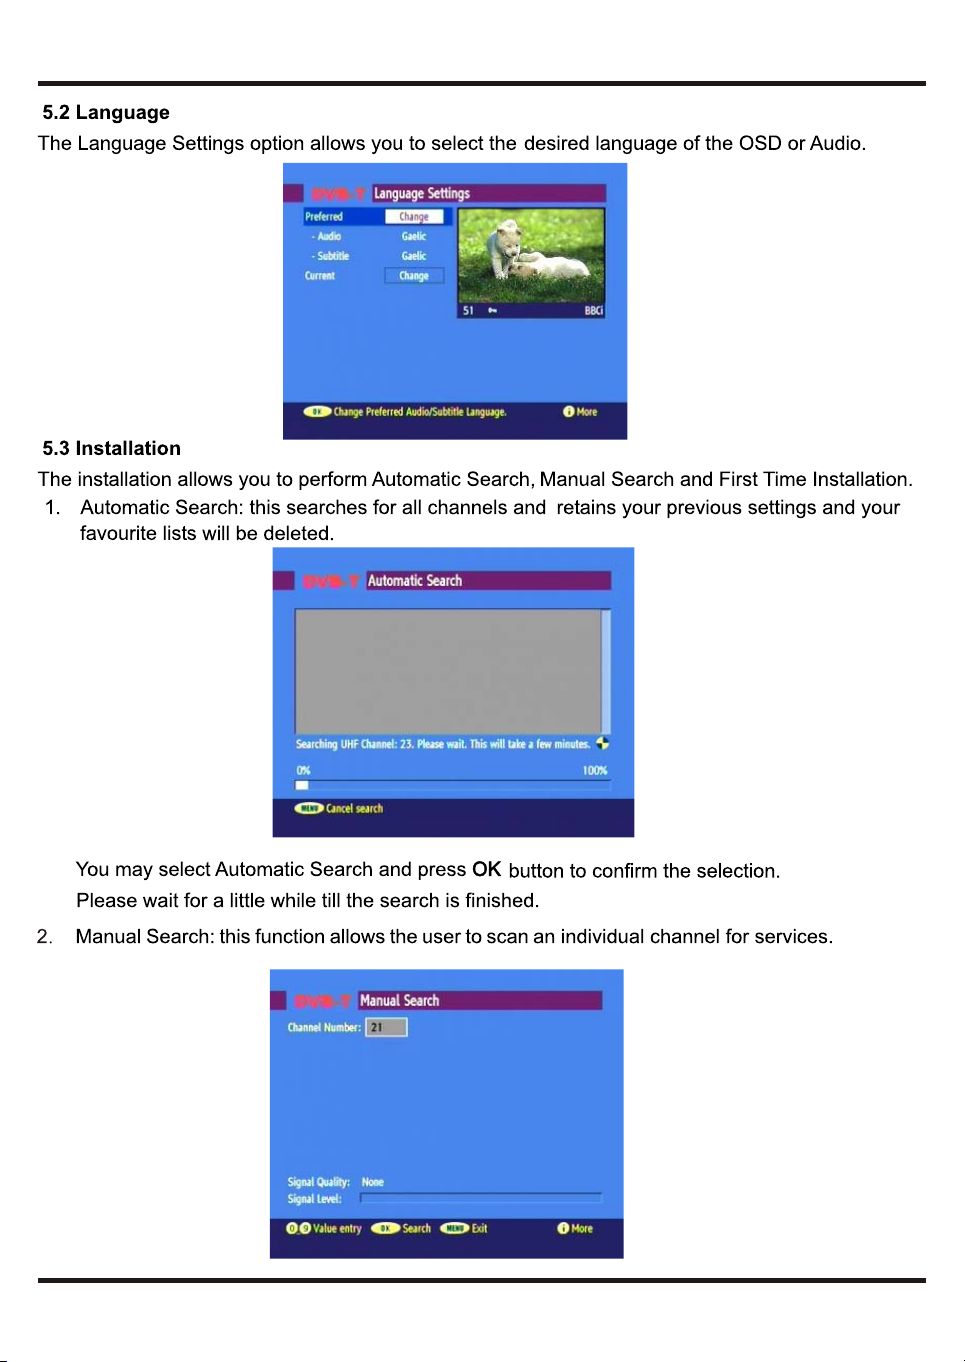
23
Page 27
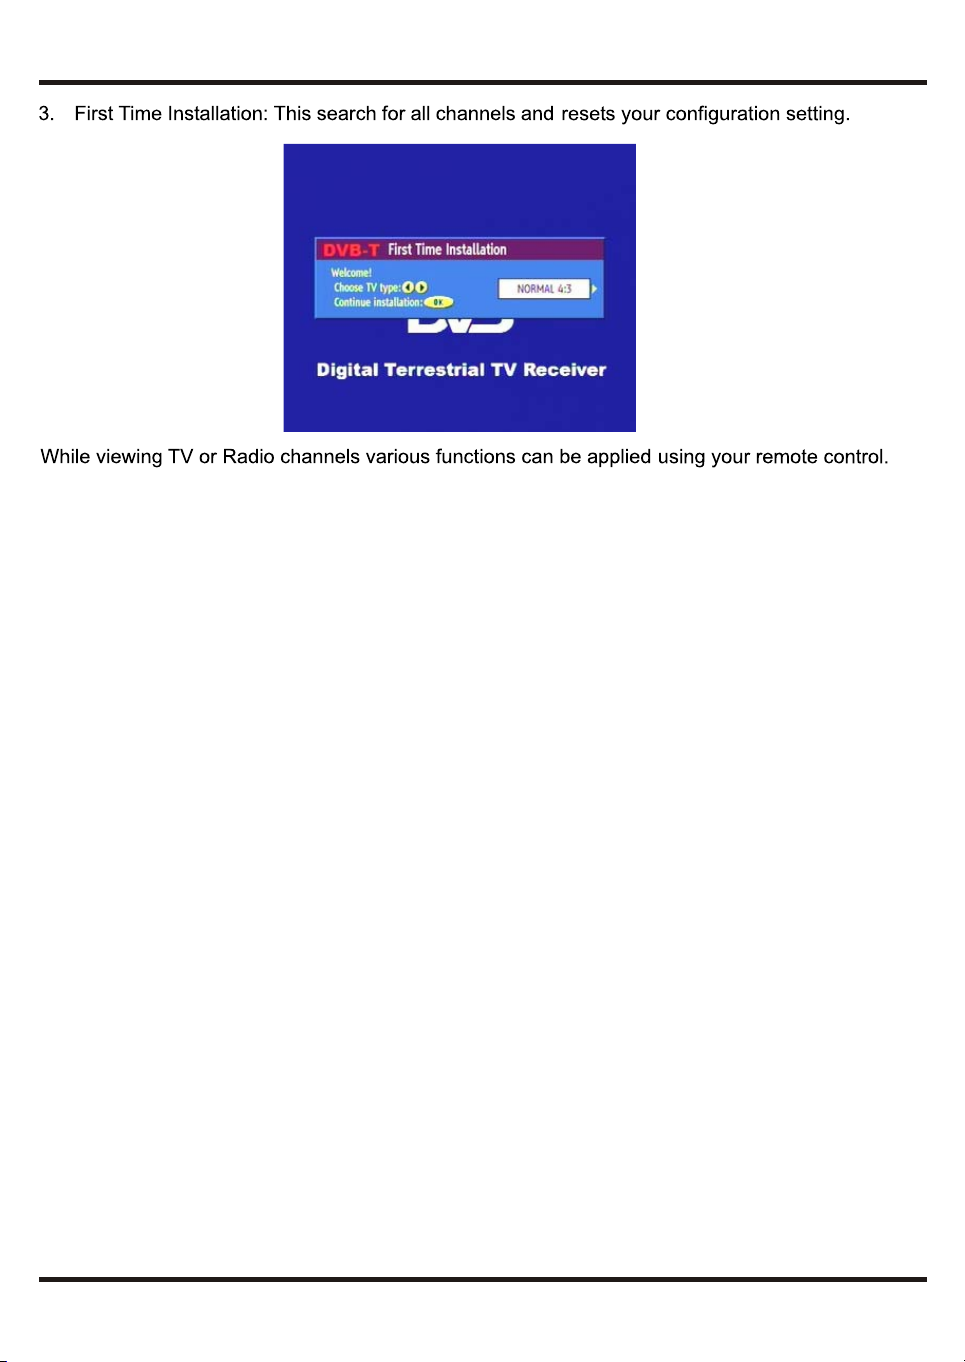
24
Page 28
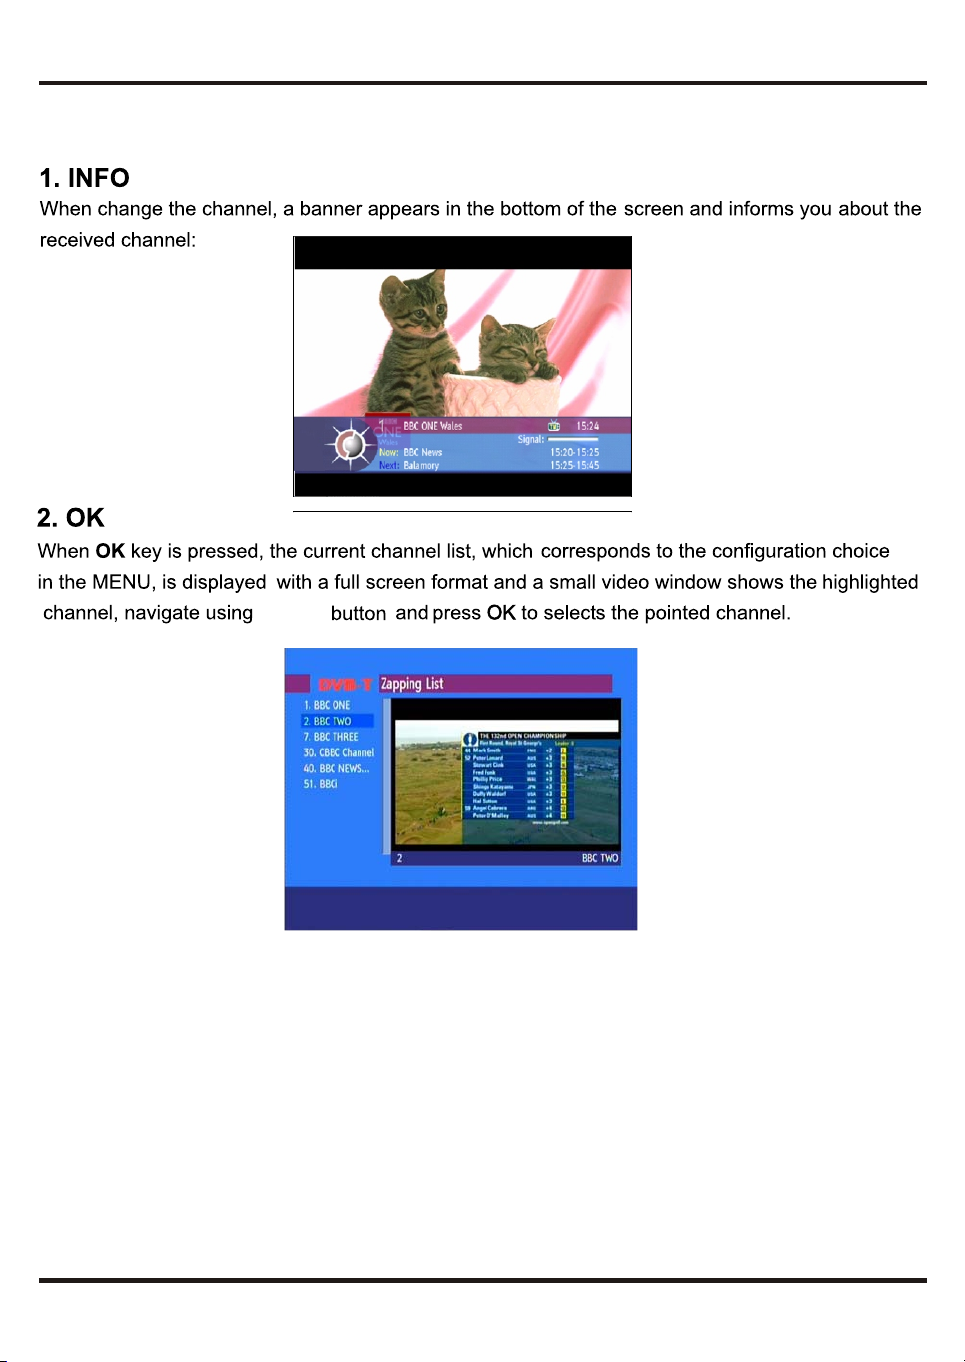
11. DVB Basic Functions
CH+/-
25
Page 29
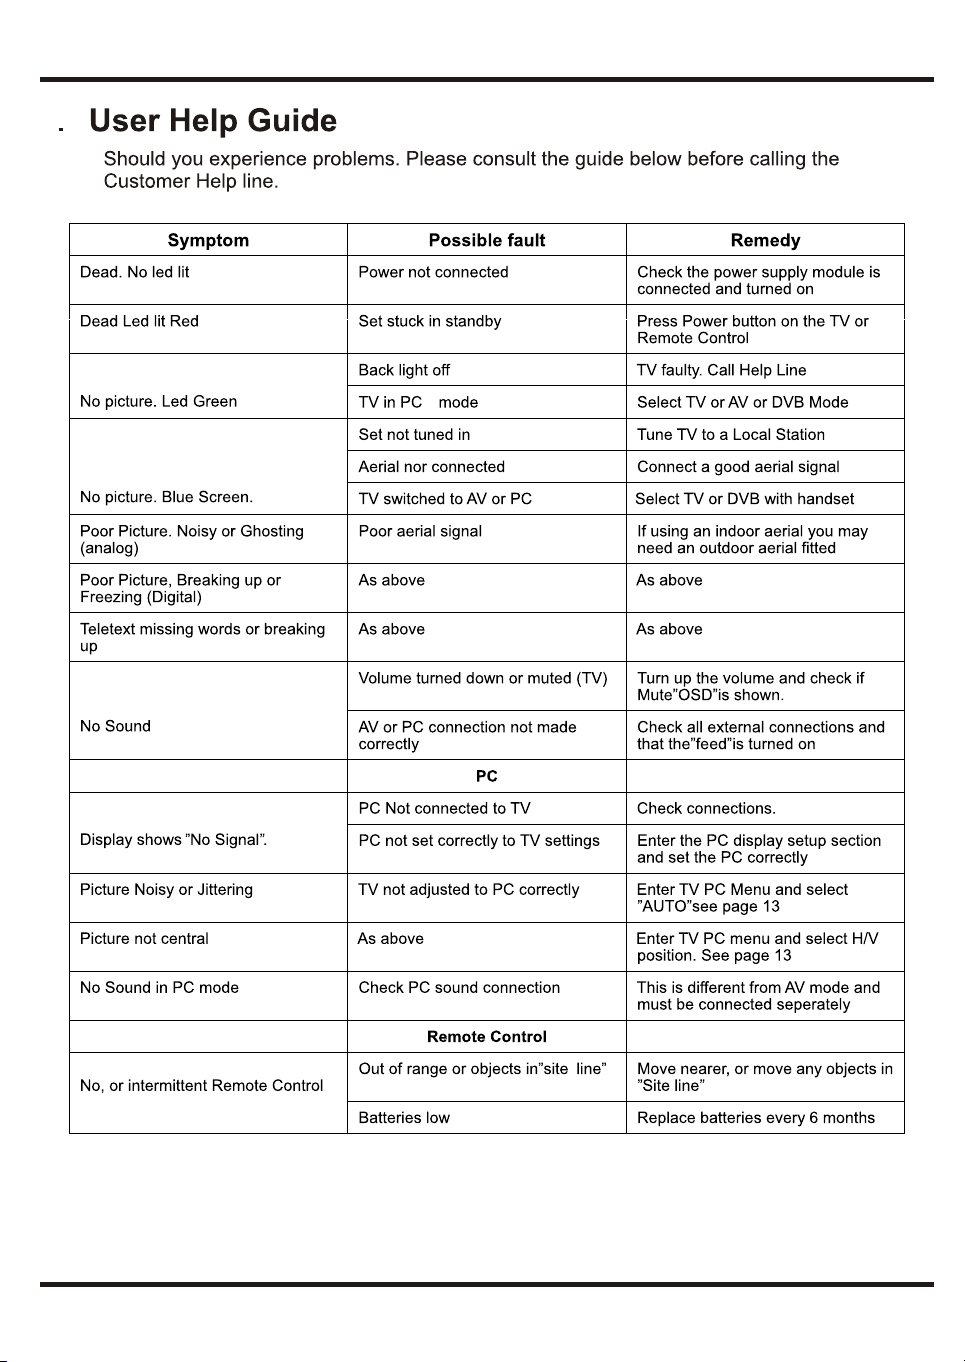
12.
If you are still having difficulty please call the Technical help line. Ring 01422 203676
(Normal rates apply).
Opening hours Mon-Fri 8 am 8pm. Sat 9 am 4pm. Sun 11am 4pm “Bank holidays as Sun”
26
Page 30
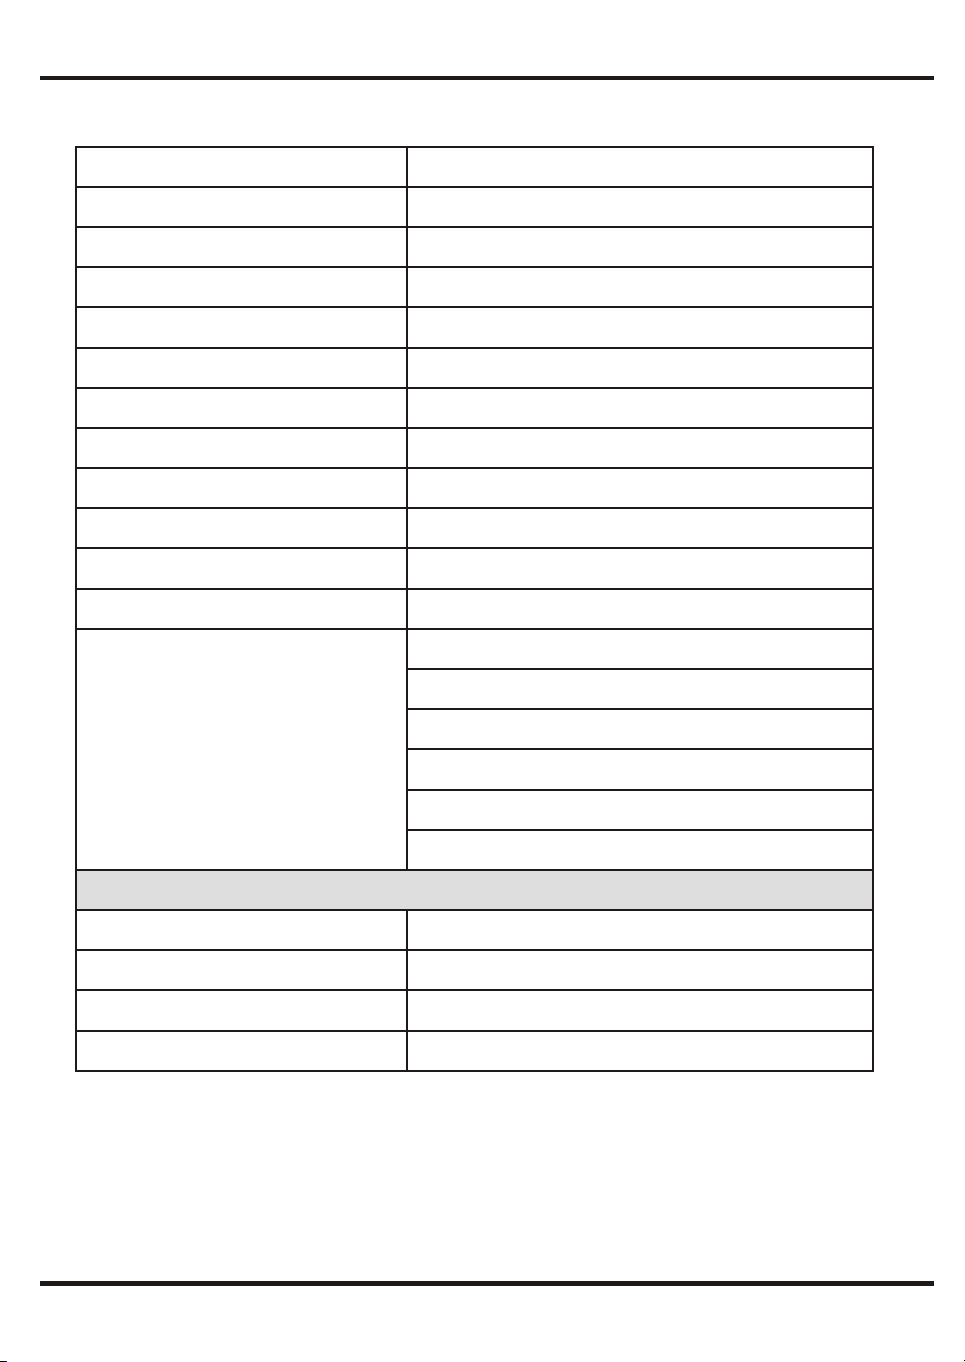
13.Technical Specification
TV Receiv er modes Analog. Digital (freev iew)
TV Dimensions
Net weight (Kg's)
Screen Size
Screen Ratio
Definition
Brightness (cd/m2)
Contrast
Inputs
DC Supply
Power Consumption
Tuner range
VGA support
490x196x415 mm
4.0kg
19” (48cm) diagonal
16 :10
1440 x 900 pixels
300
500 : 1
Tuner,Video (1vPP)VGA, SCART, Audio
12V @ 3.33A
40W
VHF 48 224 Mhz, UHF 471- 847 Mhz
640x480 60Hz 70Hz 75Hz
800x600 60Hz 70Hz 75Hz
1024x768 60Hz 70Hz 75Hz
1280x600 60Hz 70Hz 75Hz
1280x720 60Hz 70Hz 75Hz
1280x768 60Hz 70Hz 75Hz
REMOTE CONTROL
Control Distance
Control Angle
Batteries
Weight
Note:
The specification shown above may be changed without notice for quality improvement.
> 6 metres
> 30 deg
2 x “AA” 1.5V cells
70 g (without batteries)
27
Page 31
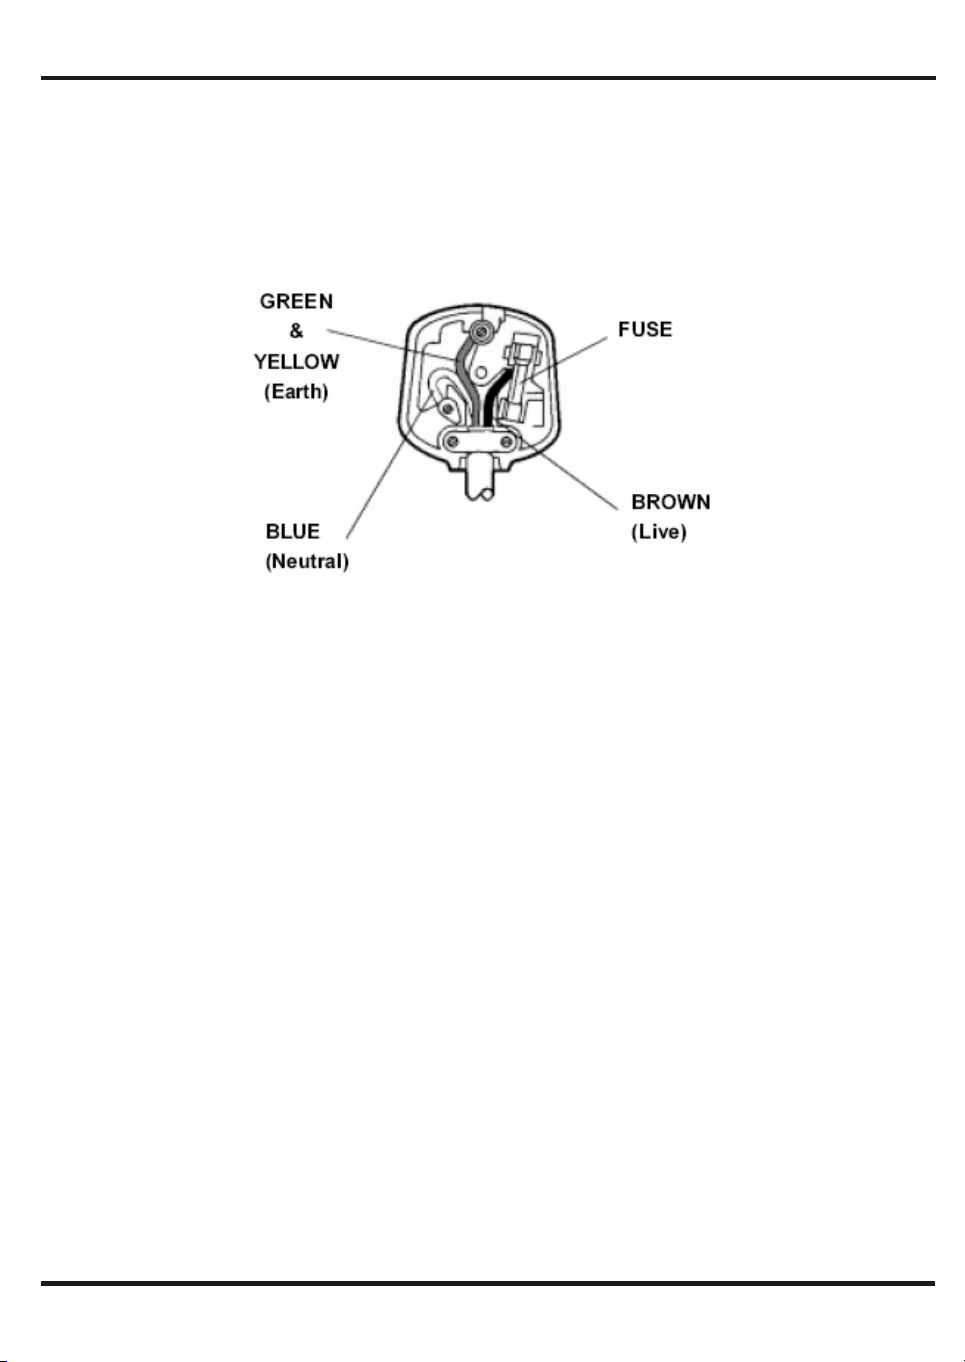
Mains Plug Wiring Diagram
For your own saftty read following instruction before attempting to connect this unit to the mains
supply
MAINS (AC) OPERATION
The wires in the main lead are coloured in accordance with the following code:
IMPORTANT
As the colours of the wires in the mains lead of this appliance may not correspond with the coloured
markings identifying the terminals in your plug, proceed as follows:
The wire which is coloured green and yellow must be connected to the terminal which is marked with
the letter E, or by the earth symbol, or coloured green or green and yellow.
The wire which is coloured blue or black must be connected to the terminal which is marked with the
letter N or coloured Black.
The wire which is coloured brown or red must be connected to the terminal which is marked with the
letter L or coloured Red.
For continued protection against risk of fire, replace only with same type and rating of fuse(ASTA
Approved 3A 250VAC fuse)
If your product is fitted with a moulded plug which requires replacement please out off and dispose
of safety, then rewire as shown above.
Wall Mounting
The Tv is provided with mounting holes for a VESA approved wall mounting bracket (NOT
SUPPLIED). Remove the Two Posi screws holding the base to the base bracket and lift the base
away (do not remove the base mounting bracket). Mount the VESA bracket using 4x M4 x 10
Iso metric threaded screws (not supplied). Do NOT use screws longer than 10mm, damage will
occur to the internal parts. Fit the wall bracket securely following the manufacturers instructions.
Akura accept no responsibility for damage caused by faulty bracket installation.
28
 Loading...