


>>>
AAMT15LCD
Instruction Manual for LCD -TV

Instruction Manual
for LCD -TV
This product complies with In-
ternational Electric Engineering
Society and national relevant
standards.
Thank you for your buying and using AKURA products. Check to see if the
accessories are complete after opening the box.
Read the Instruction Manual carefully before connecting the parts and the set
to power. Keep this book for later reference.

Table of Contents
Important Safety Instructions .................................................................. 1-3
Accessories ............................................................................................... 4
Connections............................................................................................ 5-6
Front Control Buttons ................................................................................ 7
Power Supply ............................................................................................ 8
Remote Control .................................................................................... 9-10
TV Operation ............................................................................................11
First time Installation ...................................................................................11-12
Station Sorting .............................................................................................12-13
Manual Tuning ...................................................................................................14
Fine Tuning ..................................................................................................14-15
Skip channels ....................................................................................................15
Sound System .............................................................................................15-16
Picture Adjustments .....................................................................................16-17
Sound Adjustments .....................................................................................18-19
Set Up...................................................................................................... 19
Language ..........................................................................................................20
OSD ...................................................................................................................20
Blue Screen .................................................................................................20-21
Input Source ......................................................................................................21
Sleep Time ........................................................................................................21
PC Operation ........................................................................................... 22
Set Up .........................................................................................................23-24
Wall Mounting .......................................................................................... 25
Adjusting Screen Angle ........................................................................... 26
Display Modes ......................................................................................... 27
Trouble Shooting Guide ........................................................................... 28
Product Specication ............................................................................... 29

Important Safety Instructions
CAUTION: TO REDUCE THE RISK OF
CAUTION
RISK OF ELECTRIC
SHOCK DO NOT OPEN.
The lighting ash with arrowhead symbol,with an equilateral triangle is intended
to alert the user to the presence of uninsulated “dangerous voltage” within the
product’s enclosure that may be of sufcient magnitude to constitute a risk of
electric shock to the person.
The exclamation point within an equilateral triangle is intended to alert the user to
the presence of important operating and maintenance (servicing) instructions in
the literature accompanying the appliance.
The crossed out “Wheelie bin” is intended to show that this appliance must not be
placed with ordinary household waste.
When this appliance has reached the end of its useful life. It must be disposed
of in accordance with local by-laws. Consult your local waste disposal authority.
(WEEE Directive)
ELECTRICAL SHOCK, DO NOT REMOVE
COVER(OR BACK).NO USER SERVICEABLE
PARTS INSIDE. REFER SERVICING TO
QUALIFIED SERVICE PERSONNEL.
WARNING: TO REDUCE RISK OF FIRE OR ELECTRIC SHOCK,
DO NOT EXPOSE THIS APPLIANCE TO RAIN OR MOISTURE.
1

CAUTION:
1. Read Instructions - All the safety and operating instructions should be read
before the product is operated.
2. Retain Instructions - The safety and operating instructions should be retained
for future reference.
3. Heed Warnings - All warnings on the product and in the operating instruc-
tions should be adhered to.
4. Follow Instructions- All operating and use instructions should be followed.
FOR YOUR PERSONAL SAFETY
1. When the power cord or plug is damaged or frayed, unplug the tele vision set
from the wall outlet and refer servicing to a qualied service department.
2. Do not overload wall outlets and extension cords as this can result in re
or electric shock.
3. Do not allow anything to rest on or roll over the power cord. Do not place the
TV where the power cord may be tripped over. This may result in a shock
or re hazard.
4. Do not attempt to service this television set yourself as opening or removing
covers may expose you to dangerous voltages or other hazards. Refer all
servicing to qualied service personnel.
5. Never push objects of any kind into this television set through cabinet slots
as they may touch dangerous voltage points or short out parts that could
result in a re or electric shock. Never spill liquid of any kind on the televi-
sion set.
6. If the television set has been dropped or the cabinet has been damaged,
unplug this television set from the wall outlet and refer servicing to qualied
service personnel.
7. If liquid has been spilled into the television set, unplug the television set from
the wall outlet and refer servicing to qualied service personnel.
8. Do not subject your television set to impact of any kind. Be particularly
careful not to damage the picture tube surface.
9. Unplug the television set from the wall outlet before cleaning. Do not use
liquid cleaners or aerosol cleaners. Use a damp cloth for cleaning.
PROTECTION AND LOCATION OF YOUR SET
10. Do not place the television set on an unstable stand, or table. The televi-
sion set may fall, causing serious injury to a child or an adult, and seriously
2

damage the appliance.
11. Do not use the television set near water ... for example, near a bathtub,
washbowl, kitchen sink, in a wet basement, or near a swimming pool,
etc. Never expose the set to rain or water. If the set has been exposed
to rain or water, unplug the set from the wall outlet and refer servicing to
qualied service personnel.
12. Choose a place where light (articial or sunlight) does not shine directly
on the screen.
13. The set has slots, or openings in the cabinet for ventilation purposes.
These openings must not be blocked or covered. Never cover the slots
or openings with cloth or other material. Never block the bottom ventila-
tion slots of the set by placing it on a bed, sofa, rug, etc. Never place the
set near or over a radiator. Do not place the set in a “built-in” enclosure,
unless proper ventilation is provided.
14. An outside antenna system should not be located in the vicinity of overhead
power lines or where it can fall into such power lines or circuits.
15. For added protection for this television set during a lightning storm, or
when it is left unattended and unused for long periods of time, unplug it
from the wall outlet and disconnect the antenna. This will prevent damage
due to lightning and power-line surges.
OPERATION OF YOUR SET
16. This television set should be operated only from the type of power source
indicated on the marking label. If you are not sure of the type of power sup-
ply at your home, consult your television dealer or local power company.
For television sets designed to operate from battery power, refer to the
operating instructions.
17. If the television set does not operate normally by following the operating
instructions, unplug this television set from the wall outlet and call the
“Technical Help Line” details on page 28
18. When going on a holiday or if your television set is to remain unused for a
period of time, unplug the television set from the power outlet and aerial
system.
19. Do not use attachments not recommended by the television set manufac-
turer as they may cause hazards.
3

Accessories
Quality guarantee card
The master and the base
Power adaptor
Quality guarantee card
VGA wire
Instruction manual
Instruction manualAudio-frequency cable
Remote controller Av to scart converter
4

Connections
1. TV Aerial connection (75 ohms)
2. Stereo Headphones
3. Stereo Audio Input
4. Video Input (CVBS)
5. “Y” 6. Pb/Cb 7. Pr/Cr
8. S-Video Input
9. VGA Computer Input
10. DC Input (AC/DC Adaptor) 12V
1 2 3 4 5 6 7 8 109
Aerial Connection
5

Connections to a Computer
1. Switch off the power to the computer and Tv
2. Connect one end of the VGA line to the display card and the other to the
Tv.
3. Connect the two ends of the audio cable to the sound card of the PC and
the audio input socket respectively.
4. Connect the power wire of the adaptor to the power plug socket of the
set.
5. Make sure all lines are connected correctly before switching on.
Connecting DVD and Video etc.
6

Front Control Buttons
2 3 4 5 61
1. Source: This selects the video source, TV, PC, VIDEO, S-VIDEO, YUV.
2. Menu: Press the [MENU] button to show the main [MENU] on the screen
and select the items to be adjusted.
3. Vol: Volume select. Press this key and then use the / keys to adjust
volume.
4. : In TV mode, press to change the Channel number downwards. In Menu,
changes the values downwards.
5. : In TV mode, press to change the Channel number upwards. In Menu,
changes the values upwards.
6. Power: Switches the Tv to standby or operate.
7

Power Supply
How to Connect/Disconnect the Power Supply
1. Insert the plug of the12V DC power supply into the 12V input socket of
the TV set.
2. To turn the Tv on press the ON/OFF button on the Tv or the Remote
control.
3. To turn the TV set off temporarily, “standby”, press the ON/OFF button on
the remote control or ON/OFF button on the TV set.
4. To cut off the power completely, pull the Mains power plug out, this discon-
nects the AC/DC adaptor.
Power Indicators
Operating Mode Indicator Colour State
Power off Off Off
No signal/standby Red light On
Normal operation Green light On
Automatic Standby
In VGA mode, the Tv will switch to Standby if it receives no signal after 15
seconds. If you switch to TV mode the Tv will operate normally.
8

Remote Control
Mute .........................Turns the Sound On and Off.
ON/OFF ....................Switches the Tv to and from Standby.
Source .....................Selects the input source.
Digit Buttons ...........Selects channel numbers directly.
Sys ...........................Changes the “Sound System” used in conjunction with
the V+/V- buttons.
Colour ......................Selects the Screen colour content.
Sound ......................Selects the “Sound mode”.
Review .....................Selects previous “Viewed” channel.
-/— ............................Enables Single, Double or Triple digit entry.
Programme +/- ........Steps channel selection up or down.
Volume +/-................Adjusts Volume Up and Down.
9

Auto ........................Adjust the picture in best position automaticaly.(In PC
mode)
Display ....................Shows the status of the Tv
Sleep ........................Selects Sleep Timer, use in conjunction with Vol +/-
Exit. ..........................Exits all menu and sub – menu screens
When you receive the remote control it will require the battery to be tted.
Slide off the battery cover and place the battery (CR2025) with the + side
facing upwards.
Slide the cover back in position.
When the handset fails to operate replace the battery.
When not using the remote control for a long time, remove the battery and
keep in a safe place.
Do NOT throw the exhausted battery in a re or break open. Dispose of in a
responsible manner.
10

TV Operation
First Time Installation
Ensure the Tv is connected to the Power supply and suitable aerial. Plug the
power supply in to the mains connector and switch the Tv on, with either the
remote control or the button on the front of the Tv.
Select Tv using the “Source” button on the Tv or remote control.
You should now have a “snowy” noisy picture or screen.
Press the “Menu” button, this will show the menu, see “g 1”
Fig 1
Using the “ ” button move the highlight on the left side of the menu to “Tuner”,
see “g 2”
11
Fig 2

Using the “Menu” button enter that menu and with the “ ”button move the
highlight down to “Auto Search” and press the “Menu” button, see “g 3”,
Fig 3
now press the “ ” button. The Tv will now begin to search all bands, see “g
4”.
Fig 4
When search tuning has nished the Tv will display the “rst” station it received,
and all other stations are placed in “found” order.
To stop “Auto search” you must press the “VOL” button on the Tv, this will
return you to the Main Menu.
Station Sorting. (Programme edit)
“Note it would be useful to have a current Tv programme Guide to hand for
the next steps”.
When “Auto search” is nished all the stations are stored in memory, in “found”
order. This means that BBC1 would not be in location 1 etc.
To sort the stations into the correct order :
1. Press the “Menu” button as “g 1”.
2. Using the “ ” button move the highlight on the right side of the menu
to “Tuner”, see “g 2”.
12
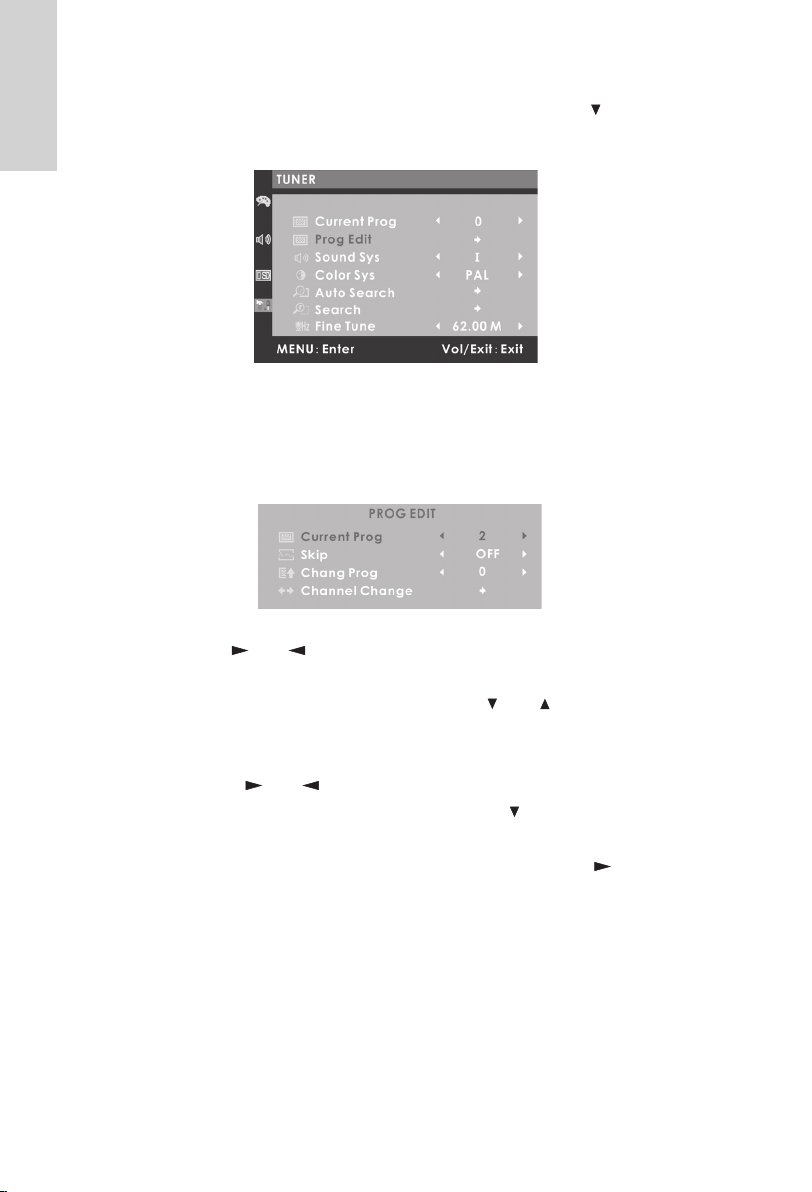
3. Using the “Menu” button enter that menu and with the “ ”button move
the highlight down to “Prog Edit” see “g 5”,
Fig 5
4. Now press the “Menu” button, Current Prog will now be highlighted.
5. Press the “Menu” button again and the Programme number will be in
red, see “g 6”.
Fig 6
6. Use the “ and ” buttons to select the picture showing BBC1 in the
background.
7. Press the “Menu” button and using the “ and ” buttons, move the
highlight to “Chang Prog”.
8. Press the “Menu” button and the number will change to red.
9. Using the “ and ” buttons, change the number to “1” (for BBC1).
10. Press the “Menu” button and then press the “ ” button to select “Chan-
nel Change”.
11. Press the “Menu” button to conrm the change and the “ ” will change
to red. Press “Menu” button to change the other station locations i.e.
BBC 2 = “2”, ITV = “3”, CH 4 = “4” and CH5=“5”, follow the instructions
3 to 11.
12. To exit this menu press “Exit”.
13
Manual Tuning
Occasionally you may wish to add another station to the “tuning list”. This may
be a VCR or Tv game or another Tv station opening in your area.
1. Press the “Menu” button, this will show the menu, see “g 1”
2. Using the “ ” button, move the highlight on the left side of the menu to
“Tuner”, see “g 2”.
3. Using the “Menu” button enter that menu and with the “ “button move
the highlight down to “Current Prog”.
4. Press “Menu” and using the “ and ” buttons select a programme
location with no signal.
5. Press “Menu” and then the “ and ” buttons, to select “Search” and
then press the “Menu” button, see “g 7”,
Fig 7
6. Now press the “ and ” button. The Tv will now begin to search up-
wards “ ” or downwards “ ” see “g 4”. To stop the “Search”, press
“VOL” on the Tv.
The search process will stop each time a station is received, if it is not
the station required.
7. Press the “Menu” button and then the “direction” button, the Tv will then
continue to search again.
8. When the station required is found, press the “Exit” button. The station
will now be stored in that Programme location.
Fine Tuning
Occasionally it may be necessary to “Fine Tune” a station, this may be for a
number of reasons. To do this:
1. Press the “Menu” button, this will show the menu, see “g 1”
2. Using the “ ” button, move the highlight on the right side of the menu
to “Tuner”, see “g 2”.
14

3. Using the “Menu” button enter that menu and with the “ ”button move
the highlight down to “Fine Tune”.
4. Press the “Menu” button and using the “ and ” buttons, adjust the
tuning as required.
5. To exit this menu press “Exit”
Skip. (Remove)
When “Auto Search” was done, there will have been a number of “unwanted”
stations added to the memory, these could either be noisy pictures or stations
out of your area. To remove these do the following :
1. Press the “Menu” button, this will show the menu, see “g 1”
2. Using the “ ” button, move the highlight on the left side of the menu to
“Tuner”, see “g 2”.
3. Using the “Menu” button enter that menu and with the “ ”button move
the highlight down to “Prog Edit”.
4. Press “Menu” to enter the sub menu see “g 6”.
5. Using the “ ” button, move the highlight to “Current programme”.
6. Press “Menu” to enter that selection and using the “ and ” buttons,
select the rst “unwanted” station.
7. Again press “Menu” and using the “ ” button, move to “Skip”.
8. Press “Menu” and then the “ and ” button to switch “On or Off”.
9. Press “Menu” to conrm the change.
10. To remove any other unwanted stations repeat 5 to 9.
11. To exit the menu, press “Exit”, until the menu is turned Off.
Sound System
This selects the “Sound System” received in various countries. In the UK we
use “I”, Western Europe uses “B/G”, Eastern Europe uses “D/K” , USA and
Japan use “MN”.
To select the “Sound System” proceed as follows :
1. Press the “Menu” button, this will show the menu, see “g 1”
2. Using the “ ” button, move the highlight on the left side of the menu to
“Tuner”, see “g 2”.
3. Using the “Menu” button enter that menu and with the “ ”button move
the highlight down to “Sound Sys”.
15
4. Press the “Menu” button, this will show as “g 8”
Fig 8
5. Using the “ and ” buttons, select the sound system you require.
6. Press the “Menu” button or Exit button to exit the menu.
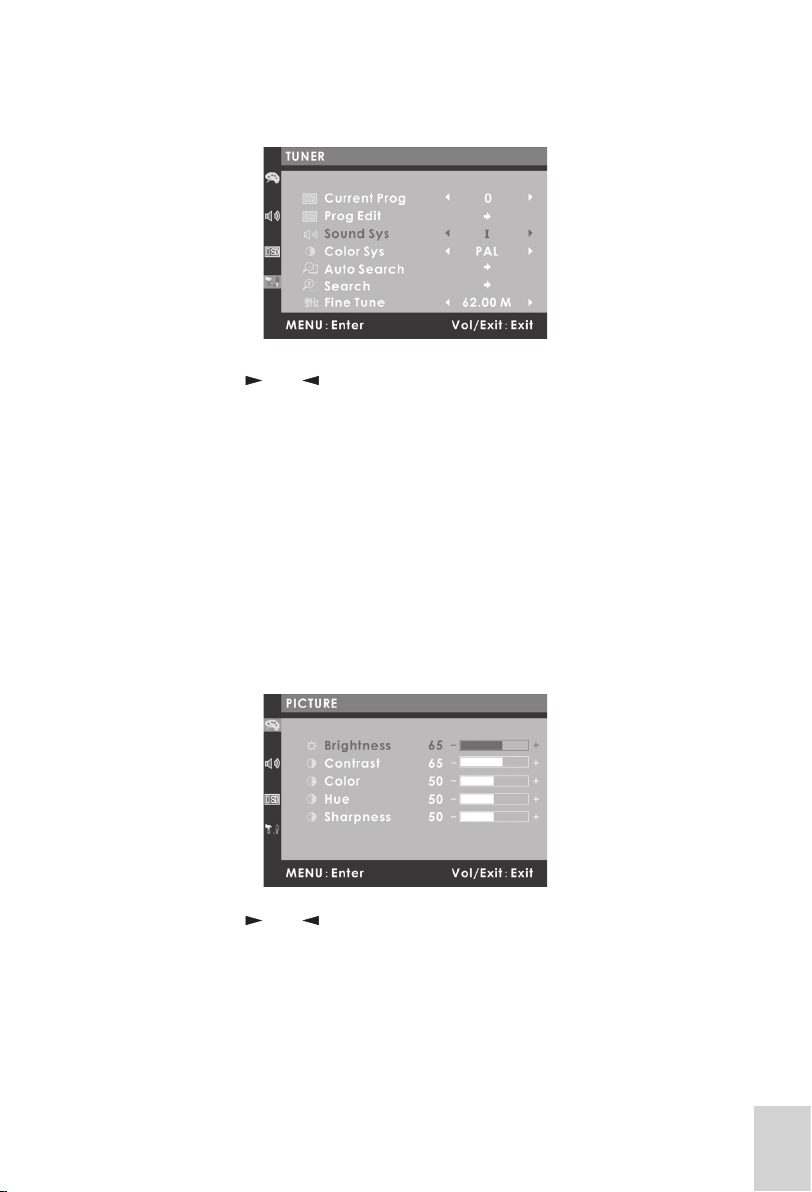
Picture Adjustments. ( TV, VIDEO, S-VIDEO, YUV)
To adjust the picture levels to your requirements.
Press the “Menu” button, this will show the “PICTURE” menu, see “g 1”
Brightness
This adjusts the overall brightness level of the picture, increasing the level for
brightly lit rooms, and decreasing for less brightly lit rooms.
1. Press the “Menu” button, twice, this will show as “g 9”
Fig 9
2. Using the “ and ” buttons adjust the level to your requirements.
3. Press the “Menu” button once to exit that adjustment, or use the “Exit”
button once.
16

Contrast.
This adjusts the ratio of black to white picture, adjust this to your taste.
1. Use the “ and ” buttons to select “Contrast”.
2. Press the “Menu” button and then use the “ and ” buttons to adjust
the level.
3. Press the “Menu” button once to exit that adjustment, or use the “Exit”
button once.
Colour.
This adjusts the level of picture colour, adjust this to your taste
1. Use the “ and ” buttons to select “Colour”.
2. Press the “Menu” button and then use the “ and ” buttons to adjust
the level.
3. Press the “Menu” button once to exit that adjustment, or use the “Exit”
button once.
Hue. (only used with NTSC VCR’s)
Use this to adjust the “skin tones” when viewing Ntsc media
1. Use the “ and ” buttons to select “Hue”.
2. Press the “Menu” button and then use the “ and ” buttons to adjust
the level.
3. Press the “Menu” button once to exit that adjustment, or use the “Exit”
button once.
Sharpness.
If signal quality is good, you may advance the “sharpness” to increase the
clarity of the picture. If the signal is poor or noisy, adjust the level to reduce
the picture noise.
1. Use the “ and ” buttons to select “Sharpness”.
2. Press the “Menu” button and then use the “ and ” buttons to adjust
the level.
3. Press the “Menu” button once to exit that adjustment, or use the “Exit”
button once.
4. To exit the menu totally, press the “Exit” button twice.
17
Sound Adjustments. ( all modes).
To adjust the sound levels to your requirements.
Volume.
This adjustment is not in the menu system and is adjusted with the Remote
control or the “VOL” button and “ and ” buttons, on the front of the Tv.
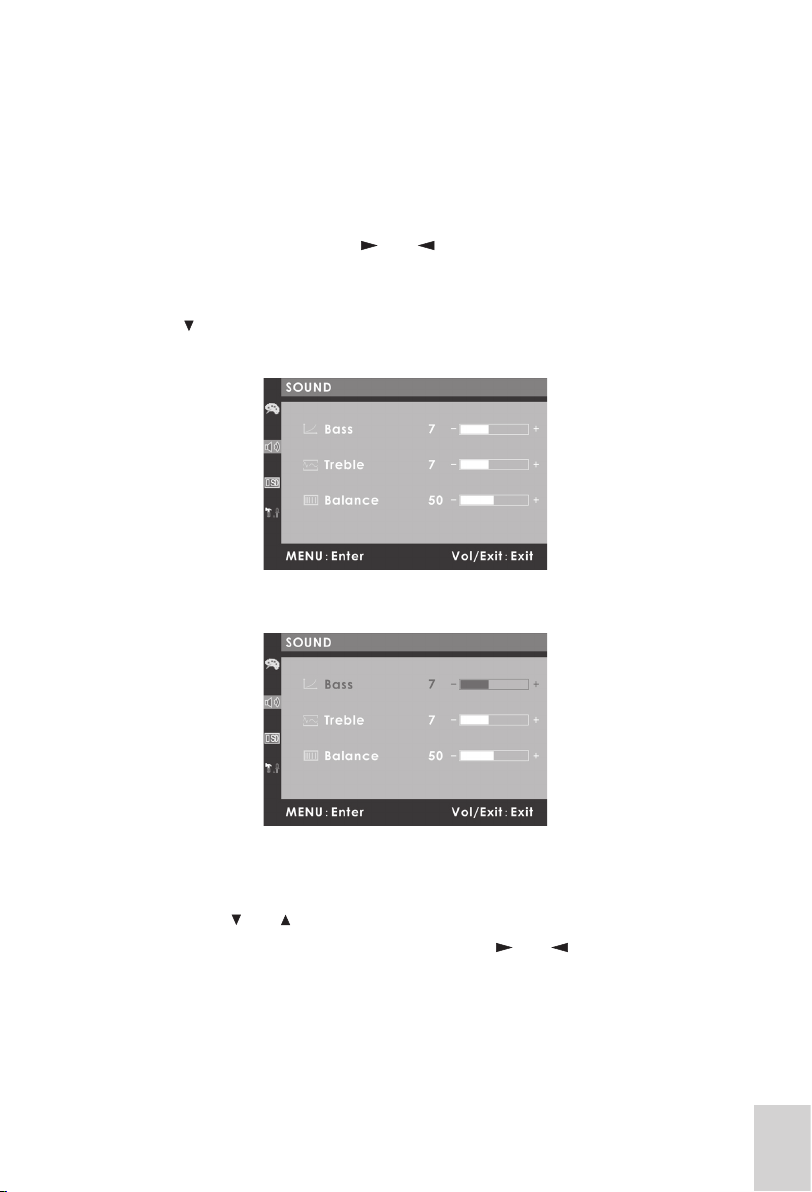
Press the “Menu” button, this will show the menu, see “g 1”
Using the “ ” button move the highlight on the left side of the menu to “SOUND”,
see “g 10”
Fig 10
Press the “Menu” button to enter the sub menu see “g 11”
Fig 11
Bass.
Adjusts the Bass frequencies for a “fuller” sound.
1. Use the “ and ” buttons to select “Bass”.
2. Press the “Menu” button and then use the “ and ” buttons to adjust
the level.
3. Press the “Menu” button once to exit that adjustment, or use the “Exit”
button once.
18
Treble.
Adjusts the sound for a “brighter” sound.
1. Use the “ and ” buttons to select “Treble”.
2. Press the “Menu” button and then use the “ and ” buttons to adjust
the level.
3. Press the “Menu” button once to exit that adjustment, or use the “Exit”
button once.
Balance.
Adjusts the “balance” between the two stereo channels.
1. Use the “ and ” buttons to select “Balance”.
2. Press the “Menu” button and then use the “ and ” buttons to adjust
the level.
3. Press the “Menu” button once to exit that adjustment, or use the “Exit”
button once.
To exit the menu totally, press the “Exit” button twice.
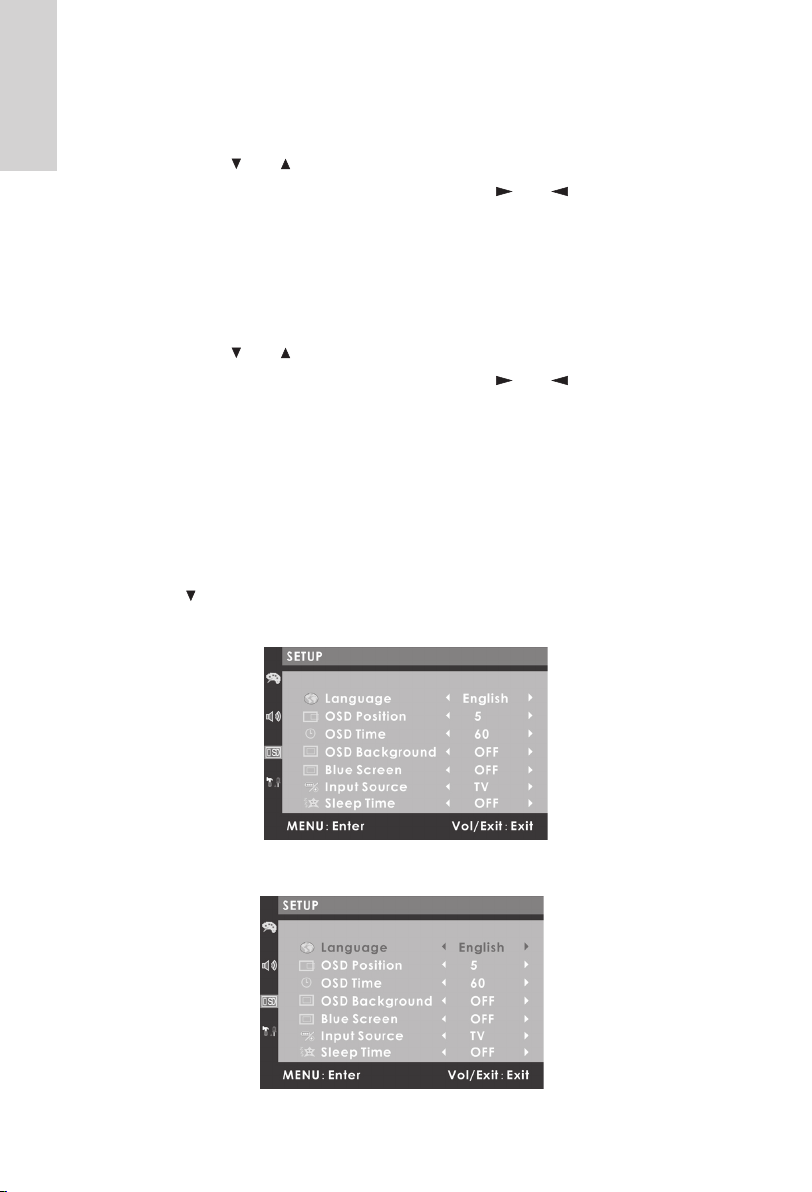
SETUP. (TV, VIDEO, S-VIDEO, YUV).
Press the “Menu” button, this will show the menu, see “g 1”
Using the “ ” button move the highlight on the left side of the menu to “SETUP”
see “g 12”.
Press the “Menu” button to enter the sub menu see “g 13”
19
Fig 12
Fig 13

Language.
This sets the OSD (On Screen Display) language. (normally default to Eng-
lish).
1. Use the “ and ” buttons to select “Language”.
2. Press the “Menu” button and then use the “ and ” buttons to adjust
the required Language.
3. Press the “Menu” button once to exit that adjustment, or use the “Exit”
button once.
OSD Position.
This sets the OSD box horizontal position.
1. Use the “ and ” buttons to select “OSD Position”.
2. Press the “Menu” button and then use the “ and ” buttons to adjust
to the required position.
3. Press the “Menu” button once to exit that adjustment, or use the “Exit”
button once.
OSD Time.
This sets the time the OSD is displayed, you may set from 5 seconds to 60
seconds.
1. Use the “ and ” buttons to select “OSD Time”.
2. Press the “Menu” button and then use the “ and ” buttons to adjust
to the required “on time”.
3. Press the “Menu” button once to exit that adjustment, or use the “Exit”
button once.
OSD Background.
This may be set as “solid” or “translucent”.
1. Use the “ and ” buttons to select “OSD Background”.
2. Press the “Menu” button and then use the “ and ” buttons to adjust
to your requirement.
3. Press the “Menu” button once to exit that adjustment, or use the “Exit”
button once.
20

Blue Screen.
When in “no signal” conditions, e.g, the aerial lead is unplugged, or No AV
inputs, the screen may be set to display “Blue”.
1. Use the “ and ” buttons to select “Blue Screen”.
2. Press the “Menu” button and then use the “ and ” buttons to adjust
to your requirement.
3. Press the “Menu” button once to exit that adjustment, or use the “Exit”
button once.
Input Source.
You may select the Input Source from here, as well at the “Mode” button on
the Remote Control or the “Source” button on the Tv.
1. Use the “ and ” buttons to select “Input Source”.
2. Press the “Menu” button and then use the “ and ” buttons to select
the source you require.
3. Press the “Menu” button once to exit that adjustment, or use the “Exit”
button once.
Sleep Time.
You may set the Tv to switch to “Sleep” at a pre determined time. This can
be set in 15 minute intervals, from “OFF” to 60 Minutes. When the Tv “times
out” it will go to standby.
1. Use the “ and ” buttons to select “Sleep Time”.
2. Press the “Menu” button and then use the “ and ” buttons to select
the time you require.
3. Press the “Menu” button once to exit that adjustment, or use the “Exit”
button once.
To exit the menu totally, press the “Exit” button twice.
21
PC Operation. (VGA).
Connect the Tv to your PC as described on Page 6.
Turn on the PC and the Tv monitor.Using the “Mode” button on the Remote
Control or the “Source” button on the Tv, select PC.You should now see the
PC display screen.
The Tv does not require any settings such as “Refresh mode” or “Resolution”
to be made, these are all done in the PC Setup mode.
There are, however, certain settings that may be made to your Tv in PC mode.
These are described as follows :
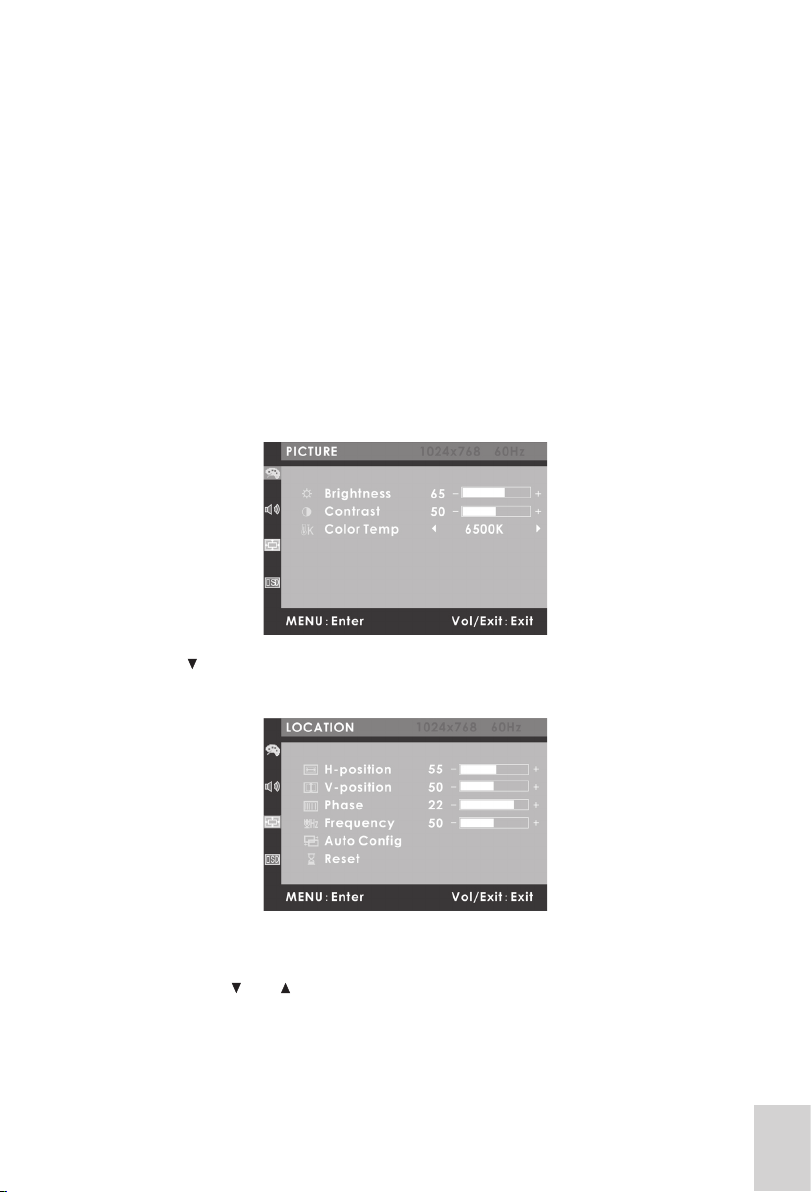
To enter the “LOCATION” menu Press the “Menu” button, this will show the
menu, see “g 14”
Fig 14
Using the “ ” button move the highlight on the left side of the menu to “LOCA-
TION” .Press the “Menu” button to select the sub menu see “g 15”
Fig 15
In most cases the “Auto Cong” will be all that is necessary.
1. Press the “Menu” button to enter the Sub Menu.
2. Use the “ and ” buttons to select “Auto Cong”.
3. Press the “Menu” button to start “Auto Cong”. The picture displayed
will appear to move from side to side. This is quite normal, the PC and
the Tv are communicating the best setup.
22

4. When the “Auto Cong” is completed the menu will disappear.
Other Menu Choices.
Should the screen not adjust to your liking, you may adjust manually, using
the “Location” menu.To enter the “LOCATION” menu Press the “Menu” button,
this will show the menu, see “g 14”.Using the “ ” button move the highlight
on the left side of the menu to “LOCATION” Press the “Menu” button to select
the sub menu see “g 15”
H-Position.
This shifts the picture horizontally.
1. Use the “ and ” buttons to select “H-Position”.
2. Press the “Menu” button and then use the “ and ” buttons to select
the position you require.
3. Press the “Menu” button once to exit that adjustment, or use the “Exit”
button once.
V-Position.
This shifts the picture Vertically.
1. Use the “ and ” buttons to select “V -Position”.
2. Press the “Menu” button and then use the “ and ” buttons to select
the position you require.
3. Press the “Menu” button once to exit that adjustment, or use the “Exit”
button once.
Phase.
This adjusts the “clock phase” of the PC to the internal clock of the TV to stop
“jitter”.
1. Use the “ and ” buttons to select “Phase”.
2. Press the “Menu” button and then use the “ and ” buttons to mini-
mize horizontal jitter.
3. Press the “Menu” button once to exit that adjustment, or use the “Exit”
button once.
Reset.
This resets all settings to factory default.
23

1. Use the “ and ” buttons to select “Reset”.
2. Press the “Menu” button and then to Tv will reset to the default condi-
tion.
To exit the menu totally, press the “Exit” button twice.
Picture Adjustments. (PC mode).
To adjust the picture levels to your requirements.
Press the “Menu” button, this will show the “PICTURE” menu, see “g 14”
Brightness and Contrast have been discussed on page 16-17
Color Temp.
This is the shade of “White” you wish to see. There are 3 xed shades and
one user level to select.
1. Use the “ and ” buttons to select “Color Temp”.
2. Press the “Menu” button and then use the “ and ” buttons to select
the color temperature you require.
3. Press the “Menu” button once to exit that adjustment, or use the “Exit”
button once.
Color Temp USER
1. Use the “ and ” buttons to select “Color Temp”.
2. Press the “Menu” button and then use the “ and ” buttons to select
User. See “g 16”
Fig 16
3. Press the “Menu” button and then use the “ and ” buttons to select
“USER-R -G-B”
4. Use the “ and ” buttons to select each color level, and then “Menu”
or “Exit” button to exit that selection.
24

Wall Mounting
You may mount this Tv on the wall using the desk existing stand.
Place the Tv in the approximate location, where you wish to mount it on the
wall and mark with a pencil.
Place the Tv on its face and carefully turn the base bracket upwards, until the
base is parallel with the cabinet back.
From the Top of the Tv cabinet to the line of the mounting holes is 280 mm.
Using a spirit level, mark a line on the wall 150mm long.
Mark two points 100 mm apart, (these are the mounting holes).
Drill two holes using a 7mm masonary drill ( if mounting into brick or stone),
and place two “Brown” plastic “Rawl Plugs” into the wall. Place two 10 gauge
x 35 mm screws into the plugs.
Carefully mount the screen onto the screws. Do NOT leave the Tv until you
are sure the xing is rm.
Note : if tting to a partition wall or none solid wall, please seek advice.
Important Note : Please do not press the Screen Glass or carry with the face
plate. Always handle the Tv with the cabinet sides or base.
25

Adjusting Screen Angle.
When you adjust the screen angle, press the base with one hand and the set
with another one and push it back and forth to get the best angle as it shows
in the following gure.
o
About 5
o
About 25
Using forbiden area
Note: Do not put your hand on the
back of the bracket or the master set to
avoid your hand being hurt.
Note: Rotate forward or backward
within the range of 5o-25
o
[Note]
1. Do not put your ngers on the connecting part of the cabinet and the
spiral arm or you may hurt yourself.
2. Do not touch the LCD screen with your hands or pull it forcefully beyond
the limited angle when you adjust the angle.
26

Display Modes
The follow table shows the display modes you can have on your machine
Resolutio ratio Line frequency(kHz) Field frequency (Hz) Point frequency(MHz)
28.80 60.00 18.43
640*480 34.56 72.00 22.12
36.00 75.00 23.04
36.00 60.00 28.80
800*600 43.20 72.00 34.56
45.00 75.00 36.00
46.08 60.00 47.19
1024*768 53.76 70.00 55.05
57.60 75.00 58.98
Setting Display Parameter
1. The resolution ratio of this screen is 1024*768. It would be best to set
the display parameter on the computer as 1024*768 when using it as
computer screen.
2. Do not set the refresh mode greater than 75Hz in VGA mode or the
input will not be accepted. You are advised to set the refresh frequency
as 60Hz.
27

Trouble Shooting Guide
If you experience trouble with this Tv please consult this help guide before
calling the “Technical Help Line”.
General operation
Symptom Possible cause Remedy
No power. No leds lit. No power connected to the Tv.
Screen Not Lit. Led shows red The Tv is in Standby.
Sc reen not li t. Led shows
green.
Screen lit and shows a “Snow-
storm”
Picture shows but is noisy or
Ghosting.
Screen shows Blue. No signal input. Select another signal source
No Sound Poor adjustment
White or Dark spots o n the
screen.
No computer display.
Blue Screen. PC Selected PC is probably “Out of range”
No sound in PC mode Sound not connected
Picture jittering sideways. PC not matched to Monitor
No Remote control operation Battery exhausted Replace battery.
Intermittent operation Tv not “seeing” handset
No input. Tv switched to AV or
PC. Blue screen “Off”
No Signal.
Poor aerial signal.
Pixels turned fully on or off.
PC Mode
VGA Lead not connected cor-
rectly
Remote Control
If you are still having difculty please call the Technical help line. Ring 01422
203676 (Normal rates apply).
Opening hours Mon-Fri 8am – 8pm. Sat 9am – 4pm. Sun 11am – 4pm
“Bank holidays as Sun”
Check all connections to the
Tv. Ensure all plugs are rmly
pushed home.
Bring the Tv out of standby us-
ing the Remote control or the
“Power” button on the Tv
Select TV with the “Mode” or
“Source” button.
Check the aerial connections.
Use the Menu’s to tune the Tv
to the local stations.
If using an indoor aerial you
may need an outside aerial.
Try retuning after checking the
aerial connections.
Adjust the Volume control.
Turn the “Mute” off.
Occasionally a pixel may be-
come faulty. This is not covered
by warranty.
Check all leads from the PC to
the monitor.
Re connect your old monitor
and set the display drivers as
previous page.
Check connection from sound
card.
Enter Menu and set up as
page 22
Remove any objects in the line
of view.
28

Product Specications
Model ...................................... AAMT15LCD
Tuning range .....................................45 Mhz – 870 Mhz (Band 1, Band 3, UHF)
Tuning Mode......................................Frequency Synthesizer.
Inputs .................................................TV, AV, S-Video, VGA, “Y, Pb/Cb,Pr/Cr”(non-progressive)
Outputs ..............................................Headphones
Screen Panel size..............................15” Diagonal
Contrast ratio (typical) .......................400 : 1
Bright intensity (typical) .....................250 nits
Dot pitch ............................................0.297 mm
Number of colours .............................16,777,216
Visual angle: Horizontal .....................170 deg
Visual angle: Vertical .........................170 deg
Horizontal frequency..........................30 – 62 Khz
Vertical frequency ..............................50 – 75 Hz
Optimum resolution ratio ...................1024 x 768
TV system ..........................................PAL ( NTSC AV input)
Sound Systems .................................“I”, “B/G”, “D/K”,”MN”
Speakers ...........................................2 x 2.2 W (8 ohms)
Temperature ......................................0 – 40 deg C
Average life span of the display.........50,000 Hrs
Size(cm) ............................................36 (L) x 18.3 (W), 34.5 (H)
Weight ...............................................3.8 Kg
Power supply .....................................12V DC 4A.
Mains Adaptor ...................................AC input 100 – 240V AC 50 – 60 Hz 1.0 A.
Power consumption ...........................30W Max
* No notice will be given in case of a change in the design*
29
 Loading...