

LCD TV/DVD COMBINATION
ATDVD1930W


Safety Information………………………………………2
1. Pro d uct Fe ature s………… … ………… … …………4
2 . A c c e s s o r i es … …… … …… … …… … …… … …… … 4
3. Fr ont Vi ew… ……… … ……… ……… … ……… ……5
4. R ea r Vi ew … …… …… ……… …… …… … …… …… 6
5 . Re m ot e Co n t ro l … … …… … … … …… … … … …… 7
6. Basi c Inst a llat i on……… … ………… … …………… 9
7. OSD Menu………………… …………………………10
7.1Sound Menu…………………………………………11
7.2Channel Menu………………………………………12
7.3Function Menu………………………………………13
7.4PC Menu………………………………………………14
8.DVD Operation…………………………………………15
9.System Operation……………………………………20
10.User Help Guide……………………………………23
11.Disc Care and Handling……………………………24
12. Technical Specifications……………………………25
Mains Plug wiring…………………………………………26
Wall bracket mounting instructions…………………….26

Safety Information
The lightening flash with arrowhead symbol, within an equilateral triangle, is
intended to alert the user to the presence of un-insulated “dangerous
voltage” within the products enclosure that may be of sufficient magnitude
to constitute a risk of electric shock to the persons.
The exclamation point within an equilateral triangle is intend to alert the user
to the presence of important operating and maintenance (servicing)
instructions in the literature accompanying the appliance.
Correct disposal of this Product
(Waste Electrical & Electronic Equipment (WEEE)
The crossed out “Wheelie bin” is intended to show that this appliance must not
be placed with ordinary household waste at the end of its useful life. To prevent
possible harm to the environment or human health from uncontrolled waste
disposal, please keep separate from other household waste and recycle it
responsibly to promote the sustainable reuse of material resources.
Household users should contact either the retailer where you purchased the
product, or their local government office for details of where and how you can
take this item for environmentally safe re-cycling.
Business users should contact their supplier and check the terms and conditions
of the purchase contract. This product must not be mixed with other
commercial wastes for disposal
1. THIS LABEL IS ATTACHED TO THE PLACE AS ILLUSTRATED TO INFORM
THAT THE APPARATUS CONTAINS A LASER COMPONENT.
2. THE WARNING LABEL INFORMING OF RADIATION IS PLACED INSIDE
THEn UNIT. AS SHOWN IN THE ILLUSTRATION. TO WARN AGAINST
FURTHER MEASURES ON THE UNIT. THE EQUIPMENT CONTAINS A
LASER RADIATING LASER RAYS ACCORDING THE LIMIT OF LASER
PRODUCT OF CLASS
This unit complines with European safety and electrical interference directives.

Safety Information cont.
Do not place the Tv on an unstable surface, it may tip over and cause injury or damage
to the LCD screen.
Do not place the tv in a cabinet where airflow is restricted, ensure the ventilation holes
are not covered to prevent overheating. Do NOT cover the DC mains adaptor, this will
feel warm to the touch and must be allowed to radiate the heat.
Do not use the Tv in wet or damp conditions, if water or liquids are allowed to enter the
case, disconnect the power and call the Technical Help line. Do not handle the Tv or
Power adaptor with wet hands.
During an Electrical storm or when going on holiday, disconnect from the mains supply
and aerial (if external or rooftop).
Do not place heavy objects on the mains lead or DC supply lead, do not place where
they can be stepped on, cut or damaged. If the leads do become damaged please call
the Technical Help Line for advice.
Do not drop or damage the Tv. If the casing becomes damaged it may cause a safety
issue, Do not open the case or Power adaptor, you risk a severe electric shock, injury
or death.
Do not drop objects into the Tv ventilation slots or DVD disc slot. Should an object enter
the Tv, contact the Technical Help Line for advice.
Do not place the Tv near heat sources such as radiators or direct sunlight
Cleaning the Tv. Disconnect from the supply before cleaning. Do NOT use petrol
based or chemical cleaning fluids. You may wipe with a soft damp cloth. For stubborn
sticky dirt use a dilute detergent solution..
LCD Screen. Do NOT use chemical solvents on the screen surface, sticky finger
marks must only be removed with a dilute detergent solution. Occasionally one or two
bright dots may be seen on the screen, this is not considered a fault.
1.Product Features
- Inputs : Tuner, Scart, VGA, CVBS (video), Audio, S-Video, PC Audio
- Tv Systems : PAL (B/G,I,D/K). SECAM (B/G,D/K,L,LL) for UK use PAL “I”.
- Memory. Up to 200 channels may be stored
- No Signal (TV) Auto standby.
- Timer functions
- Programme exchange (swap)
- Power requirements (DC 12V 5 A (60W).
- LCD Screen 1440 x 900 pixels
- Tuning Range VHF / UHF 48 Mhz 847 Mhz
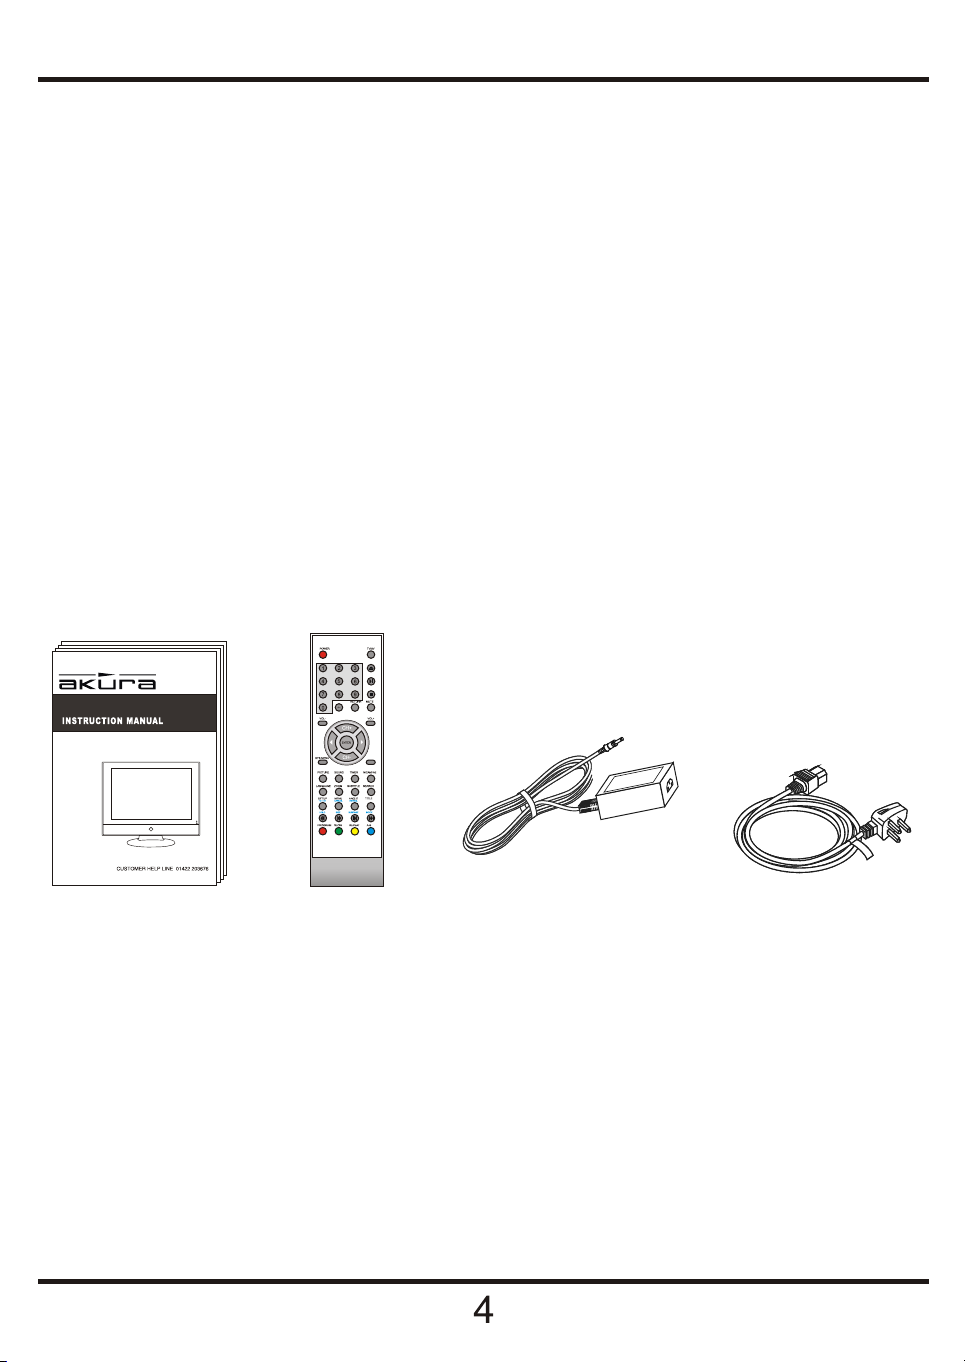
2.Accessories
LCD TV/DVD COMBINATION
ATDV D1930 W
SYSTEM
Users' Manual Remote Control Adapter Adapter Cable
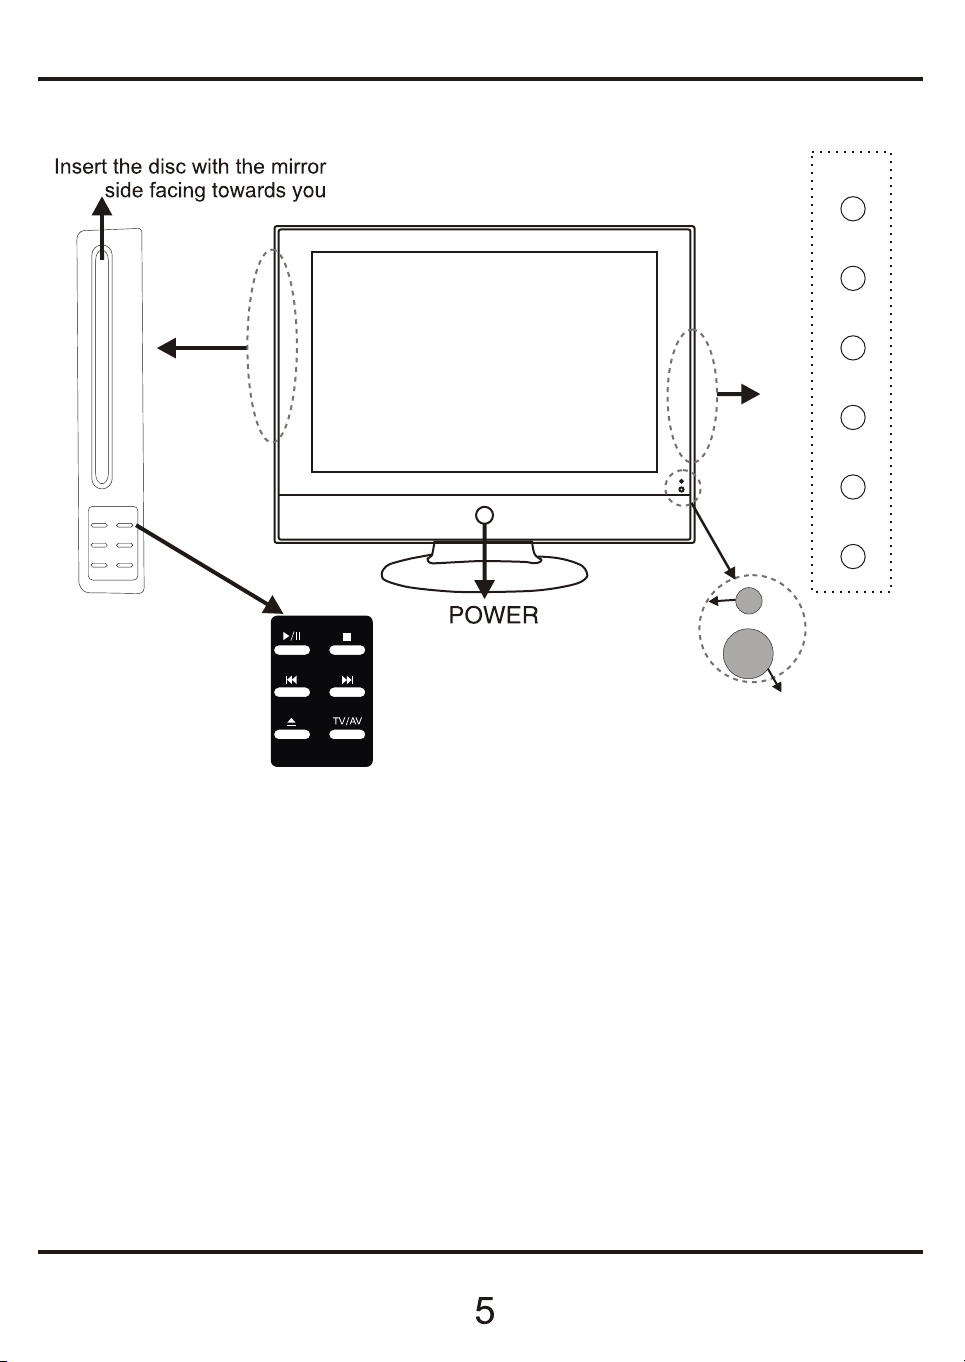
3.Front View
MENU
CH-
CH+
VOL-
VOL+
TV/AV
Led Indicator
Play/pause
Previous track or chapter
load/eject DVD disc
1(IR)Infrared Receiver:Receives IR signals from the remote control.
(Power on/Standby)LED Indicator: Press POWER to turn on and off.
Indicator on(Red) Standby mode
Indicator on(Green) Power on mode
The effective range of the I/R signal is approx 6 metres and an angle of +/- 30 deg
2 The functions of the buttons are described as below:
MENU: Press to display the OSD menu, Press again to exit the menu.
CH-/CH+: Press to scan through channels. When pressing and holding down either button
user can scan channels quickly.
They are also can be used to move down/up in the OSD menu screen.
VOL-/VOL+: Press to adjust the volume.
they are also can be used to move left/right in the OSD menu screen.
VOL+ button can be used to skip forward to next menu.
TV/AV: Press to select the source: TV,AV,SVIDEO,PC,DVD,SCART
Power: Turn on/off the TV set.
stop DVD
Next track or chapter
Remote control windo w(IR )
(keep clear)
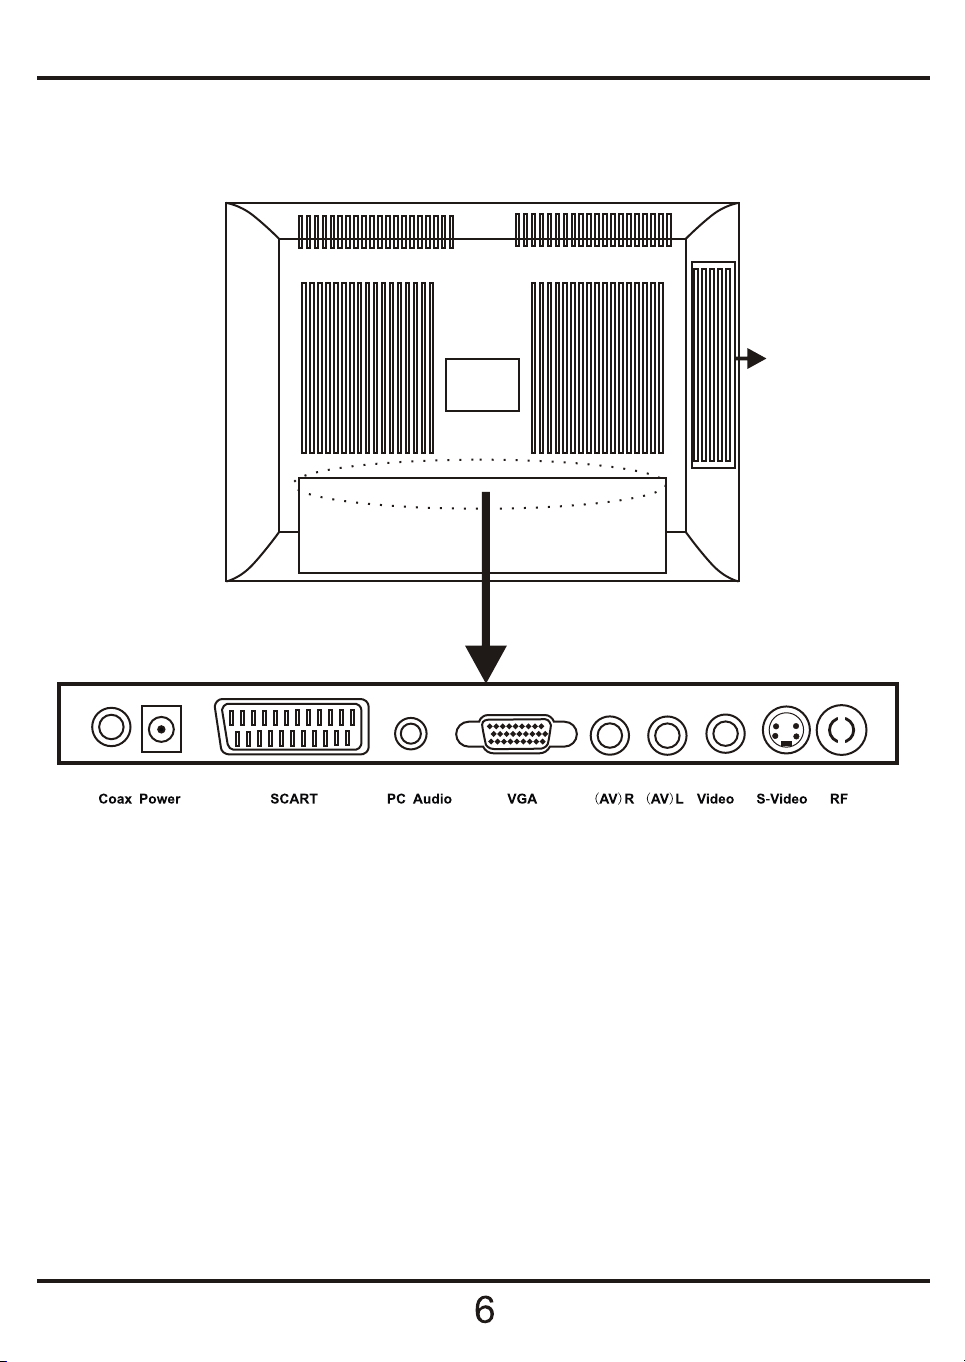
4.Rear View
DVD
Coax : Output to Audio amplifier (RF encoded)
Power : Connection to Power adaptor.
SCART : Composite video and Audio input from VCR or other devices.
PC Audio : Audio connection from PC.
VGA : PC Monitor display input. Connect to your Pc Mini D15 pin connector.
AV-R,AV-L (Phono): Right and Left Audio input from other sources such as Camcorder.
Video : CVBS video input from other sources such as Camcorder.
S-Video In : Alternative High Quality Video only (sound via AV-R,AV-L).
RF : Tuner / Antenna RF input.
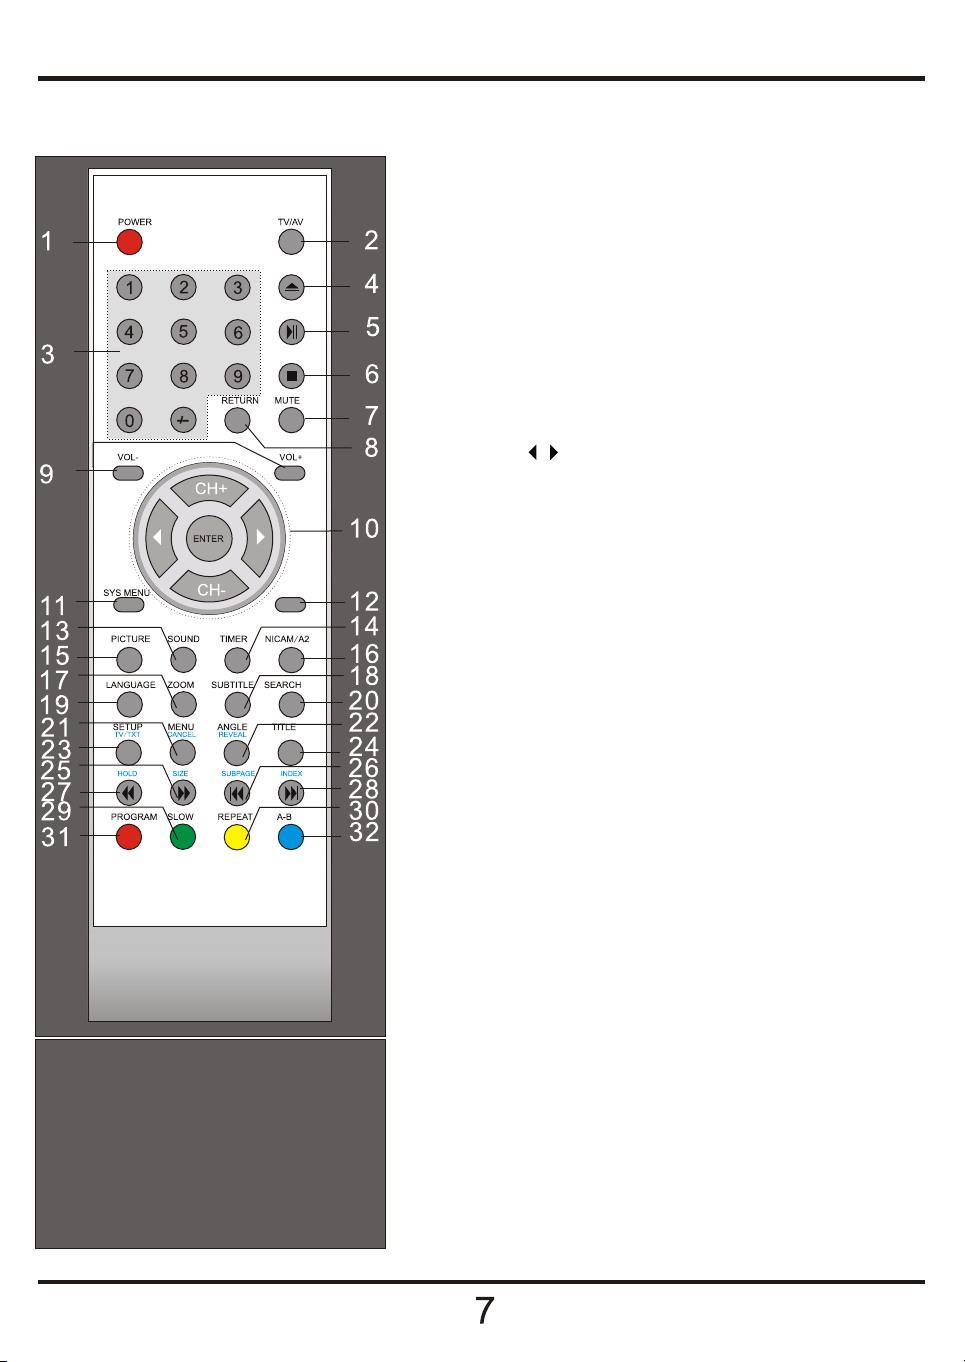
5.Remote control
DISPLAY
Buttons for TV functions
1 POWER: turn the TV on or turn it standby.
2 TV/AV: select the input source.
3 0-9,-/--:press 0 to 9 for the first ten channel, press -/- for 10 to 99, and again for 100 to 199.
7 MUTE: press to go into the silence status or cancel.
8 RETURN: go back to play the last channel.
9 VOL+/-: volume up/down.
10 CH+/-: channel up/down,
CH+ CH- : direction buttons for OSD menu.
ENTER: CONFIRM BUTTON for OSD menu.
11 SYS MENU: TV system menu(see page 9)
DISPLAY: Press to show current mode
12
13 SOUND: press to select the sound mode: User,
Normal,Movie and News.
14 TIMER: press to set a sleep time, the TV will go standby
after the time you setting.
15 PICTURE: press to select the picture mode: User,
Normal, Soft or Vivid.
16 NICAM/A2: press to select mono or stereo.
Note:
1. Fit two AA batteries, making sure that
they are the correct way round, as
marked on the case.
2. Aim the remote control at the window
to keep the right side of the screen, and
keep the window clear at all times.
3. Do not press the buttons on the remote
control too quickly-allow time for the
set to respond.
Buttons for Teletext
21 CANCEL: turn off the Teletext display.
22 REVEAL: reveal any hidden text, for example quiz answers.
23 TV/TXT: turn off/on the Teletext display.
25 SIZE: press to see top half of page double size.
press again to see the bottom half of page
double size.
Press again for normal size.
26 SUBPAGE: for example, to go directly to subpage 4:
press SUBPAGE,then 0,0,0,4;
press SUBPAGE again to cancel subpage mode.
27 HOLD: hold or carry on the current subpage.
28 INDEX: direct recall of page 100.
29-32 Colour buttons: short cuts-follow the coloured
links in the text.

DISPLAY
Buttons for DVD functions
4. : load/eject DVD disc.
5. : play/pause DVD program.
6. : stop DVD program.
17 ZOOM: adjust picture size in DVD mode.
18 SUBTITLE: turn on/off the DVD subtitle display.
19 LANGUAGE: select DVD disc language.
20 SEARCH: DVD search, Tracks or Chapters.
MENU (PBC): DVD play list/Disc menu
21
22 ANGLE: select DVD picture angle.
23 SETUP: DVD system setup.
24 TITLE: DVD title.
25 : DVD fast forward.
26 : DVD previous chapter.
27 : DVD fast reverse.
28 : DVD next chapter.
29 SLOW: play DVD programs at slow speed.
30 REPEAT: play the title or chapter once again.
31 PROGRAM: edit the program and play.
32 A-B: select and play the preferable paragraph of
DVD program by pressing this key twice at the
beginning and end of it.
Battery Disposal.
When the batteries are exhausted and need replacing,
do NOT break open or throw on a fire.
Contact your local waste authority for disposal instructions,
do not throw in the domestic waste.

6. Basic Installation.
TV.
1. Connect the Power adaptor to the DC input socket and the Aerial lead to the TV Tuner input.
2. To turn ON, press the “Power Button”.
3. Press the TV/AV button on the TV or Remote Control, the source menu
will display on the screen “as seen on the right”. Use the CH+/- buttons
to select the source, press to confirm.
4.Press the MENU button on the TV or the SYS MENU button on the
remote control, the screen will display the OSD menu, press the CH+/-
button to select the third menu Channel (see picture below)
press the button to enter the menu, press CH+/- buttons to select the item
“Auto Tune”. Press the button, the TV will start to search from the lowest
frequency upwards. When a station is found it will be stored automatically in
the “First” location, further received stations will be stored in order. When Auto Tune is
completed the TV will display the first station received. In most cases the stations stored will
not be in Channel Order i.e. BBC1 will not be in Location “1”. To move the stations into the
correct locations you will need to use “Channel Swap” see page 13.
Note:when Auto Tune starts, to stop it press SYS MENU, otherwise leave to complete the search.
Channel
Auto Tune
Manual Tune
Fine Tune
Skip
Sound.SYS
Channel Swap
Off
I
TV
AV
S-VIDEO
DVD
SCART
PC
Mov e Selec t Exit
DVD.
1.Press the TV/AV button to display the source menu, use the CH+/- buttons to select DVD and
press to confirm.
2.Insert the disc into the player with the Title Label facing away from you (Shiny side forward),
Most discs will start playing automatically.
PC.
1.Connect the TV to the PC using a 15pin VGA lead (not supplied) and Audio to the PC audio socket
2.Press the TV/AV button to display the source menu, use the CH+/- buttons to select PC and
press to confirm. The TV will now display the signals from the PC. You may need to adjust
the PC to the TV. See page 14

7.OSD menu
Press the SYS MENU button on the remote control, the screen will display the OSD menu,
press the CH+/- buttons to select the Main Menu and press the button to enter. To select the
item you want (Picture, Sound, Channel, Function, PC) use the CH+/- buttons and to enter the
selection. Press buttons to select, adjust or enter a sub menu.
Note Items highlighted in the Menu's may be adjusted. Items “greyed” out are not available.
7.1 Picture menu
Picture
Picture Mode
Soft
Brightness
Contrast
Saturation
Sharpness
Hue
Scale FULL
Move Se lect Exit
Picture Mode: select the picture display mode----User, Normal, Soft, Vivid.
You can also use the PICTURE button on the remote control to select.
Brightness: adjust the brightness of the picture.
Contrast: adjust the contrast of the picture.
Saturation Adjusts the Colour depth (contrast)
Sharpness: adjust the sharpness of the picture.
Hue: adjust the hue of the picture(only used in the mode of NTSC).
Scale: exchange the 16:10 and 4:3 picture mode.
:
Note: when you are in the mode of PC, you can only adjust the brightness and contrast .

7.2 Sound menu
Sound
Sound Mode
New
Volume
Bass
Treble
Balance
Move Se lect Ex it
Sound Mode: select the sound mode----User, Normal, Movie, News.
You can also use the SOUND button on the remote control to select.
Volume: adjust the volume of the sound.
You can also use the VOL+/- button on the remote control or TV set to adjust the volume.
Bass: adjust the bass of the sound.
Treble: adjust the treble of the sound.
Balance: adjust the balance of the sound.

7 3 Channel Menu (The menu is only used in TV mode).
Channel
Auto Tune
Manual Tune
Fine Tune
Skip
Sound.SYS
Off
I
Channel Swap
Move Se lect Ex it
Auto Tune. Press the button, the TV will start to search from the lowest frequency up-
wards. When a station is found it will be stored automatically in the “First” location, further
received stations will be stored in order. When Auto Tune is completed the TV will display
the first station received. In most cases the stations stored will not be in Channel Order i.e.
BBC1 will not be in Location “1”. To move the stations into the correct locations you will
need to use “Channel Swap” see page 13.
Note when Auto Tune starts, to stop it press SYS MENU, otherwise leave to complete the search.
Auto Tune
140.15M Hz VH F L
0
Manual Tune: press button to search forwards, and press button to search backwards. When
a station found, it will be stored automatically.
Fine Tune : press the button to tune upwards and press button to tune downwards. (normally
fine tune will not be necessary).
Skip Some received channels may be unwanted, they may be noisy or weak stations from another
:
area, to remove these from the list select “Skip” . When skip is selected for a particular channel,
that channel is “Skipped” when using the CH+/- buttons. You may still select using the
“Numeric” buttons.
Sound SYS This is used to select the “sound system” for the particular country or area. In the
UK it must be set as “I”. In Western Europe use “B/G”, Eastern Europe use “D/K”, in certain
areas of France use “L”.
:

Channel Swap: press the button to enter the swap menu as the following picture.
Chann el
Channel1
Channel2
Swap
Mov e Selec t Exit
Use the CH+/- buttons to select “Channel 1”. Use the buttons to Locate BBC1, “it is useful to
have a current copy of a Tv guide to hand”. Select “Channel 2”, use the buttons to select “1”.
Then select “Swap” and press to swap the Tv will revert to “menu”. Press to Continue by
putting BBC2 in 2, ITV in 3, CH4 in 4 and CH5 in 5. Other channels may be numbered as required.
3
4
7.4 Function menu
Function
Language
Blue Back
English
on
TXT Language
Color Temp.
DNR
EAST
User
Normal
Reset
Timer
Move Se lect Ex it
Language: Selects the OSD Language.
Blue Back. Select On or Off, this turns the background to Blue under no signal conditions.
TXT Language. Selects the Teletext language Chose “West” for normal viewing.
Color Temp. Adjusts the colour temperature. You may select Cool, Warm, Normal or User.
User allows you to set the Red, Green and Blue individually.
DNR:press the key to choose "Normal" or "Strong" to reduce picture interfere.
Reset. Select “Reset” and press to reset all analog settings to “Factory Default”

Timer: press the button to enter the timer menu as the following picture.
Chann el
CURRENT
TURN OFF
TURN ON
TURN ON PROGRAM
Mov e Selec t Exit
You MUST set the Select Current Time by pressing the CH+/- buttons, to select the “HOURS”
press and CH+/- to change the time. Press to select “MINUTES” and CH+/- buttons to set
the time.
To set the “OFF” and “ON” times Select using the CH+/CH- buttons, set the times required as you
did setting the time. If you want the TV to switch to a particular station select “TURN ON
PROGRAMME” using the CH+/- buttons and change using the buttons, the TV will then switch
at the requested time.
00:00
_ _:_ _
_ _:_ _
1
7.5 PC menu(the menu can only be used in the mode of PC)
PC
Clock
Phase
H.Position
V.Position
Auto
Move Se lect Ex it
Clock: adjust the pixel clock frequency, until the image size is maximized for the screen.
Phase: adjust the phase of the ADC sampling clock relative to the sync signal, until a stable
image is obtained.
H/V. Position: adjust the transverse/vertical position of the screen.
Auto: press the button to setup the parameter of the screen automatically.

8.DVD operation
Press the Power button on the TV or the Remote Control, then press either the DVD button on the
left of the TV or the TV/AV button on the right of the Tv to display the “Source” menu. Using the
CH+/- buttons select DVD, to confirm press V+/-. “NO DISC” will be shown on the screen. If there
is a disc in the player it will display “READ” and start automatically or display the “Menu”.
Place a disc.
Insert a disc with the label side facing AWAY from you. Do not force it in, the mechanism will load
it automatically. (do NOT attempt to put a disc in if another is already in the player). To Eject a
disc press the EJECT button on the Tv or remote control.
Play
The contents of each disc menu vary according to how the disc was authored and what features
are included. The disc menu will be turned on for you to select, when Menu button is pressed. Also
play and pause can be switched with the Pause button on the remote. Different play modes are
offered, such as menu play, sequence play etc.
Menu Play
1.Compatible with DVD, SVCD or VCD2.0.
2
.If the disc is a DVD, ROOT MENU will appear on the screen. If it is a SVCD or VCD please press
the (Menu) PBC button to see the menu.
3. When a DVD disc is loaded, press the Arrow buttons to highlight the menu item you want to play.
For SVCD or VCD press the numeric buttons to select the track to play.
4. Press Enter or Play to play the highlighted selection.
5.To return to Menu when playing. When a DVD is playing, press the MENU button to return to the
Root Menu. With SVCD and VCD and PBC is on, press the Menu (PBC) button or the RETURN
button to return to the menu
Title Play
1.Compatible with DVD discs only.
2.During DVD playback, press Title button to display the DVD title content.
3.Press the Arrow buttons to highlight the title you want to choose, and press Enter; also you can
press numeric buttons to choose.
4.The DVD player begins with the chapter 1 of the chosen title.
Sequence Play
1.Compatible with DVD, SVCD, VCD, CD, HD-CD, WMA, Digital audio/JPEG discs.
2.When a SVCD or VCD disc is loaded and PBC is on, once ANGLE button pressed ANGLE
switches off. Then the player can play in sequence playback mode; when ANGLE button pressed
twice, ANGLE switches on.
3.
For SVCD and VCD discs, and PBC is ON, press the PBC button once to turn OFF, and the player
will play in sequence mode.

Program Play
1.Compatible with DVD, SVCD, VCD, CD, HD-CD, WMA, Digital audio/JPEG discs.
2.The Program Playback option allows you to enter the order in which you want chapters or tracks
to play, maximum to 16.
3.Program Menu:
If PBC is on, this operation will turn PBC off while the chapters / tracks plays in programmed
order.
4.According to the highlight, use the Numeric buttons to enter the chapters / tracks in the order
you want them to play. Then press Play or use Arrow buttons to highlight the “PLAY” item and
press Enter. The chapters / tracks will play in the programmed order. You can program
maximum 16 titles / chapters / tracks.
5.According to the Direction Indicator on the menu, you can press Arrow buttons to highlight
where you want to enter.
6.During Program Playback, if program button is repressed, the program order and the contents
will be displayed on the screen, and the Program Playback will be stopped; also you can press
Stop and Play to resume normal playback.
7.Notes:
To clear the program order, use Arrow buttons to highlight the “CLEAR” item,then press Enter.
To modify the program order, use Arrow buttons to highlight the item you are changing and enter
the new chapter / track you want to program directly.
8.The program indicator in the screen, and the playing chapter / track illuminate.

Additional operation
Selecting Tracks
1.Compatible with DVD, SVCD, VCD, CD, HD-CD, WMA, Digital audio/JPEG discs.
2.When playing a DVD disc, press Numeric buttons on the menu or title page to select tracks;
During DVD playback, you can input desired title numbers directly.
3.During sequence playback of a SVCD or VCD disk, press the numeric buttons to select tracks.
(During Program Playback and when the PBC is on, you can only press Prev / Next button to
select)
4.As for CD, HD-CD, discs, press Numeric buttons directly to select tracks.
5.When playing WMA, Digital audio/JPEG discs, press Numeric buttons to select different
tracks on current track list.
Skipping Tracks
1.Compatible with DVD, SVCD, VCD, CD, HD-CD, WMA, Digital audio/JPEG discs.
2.To skip forward to the beginning of the next title / chapter / track on a disc, press Next on the
remote or the right side of the player.
3.To skip backward to the beginning of the preceding title / chapter / track on a
disc, press Prev on the remote or the right side of the player.
Multispeed Fast/Slow Motion Play
1.Compatible with DVD, SVCD, VCD, CD, HD-CD, WMA, Digital audio/JPEG discs.
2.Press the Multispeed Fast/Slow button on the remote during play to search through a disc.
Multispeed Fast/Slow has three speeds:×2,×4,×8,×20. With each consecutive press of the
button, the search speed increases. If you press the button five times, Fast Multispeed
Fast/Slow cycles back to normal play.
3.During DVD play, when Multispeed Fast/Slow gets to the beginning of the next title / chapter, it
resumes normal play; During SVCD or VCD play with PBC on,when Fast Forward Play gets to the
beginning of the next track, it resumes normal play.
Multiphase Slow Motion Play
1.Compatible with DVD, SVCD, VCD, CD, HD-CD, WMA, Digital audio/JPEG discs.
2.Multiphase Slow has five speeds:1/2, 1/3, 1/4, 1/5, 1/6, 1/7 of the normal speed play when press
Slow button consecutively in playing discs.
3.When press Play button or press the slow button seven times, it goes to normal station.]
Freeze Frame
1.Compatible with DVD, SVCD, VCD, CD, HD-CD, WMA, Digital audio/JPEG discs.
2.During CD, HD-CD, WMA or Digital audio disc / JPEG playback, press Pause once to freeze
playback; Press Play button to resume normal playback.

Using the Repeat Feature
1.Compatible with DVD, SVCD, VCD, CD, HD-CD, WMA, Digital audio/JPEG discs.
2.While a disc is playing, press Repeat button once, and the repeat banner appears to show
current repeat mode.
In SVCD,VCD,CD, HD-CD,WMA, Digital Audio,/JPEG sequence playback mode
A) ,Press Repeat
button again to turn on repeat mode. Press the button again on the remote to turn to the next
repeat mode. There are three repeat options: Off, Track Repeat, and Disc Repeat.
With each consecutive press of the button, the repeat mode switches. If you press the
button four times, repeat mode cycles back to Off.
b)In DVD playback, press Repeat button again to turn on repeat mode. There are three repeat
options: Off, Chapter Repeat, and Title Repeat. With each consecutive press of the button,
the repeat mode switches. If you press the button four times, repeat mode cycles back to Off.
c)In WMA, Digital audio disc / JPEG playback, press Repeat button again to turn on repeat mode.
There are four repeat options: Off, Track Repeat, Directory Repeat, and Disc Repeat. With each
consecutive press of the button, the repeat mode switches.
If you press the button five times, repeat mode cycles back to Off.
Using the Search Feature
1.Compatible with DVD, SVCD, VCD, CD, HD-CD discs.
2.You can use Search feature to select a title / chapter / track number or go to a specific point in
a title. First, press Search button on the remote controller to bring up the search menu and enter
the edit state; Secondly, press Arrow buttons to highlight the title / chapter / track number or the
time option; Thirdly, use Numeric buttons to enter the title / chapter / track you want to play or
the elapsed time you want to go to in that title; At last, press Enter button to start playback. For
example, entering 01:23:56 will start playback one hour, twenty-three minutes and fifty-six
seconds into the title.
3.Notes
a)This feature does not work in Program Play mode.
b)If PBC is on, it will turn off automatically when Search Playback starts.
When playing WMA, Digital Audio or JPEG discs, the Search feature does not work
C)
Changing the Soundtrack or Language
1.Compatible with DVD SVCD, VCD, CD, HD-CD, WMA, Digital audio/JPEG discs.
2.Press the LANGUAGE button to display current soundtrack.
A)Press the button to switch soundtracks.
b)Press the button again on the remote to turn to next soundtrack.
3.When playing a SVCD or VCD disc, there are five soundtracks: Stereo (L/R), L/L, R/R, L/L Auto
A/D Detect, and R/R Auto A/D Detect. With each consecutive press of the button, the soundtrack
switches. If you press the button six times, soundtrack cycles back to Stereo.
4. When playing CD,HD-CD,WMA, or Digital Audio discs, there are three (L/R),L/L and R/R.
5.When playing a DVD or SVCD disc, press LANGUAGE button to display current language, press
the button again to turn to next language if the disc has different languages.

Subtitles
1.Compatible with DVD, SVCD discs.
2.Press the Subtitle button on the remote once, and the subtitle info banner appears.
3.When a DVD or SVCD is recorded with subtitles, you can use the Subtitle feature to view the
subtitles on-screen. By default, subtitles are off. The info banner will display Subtitle Off.
4.To display subtitles, press the Subtitle button again. The default language with its responding
serial number will be displayed in the info banner and subtitles will be displayed in that language.
With each consecutive press of the Subtitle button, the subtitle switches. For
example, “Language Icon: [1 English DTS 6CH] or [Off]” (the availability of the subtitles are
disc-dependent). To turn subtitles off, press the Subtitle button until Subtitle Off is displayed.
Mute the Audio Output
1.Compatible with DVD, SVCD, VCD, CD, HD-CD, WMA, Digital audio/JPEG discs.
2.Pressing the Mute button allows you to reduce sound to an inaudible level, and the icon of
“MUTE” will be displayed on screen. Press the button again or press the Vol +/- button to return
to the normal condition.
3. If playing back there is no sound, press the “Mute” button.
Zoom In the Video Image
1.Compatible with DVD, SVCD, VCD, JPEG discs.
2.The Zoom Function allows you to enlarge the video image.
3.Press Zoom repeatedly to activate the function and choose the required zoom factor: Zoom 1,
Zoom 2, Zoom 3, Zoom 1/2, Zoom 1/3, Zoom 1/4, Zoom Off.
Repeat a Specific Segment on the Disc that You Define
1.Compatible with DVD, SVCD, VCD, CD, HD-CD, WMA, Digital audio discs.
2.During the normal or fast motion playback, press the A-B button once, and
“REPEAT A-” will appears on the screen. This indicates the start of the loop to
be repeated.
3.During the normal of fast motion playback, press A-B again, and “REPEAT A-B”
will appears on the screen. It indicates the end of the loop.
4.Looping will run from set point A to set point B until you turn off Repeat.
5.Press A-B again to cancel A-B loop mode.
6.When playing a SVCD, VCD, or CD disc, you can repeat a specific segment only
in one track. When the next track begins, A-B Repeat turns off automatically.
7.When playing a DVD disc, you can repeat a specific segment only in one title.
Digital Audio
1.Compatible with Digital Audio discs.
2.The set will search the directory of the disc automatically and will be displayed on the screen.
3.The set will then play the disc automatically according to the directory listed.
4.To select the directory use the direction buttons.
19

9.System operation
System operation will define the setting of the set, these
settings will be stored until you
change them again.
General Steps of Setup Menu
1. Press SETUP button of the remote control, the main menu will appear on the screen,and
the system will be paused.
SYSTE M SET UP
TV SYSTEM
TV TYPE
PASS WOR D
RATI NG
DEFAULT
EXIT SETUP
2.Press the CH+/- buttons to highlight the icon of the desired page, then press the button to
activate that page; For example, if you want to setup the video page, press to highlight the
video icon, the video page will be displayed on the screen.
3.Press the CH+ button to highlight the desired option. Press Enter or press button to select the
choices of that option appear on the right.
4.Press the Arrow buttons to highlight the Exit Setup option, then press Enter or Setup again to
exit Setup Menu.
5.When launching the setup routine, the pressing of the following buttons will turn off the setup
menu, while the choices that have been changed will be saved: Subtitle, F.F, F.R, Vol +/-, PBC,
Title, Return, Play/Pause, Stop, Next, Prev, S.F, S.
R, Zoom, Display, Program, Repeat, A-B, language, Mute, Setup.
Menu specification
1.SYSTEM SETUP
The system setup options are illustrated below:
20

-TV SYSTEM: According to the Color System of the TV, you can choose the TV System..
-PASSWORD: The password option is initialized as locked, and you cannot set the ratings limit or
change the password. In order for the Ratings feature work, the password mode must be turned
on. If you want to set the ratings limit, you will need to enter the default password, which is 0000,
then press Enter to confirm. To change the password, you will be prompted for the old password,
then be prompted for a new. Enter a 4-digit number (this is your password).
-RATING: The Rating feature is a rating limit system, like movie ratings. It works with DVD discs
that have been assigned a rating. This helps you control the types of DVDs that your family
watches.
There are 8 level of selection, from KID SAFE to ADULT, Adult is the "play all"selection.
2.LANGUAGE SETUP
The language setup options are illustrated below:
LANGUAG E SETUP
OSD LAN GUAGE
AUDIO L ANG
SUBTI TLE LAN G
MENU LA NG
EXIT SE TUP
-OSD LANGUAGE: The OSD will display in the language you choose.
-AUDIO LANG: If the disc you are playing has the language you choose, it will output audio in
that language.
-SUBTITLE LANG: If the disc you are playing has the language you choose, it will displays
subtitles in that language..
-MENU LANG: If the disc you are playing has the language you choose, it will displays menu
in that language.
21

3.AUDIO SETUP
The audio setup options are illustrated below:
AUDIO S ETU P
AUDIO OUT
TON E
EXIT SETUP
SPDIF/OF F
SPDIF/RAW
SPDIF/PC M
#
+4
+2
0
-2
-4
-Highlight the AUDIO OUT option, and press the Arrow buttons to choose the audio output mode
you prefer. Press Enter to confirm; There are 3 optional audio output modes: SPDIF /OFF,
SPDIF / RAW, and SPDIF/ PCM.
-TONE:Use the Up and Down arrow button to move the scroll and adjust the tone.
4.DIGITAL SETUP
The video setup options are illustrated below:
DYNAMIC RANGE : use the Up and Down
-
arrow button to move the scroll and adjust
the dynamic rangeo.
-DUAL MONO:Choose the mode of the
audio output. Three are four modes:
STEREO,MONO L,MONO R,MIX MONO.
DIGITAL SET UP
DYNAM IC RA NGE
DUAL MO NO
EXIT SE TUP
STEREO
MONO L
MONO R
MIX MONO
FUL L
6/8
4/8
2/8
OFF
22

10.User Help Guide
If you are still having difficulty please call the Technical help line. Ring 01422 203676
(Normal rates apply).
Opening hours Mon-Fri 8 am 8pm. Sat 9 am 4pm. Sun 11am 4pm “Bank holidays as Sun”
23

11.Disc Handling and Care.
The performance and continued good performance of the DVD section relies on good care of
your DVD/CD discs.
Discs Formats Supported By This Player
Maximum playback form
Size
12cm
DVD video
disc
Disc mark
Contents
Audio+ Vid eo
(movin g pic tur e)
CD
Digita l
Audio
JPEG
Audio
Audio
12cm
- The operating method of some DVD discs is specified by the software marker.
Please refer to this instruction manual of the disc.
- The DVD Player will play most recordable(CD-R) or erasable (CD-RW)CDs,but
playback of CD-R or CD-RW discs created on a computer requires proper formating
and finalization of the disc foe audio playback. Some computers and/or formating
and finalization of the disc for audio playback. Some computers and/or software
programs may not be capable of creating compatible discs.
About Disc Terms
Title
Generally,pictures or music compressed on a DVD are divided into several sections,”title"
Chapter
The smaller section unit of picture or music in a DVD under the title,usually one title is comprised of
one or more chapters and each of them is numbered for easy searching,But some discs may not
have a recording chapter.
Track
A segment of picture or music on a CD,Each track is numbered for searching.
Care of Disc
Video disc contains high-density compressed data that needs proper handling.
1.Hold the disc with fingers by outer edge and/or the center spindle hole.Do not touch the dics
surtace.
2.Do not bend or press the disc.
3.Do not expose the disc to direct sunlight or heating sources,Stere discs in cabinet vertically,and in
dry condition,Prevent exposure to:
- Direct sunlight
- Heat or exhaust from a heating device
- Extreme humidity
Clean the disc surface with a soft,dry cleaning cloth,Wipe the disc surface gently and radically from
center toward the outer edge,Do not apply thinner,alcohol,chemical solvent,or sprays when cleaning.
Such cleaning fluids will permanently damage the disc surface.

12.Technical Specification
TV Dimensions
Net weight (Kg's)
Screen Size
Screen Ratio
Definition
Angle of view
Brightness (cd/m2)
Contrast
Inputs
DC Supply
Power Consumption
Tuner range
DVD disc size
VGA support
490x196x415 mm
5.2kg
19” (48cm) diagonal
16 :10
1440 x 900 pixels
150 x 130 deg
300
500 : 1
Tuner,S-Video,Video (1vPP)VGA, SCART, Audio
12V @ 5A
60W
VHF 48 224 Mhz, UHF 471- 847 Mhz
12 cm only (4.75”)
640x480 60Hz 70Hz 75Hz
800x600 60Hz 70Hz 75Hz
REMOTE CONTROL
Control Distance
Control Angle
Batteries
Weight
1024x768 60Hz 70Hz 75Hz
1280x600 60Hz 70Hz 75Hz
1280x720 60Hz 70Hz 75Hz
1280x768 60Hz 70Hz 75Hz
> 6 metres
> 30 deg
2 x “AA” 1.5V cells
70 g (without batteries)
25

Mains Plug Wiring Diagram
For your own saftty read following instruction before attempting to connect this unit to the mains
supply
MAINS (AC) OPERATION
The wires in the main lead are coloured in accordance with the following code:
IMPORTANT
As the colours of the wires in the mains lead of this appliance may not correspond with the coloured
markings identifying the terminals in your plug, proceed as follows:
The wire which is coloured green and yellow must be connected to the terminal which is marked with
the letter E, or by the earth symbol, or coloured green or green and yellow.
The wire which is coloured blue or black must be connected to the terminal which is marked with the
letter N or coloured Black.
The wire which is coloured brown or red must be connected to the terminal which is marked with the
letter L or coloured Red.
For continued protection against risk of fire, replace only with same type and rating of fuse(ASTA
Approved 3A 250VAC fuse)
If your product is fitted with a moulded plug which requires replacement please out off and dispose
of safety, then rewire as shown above.
Wall Mounting
The Tv is provided with mounting holes for a VESA approved wall mounting bracket (NOT
SUPPLIED). Remove the Two Posi screws holding the base to the base bracket and lift the base
away (do not remove the base mounting bracket). Mount the VESA bracket using 4x 4mm x 10mm
Iso metric threaded screws (not supplied). Do NOT use screws longer than 12mm, damage will
occur to the internal parts. Fit the wall bracket securely following the manufacturers instructions.
Akura accept no responsibility for damage caused by faulty bracket installation.
26
 Loading...