

Akura ASW8411-250 User Manual

ASW8411-250
HARD DRIVE / DVD RECORDER
DVD +/- Write /Re Writable
USER MANUAL
Customer Help Line 01422 203676

TABLE OF CONTENT
A
Safety information.........................................................................
B
Front Panel and Rear Panel..............................................................
C
1
2
3
4
565
6
7
8
9
10
11
12
13
14
15
16
17
18
19
20
21
c
Basi
Connections..........................................................................
Featur
Dis
Remot
e
Hightlights............................................................................
c
Types..........................................................................................
e
Control..................................................................................
On Screen Set-up.............................................................................
4.1.Settin
4.1.Setting the Tim e a nd Date............................................................................................................... .
4.2.Settin
4.2.Settin
4.3.Settin
4.3.Settin
4.4.Parenta
4.4.Parenta
4.5.Settin
4.5.Settin
4.6.T
4.6.T
Pow
Rec o rding/Tim
6.1.Save...........................................................................................................................................
6.1.Save.............................................................................................................................................
6.2.Recodin
6.2.Recodin
6.3.Recodin
6.3.Recodin
6.4.Recodin
6.4.Recodin
6.5.Chapte
6.5.Chapte
g
the Time and Dat e. .. .. .. .. .. .. .. .. .. .. .. .. .. .. .. .. .. .. .. .. .. .. .. .. .. .. .. .. .. .. .. .. .. .. .. .. .. .. .. .. .. .. .. .. .. .. .. .. .. .. .. .. .. .. ...
g
the Language...................................................................................................................... .
g the Language.......................................................................................................................
g the Video Preferences......................................................................................................... .
the Video Preferences..........................................................................................................
g
l Control.............................................................................................................................
l
Control............................................................................................................................ .
the Digital Aud io Ou tp ut .. .. .. .. .. .. .. .. .. .. .. .. .. .. .. .. .. .. .. .. .. .. .. .. .. .. .. .. .. .. .. .. .. .. .. .. .. .. .. .. .. .. .. .. .. .. .. .. .. .. ...
g
the Digital Aud io Ou tp ut .. .. .. .. .. .. .. .. .. .. .. .. .. .. .. .. .. .. .. .. .. .. .. .. .. .. .. .. .. .. .. .. .. .. .. .. .. .. .. .. .. .. .. .. .. .. .. .. .. .. ...
g
V
Channel Set-up..........................................................................................................................
V
Channel Set-up..........................................................................................................................
r On/Off.. . ........... ........... . ........... . .......... . ........... . .....
e
Shi f ting....... . ........... ........... . ........... ....
e
to DVD............................................................................................................................ .
g
g to DVD.............................................................................................................................
g
Quality............................................................................................................................ .
g Quality.............................................................................................................................
g Source............................................................................................................................ .
g
Source.............................................................................................................................
r Markers.............................................................................................................................
r Markers.............................................................................................................................
Timer Recording.........................................................................
Dubbing..........................................................................................
DV
D
Disc Menu................................................................................
Dis
c
Edit Menu................................................................................
Titl
e
Edit Menu................................................................................
Palybac
Hd
k
from Optical Drive.......................................................
d
Title List..................................................................................
Sorting..........................................................................................
Playbac
15.1.Pla yb ac k o f R ec or de d Disc.... .. .. .. .. .. .. .. .. .. .. .. .. .. .. .. ......................... .. .. .. .. .. .. .. .. .. .. .. .. .. .. .. .. ................15.1.Pla yb ac k o f R ec or de d Disc.... .. .. .. .. .. .. .. .. .. .. .. .. .. .. .. ......................... .. .. .. .. .. .. .. .. .. .. .. .. .. .. .. .. ................
k
from HDD....................................................................
HDD Edit..........................................................................................
e
16.1.Delete.......................................................................................................................................
16.1.Dele
16.2.Spl
16.2.Split..........................................................................................
16.3.Segme
16.3.Segment..........................................................................................
16.4.Chang
16.4.Chang
16.5.Rena
16.5.Rename..........................................................................................
16.6.Lo
16.6.Lock..........................................................................................
16.7.Prote
16.7.Protect..........................................................................................
..........................................................................................
t
..........................................................................................
t
i
..........................................................................................
t
n
e Index Pivture
Index Pivture....................................................................................................................
e
..........................................................................................
e
m
..........................................................................................
ck
..........................................................................................
c
t
..........................................................................................
............................................
.
.. .................................................
.. .................................................
.............................................
.
.. ............................................
.. ...........................................
.. ...........................................
................................................
.
.
................................................
.
............................................
.. ...........................................
Concurrency Scenarios Summary........................................................
17.1.Bas ic DV D R ec or de r Operatio ns.. .. .. .. .. .. .. .. .. .. .. .. .. .. .. ............................ .. .. .. .. ......................... .. .. ...17.1.Bas i DVD Recor de r Operations............ .. .. .. .. .. .. .. .. .. .. .. .. .. .. .................. .. .. .. .. .. .. .. .. .. ......................
Specifications.....................................................................
Troubl
Carin
Main
Shooting.................................................................
e
discs...................................................................
for
g
Plug Wiring.................................................................
s
.
.
.
.
.
.
.
.. ........................
14-
14-
.
18-
18-
22-
22-
27-
27-
1-
2
1-
2
3
3
4-
5
4-
5
6
6
7
7
8
8
9
9
10
10
11
11
11
11
12
12
13
13
13
13
14
14
1
5
1
5
.
16
16
17
17
18
18
18
18
18
18
1
9
1
9
20
20
20
20
20
20
21
21
2
6
2
6
27
27
27
27
2
8
2
8
28
28
29
29
29
29
29
29
30
30
31
31
31
31
32
32
33
33
33
33
33
33
34
34
35
35
36
36
36
36
A.
CAUTION. PLEASE READ AND OBSERVE ALL WARNINGS AND INSTRUCTIONS GIVEN IN THIS USER
MANUAL AND MARKED ON THE APPLIANCE. RETAIN THIS BOOKLET FOR FUTURE USE.
set has been designed and manufactured to assure your personal safety. Improper use can result in
This
ctric shock or Fire hazard. The safeguards in this appliance will protect you if you observe the correct
Ele
ocedures for installation, servicing and operation. There are NO user parts inside. DO NOT REMOVE
pr
THE CASE OR OTHER COVERS OR YOU MAY BE EXPOSED TO DANGEROUS VOLTAGES OR LASER
RADIATION AND WILL INVALIDATE YOUR WARRANTY. REFER ALL SERVICING TO QUALIFIED SERVICE
PERSONNEL.
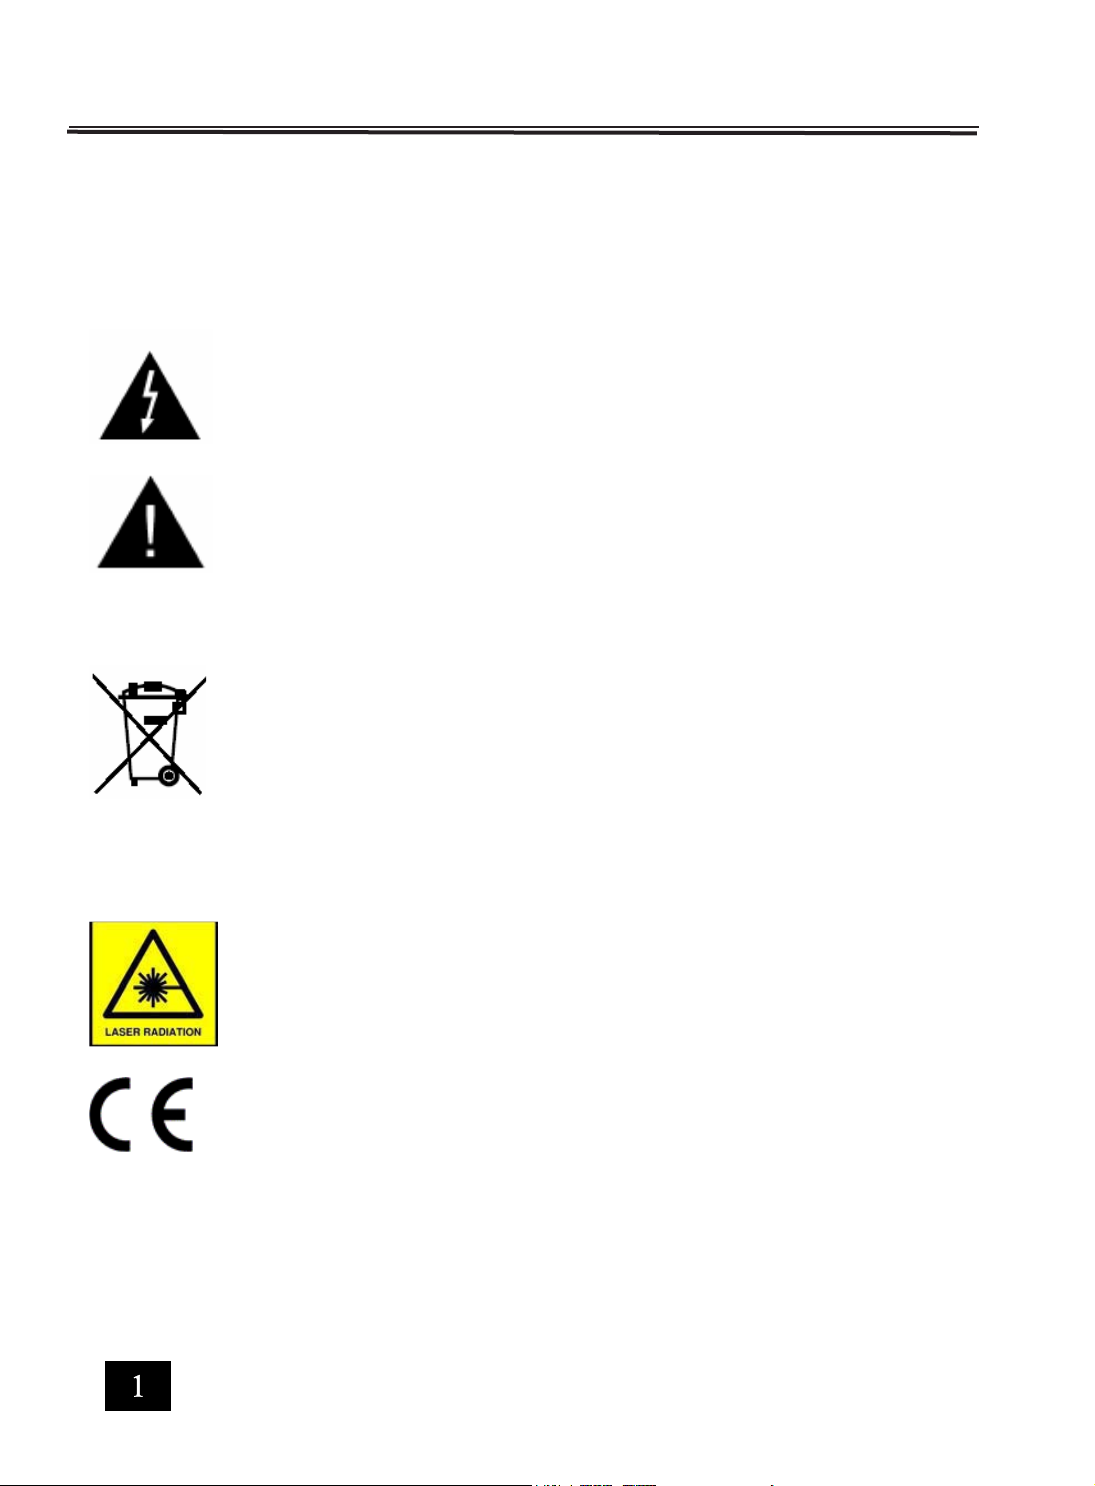
Safety Information
The lightning flash with arrowhead symbol, within an equilateral triangle,
is intended to alert the user to the presence of un-insulated “dangerous
voltage” within the products enclosure that may be of sufficient
gnitude to constitute a risk of electric shock to the persons.
ma
The exclamation point within an equilateral triangle is intend to alert the
user to the presence of important operating and maintenance (servicing)
uctions in the literature accompanying the appliance.
instr
Correct disposal of this Product
(Wast
e Electrical & Electronic Equipment (WEEE)
The crossed out “Wheelie bin” is intended to show that this appliance
not be placed with ordinary household waste at the end of its useful
must
life.
To prevent possible harm to the environment or human health from
uncontr
olled waste disposal, please keep separate from other household
waste and recycle it responsibly to promote the sustainable reuse of
material
resources.
Household users should contact either the retailer where you purchased
the product, or their local government office for details of where and how
you can take this item for environmentally safe re-cycling.
Business users should contact their supplier and check the terms and
conditions
of the purchase contract. This product must not be mixed with
other commercial wastes for disposal
CLA
SS 1 LASER PRODUCT
DANGER : INVISIBLE LASER RADIATION WHEN OPEN AND
INTERLOCKS DEFEATED, AVOID EXPOSURE TO BEAM
This appliance complies with European Safety and Electrical directives
WARNING. THIS APPLIANCE MUST BE EARTHED

A.
Location.
Do not plac
othe
harm its functions.
Do not p
airflow is necessary to maintain trouble free operation.
Thi
s apparatus contains a small ventilation fan, do NOT
obstruct its grill
ter and Moisture.
Wa
Do not use t
locations such as basements.
Do not place vases or other
the
e
on an unstable surface loose shelves or
r
similar place. Dropping this apparatus will severely
lace where ventilation is restricted, a good
hi
s appliance near water, or in damp
pliance
ap
such containers on top of
Sa fe ty Information
Power cord protection.
Do not p
stepped on. Do not pull the cord when removing the
mains plug, grip the plug body firmly.
Lig
During a th
long periods such as holidays, disconnect the aerial
input (if external aerial) and remove the mains plug, This
is to prevent power surges damaging the apparatus
lace wires where they may be tripped over or
htning.
understorm or when leaving the appliance for
Object or Liquid entry
No not
allow objects to be pushed into the ventilation
slots, they may touch live parts and cause an electric
shock. Do not spill any liquids into the appliance.
If e
ither should happen, disconnect from the mains
supply and contact a service engineer. DO NOT attempt
to repair yourself.
Ventilation.
Slots and openings in the cabinet are provided for
ventilation to ensure the correct operation of the
appliance.
Do NOT blo
Do NOT pl
restri
Do not place
placing in a cabinet this apparatus should be at the
om of the appliance “Stack”
tt
bo
He
at
Do not plac
such as radiators or in direct sunlight
Power cord protection.
Do not p
stepped on. Do not pull the cord when removing the
mains plug, grip the plug body firmly.
ck
any slots or restrict any Fan opening.
on fabric or soft furnishings, this will
ace
ct airflow.
a cabinet without sufficient clearance. If
in
.
on or near appliances that radiate heat
e
wires where they may be tripped over or
lace
Disc Tray.
Keep your fingers well clear of the DVD disc drawer
when it is closing, it may cause injury and damage to the
player. Do NOT push the disc drawer to close, use the
Open / Close button on the appliance.
Do NOT
supervision.
Dama
Should any of the following happen, disconnect from the
mains supply and call an engineer or Technical Help
Centr
Damage
Liquid or other objects enter the casing.
The
If the
no
If
allow children to operate this apparatus without
equiring Service.
ge
R
e. :-
the
mains cord or plug.
a
pparatus has been exposed to rain or moisture.
pliance does not operate in accordance with the
ap
rmal operation expected.
appliance has been dropped or the case damaged.
the
B
FRONT PANEL
1. STANDBY ON/OFF 8. DVD DOOR
2. VIDEO INPUT (CVBS) 9. DOOR OPEN / CLOSE
3. AUDIO IN LEFT 10. PLAY
4. AUDIO IN RIGHT 11.PAUSE
5. S-VIDEO INPUT 12. INPUT SOURCE
6. DV INPUT (Firewire) 13 PREV / NEXT
7. USB INPUT 14. CH + / -
250
1. TUNER RF INPUT 13. COAXIAL RF(AUDIO) OUTPUT
2. TUNER RF OUTPUT (Loop through) 14. Cr / Pr OUTPUT
3. VIDEO INPUT (CVBS) 15. AUDIO OUTPUT (OPTICAL)
4. S-VIDEO INPUT 16. SUB WOOFER OUTPUT
5. AUDIO LEFT INPUT 17. SURROUND RIGHT OUTPUT
6. AUDIO RIGHT INPUT 18. SURROUND CENTRE OUTPUT
7. VIDEO OUTPUT (CVBS) 19. SURROUND LEFT OUTPUT
9. MIXED AUDIO LEFT OUTPUT 21. FRONT RIGHT OUTPUT
10. Y (Luma) OUTPUT 22. SCART OUTPUT
11. MIXED AUDIO RIGHT OUTPUT 23. SCART INPUT
12. Cb / Pb OUTPUT 24. VENTILATION FAN
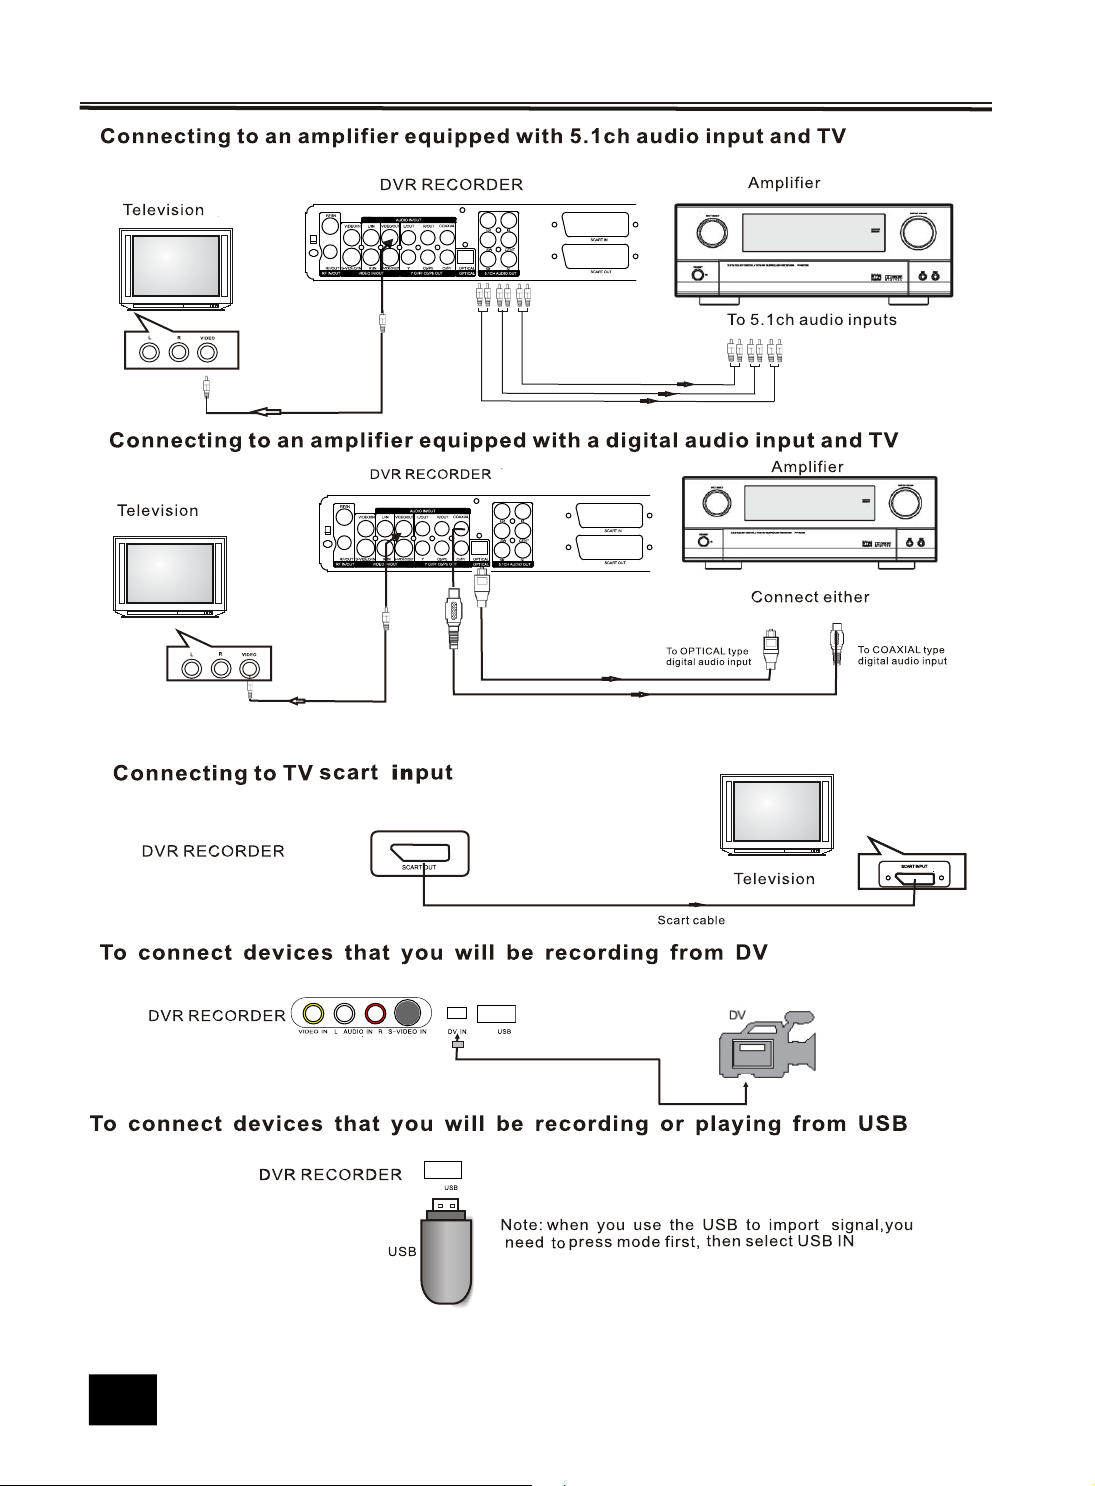
Note :- Do not have more than one Video output connected at any one time, picture degrading or interference may oc
cur.
3
C.
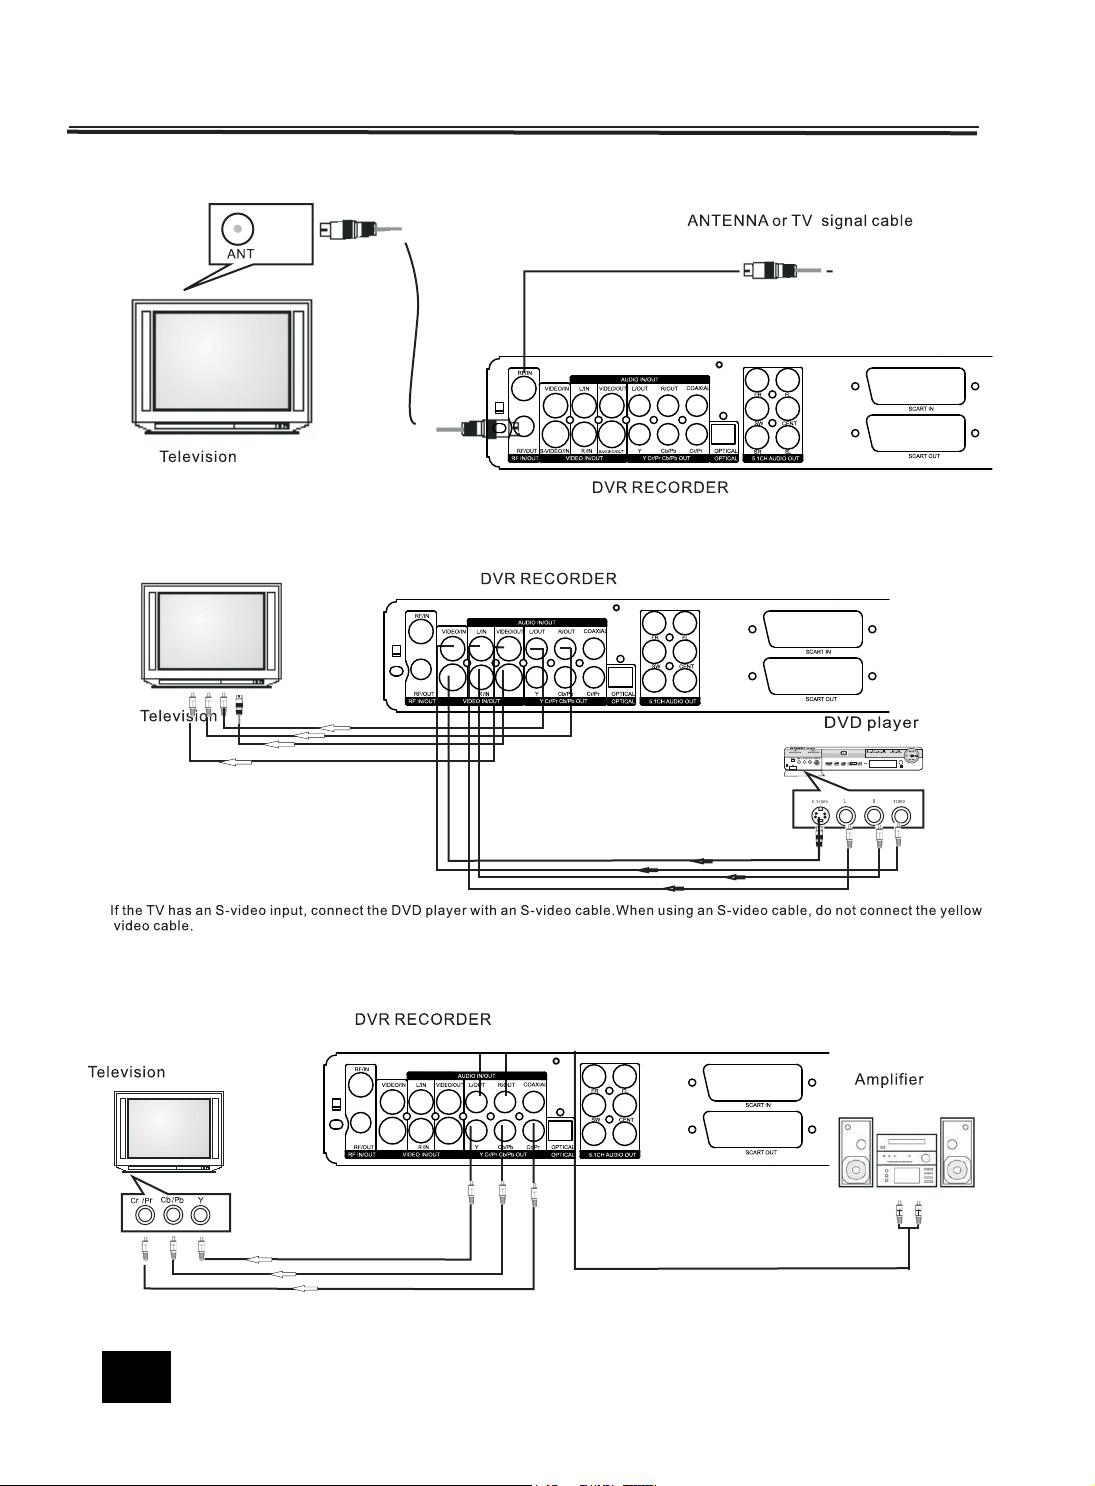
To Record fro m an an alo g cabl e TV si gnal, con nec t th e ca ble to the tu ner IN jac k.To Record fro m an an alo g cabl e TV si gnal, con nec t e I .
To connec t de vic es tha t yo u will be rec ord ing from (such a s DV D play er VCR ,et c)To connec t de vic es tha t yo u will be rec ord ing from (such a s DV D play er VCR ,et c)
BASIC
CONNECTIONS
Co nne ctin
S-VIDEO/OUT
S-VIDEO/IN
to a a udi o syst em a nd TV e qui ppe d wit h YU V vide o in putCo nne cting to a aud io syste m an d TV equip ped wi th Y UV vi deo inp ut
g
S-VIDEO/OUT
S-VIDEO/IN
SR SL
SR SL
4
5
1. Feature Highlights
Overview
Time ShiftingTime Shifting
Simultane
use
Pa
Pa
use
comma
comma
re
pla
re
pla
Play
Play
a previously recorded program while another
a previously recorded program while another
prog
ram
prog
ram
Program RecordingProgram Recording
ing
Record
Manua
Manua
recurr
recurr
ing
ing
Personal
video copyingPersonal video copying
and DV camcorder tapesAnalog and DV camcorder tapes
log
Ana
Easily
ily
Eas
industry-lead
industry-lead
VCR tapesVCR tapes
Watch
tch
Wa
sp
sp
eed
eed
le ,
Simp
Rename
Ren
ame
Segm
Segm
Ident
if
Ident
if
u
u
yo
yo
do not need-easily!
do not need-easily!
Video recording and playbackSimultaneous Video recording and playback
ous
and resume live TV broadcast, Issue trick mode
and resume live TV broadcast, Issue trick mode
nds
nds
like fast forward, fast rewind,jump,and instant
like fast forward, fast rewind,jump,and instant
y
y
is being recorded simultaneously
is being recorded simultaneously
from TV tuner or analog AV inputRecording from TV tuner or analog AV input
lly
set up timer recording for a TV program or a
set up timer recording for a TV program or a
lly
TV program
TV program
control a DV camcorder using LSI Logic s
control a DV camcorder using LSI LogiLogic’c’
ing
ing
Direct Digital Dub technology
Direct Digital Dub technology
a TV program(in tim shifting mode) while high-
a TV program(in timeme shifting mode) while high-
dubbing is in progress
dubbing is in progress
easy video editing, easy video editing
programs, Delete programs, Split programs,
programs, Delete programs, Split programs,
ent
ent
programs
programs
y
y
and keep the desired video and remove the Protions
and keep the desired video and remove the Protions
TMTM
Featrues
Time Shifting
Program Record
l
Man
ua
programming
programming
Man
ual
VCR
VCR
Plus+,VideoPlus&
Plus+,VideoPlus&
Show
Vie
Show
Vie
w
w
VPS/PDC
VPS/PDC
From
From
or
or
camcor
camcor
Du
Du
DVD,VCD,JP
DVD,VCD,JP
e video
fil
e video
fil
MPEG-
MP
Compressio
audi
audi
audi
DoMiN
DoMiN
vi
vi
deo encoding, progressive scan
de
ou
ou
(EU
(EU
Personal Video Archiving
VCR, analog camcorder,
VCR, analog camcorder,
digital(IEEE input(1-Link))
digital(IEEE input(1-Link))
der
der
with Direct Digital
with Direct Digital
TMTM
b
b
DVD Playback
EG,
EG,
1 Layer 2,
1 Layer 2,
EG-
o Dolby Digital & DTS digital
o Dolby Digital & DTS digital
o output
Visible Superior Video Qual
o
tpu
u
tp
n
R
X
oF
noise reduction and
noise reduction and
oFX
encoding, progressive scan
t
t
ing
)
)
MPEG
MPEG
Digi
tal Audio
, WMA, CD stereo
, WMA, CD stereo
ity
6
6
USB Interface
JPEG picture slide show Digit
Compress
Copying pictures and music o
recordable
The
Th
HDD DVD
is
ionCompression
music playb
Drecordable DVD
DV
Recorder
Reco
.
ode
rd
Region C
region code for this
region code for this
e
TWO
ac
r
e
al JPEG picture slide show Digital AudioAudio
k music playback
nt
oCopying pictures and music onto
2. Disc Types
The DVD Recorder capable of recording on the following types of disc:
Lo
go
Disc type comments
DV
D+R
W
DVD
+R
W
-R
DVD
R
D-
DVD-R
The
DVD Recorder is capable of playing the following types of discs:
Lo
go
Disc type comments
DV
DVD-Vi
+R
D
DV
DVD+
RW
d
o
e
eo
Vid
recording in DVD+VR format
ISO-96
60
JPG
archiving
for Digital Audio Compression/WMA and
-R
DV
D
-R
The DVD Recorder cannot play back the following type of discs:
E:
NOT
DVD-
RA
M
SVCD(hi
DVD-Audio(M
gh
density layer)
LP
DVD
RW
DVD
-
D
VC
Aud
io CD
CD-R/
-R
encoded tracks)
W
DVD-Vid
DVD+
Vid
Fo r
JP
eo
format (disc must be finalized)
VR
format
eo
CD, Super VCD
playback of CD-DA, Digital Audio Compression,
EG
files,WMA
7
/FILE/FILE
Do not break open or throw on a fire exhausted batteries.
If batteries “leak” remove immediately, clean out any residue with warm soapy water, do
NOT allow water to enter the main body of the Remote Control, dry thoroughly before fitting
new batteries.
Do not throw old batteries in the domestic waste. Contact your local waste authority for
disposal instructions.
On-screen Set -up
The following Table provides the Setup options of the DVD Recorder(press
System Set-up MenuSystem Set-up Menu Setup ItemSetup Item
Record
OptionsOptions
Setup
DescriptionDescription
button on the remote)
Playback
Language
Clock
9
ing
4.1.Sett
The time and date will need to be set before a timer recording can be set. There are two ways to set the clock
of
the recorder: Auto Clock or Manual Clock setting.
Auto
ar
Man
manua
No
te:
-If the mains power is removed the clock and calendar will require require re setting before a timer
record
the time and date
Clock Setting-If a Public Broadcasting Station (PBS channel in USA)is a available in your
ea,
the clock may set itself automatically by tuning to this channel.
sure the antenna or cable box connections are correct.
Make
the channel to the local PBS station.
Cha
nge
Pres
s SETUP button on the remote control to display the SYSTEM SET-UP
U . Use CURSOR buttons on the remote control to move the highlight bar to
MEN
K and press SELECT .
CLOC
e CURSOR buttons on the remote control to move the highlight bar to TIME and
Us
s SELECT .
pres
ual
Clock Setting - If the clock does not autormatically set itself, the clock will need to be
lly
set.
Press SETUP button on the remote control to display the SYSTEM SET-UP
MEN
U .
Use CURSOR buttons on the remote control to move the highlight bar to CLOCK
and
press SELECT
Us
e CURSOR buttons on the remote control to move the highlight bar to DATE and
pres
s SELECT using the numeric keys to enter the correct date inmm/dd/yy/format
(Month/Day/Y
the CURSOR button on the remote control to move the highlight bar to TIME and
Use
pres
s SELECT using the numeric keys to enter the correct time in hh:mm format
(Hour:Minute:Seco
the date and time have been set press SETUP to exit
Af
ter
ing
can take place.
ear
)
nds
)
10
 Loading...