

ASDVCR210R-S
TV/VCR/DVD COMBINATION
User’s Manual
1

CAUTION: TO REDUCE THE RISK OF ELECTRIC SHOCK. DO NOT REMOVE COVER (OR
BACK).
NO USER SERVICEABLE PARTS INSIDE. REFER SERVICING TO QUALIFIED SERVICE
PERSONNEL.
The graphic symbols on the back cover of the set mean the following:
The lightning flash with arrowhead symbol within an equilateral triangle is intended to
alert the user to the presence of uninsulated "dangerous voltage" within the product's
enclosure that may be of sufficient magnitude to constitute a risk of electric shock to
persons.
The exclamation point within an equilateral triangle is intended to alert the user to the
presence of important operating and maintenance (servicing) instructions in the literature
accompanying the appliance.
WARNING : TO REDUCE THE RISK OF FIRE OR ELECTRIC SHOCK, DO NOT EX-
POSE THIS APPLIANCE TO RAIN OR MOISTURE.
INSTALLATION
LOCATE the receiver in the room where direct light does not strike the screen. Total darkness or
a reflection on the picture screen can cause eyestrain. Soft and indirect lighting is recommended
for comfortable viewing.
ALLOW enough space between the receiver and the wall to permit good ventilation. Should the
set be boxed in, allow at least 15cm ( 3” ) around all surfaces to provide sufficient ventilation.
AVOID excessive warm locations to prevent possible damage to the cabinet or component failure.
CONNECTION
This TV receiver can be connected to AC: 230V~ 50Hz .
AUTOMATIC DEGAUSSING
All color television receivers are sensitive to magnetic influences, usually caused by either mov-
ing the receiver from one place to another or using certain electrical appliances near the receiver.
This residual magnetism as it is called, sometimes causes distortion which gives rise to "blotchy"
areas of color in the picture. To avoid these effects the receiver incorporates an automatic
degaussing circuit which operates for a short while immediately each time the receiver is switched
on using the mains switch. This circuit removes any residual magnetism in the metal parts of the
picture tube, and ensures that each time the set is switched on, the pictures are lifelike.
2
CAUTION
Never tamper with any components inside your set, or any other adjustment controls not men-
tioned in this manual. All television receivers are high voltage instruments. Your Picture Tube is
highly evacuated. If it is broken, glass fragments will be expelled at a high velocity. Scratching,
Chipping or undue pressure must be avoided. When cleaning the set, it is wise to disconnect
from the mains supply. Use a soft dry cloth to clean the screen. Non-abrasive cleaning products
may be used should the glass become coated with smoke residue. Should your set become
Faulty. Do NOT attempt to repair. Call an Authorized Service Engineer.
LEAVING THE SET UNATTENDED
Should the user leave the set unattended for long periods, such as holidays. It is advised you
unplug the set from the Mains Supply, and if used, external aerial.
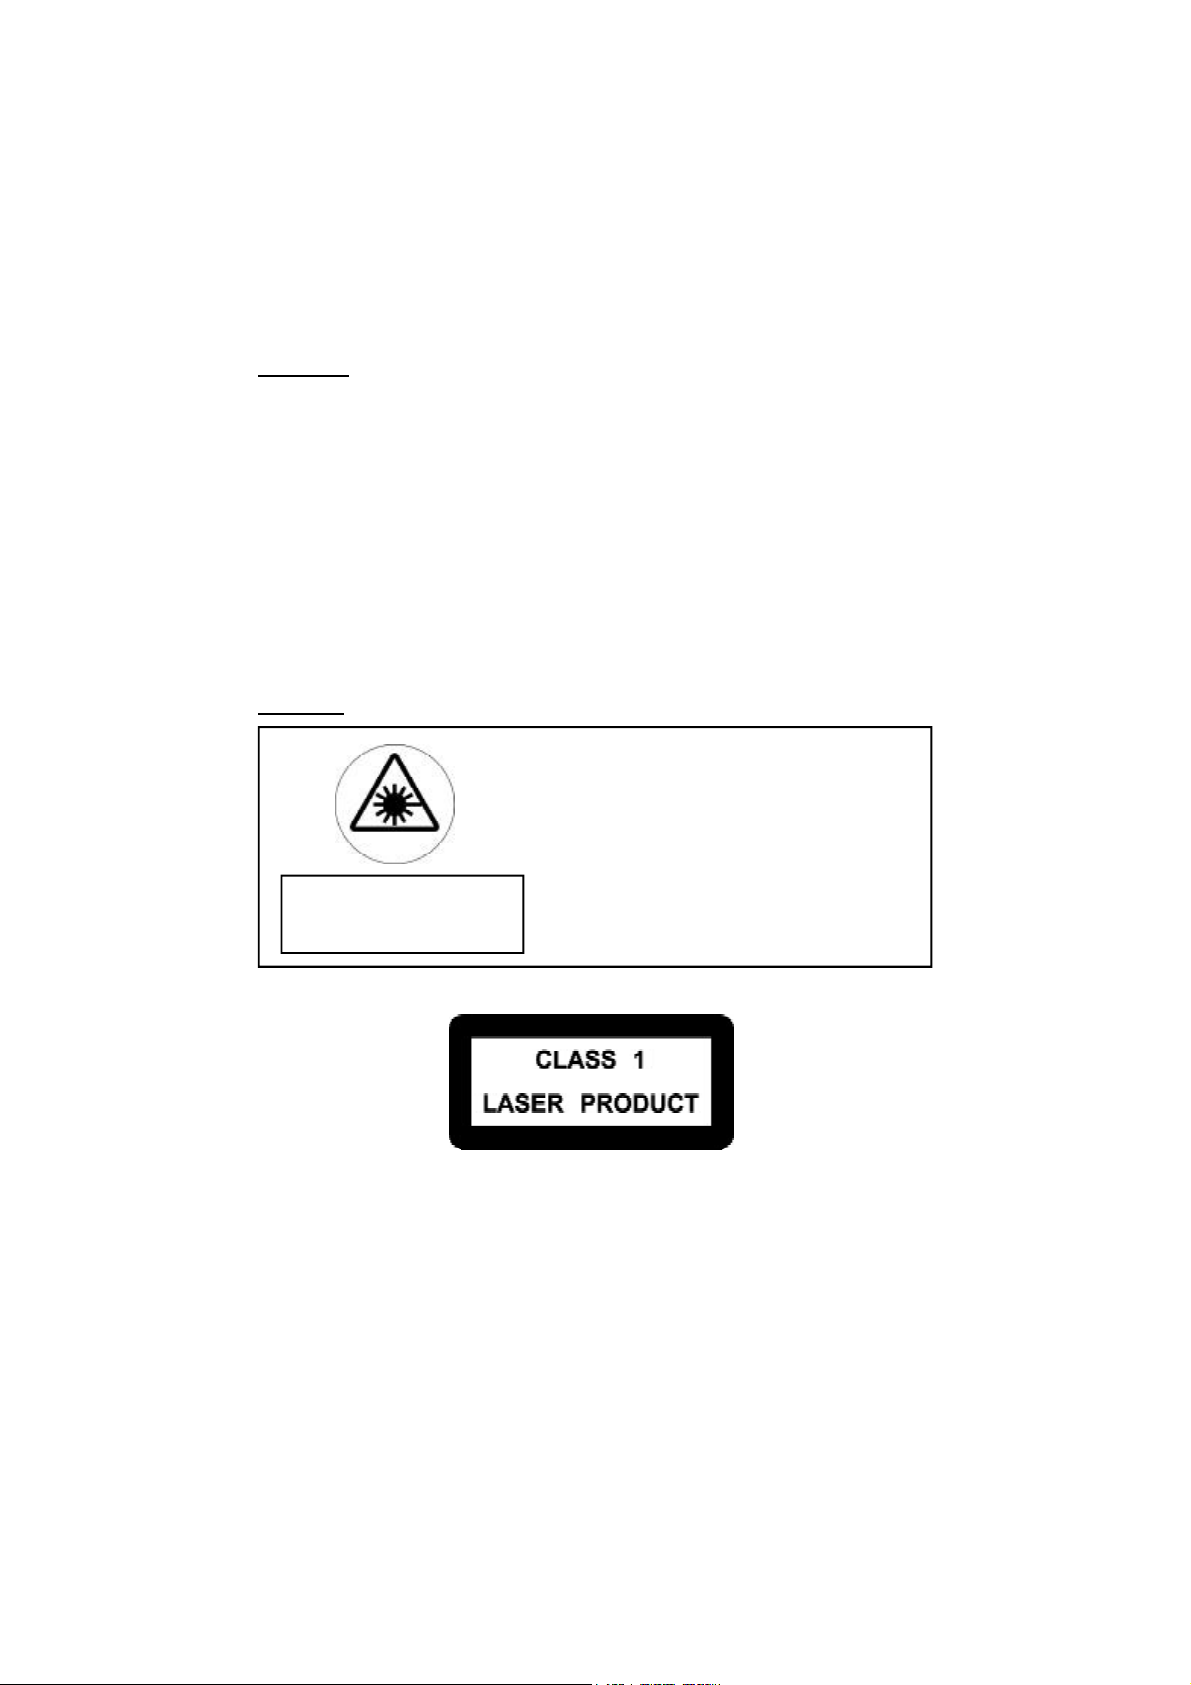
DANGER
laser safety
This unit employs an optical laser beam system in the CD
mechanism,designed with built in safeguards. Do not attempt
to disassemble, refer to qualified service personnel.
Exposure to this invisible laser light light beam may be harmful
to the human eye.
Invisible laser radiation when open
and interlock failed or defeated. avoid
direct exposure to laser beam.
THIS IS A CLASS-1 LASER PRODUCT. USE OF CONTROLS,
OR ADJUSTMENTS OR PROCEDURES OTHER THAN
THOSE SPECIFIED HEREIN, MAY RESULT IN HAZARDOUS
LASER LIGHT BEAM EXPOSURE.
3
IMPORTANT SAFEGUARDS
PREFITTED MAINS PLUGS
For you convenience a mains plug has been fitted to this appliance. For your safety please ob-
serve the following information.
1. Should the fuse in the plug fail, remove the plug from the wall socket and replace the fuse with
a 3 Amp ASTA approved to BS 1362 fuse.
2. Should the mains plug become detached, rewire in accordance with the diagram below.
3. If the mains plug is out off the cable, rewire the replacement plug in accordance with instruc-
tion give in this manual.
4. CAUTION: Under no circumstances should the discarded plug be inserted into the mains
socket. To prevent a shock hazard carefully dispose of the discarded plug.
Do not leave the plug lying around where children might see it.
CAUTION:
DANGEROUS VOLTAGES EXIST INSIDE THIS UNIT DO NOT REMOVE COVER
(OR BACK).
NO USER SERVICEABLE PARTS INSIDE REFER SERVICING TO QUALIFIED SER-
VICE PERSONNEL. DISCONNECT FROM MAINS SUPPLY WHEN NOT IN USE.
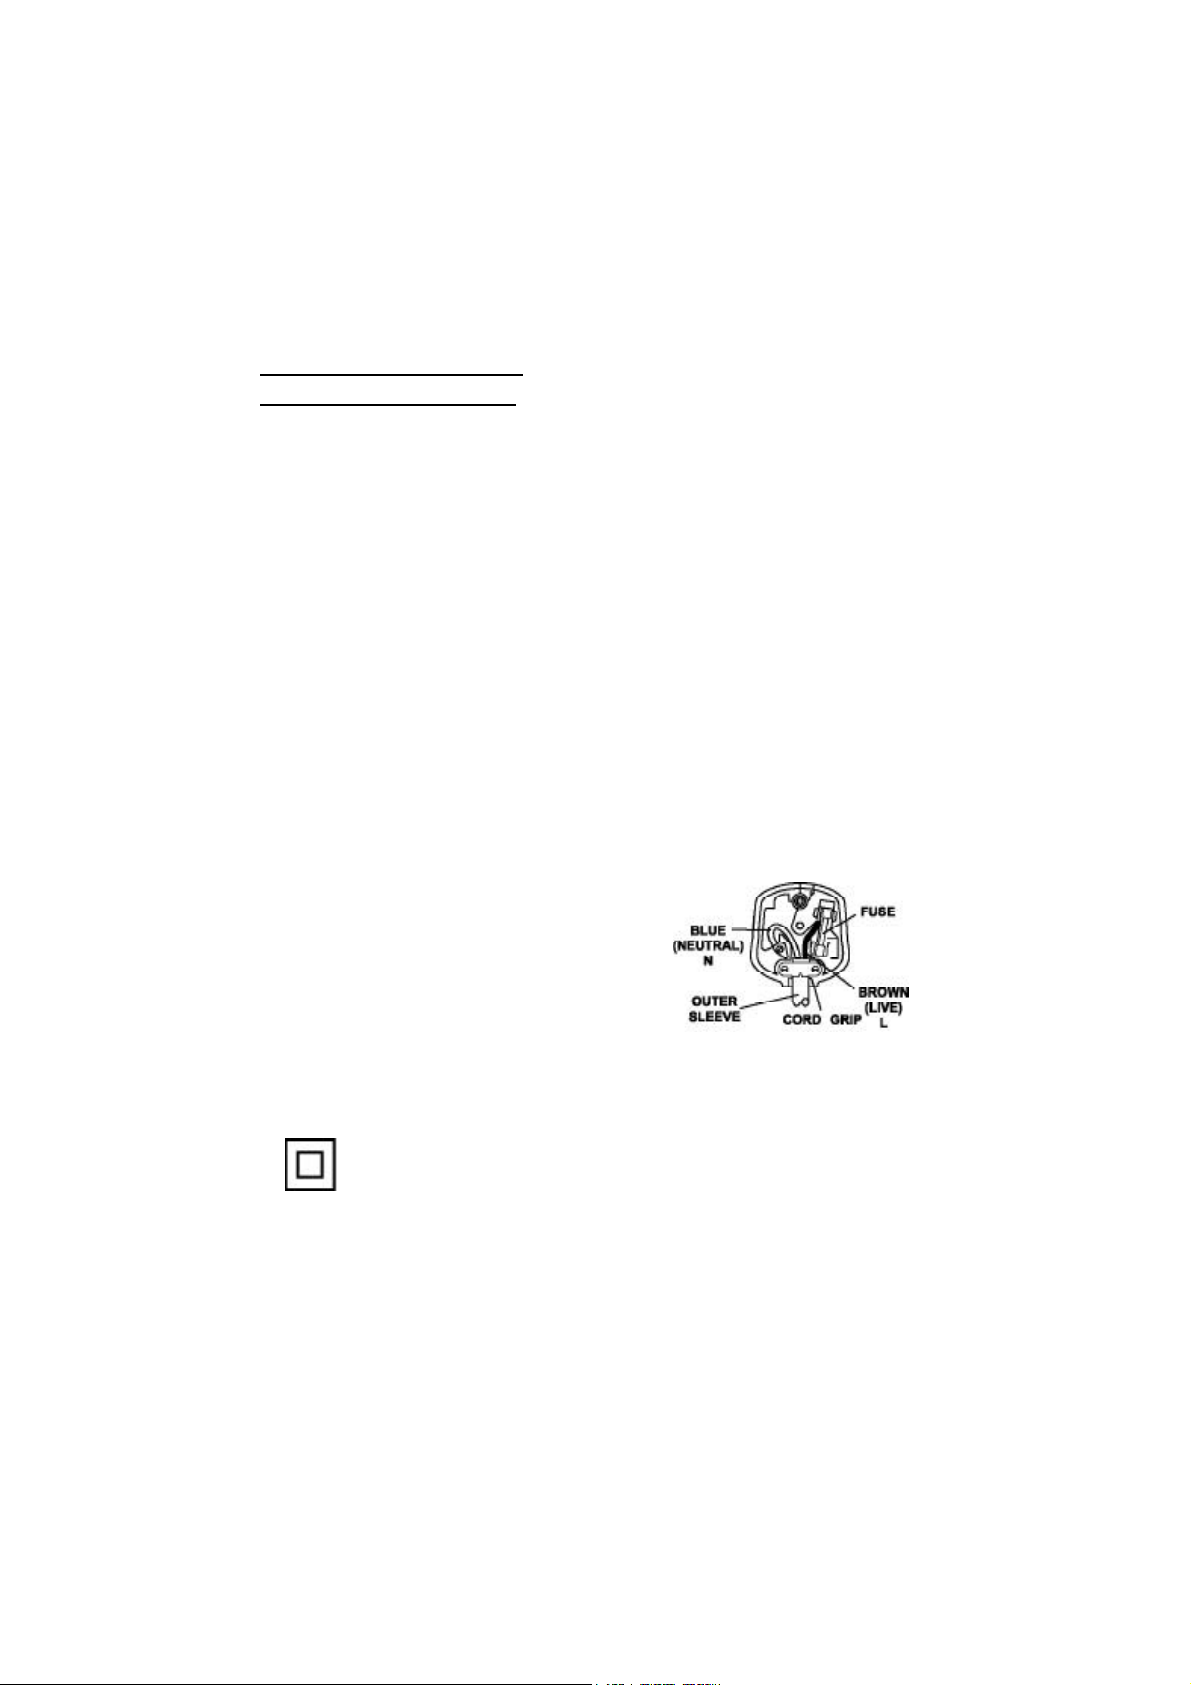
This wires in this mains lead are coloured in accor-
dance with the following wiring codes:
Blue................................... Neutral
Brown................................... Live
This wires in this mains lead must be connected to
the terminals in the plug as follows:
Blue Wire........................... N or Black
Brown Wire.......................... L or Red
Only a 3 Amp fuse should be fitted in the plug or a 5 Amp fuse at the distribution board.
WARNING: UNDER NO CIRCUMSTANCES MUST THE LIVE OR NEUTRAL WIRES BE
CONNECTED TO THE EARTH TERMINAL IN A 3 - PIN MAINS PLUG.
This symbol means that this unit is double insulated. An earth connection is not required.
4

FEATURES OF THIS PRODUCT
l DVD, VCD, CD, CD-R(MP3), CD-RW, VHS playback function
l DVD one-touch record function
l Watching DVD for recording broadcast
l Integrated REMOTE (VCR, DVD)
l Index Search
l GUI (Graphical User Interface) OSD (On Screen Display)
By using the [DISPLAY] button on the remote control, information on the DVD / VCD / CD
player and disc, can be displayed on the TV screen.
l Screen saver function (DVD)
l Built-in Dolby Digital decoder (DVD)
l Composite Scart video out
l Slow Forward / Reverse playback (DVD)
l Fast Forward / Reverse playback (DVD)
l Search of title, chapter, and time in DVD disc, and search of time and track time in CD
l Various TV aspect (DVD) 4:3 for Pan and Scan, 4:3 for Letter Box, and 16:9 for Wide
l Repeat playback for DVD
l 4 languages OSD (On Screen Display) function (DVD)
You can select and display OSD in 4 languages.
l Parental Lock function (DVD)
This function can prevent playback of software that may be unsuitable for children.
l Multi Audio function (DVD)
The audio soundtrack can be heard in up to 8 languages. it depends on the disc. (The number
of audio languages depends on the software.)
l Multi Subtitle function (DVD)
The subtitle can be seen in up to 32 languages. it depends on the disc. (The number of
subtitle languages depends on the software.)
l Multi Angle function (DVD)
This function allows you to choose the viewing angle of scenes which were shot from a
number of different angles. (The number of angles depends on the software.)
l Screen zoom function (DVD)
Please read carefully before using this product.
Installation and handling
l It is wise not to place this set near strong magnetic fields, such as large speakers. This may
affect the screen purity and video recordings.
l Do not spill or use a cleaning fluid, or volatile chemicals, such as petrol. This could damage
the plastic case or paint finish.
5

Not in use
l If the unit is not to be used for long periods, it is wise to remove tapes and discs.
l Disconnect the mains power and the external aerial, if fitted.
l Remove the batteries from the Remote control to prevent battery I eakage.
l Occasionally plug the set in and test it. This will keep the components in good condition.
Moving
l Should you need to move the set, it is best to use the original packing. If this is not available,
wrap the set in soft material. This helps prevent damp getting into the set causing condensation.
Cleaning
l Dust will naturally settle on this appliance. Clean with a soft cloth.
l If the dirt is greasy, use a damp soft cloth with a mild detergent solution.
l Do not use solvent cleaners such as Petrol or Benzines. This will damage the cabinet.
Maintainance
l The Video and DVD sections are precision instruments which need periodical maintenance. If
the picture deteriorates from either playback system, try a proprietary tape head or laser
cleaner. If this is not successful consult your local repair dealer.
External aerial maintainance
l Should you use an external aerial and the picture deteriorates. This may be due to the aerial
being moved or damaged in high winds. Consult your local dealer for advice.
Copyright material
l Copyright material is only for personal use. It is IIIegal to copy copyright material from DVD to
tape, unless for personal use.
Tape and disc handling
l Do not use tapes or discs if they have been contaminated with:
- Fungus or mold, Juice or Dust.
l Do not use tapes or discs if they have been damaged, scratched or tapes that have been
rejoined after breaking.
l Tapes and discs should be stored vertically in a dry dust free location. Avoid high humidity or
high temperatures. Do not store tapes near Loudspeakers.
6
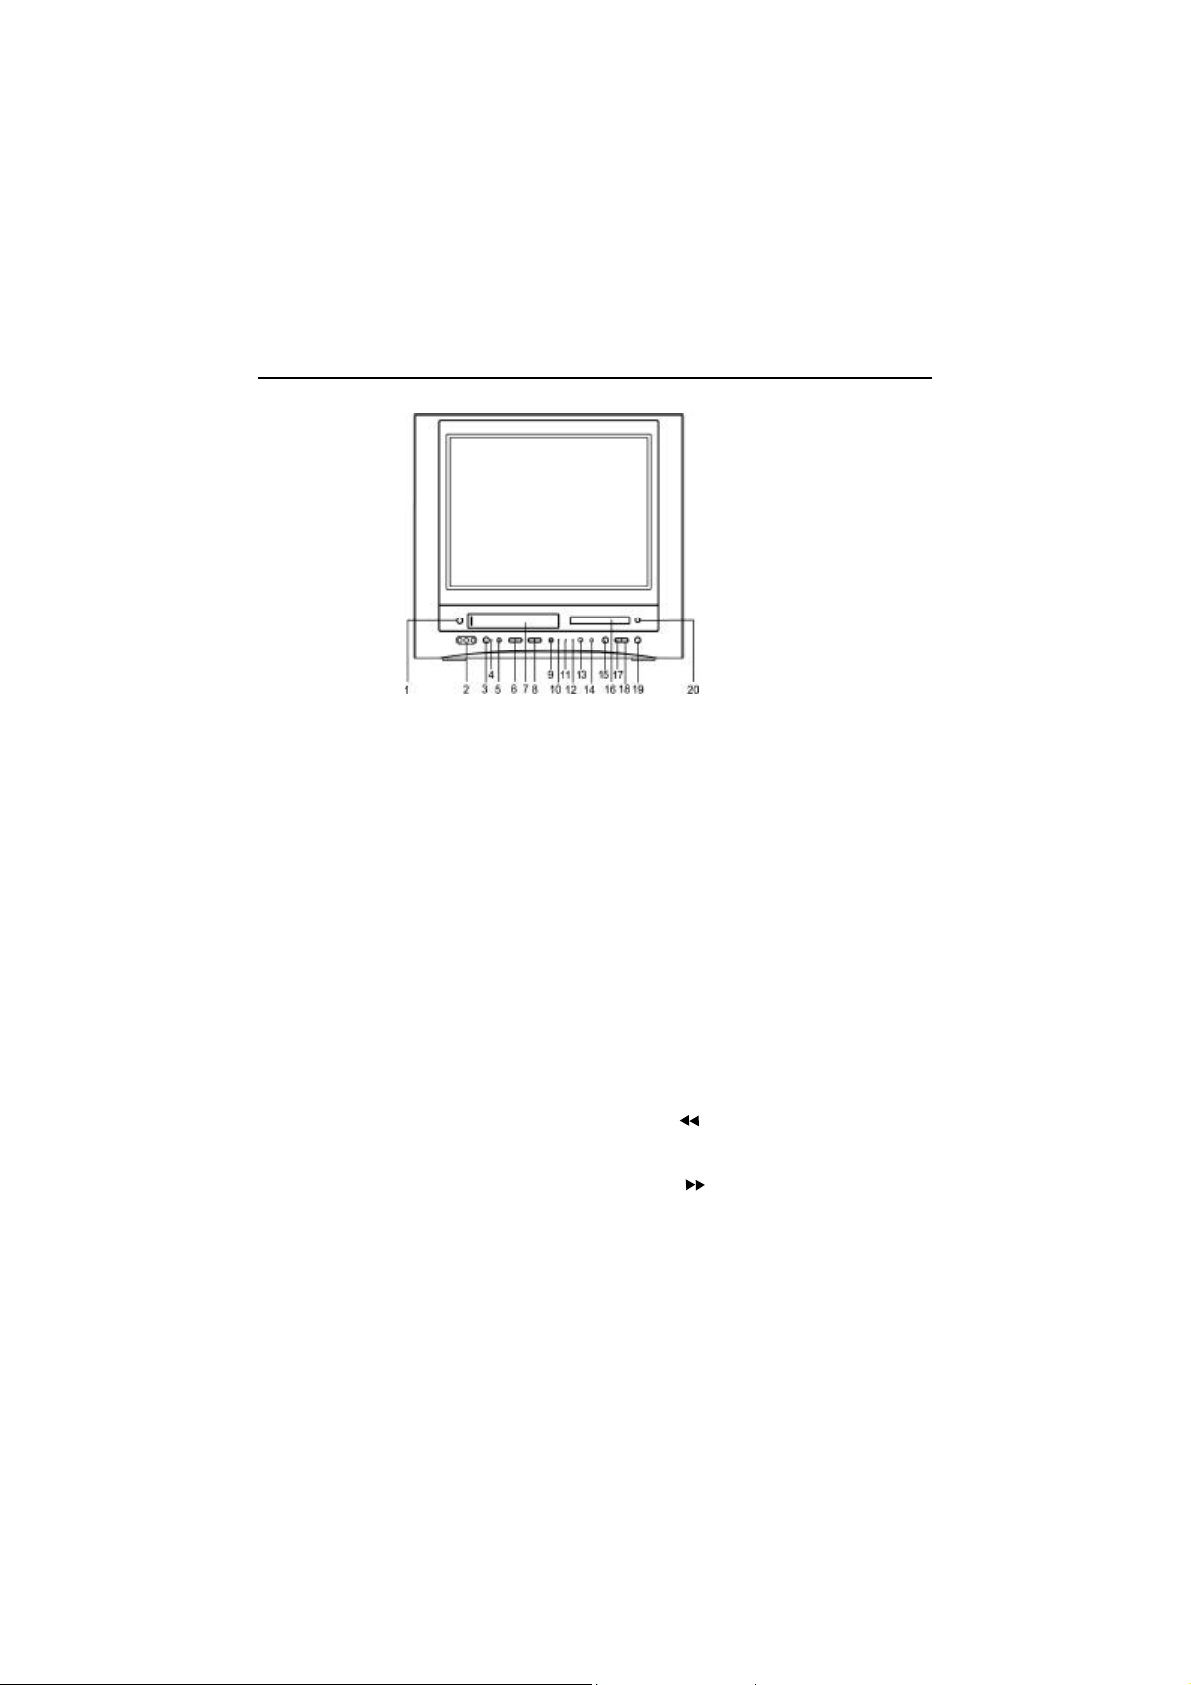
Overview of the equipment
1.VCR Eject
Press to stop tape movement and Eject
tapes.
2.Video in/Audio in(L/R)
VCR External video and audio inputs.
3.Standby switch
Press to turn the power on and off.
NOTE:
The power switch will not operate during
OTR and Record modes.
4.Power indicator
In standby mode the LED will illuminate.
5.Function(TV+VCR/DVD)
Select the TV+VCR or DVD source.
6.Channel up/down
Press to change the channel .
7.Cassette compartment
Insert a video cassette into this slot.
8.Volume control
To adjust the sound output level.
9.Record/OTR
Press to record the programme currently
shown on the screen. Press multiple times
to process OTR time options.
10.Record indicator
When recording is in progress this LED
will light.
11.Timer indicator
When a TIMER recording is set, the LED
will light.
12.Screen off indicator
When screen is off the LED will illuminate.
13. Remote sensor
This receives a signal from your Remote
control.
14.Pause/Step
Press to Pause the picture, press again to
advance the picture in Step mode.
15. Play(VCR/DVD)
Press to start either DVD or Tape playback.
16. DVD tray
Open or close tray by pushing DVD open/
close button,place a disc on the disc tray.
label side up.
17.REW(VCR/DVD)
press ( )button to rewind the disc or VCR
tape.
18. FF(VCR/DVD)
Press( )button to fast forward the DISC
or VCR tape.
19. Stop (DVD)
Stop playing the disc.
20. Open/Close(DVD)
Use to open or close the tray.
7
Overview of the equipment,continued
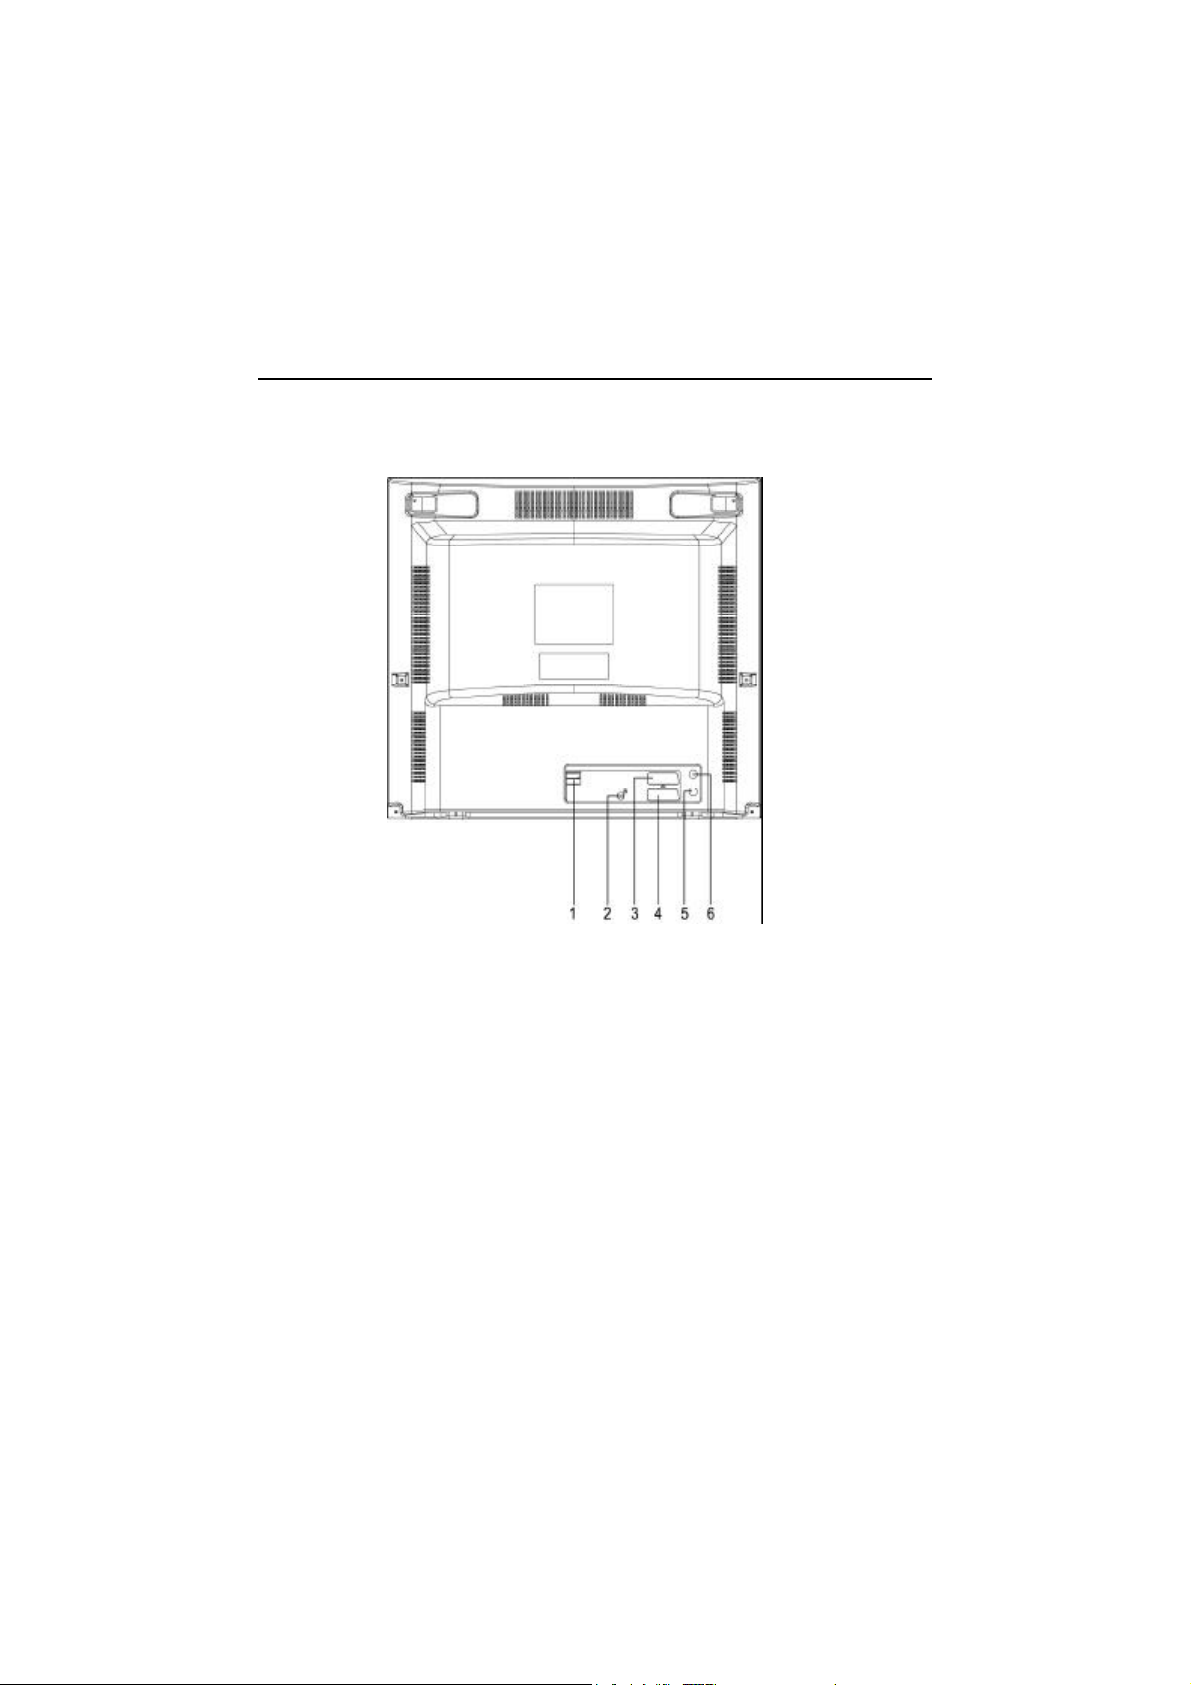
Back panel
1. Main Power Switch
2. DVD Digital Audio Output (Coaxial)
3. Euro AV2 / DECODER
4. Euro AV1
5. TV Antenna In
8
Overview of the equipment,continued
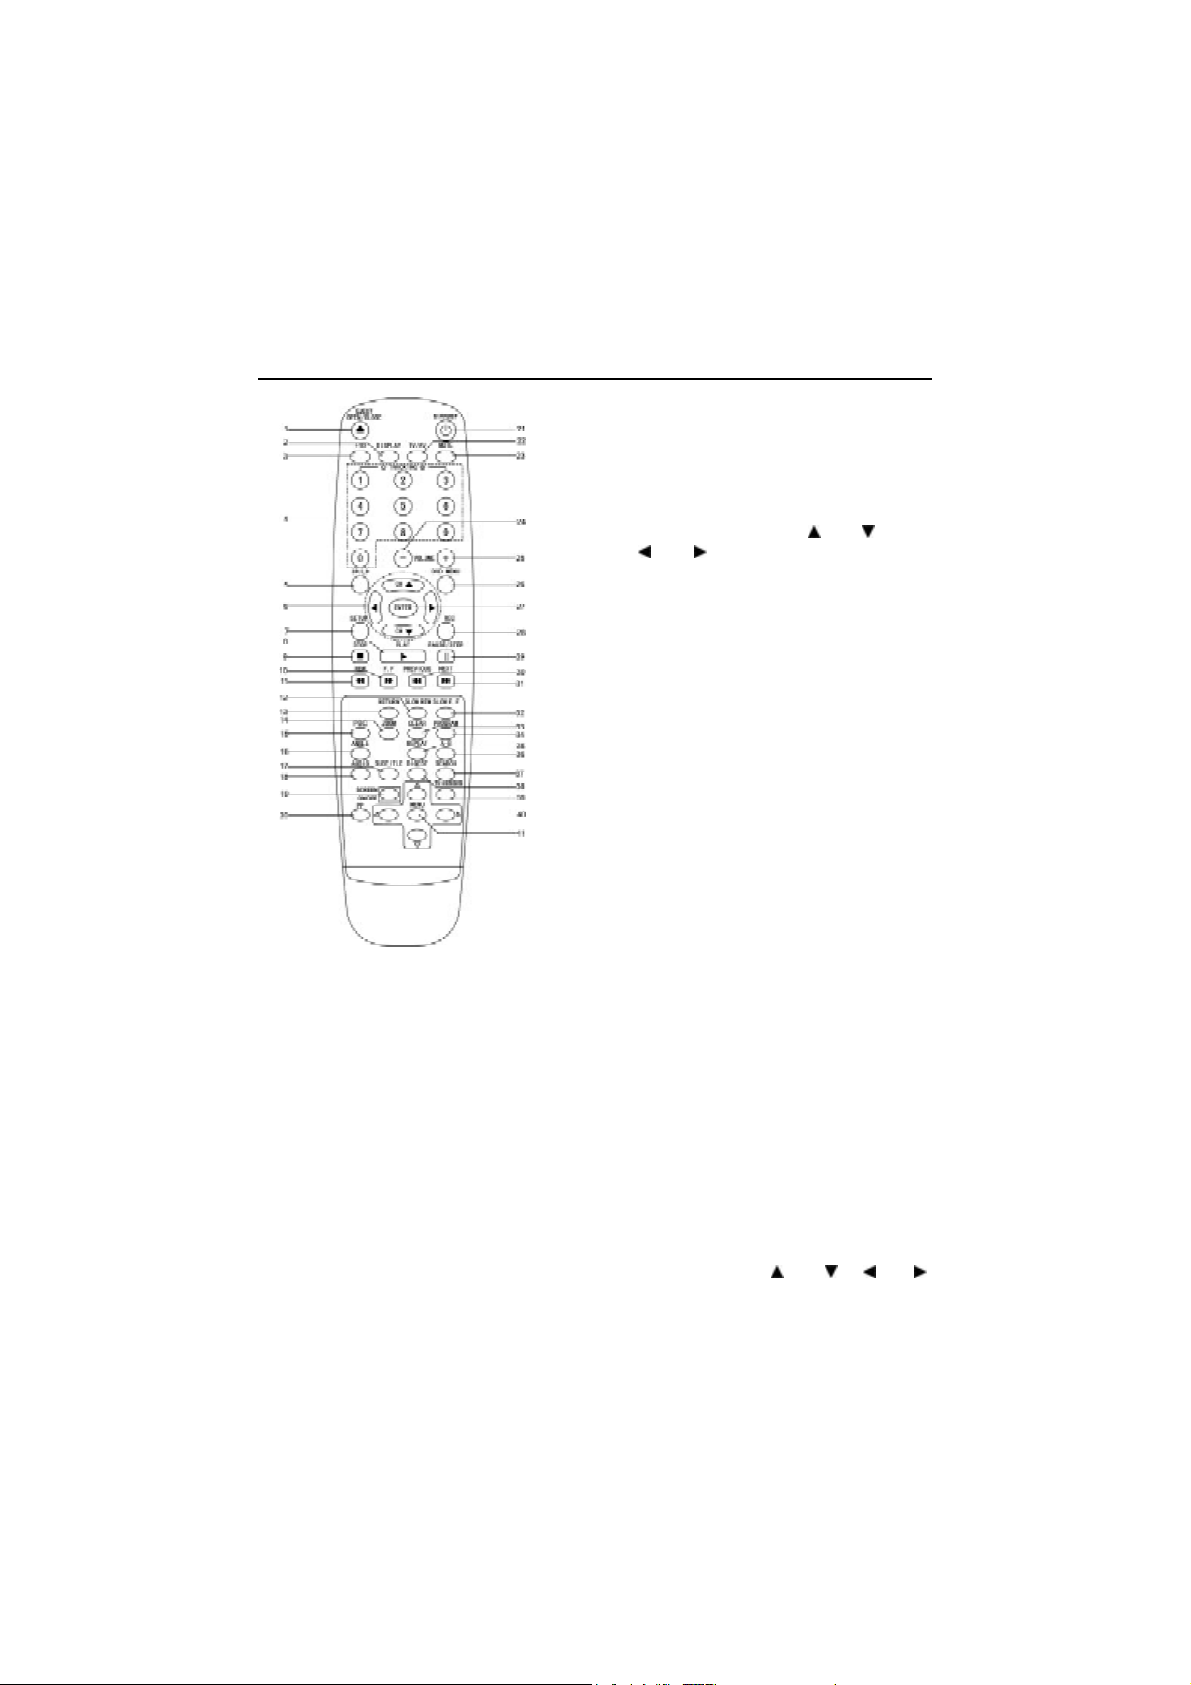
Remote control
1. Open/close Button(DVD) Eject/(VCR)
2. Display Button
3. +10 Button
4. Numeric Buttons(TRACKING)
5. SP/LP Button
6. Channel / Direction Buttons( Up Down
Left Right )
7. Setup Button
8. Play Button
9. Stop Button
10. Fast Forward Button
11. Fast Backward Button
12. Slow REW Button
13. Return Button
14. Zoom Button
15. PBC Button
16. Angle Button
17. Subtitle Button
18. Audio Button
19. Screen ON/OFF Button
20.PP button(personal preference)
21. Standby Button
NOTE: The power switch will not function during OTR
and Record mode.
22. TV/AV Button
23. MUTE Button
24. Volume (- ) Button
25. Volume (+) Button
26. DVD Menu Button
l Objects between the
remote control and VCR
will block the path of the
remote control beam.
l Dark walls,direct
sunshine or very bright
light will reduce the
remote sensor’s sensitivity.
l The remote control will not
work correctly if you press
several buttons at the
same time.
27. Enter Button
28. REC Button
29. Pause/STEP Button
30. Previous Button
31. Next Button
32. Slow F.F Button
33. Clear Button
34. Program Button
35. Repeat Button
36. Repeat A-B Button
37. Search Button
38. Digest Button
39. TV+VCR/DVD Select Button
40.
Menu Direction Button(Up ,Down ,Left ,Right )
41. Menu Button
9

Setting up your unit
1. Once you have connected your unit and put batteries in the remote control, you must
do the following :-
l Connect the TV aerial located at the back.
l Press the Power switch to ON. (Located at the back)
l Press the standby button on the handset or front panel. The screen should light after a few
seconds.
2. BASIC OPERATION
(1) Press the [SETUP] button to display the SETUP menu on the screen.
(2) Press the [ / ] buttons to select the desired function on the SETUP menu.
And press the [ENTER] button to confirm the selected function.
(3) Press the [SETUP] button to return to the SETUP menu at any time.
(4) Press the [SETUP] button to leave the SETUP menu screen.
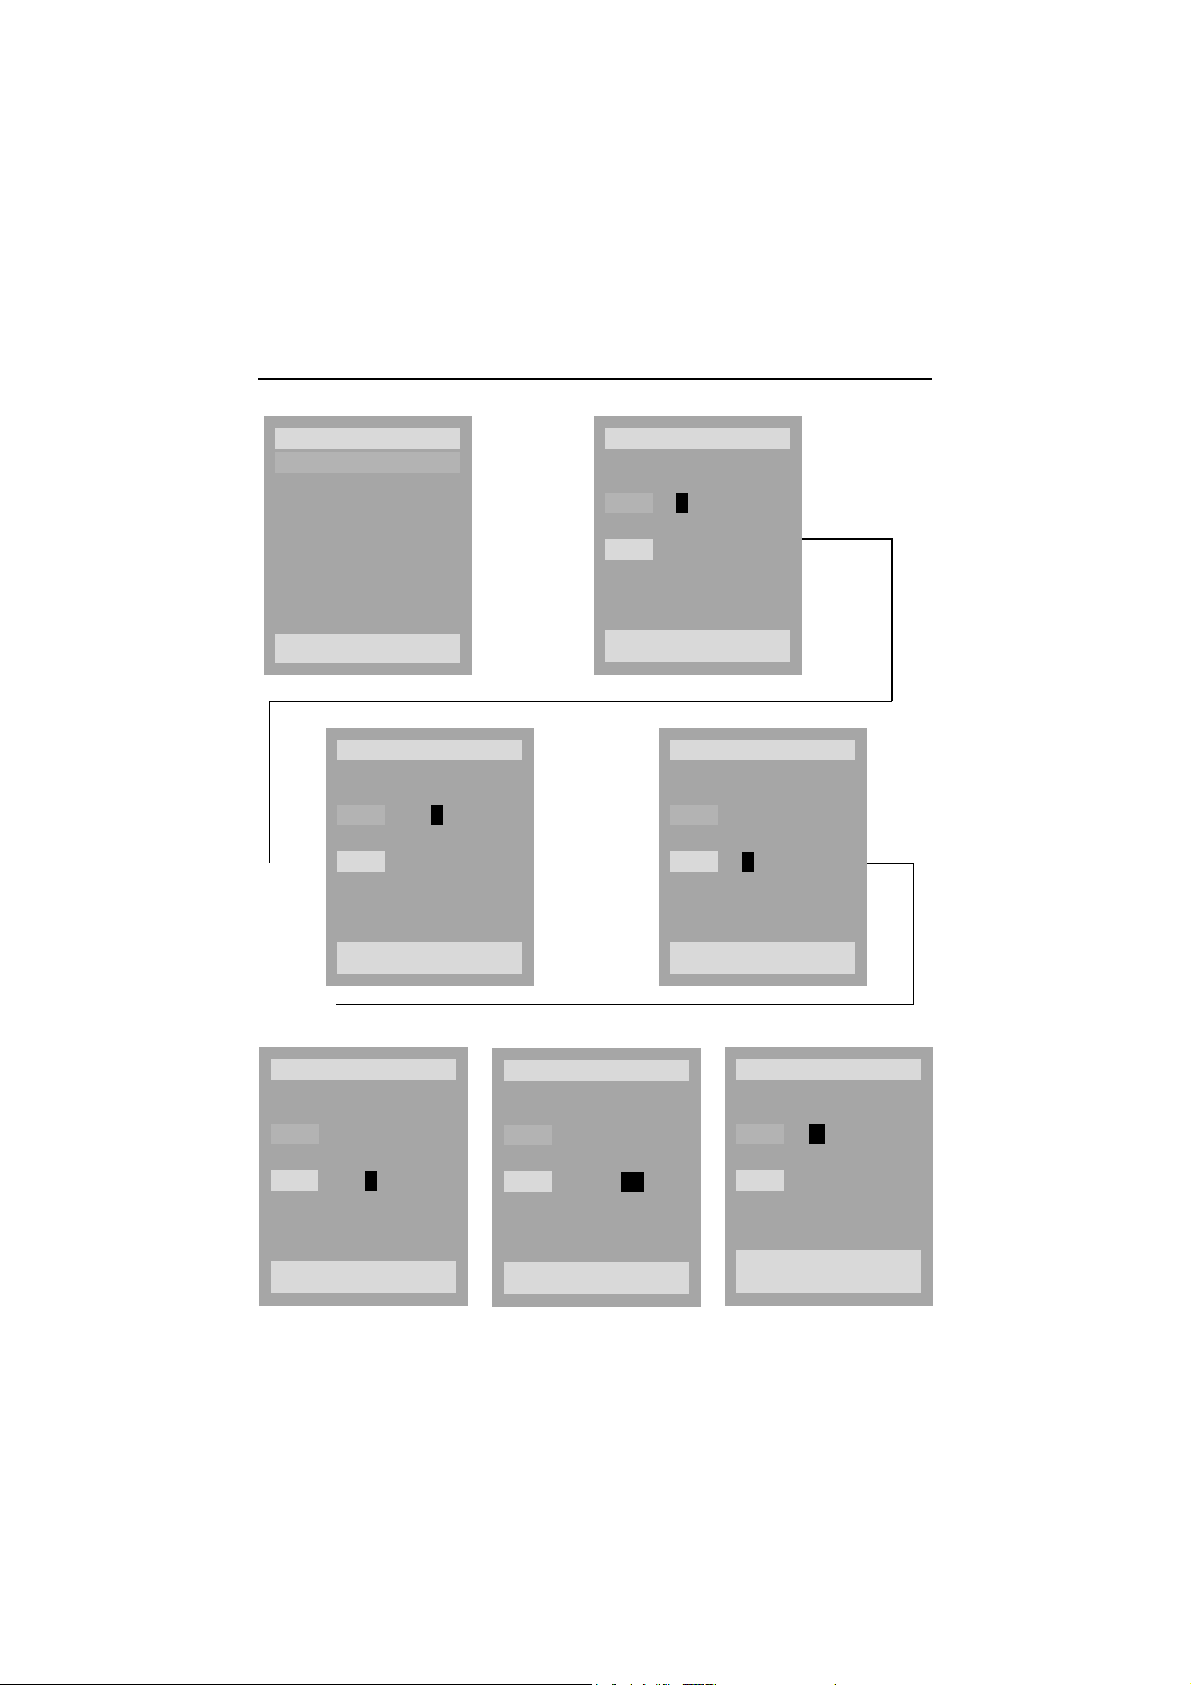
3. MANUAL CLOCK SET
l Press the [SETUP] button to call the Main SETUP.
l Press the [ / ] buttons to select the line of “Clock Set” and press the [ENTER] button to
confirm that.
l To set the clock for the first time, use the [0-9] buttons, in the following order:
Hours->Minutes->Day->Month->Year.
l To correct settings, move the cursor with the [ / ] to the correct location and input the new
numbers.
l The clock will work, although the VCR is in the clock setting state.
l To set the “Year”, use only the last two digits, i.e. 2001 = 01.
l Press the [ Enter ] button to confirm the clock settings. After storing, the menu reverts to the
Setup menu. The settings being also stored in the VCR setup memory. If the Clock settings
are interrupted before completion then the VCR timer will not operate.
4. DISPLAY COLORS
All lines have a Grey background. Selected lines have a Green background with White
characters.
10
Setting up your unit, continued
SETUP
Clock set
Record timer
Installation
Search
Preferences
ENTER:Confirm SETUP:End
CLOCK SET
Time 11:--
-------->
Date -- / -- / ----
SETUP:End
------>
----------------->
----------------->
CLOCK SET
Time --:--
Date -- / -- / ----
SETUP:End
CLOCK SET
Time 11:11
Date -- / -- / ----
SETUP:End
CLOCK SET
Time 11:11
Date -- / -- / ----
SETUP:End
Time 11:11
Date -- / -- / ----
--->
CLOCK SET
SETUP:End
11
CLOCK SET
Time 11:11
Date -- / -- / ----(Fri)
--->
ENTER:Confirm SETUP:End

SETUP
Clock set
Record timer
Installation
Search
Preferences
ENTER:Confirm SETUP:End
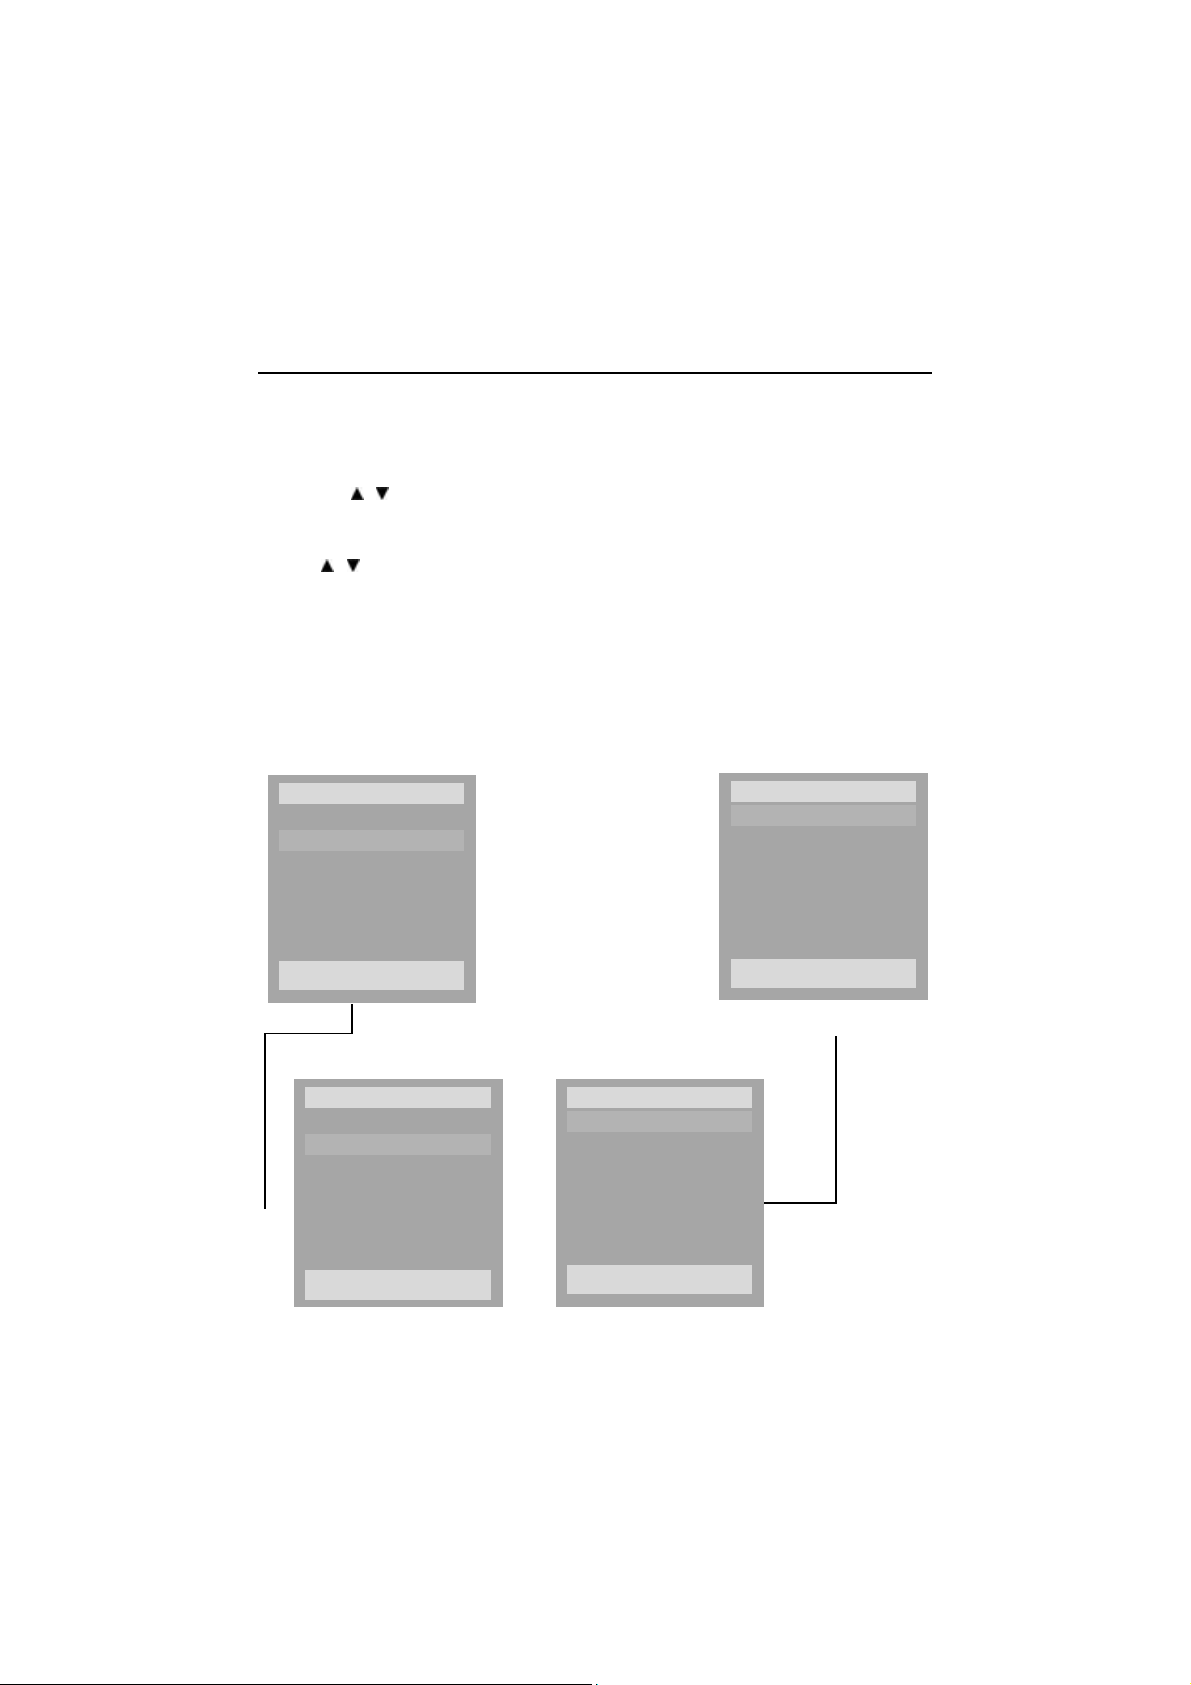
RECORD TIMER
1. TIMER REVIEW (Erasure & Correction)
1-1.ERASURE
(1) Press the [SETUP] button to call the SETUP menu in TV state or press the [PROGRAM]
button.
Press the [ / ] buttons to select the line of “Record Timer” and press the [ENTER] button to
confirm that.
(2) At that time, the VCR will check whether there are some errors or not:
- If the clock has not been set, then it will change to “Clock Set” screen automatically.
- If the PRs have not been set, then it will change to “Installation” screen automatically.
If there is no error, (2) screen appears.
Press the [ / ] buttons to select a erasing timer program.
The [ENTER] button is pressed to confirm that, the stored contents of the selected Timer program
are displayed.
(3) The [CLEAR] button is pressed to erase.
1-2.CORRECTION
(1) Press the [SETUP] button to call the SETUP menu in TV state or press the [PROGRAM]
button.
Press the [ / ] buttons to select the line of “Record Timer” and press the [ENTER] button to
confirm that.
12
Setting up your unit, continued
(2) At that time, the VCR will check whether there are some errors or not:
- If the clock has not been set, it will change to “Clock Set” screen automatically.
- If the PRs have not been set, it will change to “Installation” screen automatically.
- If there is no error, (2) screen appears.
Press the [ / ] buttons to select a correcting record timer program.m.
The [ENTER] button is pressed to confirm that, the stored contents of selected Record Timer
program are displayed on the TV screen.
(3) The [ / ] buttons are pressed to correct the record timer program, the OSD screen will be
changed to the screen of (3).
(4) How to correct: See the NEW PROGRAMMING procedures. The next steps are same as the
steps of New Programming.
(5) To correct the other record timer programs, repeat the procedure from the step (1) to step (4).
(6) When the programme setting has been achieved, turn off the unit by pressing the “Standby”
button. The “Timer” indicator will light, and when the programmed time is reached the recording
will start automatically.
SETUP
Clock set
Record timer
Installation
Search
Preferences
ENTER:Confirm SETUP:End
(1)
(2)
PR Start End Date
01 14:10 16:00 19/11
11 10:00 12:00 24/12
AV 12:00 14:00 25/12
04 10:10 11:30 Mo-Fri
06 11:40 12:00 W/Fri
---->
07 15:00 17:00 Mo-Sa
08 18:00 19:00 Mo-Su
ENTER:Confirm SETUP:End
-->(1) GO TO “Clock set”
-->(2) GO TO “Installation”
ENTER
(3)
TIMER 2
PR 01
Starttime 14:10
Endtime 16:00
Startdate
------>
Howoften Once
Tapespeed SP
ENTER:Confirm SETUP:End
13
SETUP
Clock set
Record timer
Installation
Search
Preferences
ENTER:Confirm SETUP:End
------>
18/11(Wed)

Setting up your unit, continued
2. NEW PROGRAMMING
2-1.MENU OPERATIONS
(1) Press the [SETUP] button to call the Setup Menu .
Press the [ / ] buttons to select the line of “Record Timer” and press the [ENTER] button
to confirm that.
(2) At that time, the VCR will check whether there are some errors or not:
- If the clock has not been set, then it will change to “Clock Set” screen automatically.
- If the PRs have not been set, then it will change to “Installation” screen automatically.
If there is no error, (2) screen appears.
Press the [ / ] buttons to select the empty(not occupied) record timer program.
Press the [ENTER] button to confirm that.
(3) Press the [ / ] buttons to select the type of the wanted timer recording.
The [ENTER] button is pressed to confirm that, the data input screen for the new timer
programming will appear.
* ONCE (In the case of selecting the type to “Once”)
(4) Press the [0-9] buttons to set a PR number or press the [ / ] buttons to select an external
(AV).
“PRs”: To choice the recording signals from the own tuner, which is built-in VCR to tune and
detect broadcasting signals.
(5) Press the [0-9] buttons in the following order: start time -> end time -> start date.
In initial state, the start date will be displayed a current date automatically.
Also, if the day or the month is changed at the start date, the day of the week will be changed
too automatically, changed after inputting the day.
Press the [ / ] buttons to select the tape speed and press the [ / ] button to input the
next data.
In case of SP only model, this speed selection guide won’t appear on the screen.
Press the [ENTER] button at the screen to confirm that.
If the program overlaps with another one, which had already been programmed, the Error
message will appear for 3 seconds and it will change to the screen for the “TIMER REVIEW”
automatically.
If the program does not overlap, the Guide Message will appear for 3 seconds.
* DAILY(MON-FRI) [In the case of selecting the type to “DAILY(MON-FRI)”]
All the procedures of daily (Mon-Fri) recording are the same as “once timer recording”.
* DAILY(MON-SAT) [In the case of selecting the type to “DAILY(MON-SAT)”]
All the procedures of daily (Mon-Sat) recording are the same as “once timer recording”.
* DAILY(MON-SUN) [In the case of selecting the type to “DAILY(MON-SUN)”]
All the procedures of daily (Mon-Sun) recording are the same as “once timer recording”.
* WEEKLY [In the case of selecting the type to “WEEKLY”]
All the procedures of daily (once a week) recording are the same as once timer recording.
(6) When the programme setting has been achieved, turn off the unit by pressing the “Standby”
button. The “Timer” indicator will light, and when the programmed time is reached the recording
will start automatically.
14

Setting up your unit, continued
* ONCE
TIMER 1
PR -
Starttime 11:10
Endtime 12:00
Startdate
11/11(Wed)
Howoften Once
Tapespeed SP
/
: Up/Down SETUP:End
* Daily
TIMER 1
Startdate
11/11(Wed)
Howoften Mon-Fri
Tapespeed SP
* Daily
TIMER 1
Startdate
11/11(Wed)
Howoften Mon-Sun
Tapespeed SP
* Daily
TIMER 1
Startdate
11/11(Wed)
Howoften Mon-Sat
Tapespeed SP
(5)
TIMER 1
PR 11
Starttime - -: -Endtime - -:- -
--> --> -->
Startdate
11/11(Wed)
Howoften Once
Tapespeed SP
/
: Up/Down SETUP:End
TIMER 1
PR 11
Starttime 12: -Endtime - -:- Startdate
11/11(Wed)
Howoften Once
Tapespeed SP
/
: Up/Down SETUP:End
TIMER 1
PR 11
Starttime 12:20
Endtime 14:20
Startdate
Howoften Once
11/11(Wed)
<--
Tapespeed SP
ENTER:Confirm SETUP:End
<------------------
TIMER 1
Startdate
11/11(Wed)
ENTER
------------------->
Howoften Weekly
Tapespeed SP
15
------------------->

Setting up your unit, continued
TIMER 1
PR 11
Starttime 12: 20
Endtime - -:- Startdate
--> ---->
11/11(Wed)
Howoften Once
Tapespeed SP
/
: Up/Down SETUP:End
TIMER 1
PR 11
Starttime 12:20
Endtime 14:20
Startdate
<-- <- <- <-
Howoften Once
11/11(Wed)
Tapespeed SP
ENTER:Confirm SETUP:End
PR 11
Starttime 12:20
Endtime 14:20
Startdate
Howoften Once
Tapespeed SP
ENTER:Confirm SETUP:End
TIMER 1
PR 11
Starttime 12: 20
Endtime 14: - Startdate
11/11(Wed)
Howoften Once
Tapespeed SP
/
: Up/Down SETUP:End
TIMER 1
11/11(Wed)
TIMER 1
PR 11
Starttime 12:20
Endtime 14:20
Startdate
11/11(Wed)
Howoften Once
Tapespeed SP
ENTER:Confirm SETUP:End
<-------------------------------------------------------------------------------------------------------
--->
Timer 1 Stared
PR 11
Starttime 12:20
--->
Endtime 14:20
Startdate
Howoften Once
Tapespeed SP
TIMER 1
11/11(Wed)
Overlap!
16

Setting up your unit, continued
1. AUTO SEARCH
(1) Press the [SETUP] button to display the Setup Menu screen in TV mode.
Press the [ / ] buttons to select the line of “Installation” and press the [ENTER] button to
confirm that.
(2) Press the [ / ] buttons to select the line of “Auto Installation” and press the [ENTER] button
to confirm that.
(3) The searching step is follow
Option:
- PAL I: CH01-13, CH21~CH69, CC01-54 PAL I/I: CH01-13, CH21-CH69, CC01~CC54
If the VCR tunes a station, it will display the virtual station name such as “PR01” for 1seconds.
During channel searching, you can press the [SETUP] button to interrupt it, then the VCR goes
to the Real Picture.
(4) After the channel searching is completed, the “Please wait” screen will appear a while.
(5) If other stations are positioned on or near the current RF OUTPUT PR, the guide message will
appear automatically, even if you are not using “RF” output, you will still need to complete the
process below.
The VCR recommends the optimal RF OUTPUT PR number automatically. Press the
[Enter] button to confirm. If you wish to select your own PR number press the [0-9] buttons,
and press [Enter] to confirm. If you don’t want to change, press the [Setup] button to return
to the main screen.
(6) The Clock Set screen automatically appears for manual clock set.
How to set the clock: See the CLOCK SET procedures.
(7) After completing the Auto Searching procedures, the “Manual Installation” screen appears.
Whenever a channel is searched and memorized, the PR number will be increased from 01 to99 .
During channel searching, you can press the [SETUP] button to interrupt it, then the VCR goes
to the Real Picture.
17

Setting up your unit, continued
2. MANUAL INSTALLATION
(1) Press the [SETUP] button to display the Setup Menu screen in TV state. Press the [ / ]
buttons to select the line of “Installation” and press the [ENTER] button to confirm that.
(2) Press the [ / ] buttons to select the line of “Manual Installation” and press the [ENTER]
button to confirm that.
Press the [ / ] buttons to select the re-searching channel and press the [ENTER] button to
confirm that.
l Reception - The list is: AERIAL, CABLE
If aerial is selected, CH is written before the channel number. If cable is selected, CC is written
before the channel number. If the user changes the reception: “AUTO SEARCH” is set to “--”
l Auto search -The user can either launch the auto search using right and left keys, or directly
enter the channel number. Auto search moves automatically from last cable to first antenna
channel found and vice versa.
The Searching step is follow
- PAL I: CH01-13,CH21-69,CC01-54 PAL I/I : CH01-13,CH21-69, CC01~CC54
l Fine Tuning-The user can fine tuning using right and left keys
l Decoder-It is toggled ON or OFF for the current programme. (In 1scart model the decoder is
not displayed)
18

Setting up your unit, continued
3. ORGANIZER
3-1.NAME
* Creating of New Names :
Press the [ / ] buttons to select the wanted characters.
(the [ / ] button will be used to move the position of digit).
The [ENTER] button is pressed to confirm that.
To make and memorize the new names for the other channels, repeat the procedure.
3-2. DELETE PR
(1) Press the [SETUP] button to call the Main SETUP in TV mode.
Press the [ / ] buttons to select the line of “Installation” and press the [ENTER] button to
confirm that.
(2) Press the [ / ] buttons to select the line of “Organizer” and press the [ENTER] button to
confirm that.
(3) Press the [ / ] buttons to select the Delete PR..
(4) The [ENTER] button is pressed to confirm that.
The [SETUP] button is pressed to interrupt before pressing the [ENTER] button , the real
picture will appear without storing the data.
(5) To erase another channel, repeat the procedure from step (3) to (4).
(1)
SETUP
Clock set
Record timer
Installation
Search
Preferences
--------------->
Autoinstallation
Manualinstallation
Organizer
RF outputset
(2)
INSTALLATION
ENTER:Confirm SETUP:End
ORGANIZER
PR 01
--------------->
Name ---Swap with PR -Delete program. 01
ENTER:Confirm SETUP:End
ENTER:Confirm SETUP:End
PR 01
Name ----
--------------->
Swap with PR -Delete program. 01
ENTER:Confirm SETUP:End
19
ORGANIZER

Setting up your unit, continued
3-3. SWAP WITH PR
(1) Press the [SETUP] button to call the Setup Menu in TV mode.
Press the [ / ] buttons to select the line of “Installation” an press the [ENTER] button to
cofirm that.
(2) Press the [ / ] buttons to select the line of “organizer” and press the [ENTER] button to
confirm that
(3) Press the [ / ] buttons to select the aligning channel and press the [ENTER] button to
confirm that.
(4) The [ / ] buttons are pressed to move the selected PR.
The changed position of the PR number will be memorized whenever the PR is moved by
pressing the [ / ] buttons.
(5) Press the [ENTER] button to confirm that or the [SETUP] button to finish the alignment without
data change.
(6) To align the other channels, repeat the procedure from the step (3) to step (5).
4. RF OUTPUT SET(For stand alone VCR only)
No setting require for TV+VCR/DVD combo.
SETUP
Clock set
Record timer
Installation
Search
Preferences
ENTER:Confirm SETUP:End
--->
PR 01
Name ---Swap with PR - Delete program. 01
ENTER:Confirm SETUP:End
INSTALLATION
Autoinstallation
Manualinstallation
--->
Organizer
--->
RF outputset
ENTER:Confirm SETUP:End
PR 01
Name ---Swap with PR 02
---> --->
Delete program. 01
ENTER:Confirm SETUP:End
20
PR 01
Name ---Swap with PR -Delete program. 01
ENTER:Confirm SETUP:End
PR 02
Name ---Swap with PR -Delete program. 01
ENTER:Confirm SETUP:End

Setting up your unit, continued
SEARCH
1. GO TO ZERO
(1) Press the [SETUP] button to call the Main SETUP screen in [cassette-in] state. Press the
[ / ] buttons to select the line of “Search” and press the [ENTER] button to confirm that.
(2) Press the [ / ] buttons to select the line of “GO TO ZERO” and press the [ENTER] button
to confirm that.
Then, the sub-SETUP picture will disappear and the VCR will wind a tape to the position, “0:
00:00” and will stop automatically. Also, the OSD picture will disappear after 3 seconds from
stopping the wind.
SETUP
Clock set
Record timer
Installation
Search
Preferences
ENTER:Confirm SETUP:End
----------->
Super-Imposed
REW SP
GO TO ZERO
0:00:30
------------->
or
SEARCH
Go to zero
Index+
Index-
ENTER:Confirm SETUP:End
Super-Imposed
FF SP
GO TO ZERO
-0:00:30
21

Setting up your unit, continued
2. INDEX +
(1) Press the [SETUP] button to call the Main SETUP screen in [cassette-in] state.
Press the [ / ] buttons to select the line of “Search” and press the [ENTER] button to
confirm that.
(2) Press the [ / ] buttons to select the line of “Index +” and press the [ENTER] button to
confirm.
The sub-menu picture will disappear and the VCR will search for the next Viss mark. If it finds
a Viss mark the playback picture will start automatically. This process is repeated continuously.
If you want to stop the process, press any key related to the tape function, i.e. Stop, Play, FF,
etc.
SETUP
Clock set
Record timer
Installation
Search
Preferences
ENTER:Confirm SETUP:End
----------->
Super-Imposed
REW SP
INDEX 00
0:00:00
------------->
After
------------------>
3 Sec
SEARCH
Search
Index+
Index-
ENTER:Confirm SETUP:End
Real picture
22

Setting up your unit, continued
3. INDEX-
(1) Press the [SETUP] button to call the Main SETUP screen in [cassette-in] state.
Press the [ / ] buttons to select the line of “Search” and press the [ENTER] button to
confirm that.
(2) Press the [ / ] buttons to select the line of “Index +” and press the [ENTER] button to
confirm.
The sub-menu picture will disappear and the VCR will search for the next Biss mark. If it finds
a Biss mark the playback picture will start automatically. This process is repeated continuously.
If you want to stop the process, press any key related to the tape function, i.e. Stop, Play, FF,
etc.
SETUP
Clock set
Record timer
Installation
Search
Preferences
ENTER:Confirm SETUP:End
----------->
Super-Imposed
REW SP
INDEX 00
0:00:00
(3)
------------->
After
------------------>
3 Sec
SEARCH
Search
Index+
Index-
ENTER:Confirm SETUP:End
Real picture
23

SPECIAL PLAYBACK/PICTURE SEARCH
1. VARIABLE SLOW
(1) During playback mode, press the [SLOW] button once to see the slow picture.
Whenever the [SLOW] button is pressed in slow mode, the slow speed will be changed:
1/15 -> 1/10 -> 1/5 -> 1/30 -> 1/25 -> 1/20 -> 1/15 -> .....
And the VCR goes to playback mode automatically, if the slow mode exceeds 5 minutes
without a mode change, the VCR will automatically return to normal play mode.
(2) Press the [Play] button to turn it back to normal play.
2. STILL / FRAME ADVANCE
(1) During play mode, press the [ Still ] button once to “Freeze” the picture. If the [Still] button is
pressed again the picture will advance frame by frame. If the [ Still ] mode continues over 5
minutes without a mode change, the VCR will automatically return to normal play mode.
(2) Press the [PLAY] button to switch it back to normal playback mode.
3. TWO STEP PICTURE SEARCH
3-1.CUE
(1) During playback mode, press the [F/FORWARD] button once, VCR will search the picture
forward: SP(x3), LP(x5).
(2) Press the [F/FORWARD] button again, the tape will advance more rapidly. : SP(x7), LP (x15)
The cue mode is automatically changed to playback mode, when this mode is continued for
more than 5 minutes without any mode changes.
(3) Press the [PLAY] button to switch it back to normal playback mode.
3-2.REVIEW
(1) During playback mode, press the [REW] button once, VCR will search the picture backward:
SP(x3), LP(x5).
(2) Press the [REW] button again, the tape will advance more rapidly. : SP(x7), LP(x15)
The review mode is automatically changed to playback mode, when this mode is continued
for
more than 5 minutes without any mode changes.
(3) Press the [PLAY] button to switch it back to normal playback mode.
4. VISS (VHS Index Search System)
(1) Under the following conditions, VISS can be executed.
- Power On
- Cassette In
- Except for recording mode
- Except for performing a Timer Programming
- Except for channel setting
(2) The index marks are automatically recorded on the tape at the recording start time. It is
impossible to record and erase the index marks at any time.
24

(3) Press the [INDEX+/-] buttons, the VCR will wind(fast forward or rewind) a tape and play the
first part for 5 seconds whenever the index mark is found.
After 5 seconds it will wind (fast forward OR rewind) again until it reaches the next index mark.
If the [Play] button is pressed during temporary playback (within 5 seconds), the VCR will go
to normal playback mode.
(4) During the operation of VISS, the mode displayed contents are as follow:
REW SP
INDEX -01
-0:00:30
FF SP
INDEX -01
0:00:30
PLAY SP
-------> ------->
-0:00:45
PLAY SP
-------> ------->
-0:00:45
REW SP
INDEX -02
-0:00:55
FF SP
INDEX -02
-0:00:55
------->
------->
PLAY SP
----->
-0:01:30
PLAY SP
----->
-0:01:30
PICTURE ADJUSTMENT
1. TRACKING
1-1. AUTO TRACKING
(1) Under the following conditions the “auto tracking” operation is performed automatically.
- When a pre recorded cassette tape is inserted and is played back.
- When the playback speed is changed during continuous played back.
- When a signal is detected after a temporary signal loss during continuous playback.
- When a tape, which has a signal is played after “Power on”.
- When a tape is played back after recording.
(2) During autotracking and the Stop button is pressed, the autotracking operation will be stopped.
However if the Play button is pressed again the auto tracking will start again.
1-2. MANUAL TRACKING
(1) In playback mode press the [1] or [3] buttons to adjust the tracking manually. Unfortunately
there is no “on screen display” to note the optimum setting. This can only be done visually.
(2) In special playback mode, tracking data is obtained in slow mode.
25

2. V-LOCK CONTROL
In “Still” mode, press the [ / ] buttons to adjust V-LOCK.
The optimal V-Lock setting can only be done visually, as there is no OSD to show optimum
setting.
OPERATING A TAPE MODE
When the VCR operates a tape, the tape mode display, the tape speed indicator and the tape
counter will be displayed.
When the VCR playbacks a Hi-Fi tape, the detected conditions are displayed on TV screen for 3
sec and be changed by pressing the [AUDIO] button manually.
(1) In the case of playing back a Monaural tape:
PLAY SP
0:30:10
(2) In the case of playingback a Hi-Fi tape:
---->
PLAY SP Hi-Fi
L+R
0:30:10
PLAY SP Hi-Fi
L
------> ------>
0:30:10
26
PLAY SP Hi-Fi
R
0:30:10
PLAY SP Hi-Fi
OFF
------>
0:30:10

THE OTHER OPERATIONS
1. AUTO POWER OFF
If no signal is detected via the antenna for 5 minutes, the set switches to “Standby”
automatically. This will not happ en if DVD, VCR or AV input is selected.
2. SELECTING AV MODE
There are 3 ways of selecting AV. They are selected by additional presses of the button :-
- Press the [AV] button.
----> AV1 ----> AV2 ----> AV-F ----> PR01(last tuned PR)
- Press the [ / ] button.
----> AV1 ----> AV2 ----> AV-F ----> PR01(last tuned PR)
- Input the [00].
----> AV1 ----> AV2 ----> AV-F ----> PR01(last tuned PR)
27

VCR PLAYBACK/RECORDING
1. Press [ ] to turn set on.
2. Insert your tape.
3. Press the [PLAY] button, either using the front controls or the Remote control handset.
4. To [Pause] a playing tape, press [Pause]. Note: (if the pause is more than five minutes, the
tape will revert to [Play] ).
5. To [Fast forward] or [Fast rewind] press the appropriate button.
6. To stop playback, press [Stop].
7. To eiect the tape, press the [VCR Eject] button.
VCR RECORDING
1. Press [ ] to turn set on.
2. Insert a recordable tape. (ensure recording tab is complete)
3. Select the channel number, or other source you wish to record.
4. Select the desired speed. (SP or LP) (handset)
5. Press the [REC] button.
6. To pause a recording press [Pause]. If you pause for more than 5 minutes, the set will revert to
[Record].
7. To stop recording press the [Stop] button.
To play a DVD disc while recording
1. Press the [DVD Open / Close] button.
2. Insert a DVD disc “label side up”.
3. Press the [TV + VCR / DVD] button on the handset.
4. Press [Play].
To Copy from DVD to Videotape
: note you CANNOT copy any DVD with “copy protection”.
1. Insert a recordable tape.
2. Insert the DVD disc you wish to record.
3. Select DVD and press [Play].
4. Press [REC] and the VCR will start to record.
5. To exit copy press the [ ] button. (to pause a VCR recording press [REC] button once, to
restart recording press [REC] again.)
This product incorporates copyright protection technology that is protected by method claims of certain U.
S patents and other intellectual property rights owned by Macrovision Corporation and other right owners
Use of this copyright protection technology must be authorized by Macrovision Corporation, and is intended
for home and other limited viewing uses only unless otherwise authorized by Macrovision Corporation.
Reverse engineering or disassembly is prohibited.
28

One Touch timer Recording(OTR)
Should you decide to record a programme that you are watching, and have no time to set the
timer, follow the next procedure.
1. Insert a recordable tape and press [REC].
2. Press [REC] again and you will see on the screen a display of (Recording length). Each press
will increase the recording time by 30 minutes “up to 4 hours”.
l See the “Recording Times Table” below.
Button Press Times-----------------------------------Operational Status
Once ---------------------------------------------------- continuous recording until you press STOP button
Twice --------------------------------------------------- recording for thirty minutes from current time
3 (times)------------------------------------------------ recording for one hour
5 --------------------------------------------------------- recording for one hour and thirty minutes
6---------------------------------------------------------- recording for two hours and thirty minutes
7 --------------------------------------------------------- recording for three hours
8 --------------------------------------------------------- recording for three hours and thirty minutes
9 --------------------------------------------------------- recording for four hours
10 ------------------------------------------------------- recording to the status of Once Press
3. To stop the recording before the end of the “Set timing” press the [Stop] button for more than
8 seconds.
ABOUT VCR
Video head cleaning
The video head “presents” and “reads” data from the Video tape. In the event of a damaged or
dirty tape being used, the head can become “coated” with oxide. The effect of dirty tape heads
are :-
Snowy pictures or no pictures on playback. Non recording of video, “sound may be recorded”.
In such an event you may use a commercial head cleaning tape.
If this does not improve the playback or recording, do not attempt more than two uses of the
head cleaning tape. Contact your nearest service agent.
ERASURE PROTECTION
Video cassettes are equipped with a safety tab to prevent accidental erasure. When the tab is
removed, recording can not be performed.
29

OTHER INFORMATION
TO PREVENT ACCIDENTAL ERASURE
- After recording, break off the safety tab with
a screwdriver if you don’t want to record
over the tape.
WHAT IS DEW CONDENSATION SYMPTOM?
If the set is moved from a cool place to a warm room, condensation may occur on the tape
head drum.
IF DEW CONDENSATION OCCURS,
1. It is wise to allow the set to acclimatize for 2 hrs,
turned on, to warm up, before attempting to
use a tape.
2. If a tape is played with condensation on the heads
serious damage to the heads and tape may occur.
TO RECORD AGAIN
- Cover the hole with sticky
tape.
30

GENERAL OPERATION
1. PICTURE
l Press the MENU button to enter to the picture mode.
l Press the Direction button / button to select the
function to be adjusted.
l Press Direction button / to adjust the level of the
selected function. The level setting can be adjusted
from “0” to “99”.
LANGUAGE(For picture,volume)
l The language menu allows the user to select different languages. You may select from the following :-
ENGLISH, RUSSIAN, GERMAN, ITALIAN, DUTCH, PORTUGESE, SPANISH and FRENCH.
l Press the menu button twice to enter to the language setup mode.
l Press the Direction / button to select the desired Language.
l Press the MENU button to go back to the previous screen.
PP Button(personal preference)
l Press PP button to select the picture effect.
Personal MILD STANDARD VIVID
PICTURE
CONTRAST 50
BRIGHTNESS 50
COLOR 50
SHARPNESS 50
MUTE Button
l Press the mute button to turn Off the sound. Press again to restore the sound.
TV/AV Button
l Press the TV/AV mode Button to select
AV1 AV2 AV-F PR
TV+VCR/DVD Button
l Press the TV+VCR/DVD Button switch to DVD mode.Press again go back to TV mode.
SCREEN ON/OFF
l During the “Timer record mode” the screen will switch off automatically. If you wish to watch
a TV programe during that time, press the [SCREEN ON / OFF] button on the handset. To
switch off the screen press the button again.
31

DVD PLAYER OPERATION
Basic Operation
1. Press “TV+VCR/DVD” button on the unit or press the “TV+VCR/DVD” button on the remote
handset to turn ON DVD.
2. Press “OPEN / CLOSE (EJECT)” button to load disc in disc tray.
3. Press “OPEN / CLOSE” button to close the tray.
• Hold the disc without touching either of its surfaces, position it with the printed title side facing
up.
Play Discs
1. Press the OPEN/CLOSE Button on the front panel and load the Disc on the tray.
The label side should be facing upwards. For a Double-sided DVD Disc, put the disc with label A/
1 up.
2. Press the OPEN/CLOSE button again to close the tray and the disc will be loaded.
3. The Disc will be played automatically.
• If it is a DVD disc, it will show the Menu/Title Page on the screen.
• If it is a CD, it will play the first track directly.
4. Press the STOP Button if you want to stop the Disc playback You can resume playback by
pressing the PLAY button and it will start at the location where you have pressed stopped (Resume
Play).
5. Press the stop button twice to stop play completely.
|| (Pause)/ Step
This function is applicable for DVD and CD audio.
• For DVD, the picture will freeze.
• For CD audio, it will become muted.
1. Press the ( || ) Button to pause play.
2. Press the PLAY Button again to resume Play.
DVD Setup Mode
• Setup Mode provides the menu for the configuration of TV DISPLAY Mode,OSD LANGUAGE
Mode, AUDIO Mode,PARENTAL Mode,PASSWORD,etc.
• Item selection in the SETUP menu is done by using the Direction button and the ENTER
button.
• To exit the SETUP Mode, press the SETUP button again.
• The initial password for PARENTAL Mode is set at 1379.
Note: To setup the TV display mode must be in stop mode.
32

DVD player operation,continued
Set Menu Items:
Press the SETUP Button on the remote
controller. The following menu will be shown:
1. GENERAL SETUP
TV DISPLAY
• Normal/PS
This is selected when the DVD player is
connected to a normal TV. Wide-screen images
are shown on the screen. but with some parts
cut automatically.
• Normal/LB
This is selected when the player is connected to
a normal TV. Wide-screen images are shown on
the screen, with black belt on the top and bottom.
• WIDE
This is selected when the player is connected to a wide-screen TV.
ANGLE MARK
This only works when there is an angle mark
on the disc. Select On, the screen shows the
mark when playing DVD.
• On
• Off
OSD LANGUAGE
This is used to select the OSD language.
• English
• French
• German
• Spanish
• Italian
CAPTIONS
This option can show or hide the captions.
• On (Show captions)
• Off (Hide captions)
-- GENERAL SETUP PAGE --
TV Display LB
Angle Mark On
OSD Lang ENG
Captions Off
Screen Saver On
Go To General Setup Page
-- GENERAL SETUP PAGE --
TV Display Normal/PS
Angle Mark Normal/LB
OSD Lang Wide
Captions
Screen Saver
Set TV Display Mode
-- GENERAL SETUP PAGE --
TV Display
Angle Mark On
OSD Lang Off
Captions
Screen Saver
Set Angle Mark
-- GENERAL SETUP PAGE --
TV Display
Angle Mark English
OSD Lang French
Captions German
Screen Saver Spanish
Set OSD Language
-- GENERAL SETUP PAGE --
TV Display
Angle Mark
OSD Lang
Captions On
Screen Saver Off
Closed Caption
Italian
33

DVD player operation,continued
SCREEN SAVER
Start the screen saver, the screen saver image
appears when the player stops or the image is
frozen for a few minutes. This saver can keep
the screen from being damaged.
• On (Start the screen saver).
• Off (Remote the screen saver).
2. SPEAKER SETUP
When SPEAKER SETUP option is selected, the
following menu will be shown.
SPEAKER SETUP
DOWNMIX
• LT/RT
A disc recorded multi channel soundtrack,
the output signal will be incorported to left
and right channel.
• STEREO
A disc recorded multi channel soundtrack,
the output signal will be incorported to
stereo.
-- GENERAL SETUP PAGE --
TV Display
Angle Mark
OSD Lang
Captions
Screen Saver On
Screen Saver
Off
--SPEAKER SETUP PAGE --
Downmix LT/RT
Stereo
Set Downmix Mode
DYNAMIC
This option is used to set the compression ratio
in order to control the sound (volume) contrast.
34

DVD player operation,continued
4. Preference Setup
TV Type
• PAL
This is selected when the player is
connected to a PAL TV.
-- PREFERENCE PAGE --
TV Type
Audio
Subtitle
Disc Menu
Parental
Password
Default
Go To Preference Page
PAL
ENG
ENG
ENG
AUDIO
If a language listed below is recorded
on the disc, you can play the sound in
such language. If not, the language
recorded will be used.
• ENGLISH
• FRENCH
• SPANISH
• GERMAN
• ITALIAN
SUBTITLE
If a language listed below is recorded
on the disc, you set the subtitle to be
displayed in such language. If not, the
language recorded will be used.
• ENGLISH
• FRENCH
• SPANISH
• GERMAN
• ITALIAN
• OFF
-- PREFERENCE SETUP PAGE --
TV Type
Audio
Subtitle
Disc Menu
Parental
Default
Preference Aduio Languages
English
French
Spanish
German
Italian
-- PREFERENCE SETUP PAGE --
TV Type
Audio
Subtitle
Disc Menu
Parental
Default
Subtitle
English
French
Spanish
German
Italian
Off
35

DVD player operation,continued
DISC MENU
If a language listed below is recorded on
the disc, you can set the Menu to be
displayed in such language. If not, the
language recorded will be used.
• ENGLISH
• FRENCH
• SPANISH
• GERMAN
• ITALIAN
PARENTAL
When playing disc with parental lock function,
you may select an age control grade according
to grade of disc and your own preference. For
example, if PG is selected, DVD Video disc
rated higher than the PG grade cannot be
played.
• KID SAF
• G
• PG
• PG 13
• P GR
• R
• NC 17
• ADULT
• OFF
-- PREFERENCE SETUP PAGE --
TV Type
Audio
Subtitle
Disc Menu
Parental
Default
Preference Disc Menu Language
English
French
Spanish
German
Italian
-- PREFERENCE SETUP PAGE --
TV Type
Audio
Subtitle
Disc Menu
Parental
Default
Set Parental Control
KID SAF
G
PG
PG 13
PGR
R
NC17
ADULT
OFF
DEFAULT
User can load the original factory setting by
choose RESET and press ENTER.
• RESET
-- PREFERENCE SETUP PAGE --
TV Type
Audio
Subtitle
Disc Menu
Parental
Password
Default
Preference Manu Language
36
Reset

DVD player operation,continued
DVD ROOT Menu
The DVD Menu Play function is only applicable for DVD movie. User can access the Casting
information, Production History, Movie Introduction etc. directly through this function.
1. Press the DVD MENU Button on the remote controller to enter the Root Menu.
2. Use the Direction button ( ) or input the item index through the Number keys (0-9) to do
the selection.
2. Press ENTER to confirm the selection
Audio
This function is applicable for DVD and CD audio but with different effects.
• Pressing the AUDIO Button will change the Audio channel.
REW / F.F ( )
This function is applicable for DVD and CD audio but with different effects. The FAST FORWARD
key and FAST BACKWARD key are used to achieve fast play function.
• For DVD , there are 5 different levels of speed (2x, 4x, 8x, 16x,32x). Every successive key press
will increment the speed of quick play.
• For CD audio, the FORWARD/BACKWARD will perform quick rolling on the music output.
Note : Press PLAY Button at any stage will resume to normal speed.
PREV. / NEXT( )
During playback, press one of the PREV./NEXT buttons (PREVIOUS button and NEXT button)
• When the PREV. button is pressed once, the pickup returns to the beginning of the PREVI-
OUS playing chapter or track.
• When the NEXT button is pressed once, the pickup will go to the beginning of next chapter or
track.
37

DVD player operation,continued
Slow F.F/REW
The Slow Forward is applicable for DVD. There are 4 steps of slow motion speed, 1/2, 1/4, 1/8,
1/16. Successive key presses will decrement the playback speed.
Note : Press Play Key to switch back to normal playback speed.
Repeat Mode
This function is applicable for DVD and CD audio but with different effects.
• For DVD disc playback, user can choose to repeat the current chapter,the current title or disc.
Subsequent key press of the REPEAT key can change between these three options.
• For CD, user can choose to repeat the current track or the whole disc (Repeat All). Subse-
quent key press of the REPEAT key can change between these two options.
A - B
This function is applicable for DVD and CD audio. User can specify the repeating interval by
marking the starting point and the end point.
1. Press the A - B Button to mark the starting point. (Playback will continue).
2. Press the A - B Button to mark the end point. (The marked part will be repeated automatically)
Note : Press the A - B Button during repetition will disable the Repeat mode.
Subtitle
This function is only applicable for DVD disc. It can change the subtitle language shown on the
screen.
Note : Number of subtitle available depends on the DVD disc.
Angle
Some discs may have multiple viewing angles during production. The ANGLE button is to select
the viewing angle shown on the screen.
Note : The number of Angle of View depends on the Disc.
Search
This function is applicable for DVD and CD audio. Through this function, the user can access a
specific location or a specific track by key in the target time or the track number.
1. Press the SEARCH Button Enter to search mode .
2. Input the target time though the number button (0~9) and the player will jump to the target
Location immediately.
38

DVD player operation,continued
Display (Remain Time)
This function is applicable for DVD only. It will display the timing information of the playback on
the screen.
• For DVD playback, subsequent key press on the DISPLAY Button will show the Title Elapsed
Time, Title Remain Time, Chapter Elapse Time and Chapter Remain Time one by one.
Press the DISPLAY Button
Press the DISPLAY Button
Press the DISPLAY Button
Press the DISPLAY Button
Press the DISPLAY Button
TITLE ELAPSED
TT 01/04 CH 01/12 0:02:13
TITLE REMAIN
TT 01/04 CH 01/12 1:33:30
CHAPTER ELAPSED
TT 01/04 CH 01/12 0:02:15
CHAPTER REMAIN
TT 01/04 CH 01/12 0:02:18
DISPLAY OFF
Play
This function is applicable for DVD and CD audio. During the disc playback, when the STOP
Button is pressed once, the player will enter the Resume Play mode. At this time, if the PLAY
Button is pressed, the player will resume playback at the location where the STOP Button is
pressed. If the STOP button is pressed (i.e. STOP Button is pressed twice) the player will stop
completely.
Zoom
This function is applicable for DVD . User can enlarge or reduce a static picture or a moving
picture by pressing the ZOOM buttons. There are 6 levels of zooming (2x, 3x, 4x, 1/2x, 1/3x,1/4x)
and they can be achieved one by one through subsequent key presses on the ZOOM button.
NOTE: User can select the portion of the picture to be enlarged by using the Direction button
( ).
Program Mode
This function is applicable for DVD and CD audio. User can assign the playback sequence ac-
cording to his/her preference. For CD audio, user can assign the track sequence while for DVD
disc, user can assign both the Title and Chapter sequence.
39

DVD player operation, continued
1. Press the PROGRAM button. The Program Se-
quence table will be shown on the screen.
2. Enter the track numbers according to the user
preference through the Number keys (0-9).
3. After assigning the playback sequence, move the
highlight cursor to the START option by using
the Navigation Arrows.Press ENTER on the re-
mote controller to confirm.
PROGRAM
01
02
03
04
05
PROGRAM
05
01
03
02
08
03
04
05
06
07
08
09
10
EXIT NEXT
06
07
08
09
10
EXIT START NEXT
To Remove the program move the highlight cur-
sor to desire Program By use the Navigation ar-
rows then press the clear button to Remove the
selected program.
PROGRAM
05
01
03
02
08
03
04
05
06
07
08
09
10
EXIT START NEXT
Digest Play
This function is applicable for DVD and CD audio but with
different effects.Through this function,user can have a brief
view of the content on the disc.For playing DVD,the screen
will be divided into 6 sub-screens with each one showing
different parts of the movie (depends on the mode selected).
- For DVD,there are 4 options: Title Digest,Title Interval,Time Interval and Chapter Interval.
l Title Digest
The movie will be divided into serval parts according to the number of Titles it contains.Each of
the 6 sub-screens will show one of the divided Titles. Each sub-screen will only play the first 4
seconds of the assigned Title.
l Title Interval
The current title will be divided into several parts with all of them have the same length in time(10
mins). Each of the 6 sub-screens will show one of the divided parts. Each sub-screen will only
play the first 4 seconds of the assigned part.
l Chapter Interval
The current chapter will be divided into several parts with all of them have the same length in
time. Each of the 6 sub-screens will show one of the divided parts. Each sub-screen will only play
the first 4 seconds of the assigned part.
- For CD audio, this function only supports Intro Play.The player will play the first 6 seconds of
each track sequentially.
Note: To switch off the digest features,choose EXIT in the Menu.
PREV EXIT START NEXT
40

DVD player operation, continued
MP3 Operation
This unit can support ISO9660 file system CD-ROM navigation. Multi-Media files such as MP3
thus can be played in the player.
Operation
• Insert the MP3 disc into the tray.The navigation menu will be displayed. The menu will show
the files in the root directory, and the MP3 files can then be played automatically.
• In the MP3 menu shows a blue and an orange cursor. The blue cursor indicates the currently
playing MP3 song, the orange cursor indicates a title to be selected.
Blue cursor
Orange cursor
MP3 SONG001
MP3 SONG002
MP3 SONG003
MP3 SONG004
MP3 SONG005
MP3 SONG006
You can select the other songs by the navigation arrow buttons or directly input the song number
by pressing the number keys. The orange cursor will move to the selected song. Then press
ENTER to confirm.
Note:There are three digits displayed.If you want call up a title with only one or two digts,you can
either start the entry with “0” or “00”,or can you can enter the number of the song and then wait a
few seconds until the cursor skips to the selected title.
Press the repeat button to select: Random (playback in random order),Single (play one title,then
stop),Repeat one (repeat the current title).Repeat Folder(repeat current folder)
Picture CD
Digital picture (JPEG) from a digital camera can be burnt on to a disc and played on this TV. Insert
a picture CD into the tray and the disc will be loaded automatically. If the disc type can be identified,
the player will start showing the pictures one by one (Slide Show Mode).
Operations
During Slide Show Mode: -
• Press the PAUSE Button will freeze the screen so that the current picture can be held for a long
time. To resume the slide show mode, press PLAY Button.
• Press the NEXT Button on the remote controller will skip the next picture.
• Press the PREVIOUS Button on the remote controller will repeat the current picture.
41

Trouble Shooting
Symptom
The unit does not
work. (No power)
Power ON does not
work.
TV screen not
illuminated.
(no picture)
Remote control does
not function.
Picture Ok. No sound.
Tape will not play.
Tape plays but is very
noisy.
Not recording.
Recorded pictures not
steady.
Check the mains switch is
turned on.
Check that the mains plug is
inserted correctly.
Check that a tape is not stuck
in the mechanism.
Is the screen blue? NO
Is the screen blue? YES
Are you out of range?
Battery power may be low.
Room brightly illuminated.
Volume turned down.
Mute set.
Tape not loaded correctly.
Tape at one end.
Controls not activated correctly.
Tracking may be incorrectly set.
Dirty tape head drum.
Pre recorded tape in machine.
Tab removed from cassette.
Incorrect source. May be
switched to AV.
Dirty tape head drum.
Dirty tape head drum.
If recorded from DVD.
Checks Remedy
Turn mains switch on (at rear of
set).
Re insert the mains plug.
Switch on the wall socket.
Call a qualified service engineer.
Try bringing the set out of standby.
If it will not, call a qualified service
engineer.
Connect a suitable aerial to the
socket at the rear.
Select TV from AV.
Move nearer the set.
If the remote is used frequently,
change the batteries every 6
months.
In some cases bright lighting may
affect remote control functions.
Turn up the volume.
Unset the “Mute”.
Eject tape and reload.
Try Fast forward or Fast Rewind.
The tape may be at one end.
Retry Play buttons on handset
and main TV.
Reset tracking using handset
controls.
Clean head drum with tape
cleaner. If unsuccessful call a
qualified engineer.
Replace with a recordable cassette.
Cover tab hole with tape.
Select source correctly.
As above.
As above.
DVD copy protected.
42

Trouble Shooting
Symptom
Tape will not eject.
“Screen Error”
message on screen.
Tape ejects as soon
as record is selected.
DVD will not play.
DVD appears to play
but no picture.
Audio or Subtitle does
not work.
Tape may be stretched.
Tape heads may be dirty.
Pre recorded tape in machine,
or Tab removed.
Disc incorrectly loaded.
Disc incorrect region.
Disc may be dirty or damaged.
The disc may not support this feature.
Checks Remedy
Wait 10 minutes and retry. If still no
eject, call a qualified engineer.
As above.
Replace tape cassette or cover
“Tab” hole with tape.
Reload disc with label side up.
Check region code. This player
only plays region 2 discs.
Clean the disc carefully.
Replace the disc with a good
known one.
Angle button does not
work.
MP3 and CD-R file
names appear in
strange letters.
The disc may not support this feature.
MP3 file names are only recognized with the alphabet letters and
(0 - 9). Only 10 characters can be displayed.
43

SPECIFICATION
TV System PAL I
VCR System VHS
FAV INPUT
Video 1.0V(PP)75 Ohm Negative sync. pin jack x1
Audio 0.5V (RMS) 1K Ohm R/L pin jack x2
EURO SCART
Scart 1(AV1)
Video input 1.0V(PP) 75 Ohm Negative sync.
Audio input 0.5V(RMS) 10K Ohm
Video output
Audio output 0.5V(RMS) 1K Ohm(TV +VCR/DVD Monitor output)
Scart 2(AV2/DECODER)
Video input 1.0V(PP) 75 Ohm Negative sync.
Audio input 0.5V(RMS) 10K Ohm
Video output
Audio output 0.5V(RMS) 1K Ohm(TV output)
Digital Audio output 0.5V(PP) 75 Ohm pin jack(DVD)
Tape speed SP: 23.39 mm/s, LP: 11.70 mm/s.(approximate)
Play time(E180 Tape) SP: 3 hours, LP: 6 hours .(approximate)
Clock display 24 hours
DVD SECTION
Laser Wave length Semicondactor Laser 655nm
Signal System PAL / NTSC output 50/60Hz
1.0V(PP) 75 Ohm Negative sync.(TV +VCR/DVD Monitor output)
1.0V(PP) 75 Ohm Negative sync.(TV output)
GENERAL SECTION
AC Power Input 230V ~ 50 Hz
Power Consumption 110 watts
Speaker 120 x 50 mm 3W 8ohm x 2
Audio Output power 2.5 W + 2.5 W
CRT dimensions 21”(V51cm) Visible Screen
Dimensions 570mm(W)x 517mm(H)x 480mm(D)
Net Weight 25.5 Kg(approximate)
Design and specification are subject to change without notice.
This region of this DVD plays is .
44
 Loading...