

Customer Help Line: 01422 263313
Opening Hours: Mon-Fri 8am-8pm, Sat 9am-4pm, Sun 11am-4pm
Or visit our website at www.ekey.co.uk
APTUC801PR
WARNING
TO PREVENT FIRE OR SHOCK HAZARD DO NOT EXPOSE THIS APPLIANCE TO RAIN OR MOISTURE.
CAUTION
RISK OF ELECTRIC SHOCK
DO NOT OPEN
WARNING : SHOCK HAZARD-DO NOT OPEN
LIGHTNING FLASH WITH ARROWHEAD SYMBOL -
within an equilateral triangle, is intended to alert the
us e r t o th e pr e sen c e o f un i nsu l ate d da n ger o us
voltage within the products enclosure that may be of
sufficient m agn itu de to constitu de a r isk of electri c
shock to persons.
The following label has been affixed to the unit, listing the proper procedure for working with the laser beam:
CLASS 1 LASER PRODUCT LABEL -
CLA SS 1 LA SE R PRO DU CT
KLA SS 1 LA SE R APP AR AT
LUO KE N 1 L AI SERLA IT E
KLA SS E 1 L AS ER PR OD UKT
This label is attached to the place as illustrated to inform that the
apparatus contains a laser component.
WARNING LABEL INFORMING OF RADIATION -
This label is placed inside the unit. As shown in the illustration. To
warn against further measures on the unit. The equipment contains
a laser radiating laser rays according to the limit of laser product of
class 1.
EXCLAMATION POINT -
is used to indicate that a specific component shall be
replaced o nl y by t he c omponent spec if ie d in t ha t
documentation for safety reason.
within an equilateral triangle,
E-1

SAFETY INSTRUCTIONS
1. READ INSTRUCTIONS - All the safety and operating instructions should be read before the appliance is operated.
2. RETAIN INSTRUCTIONS - The safety and operating instruction should be retained for future reference.
3. HEED WARNINGS - All warnings on the appliance and in the operating instructions should be adhered to.
4. FOLLOW INSTRUCTIONS - All operating instructions should be followed.
5. WATER AND MOISTURE - The appliance should not be used near water, for example, near a bathtub, washbowl,
kitchen sink, laundrytub, swimming pool or in a wet basement.
6. VENTILATION - The appliance should be situated so that its location or position does not interfere with its proper
ventilation. Do not place on bed, sofa, rug or similar surface that may block the ventilation openings, in a built-in
installation, such as a bookcase or cabinet that may impede the flow of air through the ventilation openings.
7. HEAT - The appliance should be situated away from heat sources such as radiators, stoves, or other appliances
(including amplifiers) that produce heat.
8. POWER SOURCE - The ap pl ia nce sho ul d be co nn ec ted to po wer sup pl y only of t he type d es cribed in the
operating instructions or as marked on the appliance.
9. GROUNDING - Precautions should be taken to ensure that the grounding means of an appliance is not defeated.
10. POWER CORD PROTECTION - Power supply cords should be routed so that they are not likely to be walked
on or pinched by items placed upon or against them.
11. POWER LINES - An outdoor antenna should be located away from power lines.
12. OBJECT and LIQUID ENTRY - Care should be taken so that objects do not fall and liquids are not spilled into
the enclosure through openings.
13. ESD WARNING - The display does not function properly or no reaction to operation of any the control may due
14. DAMAGE REQUIRING SERVICE - The appliance should be serviced by qualified service personnel when:
a. The power-supply cord or plug has been damaged.
b. Objects have fallen into, or liquid has been spilled into the appliance enclosure.
c. The appliance has been exposed to rain.
d. The appliance has been dropped, or the enclosure damaged.
e. The appliance does not appear to operate normally.
15. SERVICING - The user should not attempt to service the appliance beyond that described in the user operating
instructions. All other servicing should be referred to qualified service personnel.
Notes:
a. Dirty or scratched CD may cause a skipping problem. Clean or replace the CD.
b. If an error display or malfunction occurs, disconncet the AC cord and remove all the batteries. Then turn the power
back on.
to the electrostatic discharge. Switch off and unplug the set. Reconnect after a few seconds.
BEFORE OPERATION
Notes: CONCERNING COMPACT DISCS.
Since dirty, damaged or warped discs may damage the appliance, care should be taken of the followings items:
a. Usable compact discs. Use only compact disc with the mark shown below.
b. CD compact disc only with digital audio signals.
E-2
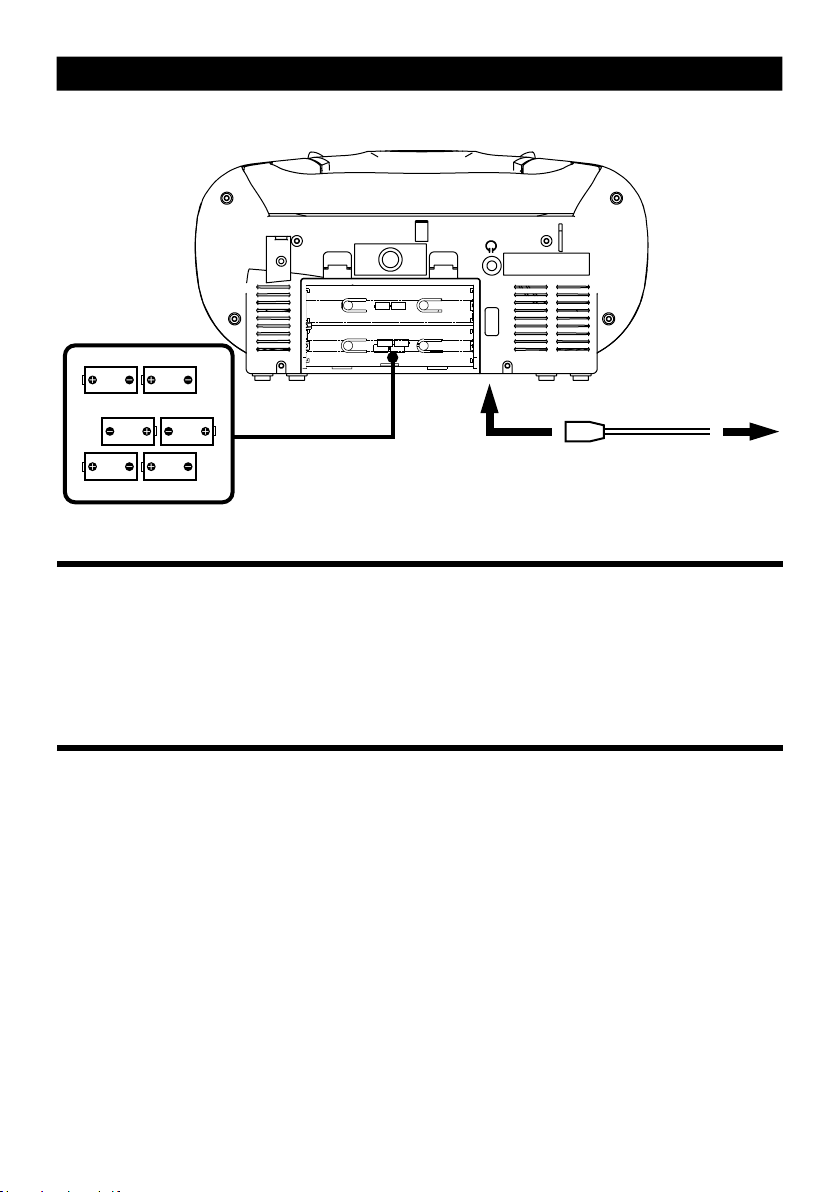
POWER SOURCES
to AC IN to a wall outlet
Insert 6 x “C” size batteries
into the battery compartment
AC POWER
You can power your portable system by plugging the detachable AC power cord into the AC inlet at
the back of the unit and into a wall AC power outlet. Check that the rated voltage of your appliance
matches your local voltage. Make sure that the AC power cord is fully inserted into the appliance.
BATTERY POWER
Insert 6 x “C” size batteries into the battery compartment. Be sure that the batteries are inserted
correctly to avoid damage to the appliance. Always remove the batteries when appliance will not be
used for a long period of time, as this will cause leakage to the batteries and subsequently dam
to your set.
Not
es:
- Use batteries of the same type. Never use different types of batteries together.
- To use the appliance with batteries, disconnect the AC power cord from it.
age
E-3

LOCATION OF CONTROL
FM ANTENNA
DOT-METRICS DISPLAY
CD DOOR
OPEN / CLOSE
VOLUME +
STANDBY
SKIP -
STOP / BAND
PREVIOUS DOWN
CLOCK
SD CARD SLOTUSB SLOT
USB/SD DOOR COVER
FUNCTION
SKIP +
PLAY / PAUSE
PREVIOUS UP
MEMORY
REMOTE SENSOR
VOLUME -
E-4

1 POWER
2 TIMER / ALARM
3 SLEEP
4 0-9 KEYS
5 MEMORY
6 FIND , MONO / ST.
7 SKIP+
8 STOP
9 SKIP-
10 RANDOM
11 X-BASS
12 BAND
13 VOL-
14 VOL+
15 P-DOWN
16 P-UP
17 PLAY / PAUSE
18 REPEAT
19 EQ
20 INTRO
21 MUTE
22 FUNCTION
BATTERY INSTALLATION
REMOTE CONTROL
1
2
3
4
5 15
6
7
8
9
10
11
12
13
14
16
19
21
17
18
20
22
Insert 2 x “AAA” size batteries into the battery compartment. Be sure that the batteries are inserted
correctly to avoid da mage to t he remote control. Always remove the batteries when the remote
control wi ll not be used for a long peri od of time, as this wil l cause leakage to the batteries and
subsequently damage to your set.
Notes:
- Use batteries of the same type. Never use different types of batteries together
.
- If the distance required between the remote control and the appliance decreases, the batteries
are exhausted. In this case replace the batteries with new one.
SENSOR WINDOW OF THE RECEIVER
- Even if the remote control is operated within the effective range, its operation may be impossible if
there are any obstacies between the appliance and the remote control.
- If the remote control is operated near other appliances which generate infrared rays, or if other
remote control devices using infrared rays are used near the appliance, it may operate incorrectly.
E-5

RADIO OPERATION
AUTOMATIC TU
1. Press the “FUNCTION” button to select “TUNER”
2. Press the “BAND” button to select AM or FM mode.
3. Press the “SKIP +” or “SKIP -” button to start automatic tuning process.
4. When a station is tuned in the tuning process, it will stop automatically and you can listen to your
desired station.
MANUAL TU
It is for selecting stations, which cannot be tuned automatically. (manual selection)
To tune a channel manually.
- Skip step 4 in the above procedures.
- In step 3, each time the “SKIP +” or “SKIP -” button is pressed momentarily (0.5 second or less),
the frequency changes by a fixed step:
FM: 50 MHz steps
AM: 9 kHz steps
NING
mode.
NING
MEMORY PRESET
1. Repeat step 1 to 4 in the AUTOMATIC TUNING procedures.
2. Press the “MEMORY” button to start the preset process.
3. Display will show the memory sequence number and a flashing “1”.
4. Press the “P - UP” or “P - DOWN” button or the “MEMORY” button of front panel to determine
the preset station number.
5. Press again the “MEMORY” button to preset your desired station.
6. Once al l the s tations were p reset, press t he “P - UP” or “P-DOW N” butt on to l isten t o your
desired station.
MONO / STEREO
Press the “MONO / ST” button to achieve the best frequency.
E-6

RADIO OPERATION
FOR BETTER RECE
- Reorient the antenna for better reception.
- Reorient the appliance to get better AM recept
PTION
ion..
E-7

CD / MP3 OPERATION
GENERAL OPERATIO
PLAY / PAUSE Press to start playing CD / MP3 disc.
Press again to stop playing CD / MP3 operation temporarily.
Press again to resume playback.
SKIP + & Press to go to the next track or back to the previous track.
SKIP - Press and hold while playing until you find the point of the sound.
STOP Press to stop all CD / MP3 operation.
N
PLAYBACK
1. Open the CD door and place a CD / MP3 disc with the label up in the CD compartment.
2. Close the CD door.
3. Press the “FUNCTION” button to select “READING”.
4. Focus search is performed if disc is inside. Playback will start automatically from the first track.
5. Adjust the “VOLUME” control to the desired level.
6. Press the “PLAY / PAUSE” button again when you want to stop playback temporarily
7. Press the “STOP” button when finished.
.
FOLDER SELECT
Press the “P - UP” or “P - DOWN” button on remote control to select folder. ( Folder select function
can only operate if disc store with at least 2 directories / files. )
E-8

CD / MP3 OPERATION
PROGRAM
It is possible to program the tracks you wish to play in a sequence of your choice. e i Program mod s
ractivated while in stop mode. If the unit is playing, press the “STOP” button fi st.
CD
1. Press the “MEMORY” button, the unit shifts to program mode, displays as below.
2. Press the “SKIP + or - ” button to select the desired track.
3. Press the “MEMORY” button once, the track NO. is saved into memory.
4. Repeat above steps 2 to 3.
MP3 / USB / MEMORY CARD
1. Press the “MEMORY” button, the unit shifts to program mode, displays as below,
the album NO. is flashing.
2. Press the “SKIP + or - ” button to select desired album & track NO. .
3. Press the “MEMORY” button, the track NO. is saved into memory.
4. Repeat above steps 2 to 3.
*Press play to start play of programmed setting.
*Press the “STOP” button to terminate programmed playback.
REPEAT
FILENAME
ALBUM
01 - PROG
01
001 P-01
TRACK NO.
Press the “REPEAT” button before or during playing CD / MP3 disc,
each press switches the repeat function as follows:
1 - REPEAT 1
2 - REPEAT ALBUM ( For MP3 only )
REPEAT 1
REPEAT 1
REPEAT
ALBUM
REPEAT
ALBUM
3 - REPEAT ALL
4 - NORMAL PL
AYBACK
NORMAL
AYBACK
PL
RANDOM
1. Press the “RANDOM” button on remote control before playing disc.
2. Press the “PLAY / PAUSE” button and the unit will select and play a track randomly.
3. Press the “RANDOM” button again to terminate random mode.
E-9
REPEAT
ALL
REPEAT
ALL

USB / SD OPERATION
GENERAL OPERATIO
PLAY / PAUSE Press to start playing tracks from the USB / SD card.
Press again to stop playing USB / SD operation temporarily.
Press again to resume playback.
SKIP + & Press to go to the next track or back to the previous track.
SKIP - Press and hold while playing until you find the point of the sound.
STOP Press to stop all USB / SD operation.
N
PLAYBACK
1. Plug or slot in USB / SD card device to port. (Make sure no disc on disc tray)
2. Press the “FUNCTION” button to select “READING”.
3. Play will start automatically from the first track.
4. Press the “STOP” button when finished.
5. Press the “PLAY / PAUSE” button again, playback will start from the first track.
Notes
:
You can press the “BAND” button twice during CD playing change to “USB / SD”
mode.
FOLDER SELECT, PROGRAM, REPEAT, RANDOM
The operation of FOLDER SELECT, PROGRAM, REPEAT and RANDOM mode are as the same as
that of CD / MP3. Please refer to CD / MP3 OPERATION.
E-10

OTHER FEATURES
EQ
Press the “EQ” button on remote control, each press switch the EQ function as follows:
1 - CLASSIC
2 - ROCK
3 - POP
4 - JAZZ
5 - FLAT (NORMAL)
Notes:
- The player not responsible for playability of MP3 in any case. Due to recording condition such as PC
performance, writing software, media ability or etc.
- For CD-RW, CD-R, it may not be played according to the type of this disc.
EXTRA BASS
1. Press the “X-BASS” button on remote control to enjoy extra bass sound effect.
2. Display will show “BASS - ON”.
3. Press the “X-BASS” button again to switch off extra bass sound effect.
ID-3 TAG ( FOR MP3 ONLY )
1. Press the “MONO / ST.” button on remote control.
2. ID3 information will show on display.
3. Press the “MONO / ST.” button agian to terminate.
INTRO
1. Press the “INTRO” button on remote control to play each song for 10 seconds.
2. Press the “INTRO” button again to resume normal playback.
MUTE
1. Press the “MUTE” button to remove the sound during playing disc.
2. Press the “MUTE” button again to resume the sound.
E-11

OTHER FEATURES
SLEEP
1. Press the “SLEEP” button on remote control, display will show “SLEEP 90”. That means, after 90
minutes, appliance will automatically turn to standby mode.
2. Press the “SLEEP” button again to select the automatically turn off time, from 90, 80, 70, 60, 50,
40, 30, 20, 10 minutes.
3. Press the “SLEEP” button to “SLEEP 00” to canel sleep function.
CLOCK SET
1. Press the “STANDBY” button to switch unit at standby mode.
2. Press the “MEMORY” button twice to entry clock set mode. The display will show “24H” and
flash
3. Adjust time format ( 12H / 24H ) by pressing the “SKIP +” or “SKIP -” button.
4. Press the “MEMORY” button to confirm time format, display will show “AM” or “PM” if 12H
format is set.
5. Adjust hour by pressing the “SKIP +” or “SKIP -” button, press the “MEMORY” button to confirm.
6. Adjust minute by pressing the “SKIP +” or “SKIP -” button, press the “MEMORY” button to confirm.
No
tes:
Because clock setting is at standby mode, the display is dim.
TING
ing.
TIMER SETTING
Timer setting must be after completed clock setting.
1. Turn on the unit.
2. Press the “TIMER/ALARM” button on remote control to timer on mode.
3. Set the unit on STANDBY mode.
4. Press the “CLOCK” button once.
5. Press the “MEMORY” button once, then press the “SKIP+” or “SKIP-” button to adjust hour (1-24).
6. Press the “MEMORY” button again, then press the “SKIP+” or “SKIP-” button to adjust minutes.
7. Press the “MEMORY” button once, to save time.
8. Unit will automatically turn on at the preset time.
9. Press the “CLOCK” button 2 times.
10. Repeat step 5-8 to set the timer.
11. Unit will automatically turn off at the preset time.
12. To cancel timer setting, turn on the unit and press the “TIMER/ALARM” on remote control to timer
off mode.
.
E-12
 Loading...