

Customer Help Line: 01422 263313
Opening Hours: Mon-Fri 8am-8pm, Sat 9am-4pm, Sun 11am-4pm
Or visit our website at www.ekey.co.uk
APTCDC9903AR

TROUBLE SHOOTING
Power switch on, but no power
• Check power to wall plug.
• Check AC cord connection to wall plug.
Power Indicator is on, but no sound
from speakers
• Check Function selector.
• Check VOLUME setting.
• Make sure headphones are not plugged in.
Poor AM Reception
• Internal AM bar antenna is directional.
• Slight rotation of unit may improve
reception.
Poor FM Reception
• Unravel and fully extend FM wire antenna
for best
reception.
No Sound when playing tapes
• Make sure function selector is in TAPE
position.
• Make sure PAUSE button is not pressed.
• Make sure cassette is recorded on.
Poor Playback Sound
• Check cassette - tape may be stretched
or damaged.
• Are cassette heads dirty? If so, clean as
rected in MAINTENANCE section of this
di
manual.
rd button cannot be pressed in
Reco
• Cassette erase-protection tab is removed.
Use another cassette or apply adhesive
tape over tab hole.
Poor Reco
• Are cassette heads dirty ? If so, clean as
• Check tape type. Use only Normal (Type A)
Tape speed is erratic
• Are capstan and/or pinch rollers dirty ? If
CD does not play
• Check Function selector - set to CD.
• CD must be inserted label side up.
• Check disc for dirt or scratches.
• Lens may be dirty or clouded. Clean with a
• If unit is taken from inside to cold weather,
rding
di
rected in MAINTENANCE section of this
manual.
cassette tape.
so,clean as di
section of this manual.
comme
condensation may form on the lens.
Let unit warm up to
rected in MAINTENANCE
rcially available CD lens cleaner.
room temperature.
1
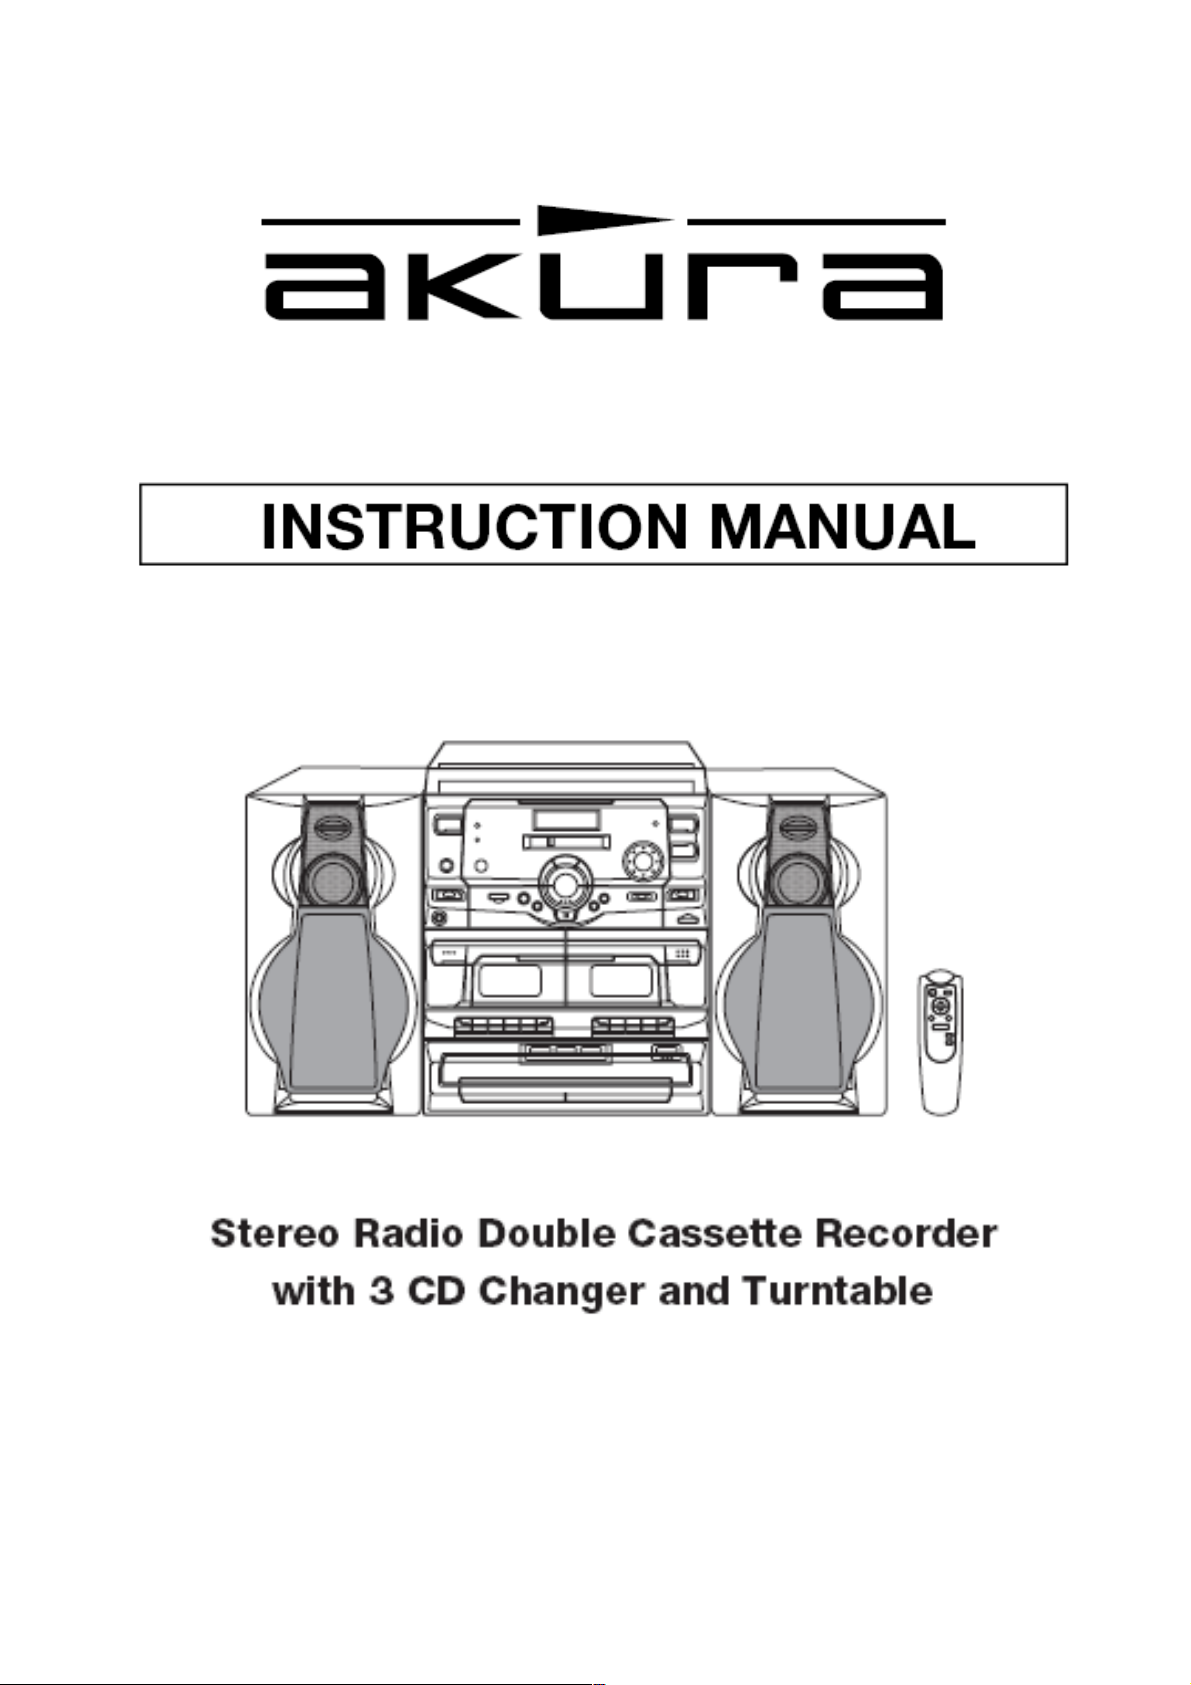
CONTROLS
4
5
6
7
8
9
10
11
12
13
14
15
1) Pick-up Holder
2) Speed Selector
3) Spindle Adapter
4) CD Skip Forward button
5) CD Skip Backwa
rd button
6) Power button
7) Remote Sensor
8) Extra Bass Selector
9) Function Selector
10) Phones Jack
11) Disc Change button
12) Memory button
13) Repeat button
14) CD Door
15) Deck 1 Cont
rol
RECORD (recode) button - DECK A only
PLAY (playback) button
REW (rewind) button
F.FWD (fast forward) button
STOP/EJECT (stop/eject) button
PAUSE button
16) LCD Display
17) FM Stereo Indicator
18) Volume Up button
16
17
18
19
20
21
22
23
24
25
26
27
31
32
28
29
30
Volume Down button
19)
20)
Tuning button
21) CD PL
AY/PAUSE button
22) Band Selector
23) Dubbing Speed Selector
24) FM Mode Selector
25)
Random button
26) Intro button
27) CD STOP button
28) Deck 2 Cont
rol button
PLAY (playback) button
REW (rewind) button
F.FWD (fast forward) button
STOP/EJECT (stop/eject) button
PAUSE button
29) CD Door Open/Close button
30) Disc Selector
31) Speaker Jacks (L/R)
32) FM Wire Antenna
33) Beat Cut Switch
34)
AC Power Cord
3
2
1
33
34
2
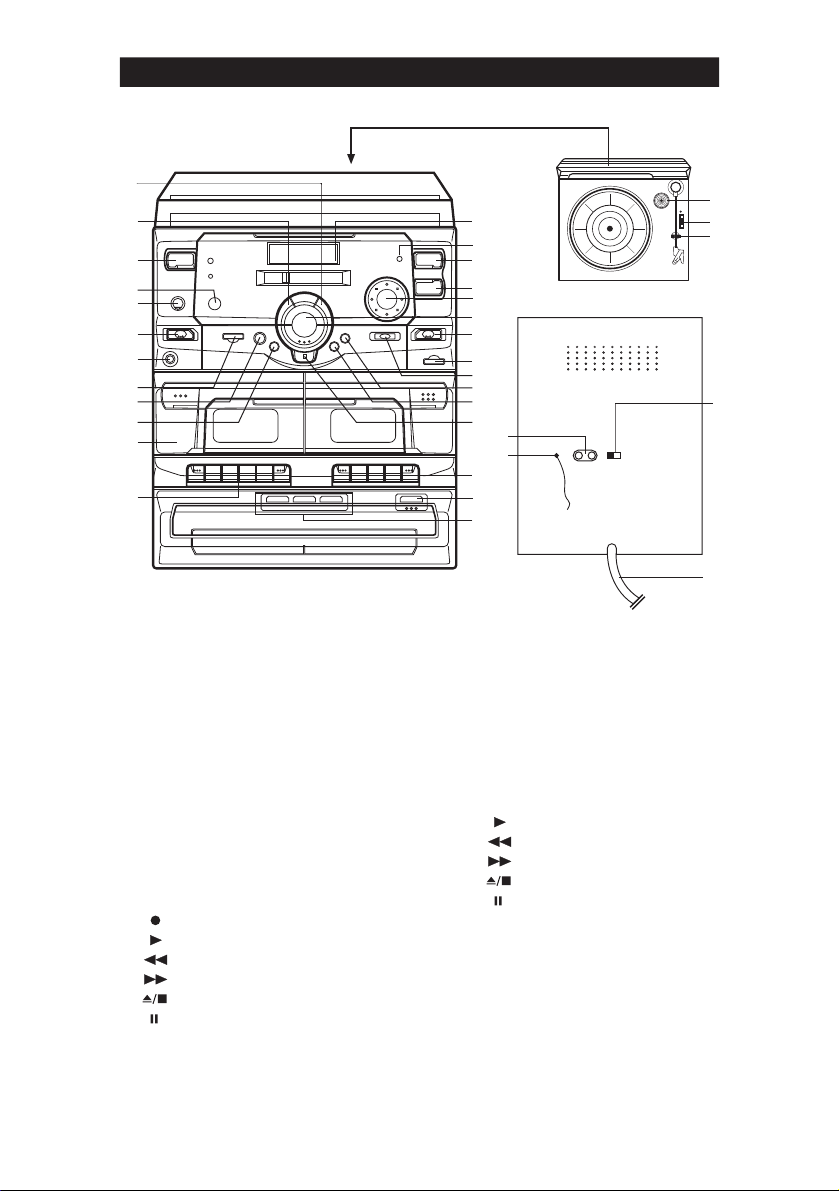
REMOTE CONTROL
This unit comes with a Remote Control
which allows the user to cont
system functions f
feet.
The Remote Cont
batteries (not included).
NOTE :
The Remote Control should always be
aimed at the Remote Control Sensor on the
unit for best perfo
rom a distance of up to 20
rol requires two AAA
rmance.
rol certain
REMOTE CONTROL RANGE
Remote Control Sensor
Remote Control Functions:
NOTE :
POWER button on main unit must be 'ON' in
order for Remote Control to operate.
1. Power ON / STANDBY - Switches the
unit between Power "ON" and Stand-By
modes. The Power indicator LED on the
unit will remain lit in the Stand-By mode.
2. Mute - Mutes the volume when pressed.
Pressed the MUTE button a second time
to restore the previous volume level.
3. Volume Up / Down - Increase (UP) or
decrease (DOWN) the volume.
4. Skip Forward & Skip Backward
- Press to change tracks as desired.
5. Play / Pause
to begin play. Press during play to pause
playback - press a second to resume play.
6. Stop - Press to stop CD playback.
7. Open / Close - Opens or closes the CD tray.
-- items 4 thru 7 operate only while using
the Compact Disc Player.
- Press in the STOP mode
30 Degrees
20 Fe et
1
2
3
4
5
6
7
3

CONNECTIONS
POWER CONNECTION
Connect the power cord to AC outlet only.
SPEAKER JACKS
Connect the SPEAKER PLUGS to the
SPEAKER JACKS located on the
unit.
Safety Instruction :
Do not connect the power cord to the mains supply until all other connections have been
made.
Do not expose this apparatus to dripping or splashing.
REMOTE CONTROL
rear of the
HEADPHONE JACK (PHONES)
This unit will accept ste
included) with a 3.5mm socket.
The speakers a
disconnected when headphones a
connected to the PHONES jack.
reo headphones (not
re automatically
GENERAL
POWER - P
The Power Indicator LED will light when the
unit is on.
VOLUME - Adjusts loudness of speakers or
headphones
ress to turn unit ON or OFF.
FUNCTION - Use to select desi
(TAPE, CD, RADIO or PHONO) to be
listened to. The selected sou
available for
RECORDING section of this manual for
mo
recording. Please consult
re details.
TUNER
1) Press POWER button to turn “ON” unit.
2) Slide FUNCTION switch to RADIO.
3) Set the BAND selector as desi
Tune in the desired station using the
4)
Tuning knob.
If the FM S
STEREO indicator will light to indicate
ste
To listen in Mono or to improve noisy, weaksignal
selector switch to the MONO position. The
STEREO
is now
5)
Adjust the VOLUME, EXTRA BASS controls
to the desi
T. band was chosen, the FM
reo received.
stereo broadcasts, set the FM Mode
indicator will go off and FM Mono
received.
red sound level.
red.
HINTS FOR BEST RECEPTION :
MW : The receiver has a built-in MW
bar antenna. If MW reception is
weak, slight rotation or repositioning of the
unit will usually improve MW reception.
recording, beating whistle at some
During
stations may occur, so sliding "FM MODE"
switch may help.
FM : The receiver has a built-in FM wire antenna
rom the rear cabinet. This wire
hanging f
should be totally unravelled and extended
for best
reception.
re
red source
rce is also
4

PHONO
Note :
Remove the stylus protector.
Be sure that the phono arm is detached from the
tone arm rest before operation and re-secured
again afterward.
1.
Press POWER button to turn “ON” unit.
2. Set the FUNCTION switch to the
PHONO.
3. Set the speed selector to the p
position depending on the
roper
record to be
played.
4. Place the
record on the platter (if
required, use the 45 rpm adaptor).
5. Lift the phono arm f
mo
ve it to the edge of the record. The platter
will begin to
rom the rest and slowly
rotate.
CASSETTE TAPES
Inserting and Removing the Cassette
Tape
Open the cassette compartment lid by
pressing the STOP/EJECT button. Insert
the cassette placing the full
(visible th
rough the window) and the
exposed section of the tape at the bottom.
Close the compartment lid. Now the unit is
ready for operation. To use the second
track, p
ress the STOP/EJECT button and
remove the cassette. Turn the cassette
around and reinsert it as previously
described.
Recommended Cassette Tapes
In order to obtain optimum performance with
the built-in cassette tape deck, it is essential
to use only high quality cassette tapes. The
bias and equalization of your tape deck is
adjusted to yield excellent
with brand name tapes. Use C-30, C-60
and C-90 cassettes only.
recommend C-120 cassettes because
they can be subject to mechanical instability
and p
roper constant tape tension cannot be
cont
rolled.
Checking the Cassette
re that the cassette tape has no
Make su
slack prior to inserting it into the
reel on the left
results if used
We do not
recorder.
6. Place the phono arm to the desired
position.
7. Adjust VOLUME & EXTRA BASS
ntrols to the desired sound level and sound
co
equalization.
8. At the end of
automatically stop
record, the platter will
rotation. Lift the phono
arm from the record and return it to the rest.
9.
To stop manually, lift the phono arm from
the
record , and return it to the rest.
Unless the tape is taut, it may wind around
the head mechanism and t
Use a pencil as shown in the Figu
up slack on one of the
rouble may result.
re to take
reels.
Safeguard Against Accidental
Erasure
To protect valuable recordings from accidental
erasin
g, the tape deck and the cassette are
eq
uipped with standard safety features. To
keep the recorded material carefully, break out
the tabs on the back of the cassette with a knife
or
screwdriver. To protect the side A (1) from
accidental erasure, break out the right side
tab (2). To record on a cassette whose tabs
ha
ve been broken, simply attach adhesive
ta
pe (3) over the tab opening. The REC button
wi
ll not lock in position when a cassette tab
has been
removed.
(1) SIDE A
TAB
(2)
(3) ADHESIVE
TAPE
5

CASSETTE PLAYBACK (DECK B) (DECK A)
The TAPE B is used for playback only. The
TAPE A is used both for recording and
playback.
Do not tu
rn the unit off while the tape is
running. Otherwise, the pinch
damaged.
1. Press TAPE button to TAPE mode.
2.
Press the appropriate STOP/EJECT
button and insert a
3.
Press the PLAY button to start playback.
4. Adjust the VOLUME & EXTRA BASS
controls to the desired sound level and sound
equalization.
5.
Press the STOP/EJECT button to stop
playback at any time.
roller may be
recordable cassette.
RECORDING (DECK A)
Fast-Forwa
For fast winding or
the
EJECT button when the desi
been
continuous play back from desired location.
Pause
Press the PAUSE button to momentarily
suspend tape travel during
playback. Re-p
release pause and recording or playback
restart. Pause control does not function
during fast forwa
rd and Rewind
rewinding the tape, press
F.Fwd or REW button. Press the STOP/
red location has
reached. Press PLAY button for
recording or
ress the PAUSE button to
rd or rewind.
This unit has an ALC (Automatic Level
Cont
rol) circuit and no further adjustment of
the controls is necessary while recording.
Press TAPE button to TAPE mode.
1.
2.
Press the STOP/EJECT button to insert
a blank tape.
3. Press the RECORD/PLAY button to
recording.
start
4. Since you can monitor th
speakers regardless of the recording
level, adjust the VOLUME & EXTRA
BASS cont
level and sound equalization.
rols to the desired sound
rough the
Press the STOP/EJECT button to stop
6.
recording at any time.
Note:
Noise may be heard if
dio station, to reduce this noise please adjust
Ra
the Beat Cut Switch at rear panel.
Erasing
To erase the recording tape without making a
new recording, let the un it operate in the
recording mode.
Note:
Do not opearate the DECK B while erasing.
recording from AM
6

DUBBING (DECK B) TO (DECK A)
This unit enables you to duplicate a prerecorded tape to another tape by using the
unit-in double deck mechanisms. It is
performed only one wa
(playback) to DECK A (
Dubbing at normal Speed
Note:
Be sure the HIGH SPEED DUBBING switch
AT NORMAL in order to record
is SET
rmal speed.
at no
Press the POWER switch to ON.
1.
2. Set the
3. Insert a p
4.
5.
6. Adjust the VOLUME & EXTRA BASS
TAPE function selector.
DECK B and a blank cassette into the
DECK A.
Press the DECK A PAUSE button and
ress the RECORD button.
then p
Press the DECK B PLAY button to start
dubbing.
cont
rols to desired sound level and
sound equalization.
y, from the DECK B
recording).
re-recorded cassette into the
Dubbing at High Speed
This unit is equipped with a HIGH SPEED
DUBBING system which allows duplicating
re-recorded tape at approximately two-
a p
rds the time of the duration at normal
thi
speed.
Slide the HIGH SPEED DUBBING switch,
and follow the same p
in "DUBBING
When dubbing a p
at HIGH SPEED in
chattering sound is hea
the VOLUME cont
red FUNCTION button according to
the desi
rce to be heard.
the sou
Note:
When the dubbing at HIGH SPEED is in prog
do not
release the HIGH SPEED SWITCH, since
this will vary the speed of the program and ruin the
recording.
rocedure as instructed
AT NORMAL SPEED".
re-recorded cassette tape
TAPE function, a
rd. To avoid this, set
rol to a minimum or set
ress,
7

HANDLING COMPACT DISCS
To remove a disc from its storage case, press down on the centre of the case and lift the disc
out, holding it ca
refully by the edges.
Fingerprints and dust should be ca
Unlike conventional
debris so gently wiping with a soft cloth should
from the inside to outside of the disc. Small dust particies and light stains will have absolutely
no e
ffect on reproduction quality.
Never use chemicals such as
compact discs. These chemicals can ir
Discs should be
cause the Laser pickup to skip. Do not expose discs to di
temperatu
Important
Since movement of the CD mechanism and the sensitive ci
radio tuner nearb
res for extended periods. Long exposure to high temperatures can warp the disc.
records, compact discs have no grooves to collect dust and microscopic
returned to their cases after use. This avoids serious scratches that could
y, switch this unit off white operating other radio devices.
This product utilises a laser
Danger - invisible laser radiation when opened and interlock failed or defeated.
Avoid direct exposure to the beam.
Caution - Use of controls, adjustments, or procedures not listed in this
manual may result in hazardous radiation exposure.
Concerning Compact Discs
Only compact discs identified with this mark can be used with in this player.
refully wiped off the disc's recorded surface with a soft cloth.
remove most particles. Wipe in a straight line
record sprays, antislatic sprays, benzine, or thinners to clean
reparably damage the disc's surface.
rect sunlight, high humidity, or high
rcuitry may cause interterence to a
8

CAUTION
Do not put anything except a compact disc into the compartment. Foreign objects can damage
the mechanism. Do not fo
operations. Keep the disc compartment closed when not in use to
entering the mechanism. Never place mo
If the disc is deeply scratched, or too dirt
rce the compartment by hand during the opening and closing
prevent dirt and dust from
re than one disc in each tray at any time.
y, the disc may not play.
LOADING CDS
1) Switch FUNCTION selector to “CD” mode .
2) Press OPEN/CLOSE button once and disc load er co mpart ment will open.
3) Place disc with label facing up on di sc co mpart ment.
4) During disc loader compartment were o pen, expos ing o nly the right and left disc holders.
The third disc holder will remain in unit . To expos e the third disc holder, press one of the
discs number buttons.
5) Press OPEN/CLOSE button to close comp artme nt.
6) The disc compartment may be opened at anyt ime b y pre ssing the OPEN/CLOSE button,
remove the disc only after the compa rtmen t has full y opened.
7) Unit allows you to open disc compartm ent d uring play mode and allowing you to load
another one or two disc without inte rrupt ing p lay.
PLAYING CDS
Normal Playback
1)
Switch FUNCTION selector to “CD” mode.
2) Follow load disc instruction to store disc compartment.
3) Select your desir e disc by pressing DISC CHANGE button, display will show 1 / 2 / 3
indicate th e sel ected disc play.
4) Press PLAY/P AUSE button once, play start automatically from the firs t track of disc
selected.
5) Track number and playing time will show on display.
6) Press INTRO butto n once on remote for INTRO playback, few secon d of each songs of
played disc will be played respectively. Press again INTRO but ton t o terminate.
7) Press SKIP + /- bu tton to select next / previous track.
8) Press STOP b utton once to stop play.
Repeat Disc Play by Remote Control
The function allows the operator to repe at a singl e tra ck, all tracks or all disc loaded in
compartment.
1) Press REPEAT button on remote once to repe at 1 track .
2) Press REPEAT button again to repeat a ll tr acks.
3) Press REPEAT button to repeat all dis cs in comp artme nt.
To canel repeat mode, keep pressing the REPEA T but ton u ntil the REPEAT indicator
disappeared.
9

PROGRAMMED DISC PLAY
It is possible to program the tracks you wish to play in a sequence of your choice. It is not
possible to enter p
instructions belo
PROGRAMMING THE TRACK FROM 1 DISC
1. Select the desi
2. P
ress the MEMORY button. The following information will be displayed on the CD Display.
rograms during disc play. Press the STOP button first, then follow the
w.
red disc.
DISC TRACK
PROGRAM
3 8 P -- 0 1
3. Select the desi
4. P
ress the MEMORY button.
The first p
Select the next desi
5.
6.
Press the MEMORY button.
PROGRAMMING THE TRACK FROM MORE THAN 1 DISC
Programming the track from a different disc. Repeat the same procedure 1-4.
Press the No. button to select the next disc.
Repeat procedures 1-4 to program the next tracks.
Continue entering tracks in this way until all the desi
20
Tracks can be programmed in this way.
Notes:
If the PLAY/PAUSE button is pressed before the MEMORY button is pressed to store a track,
the track will not be programmed and the disc will start playing from the first selected track. Any
track can be programmed to play mo
Listen to Programmed Tracks
Press the PLAY/PAUSE button.
Disc play will start at the beginning of the first p
To Clear The Program Memory
If the disc is playing, p
Press the STOP button again until the MEMORY Indicator does not appear.
The p
rogram memory will also be cleared if the disc compartment is opened, if the function is
changed, or if the power is switched o
red track using the Forward and Reverse SKIP/SEARCH buttons.
rogram selection is now stored in the program memory.
red track using the Forward and Reverse SKIP/SEARCH buttons.
red tracks are stored.
re than once.
rogrammed track.
ress the STOP button.
ff.
10
 Loading...