


14” ESS DVD TV
DVD AND COLOUR TELEVISION WITH REMOTE
CONTROL, TELETEXT AND STEREO
INSTRUCTION MANUAL
INGILIZCE PT 90 DVD TV 1P RC112 18/6/02 17:58 Page 1

2
MAINS OPERATION . . . . . . . . . . . . . . . . . . . . . . . . . . . . . . . . . . . . . . . . . . . . . . . . . . . . . . . . . . . . . . . . . . . . . . . . . . . . . .3
WHAT TO DO FOR SAFETY OF YOUR TV . . . . . . . . . . . . . . . . . . . . . . . . . . . . . . . . . . . . . . . . . . . . . . . . . . . . . . . . . . . . .4
WHICH PART OF YOUR TV PERFORMS WHAT FUNCTION . . . . . . . . . . . . . . . . . . . . . . . . . . . . . . . . . . . . . . . . . . . . . . .5
REMOTE CONTROL . . . . . . . . . . . . . . . . . . . . . . . . . . . . . . . . . . . . . . . . . . . . . . . . . . . . . . . . . . . . . . . . . . . . . . . . . . . . . .6
AERIAL CONNECTION . . . . . . . . . . . . . . . . . . . . . . . . . . . . . . . . . . . . . . . . . . . . . . . . . . . . . . . . . . . . . . . . . . . . . . . . . . . .8
VCR, COMPUTER AND DECODER CONNECTIONS . . . . . . . . . . . . . . . . . . . . . . . . . . . . . . . . . . . . . . . . . . . . . . . . . . . . .9
TV FUNCTIONS . . . . . . . . . . . . . . . . . . . . . . . . . . . . . . . . . . . . . . . . . . . . . . . . . . . . . . . . . . . . . . . . . . . . . . . . . . . . . . . . .10
TV FUNCTIONS (MENUS) . . . . . . . . . . . . . . . . . . . . . . . . . . . . . . . . . . . . . . . . . . . . . . . . . . . . . . . . . . . . . . . . . . . . . . . . .11
PICTURE SETTINGS MENU, SOUND SETTINGS MENU , . . . . . . . . . . . . . . . . . . . . . . . . . . . . . . . . . . . . . . . . . . . . . . . . .12
HEADPHONE MENU, FEATURES MENU . . . . . . . . . . . . . . . . . . . . . . . . . . . . . . . . . . . . . . . . . . . . . . . . . . . . . . . . . . . . . .13
CHILD LOCK MENU, INSTALLATION MENU . . . . . . . . . . . . . . . . . . . . . . . . . . . . . . . . . . . . . . . . . . . . . . . . . . . . . . . . . .14
AUTOMATIC PROGRAMMING . . . . . . . . . . . . . . . . . . . . . . . . . . . . . . . . . . . . . . . . . . . . . . . . . . . . . . . . . . . . . . . . . .15,16
TELETEXT . . . . . . . . . . . . . . . . . . . . . . . . . . . . . . . . . . . . . . . . . . . . . . . . . . . . . . . . . . . . . . . . . . . . . . . . . . . . . . . . . . . . . .17
DVD PLAYER SECTION . . . . . . . . . . . . . . . . . . . . . . . . . . . . . . . . . . . . . . . . . . . . . . . . . . . . . . . . . . . . . . . . . . . . . . . . . . .19
DVD PLAYER . . . . . . . . . . . . . . . . . . . . . . . . . . . . . . . . . . . . . . . . . . . . . . . . . . . . . . . . . . . . . . . . . . . . . . . . . . . . . . . . . . .20
REMOTE CONTROL (DVD FUNCTIONS) . . . . . . . . . . . . . . . . . . . . . . . . . . . . . . . . . . . . . . . . . . . . . . . . . . . . . . . . . . . . .21
DVD AUDIO OUT CONNECTIONS . . . . . . . . . . . . . . . . . . . . . . . . . . . . . . . . . . . . . . . . . . . . . . . . . . . . . . . . . . . . . . . . .22
PLAYING CDS . . . . . . . . . . . . . . . . . . . . . . . . . . . . . . . . . . . . . . . . . . . . . . . . . . . . . . . . . . . . . . . . . . . . . . . . . . . . . . . . . .25
DVD SETTINGS . . . . . . . . . . . . . . . . . . . . . . . . . . . . . . . . . . . . . . . . . . . . . . . . . . . . . . . . . . . . . . . . . . . . . . . . . . . . . . . . .26
BASIC FUNCTIONS . . . . . . . . . . . . . . . . . . . . . . . . . . . . . . . . . . . . . . . . . . . . . . . . . . . . . . . . . . . . . . . . . . . . . . . . . . . . . .29
VCD, CD, MP3 CD . . . . . . . . . . . . . . . . . . . . . . . . . . . . . . . . . . . . . . . . . . . . . . . . . . . . . . . . . . . . . . . . . . . . . . . . . . . . . .31
TROUBLESHOOTING . . . . . . . . . . . . . . . . . . . . . . . . . . . . . . . . . . . . . . . . . . . . . . . . . . . . . . . . . . . . . . . . . . . . . . . . . . . .32
TECHNICAL SPECIFICATIONS . . . . . . . . . . . . . . . . . . . . . . . . . . . . . . . . . . . . . . . . . . . . . . . . . . . . . . . . . . . . . . . . . . . . . .33
CONTENTS
INGILIZCE PT 90 DVD TV 1P RC112 18/6/02 17:58 Page 2
DEAR CUSTOMER
3
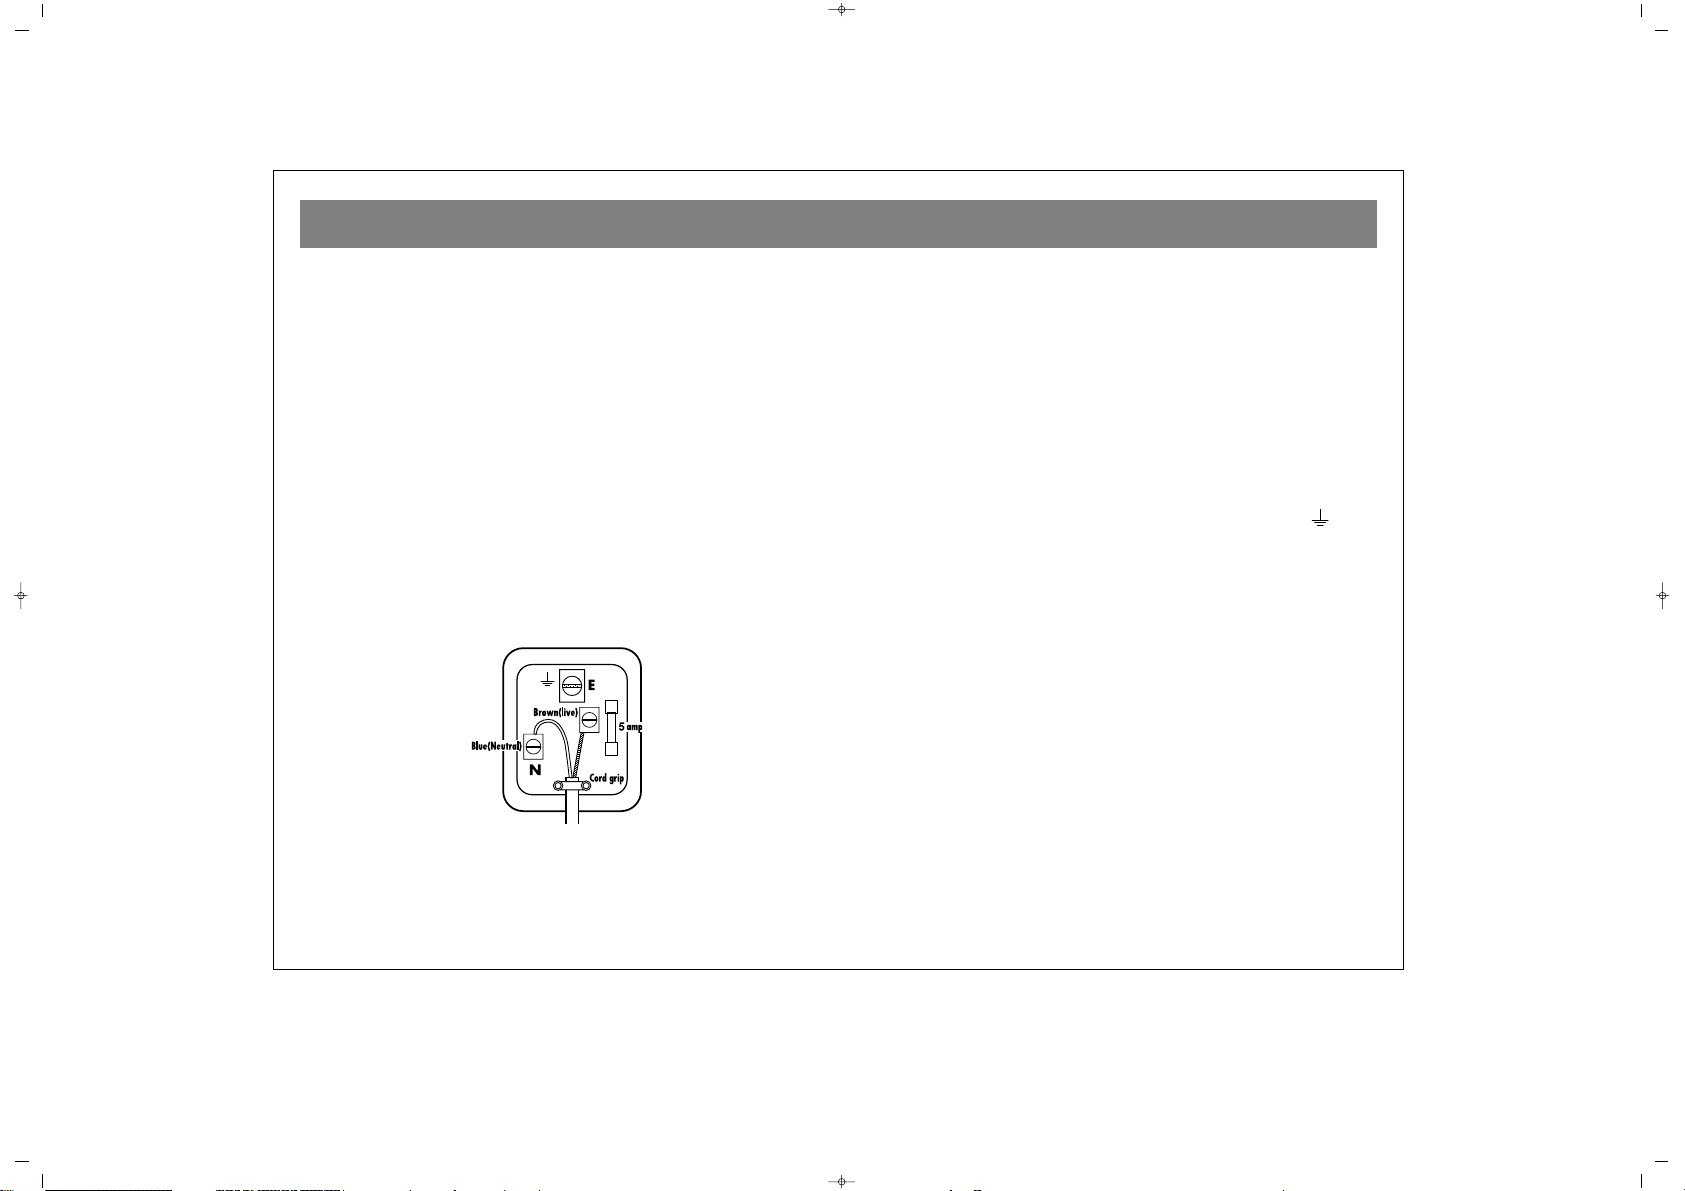
MMAAIINNSS SSUUPPPPLLYY 223300-- 224400 VV ~~ 5500 HHzz
MMAAIINNSS PPLLUUGG
The mains lead supplied with this equipment is fitted with a standard 13 amp plug (BS 1362) and is fitted with a 5 amp fuse. When
changing or examining the fuse, the correct 5 amp fuse- ASTA or
BSI approved (BS 1362) must be fitted and the fuse cover replaced.
The 13 amp plug is the most widely used type in the UK and should
be suitable for most users.
However some locations (mainly older buildings) may not be equipped with normal 13 amp sockets. In such cases it is recommended
that a suitable plug adaptor be purchased from your dealer.
IIMMPPOORRTTAANNTT::
This product is fitted with an approved non-rewireable 13 amp plug
fitted with a 5 amp fuse.
Should you decide to change the plug it should be cut from the power cord and disposed of safely.Insertion into a mains socket would
cause an electrical hazard.
However should you decide to change the plug. Please follow the
instructions below:
IIMMPPOORRTTAANNTT
The wires in the mains lead are coloured in accordance with the
following code :
BBlluuee ::
Neutral
BBrroowwnn::
Live
As the wires in the mains lead of this apparatus may not correspond
with the coloured markings identifying the terminals in your plug
proceed as follows: The wire that is coloured BLUE must be connected to the terminal which is marked by the letter
““NN””
or coloured
black. The wire that is coloured
BBRROOWWNN
must be connected to the
terminal which is marked by the letter
““LL””
or coloured red. A 5 amp
fuse must be fitted either in the plug or the adaptor or at the distribution board.
DDOO NNOOTT MMAAKKEE AANNYY CCOONNNNEECCTTIIOONN TTOO TTHHEE LLAARRGGEERR PPIINN MMAARR--
KKEEDD WWIITTHH TTHHEE LLEETTTTEERR ““EE”” OORR BBYY TTHHEE SSYYMMBBOOLL ““ ““ OORR
CCOOLLOOUURREEDD GGRREEEENN OORR GGRREEEENN AANNDD YYEELLLLOOWW..
The screw in this terminal must be fully tightened.
WARNING: The plug which you cut off the mains lead must be
disposed of immediately and safely, since a shock hazard will arise
if the plug is inserted into a 13A socket elsewhere in the house. This
appliance must be protected by a 5A fuse, if a 13A(BS 1363) plug is
used. If any other type of plug is used, a 5A fuse must be fitted in the
plug or distribution board. Only ASTA approved BS 1362 fuses
should be used. This appliance must not be connected to a multiple
plug adaptor.The fuse carrier must be refitted in the event of
changing the fuse. Do not use the plug if the fuse carrier lost. The
fuse carrier must be of the correct type and colour (as indicated by
the plug base). Fuse carriers may be obtained from your supplier or
service centre.Should at any time the mains lead need replacing the
replacement lead should only be fitted by a competent
electrician."
INGILIZCE PT 90 DVD TV 1P RC112 18/6/02 17:58 Page 3
WHAT TO DO FOR SAFETY OF YOUR TV
4
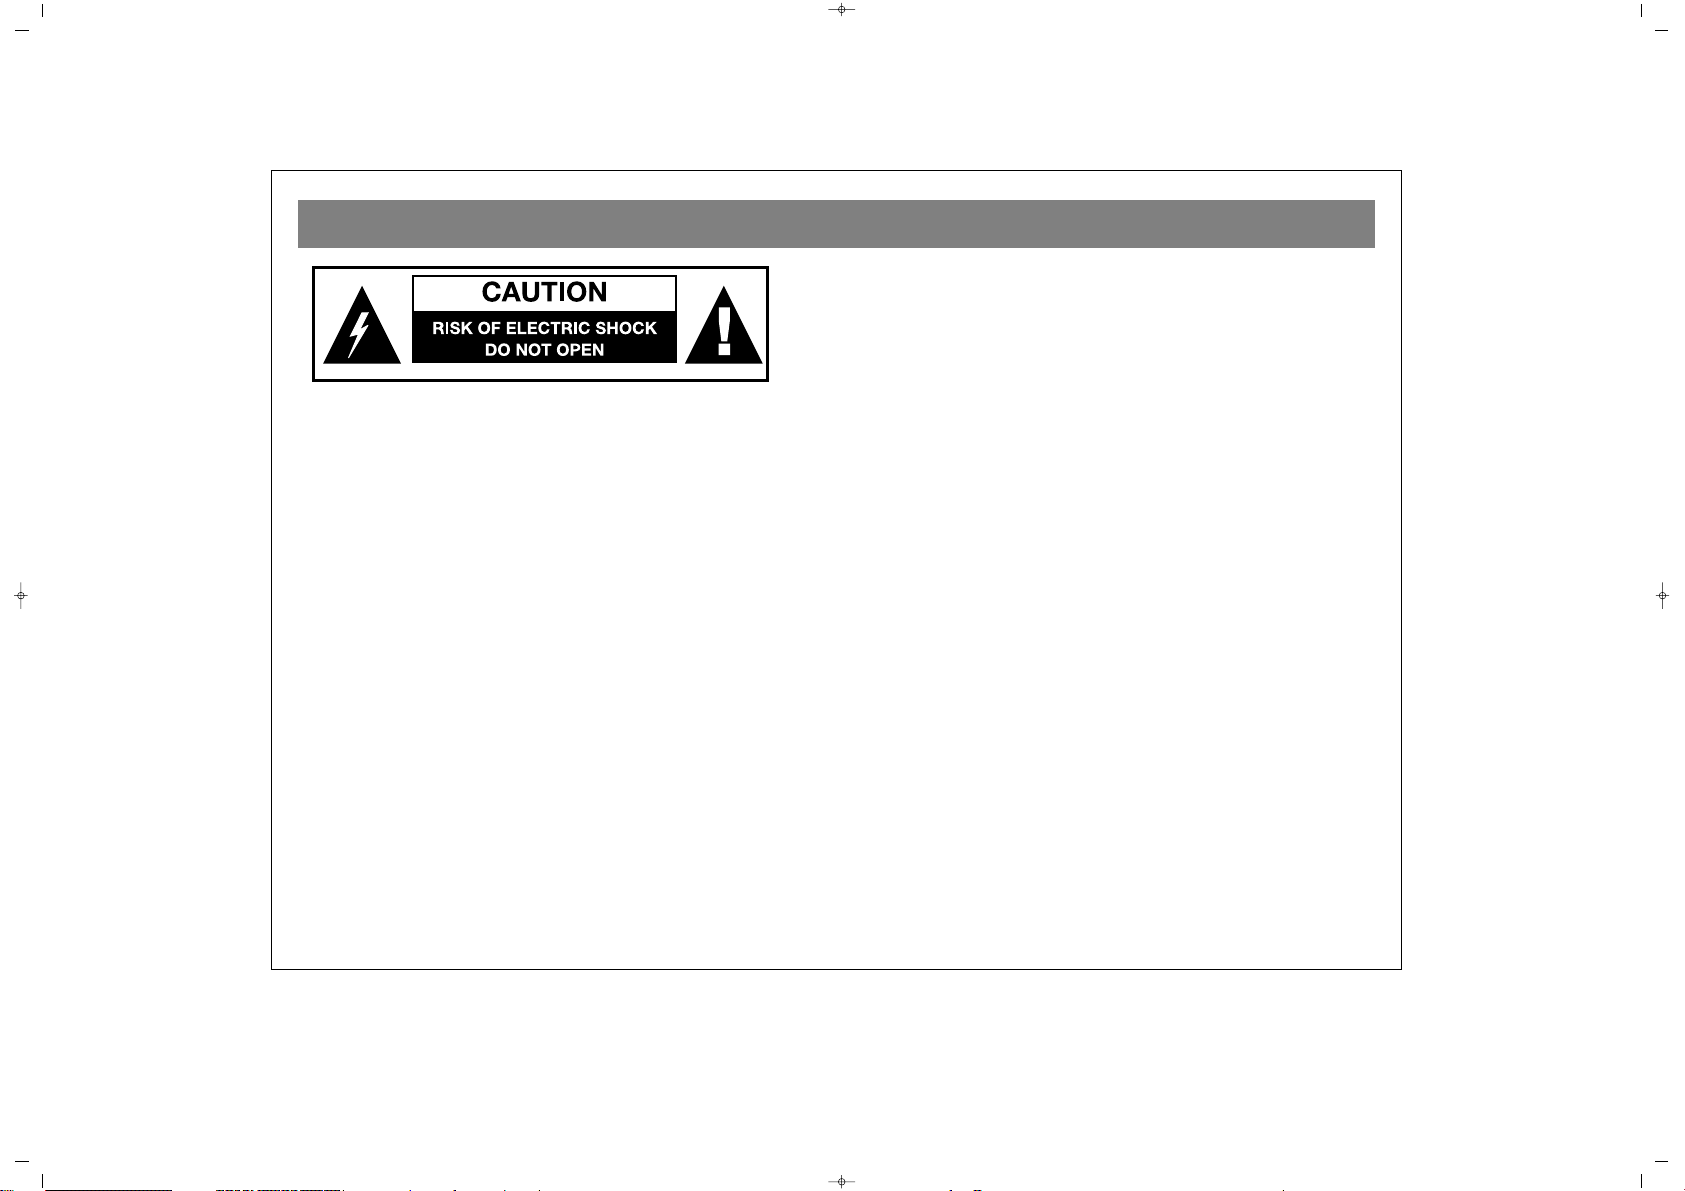
CCAAUUTTIIOONN :: TTOO RREEDDUUCCEE TTHHEE RRIISSKK OOFF EELLEECCTTRRIICC SSHHOOCCKK..
DDOO NNOOTT RREEMMOOVVEE CCOOVVEERR ((OORR BBAACCKK)).. NNOO UUSSEERR --
SSEERRVVIICCEEAABBLLEE PPAARRTTSS IINNSSIIDDEE.. RREEFFEERR SSEERRVVIICCIINNGG TTOO
QQUUAALLIIFFIIEEDD PPEERRSSOONNNNEELL..
PPoowweerr ssoouurrccee
You should only plug the TV into a 230V to 240V AC, 50 Hz supply.
Make sure you select the correct voltage setting for your TV.
PPoowweerr ssuuppppllyy lleeaadd aanndd ootthheerr lleeaaddss
Position the power supply lead and other leads so that they are not
likely to be walked on or pinched by things placed on or against
them. Pay particular attention to leads where they enter a power
socket and at the point where they come out of the TV.
MMooiissttuurree aanndd wwaatteerr
Do not use the TV in a humid or damp area. The apparatus shall not
be exposed to dripping or splashing, as this may dangerous. No
objects filled with liquids, such as vases, shall be placed on the
apparatus.
NNoo nnaakkeedd ffllaammeess
It’s recommended that the user is informed that no naked flame
sources, such as lighted candles, should be placed on top the
apparatus.
BBaatttteerryy ddiissppoossaall
It is recommended that attention should be drawn to the
environmental aspects of IR remote control battery disposal.
CClliimmaatteess
It is recommended that attention should be drawn to any limitations
to the use of the apparatus in tropical and/or moderate climates.
CClleeaanniinngg
Unplug the TV before you clean it. Do not use liquid or aerosol
cleaners. Clean your TV with a soft, damp cloth.
VVeennttiillaattiioonn
The slots and openings on the TV are for ventilation. Do not cover
or block them as it could lead to overheating.
LLiigghhttnniinngg
Unplug the TV from the wall socket if there is a storm or lightning,
or if you are going on holiday.
RReeppllaacceemmeenntt PPaarrttss
If your TV needs a part replacing, make sure the person who does it
uses parts which are specified by the manufacturer or have the same
specifications as the original part. Other parts may cause a fire,
electric shock or other hazards.
SSeerrvviicciinngg
Make sure the person who services your TV is qualified to do so. Do
not remove the cover yourself - you could get an electric shock.
GGeenneerraall
• Do not connect or adjust cables when the TV is plugged in.
• Do not leave the TV in a hot, cold or humid area.
• We are proud to offer a high-quality product. To keep this level of
quality, your TV should be serviced at your an authorised service centre.
INGILIZCE PT 90 DVD TV 1P RC112 18/6/02 17:58 Page 4
WHICH PART OF YOUR TV PERFORMS WHAT FUNCTION
5
FFRROONNTT ::
11..
ON-OFF button
22..
Remote control sensor
33..
Speaker(s)
44..
Programe up and down buttons
55..
Volume up and down buttons
88..
Headphone input
99..
DVD Driver
1100..
DVD Eject
1111..
DVD Back Skip
1122..
DVD Forward Skip
1133..
DVD Stop
1144..
DVD Play / Pause
BBAACCKK ::
66..
Aerial in
77..
“Scart in” (Using this entry, you can connect to your TV
such devices as computer, decoder and VCR)
1155..
DVD Left/Right audio output and DVD digital coaxial audio
output
1166..
AV in
INGILIZCE PT 90 DVD TV 1P RC112 18/6/02 17:58 Page 5
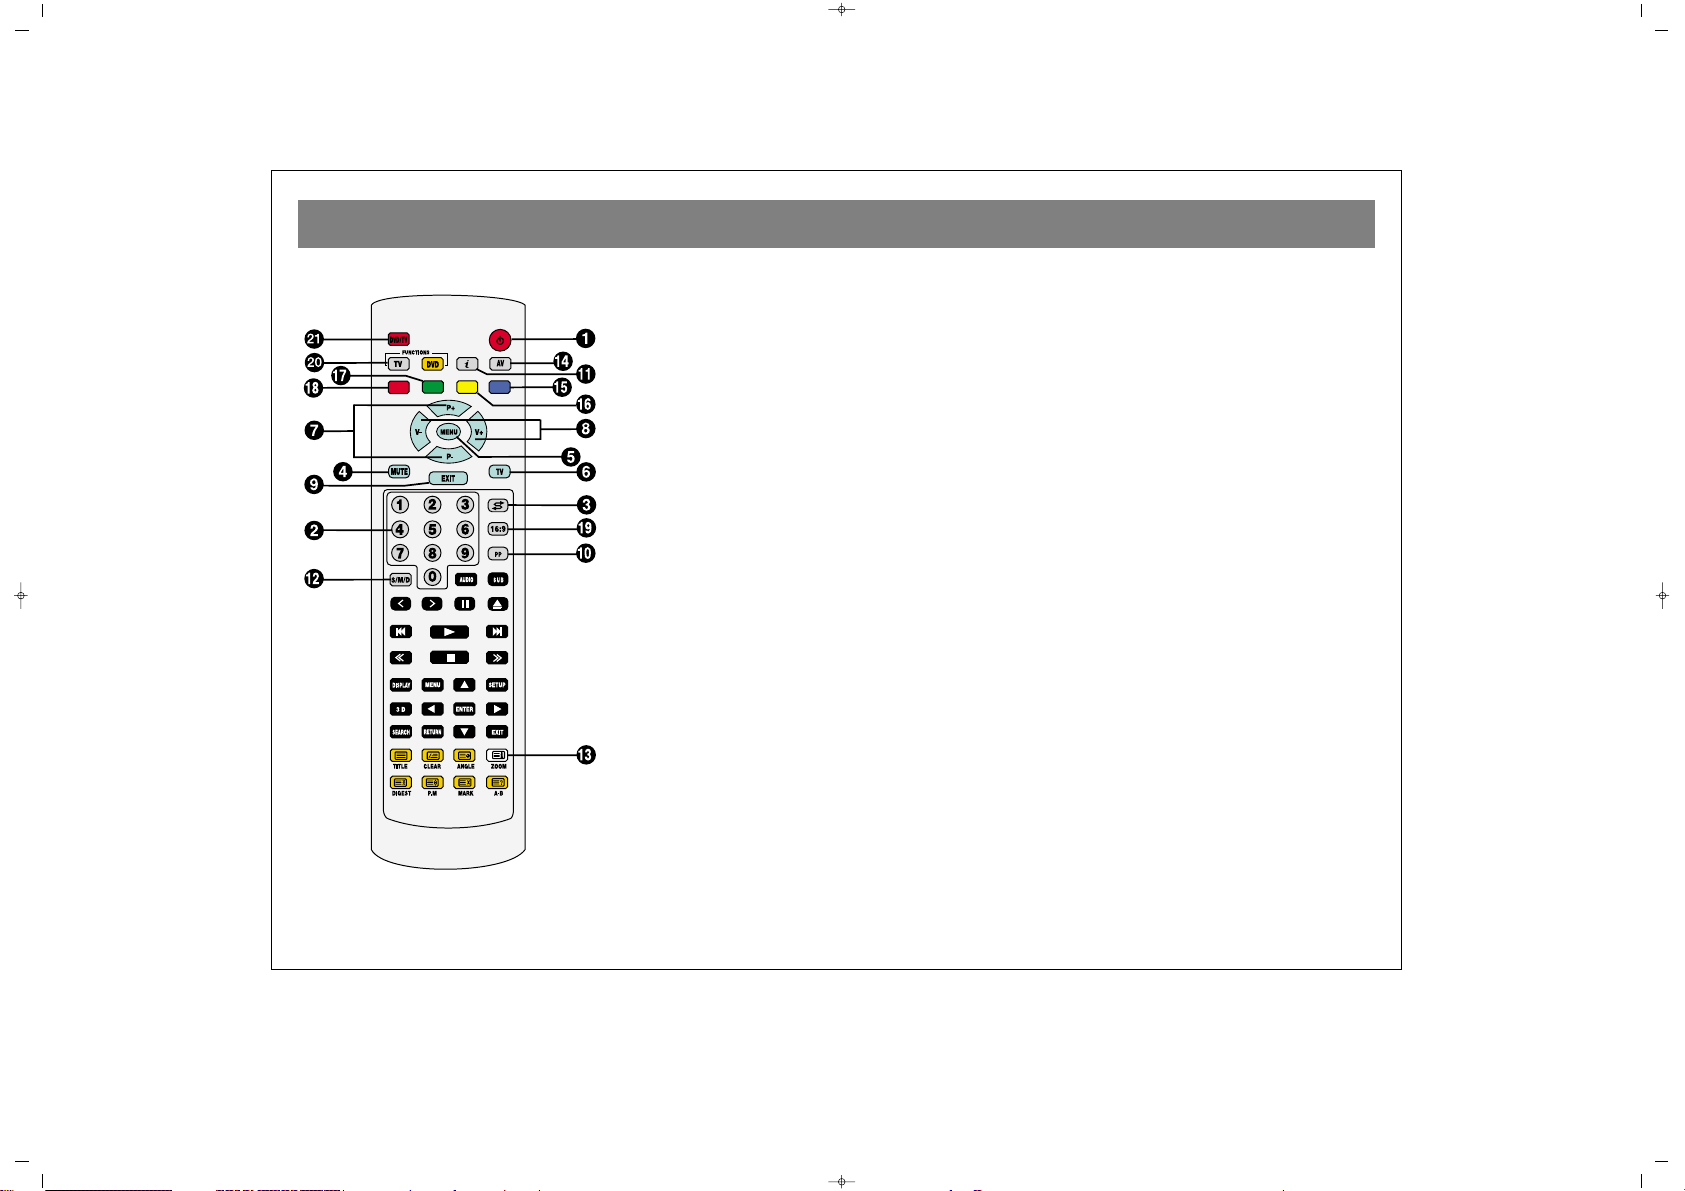
REMOTE CONTROL
6
11..
Stand-by button
22..
Direct program selection button
33..
Swap button
44..
Mute button
55..
Menu selection button
66..
TV button
77..
Program button at TV position, page up (+) or down (-) button at Teletext position,
up (+) or down (-) movement buttons in the menus.
88..
Volume up (+), down (-) and in the menus adjustment buttons
99..
Exit button
1100..
User normalization button
1111..
Status button (i)
**1122..
Audio selection button DUAL I, DUAL II, Stereo, Mono (DUAL I, II, ST/MONO)
1133..
Automatic search button
1144..
AV button
1155..
(Blue key) Picture menu
**1166..
(Yellow key) Sound menu
1177..
(Green key) Timer menu
1188..
(Red key) Overview menu
1199..
Picture format selection
2200..
FUNCTIONS DVD/TV Buttons (For remote control) By using these buttons RC
switches between TV and DVD functions. When a related function is performed
illuminated TV or DVD button blinks.
2211..
DVD/TV Button (For TV with DVD Player)
NNoottee::
To use other key functions described in the menus, please refer to the remote
control figure described in the TELETEXT section and DVD Player section.
**FFoorr sstteerreeoo mmooddeell oonnllyy
INGILIZCE PT 90 DVD TV 1P RC112 18/6/02 17:58 Page 6

REMOTE CONTROL
7
Never drop your Remote Control.
Do not attempt to open your Remote Control.
Do not press any 2 buttons on Remote Control.
simultaneously
If you do not use your Remote Control. for a long time,
remove the batteries.
NNoottee::
Your Remote Control controls your TV at 7 meters far
and 30 degrees of an angle
.
BBAATTTTEERRYY IINNSSEERRTTIIOONN ((11..55VV AAAAAA xx 22 ppiieecceess))
• Remove battery cover
• Place the batteries properly.
• Close the cover.
+
-
-
+
INGILIZCE PT 90 DVD TV 1P RC112 18/6/02 17:58 Page 7
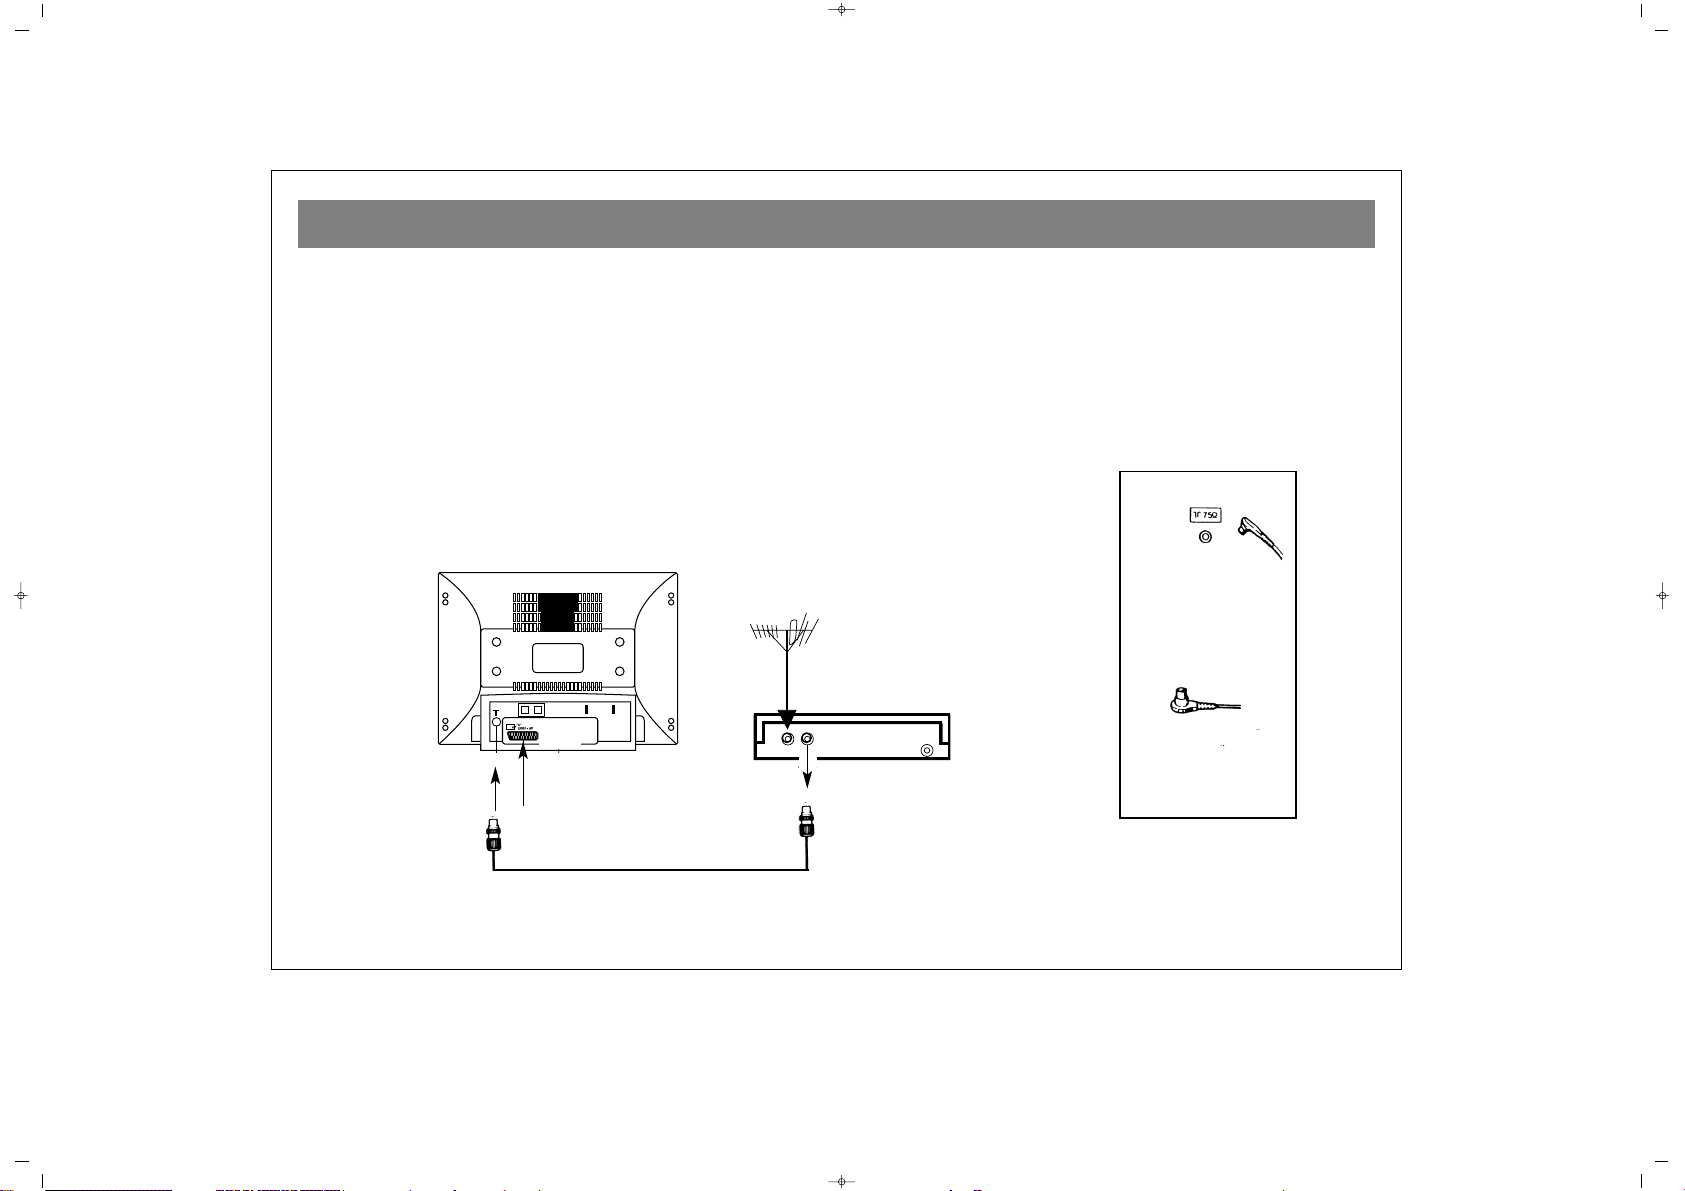
AERIAL CONNECTION
8
OOUUTTDDOOOORR AAEERRIIAALL CCOONNNNEECCTTIIOONN
Optimum good picture and colour reception requires a good outdoor
aerial.
Using a coaxial cable (75 ohm Fig A-2) for a aerial, connect the plug
(refer to Fig. A-1) into the aerial input of the set.
AERIAL Socket
(Fig.A-1)
Coaxial cable(75 ohm)
Fig. A-2
Back cover
AERIAL Connection with video recorder
RF input
RF output
Aerial input
Scart socket
INGILIZCE PT 90 DVD TV 1P RC112 18/6/02 17:58 Page 8
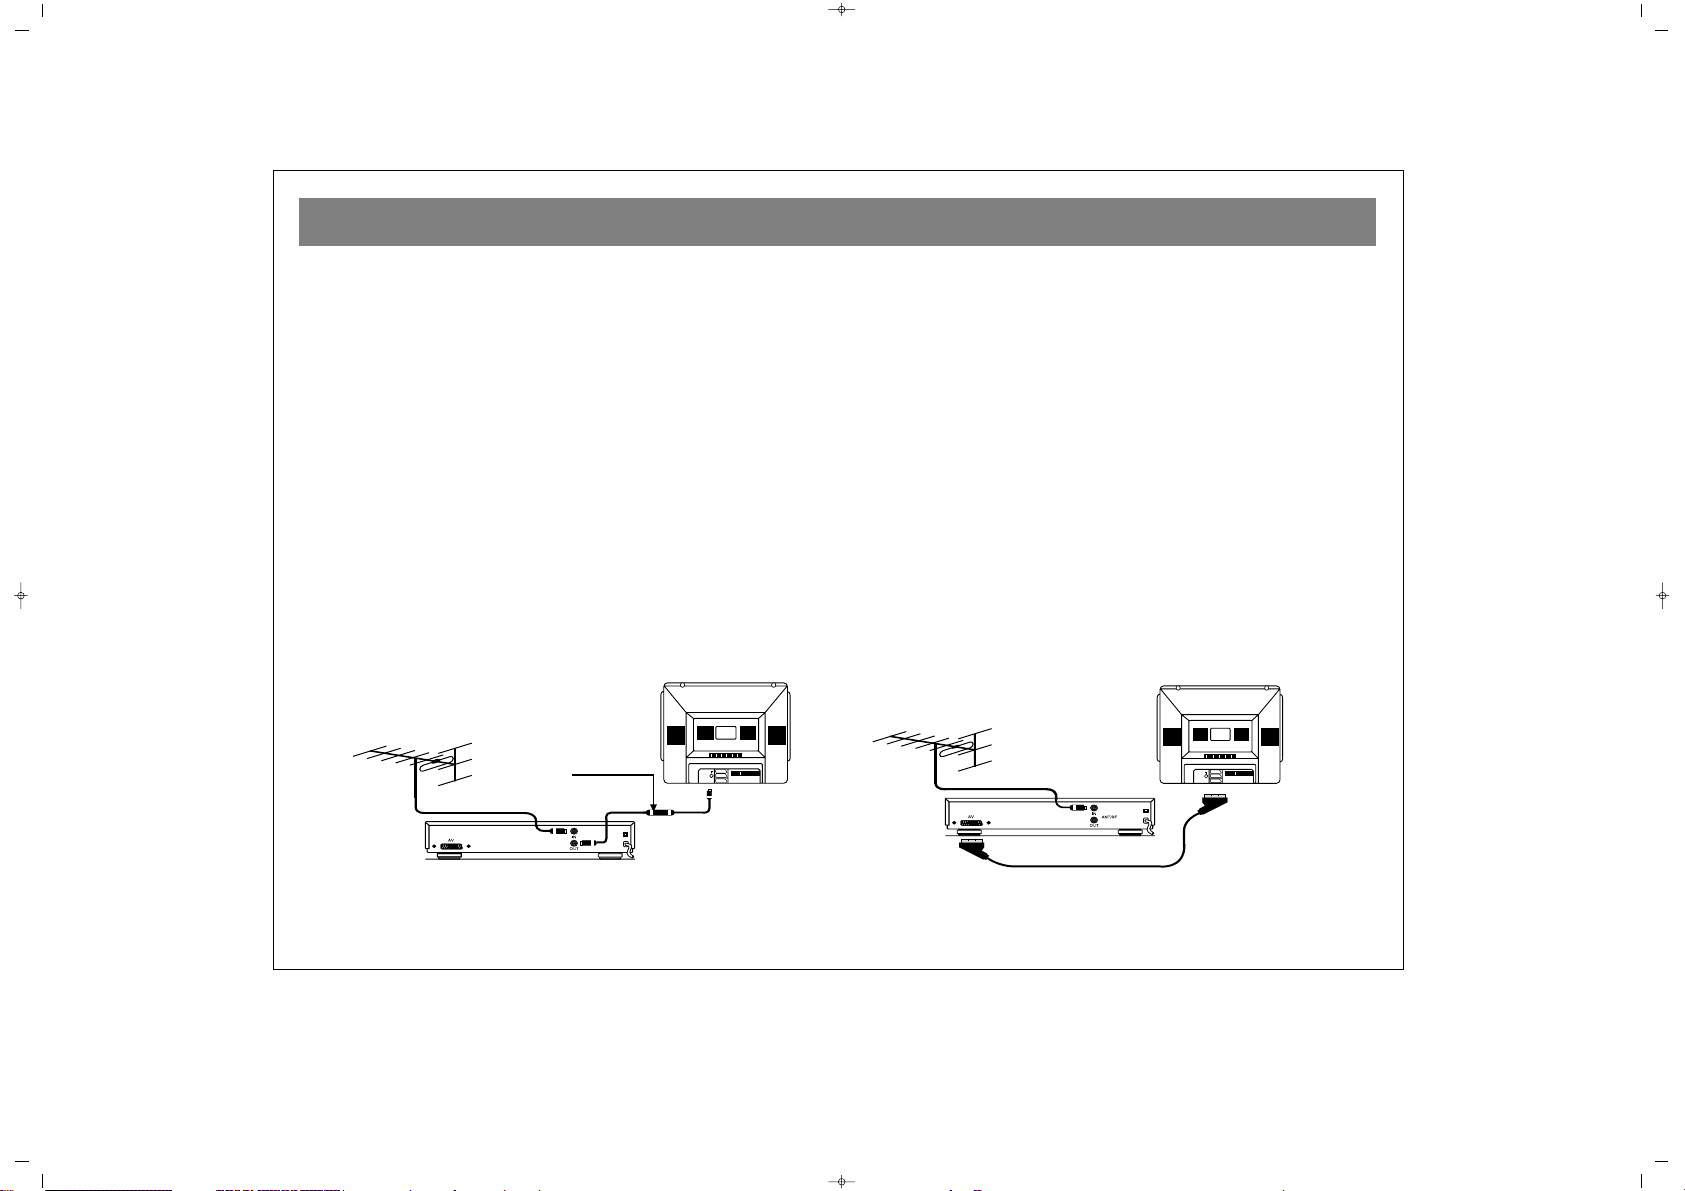
VCR, COMPUTER AND DECODER CONNECTIONS
9
EEUURROO--SSCCAARRTT SSOOCCKKEETT
A video cassette recorder, video discplayer, TV games, home computer or video camera can be connected to this AV
socket with an appropriate connecting cable.
When programme mode "AV" is selected, the TV is switched for direct video input mode; and early RF stages of the
receiver are muted.
VVCCRR OOPPEERRAATTIIOONN BBYY UUSSIINNGG TTHHEE RRFF OOUUTT
• To connect a home VCR to the receiver, connect the
coaxial cable from the RF OUT socket of the VCR to the
aerial socket of the TV SET, and connect the areial lead-in
cable to the RF IN socket of the recorder.
• Select the programme No. 0 (on the TV set).
• Push the PLAY-key (on the video).
• Search RF channel of the VCR
• Then memorize in PROGRAMME No. 0 the found RF
channel by using the store section of Installation Menu
VVCCRR OOPPEERRAATTIIOONN BBYY UUSSIINNGG TTHHEE EEUURROO--SSCCAARRTT
SSOOCCKKEETT
• Your receiver has EURO - SCART SOCKET, connect this
SOCKET to VCR,using a scart lead
• Select AV by pressing the AV mode selection key on the
remote control handset.
• Push the PLAY key
The advantage of this connection is a superior quality of
picture and sound during play back.
AC230V~
50Hz/30W
AC230V~
50Hz/30W
To “RF IN”
Coaxial cable
From “RF OUT”
Aerial
To areial socket
To “RF IN”
To “EURO SCART”(VCR)
To “EURO SCART”(TV)
INGILIZCE PT 90 DVD TV 1P RC112 18/6/02 17:58 Page 9
TV FUNCTIONS
10
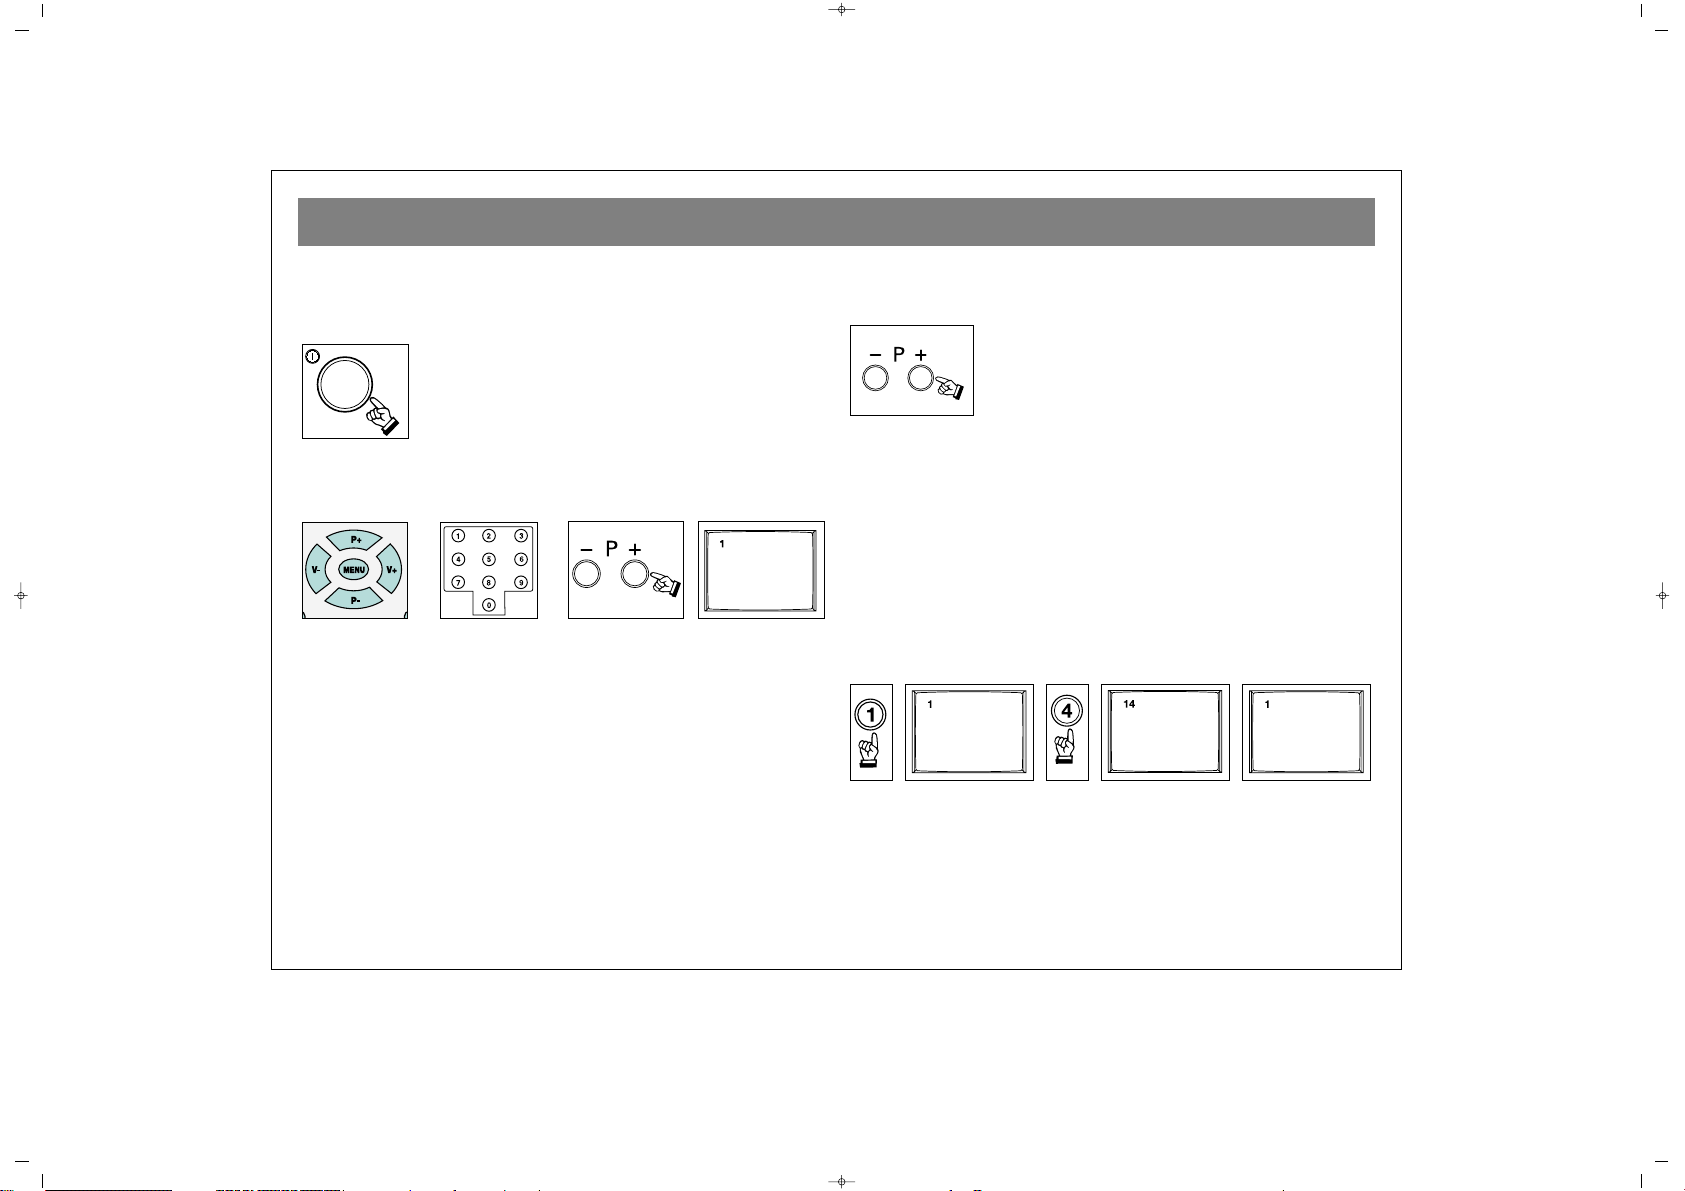
11..TTUURRNNIINNGG OONN
aa..TTuurrnniinngg TTVV OONN
Press the on/off button in front of your television. Your
television goes to Stand-by mode.
bb..SSttaanndd--BByy MMooddee
When the TV is in stand-by mode, you can turn it on by
pressing one of the program selection keys (0-9) or
PP++//PP--
on
the Remote Control or
PP++//PP--
keys on the TV.
22..TTUURRNNIINNGG OOFFFF
bb..TTuurrnniinngg TTVV OOFFFF
When you wish to turn off your television, press the on/off
button on it. If your TV has
““EECCOO sswwiittcchh””
feature, your TV will
also shut down when you press the stand-by button twice.
bb.. SSttaanndd--BByy MMooddee
To turn TV off for a short while, press stand-by button on the
Remote Control.
WWaarrnniinngg::
While pressing a button if any of the “functions illuminated
TV & DVD” buttons don’t blink, this means that RC is at the wrong
mode. For example: If you want to perform DVD functions, firstly
you should press “functions DVD” button at the top.
33..PPRROOGGRRAAMM NNUUMMBBEERR SSEELLEECCTTIIOONN
• Press the
PP++//PP--
buttons on the TV control panel, to select
the desired program number.
•Select the program no.0-9 with the single number keys (0-9)
on the Remote Control will be pressed and held pressed for a
while to skip the time for the second digit.
•Select a program no.10-99, press number keys on the
Remote Control without a long interval.
EExxaammppllee::
To move to program no.14, first press key 1. A
message “1-“ appears on the upper left corner of the screen.
If you hold this key pressed then it goes to program no.1.
While this message is on the screen (3 seconds), if the key 4
is pressed the TV will go to programme 14. If the key 4 is not
pressed within 3 seconds the TV goes to programme 1.
44.. MMUUTTEE
To mute the sound immediately, press the mute button on the
RC. If you press this button again, you will hear the sound at
the same intensity as before.
INGILIZCE PT 90 DVD TV 1P RC112 18/6/02 17:58 Page 10
 Loading...