

Please read this User Manual carefully to ensure proper
use of this product and keep safe for future use.
Customer Help Line :-
Website : www.ekey.co.uk
08452937698

Table of contents.
Introduction 2
Digital Upgrade 2
Safety Information 3
Remote Control 5
Front and Rear panel diagrams 7
External Connections 8
Getting Started 11
Switch on for the first time 11
Channel search 12
Auto channel scan 12
Manual channel scan 12
System setting 13
A/V setting 13
First time installation 14
System information 14
Change Pin Code 14
DTR setting 15
Time Shift Duration 15
Format Hard drive 15
HDD information 15
Auto discard setting 15
OSD setting 15
Timers 15
Channel list 16
Favourite list 17
Basic operation 18
Channel Schedule (EPG) 18
Time Line (EPG) 19
Changing channels 19
Volume control 19
Digital Teletext 20
Subtitles 20
Display programme information 20
TV format 20
Pause current programme (Time Shifting) 21
Record operation 21
Hard disc Installation 23
User Guide 24
Specifications 25
Mains plug Replacement 25

Introduction
Than you for purchasing this product which has been designed and
years of trouble free service.
About this User Guide.
This user guide contains all the information you need to know, how to setup watch,
record and replay available Freeview Channels and programmes.
What is DVB-T ?
Digital Video Broadcast (DVB) is the latest method of transmitting television to your
home, allowing many more channels and programmes than the Analog
PVR (Personal Video Recording) Instructions.
This PVR has a disc capacity of either 250 or 320 Gigabytes, depending upon model,
allowing up to 160 or over 200 Hours of recording. You may replace the HDD with an alternative up to
500 Gigabytes (see page 23).
Accessories.
Remove the PVR carefully from its packaging and remove the accessories from the
packaging. It is wise to keep the packaging away from children
safe for future use.
You will find the following items :-
Infra red Remote control (batteries NOT supplied).
Scart lead
Instruction manual
RF Loop through lead.
manufactured to give you many
TV system.
and small animals. Keep the packaging
Digital Upgrade
Starting in 2008 and ending in 2012, television services will go
region.
To continue using this PVR during and following the digital switchover, you will need to “reset”
digital TV channels.
Users of this PVR must reset on at least 2 different occasions, normally 1 month apart when your
switchover happens. Digital UK, the body leading the digital switchover, and broadcasters, will advise
you when to reset your digital channels on each occasion.
If you do not reset your digital channels, you risk loosing some or all of your TV services during and
following switchover.
Please refer to this instruction manual to retune the Digital TV
Do NOT use “ADD”
For more information please contact the “Customer Help Line”
channels, you MUST “RESET”
and allow a complete retune. (See page 12)
Trade mark of Digital Video Broadcasting
completely digital, TV region by TV
your
services.
(Page 24) or visit www.digitaluk.co.uk
2
Safety Information
The lightning flash with arrowhead symbol, within an equilateral
intended to alert the user to the presence of un-insulated “dangerous voltage”
within the products enclosure that may be of sufficient magnitude to constitute a
risk of electric shock to the persons.
The exclamation point within an equilateral triangle is intend to alert the user to
the presence of important operating and maintenance (servicing) instructions in
the literature accompanying the appliance.
Correct disposal of this Product
(Waste Electrical & Electronic Equipment (WEEE)
The crossed out “Wheelie bin”
placed with ordinary household waste at the end of its useful life. To prevent
possible harm to the environment or human health from uncontrolled waste
disposal, please keep separate from other household waste and recycle it
responsibly to promote the sustainable reuse of material resources.
Household users should contact either the retailer where you purchased the
product, or their local government office for details of where and how you can take
this item for environmentally safe re-cycling.
Business users should contact their supplier and check the terms
the purchase contract. This product must not be mixed with other
wastes for disposal
is intended to show that this appliance must not be
triangle, is
and conditions of
commercial
This appliance complies with European Safety and Electrical directives
This symbol means that this appliance is double insulated. An earth connection is
not required
This symbol denotes that the appliance is assembled using components and materials
that comply with the RoHs directive.
3

Safety Instructions
CAUTION. PLEASE READ AND OBSERV E ALL WARNINGS AND INSTRUCTIONS GIVEN IN THIS
USER MANUAL AND MARKED ON THE APPLIANCE. RETAIN THIS BOOKLET FOR FUTURE USE.
This set has been designed and manufactured to assure your personal safety. Improper use can
result in Electric shock or Fire hazard. The safeguards in this appliance will protect you if you
observe the correct procedures for insta ll ation, servicing and operation. There are NO user
parts inside. DO NOT REMOVE THE CASE OR OTHER COVERS OR YOU MAY BE EXPO SED TO
DANGEROUS VOLTAGES AND WILL INVALIDATE YOUR WARRANTY. REFER ALL SERVICING
TO QUALIFIED SERVICE PERSONNEL.
Power Supply.
This apparatus is designed to operate from a 100 –
alternative supply.
Ventilation and Heat Sources. Do not place material over the ventilation slots, this will cause the PVR
to overheat and fail. Do not place the PVR in direct sunlight or
fires.
Connections. When connecting the PVR to external sources and the mains supply, do not place wires
that can be tripped over. Do not trap or place heavy objects on the mains lead or adaptor.
Should the mains plug become damaged you may replace by following the instructions on page 26
250V AC 50/60 Hz supply. Do NOT connect to an
near heat sources such as radiators or
Moisture. Do not place the PVR in wet or damp conditions, such as steamy
other damp places. Do not allow water or other fluids to enter the PVR. Do not touch the Mains plug or
adaptor with wet hands. Should moisture enter the PVR, disconnect from the supply and call the
customer help line.
Cleaning. Disconnect the PVR from the mains supply. Use a soft dry cloth, for stubborn stains use a
soft moist cloth with a dilute mild detergent.. Do NOT use petrol based fluids or abrasive materials.
Transportation. The PVR has an internal HDD (Hard drive) that is susceptible to shock and vibration.
Do not drop the PVR, only carry in the packaging provided. The HDD is not covered by warranty if
shown to have impact damage.
Lightning.
During a thunderstorm or when leaving the appliance for long periods such as holidays, disconnect
the aerial input (if external aerial) and remove the mains plug,
damaging the apparatus
Damage Requiring Service.
Should any of the following happen, disconnect from the mains supply and call an engineer or
Technical Help Centre. :Damage of the mains cord or plug.
Liquid or other objects enter the casing.
The apparatus has been exposed to rain or moisture.
If the appliance does not operate in accordance with the normal operation expected.
If the appliance has been dropped or the case damaged.
This is to prevent power surges
kitchens, basements or
4
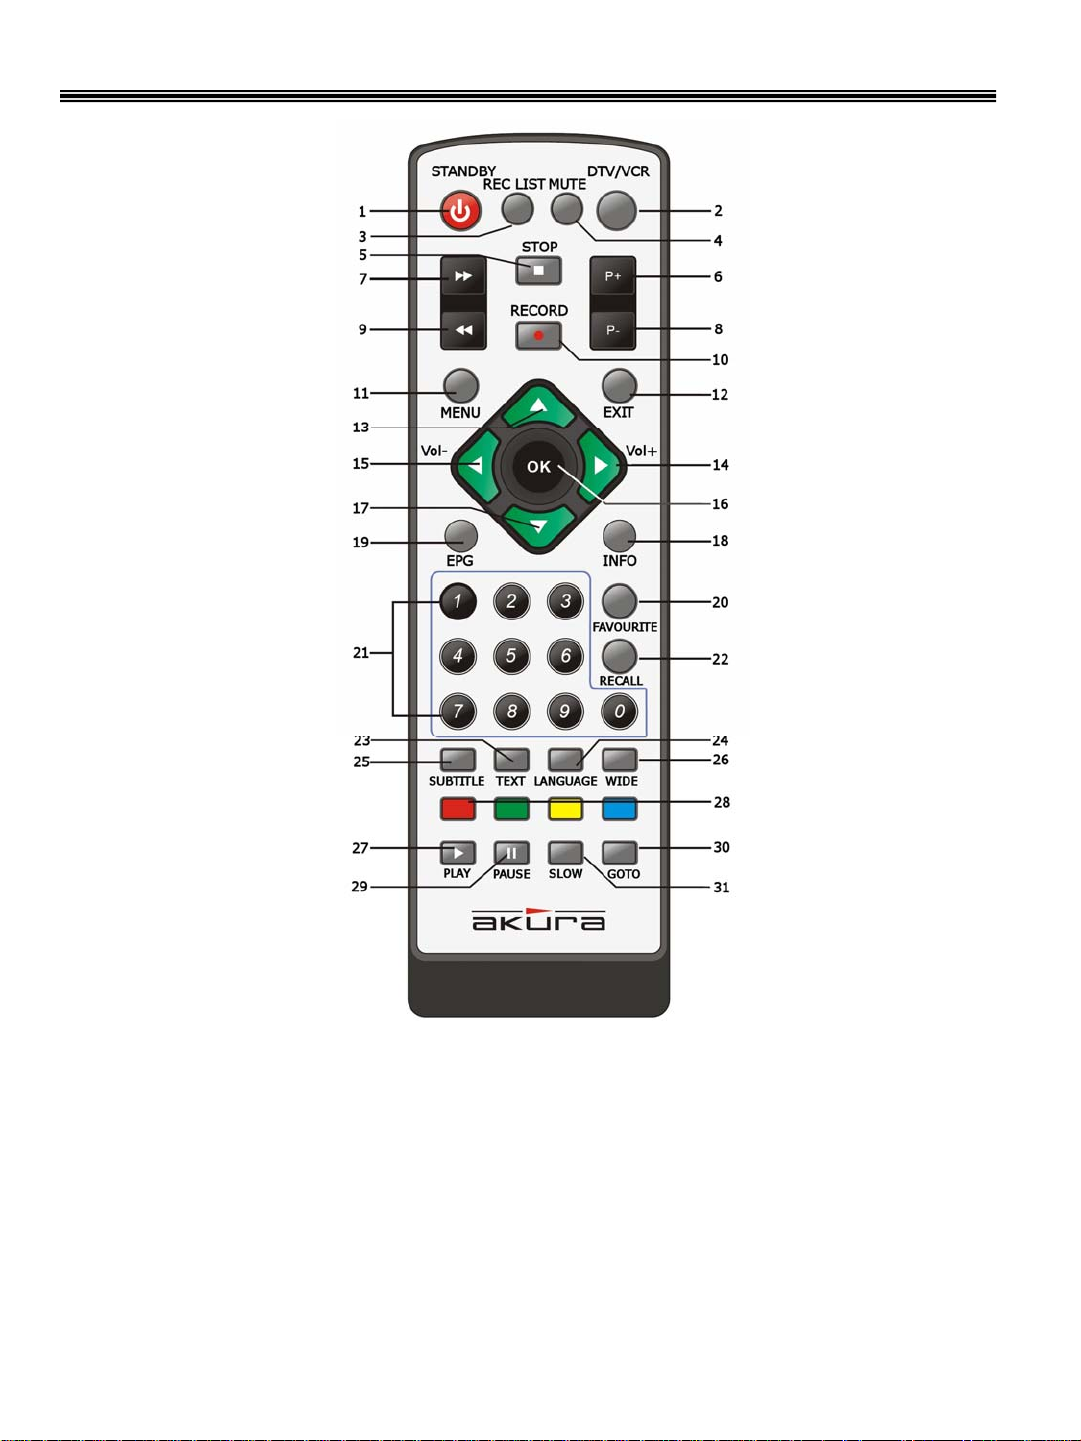
Remote Control
1.Standby. Switches PVR to
standby and operation.
3.Rec List. Displays list of
recorded programmes.
5.Stop. Stops playback or
recording.
7.Fast Forward. Sets fast forward
speed.
9.Fast Rewind. Sets fast rewind
speed.
11.Menu. Displays menu list.
13.Up. Moves around menu
screen.
15.Vol -. Reduces volume level
and Left menu navigation.
17.Down. Moves around menu
screen.
19.EPG. Displays the Electronic
Programme Guide.
21.0-9 Numeric buttons. Direct
entry of channel numbers or
menu entry numbers.
23.Text. Turns Teletext On and
Off if available.
25.Subtitle. Turns Subtitle feature
On and Off.
27.Play. Starts playback in all
modes.
29.Pause. Pauses playback in all
play modes.
31.Slow. Plays replay in various
speeds.
2.DTV/VCR. Selects between
VCR scart input and PVR
operation.
4.Mute. Mutes sound and
restores sound.
6.P+. Selects next TV channel.
8.P-. Selects previous TV
channel.
10.Record. Starts instant
recording.
12.Exit. Exits menu system.
14.Vol+. Increases Volume level
and Right menu navigation.
16.OK. Confirms menu selection.
18.Info. Displays current
Channel and programme
information.
20.Favourite. Displays favourite
channels selected.
22.Recall. Recalls previous
viewed channel and back to
current channel.
24.Language. Selects different
languages if broadcast.
26.Wide. Selects screen aspect
ratio.
28. Red,Green,Yellow,Blue.
Used in Text mode and other
menu options.
30.GOTO. Selects playback time
in playback mode.
5
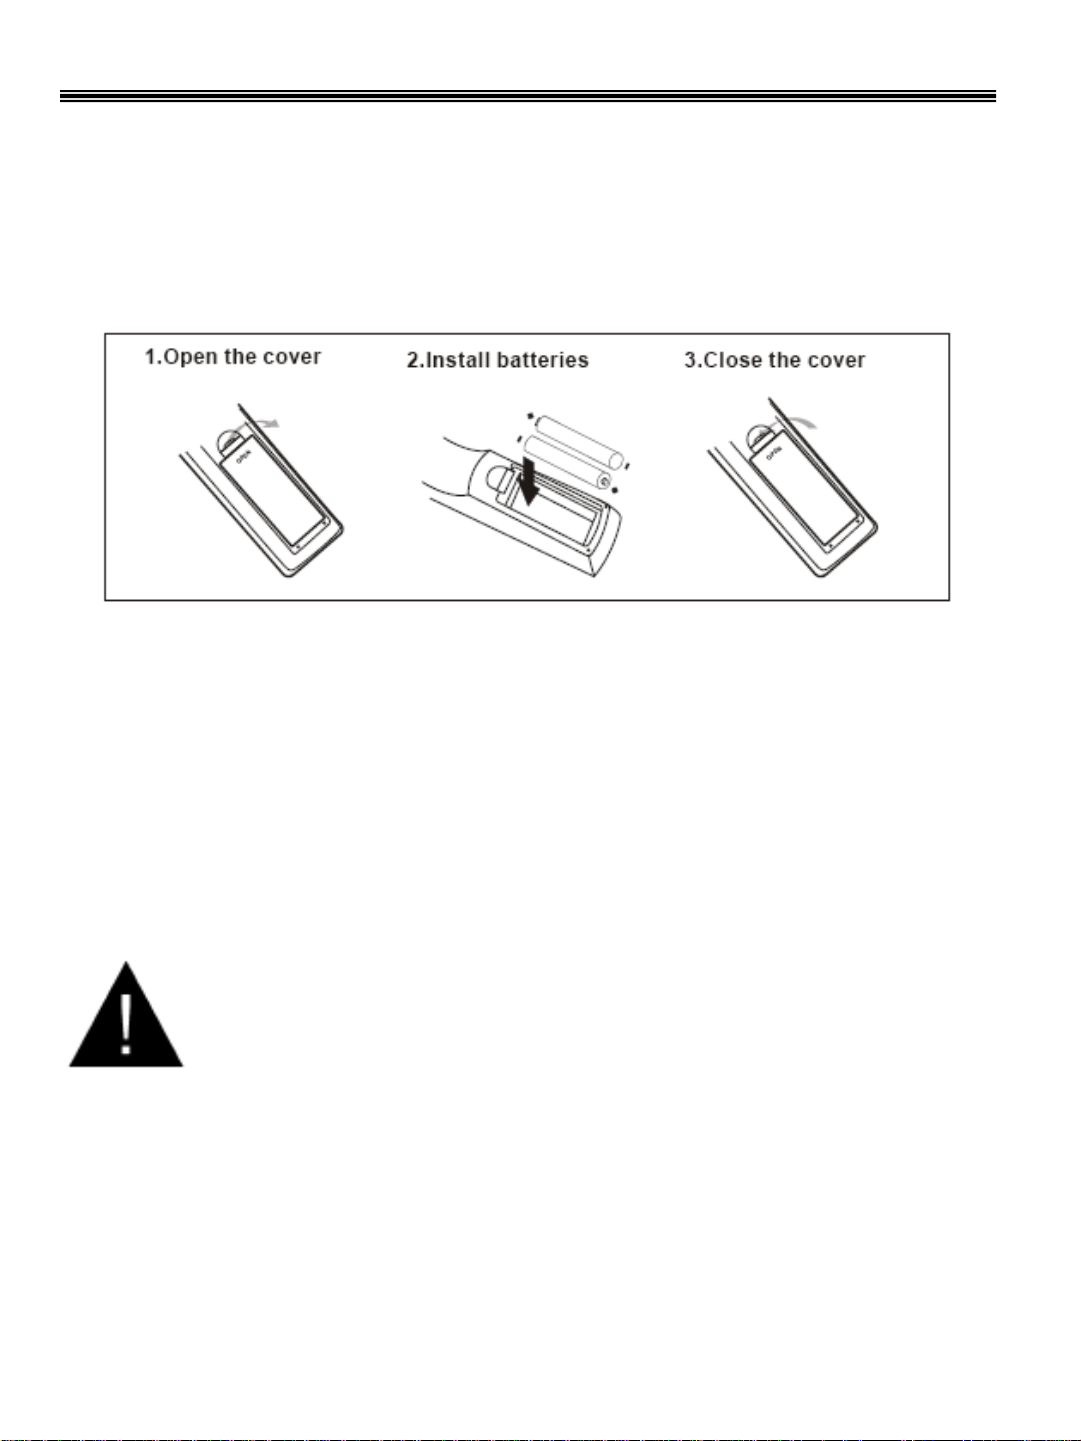
Installing the Batteries.
Remove the battery cover from the remote control and place 2 x AAA batteries (Not supplied)
inside the battery compartment, taking note of battery polarity,
compartment. Replace battery cover firmly.
Using the Remote Control.
Point the Remote Control towards the front of the PVR. Do not press more than one button at
a time. The working range is approx 7 metres and +/Do not place any objects in the signal path.
Bright sunlight or fluorescent lights may decrease the operating
30 degrees.
see diagram inside battery
sensitivity.
Battery Disposal.
Do not break open or throw on a fire exhausted batteries.
If batteries “leak”
with warm soapy water, do NOT allow water to enter the main
body of the Remote Control, dry thoroughly before fitting new
batteries.
Do not throw old batteries in the domestic waste. Contact your
local waste authority for disposal instructions
remove immediately, clean out any residue
6

Front Panel and Rear Panel Connections
Front view
1. Power Button. Switches the Mains supply On and Off.
2. Standby Indicator. Red led will illuminate in standby.
3. Remote Control Sensor. Receives commands from remote control.
4. Led Display. Displays channel number, time and playing states.
5. Channel Up. Increments channels upwards.
6. Record. Starts recording manually. Each press increments recording time.
7. Channel Down. Decrements channels downwards.
Rear view
1. RF In / RF Loop through (PVR and Tuner).
PVR/TV RF In socket connects to your external aerial. The PVR/TV
will allow connection to another tuner or your TV. See connections diagram for details.
2. VCR SCART. Allows connection from a DVD or other video system.
3. TV SCART. Connects to your TV.
4. Coaxial. Allows connection of Hi Quality PCM audio to a suitable external Hi Fi
5. CVBS video. Composite video output (1V pp @ 75 ohms).
6. S - Video. Y/C video output. (Luma/ Chroma).
7. Audio L/R. Analog audio output. (200m/V @ 5K ohms)
8. RS232 Port. Firmware upgrade port. (Not for general use).
9. Mains power cable. Connect to the mains supply.
RF Loop through socket
system.
7
 Loading...