


AMTDR3101X
Instruction Manual
DVD RECORDER
PRECAUTIONS
A lightning bolt with an arrowhead symbol within
an equilateral triangle is intended to alert the
user to the presence of uninsulated "dangerous
voltage" within the product's enclosure that may
be of sufficient magnitude to constitute a risk of
electric shock to persons.
The exclamation point within an equilateral
triangle is intended to alert the user to the
presence of important operating and main-
tenance (servicing) instructions in the literature
accompanying the appliance.
WARNING: TO AVOID THE DANGER OF FIRE
OR ELECTRIC SHOCK, DO NOT EXPOSE THIS
APPLIANCE TO RAIN OR MOISTURE. NEVER
OPEN THE CABINET, AS DANGEROUS HIGH
VOLTAGES ARE CONTAINED INSIDE. ONLY
A QUALIFIED SERVICE TECHNICIAN SHOULD
ATTEMPT TO OPEN THE CABINET.
CAUTION: TO PREVENT ELECTRIC SHOCK,
MATCH WIDE BLADE OF PLUG TO WIDE
SLOT, AND FULLY INSERT INTO ELECTRICAL
SOCKET.
PROTECT YOURSELF!
Record the model and serial numbers for this
unit while it is easy to see them. These numbers
are located on the back of the unit's cabinet.
Retain this information for future reference.
Model Number:
Serial No. _________________________
Retain this information for future reference.
WARNING
RISK OF ELECTRICSHOCK
DO NOT OPEN
CAUTION:
RISK OF ELECTRIC SHOCK DO NOT OPEN
CAUTION:
TO R EDUCE T H E RIS K OF
DO NOT REMOVE COVER
IS NO USER SERVICE
REFER SERVICING TO
ELECTRIC
(OR BACK).
ABLE PAR T INSIDE.
QUALIFIED SERVICE
SHOCK,
THERE
PERSONNEL.
CAUTION: THIS DVD RECEIVER UNIT & AMPLIFIER
EMPLOYS A LASER SYSTEM. TO PREVENT DIRECT
EXPOSURE TO THE LASER BEAM, DO NOT OPEN THE
ENCLOSURE. VISIBLE LASER RADIATION IS PRESENT
WHEN ENCLOSURE IS OPEN. DO NOT STARE INTO
BEAM. ADDITIONALLY, THE USE OF CONTROLS OR
ADJUSTMENTS OR PERFORMANCE OF PROCEDURES
OTHER THAN THOSE SPECIFIED HEREIN MAY RESULT IN
HAZARDOUS RADIATION EXPOSURE.
TO ENSURE PROPER USE OF THIS PRODUCT, PLEASE
READ THIS MANUAL CAREFULLY AND RETAIN
FOR FUTURE REFERENCE. SHOULD THE UNIT REQUIRE
MAINTENANCE, CONTACT AN AUTHORISED SERVICE
CENTRE.
CLASS 1
LASER PRODUCT
Since it is very usual for DVD movies to be released at different times in different regions of the world, all players have region codes and
disks can have an optional region code. If you load a disk of a different region code to your player, you will see the region code node
notice on the screen. The disk will not play, and should be unloaded.
1

Safety Information
CAUTION: Use of controls or adjustments or performance of procedures other than those specified herein may result in
hazardous radiation exposure.
Please carefully study this manual and always keep it available. There are, however, some installation and operation precautions
which you should be aware of.
1.Read Instructions - All the safety and operating instructions should be read before the product is operated.
2.Retain Instructions - The safety and operating instructions should be retained for future reference.
3.Heed Warnings - All warnings on the product and in the operating instructions should be adhered to.
4.Follow Instructions - All operating and use instructions should be followed.
5.Cleaning - Unplug this product from the wall outlet before cleaning. Do not use liquid cleaners or aerosol cleaners. Use a damp
cloth for cleaning.
6.Attachments - Do not use attachments not recommended by the product manufacturer as they may cause hazards.
7.Water and Moisture - Do not use this product near water - for example, near a bath tub, wash bowl, kitchen sink, or laundry tub; in a
wet basement; or near a swimming pool; and the like.
8.Accessories - Do not place this product on an unstable cart, stand, tripod, bracket, or table. The product may fall, causing serious
injury to a child or adult, and serious damage to the product.
9. Ventilation - Slots and openings in the cabinet are provided for ventilation and to ensure reliable operation of the product and to
protect it from overheating, and these openings must not be blocked or covered. The openings should never be blocked by placing the
product on a bed, sofa, rug, or other similar surface. This product should not be placed in a built-in installation such as a bookcase or
rack unless proper ventilation is provided or the m anuf a c tu r e r i n st ru ctions have been adher ed to.
10.Power Sources - This product should be operated only from the type of power source indicated on the marking label. If you are not
sure of the type of power supply to your home, consult your product dealer or local power company. For products intended to operate
from battery power, or other sources, refer to the operating instructions.
11.Grounding or Polarization This product may be equipped with a polarized alternating-current line plug (a plug having one blade
wider than the other). This plug will fit into the power outlet only one way, This is a safety feature. If you are unable to insert the plug
fully into the outlet, try reversing the plug. If the plug should still fail to fit, contact your electrician to replace your obsolete outlet. Do
not defeat the safety purpose of the polarized plug.
Alternate Warnings This product is equipped with a three-wire grounding-type plug, a plug having a third (grounding) pin. This plug
will only fit into a grounding-type power outlet. This is a safety feature, If
you are unable to insert the plug into the outlet, contact your electrician to
replace your obsolete outlet. Do not defeat the safety purpose of the
grounding-type plug.
12.Power-Cord Protection Power-supply cords should be routed so that
they are not likely to be walked on or pinched by items placed upon or
against them, paying particular attention to cords at plugs, convenience
receptacles, and the point where they exit from the product.
13.Protective Attachment Plug The product is equipped with an attachment
plug having overload protection. This is a safety feature. See instruction
manual for replacement or resetting of protective device. If replacement of
the plug is required, be sure the service technician has used a replacement
plug specified by the manufacturer that has the same overload protection as
the original plug.
14.Outdoor Antenna Grounding - If an outside antenna or cable system is connected to the product, be sure the antenna or cable
system is grounded so as to provide some protection against voltage surges and built-up static charges.
15.Lightning - For added protection for this product during a lightning storm, or when it is left unattended and unused for long periods
of time, unplug it from the wall outlet and disconnect the antenna or cable system. This will prevent damage to the product due to
lightning and powerline surges.
16.Power Lines - An outside antenna system should not be located in the vicinity of overhead power lines or other electric light or
power circuits, or where it can fall into such power lines or circuits. When installing an outside antenna system, extreme care should
be taken to keep from touching such power lines or circuits as contact with them might be fatal.
Power Sources---This product should be operated only from the type of power source indicated on the marking label. If you are not
17.
sure of the type of power supply to your home, consult your product dealer or local power company. For products intended to operate
from battery power or other sources, refer to the operating instructions.This DVD home theater operates on AC 230V/50Hz. Do not turn
off unit immediately after turning on; wait at least 10 seconds.
18.Overloading - Do not overload wall outlets, extension cords, or integral convenience receptacles as this can result in a risk of fire
or electric shock.
19.Object and Liquid Entry - Never push objects of any kind into this product through openings as they may touch dangerous voltage
points or short-out parts that could result in a fire or electric shock. Never spill liquid of any kind on the product.
20.Servicing - Do not attempt to service this product yourself as opening or removing covers may expose you to dangerous voltage or
other hazards. Refer all servicing to qualified service personnel.
21.Damage Requiring Service - Unplug this product from the wall outlet and refer servicing to qualified service personnel under the
following conditions:
a. When the power-supply cord or plug is damaged.
b. If liquid has been spilled, or objects have fallen into the product.
c. If the product has been exposed to rain or water.
d. If the product does not operate normally by following the operating instructions. Adjust only those controls that are covered by the
operating instructions as an improper adjustment of other controls may result in damage and will often require extensive work by a
qualified technician to restore the product to its normal operation.
e. If the product has been dropped or damaged in any way, and
f. When the product exhibits a distinct change in performance - this indicates a need for service.
22.Replacement Parts - When replacement parts are required, be sure the service technician has used replacement parts specified
by the manufacturer or have the same charateristics as the original part. Unauthorized substitutions may result in fire, electric shock,
or other hazards.
23.Safety Check - Upon completion of any service or repairs to this product, ask the service technician to perform saftey checks to
determine that the product is in proper operating condition.
24.Wall or Ceiling Mounting - The product should be mounted to a wall or ceiling only as recommended by the manufacturer.
25. Heat - The product should be situated away from heat sources such as radiators, heat registers, stoves or other products
(including amplifiers) that produce heat.
EXAMPLE OF ANTENNAGROUNDING
AS PER NATIONALELECTRICAL CODE
NEC-NA TIONALELECTRICAL CODE
S2898A
FIGURE A
ELECTRIC
SERVICE
EQUIPMENT
GROUND
CLAMP
ANTENNA
LEAD
WIRE
ANTENNA
DISCHARGE UNIT
(NEC SECTION 810-20)
GROUNDING CONDUCTORS
(NEC SECTION 810-21)
GROUD CLAMP
POWER SERVICE
GROUNDING ELECTRODE
SUSTEM
(NEC ART 250, PART H)
2
About Your DVD Recorder
This model combines the function of a DVD
receiver and recorder. As a DVD player, you will be able to
enjoy full length movies with ture cinema picture quality,
and stereo or multichannel sound (depending on the disc
and your playback system). Unique features of this player
include Scart & S-video outputs for greater
picture clarity.
DIGITAL AUDIO
What’s more, as a DVD Video Recorder, it has some of the
key features that allow you to record programs conveniently
such as:
• A complete DVD+RW/DVD+R recorder.
• Preset recording
• Playback of pre-recorded or user-recorded DVDs and CDs
• View, edit and play from a pre-recorded DVD+RW.
The following will help you get the most enjoyment from your DVD recorder
MP
BEST LOCATION
The unit should be placed on a firm flat surface, away from VCRs, stereos, radios, or large
speakers, as the magnetic flux from these devices may cause distortion in the sound and a poor
picture. If placed in a cabinet, be sure there is at least 1 inch of free space completely around the unit
for proper ventilation.
TO OBTAIN A CLEAR PICTURE
A DVD recorder is a precision device. If the optical pick-up lens and disc drive parts
become dirty or worn down, picture quality will become poor. Store DVD player in a clean dust free
environment.
PLAYABLE DISCS
This DVD recorder will play the following types of discs: DVD,DVD+R,DVD+RW MP3,CD,C D-R,
and CD-RW with super-error correction ability. It is also capable of displaying picture CDs and digital
photo albums. It supports four languages,up to 32 subtitles, and multi-angle viewing. It features
easy setup and operation with on-screen menus. It has full function CPU up grade capability.
DIGITAL AUDIO OUTPUT
The unit's coaxial output capability enables you to connect an external six-channel AV amplifier
and processor with built-in Dolby Digital code with just one cord. This enables you to conveniently
enjoy different DVD, CD, and Mp3 discs.
ANALOG AUDIO OUTPUT
5.1 channel output
LASER-HEAD OVER-CURRENT
PROTECTION SYSTEM
To extend the service life of the laser head, the unit includes a unique laser-head over-current
protection system, ensuring a constant laser current.
3

Table of Contents
Precautions…………..............……...….. ..1
Safety Information………………….…....…2
About Your DVD Recorder ......................3
Table of Contents……………… ............ ...4
Front Panel............................................ 5
Rear Panel............................................ .5
The Remote Control............................. ..6
C …………......8onnection for Video Output
C.8onnection For TV Tuner........................
Connection for AV Signal(a/v rear input)
……............................................……....9
Connection for AV Signal(a/v front input)
How to Set Titles, Chapters, or
Tracks in a Favourite Order…………....…...…..20
How to Display Subtitles……….............…...21
Checking the Operational Status.....…........22
Using the Volume or Mute Function...... ......22
Setting the Parental Lock.......………………..23
To Change Your Password..........................23
Displaying the Setup Menu Screen..…….… 24
Channel Search...............................….…...25
Setup Record Quality…………………….……. 25
Normal Recording.......................................25
One-Touch Record...................................... 26
How to Switch to Playback Mode................ 26
……............................................……....10
Connecting Power Supply............. .......11
Basic Operation................................. ..11
Playing a Normal Disc…………............. 12
Playing a DVD+RW or DVD+R Disc….... 13
Navigation Function.............................13
General Features……………………........14
Locating a Title Using the Title Menu... ..15
Locating a Specific Chapter or Track.... .15
Locating a Title...…………………….........16
How to Repeat a Title, Chapter, or Track...17
How to Repeat a Specific Segment......... 17
Playing Titles in Random Order...……..... 18
Clock Setup............................................... 26
Timer Record..............................................27
Editing Title of DVD+RW............................. 28
Chapter Editing..........................................29
Chapter Hide or Unhide............................. 29
Title Icon and Split Title.............................. 30
Edit Title Name........................................... 30
Editing a Disc of a DVD+RW........................31
Editing a Disc of a DVD+RW or DVD+R........31
Specifications……………………………....….32
Trouble Shooting Guide…………………..…. 33
4
How to Change the Camera Angle ..….....19
How to Select a Language & Playback
Audio Setting........................................19
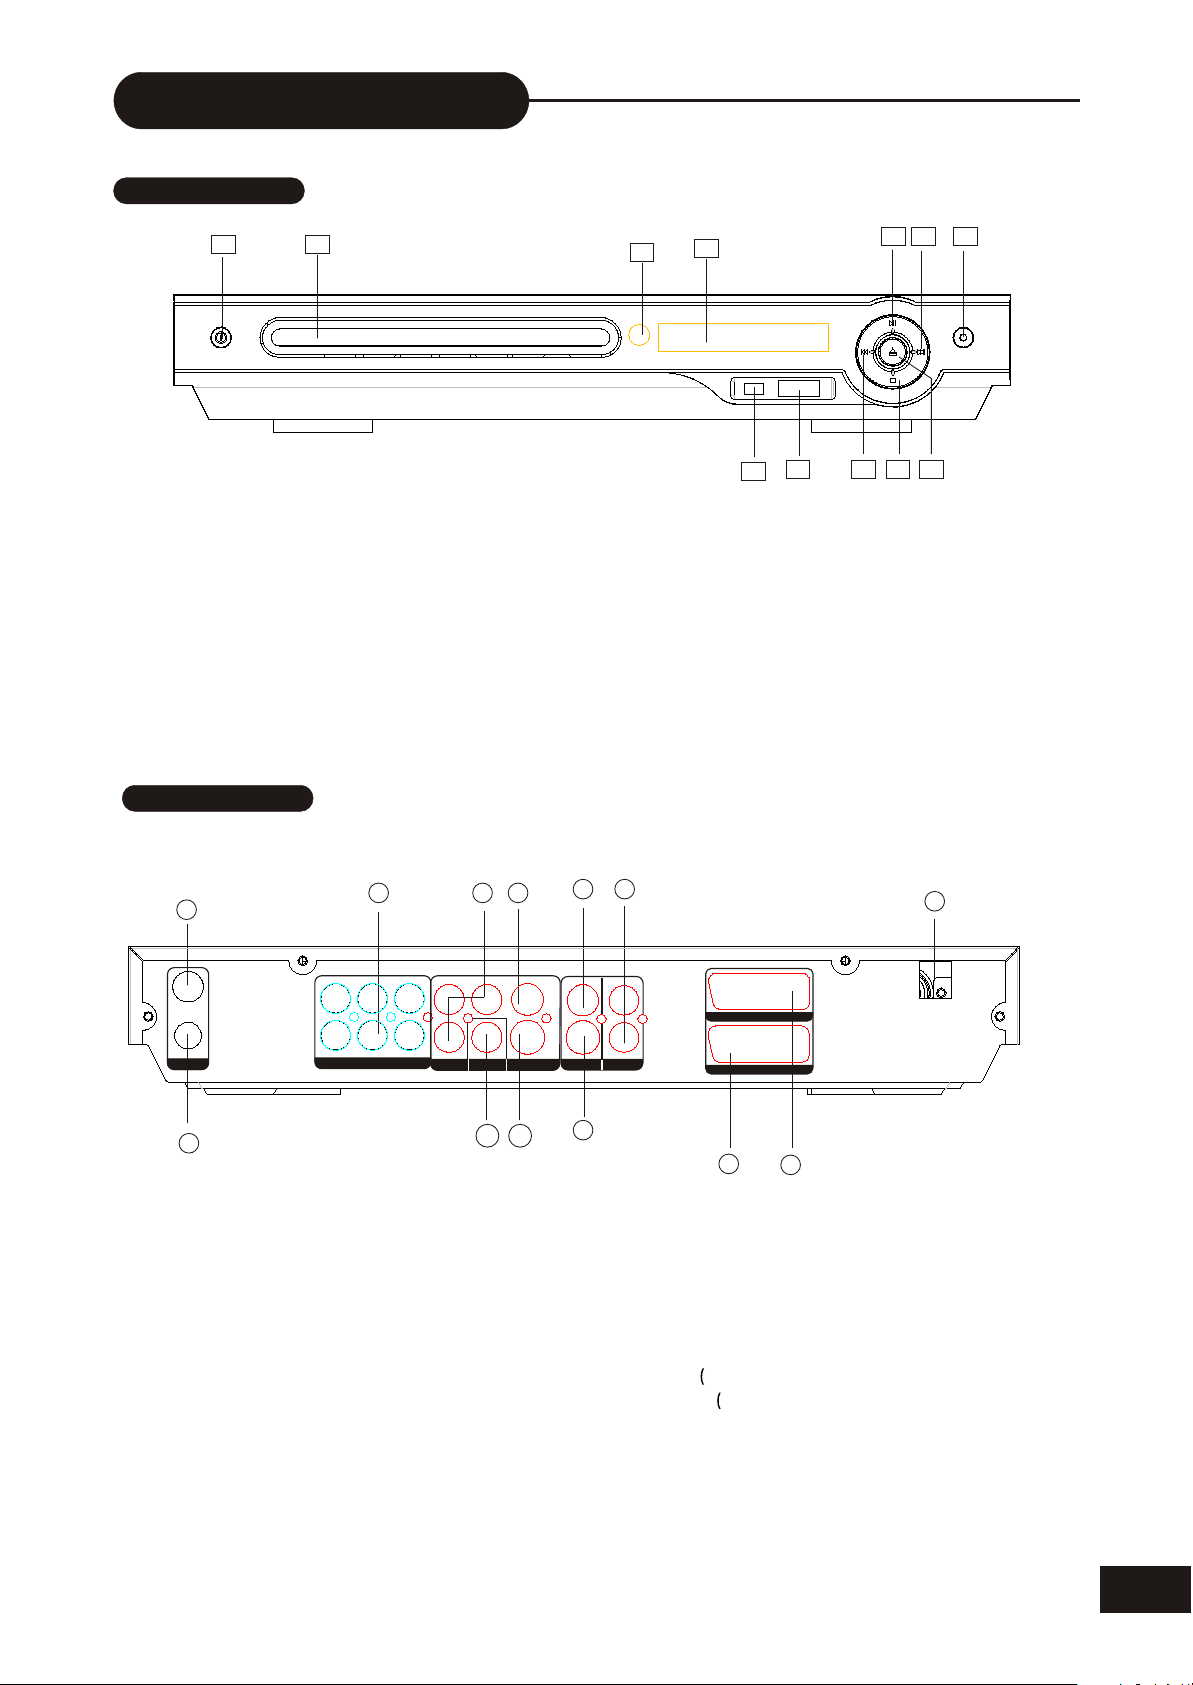
Identification of Controls
FRONT PANEL
1
2
9
3
4
10 12
1.POWER Button
2.DVD Door
3.IR(Remote Sensor)
4.LED
5.1394 DV INPUT
6.USB INPUT
REAR PANEL
1
IN
TV
OUT
ANTENNA
C
SW
5.1CH AUDIO OUT
5
6
7 8
11
7.PREV Button
8.STOP Button
9.PLAY/PAUSE Button
10.NEXT Button
11.OPEN/CLOSE Button
12.RECORD Button
7
VIDEO
S-Video
VIDEO I N
6
L
SCART OUT
R
ANALOG AUDIO
IN
SCART IN
13
100-240V~
50/60HZ
5
3
L R SL
SR
OUT
4
Cb/Pb
Cr/Pr YCoaxial
VIDEO OUT VIDEO OUTDIGITAL OUT
VIDEO
S-Video
2
1. TV Antenna Input
TV Antenna Output
2.
3.
5.1CH Audio Output
(L,R,SL,SR,C,SW)
4. Component Videos Output
(Y, Cr/Pr, Cb/Pb)
5.Video Output
10
9
8
11
12
6. Video Input
7. Analog Audio In (Rear Left/Right)
8. Coaxial Output
9. S-video Output
10.S-video Input
11. SCART Input only for Europe)
12. SCART Output only for Europe)
13. AC100-240V~ 50/60HZ
5
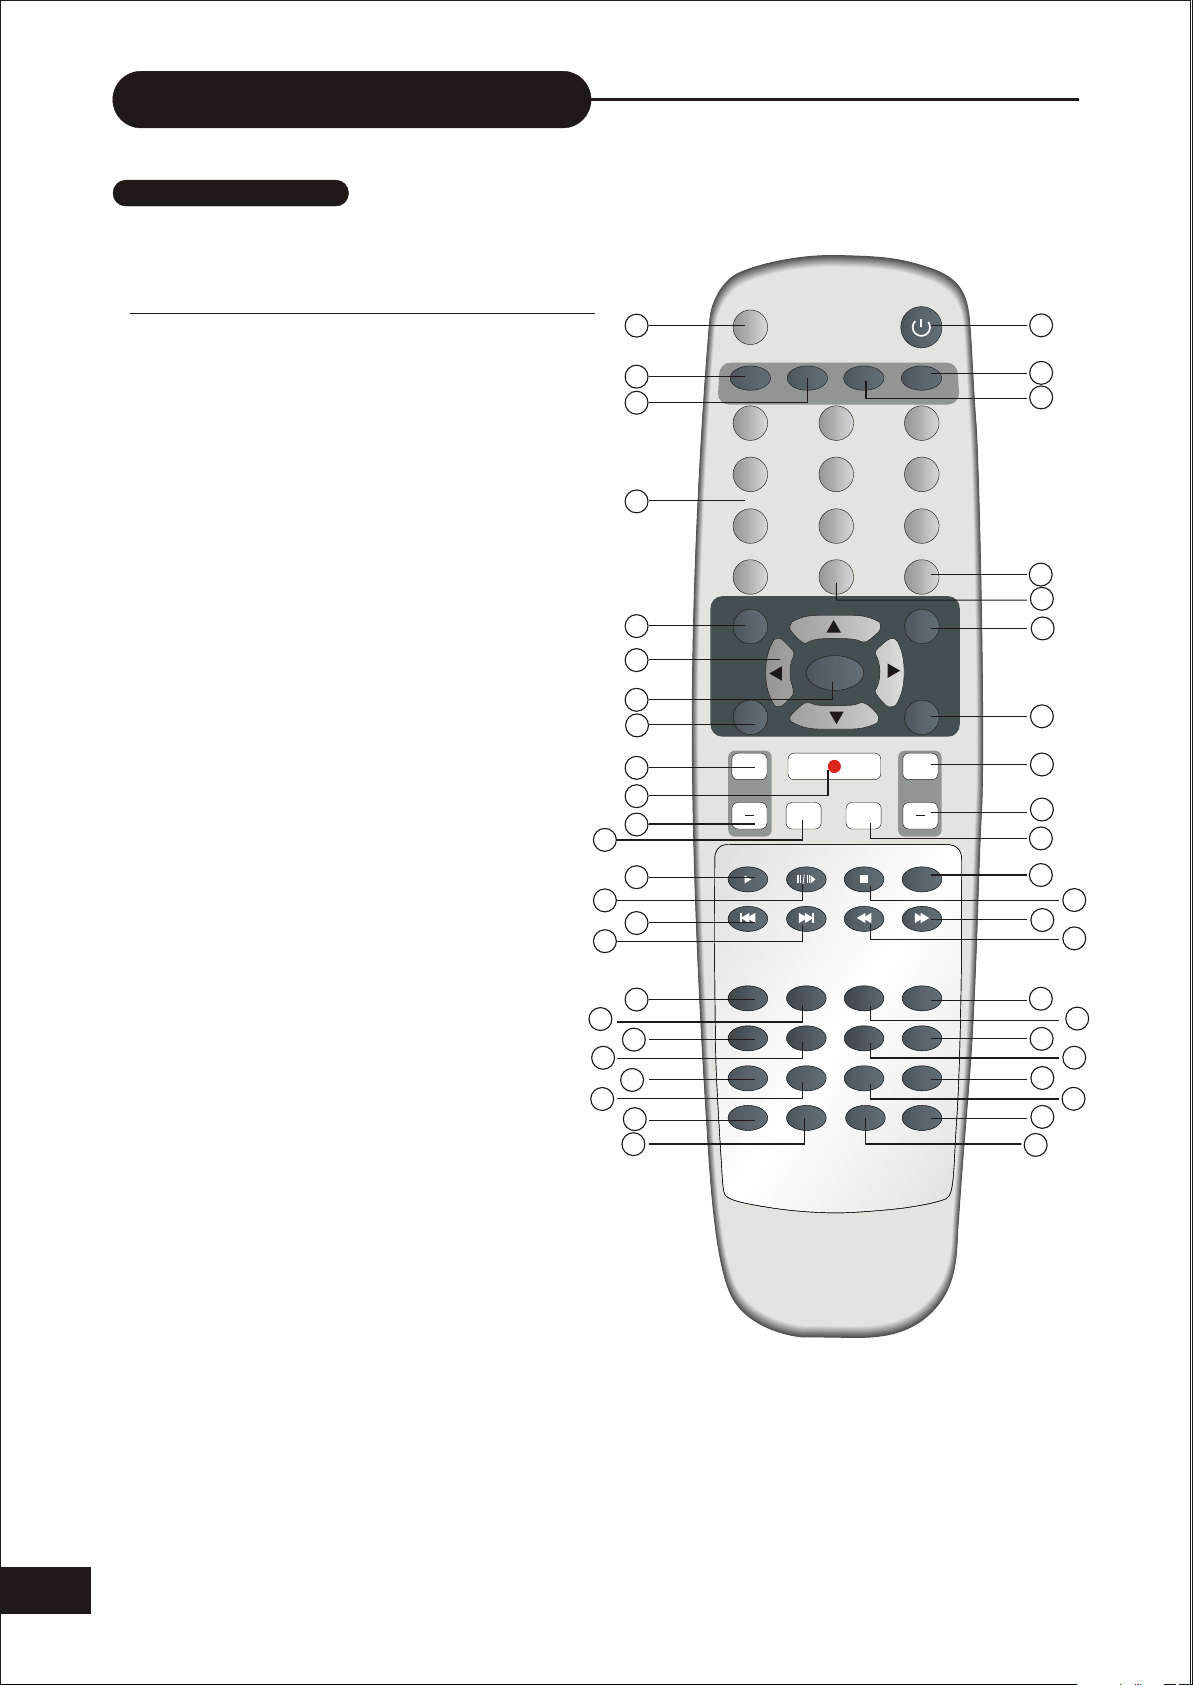
The Remote Control
REMOTE CONTROL
THE INSTRUCTIONS BELOW DESCRIBE THE
FUNCTIONS OF THE REMOTE CONTROL
1. OPEN/CLOSE
2.SUBTITLE
3. AUDIO
4. NUMBERS
5. SETUP
6. DIRECTION
(UP/DOWN/LEFT/RIGHT)
7. ENTER
8. SOURCE
9. CHANNEL +
10.REC/OTR
(RECORD/ONE-TOUCH RECORD)
11.CHANNEL -
12.DISC OP
13.PLAY
14.PAUSE/STEP
15.PREV
16.NEXT
17.DVD
18.TV
19.EDIT
20.FINALIZE
21.ADD/CLEAR
22.RANDOM
23.A-B REPEAT
24.REPEAT
25.STANDBY
26.PS/IS
27.ANGLE
28.MUTE
29.GOTO
30.TITLE
31.MENU
32.VOLUME+
33.VOLUME-
34.TIMER
35.RETURN
36.STOP
37.FF
38.FB
39.USB
40.DV
41.QUALITY
42.ERASE
43.DISPLAY
44.ZOOM
45.SCAN
46.PROGRAM
18
20
22
12
14
16
19
21
23
24
1
10
11
13
15
17
25
ANGLE
STOP
ERASE
ZOOM
PROGRAM
STANDBY
PS/IS
3
6
MUTE
TITLE
MENU
+
VOL
RETURN
USB
QUALITY
DISPLAY
SCAN
26
27
28
29
30
31
32
33
34
35
36
37
38
39
40
41
42
43
44
45
46
OPEN/CLOSE
2
3
4
5
6
7
8
9
SUBTITLE
SOURCE
ADD/CLEAR
AUDIO
1 2
4
7
0
SETUP
5
8 9
GOTO
ENTER
REC/OTR
+
CH
DISC OP TIMER
PLAY PAUSE/STEP
PREV NEXT FFFB
DVD TV DV
FINALIZE EDIT
RANDOM
A-B
REPEAT
6
THE REMOTE CONTROL
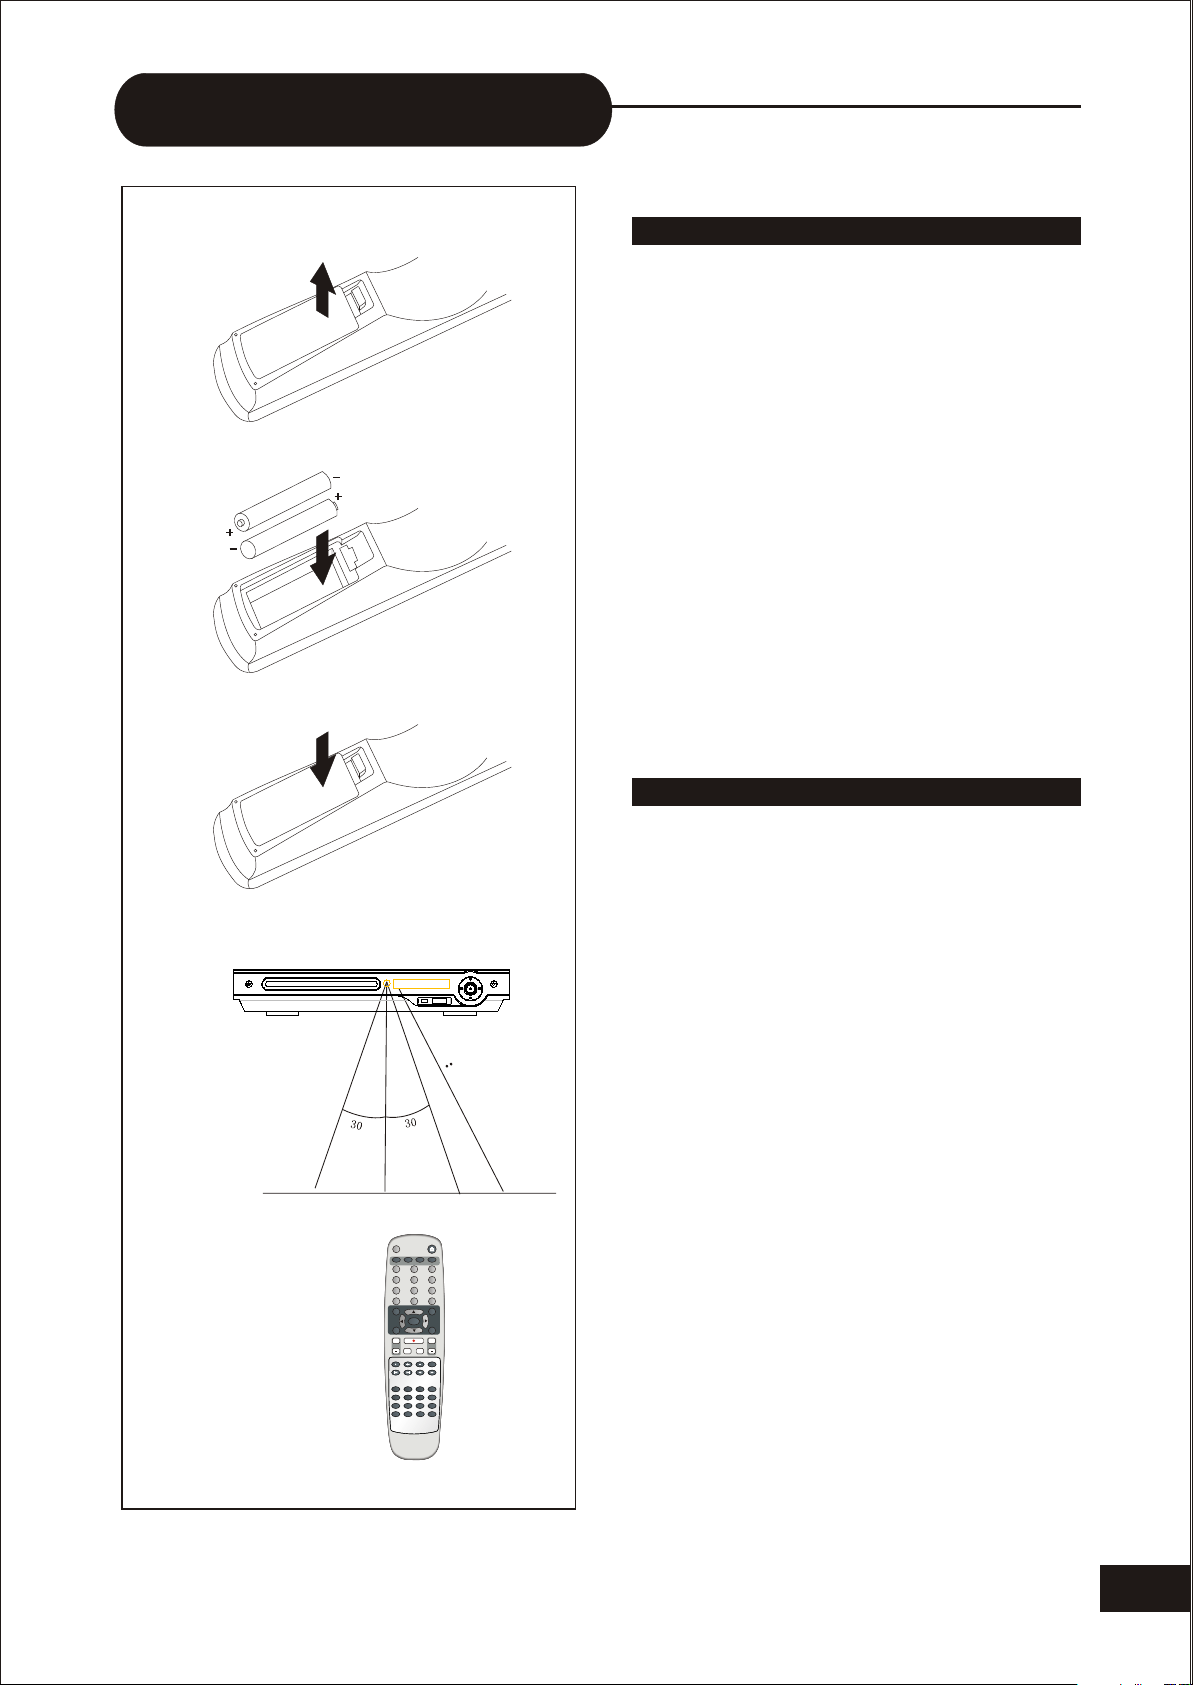
Battery Installation
1. Push downward and outward the leaf spring
to remove the battery compartment cover.
2. Insert two AAA batteries according to the
"+" and "-" markings.
3. Make sure the batteries have been properly
installed, then close the battery compartment cover.
Notes:
Do not mix different types together, o r o ld
batteries with new batteries.
While the remote control will not be used for
an extended period of time, remove the batteries to
prevent possible corrosion.
To prevent corrosion r esulting i n d a mage,
remove exhausted batteries immediately. W here
the remote control doesn't appear to operate
normally, replace both of the batteries.
Typical life for the batteries provided with this
product is about 6-12 months. The life expectance
may vary according to the use status.
OPEN/CLOSE
AUDIO
SUBTITLE
1 2
4
7 8 9
0
SETUP
SOURCE
+
CH
DISC OP TIMER
PLAY PAUSE/STEP
PREV NEXT FFFB
DVD TV DV
FINALIZE EDIT
ADD/CLEAR
RANDOM
A-B
REPEAT
Use of the Remote Control
Point the remote control toward the remote
sensor on your DVD home theater center. Upon
receipt of the signal from the remote control, the
equipment will operate accordingly.
The description in this Manual is based on the
buttons on the equipment. You may use the
counterparts on the remote control to do the same.
Notes:
A
P
P
5
M
Do not place this equipment in a place exposed
to direct sunlight or strong light source like inverting
fluorescent light, or else it may interfere with correct
operation of the remote control.
When other similar remote control is used in
the same room, or when this product is used near
other equipment using infrared ray, interference with
the operation of this remote control may occur.
Do not place any object on the remote control,
STANDBY
PS/IS
ANGLE
3
5
6
MUTE
GOTO
TITLE
ENTER
MENU
REC/OTR
+
VOL
STOP
RETURN
USB
QUALITY
ERASE
DISPLAY
ZOOM
SCAN
PROGRAM
or else it may cause unintentional depression of the
buttons and waste the batteries unnecessarily.
The front of the chassis should not be glazed
with colour glass, or else it may cause interference
with normal operation of the remote control.
Any barrier between the remote control and
remote sensor will inactivate any operation of the
remote control.
The operating range between the remote
control and the equipment shall be no more than
5 metres (16 feet). When the operating range
becomes shorter, replace the batteries with new
ones.
7
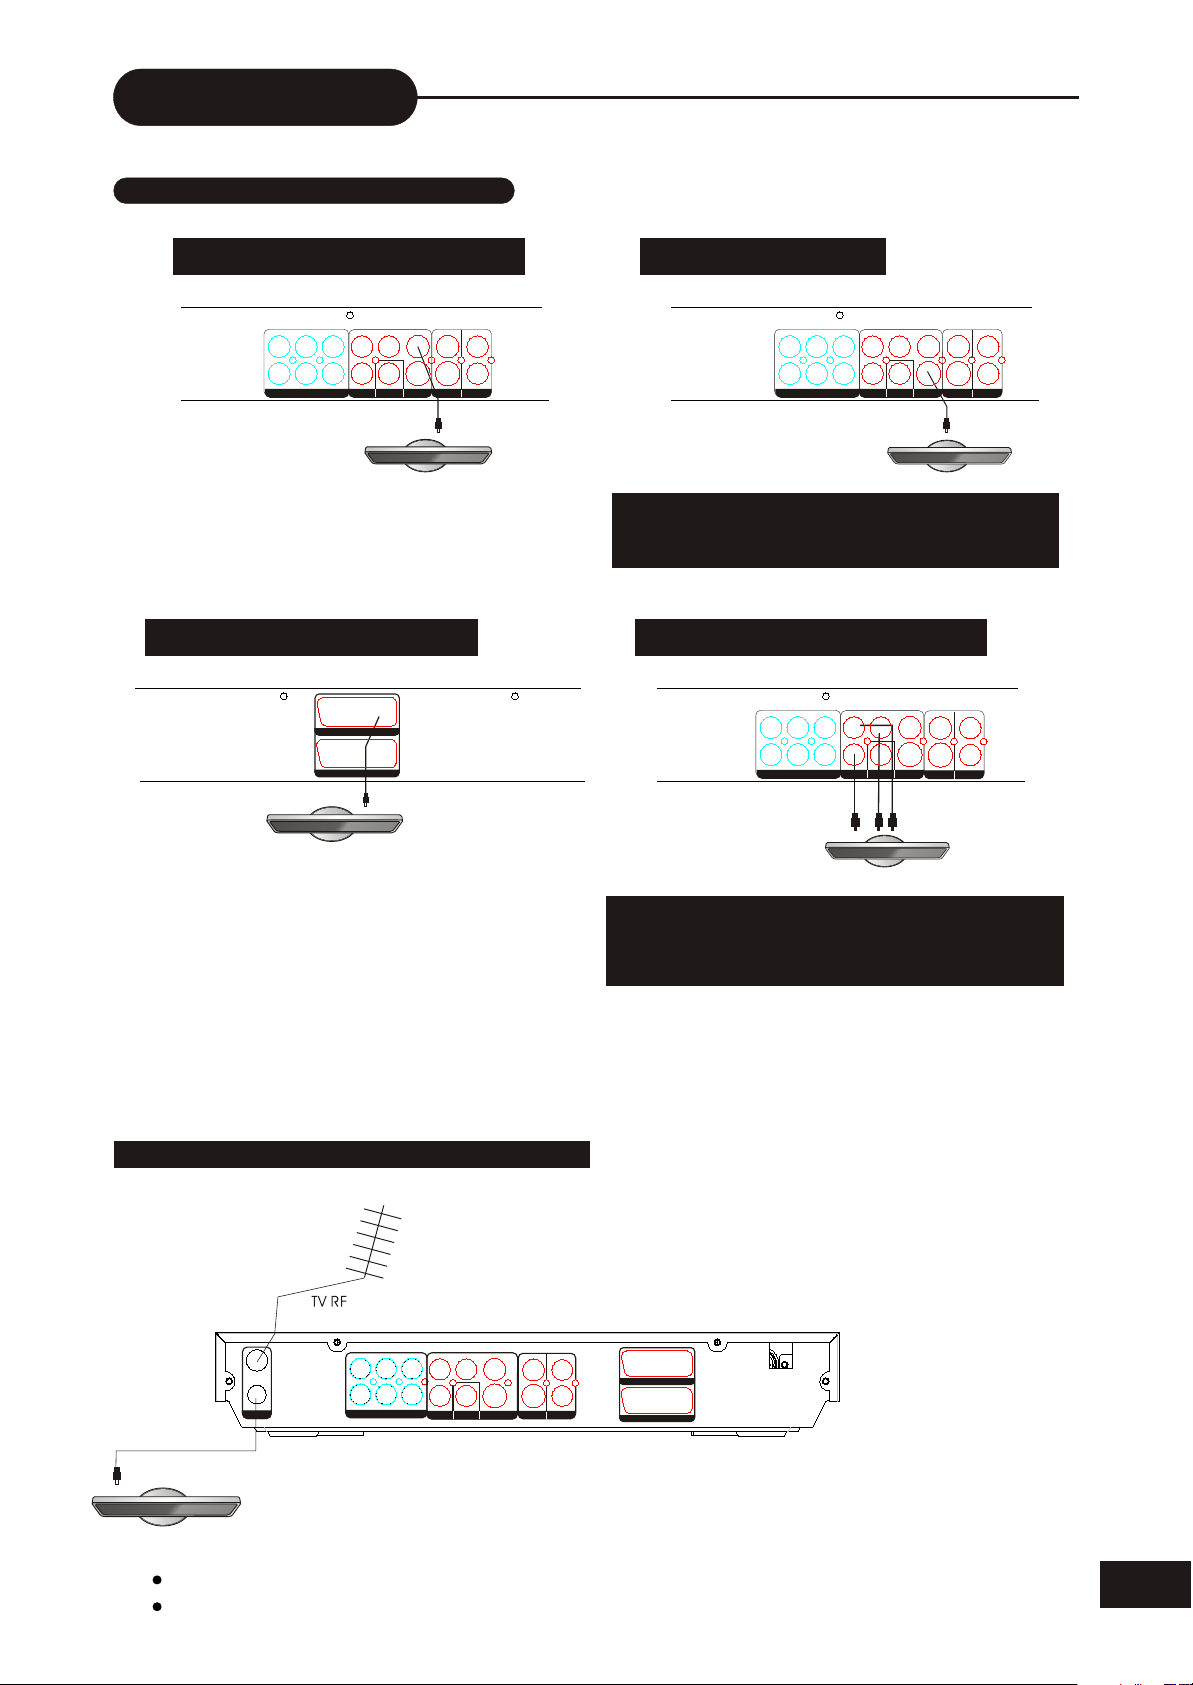
Connection
CONNECTION FOR VIDEO OUTPUT
Good - Composite Video
L R SL
C
SW
5.1CH AUDIO OUT
Cb/Pb
VIDEO
Cr/Pr YCoaxial
SR
VIDEO OUT VIDEO OUTDIGITAL OUT
S-Video
Best - Scart RGB Video
SCART OUT
SCART IN
VIDEO I N
VIDEO
S-Video
L
R
ANALOG AUDIO
IN
COMPOSITE
VIDEO
Better - S-Video
L R SL
C
SW
5.1CH AUDIO OUT
Cb/Pb
VIDEO
Cr/Pr YCoaxial
SR
VIDEO OUT VIDEO OUTDIGITAL OUT
S-Video
S-VIDEO
VIDEO I N
L
VIDEO
R
S-Video
ANALOG AUDIO
IN
Do not connect the yellow video
c able i f u sing t he S -Video cable.
Best - Component Video
L R SL
C
SW
5.1CH AUDIO OUT
Cb/Pb
VIDEO
Cr/Pr YCoaxial
SR
VIDEO OUT VIDEO OUTDIGITAL OUT
Y
Cr/Pr
S-Video
Cb/Pb
VIDEO I N
L
VIDEO
R
S-Video
ANALOG AUDIO
IN
CONNECTION FOR TV TUNER
Signal Input
L R SL
IN
TV
OUT
ANTENNA
TV Signal output
TV Antenna INPUT
C
SW
SR
5.1CH AUDIO OUT
OUT
Cb/Pb
Cr/Pr YCoaxial
VIDEO OUT VIDEO OUTDIGITAL OUT
Scart RGB Video and Component
Video can not be used at the same
time.
VIDEO
S-Video
VIDEO I N
L
VIDEO
SCART OUT
R
S-Video
ANALOG AUDIO
IN
SCART IN
100-240V~
50/60HZ
NOTE
Refer to the manual of the connected TV.
Turn off the power and unplug both units before setting up any connections.
8
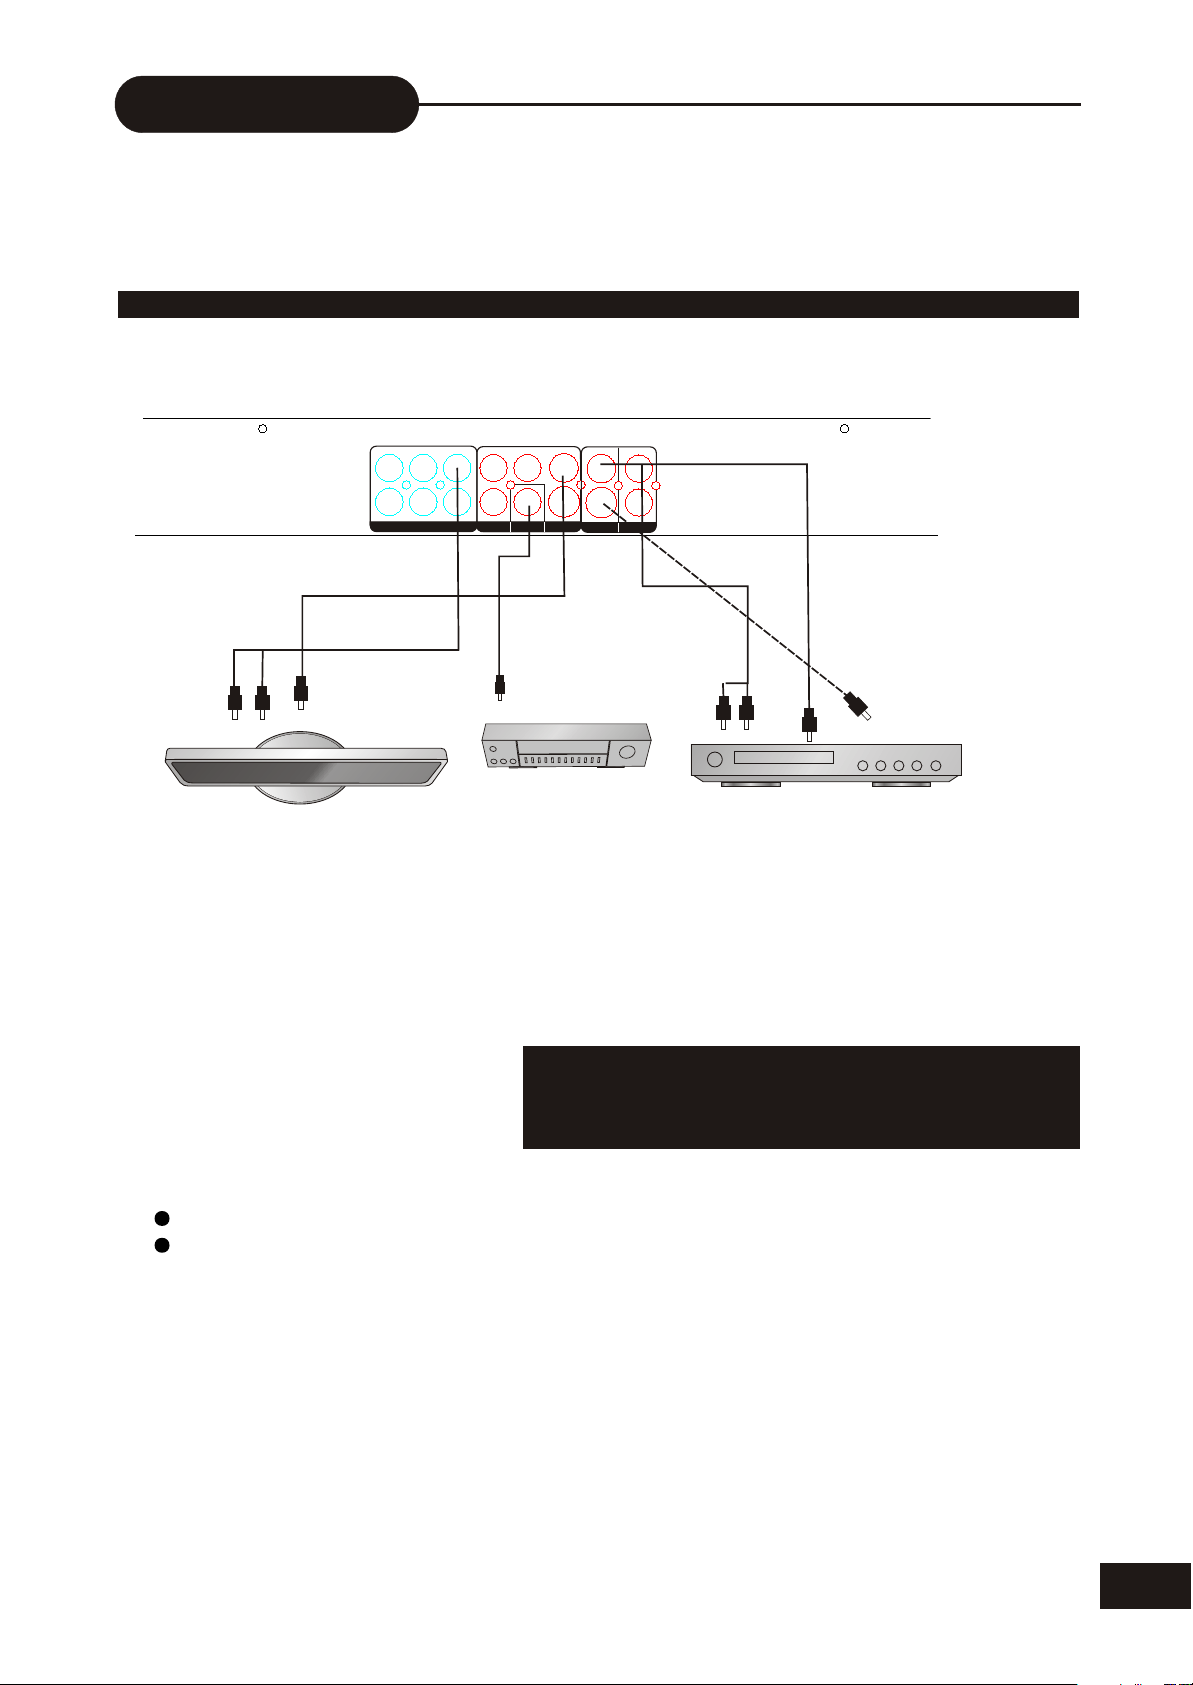
Connection
THE RECORDER ALLOWS YOU TO ENJOY OR RECORD PROGRAMS WITH SIGNAL FROM AV
SYSTEMS SUCH AS VCR, DVD PLAYER, ETC.
CONNECTION FOR AV SIGNAL (A/V REAR INPUT and DIGITAL AUDIO OUTPUT)
YOUR RECORDER
L
SL
C
Cb/Pb
VIDEO
L
VIDEO
Audio out
TV set
SW
5.1CH AUDIO OUT
Video out
R
Cr/Pr YCoaxial
VIDEO OUT VIDEO OUTDIGITAL OUT
Coaxial cable
S-Video
S-Video
VIDEO I N
ANALOG AUDIO
IN
R
Video in
SR
AMPLIFIER
DVD player
Connect your recorder with the S-Video cable, if the Signal
Source has an S-Video input. Do not connect the yellow
video cable if using the S-Video cable.
NOTE
Refer to the manual of the connected system.
Turn off the power and unplug both units before setting up any connections.
9
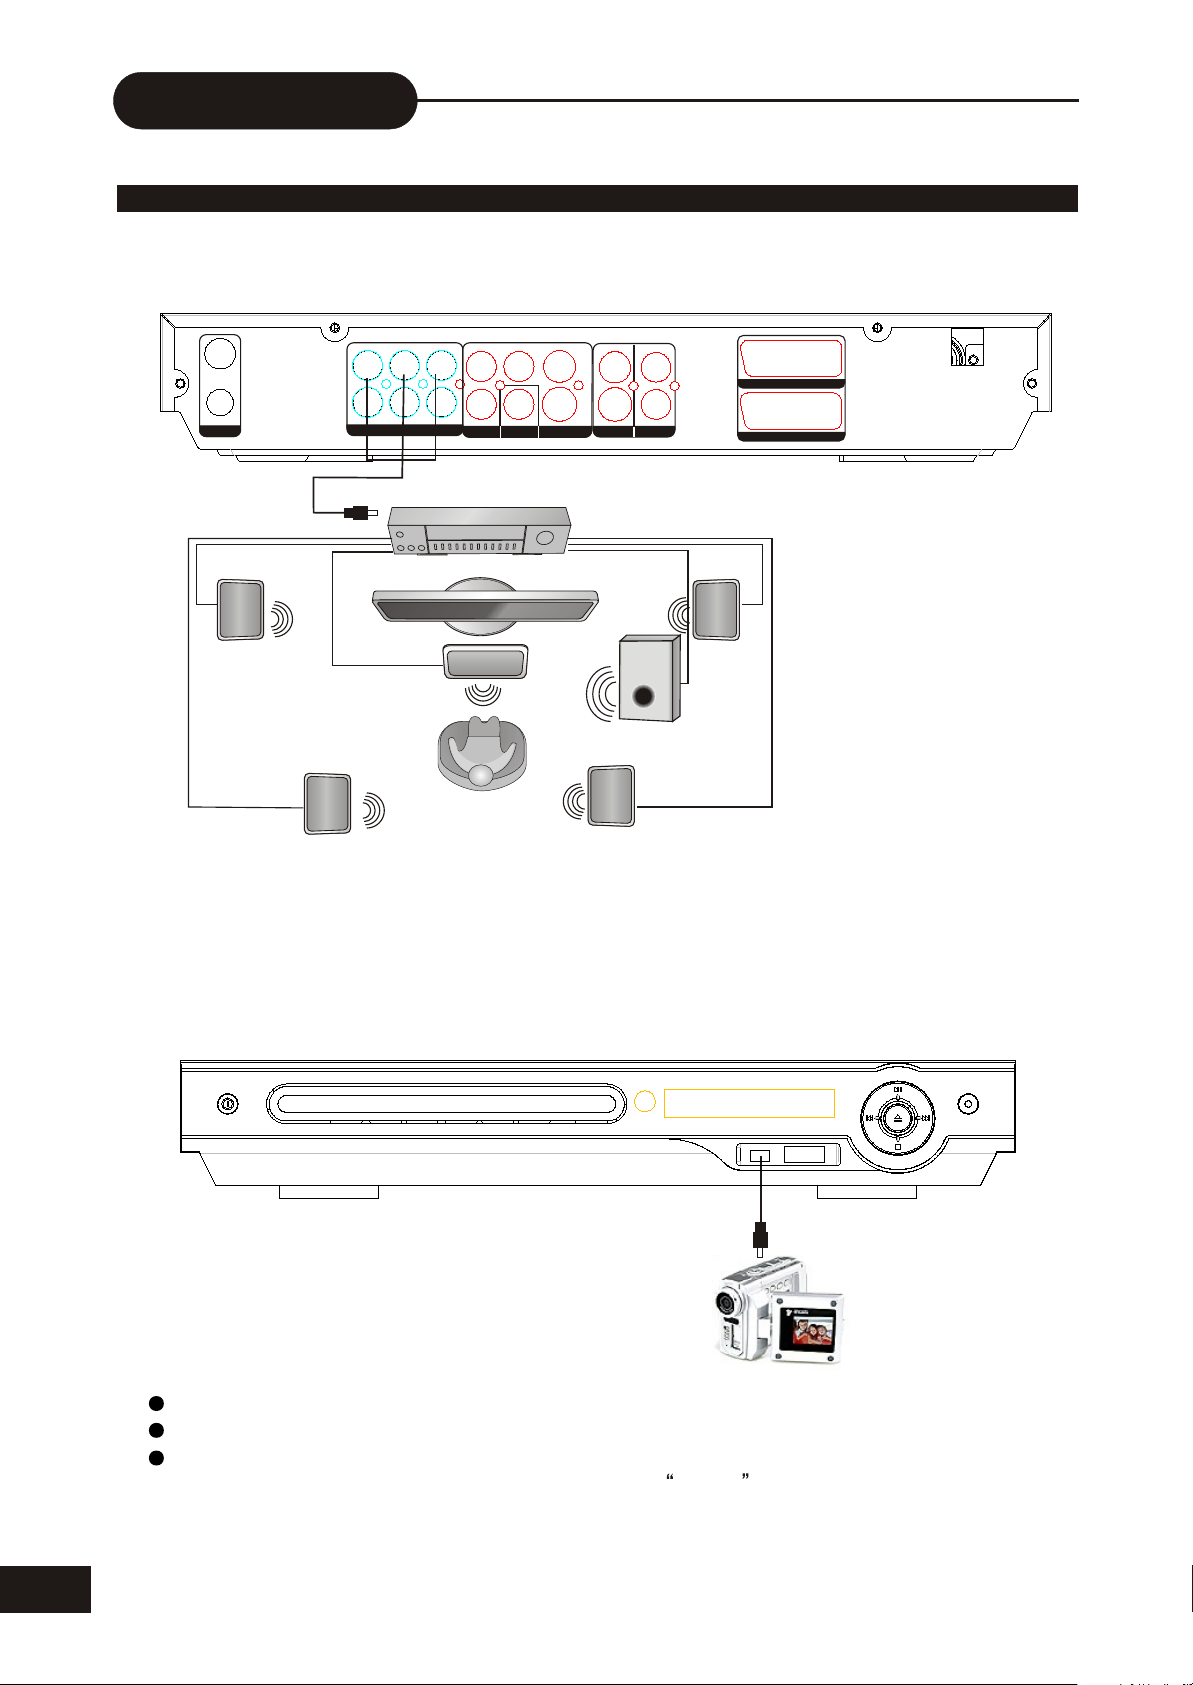
Connection
CONNECTION FOR AV SIGNAL (A/V FRONT INPUT)
L
SL
C
IN
TV
Cb/Pb
VIDEO
VIDEO
The Rear Panel of the Unit
L
SCART OUT
100-240V~
50/60HZ
OUT
ANTENNA
Ordinary Cable
(Analog Output)
SW
5.1CH AUDIO OUT
5.1 Channel
SR
R
Cr/Pr YCoaxial
VIDEO OUT VIDEO OUTDIGITAL OUT
OUT
Amplifier 1
S-Video
S-Video
VIDEO I N
ANALOG AUDIO
IN
R
SCART IN
10
DVD RECORDER
DIGITAL
DV INPUT
NOTE
Refer to the manual of the connected system.
Turn off the power and unplug both units before setting up any connections.
Turn off the power, connect the digital camera (refer to your instruction manual)
Power on the DVD RW and Digital camera . Press source to activate the DV in
for connection.
 Loading...