

AKURA HELP-LINE
ADVR171S
Call the number below if you have any difficulties operating this product.
01422 263273
Please Read This Manual.
We recommend that you read this manual carefully
before connecting your DVD Video Recorder and
operating it for the first time.
Keep the manual in a safe place for future reference.
1

Important Safety Instructions
1 Read these instructions.
2 Keep these instructions.
3 Heed all warning.
4 Follow all instructions.
5 Do not use this apparatus near water.
6 Clean only with dry cloth.
7 Do not block any ventilation openings. Install in
accordance with the manufacturer’s instructions.
8 Do not install near any heat sources such as radiators,
heat registers, stoves, or other apparatus (including
amplifiers) that produce heat.
9 Do not defeat the safety purpose Do not remove the
mains plug fitted. If it is damaged it must be replaced by
a competent engineer. Do not remove the “E arth pin” as
this is central to your safety. If the plug fitted does not fit
the mains outlet, please consult your local dealer.
10 Protect the power cord from being walked on or pinched,
particullarly at plugs, convenience receptacles, and the
point where they exit from the apparatus.
11 Only use attachments/accessories specified by the
manufacturer.
15 To reduce the risk of fire or electric shock, Do not
expose this apparatus to rain or moisture.
16 This appliance shall not be exposed to dripping or
splashing water and that no object filled with liquid such
as vases shall be placed on the apparatus.
17 Power Lines - An outdoor antenna should be located
away from power lines.
******************************************
CAUTION
12 Unplug this apparatus both from the mains supply and
aerial connection in the event of a Thunder storm or if
going on holiday.
13 Refer all serving to qualified service personnel.
Servicing is required when the apparatus has been
damaged in any way, such as power-supply cord or plug
is damaged, liquid has been spilled or objects have fallen
into the apparatus, the apparatus has been exposed to
rain or moisture, does not operate normally, or has been
dropped.
14 Battery use CAUTION - To prevent battery leakage which
may result in bodily injury, property damage, or damage to
the unit:
• Install all batteries correctly, observing their polarity.
Ensure they are fitted as marked on the handset.
• Do not mix batteries (old and new or carbon and alkaline,
etc.).
• Remove batteries when the unit is not used for a long
time.
Disposing of batteries. Do not throw onto a fire. Consult
your local authority regarding safe disposal.
• The ventilation holes should not be blocked or covered.
• Keep naked flames and Lighted candles away from the
player.
• Do not place Vases or other vessels filled with water on
the apparatus. Do not use in a high humidity environment.
Do not splash water or other liquids into the player.
• The mains plug is used at the Final connection. Access
should be easily available.
2

Table of Contents
Important safety instruction ............................... 2
General information ........................................... 4~5
Features .............................................................. 4
DVD region code ................................................. 4
Discs that may be played..................................... 4
Disc can be recorded .......................................... 4
Glossary of disc terms ........................................ 4
Supplied Accessories.......................................... 4
Inserting batteries into the remote control ............ 4
Notes on disc....................................................... 5
Conventions about this manual ............................ 5
Function Overview .............................................. 6~7
Front panel........................................................... 6
Back panel ........................................................... 6
Remote control..................................................... 7
Basic Connetion .................................................. 8~11
Connect your DVD recorder to TV set ................. 8
Connect your DVD recorder to Audio devices..... 9
Connect your DVD recorder to VCR or a similar
Recording equipment ........................................... 10~11
Before initial setting ........................................... 12~14
Setting the clock................................................... 12
Setting the channel .............................................. 12
NICAM select ....................................................... 12
Auto CH Scan ....................................................... 12
Channel List .......................................................... 13
Modify Channel .................................................... 13
Moving the stations.................................................14
Naming stations........................................................14
Initial settings ...................................................... 15~20
DVD control ......................................................... 15~16
Setting Disc Menu ............................................ 15
Setting Angle Mark ........................................... 15
Setting Audio.................................................... 15
Setting Subtitle ................................................. 15
Setting Parental Control.................................... 16~17
General ................................................................ 17
Setting Menu Language ................................... 17
Video ................................................................... 18
Setting TV Display ........................................... 18
Setting Video Output ........................................ 18
Setting AV1 Select .......................................... 18
Setting AV2 Select ........................................... 18
Speaker ............................................................... 19
Setting Down Mix............................................. 19
Setting Center, Rear, Subwoofer ..................... 19
Setting Center Delay ........................................ 19
Setting Rear Delay ........................................... 19
Speaker Test.................................................... 19
Audio ................................................................... 19
Setting Digital Out ............................................. 19
Setting DRC...................................................... 19
Pro Logic.......................................................... 20
Recording TV Programs ...................................... 22
Timer Recording................................................... 23~26
Setting Record Time ......................................... 23
Setting Record Day .......................................... 23
Setting Input Source ........................................ 24
Setting Position ................................................ 24
Setting Record Mode........................................ 24
Setting Title ...................................................... 24
Recording List.................................................. 25
Press STANDBY/ON to turn the power off ...... 26
Recording from an External Equipment ............ 26
One Touch Recording ...................................... 26
Playback Features .............................................. 26~30
Preparations ........................................................ 26
Start or Pause Playback....................................... 26
Stopping Playback ............................................... 26
Fast Playback ...................................................... 26
Skip Playback....................................................... 27
Slow Motion Playback .......................................... 27
Step Playback ...................................................... 27
Repeat Playback .................................................. 27
A-B Repeat Playback ........................................... 27
Using DVD TITLE menu ........................................ 27
Using MENU/PBC .................................................. 27
Return.................................................................. 27
GOTO .................................................................. 27
Display the playback information ......................... 28
Subtitle................................................................. 28
AUDIO .................................................................. 28
Language............................................................. 29
Zooming............................................................... 29
Angle ................................................................... 29
Intro play mode .................................................... 29
Shuffle playback.................................................. 29
Programmed playback ......................................... 29
Sleep timer setting ............................................... 29
MP3 CD Playback .................................................. 30
Picture CD Playback.............................................. 30
JPEG CD Playback ................................................ 30
Picture CD/JPEG Picture Zoom .............................. 30
Managing the disc contents ............................... 31~33
Playing/Edit titles .................................................. 31
PLAY TITLE ...................................................... 31
TITLE DELETE ................................................... 31
TITLE RENAME ................................................. 31
Edit titles............................................................... 32
Format Disc...................................................... 32
Erase Disc ....................................................... 32
Finalize Disc..................................................... 32
Rename Disc.................................................... 32-33
Protect Disc ..................................................... 33
Troubleshooting Guide ....................................... 34
Maintenance........................................................ 35
Specifications ...................................................... 35
Recording ............................................................ 21~26
Preparations......................................................... 21
Recording setup .................................................. 21~22
Setting Record Mode ............................................ 21
Setting Auto Chapter............................................. 22
3
General Information
Features
·Built-in Dolby Digital decorder, supporting Dolby Pro Logic and
Virtual Surround
·5.1Channel audio out
·TV tuner receiver
·Conforming DVD,SVCD,VCD1.1,VCD2.0,MP3,CDR,CDRW discs
·DVD navigation and SVCD,VCD2.0 PBC controlling functions
·VFD front panel display and OSD menu display
·Full function remote control
• Track (Video or audio CD)
Sections of a picture or a music piece on a VIDEO or a CD. Each
track is assigned a track number enabling you to locate the track
you want.
Supplied Accessories
Check that you have the following items:
DVD region code
DVD players and discs are designed with region numbers which
dictate the region (printed on the rear panel). If the region number
does not match the region number in your DVD player, you will not be
able to play the disc. If you try to play the DVD, the message “ WRONG
REGION NUMBER” will appear on OSD.
The region number for this DVD player is 2
Discs that may be played
• DVDs
Discs are generally recorded with multi-titles.
Titles may be subdivided into chapters.
• Video CD
Discs are generally divided into tracks.
• Audio CD’s
Discs are divided into tracks.
Note
• You cannot play CD-G, CD-EXTRA, , CD-ROM and DVD-ROM discs.
• You cannot play illegally produced discs.
• You cannot play scratched discs.
• You cannot play disc that are dusty, soiled or marked with finger-
prints.
• Remote control
• AA batteries
• Owner’s manual
• Scart Cable
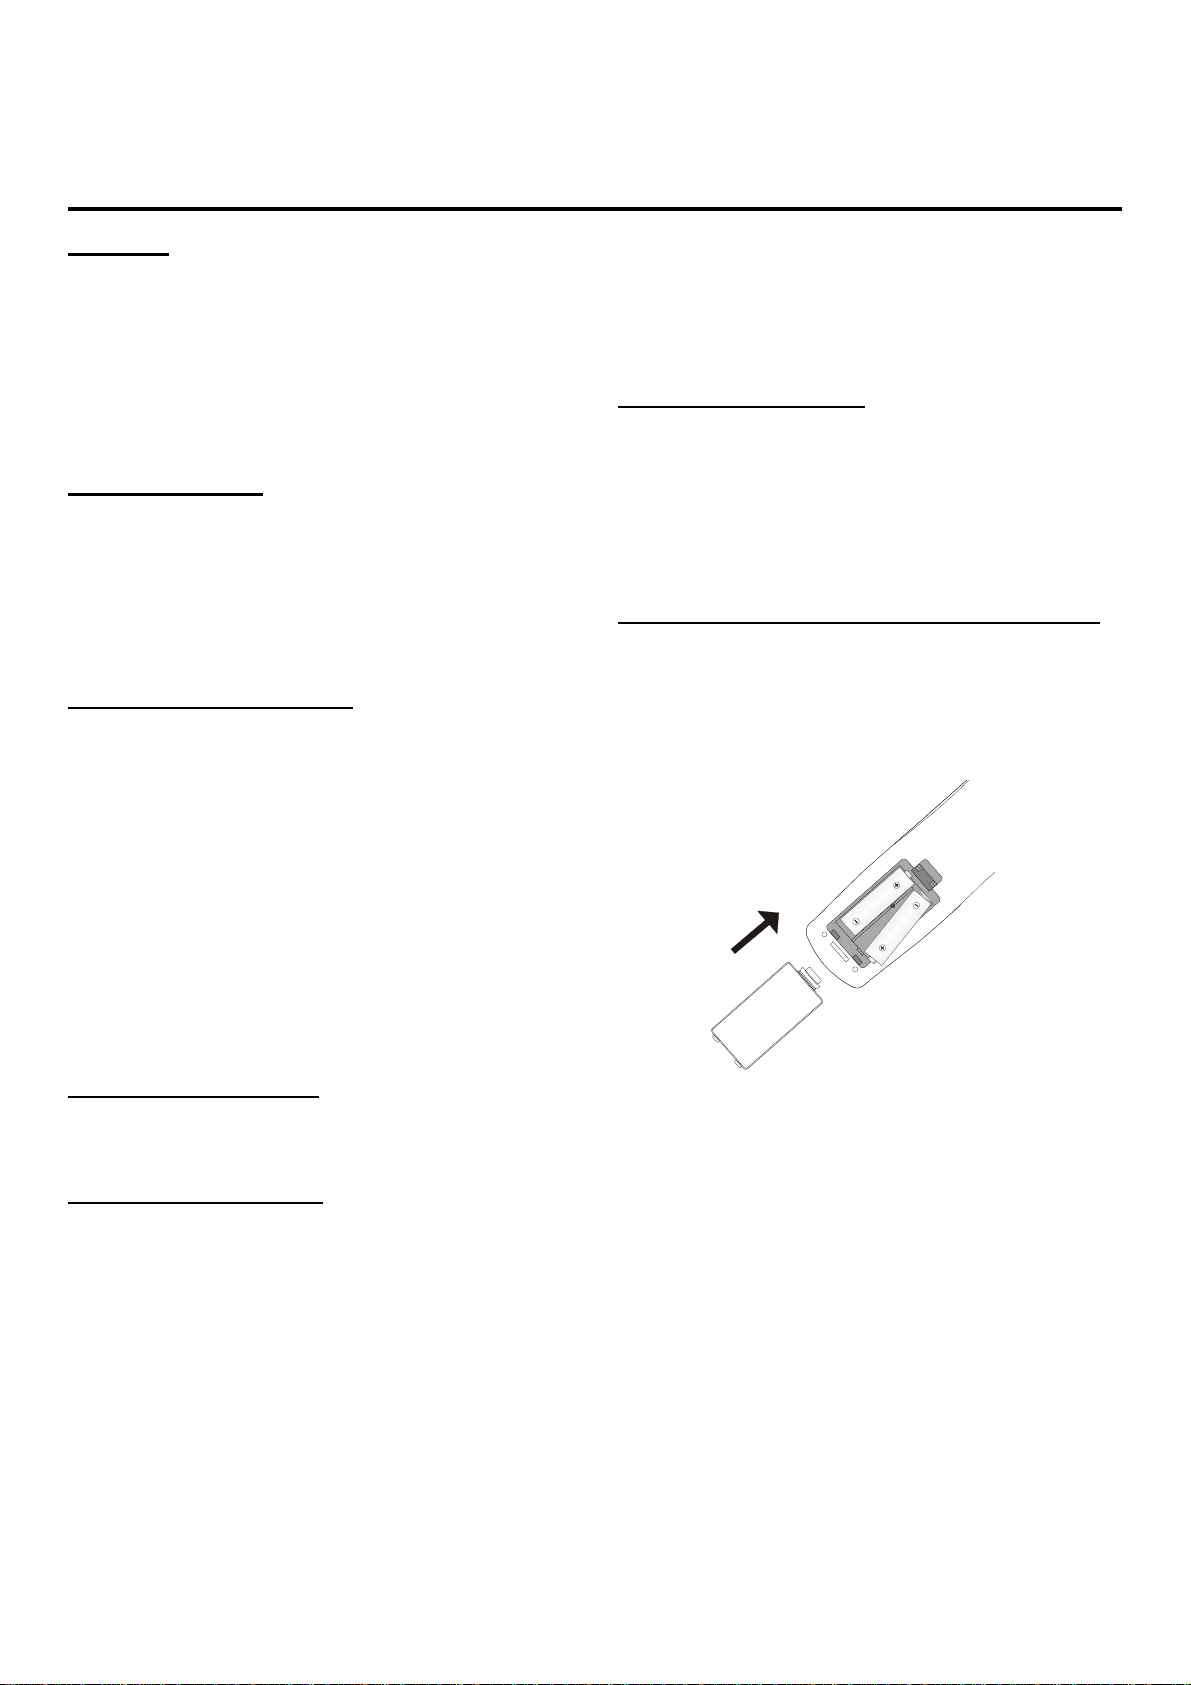
Inserting Batteries into the Remote Control
You can control the system using the supplied remote. Insert two AA
batteries by matching the + and - on the batteries. When using the
remote, point it at the remote sensor on the front panel of this system.
DISC can be recorded
• DVD+R (Digital Versatile Disc + recordable)
• DVD+RW (Digital Versatile Disc + rewritable)
Glossary of disc terms
• Title (DVD)
The longest sections of a picture or a music piece on a DVD; a
movie, ect., for a picture piece on a video software; or an album,
etc., for a music piece on and audio software. Each title is assigned a title number enabling you to locate the title you want.
• Chapter (DVD)
Sections of a picture or a music piece that are smaller than titles. A
title is composed of several chapters. Each chapter is assigned a
chapter number enabling you to locate the chapter you want. Depending on the disc, no chapters may be recorded.
4
Note
• Do not leave the remote in an extermely hot or humid place.
• Do not use a new battery with an old one.
• Do not drop any foreign object into the remote casing. particularly
when replacing the batteries.
• Do not expose the remote sensor to direct sunlight or lighting appa-
ratuses. Doing so many cause a malfunction.
• If you will not use the remote for an extended period of time, remove
the batteries to avoid possible damage from battery leakage and
corrosion.

Notes on disc
Conventions about this manual
Disc handling precautions
• To keep the disc clean, handle the disc by its edge. Do not touch
the surface.
• Do not stick paper or tape on the disc.
If there is glue (or a similar substance) on the disc, remove the glue
completely before using the disc.
• Do not expose the disc to direct sunlight or sources such as hot
air ducts, or leave it in a car parked in direct sunlight as there can
be considerable rise in temperature inside the car.
• After playing, store the disc in its case.
• Do not write on the label side with a ball-point pen or other writing
utensils.
• Be careful not to drop or bend the disc.
Disc cleaning precautions
• Before playing, clean the disc with a cleaning cloth. Wipe the disc
from the center to out.
• Instructions in this manual describe the controls on the system.
You can also use the controls on the remote control if they have the
same or similar names as those on the system.
• The types of functions and operations that can be used for a par-
ticular disc vary depending on the features of that disc. In some
cases, these functions and operations may differ from the descriptions given in this Operations Manual. In this event, follow the instructions given on the screen. This Operations Manual only covers
basic disc operations.
• For some operations, the icon may appear on the the screen.
This indicates that the operation described in this Operations Manual
is not permitted for the current disc.
• The drawings about the TV screen and front panel display used in
this Operations Manual are purely for the purposes of explanation.
The actual displays may differ slightly from what are shown here.
• Do not use solvents such as benzine, thinner, commerically
avaiable cleaners or anti-static spray intended for viny1 LPs.
Disc installing precautions
• Do not install more than 1 disc on disc tray.
• Do not place the disc on the tray up-side down.
• Do not try to close the disc tray when the disc is not installed
properly.
5
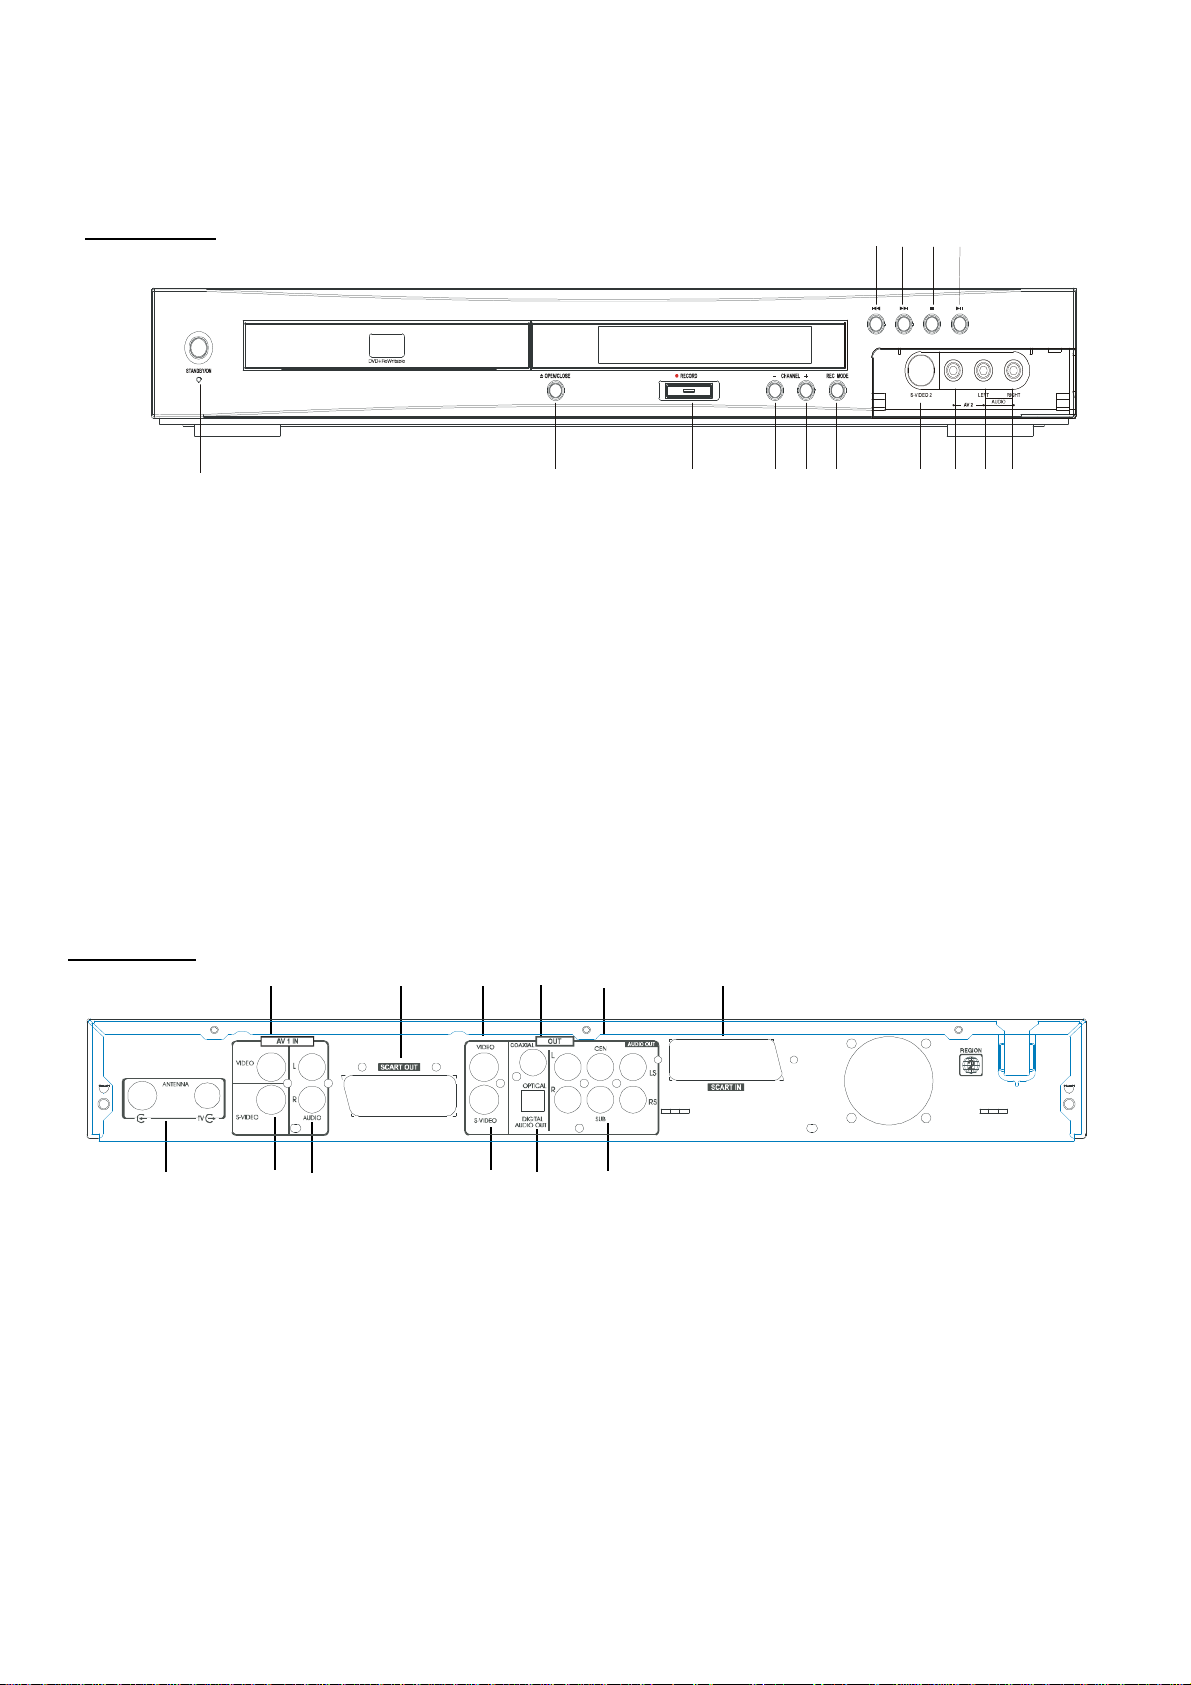
Front panel
3
4
12
1
23456
78910111213
14
1-STANDBY/ON
To switch the Unit to standby and power on mode
2-OPEN/CLOSE
Press to open/close disc tray.
3-RECORD
Press to record.
4-CHANNEL (-)
Press to select previous TV channel
5-CHANNEL (+)
Press to select next TV channel
6-REC MODE
Select the record mode
7-S-VIDEO
S-video input jack
Back panel
11
10
8- VIDEO
Video input jack
9- AUDIO IN (L)
Audio input jack(left channel)
10- AUDIO IN (R)
Audio input jack(right channel)
11- PREV
Press it to select the previous track or chapter.
12- NEXT
Press it to select the next track or chapter.
13- STOP
Press to stop playback exept for timer recording.
14- PLAY/PAUSE
Press it to play or pause the playback.
89
7
1
1-ANTENNA
Connect RF ANTENNA to TV set
2-S-VIDEO (IN)
S-video input jack
3-AUDIO IN (L and R)
Audio input jacks
4-S-VIDEO( OUT)
S-video output jack
5-OPTICAL OUT
Optical digital audio output
6-SUBWOOFER
Connect the Amplifier Sub terminals
2
6
5 6
7- SCART IN
S-cart in jack
8- AUDIO OUT
Connect the Amplifier Audio input
9- COAXIAL OUT
Coaxial digital audio output
10- VIDEO OUT
Video input jack
11- SCART OUT
S-cart out jack
12- VIDEO IN
VIdeo input jacks
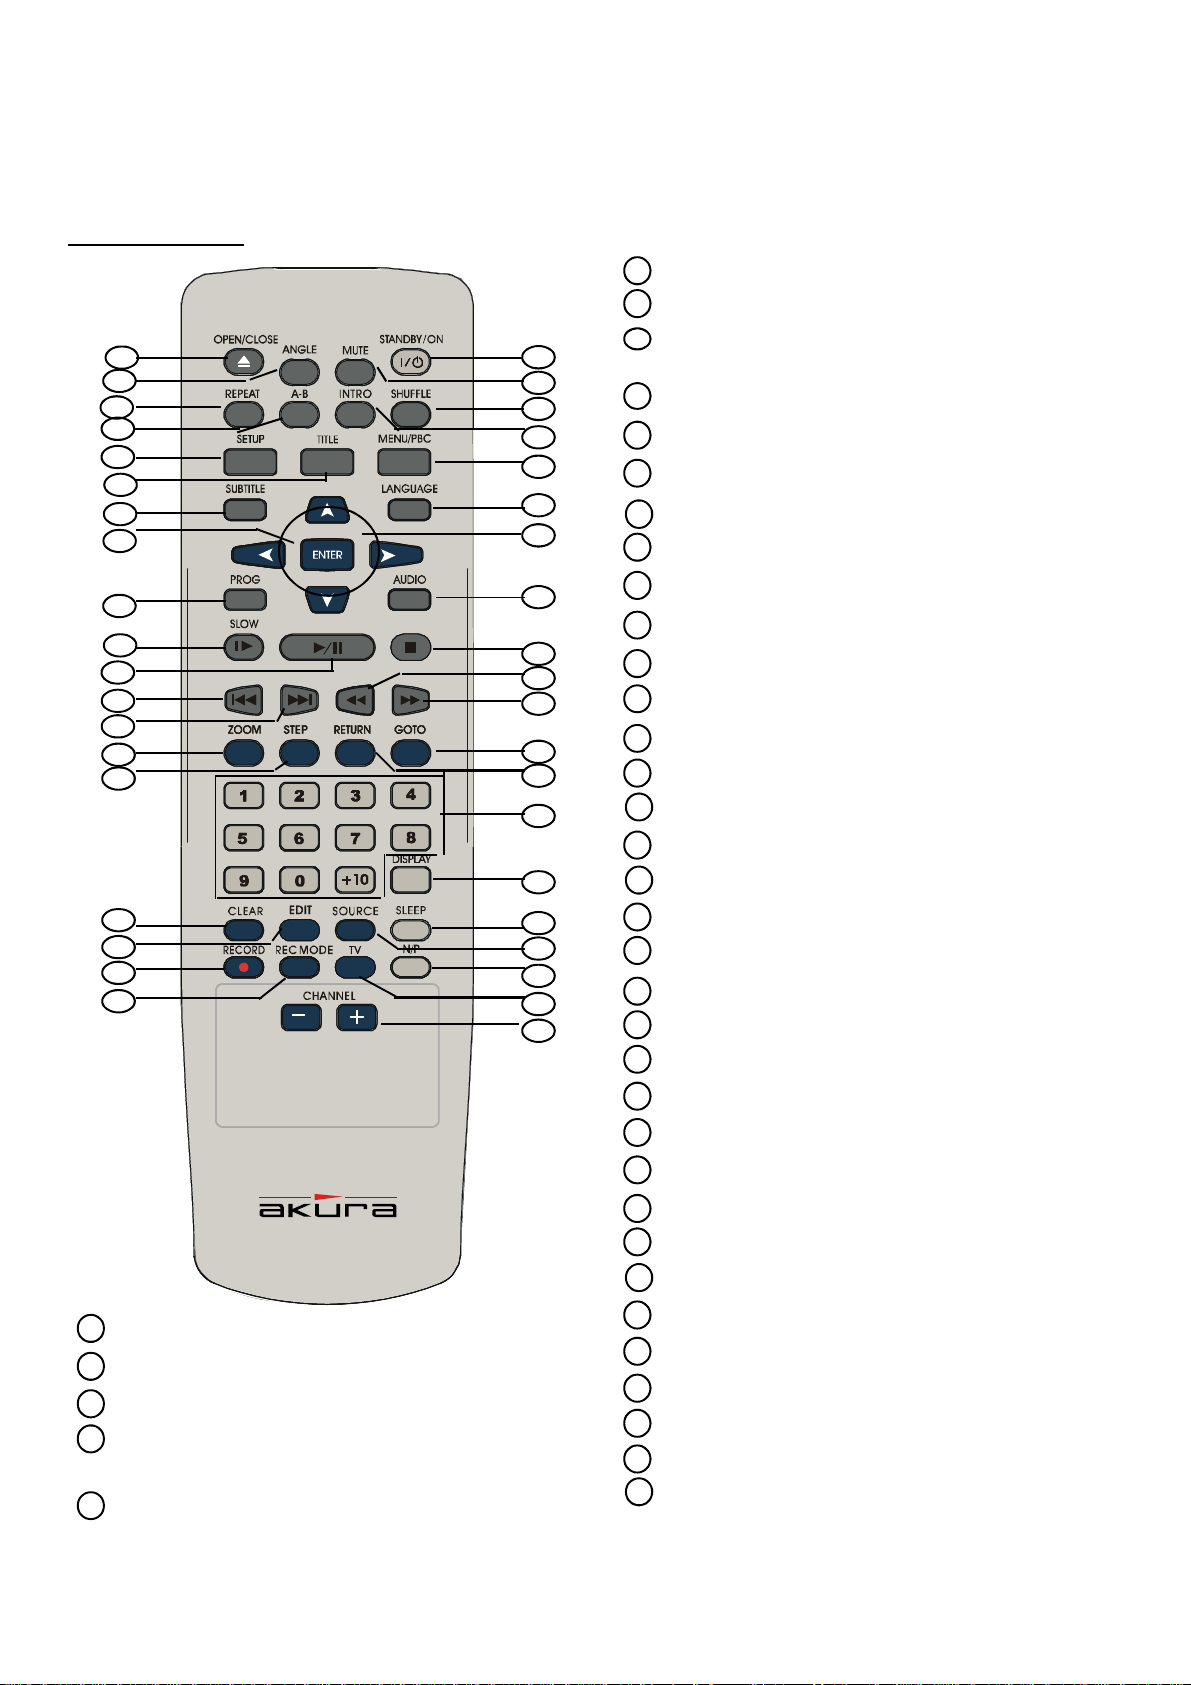
Remote control
6 LANGUAGE: select a different audio language or direction.
7 Directional arrow buttons: press to select the item you want.
37
36
35
29
28
27
38
34
33
32
31
30
26
25
24
23
22
21
39
10
11
12
13
14
15
16
17
18
19
20
1
2
3
4
5
6
7
8
9
8 AUDIO : changes the audio channels of a VCD or CD if available.
9 STOP : stops play momentarily or completely.
10 FAST BACKWARD : Fast backward search.
11 FAST FORWARD: Fast forward search.
12 GOTO: go to the desired starting title, chapter, track or time.
13 RETURN : return back to the menu (VCD only).
14 NUMERIC KEYS : used in DVD menu and CD track selection.
15 DISPLAY : press to show the playing information about the disc.
16 SLEEP : To set the timer on the unit.
17 SOURCE : press to select your desired source.
18 N/P: Selects PAL, NTSC, MULTI & P-SCAN systems.
19 TV : Switches from DVD to TV.
20 CHANNEL- /+ : press to select lower/upper TV program channel.
21 REC MODE :press to select the record mode before recording.
22 RECORD : press to start record.
23 EDIT : press to edit what you record.
24 CLEAR : press to clear what you select or input.
25 STEP : press to view playback frame by frame
26 ZOOM : press to enlarge the picture.
27 NEXT SKIP : skip to next chapter or track.
1 STANDBY :Switches the player “On” and to “ standby”.
2 MUTE : Mutes and restores the audio.
3 SHUFFLE : press to play the tracks at random.
4 INTRO : Plays several seconds of each track during
stop mode (CD and VCD only).
5 MENU/PBC : press to select the subtitle(root) menu.
28 PREV SKIP: skip to previous chapter or track.
29 PLAY/PAUSE : press to start or pause playback.
30 SLOW : select the forward/backward slow speed playback.
31 PROG : program the tracks in your own order.
32 ENTER : press to enter a command or confirm a selection.
33 SUBTITLE : access various subtitle language in DVD.
34 TITLE : displays the title menu if available (DVD only)
35 SETUP : enter into the SETUP menu.
36 A-B : repeat a certain segment between A and B.
37 REPEAT : allow you to repeat a title,a chapter, a song or all
songs on the disc.
38 ANGLE: access various camera angles on DVD.
39 OPEN/CLOSE: open or close the disc tray.
7
Basic connection
IMPORTANT !
● Before connecting the AC power to the wall outlet, ensure
that all other connections have been made.
● Never make or change any connections with the power
switched on.
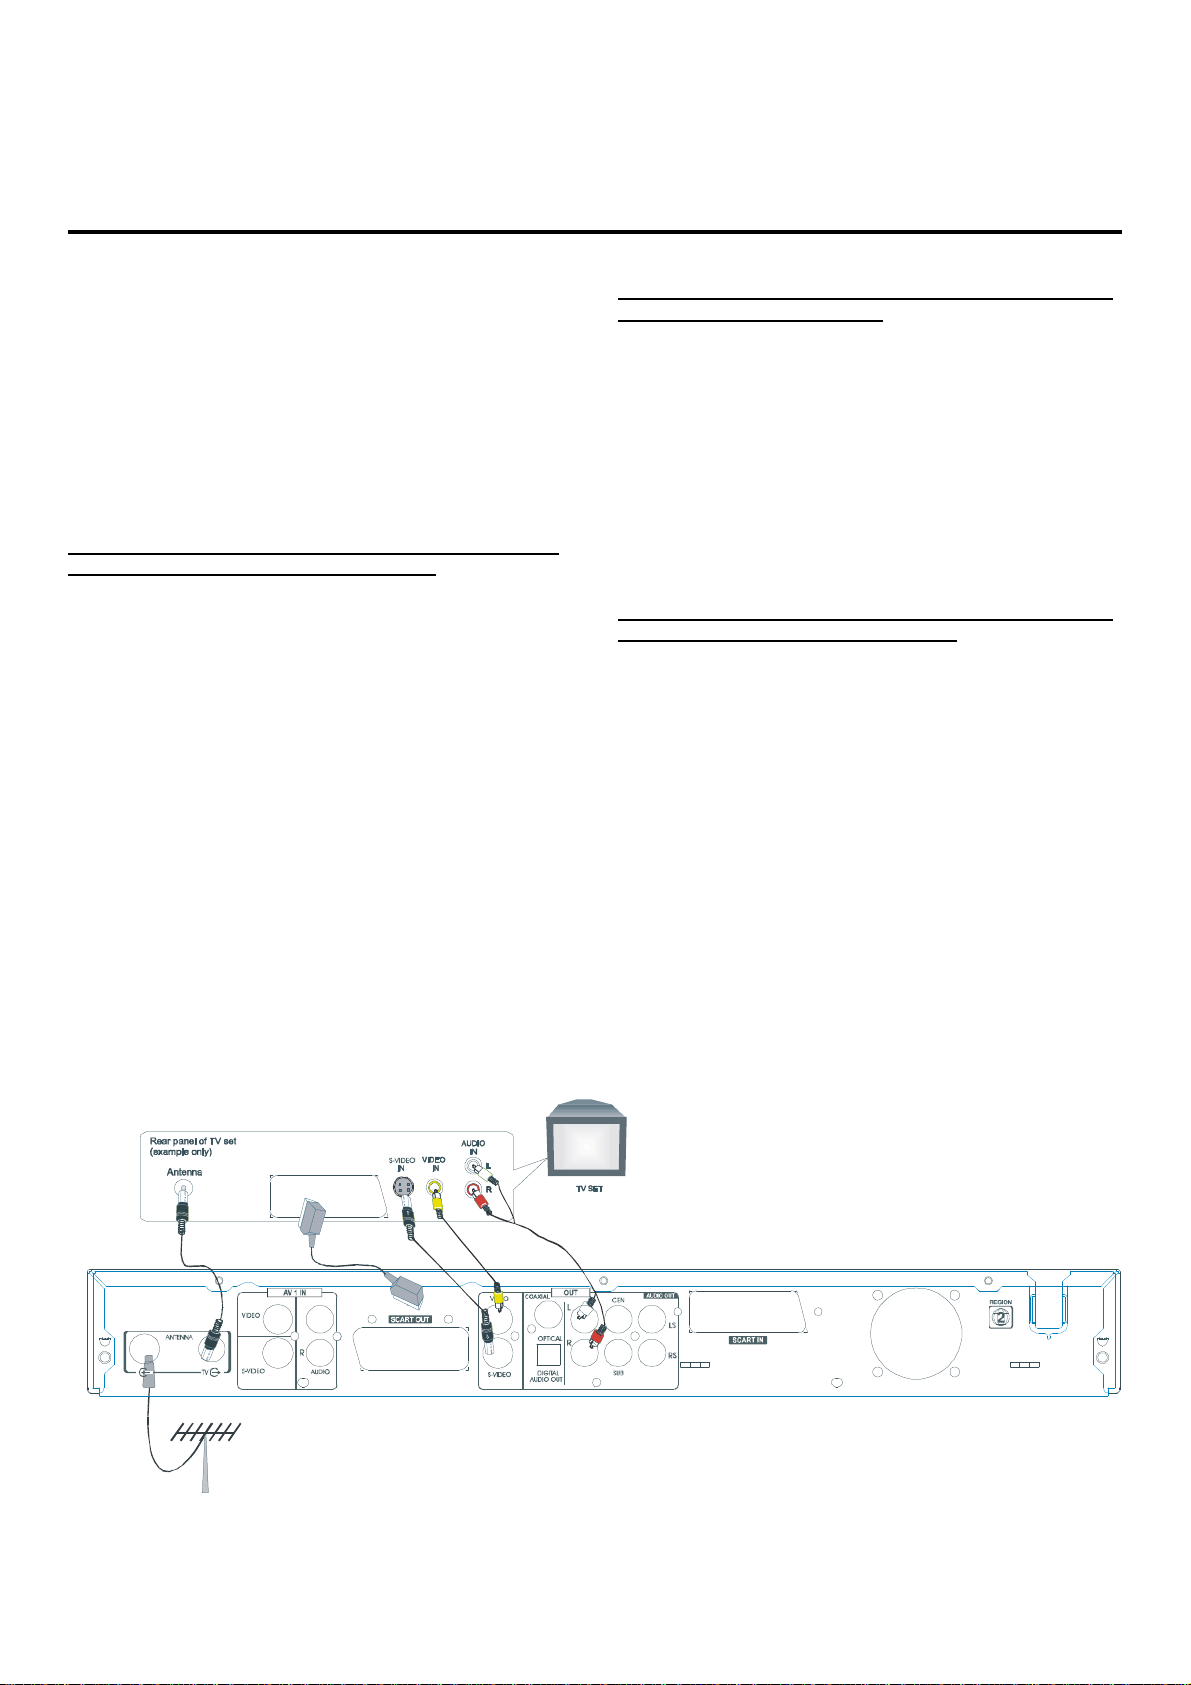
Connect your DVD recorder to TV set★
If your TV set has a VIDEO OUT socket , connect your TV
with a Video cable . (Configuration A+C+D )
1. Insert ANTENNA cable into ANTENNA socket at the back of the
DVD recorder.
2. Insert one end of the supplied aerial cable to the ANTENNA OUT at
the back of the DVD recorder and the other end into the aerial
input socket at the back of the TV set.
3. Plug one end of the supplied Video cable into the yellow Video
(CVBS) output socket at the back of the DVD recorder and the
other end into the Video in or AV in socket on the TV set .
4. Insert one end of the supplied Audio cable into the Red/White
socket OUT L AUDIO R at the back of the DVD recorder and the
other end into the Audio input (usually red/white )socket on the TV
set.
If your TV set has a SCART socket , connect your TV with
a Scart cable .(Configuration E)
1. Insert ANTENNA cable into ANTENNA socket at the back of the
DVD recorder.
2. Insert one end of the supplied aerial cable to the TV socket at
the back of the DVD recorder and the other end into the aerial
input socket at the back of the TV set.
3. Plug scart cable into the corresponding scart socket at the back of
the TV set and the scart socket (SCART OUT).
If your TV set has a S-Video socket , connect your TV with
a S-Video cable .(Configuration B+C+D)
1. Insert ANTENNA cable into ANTENNA socket at the back of the
DVD recorder.
2. Insert one end of the supplied aerial cable to the ANTENNA OUT at
the back of the DVD recorder and the other end into the aerial
input socket at the back of the TV set.
3. Plug one end of a S-Video cable into the S-Video 1 output socket
at the back of the DVD recorder and the other end into the S Video input socket on the TV set .
4. Insert one end of the supplied Audio cable into the Red/White
socket OUT L AUDIO R at the back of the DVD recorder and the
other end into the Audio input (usually red/white )socket on the TV
set.
D
E
B
A
C
8
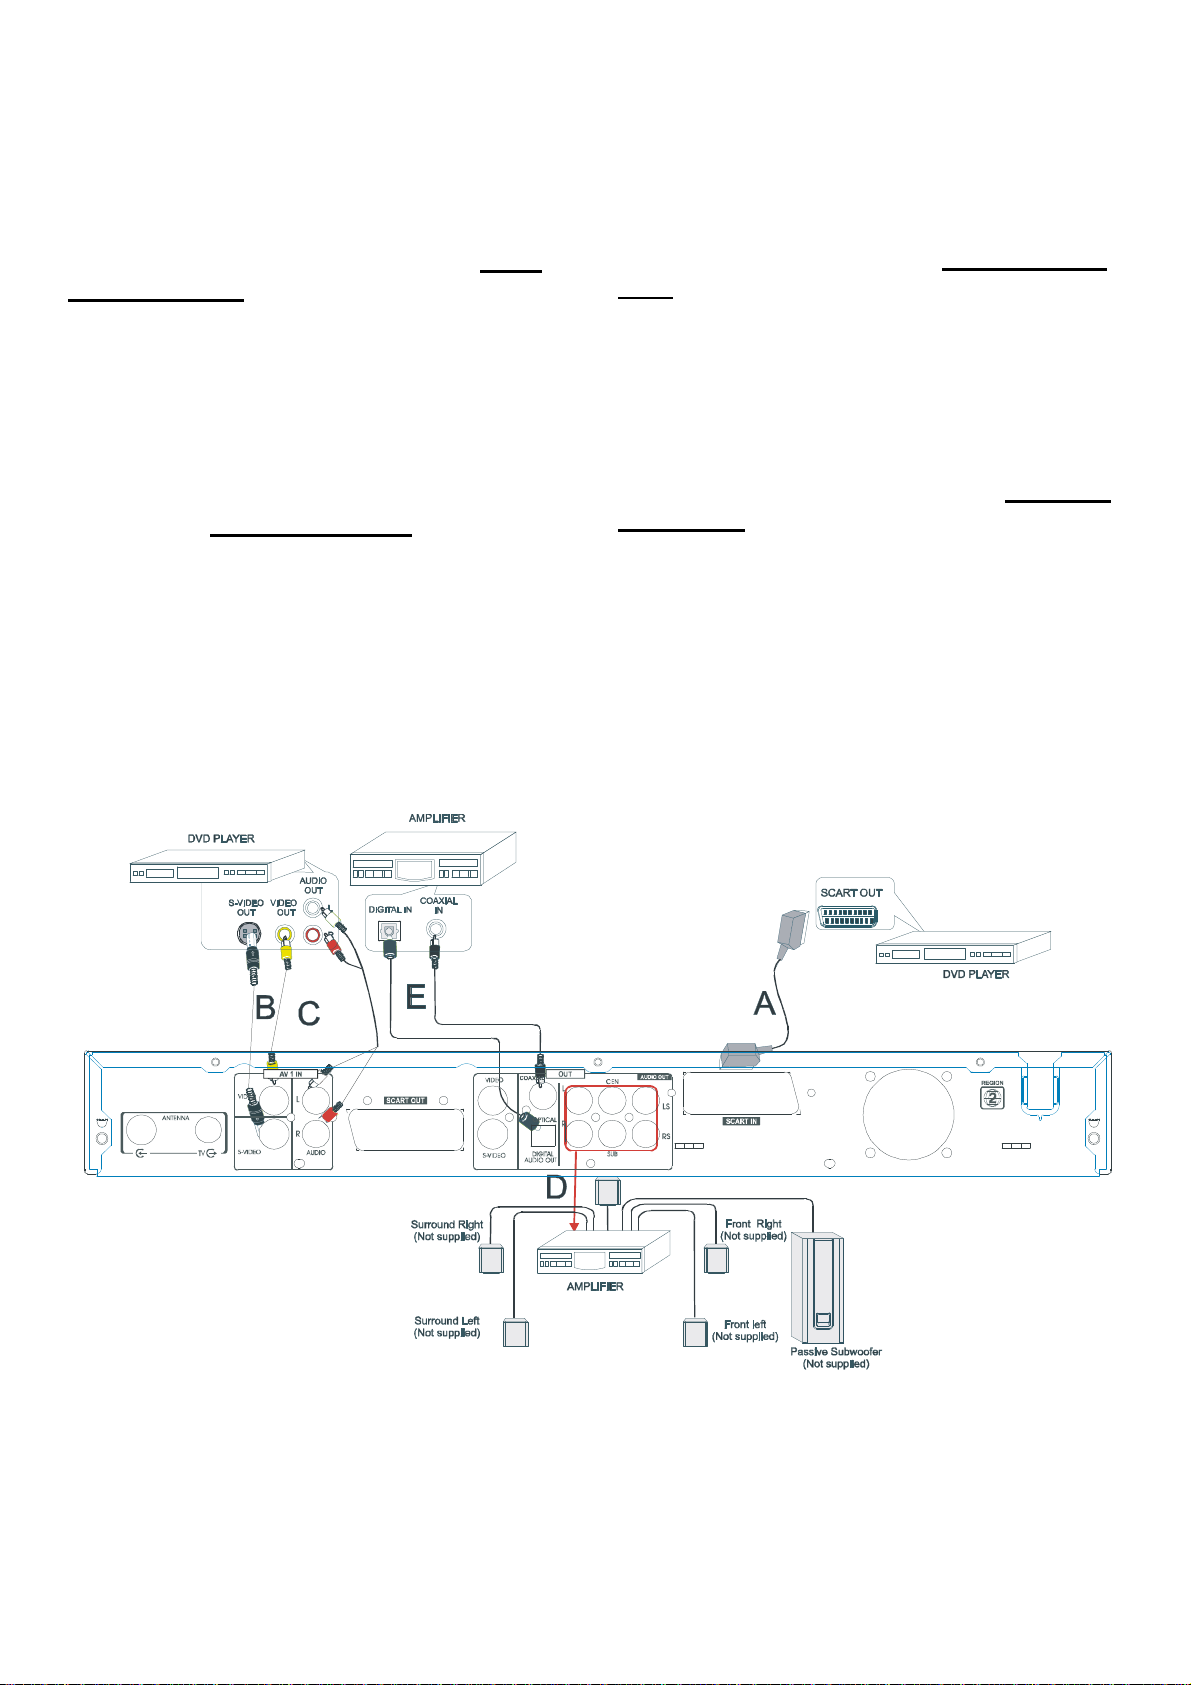
Connect your DVD recorder to additional★
devices, using second Scart socket (Con-
figuration A +D)
Connect your DVD recorder to additional★
devices, using Video socket (Configuration
B/C )
You can connect additional devises such as decorders,DVD
player,etc. to the Scart In, then you can see the picture from the
additional device on your TV set. At same time, you can recorder the
program from the additional device.
Connect your DVD recorder to an Ampli-★
fier with 5.1 channels and surrounding
audio input. (Configuration D )
T Analogue audio sockets AUDIO OUT are located at the back of the
DVD recorder.
These can be used connect the following:
1) a receiver with Dolby Surround Prologic
2) a receiver with two channel analo stereo
You can connect additioanl devises such as decorders,
camcorders,etc. to the S-video /Video and Audio in ,then you can see
the picture from the additional device on your TV set. At same time,
you can recorder the program from the additional device.
Connect your DVD recorder to the digital★
audio socket of an Audio devices, (Configu-
ration A+E)
At the back of the DVD decorder there are digital output socket Digital
DVD recorder.
These can be used connect the following:
1)an A/V receiver or A/V amplifier with digital muti-channel sound
decorder
2) a receiver with two channel digital stereo
Note. Do not connect both audio leads at once.
9
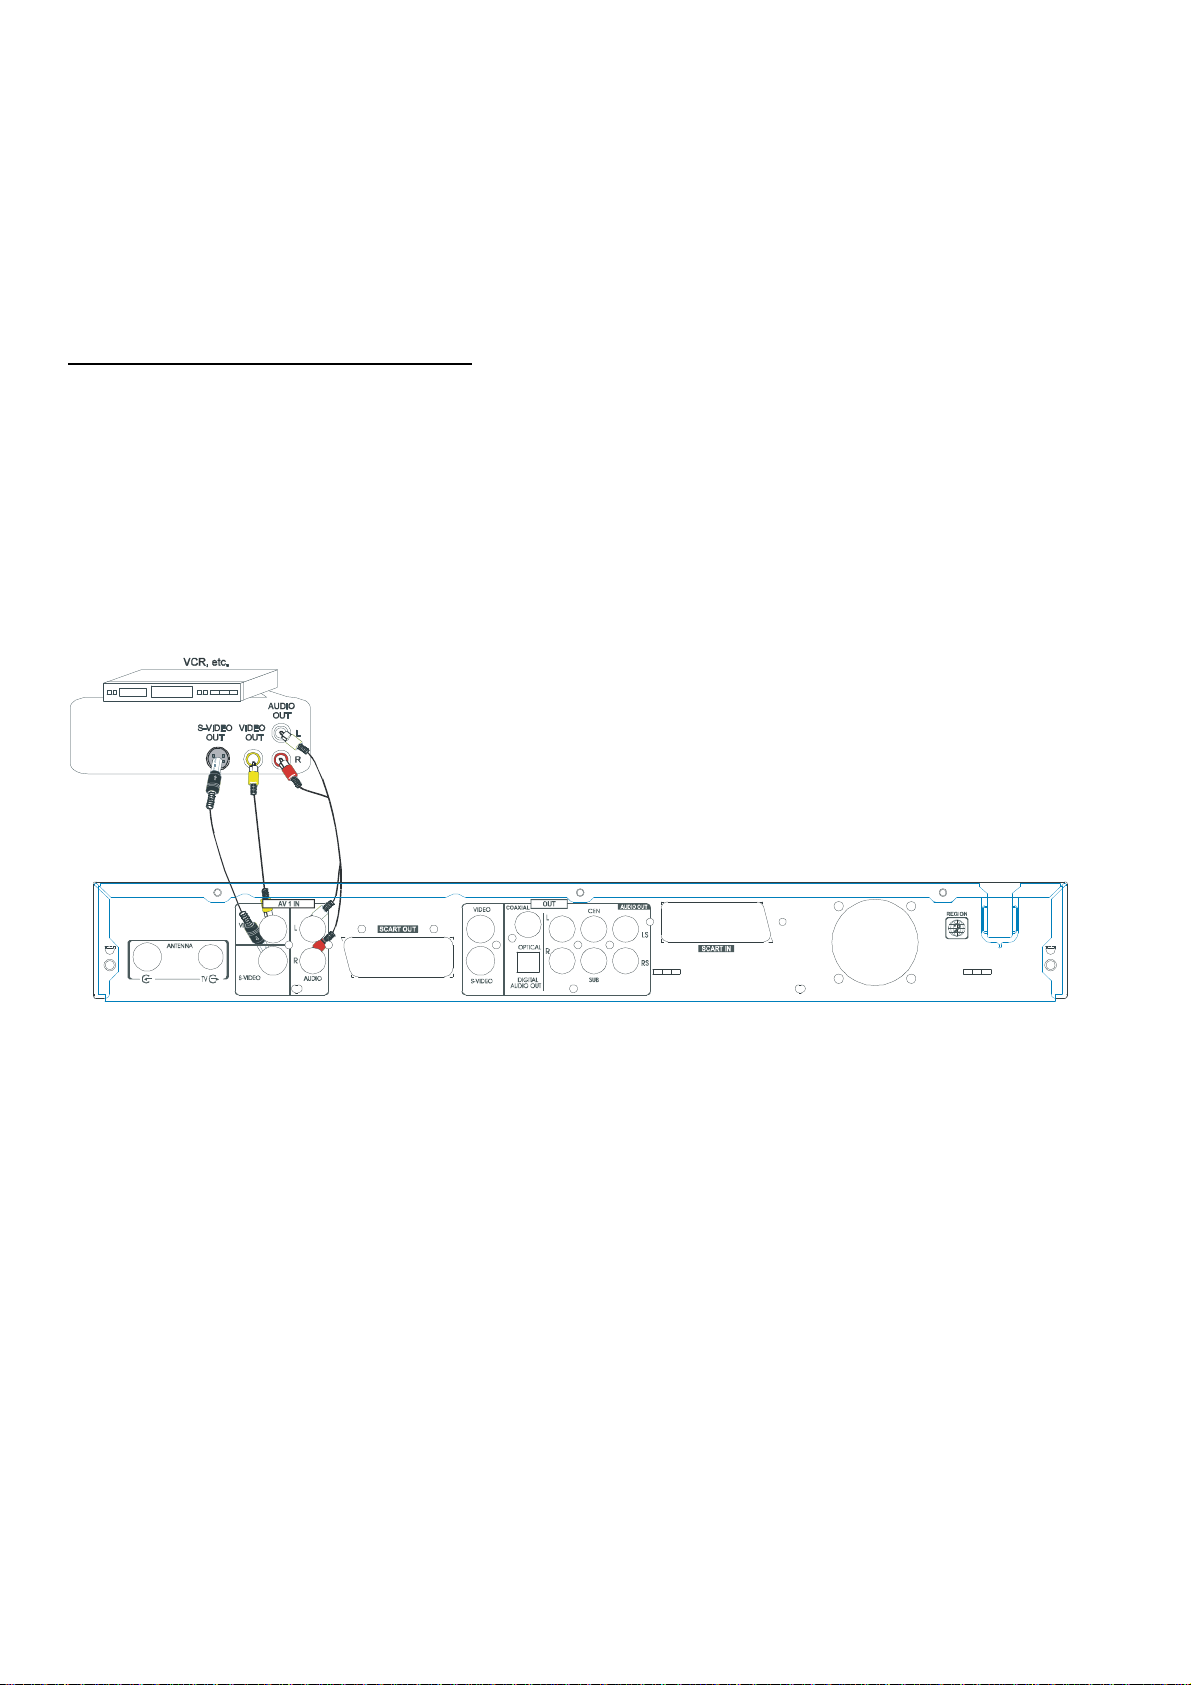
Connect your DVD recorder to VCR or★
a similar recording equipment
You can use this unit as the source player or as the recording
deck.
Connection for recording from other equipment
You can connect additional devices such as decoders, camcorders,
etc. to the S-video /Video/component and Audio in , then you can see
the picture from the additional device on your TV set. At the same
time , you can record the program from the additional device .
1. Connect to the AV IN by a video cable.(configuration A+C)
2. Connect to the AV IN by a s-video cable.(configuration B+C)
3. Connect with component video cable.(configuration C)
AB C
10
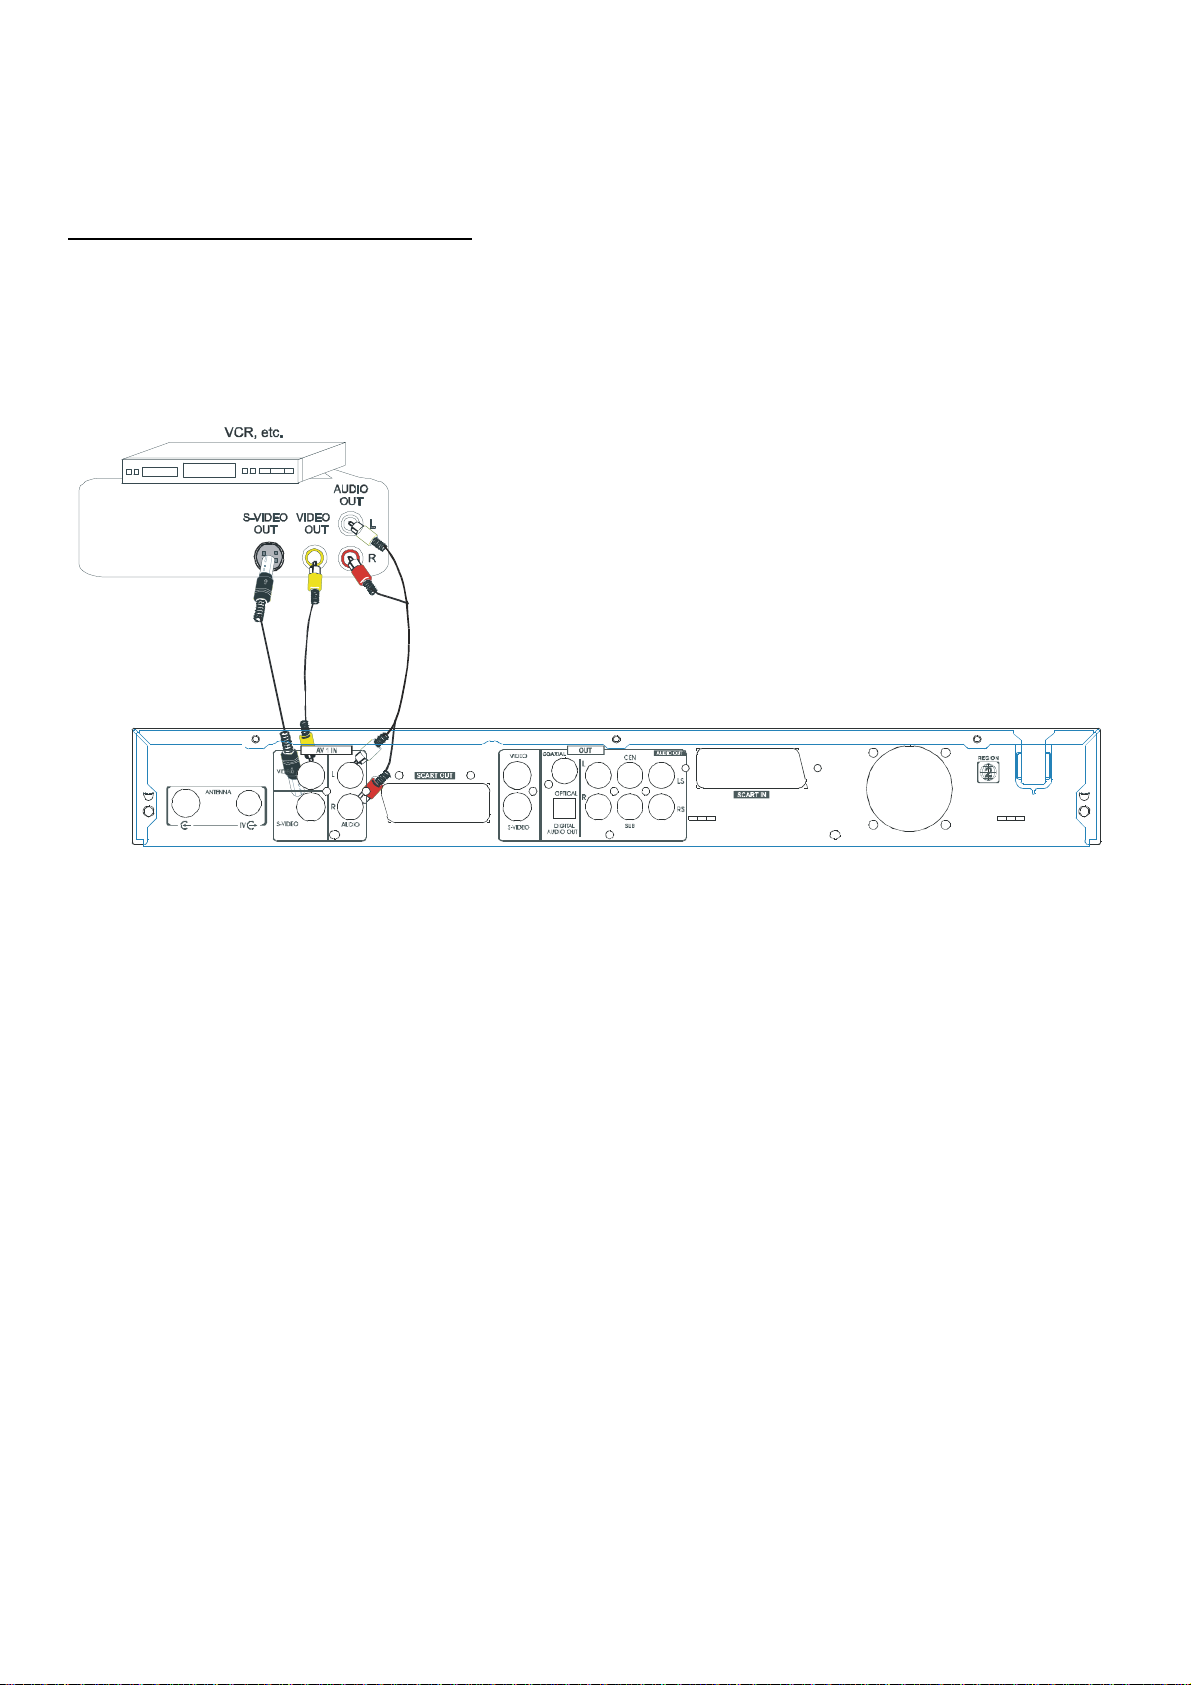
Connection for recording from other equipment
Connect a VCR or similar recording equipment to the OUT jacks.
1. Connect to Video IN by a video cable.(configuration A+C)
2. Connect to S-video IN by a s-video cable.(configuration B+C)
3. Connect with component video cable.(configuration C)
B
A
C
11
 Loading...