

Page 1
Bedienungsanleitung . . . . . . . . . . . . S. 2
Bitte vor Inbetriebnahme des Gerätes lesen!
User Instructions . . . . . . . . . . . . . . . p. 8
Please read the manual before using the equipment!
Mode d’emploi . . . . . . . . . . . . . . . . p. 14
Veuillez lire cette notice avant d’utiliser le système!
Istruzioni per l’uso . . . . . . . . . . . . . p. 20
Prima di utilizzare l’apparecchio, leggere il manuale
Modo de empleo . . . . . . . . . . . . . . . p. 26
¡Sirvase leer el manual antes de utilizar el equipo!
Instruções de uso . . . . . . . . . . . . . . p. 32
Favor leia este manual antes de usar o equipamento!
C 477
Page 2
1.1 Sicherheit
1.2 Umwelt
2.1 Einleitung
2.2 C 477 WR
2.3 Abtropfring
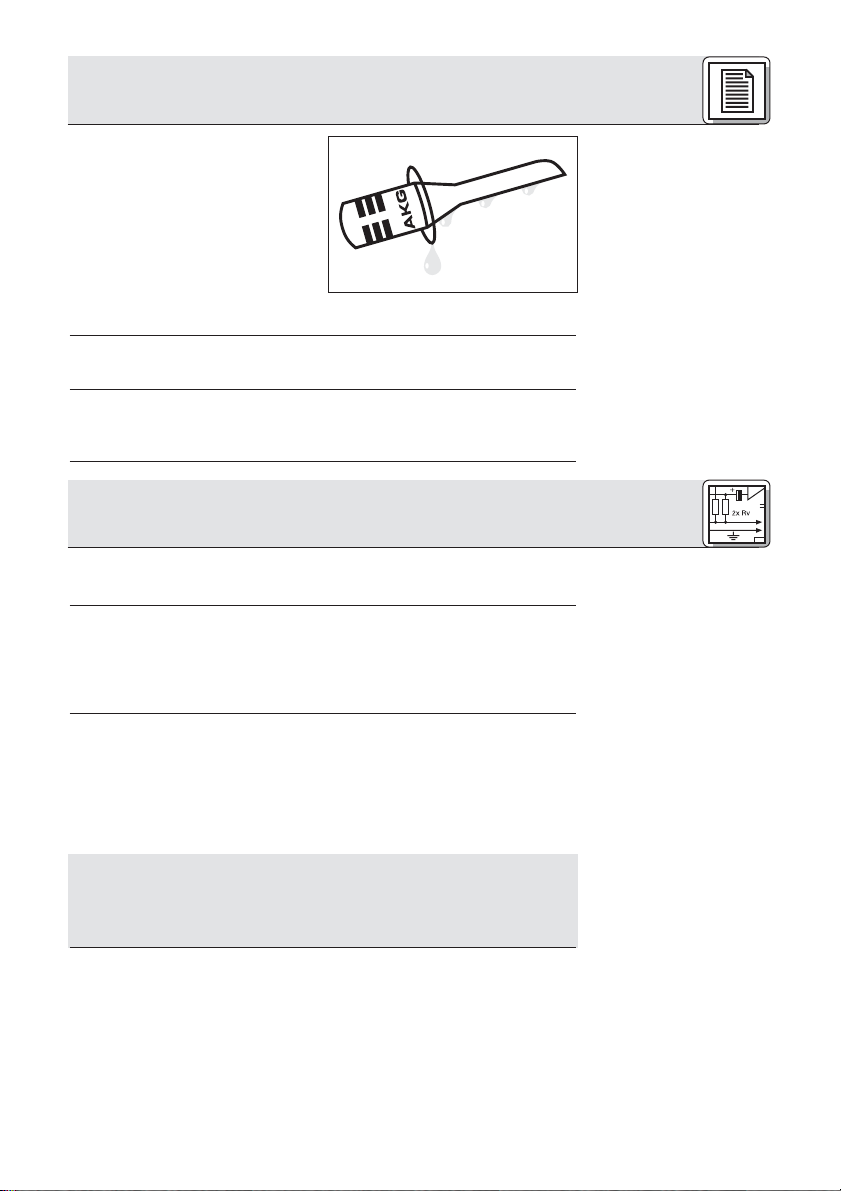
Abb. 1: Abtropfring
Überprüfen Sie bitte, ob das Gerät, an das Sie das Mikrofon anschließen
möchten, den gültigen Sicherheitsbestimmungen entspricht und mit
einer Sicherheitserdung versehen ist.
1. Entsorgen Sie verbrauchte Batterien und Akkus immer gemäß den
jeweils geltenden Entsorgungsvorschriften. Werfen Sie Batterien oder
Akkus weder ins Feuer (Explosionsgefahr) noch in den Restmüll.
2. Wenn Sie das Gerät verschrotten, entfernen Sie die Batterien bzw.
Akkus, trennen Sie Gehäuse, Elektronik und Kabel und entsorgen Sie alle
Komponenten gemäß den dafür geltenden Entsorgungsvorschriften.
3. Die Verpackung ist recyclierbar. Entsorgen Sie die Verpackung in einem
dafür vorgesehenen Sammelsystem.
Vielen Dank, dass Sie sich für ein Produkt aus dem Hause AKG entschieden haben. Bitte lesen Sie die Bedienungsanleitung aufmerksam
durch, bevor Sie das Gerät benützen, und bewahren Sie die
Bedienungsanleitung sorgfältig auf, damit Sie jederzeit nachschlagen
können. Wir wünschen Ihnen viel Spaß und Erfolg!
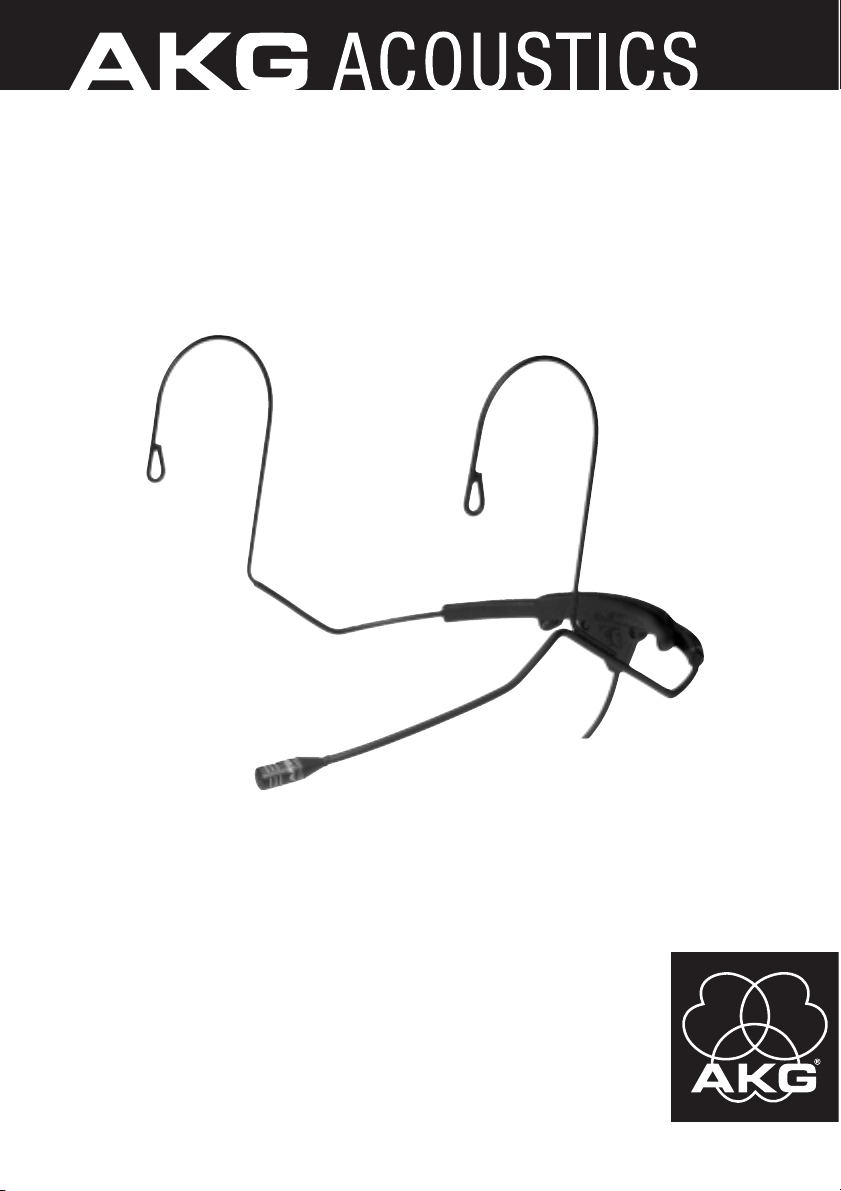
Das C 477 WR ist ein hochprofessionelles Headset–Mikrofon in Kondensatortechnik, das speziell für die praktisch "unsichtbare" Anwendung auf
der Bühne sowie für Rundfunk- und Fernsehmoderatoren entwickelt wurde.
Diesem Konzept entsprechend ist das Mikrofon extrem leicht.
Die Doppelmembran-Kapsel des C 477 WR ist mit einer zusätzlichen goldbedampften Schutzmembran ausgestattet, die das Eindringen von Schweiß
und Feuchtigkeit in den Wandler verhindert. Das Risiko von Ausfällen durch
Feuchtigkeit ist daher extrem gering.
Der Mikrofonarm ist links am Nackenbügel montiert. Für TV-Doppelmoderationen oder ähnliche Anwendungen ist auch eine Ausführung mit
rechts montiertem Mikrofonarm erhältlich.
Das C 477 WR ist in sechs Varianten erhältlich:
1. C 477 WR L: mit 3-poligem Mini-XLR-Stecker zum Anschluss an AKGTaschensender oder, über den Phantomspeiseadapter MPA III von AKG
(optional), an Mischpulte und Verstärker. Schwarz, Mikrofonarm links.
2. C 477 WR L/P: wie C 477 WR L, Seitenteile und Mikrofon hautfarben.
3. C 477 WR oc: mit freien Kabelenden. Schwarz, Mikrofonarm links.
4. C 477 SH/P: mit Lemo-Stecker.
5. C 477 WR oc/P: mit freien Kabelenden. Seitenteile und Mikrofon hautfarben, Mikrofonarm links.
6. C 477 WR oc/P/R: wie C 477 WR oc/P, Mikrofonarm rechts.
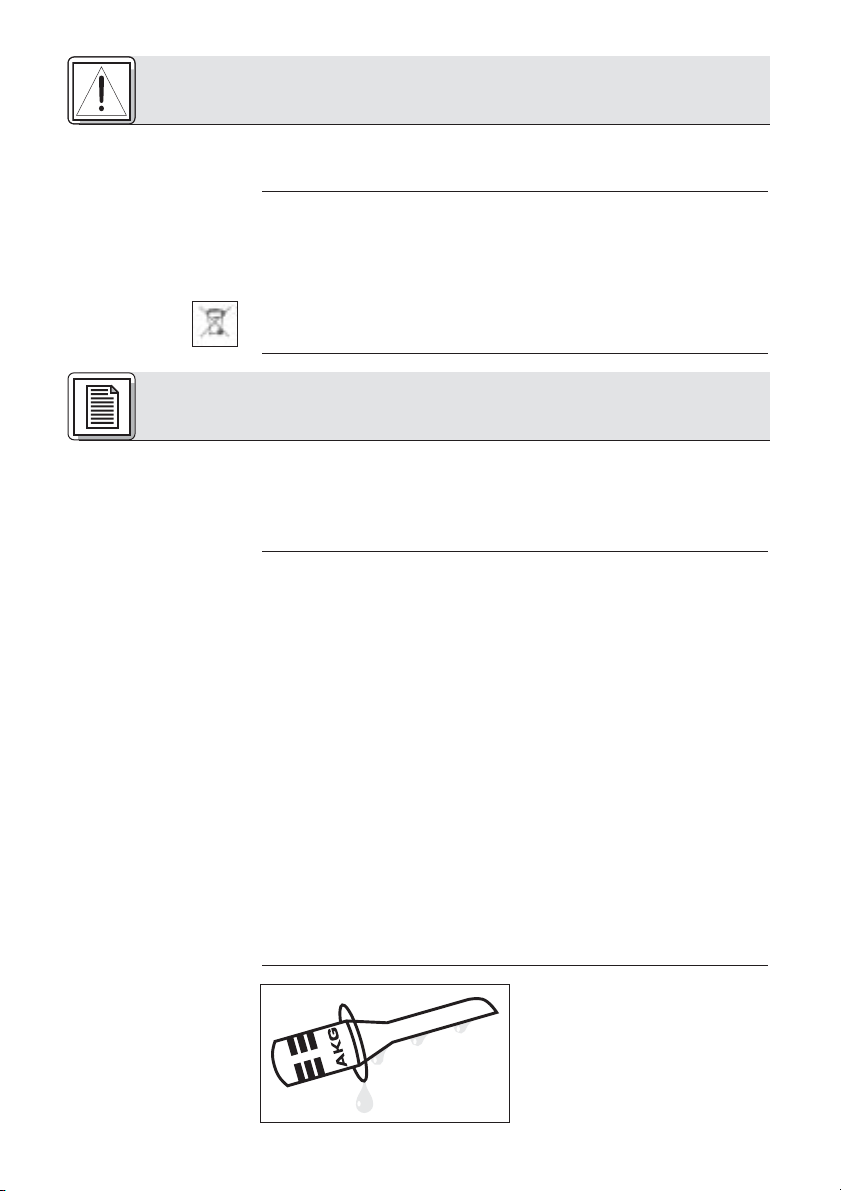
Ein spezieller Abtropfring an der
Mikrofonkapsel erschwert das
Eindringen von Schweiß und
Schminke in den Kapselbereich. Dies
verhindert, dass die Einsprechschlitze des Mikrofons durch
Schweiß oder Schminke verstopft
2
1 Sicherheit und Umwelt
2 Beschreibung
Page 3
2.4 mitgeliefertes
Zubehör
2.5 Empfohlenes
Zubehör
3.1 C 477 WR L
3.1.1 Anschluss an
Taschensender
Wichtig!
3.1.2 Anschluss
mittels MPA III
werden, was zu dumpfem Klang und geringerer Empfindlichkeit des
Mikrofons führen würde. Entfernen Sie daher den Abtropfring niemals vom
Mikrofon!
Windschutz W 77
Abtropfring
Drahtgitterwindschutz W 77 M, schwarz
Drahtgitterwindschutz W 77 M, hautfarben
Phantomspeiseadapter MPA III
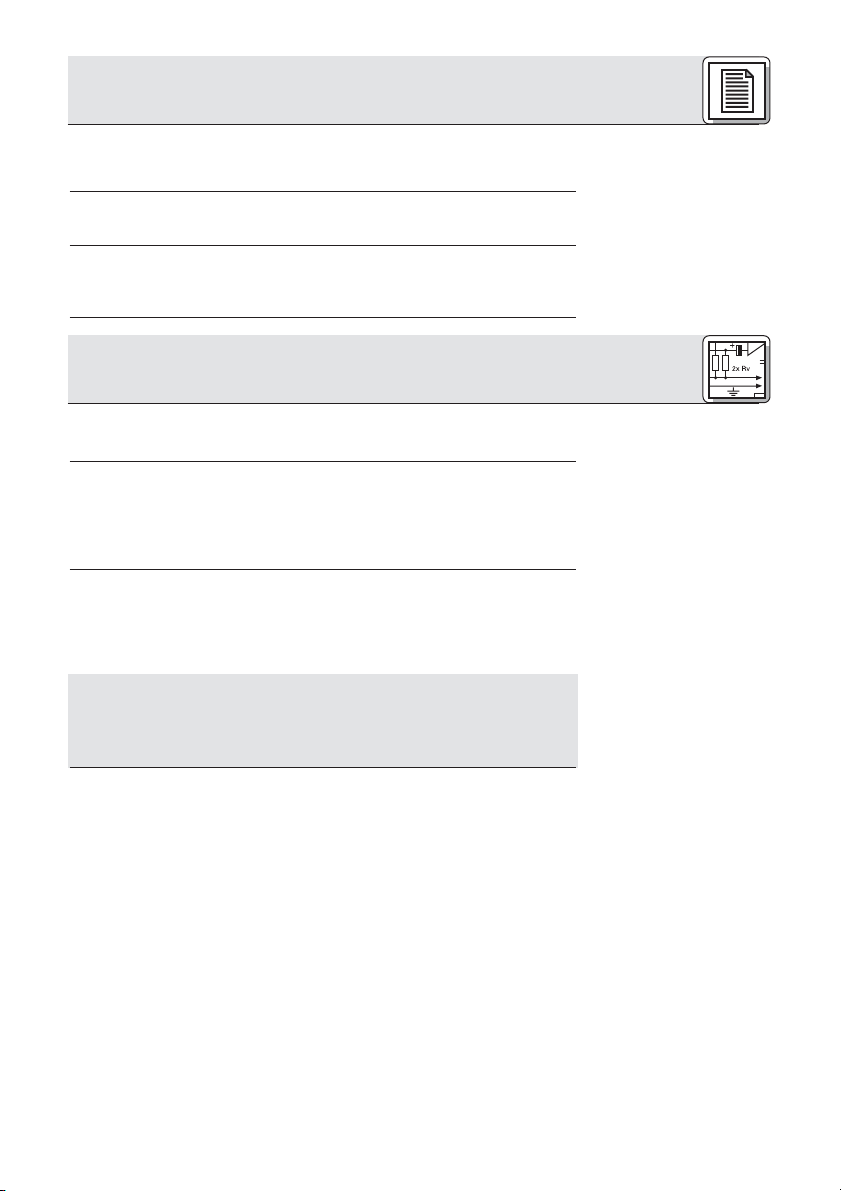
Das C 477 WR ist ein Kondensatormikrofon mit Permanentladung und
benötigt eine Speisespannung von 1,5 bis 12 V DC.
Das C 477 WR L können Sie direkt an alle Taschensender von AKG anschließen.
Sie können das Mikrofon aber auch über den Phantomspeiseadapter
MPA III von AKG und ein Mikrofonkabel an einen Mischpult- oder
Verstärkereingang anschließen.
1. Stecken Sie den Mini-XLR-Stecker am Anschlusskabel des Mikrofon bis
zum Anschlag in die Audio-Eingangsbuchse Ihres Taschensenders.
Der Stecker verriegelt sich automatisch.
Lesen Sie dazu die Bedienungsanleitung Ihres Taschensenders nach.
Das C 477 WR L ist speziell für den Betrieb mit AKGTaschensendern ausgelegt. Wenn sie das Mikrofon mit Taschensendern anderer Hersteller betreiben, kann es zu Fehlfunktionen
kommen oder das Mikrofon beschädigt werden. Darüberhinaus
kann in bestimmten Fällen die Garantie erlöschen.
Mit dem optionalen Phantomspeiseadapter MPA III können Sie das
Mikrofon an jede Phantomspeisequelle sowie an XLR-Eingänge mit 9
bis 52 V Phantomspeisung anschließen.
Als Phantomspeisegeräte für den MPA III empfehlen wir das optionale
Netzgerät N 62 E oder N 66 E sowie das (ebenfalls optionale)
Batteriespeisegerät B 18 von AKG.
1. Stecken Sie den Mini-XLR-Stecker am Mikrofonkabel bis zum
Anschlag in die Mini-XLR-Kupplung am Anschlusskabel des MPA III.
Der Stecker verriegelt sich automatisch.
2. Verbinden Sie den MPA III mit dem gewünschten Eingang mit
Phantomspeisung.
Falls am betreffenden Eingang keine Phantomspeisung zur Verfügung
steht:
1. Verbinden Sie den MPA III mit einem der oben angeführten optionalen Phantomspeisegeräte.
3 Anschluss
3
2 Beschreibung
Page 4
Wichtig!
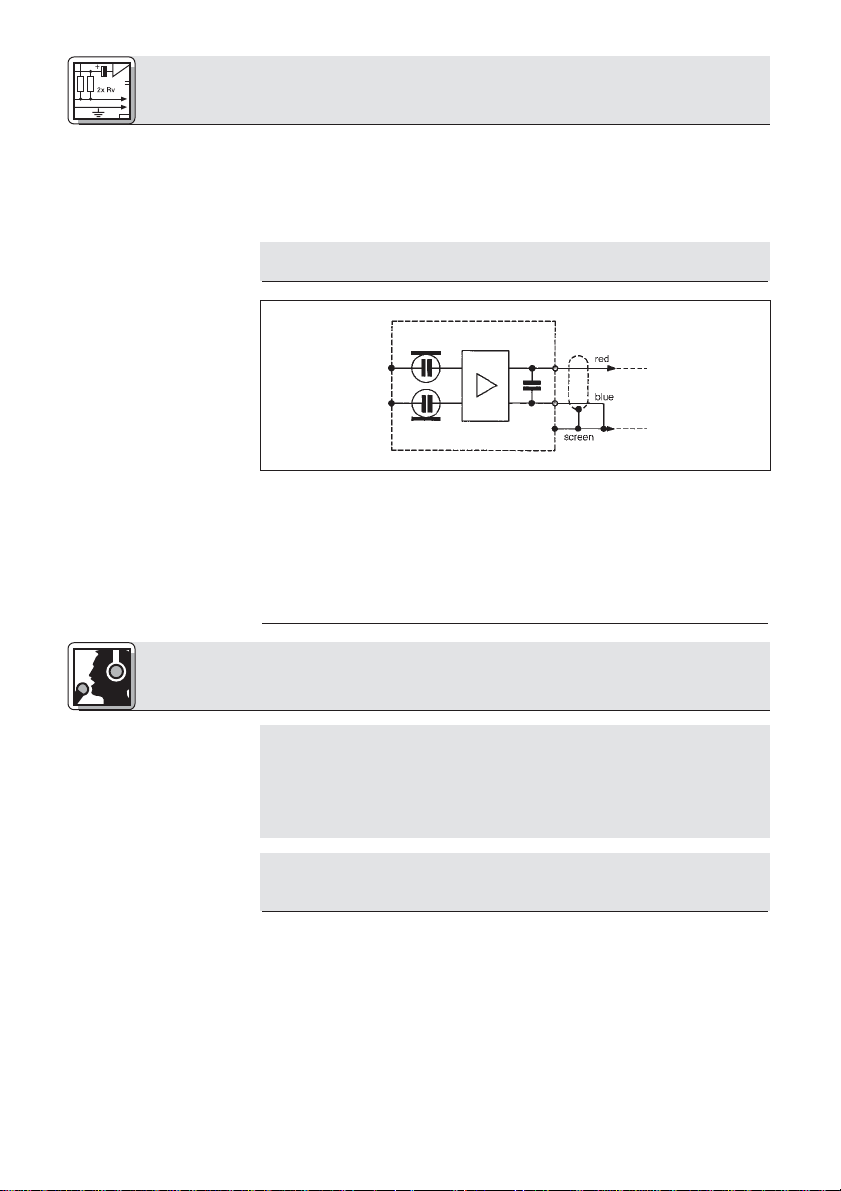
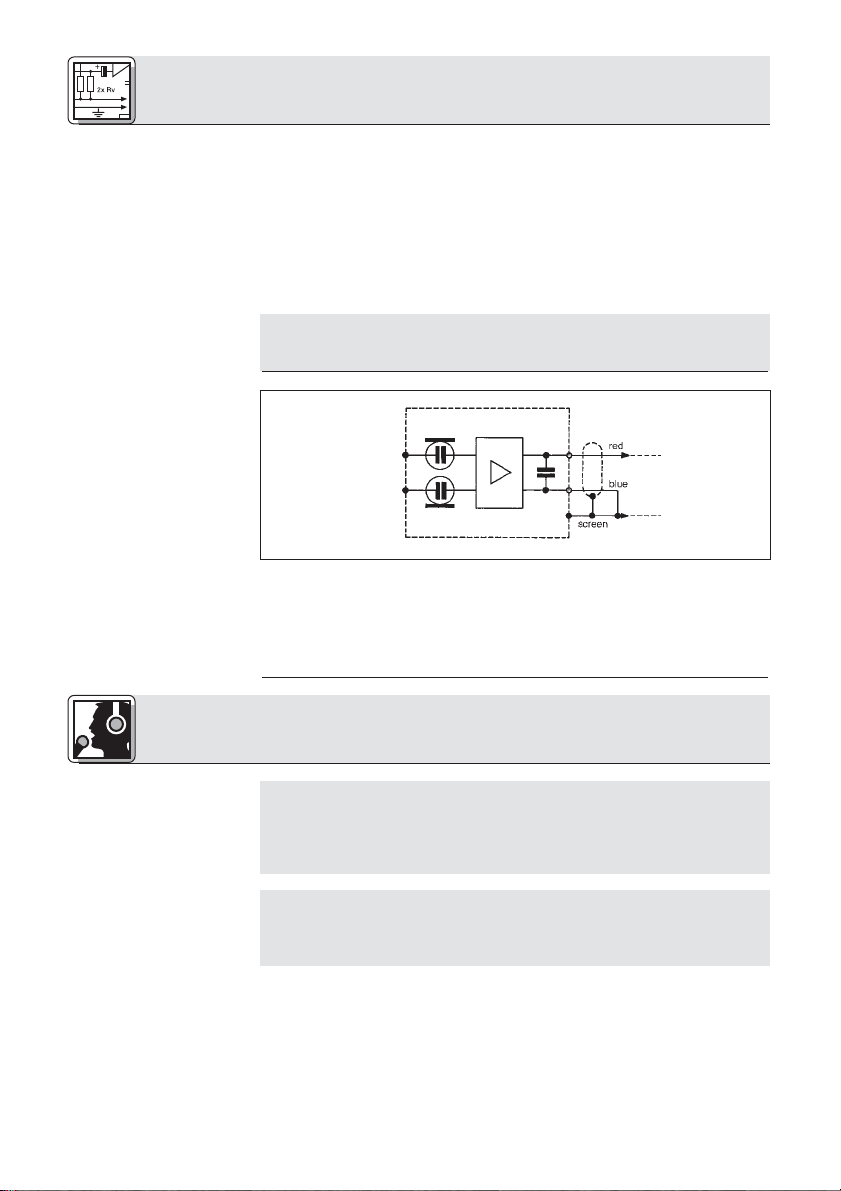
3.2 C 477 WR oc
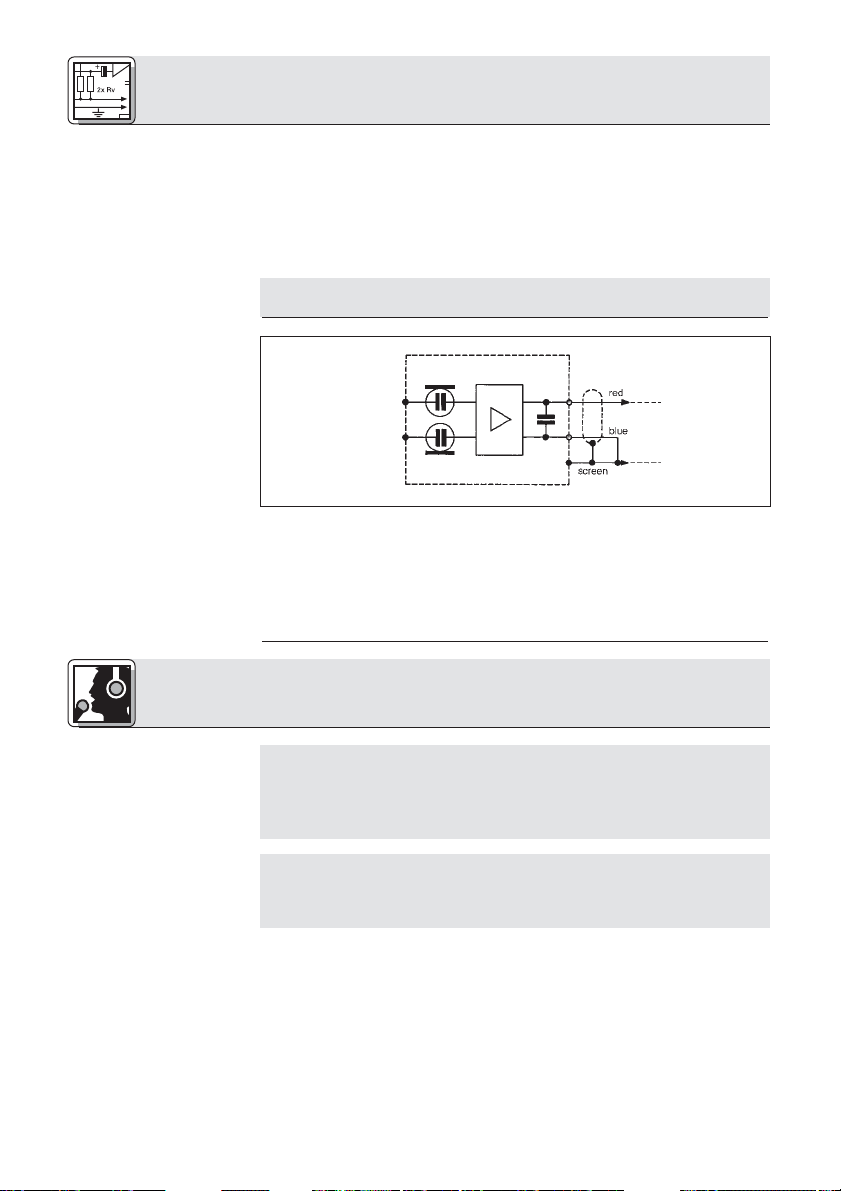
Abb. 2: Schaltung
C 477 WR oc
Wichtig!
Wichtig!
4.1 Mikrofon
aufsetzen
2. Verbinden Sie das Phantomspeisegerät mit dem gewünschten
Eingang.
Wenn Sie andere als die von AKG empfohlenen Speisegeräte
verwenden, kann das Mikrofon beschädigt werden und erlischt
die Garantie.
Das C 477 WR oc ist mit einem Anschlusskabel mit freien Enden ausgestattet. Sie können dieses Mikrofon daher an Taschensendern oder anderen
Geräten betreiben, die eine Versorgungsspannung zwischen 1,5 V DC und
12 V DC liefern.
Lesen Sie in der Bedienungsanleitung des Geräts, an das Sie das Mikrofon
anschließen möchten, nach, welchen Stecker Sie benötigen.
Der Abtropfring aus durchsichtigem Kunststoff am Mikrofon
verhindert, dass Schweiß oder Schminke die Einsprechschlitze
verstopft und dadurch den Klang verändert und die Empfindlichkeit des Mikrofons verringert.
Entfernen Sie daher niemals den Abtropfring vom Mikrofon!
Mikrofonbügel und -arm bestehen aus einem dünnwandigem
Rohr. Verbiegen Sie diese Teile nur sehr vorsichtig. Wenn Sie
die Teile zu stark verbiegen, können sie brechen und erlischt
die Garantie.
3 Anschluss
4
4 Anwendung
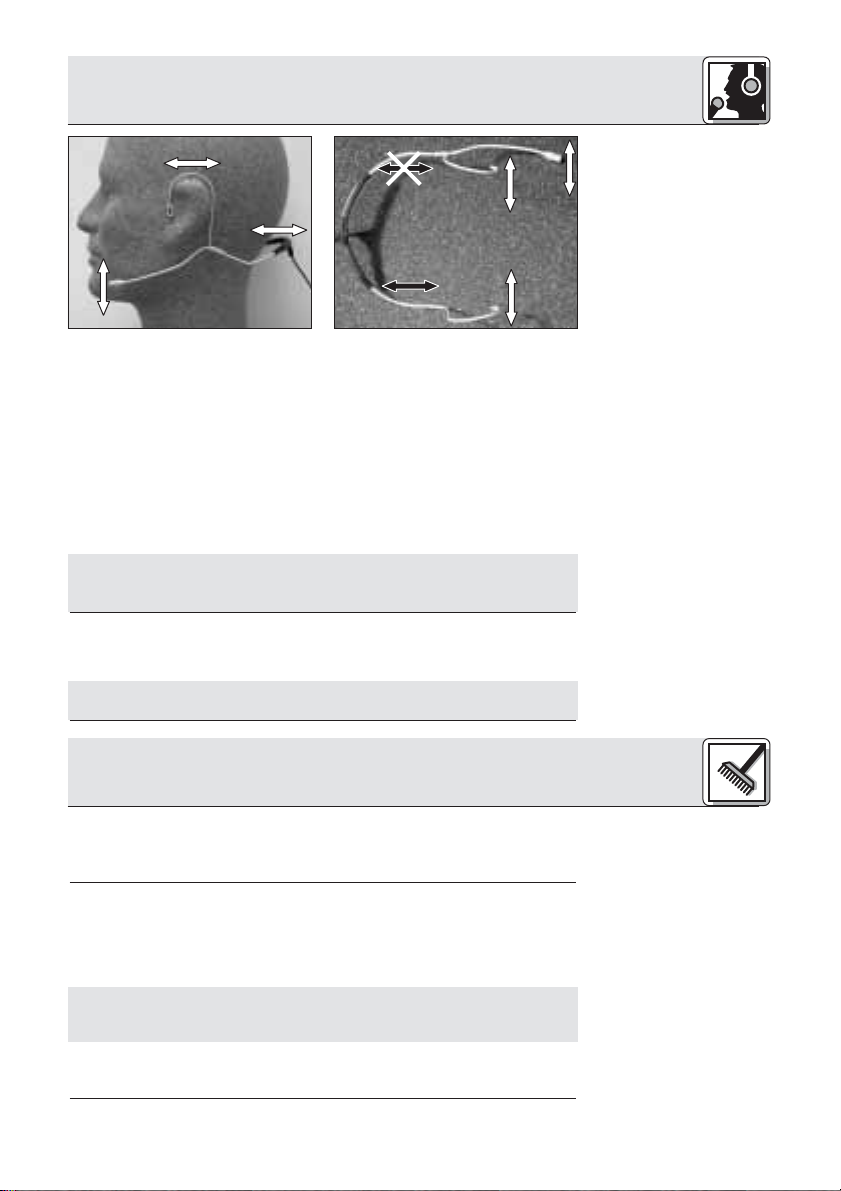
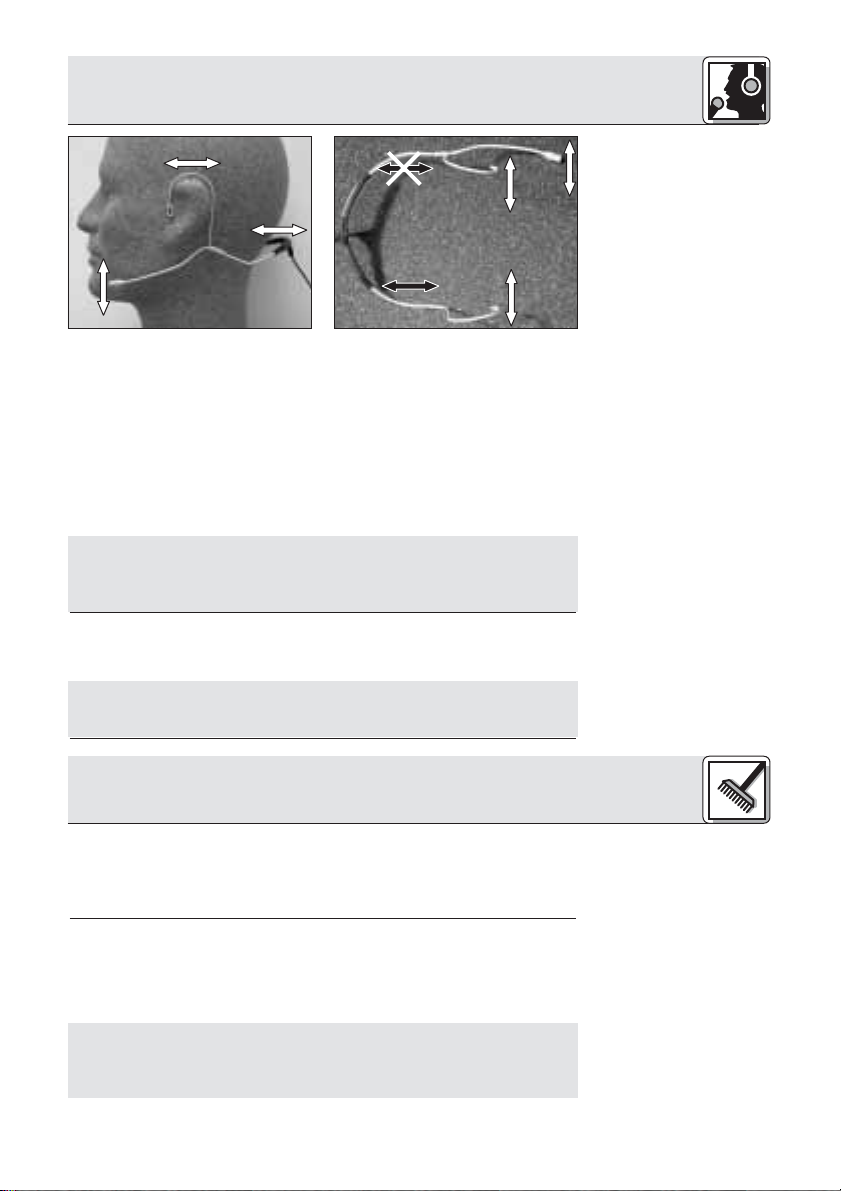
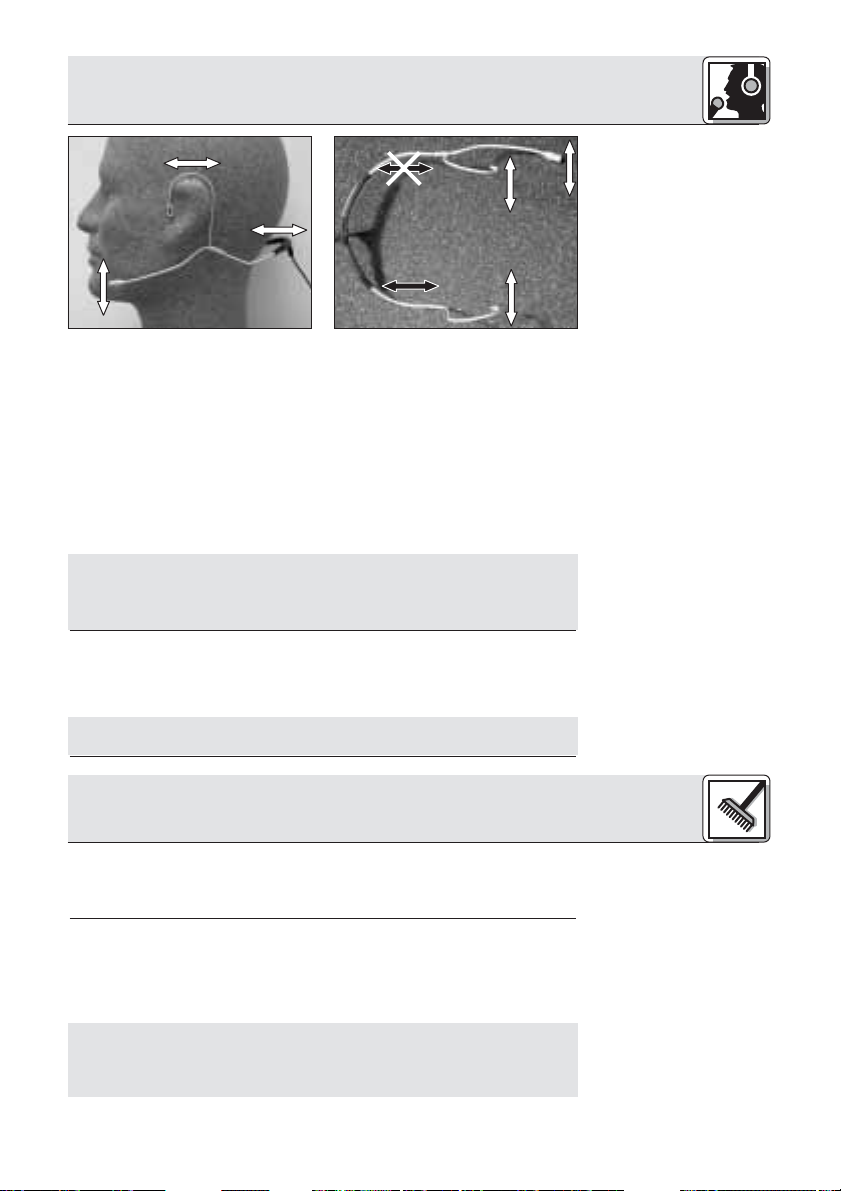
Abb. 3: Position des Mikrofons
am Kopf
Abb. 4: Anpassen des Bügels
Page 5
Siehe Abb. 3.
Siehe Abb. 4.
Wichtig!
4.2 Windschutz
Hinweis:
5.1 Oberflächen
5.2 Mikrofongehäuse
Wichtig!
5.3 Windschutz
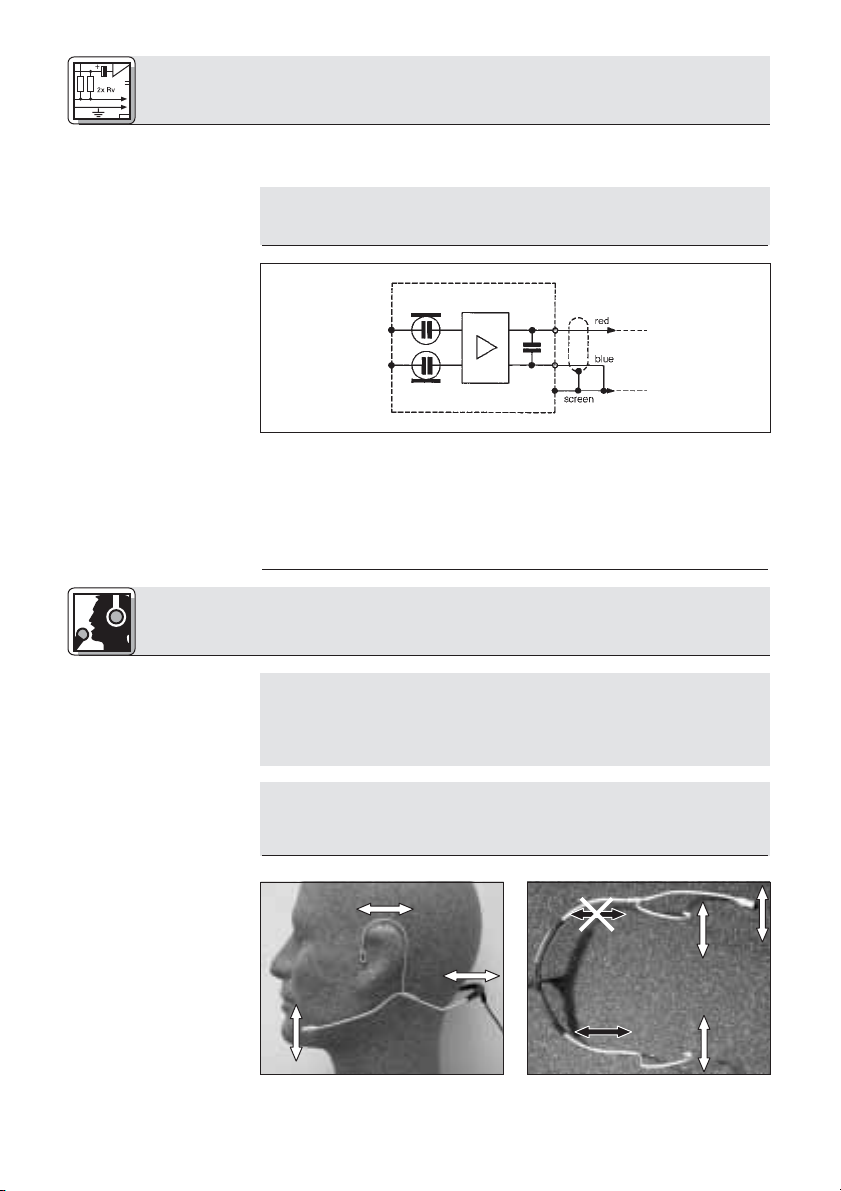
1. Setzen Sie das Mikrofon wie in Abb. 3 gezeigt auf.
2. Biegen Sie den Mikrofonarm so, dass das Mikrofon seitlich vor dem
Mundwinkel, möglichst nahe am Mund sitzt.
3. Um den Bügel an die Kopfform des Trägers anzupassen, können Sie
den Bügel zurechtbiegen (weisse Pfeile) und den Seitenteil OHNE
Mikrofonarm gegen den Kunststoff-Mittelteil verschieben (schwarze
Pfeile). (Der Seitenteil, an dem der Mikrofonarm befestigt ist, ist nicht
verschiebbar.)
Versuchen Sie niemals, den Kunststoff-Mittelteil des Bügels zu
verbiegen, da das Kunststoffmaterial in seine ursprüngliche
Form zurückspringen würde und bei Überbeanspruchung
bricht. In diesem Fall erlischt die Garantie.
Falls (z.B. im Freien) starke Wind- oder Popgeräusche auftreten, stecken
Sie den mitgelieferten Schaumstoff-Windschutz auf das Mikrofon auf.
Noch unauffälliger ist der optionale Drahtgitterwindschutz W 77 M in
schwarzer oder hautfarbener Ausführung.
Metalloberflächen reinigen Sie am besten mit (Industrie-) Spiritus oder
Alkohol.
Zum Reinigen von Kunststoffoberflächen verwenden Sie ein mit
Wasser befeuchtetes weiches Tuch (keinesfalls Reinigungsbenzin oder
Lösungsmittel).
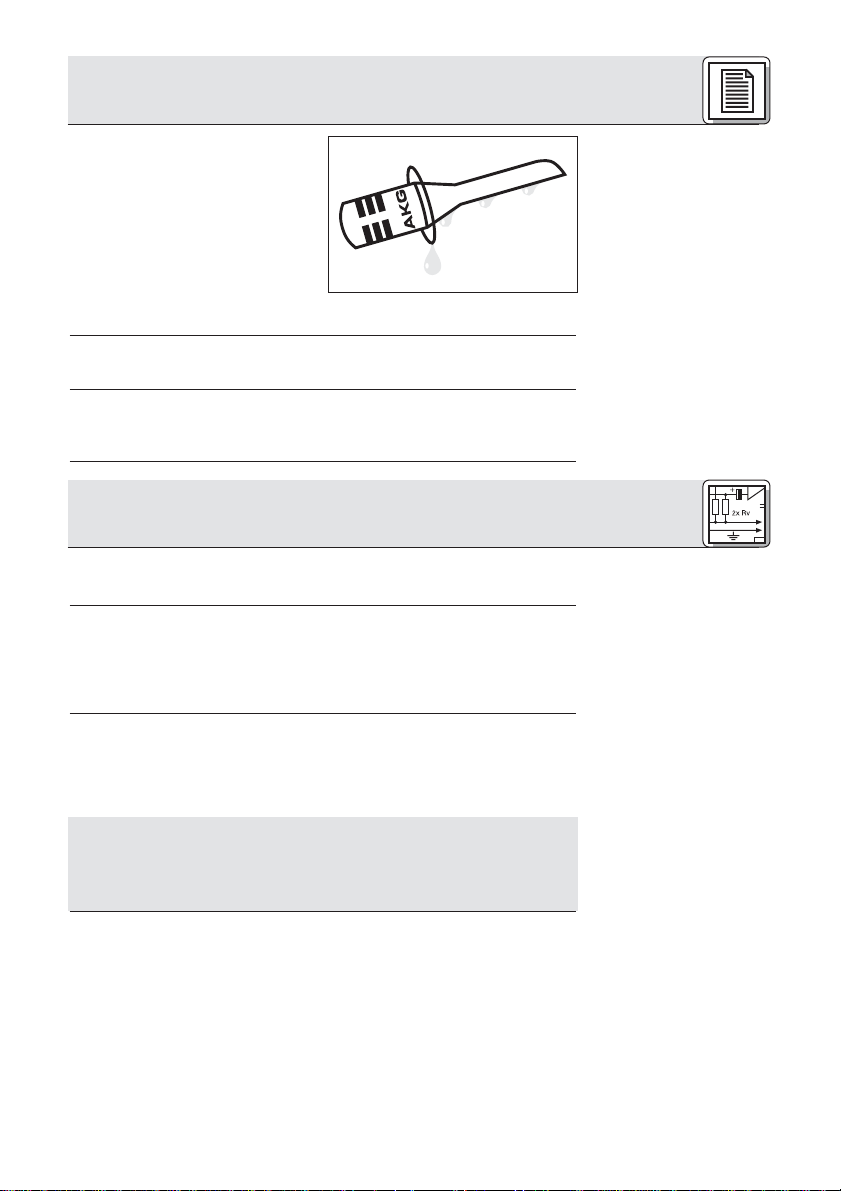
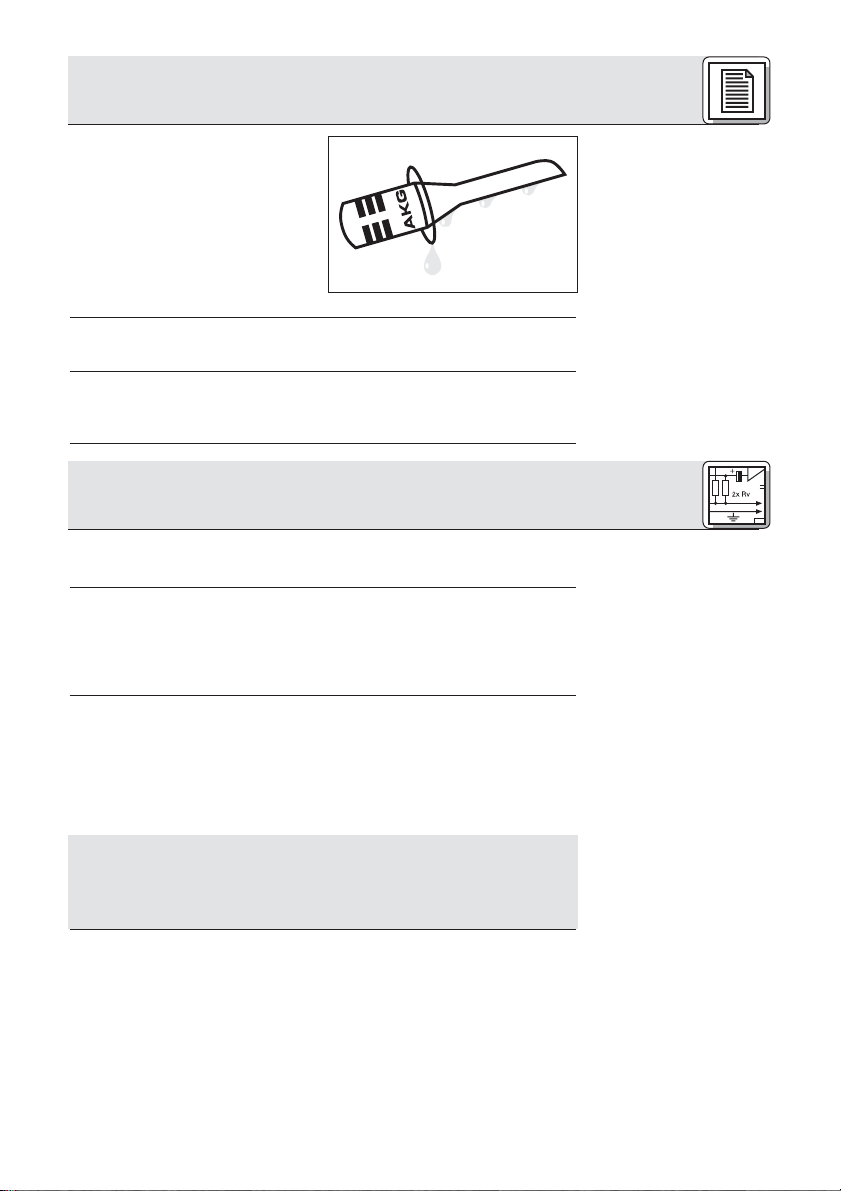
Falls Schweiß oder Schminke in die Mikrofonkapsel gelangt,
1. Schrauben Sie das Mikrofongehäuse vom Mikrofonarm ab.
2. Schwenken Sie das Gehäuse in destilliertem Wasser.
Das Gehäuse ist geerdet. Wenn Sie normales Leitungswasser verwenden, können Kalkablagerungen den Erdkontakt unterbrechen
und zu Brummgeräuschen führen. Reinigen Sie das
Mikrofongehäuse daher nur mit destilliertem Wasser.
3. Lassen Sie das Gehäuse vollständig trocknen.
4. Schrauben Sie das Gehäuse wieder auf den Mikrofonarm auf.
Den Schaumstoff-Windschutz waschen Sie am besten in einer milden
Waschmittellösung. Der Windschutz ist sofort nach dem Trocknen wieder
einsatzbereit.
5
5 Reinigung
4 Anwendung
Page 6
6
6 Fehlerbehebung
Fehler
1. Mikrofon funktioniert nicht:
2. Starke Pop-, oder Windund Atemgeräusche hörbar:
3. Mikrofon klingt mit der Zeit
immer dumpfer:
4. Mikrofon wird unempfindlicher, Rückkopplung bereits
bei geringen Pegeln:
Mögliche Ursache
1. Keine Speisespannung
2. Kontakte im Mikrofonarm
verschmutzt, durch
Feuchtigkeit kurzgeschlossen oder korrodiert.
1. Mikrofon zu nahe an Mund
oder Nase.
2. Kein Windschutz montiert.
1. Verschmutzter Windschutz
dämpft hohe Frequenzen.
2. Einsprechschlitze verstopft.
1. Mikrofon zu weit vom
Mundwinkel entfernt.
2. Einsprechschlitze verstopft.
Behebung
1. Speisegerät überprüfen.
2. AKG-Service kontaktieren
1. Mikrofon-Einsprechschlitze
zum Mundwinkel ausrichten und gerade so weit von
Mund und Nase entfernt,
dass Atemgeräusche nicht
mehr auftreten.
2. Windschutz montieren.
1. Windschutz reinigen.
2. Mikrofongehäuse reinigen.
1. Mikrofon näher am
Mundwinkel positionieren.
2. Mikrofongehäuse reinigen.
Page 7
7
7 Technische Daten
Arbeitsweise: Doppelmembran-Kondensatorwandler mit
Permanentladung
Richtcharakteristik: Kugel
Übertragungsbereich: 20 Hz bis 20.000 Hz
Leerlauf-Übertragungsfaktor: 8 mV/Pa
Grenzschalldruckpegel: 133 dB
Äquivalentschalldruckpegel: <26 dB-A
Signal/Rauschabstand (A-bew.): >68 dB
Elektrische Impedanz: <3.500 Ω
Empfohlene Lastimpedanz: 10.000 Ω
Speisespannung: 1,5 VDC bis 12 VDC
Stromaufnahme: <0,6 mA
Anschlußstecker: L-Versionen: 3-poliger Mini-XLR-Stecker
OC-Versionen: offene Kabelenden (verzinnt)
SH/P-Version: Lemo-Stecker
Kabellänge: 1,5 m
Oberfläche: schwarz matt
P-Versionen: Metallbügel: hautfarben, matt
Kunststoff: schwarz, matt
Kabel: schwarz, matt
Abmessungen (l x b x h): ca. 180 x 130 x 85
Gewicht netto/brutto : ca. 15g / 325 g
Dieses Produkt entspricht der Norm EN 50082-1, vorausgesetzt, dass die nachgeschalteten Audiooder Speisegeräte CE-konform sind.
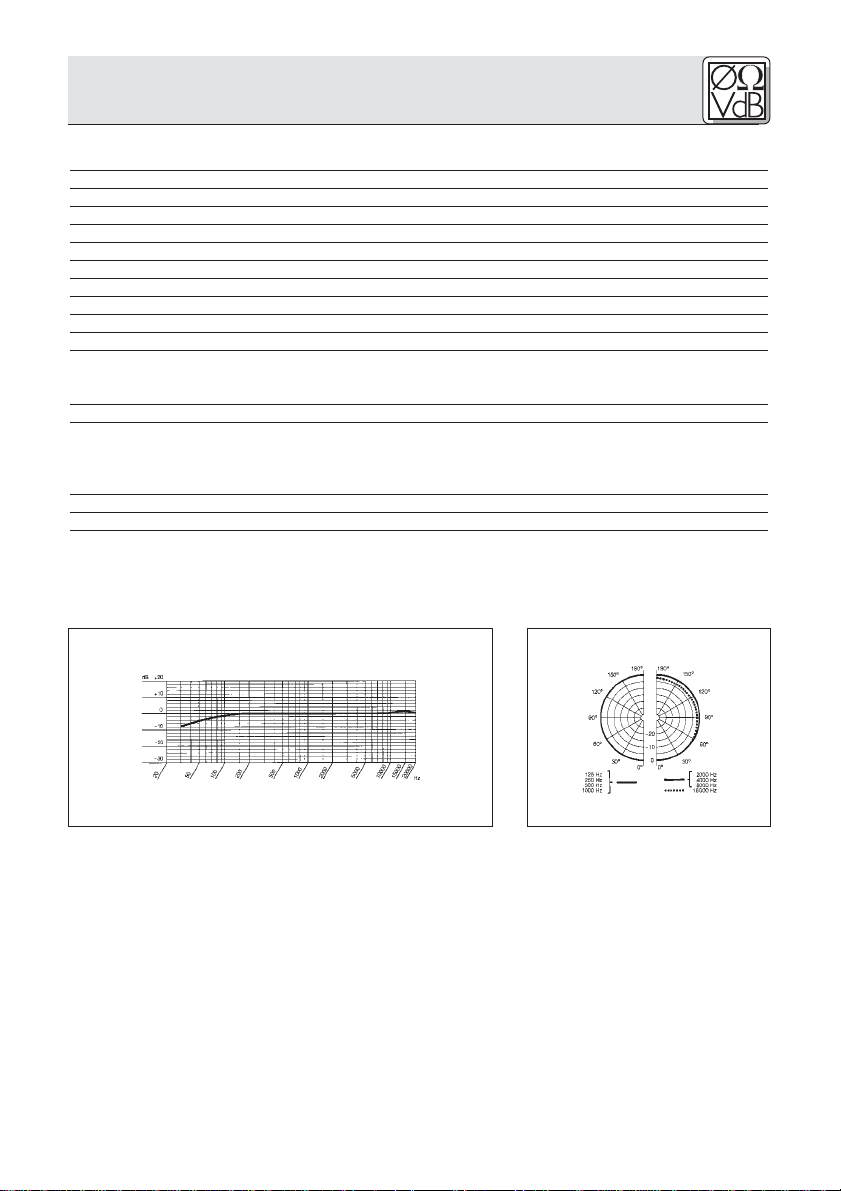
Frequenzkurve Polardiagramm
Page 8

1.1 Safety
1.2 Environment
2.1 Introduction
2.2 C 477 WR
Please make sure that the piece of equipment your microphone will be
connected to fulfills the safety regulations in force in your country and
is fitted with a ground lead.
1. Be sure to dispose of used batteries as required by local waste disposal rules. Never throw batteries into a fire (risk of explosion) or
garbage bin.
2. When scrapping the equipment, remove the batteries, separate the
case, circuit boards, and cables, and dispose of all components in
accordance with local waste disposal rules.
3. The packaging of the equipment is recyclabe. To dispose of the
packaging, make sure to use a collection/recycling system provided
for that purpose and observe local legislation relating to waste disposal and recycling.
Thank you for purchasing an AKG product. This Manual contains
important instructions for setting up and operating your equipment.
Please take a few minutes to read the instructions below carefully
before operating the equipment. Please keep the Manual for future
reference. Have fun and impress your audience!
The C 477 WR is a highly professional head-worn condenser microphone specifically designed for almost "invisible" use by performers on
stage and radio or TV moderators. In line with this concept, the microphone is extremely light.
The dual-diaphragm capsule of the C 477 WR features an additional
gold-sputtered protective diaphragm that prevents moisture and
perspiration from penetrating into the transducer. This reduces the risk
of failure caused by humidity to a practical minimum.
The microphone arm is attached to the left-hand side of the behind-theneck headband. A right-hand version is also available for TV moderator
duos or similar applications.
The C 477 WR is available in six versions:
1. C 477 WR L: with 3-pin mini XLR connector for use with AKG body-
pack transmitters or the optional MPA III phantom power adapter
from AKG for connecting to mixers or amplifiers. Black, microphone
on the left.
2. C 477 WR L/P: as C 477 WR L except for flesh-tone side pieces
and microphone.
3. C 477 WR oc: stripped and tinned leads. Black, microphone on the
left.
4. C 477 SH/P: with Lemo connector.
5. C 477 WR oc/P: stripped and tinned leads. Flesh-tone side pieces
and microphone, microphone on the left.
6. C 477 WR oc/P/R: as C 477 WR oc/P, except with microphone on
the right.
2 Description
8
1 Safety and Environment
Page 9
2.3 Moisture Shield
Fig. 1: Moisture shield.
2.4 Standard
Accessories
2.5 Optional
Accessories
3.1 C 477 WR L
3.1.1 Connecting to
a Bodypack
Transmitter
Important!
3.1.2 Hardwire
Connection
A special moisture shield on the
microphone capsule makes it difficult for moisture and makeup to
penetrate into the microphone.
This barrier prevents the microphone sound entries from being
clogged by perspiration or makeup
which would make the sound dull
and reduce the sensitivity of the
microphone. Therefore, never remove the moisture shield from the
microphone!
W 77 Windscreen
Moisture shield
W 77 M wire-mesh windscreen, black
W 77 M wire-mesh windscreen, flesh-tone
MPA III phantom power adapter
The C 477 WR is a prepolarized condenser microphone and requires a
supply voltage of 1.5 VDC to 12 VDC.
You can connect the C 477 WR L directly to any bodypack transmitter
from AKG.
Alternatively, you can use the MPA III phantom power adapter from
AKG and a microphone cable to connect the microphone to a mixer or
amplifier input.
1. Plug the mini XLR connector on the cable of your microphone all the
way into the audio input connector on the bodypack transmitter.
The connector will lock automatically.
Refer to the instruction manual of your bodypack transmitter.
The C 477 WR L has been designed specifically for use with
AKG bodypack transmitters. Using the microphone with a
bodypack from a different manufacturer may cause malfunction or damage to the microphone which may not be covered by
the warranty.
The optional MPA III phantom power adapter lets you connect the
microphone to any phantom power source or XLR inputs with 9 to 52 V
phantom power.
We recommend the optional N 62 E or N 66 E AC power supply or B 18
battery supply (also optional) from AKG for powering the MPA III.
1. Plug the mini XLR connector on the cable of your microphone all the
way into the mini XLR connector on the MPA III connecting cable.
The connector will lock automatically.
2. Connect the MPA III to the desired input with phantom power.
2 Description
9
3 Interfacing
Page 10
Important!
3.2 C 477 WR oc
Fig. 2: C 477 oc
circuit diagram.
Important!
Important!
If the selected input provides no phantom power:
1. Connect the MPA III to one of the phantom power supplies listed
above.
2. Connect the phantom power supply to the desired input.
Using any power supply other than those recommended by
AKG may damage your microphone and will void the warranty.
The C 477 WR oc uses a connecting cable with stripped and tinned leads.
You can use this microphone with bodypack transmitters or other devices
that provide a supply voltage between 1.5 VDC and 12 VDC.
For details on the type of connector you will need, refer to the instruction manual of the device to which you want to connect your microphone.
The clear-plastic moisture shield on the microphone prevents
perspiration or makeup from clogging the sound entry ports
and thus changing the sound and reducing the microphone’s
sensitivity.
Therefore, never try to remove the moisture shield from the
microphone!
The headband and microphone arm are made of thin-walled
tubing. Bend these parts with extreme caution. If you bend the
tubing too sharply it may break, which will void the warranty.
3 Interfacing
10
4 Operating Notes
Page 11
4.1 Putting the
Microphone On
Refer to fig. 3.
Refer to fig. 4.
Important!
4.2 Windscreen
Note:
5.1 Surfaces
5.2 Microphone
Case
Important!
1. Put the microphone on as shown in fig. 3.
2. Bend the microphone arm so that the microphone will sit in front of
the corner of the user’s mouth, as close as possible to the mouth.
3. In order to adjust the headband to the user’s head, you can bend the
metal parts to shape (white arrows) and slide the side piece WITHOUT the microphone arm in and out within the plastic center piece
(black arrows). (The side piece carrying the microphone arm is not
movable.)
Never try to bend the plastic center piece! The plastic material
would return to its original shape and break if overstressed,
voiding the warranty.
If (for instance, in outdoor use) excessive wind or pop noise becomes
audible, attach the supplied windscreen to the microphone.
The optional W 77 M wire-mesh windscreen in black or flesh-tone is
even less visible.
To clean metal surfaces, use industrial spirits or alcohol .
To clean plastic surfaces, use a soft cloth moistened with water.
Never use benzine or solvents!
If perspiration or makeup should penetrate into the microphone capsule:
1. Unscrew the microphone case CCW from the microphone arm.
2. Move the case rapidly back and forth in distilled water.
The case is connected to ground. If you use tap water to clean
the case, furring may interrupt the ground connection and
cause hum. Therefore, use distilled water only.
3. Allow the case to dry completely.
4. Screw the case back on the microphone arm CW.
4 Operating Notes
11
Fig. 3: Microphone position on
the head.
Fig. 4: Adjusting the headband.
5 Cleaning
Page 12
12
6 Troubleshooting
Problem
1. No sound:
2. Loud pop, wind, and/or
breath noise:
3. Microphone sound
becomes duller by and by:
4. Reduced sensitivity and
gain-before-feedback:
Possible Cause
1. No supply voltage.
2. Microphone arm contacts
soiled, shorted by
moisture, or corroded.
1. Microphone sits too close
to mouth or nose.
2. No windscreen attached.
1. Soiled windscreen attenuates high frequencies.
2. Sound entries clogged.
1. Microphone sits too far
away from corner of
mouth.
2. Sound entries clogged.
Remedy
1. Check phantom power
supply.
2. Contact an AKG service
center.
1. Align microphone sound
entries with corner of
mouth and move microphone just far enough
away from mouth and nose
to stop breath noise.
2. Attach windscreen.
1. Clean windscreen.
2. Clean microphone case.
1. Place microphone closer to
corner of mouth.
2. Clean microphone case.
5 Cleaning
Use a mild detergent solution to wash the windscreen. The windscreen
will be ready for use as soon as it has dried completely.
5.3 Windscreen
Page 13

13
7 Specifications
Type: Pre-polarized dual-diaphragm condenser microphone
Polar pattern: Omnidirectional
Frequency range: 20 Hz to 20,000 Hz
Sensitivity at 1000 Hz: 8 mV/Pa
Max. SPL: 133 dB
Equivalent noise level: <26 dB-A
Signal-to-noise ratio (A-weighted): >68 dB-A
Electrical Impedance: 3.5 kΩ
Recommended load impedance: 10 kΩ
Supply voltage: 1.5 VDC to 12 VDC
Current consumption: <0.6 mA
Connector: L versions: 3-pin mini XLR
oc versions: stripped and tinned leads
SH/P version: Lemo connector
Cable length: 1.5 m (5 ft.)
Finish: Matte black
P versions: metal headband: matte flesh-tone
plastic center piece: matte black
cable: matte black
Size (LxWxH): Approx. 180 x 130 mm x 85 mm (7.1 x 5.2 x 3.3 in.)
Net/shipping weight: Approx. 15 g / 325 g (0.53 oz. / 11.5 oz.)
This product conforms to EN 540082-1 provided it is connected to audio/power supply equipment
with a CE mark.
Frequency Response Polar Diagram
Page 14

1.1 Sécurité
1.2 Ecologie
2.1 Introduction
2.2 C 477 WR
Vérifiez si l’appareil sur lequel vous voulez brancher le microphone
répond aux règlements de sécurité en vigueur et possède une prise de
terre de sécurité.
1. Eliminez toujours les piles et accus usés conformément aux prescriptions en vigueur. Ne mettez jamais une pile ou un accu au feu
(risque d’explosion) et ne les mettez pas aux ordures.
2. Si vous mettez le micro à la ferraille, enlevez les piles ou les accus,
démontez boîtier, électronique et câbles et éliminez chacun de ces
éléments conformément aux prescriptions en vigueur.
3. L'emballage est recyclable. Déposez l'emballage dans un récipient
de collecte prévu à cet effet.
Nous vous remercions d’avoir choisi un produit d’AKG et vous invitons
à lire attentivement le présent mode d’emploi avant de mettre votre
micro en service. Conservez soigneusement le mode d’emploi pour
l’avoir toujours sous la main lorsque vous avez besoin de le consulter.
Nous espérons que vous aurez beaucoup de satisfaction et de succès
avec votre micro.
Le C 477 WR est un microphone sur serre-tête hautement professionnel, en technique électrostatique, spécialement développé pour les
besoins de la scène et de la télévision nécessitant un micro pratiquement « invisible ». Il est par conséquent extrêmement léger.
La capsule à double diaphragme du C 477 WR est revêtue d’une
membrane de protection à couche d’or vaporisé s’opposant à la
pénétration de sueur et d’humidité dans le transducteur. Le risque de
défaillances dues à l’humidité est donc pratiquement inexistant.
La branche supportant le micro est montée sur la gauche du serretête. Pour permettre l’utilisation par deux présentateurs de télévision
ou autres applications analogues, il existe aussi un modèle avec
micro monté sur la droite.
Le C 477 WR se fait en 6 versions :
1. C 477 WR L : avec connecteur mini-XLR 3 points pour le raccor-
dement à un émetteur de poche, ou une table de mixage ou un
ampli, via l’adaptateur pour alimentation fantôme MPA III d’AKG.
Noir, micro sur la gauche du serre-tête.
2. C 477 WR L/P : comme C 477 WR L, parties latérales et micro cou-
leur chair.
3. C 477 WR oc : avec extrémités de câble libres. Noir, micro sur la
gauche du serre-tête.
4. C 477 WR SH/P : avec connecteur Lemo.
5. C 477 WR oc/P : avec extrémités de câble libres. Parties latérales
et micro couleur chair, micro sur la gauche du serre-tête.
6. C 477 WR oc/P/R : comme C 477 WR oc/P, micro sur la droite du
serre-tête.
2 Description
14
1 Sécurité et écologie
Page 15
2.3 Bague
collectrice
Fig. 1 : Bague collectrice
2.4 Accessoires
fournis d’origine
2.5 Accessoires
recommandés
3.1 C 477 WR L
3.1.1 Raccordement
à un émetteur de
poche
Important !
3.1.2 Raccordement
à l’aide du MPA III
Une bague collectrice spéciale, sur
la capsule du micro, s’oppose à la
pénétration de sueur ou de
maquillage dans la capsule. On
évite ainsi une obturation des
fentes par la sueur ou le maquillage, qui amortirait le son et réduirait
la sensibilité du micro. Laissez
donc toujours la bague collectrice
sur le micro !
Bonnette anti-vent W 77
Bague collectrice
Bonnette en maille métallique W 77 M, noire
Bonnette en maille métallique W 77 M, couleur chair
Adaptateur pour alimentation fantôme MPA III
Le C 477 WR est un microphone électrostatique à charge permanente
nécessitant une tension d’alimentation de 1,5 à 12 V c.c.
Vous pouvez raccorder le C 477 WR L directement sur tous les émetteurs de poche AKG.
Il est également possible de raccorder le micro à une table de mixage
ou une entrée d’ampli, via un câble de micro et l’adaptateur pour alimentation fantôme MPA III d’AKG.
1. Branchez le connecteur mini-XLR sur le câble de raccordement du
micro en l’enfonçant à fond dans l’embase d’entrée audio de votre
émetteur de poche.
Le connecteur se verrouille automatiquement.
Veuillez vous reporter à ce sujet au mode d’emploi de votre émetteur
de poche.
Le C 477 WR L est spécialement conçu pour être utilisé avec
des émetteurs de poche AKG. L’utilisation de ce micro avec
des émetteurs d’autres marques peut être cause de dysfonctionnements ou de dégâts sur le micro. Elle peut en outre, dans
certains cas, entraîner la perte de la garantie.
Avec l’adaptateur pour alimentation fantôme MPA III, fourni en option,
vous pouvez brancher le micro sur n’importe quelle alimentation
fantôme de même sur des entrées XLR avec alimentation fantôme de
9 à 52 V.
Les alimentations fantômes recommandées pour le MPA III sont le bloc
secteur optionnel N 62 E ou 66 E ainsi que le boîtier à piles B 18 (également optionnel) d’AKG.
2 Description
15
3 Raccordement
Page 16
Important !
3.2 C 477 WR oc
Fig. 2 : Brochage du
C 477 WR oc
Important !
Important !
1. Enfoncez le connecteur mini-XLR du câble de micro jusqu’en butée
dans l’embase mini-XLR du câble de raccordement du MPA III.
Le connecteur se verrouille automatiquement.
2. Branchez le MPA III sur l’entrée voulue avec alimentation fantôme.
Si l’entrée ne dispose pas d’une alimentation fantôme :
1. Raccordez le MPA III à une des alimentations fantômes optionnelles
indiquées ci-dessus.
2. Branchez l’alimentation fantôme sur l’entrée voulue.
En utilisant une alimentation autre que celles recommandées
par AKG, vous risquez d’endommager le microphone et perdez
la garantie.
Le C 477 WR oc est fourni avec un câble de raccordement à extrémités libres. Vous pouvez donc brancher ce micro sur des émetteurs de
poche ou d’autres appareils fournissant une tension d’alimentation
comprise entre 1,5 V et 12 V c.c.
Consultez le mode d’emploi de l’appareil sur lequel vous voulez brancher le micro pour savoir de quel connecteur vous avez besoin.
La bague collectrice en plastique transparent placée sur le
micro empêche la sueur et le maquillage d’obturer les fentes,
ce qui aurait pour effet de modifier le son et de réduire la sensibilité du micro.
Laissez donc toujours la bague collectrice sur le micro.
Le bras et la tige du micro sont des tubes à paroi très mince.
Ne les courbez qu’avec d’infinies précautions. En les déformant excessivement vous risqueriez de les casser, en perdant
la garantie.
3 Raccordement
16
4 Utilisation
Page 17
4.1 Positionnement
du micro
Voir fig. 3.
Voir fig. 4.
Important !
4.2 Bonnette
anti-vent
N.B.
5.1 Surfaces
5.2 Boîtier du micro
Important !
1. Mettez le serre-tête sur la nuque comme indiqué à la Fig. 3.
2. Courbez la branche support pour que le micro se trouve sur le côté
de la bouche, aussi près de la commissure des lèvres que possible.
3. Vous pouvez courber l’arceau (flèches blanches) pour l’adapter à la
forme de la tête et faire coulisser la partie latérale ne supportant PAS
le micro dans la partie médiane en plastique (flèches noires). (La
partie latérale supportant le micro est fixe.)
N’essayez jamais de modifier la forme de la partie médiane de
l’arceau, en matière plastique ; elle reprendrait par élasticité sa
forme première et au cas où vous forceriez, elle risquerait de
casser. Ceci entraînerait la perte de la garantie.
Si vous risquez d’avoir des pops ou des bruits de vent gênants (p.ex.
en plein air), mettez la bonnette fournie sur le micro.
Si vous souhaitez une bonnette encore plus discrète, il existe, en
option, un modèle à maille métallique W 77 M, se faisant en noir ou
couleur chair.
Les surfaces métalliques se nettoient à l’alcool à brûler ou à l’alcool
ordinaire.
Pour les surfaces en plastique, utilisez un chiffon souple humecté
d’eau (jamais d’essence ou de solvant).
S’il a pénétré de la sueur ou du maquillage dans la capsule du micro :
1. Dévissez le micro de la branche support.
2. Rincez le boîtier en l’agitant dans l’eau distillée.
Le boîtier est relié à la terre. Si vous utilisez l’eau du robinet,
des dépôts calcaires risquent d’interrompre le contact à la
terre et de provoquer des ronflements. Utilisez donc exclusivement de l’eau distillée.
17
Fig. 3 : Position correcte du
micro sur la tête
Fig. 4 : Réglage de l’arceau
4 Utilisation
5 Nettoyage
Page 18
18
3. Attendez que le boîtier soit parfaitement sec.
4. Revissez le boîtier sur la branche support.
La bonnette en mousse se lave à l’eau avec un détergent doux. Elle
peut être réutilisée dès qu’elle est sèche.
5.3 Bonnette
anti-vent
5 Nettoyage
6 Dépannage
Problème
1. Le micro ne fonctionne pas :
2. On entend des bruits de
souffle, de vent ou des
pops gênants :
3. Le son devient de plus en
plus mat :
4. Le micro est de moins en
moins sensible, le larsen se
manifeste déjà pour un faible niveau sonore :
Causes possibles
1. Le micro n’est pas sous
tension.
2. Les contacts de la branche
support sont encrassés,
court-circuités par l’humidité ou corrodés.
1. Le micro est trop près des
lèvres ou du nez.
2. On n’a pas mis de
bonnette anti-vent.
1. La bonnette est encrassée
et atténue les hautes fréquences.
2. Les fentes du micro sont
obturées.
1. Le micro est trop loin de la
commissure des lèvres.
2. Les fentes du micro sont
obturées.
Remède
1. Vérifier l’appareil d’alimentation.
2. Contacter le S.A.V. d’AKG.
1. Orienter le côté sensible du
micro vers la commissure
des lèvres et l’éloigner des
lèvres et du nez juste ce
qu’il faut pour qu’on n’entende plus de bruits de
souffle.
2. Mettre une bonnette antivent.
1. Nettoyer la bonnette.
2. Nettoyer le boîtier du
micro.
1. Rapprocher le micro de la
commissure des lèvres.
2. Nettoyer le boîtier du
micro.
Page 19

19
7 Caractéristiques techniques
Fonctionnement : Transducteur électrostatique à double diaphragme, à
charge permanente
Directivité : Omnidirectionnel
Réponse en fréquence : 20 Hz … 20.000 Hz
Sensibilité à vide : 8 mV/Pa
Niveau maximum de pression sonore : 133 dB
Niveau de bruit équivalent : <26 dB-A
Rapport signal/bruit à 1 Pa (pondéré A): >68 dB
Impédance électrique : <3.500 Ω
Impédance de charge recommandée : 10.000 Ω
Tension d’alimentation: 1,5 V … 12 V c.c.
Consommation: <0,6 mA
Connecteur: Versions L : type mini-XLR, 3 points
Versions oc : extrémités de câble libres (galvanisé)
Version SH/P: connecteur Lemo
Longueur du câble : 1,5 m
Boîtier : noir mat
Versions P : arceau métallique : couleur chair, mat
partie en plastique : noire, mate
câble : noir mat
Dimensions (L x l x h) : 180 x 130 x 85 mm
Poids net/brut : 15 g/325 g
Ce produit est conforme à la norme EN 50 082-1 à condition que les appareils en aval soient aux normes européennes.
Réponse en fréquence Diagramme polaire
Page 20
1.1 Sicurezza
1.2 Ambiente
2.1 Introduzione
2.2 C 477 WR
Controllate, per favore, se l’apparecchio al quale volete collegare il
microfono, corrisponde alle norme di sicurezza vigenti e se è dotato di
una messa a terra di sicurezza.
1. Smaltite le batterie e gli accumulatori esausti sempre secondo le
norme di smaltimento rispettivamente vigenti. Non gettate le batterie o gli accumulatori né nel fuoco (pericolo di esplosioni) né tra i
residui.
2. Se rottamate l’apparecchio, togliete le batterie rispettivamente gli
accumulatori, separate scatola, parti elettroniche e cavi e smaltite
tutti i componenti secondo le norme di smaltimento vigenti al riguardo.
3. L'imballaggio è riciclabile. Smaltite l'imballaggio in un apposito
sistema di raccolta.
Vi ringraziamo di aver scelto un prodotto della AKG. Leggete, per favore, attentamente le istruzioni per l’uso, prima di mettere in esercizio
l’apparecchio, e conservate bene le istruzioni per l’uso per poterle
consultare in qualsiasi momento. Vi auguriamo buon divertimento e
buon successo!
Il C 477 WR è un microfono headset altamente professionale in tecnica
a condensatore, sviluppato particolarmente per l’impiego praticamente
"invisibile" sul palco nonché per conduttori radio e televisivi.
Corrispondentemente a questo concetto, il microfono è estremamente
leggero.
La capsula del C 477 WR a doppia membrana è dotata di un’addizionale membrana protettiva placcata in oro grazie alla quale sudore ed
umidità non possono penetrare nel trasduttore. Il rischio di guasti causati dall‘umidità è quindi estremamente basso.
Il braccio microfonico è montato a sinistra, sull’archetto dietro la testa.
Per moderazioni doppie in tv o impieghi simili è disponibile anche una
versione con braccio microfonico montato a destra.
Il C 477 WR è disponibile in sei varianti:
1. C 477 WR L: con connetore mini-XLR a 3 poli per collegare il
microfono a trasmettitori da tasca AKG rispettivamente, per mezzo
dell’adattatore opzionale per alimentazione phantom MPA III della
AKG, a mixer o amplificatori. Nero, braccio microfonico a sinistra.
2. C 477 WR L/P: come il C 477 WR L, parti laterali e microfono color
pelle.
3. C 477 WR oc: con estremità del cavo libere. Nero, braccio microfo-
nico a sinistra.
4. C 477 SH/P: con connettore Lemo
5. C 477 WR oc/P: con estremità del cavo libere. Parti laterali e
microfono color pelle, braccio microfonico a sinistra.
6. C 477 WR oc/P/R: come il C 477 WR oc/P, braccio microfonico a
destra.
2 Descrizione
20
1 Sicurezza ed ambiente
Page 21
2.3 Anello scolaliquidi
Fig. 1: Anello scolaliquidi
2.4 Accessori in
dotazione
2.5 Accessori
raccomandati
3.1 C 477 WR L
3.1.1 Collegamento
al trasmettitore da
tasca
Importante!
3.1.2 Collegamento
mediante l’MPA III
Uno speciale anello scola-liquidi
montato sulla capsula microfonica
impedisce che sudore e trucco
penetrino all’interno della capsula.
In tal modo, le feritoie di ripresa del
microfono non possono venir otturate dal sudore o dal trucco il che
potrebbe causare un suono cupo o
una ridotta sensibilità del microfono.
Non togliete quindi mai l’anello scola-liquidi dal microfono!
Antisoffio W 77
Anello scola-liquidi
Antisoffio a griglia metallica W 77 M, nero
Antisoffio a griglia metallica W 77 M, color pelle
Adattatore per alimentazione phantom MPA III
Il C 477 WR è un microfono a condensatore a carica permanente e
necessita di un’alimentazione da 1,5 a 12 V c.c.
Potete collegare il C 477 WR L direttamente a tutti i trasmettitori da
tasca dell’AKG.
Potete collegare il microfono, per mezzo dell’adattatore per alimentazione phantom MPA III della AKG e di un cavo microfonico, anche all’ingresso di un mixer o di un amplificatore.
1. Inserite il connetore mini-XLR disposto sul cavo di collegamento del
microfono nella presa d’ingresso audio del vostro trasmettitore da
tasca fino all’arresto.
Il connettore è assicurato automaticamente.
Leggete al riguardo le istruzioni per l’uso del vostro trasmettitore da
tasca.
Il C 477 WR L è ideato specialmente per l’impiego con trasmettitori da tasca AKG. Se usate il microfono con trasmettitori da tasca di altri produttori, si possono verificare dei malfunzionamenti o danni al microfono. In certi casi si potrebbe addirittura estinguere la garanzia.
Con l’adadattore opzionale per alimentazione phantom MPA III potete
collegare il microfono a qualsiasi fonte di alimentazione phantom nonché ad ingressi XLR con alimentazione phantom da 9 a 52 V.
Come apparecchi di alimentazione phantom per l’MPA III vi raccomandiamo l’alimentatore di rete opzionale N 62 E o N 66 E e l’alimentatore
a batterie (sempre opzionale) B 18 della AKG.
2 Descrizione
21
3 Collegamento
Page 22

Importante!
3.2 C 477 WR oc
Fig. 2: Collegamento
del C 477 WR oc
Importante!
Importante!
1. Inserite il connetore mini-XLR disposto sul cavo microfonico nel
accoppiamento mini-XLR disposto sul cavo di collegamento
dell’MPA III fino all’arresto.
Il connettore è assicurato automaticamente.
2. Collegate l’MPA III all’ingresso prescelto dotato di alimentazione
phantom.
Se al rispettivo ingresso non è disponibile un’alimentazione phantom:
1. Collegate l’MPA III ad uno degli apparecchi opzionali per alimentazione phantom di cui sopra.
2. Collegate l’apparecchio di alimentazione phantom all’ingresso prescelto.
Se usate apparecchi di alimentazione diversi da quelli della
AKG, il microfono potrebbe venir danneggiato e la garanzia si
estingue.
Il C 477 WR oc è dotato di un cavo di collegamento ad estremità libere. Potete usare questo microfono quindi con trasmettitori da tasca o
altri apparecchi che forniscono una tensione di alimentazione tra 1,5 V
c.c. e 12 V c.c.
Leggete le istruzioni per l’uso dell’apparecchio al quale volete collegare il microfono per verificare di quale connettore avete bisogno.
L’anello scola-liquidi in materia sintetica trasparente, disposto
sul microfono, evita che sudore o trucco otturino le feritoie di
ripresa il che potrebbe causare un’alterazione del suono o
ridurre la sensibilità del microfono. Non togliete quindi mai l’anello scola-liquidi dal microfono!
L’archetto ed il braccio microfonico consistono di un tubo a
parete sottile. Piegate questi componenti con estrema prudenza. Se li piegate troppo fortemente, potrebbero rompersi. In
questo caso la garanzia si estingue.
3 Collegamento
22
4 Impiego
Page 23

4.1 Come indossare
il microfono
Vedi fig. 3.
Vedi fig. 4.
Importante!
4.2 Antisoffio
Nota:
5.1 Superfici
5.2 Scatola microfonica
Importante!
1. Indossate il microfono come dimostrato nella fig. 3.
2. Piegate il braccio microfonioc in modo che il microfono si trovi lateralmente davanti alla bocca, il più possibile vicino alla bocca.
3. Per adattare l’archetto alla forma cranica del portatore, piegate l’archetto (frecce bianche) e spostate la parte laterale - SENZA il braccio microfonico - verso la parte centrale in materia sintetica (frecce
nere). (La parte laterale sulla quale è fissato il braccio microfonico
non si può spostare).
Non cercate mai di piegare la parte centrale in materia sintetica dell’archetto perché il materiale sintetico ritornerebbe nella
sua forma originale e in caso di sovrasollecitazione si romperebbe. In questo caso la garanzia si estingue.
Quando (p.e. all’aperto) si verificano forti rumori da vento o rumori pop,
infilate la protezione antisoffio in schiuma (in dotazione) sul microfono.
Ancora meno vistoso è l’opzionale antisoffio a griglia metallica W 77 M,
in versione nera o color pelle.
Le superfici metalliche vanno pulite con spirito (industriale) o alcool.
Per pulire le superfici in materia sintetica usate un morbido panno
inumidito di acqua (in nessun caso benzina per pulire o solventi).
Quando sudore o trucco entrano nella capsula microfonica:
1. Svitate la scatola microfonica dal braccio microfonico.
2. Sciacquate la scatola in acqua distillata.
La scatola ha una messa a terra. Se usate acqua del rubinetto,
sedimentazioni di calce potrebbero interrompere il contatto
con la terra e causare ronzìi. Pulite la scatola dunque solo con
acqua distillata.
3. Fate asciugare bene la scatola.
4. Riavvitate la scatola sul braccio microfonico.
4 Impiego
23
Fig. 3: Posizione del microfono
sulla testa
Fig. 4: Adattamento dell’archetto
5 Pulizia
Page 24

24
La protezione antisoffio in schiuma va lavata in una blanda soluzione di
detersivo. L’antisoffio può venir impiegato appena asciugato.
5.3 Antisoffio
5 Pulizia
6 Difetti e rimedi
Difetto
1. Il microfono non funziona:
2. Si sentono forti rumori pop,
da vento o da fiato:
3. Il suono del microfono
diventa sempre più cupo:
4. Il microfono diventa sempre più insensibile, feedback
già a livelli molto bassi:
Possibile causa
1. Non c’è tensione di alimentazione
2. I contatti nel braccio microfonico sono imbrattati, cortocircuitati o corrosi per via
dell’umidità.
1. Il microfono è posizionato
troppo vicino alla bocca o
al naso.
2. Non è montato l’antisoffio.
1. L’antisoffio è imbrattato e
attenua le frequenze alte.
2. Le feritoie di ripresa sono
otturate.
1. Il microfono è troppo
distante dall’angolo della
bocca.
2. Le feritoie di ripresa sono
otturate.
Rimedio
1. Controllare l’alimentatore.
2. Contattare il service AKG.
1. Orientare le feritoie di ripresa verso l’angolo della
bocca e tenerle lontane
dalla bocca e dal naso quel
poco che basta perché non
si verifichino più rumori da
fiato.
2. Montare l’antisoffio.
1. Pulire l’antisoffio.
2. Pulire la scatola microfonica.
1. Posizionare il microfono
più vicino alla bocca.
2. Pulire la scatola microfonica.
Page 25

25
7 Dati tecnici
Modo di funzionamento: trasduttore a condensatore a membrana doppia a
carica permanente
Direttività: omnidirezionale
Risposta in frequenza: da 20 Hz a 20.000 Hz
Sensibilità: 8 mV/Pa
Livello di pressione acustica limite: 133 dB
Livello di pressione acustica equivalente: <26 dB-A
Rapporto segnale/disturbo (pond. A): >68 dB
Impedenza elettrica: <3.500 Ω
Impedenza di carico raccomandata: 10.000 Ω
Tensione di alimentazione: da 1,5 V c.c. a 12 Vc.c.
Assorbimento: <0,6 mA
Connettore di collegamento: versioni L: connetore mini-XLR a 3 poli
versioni oc: estremità del cavo libere (stagnate)
versione SH/P: connettore Lemo
Lunghezza cavo: 1,5 m
Superficie: nero opaca
versioni P: archetto metallico: color pelle, opaco
Materia sintetica: nera, opaca
cavo: nero, opaco
Dimensioni (lunghezza x larghezza x altezza): circa 180 x 130 x 85
Peso netto/lordo: circa 15g / 325 g
Questo prodotto corrisponde alla norma EN 50 082-1, presupposto che gli apparecchi collegati siano
conformi alle norme CE.
Curva delle frequenze Diagramma polare
Page 26

1.1 Seguridad
1.2 Medio ambiente
2.1 Introducción
2.2 C 477 WR
Por favor, verifique que el aparato al que desea conectar el micrófono
cumpla con las disposiciones de seguridad vigentes y tenga una conexión a tierra.
1. La evacuación de las pilas inservibles (comunes o recargables) debe
realizarse cumpliendo con las disposiciones vigentes para la eliminación de residuos. No arroje pilas al fuego (peligro de explosión) ni
a la basura común.
2. Para deshacerse del aparato, sáquele las pilas (comunes o recargables) y desármelo separando caja, electrónica y cables, y elimine
cada uno de los componentes cumpliendo con las correspondientes disposiciones vigentes para la eliminación de residuos.
3. El embalaje es reciclable. Elimine el embalaje en un sistema de recogida previsto para ello.
Muchas gracias por haber elegido un producto AKG. Por favor, lea el
manual de operación con detenimiento, antes de poner el aparato
en funcionamiento por primera vez, y guarde el manual de operación en un lugar a mano donde lo pueda consultar en cualquier
momento. ¡Le deseamos que este aparato le depare muchas satisfacciones y éxitos!
El C 477 WR es un micrófono profesional de tipo condensador con
banda de cabeza, diseñado especialmente para el uso prácticamente
"invisible" en el escenario y para locutores de radio y moderadores de
televisión. Es, por consiguiente, un micrófono sumamente liviano.
La cápsula de doble membrana del C 477 WR tiene una membrana de
protección adicional con recubrimiento metálico en oro que impide la
entrada de transpiración y humedad en el transductor. Esto reduce al
mínimo el riesgo de fallos por humedad.
El brazo del micrófono está montado a la izquierda en el arco de nuca.
Para moderación doble en televisión o usos similares, está disponible
un modelo que tiene el brazo de micrófono montado a la derecha.
Hay cinco modelos del micrófono C 477 WR disponibles:
1. C 477 WR L: con clavija mini XLR de tres polos para conectar a los
transmisores portátiles de AKG o a mesas de mezclas y amplificadores mediante un adaptador de alimentación fantasma opcional
MPA III de AKG. De color negro, con brazo de micrófono a la izquierda.
2. C 477 WR L/P: como C 477 WR L, pero con laterales y micrófono
de color piel.
3. C 477 WR oc: con cable con terminales descubiertas. De color
negro, con brazo de micrófono a la izquierda.
4. C 477 WR oc/P: con conector Lemo.
5. C 477 WR oc/P: con cable con terminales descubiertas. Laterales
y micrófono de color piel y brazo de micrófono a la izquierda.
6. C 477 WR oc/P/R: como C 477 WR oc/P, pero con brazo de micró-
fono a la derecha.
2 Descripción
26
1 Seguridad y medio ambiente
Page 27

2.3 Anillo escurridor
Fig. 1: Anillo escurridor
2.4 Accesorios
incluidos en el
suministro
2.5 Accesorios
recomendados
3.1 C 477 WR L
3.1.1 Conexión a
transmisores
portátiles
¡Importante!
3.1.2 Conexión
mediante el MPA III
Un anillo escurridor especial montado a la cápsula del micrófono dificulta la entrada de transpiración y
maquillaje en la cápsula. Esto evita
que las ranuras del micrófono se
tapen con transpiración o maquillaje y, por consiguiente, que se
produzca una amortiguación del
sonido o una reducción de la sensibilidad del micrófono. ¡No desmonte nunca el anillo escurridor del
micrófono!
Pantalla antiviento W 77
Anillo escurridor
Pantalla antiviento con rejilla metálica W 77 M, de color negro
Pantalla antiviento con rejilla metálica W 77 M, de color piel
Adaptador de alimentación fantasma MPA III
El C 477 WR es un micrófono de tipo condensador con carga permanente y requiere de una tensión de alimentación de 1,5 a 12 V c.c.
El C 477 WR L lo puede conectar directamente a todos los transmisores de bolsillo de AKG.
También puede ser conectado a una entrada de una mesa de mezclas
o de un amplificador mediante el adaptador de alimentación fantasma
MPA III de AKG.
1. Conecte la clavija mini XLR del cable de conexión del micrófono a
la hembrilla de entrada de audio del transmisor portátil introduciéndola hasta el tope.
La clavija queda automáticamente enganchada.
Lea las instrucciones correspondientes del manual de operación del
transmisor portátil.
El micrófono C 477 WR L está diseñado especialmente para ser
conectado a los transmisores portátiles de AKG. La operación
con transmisores portátiles de otros fabricantes puede producir fallos de funcionamiento o daños del micrófono. En determinados casos se pueden perder los derechos de garantía.
Con el adaptador de alimentación fantasma MPA III opcional, puede
conectar el micrófono a cualquier fuente de alimentación fantasma así
como a entradas XLR con alimentación fantasma de 9 a 52 V.
Como aparato de alimentación fantasma para el adaptador MPA III
recomendamos utilizar el alimentador de red opcional N 62 E o N 66 E
así como el alimentador de pilas B18 (también opcional) de AKG.
2 Descripción
27
3 Conexión
Page 28

¡Importante!
3.2 C 477 WR oc
Fig. 2: Esquema eléc-
trico del C 477 WR oc
¡Importante!
¡Importante!
1. Conecte la clavija mini XLR del cable del micrófono al conector mini
XLR del cable de conexión del adaptador MPA III introduciéndola
hasta el tope.
La clavija queda automáticamente enganchada.
2. Conecte el adaptador MPA III a la entrada con alimentación fantasma.
Si la entrada no tiene una alimentación fantasma,
1. Conecte el adaptador MPA III a uno de los alimentadores fantasma
opcionales mencionados anteriormente.
2. Conecte el alimentador fantasma a la entrada.
Si utiliza alimentadores fantasma que no son los recomendados por AKG, puede dañar el micrófono y perder los derechos
de garantía.
El C 477 WR oc tiene un cable de conexión con terminales descubiertas, con el que se puede conectar el micrófono a transmisores portátiles u otros aparatos que suministren una tensión de alimentación de
1,5 V c.c. a 12 V c.c.
Para saber qué conector necesita, lea el manual de operación del aparato al que desea conectar el micrófono.
El anillo escurridor de material sintético transparente montado
al micrófono impide que transpiración o maquillaje tape las
ranuras del micrófono y se produzcan así cambios en el sonido
o una reducción de la sensibilidad del micrófono.
¡No desmonte nunca el anillo escurridor del micrófono!
El muelle y el brazo del micrófono están fabricados de un tubo
de pared delgada. Al doblar estas piezas, proceda con mucho
cuidado, ya que si las dobla demasiado, se pueden romper y
con ello caduca la garantía.
3 Conexión
28
4 Utilización
Page 29

4.1 Modo de colocar
el micrófono en la
cabeza
Véase fig. 3.
Véase fig. 4.
¡Importante!
4.2 Pantalla
antiviento
Nota:
5.1 Superficies
5.2 Caja del
micrófono
¡Importante!
1. Póngase el micrófono como se indica en la fig. 3.
2. Doble el brazo del micrófono de modo tal que el micrófono quede al
lado de la comisura de los labios y lo más cerca posible de la boca.
3. Para ajustar el arco a su cabeza, puede doblarlo cuanto sea necesario (flecha blanca) y correr el lateral SIN brazo del micrófono dentro fe la pieza central de material sintético (flechas negras). (El lateral al que está fijado el brazo del micrófono no es corredizo.)
No intente combar la pieza central de plástico del arco ya que
el material sintético volvería a retomar su forma original y se
rompe con el esfuerzo excesivo. En este caso se pierden los
derechos de garantía.
Si se producen ruidos secos o de viento (por ej. al aire libre), coloque
al micrófono la pantalla antiviento de goma espuma que se incluye en
el suministro.
La pantalla antiviento con rejilla metálica W 77 M opcional, de color
negro o piel, es todavía menos visible.
Para limpiar las superficies de metal, lo mejor es utilizar alcohol
comercial o industrial.
Para limpiar las superficies de material sintético utilice un trapo
humedecido con agua (no utilice nunca gasolina de lavado o solvente).
Si llegara a entrar transpiración o maquillaje en la cápsula del micrófono,
1. Destornille la caja del micrófono para separarla del brazo del micrófono.
2. Lave la caja con agua destilada.
La caja está conectada a tierra. Si se utiliza agua del grifo, pueden formarse depósitos de cal que interrumpan el contacto a
tierra y produzcan, en consecuencia, zumbidos. Limpie la caja
del micrófono únicamente con agua destilada.
4 Utilización
29
Fig. 3: Forma de colocar y ajustar
el micrófono en la cabeza
Fig. 4: Ajuste del arco
5 Limpieza
Page 30

30
5 Limpieza
3. Espere a que la caja esté completamente seca.
4. Vuelva a atornillar la caja al brazo del micrófono.
Lo mejor para limpiar la pantalla antiviento de goma espuma es un producto de limpieza suave. La pantalla antiviento puede volverse a colocar apenas esté seca.
5.3 Pantalla
antiviento
6 Solución de fallos
Fallos
1. El micrófono no funciona:
2. Se escuchan ruidos secos
o ruidos de viento o de
respiración:
3. Con el tiempo el sonido es
cada vez más bajo:
4. Se reduce la sensibilidad
del micrófono; se produce
una retroalimentación aun
con un nivel muy bajo:
Posibles causas
1. No hay tensión de alimentación.
2. El contacto del brazo del
micrófono está sucio o
cortocircuitado por humedad o corroído.
1. El micrófono está muy
cerca de la boca o de la
nariz.
2. La pantalla antiviento no
está montada.
1. La pantalla antiviento está
sucia y amortigua altas frecuencias.
2. Las ranuras del micrófono
están obturadas.
1. El micrófono está muy
lejos de la comisura de los
labios.
2. Las ranuras del micrófono
están obturadas.
Solución
1. Verifique el buen funcionamiento de la alimentación.
2. Contacte con el Servicio
Técnico de AKG.
1. Coloque las ranuras del
micrófono orientadas hacia
la comisura de los labios, a
una distancia de la boca y
la nariz a la que la respiración no produzca ruidos en
el micrófono.
2. Monte la pantalla antiviento.
1. Limpie la pantalla antiviento.
2. Limpie la caja del
micrófono.
1. Coloque el micrófono más
cerca de la comisura de
los labios.
2. Limpie la caja del
micrófono.
Page 31

31
7 Características técnicas
Funcionamiento: transductor de condensador de doble membrana con
carga permanente
Característica direccional: omnidireccional
Gama de frecuencia: 20 Hz a 20.000 Hz
Sensibilidad: 8 mV/Pa
Nivel límite de intensidad acústica: 133 dB
Nivel equivalente de intensidad acústica: <26 dB-A
Relación señal/ruido (ponderación A): >68 dB
Impedancia eléctrica: <3.500 Ω
Impedancia de carga recomendada: 10.000 Ω
Tensión de entrada: 1,5 V c.c. a 12 V c.c.
Consumo de corriente: <0,6 mA
Enchufe de conexión: modelos L: clavija mini XLR de tres polos
modelos oc: cable con terminales descubiertas (estañadas)
modelo SH/P: conector Lemo
Largo del cable: 1,5 m
Superficie: negro mate
modelos P: arco de metal: de color piel, mate
material sintético: negro mate
cable: negro mate
Medidas (L x F x Al): aprox. 180 x 130 x 85
Peso neto/bruto: aprox. 15 g / 325 g
Este producto corresponde a la norma EN 50 082-1, siempre y cuando los aparatos postconectados
correspondan también a las normas CE.
Curva de respuesta de frecuencia Diagrama polar
Page 32
1.1 Segurança
1.2 Meio ambiente
2.1 Introdução
2.2 C 477 WR
Verifique se o aparelho que pretende ligar ao microfone corresponda às
prescrições de segurança em vigor e assegure-se de que esteja ligado
à terra.
1. Respeite as prescrições de colheita de detritos em vigor quando
pretende jogar fora as pilhas e os acumuladores esgotados. Não
jogue as pilhas ou os acumuladores no fogo (perigo de explosão)
nem no lixo comum.
2. Quando pretende desfazer-se do aparelho, retire as pilhas ou os
acumuladores, separe a carcaça, a eletrônica e os cabos e respeite
as prescrições de colheita de lixo quando o joga fora.
3. A embalagem é reciclável. Elimine a embalagem num sistema de
colheita apropriado.
Agradecemos a sua preferência por um produto da AKG. Antes de
usar o aparelho, leia por favor o manual de uso com atenção e guarde-o para se poder informar sempre que seja necessário. Divirta-se e
bom trabalho!
O C 477 WR é um microfone de cabeça altamente profissional provido
de técnica de condensador que foi desenvolvido especialmente para a
aplicação "invisível" em palcos e para locutores de rádio e televisão.
Devido a este princípio o microfone é extremamente leve.
A cápsula de membrana dupla do C 477 WR está provida duma
membrana de proteção revestida por meio de vapor de ouro, o que
impede a penetração de suor e umidade no transdutor. Por isso o perigo de falhas em virtude da umidade é extremamente baixo.
O braço do microfone é fixado no lado esquerdo do arco de nuca. Para
aplicações de apresentação em duo ou outras aplicações semelhantes
está disponível um modelo com o braço do microfone fixado no lado
direito do arco.
O C 477 WR está disponível em seis variantes:
1. C 477 WR L: com plugue mini-XLR para ligar a um emissor de
bolso da AKG ou mesas de mixagem e amplificadores através do
adaptador de alimentação fantasma MPA III da AKG. Preto, braço
do microfone no lado esquerdo.
2 C 477 WR L/P: como o C 477 WR L, partes laterais e o microfone
em cor da pele.
3. C 477 WR oc: com extremidades do cabo livres, preto, braço do
microfone no lado esquerdo.
4. C 477 WR SH/P: com conector Lemo.
5. C 477 WR oc/P: com extremidades do cabo livres, partes laterais
e microfone em cor da pele, braço do microfone no lado esquerdo.
6. C 477 WR oc/P/R: como o C 477 WR oc/P, braço do microfone no
lado direito.
2 Descrição
32
1 Segurança e meio ambiente
Page 33

2.3 Anel de gotejamento
Fig. 1: anel de gotejamento
2.4 Acessórios
fornecidos na
embalagem
2.5 Acessórios
opcionais
3.1 C 477 WR L
3.1.1 Ligar a um
emissor de bolso
Importante!
3.1.2 Ligar através
do MPA III
Um anel especial na cápsula do
microfone impede a penetração de
suor e maquiagem na área da cápsula, evitando-se desta forma que
as fendas de entrada de som
fiquem entupidas por suor ou maquiagem que poderá levar a um
som surdo e reduzir a sensibilidade do microfone.
Nunca retire o anel de gotejamento do microfone!
Filtro antivento W 77
Anel de gotejamento
Filtro antivento em forma de grade W 77 M, preto.
Filtro antivento em forma de grade W 77 M, cor da pele
Adaptador de alimentação fantasma MPA III
O C 477 WR é um microfone de condensador com carga permanente
e precisa duma voltagem de alimentação de 1,5 a 12 V CC.
Pode ligar o C 477 WR L diretamente a todos os emissores de bolso da
AKG.
Pode ligar o microfone também a uma entrada duma mesa de mixagem
ou dum amplificador através do adaptador de alimentação fantasma
MPA III da AKG.
1. Ligue o plugue mini XLR no cabo de conexão do microfone à entrada de áudio do seu emissor de bolso, enfiando o plugue até este ter
entrado completamente.
O plugue tranca automaticamente.
Leia o manual do emissor de bolso.
O C 477 WR foi concebido especialmente para o uso com os
emissores de bolso da AKG. Quando o utilizar com emissores
de bolso de outras produtoras, poderá levar a falhas ou prejudicar o microfone. Além disso, a garantia poderá ficar nula em
alguns casos.
Com o adaptador de alimentação fantasma MPA III opcional pode ligar
o microfone a entradas XLR com alimentação fantasma de 9 a 52 V.
Para o MPA III recomendamos como melhores alimentadores fantasma
o alimentador de rede opcional N 62 E ou N 66 E ou o alimentador de
pilhas B 18 (também opcional) da AKG.
1. Ligue o plugue mini XLR no cabo do microfone à entrada mini XLR
que se encontra no cabo de conexão do MPA III, enfiando o plugue
até este ter entrado completamente.
O plugue tranca-se automaticamente.
2 Descrição
33
3 Conexão
Page 34
Importante!
3.2 C 477 WR oc
Fig. 2: diagrama do
circuito do
C 477 WR oc
Importante!
Importante!
2. Ligue o MPA III à entrada desejada provida de alimentação
fantasma.
Se não houver alimentação fantasma na entrada:
1. Ligue o MPA III a um aparelho de alimentação fantasma descrito
acima.
2. Ligue o aparelho de alimentação fantasma à entrada desejada.
Se utilizar outros aparelhos de alimentação do que os da AKG,
o microfone poderá levar prejuízos e a garantia ficará nula.
O C 477 WR oc está provido de um cabo de conexão com extremidades livres. Pode usar este microfone em emissores de bolso ou outros
aparelhos que possuem uma alimentação entre 1,5 V e 12 V CC.
Leia no manual do aparelho a que pretende ligar o microfone, qual é o
plugue que precisa.
O anel de gotejamento de material sintético transparente impede que suor ou maquiagem entupa as fendas de entrada de
som do microfone e que altere desta forma o som e a sensibilidade do microfone.
Nunca remova este anel de gotejamento do microfone!
O arco e o braço do microfone consistem num tubo de paredes
finas. Dobre estas partes com cautela. Se dobrar estes componentes com demasiada força, poderão quebrar e a garantia ficará nula.
3 Conexão
34
4 Aplicação
Page 35
4.1 Colocar o
microfone
Veja fig. 3.
Veja fig. 4.
Importante!
4.2 Filtro antivento
Nota:
5.1 Superfícies
5.2 Carcaça do
microfone
Importante!
1. Coloque o microfone como demostra a fig. 3.
2. Dobre o braço do microfone de maneira que o microfone se encontre em posição lateral ao canto da boca mantendo a menor distância possível à boca.
3. Pode dobrar o arco (setas brancas) e deslocar a parte lateral SEM o
braço do microfone em relação à parte do meio de plástico (setas
pretas). (A parte lateral onde o braço do microfone é fixado não
pode ser deslocado).
Nunca tente dobrar a parte do meio de material sintético do
arco porque o material sintético assume novamente a forma
original e quebra quando manipulado com muita força. Neste
caso a garantia fica nula.
Se ocorrerem ruídos fortes de vento ou estalos (por exemplo no ar
livre), coloque o filtro antivento de espuma fornecido na embalagem em
cima do microfone.
O filtro antivento de grade de arame W 77 em cor preta ou em cor da
pele possui uma aparência física mais discreta.
Limpe as superfícies de metal com álcool etílico ou álcool.
Para limpar as superfícies de material sintético use um pano mole
molhado em água (nunca use benzina ou solventes).
Se entrar suor ou maquiagem no microfone,
1. Desatarraxe a carcaça do microfone do braço do microfone,
2. Lave a carcaça em água destilada.
A carcaça está ligada à terra. Quando usa água da torneira normal os depósitos de calcário poderão interromper a ligação à
terra e provocar zumbidos. Por isso limpe a carcaça só com
água destilada.
4 Aplicação
35
Fig. 3: posição do microfone na
cabeça
Fig. 4: Adaptar o arco
5 Limpeza
Page 36

36
5 Limpeza
3. Deixe a carcaça secar completamente.
4. Atarraxe a carcaça no braço do microfone.
Lave o filtro antivento de espuma numa solução de sabão suave. O filtro antivento pode ser usado quando secado.
5.3 Filtro antivento
6 Resolução de problemas
Problema
1. O microfone não funciona:
2. Ouve-se estalos, ruídos de
vento ou respiração:
3. O som do microfone tornase mais surdo com o
tempo:
4. A sensibilidade do microfone torna-se cada vez
menor, realimentações já
em níveis baixos.
Causa possível
1. Não há alimentação de
corrente.
2. Os contatos no braço do
microfone estão sujos, têm
curto-circuito por causa de
umidade ou corroeram.
1. O microfone encontra-se
muito próximo à boca ou
ao nariz.
2. Falta o filtro antivento.
1. Um filtro antivento sujo
atenua as freqüências
altas.
2. As fendas de entrada de
som estão entupidas.
1. O microfone encontra-se
muito afastado do canto
da boca.
2. As fendas de entrada de
som estão entupidas.
Solução
1. Verificar o dispositivo de
alimentação.
2. Contate uma agência de
serviço da AKG.
1. Direcionar as fendas de
entrada de som para o
canto da boca a uma
distância da boca e do
nariz que faz desaparecer
os ruídos de respiração.
2. Colocar o filtro antivento.
1. Limpar o filtro antivento.
2. Limpar a carcaça do
microfone.
1. Aproximar o microfone do
canto da boca.
2. Limpar a carcaça do
microfone.
Page 37

37
7 Dados técnicos
Tipo: transdutor de condensador de membrana dupla com
carga permanente
Caraterística direccional: omnidireccional
Resposta de freqüência: 20 Hz a 20.000 Hz
Sensibilidade: 8 mV/Pa
Pressão sonora máxima: 133 dB
Pressão sonora equivalente: <26 dB-A
Relação sinal/ruído (pond. A): >68 dB
Impedância elétrica: <3.500 Ω
Impedância de carga recomendada: 10.000 Ω
Tensão de alimentação: 1,5 V CC a 12 V CC
Consumo de corrente: <0,6 mA
Tipo de conetor: versões L: plugue mini XLR com 3 pólos
versões oc: extremidades libres (estanhadas)
versão SH/P: conetor Lemo
Cumprimento do cabo: 1,5 m
Superfície: preta mate
versões P: arco de metal: cor da pele, mate
material sintético: preto mate
cabo: preto mate
Dimensões (largura x profundidade x altura): aprox. 180 x 130 x 85 mm
Peso neto/bruto: aprox. 15g / 325 g
Este produto corresponde à norma EN 50 082-1, suposto que aparelhos adicionais sejam conforme
às normas CE.
Resposta de freqüência Diagrama polar
Page 38

Notizen - Notes - Notes - Note - Notas - Notas
38
Page 39

Notizen - Notes - Notes - Note - Notas - Notas
39
Page 40

Printed in Austria on recycled paper. 05/04/9100 U 0985
Technische Änderungen vorbehalten. Specifications subject to change without notice. Ces caractéristiques sont susceptibles de modifications.
Ci riserviamo il diritto di effettuare modifiche tecniche. Nos reservamos el derecho de introducir modificaciones técnicas. Especificações sujeitas a mudanças sem aviso prévio.
AKG Acoustics GmbH
Lemböckgasse 21–25, P.O.B. 158, A-1230 Vienna/AUSTRIA, Tel: (+43 1) 86 654-0*, Fax: (+43 1) 86 654-7516,
www.akg.com, e-mail: sales@akg.com, Hotline: (+43 676) 83200 888, hotline@akg.com
AKG Acoustics GmbH
Bodenseestraße 228, D-81243 München/GERMANY, Tel: (+49 89) 87 16-0, Fax: (+49 89) 87 16-200,
www.akg.com/de, e-mail: infode@akg.com,
Hotline: (+49 89) 87 16-22 50, hotlinede@akg.com
AKG ACOUSTICS, U.S.
914 Airpark Center Drive, Nashville, TN 37217, U.S.A., Tel: (+1 615) 620-3800, Fax: (+1 615) 620-3875,
www.akgusa.com, e-mail: akgusa@harman.com
For other products and distributors worldwide see our website: www.akg.com
Mikrofone · Kopfhörer · Drahtlosmikrofone · Drahtloskopfhörer · Kopfsprechgarnituren · Akustische Komponenten
Microphones · Headphones · Wireless Microphones · Wireless Headphones · Headsets · Electroacoustical Components
Microphones · Casques HiFi · Microphones sans fil · Casques sans fil · Micros-casques · Composants acoustiques
Microfoni · Cuffie HiFi · Microfoni senza filo · Cuffie senza filo · Cuffie-microfono · Componenti acustici
Micrófonos · Auriculares · Micrófonos inalámbricos · Auriculares inalámbricos · Auriculares con micrófono · Componentes acústicos
Microfones · Fones de ouvido · Microfones s/fios · Fones de ouvido s/fios · Microfones de cabeça · Componentes acústicos
 Loading...