

AKG C-444 Owners manual
C 444
Bedienungshinweise. . . . . . S. 2
User Instructions. . . . . . . . p. 10
Mode d’emploi . . . . . . . . . . p. 18
Istruzioni d’uso . . . . . . . . . p. 26
Modo de empleo . . . . . . . . p. 34
Instruções de uso . . . . . . . p. 42
Bitte vor Inbetriebnahme des Gerätes lesen!
Please read the manual before using the equipment!
Veuillez lire cette notice avant d’utiliser le système!
Prima di utilizzare l’apparecchio, leggere il manuale!
Antes de utilizar el equipo, lea por favor el manual!
Por favor leia este manual antes de usar o equipamen
to!
1 Beschreibung
1.1 Allgemeines
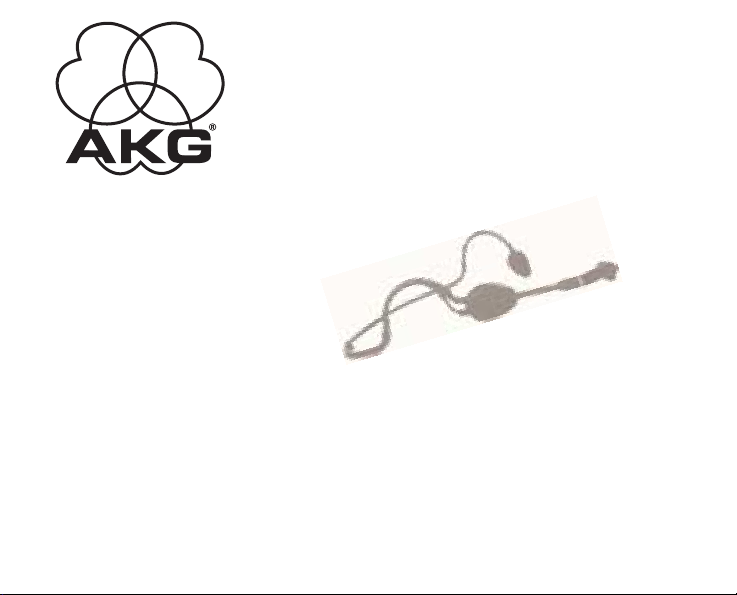
Das C 444 ist ein Miniatur-Kondensatormikrofon, das mit
einem Nackenbügel am Kopf getragen wird. Das Mikrofon hat
eine nierenförmige Richtcharakteristik und nimmt daher
Schall von vorne (vom Mund) bevorzugt auf.
Das Mikrofongehäuse mit dem Kondensatorwandler ist über
eine elastische Lagerung mit dem Mikrofonarm verbunden,
um Kabelgeräusche und Körperschall zu unterdrücken. Der
Mikrofonarm positioniert das Mikrofon seitlich vor dem Mund.
Dadurch werden Popgeräusche weitgehend vermieden und
das Mikrofon vor Verunreinigung geschützt. Der mitgelieferte
Windschutz unterdrückt zusätzlich Wind- und Popgeräusche.
1.2 Mitgeliefertes
Zubehör
1.3 Empfohlenes
Zubehör
2
Das C 444 wird mit folgendem Zubehör geliefert:
Schaumstoff-Windschutz W 444
Batteriespeisegerät B 29 L
Phantomspeiseadapter MPA III
Das C 444 ist ein Kondensatormikrofon und benötigt daher
eine Stromversorgung.
2 Anschluss
1. Stecken Sie den Mini-XLR-Stecker am Mikrofonkabel bis
zum Anschlag in eine der beiden Mini-XLR-Buchsen am
B 29 L, die Mini-XLR-Kupplung am Anschlusskabel des
MPA III bzw. die Eingangsbuchse des Taschensenders an.
Der Stecker verriegelt sich automatisch.
2. Verbinden Sie das B 29 L bzw. den MPA III mit dem
gewünschten Eingang.
Das optionale Batteriespeisegerät B 29 L ermöglicht Ihnen,
zwei Mikrofone an einen gemeinsamen symmetrischen oder
asymmetrischen Eingang anzuschliessen, sodass Sie weniger Mischpulteingänge benötigen.
Mit dem optionalen Phantomspeiseadapter MPA III können
Sie das C 444 an jede Phantomspeisequelle sowie an XLREingänge mit 9 bis 52 V Phantomspeisung anschliessen.
Als Phantomspeisegeräte für C 444 L mit MPA III empfehlen
wir das optionale Netzgerät N 62 E oder N 66 E sowie das
(ebenfalls optionale) Batteriespeisegerät B 18 von AKG.
Wenn Sie andere als die von AKG empfohlenen
Speisegeräte verwenden, kann das Mikrofon
beschädigt werden und erlischt die Garantie.
2.1 C 444 L
2.2 Batteriespeisegerät B 29 L
2.3 Phantomspeiseadapter MPA III
2.4 Externe
Phantomspeisegeräte
Achtung!
3
2 Anschluss
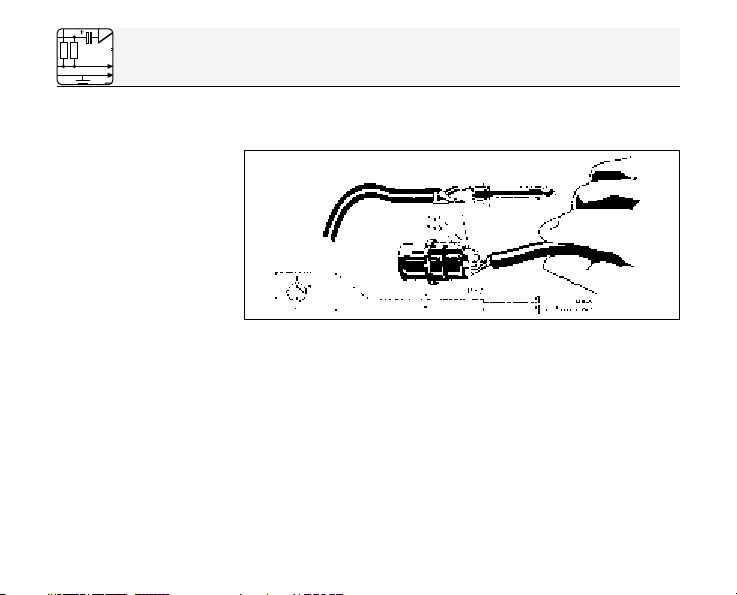
2.5 Anschlusskabel
4
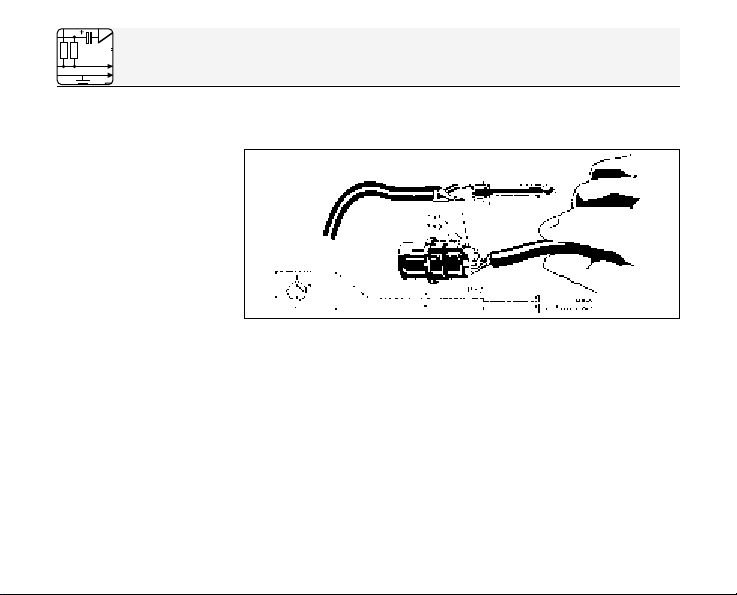
Zum Anschluss an symmetrische (XLR-) Eingänge verwenden Sie ein normales XLR-Kabel.
Abb. 1: Anschlusskabel für asymmetrische Mikrofoneingänge.
Für asymmetrische Eingänge (Mono-Klinkenbuchse) ver-
wenden Sie ein Kabel mit XLR-Stecker (weiblich) und MonoKlinkenstecker (s. Abb. 1):
1. Verbinden Sie im XLR-Stecker mittels einer Drahtbrücke
Stift 1 mit Stift 3 und mit der Abschirmung.
2. Verbinden Sie die innere Ader des Kabels mit Stift 2 des
XLR-Steckers und der Spitze des Klinkensteckers.
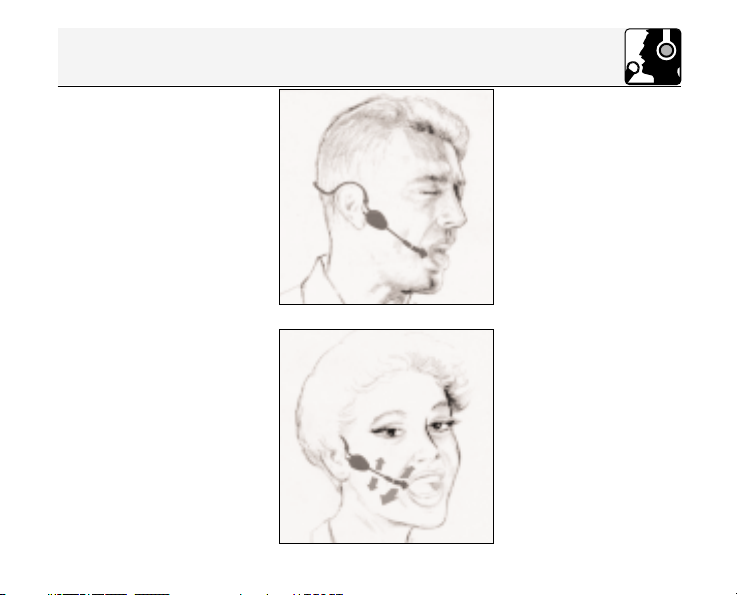
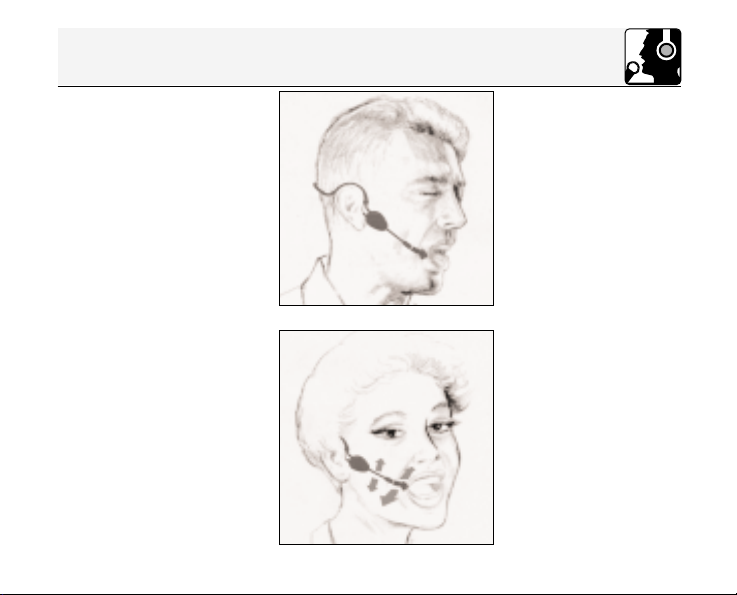
1. Setzen Sie das Mikrofon
wie in Abb. 2 gezeigt auf.
2. Biegen Sie den Schwanenhals so, dass das
Mikrofon seitlich vor dem
Mundwinkel sitzt.
Anm.: Wenn das Mikrofon
”poppt” (”p” und ”t” werden
unnatürlich laut übertragen), plazieren Sie die
Mikrofonkapsel etwas weiter vom Mund weg (nach
hinten oder nach unten).
Klingt das Mikrofon
”dünn”, ohne Druck, positionieren Sie die Kapsel
näher am Mund.
Suchen Sie beim Soundcheck die ideale Position
(s. Abb. 3).
3 Anwendungshinweise
3.1 Mikrofon
aufsetzen
Abb. 2: Mikrofon aufsetzen.
Abb. 3: Mikrofon positionieren
5

3 Anwendungshinweise
3.2 Windschutz
4 Technische Daten
4.1 Mikrofon
6
Falls (z.B. im Freien) starke Windgeräusche oder
Popgeräusche auftreten, befestigen Sie den mitgelieferten
Schaumstoff-Windschutz am Mikrofon.
1. Stecken Sie den Windschutz auf die Mikrofonkapsel auf.
2. Ziehen Sie den Windschutz auch über das äussere Ende
der Mikrofonkapsel.
Arbeitsweise: Kondensatormikrofon mit
Permanentladung
Richtcharakteristik: Niere
Übertragungsbereich: 20-20.000 Hz
Empfindlichkeit bei 1000 Hz: 40 mV/Pa (-28 dBV bez. auf 1 V/Pa)
Elektrische Impedanz bei 1000 Hz: 200 Ω, elektronisch symmetriert
Empfohlene Lastmpedanz: >2000 Ω
Grenzschalldruckpegel für 1% / 3% Klirrfaktor: 126 / 130 dB SPL
Äquivalentschalldruckpegel: 22 dB-A
Speisespannung:
C 444 L: 9 V Batteriespeisung über B 29 L
oder Taschensender, oder 9 - 52 V
Universalphantomspeisung über
Adapter MPA III

4 Technische Daten
Stromaufnahme: ca. 2 mA
Zulässige klimatische Temperatur: -20°C ... +60°C
Verhältnisse: Rel. Luftfeuchte bei +20°C: 99%
Gehäusematerial: Bügel: Metall
Mikrofongehäuse: Noryl
Oberfläche: mattschwarz
Abmessungen: 130 mm ø
Kabellänge: 1,5 m
Nettogewicht: 30 g ohne Stecker
Dieses Produkt entspricht der Norm EN 50 082-1, vorausgesetzt, dass nachgeschaltete Geräte CE-konform sind.
4.2 Konformitätshinweis
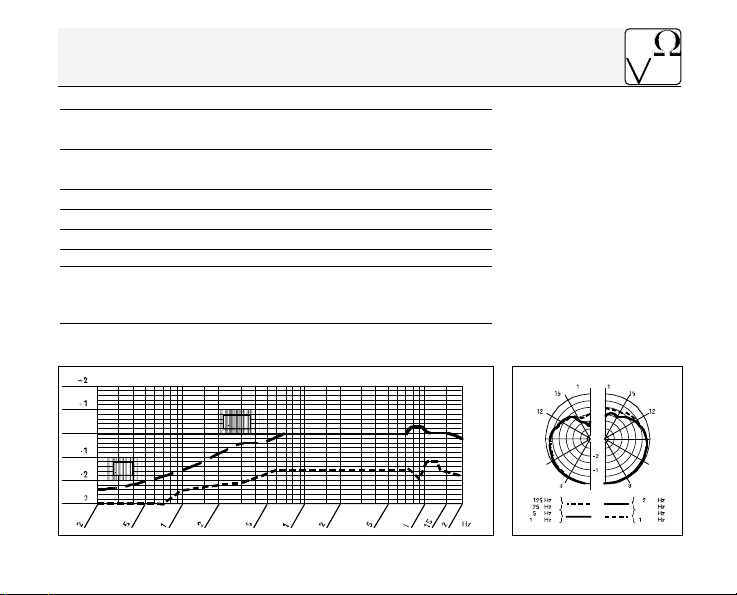
4.3 Frequenzkurve
4.4 Polardiagramm
7

5 Reinigung
Alle Metalloberflächen können Sie problemlos mit (Industrie-)
Spiritus oder Alkohol reinigen.
Den Schaumstoff-Windschutz reinigen Sie am besten mit
einer milden Waschmittellösung. Der Windschutz ist sofort
nach dem Trocknen wieder einsatzbereit.
8
6 Fehlerbehebung
1. Mikrofon funktioniert
Fehler
nicht:
2. Starke Pop-, oder
Wind- und Atemgeräusche hörbar:
3. Mikrofon klingt mit der
Zeit immer dumpfer:
4. Mikrofon klingt ”dünn”,
Rückkopplung bereits
bei geringen Pegeln:
Mögliche Ursache
Keine Speisespannung
Mikrofon zu nahe an Mund
oder Nase.
Verschmutzter Innen- oder
Aussenwindschutz W 444
dämpft hohe Frequenzen.
Mikrofon zu weit vom
Mundwinkel entfernt.
Behebung
Speisegerät überprüfen.
Mikrofon-Einsprechöffnungen zum Mundwinkel
ausrichten und so weit von
Mund und Nase entfernt,
dass Atemgeräusche nicht
mehr auftreten.
1. Windschutz W 444 mit
Seifenlauge reinigen.
2. Innenwindschutz von
AKG-Service reinigen
lassen.
ACHTUNG: Mikrofon-
gehäuse nicht öffnen, da
ansonsten die Garantie
erlischt.
Mikrofon näher am
Mundwinkel positionieren.
9
1 Description
10
1.1 General
1.2 Standard
Accessories
1.3 Optional
Accessories
The C 444 is a head-worn miniature condenser microphone
with a convenient behind-the-neck headband. The microphone has a cardioid polar pattern and therefore “prefers”
sounds arriving from in front of it (from the user’s mouth).
The microphone case containing the condenser transducer is
shock mounted on the microphone arm in order to suppress
cable and mechanical noise. The microphone arm will place
the microphone in front of the corner of your mouth to minimize pop noise and protect the microphone from contamination. The supplied windscreen makes the microphone even
less susceptible to wind and pop noise.
The C 444 is supplied with the following accessory:
W 444 foam windscreen
B 29 L battery supply
MPA III phantom power adapter
The C 444 is a condenser microphone and therefore needs a
power supply.
2 Interfacing
1. Plug the mini XLR connector on the microphone cable all
the way into one of the two mini XLR sockets on the
B 29 L, the mini XLR socket on the connecting cable of the
MPA III, or the input socket on the bodypack transmitter.
The connector will lock automatically.
2. Connect the B 29 L or MPA III to the desired input.
The optional B 29 L battery supply allows you to connect two
microphones to a common balanced or unbalanced input in
order to save on mixer inputs.
The optional MPAIII phantom power adapter lets you connect
the C 444 to any phantom power source or XLR input with
9 to 52 V phantom power.
For phantom powering the C 444 L via an MPA III we recommend the optional N 62 E or N 66 E AC power supply or the
B 18 battery supply (also optional) from AKG.
Using any power supply other than those recommended by AKG may damage your microphone and
will void the warranty.
2.1 C 444 L
2.2 B 29 L Battery
Supply Unit
2.3 MPA III Phantom
Power Adapter
2.4 External
Phantom Adapters
Warning
11
2 Interfacing
2.5 Connecting
12
Cable
To connect to a balanced (XLR) input, use a standard XLR
cable.
Fig. 1: Connecting cable for unbalanced microphone inputs.
To connect to an unbalanced input (mono jack), use a cable
with a female XLR connector and TS jack plug (see fig. 1
above):
1. On the XLR connector, use a wire bridge to connect pin 1
to pin 3 and the cable shield.
2. Connect the inside wire of the cable to pin 2 on the XLR
connector and the tip contact of the jack plug.
1. Put the microphone on as
shown in fig. 2.
2. Bend the gooseneck so
that the microphone will sit
to one side in front of the
corner of your mouth.
Note: Should you hear
excessive pop noise (”p”
and ”t” sounds are overemphasized unnaturally),
move the microphone
capsule further away from
your mouth (up or back).
If the microphone sounds
”thin” or flat, move the
microphone capsule
closer to your mouth (refer
to fig. 3).
Find the optimum position
during the soundcheck.
3 Operating Notes
3.1 Putting On the
Microphone
Fig. 2: Putting the mic on.
Fig. 3: Positioning the mic.
13
3 Operating Notes
3.2 Windscreen
4 Specifications
4.1 Microphone
14
If (for instance, in outdoor use) excessive wind or pop noise
becomes audible, attach the supplied windscreen to the
microphone.
1. Slide the windscreen onto the microphone capsule.
2. Pull the windscreen over the outer edge of the microphone
capsule.
Type: Pre-polarized condenser microphone
Polar pattern: Cardioid
Frequency range: 20 Hz to 20,000 Hz
Sensitivity at 1000 Hz: 40 mV/Pa (-28 dBV re 1 V/Pa)
Electrical Impedance at 1000 Hz:
Recommended load impedance:
Max. SPL for 1% / 3% THD: 126 dB / 130 dB
Equivalent noise level: 22 dB-A
Supply voltage:
C 444 L: 9 V battery supply through B 29 L or
200 Ω electronically balanced
>2000 Ω
bodypack transmitter, or 9 to 52 V
universal phantom power through
MPA III adapter
4 Specifications
Current consumption: Approx. 2 mA
Environment: Temperature: -20°C to +60°C
R.H. at +20°C: 99%
Case materials: Headband: metal
Microphone case: Noryl
Finish: Matte black
Size: 130 mm (5.2 in.) in dia.
Cable length: 1.5 m (5 ft.)
Net weight: 30 g (1.1 oz.) exc. of connector
When connected to equipment with a CE sign, this product
conforms to EN 50 082-1.
4.2 Declaration of
Conformity
4.3 Frequency Response
4.4 Polar Diagram
15
16
5 Cleaning
Clean metal surfaces with (industrial grade) methylated spirits
or alcohol.
Clean the foam windscreen in mild soap suds. You can use
the windscreen again as soon as it has dried.
 Loading...