


RH0380

Owner’s Manual
Stainless Steel Range Hood
Island Mounts: Type A Only
Copyright ShopRangeHoods.com© 2016
Office: +1 (626) 321-9834
Email: support@shoprangehoods.com
Distributed by ShopRangeHoods.com
Manufactured by AKDY
FOR RESIDENTIAL USE ONLY IN US & CA
WARRANTY VOID OUTSIDE US & CA
Revised 06/16
TO REDUCE THE RISK OF FIRE, ELECTRIC SHOCK,
INJURY TO PERSONS, OBSERVE THE FOLLOWING:
1. Use this unit only in the manner intended by the manufacturer. If you have questions, contact
the manufacturer at the address or telephone number listed in the warranty.
2. Before servicing or cleaning unit, switch power off at service panel and lock the service discon-
necting means to prevent power from being switched on accidentally. When the service dis-
connecting means cannot be locked, securely fasten a prominent warning device, such as a
tag, to the service panel.
3. Installation work and electrical wiring must be done by a qualified person(s) in accordance with
all applicable codes and standards, including fire-rated construction codes and standards.
4. Sufficient air is needed for proper combustion and exhausting of gases through the flue
(chimney) of fuel burning equipment to prevent backdrafting. Follow the heating equipment
manufacturer’s guideline and safety standards such as those published by the National Fire
Protection Association (NFPA), and the American Society for Heating, Refrigeration and Air
Conditioning Engineers (ASHRAE), and the local code authorities.
5. When cutting or drilling into wall or ceiling, do not damage electrical wiring and other hidden
utilities.
6. Ducted fans must always be vented to the outdoors.
7. Acceptable for use over a tub or shower when connected to a GFCI (Ground Fault Circuit
Interrupter) - protected branch circuit (ceiling installation only).
8. This unit must be grounded.
CAUTION
1. For general ventilating use only. Do not use to exhaust hazardous or explosive materials and
vapors.
2. This product can be installed in a wall if mounted 8-ft. or more above the floor.
3. To avoid motor bearing damage and noisy and/or unbalanced impellers, keep drywall spray,
construction dust, etc. off power unit.
4. Please read specification label on product for further information and requirements.

TOOLS & PARTS REQUIREMENTS
Electrical drill or ratchet driver
1/2” drill bit for drilling pilot holes
1¼” drill bit for drilling electrical wiring access hole
Screwdrivers: Philips & Straight blade
Pliers
Tape measure or ruler and pencil
Electrical supplies for wiring
Aluminum foil tape and/or HVAC tape
Hammer
Jigsaw or saber saw
Stud finder
PARTS SUPPLIED
Body & Main Unit: 1 pc.
Chimney Mounting Bracket: 1 pc.
Installation Manual: 1 set
Chimney Cover: 1 set
Metal Grease Filter: 1-4 pcs.
Air Outlet & Air Damper: 1 set
Exhaust Pipe & Ducting: 1 pc.
Hardware: 1 set
LOCATION REQUIREMENTS
Observe all governing codes and ordinances. Have a qualified
technician install the range hood. It is the installer’s responsibility
to comply with installation clearances specified on the model
serial rating plate.
Canopy hood's location should be away from strong draft areas,
such as windows, doors, and strong heating vents.
Cabinet opening dimensions that are shown must be used. Given
dimensions provide minimum clearance.
A. Coun tertop Heigh t
B. Hood h eig ht fro m ceili ng to botto m of th e range hood fi lter
surface: D-A-C=B
C. 29” (73.66 cm) min. from cooking surface, suggested
31” (78.74 cm) max.
D. Ceiling Height
VENTILATION REQUIREMENTS
Range hoods must be ventilated to the outdoors, except for non-
vented (recirculating) installations.
Do not ventilate the range hood into an attic or other en-
closed areas.
Do not use 4" (10.2 cm) laundry-type wall caps.
The length of the range hood and the number of elbows
should be kept to a minimum to provide maximum perfor-
mance.
For the Most Efficient and Quiet Operation
Use no more than three 90° elbows.
Make sure there is a minimum of 24" (61 cm) of straight duct
between the elbows if more than one elbow is used.
Do not install two elbows together.
Use clamps to seal all joints in the vent system.
The vent system must have a damper. If the roof or wall cap
has a damper, do not use the damper supplied with the
range hood.
Use caulking to seal exterior walls or roof openings around
the cap.
The size of the vents should be uniform.
Makeup Air
Local building codes may require the use of makeup air systems,
when using ventilation systems greater than specified CFM of air
movement. The specified CFM varies from state to state. Consult
your HVAC professional for specific requirements in your area.
Cold Weather Installations
An additional back draft damper should be installed to minimize
backward cold air flow. A thermal break should be installed to
minimize conduction of outside temper-atures as part of the vent
system. The damper should be on the cold air side of the thermal
break. The break should be as close as possible to where the
vent system enters the heated portion of the house.
Venting Method
This canopy hood is factory set for through the roof or wall. A
6" (15.2 cm) round vent system is needed for installation. The
hood exhaust opening is 6" (15.2 cm) round. To vent through a
wall, a 90° elbow is needed. If exhaust ducting with a diameter of
less than 5.91” (150 mm) or if flat ducting is used, the noise level
of the range hood will Increase and extraction will be less effi-
cient.
Rear Discharge
A 90° elbow may be installed immediately above the hood.
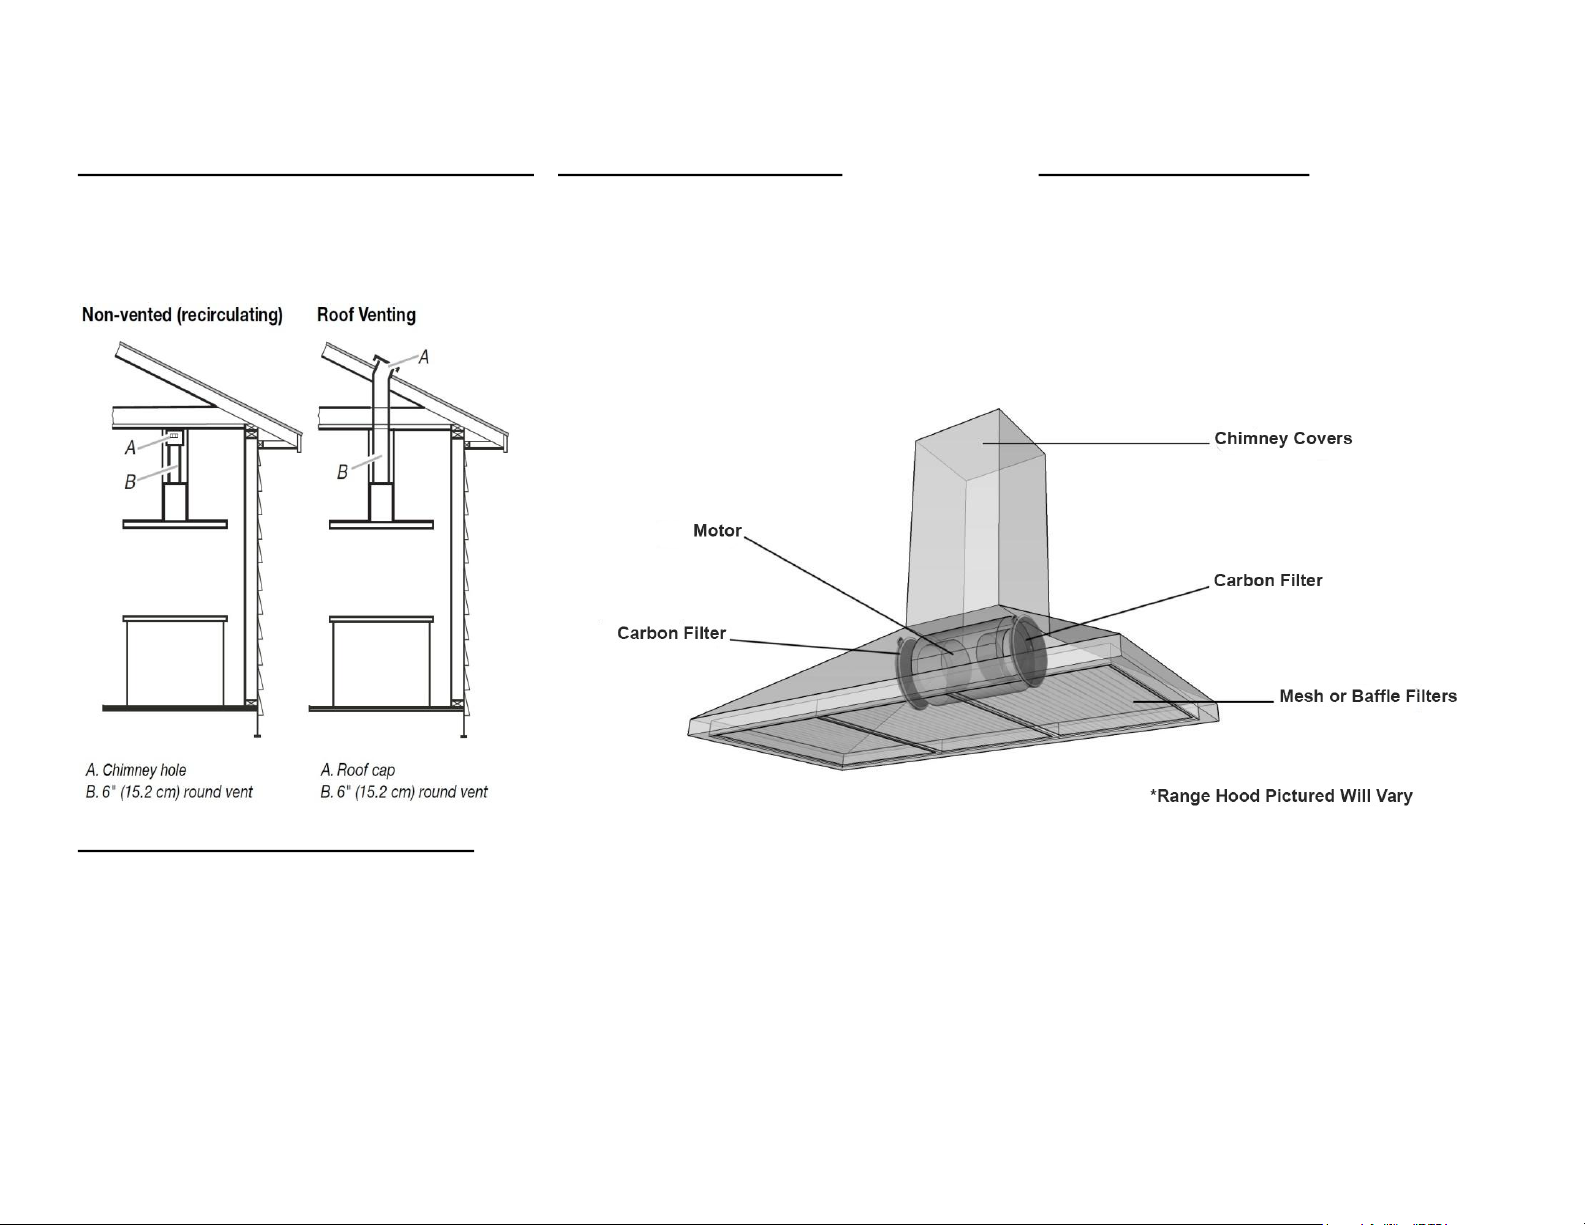
Recirculating Installations & Carbon Filters
Non-Vented (Recirculating) Installations
If it is not possible to vent cooking fumes and vapors to the out-
side, the hood can be used in the non-vented (recirculating ver-
sion, fitting a carbon filter at the motor. Fumes and vapors are
then recycled through the top grille. Do not block the chimney
holes and vents on either side.
Installation Steps for Recirculating
Prerequisites:
1 set of carbon filters (2 pcs.) ]”Recirculating Kit”]
Step 1: Remove the mesh or baffle filters
Step 2: Locate the motor and the carbon filter clips on each side
Step 3: Place the carbon filters into the corresponding ends of the
motor
Step 4: Twist each carbon filter until it clips into place
Carbon Filter Care Guide
Carbon filters have to be replaced approximately every 6 months
depending on the frequency of use. They cannot be washed and
reused. Please replace carbon filters when your kitchen air is no
longer smelling fresh and dispose of the used ones.
DO NOT WASH
DO NOT REUSE
DO NOT OPEN
Ordering Carbon Filters
Carbon filters can be ordered on: ShopRangeHoods.com or by
phone at: +1 (626) 321-9834. Please ask for Sales.
Navigate to Replacement Parts in the navigation bar
Click Recirculating Kit
Under Options, click and choose your model number/PID
Checkout to complete the ordering process
 Loading...