

Page 1
UNIBASS UB1
English
English
WARNING!
To prevent fire or shock hazard, do not expose this appliance to rain or moisture.
CAUTION
RISK OF ELECTRIC SHOC K
DO NOT OPEN
CAUTION: TO REDUCE THE RISK OF ELECTRIC SHOCK
DO NOT REMOVE COVER (OR BACK).
NO USER-SERVICEABLE PARTS INSIDE.
REFER SERVICING TO QUALIFIED SERVICE PERSONNEL.
THE SYMBOLS ARE RULED BY UL STANDARDS (U.S.A.)
The lightning flash with arrowhead symbol, within an equilateral triangle,
is intended to alert the user to the presence of uninsulated “dangerous
voltage” within the product’s enclosure; that may be of sufficient magnitude to constitute a risk of electric shock to persons.
The exclamation point within an equilateral triangle is intended to alert
the user to the presence of important operating and maintenance
(servicing) instructions in the literature accompanying the appliance.
5B-En
1-En
Harmonized Bass Distortion
English
CAUTION (Only for products sold in Canada and U.S.A.)
To prevent electric shock, do not use this polarized AC power plug with an extension cord,
receptacle, or other outlet unless the blades can be fully inserted to prevent blade exposure.
ATTENTION
Afin d’éviter tout risque de décharge électrique, n’ utilisez pas cette prise polarisée avec une
rallonge, une prise de courant ou autre sortie á moins que les lames puissent être complétement
insérées et qu’elles ne soient plus visibles.
IMPORTANT (for U.K. customers only)
This equipment is fitted with an approved converter plug.
To change the fuse in this type of plug proceed as follows:
1) Remove the fuse cover and old fuse.
2) Fit a new fuse which should be a BS1362 5 Amp A.S.T.A. or BSI approved type.
3) Refit the fuse cover.
If the AC mains plug fitted to the lead supplied with this equipment is not suitable for your type
of AC outlet sockets, it should be changed to an AC mains lead, complete with moulded plug of
the appropriate type.
If this is not possible, the plug should be cut off and a correct one fitted to suit the AC outlet. This
should be fused at 5 Amps.
If a plug without a fuse is used, the fuse at the distribution board should not be greater than 5 Amp.
PLEASE NOTE: THE SEVERED PLUG MUST BE DESTROYED TO AVOID A POSSIBLE
The wires in this mains lead are coloured in accordance with the following code:
As the colours of the wires in the mains lead of this apparatus may not correspond with the
coloured markings identifying the terminals in your plug, please proceed as follows:
The wire which is coloured BLUE must be connected to the terminal which is marked with the
letter N or coloured BLACK.
The wire which is coloured BROWN must be connected to the terminal which is marked with
the letter L or coloured RED.
DO NOT CONNECT ANY WIRE TO THE PIN MARKED E OR
OR YELLOW & GREEN WHEN WIRING THE PLUG.
Ensure that all the terminals are securely tightened and no loose strands of wire exist.
Before replacing the plug cover, make certain the cord grip is clamped over the outer sheath of
the lead and not simply over the wires.
SHOCK HAZARD SHOULD IT BE INSERTED INTO A 13 AMP SOCKET
ELSEWHERE.
BLUE — NEUTRAL
BROWN — LIVE
OR COLOURED GREEN
14-En
14-F
6F-En
English
CHANGES OR MODIFICATIONS NOT EXPRESSLY APPROVED BY THE MANUFACTURER FOR COMPLIANCE COULD VOID THE USER’S AUTHORITY TO
OPERATE THE EQUIPMENT.
32-En
This appliance is not equipped with a main power switch. Even when the appliance
is turned off, the power supply to the appliance is not completely turned off when the
power cord is plugged in. Pull out the adaptor when not using the appliance for long
periods.
4-En
FCC WARNING
This equipment has been tested and found to comply with the limits for a Class B digital
device pursuant to Part 15 of the FCC rules. These limits are designed to provide
reasonable protection against harmful interference in a residential installation. This
equipment generates, uses, and can radiate radio frequency energy and, if not
installed and used in accordance with the instructions, may cause harmful interference to radio communications. However, there is no guarantee that interference will not
occur in a particular installation. If this equipment does cause harmful interference to
radio or television reception, which can be determined by turning the equipment off and
on, the user is encouraged to try to correct the interference by one or more of the
following measures:
• Reorient or relocate the receiving antenna.
• Increase the separation between the equipment and receiver.
• Connect the equipment into an outlet on a circuit different from that to which the receiver
is connected.
• Consult the dealer or an experienced radio/TV technician for help.
21B-En
This digital apparatus does not exceed the Class B limits for radio noise
emissions from digital apparatus set out in the Radio Interference Regulations
of the Canadian Department of Communications.
27-En
AVIS POUR LES ACHETEURS CANADIENS DU UB1
Le présent appareil numérique n’ément pas de bruits radioélectriques
dépassant les limites applicables aux appareils numériques de la Class B
prescrites dans le Règlement sur le brouillage radioélectrique édicté par le
ministère des Communications du Canada.
27-F
Page 2
English
WARNING
The UB1 UNIBASS is designed to be used in a standard household environment.
Power requirements for electrical equipment vary from area to area. Please ensure that your AC
Adaptor supplied meets the power requirements in your area. If in doubt, consult a qualified electrician
or AKAI professional dealer.
120 VAC @ 60 Hz for USA and Canada AC Adaptor MP-9 (CA)
220~230/240 VAC @ 50 Hz for Europe AC Adaptor MP-9 (EVB)
PROTECTING YOURSELF AND THE UB1 UNIBASS
• Never touch the AC Adaptor with wet hands.
• Always disconnect the AC Adaptor from the power supply by pulling on the adaptor/plug, not the
cord.
• Allow only an AKAI professional dealer or qualified professional engineer to repair or reassemble
the UB1 UNIBASS. Apart from voiding the warranty, unauthorized engineers might touch live
internal parts and receive a serious electrical shock.
• Do not put, or allow anyone to put any object, especially metal objects, into the UB1 UNIBASS.
• Use only a household AC power supply. Never use a DC power supply.
• If water or any other liquid is spilled into or onto the UB1 UNIBASS, disconnect the power, and call
your dealer.
• Make sure that the unit is well-ventilated, and away from direct sunlight.
• To avoid damage to internal circuitry, as well as the external finish, keep the UB1 UNIBASS away
from sources of direct heat (stoves, radiators, etc.).
• Avoid using aerosol insecticides, etc. near the UB1 UNIBASS. They may damage the surface, and
may ignite.
• Do not use denaturated alcohol, thinner or similar chemicals to clean the UB1 UNIBASS. They will
damage the finish.
• Modification of this equipment is dangerous, and can result in the functions of the UB1 UNIBASS
being impaired. Never attempt to modify the equipment in any way.
• Make sure that the UB1 UNIBASS is always well-supported when in use on a firm level surface.
• In order to assure optimum performance of your UB1 UNIBASS, select the setup location carefully,
and make sure the equipment is used properly. Avoid setting up the UB1 UNIBASS in the following
locations:
1. In a humid or dusty environment
2. In a room with poor ventilation
3. On a surface which is not horizontal
4. Inside a vehicle such as a car, where it will be subject to vibration
5. In an extremely hot or cold environment
• Be sure to wait for a few seconds before turning the unit on again after the power has been turned
off to ensure proper operation.
• When you connect this unit to other equipment, make sure that all of the other equipment is turned
off in order to prevent malfunction or damage to speakers.
Copyright Notice
The AKAI UB1 is a computer-based instrument and uses software contained in ROM.
Software that is provided with the instrument, including information contained in this
manual, is copyrighted by applicable laws. You can use that software or information
concerning the instrument only for personal use. You are strictly prohibited to copy or
modify any part of the software or manual without written permission from AKAI
professional M.I. Corp. in Japan.
English
For bass players who want to add more
depth to their sound, the UniBass is at your
feet giving great versatility and depth to
your playing style. It does this by shifting
the pitch one octave up and outputing the
original bass sound plus the effect sound
you can even output the original and effect sounds to two separate amps). Now it’s your
turn to stand out!
Using the MODIFY mode, you can add an upper 5th up or lower 4th to the effect or mute
the original bass sound completely. Tone and distortion can also be adjusted for more
control of the sound.
1
5 6 7
9
(you can control the mix between the two,
2
3
4
8
10 11
12 13
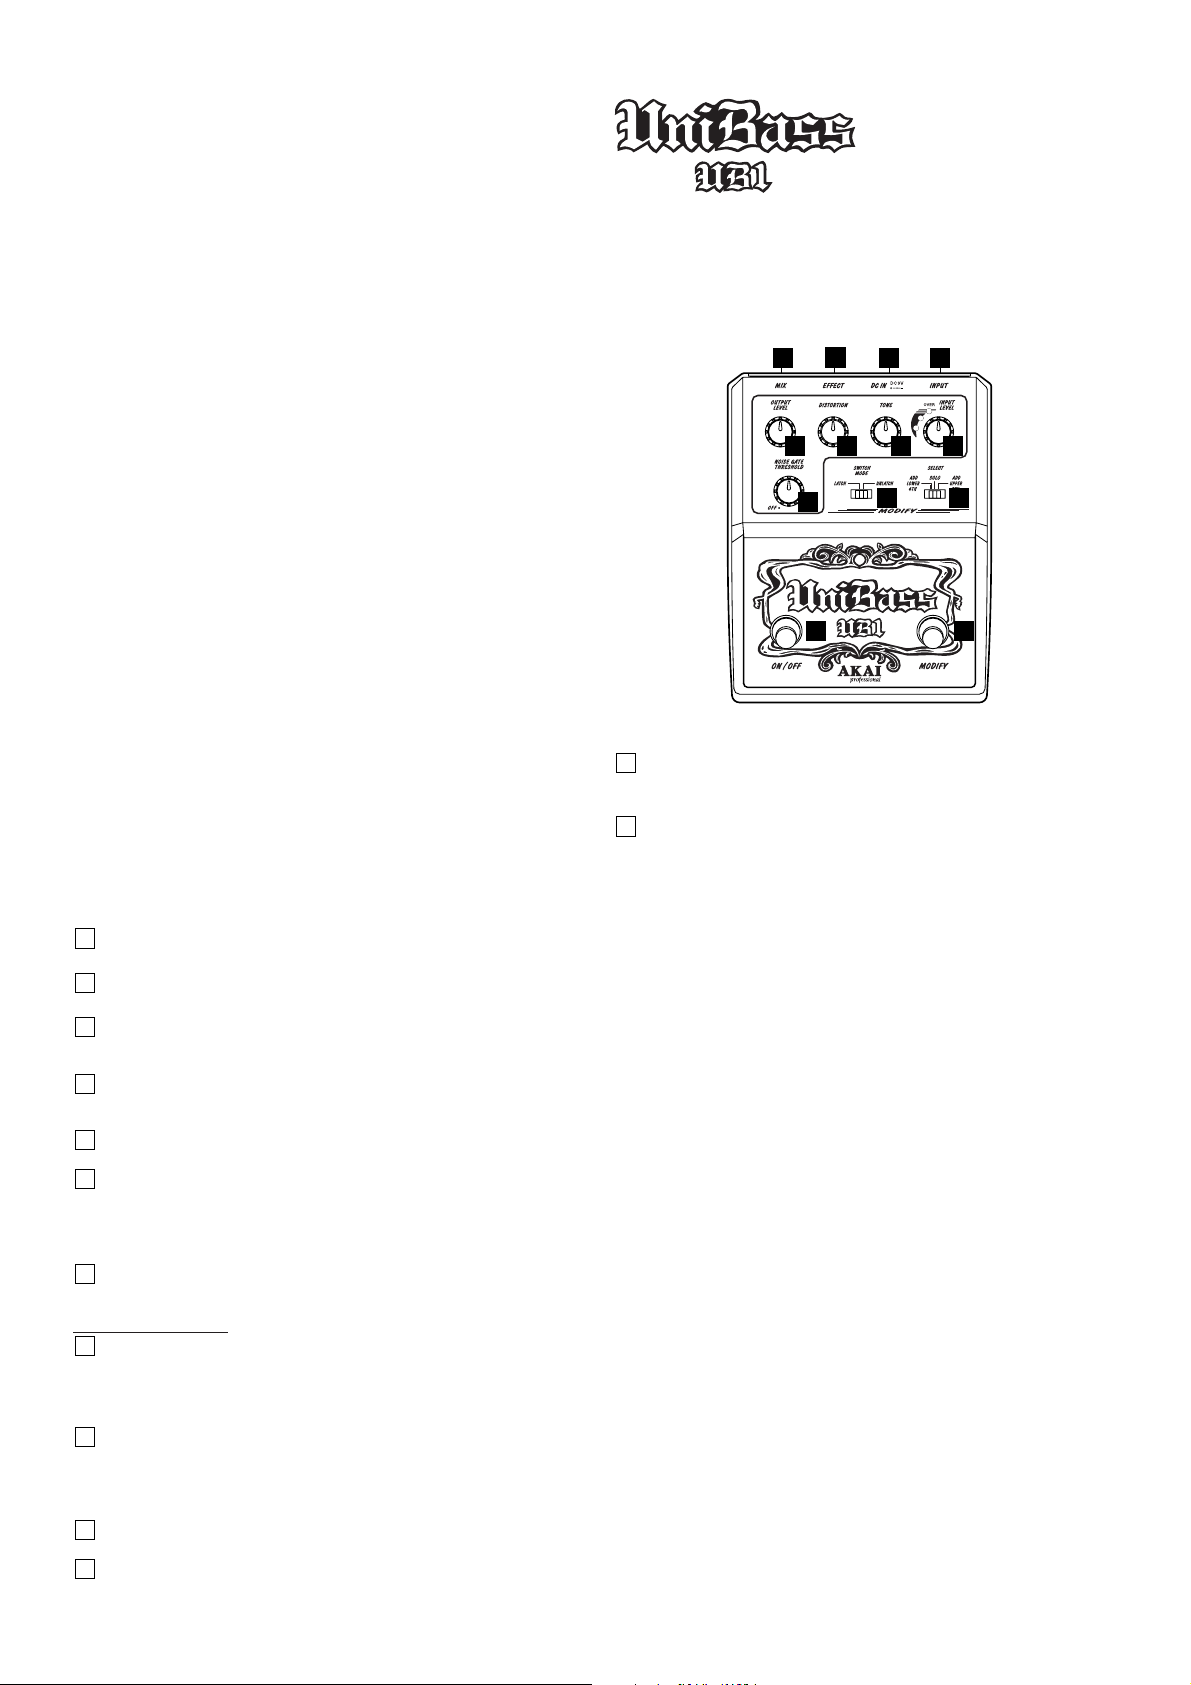
MIX output
1
This outputs a mix of the direct and effect signals. If you plug into the EFFECT
output, this outputs the direct signal only.
EFFECT output
2
This outputs only the effect signal.
DC IN
3
Plug the supplied MP-9 (9-volt) AC adapter in here.
INPUT
4
Plug your bass in here.
OUTPUT LEVEL control
5
This sets only the level of the effect sound. The level of the direct signal is not
affected and remains the same even when the effect is turned off.
DISTORTION control
6
The distortion effect emulates the sound of an overdriven guitar. The higher the
setting the more pronounced the effect becomes.
TONE control
7
Controls the tone of the effect sound.
INPUT LEVEL control
8
This sets the input level.
Set it so that the red LED (OVER) doesn't light when playing at your loudest.
Level meter: The LEDs show the following levels for the input signal:
NOISE GATE THRESHOLD control
9
Sets the threshold level of the noise gate. The noise gate function cuts off the
harsh noise when the signal level is low, especially with the distortion effect.
MODIFY switches (10/11)
SWITCH MODE
10
This selects how the MODIFY (13) footswitch works:
LATCH - The footswitch toggles the modify mode on and off.
UNLATCH - Modify is turned on only while pressing and holding the footswitch.
(MODIFY LED lights while the MODIFY is active.)
SELECT
11
This selects the type of effect when the MODIFY (13) footswitch is on:
ADD UPPER 5TH - Upper 5th is added to the effect sound.
SOLO - The direct signal is muted and only the effect sound is played.
ADD LOWER 4TH - Lower 4th is added to the effect sound.
ON/OFF footswitch
12
Switches the effect on and off.
MODIFY footswitch
13
Switches the modify mode on and off.
Red - overload / Yellow - correct level / Green - low level
English
English
Operation:
1. Connect your bass to the INPUT jack.
2. Connect the MIX output to the input of your amplifier.
If you want to separate the bass and effects sounds, also connect the EFFECT
output to the input of a separate amplifier. In this case, MIX outputs the original
bass sound and EFFECT outputs the effect sound.
3. Turn your amp/s on.
4. Adjust the INPUT LEVEL while playing the bass. The level should be adjusted so
as the Red LED does not come on when playing at your loudest. However, since
the pitch cannot be determined properly if the level is too low, the level should be
adjusted as high as possible without turning on the Red LED.
5. Press the ON/OFF (left) footswitch to turn the effect on.
6. Adjust the TONE, DISTORTION and OUTPUT LEVEL to suit your taste.
NOTE:
If noise is noticeable when the bass is not being played, and the effect is on, adjust the
NOISE GATE THRESHOLD by turning it to the minimum position and then turn it slowly
to the point where the noise becomes unnoticeable (while not playing). Play the bass to
check that the effects sound is released OK. If the release is too abrupt or unnatural
sounding, try turning the NOISE GATE THRESHOLD down a little.
MODIFY mode
In MODIFY mode, you can add a upper 5th or a lower 4th sourd to the one octave high
effect sound. Or you can mute the original bass sound completely. Also, you can set how
the MODIFY footswitch works. The MODIFY LED lights when the mode is on.
The SELECT switch selects the type of effect when the MODIFY mode is turned on:
ADD UPPER 5TH - Upper 5th is added to the effect sound.
SOLO - The direct signal is muted and only the effect sound is played.
ADD LOWER 4TH - Lower 4th is added to the effect sound.
NOTE:
Please do not turn the SOLO mode on within 10 seconds of turning the power on, as
there may be an audible click.
Page 3

The SWITCH MODE selects how the footswitch functions:
LATCH
Turns the MODIFY mode on until the footswitch is pressed again.
As you may have to press the switch twice in a short time to switch it on and off, this
is better suited to long phrases.
UNLATCH
Turns the MODIFY mode on only while the footswitch is held down.
This is better when the effect is applied to short phrases.
Setting the switch to UNLATCH position while holding the MODIFY footswitch down
makes it in invert mode where the effect stops working when the footswitch is pressed
and starts again when it is released. This mode is useful when you want to have the
effect on most of the time and you want to switch it off for a short phrase.
Important note:
The UB1 detects the pitch of incoming note to make the unison sound correctly.
However, when the chord is played, it may not be able to detect the pitch accurately
and may produce the effect sound in the wrong pitch. To avoid this, play the bass
single notes only.
English
English
Specifications
Functions: SELECT - ADD LOWER 4TH, SOLO, ADD UPPER 5TH
SWITCH MODE - LATCH, UNLATCH
Connectors: INPUT (Input impedance: 500k ohms or more)
MIX (Output impedance: 1k ohms or less)
EFFECT (Output impedance: 1k ohms or less)
DC IN (9 Volts)
Controls: INPUT LEVEL, TONE, DISTORTION, OUTPUT LEVEL,
NOISE GATE THRESHOLD, SWITCH MODE, SELECT,
FOOTSWITCH (EFFECT on/off, MODIFY on/off) x 2
Indicator: LED x3 (Input Level)
LED x2 (Effect on/off, MODIFY on/off)
Power requirements: 9V DC/140mA, AC adaptor MP-9
Accessories: Operator’s Manual, AC adaptor MP-9
Dimensions: 140 (W) x 175 (D) x 61 (H)mm
Weight: 720g
• Specifications are subject to change without notice.
Français
Avertissement
Le UB1 UNIBASS est conçu pour être utilisé dans un environnement domestique normal.
L’alimentation secteur des équipements électriques varie d’un pays à l’autre. Aussi, vérifiez que
la tension de votre UB1 correspond bien aux normes appliquées dans la région où vous vous
trouvez. En cas de doute, demandez conseil à un électricien qualifié ou à votre revendeur AKAI
professionnel.
120 V secteur @ 60 Hz pour les Etats-Unis et le Canada
220 V - 230/240 V secteur @ 50 Hz pour l’Europe
Pour votre protection et celle du UB1 UNIBASS
• Ne touchez jamais l’adaptateur secteur avec des mains mouillées.
• Débranchez toujours l’adaptateur secteur à la prise murale en tirant sur la prise et non sur
le cordon d’alimentation.
• Ne confiez les réparations ou installations sur votre UB1 UNIBASS qu’aux revendeurs AKAI
professionnel ou à des ingénieurs qualifiés. Mis à part le fait d’annuler la garantie, un
ingénieur non qualifié pourrait toucher des pièces internes sous tension et recevoir une
décharge électrique puissante.
• Ne laissez aucun objet métallique sur le UB1 UNIBASS ou tomber dedans.
• N’utilisez que l’alimentation secteur fournie aux prises murales. N’utilisez jamais l’alimentation
CC.
• Si de l’eau ou un liquide quelconque venait à tomber dans ou sur le UB1 UNIBASS,
débranchez la prise et portez l’appareil chez votre revendeur.
• Vérifiez si l’unité est bien aérée et qu’elle n’est pas exposée au soleil.
• Pour éviter d’endommager les circuits internes, ainsi que la finition du boîtier, éloignez le UB1
UNIBASS des sources directes de chaleur (po,êles, radiateurs, etc.).
• Evitez d’utiliser des insecticides en aérosol, etc., à proximité du UB1 UNIBASS. Ils pourraient
endommager la finition et s’enflammer.
• N’utilisez pas d’alcool à brûler, de diluant, de solvant ou tout produit chimique équivalent pour
nettoyer le UB1 UNIBASS. Ils pourraient endommager la finition.
• Il est dangereux de modifier cet équipement qui pourrait mal fonctionner par la suite.
N’essayez jamais de modifier votre UB1 UNIBASS, de quelque manière que ce soit.
• Assurez-vous que le UB1 UNIBASS repose toujours sur une surface stable.
• Pour assurer la performance optimisée de votre UB1 UNIBASS, choisissez soigneusement
son emplacement. Evitez les endroits suivants:
1. Les endroits humides ou poussiéreux
2. Une pièce mal aérée
3. Une surface qui n’est pas horizontale
4. L’intérieur d’un véhicule comme une voiture, ou il serait soumis aux vibrations
5. Les endroits très chauds ou très froids
• Assurez-vous d’attendre quelques secondes avant de rallumer l’unite apres que l’alimentation
ait ete coupee pour assurer un fonctionnement correct.
• Lorsque vous connecter cet appareil à un autre équipement, assurez-vous que tout soit éteint
dans l'autre équipement afin d'empêcher tout dysfonctionnement ou dégât des enceintes.
Adaptateur CA MP-9 (CA)
Adaptateur CA MP-9 (EVB)
Français
Pour les joueurs de basse qui veulent
ajouter plus de profondeur à leur son,
l’Unibass instalé à vos pieds permet de
fournir une grande versatilité et profondeur
à votre style de jeu. Cela s’opère en
décalant d’une octave vers le haut et en
auquel on ajoute un effet sonore (vous pouvez contrôler le dosage de ces deux effets),
et il est également possible de diffuser les sons originels et transformés vers deux
amplificateurs différents. Maintenant c’est à vous de vous distinguer par votre style de
jeu!
En utilisant le mode MODIFY (changement), vous pouvez ajouter un 5 ème plus haut ou
retirer un 4 ème plus bas à l’effet ou mettre complètement en sourdine le son originel de
la basse. Le timbre et la distortion peuvent également être réglés pour un contrôle encore
plus précis du son.
1
5 6 7
9
diffusant le son d’origine de la basse
2
3
4
8
10 11
12 13
MIX <Sortie du MIX>
1
Cela diffuse un mélange des signaux directs et transformés. Si vous vous branchez
sur la sortie EFFECT, cela ne diffuse que le signal direct.
EFFECT <Sortie des effets sonores >
2
Cela ne diffuse que le signal transformé.
DC IN <
3
4
Entrée DC
Brancher ici l’adapteur secteur CA MP-9 (9 volts) fourni.
INPUT <ENTREE>
Brancher ici la basse.
>
Page 4

OUTPUT LEVEL <
5
Cela ne règle que le niveau du son transformé par les effets sonores. Le niveau du
signal direct n’est pas modifié et reste identique, même si l’effet sonore est désactivé.
DISTORTION
6
L’effet de distortion crée le son d’une guitare démultipliée. Plus le paramètre est
élevé, plus les effets sont accentués.
<
Contrôle du timbre (TONE)
TONE
7
Ceci règle le volume de feed-back pour les modes écho et différé (la tourner à droite
accroît le nombre de répétition).
INPUT LEVEL <Contrôle du niveau d’entrée
8
Cela règle le niveau d’entrée.
Régler de manière à ce que la LED rouge (OVER - saturation) ne s’allume pas
quand vous jouez au maximum de puissance.
Mesure du niveau: Les LED indiquent les niveaux suivants concernant le signal
NOISE GATE THRESHOLD
9
Règle le niveau du seuil de parasites. La fonction de seuil de parasites élimine le
bruit désagréable lorsque le niveau du signal est bas, spécialement en cas
d’utilisation de l’effet de distorsion.
Commutateurs de changement (MODIFY) (10/11)
SWITCH MODE
10
Cela sélectionne comment fonctionne le commutateur à pédale MODIFY (13).
LATCH (Loquet) - le commutateur à pédale bascule le mode MODIFY d’activé à
désactivé.
UNLATCH (Non-verrouillé) - Le mode MODIFY n’est activé que lorsque le
commutateur est appuyé et maintenu enfoncé.
(La LED MODIFY s’allume à chaque que le mode MODIFY est activé.)
SELECT
11
Cela sélectionne le type d’effet sonore lorsque le commutateur à pédale MODIFY
est activé :
UPPER 5 TH (AJOUTER UNE 5 EME EN HAUT) -Une 5 ème en haut est ajoutée
à l’effet sonore.
SOLO - le signal direct est mis en sourdine et seul le son transformé par les effets
sonores est diffusé.
LOWER 4 TH (AJOUTER UNE 4 EME EN BAS) - Une 4 ème en bas est ajoutée
à l’effet sonore.
ON/OFF
12
Active et désactive l’effet sonore.
MODIFY
13
Active et désactive le mode MODIFY.
Contrôle du NIVEAU DE SORTIE
<
Contrôle de la DISTORTION
>
d’entrée :
Rouge: surcharge-saturation / Jaune: niveau correct / Vert:
bas niveau
<
Contrôle du seuil de parasites
<
MODE DE COMMUTATION
<
SELECTION
<
Commutateur à pédale ON/OFF
<
Commutateur à pédale MODIFY
>
>
>
>
>
>
>
>
Français
Français
Fonctionnement:
1. Brancher sa basse sur la prise jack d’entrée INPUT
2. Brancher la sortie MIX sur l’entrée de votre amplificateur.
Si vous voulez séparer les sons de la basses et ceux transformés, brancher
également la sortie EFFECT sur l’entrée d’un autre amplificateur. Dans ce cas,
MIX diffuse le son originelle de la basse et EFFECT diffuse le son transformé par
les effets sonores.
3. Allumer le ou les amplificateurs.
4. Ajuster le niveau d’entrée (INPUT LEVEL), tout en jouant de la basse. Le niveau
doit ajusté pour que la LED rouge ne s’allume pendant un jeu au maximum de
puissance. Cependant comme la gamme musicale ne peut pas être aisément
déterminée si le niveau est trop bas, le niveau peut être ajusté au maximum, tant
que la LED rouge ne s’allume pas.
5. Appuyer sur le commutateur à pédale ON/OFF (à gauche) activer les effets sonores.
6. Ajuster le timbre (TONE), la DISTORTION et le niveau de sortie (OUTPUT LEVEL)
en fonction de vos goûts.
REMARQUE:
Si des parasites se font entendre lorsque l’on ne joue pas de la basse, et que l’effet
sonore est activé, ajuster le niveau du seuil de parasites (NOISE GATE THRESHOLD)
au minimum puis le relever doucement jusqu’à ce que les parasites deviennent
négligeables (avant même de commencer à jouer). Jouer de la basse pour vérifier que
l’effet sonore est resté correct. Si le résultat est trop abrupt ou artificiel, essayer de
baisser un peu le niveau du seuil de parasites (NOISE GATE THRESHOLD).
Mode MODIFY
Dans le mode MODIFY, vous pouvez ajouter une 5 ème plus haut ou retirer une 4 ème
plus bas à une octave de l’effet sonore. Ou vous pouvez mettre complètement en sourdine
le son originel de la basse. Par ailleurs, vous pouvez ajuster le fonctionnement du
commutateur à pédale MODIFY. La LED rouge MODIFY s’allume lorsque ce mode est
activé.
Le commutateur SELECT permet de choisir le type d’effet sonore quand le mode MODIFY
est activé :
UPPER 5 TH (AJOUTER UNE 5 EME EN HAUT) -Une 5 ème en haut est ajoutée à
l’effet sonore.
SOLO - le signal direct est mis en sourdine et seul le son transformé par les effets
sonores est diffusé.
LOWER 4 TH (AJOUTER UNE 4 EME EN BAS) -Une 4 ème en bas est ajoutée à
l’effet sonore.
REMARQUE:
Veuillez ne pas activer le mode SOLO après un délai de 10 secondes, après que l’appareil
ait été allumé, afin d’éviter d’entendre un possible déclic sonore.
Le MODE SWITCH (commutation) détermine comment le commutateur à pédale
fonctionne.
LATCH (Loquet)
Le mode MODIFY est activé jusqu’à la prochaine pression sur le commutateur à
pédale.
Comme il faut appuyer deux fois sur le commutateur dans une court laps de temps
pour l’activer et le désactiver, ce mode est plus adapté pour des phases de jeu
longues.
UNLATCH (Non-verrouillé)
Le mode MODIFY n’est activé que lorsque le commutateur est appuyé et maintenu
enfoncé.
C’est mieux lorsque l’effet sonore ne doit être activé que brièvement.
Le réglage du commutateur en position UNLATCH (déverrouillée) tout en maintenant
enfoncé le commutateur à pédale MODIFY, entraine l’inversion du fonctionnement,
c’est-à-dire que l’effet s’arrête quand le commutateur à pédale est enfoncé, puis
recommence dès que celui-ci est relâché. Ce mode est utile pour obtenir un effet la
plupart du temps et pour ne le désactiver que pour de brèves périodes de temps.
Remarque importante:
L’UB1 détecte la tonalité de la note en entrée, afin de permettre un unisson
satisfaisant. Cependant, lorsqu’une corde est activée pendant le jeu, il se peut
que l’évaluation précise de la tonalité ne soit pas possible, ce qui peut conduire à
l’émission d’un effet sonore dissonant. Pour éviter cela, ne jouer que des notes
simples sur la basse.
Français
Français
Caractéristiques techniques
Fonctions: SELECT (Sélection)-Mode de commutation pour
Connecteurs: INPUT (Entrée) - (Impédance d’entrée : 500k
Commandes: INPUT LEVEL (Niveau d’entrée), TONE (Timbre),
Indicateurs: 3 LED (niveau d’entrée)
Alimentation électrique requise: 9V DC / 140 mA / Adaptateur secteur CA MP-9.
Accessoires: Mode d’emploi, Adaptateur secteur CA MP-9.
Dimensions : 140(L) x 175 (P) x 61 (H)mm
Poids : 720 g
Notice sur copyright
Le AKAI UB1 est un appareil basé sur l’informatique et, en tant que tel, comprend et utilise
un logiciel dans sa ROM. Le logiciel qui est proposé avec l’instrument et toutes les
informations comprises dans ce manuel sont protégés par les lois sur le copyright. Vous
pouvez utiliser le logiciel ou les informations concernant l’instrument, seulement dans le
cadre de votre usage personnel. Il est formellement interdit de copier ou de modifier une
partie du logiciel ou du mode d’emploi sans le consentement préalable écrit de AKAI
professional M.I. Corp. au Japon.
ajouter une 5 ème en haut (ADD UPPER 5TH)/
pour ajouter une 4 ème en bas (ADD LOWER
4TH)/SOLO,
SWITCH MODE (Mode de commutation)LATCH/UNLATCH(Loquet/non-verrouillé ).
ohms ou plus)
MIX (Impédance de sortie : 1k ohms ou moins)
EFFECT (Effet) - (Impédance de sortie : 1k ohms
ou moins)
Entrée DC ( 9 volts)
DISTORTION, OUTPUT LEVEL (Niveau de
sortie), Seuil de parasites (NOISE GATE
THRESHOLD), SWITCH MODE (Mode de
commutation), SELECT (Sélection),
FOOTSWITCH (2 commutateurs à pédale)
(Activation/désactivation d’EFFECT et de
MODIFY).
2 LED (Activation/désactivation d’EFFECT et de
MODIFY)
• Les caractéristiques sont susceptibles de changer sans préavis.
Page 5

Deutsch
ACHTUNG!
Der UB1 UNIBASS ist für Betrieb mit gewöhnlichem Haushaltsnetzstrom vorgesehen.
Die Netzspannungen für elektrische Geräte sind von Gebiet zu Gebiet unterschiedlich. Vergewissern
Sie sich daher bitte, daß die Kennwerte des Netzadapters der Netzspannung und -frequenz des
örtlichen Versorgungsnetzes entsprechen. Wenn Sie sich nicht sicher sind, wenden Sie sich
vorsichtshalber an einen Elektrofachmann oder einen AKAI-professional-Fachhändler.
120 V, 60 Hz @ für USA und Kanada
220~230/240 V, 50 Hz @ für Europa
Wichtige Hinweise zu Ihrer Sicherheit und zum Schutz des UB1 UNIBASS
• Berühren Sie den Netzadapter niemals mit nassen Händen.
• Ziehen Sie beim Abtrennen des Netzadapters stets am Adapter/Stecker und nicht am Kabel selbst.
• Überlassen Sie alle Wartungs- und Instandesetzungsarbeiten am UB1 UNIBASS dem AKAIprofessional-Fachhändler oder dem geschulten Kundendienstpersonal. Bei eigenmächtigen und
unbefugten Eingriffen erlöschen nicht nur sämtliche Garantieansprüche, sondern es besteht auch
die Gefahr, daß die betreffende Person einen schweren elektrischen Schlag erleidet!
• Achten Sie darauf, daß keine Fremdkörper (insbesondere Gegenstände aus Metall) in das
Geräteinnere gelangen.
• Betreiben Sie das Gerät ausschließlich mit gewöhnlichem Haushaltsnetzstrom und niemals mit
Gleichstrom.
• Sollte Wasser oder eine andere Flüssigkeit auf dem UB1 UNIBASS verschüttet werden bzw. in das
Gerät gelangen, ziehen Sie sofort das Netzkabel und benachrichtigen den Fachhändler.
• Stellen Sie das Gerät an einem gut belüfteten Platz auf, wo es keiner direkten Sonnenbestrahlung
ausgesetzt ist.
• Zum Schutz der internen Schaltungen sowie auch der Gehäuseoberfläche stellen Sie den UB1
UNIBASS in ausreichender Entfernung zu direkten Wärmequellen (Ofen, Heizkörper o.ä.) auf.
• Versprühen Sie keine Sprays (Insektenvertilgungsmittel u.dgl.) in der der Nähe des UB1 UNIBASS,
da solche Chemikalien die Gehäuseoberfläche angreifen und sich entzünden können.
• Verwenden Sie zum Reinigen des UB1 UNIBASS keinen denaturierten Alkohol, Verdünner oder
ähnliche Mittel, da solche Chemikalien die Gehäuseoberfläche angreifen.
• Eine Modifikation des UB1 UNIBASS ist gefährlich und kann das Gerät beschädigen und
unbrauchbar machen. Sehen Sie daher unbedingt von eigenmächtigen Eingriffen ab!
• Achten Sie darauf, daß der UB1 UNIBASS beim Betrieb auf einer festen, ebenen Fläche steht.
• Um optimale Betriebsvoraussetzungen zu schaffen, sollten Sie den Aufstellort für Ihren UB1
UNIBASS sorgfältig wählen und auf ordnungsgemäße Handhabung achten. Vermeiden Sie eine
Aufstellung des UB1 UNIBASS:
1. an feuchten und staubigen Orten.
2. in schlecht belüfteten Räumen.
3. auf geneigten Stellflächen.
4. an Orten, wo das Gerät starken Erschütterungen ausgesetzt ist (z.B. in einem Fahrzeug).
5. in extrem warmer oder kalter Umgebung.
• Für einen einwandfreien Betrieb sicherstellen, daß einige Sekunden gewartet wird, bevor das
Gerät wieder eingeschaltet wird, nachdem die Spannungsversorgung ausgeschaltet wurde.
• Wenn Sie dieses Gerät an eine andere Anlage anschließen, vergewissern Sie sich, daß die
gesamte Anlage ausgeschaltet ist, damit Fehlfunktionen oder Beschädigungen an den Lautsprechern
vermieden werden.
INPUT
4
Hier Ihre Bassgitarre anschließen.
OUTPUT LEVEL
5
Diese Steuerung stellt nur den Pegel des Effektsounds ein. Der Pegel des
Direktsignals wird nicht beeinflusst und bleibt auch bei Ausschalten des Effekts
gleich.
DISTORTION
6
Dieser Verzerrungseffekt kreiert den Sound einer übersteuerten Gitarre. Je höher
die Einstellung desto mehr wird der Effekt verstärkt.
TONE
7
Diese Steuerung steuert den Ton des Effektsounds.
INPUT LEVEL
8
Diese Steuerung stellt den Eingangspegel ein.
Stellen Sie die Steuerung so ein, dass die rote LED (OVER) nicht aufleuchtet,
wenn mit dem am lautesten eingestellten Pegel gespielt wird.
Pegelmesser: Die LEDs zeigen für das Eingangssignal die folgenden Pegel ein:
NOISE GATE THRESHOLD
9
Diese Steuerung stellt den Schwellenpegel des Rauschgate ein. Die StörungsfilterFunktion eliminiert bei niedrigem Signalpegel harte Nebengeräusche. Dies
insbesondere mit dem Verzerrungseffekt.
MODIFY-Schalter (10/11)
SWITCH MODE
10
Dieser Modus wählt aus, wie der MODIFY-Fußschalter (13) arbeitet:
LATCH - Der Fußschalter schaltet den Modifizierungsmodus ein und aus.
UNLATCH - Die Modifizierung wird nur dann eingeschaltet, wenn der Fußschalter
gedrückt und gehalten wird.
(MODIFY-LED leuchtet auf, wenn der MODIFY-Modus aktiviert ist.)
SELECT
11
Damit wird der Effekt-Typ ausgewählt, wenn der MODIFY-Fußschalter (13)
eingeschaltet ist:
ADD UPPER 5TH - Oberer 5. wird zum Effektsound hinzugefügt.
SOLO - Das Direktsignal wird ausgeblendet und nur der Effektsound wird
wiedergegeben.
ADD LOWER 4th - Unterer 4. wird zum Effektsound hinzugefügt.
ON/OFF
12
Damit wird der Effekt ein- und ausgeschaltet.
MODIFY
13
Damit wird der Modifizierungsmodus ein- und ausgeschaltet.
<
<
TONE-Einstellung
<
Rot - Übersteuerung / Gelb: korrekter Pegel / Grün - niedriger
Pegel
<
ON/OFF-Fußschalter
<
MODIFY-Fußschalter
Wechselstrom-Adapter MP-9 (CA)
Wechselstrom-Adapter MP-9 (EVB)
<
OUTPUT LEVEL-Steuerung
DISTORTION-Steuerung
>
INPUT LEVEL-Steuerung
<
NOISE GATE THRESHOLD-Steuerung
>
>
Deutsch
>
>
>
>
Deutsch
Für Bassisten, die Ihrem Sound mehr Tiefe
geben wollen, ist der UniBass zu Ihren
Füßen, der Ihrem Spielstil Vielseitigkeit und
Tiefe verleiht, genau das richtige. Dies
geschieht durch Umschalten der Tonhöhe
um eine Oktave nach oben und durch
Effektsounds (Sie können die Mischung zwischen den beiden regeln), und Sie können
den Original- und Effektsound von zwei separaten Verstärkern ausgeben lassen. Jetzt
sind Sie an der Reihe aufzutreten!
Mit dem MODIFY-Modus können Sie dem Effekt einen oberen 5. oder unteren 4.
hinzufügen oder den Originalbasssound vollständig ausblenden. Töne und Verzerrungen
können für mehr Steuerung des Sounds auch eingestellt werden.
1
5 6 7
9
Ausgabe des Originalbasssounds und des
2
3
4
8
10 11
12 13
MIX <MIX-Ausgang
1
Dieser Ausgang gibt eine Mischung der Direkt- und Effektsignale aus. Wenn Sie
ihn an den EFFECT-Ausgang anschließen, gibt er nur die Direktsignale aus.
<
EFFECT
2
Dieser Ausgang gibt nur Effektsignale aus.
DC IN
3
Hier den mitgelieferten MP-9 (9-Volt) Netzadapter anschließen.
Deutsch
Betrieb:
1. Schließen Sie Ihre Bassgitarre an die INPUT-Buchse an.
2. Schließen Sie den MIX-Ausgang an den Eingang an Ihrem Verstärker an.
Wenn Sie den Basssound und den Effektsound trennen möchten, den EFFECTAusgang an den Eingang eines separaten Verstärkers anschließen. In diesem Fall
gibt der MIX-Anschluss den Originalbasssound und der EFFECT-Anschluss den
Effektsound aus.
3. Schalten Sie Ihre/n Verstärker ein.
4. Stellen Sie während Sie spielen den INPUT LEVEL ein. Der Pegel sollte so
eingestellt werden, dass die rote LED nicht aufleuchtet, wenn Sie am lautesten
spielen. Da die Tonhöhe jedoch nicht einwandfrei bestimmt werden kann, wenn
der Pegel zu niedrig ist, sollte der Pegel so hoch wie möglich eingestellt werden,
ohne dass die rote LED aufleuchtet.
5. Drücken Sie den ON/OFF-Fußschalter (links), um den Effekt einzuschalten.
6. Stellen Sie TONE, DISTORTION und OUTPUT LEVEL auf einen für Sie geeigneten
Pegel ein.
HINWEIS:
Wenn Rauschen auftritt, während die Bassgitarre nicht gespielt wird und der Effekt
eingeschaltet ist, den NOISE GATE THRESHOLD einstellen, indem Sie ihn auf ein
Minimum herunter drehen und dann langsam zu dem Punkt, an dem das Rauschen
verschwindet (Gitarre wird nicht gespielt). Spielen Sie auf der Bassgitarre und prüfen
Sie, das der Effektsound einwandfrei freigegeben wird. Wenn die Freigabe zu abrupt
erfolgt oder ein unnatürlicher Sound erzeugt wird, den NOISE GATE THRESHOLD ein
wenig herunter drehen.
MODIFY-Modus
Im MODIFY-Modus können Sie einen oberen 5. oder einen unteren 4. Sound zu einem
1-Oktaven-Effektsound hinzufügen. Oder Sie können den Originalbasssound vollständig
ausblenden. Sie können auch einstellen, wie der MODIFY-Fußschalter arbeitet. Die
MODIFY- LED leuchtet, wenn der Modus aktiviert ist.
Der SELECT-Schalter wählt den Effekt-Typ aus, wenn der MODIFY -Modus aktiviert wird.
ADD UPPER 5TH - Oberer 5. wird zum Effektsound hinzugefügt.
SOLO - Das Direktsignal wird ausgeblendet und nur der Effektsound wird
wiedergegeben.
ADD LOWER 4th - Unterer 4. wird zum Effektsound hinzugefügt.
HINWEIS:
Bitte aktivieren Sie den SOLO-Modus nicht innerhalb der ersten 10 Sekunden nach
einschalten des Gerätes, da sonst ein deutliches “Klicken” zu hören ist.
>
EFFECT-Ausgang
>
Page 6

Der SWITCH MODE wählt die Fußschalter-Funktionen:
LATCH
Schaltet den MODIFY-Modus ein, bis der Fußschalter nochmals gedrückt wird.
Da Sie den Schalter innerhalb kurzer Zeit vielleicht zweimal drücken müssen, um
ihn ein- und auszuschalten, ist er für lange Sätze besser geeignet.
UNLATCH
Schaltet den MODIFY-Modus nur dann ein, wenn der Fußschalter gedrückt wird.
Dies ist besser, wenn der Effekt bei kurzen Sätzen eingesetzt wird.
Wenn Sie den Schalter auf die UNLATCH-Position stellen während Sie gleichzeitg
den MODIFY-Fußschalter betätigen, ist der Umkehrmodus eingestellt, in dem der
Effekt stoppt, wenn der Fußschalter betätigt wird und startet, wenn Sie ihn freigeben.
Dieser Modus eignet sich besonders, wenn der Effekt die meiste Zeit aktiv sein soll
und sie ihn immer nur für kurze Momente entaktivieren möchten.
Wichtiger Hinweis:
Der UB1 erkennt die Geschwindigkeit eingehender Töne und sorgt für einen
richtigen Gleichklang. Dennoch kann es während der Wiedergabe des Akkordes
unter Umständen nicht möglich sein, die Geschwindigkeit genau zu erkennen, so
dass der Effektsound in falscher Geschwindigkeit produziert wird. Um dies zu
vermeiden, sollten Sie nur die Bass-Einzeltöne wiedergeben.
Deutsch
Deutsch
Technische Daten
Funktionen: SELECT (Wählen)- ADD LOWER 4TH (Unteren 4.
Anschlüsse: INPUT (Eingangsimpedanz: 500 kOhm oder mehr)
Steuerungen: INPUT LEVEL (Eingangspegel), TONE (Ton), DISTORTION
Anzeigen: LED x 3 (Eingangspegel)
Leistungsaufnahme: 9 V Gleichstrom/140 mA, Netzadapter MP-9
Zubehör: Bedienungsanleitung, Netzadapter MP-9
Abmessungen: 140 (B) x 175 (T) x 61 (H) mm
Gewicht: 720 g
Urheberrechtsvermerk
Der AKAI UB1 ist ein auf Computertechnik basierendes Gerät und arbeitet mit Software,
die in ROMs gespeichert ist. Diese Software und alle zum Gerät gehörende Dokumentation,
einschließlich der vorliegenden Bedienungsanleitung, enthält Information mit
Eigentumsvorbehalt, die durch die gültigen Urheberrechtsgesetze geschützt ist. Sie
haben das Recht, die Software und die zum Gerät gehörende Dokumentation für
persönlichen Gebrauch zu nutzen. Kopieren und Ändern der Software und der Anleitung,
auch teilweise, ist untersagt, wenn nicht eine ausdrückliche schriftliche Genehmigung der
AKAI professional M.I. Corp. in Japan vorliegt.
hinzufügen), SOLO (Solo), ADD UPPER 5TH (Oberen 5.
hinzufügen)
SWITCH MODE (Umschaltmodus) - LATCH (verriegeln),
UNLATCH (freigeben)
MIX (Ausgangsimpedanz: 1 kOhm oder weniger)
EFFECT (Ausgangsimpedanz (1 kOhm oder weniger)
DC IN (9 Volt)
(Verzerrung), OUTPUT LEVEL (Ausgangspegel),
NOISE GATE THRESHOLD (Rauschgate-Schwellenwert),
SWITCH MODE (Umschaltmodus), SELECT (Wählen),
FOOTSWITCH (Fußschalter) (EFFECT ein/aus,
MODIFY ein/aus) x 2
LED x 2 (Effekt ein/aus, MODIFY ein/aus)
• Technische Daten können ohne Vorankündigung geändert werden.
%
1-3, Hiranuma 1-chome, Nishi-ku,
Yokohama, Japan
000120
APC
Printed in Japan
 Loading...