

Page 1
Rh
m .AKAI IERUICE lllAllUU1
. .
Solid State 21” Colour Television Receiver
Page 2
iI
L-_______-.
I _*_ u
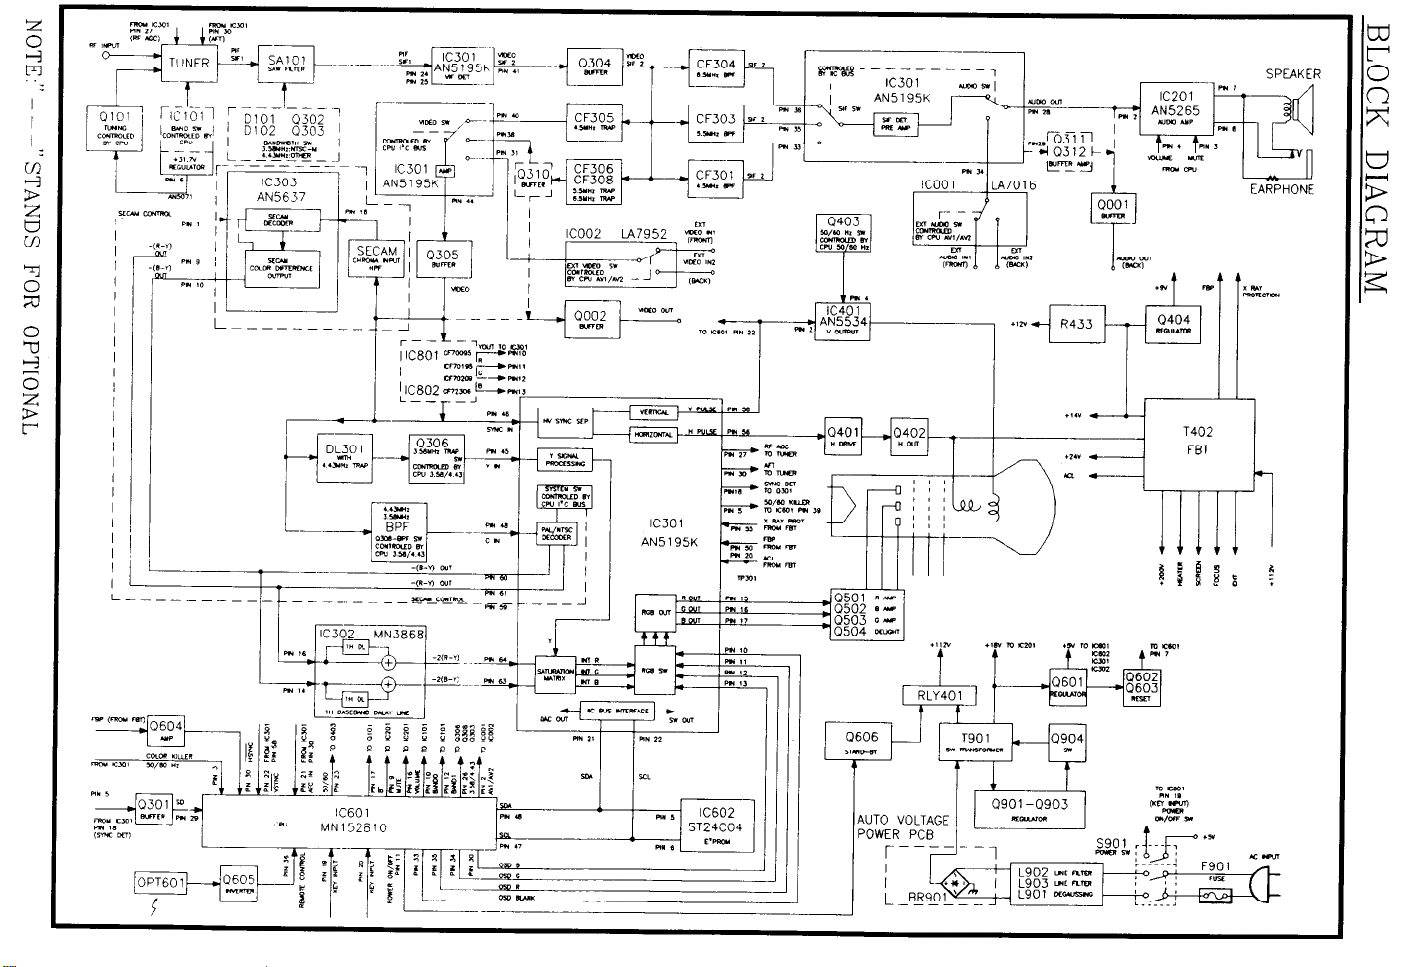
EARPHONE
AUTO VOLTAGE
Page 3
ALIGNMENT INSTRUCTION
Before Adjustment and Maintenance
I .
Don’t short any two soldering points or connect any component while TV set is power on.
A.
Pull out power plug before maintenance.
B.
In order to ensure safety all components replaced should be identical with originals. (For
C.
further details, refer to the component name and component No. in PARTS LIST.)
Must warm up for 30 minutes or more and degauss CRT thoroughly with demagnetiser
D.
before alignment.
Equipments for Adjustment
II.
a. Pattern Generator (PHILIPS PM 5518)
c. High Voltage Meter
e. DC Regulated Power Supply
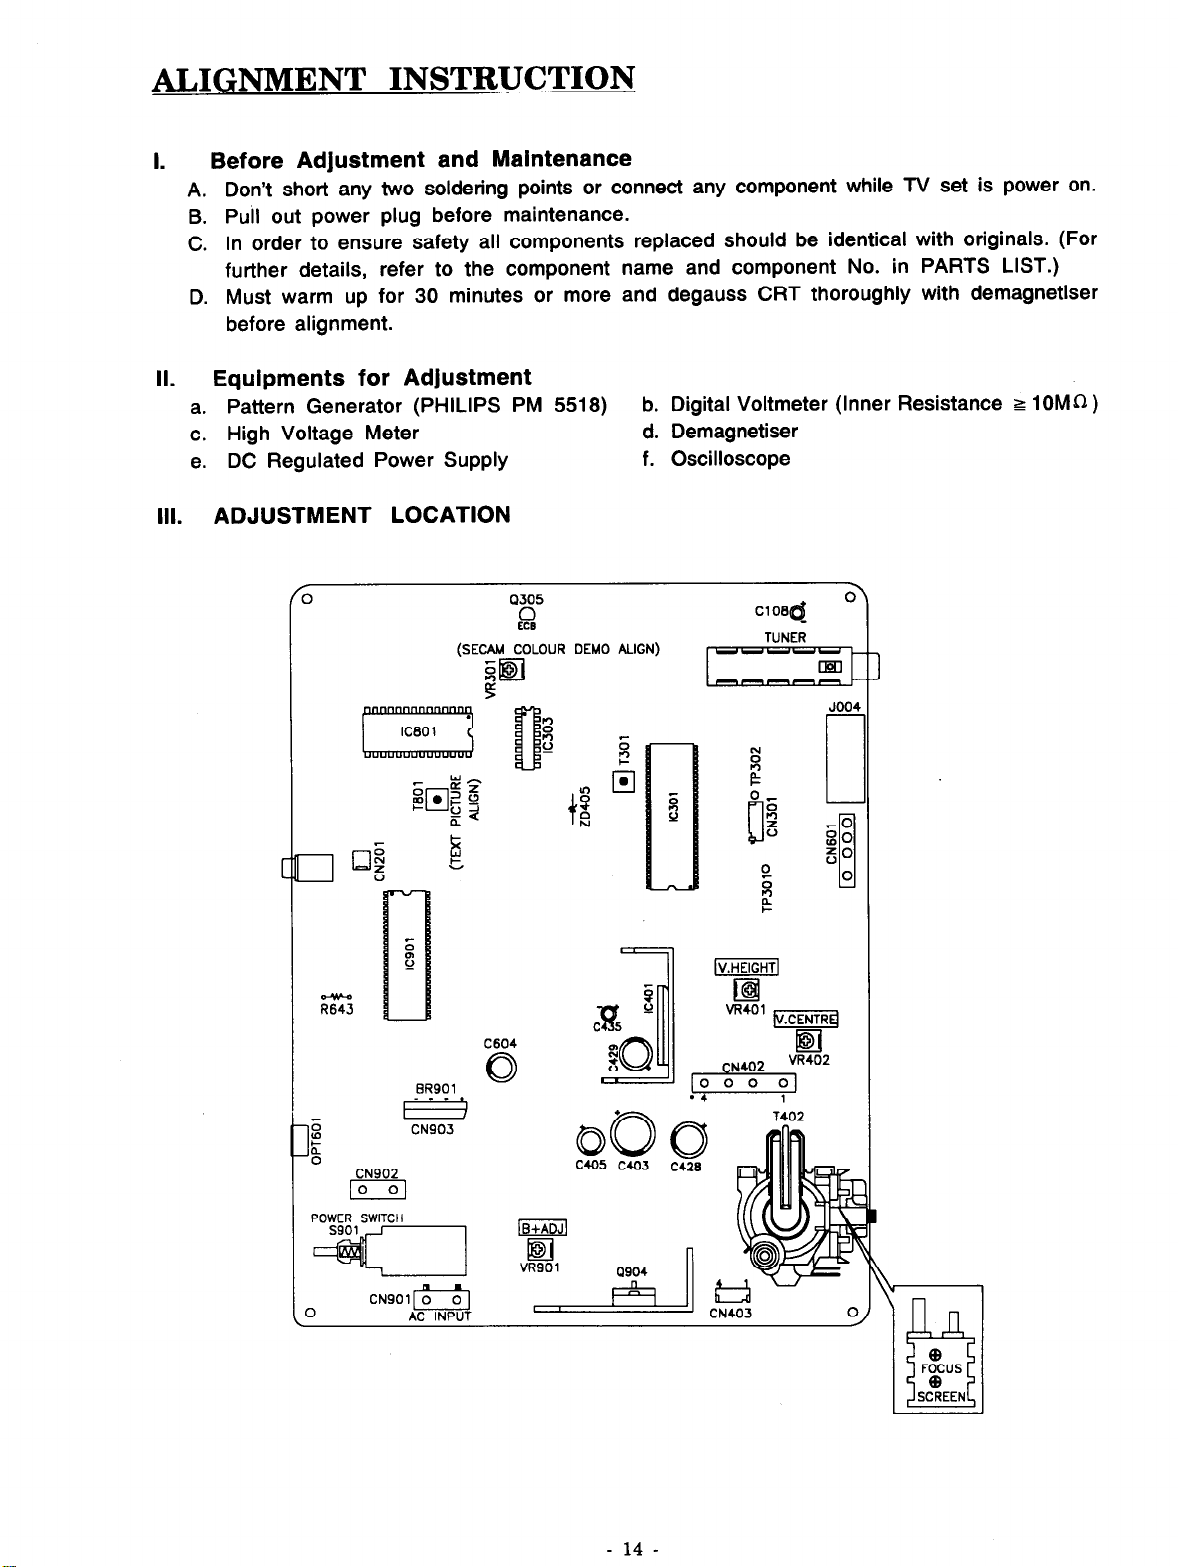
ADJUSTMENT LOCATION
Ill.
b. Digital Voltmeter (Inner Resistance t 10MhZ )
d. Demagnetiser
f. Oscilloscope
z
it
1
0
CN902
lo
POWER SWITC H
_-_
(SECAM COLOUR DEMO A LIGN)
C604
BR901
s?
0
ClO6d
TUNER
JO04
piiEiGq
q
vR401 53
, o z o\;1402
04
1
0 .
CN901 0
0
I
AC INPUT
- 14 -
Page 4
ALIGNMENT INSTR U CTION
IV. SETUP EEPROM (IC602)
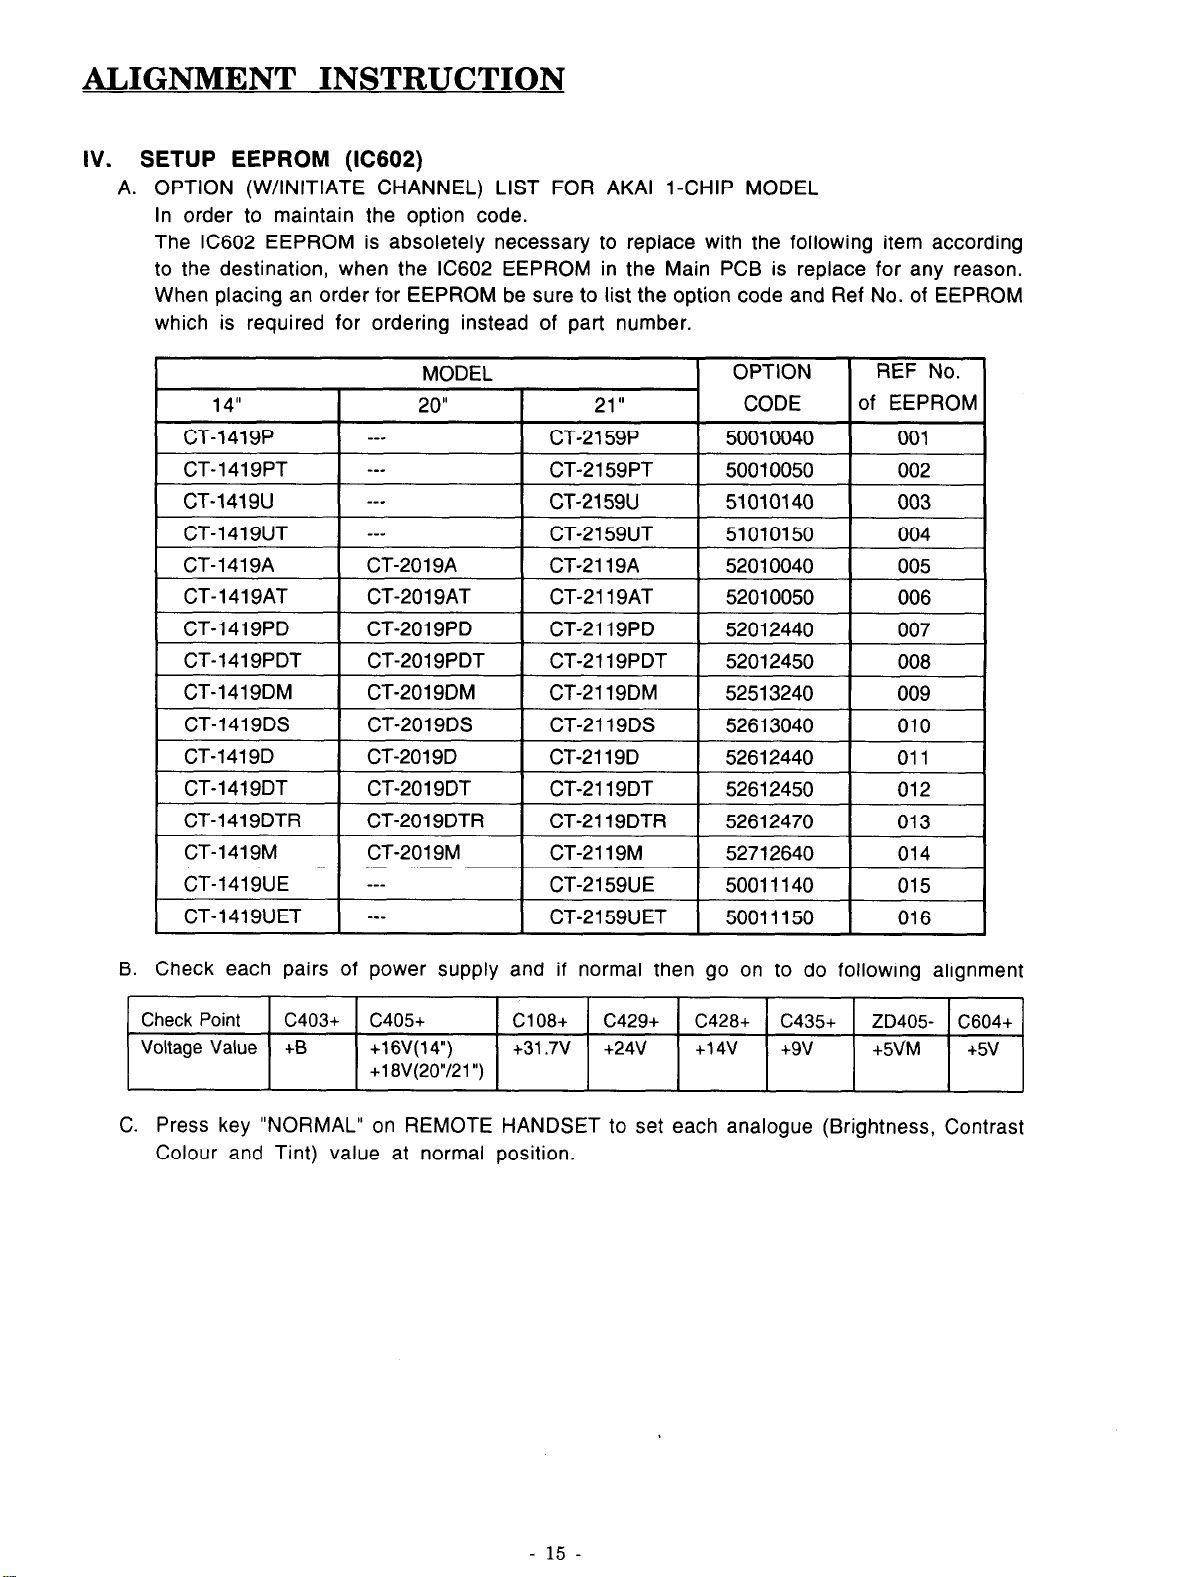
A. OPTION (W/INITIATE CHANNEL) LIST FOR AKAI l-CHIP MODEL
In order to maintain the option code.
The IC602 EEPROM is absoletely necessary to replace with the following item according
to the destination, when the IC602 EEPROM in the Main PCB is replace for any reason.
When placing an order tor EEPROM be sure to list the option code and Ref No. of EEPROM
which is required for ordering instead of part number.
B. Check each pairs of power supply and if normal then go on to do following alignment
Check Point c403+ c405+ C108+
Voltage Value +B +16V(14”)
+18\/(20”/21”)
C. Press key “NORMAL” on REMOTE HANDSET to set each analogue (Brightness, Contrast
Colour and Tint) value at normal position.
+31.7v
c429+ C428+ c435+ ZD405- C604+
+24V +14v
+9v +5\IM +5v
- 15 -
Page 5
ALIGNMENT INSTRUCTION
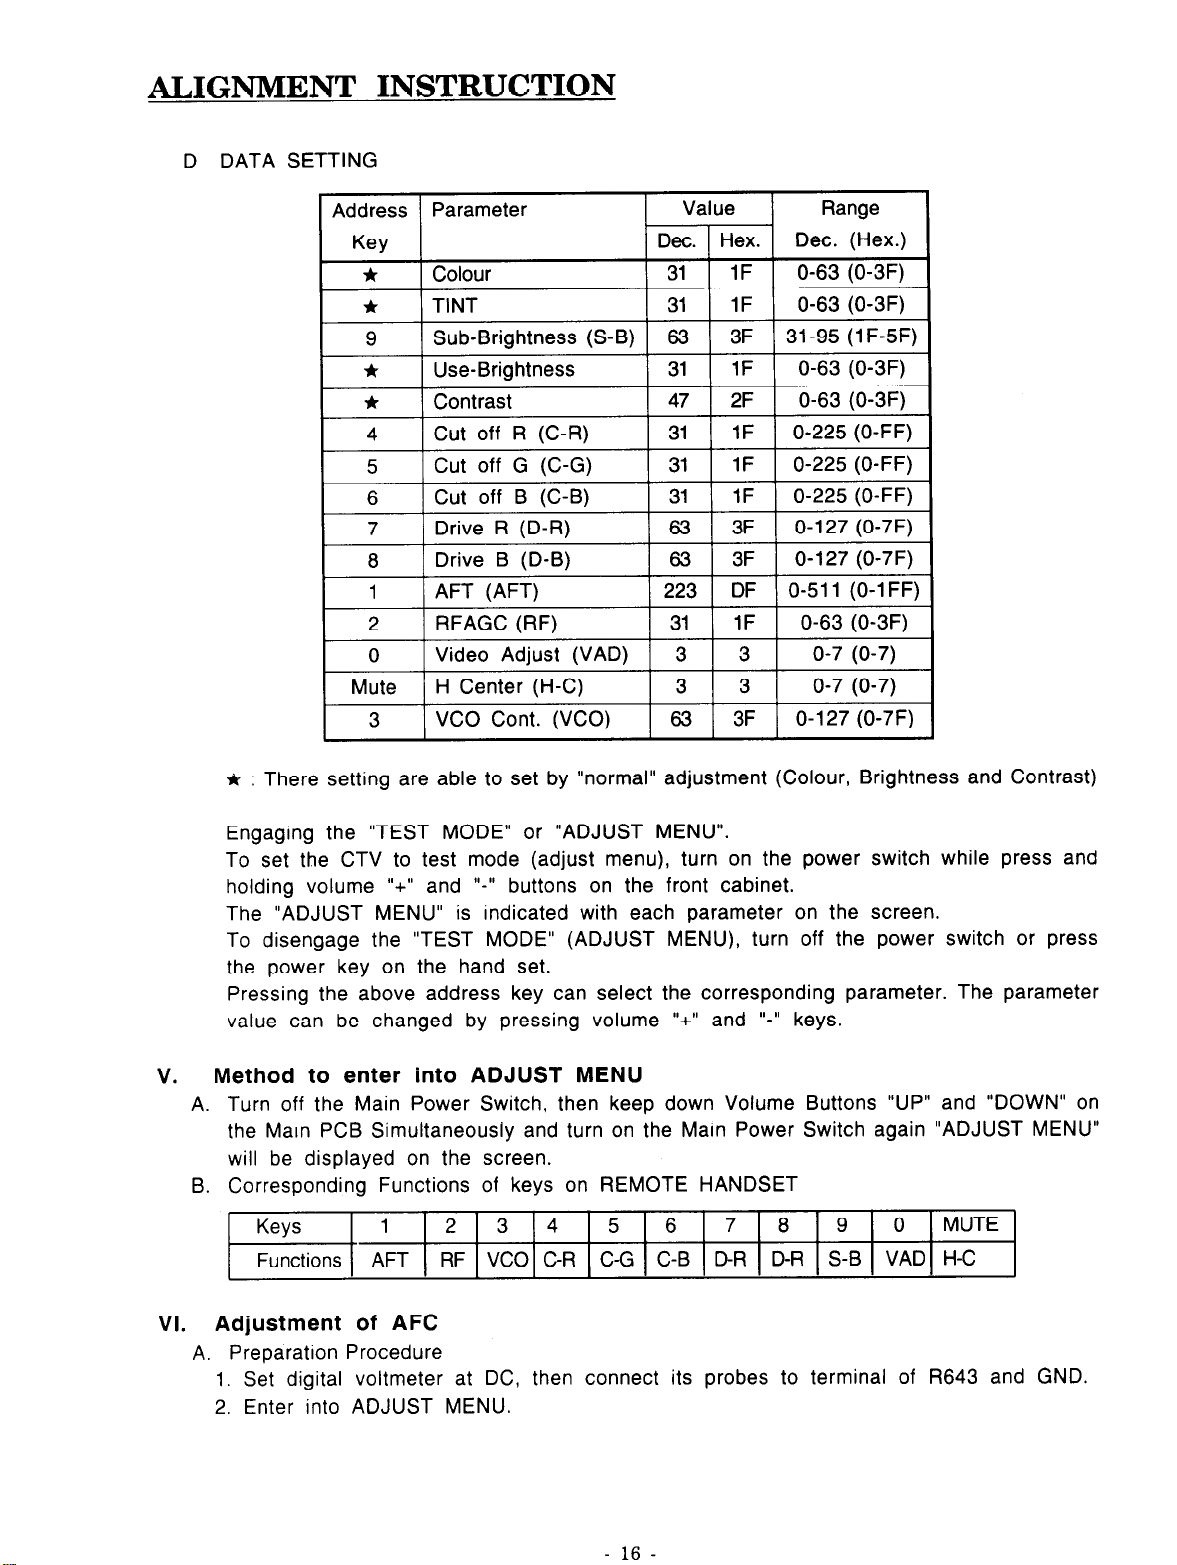
D DATA SETTING
* : There setting are able to set by “normal” adjustment (Colour, Brightness and Contrast)
Engaging the “TEST MODE” or “ADJUST MENU”.
To set the CTV to test mode (adjust menu), turn on the power switch while press and
holding volume “+” and
The “ADJUST MENU” is indicated with each parameter on the screen.
To disengage the “TEST MODE” (ADJUST MENU), turn off the power switch or press
the power key on the hand set.
Pressing the above address key can select the corresponding parameter. The parameter
value can be changed by pressing volume “+” and “-” keys.
Method to enter into ADJUST MENU
v.
A. Turn off the Main Power Switch, then keep down Volume Buttons “UP” and “DOWN” on
the Marn PCB Simultaneously and turn on the Main Power Switch again “ADJUST MENU”
will be displayed on the screen.
B. Corresponding Functions of keys on REMOTE HANDSET
Keys
Functions AFT RF VC0 C-R C-G C-B DR D-R S-B VAD H-C
Adjustment of AFC
VI.
A. Preparation Procedure
1. Set digital voltmeter at DC, then connect its probes to terminal of R643 and GND.
2. Enter into ADJUST MENU.
1 234567890
“-‘I buttons on the front cabinet.
MUTE
- 1 6 -
Page 6

ALIGNMENT I NSTR U CTION
B. Adjustment Step
Press key “1” on REMOTE HANDSET, following will be displayed on the screen:
1.
ADJUST MENU
Af=TO-
-1
xx
--
2.
Press key
“XX” at right on the first line to be “OO”, then power off
Receive Broadcasting TV signal. Press the “MENU” key
3.
“MANUAL TUNE” (press “RED” colour key) and press
picture and sound, and press “GREEN” key to memorite.
4.
Enter into ADJUST MENU again, repeat step 1.
Press key
5.
voltmeter rise to 2.5 f O.lV slowly after jumping down.
Exit from ADJUST MENU.
6.
VII.
+B voltage Alignment
A. Preparation Procedure.
1. Receive standard colour bar signal.
2. Press key “NORMAL” on remote handset to set analogue values at normal position.
3. Connect digital voltmeter between o of C403 and GND.
4.
‘-‘I on REMOTE HANDSET, to make digit q
“+” on REMOTE HANDSET continuously until the DC voltage on digital
MODEL CRT
CT-1419xX
CT-201 9xX 102-320001-19
CT-2 119xX 102-321004-l 9
CT-2 159xX
102-314000-l 3 +llOV
102-321001-10 +llOV
+B
+115v
+liOV
following AFT to be 0, the
(Exit from ADJUST MENU).
on the handset then select
“-” or “+” key, until get the best
NOTE: Other CRT, +B see the CRT conversion.
B. Adjustment Step
Adjust VR901 to make the read-out on the Voltmeter
to be +B f 0.25V.
VIII. Adjustment for White Balance
A. Preparation Procedure.
1. Receive Black-White pattern RF signal.
2. Press key “NORMAL” to set Contrast, Brightness
3. Switch off then switch on again immediately to enter ADJUST MENU.
B. Adjustment Step
Press keys 1’4”; “5”; “6”; 10,“; “6”;
1.
Set C-R, C-G, C-B, (CUT OFF R/G/B) at “1F”;
Set D-R, D-B (DRIVE R/B) at “3F”;
Set S-B (SUB-BRIGHTNESS) at “3F”.
2.
Short TP301 to TP302 with jumper wire.
Adjust knob “SCREEN” on the FBT, until just begin to see a horizontal line (which is
3.
red or green or blue).
4.
If the horizontal line is red, then press key “+” or “-” to change the of C-G, C-B to
make the horizontal line to become white. In the same way, if appeared horizontal line
is green or blue, should change the values of C-R, C-B or C-R, C-G correspondingly.
At last the horizontal line should become white.
“9” on REMOTE HANDSET separately.
at normal position.
a*,
- 1 7 -
Page 7

ALIGNMENT INSTRUCTION
5. Remove the jumper wire which from TP301 to TP302, then adjust values
B to make bright area of Black White pattern become normal white.
6. Repeat above step 2, 3, 4, 5, until both bright area and area meet white balance.
7. Power off to exit from ADJUST MENU.
IX. TV video signal amplitude Adjustment (VAD)
A. Preparation procedure
1. Receive standard colour bar RF signal.
2. Connect the probe of oscilloscope to the emitter of Q305 and GND.
3. Switch off, then enter into ADJUST MENU.
B. Method of Adjustment
1. Press key “0” on REMOTE HANDSET and following be displayed on screen:
2. Press key “+‘I or
amplitude of video signal on oscilloscope to be 2V,, * 5%.
3. Power off to exit.
SECAM Colour Demodulator Alignment.
X.
(FOR M/D/DT/DTR/DS)
1. Turn TV SET to AV mode.
2. Input SECAM (-BG/DK) COLOUR BAR signal.
3. Connect the Oscilloscope’s probe to PIN. 10 of IC303 (AN5637) and GND.
4. Adjust VR301 to obtain the waveform as in Fig.1.
“-” on REMOTE HANDSET to change value of VAD to make the
1
of D-R, D-
1
1
1
FIG. 1
Xl. Adjustment of RF AGC
1. Receive RF signal (62 * 3dBuV).
2. Enter into ADJUST MENU.
3. Press key “2” on REMOTE HANDSET, and following will be displayed on the screen:
RF_______________________1 ______ ____________________________
ADJUST MENU xx
4. Press key “+” or “-” on REMOTE HANDSET change the value of RF AGC until snow
noise on the screen just disappeared.
5. Exit from ADJUST MENU
XII. Adjust of Sub-brightness
1. Receive Moonscape Pattern.
2. Press key “NORMAL” on REMOTE HANDSET to set Brightness and Contrast at normal.
3. Enter into ADJUST MENU.
4. Press key “9” on REMOTE HANDSET, the display on screen will be:
ADJUST MENU
S-B_____ _____ ___________ ____ _l_________ _________________ __
- 18 -
xx
Page 8

ALIGNMENT INSTRUCTION
5. Press key “+” or “-” on REMOTE HANDSET to change the value of S-B until eight
and half of portions indicated in Fig.2 is just visible.
Just v isible
Fig.2
XIII. Teletext picture Alignment. (FOR PT/UT/UET/AT/PDT/DT MODELS)
1. Receive a pattern with teletext signal.
2. Select a teletext page.
3. Connect DC voltage meter to IC801 PIN 28 and GND.
4. Adjust T801 to obtain 2.5 f ,O.lV.
XIV. Adjust for Horizontal Centre (H-C) and V-HIGHNESS & V-CENTER
Receive +Ej pattern signal.
1.
2.
Enter then change the value of “H-C” to make the centre of picture to be on top of
the center of screen.
3.
Adjust VR401 to get a normal picture.
4.
Adjust VR402 to get a get V-CENTER picture.
XV. Adjust for FOCUS
1. Press key “NORMAL” on
position.
2. Adjust knob “FOCUS” on
XVI. COLOUR PURITY ADJUSTMENT (See Fig.3)
BEFORE ANY ADJUSTMENTS DESCRIBED BELOW ARE ATTEMPTED, V-HIGH, B+
VOLTAGE AND FOCUSING ADJUSTMENT MUST BE COMPLETED.
Place the TV receiver facing NORTH or SOUTH.
1.
Plug in TV receiver and turn it on.
2.
Operate the TV receiver over 30 minutes.
3.
4.
Fully degauss the TV receiver by using and external degaussing coil.
Receive a crosshatch pattern and adjust the static convergence control roughly.
5.
Loosen the clamp screw of the deflection yoke and pull the deflection yoke towards you.
6.
Enter into ADJUST MENU. Set the values of C-R, C-G, C-B to “00”.
7.
Adjust the purity magnets so that green field is obtained at the center of the screen.
8.
Slowly push the deflection yoke toward cone of CRT and set it where a uniform green
9.
field is obtained.
Tighten the clamp screw of the deflection yoke.
10.
11. After COLOUR PURITY ADJUSTMENT, you must adjust the WHITE BALANCE again.
remote handset to set brightness and contrast both at normal
FBT to make the picture on the screen to be the most distinct.
-
Page 9

AUDIO SIGNAL FLOW
” * I’
VIDEO & INCLUDE VIDEO(SUCH AS: VIF) SIGNAL FLOW
” e ”
_
fL-1 1 11 I r-r-- r-----i r-
Page 10

-
RR
r
I
RL107 . . .
10K . .
m
I
Page 11

J
HANDSET BOARD
I
I
I
I
I
I----.
I
iik+&+J CN,O,
_________I
I
ISSV
r-t---A
Page 12

AUDIO SIGNAL FLOW
VIDEO & INCLUDE VIDEO(SUCH AS. VIF) SIGNAL FLOW
Page 13

7
1
+
r-
Page 14

I I I I mm
_--------
yH CNJOI
U&LOG AFT BOARD
 Loading...