


P1-P17
P18-P37

Table Of Contents
Table of Contents
Important Safety Instruction
Warnings and Cautions
Functional Parts(TV)
Rear View Of TV Set
Operation-Remote Control
Select Input Source
Basic Operation
ATV Source
Other Source
PC Source
1
2
3
4
5
6
7
7
8-10
11
11
DTV Source
USB Source
PVR Source
Troubleshooting Tips
11-12
12
13-15
16
1
Important Safety Instruction
WARNING
RISK OF ELECTRIC SHOCK
DO NOT OPEN
WARNING: TO REDUCE THE RISK OF ELECTRIC SHOCK DO NOT
REMOVE COVER OR BACK. NO USER-SERVICEABLE PARTS INSIDE.
REFER SERVICING TO QUALIFIED SERVICE PERSONNEL.
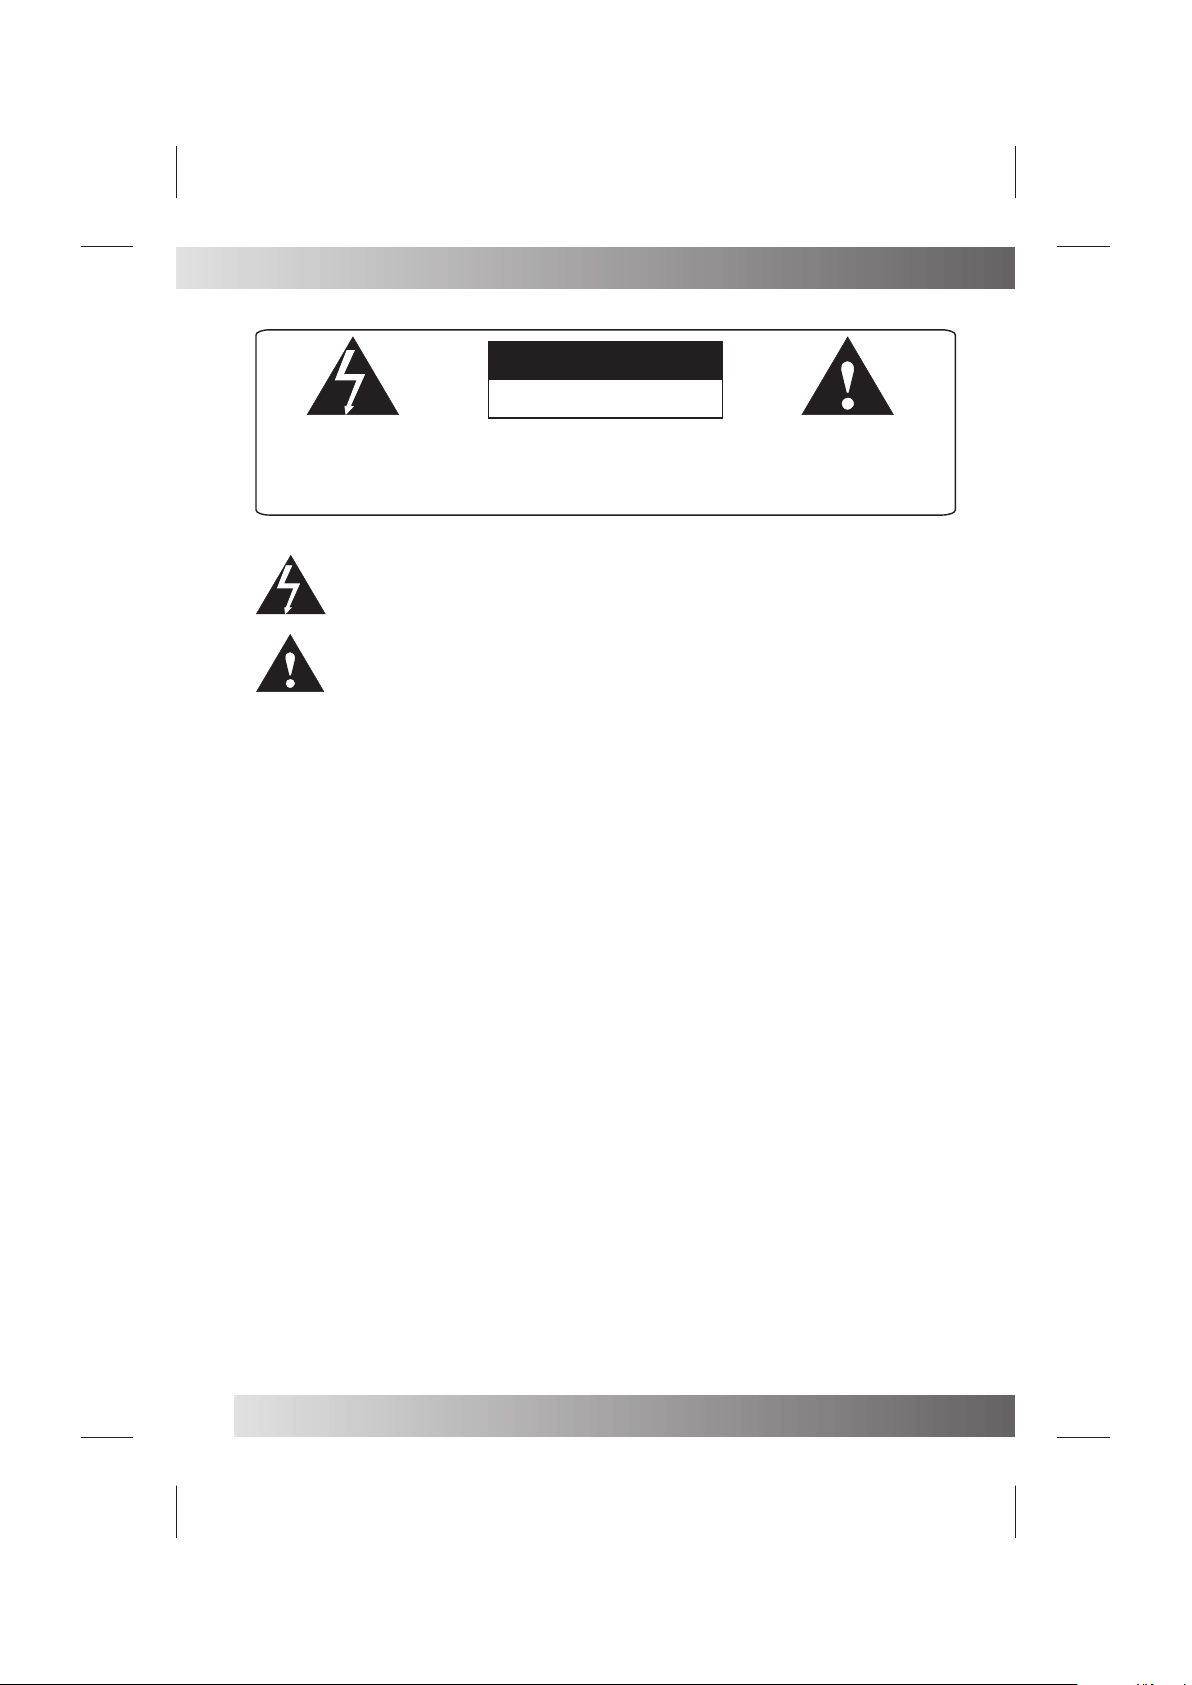
The lighting flash with arrow head within a triangle is intended to tell the user that
parts inside the product are a risk of electric shock to persons.
The exclamation point within a triangle is intended to tell the user that important
operating and servicing instructions are in the papers with the appliance.
WARNING: TO REDUCE THE RISK OF ELECTRIC SHOCK DO NOT EXPOSE THIS
APPARATUS TO RAIN OR MOISTURE AND OBJECTS FILLED WITH LIQUIDS,
SUCH AS VASES, SHOULD NOT BE PLACED ON THIS APPARATUS.
2
Warnings And Cautions
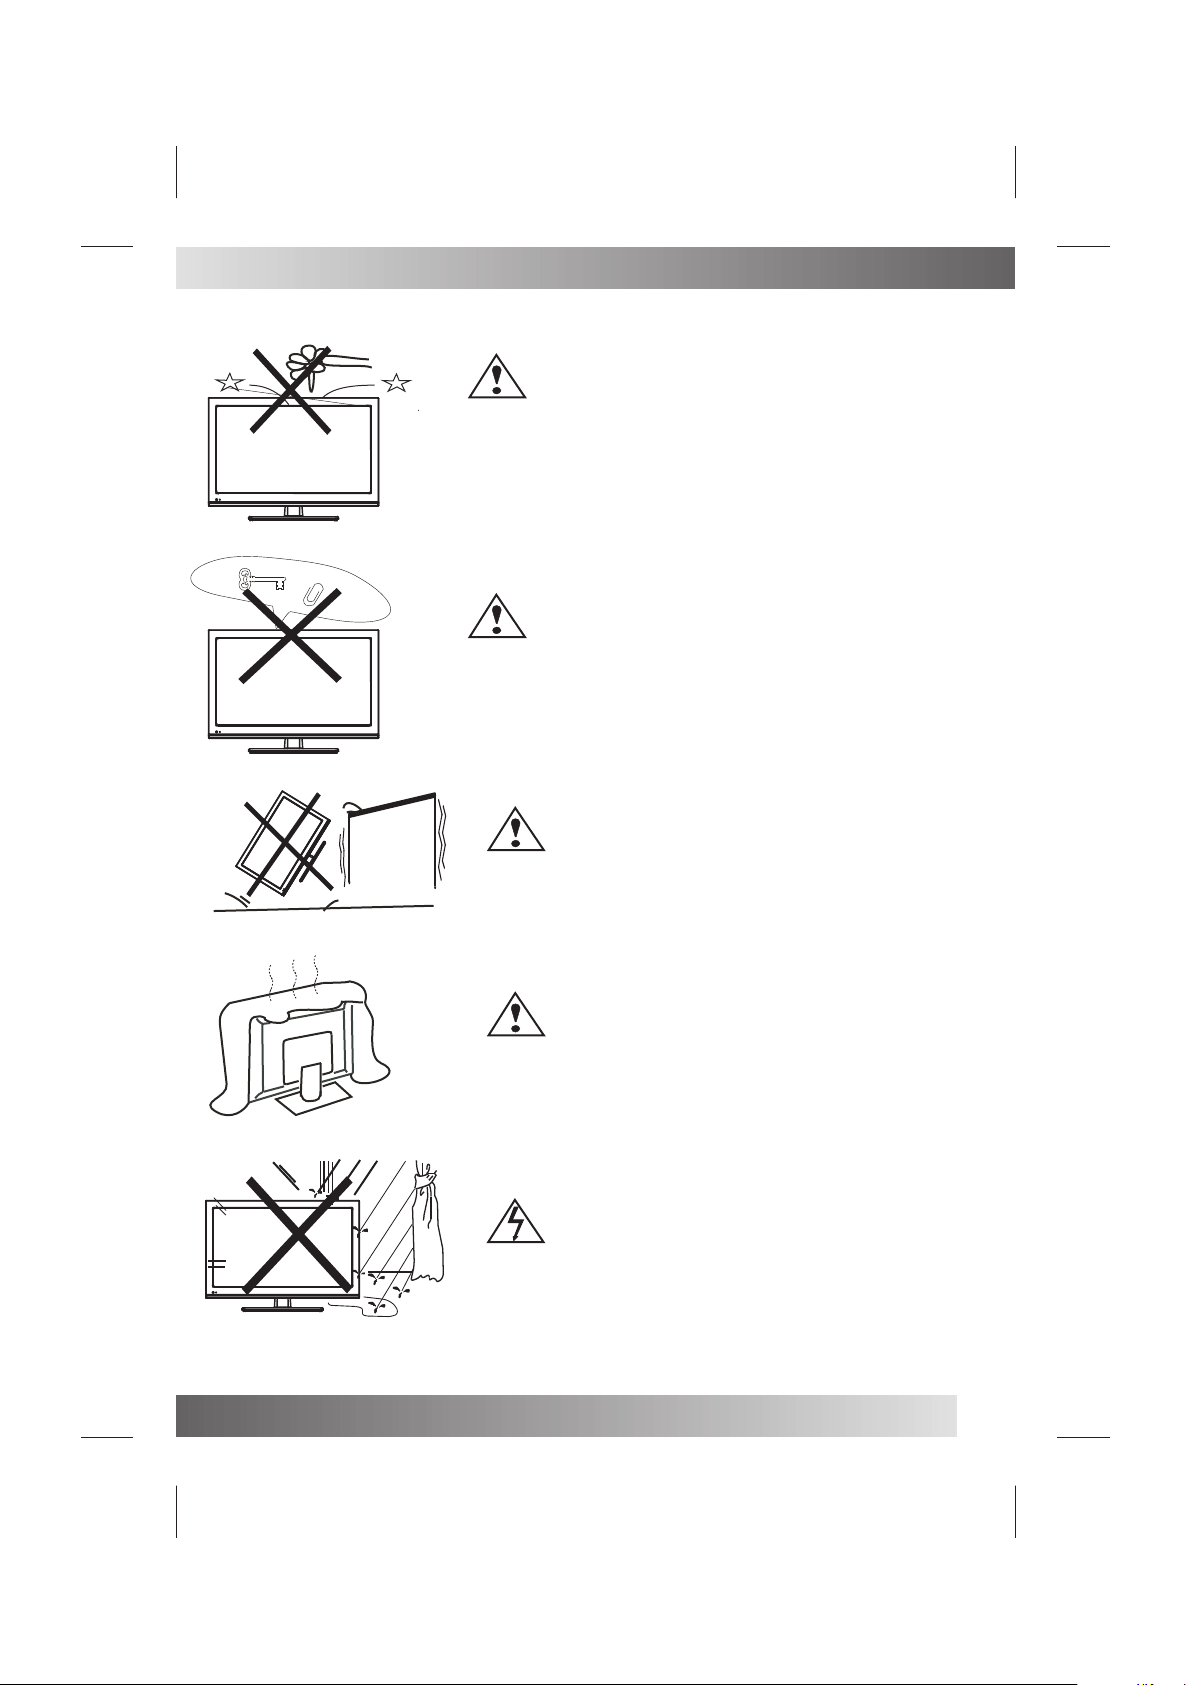
Do not drop or push obje cts into the television cabinet slots
or openings. Never s pill any kind of liquid on the television
receiver.
Do not insert anythi ng in the ventilation holes. If metal or
something flamma ble enters, it may result in fire or electric s hock.
Caution
Caution
Caution
Do not place your tele vision on an unstable cart , stand , shelf or
table. Serious inj ury to an individual, and damage to the television,
may result if it should fall.
Caution
Do not block the ventilation holes in the back cover.
Adequate ventila tion is essential to prevent failure of ele ctrical
component.
Warning
To prevent fire or electrical shock hazard, Do not expose the
television recei ver to rain or moisture.
3
Functional Parts( TV )
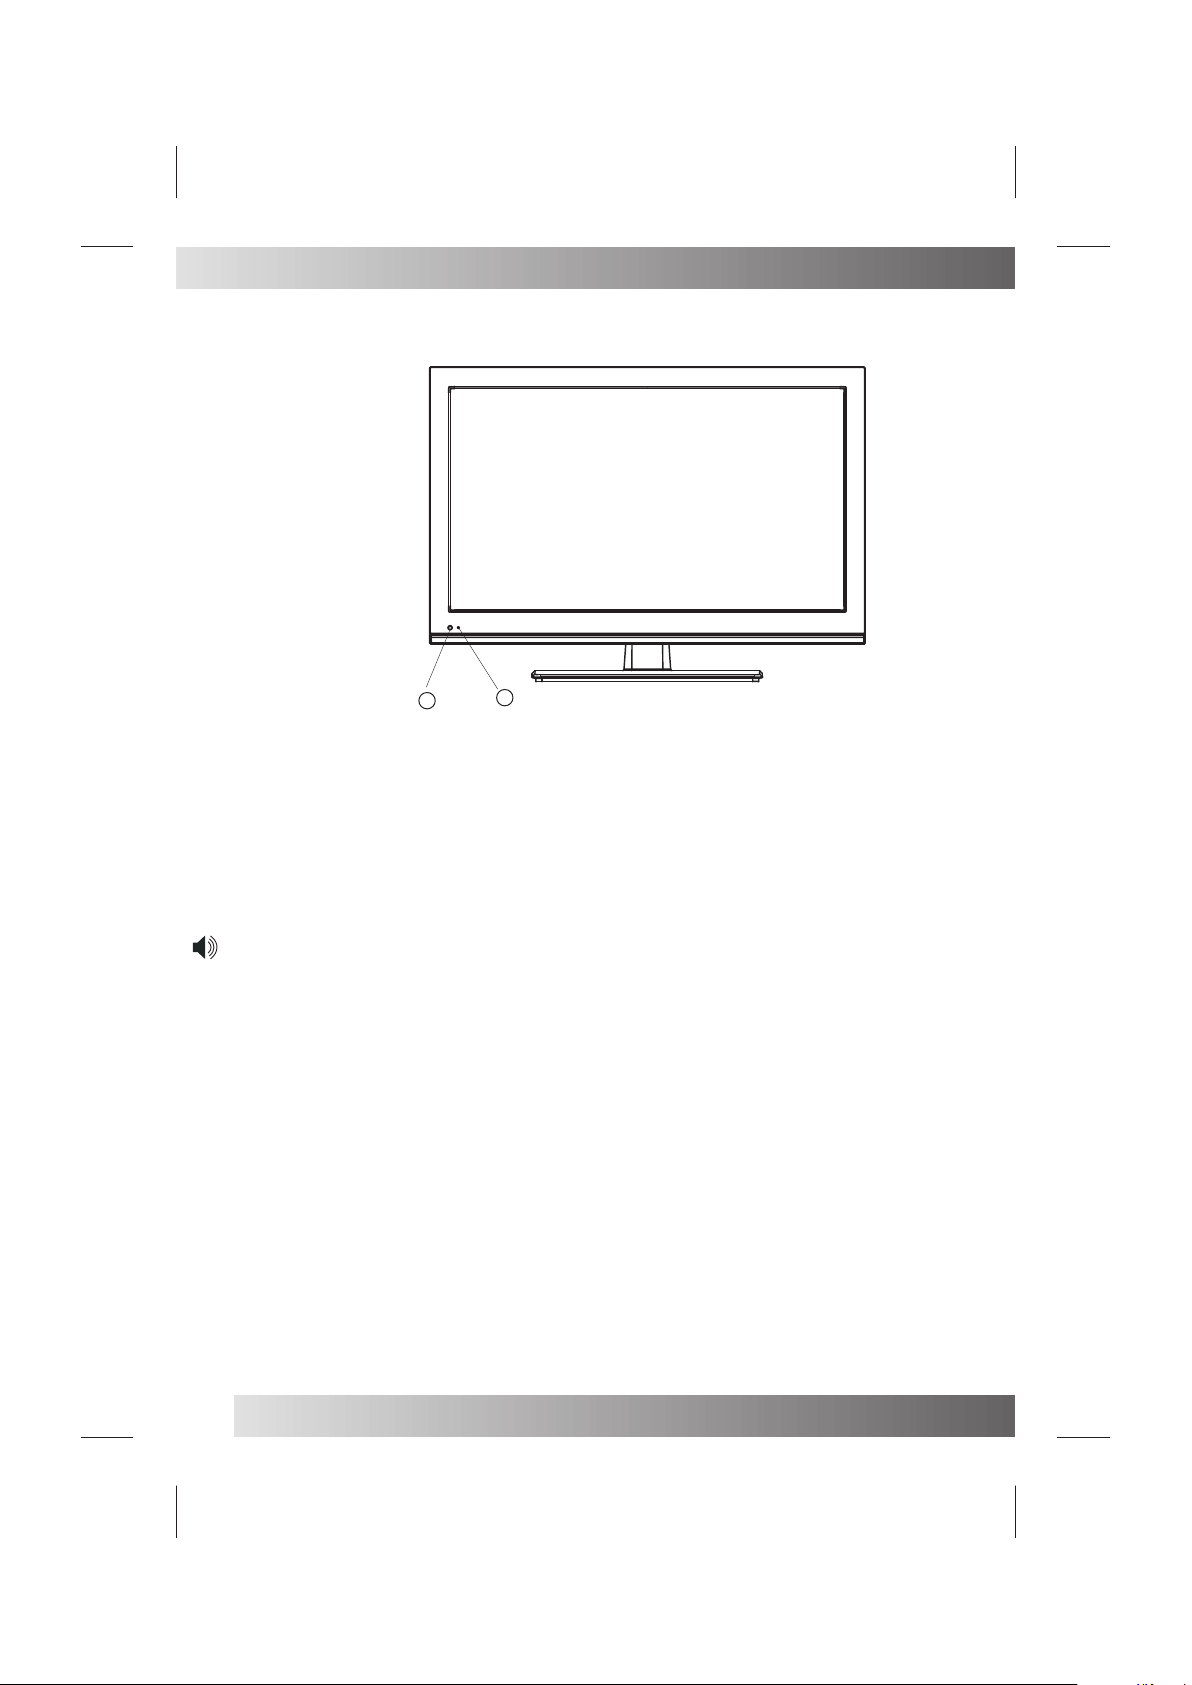
Front View of LED Set
1.
Remote Sensor
2. LED indicator lamp
1
To turn the TV power ON
Put the TV set on the correct place, then connect the DC plug of the AC-DC adaptor to the D C 12V socket
at the back of the TV set. Connect the adaptor main cord to the wall outlet ,then the LE D indicator lamp
turns red/blue and the TV set is at Standby/work Mode. At Standby Mode, if Standb y Button is pressed
the power indicato r will change to blue. It will flash a few seconds before the picture appears.
To turn the TV power OFF
Press the Standby Button to make the TV set in Standby Mode, then disconnect the p ower plug from the
wall outlet.
NOTE:
If TV is the selected input without signal received and NO operation is perfor med for about 5 minutes
continuously, the TV set will enter standby mode. For any inputs other than TV, the TV set will not enter
standby mode autom atically without users instruction. I f you are not going to use this TV set for a long
time, switch off the set and disconnect the power plug from the wall outlet.
2
4
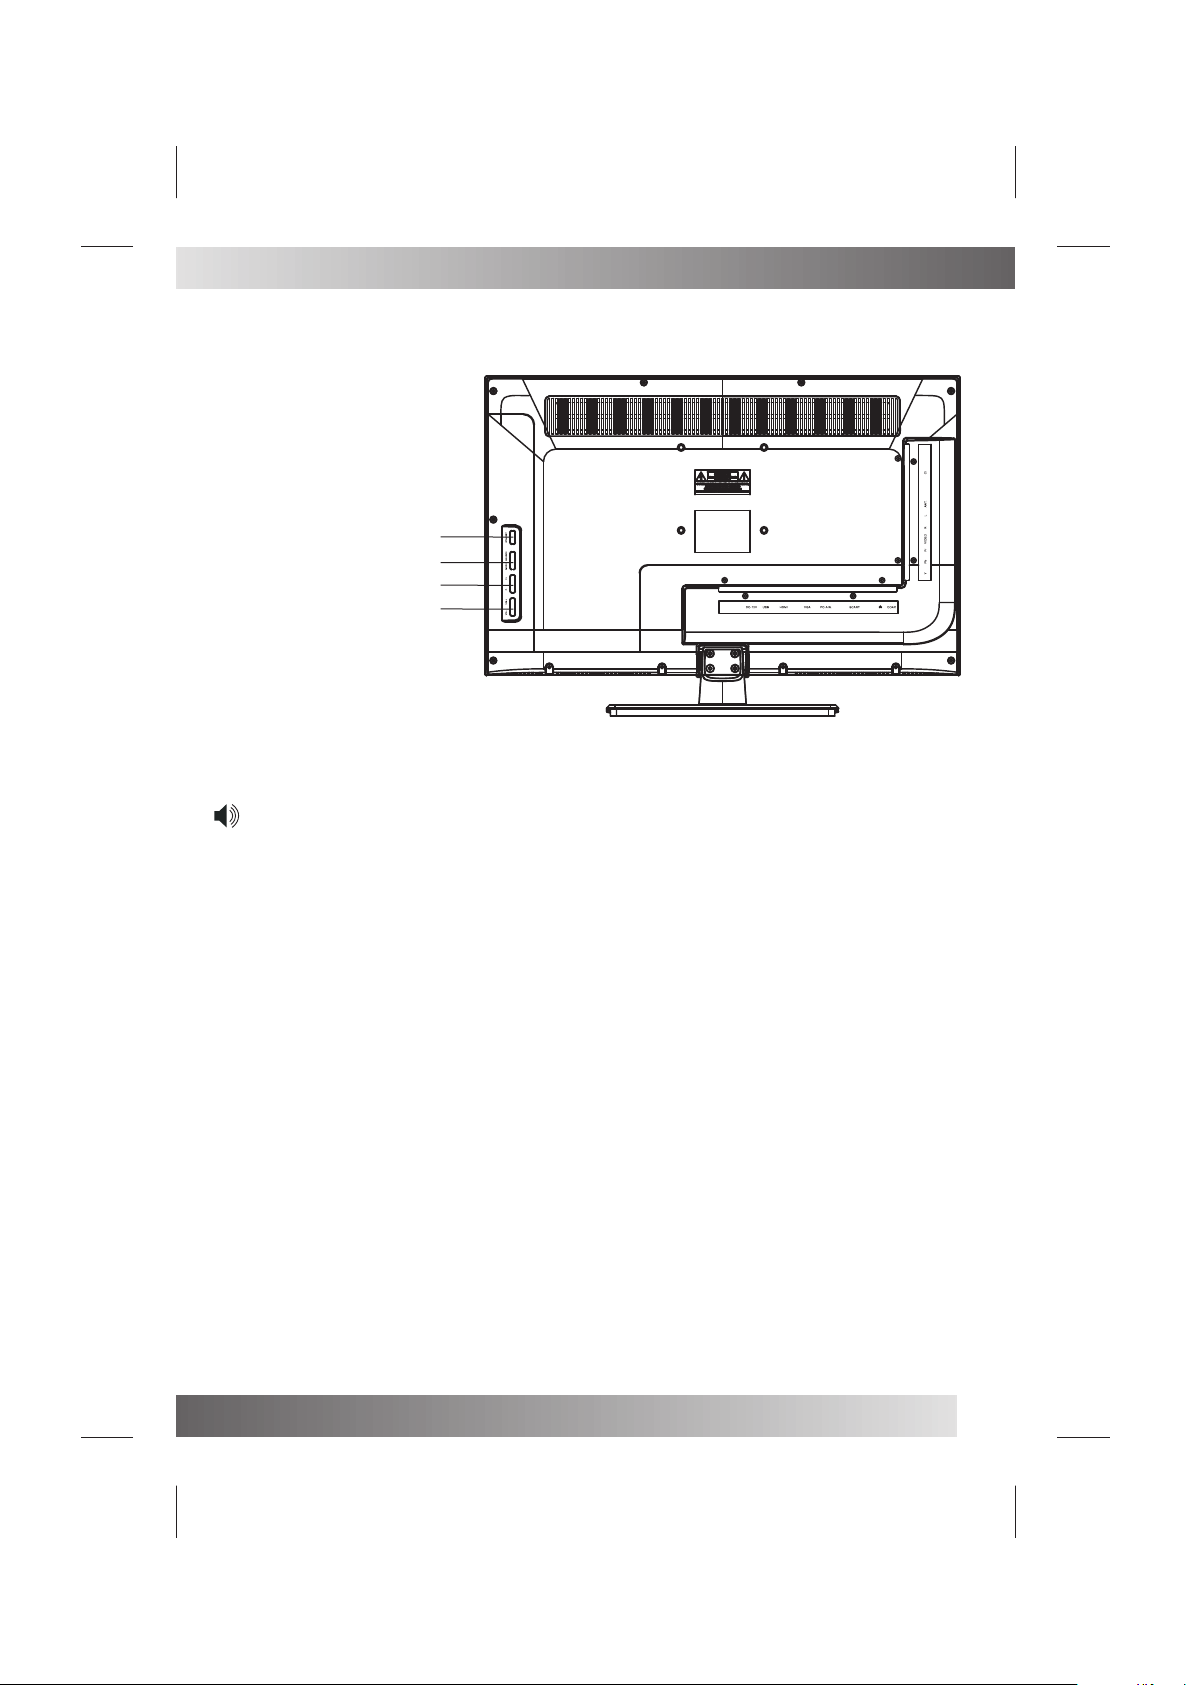
Rear View Of TV Set
Back View of LED Set
1. Standby Button
2. SOURCE Button
MENU Button
3. P+ Button
P- Button
4. V+ Button
V- Button
NOTE:
Precautions when connecting to other equipment.
When using external equipment with this TV set, please read the instruction manual of the external
equipment.
Switch off all power supplies to the equipment and TV set before connection.
Always ensure that the input and output terminals are correctly connected.
The UPDATE terminals just use to update the system software.
①
②
③
④
5

Operation-Remote Control
SOURCE
LANG
AUT O
TV/RADIO
EXIT
STAN DBY:
AUTO: Press to do auto configuration d irectly in PC so urce.
MUTE: Pr ess to mute the sound . Press again or p ress
VOL+ to un mute.
0-9: Pre ss 0-9 to select a TV channel d irectly when y ou are watchin g
TV.To enter pa ge number in telete xt mode and so on.
-/-- :P ress this button to enter a program n umber with different
:Retur ns to the previousl y viewed progr amme.
CH+/-: P ress to scan throug h or to select a cha nnel.
VOL+/- : Press to increase / d ecrease the so und level.
ASPECT : To selec t the aspect of scree n.
NICAM: C hange audio mode in ATV source: St ero/ Dual I/II /Mono.Chan ge
audio mo de in other source: L eft/Right.
DISPLAY:Press to display the sou rce and channe l’s infor mation.
▼ / ▲ / ◄ / ►/ K: Allow s you to navigat e the on-scree n menus and
adjust t he system sett ings to your preference.
MENU:B rings up the LED main m enu to the scree n in TV mode.
EXIT: Pres s EXIT to exit menu or sub menu.
SOURCE :Press to select th e input source .
PMODE: Press repeatedl y to cycle throu gh the availab le video pictu re
modes.
SMODE: Press to cycle thro ugh the different sound s ettings.
SLEEP: Let you select amou nt of time befor e your TV tur n itself off
automa tically.
FAV:P ress to display FAV menu in TV mo de.
FAV+/ -:Press to select the channel in fa v channel.
EPG:Pr ess to show the Elect ronic Progra m Guide menu.
TEXT:S witch On or Off the teletext mod e.
HOLD:H old On or Off for current page dis play.
TV/RAD IO: Press to select TV or RADIO mo de.
SUBTIT LE:To switc h the dialogue at the b ottom of the scr een.
INDEX: I NDEX request the in dex page.
REVEAL : Press REVEAL to r eveal or hidden the h idden words.
SUBPAGE: Press SUBPAGE to sub coded p age access.
LANG: To show the list of audi o languages av ailable for th e
curren t channel.
: Play/p ause or begin to time shift.
: Stop rec ording
: Press to g o to the previous cha pter.
: Press to g o to the next chapter.
: Press to t imeshift or play a program in fast re wind mode.
: Play a pro gram in fast forwar d mode.
: To begi n recording.
RED/ GRE EN/ YELLOW/ BL UE: Navigati on buttons in TV mode.
Switch o n LED TV when at sta ndby mode.
digits .eg. - for 1,-- for 11,--- for 111,--- - for 1111.
O
6

SELECT INPUT SOURCE
Press S OURCE button to display the input sourc e list;
Press ▼ / ▲ button to select the i nput source you want to watc h;
Press O K button to ente r the select ed source;
BASIC OPERATION
DTV
ATV
AV
SCA RT
YPB PR
PC
HDM I
USB
VID EO
Brightness
Contrast
Saturation
Sharpness
Move
50
50
50
50
Select
Picture Mode
Color Temp
NR
MPEG NR
Cinema Mode
Exit
Custom
Normal
Medium
Low
Low
Press ME NU button to displa y the MAIN OSD MEN U;
Press ◄ / ► bu tton to select the ME NU you want to
adjust ;
Press O K button or ▼ button to enter the sub menu ;
Press ▼ / ▲ button to select the e ntry, the n press
OK butt on to enter and p ress ◄ / ► to adjust th e
value o f selected entr ies;
You can press MEN U or EXIT but ton to save a nd
return back to the prev ious menu .
Setup Wizard
There ar e Setup Wizard oper ations if the TV system is fi rst time opene d.
Setup Wi zard(1)
Press ▼ / ▲ bu tton to select the La nguage that yo u want to choose .
Press OK b utton to choose and e nter the next st ep;
Press ► bu tton to select Canc el. Choose Yes, th ere wil be Setup W izard operat ions when open the TV next time.
Setup Wi zard(2)
Press ▼ / ▲ bu tton to select the Co untry that you w ant to choose.
Press OK b utton to choose and e nter the next st ep;
Press ► bu tton to select Prev ious or Cancel , and press OK but ton to confirm t he selection;
Setup Wi zard(3)
Press OK b utton to start Auto Scan;
Press ▼ bu tton to the buttom li ne ,then press ◄ / ► b utton to selec t Previous or Ca ncel.
Setup Wi zard(4)
Press Ke y MENU or EXIT to stop searching
7

ATV Source
Video Menu
简 介简 介
VID EO
Brightness
Contrast
Saturation
Sharpness
Audio Menu
AUD IO
Volu me
Balanc e
Treble
Bass
TV MENU
Move
Move
50
50
50
50
Select
50
0
50
51
Select
Picture Mode
Color Temp
NR
MPEG NR
Cinema Mode
Exit
SPDIF Output
EqualiZer
Exit
Custom
Normal
Medium
Low
Low
OFF
Press ▼ / ▲ / ◄ / ► button to selec t
Brightness/Con trast/Saturation/Sharpness,
then press OK button to enter and press ◄ /►
button to adjust.
Press ▼ / ▲ / ◄ / ► button to s elect Picture
Mode/Color Tem p/NR/MPEG NR/Cin ema,
then press OK button to enter and press ▼ / ▲
button to select which mode you want.
Press ▼ / ▲ / ◄ / ► button t o select
Volu me/Balance/Tre ble/Bass/ S PDIF,
then pr ess OK button to enter and pr ess ◄ / ► butt on
to adju st.
Press ▼ / ▲ / ◄ / ► bu tton to select SPDI F output/E
qualiz er, then press OK but ton to enter and P ress ▼ / ▲
button t o select the Mode of SP DIF output or
Equali zer.
TV
Program Edit
EPG
Move
Networ k: Press ▼ / ▲ / ◄ / ► butto n to select Network , then press OK bu tton to enter an d press OK butto n to select
All, Row ridge, Crystal Pa lace, Digita l Finland, Win ter Hill.
Press RE D button on the remot e control to ren ame the progra m. Press ▼ / ▲ butto n to select different charac ters.
Press GR EEN button to delet e the program yo u don’t want to re main.
Press YE LLOW button to chan ge the places of t he two program s.
Press BL UE button to move the p rogram to the ne w place.
FAV: Pr ess ▼ / ▲ button to select you want to make i t a favorite cha nnel, then pre ss ► button to sel ect fav and press
OK butto nto confirm, pres s OK button agai n will set it to a nor mal channel.
Select
Auto Search
Manual Search
Exit
Progra m Edit: Press ▼ / ▲ / ◄ / ► bu tton to select
Progra m Table, then press OK button to en ter.
Servic e Type: Press ▼ / ▲ / ◄ / ► button to select
Servic e Type, then pres s OK button to ent er and press
OK butto n to adjust.
8

ATV Source
Lock: Pr ess ▼ / ▲ button to selec t you want to lock c hannel, then p ress ► button to s elect lock and press OK button
to confi rm. press OK button a gain to cancel c hannel lock.
Skip: Pr ess ▼ / ▲ button to selec t you want to skip c hannel, then p ress ► button to s elect skip and press OK button
to confi rm.press OK butto n again to cance l skip channel .
Auto Sea rch : Press ▼ / ▲ / ◄ / ► butt on to select Auto Sea rch, then pres s OK button to ent er.
Press ▼ / ▲ bu tton to select Anal og( or ATV), then press OK butt on to start sear ch.Press ▼ / ▲ but ton to select
Digita l, then press OK butt on to enter.
DVB-T: Pre ss ▼ / ▲ button to select A erial(or DTV ), then press OK b utton to start s earching DVB -T.
DVB-C: P ress ▼ / ▲ button to sele ct Cable, then p ress OK button t o set the inform ation of DVB-C S earching.
Networ k ID: Press ▼ / ▲ / ◄ / ► butt on to select Networ k ID, then press O K button to ente r. Press ◄ / ► button t o
select Au to or press the numbe r button to set th e ID by yourself , then press OK bu tton to confirm the setting and bac k
to the pre vious menu.
Freque ncy: Press ▼ / ▲ / ◄ / ► but ton to select Frequ ency, then pre ss OK button to en ter. Press ◄ / ► butt on to
select Au to or press the numbe r button to set th e Frequency by y ourself, the n press OK button to co nfirm the sett ing
and back t o the previous menu .
Symbol R ate: Press ▼ / ▲ / ◄ / ► but ton to select Symbo l Rate, then pre ss OK button to en ter. Press ◄ / ► butt on
to selec t Auto or press the numb er button to set t he Symbol Rate b y yourself, th en press OK button to c onfirm the
settin g and back to the previ ous menu.
Demodu lation: Press ▼ / ▲ / ◄ / ► button to select De modulation , then press OK bu tton to enter.
Press ▼ / ▲ bu tton to select Au to \16QAM\64QAM \128QAM\25 6QAM. then pre ss OK button to co nfirm the setting
and back t o the previous menu .
Servic e Type: Press ▼ / ▲ / ◄ / ► button to select Se rvice Type , then press OK bu tton to enter. Pr ess ▼ / ▲
button t o select All Services or Fr ee Services. then press OK bu tton to confir m the setting and bac k to the previou s
menu.
Scan Type: Press ▼ / ▲ / ◄ / ► but ton to select Scan Type, then pre ss OK button to en ter.
Press ▼ / ▲ bu tton to select Quic k Scan or Full Sca n. then press OK b utton to confi rm the setting a nd back to
the revi ous menu. Press ▼ / ▲ but ton to select St art, Press Sta rt to search. Aft er setting the a bove
inform ation,Press ▼ / ▲ but ton to select St art, Press Sta rt to search.
Manual S earch: Press ▼ / ▲ / ◄ / ► button to select Man ual Search, th en press OK butt on to enter.
Channe l No.: Press ◄ / ► button to select Chann el No., then pre ss ▼ / ▲ button to adj ust.
Color Sy stem : Press ◄ / ► button to select Color S ystem, then pr ess ▼ / ▲ button to se lect Auto, SEC AM, PAL.
Sound Sy stem: Press ◄ / ► button to select Soun d System, then p ress ▼ / ▲ button to s elect B/G, L/L’, D /K, I.
AFT: Pr ess ◄ / ► button to se lect AFT, then press ▼ / ▲ button to sele ct On or Off.
Freque ncy: Press ◄ / ► button to select Frequ ency, then pre ss ▼ / ▲ button to adj ust.
SETUP MENU
Country
OSD Language
Audio Language
Teletext Language
Subtitle
Move
SET UP
Norway
English
English
Select
Setup Wizard
Reset
Exit
Press ▼ / ▲ / ◄ / ► bu tton to select Country/OSD
Langua ge/Teletext L anguage, the n press OK butto n
to enter a nd press ▼ / ▲ button to se lect.
Press ▼ / ▲ / ◄ / ► bu tton to select Rese t/Setup
Wizard , then press OK bu tton to enter an d press ▼ / ▲
button t o select Yes or No.
9

ATV Source
TIME MENU
Time Mode
Sleep Time
Current Time
Wake UP Timer
PVR Timer
Move
OTHERS MENU
Auto
Off
Select
TIM E
Exit
Press ▼ / ▲ bu tton to select Time Mode/Sle ep
Tim e/Current Ti me, then press O K button to ente r and
press ▼ / ▲ bu tton to select Auto or Manual.
Date: Press ◄ / ► button to select year, then press ▼ /
▲ button to choose the year of curr ent time, Chooses t he
month an d the day withthe sim ilar method.
Tim e: P ress ◄ / ► butto n to select hour, then press ▼ /
▲ button to cho ose the hour of current ti me, Chooses th e
minute w ith the similarme thod.
NOTE:O nly when you set the Time Mode
“Manua l”,you can set the Cu rrent Tim e .
OTH ERS
USB
Screen Mode
Auto
Parent Control
Move
Off
Select
Exit
Blue Screen
Format : Press ▼ / ▲ / ◄ / ► button t o select Format, th en press OK butt on to enter.
Press OK b utton to select FAT32, EXT3 or EXT 2.After the de signation, p ress ▼ / ▲ button to s elect OK button, wi ll
demons tratethe follow ing dialog box .
Press ◄ / ► bu tton to select Yes, th en press OK butt on to format the d evice, other wise cancels the formatting.F or
more inf ormation please r efer to USB chan nel.
Screen M ode: Press ▼ / ▲ / ◄ / ► but ton to select Scree n Mode.
Parent al Control: Press ▼ / ▲ / ◄ / ► button to selec t Parental Con trol, then pre ss OK button to en ter.
Input pa ssword to enter, def ault passwor d is “8888”
Parent al Lock: Press ▼ / ▲ / ◄ / ► button to select Par ental Lock, th en press OK butt on to enter and pr ess ▼ / ▲
button t o select Off or On.When parent al lock is at the “off” state, do es not need to inp ut the password to en ter the
parent al control menu dir ectly.
Parent al Rating: Press ▼ / ▲ / ◄ / ► button to select P arental Rati ng, then press O K button to ente r and press ▼
/ ▲ button t o select between 3a nd 18.
Change P IN: Press ▼ / ▲ / ◄ / ► butt on to select Change P IN, then press O K button to ente r.i
After in putting the old pas sword, will de monstrate th at inputs the ne w password dialog b ox. Input your n ew
passwo rd.
After in putting the new pas sword, will de monstrate th e confirmati on password dialo g box. Input you r new password
again. After inputting t he confirm pas sword, will de monstrate “Pa ssword Changed!”.
Blue Scr een: Press ▼ / ▲ / ◄ / ► button to select Blue Sc reen, then pre ss OK button to en ter and press ▼ / ▲
button t o select Off or On.
Press ▼ / ▲ / ◄ / ► bu tton to select
USB/SL OT/Partition, then press OK but ton to enter.
Press ▼ / ▲ / ◄ / ► bu tton to select Sele ct, then press
OK butto n to enter.
Press ▼ / ▲ / ◄ / ► bu tton to select Al l, then Press ◄ /
► / ▼ / ▲ button t o select the progra m you want to play.
Press ▼ / ▲ / ◄ / ► bu tton to select
Pictur e/Music/Movie , then Press ◄ / ► / ▼ / ▲ but ton
to selec t the picture you wan t to look. Press O K button to
enter th e picture/song/ Movie you have s elected.
10

OTHER Source
AV/YPBPR/HDMI/SCART
Notes:
1.Video / Audio / S etup / Time menu and des cription are t he same with the ATV source.
2.AV/YPBPR/HDMI/SCART Source non -TV menu.
PC Source
PC MENU
Press ▼ / ▲ / ◄ / ► bu tton to select
V.Position/ H.Position/Ph ase/Clock, t hen press OK
button t o enter and press ◄ / ► but ton to adjust.
Press ▼ / ▲ / ◄ / ► bu tton to select Auto Adjust/Auto
Phase, t hen press OK button t o auto adjust V.Posit ion
and H.Po sition.
Reset: P ress ▼ / ▲ / ◄ / ► button to select Reset, then
press OK b utton to return to fa ctory settin gs.
Notes:
1.Video / Audio / Setup / Time menu and descr iption
are the sa me with the ATV s ource.
2.Othe rs menu and descrip tion are the sam e with the
ATV so urce.
V.Posit ion
H.Position
Phase
Clock
Move
PC
Auto Adj ust
50
Auto Phase
50
Reset
50
50
Select
Exit
DTV Source
DTV MENU
Program Edit
EPG
Move
TV
Auto Search
Manual Search
Select
Exit
EPG: Pre ss ▼ / ▲ / ◄ / ► button to sel ect EPG, then
press OK b utton to enter.Pre ss ▼ / ▲ / ◄ / ► button to
select p rogram, then pres s OK button to rem ind, there
will be a ir on right of the progr am’s name .
Auto Sea rch: Press ▼ / ▲ / ◄ / ► but ton to select Auto
Search , then press OK butto n to enter.
Manual S earch: Press ▼ / ▲ / ◄ / ► button to select
Manual S earch, then press O K button to ente r.
11

DTV Source
SETUP MENU
Audio La nguage: Press ▼ / ▲ / ◄ / ► button to select
SET UP
Country
OSD Language
Norway
English
Setup Wizard
Reset
Audio Language
Teletext Language
English
Subtitle
Move
Subtit le Language: Press ▼ / ▲ / ◄ / ► button to sele ct Subtitle La nguage/Alt .Language1 /2/3,
then pre ss OK button to enter a nd press ▼ / ▲ butto n to choose.
Common Interface
Note: The Common Inter face Menu only d isplay after C I card inserte d
Press ▼ / ▲ / ◄ / ► bu tton to select Comm on Interface , then press OK bu tton to enter an d press ▼ / ▲ button t o
choose .
Press ▼ / ▲ / ◄ / ► bu tton to select the options , then pre ss OK button to se e the detailed i nformation o f the CI card.
Press ME NU button on the fron t of panel or MENU o n the remote con trol to displa y the main menu.
Press ◄ / ► bu tton to select Othe rs in the main men u, then press OK o r button to ente r.
Notes:
1.Video / Audio / Time menu a nd descripti on are the same wi th the ATV sour ce.
2.Othe rs menu and descrip tion are the sam e with the ATV sourc e.
Select
Exit
Audio La nguage/Teletext Languag e, then press OK
button t o enter and press ▼ / ▲ but ton to choose.
Subtit le: Press ▼ / ▲ / ◄ / ► butt on to select Subtit le,
then pre ss OK button to enter.
Subtit le: Press ▼ / ▲ / ◄ / ► butt on to select Subtit le,
then pre ss OK button to enter a nd press ▼ / ▲ butto n to
choose O n or Off.
Notes:
1. Press S UBTITLE button on t he remote cont rol to enter
and pres s ▼ / ▲ button to choose On o r Off.
2. When su btitle is at “Off” state, the su btitle mode an d
subtit le language show gr ay, will not b e available.
Subtit le Mode: Press ▼ / ▲ / ◄ / ► button to select
Subtit le Mode, then press O K button to ente r and press
▼ / ▲ button t o choose Normal or Ha rd of Hearing.
USB Source
Press SO URCE button on the re mote control , then press ▼ / ▲ but ton to select US B and press OK or ▼ button to
enter.
Pictur e
Press ▼ / ▲ bu tton to select Pict ure and press OK b utton
to show al l folders and the pic ture documen t.
Press ▼ / ▲ / ◄ / ► bu tton to choose some picture
demons tration
Press OK b utton demonstra tion
Press ◄ / ► bu tton to select , then press OKbutto n to
view the p revious picture .
Press ◄ / ► bu tton to select , then press OKbutto n to
view the n ext picture.
Press ◄ / ► bu tton to select , then press OK button
clockw ise rotating the pi cture.
Press ◄ / ► bu tton to select , then press OK button
anti-c lockwise rotati ng the picture .
Press ◄ / ► bu tton to select , then press OK button t he
menu wil l appear Press ▼ / ▲ butt on to select Rep eat,
then Pre ss ◄ / ► button select On o r Off. This c lause
uses in es tablishing whet her to circula te the broadca st
pictur e.
Press ▼ / ▲ bu tton to select Shuf fle, then pres s ◄ / ►
button s elect On or Off. This clause use s in establish ing
the pict ure to broad-cast s tochastica lly.
USB
A ll
P ic tur e
M us ic
M ov ie
Up/Dow n
F il e N am e: M YRE CO RD
F il e P at h: / mnt Al l
Goodbye .mp3
DSC04634. JPG
Left/R ight
Music Phone
Select
MYRECO RD
111.mp3
DSC0463 3.JPG
DSC04632. JPG
La_lasla_ Boni
12

PVR
Instant Recorder
Note:Make sure you have insert the USB device to the TV board before you start to do t he recording.
only working for dig ital TV.
Press RECORD button on your remote control to start record when ever you want to start.
The LED will keep blue a nd there will be a recording iron on the left top of the display screen during
recording:
DVB subtitles will not be recorded
Press RECO RD bu tto n again to set the During time of re cor din g, to s elect the hour and minute ,
press ▼ / ▲ butt on to s et th e number. Press ◄ button to conf irm y ou re cor d time setting and back to the
previ ous o per ati on.
It will stop r eco rdi ng when have recorded for the Du rat ion T ime .
Press STOP b utt on on y our remote control to stop rec ord ing , the re will be a dialog as follow s:
press ◄ / ► butt on to s ele ct OK(to exit) or Cancel(con tin ue re cor ding), press OK button on
your remot e con tro l to confirm your choose.
Note: During recor ding,you can not callout Input Source,Menu ,Text,EPG, MHEG ,FAV List an d so
on unless you stop RECORD f irst.
Press POWER button to ent er the standby mode,the recording is c ontinue backstage.
During recording,you can’t change the channel unless you st op recording first;
The PVR function doesn’ t support recording Subtitle, Radio Cha nnel and locked channel.
13

PVR Timer
Press MENU b utt on on t he front of panel or MENU on the rem ote c ont rol t o display the main menu.
Press ◄ / ► butt on to s ele ct Time in the main menu, then pre ss OK b utt on or t o enter.
PVR Ti mer
1. Press button to sele ct PV R Tim er.
2. Press OK bu tto n to en ter and press ▼ / ▲ button to edit.
3. After fin ish ing y our adjustment, Press Menu o r EXI T but ton t o save and back to the previous
menu.
Timer NO
Press ▼ / ▲ butt on to s ele ct Time NO, then press OK button t o ent er an d pre ss ▼ / ▲ button to select
Timer NO, yo u can s et 8 di fferent PVR WakeUp Timers in a ll.
Timer Mode
Press ▼ / ▲ butt on to s ele ct Timer Mode , then press OK butt on to e nte r and p ress ▼ / ▲ button to
selec t Off , Onc e,D aily or Weekly.
Note:You c an no t set t he following options if you se t the T ime r Mod e “Off”.
Wakeup C hannel
Press ▼ / ▲ butt on to s ele ct Wakeup Channel , then press O K but ton t o ent er the Channel List
and pre ss ▼ / ▲ bu tto n to se lect the program which you wan t to re cor d.
Wakeup D ate
Press ▼ / ▲ butt on to s ele ct Wakeup Date , then press ◄ / ► butt on to s ele ct th e year, month and day,
press ▼ / ▲ butt on to s et th e number.
Press ◄ butt on to c onf irm you date setting and back to t he pr evi ous o peration.
▼ / ▲
On Time
Press ▼ / ▲ butt on to s ele ct On Time , then to select the minu te an d sec ond , p ress ▼ / ▲ button to
set the numb er.
Press ◄ butt on to c onf irm you start record time sett ing a nd ba ck to t he previous operation.
Duration
Press ▼ / ▲ butt on to s ele ct Duration ,press ◄ / ► button to s ele ct th e hou r and minute, press ▼ / ▲ button
to set the num ber .
Press ◄ butt on to c onf irm you record time setting an d bac k to th e pre vious operation.
14

EPG Timer for PVR
Press ▼ / ▲ / ◄ / ► butt on to s ele ct EP G, then press OK button to en ter .
The current progra m’s channel No. and channel
name.
The current progra m’s name.
The current progra m’s broadcast date and
start-stop time.
Press ▼ / ▲ / ◄ / ► butt on to s ele ct program, then press Red but ton t o wak eup r ecord, there
will be a i ron r igh t of th e program’s name.
Note:You c an’t re cor d the program which have been pl aye d
Timeshift
Press Time shi ft bu tton on your remote control to s tar t Tim esh ift, the scene will stop,you c an se e
a dialo g as f ol low s a few s econds later:
Then you can p res s Tim eshift button again to play th e pro gra m.
Press OK but ton t o cal lout the control bar in the bott om of t he sc ree n as follows:
The time hav e pla yed
Free space a nd av ail able timeshift time of your US B
The time hav e tim esh ifted
Press Stop b utt on on y our remote control or on the con tro l bar i n the b ottom of the the screen to stop
Timeshif t,t her e will be a dialog as follows:
Press OK to st op Ti mes hift and press Cancel to conti nue T ime shi ft.
Press Fast for war d button to fastforward and pr ess F ast bac k to fastback the play.
Note: Duri ng Ti mes hift,you can not callout Inp ut So urc e, Me nu,Text,EPG,MHEG ,FAV Li st
and so on u nle ss yo u sto p it first.
Press POWE R but ton w ill stop the Timeshift;
Durin g rec ord ing ,you can’t change the channel un les s you s top it first;
The Timesh ift f unc tion doesn’t support Timeshi ft Ra dio C han nel and locked channel.
15

Troubleshooting Tips
Before calling for s ervice, you can check the following items o n symptoms and solutions.
No picture:
Check other channe l, maybe station problem.
Adjust the tuning control.
Ensure that the input setting is at TV sta te.
Ensure that the LCD is on.
Ensure that the equipment is connected properly.
No sound and distort ed sound:
Ensure that the input settings for the TV and sound are proper.
Adjust the tuning control.
Probably local int erference, such as an appliance.
Re-orient aerial (if indoor type).
Ensure that the equipment is connected properly.
No remote Control:
Check the battery are installed with the correct polarity.
Point the remote control unit at the remote control sensor and op erate.
Remove the obstacl es between the remote control and the remot e control sensor.
Operate the remote control unit at a distance of not more than 8 mete rs from the remote control sensor.
NO SIGNAL displayed
Check if the wire is connected correctly.
Ensure the computer or other equipments are at power on mode.
Ensure the TV input setting is at pc mode.
INVALID FORMAT displayed
Check if the input setting is compatible to the monitor specifi cation.
Led lamp indicator o n but no picture
Check the monitor setting :contrast ,brightness.
Check if the wire is connected correctly.
Some unusual spots o n screen:
Some dot defects may appear on the screen, like red, green or blue, S pots, However, this will have no
impact or effect on the monitor performance.
Lost password:
On the password screen , enter the following master password: 4 886
You may use t he master password to set a new password as desired .
Please remember yo ur password and keep it carefully.
(PC mode)
(PC mode)
16

17
 Loading...