

Page 1

WARNING
To prevent fire or shock hazard, do not
expose this appliance to rain or moisture.
Operator’ s Manual
Page 2

18/12/98
Page 3

Table of contents
Additional features
CD-R/RW Support ..............................................................................................................1
CD-R/RW Mode................................................................................................................ 1
Viewing the Drive Information........................................................................................... 2
Making an Audio CD ......................................................................................................... 3
Writing a Disc ................................................................................................................3
Finishing Disc Write ....................................................................................................... 3
Playing Back the Audio CD...............................................................................................4
Erasing Data from a CD-R/RW Disc................................................................................. 5
Setup of the CONTROL PANEL .......................................................................................5
Backup to CD-R/RW......................................................................................................... 6
Backup Enhancement .......................................................................................................7
Backing Up a Project ........................................................................................................ 7
Reloading the Backup Project ..........................................................................................7
Edit Enhancement ......................................................................................................... 8-9
Timestretch .......................................................................................................................8
Stretch Insert ....................................................................................................................9
Effect Enhancement ................................................................................................... 10-11
DPS12 Version 2.0 Addendum
i
Page 4

DPS12 Version 2.0 Addendum
CD-R/CD-RW care
Dust, dirt, scratches or warps on the CD may lead to faulty CD playback. In order to take full advantage
of the CD player’s performance capabilities, follow the precautions outlined on this page.
Removing the disc from its case
After opening the CD case, depress the centre section of the case with the forefinger of one hand and
use you other hand to lift the disc up by its edge.
Disc handling
Hold the CD by the outer edge only, supporting it at the center with your index finger if necessary.
Avoid touching the unprinted side of the disc.
Do not glue any labels or stickers etc., on the disc.
Disc storage
Do not store the CD in a location which is subject to direct sunlight, high humidity, or hot air from
heating appliances.
Always return the CD to their plastic cases for storage.
Disc cleaning
It is recommended that you periodically wipe the recorded side of your CD with a commercially
available silicone cloth (such as that used for cleaning camera lenses or glasses) in order to remove
dust, dirt or fingerprints. Wipe the disc gently, being careful not to scratch its surface.
When wiping the disc, refer to the illustrations below. Unlike records, CDs should always be wiped
in a straight line from the center to the edge.
Do not use volatile chemical substances such as denatured alcohol, cleaning fluid intended for analog
records, or antistatic fluids, as these may damage the CD.
ii
Page 5

DPS12 Version 2.0 Addendum
CD-R/RW Drive Support
This version software will allow you to use MMC (Multi Media Command) compatible CD-R or CD-RW drives that
can be connected to the SCSI port of the DPS12 to make an audio CD disc that is playable on a normal CD player. It
can also be used for data backup similar to other SCSI devices, such as hard disks or MO drives.
NOTE:
For a list of compatible CD-R/RW drives, please inquire at your AKAI professional dealer or service center.
CD-R/RW Mode
The MAIN screen now has an additional function key , CD-R [F6]. Pressing this key will go into the CD-R/R W mode
and the following screen will appear.
1
4
2
5
3
6
7
NOTE:
This screen will not appear if a CD-R/RW drive is not recognized on the SCSI bus.
1 Project=
This indicates the name of the Project currently selected. Any two tracks in this Project can be recorded on to the
disc.
2 Tracks to write:
These indicate which tracks are to be recorded on to the disc. Select the tracks here.
TIP: For monaural recording, select the same track for both fields.
3 Write speed:
This allows you to select between SLOW and FAST writing speed.
With the SLOW setting, the disc will be recorded at nominal speed. With the FAST setting, the disc will be
recorded at double speed, provided that the drive is capable of 2x write speed.
4 Region:
This allows you to select either IN-OUT or ALL.
With the IN-OUT setting, only the data between the IN and OUT points will be recorded. With the ALL
setting, all of the data of the two tracks selected will be recorded.
5 Write length=
This indicates the total recording time of the two selected tracks. The total recording length will be from the
earlier start point of either track to the later end point of either track, as shown below. When IN-OUT is
selected, the recording length is between the IN and OUT points.
Actual Recording Time
1
Page 6

DPS12 Version 2.0 Addendum
6 Test write:
This allows you to select if test writing is performed before actually writing the data on to the disc. When set to
ON, it will perform test writing to check if there are any errors during writing, this means that it takes longer to
complete writing to the disc. When set to OFF, it will start writing to the disc without performing test writing.
7 Function display
These indicate the functions available in this CD-R/RW mode.
• PLAYER [F1] key..... Press to playback the audio signal from the disc.
• INFORM [F2] key..... Press to display the information of the CD-R/RW drive.
• ERASE [F3] key ....... Press to erase or format the CD-RW disc.
• FINISH [F4] key..... Press to perform the FINISH process that will enable the disc to be played back on a
• PROJECT [F5] key .. Press to select the Project.
• WRITE [F6] key ....... Press to perform actual writing to the disc.
Viewing the Drive Information
Y ou can view the name, manufacturer , used space, and available space of the disc on the connected CD-R/RW drive.
CD Player.
1. Press the
The CD-R/RW INFORMATION window appears. This window is for display purposes only. You cannot
change any parameters here.
The following information is included in this window:
INFORMINFORM
INFORM [F2] key in CD-R/RW mode.
INFORMINFORM
1
2
3
4
1 Device= (device name)
This indicates the name of the drive.
2 Vender= (manufacturer)
This indicates the name of the drive manufacturer.
3 Ver.= (version number) and SCSI ID= (SCSI ID number)
These indicate the version number of the drive and its SCSI ID number.
4 Free= (available space) and Write length= (recording length)
These indicate the amount of available space on the disc and the space required to record the tracks currently
selected.
2. Press the
The DPS12 will return to the CD-R/RW mode screen.
CLOSE CLOSE
CLOSE [F2] key to close the window.
CLOSE CLOSE
2
Page 7

DPS12 Version 2.0 Addendum
Making an Audio CD
This process will record the audio signal on to the CD-R/RW disc and, with the FINISH process, make it playable on
an Audio CD Player.
NOTE:
The Audio CD Player must support the CD-RW disc format to playback the audio from the CD-RW disc.
Writing a Disc
1. Press the
The familiar SELECT PROJECT window will appear. Select the Project that you want to record on to the disc
in the usual way.
The screen will return to the CD-R/RW mode after selecting the Project.
2. Move the cursor to the select fields and setup the recording.
Set up the Region, Tracks to write, Write speed, and Test write fields on the CD-R/RW mode screen. Some of
the parameters can be preset in CONTROL PANEL.
3. Press the
The following window will appear.
PROJECTPROJECT
PROJECT [F5] key in CD-R/RW mode.
PROJECTPROJECT
WRITE WRITE
WRITE [F6] key.
WRITE WRITE
1
1 Write to track=
This value field indicates the track number of the disc to be recorded on.
4. Press the
The selected audio data will be recorded on to the disc.
5. Repeat the above steps to continue writing to the disc.
DO ITDO IT
DO IT [F5] key.
DO ITDO IT
Finishing disc write
Perform the FINISH process when you have finished writing to the disc.
This process (FINISH) enables the recorded disc to be recognized properly on an Audio CD Player.
NOTE:
Once this process is performed, further recording to the disc is not possible. However, if you erase the data from
the CD-RW disc, you can write to it again.
1. Press the
The following window will appear.
2. Press the
The DPS12 executes the FINISH process. The screen returns to the CD-R/RW mode when the operation is
finished.
FINISHFINISH
FINISH [F4] key in CD-R/RW mode.
FINISHFINISH
DO ITDO IT
DO IT [F5] key.
DO ITDO IT
3
Page 8

DPS12 Version 2.0 Addendum
Playing Back the Audio CD
You can playback the disc you recorded or an Audio CD disc in the CD-R/RW drive. It can also playback discs on
which the FINISH process has not yet been performed.
NOTES:
• The audio signal on the CD-R/RW disc can not be heard from the DPS12. It only controls the transportation
of the drive. The audio output of the drive must be connected to a separate amplifier.
• The FINISH process must first be performed to make the CD-R/RW disc playable on the Audio CD Player.
1. Press the
The following CD PLAYER screen appears.
PLAYER PLAYER
PLAYER [F1] key in CD-R/RW mode.
PLAYER PLAYER
1
4
5
1 Track No.:
This indicates the track number of the selected disc. The track is selected with the Track- [F3] and Track+
[F4] keys.
2 Track:
This shows the time of the currently selected track.
3 Elapsed:
This indicates the elapsed time of playback.
4 Total track= and Total=
These indicate the total number of tracks and the total time recorded on the disc.
2
3
6
5 Disk status=
This indicates the condition of the disc.
BLANK ........................... Blank disc.
FINISHED ................. FINISH process has already been performed. This disc can no longer be recorded to.
NOT FINISHED ..... FINISH process has not been performed. You can make further recordings on the
disc.
NO DISC ..................... No disc in the drive.
6 Function display
This indicates the functions assigned to the function keys in the CD PLAYER mode
EXIT [F1] .............................................. Press to return to the CD-R/RW mode screen.
Track- [F3], Track+ [F4]............... Press to select the playback track of the disc.
STOP [F5]............................................... Press to stop playing back the disc.
PLAY [F6]............................................... Press to commence playback of the disc.
2. Press the
3. Press the
The CD-R/RW drive will start playing back the selected track. Press the STOP [F5] key to stop.
Track-Track-
Track- [F3]/
Track-Track-
PLAYPLAY
PLAY [F6] key.
PLAYPLAY
Track+Track+
Track+ [F4] keys to select a playback track.
Track+Track+
4
Page 9

DPS12 Version 2.0 Addendum
Erasing Data from a CD-RW disc
The contents of a CD-RW disc can be erased to enable further recording even after the disc has undergone the
FINISH process.
1. Press the
ERASEERASE
ERASE [F3] key in
ERASEERASE
CD-R/RWCD-R/RW
CD-R/RW mode.
CD-R/RWCD-R/RW
1
1 Erase
This allows you to select how the disc is erased.
FAST ERASE .......... Press to erase only the TOC area.
FULL ERASE .......... Press to erase the entire disc. This takes longer.
2. Select how the disc is to be erased.
3. Press the
The following window appears to confirm the operation.
4. Press the
The DPS12 will commence erasing the CD-RW disc.
DO ITDO IT
DO IT [F5] key.
DO ITDO IT
DO ITDO IT
DO IT [F5] key again.
DO ITDO IT
NOTE:
It is not possible to erase CD-R discs as these are write-once only.
CD-R/RW SETUP of the CONTROL PANEL
The CD-R/RW SETUP screen has been added to the selections of CONTROL PANEL.
1
2
You can select the tracks to be recorded and their recording region parameters here. It also shows the recording
length and start time. This setup will appear when you access the CD-R/RW mode screen. Changes made on the
CD-R/RW screen will be reflected here also.
1 L: and R:
The same as the Track to write field in the CD-R/RW mode screen. These indicate which tracks are
to be recorded onto the disc.
2 Region:
The same as the Region field in the CD-R/RW mode screen. This allows you to select between the IN-OUT
and ALL record regions.
3 Length=
This indicates the length of the actual recording data.
3
4
4 Start time=
This indicates the start time of the selected recording data.
5
Page 10

DPS12 Version 2.0 Addendum
Backup to CD-R/RW
Data from the DPS12 can be backed up to a CD-R/RW disc as well as other SCSI devices, such as hard disks and MO
drives.
The basic procedure is the same as that of backup to a SCSI device (Please refer to Chapter 10: Project management
pages in the manual for details.).
When the DO IT [F5] key is pressed, the following screen appears.
1
2
1 Write speed:
This indicates the write speed of the drive. The selections are AUTO, x1, •••, x8. The DPS12 will automatically detect and use the fastest write speed when AUTO is selected.
2 Test write:
This allows you to select if test writing is performed before actually writing the data on to the disc. When set
to ON, it will perform test writing to check if there are any errors during writing, this means that it takes
longer to complete writing to the disc. When set to OFF, it will start writing to the disc without performing
test writing.
When the DO IT [F5] key again to commence backup. To RELOAD backup projects, please refer to the “Reloading the Backup Project” section in the manual.
6
Page 11

DPS12 Version 2.0 Addendum
Backup Enhancement
The new software now allows you to back up multiple Projects on a single disk (SCSI device). You can add the
Projects to a disk which already contains backup data for a different Project.
The basic operation of backup is the same as before (Please refer to the manual’s Back-up to a SCSI device pages in
Chapter 10: “Project management” for details.).
Backing up a Project
When you press the BACKUP [F2] key in the Project mode, the following window appears.
APPEND has been added to the select option of the Disk operation field. The APPEND option is selected
when you want to add the backup data of the Project on to a disk which already contains backup data from another
Project.
Also, FORMAT and ERASE have been renamed as FULL FORMAT and FAST ERASE respectively.
}}
} CAUTION: When the FULL FORMAT or FAST ERASE option is selected in the Disk opera-
}}
tion
field, all previous data contained on the disk will be lost. This is an irrevocable process!!
NOTES:
• When the APPEND option is selected in the Disk operation field with a new disk or a disk with no
data, an error prompt will appear. In this case, select either the FULL FORMAT or FAST ERASE option.
• One disc may contain a maximum of 99 projects.
Reloading the Backup Project
When the RELOAD [F3] key is pressed, the DATA RELOAD window appears. Select the SCSI option and set
the SCSI ID number. Pressing the DO IT [F5] key will show the SELECT FILE window . Use the [CURSOR]
key to move the cursor up and down to select the Project that you want to reload and press the DO IT [F5] key to
start reloading.
7
Page 12

DPS12 Version 2.0 Addendum
Edit Enhancement
New edit functions TIME STRETCH and STRETCH INSERT have been added to the edit operation. These functions will allow you to change the length between the IN and OUT points to be 50% to 200% of its original length
without changing the pitch. This function is useful when you want to fill in a certain time frame.
TIME STRETCH
With the Time stretch function, the area to be edited will be shortened or stretched accordingly. The rest of the data
will remain the same.
When you selectTIME STRETCH in the SLCT field in Edit mode, the following screen appears.
1
2
3
4
1 In:
This indicates the IN point.
2 Out:
This indicates the OUT point.
3 Length:
This indicates the length between the IN and OUT points. This field is not changeable.
4 New L:
This indicates the result of the Timestretch operation when executed. Adjust the time here to determine the
amount of stretch.
Pressing the DO IT [F5] key will show the following window. Select the Preset, set the Adjust value and
press the DO IT [F5] key to execute.
1
2
1 Preset:
The DPS12’s timestretch algorithm uses a series of 18 presets optimized for certain types of sounds as described by their name. Simply select a preset, the description of which largely fits the material you are trying
to process and press the DO IT [F5] key.
If the results are not that good, after the UNDO, simply select another preset and try again. However, do not
get too tied down with these preset descriptions because they are merely guidelines. Experimentation is the
order of the day!
Each preset also has three variations (giving a total of 54 presets). These are:
A: Standard quality timestretch with fast processing.
B: Better quality timestretch but slower processing.
C: The highest quality timestretch but slower processing.
Timestretch Presets:
1. FEM VOX 10. STACCATO
2. MALE VOX 11. LFREQ SLOW
3. LOW MALE VOX 12. MUSIC 1
4. VOCAL 13. MUSIC 2
5. HFREQ RHYTHM 14. MUSIC 3
6. MFREQ RHYTHM 15. SOFT PERC.
7. LFREQ RHYTHM 16. HFREQ ORCH.
8. PERCUSSION 17. LFREQ ORCH.
9. LFREQ PERC. 18. SLOW ORCH.
8
Page 13

DPS12 Version 2.0 Addendum
2 Adjust:
This parameter gives access to the key parameters in any one preset and allows you to ‘tweak’ the preset.
There are no strict rules but the basic rule of thumb is that a positive value will help improve high frequency
and percussive sounds whilst negative values will help in improving bass notes.
STRETCH INSERT
With the Stretch insert function, the area to be edited will be shortened or stretched accordingly and the following
data will shift according to the amount of stretch.
When you select STRETCH>INSERT in the SLCT: field in Edit mode, the following screen appears.
1
2
3
4
1 In:
This indicates the IN point.
2 Out:
This indicates the OUTpoint.
3 Length:
This indicates the length between the IN and OUTpoints. This field is not changeable.
4 New L:
This indicates the result of the Timestretch operation when executed. Adjust the time here to determine the
amount of stretch.
Pressing the DO IT [F5] key will show the same prompt window as for TIME STRETCH. Select the Preset,
set the Adjust value and press the DO IT [F5] key to execute.
9
Page 14
DPS12 Version 2.0 Addendum
Effects Enhancement
A new Reverb algorithm has been implemented to further enhance the sound quality of the effects. The new reverb
settings are STUDIO, LIVE HOUSE, MEDIUM HALL, and BRIGHT HALL.
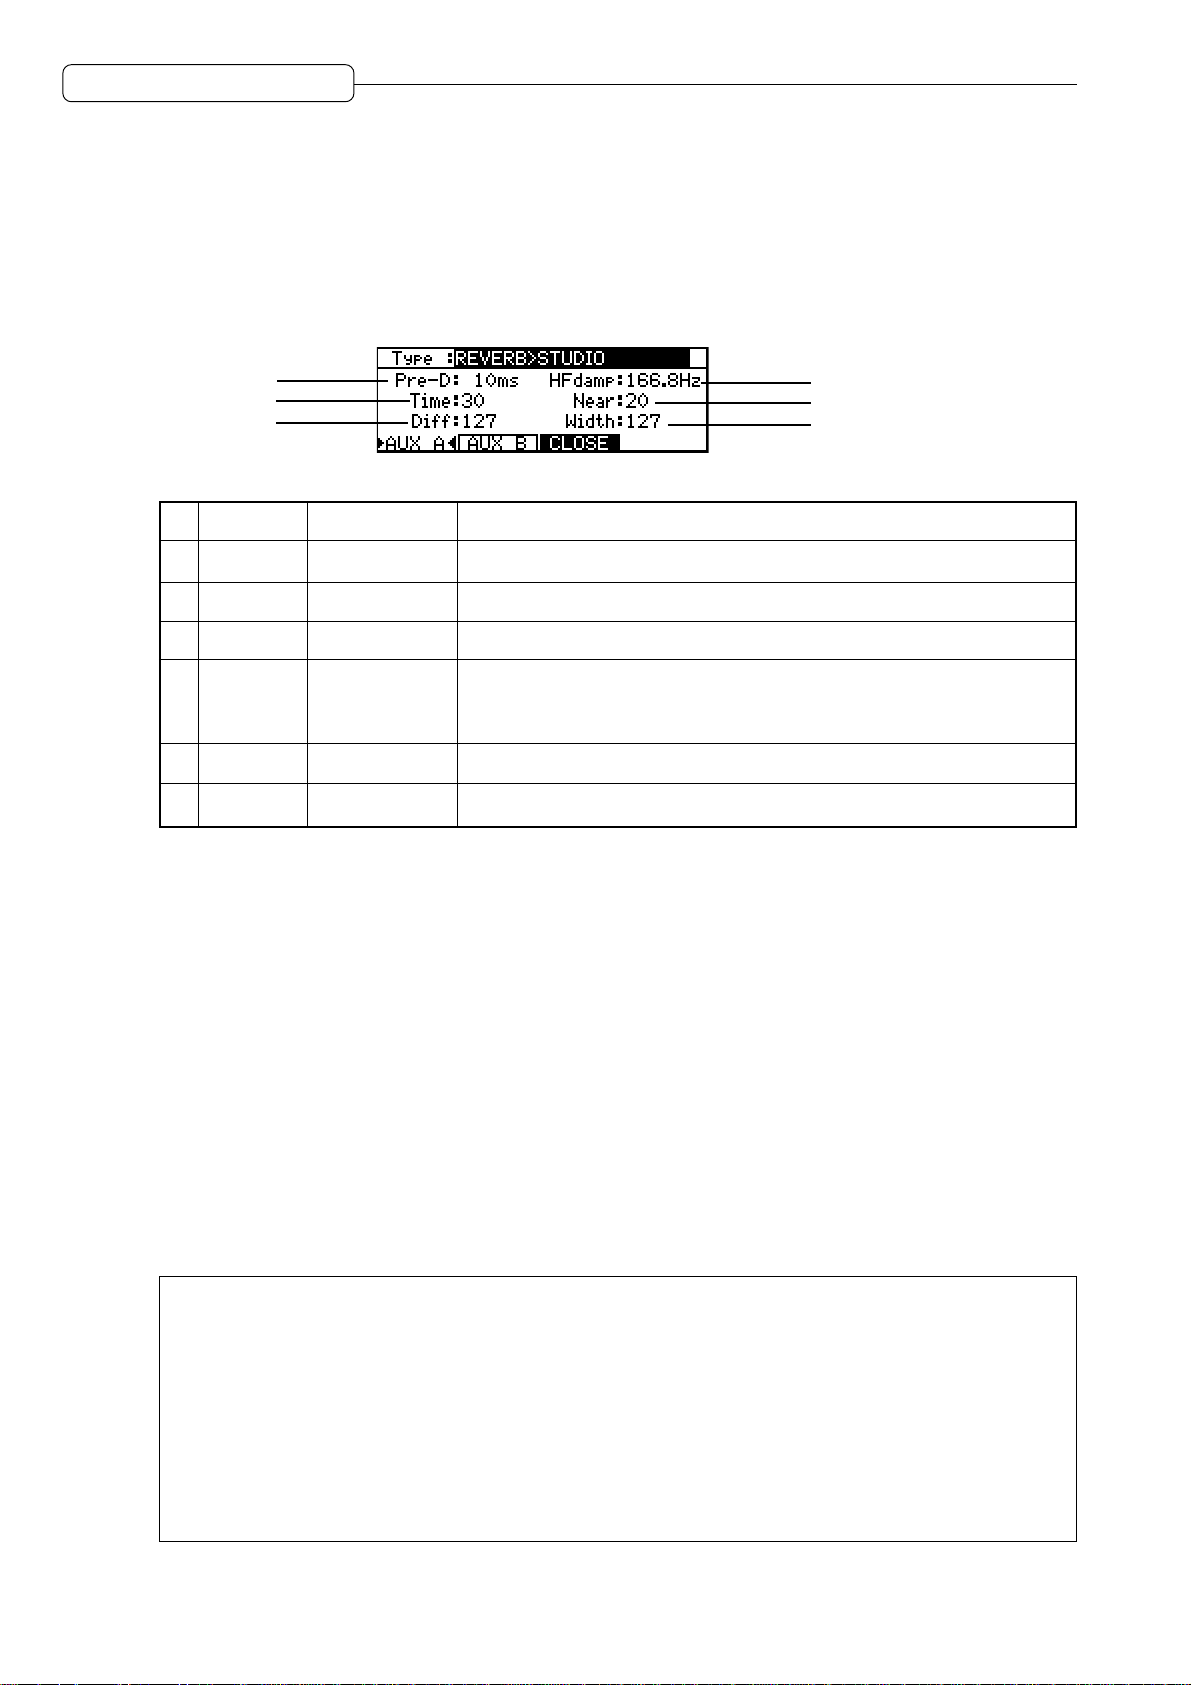
REVERB>STUDIO (G)
This short reverb simulates the reverberations in a studio with early reflections.
1
2
3
Parameter Setting range Function
1 Pre-D 1 - 100ms Adjusts the delay time of early reflections.
2 Time 0 - 99 Adjusts the time of attenuation of reverberation.
3 Diff 0 - 127 Adjusts the density of reverberation.
4 HFdamp 20Hz - 20kHz Adjusts the high-frequency damp (the high range is attenuated) of
reverberation.
5 Near 0 - 127 Adjusts the imaginary distance to the sound source.
6 Width 0 - 127 Adjusts the width and spread of the stereo image.
REVERB>LIVE HOUSE (G)
This reverb simulates the reverberations in a small scale live house.
The setting parameters are the same as those of the STUDIO reverb.
4
5
6
REVERB>MEDIUM HALL (G)
This reverb simulates the reverberations in a medium size hall.
The setting parameters are the same as those of the STUDIO reverb.
REVERB>BRIGHT HALL (G)
This reverb simulates the reverberations in a hall of bright character.
The setting parameters are the same as those of the STUDIO reverb.
NOTES:
Pre-DPre-D
Pre-D and
Pre-DPre-D
between the direct sound and the onset of the reverb and the length of the reverb decay. Adjusting these will have
a profound effect on the ‘size’ of the reverb effect you are creating. A longer setting will give a greater sense of
distance as it effectively sets the nearest wall the sound will bounce off first. If this is a long time, then we
perceive that the room is much larger . By using a long setting we also increase the ef fective size of the acoustic
environment as larger acoustic environments cause the reverberation to last longer.
Normally, you would increase the length of the predelay as you increase the length of the decay. It is uncommon
to have a very long pre-delay and a very short reverb decay (but this can be good as a special effect!). You may,
however, set a long decay but have a short (or non existent) predelay.
TimeTime
Time are probably the most important parameters you will want to edit. These set the delay
TimeTime
10
Page 15

DPS12 Version 2.0 Addendum
NOTES (continued):
Diff(usion)Diff(usion)
Diff(usion), another quality of reverb - i.e. how well the reflections ‘smudge’ together. Normally, the
Diff(usion)Diff(usion)
sound will bounce off the wall at exactly the angle it hits it. This normally gives rise to a smooth reverb decay.
Some environments have many odd alcoves or corners and other ‘acoustic obstructions’ (i.e. a gymnasium with
bars on the walls) which can cause the sound to bounce off at random angles and this can impart an ‘echoey’
quality to the sound where you can hear some of the individual reflections.
This parameter allows you to set the density of the reverb. Lower settings will give a more ‘echoey’ effect whilst
higher setting will give a smoother effect.
NEARNEAR
NEAR affects the amount of ‘agitation’ the direct sound will have on the reverb decay and this has an effect on
NEARNEAR
our perception of how close we are to the direct sound. High settings give the impression of being closer to the
original sound whilst lower settings give an enhanced sense of distance.
HfdampHfdamp
Hfdamp creates naturalness. As the sound is bouncing all over the place, each time it hits a surface, that
HfdampHfdamp
surface will absorb some high frequencies. If the room has a lot of furniture, curtains, drapes, cushions, whatever, the high frequencies are absorbed even more rapidly (which is why your living room doesn’t have a
pronounced reverberant quality). This has the effect of the reverb decay getting duller in tone as it dies away. It
is very uncommon for a room to have absolutely no damping factor and HFdamp allows you to re-create this
phenomena.
If you are trying to simulate a heavily damped environment, lower the HFdamp parameter. If you are trying to
simulate a highly reflective environment, raise the HFdamp parameter.
TIPS:
• Firstly , don’t overdo it! One common mistake is to smother a sound in reverb. This just results in an indistinct,
‘mushy’ sound. A lot of reverb can be nice on slow, floating pads and strings, the musical content of which is
fairly sedate but, generally, more reverb does not guarantee a better sound - often the reverse, in fact!.
• Be aware that using long reverbs on fast moving sounds (i.e. fast sequences or arpeggios) can cloud the music
creating an indistinct ‘blur’ behind the music (unless the reverb is mixed quite a way back). A nice ROOM
reverb on such parts is usually sufficient. If you can, tweak the decay time so that it doesn’t hang over into
adjacent notes too much.
• Small rooms and the like are good on bass sounds. Avoid long, boomy reverbs on bass parts as this will clutter
up the bottom end of the music.
• T o create more space between the reverb and the direct sound, set longer predelay times. This will allow the
attack of the sound to be heard without ‘smudging’ it with reverb. For example, when applying reverb to a
snare drum sound, a bit of predelay can help separate the direct snare sound from the reverb.
• To make a sound seem further away, send a lot of signal to the reverb and pull the level of the direct signal
back a bit in the L/R outputs. To make a sound VERY distant, pull the direct sound out completely!
• When putting drum kits through the reverb, watch out for the hi-hat. Fast hi-hats through the reverb can make
the overall mix very ‘splashy’ as the high frequencies get reverberated. If you get this problem, take the high
hat out of the reverb altogether. Drum and percussion sounds have more or less reverb on some drums than on
others (for example, snares can take a lot of reverb but bass (kick) drums usually have less). The function
allows you to send different drum sounds to different effects types (for example, non-linear on the bass drum,
big hall on the snare, big room on the toms, small room on selected percussion, etc.).
11
Page 16

DPS12 Version 2.0 Addendum
12
 Loading...