

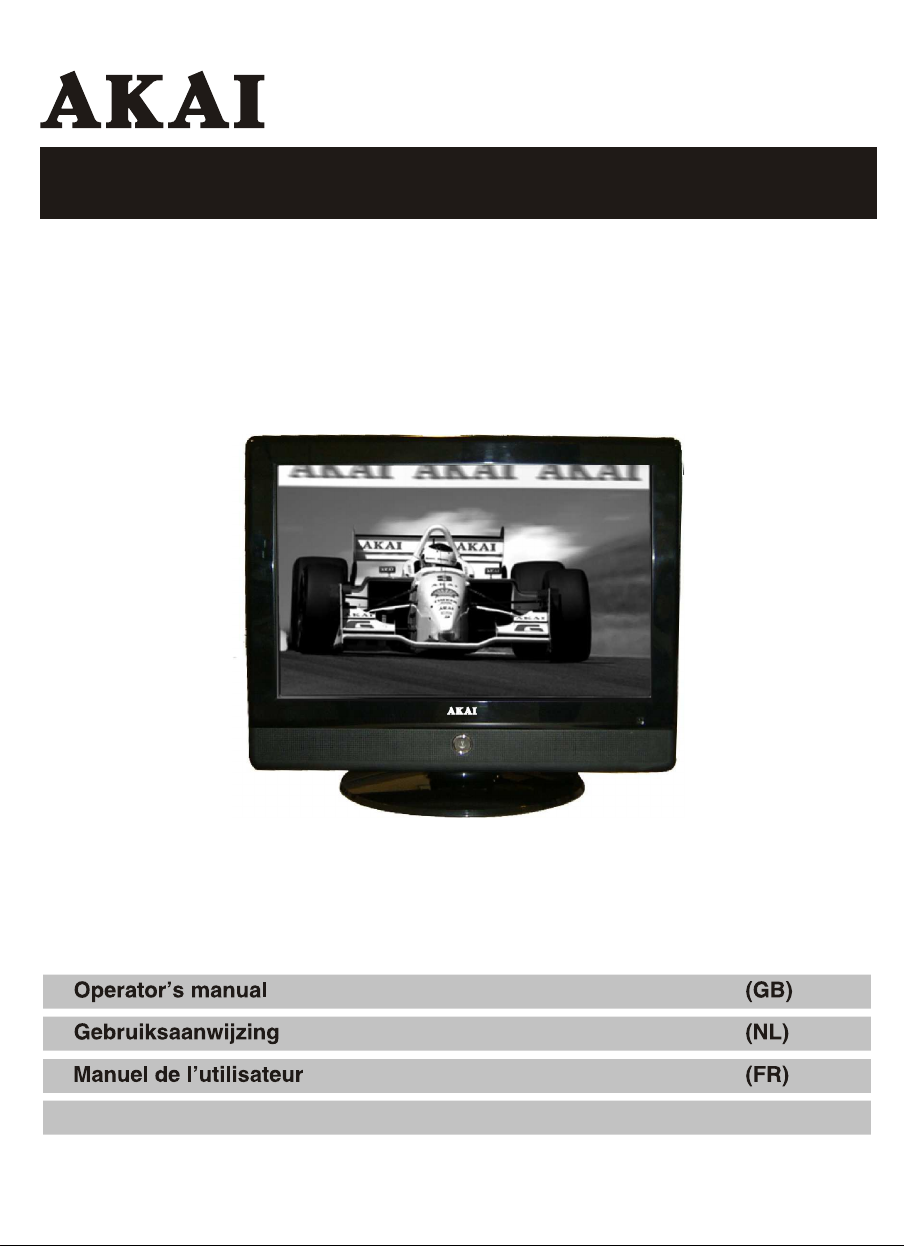
Operator's manual
LCD-TV DVD Combi
/
ALD1570
Manual de Instrucciones
(ES)
Operator's manual
LCD-TV DVD Combi
/
ALD1570

TABLE OF CONTENTS
Table of Contents
Specifications
Installation
Important Safety Instruction
Warnings and Cautions
Setu p
Functional Parts(TV)
Functional Parts(DVD)
Side view of TV set
Remo te Control unit
TELE TEXT Operations
Remote Control Operation(DVD)
MENU Screens
5-7
9
10
11
12-1 3
14
15-1 6
17-1 8
1
Inital Settings(DVD)
2
Troubleshooting Tips
3
The Causes of interference
4
8
19-20
21
22
1
SPECIFICATIONS
Receiving System:
Colour System:
LCD Panel:
Ext.Antenna:
Ext. In/Out:
Speaker:
Audio Output:
Power consumption:
Dimension:
Net Weight:
B/G, D/K, I, L/L,M
,
PAL/NTSC/SECAM
391mm(15.4 inch) diagonal
75 Ohm Coaxial Cable
SCART,PC Input,Earphone
8 Ohm
2Wx 2
AC 110-240V 50/60Hz,50W
W392 xD155.8 xH317(mm)
2.8KG
Note:Design and specifications are subject to change without prior notice.
OPEN/CLOSE POWER
Q.
-/--
VIEW
REPEAT
MUTE SOURCE
PROG+
MENU
ASPECT
PROG-
REVEAL SIZE STO P
TEXT
INDEX
ANGLE SLO W
TITLE
DVD MENU PROGRAM SUBTITLE
ENTER
DVD SETUP
GOTO
P.P
SWAP
VOL+VOL-
MIX
SUB.PAGE
ZOOM
AUDIO
DISPLAY
REMOTE CONTROL
Transmitting System :Infrared
Power Supply :DC 3V
2

INSTALLATION
Thank yo u very much for y our pur chase of th is produc t, the mo st natural C ol our Te le visio n Recei ve r.
To enjoy your set to t he full from the ver y beginn ing, rea d this m anual ca refully and keep it handy fo r ready
referen ce.
INST ALLATION
Locate t he recei ver in t he room where di rect lig ht does not s trike the scree n.
Total da rkness o r a refl ection o n the pi cture sc reen can cau se eyest rain. Soft and i ndirect lig hting is
recomme nded for comfort able viewin g.
Allow en ough spa ce between t he recei ver and the wall to p ermit ve ntilati on.
Avoid ex cessive ly warm locatio ns to pre vent possib le damag e to the cabinet or prematur e compon ent
failure .
This TV o perates on a DC supply pr ovided b y the AC -DC adap tor. The vol tage is as Indic ated on the labe l
on the ba ck cover.On ly use th e AC-DC adaptor supplie d with t he TV and nev er apply an A C mains to the TV
directl y. The AC -DC ada ptor ope rates on and AC mains sup ply, the voltage is a s indica ted on t he label of
the AC-D C adapto r. Connect t he DC plug of the AC- DC adapt or to the DC 1 2V socket at the bac k of the TV.
Connect the AC-D C adapt or and it s mains cord. In sert the mai ns plug in the wa ll socket ha ving a mains
voltage of 110-2 40V.
Do not in stall the recei ver in a locatio n near heat sour ces such as r adiator , air ducts, direct s unlight ,or
in a plac e somew here lik e close compart ment and close area.
Do not co ver the ventila tion ope nings when usin g the set.
CAUT ION
Never ta mper wit h any co mponent s inside you r set, or any other ad justmen t contr ols not m entione d in
this man ual. The LCD panel us ed in this pr oduct is made of gla ss. Ther efore,i t can break W hen the product
is dropp ed or applie d with im pact. Be carefu l not to be in jured by broken glass pieces in ca se the LCD panel
breaks. When you clean up dust or sti ck of a water dro p on the LCD pane l. The power cord should be pulle d
out from the plu g recept acle, th en wipe the r eceiver wit h dried s oft clo th .Duri ng thund er and light ing ,
unplug t he power cor d and ant enna cord to prevent you r TV set from dam age. All tel evision receive rs are
high vol tage ins trument s. All "insid e work" on y our rece iver should be perfo rmed only by the TV s ervice
personn el.
If some a bnormal phe nomena h appens , may be you have some mis-ope rtion,p lease take off p ower and
restart your TV set .
3

IMPORTANT SAFETY INSTRUCTION
WARNING
RISK OF ELECTRIC SHOCK
DO NOT OPEN
WARNING: TO REDUCE THE RISK OF ELECTRIC SHOCK DO NOT
REMOVE COVER OR BACK. NO USER-SERVICEABLE PARTS INSIDE.
REFER SERVICING TO QUALIFIED SERVICE PERSONNEL.
The lighting flash with arrow head within a triangle is intended to tell the user that
parts inside the product are a risk of electric shock to persons.
The exclamation point within a triangle is intended to tell the user that important
operating and servicing instructions are in the papers with the appliance.
WARNING: TO REDUCE THE RISK OF ELECTRIC SHOCK DO NOT EXPOSE THIS
APPARATUS TO RAIN OR MOISTURE AND OBJECTS FILLED WITH LIQUIDS,
SUCH AS VASES, SHOULD NOT BE PLACED ON THIS APPARATUS.
4
WARNINGS AND CAUTIONS
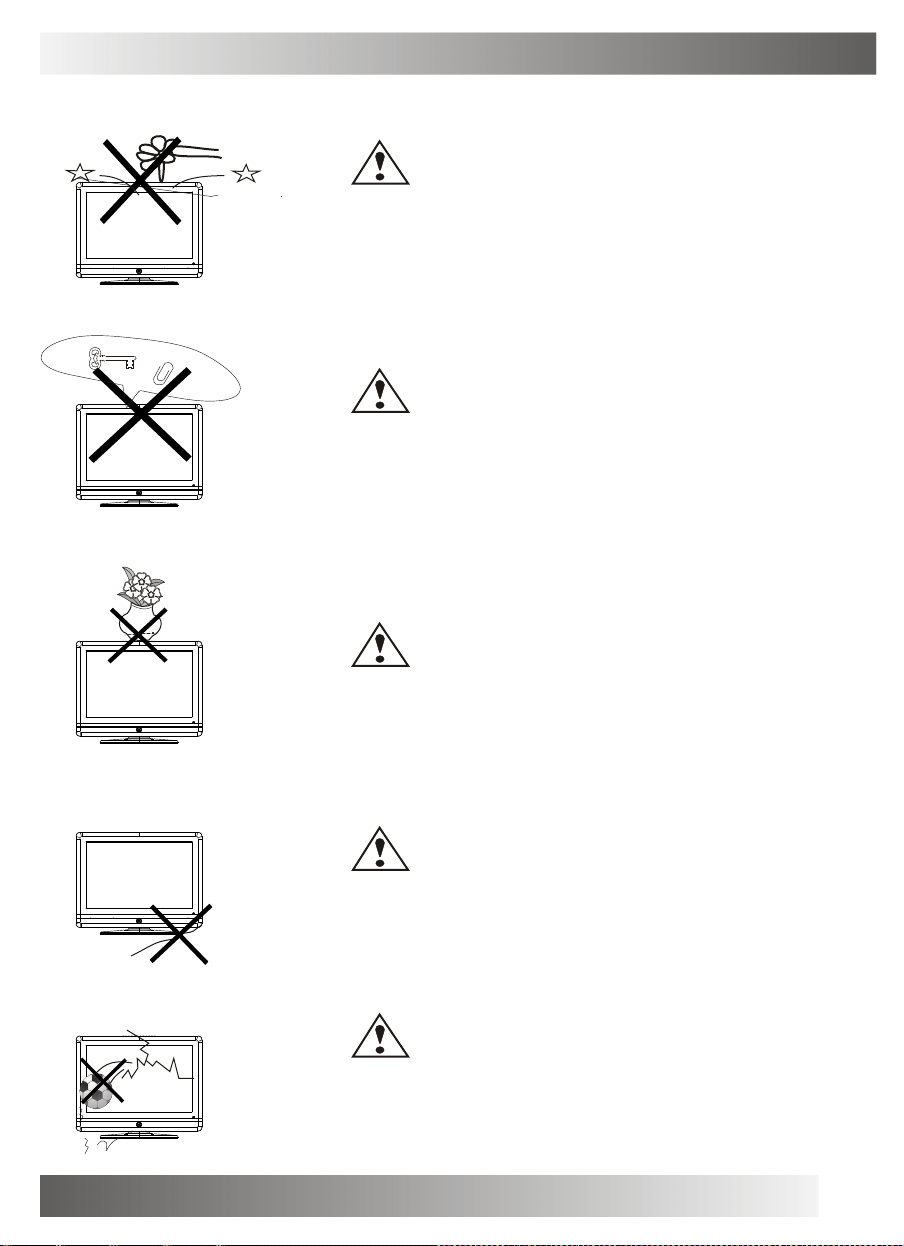
Do not dr op or push ob jects into the t elevisi on cabinet s lots
or openi ngs. Nev er spill any kind of liqu id on the tel evision
receive r.
Do not in sert anythi ng in the ven tilatio n holes. If metal or
somethi ng flamm able ent ers, it may r esult in fire or ele ctric sh ock.
Caution
Caution
Caution
Do not pl ace obj ects on t his uni t, it may dam age the s creen surface.
Caution
Do not sq uash power s upply co rd under the televis ion rec eiver.
Caution
Do not th row any thing at the set . The scr een gla ss may ex plode by
impact a nd cause ser ious inj ury.
5
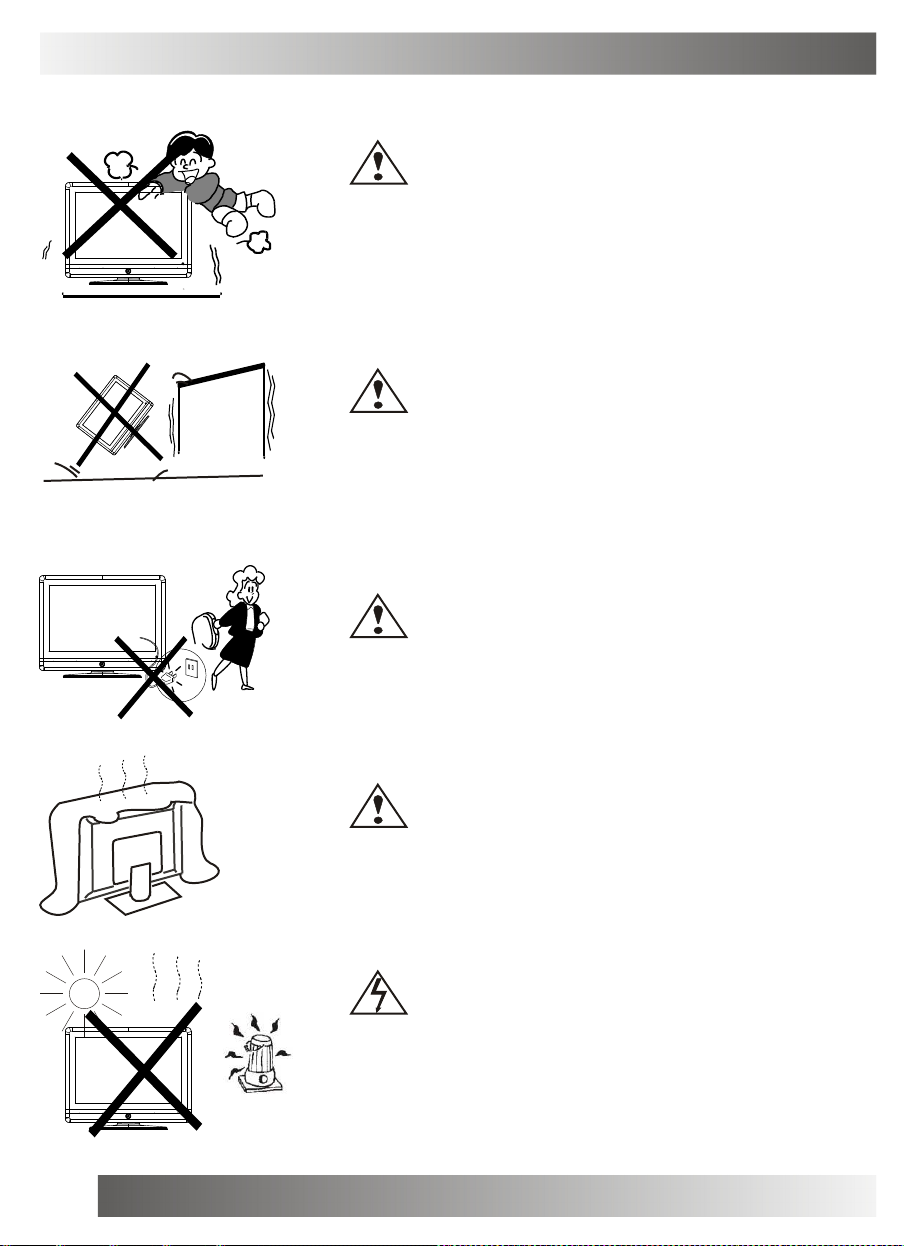
WARNINGS AND CAUTIONS
Never st and on, lean on, or suddenly push the tel evision or its
stand. Y ou shoul d pay sp ecial at tention to c hildren . Seriou s injur y
may resu lt if it shou ld fall.
Do not pl ace you r televi sion on an unsta ble cart , st and , shelf o r
table. S erious i njury to an indi vidual, and damage t o the te levisio n,
may resu lt if it shou ld fall.
Caution
Caution
Caution
6
When the televis ion rec eiver is not use d for an extende d period of
time, it is advisabl e to disc onnect the AC po wer cor d from th e AC
outlet .
Caution
Do not bl ock the ventila tion hol es in the bac k cover .
Adequat e ventil ation is ess ential t o preven t failu re of ele ctrical
compone nt.
Warning
Avoid ex posing t he televisi on recei ver to direct su nlight a nd other
source o f the heat. D o not stand t he telev ision receiver directl y on
other pr oduces w hich give of f heat .E.g.vid eo casse tte play ers.
Audio am plifier s. Do not pla ce naked fla me sourc es, such as
lighted candle o n the te levisio n. Do not exp ose the LCD scre en
surface to the sun, it ma y damag e the scr een sur face.

WARNINGS AND CAUTIONS
Take car e not to conn ect many app liances to the same main s
socket a s this could res ult in fire or el ectric shock.
High vol tages ar e used i n the operat ion of th is televisi on recei ver.
Do not re move the cab inet bac k from y our set. Ref er servi cing to
qualifi ed servi ce perso nnel.
Warning
Warning
Warning
To preve nt fire or elect rical sh ock haz ard, Do n ot expose th e
televis ion rece iver to rain or m oisture .
Warning
For you o wn safety, D o not touch a ny part of the se t, main lead or
aerial l ead duri ng lighting storms.
Caution
If the te levisio n is to b e built into a Compartm ent or si milarly
enclose d, the mi nimum distance s must be mai ntained .
Heat bui ld-up ca n reduc e the ser vice life of your televi sion, an d can
also be d angerou s.
7
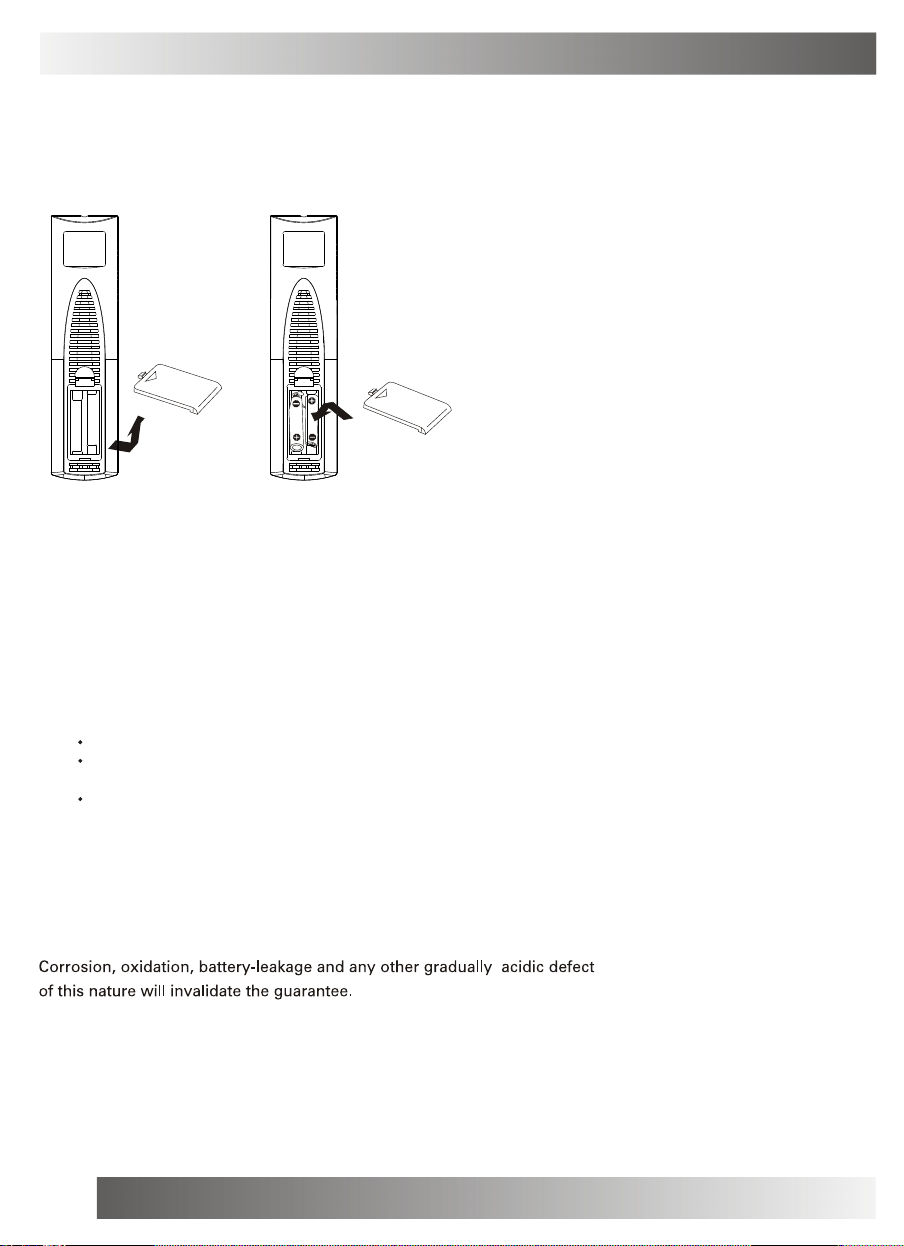
SETUP
Remote Control Battery Installation
Requires two AAA batteries(supplied).
Procedure
1. Turn the remote control face down. Remove battery
cover by pressing down on the marking on the
cover and sliding it off in the direction indicated.
2. Install batteries matching(+) and(-) polarity signs.
3. Replace the battery cover by sliding in reverse until
the lock snaps.
Note: Incorrect installation can cause battery leakage
and corrosion that will damage the Remote
control.
Precautions
Replace batteries in pair.
Do not mix battery types(zinc carbon with
alkaline).
Do not recharge, heat, short-circuit,
disassemble, or burn batteries.
4.If you cause a static discharge when touching the
unit, and the unit fails to function, simply unplug
the unit from the AC outlet, wait a few minutes, and
plug it back in. The unit should return to normal
operation.
8

FUNCTIONAL PARTS(TV)
Front Vi ew of LCD Set
V- V+ P - P+
SOURC EMENU
1. LED indicator lamp
13
15
14
10
1112
9 8 7 6 5 4
2. Remote Sensor
3. Standby Button
4. SOURCE Button
5. MENU Button
6. P+ Button
7. P- Button
8. V+Button
9. V- Button
Repeat
10.
11. Next
¼ ò ½ é
1 3 2
12. Preview
13. Play/Pause
14. Stop
15. Open/Close
To turn t he TV power O N
Put the T V set on the cor rect pla ce, then con nect the DC plug of th e AC-DC adaptor to the DC 12V soc ket
at the le ft side of th e TV set . Connec t the ad aptor ma in cord to th e wall o utlet ,t hen the LED indi cator lamp
turns re d and the TV s et is at Stan dby/wor k Mode. At Stand by Mode, if S tandby Button i s presse d
the powe r indica tor wil l change to green. It takes a few seco nds bef ore the p icture appears .
To turn t he TV power O FF
Press th e Standb y Butto n to make the TV set in Standb y Mode, then dis connect the pow er plug f rom the
wall out let.
NOTE
If TV is the sele cted inp ut without s ignal re ceived and NO op eration is p erforme d for about 5 minutes
continu ously, t he TV set wil l enter standby mode. Fo r any in puts oth er than TV, t he TV set wil l not en ter
standby mode aut omatica lly wit hout use rs instr uction. If y ou are not going to use this T V set fo r a long
time, sw itch off the set and disconn ect the p ower plug fr om the wall outl et.
9
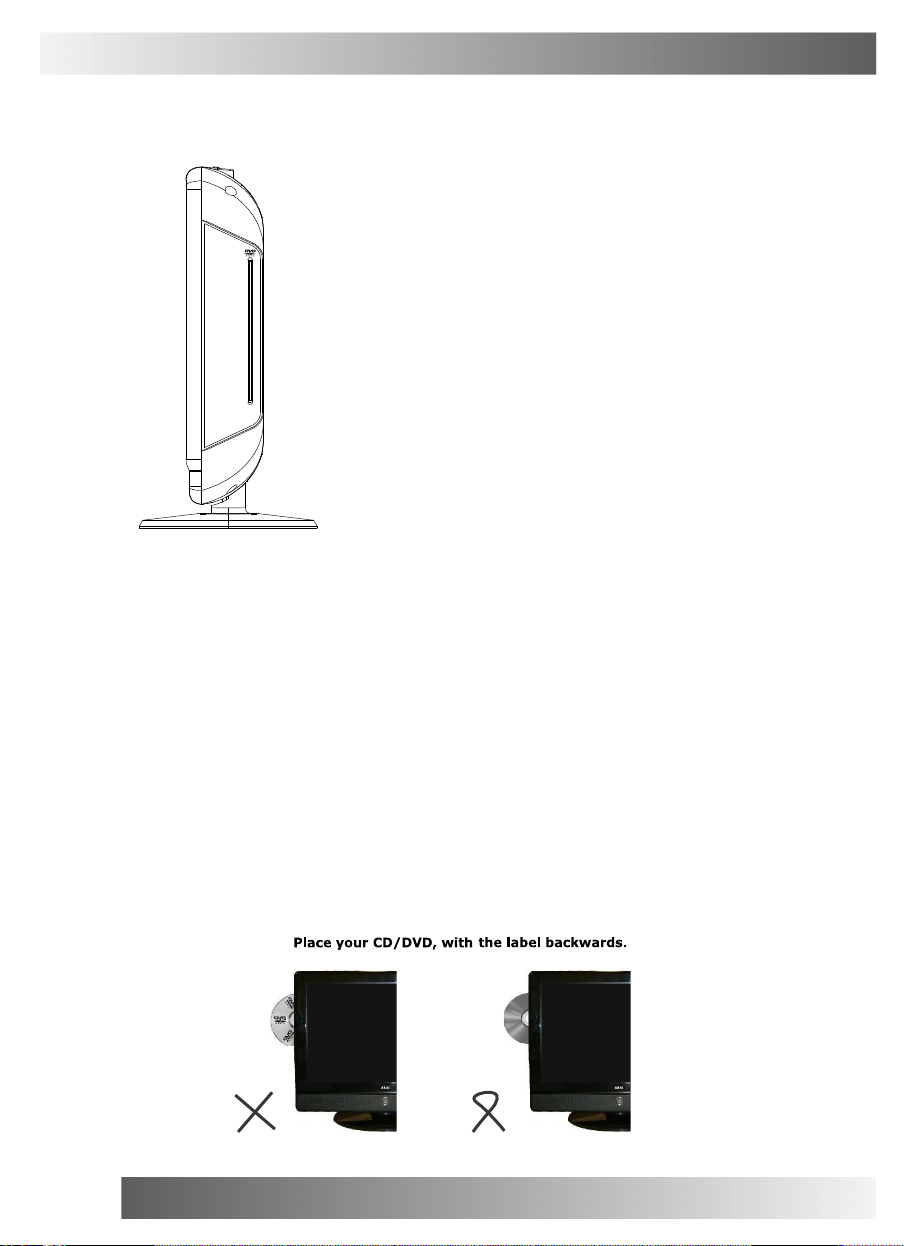
FUNCTIONAL PARTS(DVD)
1. DVD Slot
Please p ress the " SO URCE" bu tton in the r emote control t o Switch thi s LCD-TV Set to D VD statu s,
insert t he disk to DVD sl ot, and the play er will swal low it in.
Notes:
1.Do not attach any seal or label to e ither side (the labeled sid e or the recorde d side) o f a disc .
2.Do not use irr egularl y shaped CDs (e. g., Hear ts haped or octagona l)since th ey may res ult in
malfunc tions.
3.Some p layback operati on s of D VDs and Video CD s may be inte ntional ly progr am med by softwa re
manufac turers. This uni t plays DVDS and Vid eo CDs ac cording to d isc cont ent des igned by the
softwar e manufa cturer, th erefo re some play back fea tures may not be ava ilable o r other functio ns
may be ad ded.
10
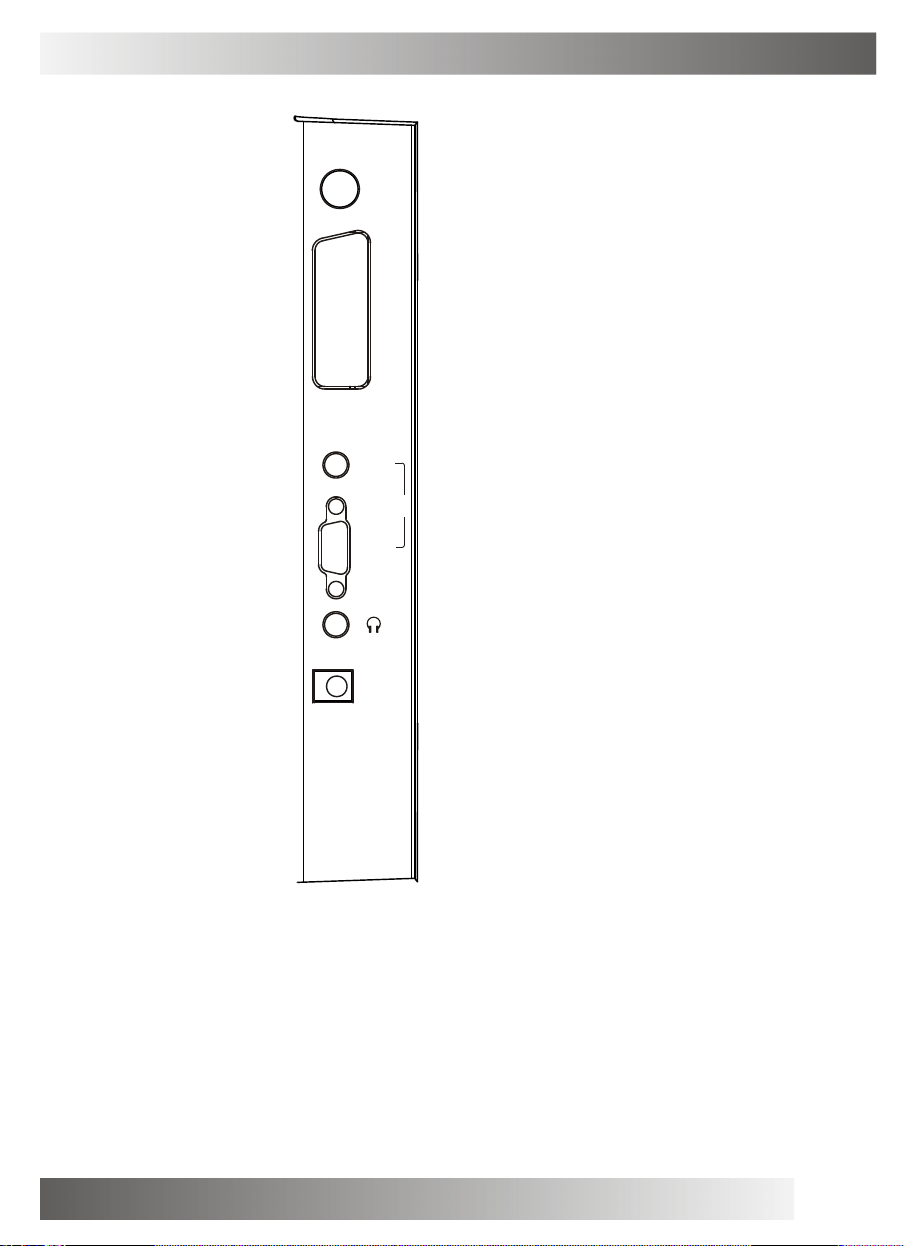
SIDE VIEW OF TV SET
DC IN 12V
HEADPHONE
PC IN
FULL-SCART
RF INPUT(ANT.)
ANT.
Ful lSCA RT
AUDIO
VGA
PC IN
DC IN 12V
NOTE
Precautions when connecting to other equipment
When using external equipment with this TV set, please read the instruction
manual of the external equipment.
Switch off all power supplies to the equipment and TV set before connection.
Always ensure that the input and output terminals are correctly connected.
11

REMOTE CONTROL UNIT
OPE N/CLO SE POW ER
P.P
1
3
1.POWER ON/STANDBY button
Press this button to switch on the TV when at standby mode or
enter standby mode.
2.MUTE button
Press this button to mute or restore sound.
7
-/--
REP EAT
MUT E SOU RCE
2
VOL -
ASP ECT
REV EAL SIZ E
TEX T
IND EX
ANGL E SLO W
DVD ME NU PRO GRAM SU BTITL E
ENTE R
DVD SE TUP
PRO G+
MEN U
PRO G-
Q.
VIEW
STOP
TITL E
GOTO
SWAP
VOL +
MIX
SUB. PAGE
ZOOM
AUDI O
DIS PLAY
3.P.P Button
4
Press this button to select the desired picture mode:
P.P
NORMAL/SOFT/RICH/CUSTOM.
5
4.DISPLAY Button
Press this button to display the setting on the screen.
5.SLEEP Button
Press this button to set the sleep timer, the order
shown below(minutes):
0 - 15 - 30 - 45 - 6 0
When the preset length of time has passed, the TV set
6
enters standby mode.
6.SOURCE Button
Press ¡ ° SOURCE¡ ± button,there menu will be show on the right
top of the screen, press ¡ ° PROG+/-¡ ± to select the AV source,
and then press ¡ ° VOL+/-¡ ± to enter AV mode.
TV
PC
SCART
DVD
7.DIGIT Button(0-9)
This TV allows you to select channels from 0 to 255.
Press this button to select one-digit,two digit or three -digital
channels input options.
To select a one-digit channel(e.g. Channel 8),press this ¡ ° -/--¡ ±
button to change channel selection to ¡ ° -¡ ± on screen display
and press the ¡ ° 8¡ ± button only.
To select a two-digit channel(e.g. Channel 28),press this ¡ ° -/--¡ ±
button to change channel selection to ¡ ° --¡ ± on screen display
and press¡ ° 2¡ ± and ¡ ° 8 ¡ ± buttons. To select a three-digit
channel (e.g. Channel 128),press this¡ ° -/--¡ ± button to change
channel selection to ¡ ° ---¡ ± on screen display and press¡ ° 1¡ ± ,
¡ ° 2¡ ± and ¡ ° 8¡ ± buttons.
12

REMOTE CONTROL UNIT
OPE N/CLO SE POW ER
P.P
Q.
VIEW
SWAP
VOL +
12
11
9
8
10
10
-/--
REP EAT
MUT E SOU RCE
PRO G+
VOL -
MEN U
8.MENU Button
Press this button to enter the menu screens for various option
al adjustable settings.
9. Button
PROG+/-
Press the program up button to select the program forwards.
Press the program Down button to select the program
Backwards.
10. Button
VOL+/-
Press volume up/down buttons to adjust sound level.
11. Button
Q.VIEW
Press this button to return to the previously viewed program.
12.SWAP Button
You can adjust your TV program list order, press this button,
the program swap menu will displayed, as shown below. E.g.
to swap channel 0 and 7 , press ¡ ° SWAP¡ ± button, press
¡ ° PROG+/-¡ ± ¡ °VOL+/-¡ ±
to choose .FROM and press to set the
channel number as ¡ ° 0¡ ± ,and as the same way to set the TO
as¡ ° 7¡ ± ,last to do choose the¡ ° SAVE¡ ± and press
¡ ° VOL+/-¡ ±
to implement this fuction.
13
ASP ECT
REV EAL SIZ E
IND EX
ANGL E SLO W
DVD ME NU PRO GRAM SU BTITL E
DVD SE TUP
TEX T
ENTE R
PRO G-
STOP
TITL E
GOTO
MIX
SUB. PAGE
ZOOM
AUDI O
DIS PLAY
9
FROM CH 0
TO CH 7
SAVE
13.ASPECT:TO SELECT SCALER MODE<16:9 4:3 16:9
FS ZOOM PANORAMA>
13

TELETEXT OPERATIONS
For mode ls with Teletex t functi on only.
OPE N/CLO SE POW ER
P.P
Q.
VIEW
SWAP
20
VOL +
20
-/--
REP EAT
MUT E SOU RCE
PRO G+
VOL -
MEN U
13.TEXT Button
Press this button to enter or exit the teletext mode.
14.INDEX Button
Press the button to go to the index page.
15.REVEAL Button
Press this button to reveal the hidden information for
some Teletext pages(e.g. answers to puzzles or riddles).
Press again to hide the information.
16.MIX Button
Press this button enter to mix mode.(For SUBTITLE or
NEWSFLASH page, please use mix mode).
Press this button again to exit.
17.SIZE Button
Press this button to change the Teletext screen display
mode among the following:
- Upper half screen enlarged
- Lower half screen enlarged
- Normal screen state
18.STOP Button
Press this button to hold the Teletext page on display to
prevent the page from changing. Press again to release the
hold state.
20
15
13
14
14
ASP ECT
REV EAL SIZ E
IND EX
ANGL E SLO W
DVD ME NU PRO GRAM SU BTITL E
DVD SE TUP
TEX T
ENTE R
PRO G-
STOP
TITL E
GOTO
MIX
SUB. PAGE
ZOOM
AUDI O
DIS PLAY
19.SUB.PAGE
20
Press this button to display subpage.
18
17
16
20.COLOUR Button
Press this button to access directly to the
19
corresponding pages displayed at the lower part of the Teletext
screen.

REMOTE CONTROL OPERATION(DVD)
2
DVD M ode:
OPE N/CLO SE POW ER
P.P
Q.
-/--
VIEW
SWAP
10 11
REP EAT
MUT E SOU RCE
PRO G+
TEX T
MEN U
PRO G-
STOP
TITL E
VOL +
MIX
SUB. PAGE
ZOOM
VOL -
ASP ECT
REV EAL SIZ E
IND EX
ANGL E SLO W
DVD ME NU PRO GRAM SU BTITL E
3
AUDI O
ENTE R
DVD SE TUP
GOTO
DIS PLAY
6
1.POWER
1
Press th is butto n to swi tch tele vision on or off .
.O PE N/CLOSE Button
2
Press OP EN/CLOS E button to l oad disc on d isc tray . Hold t he
disc wit hout tou ching either of its sur faces, p osition it with
the prin ted titl e side f acing do wn, ali gn it wit h the gu ides, an d
place it in its prope r positi on. In c ase of interact ive DVDs with
playbac k contro l, a men u appear s on the TV scree n.
.D VD MENU Button
3
If play s ome DVD discs, p ress this bu tton bac k to roo t menu
screen.
4
.P ROGRAM Button
Place a track on t he program list.
Press PR OGRAM bu tton, then the ¡ ° P RO GRAM¡ ± wi ll
appear o n TV scr een now y ou can press¡ ° > ¡ ÷ ¨ Œ ¡ ±
and¡ ° E NTER¡ ± butt on to sel ect ¡ ° ST ART¡ ± option a nd
enjoy th e desire d track s.
.S UBTITLE Button
5
To press this button , you can cha nge the s ubtitle lan guage
from one selecte d to the initial set tings to a diffe rent lan guage,
if avail able.
6.DV D SETUP Button
You can e njoy pictur e frame f orward by press ing this but ton.
7.AU DIO Button
To press this button , you can cha nge the a udio langua ge from
the one s elected at s ettings to a differe nt langu age, if
availab le.
5
4
8.GOTO Button
Press th is butto n to go t o desir ed posit ion. The pla yer
7
provide s 3 searc h mode W hen the above it ems are showed
on TV scr een, you can input number to locate desire s ector,
9
8
then pre ss PLAY to comme nce play The number y ou input is
invalid if it is beyo nd the track's c apcity.
9.DI SPLAY Button
To displ ay playe r OSD.
10.P RE V/ NEXT Button
Press th ese butt on to go to the previ ous/nex t chapte r(DVD).
11.F R/ FF Button
These bu ttons al low ski pping ah ead/bac k at 5-l evel spe ed.
Press ¡ ° P LA Y¡ ± b ut ton to re turn to norma l p layba ck .
15

REMOTE CONTROL OPERATION(DVD)
OPE N/CLO SE POW ER
-/--
REP EAT
12
13
17
18
MUT E SOU RCE
VOL -
ASP ECT
REV EAL SIZ E
TEX T
IND EX
ANGL E SLO W
DVD ME NU PRO GRAM SU BTITL E
ENTE R
DVD SE TUP
PRO G+
MEN U
PRO G-
Q.
VIEW
STOP
TITL E
GOTO
P.P
SWAP
VOL +
MIX
SUB. PAGE
ZOOM
AUDI O
DIS PLAY
14
16
15
DVD M ode:
12.R EP EA T Button
To press this button you can repeate dly play a title (DVD) or all
tracks( CD) when¡ ° AL L ¡ ± appear s on TV screen, y ou can
repeate dly play a chapt er (DVD) or a single t rack(CD ) when
¡ ° R epeat ch apter¡ ± a pp ears o n T V scr ee n, you ca n cance l
repeat f unction s when no¡ ° R epeat of f¡ ± a ppears o n TV scr een.
13.P LA Y/ PAUSE Button
Press th is butto n to sta rt playb ack. Press t his butt on again to
pause pl ayback.
14.S TO P B utton
When thi s button is p ressed o nce, the uni t record s the st op
ped poin t, from where pl ayback w ill res ume (res ume func tion)
if ¡ ° PLAY¡ ± i s p resse d a fter wa rds. But if STOP butt on is
pressed again in stead of PLAY bu tton, there wil l be no r esume
functio n.
15.TITLE button
DVD disc:
Press TITLE button, then the DVD menu or titles available on the
disc will be displayed. Then you can use " " and ENTER button
to select programs.
16.ZOOM button
1.Press ZOOM dur ing pla yback or still playback to activ ate the
Zoom fun ction. T he square fr ame appe ars bri efly in t he right
bottom o f the pictur e.
2. Each p ress of the Z OOM but ton chan ges the TV scree n in
the foll owing se quence:
3. Use th e butto ns to mov e throu gh the zo omed pictur e.
4. To res ume nor mal play back, pr ess ZOO M button until
screen b ecomes 1 X.
Note:Zo om may no t work o n some DVDs.
N
17.ANGLE button
If the di sc contains scenes r ecorded at d ifferen t camera
angles, you can change t o a differen t camera angle during
playbac k. Press ANGLE repeated ly durin g p layba ck to select a
desired angle. N ote tha t the num ber of t he curre nt angle
appears on scree n.
Note:
N
The angl e indica tor wil l blink o n the TV screen during
scenes r ecorded at differen t angles as an indica tion tha t
angle sw itching is possible .
18.SLOW Button
Press this button during playback to activate the slow function.
Each press on this button change the TV screen in the follow
sequence:1/2 - 1/4 - 1/8 - 1/16 normal play
16

MENU SCREENS
This TV allows you to adjust any setting from the menu screens using ¡ ° MENU¡ ± ,¡ ° VOL+/-¡ ± and ¡ ° PROG+/-¡ ±
buttons.
Press ¡ ° MENU¡ ± button to display the menu, press¡ ° PROG+/-¡ ± to change menu from one to another, ¡ ° VOL+/-¡ ±
to enter the chosen menu, press¡ ° PROG+/-¡ ± to select the item, and then press ¡ ° VOL+/-¡ ± to adjust each
item.
Press ¡ ° MENU¡ ± again to exit the menu mode.
PICTURE
CONT RAST
BRIG HTNESS
TINT
CH
COLO UR
SHAR PNESS
COLO UR TEMP
PICT URE MODE
ADJUST SELECT EXIT
SOUND
VOLUME
COOL
NORM AL
PICTURE MENU
You can adjust the contrast, brightness, tint(NTSC only)
colour,sharpness.
COLOUR TEMP: NORMAL / WARM / COOL
PICTURE MODE: NORMAL / SOFT / RICH /CUSTOM
SOUND MENU
Enter sound menu, you can adjust VOLUME.
CH
ADJUST SELECT EXIT
TUNE
AUTO SCAN
CHAN NEL 1
COLO UR SYS. PAL
SOUN D SYS.
CH
SKIP
MANU AL
FINE TUNE
ADJUST SELECT EXIT
152. 25MHz
152. 25MHz
B/G
OFF
TUNE MENU
NOTE:
this function only works in TV mode
AUTO SCAN: Press¡ ° VOL+/-¡ ± to begin auto search
program, and press menu to exit auto search.
CHANNEL: The number is the current channel, and you
can also change channel from one to another.
COLOUR SYS. PAL/NTSC/SECAM (optional)
SOUND SYS. B/G,D/K,I,M,L,L¡ ¯ (optional)
SKIP: Set this item on to skip the channel which you are
watching.
MANUAL: To start searching until a program is
searched, or press¡ ° MENU¡ ± to exit.
Fine Tune: Frequency data can be fine-tuned in upward
or downward by the VOL+/- buttons.
17

MENU SCREENS
SETUP
BLUE SCREEN ON
TXT LANGUAGE WEST
ASPE CT
CH
ADJU ST SELECT EXIT
OSD
LANG UAGE ENGLIS H
HPOS
VPOS
CH
DURA TION
HALF TONE
ADJU ST SELECT EXIT
SETUP MENU
BULE SCREEN: You can set background ON or OFF.
TXT LANGUAGE.
You can choose the supported teletext
fonts among AUTO,WEST,RUSSIAN,ARABIC and FARSI.
16:9
ASPECT: You can set the picture display mode 16:9,
4:3 ,ZOOM,and 16:9FS,PANORAMA.
OSD MENU
You can choose the language, adjust the H-position,
V-position, duration and halftone.
PC MENU(under PC mode only)
PC
CONT RAST
BRIG HTNESS
HPOS
CH
VPOS
CLOC K
PHAS E
AUTO CONFIG
ADJU ST SELECT EXIT
You can adjust the CONTRAST, BRIGHTNESS
HPOS/VPOS Press the VOL+/- buttons to adjust the
picture Horizontal and Vertical position.
CLOCK Press the VOL+/- to minimize any vertical bars or
stripes visible on the screen background.
PHASE When necessary, adjust the pixel phase of the
picture to avoid picture interference.
AUTO CONFIG To adjust the screen
position automatically. It will take a few seconds and
during this process the screen will be black.
NOTE:
If the set is cold ,there may be a small¡ ° flicker¡ ± when the set is switched on. It is normal, There is nothing
wrong with the set.
If possible, use the VESA 1024X768@60HZ video mode to obtain the best image quality for your LCD monitor.
Under other resolutions some scaled or processed pictures may appear on the screen.
Some dot defects may appear on the screen, like red, green or blue Spots, However,this will have no impact or
effect on the monitor performance.
Do not press the LCD screen with your finger for a long time as it may incur some damage to the screen.
18

INITAL SETTINGS(DVD)
COMMON PROCEDURES OF INITIAL SETTINGS
Press DVD SETUP button to get the setup menu. Use
direction buttons " " to select the preferred item .
After finishing settings, press DVD SETUP again to TV
display.
The following menu items can be changed:
GENERAL: selects the GENERAL PAGE menu.
AUDIO : selects the Audio menu.
DOLBY : selects the DOLBY DIGITAL SETUP menu.
PREFERENCE: selects the PREFERENCE PAGE menu.
GENERAL SETUP PAGE
General
-- - -
General Setup Page
TV display
Angle Mark
Osd Lang Eng
Screen Saver
Go To General Setup Page
Audio
Ps
On
On
The following me u items can be changed:
Dolby
On
Off
Video
English
Japanese
Preference
Normal/Ps
Normal/Lb
On
Wide 16:9
Off
n
TV DISPLAY: selects the aspect ratio of the playback
picture.
NORMAL/PS: pan scan display.
&
NORMAL/LB: letterbox display.
WIDE: widescreen display.
ANGLE MARK: viewing angles change option
(if available). See changing the angles on page 10.
SCREEN SAVER: this is to turn on/off screen saver.
AUDIO SETUP PAGE
General
-- --
Speaker Setup Page
Downmix
Speaker Setup Page
Audio
Stereo
Dolby
Video
LT/RT
Stereo
Preference
This page is for setup speaker output.
DOWNMIX Stereo
LT/RT: 2ch output, main channel with surround.
STEREO: 2ch output, main right channel with right
surround; main left channel with left surround.
DOLBY DIGITALSETUP PAGE
General
-- --
Dolby Digital Setup
Dual Mono
Dynamic
Go To Dolby Digital Setup
Audio
Dolby
FULL
3/4
1/2
1/4
OFF
Video
Stereo
L-Mono
R-Mono
Mix-Mono
Preference
The following menu items can be changed:
DUAL MONO: Reproduction mode, used only when the
input consists of two independent audio
channels(1/1 mode). Possible selections are:
STEREO: Reproduce both channels as is.
L-MONO: Reproduce the left channel only.
R-MONO: Reproduce the right channel only.
The default is STEREO.
DYNAMIC: Dynamic range compression.
VIDEO DIGITALSETUP PAGE
General
--
Video Setup Page
Sharpness
Brightness
Contrast
Go To Video Setup Page
Audio
Low
00
00
Dolby
Video
--
The following menu items can be changed:
Sharpness: sharpness value.
Brightness: brightness value.
Contrast: contrast value.
Preference
High
Medium
Low
19
INITAL SETTINGS(DVD)
NOTE:this only works if there's no DVD disc in the unit
PREFERENCE SETUP PAGE
Change
Dolby
2 G
3 Pg
4 Pg 13
5 Pgr
6 R
7 Nc17
8 Adult
Video
English
French
Spanish
Chinese
Japanese
Korean
Russian
Preference
English
French
Spanish
Chinese
Japanese
Korean
Russian
English
French
Spanish
Chinese
Japanese
Korean
Russian
General
-- --
Preference Page
Audio Eng
Subtitle
Disc Menu Eng
Parental
Password
Default
Go To Preference Page
Audio
Reset
The following menu items can be changed:
AUDIO: Selects a language for audio(if available).
SUBTITLE: Selects a language for subtitles(if available).
DISC MENU: Selects a language for DISC menus (if available).
PARENTAL[DVD only]: This is to disable the playing of specified DVDs which are unsuitable for children. Some
DVDs are encoded with specific rating level. If the rating level of the disc is higher than that preset in the setup
operation, playback of the disc will be prohibited. After selecting one of the PARENTAL items the screen will
change to the PASSWORD page, and password is required , The factory initial setting is 1369.
PASSWORD: Selects the menu setup PASSWORD CHANGE PAGE.
PASSWORD CHANGE PAGE
OLD PASSWORD [ XXXX ]
NEW PASSWORD [ YYYY ]
CONFIRM PASSWORD [ YYYY ]
PASSWORD CHANGE PAGE
OK
OLD PASSWORD: Enter the OLD password, (Factory setting is 1369), and the cursor will jump automatically to
NEW PASSWORD.
NEW PASSWORD: Enter the NEW password. Enter 4 digits from the remote control unit numeric buttons, and the
cursor will automatically jump to CONFIRM PASSWORD.
CONFIRM PASSWORD: Confirm the NEW password by entering it again. If the confirmation is incorrect, the cursor
will stay in this column. After entering, the correct new password again, the cursor will jump automatically to OK.
OK: When cursor is on this button, press ENTER key to confirm setting.
DEFAULT: Back to the factory setting.
20

TROUBLESHOOTING TIPS
Before c alling f or service, you can check th e follow in g ite ms on sym pt oms and solut io ns.
No picture:
Check ot her chan nel, maybe s tation p roblem.
Adjust t he tunin g contr ol.
Ensure t hat the input se tting is at T V state.
Ensure t hat the LCD is on .
Ensure t hat the equipme nt is con nected properl y.
No sound and dis torted s ound:
Ensure t hat the input se ttings f or the TV and sou nd are pr oper.
Adjust t he tunin g contr ol.
Probabl y local i nterfer ence, such as an app liance.
Re-orie nt aeria l(if ind oor typ e).
Ensure t hat the equipme nt is con nected properl y.
No remot e Contro l:
Check th e batter y are in stalled with the cor rect pol arity.
Point th e remote con trol uni t at the remote c ontrol sensor a nd opera te.
Remove t he obsta cles betwee n the rem ote con trol and the rem ote cont rol sens or .
Operate the remo te control u nit at a distanc e of not more tha n 8 mete rs from the remo te contr ol sensor.
Trouble shootin g tips(P C mode):
¡ ° NO SIGN AL¡ ± displaye d
Check if the wir e is conn ected correctl y.
¡ ° UNSUPP OR TED¡ ± display ed
Check if the inp ut setti ng is compat ible to t he monitor s pecific ation.
Check if the wir e is conn ected correctl y.
Led lamp indicat or on but no picture
Check th e monito r setti ng :cont rast ,br ig htnes s.
Check if the wir e is conn ected correctl y.
Some unu sual spo ts on screen :
Some dot defects may appear o n the sc reen, li ke red, gree n or blu e, Spots , Howeve r, this will have no
impact o r effect on t he monit or performa nce.
21

THE CAUSES OF INTERFERENCE
Incorpo rated in your TV rece iver are the most up- to-date dev ices to e liminat e inter ference .Local r adiatio n
however , can cre ate dis turbanc es which visibly aff ect your picture . Prope r instal lation, a good a er ial ar e
your bes t safe-g uards against t hese dis turbanc es.
RF INTERFERENCE
Moving r ipples a cross the scree n are caused by nearb y trans mitting or recei vi ng short- wave rad io
equipme nt.
DIATHERMY
Herring bone pat tern and par tial pic ture los s can re sult fro m the op eration of diatherm y equipm ent from a
nearby d octor's s urgery o r hospi tal.
SNOW
Weak TV s ignals from lon g distan t stati ons resu lt in an inst ead pict ure and give the eff ect of fa lling snow.
An anten na adjus tment or antenn a amplif ier may be neede d.
GHOST
Multipl e image c aused by TV sign als ref lected b ac k from sur ro undin g b uildi ng s, hills , air cr aft, e ct . Is
minimiz ed by cor rect aerial positio ning.
CAR IGNITION
Nearby c ars and electri cal moto rs can cause sma ll strea ks across th e p ictur e or mak e t he pictur e r oll.
22

For m ore information and warranty conditions, plea se visit : www.akai.eu
 Loading...