


CNC Retrots
Centroid Fanuc CNC Retrot Installation Manual
Models: AC/DC-30, AC/DC-60
Appendix C - Understanding Fanuc Motor Labels
www.centroidcnc.com
CENTROID_fanuc_retrot_manual.pdf rev4-21-14 Copyright © 2014 CENTROID
Fanuc is a registered trademark of Fanuc LTD
Motor Compatibility Tables
Encoder Upgrade - DC Motors
Encoder Upgrade - AC Motors
Software Setup
AC Encoder Alignment
Fanuc Motor Tuning
Appendix A - Drill Template
Appendix B - Cable Drawings and Pinouts
Appendix D - Torque, HP, and Wattage
7
14
29
40
47
52
60
62
73
79

Fanuc Retrofits
DRIVE WARRANTY DOES NOT COVER DAMAGE BY FAULTY MOTORS OR WIRING.
READ YOUR CNC11 OPERATORS MANUAL AND AC/DC USERS GUIDE BEFORE PERFORMING A FANUC RETROFIT.
FAILURE TO FOLLOW THE INSTRUCTIONS AND SAFETY PRECAUSTIONS IN THOSE MANUALS COULD RESULT IN
SERIOUS INJURY OR DEATH.
The information provided by CENTROID relating to wiring, installation, and operation of CNC components is intended only
as a guide, and in all cases a qualified technician and all applicable local codes and laws must be consulted. CENTROID makes
no claims about the completeness or accuracy of the information provided, as it may apply to an infinite number of field conditions.
As CNC control products from CENTROID can be installed on a wide variety of machine tools NOT sold or support by
CENTROID, you MUST consult and follow all safety instructions provided by your machine tool manufacture regarding
the safe operation of your machine and unique application.
The procedures detailed in this manual are designed to be used by someone familiar with the AC/DC drive and MPU11
software. This documentation is designed to be used in correlation with the available manuals and technical bulletins, and is not
intended to replace any pre-existing documentation.
Only Fanuc motor handling safety procedures are described in this procedure. Additional safety information can be found
in the CNC 11 Operators Manual and the AC/DC Users guide.
Servo Motor Handling
When working with servo motors:
• NEVER pick up or carry the motor by the cables or the shaft. (Always carry by the frame.) Use a crane or lift to
move the motor when necessary.
• NEVER drop or subject the motor to impact. The servo motor is a precision device.
• NEVER set heavy or sharp objects on the motor or cables. Do not step or sit on the motor or cables.
• NEVER use a metal hammer on any part of the motor. If it is absolutely necessary to use a hammer, use a plastic
hammer.
Keep the motor properly secured and away from the edge of the work area when servicing the motor, as a dropped motor could
cause personal injury or destroy the motor.
Page 2 of 80

Fanuc Retrofits
Failure to do so could void your warranty.
Complete the Following Checklist BEFORE powering on your drive.
To be performed with motors disconnected from drive:
□ Check for >100 MΩ between the motor chassis and motor power terminals.
To be performed with motors connected to drive:
□ Confirm continuity between the drive chassis and the motor chassis.
□ On the drive terminals, check for >100 MΩ between motor shield and power terminals.
□ Check VM wiring for correct polarity.
□ Check motor wiring for correct polarity/phase.
□ Check that all screws are tightened down properly. Driving a motor with a terminal loosened
could result in the terminal block overheating and causing a fire.
□ If you are unsure of the condition of a motor, have it inspected by a qualified professional.
Refer to TB155 for further details.
Page 3 of 80

Fanuc Retrofits
Basic Motor Safety, Procedures, and Best Practices
• Be safely dressed when handling a motor. Wear safety shoes and gloves. Avoid loose clothing which can get caught
on the motor. Be careful not to let hair get caught in the rotary section of the motor. Do not handle the motor with wet hands.
• Shut off the power before working on a motor. Wait at least 5 minutes after the motor is shut off before touching any
power terminals.
• Always use the correct cables. Centroid cables are shown in the motor compatibility table. Wiring diagrams and pin outs
for motors are provided in Appendix B.
• Ensure that the motor and motor related components are mounted securely. Ensure that the base or frame to which the
motor is mounted to is strong enough.
• Do not touch the rotary section of the motor when it is running unless instructed to.
• When attaching a component having inertia to the motor, ensure any imbalance between the motor and component is
minimized.
• Be sure to attach a key to a motor with a keyed shaft.
• Use the motor in appropriate environmental conditions. Do not store flammables in close proximity to the motor. When
not in use, store the motor in a dry location between 0° to 40° C.
• Do not remove the nameplate from a motor.
Page 4 of 80

Getting Started
Introduction.................................................................................................................................................................... 7
Motor Compatibility Tables
AC Motors......................................................................................................................................................... 8
DC Motors....................................................................................................................................................... 10
Spindles Motors.............................................................................................................................................. 12
Encoder Upgrade Kit Installation
DC Motors
Black End Cap (Fanuc ● Gettys) with Tachogenerator...................................................................................15
DC Motors with Stock Encoders..................................................................................................................... 22
AC motors
Early red cap and S Series............................................................................................................................. 30
α and αC Series.............................................................................................................................................. 31
Software Setup
Software Setup
Control Configuration...................................................................................................................................... 41
Motor Parameters........................................................................................................................................... 42
Temperature Coefficients................................................................................................................................43
PID and Motor Setup....................................................................................................................................... 44
AC Encoder Alignment
Introduction..................................................................................................................................................... 48
Procedure........................................................................................................................................................ 49
Tuning the Fanuc Motor on a AC/DC
Maximum Feed Rate....................................................................................................................................... 53
Introduction to PID.......................................................................................................................................... 54
PID Tuning Setup............................................................................................................................................ 55
Acceleration Tuning.........................................................................................................................................56
Inertia Tuning.................................................................................................................................................. 57
Position Kp Tuning..........................................................................................................................................58
Position Kd Tuning..........................................................................................................................................59
Performing a System Test............................................................................................................................... 60
Fanuc Retrofits
Table of Contents
Appendices
Appendix A - Drill Template........................................................................................................................................ 61
Appendix B - Cable Drawings and Pinouts
Appendix C - Understanding Fanuc Motor Labels
Appendix D - Torque, HP, and Wattage
Centroid Encoder Cable.................................................................................................................................. 63
Fanuc Encoder Cable..................................................................................................................................... 64
QD200 Pigtail for Black Cap Motors............................................................................................................... 65
QR12 Pigtail for AC Motors............................................................................................................................. 66
QD200 Pigtail for Yellow Cap Motors.............................................................................................................. 67
Extra Large AC Power Cable.......................................................................................................................... 68
Large AC Power Cable....................................................................................................................................69
Large DC Power Cable................................................................................................................................... 70
Medium AC/DC Power Cable.......................................................................................................................... 71
Motor Pinouts..................................................................................................................................................72
Black Caps......................................................................................................................................................74
Yellow Caps..................................................................................................................................................... 75
AC Motors....................................................................................................................................................... 76
Spindle Motors................................................................................................................................................ 78
DC Motors....................................................................................................................................................... 80
AC Motors....................................................................................................................................................... 81
Page 5 of 80

Fanuc Retrofits
Introduction
With the large number of aging FANUC equipped CNC machine tools in the world, CENTROID has answered the call for
an affordable and reliable upgrade! Directly control FANUC servo motors with CENTROID's MPU11 based AC/DC drive.
Retaining the Fanuc servo motor while eliminating the Fanuc user interface and motion control provides savings in time and
money.
This manual covers:
• How to install, align, configure, and tune Fanuc AC and DC motors using Centroid encoders.
• How configure and tune DC Fanuc motors re-using original Fanuc pulse coders
• The basics needed to connect a Fanuc spindle motor to a GPIO4D
Motor series supported:
• Gettys ● Fanuc (Black Cap)
• M Series (Yellow Cap)
• Early red caps
• S Series
If the Fanuc motor has a yellow or black end cap, it is a DC motor. If the Fanuc motor has a red cap, it is an AC motor.
The first step in retrofitting a motor to find your motor in our Motor Compatibility Tables listed on the following pages. Samples of
Fanuc motor labels are shown in Appendix to help identify your motor.
• α Series
• αC Series
• β Series
• Three models of spindle servo motors.
Page 6 of 80

Fanuc Retrofits
Fanuc AC Motor Compatibility Table
[1]
Fanuc Motor
Series
Early Red Caps
S Series
α (Alpha) Series
&
αC Series
[6]
β (Beta) Series
&
βis Series
1. This table is not a complete list of all Fanuc AC motors, just motors we have verified.
2. An AC/DC-60 may be substituted for an AC/DC-30.
3. Motors with a continuous stall current of above 30A or below 5A are not recommended with the AC/DC. (This gives the AC/DC an approximate range of 500
watts to 6,000 watts or 0.7 hp to 7.8 hp.)
4. You may reuse the existing power cables from your Fanuc with the AC/DC. Cable information is provided for ordering replacement cables and troubleshooting.
5. Encoder retrofit kit currently not available, Centroid can provide engineering to develop or installer to mount encoder.
6. Most Fanuc documentation lists the αC Series as a member of the α Series, while some Fanuc documentation lists the αC Series as a member of the β series.
7. Not to be confused with the yellow-capped DC motor also designated "20M".
Cable drawings and pinouts can be found in Appendix B, Motor RPM, torque, hp, and wattage can be found in Appendix D
Motor
Model
0 A06B-0511-Bxxx
5 A06B-0512-Bxxx
10 A06B-0501-Bxxx
20 A06B-0502-Bxxx
30 A06B-0503-Bxxx
0-0SP A06B-0374-Bxxx
0S A06B-0313-Bxxx
5S A06B-0314-Bxxx
5S/3000 A06B-0514-Bxxx
6S A06B-0316-Bxxx
6S/3000 A06B-0320-Bxxx
10S A06B-0315-Bxxx
10S/3000 A06B-0317-Bxxx
20S A06B-0502-Bxxx
20S/1500
20M
30S A06B-0590-Bxxx
30R
30/2000
40 A06B-0581-Bxxx
20S/3000 A06B-0318-Bxxx
30S/3000 A06B-0319-Bxxx
40S/2000 A06B-0583-Bxxx
α3/3000 A06B-0123-Bxxx
α6/2000 A06B-0127-Bxxx
α6/3000 A06B-0128-Bxxx
αC12/2000 A06B-0141-Bxxx
α12/2000 A06B-0142-Bxxx
α12/3000 A06B-0143-Bxxx
αC22/1500 A06B-0145-Bxxx
α22/1500 A06B-0145-Bxxx
α22/1500 A06B-0146-Bxxx
α30/1200 A06B-0151-Bxxx
α22/2000 A06B-0147-Bxxx
α30/2000 A06B-0152-Bxxx
α40/2000
αC3/2000 A06B-0121-Bxxx
αC6/2000 A06B-0126-Bxxx
α22/3000 A06B-0148-Bxxx
α30/3000 A06B-0153-Bxxx
α40/2000
α1/3000 A06B-0371-Bxxx
α2/2000 A06B-0372-Bxxx
α2/3000 A06B-0373-Bxxx
β3/3000
β6/2000
β4/4000is
β8/3000is
β12/300is
β22/2000is
β0.5/3000
β1/3000
β2/3000
Motor Type
A06B-0505-Bxxx
[7]
A06B-0506-Bxxx
A06B-0157-Bxxx
(Without fan)
A06B-0158-Bxxx
A06B-0033-Bxxx
A06B-0034-Bxxx
A06B-0063-Bx0x
A06B-0075-B203
A06B-0078-Bx0x
A06B-0085-Bx0x
A06B-0113-Bxxx
A06B-0031-Bxxx
A06B-0032-Bxxx
(With fan)
Extra Large AC Power Cable
Extra Large AC Power Cable
Power
Cable
Medium AC or DC Cable
Drawing #. S13370
Large AC Power Cable
Drawing # S13362
Medium AC or DC Cable
Drawing # S13370
Large AC Power Cable
Sub assembly # 12894
Drawing # S13362
Drawing # S13371
Medium AC or DC Cable
Drawing # S13370
Large AC Power Cable
Sub assembly # 12894
Drawing # S13362
Drawing # S13371
[4]
Not Recommended
Not Recommended
Please contact Centroid for a retrofit solution.
Not Recommended
AC/DC
Drive
Model
AC/DC–30
AC/DC - 60
AC/DC – 30
AC/DC - 60
AC/DC – 30
AC/DC - 60
[5]
TBD
Encoder
Retrofit Kit
Retrofit Kit # 12859
[2]
Installation
Instructions
Page 31
[2]
Retrofit Kit # 12859
or # 12876
See next page to
choose a kit for your
application.
[3]
[2]
Retrofit Kit # 12876
Installation
Instructions
Page 28
[3]
[3]
Encoder
Cable
AC/DC Encoder Cable
Sub assembly #12912
Drawing # S13369
Page 7 of 80

Fanuc Retrofits
Choosing a Retrofit Kit for Your Fanuc “S” Series AC Servo Motor
In order to differentiate between the two different styles of encoder used on Fanuc's “S” series motors, it is necessary to
remove the red motor end caps and visually inspect the pulse coders.
If your servo motor's encoder resembles this one, you will need assembly #12859. Instructions found in section “AC
Motors: Early and S Series Models” on page 31.
If your servo motor's encoder resembles this one, you will need assembly #12876. Instructions found in section “AC
Motors: α (Alpha) Series Models” on page 37.
Page 8 of 80

Fanuc Retrofits
Black End Cap (Fanuc ● Gettys)
DC Motor Compatibility Table
[1]
Fanuc
Measurement
Motor
Model
Technology
00 A06B-0631-B0xxx TBD
0 A06B-0613-B0xx
Tachogenerator
where xxx is 001 - 028
Pulse Coder
where xxx is 031 or 032
1. This is not a list of all Fanuc DC motors, just the motors we have verified.
2. An AC/DC-60 servo drive may be substituted for an AC/DC-30 servo drive.
5 A06B-0614-Bxxx
10 A06B-0601-Bxxx
30 A06B-0603-Bxxx
00 A06B-0631-B0xx TBD
0 A06B-0613-B0xx
5 A06B-0614-Bxxx
10 A06B-0601-Bxxx
30 A06B-0603-Bxxx
Motor
Type
Power
Cable
Medium AC or DC Cable
Drawing # S13370
Large DC Power Cable
Sub assembly # 12895
Drawing # S13361
Medium AC or DC Cable
Drawing # S13370
Large DC Power Cable
Sub assembly # 12895
Drawing # S13361
[3]
AC/DC
Drive
Model
AC/DC – 30
AC/DC - 6020 A06B-0602-Bxxx
AC/DC – 30
AC/DC - 6020 A06B-0602-Bxxx
Encoder
Retrofit Kit
[4]
[2]
Encoder Retrofit
Kit # 12903
Installation Instructions
Page 15
[4]
[2]
Reuse stock Fanuc
encoder OR replace
with Centroid Encoder
Retrofit
Kit # 12896
Installation Instructions
Page 22
Encoder
Cable
AC/DC Encoder Cable
Sub assembly #12912
Drawing #S13369
Fanuc Coder Cable
Sub assembly # 12893
Drawing # S13357
3. You may reuse the existing power cables from your Fanuc with the AC/DC. Cable information is provided for ordering replacement cables and troubleshooting.
4. CENTROID Encoder retrofit kit has not been developed yet. Centroid can provide engineering services to develop an encoder kit or adapt your own.
Motors with a continuous stall current of above 30A or below 5A are not recommended with the AC/DC servo drive.
(This gives the AC/DC servo drive an approximate range of 500 watts to 6,000 watts or 0.7 hp to 7.8 hp.)
Cable drawings and pinouts can be found in Appendix B
Motor RPM, torque, hp, and wattage can be found in Appendix D
Page 9 of 80

Fanuc Retrofits
Yellow End Cap (M Series)
DC Motor Compatibility Table
[1]
Fanuc
Measurement
Technology
Tachogenerator
or
Resolver
where xxx is 001 or 005
Pulse Coder
where xxx is 011, 012, or 005
Motor
Model
00M A06B-0632-Bxxx
0M A06B-0641-Bxxx
5M A06B-0642-Bxxx
10M A06B-0651-Bxxx
20M A06B-0652-Bxxx
30M A06B-6053-Bxxx
0M A06B-0641-Bxxx
5M A06B-0642-Bxxx
10M A06B-0651-Bxxx
20M A06B-6052-Bxxx
30M A06B-6053-Bxxx
Motor
Type
Power
Cable
Medium AC or DC Cable
Drawing # S13370
Large DC Power Cable
Sub assembly # 12895
Drawing # S13361
Large DC Power Cable
Sub assembly # 12895
Drawing # S13361
Medium AC or DC Cable
Drawing # S13370
Large DC Power Cable
Sub assembly # 12895
Drawing # S13361
Large DC Power Cable
Sub assembly # 12895
Drawing # S13361
[3]
AC/DC
Drive
Model
AC/DC – 30
AC/DC – 60
AC/DC – 30
AC/DC – 60
Encoder
Retrofit Kit
[2]
Reuse stock Fanuc
[2]
encoder OR replace with
Centroid Encoder
Installation Instructions
[4]
TBD
Retrofit
Kit # 12896
Page 22
Encoder Cable
AC/DC Encoder Cable
Sub assembly #12912
Drawing # S13369
AC/DC Encoder Cable
( Use with Retrofit
Encoder )
Sub assembly #12912
Drawing # S13369
Fanuc Coder Cable
( Use with Existing
Encoder)
Sub assembly # 12893
Drawing # S13357
1. This is not a list of all Fanuc DC motors, just the motors we have verified.
2. An AC/DC-60 servo drive may be substituted for an AC/DC-30 servo drive.
3. You may use the existing power cables from your Fanuc with the AC/DC servo drive . Cable information is provided for ordering replacement cables and
troubleshooting.
4. CENTROID Encoder retrofit kit has not been developed yet. Centroid can provide engineering services to develop an encoder kit or adapt your own.
Motors with a continuous stall current of above 30A or below 5A are not recommended with the AC/DC servo drive.
(This gives the AC/DC servo drive an approximate range of 500 watts to 6,000 watts or 0.7 hp to 7.8 hp.)
Cable drawings and pinouts can be found in Appendix B
Motor RPM, torque, hp, and wattage can be found in Appendix D
Page 10 of 80
Fanuc Retrofits
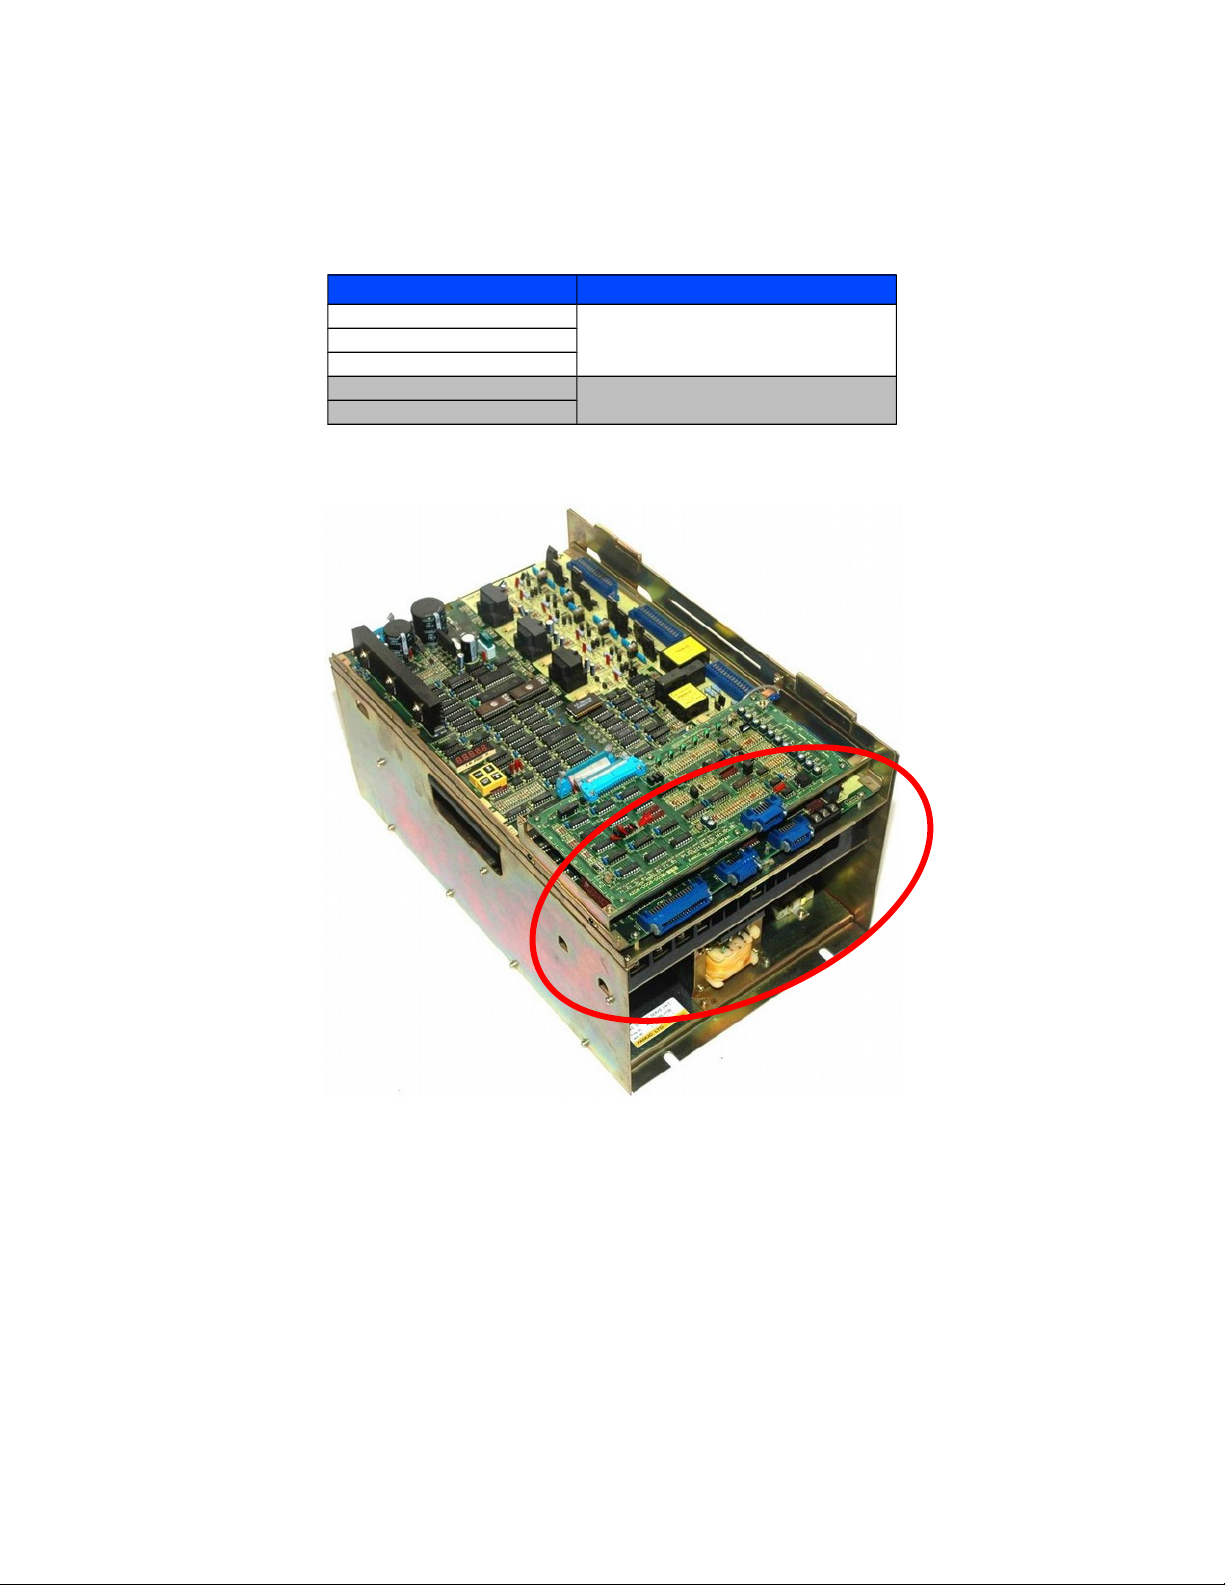
Fanuc Spindle Inverter
If your spindle is a 6044, 6055, or 5059 and does NOT use optical fiber inputs, then it is compatible with the Centroid
GPIO4D Drive Interface and PLC. Supported spindles require a 0 to +10 VDC input with forward and reverse commands. Mills
with the orient function contain an extra circuit board on the spindle control as shown below.
Spindle Inverter Compatibility Table
Spindle Motor Type Support
A06B-6044-xxxx
Models Without Fibers SupportedA06B-6055-xxxx
A06B-6059-xxxx
A06B-6064-xxxx
α## / #### (Alpha Series)
1. This is not a list of all Fanuc spindle motors, just the motors we have verified.
Not Supported
[1]
Spindle Control with the ORIENT function.
For more reading on AC spindle inverters, read Tech Bulletin #008 “AC Inverter Spindle Motors” and Tech Bulletin
#152 “Inverter Control”.
If connecting the spindle encoder output directly to a Centroid system (unnecessary in most situations), a Motrona Si 251
Sine/Cosine Inerpolater with Adjustable Multiplication Rate Interface is available from Centroid.
The following pages contain I/O information and an example schematic.
Page 11 of 80

I/O Information for a Fanuc Spindle Drive
CN1-22
CN1-26 Common
Stopped
CN1-32
If the spindle driv e has the ORIENT function, it w ill have a ORIENT card on top of the main card.
CN1-14 Common
CN1-6 Common
CN1-12
CN1-21 TLMH (Torque Limit High Gear)
CN1-46 Rev erse
CN1-4
CN1-16
CN1-31
CN1-1
CN1-17 High Gear (Used If ORIENT)
CN1-45 Forward
Spindle Speed
Common
Speed Arrival
A20B-0009-0520
CN1-24 Low Gear (Used If ORIENT)
CN1- 48 Common
CN1-23
Alarm
CN1-7 Ready
CN1-20 Common
CN1-25 Orient
Torque Limit
Spindle Drive Outputs
CN1-9
CN1-49 Load Meter
ORIENT Complete
CN1-19 Alarm Reset
A20B-0008-0240 (0241)
CN1-50 Speed Meter
A20B-0008-0030 (0031)
CN1-15
CN1-5 TLML (Torque Limit Low Gear)
CN2 connector has feedback from motor, and MUST be left on.
CN1-18 Common
CN1-18 Common
Speed Detect
0 V - 10 V Signal
CN1-10
Spindle Drive Inputs
CN1-2
CN1-11
CN1-3
CN1- 47 E-Stop
* The D/A chip on the board needs
pulled out. It w ill be in a socket on the
spindle control board labeled CBI or
CCD. Only one socket w ill have a
chip.
CN1-8 Common
Fanuc Retrofits
Page 12 of 80

Fanuc Retrofits
Example of a Schematic for a Fanuc Spindle Drive
Page 13 of 80
Fanuc Retrofits
DC Motors
Yellow (M Series) and Black (Fanuc●Gettys) end caps are used on DC motors. At the time of this publication, black cap
motors with resolvers and yellow cap motors with tachogenerators/resolvers are not supported.
If the motor has a functioning encoder, it can be used without any modification. Skip to Software Setup section.
DC Motors: Black End Cap Tachogenerator
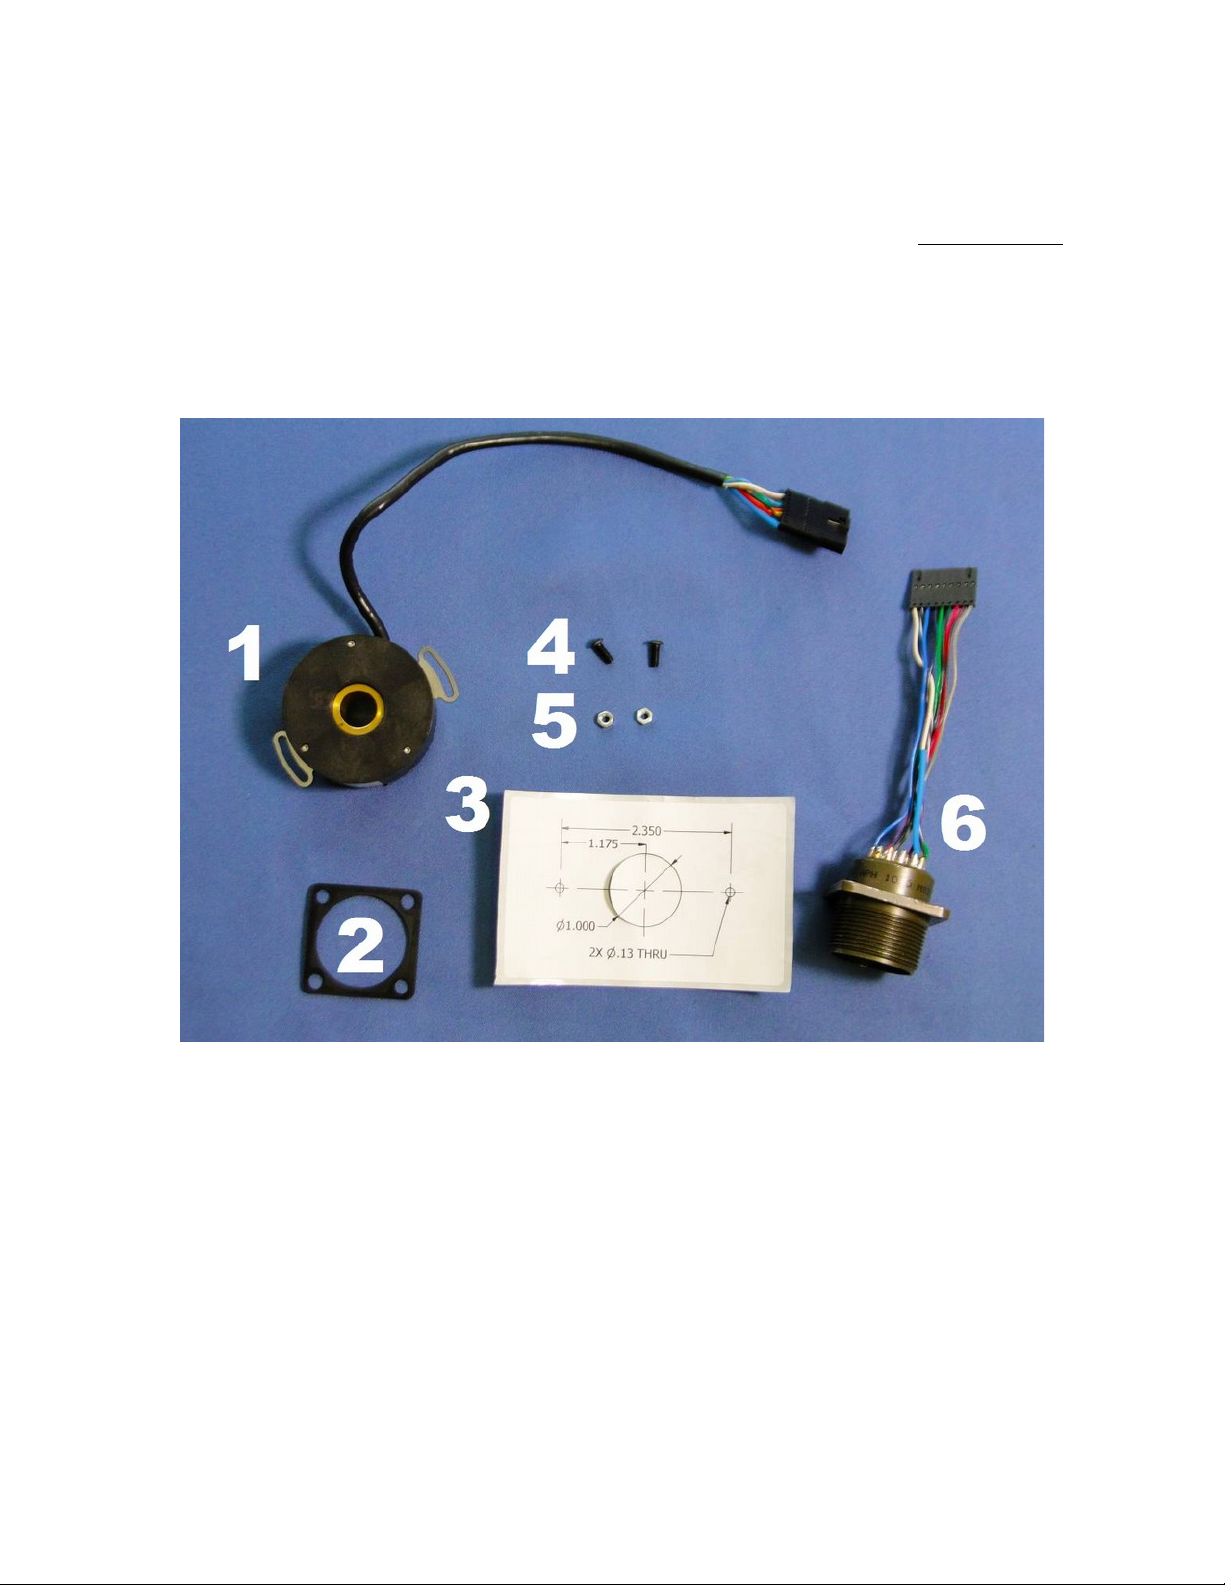
` This guide is for upgrading the tachogenerator on a black end cap motor. To retrofit a black end cap DC motor, use the
Fanuc Encoder Retrofit Kit 12903 as shown below.
1. 1 Encoder (PN 7546)
2. 1 Pigtail Gasket (PN 4602)
3. 1 Encoder Drill Template (PN 12906)
Waiting on a new picture!
4. 2 Encoder Mounting Bolts (PN 7485)
5. 2 Encoder Mounting Nuts (PN 7571)
6. 1 Encoder Pigtail (PN 12890)
Page 14 of 80
Fanuc Retrofits
1
1
22334
4
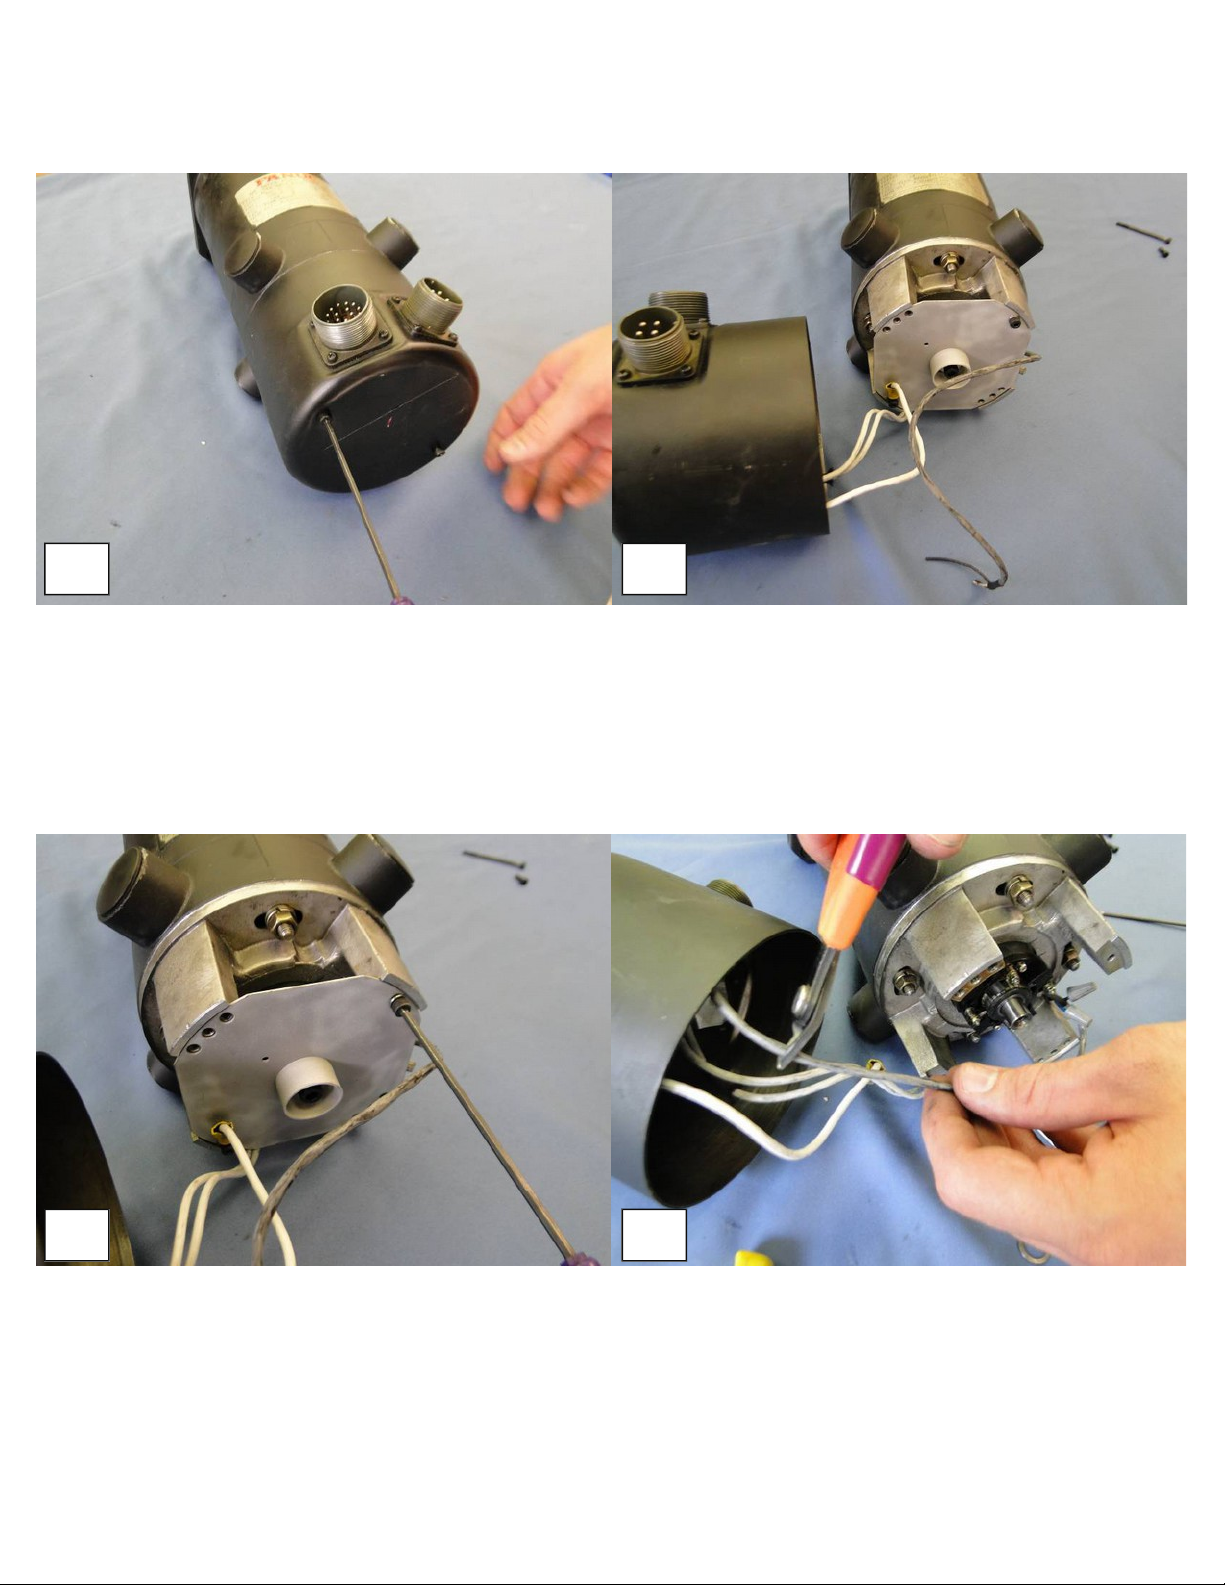
Encoder Installation
Remove the two bolts holding the black end cap in place using a
3mm hex key. Set aside the end cap bolts. You will use them
again in a later step.
Remove the end cap to expose the tachogenerator assembly.
Remove the mounting plate bolts using a 3mm hex key. Pull off
the mounting plate. Set aside both the mounting plate and
mounting plate bolts, you will use them again in a later step.
.
Disconnect the temperature sensor wires and the
tachogenerator wires. Cut the wires to the tachogenerator.
Unscrew the wire nuts to remove the wire for the temperature
sensor. DO NOT CUT THE POWER WIRES GOING TO THE
MOTOR!
Page 15 of 80

Fanuc Retrofits
556
6
778
8
Remove the center bolt using a 5mm hex key. Remove the retaining screws on the outer stator with a Phillips
screwdriver.
Remove the rotor of the stator of the tachogenerator. Remove the retaining screws on the inner stator with a screw
driver.
Page 16 of 80
.

Fanuc Retrofits
9910
10
11
11
12
12
Remove the remaining piece of the tachogenerator. The motor
should look like this.
Remove the four encoder connector screws. Set aside the
connector screws. You will use them again in a later step.
Acquire the mounting plate you removed in Step 3. If the
mounting plate is dirty or greasy, clean it with some isopropyl
alcohol. Cut out the 1-inch hole on the center of the sticker and
apply to the mounting plate. If your sticker gets lost or damaged,
a template to make a new one is included in Appendix A.
.
Use a center punch to mark the holes on the mounting plate.
Page 17 of 80

Fanuc Retrofits
13
13
14
14
15
15
16
16
Place the encoder on the mounting plate. Insert the encoder
mounting bolts through the mounting plate.
Use a drill press and a #30 drill bit to make both holes in
the mounting plate.
Loosely mount the encoder using the nuts included in the retrofit
kit. The bolts should be loose enough that the encoder can
slide slightly in each direction.
.
Check to make sure the encoder collar screws are backed out.
Slide the encoder assembly onto the back of the motor.
Page 18 of 80

Fanuc Retrofits
17
17
18
18
19
19
20
20
Re-insert the mounting plate bolts that were removed in step 3
with a 3mm hex key.
Tighten the encoder set screws and mounting bolts.
Slide the gasket with the encoder pigtail into the black end cap. Tighten the encoder pigtail using the bolts you removed in Step
10.
Page 19 of 80
.

Fanuc Retrofits
21
21
22
Connect the encoder pigtail connector to the encoder. Apply a bead of non-corrosive RTV sealant (such as Dow
Corning 3165 or 748) onto the end cap mounting surface.
Reinstall the end cap with the bolts removed in step 1.
You are done installing the encoder!
Jump to the Software Setup section.
.
Page 20 of 80

Fanuc Retrofits
DC Motors
DC Motors: Black and Yellow End Cap with Stock Encoder
This guide is for upgrading the relatively low-resolution Fanuc pulse to a high-resolution encoder. To retrofit a black end
cap DC motor, use the Fanuc Encoder Retrofit Kit 12896 as shown below.
Waiting on a new picture!
1. 1 Encoder and MS Connector (PN 12892)
2. 1 Encoder Drill Template (PN 12983)
3. 2 Encoder Standoffs (PN 3636)
.
4. 2 Encoder Mounting Screws (PN 887)
5. 1 Pigtail Gasket (PN 4602)
Page 21 of 80

Fanuc Retrofits
1
1
22334
4
Encoder Installation
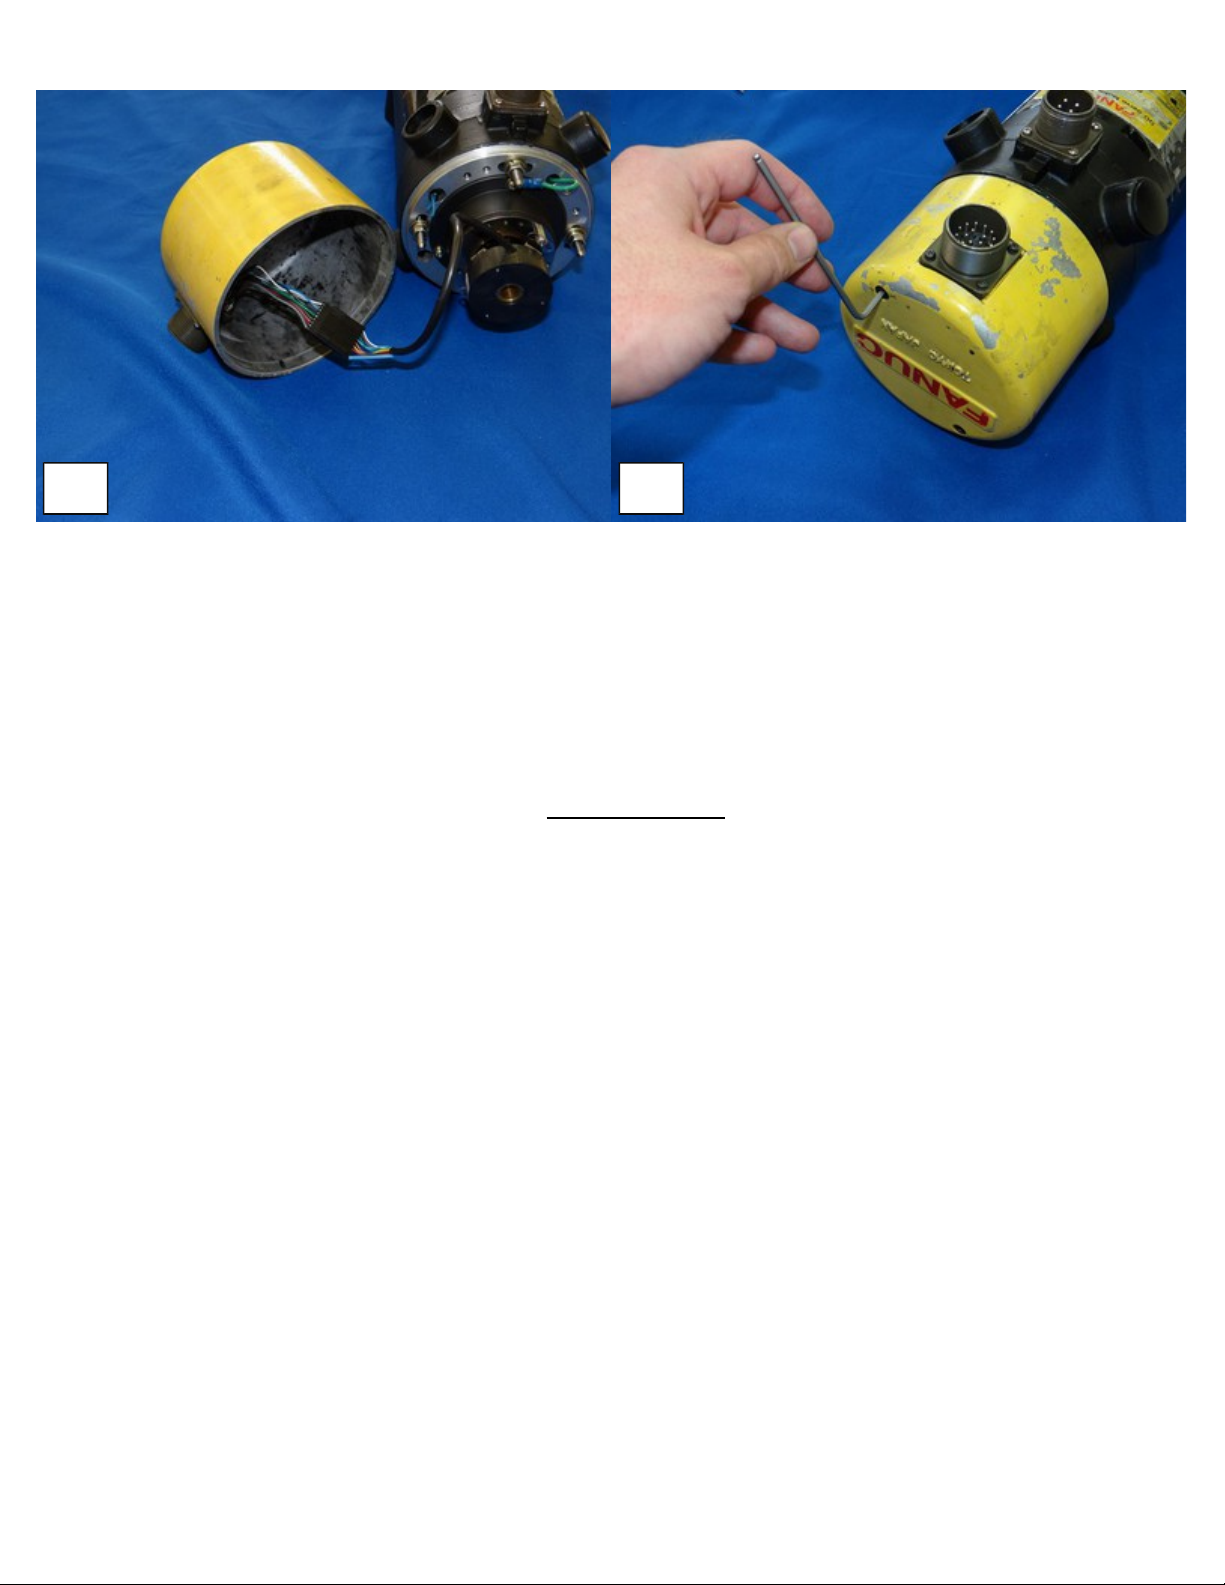
Remove the two bolts holding the black end cap in place
using a 3mm hex key. Set aside the end cap bolts. You will
use them again in a later step.
Remove the end cap to expose the pulse coder assembly.
Cut the pulse coder signal cable as well as the two temperature
sensor wires. DO NOT CUT THE GROUND WIRE!
.
Using a Phillips screwdriver, remove the three pulse coder
mounting screws. Set them aside. They will be used again in
step 21.
Page 22 of 80

Fanuc Retrofits
556
6
778
8
Remove the pulse coder. A brass coupling will remain on either
the motor or pulse coder side.
Remove and inspect the coupler. It should fit snugly into the
encoder and the motor. If the coupler is worn or damaged, order
a new one from Fanuc.
Size 0 and 5 motors: Part# A290-0611-x532
Size 10, 20, 30 motors: Part# A290-0501-x503
Using a hex key, remove the two encoder cover bolts. Remove the encoder cover.
Page 23 of 80
.

Fanuc Retrofits
9910
10
11
11
12
12
Remove all the electronics and optics found within the
encoder. Be careful, as the encoder contains a glass disk
which may shatter during removal. Clean off all dirt and glue
residue.
Cut out the center circle on the template, peel off the backing,
and apply it to the encoder base. If you wish, you may also cut
along the outer circle on the template and use it as an
additional reference when aligning it. Position the template
such that the 6-32 hole locations will not interfere with any of
the existing holes on the encoder base. The template MUST
BE CENTERED on the encoder base. Improper alignment
could cause unstable operation as well as cause damage to
your equipment.
Using a sprung center punch, mark the two hole centers on
the base through the template.
.
Refer to drawing D00327 in appendix A of this manual and
double check the center mark locations against the drawing.
Again, THE HOLE LOCATIONS ARE CRITICAL. Ensure that
the actual locations of the center marks are within 0.005” from
their specified locations.
Page 24 of 80

Fanuc Retrofits
Clean the holes of burrs and shavings.
13
13
14
14
15
15
16
16
Using a drill press with a #35 (or 7/64”) drill bit, drill holes on
the center marks approx 0.5” deep. The exact hole depth will
vary depending on the clearance required for your tap. Once
again, check the hole locations against drawing D00327.
Using a 6-32 tap, a tap handle, and some cutting fluid, carefully
thread the holes you just drilled to a minimum depth of 0.3”
Using a nut driver, screw the standoffs from your kit into the
holes you just tapped. Tighten to approximately 8 In-Lb or 0.9
Nm. Do not over-tighten.
.
Slide the encoder onto the shaft.
Page 25 of 80

Fanuc Retrofits
17
17
18
18
19
19
20
20
Using a Phillips screw driver and the crews from the retrofit
kit, secure the encoder flex mount to the standoffs. Tighten to
approximately 8 In-Lb or 0.9 Nm.
Using a hex key, tighten the two set screws on the encoder
collar.
.
Re-insert the brass coupler removed in step 6. Line up the coupling and place the encoder base back into its
original location on the motor.
Page 26 of 80

Fanuc Retrofits
21
21
18
18
19
19
20
20
Re-insert the screws that were removed in step 4. If the
ground wire was originally held down by one of the mounting
screws, re-attach it now. Alternately, the ground wire may be
bolted to one of the unused holes in the motor chassis with a
m4 bolt or screw.
Using a Phillips screw driver, remove the four MS connector
mounting screws. Set them aside. They will be used again in
step 24.
Remove the original MS connector, wiring, and gasket. Clean
the mounting area.
.
Install the pigtail connector and gasket from your kit using the
screws removed in step 22.
Page 27 of 80
Fanuc Retrofits
21
21
22
Connect the pigtail to the encoder. Apply a bead of non-corrosive RTV sealant (such as Dow
Corning 3165 or 748) onto the end cap mounting surface.
Reinstall the end cap with the bolts removed in step 1.
You are done installing the encoder!
Jump to the Software Setup section.
.
Page 28 of 80

Fanuc Retrofits
AC Motors
Red end caps are used on Fanuc AC motors. The Fanuc AC motors have coders/encoders that use a physically different
connector and a proprietary continuation protocol and must be retrofitted to use a Centroid encoder.
AC Motors: Early Red Caps and Some S Series Models
To retrofit a non-S or early S series motor, use the Fanuc Encoder Retrofit Kit 12859 as shown below
Waiting on a new picture!
1. 1 Adapter Plate (PN 12879)
2. 1 Adapter Shaft (PN 12880)
3. 1 Encoder, 40,000 Count (PN 7480)
4. 1 Encoder Pigtail (PN 12821)
5. 3 M4 standoffs (PN 7486)
.
6. 3 Plate Mounting Bolts (PN 6685)
7. 3 Lock Washers (PN 7484)
8. 2 Encoder Mounting Bolts (PN 2762)
9. 1 Pigtail Gasket (PN 4602)
Page 29 of 80

Fanuc Retrofits
3
4
1
2
Encoder Installation
4mm hex key. Set aside the end cap bolts, you will use them
again in a later step.
Remove the end cap and expose the pulse coder assembly.Remove the four bolts holding the red end cap in place using a
Remove the four coder connector screws with a Phillips
screwdriver. Set aside the connector screws. You will use them
again in a later step.
.
On two-piece connectors, remove the connector by prying the
connector apart with a flat blade screwdriver. Then remove the
connector from the end cap. On single-piece connectors, cut the
wires to remove the connector from the end cap.
Page 30 of 80

Fanuc Retrofits
785
6
Cut the temperature sensor wires going from the motor to the
pigtail connector.
Remove the encoder mounting bolts.
Remove the rubber dust cover on the pulse encoder. Loosen
the center bolt using a 4mm hex key while holding the motor
shaft.
.
Gently pull the encoder off the motor. If the encoder is stuck,
Use two allen wrenches to get under the encoder and pry up
and out on the encoder NEVER use a metal hammer or any
type of impact to remove an encoder! Once the encoder is
out then the center bolt can be removed.
Page 31 of 80

Fanuc Retrofits
11
12
9
10
Using a 7mm nut driver, screw the M4 standoffs from the
upgrade kit into the inside of the motor chassis. Tighten to
approximately 8 Lb-In or 0.9 Nm. DO NOT OVER-TIGHTEN!
Use the three plate mounting bolts with lock washers to attach
the adapter plate to the M4 standoffs inside the motor chassis.
Use a 3 mm hex key to attach the plate mounting bolts. Tighten
to approximately 8 In-Lb or 0.9 Nm.
Place the adapter shaft from the kit onto the motor’s encoder
mounting shaft.
.
Check to make sure the encoder collar screws are backed out.
Gently slide the encoder from the kit onto the adapter shaft.
Page 32 of 80

Fanuc Retrofits
15
16
13
14
Install the encoder mounting screws using a 2mm hex key.
Leave the screws loose, as you will need the encoder to be
moveable during the alignment.
Reuse the center bolt that was removed from the old encoder in
step 7. Using a 4mm hex key, tighten the bolt into the encoder
mounting shaft.
Slide the gasket with the encoder pigtail into the red end cap. Reusing the screws from step 3, tighten down the pigtail and
gasket into the red end cap.
Page 33 of 80
.

Fanuc Retrofits
17
18
Plug the pigtail connector firmly into the encoder.
You are done installing the encoder!
Jump to the Software Setup section.
Use zip-ties to hold the temperature sensor wire (and any other
loose wires inside the end cap) neatly in place.
.
Page 34 of 80

Fanuc Retrofits
AC Motors: α (Alpha) Series and some S Series Models
To retrofit an α (alpha) series AC motor and late S series motors, use the Fanuc Encoder Retrofit Kit 12876 as shown below
1. 1 Adapter plate assembly (PN 12986)
2. 1 Encoder, 40,000 Count (PN 7480)
3. 1 Encoder Pigtail (PN 12892)
.
4. 4 Plate Mounting Bolts (PN 6417)
5. 4 Lock Washers (PN 7484)
6. 1 Pigtail Gasket (PN 4602)
Page 35 of 80

Fanuc Retrofits
123
4
Encoder Installation
hex key. Set the end cap bolts aside. You will use them again in
a later step.
Remove the end cap and expose the pulse coder assembly.Remove the four bolts holding the red end cap in place using a
Cut the temperature sensor wire going from the motor to the
pigtail connector.
Page 36 of 80
.
Unplug the pigtail connector from the pulse coder.

Fanuc Retrofits
7
8
5
6
Remove the four bolts holding the pulse coder in place using a
3mm hex key.
Remove the pulse coder. A black plastic coupling will remain on
either the motor or pulse coder side. It will be used in the next
step.
Fit the plastic coupling to the shaft of the adapter plate from
the retrofit kit. It must be a snug fit. If the coupling is heavily
worn or damaged, a replacement should be ordered
(Fanuc part# A290-0501-V535)
Page 37 of 80
.
Fit the retrofit assembly onto your motor, making sure that the
black coupler mates with both the encoder shaft and the motor.
Line up the four bolt holes on the adapter plate with the
threaded holes on the motor.

Fanuc Retrofits
11
12
9
10
Using a hex key, secure the retrofit assembly in place with
the four mounting screws and lock washers supplied with
your kit.
Use zip-ties to hold the temperature sensor wires (and any other
loose wires inside the end cap) neatly in place.
Using a Phillips head screwdriver, remove the four MS
connector mounting screws and set them aside. You will need
them again in step 13.
.
Remove the original MS connector and wiring.
Page 38 of 80

Fanuc Retrofits
13
14
Slide the encoder pigtail with the gasket into the end cap and
secure them in place with the four screws removed in step 11.
Plug the pigtail connector firmly into the encoder.
.
You are done installing the encoder!
Jump to the Software Setup section.
Page 39 of 80

Fanuc Retrofits
Software Setup
The AC/DC needs the CNC11 software configured correctly to use the servo motor. The software configuration
procedure(s) described in this manual are intended for someone familiar with the CNC11 software, the AC/DC drive, and available
technical bulletins. This documentation is designed to be used in correlation with the manuals and technical bulletins, and is not
intended to replace any pre-existing documentation.
Control Configuration
The machine parameters need to be adjusted for your Fanuc drive before you can use it. Heating coefficients as well as
temperature warning and error levels are calculated in imperial units. The machine units must be set to inches from the Control
Configuration menu before entering or changing temperature parameters! After saving temperature parameters, the control may
be set back to millimeters if desired. Changing the machine units from inches to millimeters will “automatically” convert
temperature values.
NOTE: Cooling parameters do not change when switching from inches to millimeters because cooling parameters are
calculated as a unit-less value.
To get to the control configuration menu, press F1-Setup. Next, press F3 – Config (The default password is 137), then
F1 – Contrl. Press F10-Save when finished.
Control Configuration Menu
Page 40 of 80
.

Fanuc Retrofits
Motor Parameters
In the CNC11 software, access the machine parameters menu by pressing F1 – Setup, F3 – Config, and then F3 - Parms.
Machine Parameters Menu
The table below contains the most important parameters for configuring the AC/DC drive. Set up the control to match your
motor combination. (note: consult the CNC11 manual for a more complete listing of all machine parameters and their uses.)
Recommended Fanuc Parameters
Parameter Number Setting Setting Description
21-24 Motor dependent
25-28 Motor dependent
29 212 (°F) Motor temperature warning
30 260 (°F) Motor temperature error
132-135 Motor dependent
236-239 Motor dependent
256 2 Drive mode
284-291 Dependent on brake resistor Brake resistor wattage (300 w typical)
300-307 1- 8, Depending on Machine Drive axis mapping
308-315 7 -14, Depending on Machine Encoder assignments
340-347 1.75 Precision mode delay
357-364 Motor Dependent
374 255 Debug log axis inclustion (bitwise)
375 4000 Debug log size (samples) 0 to 32768
376 1 Data Log collection type: 1= current data, 2=position data
[1]
[1]
[1]
[1]
[1]
Maximum RPM, may also be set from drive PID screen
Motor heating coefficients axes 1-4
Motor cooling coefficients axes 1-4
Motor heating coefficients axes 5-8
Motor cooling coefficients axes 5-8
1. Tables containing temperature information and maximum RPMs are provided later in this section of the document.
Page 41 of 80
.

Fanuc Retrofits
Recommended Temperature Coefficients for DC Drives
(Measured in Imperial Units)
Series
Black End Cap
( Fanuc ● Gettys )
Yellow End Cap
( M Series )
S Series Red Cap
&
Early Red Cap
(Alpha) Series Red Capα
&
C Series Red Capα
(Beta) Series Red Capβ
&
βis Series Red Cap
[1]
Drive
Model
0 A06B-0613-B0xx 4.0135 3.3333
5 A06B-0614-Bxxx 3.6486 3.0303
10 A06B-0601-Bxxx 0.5017 1.6667
20 A06B-0602-Bxxx 0.2527 1.5873
0M A06B-0641-Bxxx 12.3874 0.0574
5M A06B-0642-Bxxx 7.1351 0.0517
10M A06B-0651-Bxxx 2.8668 0.0369
20M A06B-0652-Bxxx 1.1149 0.0323
30M A06B-0653-Bxxx 0.5902 0.0304
0 A06B-0511-Bxxx 11.7374 3.7037
5 A06B-0512-Bxxx 10.8766 3.3333
10 A06B-0501-Bxxx 3.4637 2.7778
20M
20S/1500
20
20S
30 A06B-0503-Bxxx 0.7993 2.5641
30R
30/2000
40 A06B-0581-Bxxx 0.2965 1.8519
0-0SP A06B-0374-Bxxx 16.6116 8.3333
0S A06B-0313-Bxxx 26.4090 3.7037
5S A06B-0314-Bxxx 14.9505 3.3333
5S/3000 A06B-0514-Bxxx 4.8340 3.3333
6S A06B-0316-Bxxx 6.3282 3.0303
6S/3000 A06B-0320-Bxxx 4.0692 3.0303
10S A06B-0315-Bxxx 7.2561 2.7778
10S/3000 A06B-0317-Bxxx 1.7904 2.7778
20S A06B-0502-B065 0.9969 2.5641
20S/1500 A06B-0505-Bxxx 1.4384 2.5641
30S A06B-0590-Bxxx 1.5897 2.5641
30/2000 A06B-0506-Bxxx 0.4730 2.5641
α3/3000 A06B-0123-Bxxx 26.4090 3.7037
α6/2000 A06B-0127-Bxxx 16.0374 3.3333
α6/3000 A06B-0128-Bx77 5.0293 3.3333
α12/2000 A06B-0142-Bxxx 5.4121 2.7778
α12/3000 A06B-0143-Bx75 1.7445 2.7778
α22/1500 A06B-0146-Bxxx 2.4760 2.5641
α22/2000 A06B-0147-Bx75 1.1063 2.5641
α30/1200 A06B-0151-Bxxx 2.2628 2.3810
α30/2000 A06B-0152-Bxxx 0.8804 2.3810
α40/2000 A06B-0157-Bx75 0.4599 2.2222
αC12/2000 A06B-0141-Bx75 12.0400 2.7778
αC22/1500 A06B-0145-Bxxx 2.4760 2.5641
β3/3000 A06B-0033-Bxxx 22.3805 4.1667
β6/2000 A06B-0034-Bxxx 20.0468 4.1667
β4/4000is A06B-0063-Bx0x 56.9187 8.3333
β8/3000is A06B-0075-B203 34.9260 8.3333
β12/300is A06B-0078-Bx0x 9.6681 6.6667
β22/2000is A06B-0085-Bx0x 6.5645 5.5556
Drive Type
A06B-0505-Bxxx 1.7194 2.5641
A06B-0502-Bxxx 0.9672 2.5641
A06B-0506-Bxxx 0.4600 2.5641
Heating
Coefficients
Cooling
Coefficients
1. Most Fanuc documentation lists the αC Series as a member of the α Series, while some Fanuc documentation lists the αC
Series as a member of the β series.
Page 42 of 80
.

Fanuc Retrofits
PID Menu Setup
From the main menu, Press F1 - Setup, F3 - Config, then F4 – PID to enter the PID Menu as shown below.
Press F1 – PID Config to edit the configuration. Enter the settings for the PID loop from the tables below. The tables are
intended to be used as a baseline of sample values to get started. The PID values shown need some fine tuning and adjusting
before your motor can be used in a machine, which is covered in later sections. Press F10-Save & Exit when you are done.
α and β Motors
Series
α (Alpha)
Series
&
αC Series
β (Beta) Series
βis Series
Black End Cap
( Fanuc ●
Yellow End Cap
( M Series )
[2]
&
Series
Gettys )
Drive
Model
α3/3000 A06B-0123-Bxxx 1 0.02 1
α6/2000 A06B-0127-Bxxx 2 0.02 3
α6/3000 A06B-0128-Bxxx 3 0.02 5
α12/2000 A06B-0142-Bxxx 3 0.02 5
α12/3000 A06B-0143-Bxxx 5 0.02 7
α22/1500 A06B-0146-Bxxx 10 0.02 12
α22/2000 A06B-0147-Bxxx 10 0.02 12
α30/1200 A06B-0151-Bxxx 10 0.02 12
α30/2000 A06B-0152-Bxxx 10 0.02 12
α40/2000 A06B-0157-Bxxx 10 0.02 12
αC12/2000 A06B-0141-Bxxx 7 0.02 9
αC22/2000 A06B-0145-Bxxx 10 0.02 12
β3/3000 A06B-0033-Bxxx 1 0.02 1
β6/2000 A06B-0034-Bxxx 2 0.02 1.8
β4/4000is A06B-0063-Bx0x 1 0.02 1
β8/3000is A06B-0075-B203 2 0.02 1.8
β12/300is A06B-0078-Bx0x 5 0.02 7
β22/2000is A06B-0085-Bx0x 10 0.02 12
Drive Type
Position PID
Kp Ki Kd
DC Motors
Drive
Model
00 A06B-0631-B0xx 1 0.02 1
0 A06B-0613-B0xx 1.25 0.02 2
5 A06B-0614-Bxxx 1 0.02 3
10 A06B-0601-Bxxx 9 0.02 10
20 A06B-0602-Bxxx 10 0.02 12
00M A06B-0632-Bxxx 0.35 0.005 0.35
0M A06B-0641-Bxxx 1 0.02 1
5M A06B-0642-Bxxx 2 0.02 1.8
10M A06B-0651-Bxxx 9 0.02 7.5
20M A06B-0652-Bxxx 10 0.02 12
30M A06B-0653-Bxxx 10 0.02 12
Drive Type
Position PID
Kp Ki Kd
S Series & Early Red Caps
Drive Model Drive Type
0 A06B-0511-Bxxx 2 0.02 3
5 A06B-0512-Bxxx 2 0.02 5
10 A06B-0501-Bxxx 5 0.02 7
20M
20S/1500
20
20S
30 A06B-0503-Bxxx 10 0.02 12
30R
30/2000
40 A06B-0581-Bxxx 10 0.02 12
0-0SP A06B-0374-Bxxx 2 0.02 3
0S A06B-0313-Bxxx 2 0.02 3
5S A06B-0314-Bxxx 2 0.02 3
5S/3000 A06B-0514-Bxxx 2 0.02 3
6S A06B-0316-Bxxx 3 0.02 5
6S/3000 A06B-0320-Bxxx 3 0.02 5
10S A06B-0315-Bxxx 5 0.02 7
10S/3000 A06B-0317-Bxxx 5 0.02 7
20S A06B-0502-B065 10 0.02 12
20S/1500 A06B-0505-Bxxx 10 0.02 12
30S A06B-0590-Bxxx 10 0.02 12
30/2000 A06B-0506-Bxxx 10 0.02 12
A06B-0505-Bxxx 10 0.02 12
A06B-0502-Bxxx 10 0.02 12
A06B-0506-Bxxx 10 0.02 12
Position PID
Kp Ki Kd
PID Menu
Page 43 of 80
.

Fanuc Retrofits
Drive Configuration Setup
From the main menu, press F1 - Setup, F3 - Config, F4 - PID, and then F8 – Drive to enter the Drive Configuration
menu. Press F1 – Drive PID to edit the configuration. Enter the settings for the current feedback PID loop from the tables below.
Press F10-Accept when you are done.
DC Motors
End Cap
Color
Black
( Fanuc ● Gettys )
Yellow
( M Series )
Drive
Model Drive Type
0 A06B-0613-B0xx 0 80% 40% 0 0.75 0.075 0 0.0252 2.12 2,000
5 A06B-0614-Bxxx 0 80% 40% 0 2.00 0.100 0 0.0434 4.23 2,000
10 A06B-0601-Bxxx 0 Not Recommended 60% 0 3.50 0.100 0 0.1736 4.72 1,500
20 A06B-0602-Bxxx 0 Not Recommended 80% 0 3.50 0.100 0 0.2864 6.74 1,500
0M A06B-0641-Bxxx 0 Not Recommended 100% 0 2.00 0.100 0 0.0220 3.73 2,000
5M A06B-0642-Bxxx 0 60% 30% 0 6.00 0.100 0 0.0320 5.80 2,000
10M A06B-0651-Bxxx 0 80% 40% 0 3.50 0.100 0 0.1130 8.85 1,500
20M A06B-0652-Bxxx 0 Not Recommended 60% 0 3.50 0.100 0 0.1649 11.28 1,500
30M A06B-0653-Bxxx 0 Not Recommended 80% 0 3.50 0.100 0 0.3211 13.89 1,200
Poles (ACDC-30)
Current
(ACDC-60)
Current
Current PID
Angle Kp Ki Kd
Inertia
In-lb sec
2
RPM
Max
Kt
S Series & Early Red Caps
Current PID
Drive Model Drive Type
Poles
0 A06B-0511-Bxxx 8 70% 35% 0.000 2.00 0.100 0 0.0174 3.73 2,000
5 A06B-0512-Bxxx 8 70% 35% 0.006 2.00 0.100 0 0.0570 7.64 2,000
10 A06B-0501-Bxxx 8 100% 55% 0.000 2.20 0.100 0 0.0330 9.55 2,000
20M
20S/1500
20
20S
30 A06B-0503-Bxxx 8 Not Recommended 100% 0.000 2.50 0.080 0 0.2083 14.76 1,200
30R
30/2000
40 A06B-0581-Bxxx 8 Not Recommended 100% 0.000 2.50 0.080 0 0.2691 16.11 1,200
0-0SP A06B-0374-Bxxx 8 80% 40% 0.000 2.00 0.100 0 0.0074 3.01 3,000
0S A06B-0313-Bxxx 8 40% 20% 0.000 2.20 0.100 0 0.0174 5.66 3,000
5S A06B-0314-Bxxx 8 50% 25% 0.000 2.20 0.100 0 0.0330 8.94 2,000
5S/3000 A06B-0514-Bxxx 8 100% 50% 0.000 2.20 0.100 0 0.0330 5.04 3,000
6S A06B-0316-Bxxx 8 80% 40% 0.000 2.20 0.100 0 0.0486 9.20 2,000
6S/3000 A06B-0320-Bxxx 8 100% 50% 0.000 2.20 0.100 0 0.0486 7.38 3,000
10S A06B-0315-Bxxx 8 70% 35% 0.000 2.20 0.100 0 0.0868 13.63 2,000
10S/3000 A06B-0317-Bxxx 8 Not Recommended 75% 0.000 2.20 0.100 0 0.0868 6.82 3,000
20S A06B-0502-B065 8 Not Recommended 100% 0.003 2.50 0.080 0 0.1800 10.09 2,000
20S/1500 A06B-0505-Bxxx 8 Not Recommended 80% 0.003 2.50 0.080 0 0.1476 12.13 1,500
30S A06B-0590-Bxxx 8 Not Recommended 75% 0.000 2.50 0.080 0 0.2083 21.15 1,200
30/2000 A06B-0506-Bxxx 8 Not Recommended 100% 0.000 1.50 0.050 0 0.2083 9.12 2,000
A06B-0505-Bxxx 8 Not Recommended 75% 0.000 2.50 0.080 0 0.1476 13.45 1,500
A06B-0502-Bxxx 8 Not Recommended 100% 0.000 2.50 0.080 0 0.1476 10.42 2,000
A06B-0506-Bxxx 8 Not Recommended 100% 0.000 2.50 0.080 0 0.2083 9.11 2,000
ACDC-30
Current
ACDC-60
Current
Angle Kp Ki Kd
Inertia
In-lb sec
Kt
2
Max
RPM
Page 44 of 80
Fanuc Retrofits
α and β Motors
Current PID
Series Drive Model Drive Type
α3/3000 A06B-0123-Bxxx 8 40% 20% 0.00 1.50 0.050 0 0.0122 5.75 3000
α6/2000 A06B-0127-Bxxx 8 56% 28% 0.000 1.50 0.050 0 0.0234 9.56 2000
α6/3000 A06B-0128-Bxxx 8 100% 50% 0.003 1.50 0.050 0 0.0234 5.31 4000
α (Alpha) Series
&
αC Series
β (Beta) Series
βis Series
[2]
&
α12/2000 A06B-0142-Bxxx 8 88% 44% 0.000 2.00 0.100 0 0.0555 12.04 2000
α12/3000 A06B-0143-Bxxx 8 Not Recommended 75% 0.000 2.00 0.100 0 0.0555 6.82 3000
α22/1500 A06B-0146-Bxxx 8 Not Recommended 62% 0.000 2.50 0.100 0 0.1042 15.58 1500
α22/2000 A06B-0147-Bxxx 8 Not Recommended 90% 0.000 2.50 0.100 0 0.1042 10.36 2000
α30/1200 A06B-0151-Bxxx 8 Not Recommended 63% 0.000 2.50 0.100 0 0.1476 20.98 1200
α30/2000 A06B-0152-Bxxx 8 Not Recommended 100% 0.000 2.50 0.100 0 0.1476 13.10 2000
α40/2000 A06B-0157-Bxxx 8 Not Recommended 100% 0.000 2.50 0.100 0 0.1996 12.39 2000
αC12/2000 A06B-0141-Bxxx 8 60% 30% 0.010 4.00 0.075 0 0.0555 18.06 2000
αC22/1500 A06B-0145-Bxxx 8 Not Recommended 62% 0.000 4.00 0.075 0 0.1042 15.58 1500
β3/3000 A06B-0033-Bxxx 8 50% 25% 0.000 2.00 0.100 0 0.0174 4.96 3,000
β6/2000 A06B-0034-Bxxx 8 50% 25% 0.000 2.00 0.100 0 0.0347 9.29 3,000
β4/4000is A06B-0063-Bx0x 8 40% 20% 0.000 2.50 0.100 0 0.0046 6.64 4,000
β8/3000is A06B-0075-B203 8 60% 30% 0.001 2.50 0.100 0 0.0103 10.27 3,000
β12/300is A06B-0078-Bx0x 8 100% 50% 0.000 2.50 0.100 0 0.0208 9.56 3,000
β22/2000is A06B-0085-Bx0x 8 100% 50% 0.000 2.50 0.100 0 0.0520 15.67 2,000
Poles
ACDC-30
Current
ACDC-60
Current
Angle Kp Ki Kd
Inertia
In-lb sec
2
RPM
Max
Kt
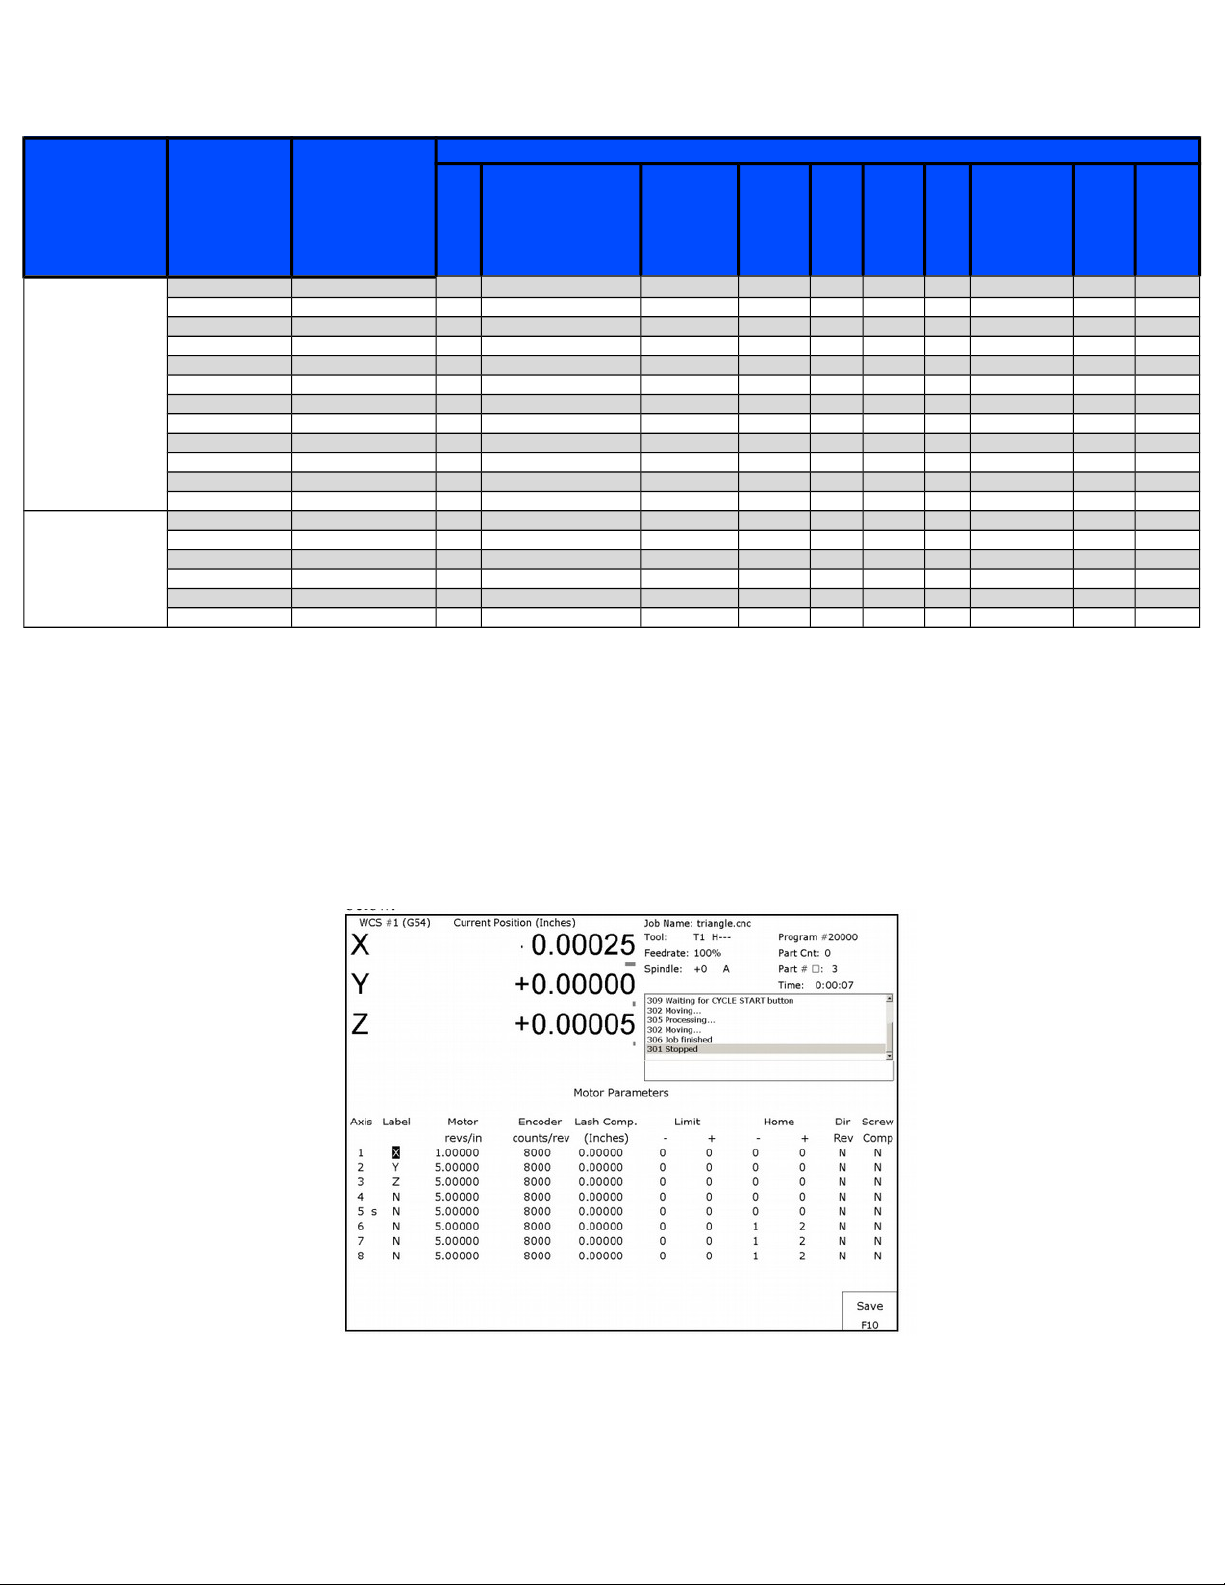
Motor Encoder Count Setup
From the main menu, Press F1 - Setup, F3 - Config, F2 – Mach., then F2 – Motor to access the motor parameters
menu. Navigate using the arrow keys. Fanuc motors with Centroid encoders have a 40,000 counts per revolution encoder. For
motors with the original Fanuc coder, CPR varies by model and options.
Set motor direction using the procedure described in Tech Bulletin # 137, “Setting Direction Reversal”.
Set motor revolutions per inch using the procedure described in Tech Bulletin # 036, “Measuring Revs. Per Inch”.
Motor Parameters Menu
Page 45 of 80

Fanuc Retrofits
Other Misc Setup Procedures
Set up the home file using the procedure described in Tech Bulletin #022, “Modifying the “HOM” file”.
You are done configuring software!
Jump to the AC Encoder Alignment on section if you have an AC servo.
Jump to the Calculating and Testing Maximum Feed Rate section if you have a DC servo.
Page 46 of 80

Fanuc Retrofits
AC Encoder Alignment
Introduction
AC drives rely on knowing the motor position in order to stay synchronized while driving the motor. Before the motor is mounted
on a machine, the motors encoder commutation tracks are aligned with the motor phases. The drive applies sinusoidal voltages
to the three-phase input to rotate the motor shaft to a starting position. Typically, there will be four poles in a full rotation of the
shaft. In Centroid software, the index pulse can be aligned with any one of these.
The drive also looks at the commutation lines from the encoder to give it a coarse position of the shaft for smooth
movement on power up. These commutation signals are interpreted by the drive as zones 1 through 6. As the motor turns
clockwise looking at the output shaft the encoder counts should increase. Centroid AC motors use a differential, 8 pole, 5V,
quadrature encoder with an index pulse. The encoder resolution depends on the motor and the drive (see below).
This procedure can also be repeated if you suspect the encoder alignment is incorrect. An incorrect alignment will
show the following symptoms:
1. Axis is jumping.
2. Motor is running roughly.
3. Motor runs better in one direction than the other.
4. Motor has an uneven amount of current draw in one direction than the other.
5. Large current draw with a light load.
Prerequisites
• If connecting a motor to a drive for the first time, please completed the following steps:
◦ Check for >100 MΩ between the motor chassis and power terminals.
◦ With the motor connected to drive, confirm continuity between the drive chassis and motor chassis.
◦ On the drive terminal, check for >100 MΩ between your power and shield terminals.
◦ Check VM wiring for correct polarity
◦ Additional information on motor testing can be found in your installation manual and Technical Bulletin 155.
Tools and Equipment for Encoder Alignment
◦ A set of metric and SAE hex keys.
◦ A small Philips head screw driver set.
◦ Loctite Blue 242 (Optional)
◦ If removing the motor from the machine, a set of clamps such as Irwin Quick Grips.
◦ If there is any contamination or debris inside the end cap, basic cleaning supplies such as a paper towel and all-
purpose cleaner.
◦ If there is not have a rubber O-ring or gasket between the end cap and motor, a non-corrosive RTV sealant (such as
Dow Corning 3165) is needed.
◦ If changing the encoder, you will need a Quantum Devices QR12-10000-8-A-B-E-A-A. This is a 10,000 line, 8 pole,
5V, 8mm shaft encoder. Encoder pigtail pinouts are listed in Appendix B.
Page 47 of 80

Alignment Setup
The motor must be disconnected from the machine or have the machine drive belt removed for the alignment process.
This procedure is best performed on a sturdy bench where you have good lighting and easy access to the encoder. If the motor is
removed from the machine, the motor frame must be firmly secured to the bench using clamps or some other attachment method.
The motor may try to jump around during the procedure (especially if something goes wrong during the alignment). Before
starting the alignment procedure, the drive software must be configured correctly.
Alignment Procedure
DANGER: Do not jog the axis until instructed!
1. Remove the motor end cap.
1. NOTICE: Any dust, dirt, coolant, or other contamination inside the motor end cap can get inside the sensitive internal
components of the optical encoder and cause a premature failure. Make sure the inside of the motor end cap and
encoder mounting plate are clean before continuing with encoder alignment.
If there is a large amount of contamination inside the end cap, there is a high probability that the existing encoder will
work unreliably and need to be replaced. If there is liquid inside the end cap, there may also be liquid inside the
motor. A motor with liquid inside is a serious safety hazard, and will have to be replaced.
2. If installing a new encoder, remove the old encoder. Attach the new encoder. Loosely tighten the encoder ears and
encoder set screws so the encoder spins when the shaft moves.
3. Connect power cable and encoder cable from the drive to the motor.
4. Power up your drive and control system running Centroid CNC software
5. In your CNC software, access the PID menu by pressing F1-Setup, F3-Config, F4-PID as shown below in
Figure 1. Homing the motor is not necessary.
6. Looking at the motor mounting flange, manually rotate the motor shaft clockwise. The “absolute position” on the PID
screen should increase as circled in the picture above. If the position does not increase check the drive communication,
encoder cable, and encoder pigtail.

Fanuc Retrofits
1. NOTICE: The AC/DC servo drive needs the encoder correctly connected/wired before starting up the CNC11
software or drive. If the encoder is not detected upon start up, you will need to restart both the AC/DC drive and the
CNC11 software before trying to test the encoder again. Users can troubleshoot drive errors through the HSC bit
screen definitions as described in the AC/DC servo drive manual.
7. Go to the drive configuration menu by pressing F8-Drive as shown below in Figure 2.
Figure 2. Drive Configuration Menu
Figure 3. Move Sync
8. Press F2-Move Sync as circled in Figure 2. The axis selected is shown underneath PWM Kp as circled in Figure 3. If
you are not on the correct axis, press F1-Toggle Axis until the correct axis label is on the screen. Finally press F10-
GO. The shaft should rotate. The first move sync rotation may cause the motor to jerk or move roughly. Move sync a few
more times by pressing F2-Move Sync then F10-GO repeatedly. All move syncs after the first sync should cause the shaft
to rotate smoothly. If the motor oscillates wildly, moves erratically, or makes loud unusual noises, kill the motor
power immediately!
1. DANGER: An incorrectly wired or configured motor may move violently or unpredictably when attempting move sync.
Keep your body (and others) away from the motor when move syncing for the first time, and be prepared to hit the
emergency stop.
2. DANGER: Large motors may have a tendency to oscillate violently during a move sync due to nature of the current
feedback loop. It is recommended for 3KW and larger motors that you adjust the motor current to half of the
recommended value in the current feedback menu while move syncing. After the encoder alignment process is
complete, set the current back to the recommended setting.
3. NOTICE: If the motor slightly oscillates after move syncing or continues to move a little rough while move syncing,
grab the motor on the shaft carefully with your hand. Move sync the motor while gently squeezing the motor shaft. If
the oscillations and/or jerky movements go away after applying a small amount of load to the shaft, this is normal.
This problem will not occur during normal motor operation.
4. NOTICE: If no motor movement occurs, an error was encountered. AC/DC users can troubleshoot drive errors
through the HSC bit screen definitions as described in the AC/DC manual.
Page 49 of 80

Fanuc Retrofits
Figure 4. Encoder Alignment
Figure 5. Encoder Collar Set Screws
9. Keep running the move sync operation until the point where the encoder reading is closest to 0 or its maximum encoder
count. The “Encoder Reading” is circled in Figure 4.
10.Loosen the encoder collar set screws as shown in Figure 5.
11. Move the encoder until the encoder reading is as close to zero as reasonably possible.
12.Tighten the encoder collar set screws. The encoder collar usually has two set screws on most encoders; make sure both
are tight if applicable.
13. Loosen up the encoder ears and use them to fine tune the adjustment. When the encoder is within specifications, a red
message will appear on the control saying “*** Tighten Encoder Now ***” as circled in Figure 4. For a 40,000 count
encoder, it needs to be aligned with +/- 25 counts of zero. Tighten the encoder ears. The encoder mounting plate is
usually made out of aluminum, so DO NOT OVERTIGHTEN! If the screws do not fit tightly in the encoder mounting
plate, Loctite blue (242) or similar may be used.
14. Press F2-Move Sync and F10 - Go to rotate the motor shaft several full revolutions. Verify that the software still displays
“*** Tighten Encoder Now ***” when closest to the zero position. Some encoder re-adjustment may be needed. Observe
the commutation count goes 1 through 6 consecutively. The commutation count is displayed below encoder reading as
circled in Figure 4. At rest position the commutation zone should be either a 1 or a 6 only. A 0 or a 7 as the commutation
value indicates a bad encoder or wiring problem.
15.Loosely tighten the end cap onto the motor. Be careful placing the encoder cable in the end cap. If the cable is causing
any strain or pushing on the encoder, it will twist the encoder out of alignment.
16.Reboot the drive and control system.
Page 50 of 80

Fanuc Retrofits
17.After a reboot, fast jog the motor in each direction to verify correct operation.
18.In the drive configuration menu, do a final move-sync check to verify that the motor is still aligned correctly. Look for the
red message saying “*** Tighten Encoder Now ***” when the motor is closest to zero.
19.If there is not a rubber O-ring or gasket between the motor and the end cap, remove the end cap again. Apply a bead of
non-corrosive RTV sealant (such as Dow Corning 3165) onto the end cap mounting surface as shown below. Reinstall
the end cap.
20.The motor is ready for normal operation after the system has been rebooted again.
You are done aligning the encoder!
Continue to Calculating and Testing Maximum Feed Rate on the next page.
Page 51 of 80

Fanuc Retrofits
Calculating and Testing Maximum Feed Rate
In past Centroid products the maximum feed rate and acceleration was determined by autotune. At the time of this writing,
the AC/DC does not support auto tune. Maximum feed rate will have to be manually calculated. To perform this calculation you
will need to know the motor revolutions per inch as described in Tech Bulletin # 036, “Measuring Revs. Per Inch”.
Use the following equation: (maximum motor rpm / motor revolutions per inch) * 0.85 = maximum feed rate.
Enter the maximum feed rate in the Jog Parameters menu (F1 - Setup, F3 - Config, F2 – Mach., and then F1-Jog.).
Upon saving your jog parameters a message will appear that says “The # axis accel time should be changed to #.#### in the PID
menu”. Write this number down, it will be used later. This number is not an ideal acceleration rate, but how much the current
acceleration rate needs to change to keep machine performance the same.
Use MDI commands to test the calculated machine maximum feed rate. If the machine is displaying the following
symptoms the calculated feed rate is too fast and should be decreased:
• The load bar graph in the DRO display of the main menu is red, indicating excessive load on the motors
• The software is giving errors such as position errors.
Deadstart
Deadstart located in the jog parameters menu has to do with direction reversal of an axis. The deadstart usually never has
to be changed from the default value on a Milling machine. Sometimes very light wood routing tables with very low resistance and
low inertia can benefit with a deadstart change along with other "hand tuning." Call in if you have this case.
Backlash
Set backlash compensation using the procedure described in Tech Bullion #037, “Measuring Backlash”.
Page 52 of 80

Fanuc Retrofits
A Basic Introduction to Tuning and PID
AC/DC uses a PID loop to control motor movement. PID stands for Proportional, Integral, and Derivative. A PID
controller calculates an "error" value as the difference between a measured process variable (motor velocity) and a desired set
point (expected motor velocity). The controller attempts to minimize the error by adjusting the power to the motor. The PID
controller’s calculation algorithm involves three separate parameters: the proportional, the integral and derivative values, denoted
in the software as Kp, Ki, and Kd. Additionally, the motors inertia constant plays a large value in how the PID loop behaves.
The general idea of the tuning process is to minimize the Absolute Error (ErrAbs), which is measured in encoder counts.
The inertia of the motor varies from machine to machine, and the ideal PID values vary from motor to motor. To achieve optimal
performance out of your Fanuc motor, the inertia, position Kp, and position Kd values will have to be manually adjusted. Under
most circumstances, the position Ki values usually do not need any adjustment. The current feedback Kp, Ki, and Kd (different
from the position feedback Kp, Ki and Kd) should be left alone unless otherwise instructed.
Altering the PID values incorrectly could cause DRAMATIC changes in the way the servo system operates, leading to
possible machine damage. Be cautious when adjusting the PID values, and be prepared to hit the E-stop as the motor may
become unstable or move unpredictably if adjusted incorrectly.
Finally, PID tuning is not a black and white process. What is “good enough” of a value will depend on your accuracy
needs and the capabilities of your system. Some experimentation is always required to find the ideal settings.
Page 53 of 80

Fanuc Retrofits
Tuning Software Setup
Tuning should be done last once everything else is set up and the motor is connected to the machine. Before tuning,
configure the software (and align the encoder if necessary) as discussed in the earlier sections of this manual.
First, home the motor. Go to the PID configuration menu by pressing F1 - Setup, F3 - Config, F4 – PID, and then F1 –
PID Config from the main menu (as shown below). Press F1-Edit Program to bring up PID_Collection_Moves.txt in the default
.txt editor. Edit the G-code so that the motor axis matches the axis of the motor to be tuned. For example, changing the line “G1
w0.0” to “G1 x0.0” will change the program to modify the X-axis instead of the W-axis. Now you should be looking at the PID
configuration menu.
The colors of the text on the top left match the colors of the graphs on the right. For example, if you have a V abs value
written in blue in the top left, the graph for V abs will be displayed on blue in the top right. For the rest of the tuning procedure
when referring to motor velocity, we are referring to the V Abs value and the corresponding graph. When referring to position
error, we are referring to the Err Abs value and the corresponding graph
The graph can be manipulated with a mouse by clicking, dragging, and scrolling. The graph can be manipulated with the
keyboard by using the F3, F4, F5, F6, and F7 keys. This menu and these settings are covered in more detail in the CNC11
manual. Pressing F8 – Change Axis will toggle the axis being graphed and will change the error information displayed in the top
left of the screen. If necessary, press F8 until the selected axis matches the motor to be tuned.
Press F2-Run Program to start the tuning process. The motor should run in a continuous loop and not stop until
manually stopped the motor or the values are adjust with the keyboard. If “finished running program” is immediately displayed,
an error was encountered. Go back to the main menu, and check the message window for errors. Advanced AC/DC users can
troubleshoot drive errors through the HSC bit screen definitions as described in the AC/DC manual.
Note: When viewing the live tuning scope (graphs) be mindful of the scale. You can adjust the scale of the graphic. The
encoder counts and the overall turns ratio of the machine will determine the counts per inch. Adjust the scale of the graph to a
resonable encoder count amount for the given encoder counts per inch of that axis. In other words on a high count per inch
system you may have errors as high as 100 counts, but 100 counts would only be representing .00005” on the machine.
Page 54 of 80

Fanuc Retrofits
Acceleration Tuning
Accel is the time for the axis to reach maximum velocity. An accel rate of 0.1 second is very fast, where an accel rate of
1.0 will be considered very slow.
Record the acceleration rate suggested by the software when the maximum feed rate was saved in the jog parameters
menu. Entered this acceleration rate into the position PID menu (Press F1 - Setup, F3 - Config, F4 – PID, and then F1 – PID
Config.) The rate provided is not the ideal acceleration rate, but a baseline number.
Press F1-Edit Program; adjust PID_Collection_Moves.txt so that it runs at the maximum feed rate. Save changes.
Press F2-Run Program. Slowly decrease the acceleration time in 0.05 increments, testing the value in-between each change. If
you see any of the following symptoms the acceleration rate is too fast and needs to be slowed down:
• The acceleration rate is causing shock or vibration as the machine moves.
• The machine movement becomes bumpy, rough, or jerky.
• The machine creates unusual or loud noises such as thunks or rapping noises.
• The software is giving errors such as position errors.
Page 55 of 80

Fanuc Retrofits
Inertia Tuning
For Inertia, Kp, Ki, and Kd tuning adjust the feed rate in PID_Collection_Moves.txt to the average rate during a typical
machine operation.
The parameters in this menu, with the exception of inertia, do not change based on machine type, and can therefore be
set once from the provided charts. Inertia is set to the motor inertia as a starting point. Once the motor is mounted to a machine,
the inertia value will need to be increased to compensate for the additional inertia of the mechanical drive components.
Inertia is adjusted in the drive configuration menu. From the PID configuration menu press F10 – Save and exit, F8 –
Drive, and then F1 – PID. Throughout the tuning process make changes in the Drive configuration menu, and then go back to the
PID configuration menu and run the collection moves program to see how those changes affect the graph. Repeat this process
until results are acceptable.
The following plots demonstrate the effect of the inertia setting. The dark blue line is the motor velocity (V abs) and the
red line is position error (Err Abs). In the first example, inertia is set to the motor inertia, but a load has been added, so the setting
is too low. The error plot shows that the motor is behind the expected position on acceleration. In the second example, the inertia
value has been increased too much. The motor moves ahead of its expected position during acceleration. In the third example,
inertia has been set to a reasonably accurate value. The motor follows closely at the beginning of the move.
It is best practice to focus on the error around the rising edge of the motor velocity graph. Start adjusting the inertia in
increments of 0.05 at a time, later switching to smaller increments as you approach your final value. Your graph will look slightly
different than the graphs displayed below due to factors such as motor velocity, encoder count, other PID values being off, etc.
The final inertia value should fall in the range of 0.5 to 0.005.
Low Inertia
High Inertia
Inertia Set Correctly
Page 56 of 80

Fanuc Retrofits
KP Tuning
The PID Config menu (F1 - Setup, F3 - Config, F4 – PID, then F1 – PID Config) is used to tune the remainder of the
motor control parameters. To adjust either type in a new value, or use the “Page Up” and “Page Down” keys of your keyboard to
increment or decrement the existing value. Increase Kp until some oscillation is heard or seen on the PID tuning graph. Reduce
the setting below the oscillation point to give some headroom for stability.
The following examples show the effect of Kp. The dark blue line is the motor velocity (V abs) and the red line is position
error (Err Abs). In the first example, Kp is set too low. Large error peaks show where the motor is not following the requested
path. Increasing Kp leads to the second example, where error is low throughout the move. However, there is an increasing
oscillation in the error plot, indicating that the motor will soon become unstable. The third example demonstrates a Kp reduction
to improve stability. The error plot has nearly minimal error achieved during tuning and does not have signs of instability.
Start adjusting the Kp in increments of 1.0 at a time, later switching to smaller increments as you approach your final
value. Your graph will look slightly different than the graphs displayed below due to factors such as motor velocity, encoder count,
motor performance, etc. The final Kp value should fall in the range of 1 to 12.
Low KP High KP
(Unstable)
Kp Set Correctly
Page 57 of 80

Fanuc Retrofits
KD Tuning
After Kp has been adjusted, continue to tuning Kd. The Kd term adds stability to the effects of Kp. If Kp or Kd have been
adjusted far from the default values, a second iteration of the tuning procedure is recommended. Because the two terms are
dependent on each other, a better Kd setting may allow Kp to be adjusted for higher performance.
Incorrect Kd settings create oscillations. A low Kd setting creates low frequency oscillations. As Kd is increased, a high
frequency oscillation will become noticeable. Often the high frequency oscillation will be audible before it is noticeable on the error
plot. The example shows an extreme case of oscillation due to Kd set too high. When Kd is set properly, it will dampen the Kp
contribution, giving a smooth error plot.
Start adjusting the Kd in increments of 1.0 at a time, later switching to smaller increments as you approach your final
value. Your graph will look different slightly than the graphs displayed below due to factors such as motor velocity, encoder count,
motor performance, etc. The final Kd value should fall in the range of 1 to 15.
High KD
(Unstable)
KD Set to Low
Low KD
KD Set Correctly
Page 58 of 80

Fanuc Retrofits
Other Misc Tuning Information
Kg, Kv, and Ka in the PID position menu are not used and do not need adjusted. Ki does not need to be adjusted under
most circumstances. After tuning the other values of the PID loop, experimentation with Ki values may sometimes help to reduce
error. Adjust Ki in increments of 0.005, with the final value falling in the range of 0.005 to 0.05.
Performing a System Test
When finished, the main menu will display a message saying “Machine Setup Not Completed. Machine Is Not Ready To Run.
Contact Your Dealer” as shown below. At this point you will need to run the System Test to clear this message. Documentation
on how to perform a system test is located on the Ajax website.
Machine Requiring a System Test
You are done retrofitting your Fanuc motor!
Save all your tuning settings. It is best practice make a “back up” of your CNC11 settings by generating a report as described in
the CNC11 manual.
Page 59 of 80

Fanuc Retrofits
Appendix A – Hole Location Templates and Drawings
If printed correctly, the labels should measure 100mm long by 62mm tall.
To be used with retrofit assembly# 12903
To be used with retrofit assembly# 12896
Page 60 of 80

Fanuc Retrofits

Fanuc Retrofits
L
S ub . A s s y .: 12 9 1 2
F
RED TO DB15HD 12 (+5V)
3
BLU/WHT TO ENC. L
BLU TO ENC. E
BLK TO DB15HD 11 (COM)
DRAIN TO ENC. T
G
PN 4 39 5
GRN TO DB15HD 2 (B)
BLK/WHT TO DB15HD 13 (/U)
PN 2 79 1
L e n gt h a s r eq u es te d
P
CO NTA CTS : PN 4 3 9 4
7
HEA T S H R INK TU B IN G PN
1 9 7 0 O N S H IEL D W IR E
GRN/WHT TO DB15HD 9 (U)
D W G N O : S 1 33 69
T
S
RED TO ENC. N
1 4
B
A CDC e nc od e r c ab le f or A C m o to r s o r Fa n uc DC mo t o r s
w it h Ce n tr o id e n c o de r u p g r a de .
WHT TO DB15HD 10 (W)
CA BL E: 2 4 G A 1 5 CO N D S H IEL D ED
RED/BLK TO DB15HD 14 (/V)
GRN/BLK TO ENC. C
1 5
5
sv n://sof tware/hardware/Cables/FANUC_CABLES.DSN
AC/DC Standard Encoder Cable
A
1 1
M o nd a y, S e p te m b e r 3 0 , 2 0 1 3
1 3 0 9 1 2
M RR
Title
Size Rev ision
Date: Sheet of
Filename:
Auth:
ORG/BLK TO DB15HD 8 (/Z)
A
C
9
ORG TO ENC. G
1 0
1 2
BLU/WHT TO DB15HD 4 (V)
SHIELD TO DB15HD CASE
4
GRN/WHT TO ENC. M
1 1
N
K
RED/BLK TO ENC. P
WHT/BLK TO ENC. D
H
D
BLU/BLK TO DB15HD 6 (/A)
2
BLK TO ENC. J
M
J
ORG/BLK TO ENC. H
GRN TO ENC. A
ORG TO DB15HD 3 (Z)
6
GRN/BLK TO DB15HD 7 (/B)
1
1 3
WHT TO ENC. B
DB 15 HD MA LE
En c od e r Co n n e c t o r
B a c k V ie w
BLU TO DB15HD 1 (A)
WHT/BLK TO DB15HD 15 (/W)
8
PN 4 20 7
E
BLK/WHT TO ENC. K
HO OD : PN 9 90
B a c k
V iew
R
BLU/BLK TO ENC. F
Appendix B – Wiring Diagrams and Pinouts
Page 62 of 80

B L K /G R N T O 8
BLK/GRN
RED T O J
A
B L K/RED TO T
Z
1 2
S ig na l
J
Pin
1 1
Z
S H IEL D T O H
E
B L K /B L U TO D
BLK/RED
3
Pin
BLU
T
1 4
7
G R N TO F
B
TEMP SW
H
1 3
/B
S
K
1 0
BLK/WH T
B L U T O A
G
RED
PN 1 2 11
3
RED
C
2
A
N
D
S t r ip Ca ble 3 / 4 "
6
+5V
G
D W G N O : S 1 3 3 5 7
G R N TO 3
BLK/BLU
T
RED
W HT T O 2
11
GRN
N
S u b . A s s y .: 12 89 3
B L K /W HT TO 7
12
WHT
L
1
Co lo r
K
P
DB 1 5HD F EMA LE
HO O D: PN 9 9 0
SIGNAL GROU ND
C
0 V
BLU1
A
S
L e ng t h a s R e q u e s te d
S tr ip Ca b le 3 / 4 "
/Z
B
BLK/RED
/A
GRN
B
F
RED TO 1 2
9
S ig n a l
0 V
+5V
+5VDC
B L K /W HT TO E
J
M
B L K /RED TO 1 1
B L K /B L U T O 6
BLK/BLU
TEMP SW
RED
RED T O K
E
L
4
B a c k V ie w
5
A
BLK/RED
2
W HT T O B
0 V
Fo r u s e w ith o rig in a l F a n uc y ello w o r b lac k c a p e n c od e r s . D o
n o t u s e if e n c od e r h a s b ee n u p g ra de d w ith Ce n tr o id e n c od e r .
Co lo r
8
PN 2 7 91
1 5
P
/B
CA BL E: 2 2 G A 4 PR S HIEL DED
BLK/RED
B L K/RED TO P
/A
L a be l: Fa n uc D C
/Z
7
H
6
SHIELD
R
PN 1 7 54
8
RED T O C
F
+5V
S H IEL D T O C A S E
En c o d er C o n ne c to r
B
M
B a c k V ie w
WHT
B L K /RED TO N
R
B L K /G R N T O G
BLK/WH T
B L U T O 1
D
sv n://s of tware/ hardware/Cables/ MOTOR_CABLES.DSN
Fanuc DC Encoder Cable
A
1 1
W e d ne sd a y, S e p te m b e r 0 4 , 2 0 1 3
1 3 0 8 3 0
M RR
Title
Size Rev ision
Date: Sheet of
Filename:
Auth:
BLK/GRN
Fanuc Retrofits
Page 63 of 80

GRN (B)
G R N
En c o de r PN ?
G
E
4 "
E
B
RED
CA B L E: 2 2 G A 4 PR S HIEL D ED
Q D 2 00 - 05 / 0 5 - 1 0 0 00 - 0 - 0 1- T8 - 0 1 -0 2
BLK/GRN
/ V
G
V
RED T O N
B L K / W HT
BLK/BLU
SHIELD
R
GRN
4 "
RED
5VN
L
0 V
W HT
PN 1 7 54
F
MS Color
YEL
B a ck
V ie w
/A
B L K/G R N T O H
G R Y TO T
Pin
A
R
B
L
W HT T O A
PN 8 6 5 Fe ma le Pin s
M
Signal
B
S
D
B L K/RED TO J
B L K / G R N
RED
H
A
J
B L K/W HT TO E
W
B L U
BLU
BLK/RED
En c od e r Co n n e c to r
S
WHT (A)
G R N TO G
C
2 2 G A G RY PN3 0 22
A
WHT
S u b . A s s y .: 12 89 0
U
Co v er w ith PN 1 97 0
He a ts hr in k T u b e
B L U TO B
Encoder
Color
B L K/B L U T O F
BRN
K
/ W
H
PN 2 5 8 6 Pin s
Re m o v e s hie ld a n d ja c k e t, u s e w ire s o nly
GRN
B L K / RED
BLK (COM)
CONNECTOR:
PN 5112
ORG
M
PN 8 5 9 Ho u s in g
D
BLK/WHT
N/C
PN 6 3 3 C- g r id H o us ing
BRN (/A)
P
SPARE
D W G N O : S 1 3 3 6 3
SHIELD
F
Z
/B
ORG (Z)
T
/U
P
J
RED (+5V)
C
T
WHT
BLU (/B)
B L K / B L U
Fill all connector
locations w ith pins
w hen using the crimp
style connector.
BLK
/Z
sv n://s of tware/ hardware/Cables/ FAN UC _CABLES.DSN
QD200 Wiring for Fanuc Black Cap with AC/DC
A
1 1
T hu rs d a y, S e p te m b e r 0 5 , 2 0 1 3
1 3 0 9 0 5
M RR
Title
Size Rev ision
Date: Sheet of
Filename:
Auth:
YEL (/Z)
N
BLU
K
Fanuc Retrofits
Page 64 of 80

Standard Centroid AC pigtail wiring w ith modified connector holes.
B
fa n uc _ c ab le s .d s n
QR12 Pigtail for Fanuc Gen. 1 and 2
A
1 1
T hu rs d a y, S e p te m b e r 0 5 , 2 0 1 3
1 3 0 9 0 5
M R R
Title
Size Rev ision
Date: Sheet of
Filename: Drawn By :
Fill all connector locations w ith pins w hen using the crimp
style connector.
T
En c od e r Pig t a il PN 7 4 81
WHT
BRN TO E
F
Color
H
TEMP SW
U
N
BLK TO J
WHT/RED TO L
RED TO N
K
BLU TO A
F
D
J
WHT/ORG TO D
WHT/YEL
YEL
GRY TO M
N
5V
L
M
S u b . A s s y. : 1 2 89 2
En c od e r Co nn ec to r
A
M
ORG TO G
/Z
BLU
TEMP SW
Z
E
J
WHT/RED
E
S
A
/ V
P
CONNECTOR:
PN 12885
WHT/ORG
/U
R
ORG
GRN
T
D
/ W
BRN
BLK
VIO TO K
V
Signal
WHT TO F
YEL TO H
R
C
B
A
WHT/BRN
SPARE
S
C
Pin
K
L
P
H
WHT/YEL TO B
B a c k
V iew
B
GRY
/A
D W G N O : S 13 36 0
/B
W
RED
G
WHT/BRN TO P
PN 12885 is PN 5112
w ith slotted screw
holes
GRN TO C
G
VIO
0 V
Fanuc Retrofits
Page 65 of 80

RED TO N
PN 2 5 86 Pin s
Signal
PN 8 5 9 H o u s in g
BLK/BLU
GRY
B L K/ B LU
B
G R Y TO T
R
C
D W G N O : S 144 2 8
K
MS Color
BRN
RED (+5V)
Z
VL
B L K/ B LU T O C
BLK/RED
W
BLU
G R N
CA B L E : 2 2 G A 4 PR S H IEL DED
P
R
S
J
Re m o ve s hie ld a n d ja c ke t , u s e w ir e s o nly
G R N T O G
B L K/ W HT
Fill all connector
locations w ith pins
w hen using the crimp
style connector.
K
SHIELD
J
BLK/GRN
B L K/ G RN
H
BLU (/B)
2 2 G A G R Y PN 3 02 2
5V
B L K/ R ED T O J
Encoder
Color
RED
PN 1 7 54
/B
WHT
B L U TO A
H
RED
ORG (Z)
B
P
U
En c o d er PN 7 5 46
En c o d e r C o nn ec to r
G
B L U
L
BLK
G
BLU
A
/U
B a ck
V ie w
ORG
T
A
Co v er w it h PN 1 9 7 0
He a ts h rin k Tu b e
GRN (B)
Q D 2 00 -0 5/ 0 5- 10 00 0- 0 - 01 -T 8 -0 1- 0 2
4 "
GRN
A
/ V
N
F
D
W HT TO E
F
M
PN 6 3 3 C - g rid H o u s in g
CONNECTOR:
PN 5112
BRN (/A)
E
BLK (COM)
0 V
S ub . A s s y. : 1 2 98 2
RED
/ W
B L K/ R ED
SPARE
B L K/ W HT T O F
SHIELD
B L K/ G RN TO H
S
B
/Z
PN 8 6 5 F e m a le Pin s
YEL
sv n:// sof tware/hardware/Cables/FANUC_CABLES.DSN
QD200 Wiring for Fanuc Yellow Cap with AC/DC
A
1 1
M o nd a y, M a rc h 1 7 , 2 0 1 4
1 4 0 3 1 7
M RR
Title
Size Rev ision
Date: Sheet of
Filename:
Auth:
Pin
E
W HT
WHT
SHIELD
D
GRN
T
BLK/WHT
M
C
N/C
4 "
YEL (/Z)
WHT (A)
N
/A
Fanuc Retrofits
Page 66 of 80

B
THREE (Label: V)
FIVE (Label: W)
S ub . A s s y .: ?
V
A
W
TWO to B
G
V
FOUR to D
B
G
THREE to C
FOUR (Label: V)
W
Centroid Connection
UA
EARTH
C
Mo to r c ab le f or Fa n u c Re d Ca p 3 0 R, A lp h a 2 2, A lph a
3 0 / 2 00 0 , A lph a 3 0 /3 00 0 , A lp h a 40
FIVE to D
SIX (Label: W)
Fanuc Connection
D
TWO (Label: U)
HEA TS HRINK PN 1 4 24
4 "
Motor Pow er
Connector
U
C ab le : A L P H A 65 40 7C Y o r A LP HA S F 6 1 2 2 1 C Y O R 0 0 5
W
V
HEA T S H RINK
TU B ING PN 2 7 2 0
O N DR A IN W IR E
GRN/YEL to G
Signal
L e n gt h a s r eq u es te d
U
CA BL E: 1 4 G A 7 CO N D S HIEL DED
DRAIN
C
PN ?
U
D W G N O : S 1 33 71
sv n: // sof tware/ hardware/ Cables/ FANU C_CABLES.DSN
Fanuc Extra Large AC Motor Cable
A
1 1
M o nd a y, S e p te m b e r 1 6 , 2 0 1 3
1 3 0 9 1 6
M R R
Title
Size Rev ision
Date: Sheet of
Filename:
Auth:
Us e t u bin g PN 5 5 30 to ma ke la b els
V
ONE (Label: U)
E
F
GRN/YEL
ONE to A
F
MS3102A24-10P
Y ello w C r imp S p ad e
PN 1 82 3
Pin
Chassis
D
AC/DC H1
E
SIX to E
W
Fanuc Retrofits
Page 67 of 80

U
GRN/YEL
D W G N O : S 133 62
L e n gt h a s r eq u e ste d
U
Us e t u bin g PN 5 5 30 to ma ke la b els
ACDC H1
TWO to B
A
V
ONE (Label: U)
A
C
V
CA BL E: 1 2 G A 4 CO N D S HIEL DED
C
Back View
ONE to A
GRN/YEL to D
MS3106E22-22S
HEA TS HRINK PN 1 4 24
HEA T S H R INK
TU B ING PN 2 7 2 0
O N DR A IN W IR E
Signal
D
W
D Chassis
Mo to r c ab le f or Fa n u c Re d Ca p 1 0 , 2 0, 2 0M, 3 0 , B e ta 2 2 is ,
A lph a 1 2 , A lp h a 2 2, A lp h a 3 0 / 1 20 0
B
Y ello w C r imp S p ad e
PN 1 82 3
sv n://s of tware/hardware/ Cables /F ANUC_CABLES.DSN
Fanuc Large AC Motor Cable
A
1 1
T hu r s d a y, S e p te m b e r 1 2 , 2 0 1 3
1 3 0 8 3 0
M RR
Title
Size Rev ision
Date: Sheet of
Filename:
Auth:
Pin
DRAIN
THREE to C
THREE (Label: W)
EARTH
Centroid Connection
PN 7 39 8
Motor Pow er
Connector
S ub . A s s y .: 12 89 4
Fanuc Connection
PN ?
4 "
W
B
TWO (Label: V)
Fanuc Retrofits
Page 68 of 80

DRAIN TO PIN P
GRN
M
F
CA BL E: 1 6 G A 4 CO N D S HIELDED1 " X 3 / 8 "
HEA T S HRINK
V
Fanuc Connection
BRAKE
Y ello w C r imp S p ad e
PN 1 82 3
V
WHT TO PIN F
K
BRAKE
-
MS3106E28-20S
D
GRN TO PIN D
FAN
H
RED TO PIN G
M
N
E
Centroid Connection
B a c k V ie w
-
1 /8 " HEA TS HRINK O N EX PO S ED
DR A IN W IR ES PN 2 7 20
K
+
L e n gt h a s R e q ue s t e d
P
B
W
PN ?
WHT
10M, 20M, 30M Motor Pow er Connector
FAN
BLK TO PIN C
N
S ub . A s s y .: 12 89 5
F
J
PN 1 42 6
D
sv n://s of tware/hardware/ Cables /F ANUC_CABLES.DSN
Fanuc Large DC Motor Cable
A
1 1
T hu r s d a y, S e p te m b e r 1 2 , 2 0 1 3
1 3 0 9 0 3
M RR
Title
Size Rev ision
Date: Sheet of
Filename:
Auth:
L
Chassis
A
BLK
Signal
DRAIN
G
P
+
Moto r c ab le f or Y e llo w Ca p 1 0M, 2 0 M, 3 0 M a nd B la ck C a p 1 0, 2 0 , 3 0 , 1 0 L ( no b r ake )
D W G N O : S 133 61
PN 1 43 2
Pin
EARTH
ACDC H1
G
C
W
RED
L
C
Fanuc Retrofits
Page 69 of 80

Fanuc Retrofits
A
HEA TS HR INK PN 1 4 24
TWO (Label: V)
sv n://s of tware/hardware/Cables /MOTOR_CABLES.DSN
AC/DC Medium Weight Motor Power Cable
A
1 1
T hu r s d a y, S e p te m b e r 1 2 , 2 0 1 3
1 3 0 9 1 2
M RR
Title
Size Rev ision
Date: Sheet of
Filename:
Auth:
L e n gt h a s r eq u es te d
Mo to r C o n ne c to r
CA BL E: 1 2 G A 4 CO N D S HIELDED
4 "
DRAIN
B a c k V ie w
PN 7 39 8
THREE
B
Mo to r c ab le f or Fa n u c R e d C a p 0 , 5 , B e ta 8 is , B e ta 1 2is , A lp h a 3 , A lph a 6 ,
Y ello w C a p 0M, 5 M, B la c k Ca p 0 , 5 , 0 L , 5 L , mo s t C e ntr o id A C mo to r s
Us e t u bin g PN 5 5 30 to ma ke la b els
Y ello w C r imp S p ad e
PN 1 82 3
S ub . A s s y .: ? DW G N O : S 13 3 7 0
ONE
THREE (Label: W)
ONE (Label: U)
D
GRN/YEL
PN 2 78 9
HEA T S H RINK
TU B ING PN 2 7 2 0
O N DR A IN W IR E
HEA T S H R INK TUB ING PN
2 7 2 0 O N S H IEL D W IR E
GRN/YEL
TWO
C
Page 70 of 80

K
W
+5V
11
W
L
B
P
E
Pin
T 11
V
S
G
10M, 20M, 30M Motor Power Connector
Chassis
MS3102A28-20P
D
12
MS3102A18-10P
E
Z
En c o d e r C o nn e c to r
-
M
+5V 12
Chassis
P
E
A
K
FAN
G
Fanuc Connection
D
+
H
0V
C
F
R
M
B
Centroid Connection
BRAKE
D
MS3102A20-29P
C
THERMAL SW
B
M
Pin
K
J
ACDC ENCODER (P1)
ACDC H1
EARTH
Signal
/B
THERMAL SW
D
B
N
+
C
SHIELD
-
Fanuc Connection
B
1
-
G
+5V
N
L
N/C
Fanuc Connection
Centroid Connection
A
2
Pin
A
0V
G
F
N/C
C
0M, 5M Motor Power Connector
S
6
A
D
F
Centroid Connection
H
V
K
7
ACDC H1
R
A
W
P
+
H
8
Signal
N
0V
EARTH
A
BRAKE
J
3
C
C
M
FAN
N
Signal
/A
11
N/C
J
L
F
D
L
P
12
B
T
/Z
V
U
V
A
W
G
U
Motor Power Connector
E
Signal
V
Pin
W
Fanuc Connection
A
B
Centroid Connection
G
B
W
0, 5, Beta 1, Beta 2, Beta 3, Beta 6, Beta 8is, Beta 12is, Alpha 3/3000, Alpha 6/2000, Alpha 6/3000,
Alpha M6/3000, Alpha M9/3000, Alpha L6/ 3000, Alpha L9/3000, Alpha C3/2000, Alpha C6/2000,
Alpha 3/ 3000HV, Alpha 6/3000HV, Alpha M6/3000HV, Alpha M9/3000HV
V
B U
Fanuc Connection
W
10, 20, 20M, 20S/2000, 30, Beta 22is, Alpha 12/2000, Alpha 12/3000, Alpha 22/1500,
Alpha 22/2000, Alpha30/1200, Alpha C12/2000, Alpha C22/1500, Alpha 12/3000HV,
Alpha 22/3000HV, Alpha 30/3000HV, Alpha M22/3000HV, Alpha M30/3000HV
D
Motor Power Connector
F
C
B
V
MS3102A24-10P
U
EARTH
MS3102A22-22P
Pin
Motor Power Connector
C
F
AC/DC H1
Signal
Fanuc Connection
EARTH
Centroid Connection
30R, Alpha 22/3000, Alpha 30/2000, Alpha 30/3000,
Alpha 40/2000
D
C
AC/DC H1
U
A
Pin
D
U
W
V
Chassis
D
V
Signal
A
A
U
W
W
W
MS3102A18-10P
B
AC/DC H1
C
Centroid Connection
EARTH
BC
Chassis
U
C
V
V
A
Chassis
D
E
D
Fanuc Retrofits
Red End Cap Connectors
Yellow End Cap Connectors
Page 71 of 80
F
A
J
N
+5V
F
C
+5V
L
V
Z
M
P
H
ACDC H1
M
C
-
C
BRAKE
A
A
N/C
G
G
D
N
BRAKE
T
0V
V
12
2
M
B
L
W
FAN
3
6
Pin
M
12
N
+
1
Chassis
FAN
L
11
+
Fanuc Connection
THERMAL SW
Fanuc Connection
C
0V
W
MS3102A20-29P
P
D
7
Signal
D
A
/A
F
S
J
-
B
H
MS3102A28-20P
Centroid Connection
K
V
S
B
K
D
SHIELD
+
W
En c od e r C o nn e c t o r
EARTH
/B
12
J
8
R
P
MS3102A18-10P
Pin
-
B
G
G
N/C
T
E
Chassis
D
B
+5V
11
H
/Z
E
10, 20, 30, 10L Motor Power Connector
Fanuc Connection
11
P
D
R
Centroid Connection
E
C
ACDC H1
Pin
A
C
EARTH
K
K
Centroid Connection
0V
Signal
B
ACDC ENCODER (P1)
A
0, 5, 0L, 5L Motor Power Connector
F
L
N/C
N
Signal
THERMAL SW
F
T
A
K
E
/Z
Signal
D
SPARE
L
B
A
Z
0 V
MS3102E20-29P
D
B
B
M
/ V
W
SHIELD
R
S
A
P
C
/U
V
En c o de r C o nn e c to r
C
M
G
U
PN 5112
L
J
SPARE
N
/B
G
T
R
Pin
K
H
P
N
J
F
S
E
/A
/ W
H
+5V
Fanuc Retrofits
Centroid Encoder Connector
Black End Cap Connectors
Page 72 of 80

Appendix C - Understanding Fanuc Motor Labels
Model Number
Fanuc Retrofits
Early Gettys/Fanuc Black Cap Motors
Model Number
Rotation Measurement
Technology
Type
Gettys/Fanuc Black Cap Motors
Rotation Measurement
Model Number
Technology
Type
Model Number
Page 73 of 80
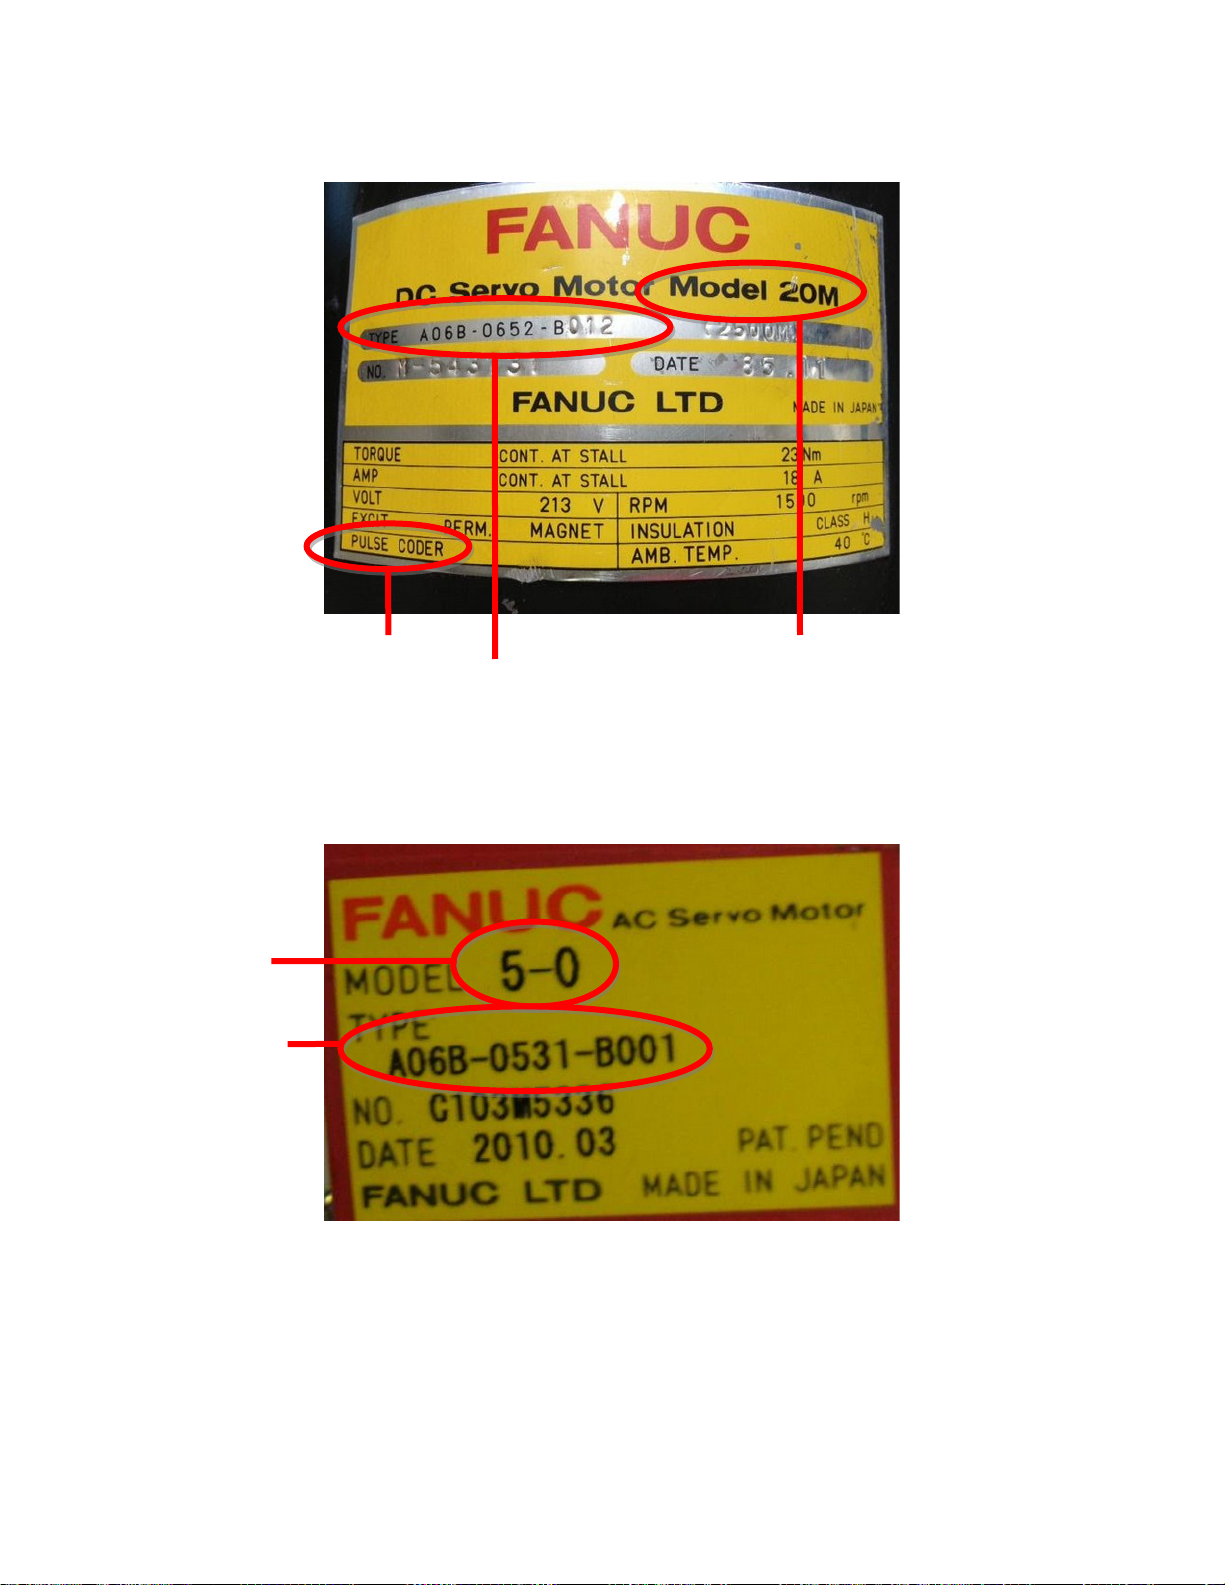
Fanuc Retrofits
Fanuc Yellow Cap Motors
Model
Type
Rotation
Measurement
Technology
Model Number
Type
Fanuc Red Cap Motors
Page 74 of 80

Fanuc Retrofits
Fanuc S Series Red Cap Motors
Type TypeModel
Model
Type
Rotation
Measurement
Technology
Fanuc Alpha Series Red Cap Motors
Model
Rotation
Measurement
Technology
Page 75 of 80

Model
Type
Fanuc Retrofits
Fanuc Beta Series Red Cap Motors
Page 76 of 80

Fanuc Retrofits
Fanuc 6055/6044 Spindle Drive Inverters
Supported, Analog input (Tags on Bottom)
Tag Containing
Drive Type
Fanuc 6059 Spindle Drive Inverter
Supported, Analog input
Page 77 of 80

Fanuc Retrofits
Fanuc 6064 Spindle Drive Inverter
(Not Supported)
Fanuc Alpha Series Spindle Drive Inverter
(Not Supported)
Page 78 of 80

Fanuc Retrofits
Appendix D
Fanuc Servo Motor Torque, HP, and Wattage
on DC Motors
[1]
End Cap Color
Black
( Fanuc ● Gettys )
Yellow
(M Series)
Drive
Model
00 A06B-0631-Bxxx 2,000 8.7 18.2 0.2 0.15
0 A06B-0613-Bxxx 2,000 25.4 50.8 0.5 0.4
5 A06B-0614-Bxx 2,000 50.8 101.5 1 0.8
10 A06B-0601-Bxxx 1,500 113.3 226.6 2 1.1
20 A06B-0602-Bxxx 1,500 222.6 404.6 2.5 1.8
00 A06B-0632-Bxxx 2,000 8.8 17.6 0.2 0.15
0M A06B-0641-Bxxx 2,000 26.9 56.0 0.5 0.4
5M A06B-0642-Bxxx 2,000 52.2 104.4 1 0.8
10M A06B-0651-B012 1,500 106.2 212.4 1.5 1.1
20M A06B-0652-Bxxx 1,500 203.1 406.2 2.5 1.8
30M A06B-0653-Bxxx 1,200 333.3 666.6 4 2.8
Drive Type Max RPM
Continuous
Torque
(in lb)
Peak
Torque
(in lb)
Mechanical
Horsepower
(Imperial)
1. The numbers in this chart are calculated from the Fanuc motor data sheets. Centroid has not verified these numbers.
Power
(kW)
Page 79 of 80

Fanuc Retrofits
Fanuc Servo Motor Torque, HP, and Wattage
on AC Motors
[1]
Series Model Type Max RPM
0-0SP A06B-0374-Bxxx 3,000 26.2 72.2 0.67 0.5
0S A06B-0313-Bxxx 3,000 26.1 68.0 1.0 0.75
5S A06B-0314-Bxxx 2,000 51.8 134.1 1.2 0.9
5S/3000 A06B-0514-Bxxx 3,000 51.5 151.3 1.3 1.0
6S A06B-0316-Bxxx 2,000 78.2 220.8 1.26
6S/3000 A06B-0320-Bxxx 3,000 78.2 221.3 1.70
S series
&
Early
Red Caps
α (Alpha) Series
&
αC Series
[3]
β (Beta) Series
&
βis Series
10S A06B-0315-Bxxx 2,000 103.6 286.2 2.4 1.8
10S/3000 A06B-0317-Bxxx 3,000 104.3 306.7 3.1 2.3
20S/1500
20M
20S
20
20S/3000 A06B-0318-Bxxx 3,000 200.9 366.4 4.7 3.5
30S A06B-0590-Bxxx 1,200 330.0 951.9 4.4 3.3
30/2000
30R
30S/3000 A06B-0319-Bxxx 3,000 261.8 456.7 6.0 4.4
40 A06B-0581-Bxxx 1,200 494.5 966.5 4.8 3.6
0 A06B-0511-Bxxx 2,000 25.8 78.4 0.79 0.6
5 A06B-0512-Bxxx 2,000 51.9 160.4 1.2 0.9
10 A06B-0501-Bxxx 2,000 105.0 315.1 2.4 1.8
30 A06B-0503-Bxxx 1,200 324.6 885.3 4.4 3.3
α3/3000 A06B-0123-Bxxx 3,000 26.5 69.0 1.3 0.9
α6/2000 A06B-0127-Bxxx 2,000 53.5 160.6 1.4 1.0
α6/3000 A06B-0128-Bxxx 4,000 53.1 159.3 1.9 1.4
α12/2000 A06B-0142-Bxxx 2,000 105.9 317.8 2.8 2.1
α12/3000 A06B-0143-Bxxx 3,000 105.6 306.7 3.8 2.8
α22/1500 A06B-0146-Bxxx 1,500 194.7 579.5 4.0 3.0
α22/2000 A06B-0147-Bxxx 2,000 193.6 559.2 5.0 3.8
α22/3000 A06B-0148-Bxxx 3,000 193.2 361.1 5.9 4.4
α30/1200 A06B-0151-Bxxx 1,200 264.3 792.9 4.4 3.3
α30/2000 A06B-0152-Bxxx 2,000 264.6 785.9 6.7 4.5
α30/3000 A06B-0153-Bxxx 3,000 265.5 472.6 7.1 4.8
α40/2000 A06B-0157-Bxxx (without fan) 2,000 334.6 743.5 7.8 5.9
αC12/2000 A06B-0141-Bxxx 2,000 106.5 325.0 1.4 1
αC22/1500 A06B-0145-Bxxx 1,500 194.7 579.5 2.1 1.5
β3/3000 A06B-0033-Bxxx 3,000 26.3 74.3 0.67 0.5
β6/2000 A06B-0034-Bxxx 3,000 52.0 139.4 1.2 0.9
β4/4000is A06B-0063-Bxxx 4,000 31.2 79.7 1 0.75
β8/3000is A06B-0075-Bxxx 3,000 61.6 184.8 1.6 1.2
β12/3000is A06B-0078-Bxxx 3,000 97.5 286.8 2.4 1.8
β22/2000is A06B-0085-Bxxx 2,000 177.0 470.0 3.4 2.5
A06B-0505-Bxxx 1,500 198.9 582.0 3.8 2.8
A06B-0502-Bxxx 2,000 198.8 605.4 4.7 3.5
A06B-0506-Bxxx 2,000 260.7 547.0 5.4 4.0
Continuous
Torque
(in lb)
Peak
Torque
(in lb)
Mechanical
Horsepower
(Imperial)
[2]
[2]
Power
(kW)
[2]
0.94
[2]
1.27
1. The numbers in this chart are calculated from the Fanuc motor data sheets. Centroid has not verified these numbers.
2. Data sheet information on Hp and Kw power could not be found; instead these numbers are calculated from torque
specifications.
3. Most Fanuc documentation lists the αC Series as a member of the α Series, while some Fanuc documentation lists the αC
Series as a member of the β series.
Page 80 of 80
 Loading...