


Ajax CNC
CENTROID CNC11 v3.06 Windows 7 Installation Guide
Last Revised 2012-04-05 (358)
//Ajax drive/Ajax Cd/Centroid Software/Ajax Centroid CNC 3.06 Windows 7 Install Guide Rev5.PDF

//Ajax drive/Ajax Cd/Centroid Software/Ajax Centroid CNC 3.06 Windows 7 Install Guide Rev5.PDF

Table of Contents
1. Introduction
2. Windows 7 Settings Setup
3. Centroid CNC11 v3.06 Installation
4. Solid State Hard-drive Specific Settings
//Ajax drive/Ajax Cd/Centroid Software/Ajax Centroid CNC 3.06 Windows 7 Install Guide Rev5.PDF

1. Introduction:
This manual will guide you through the process of installing CENTROID CNC11 v3.06 on a Windows 7
equipped computer. It includes all settings that must be configured prior to and after the installation of
the Centroid Software. It is very important that you do not skip over steps. Missing a step can lead to
problems in running the software correctly.
This installation guide is designed to be as simple as possible. It does however assume some basic
knowledge about the Windows 7 operating system. If you need additional help please take a look at
our support forum www.ajaxcnc.com/ajaxbb or email tech support at tech@ajaxcnc.com. Fee based
phone support is also available. Please see our website at www.ajaxcnc.com for details.
//Ajax drive/Ajax Cd/Centroid Software/Ajax Centroid CNC 3.06 Windows 7 Install Guide Rev5.PDF
2. Windows 7 Settings Setup
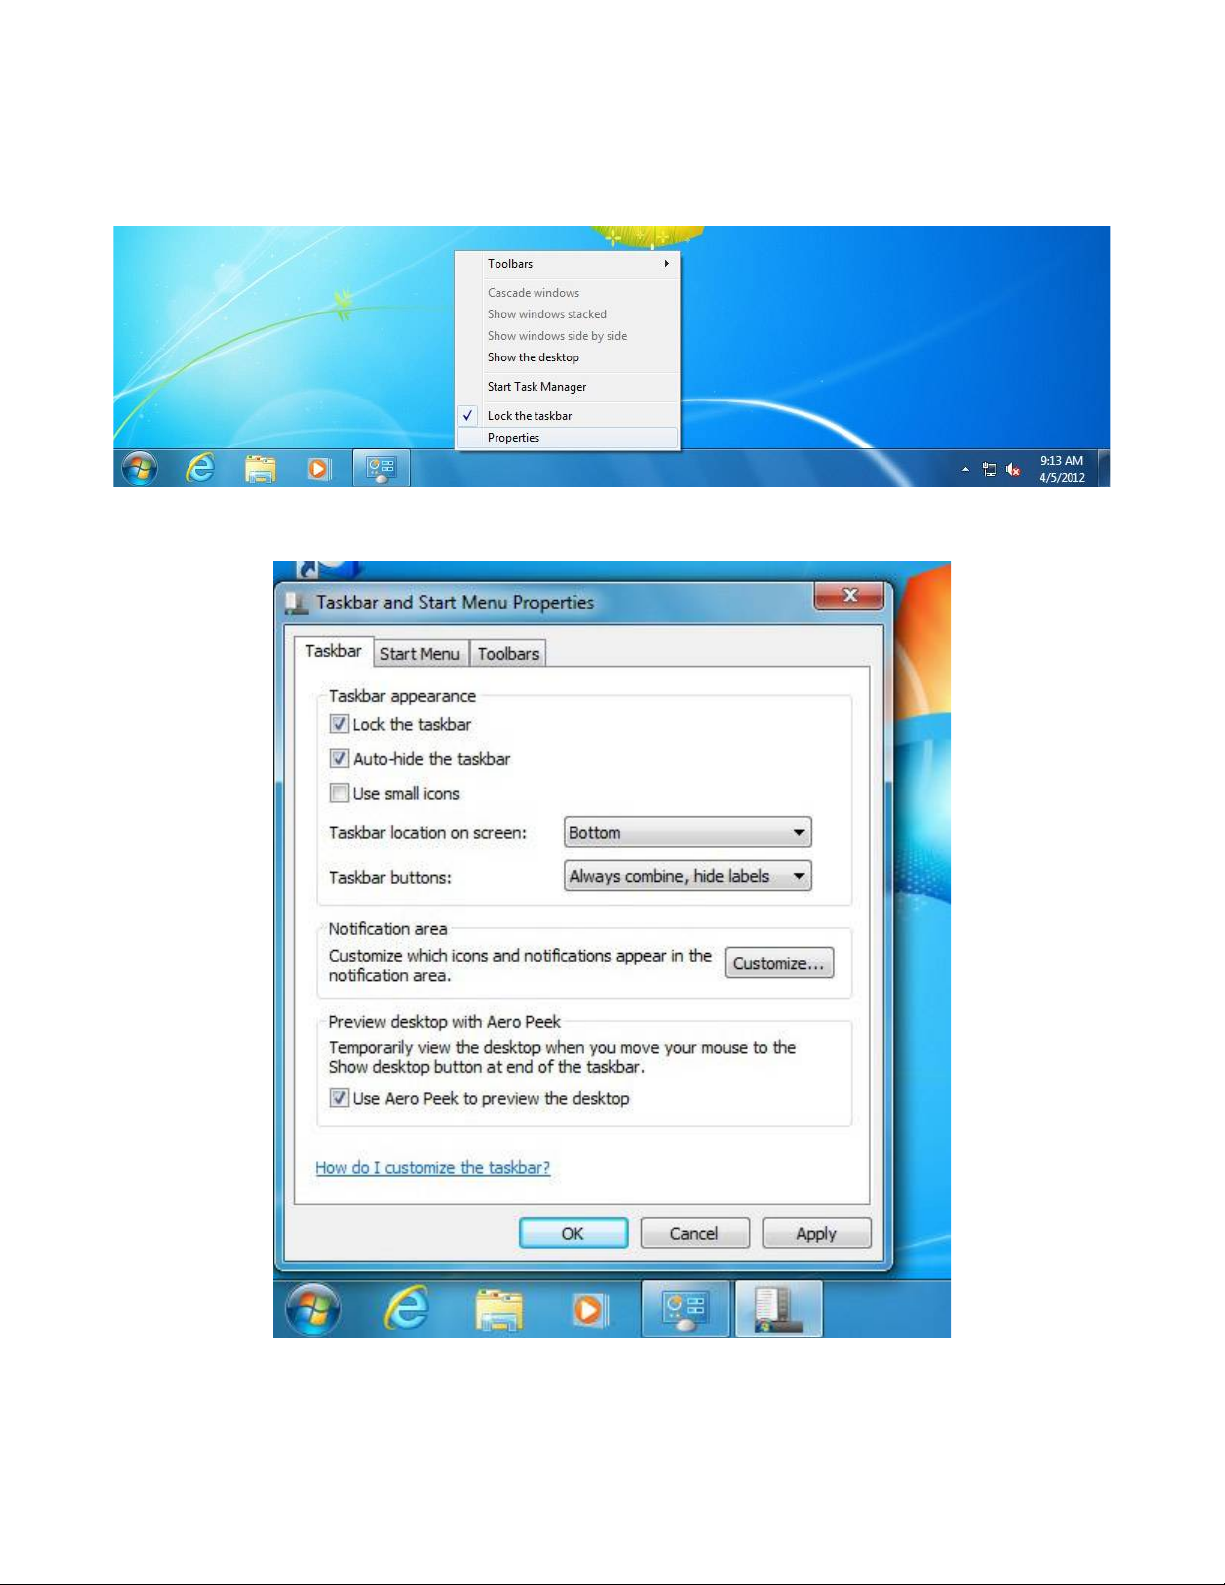
2.1) Using the mouse, right click on the task bar, which is located on the bottom of the screen, and
select “Properties”.
Check the “Auto Hide” option.
//Ajax drive/Ajax Cd/Centroid Software/Ajax Centroid CNC 3.06 Windows 7 Install Guide Rev5.PDF
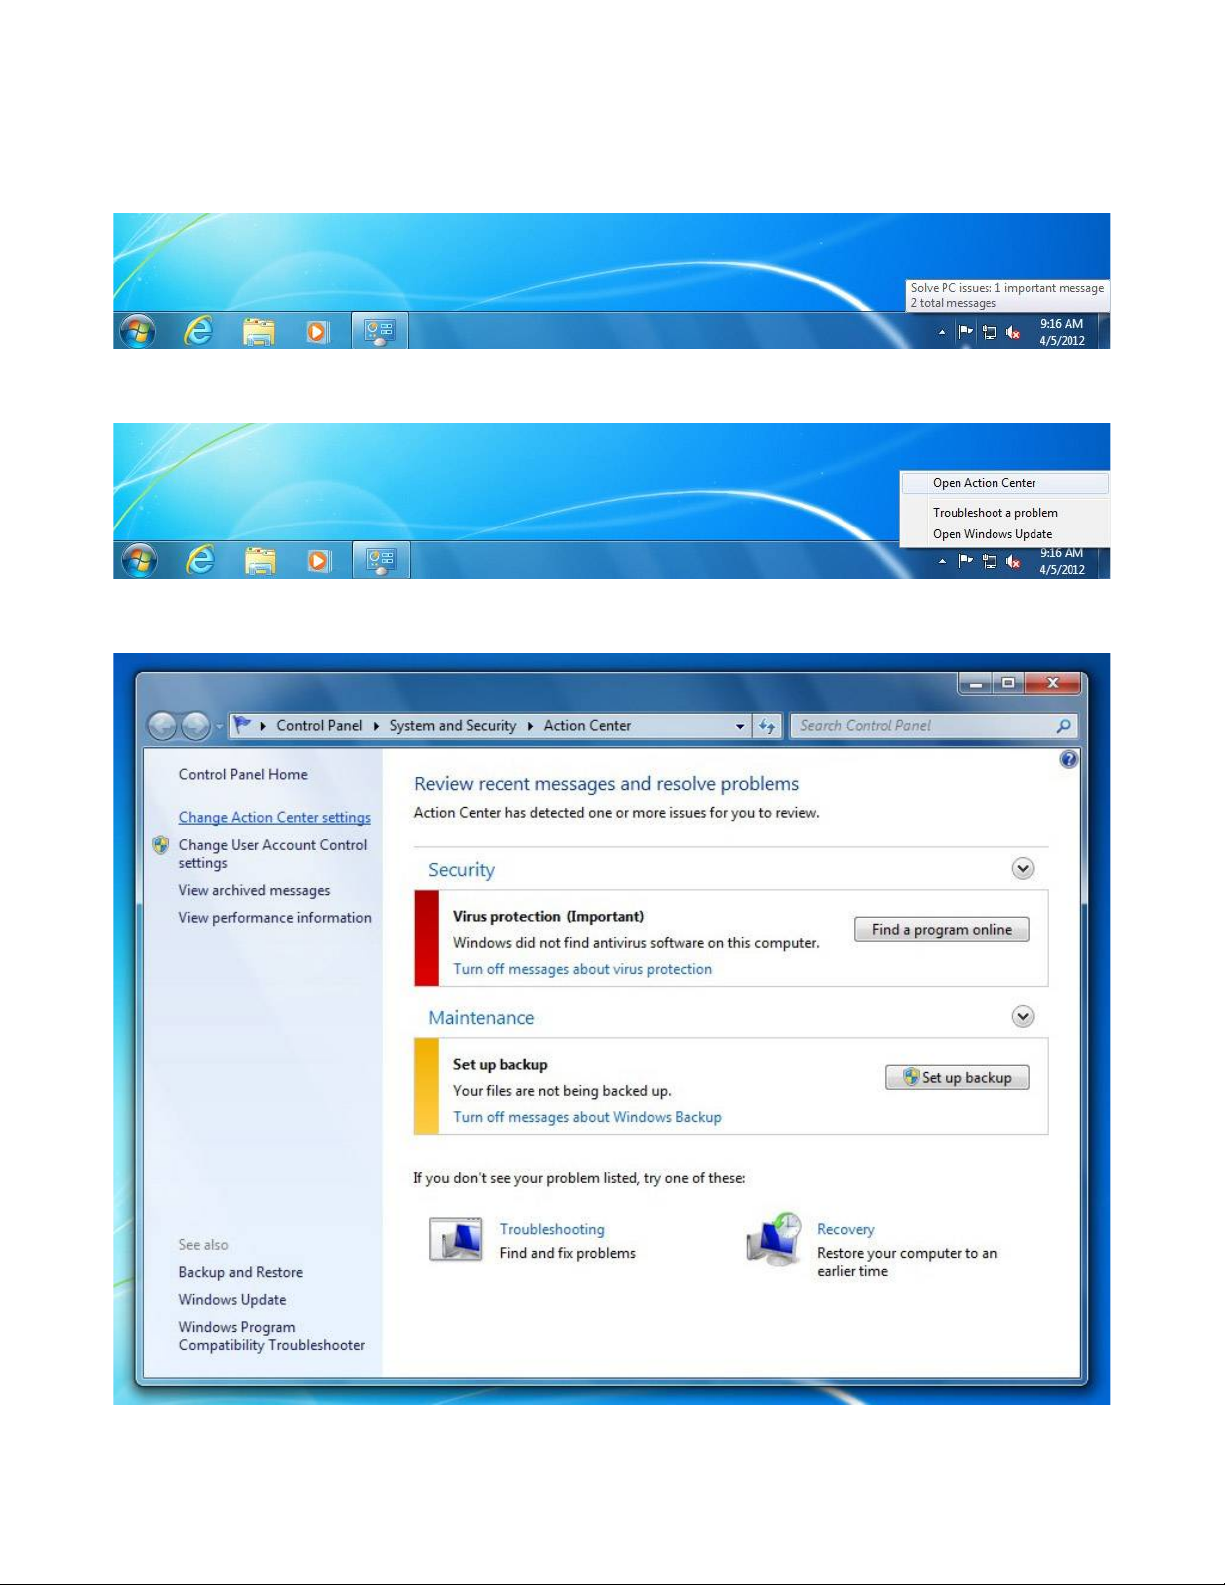
2.2) Right click on the “Action Center” icon, which is the green flag that is located on the right side on
the task bar.
Select “Open Action Center”.
Click on “Change Settings”.
//Ajax drive/Ajax Cd/Centroid Software/Ajax Centroid CNC 3.06 Windows 7 Install Guide Rev5.PDF
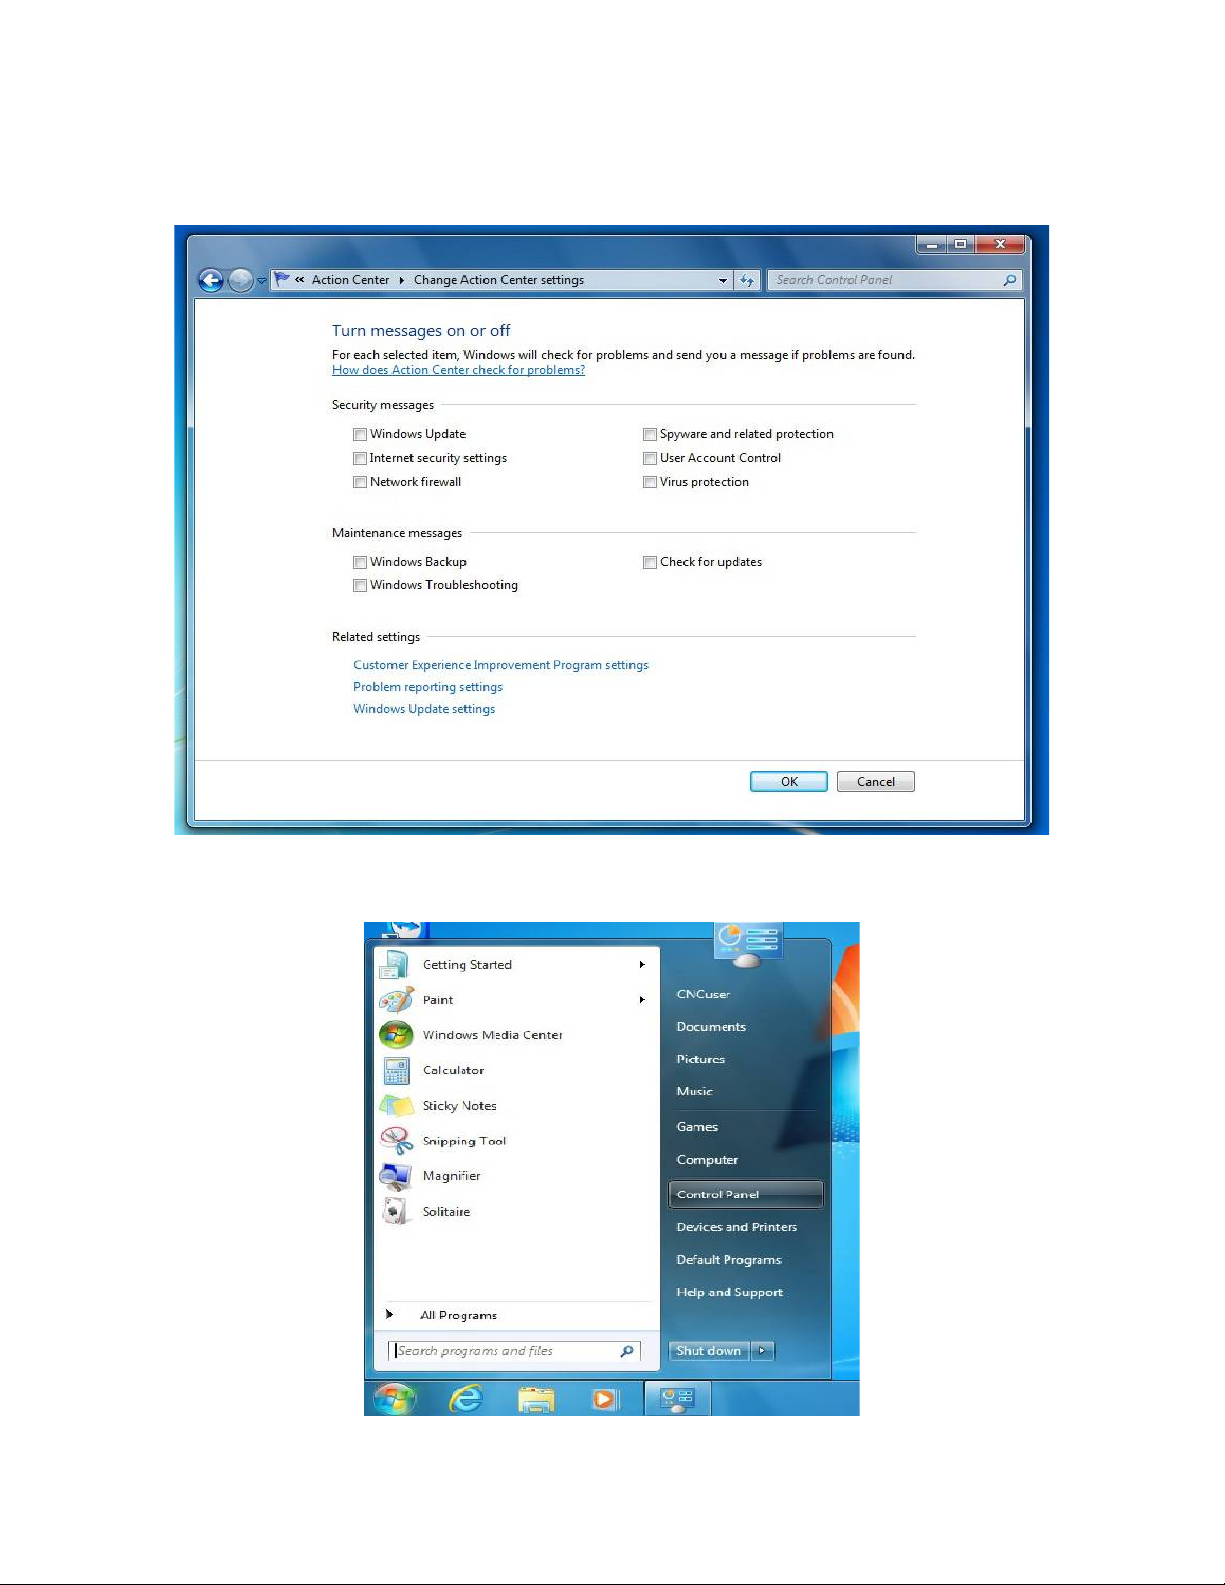
Make sure that all of the options have their respected boxes unchecked.
2.3) Click on the “Start” button and select “Control Panel”.
//Ajax drive/Ajax Cd/Centroid Software/Ajax Centroid CNC 3.06 Windows 7 Install Guide Rev5.PDF
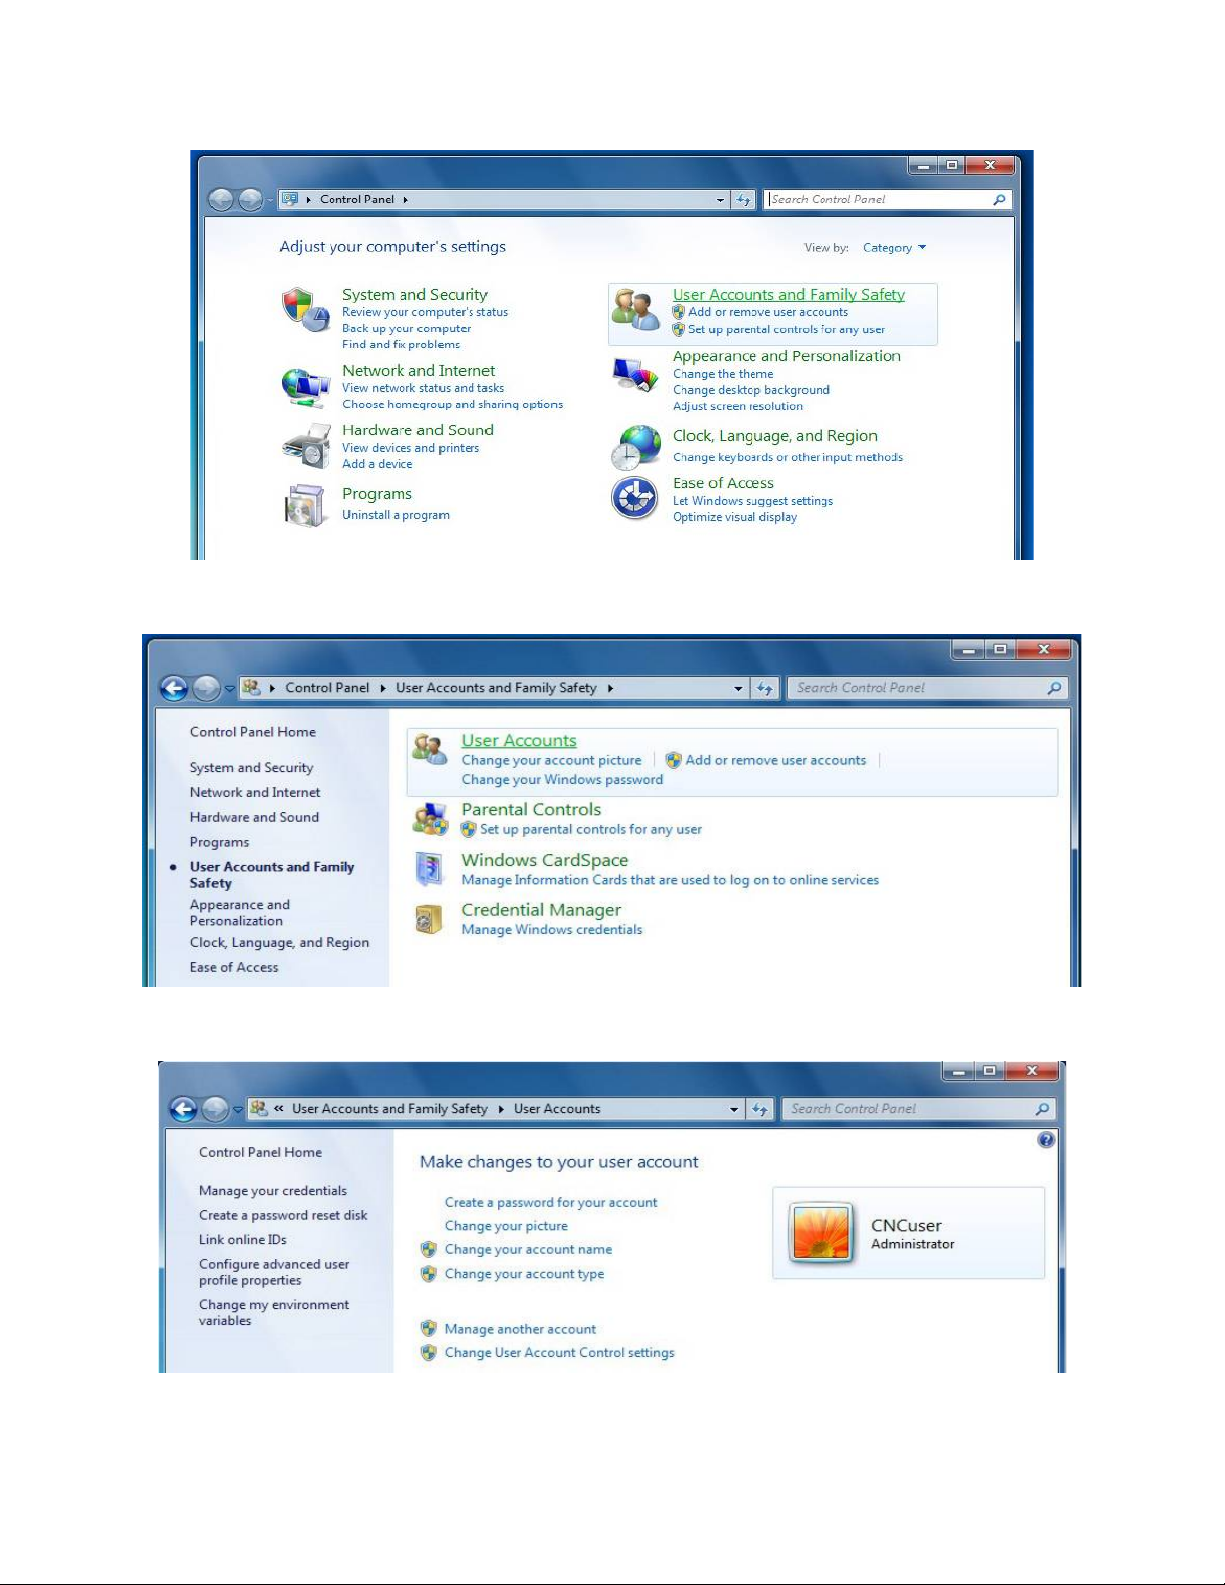
Select “User Accounts & Family Safety”.
Click on “User Accounts”
Create an administrative account with the name CNCuser.
//Ajax drive/Ajax Cd/Centroid Software/Ajax Centroid CNC 3.06 Windows 7 Install Guide Rev5.PDF

Select “Change User Account” and lower the slider bar to “Never Notify”.
2.4) Go back to “Control Panel” and select “System & Security”.
//Ajax drive/Ajax Cd/Centroid Software/Ajax Centroid CNC 3.06 Windows 7 Install Guide Rev5.PDF

Select “Windows Update”
Click on “Install Updates”.
//Ajax drive/Ajax Cd/Centroid Software/Ajax Centroid CNC 3.06 Windows 7 Install Guide Rev5.PDF
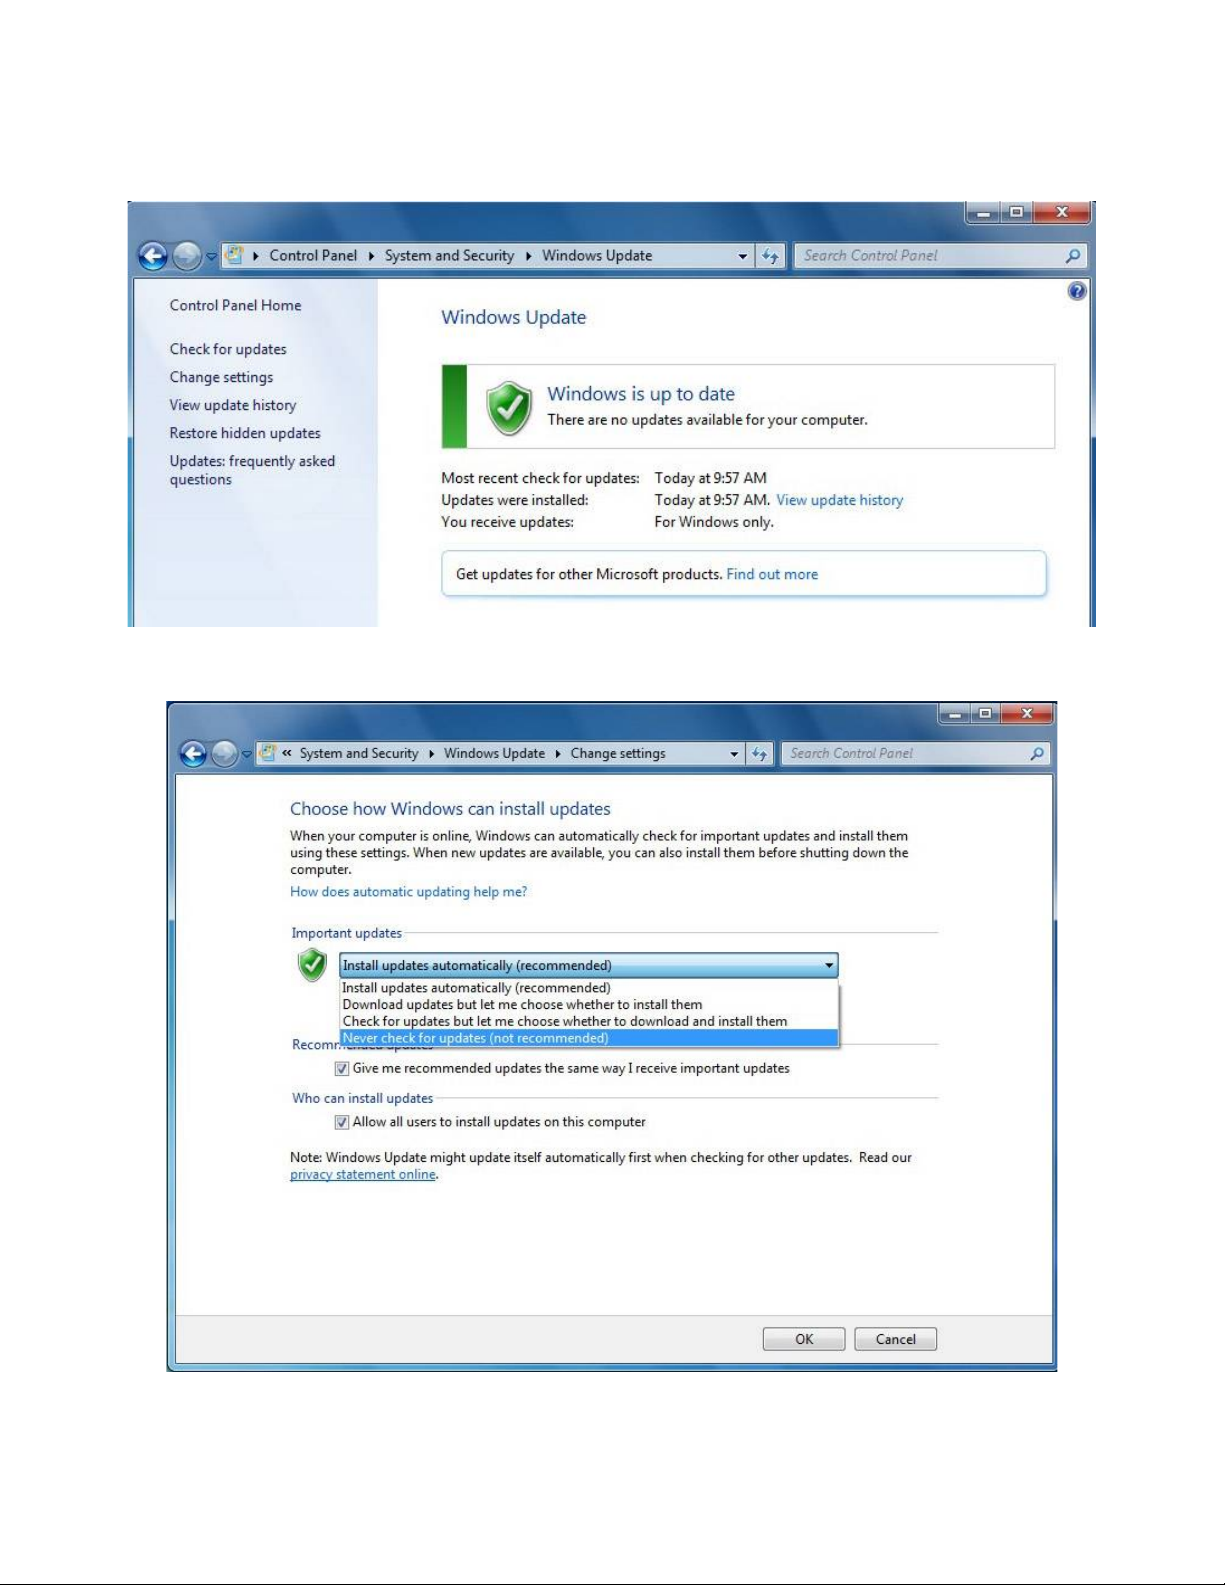
The computer may need to be restarted after the updates are done installing. Go back to the above
screen and keep clicking “Install Updates” until you see the screen below. Next click on “Change
Settings” on the left hand tab.
Select “Important Updates” and then select “Never Check for Updates”.
//Ajax drive/Ajax Cd/Centroid Software/Ajax Centroid CNC 3.06 Windows 7 Install Guide Rev5.PDF

2.5) Go back to “Control Panel”, "System and Securities".
Select “Power Options”.
//Ajax drive/Ajax Cd/Centroid Software/Ajax Centroid CNC 3.06 Windows 7 Install Guide Rev5.PDF

Click on the down tab next to “Show additional plan”.
Next select “High performance” then select “Change Plan Settings”.
Then select “Change Advanced Power Settings”.
You should now be at the Power Options screen.
//Ajax drive/Ajax Cd/Centroid Software/Ajax Centroid CNC 3.06 Windows 7 Install Guide Rev5.PDF

Make sure that the settings are as described below:
High Performance
- required password → NO
HDD
- Turn off HDD → Never
Desktop Background
- Slide Show → Available
Wireless Adapter Setting
- Power Saving mode → Maximum performance
Sleep
- Sleep after → Never
- Allow hybrid sleep → ON
- Hibernate after → Never
- Allow wake times → Enable
USB Settings
- USB selective suspend → Disable
Power Buttons
- Power button action → Shut down
- Sleep button → Sleep
PCI Express
- Link state power manage → OFF
Processor Power Management
- Minimum processor state → 100%
- System cooling policy → Active
- Maximum processor state → 100%
Display
- Turn off display after → Never
Multimedia Settings
- When sharing media → Prevent idling to sleep
- When playing video → Optimize video quality
2.6) Next the user password expiration needs turned off. Click the Windows icon, then type: cmd to
bring up the command prompt.
//Ajax drive/Ajax Cd/Centroid Software/Ajax Centroid CNC 3.06 Windows 7 Install Guide Rev5.PDF
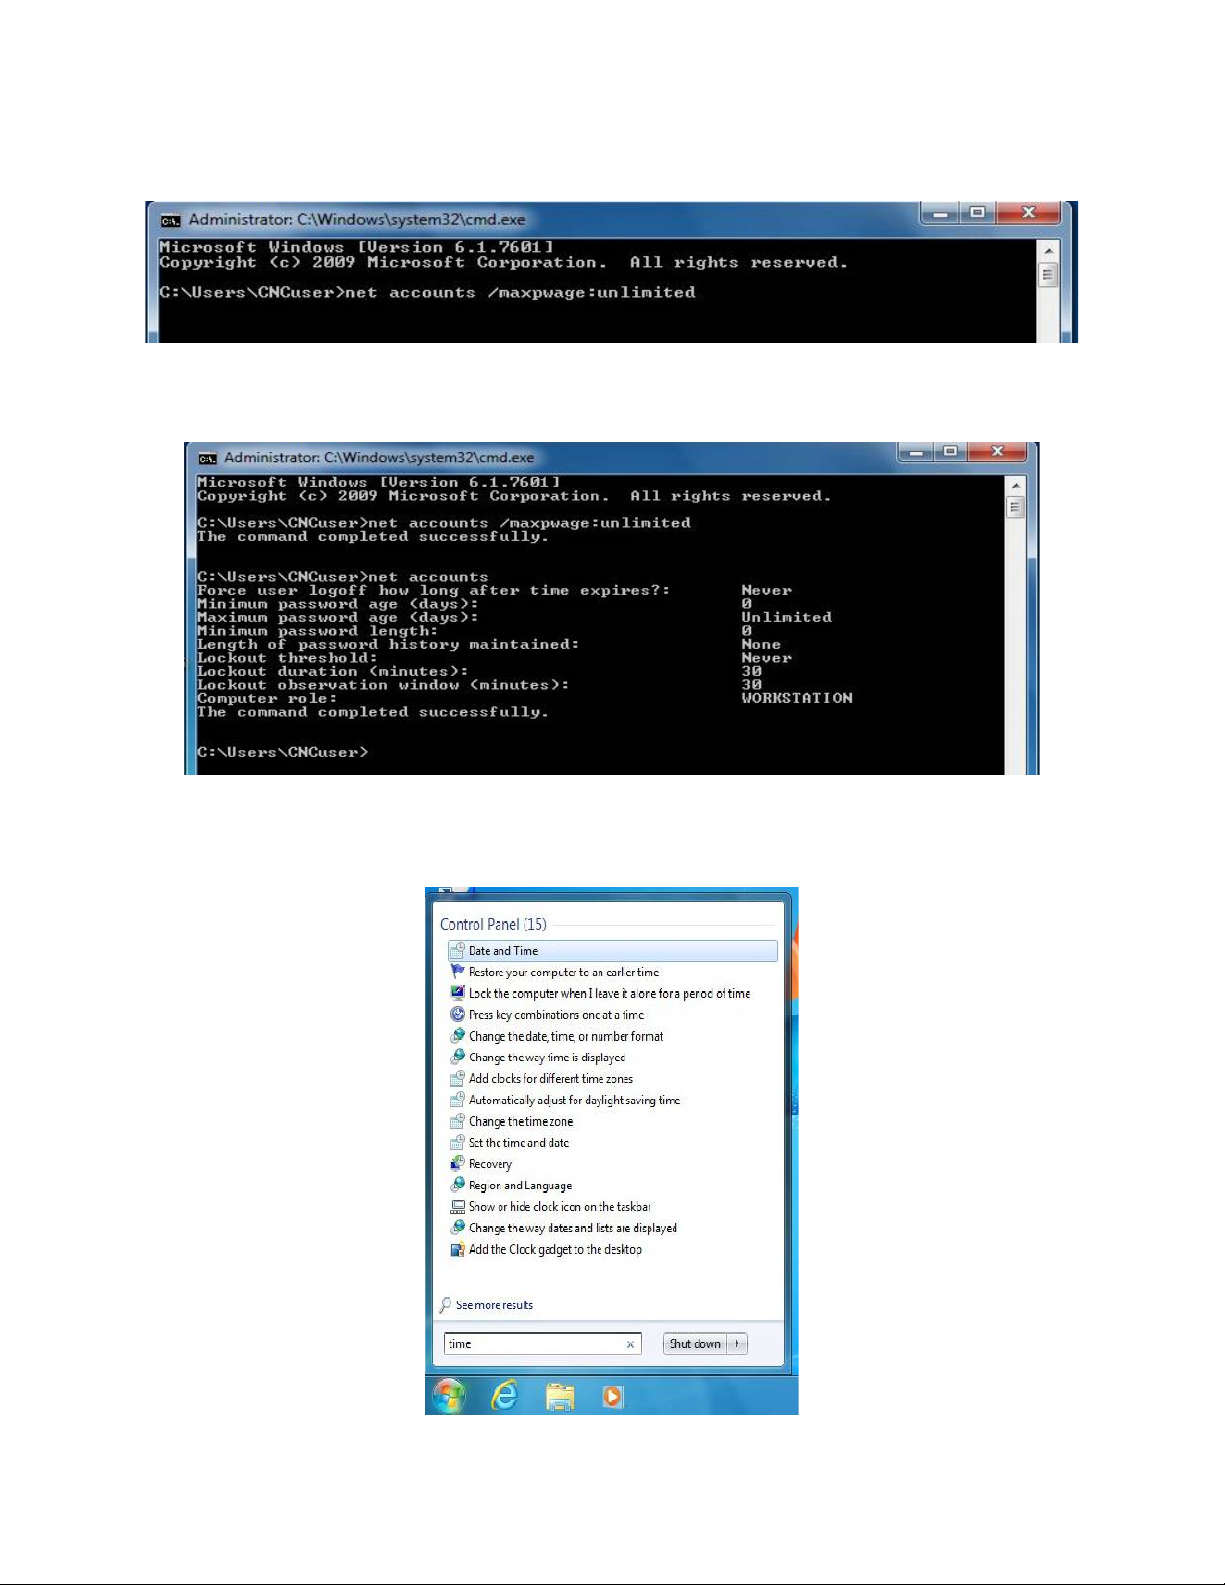
Make sure the title bar reads "Administrator: C\Windows\system32\cmd.exe", then type: net accounts
(press enter). Third line down will read " Maximum password age (days): 42", confirm and then type:
net accounts /maxpwage:unlimited (press enter).
Type: net accounts again to verify that it says "unlimited" beside the "Maximum password age". If it
does type: exit (press enter) to close the command prompt window.
2.7) The "Internet Time" synchronization also needs turned off. To do this click on the Windows
button and type: time, then click on "Date and Time" in the list.
//Ajax drive/Ajax Cd/Centroid Software/Ajax Centroid CNC 3.06 Windows 7 Install Guide Rev5.PDF

Click on the "Internet Time" tab and then click the "Change Settings" button.
Uncheck the box for "Synchronize with an Internet time server", then click "OK" to close that window
and click "OK" again to close the "Date and Time" window.
//Ajax drive/Ajax Cd/Centroid Software/Ajax Centroid CNC 3.06 Windows 7 Install Guide Rev5.PDF

2.8) Click on the "Start Button" and type: network connection in the search window. Click on "View
Network".
Right click on the network card. Click on "Properties".
//Ajax drive/Ajax Cd/Centroid Software/Ajax Centroid CNC 3.06 Windows 7 Install Guide Rev5.PDF

Click "Configure". Click on the "Power Management" tab and make sure that the "Allow the computer
to turn off this device to save power" box is unchecked.
//Ajax drive/Ajax Cd/Centroid Software/Ajax Centroid CNC 3.06 Windows 7 Install Guide Rev5.PDF

3. Centroid CNC11 v3.06 Installation
3.1) Find setup.exe either on the CD shipped with your order or the location you downloaded the
software from our website. Double-click on setup.exe to begin the installation process.
3.2) Read the License Agreement and then click “I Agree” to proceed.
//Ajax drive/Ajax Cd/Centroid Software/Ajax Centroid CNC 3.06 Windows 7 Install Guide Rev5.PDF

3.3) Next you will need to choose which software components to install.
If you are building a CNC control computer for use with our all in one DC or MPU11 Choose
CNC11Mill OR CNC11Lathe. DO NOT choose DEMO if you are connecting up to an ALL in one DC
or MPU11 card. Choose “CN11 Mill” if you wish to install the software required to control your Mill
control. Choose “CNC11 Lathe” if you wish to install the software required to control your Lathe.
“CNC11 Mill Demo/Offline Intercon” or “CNC11 Lathe Demo/Offline Intercon” is for a PC that is NOT
connected to a All in one DC or MPU11 card. The demo/offline version allows you to run the
CENTROID CNC control software on a PC without any CENTROID hardware connected. It is
software only. You will be able to see all the features the software has to offer without the need for a
control connected. The Demo/offline software WILL NOT communicate with a control.
(Note: The “Demo/Offline Intercon” installs also work as offline (a PC not connected directly to
Centroid CNC hardware) conversational programming software. if you have purchased the “Offline
Intercon Unlock”. Install “Intercon offline” version on a PC not connected to your control. This allows
you to program parts on a PC away from the machine tool, leaving your machine free to run jobs in the
meantime. )
After selecting “CNC11Mill(or Lathe)” click next. Now choose the desired drive to install the software
on. By default the software will install on the C: drive. It is recommended that you install on the C:
drive if at all possible due to terminology references in other guides.
//Ajax drive/Ajax Cd/Centroid Software/Ajax Centroid CNC 3.06 Windows 7 Install Guide Rev5.PDF

3.5) Click to install the software. If everything installed correctly you should see the screen below.
Click the “Next” button to proceed.
3.6) You will now have to set up your Network Adapter. Use the drop-down menu to select the one you
wish to have communicate with your control card. If you have multiple Ethernet cards installed they will
show up as “Local Area Connection” with the appropriate number. Remember which one you choose if
you have multiple, as you will need to connected the controller to the same one in order for
communication between the software and your controller to work.
//Ajax drive/Ajax Cd/Centroid Software/Ajax Centroid CNC 3.06 Windows 7 Install Guide Rev5.PDF

You will be asked if you wish to have the IP address changed. Select “Yes”
3.7) You should now see the screen below, informing you of the successful installation of the software.
Click on “Finish” to proceed.
//Ajax drive/Ajax Cd/Centroid Software/Ajax Centroid CNC 3.06 Windows 7 Install Guide Rev5.PDF

3.8) Next you will be prompted to choose if you wish to install a PLC. If this is your first time installing
the software then select “Yes”. If you are updating from a previous version of software and have no
need of a updated PLC choose “No”. If you install a new PLC it will over-write your existing
configuration files. If you wish to update your PLC then make sure you generate a report and back up
your parameter files. Only once that is done would you choose “Yes”.
3.9) Which PLC program you choose to install here largely depends on your circumstances. For
starters click on the “Plus” symbol next to either Mill or Lathe, depending on what type of machine you
have. Next click on the “Plus” symbol next to the type of control you have, either ALLIN1DC, DC3IOB,
or GPIO4D. From there you will need know what you will need. Most users will simply need the “basic”
option. If you have an ATC or custom machine (Bridgeport Boss) choose the appropriate PLC in that
case.
//Ajax drive/Ajax Cd/Centroid Software/Ajax Centroid CNC 3.06 Windows 7 Install Guide Rev5.PDF

3.10) Click on install when you have decided. You can always run the standalone PLC installer
“plcinstaller.exe” from the same directory if you wish to change your PLC at a later date. Please follow
the same warnings as above about what installing a new PLC will entail to your existing install. After
the installation is complete a CNC11 icon will be placed on your desktop. Right-click on the CNC11
icon and click on “Properties”.
3.11) Click on “Advanced” and then mark the check-box for “Run as administrator”. Click “OK” and
then click “Apply”. Your installation of CNC11 3.06 is now complete.
//Ajax drive/Ajax Cd/Centroid Software/Ajax Centroid CNC 3.06 Windows 7 Install Guide Rev5.PDF

4. Solid State Hard-drive Settings
4.1) First we will turn off Indexing, to do this click on the Windows icon on your task bar. In the search
field, type: indexing, then click on "Indexing Options" in the search list.
4.2) The following window will appear on the screen .
4.3) Click on the "Modify" button.
//Ajax drive/Ajax Cd/Centroid Software/Ajax Centroid CNC 3.06 Windows 7 Install Guide Rev5.PDF
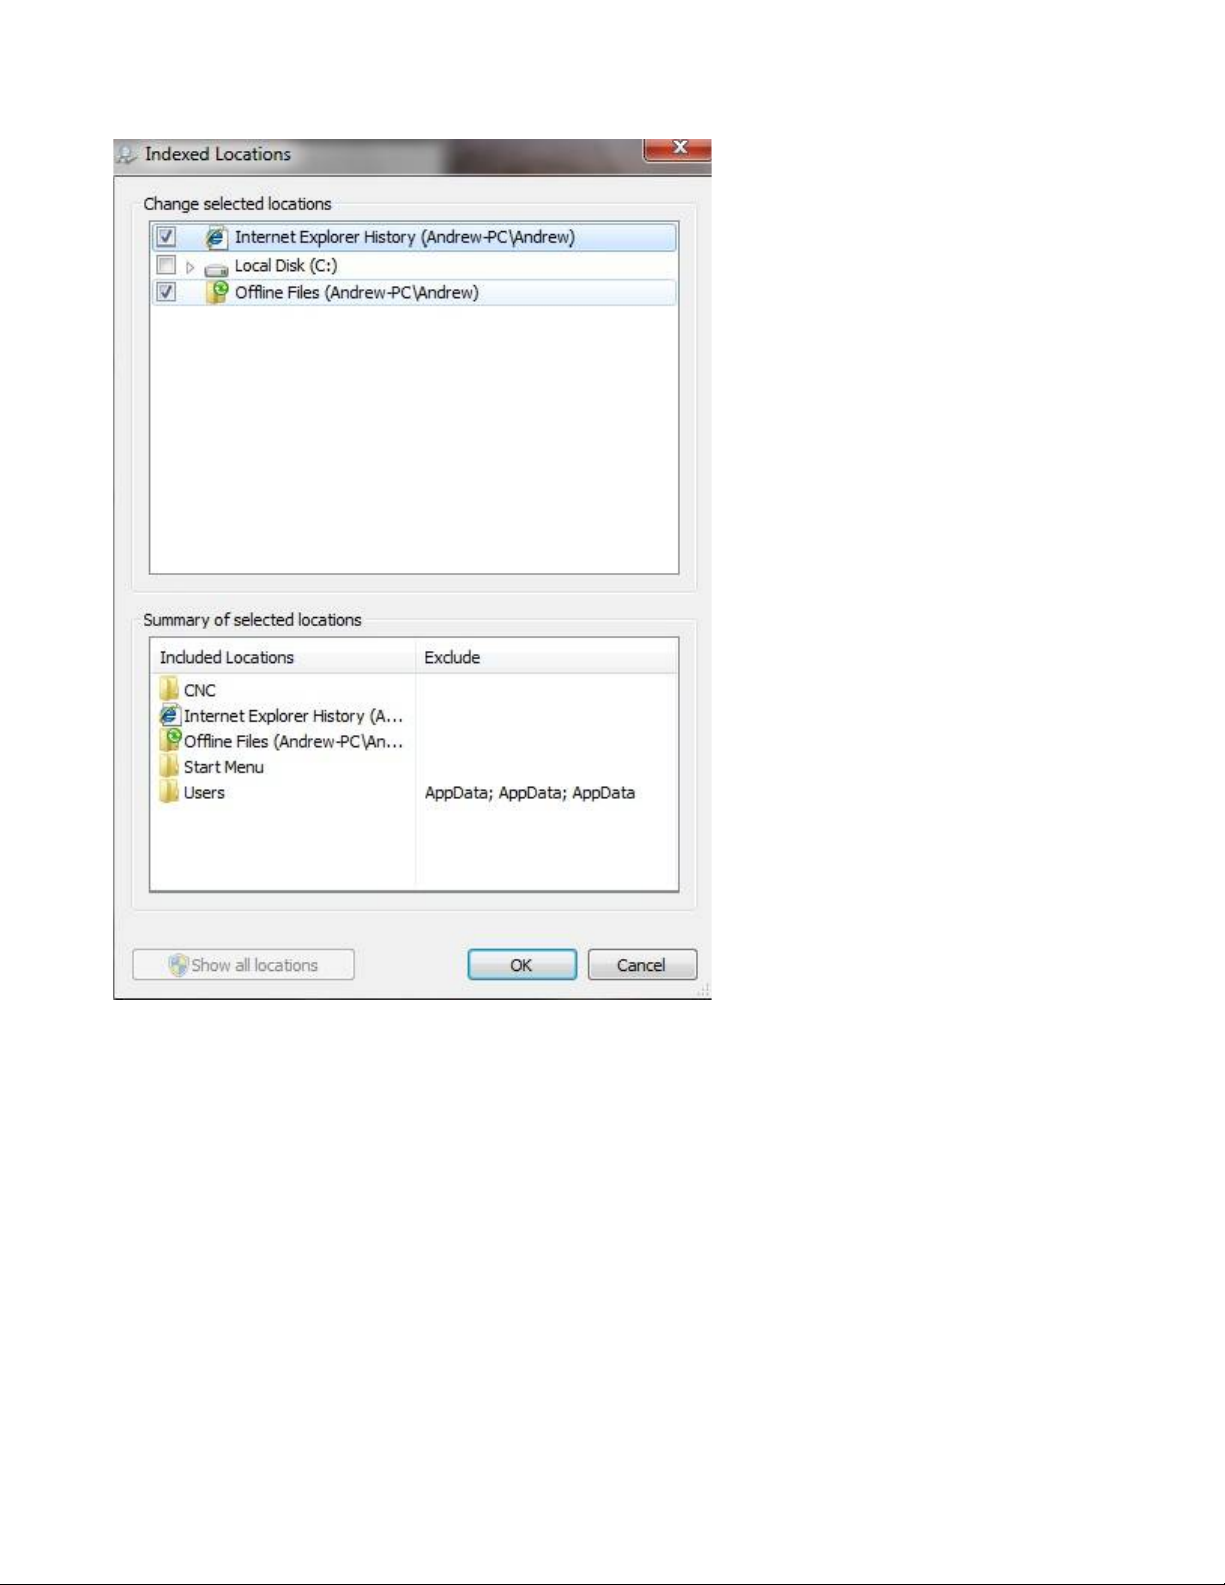
4.4) Uncheck "C:drive" then click on "OK" .
4.5) Click "Close" to close the "Indexing Options" window.
//Ajax drive/Ajax Cd/Centroid Software/Ajax Centroid CNC 3.06 Windows 7 Install Guide Rev5.PDF
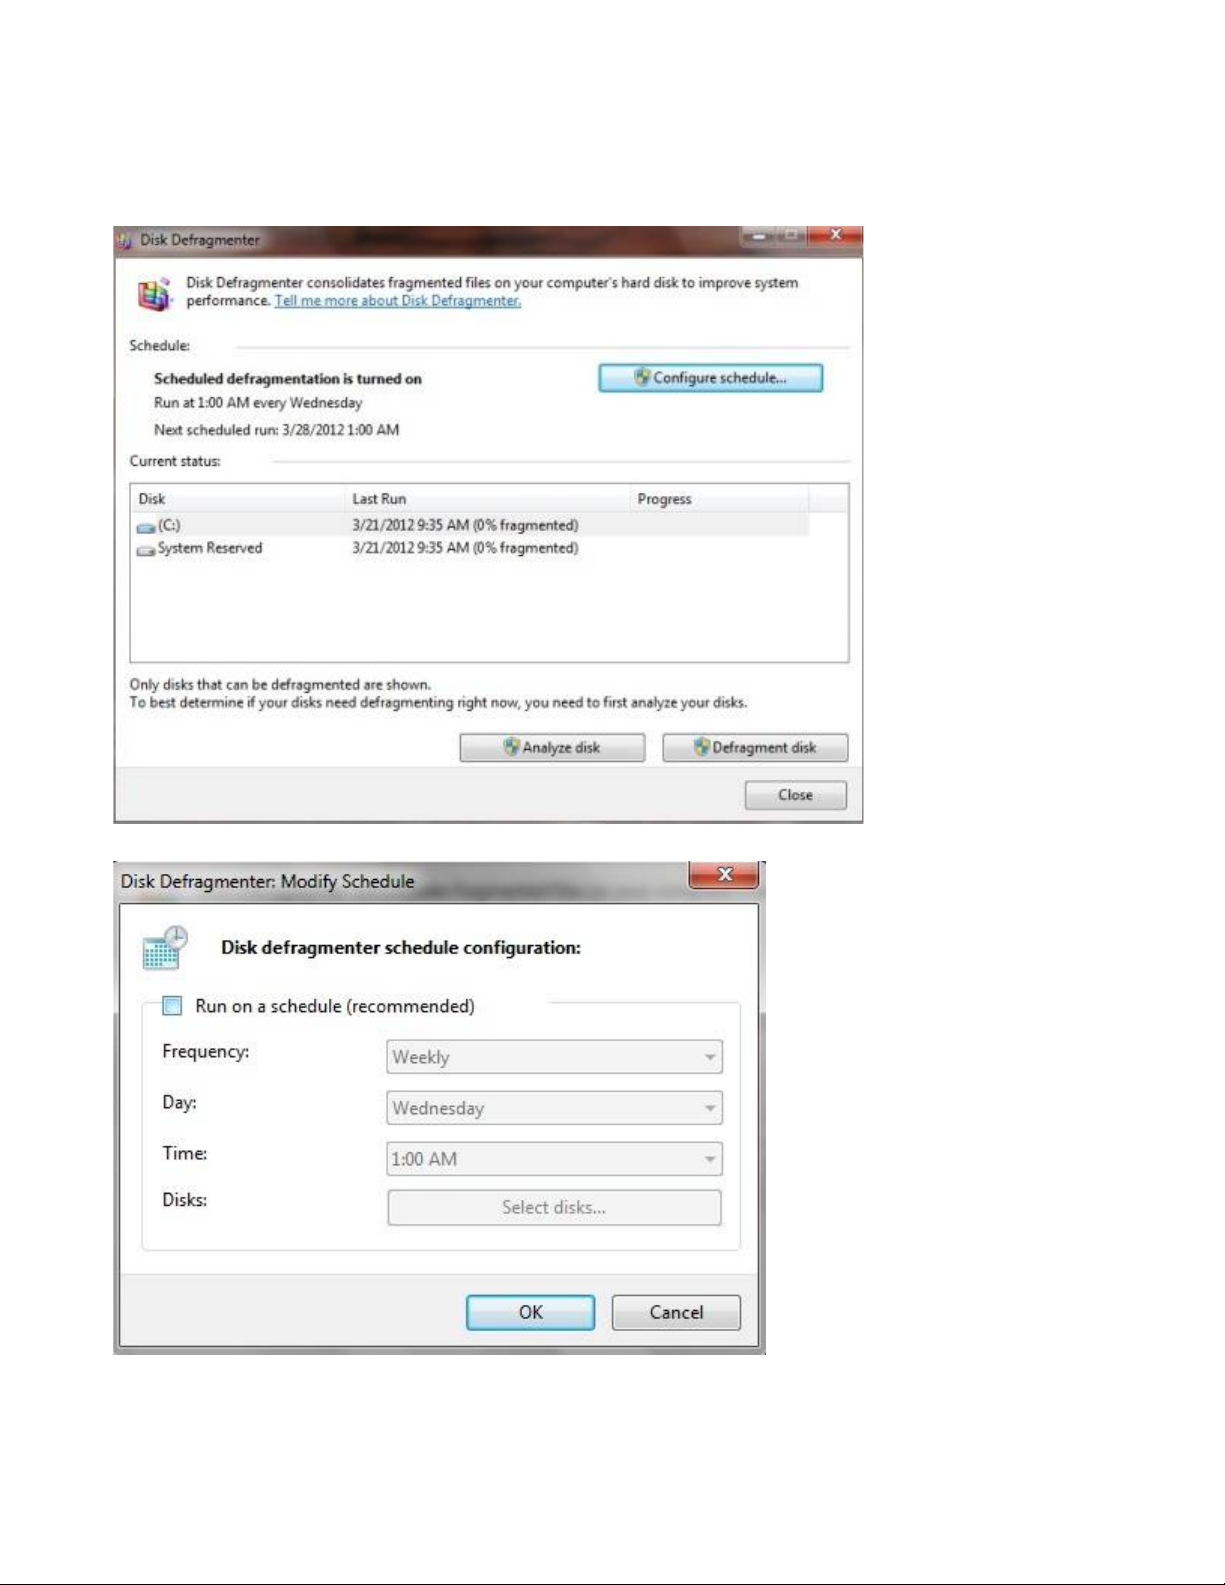
4.5) Next we will turn off Auto Defragmentation so click on the Windows icon again. This time type:
defrag into the search field. Select "Disk Defragmenter" in the search list.
4.6) The following window will come up. Click on the "Configure Schedule" button towards the upper
right corner of the window.
4.7) Uncheck the box for “Run on a schedule”.
//Ajax drive/Ajax Cd/Centroid Software/Ajax Centroid CNC 3.06 Windows 7 Install Guide Rev5.PDF

4.8) The last thing we will do is disable Superfetch. Click on the Windows icon, type: services.msc.
This will bring up the "Services" window, scroll down the list until you see Superfetch and double click
on it. (note: the list is alphabetical)
4.9) Beside "Startup type:" drop down the options and select disable. Click "OK" to close the dialog
box, then close the "Services" window.
4.10) Power cycle your control, and now you system is optimized for SSD usage.
//Ajax drive/Ajax Cd/Centroid Software/Ajax Centroid CNC 3.06 Windows 7 Install Guide Rev5.PDF
 Loading...