

Page 1

VX-S207U
VX-S137U
INTEGRATED COLOR TV/STEREO VIDEO CASSETTE RECORDER
TELEVISOR EN COLOR/VIDEOGRABADORA ESTEREO INTEGRADOS
TELEVISOR COULEUR/MAGNETOSCOPE STEREO INTEGRE
OPERATING INSTRUCTIONS
INSTRUCCIONES DE MANEJO
MODE D'EMPLOI
For Assistance And Inf ormation
Call Toll Free 1-800-BUY-AIWA
(United States and Puerto Rico)
ENGLISH
ESPAÑOL
FRANÇAIS
Page 2

ENGLISH
Warning
To reduce the risk of fire or electric shock, do not
expose this appliance to rain or moisture.
CAUTION
RISK OF ELECTRIC SHOCK
DO NOT OPEN
WARNING: SHOCK HAZARD - DO NOT OPEN.
AVIS: RISQUE DE CHOC ELECTRIQUE
- NE PAS OUVRIR.
Explanation of Graphical Symbols
The lightning flash with arrowhead symbol
within an equilateral triangle, is intended to alert
the user to the presence of uninsulated
“dangerous voltage” within the products
enclosure that may be of sufficient magnitude
to constitute a risk of electric shock to person.
The exclamation point within an equilateral
triangle is intended to alert the user to the
presence of important operating and
maintenance (servicing) instruction in the
literature accompanying the appliance.
IMPORTANT SAFETY
INSTRUCTIONS
Heat - Do not use this unit near sources of heat, including
heating vents, stoves, or other appliances that generate
heat. It also should not be placed in temperatures less than
5˚C (41˚F) or greater than 40˚C (104˚F).
Mounting surface - Place the unit on a flat, even surface.
Accessories - Do not place the unit on an unstable cart,
stand, tripod, bracket, or table. The unit may fall causing
serious injury to persons and serious damage to the
appliance. Use only with a cart, stand, tripod, bracket, or
table recommended by the manufacture, or sold with the
unit. When mounting the appliance, follow the
manufacturer's instructions. When mounting the unit, use
accessories recommended by the manufacturer.
Portable cart - An appliance and cart combination should
be moved with care. Quick stops, excessive force, and
uneven surfaces may cause the appliance and cart
combination to overturn.
PORTABLE CART WARNING
S3126A
Ventilation - The unit should be situated with adequate
space around it so that proper heat ventilation is assured.
Allow 10 cm clearance from the rear and the top of the unit,
and 5 cm from the each side.
Slots and openings in the cabinet and the back or bottom
are provided for ventilation, and to ensure reliable operation
of the unit and to protect it from overheating, these openings
must not be blocked or covered. The openings should
never be blocked by placing the unit on a bed, sofa, rug or
other similar surface. (This unit should never be placed
near or over a radiator or heat register.) This unit should not
be placed in a built-in installation such as a bookcase unless
proper ventilation is provided.
Weight and heavy objects - The unit should be moved with
care as the weight balance is not even. Do not place heavy
objects on the unit.
Read the operating instructions carefully and completely
before operating the unit. Be sure to keep the operating
instructions for future reference. All warnings and cautions
in the operating instructions and on the unit should be
strictly followed, as well as the safety suggestions below.
Warning
To prevent electric shock or other injuries, follow all the
safety instructions when installing, operating and servicing
the unit.
Installation
Attachments - Do not use attachments that have not been
recommended by the manufacturer because doing so may
result in the risk of fire, electric shock or other injuries.
Water and Moisture - Do not use this unit near water - for
example, near a bathtub, washbowl, kitchen sink, or laundry
tub, in a wet basement, or near a swimming pool, and the
like.
1
ENGLISH
Object and Liquid Entry - Never push objects of any kind
into the unit through the cabinet slots because they may
contact dangerous voltage points or short-circuit parts and
cause fire or electric shock. Never spill liquid of any kind on
the unit.
Electric Power
Power Sources - This unit should be operated only from
the type of power source indicated on the marking label. If
you are not sure of the type of power supply to your home,
consult your appliance dealer or local power company. To
operate unit on battery power, or other sources, refer to the
operating instructions.
Grounding or Polarization - This unit is provided with a
polarized alternating-current line plug (a plug having one
blade wider than the other). This plug will fit into the power
outlet only one way. This is a safety feature. If you are
unable to insert the plug fully into the outlet, try reversing the
plug. If the plug should still fail to fit, contact your electrician
to replace your obsolete outlet. Do not defeat the safety
purpose of the polarized plug.
Page 3
Overloading - Do not allow anything to rest on the power
cord. Do not overload wall outlets and extension cords
because this can result in fire or electric shock. Do not place
the unit in an area where people will walk on the cord.
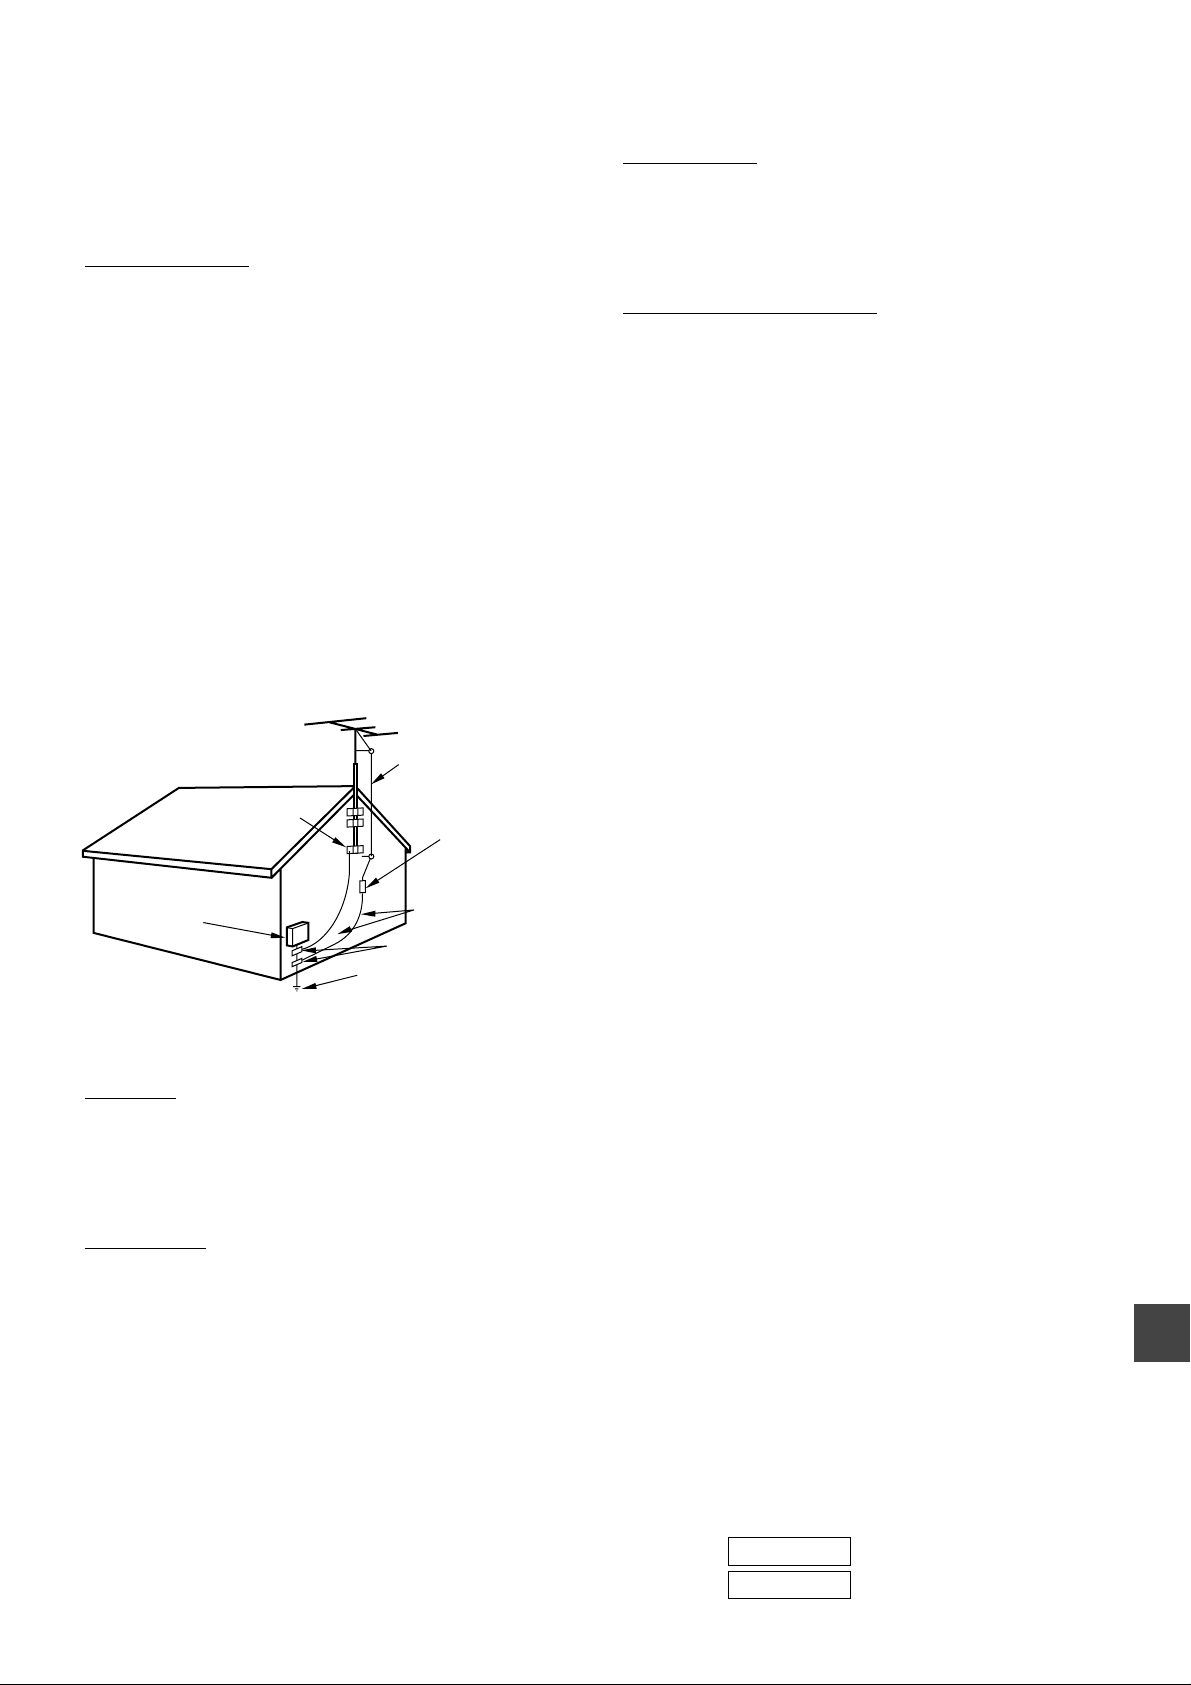
Outdoor Antenna
Power lines - An outside antenna system should not be
located in the vicinity of overhead power lines or other
electric light or power circuits, or where it can fall onto such
power lines or circuits. When installing an outside antenna
system, extreme care should be taken to avoid touching
power lines or circuits because contact with them may be
fatal.
Outdoor Antenna Grounding - If an outside antenna or
cable system is connected to the unit, be sure the antenna
or cable system is grounded so as to provide some
protection against voltage surges and built-up static
charges. Section 810 of the National Electrical Code, ANSI/
NFPA No.70, provides information with regard to proper
grounding of the mast and supporting structure, grounding
of the lead-in wire to an antenna discharge unit, size of
grounding conductors, location of antenna-discharge unit,
connection to grounding electrodes, and requirements for
the grounding electrode. See the figure.
Antenna Grounding According to the National Electrical Cord
ANTENNA LEAD IN WIRE
GROUND CLAMP
ELECTRIC
SERVICE
EQUIPMENT
NEC-NATIONAL ELECTRICAL CODE
ANTENNA DISCHARGE
UNIT
(NEC SECTION 810-20)
GROUNDING
CONDUCTORS
(NEC SECTION 810-21)
GROUND CLAMPS
POWER SERVICE GROUNDING
ELECTRODE SYSTEM
(NEC ART 250 PART H)
Lightning
For added protection during a lightning storm, or when left
unattended and unused for long periods of time, unplug the
unit from the wall outlet and disconnect the antenna or cable
system. This will prevent damage to the unit due to
lightning and powerline surges.
Condensation
If the unit is brought directly from a cold to a warm location,
moisture may condense inside the unit and cause damage
to the video heads and tapes played on it. When you first
install the unit, or when you move it from a cold to a warm
location, wait for about two hours before operating the unit.
Damage Requiring Service
Unplug the unit from the wall outlet and refer servicing to
qualified service personnel under the following conditions:
1) When the power cord or plug is damaged or frayed.
2) If liquid has been spilled into the unit.
3) If the unit has been exposed to rain or water.
4) If the unit does not operate normally when following
the operating instructions. Adjust only those controls
that are covered by the operating instructions because
improper adjustment of other controls may result in
damage to the unit and will often require extensive
work by a qualified technician to restore the unit to
normal operation.
5) If the unit has been dropped or the cabinet has been
damaged.
6) When the unit exhibits a distinct change in
performance - this indicates a need for service.
Do not attempt to service the unit yourself because opening
or removing covers may expose you to high voltage or other
hazards. Refer all servicing to qualified service personnel.
Replacement Parts - When replacement parts are required,
be sure the service technician has used replacement parts
specified by the manufacturer or having the same
characteristics as the original part. Unauthorized
substitutions may result in fire, electric shock or other
hazards.
Safety Check - After completion of any service or repairs to
the unit, ask the service technician to perform a safety
check to ensure that the unit is in proper operating
condition.
Note to CATV system installer:
This reminder is provided to call the CATV system installer’s
attention to Article 820-40 of the NEC that provides
guidelines for proper grounding and, in particular, specifies
that the cable ground should be connected to the grounding
system of the building, as close to the point of cable entry as
practical.
Maintenance
Cleaning - Unplug the unit from the wall outlet before
cleaning. Do not use liquid cleaners or aerosol cleaners.
Use a damp cloth for cleaning.
OWNER'S RECORD
For your convenience, record the model number and
serial number (you will find them on the rear of your set)
in the space provided below. Please refer to them when
you contact your AIWA dealer in case of difficulty.
Model No.
Serial No.
ENGLISH
2
Page 4
Welcome
Thank you for purchasing this AIWA
product. To optimize the performance of
this unit, please read through this
operating instructions carefully.
Table of contents
Main features of this
unit
VCR Plus+ system and OneTouch Playback
You can easily set the timer with the
VCR Plus+ system.
The recorded TV programs can be
played back quickly with One-Touch
Playback.
MTS (Multi-channel TV
Sound) broadcast
You can receive, record and play back
stereo and bilingual TV programs.
MBR (Multi Brand Remote
control)
The remote control can control the CATV
converters of many manufacturers.
V-chip
An age limitation can be set to prevent
children from viewing or listening to
violent scenes or programs with adult
content. This unit corresponds to “TVRATING” and “MOVIE RATING.”
Preparation
Connecting the antenna......................................4
Preparing the remote control ..............................7
Setting the language...........................................8
Setting the clock..................................................9
Setting the channels .........................................11
Checking the channel set-up to use
VCR Plus+® system....................12
Basic operations
Watching a TV program....................................13
Selecting the closed captions mode .................14
Adjusting the picture .........................................15
Adjusting the sound ..........................................16
Setting the On-Timer.........................................17
Setting the Off-Timer.........................................18
Playback
Playing back a tape...........................................19
Various search functions...................................21
Closed Caption
The subtitles can be displayed on the
screen when a broadcast corresponding
to closed caption is received.
SQPB (S-VHS Quasi Play
Back)
You can play back S-VHS recorded
tape.
The picture cannot have high-quality
resolution for S-VHS.
VCR Plus+ and PlusCode are registered
trademarks of Gemstar Development
Corporation.
The VCR Plus+ system is manufactured
under license from Gemstar Development
Corporation.
Recording
Recording a TV program...................................23
Recording with One-Touch Recording..............24
Setting the timer with VCR Plus+® system.......25
Setting the timer manually ................................27
Dubbing.............................................................28
Other functions
Setting the V-chip..............................................29
Multichannel TV Sound (MTS) and Hi-Fi audio
sound system...............................31
On-screen display.............................................32
Additional information
Troubleshooting ................................................33
Specifications....................................................34
Parts and controls.............................................35
3
ENGLISH
Page 5
PREPARATION
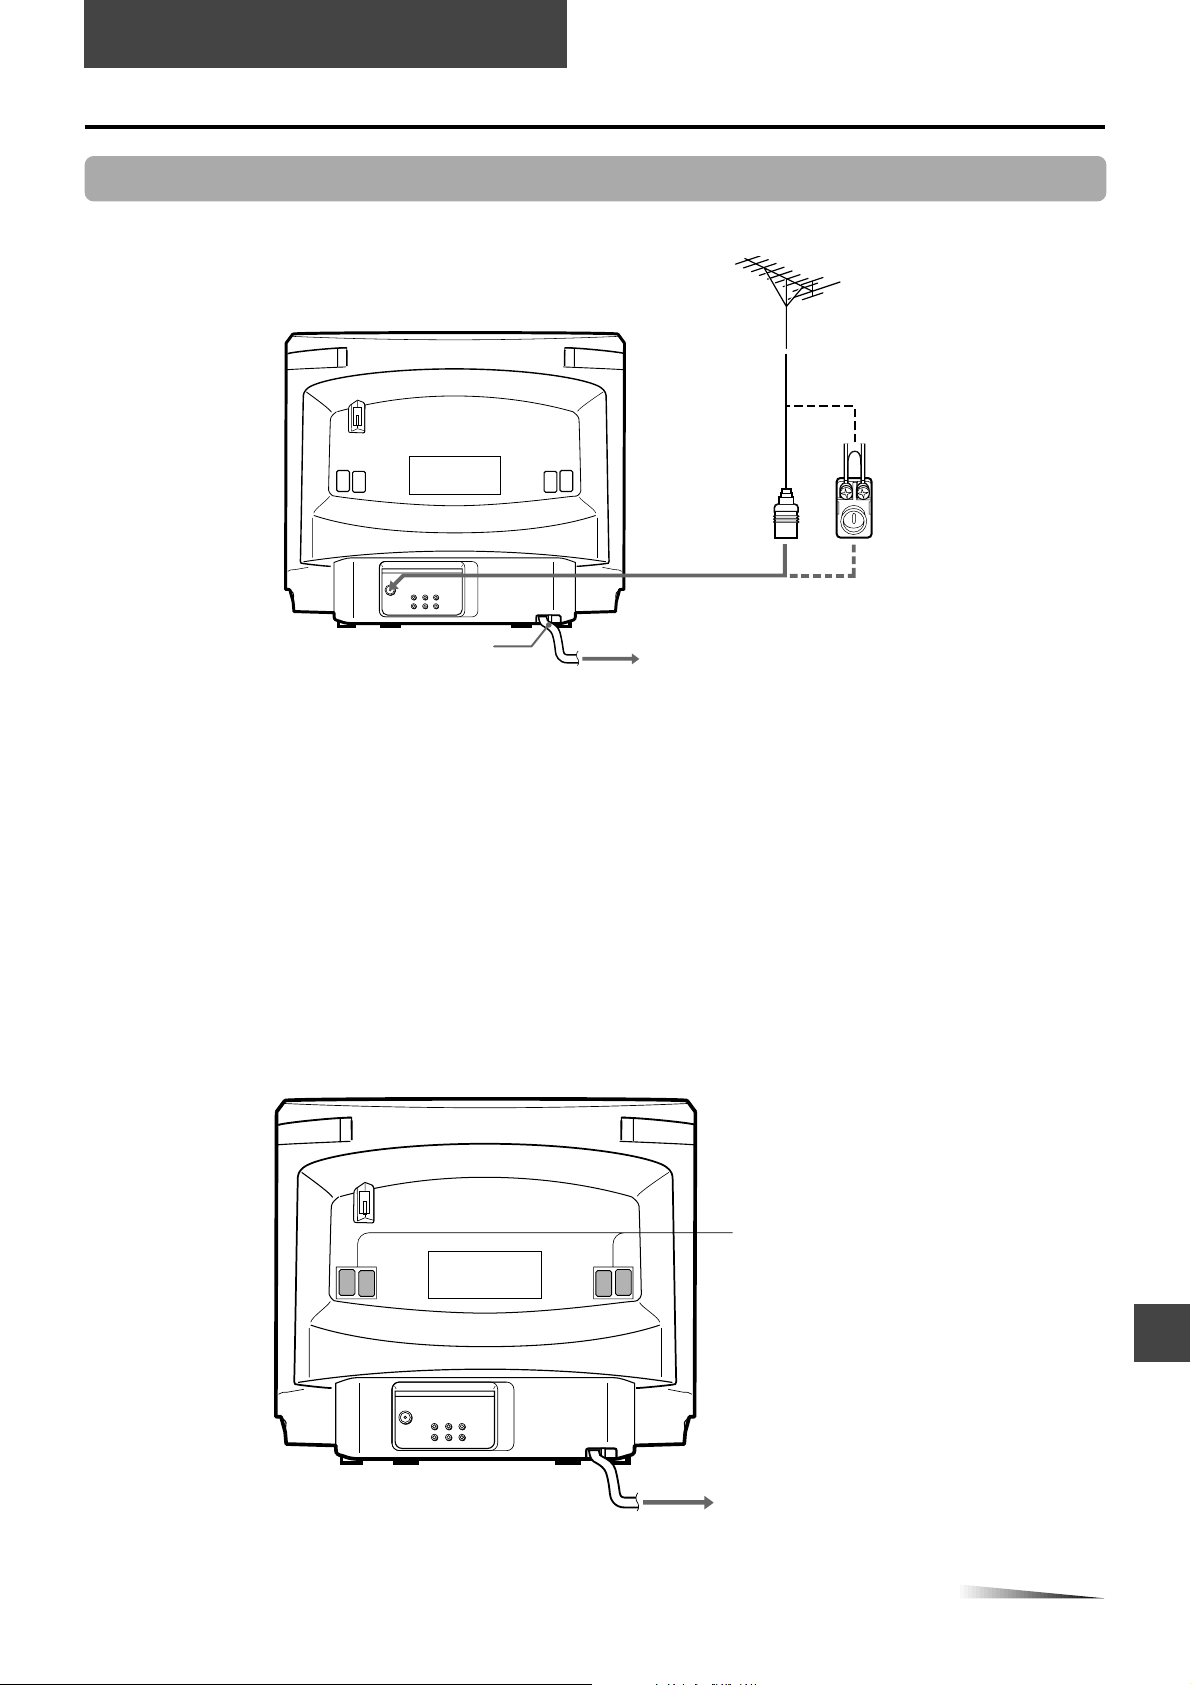
Connecting the antenna
Basic connections
VX-S207
UHF/
VHF
AC cord hook
75-ohm
coaxial cable
(not supplied)
1
o
300-ohm twin-lead cable
(not supplied)
Antenna adaptor
(supplied)
To AC outlet
2
Connect the antenna cable to the UHF/VHF connector on the unit.
1
If the cable is a round-type 75-ohm coaxial cable, connect it directly to the UHF/VHF connector.
If the cable is a flat-type 300-ohm twin-lead cable, connect it to the antenna adaptor (supplied), and connect the adaptor to
the UHF/VHF connector.
When you use VX-S137U, the antenna adaptor can be taken out from the supplied telescopic antenna.
Connect the AC cord to the AC wall outlet after passing it through the AC cord hook.
2
To use the security hook for safety (VX-S207 only)
To prevent the unit from falling during earthquakes, etc., affix the unit to a wall or pillar with the security hook on the rear using
the strong twine or wire.
VX-S207
Security hook
UHF/
VHF
CONTINUE
ENGLISH
4
Page 6
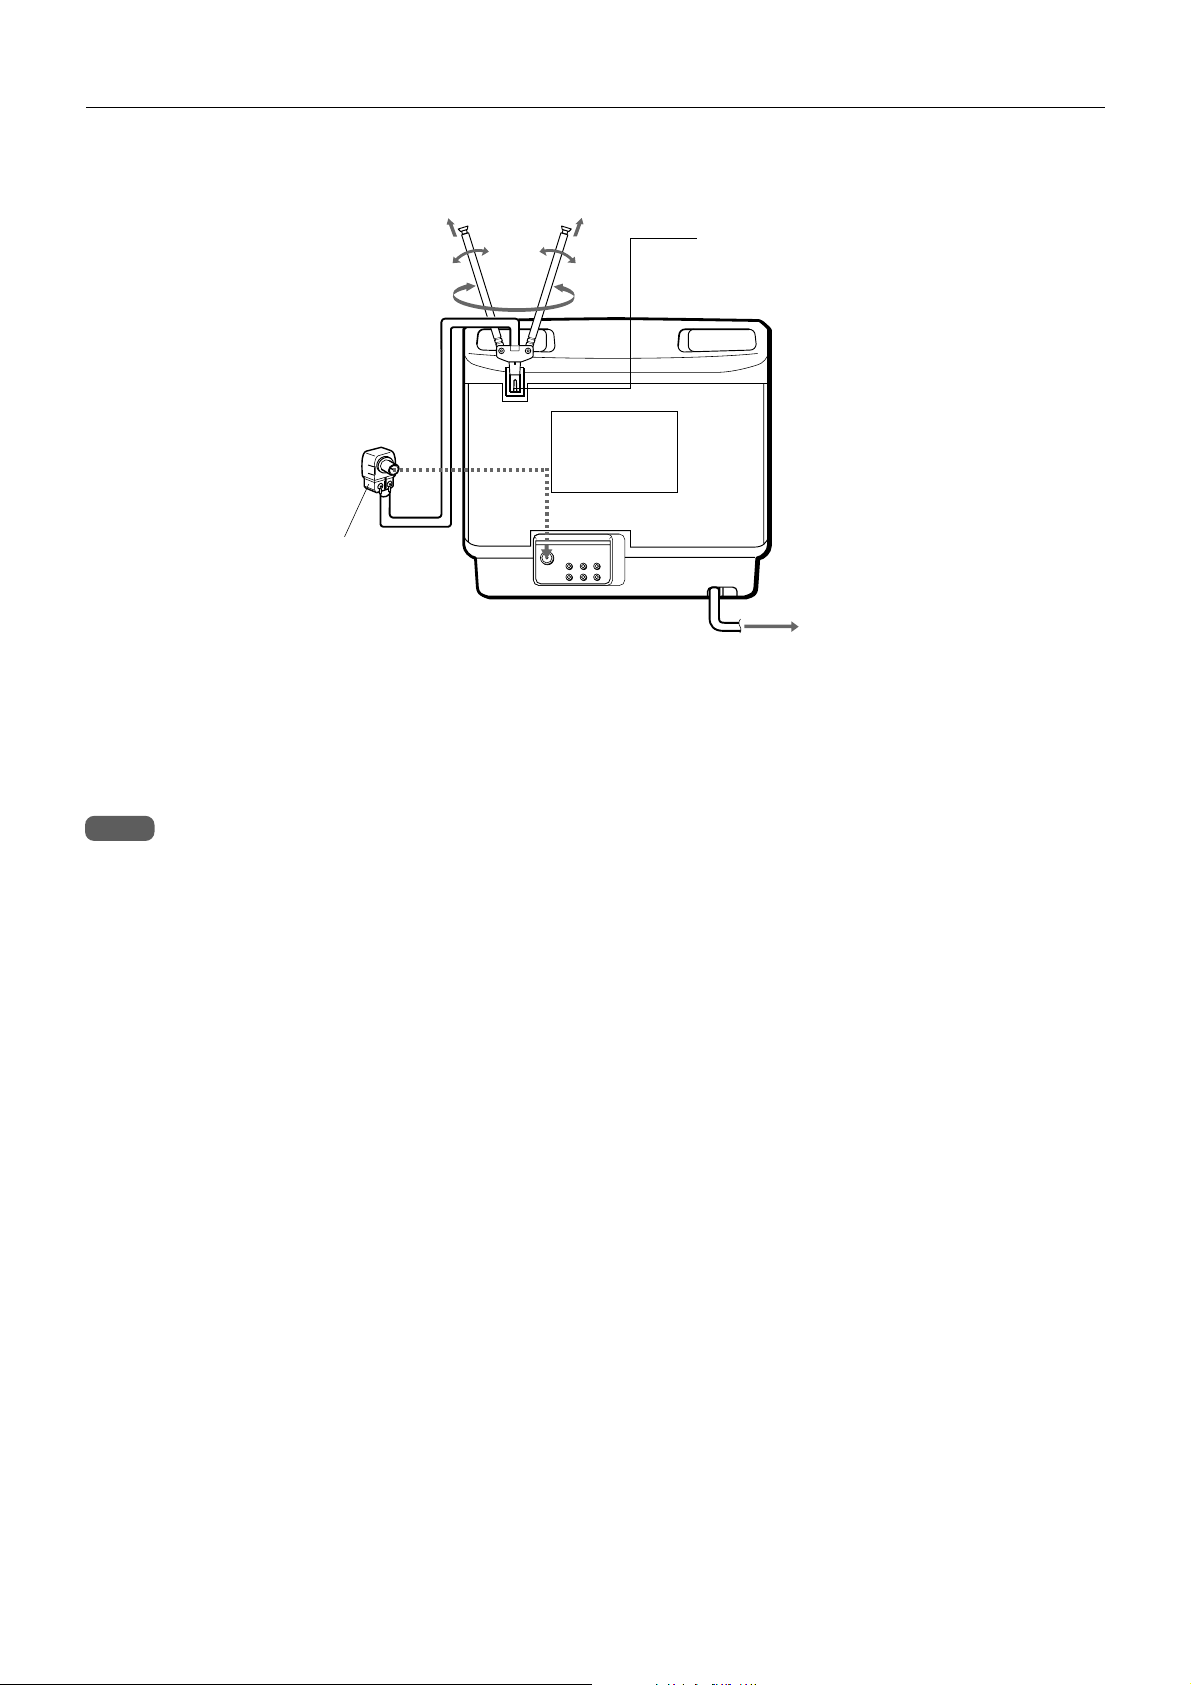
Connecting the antenna (continued)
To connect the supplied telescopic antenna (VX-S137 only)
Antenna holder
VX-S137
Antenna adaptor
(Supplied)
UHF/
VHF
Mount the supplied antenna in the antenna holder.
Extend and adjust the ends of the antenna to get the best signal reception.
Note
For better reception, especially in outlying areas, or where ghosting or interference is a problem, use an external room-mounted
antenna.
5
ENGLISH
Page 7
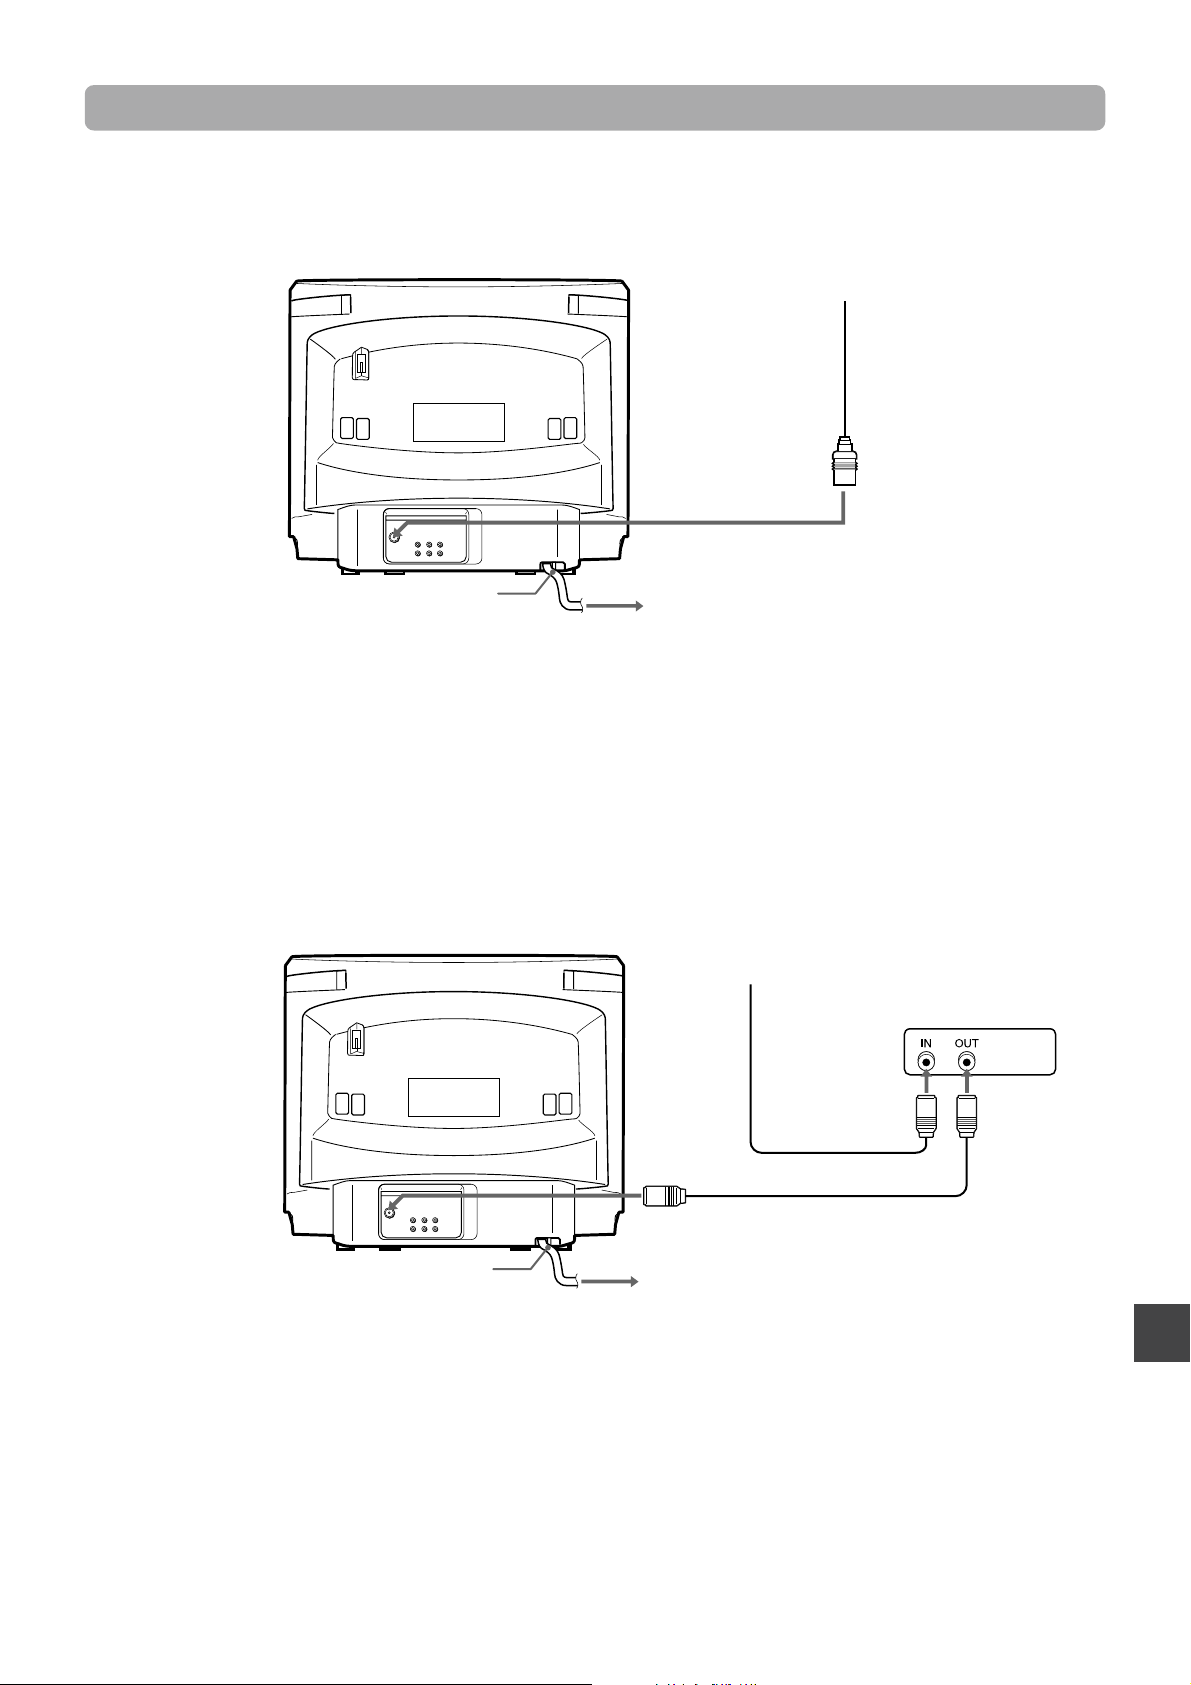
CATV connections
To connect a CATV system without using a CATV converter
VX-S207
UHF/
VHF
AC cord hook
To AC outlet
2
CATV system
75-ohm coaxial cable
(not supplied)
1
1
Connect the cable from the CATV system to the UHF/VHF connector on the unit.
Connect the AC cord to the AC wall outlet after passing it through the AC cord hook.
2
To connect a CATV system using a CATV converter
VX-S207
CATV system
75-ohm
UHF/
VHF
AC cord hook
coaxial cable
(not supplied)
1
75-ohm coaxial cable
(not supplied)
CATV converter
(not supplied)
2
To AC outlet
3
1
Connect the cable from the CATV system to the input connector on the CATV converter.
2
Connect the output connector on the converter to the UHF/VHF connector on the unit.
3
Connect the AC cord to the AC wall outlet after passing it through the AC cord hook.
ENGLISH
6
Page 8
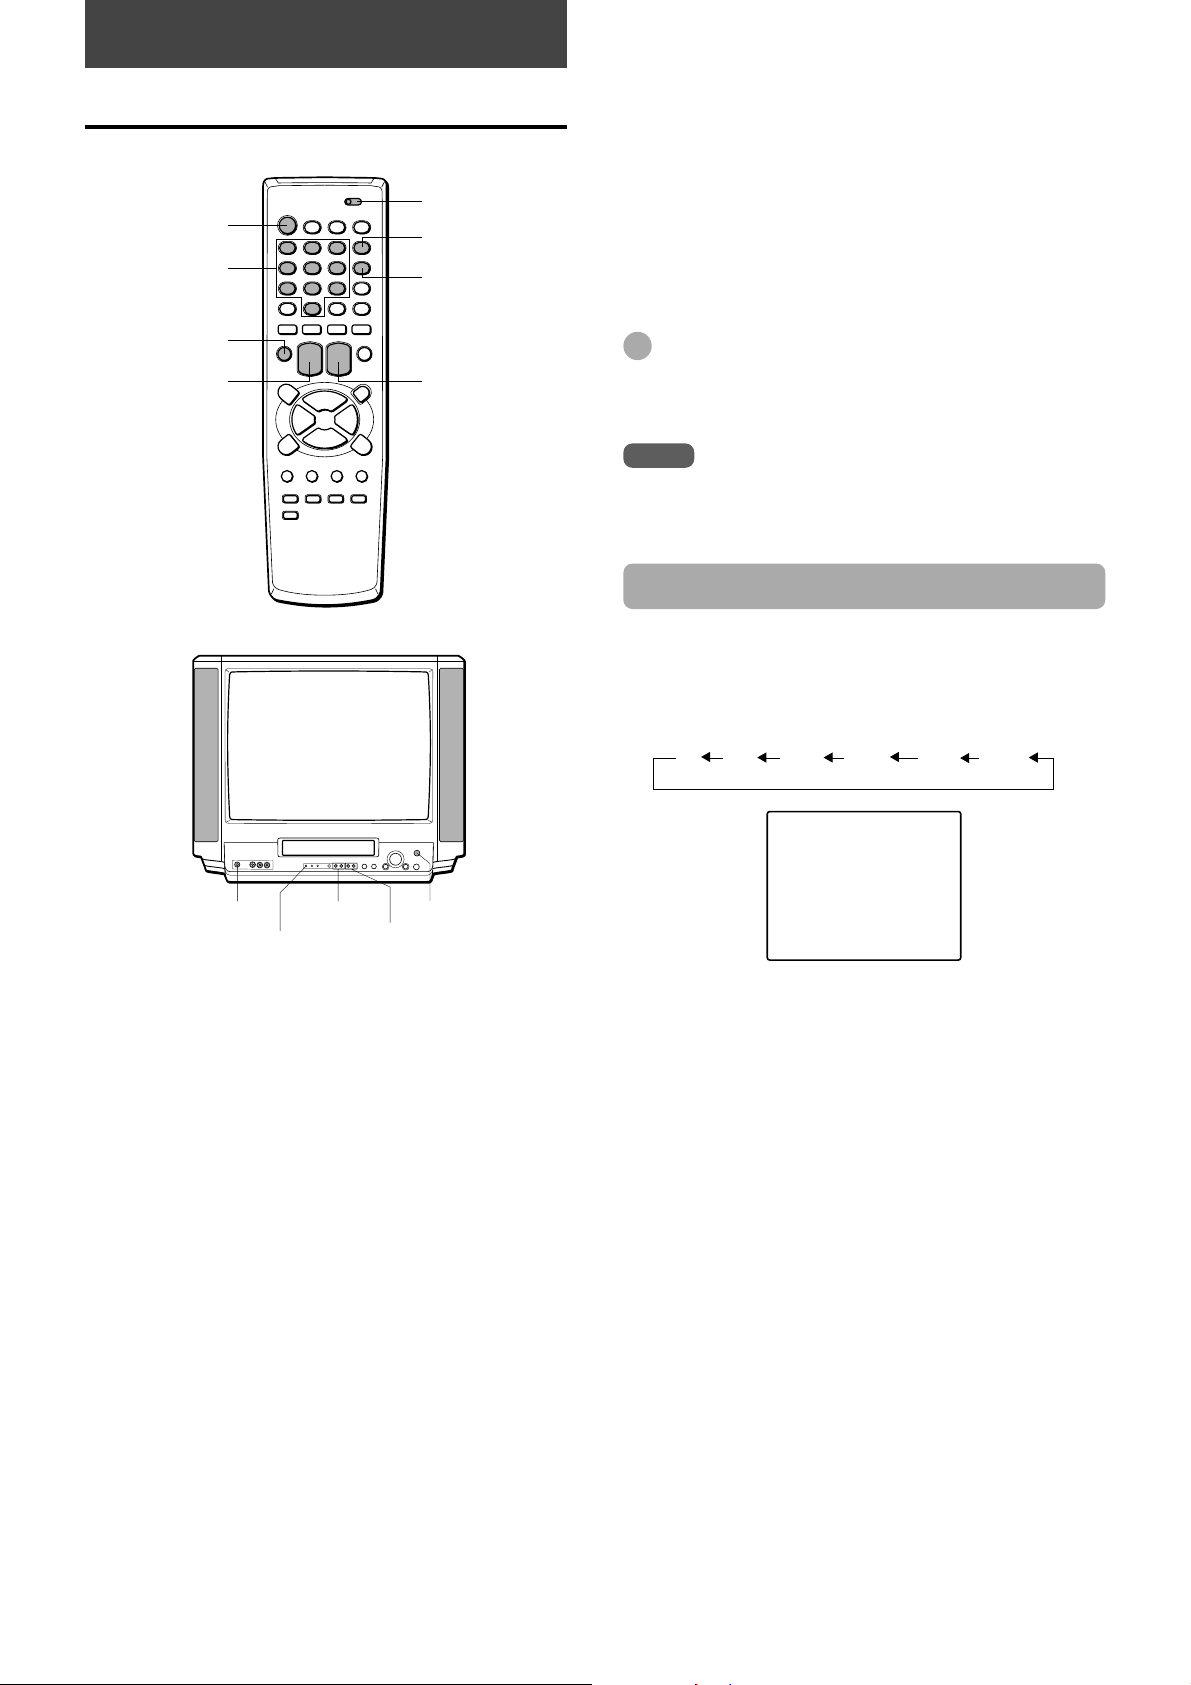
Preparing the remote control
Inserting the batteries
Caution
To prevent damage from leakage or explosion, follow
the descriptions below.
• Insert two supplied R03 (size AAA) batteries with the
0 and 9 marks correctly as illustrated.
• Do not mix old batteries with new ones or different
types of batteries.
• Do not throw the batteries into a fire, apply heat to
them or take them apart.
• Do not carry the batteries with keys or other metallic
objects.
Controlling the TVs and CATVs
The remote control can control the CATV converters for the
CATV. To control CATV converters, set the manufacturer’s
code number shown in the table on the next page.
TV VCR/CATV
POWER
Number
buttons
PRESET
CHANNEL
N/M
Note
Remove the batteries when they have no more power, or when
you do not use the remote control for a long period of time.
Using the remote control
Point the remote control toward the remote sensor.
VX-S207
Remote
sensor
Notes
• The remote control may not operate when there is any
obstruction between the remote control and the remote
sensor.
• Strong ambient light sources such as a fluorescent lamp or
direct sunlight may cause unreliable operation.
• Using a TV with the same type of infrared remote control
facing the same direction may cause incorrect operation.
• The maximum distance for effective control between the
remote control and the remote sensor is 7 meters.
• Although you can use the remote control within an angle of
up to 30 degrees in any direction from directly in front of the
remote sensor, we recommend a narrower angle for stable
operation.
7m
30˚ 30˚
1
Set the TV VCR/CATV selector to CATV.
TV
CATV
VCR
2
While holding PRESET, press the number
buttons to set the code number referring to the
table on the next page.
Some manufacturers have more than one code number.
If the remote control does not operate with the CATV
after setting the code number, try another number.
The number buttons on the remote control are activated
for the CATV converter.
When you operate except for changing the CATV
channel, set the TV VCR/CATV selector to TV VCR.
Notes
• Due to the variety of codes used by manufacturers, AIWA
cannot guarantee that the MBR remote control will operate
with every model of the brands listed.
• The number buttons can be used only for channel selection,
but they may not function correctly with some CATV
converters.
7
ENGLISH
Page 9
CATV converter manufacturer Code number
ALLEGRO 46
ARCHER 39
CABLEVIEW 39
CITIZEN 39
CURTIS MATHES 15
EAGLE 24, 25, 28
GEMINI 05, 22, 23
GENERAL ELECTRIC 43
GENERAL INSTRUMENT 05, 07, 09
GOBRAND 39
HAMLIN 33, 34, 35
JERROLD 04, 06, 07, 08, 09, 10, 17,
39
KALE VISION 29
MACOM 03, 40, 41
MAGNAVOX 24, 25, 28, 29, 36, 37
NSC 38
OAK 11, 12, 44
PANASONIC 13, 19, 21
PARAGON 01
PHILIPS 24, 25, 26, 27, 28
PIONEER 13, 14
PULSER 39
RCA 13, 15
REGAL 28
REGENCY 32
SAMSUNG 04, 13, 29
SCIENTIFIC ATLANTA 10, 15, 16, 45, 48
SLMARX 04, 13
SONY 49
SPRUCER 04, 13, 19
STANDARD COMPONENTS 29
STARGATE 04, 05, 13
TELEVIEW 04, 13, 39
TEXSCAN 31
TOCOM 12, 17, 18, 19, 38
UNIDEN 20
UNIKA 39
UNIVERSAL 46, 47
VID TECH 30
VIDEO WAY 01, 42
VIEWSTAR 24, 25, 28
ZENITH 01, 02, 03
ZENITH HT-2000 01
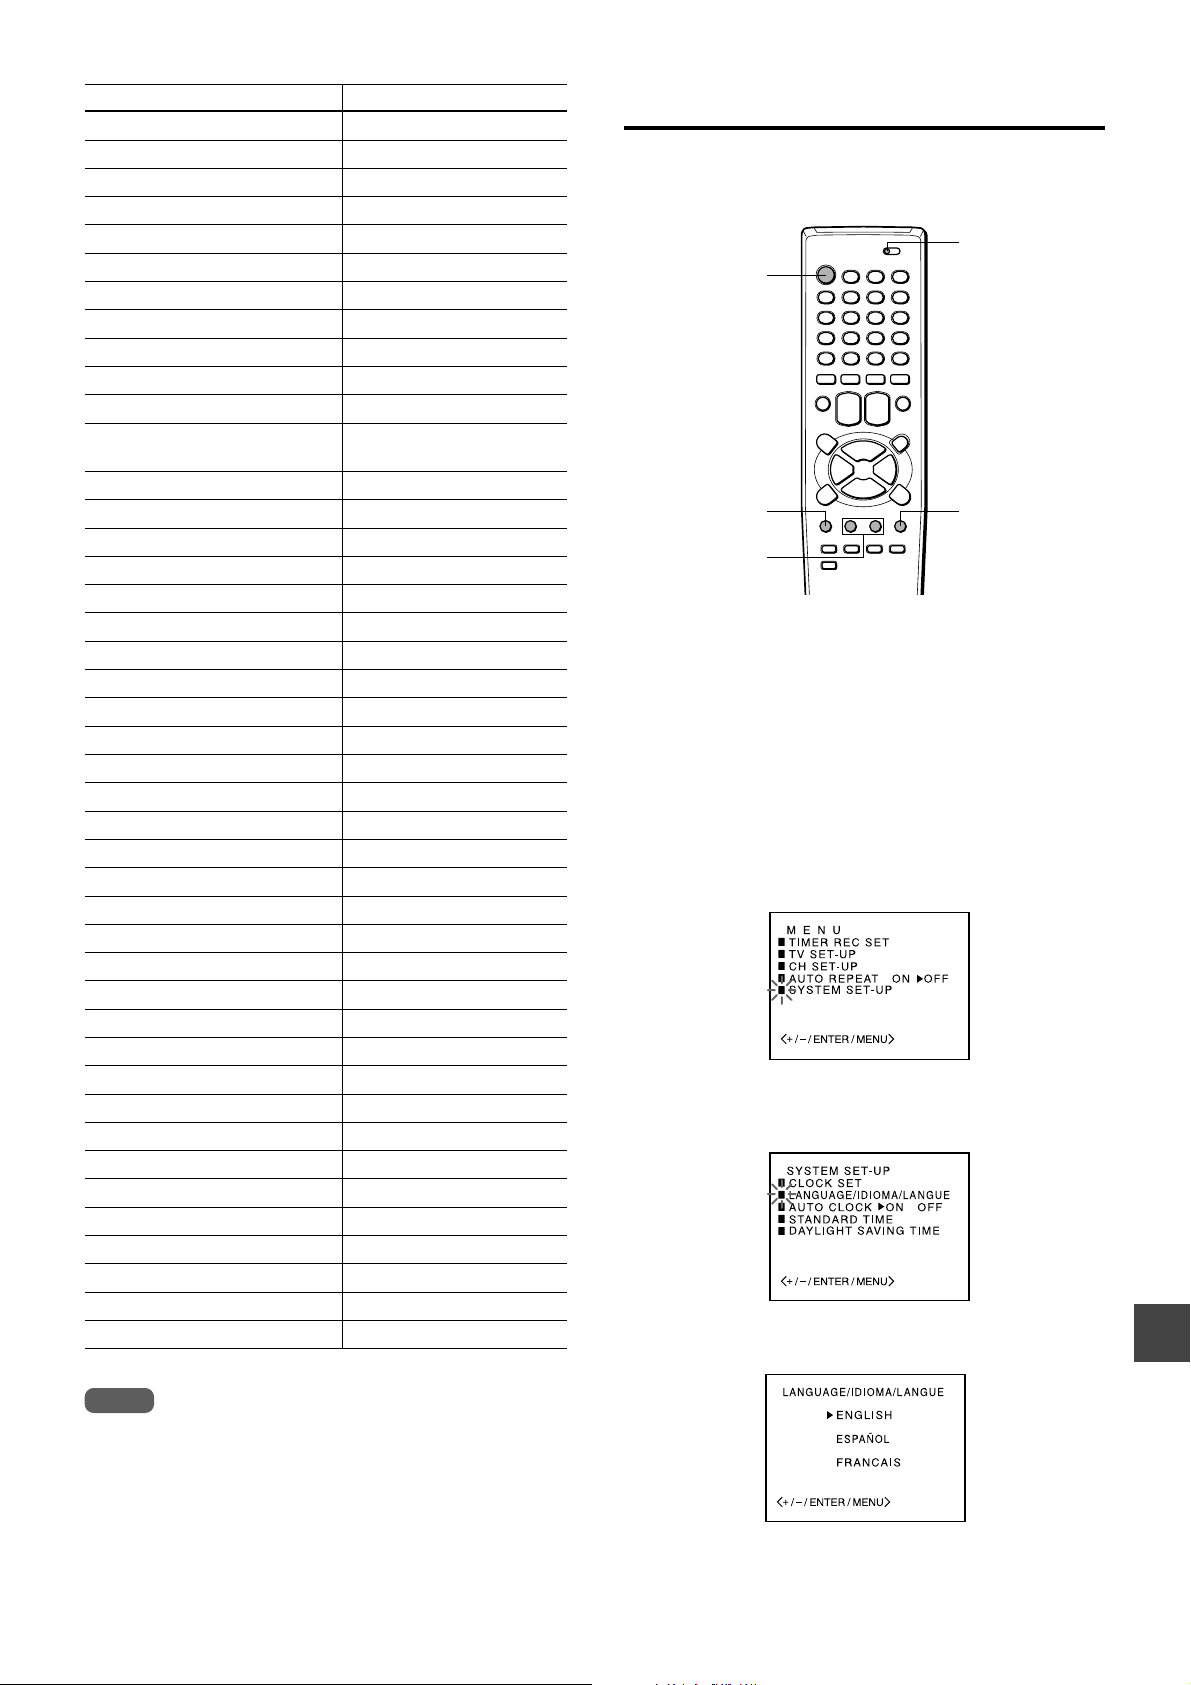
Setting the language
The on-screen menu can display three languages: English,
Spanish and French.
TV VCR/CATV
POWER
MENU ENTER
SET/TRACKING
+
/–
Before starting
Set the TV VCR/CATV selector to TV VCR
Press POWER to turn on the unit.
1
Press MENU.
2
When you press MENU for the first time after unpacking
the unit, LANGUAGE/IDIOMA/LANGUE menu in step 5
appears.
3
Press SET/TRACKING + or – to select SYSTEM
SET-UP, then press ENTER.
4
Press SET/TRACKING + or – to select
LANGUAGE/IDIOMA/LANGUE, then press
ENTER.
5
Press SET/TRACKING + or – to select the
desired language, then press ENTER.
Note
Some CATV converter manufacturers may not be listed above.
6
Press MENU twice to return to the normal
screen.
ENGLISH
8
Page 10
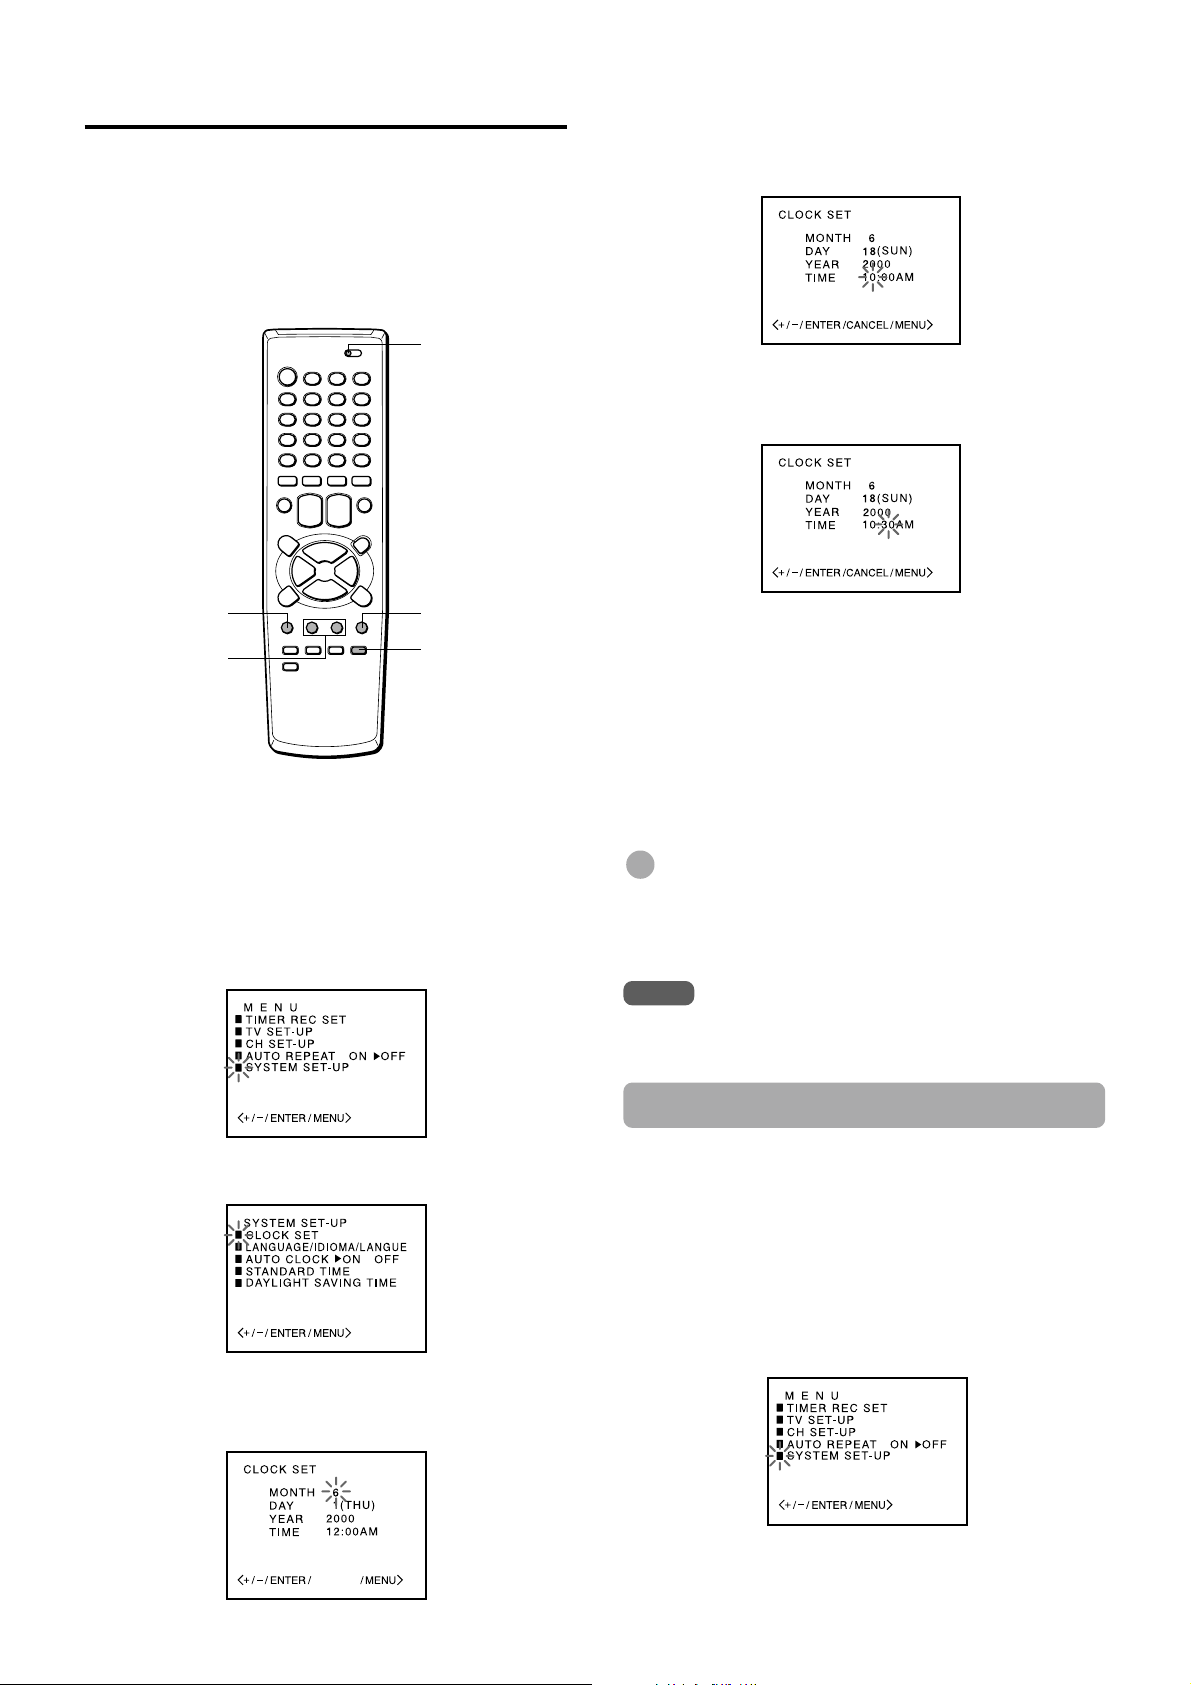
Setting the clock
You must set the date and time for timer recording.
When you connect the AC cord to the AC wall outlet, the
date and time will be set automatically if the unit receives
the clock adjustment signal. If the unit cannot receive the
clock adjustment signal or reception signal is weak, the unit
may set the clock incorrectly. In this case, you must set the
time manually.
TV VCR/CATV
5
Set DAY, YEAR and hours in the same way as
in step 4.
Press and hold SET/TRACKING + or – to change the
setting rapidly.
6
Press SET/TRACKING + or – to set the minutes.
To change the minutes setting in ten minutes, press and
hold SET/TRACKING + or – .
MENU
SET/TRACKING
+/–
Before starting
Set the TV VCR/CATV selector to TV VCR.
1
Press MENU.
If the clock is not set, SYSTEM SET-UP menu in step 3
appears.
2
Press SET/TRACKING + or – to select SYSTEM
SET-UP, then press ENTER.
Press SET/TRACKING + or – to select CLOCK
3
SET, then press ENTER.
ENTER
CANCEL
Press ENTER to start the clock.
7
The normal screen returns.
To correct the digits while setting
Before pressing ENTER in step 7, press CANCEL
repeatedly until the item you want to correct
flashes. Reset the digits using the SET/TRACKING + or –
button.
Tip
When the power supply is interrupted for more than 5 seconds
or the AC cord is disconnected from the AC wall outlet once, the
clock setting is cleared. In this case, you have to set the clock
again.
Note
The date can be set from A.D.1990 to A.D. 2081.
Setting the Auto Clock
The unit automatically corrects the clock setting once you
set AUTO CLOCK to ON. After unpacking the unit, AUTO
CLOCK is set to ON.
If AUTO CLOCK is set to OFF, follow the procedures below.
4
Press SET/TRACKING + or – to set MONTH,
then press ENTER.
The day of the week will automatically appear.
CANCEL
ENGLISH
9
1
Press MENU.
2
Press SET/TRACKING + or – to select SYSTEM SETUP, then press ENTER.
Page 11
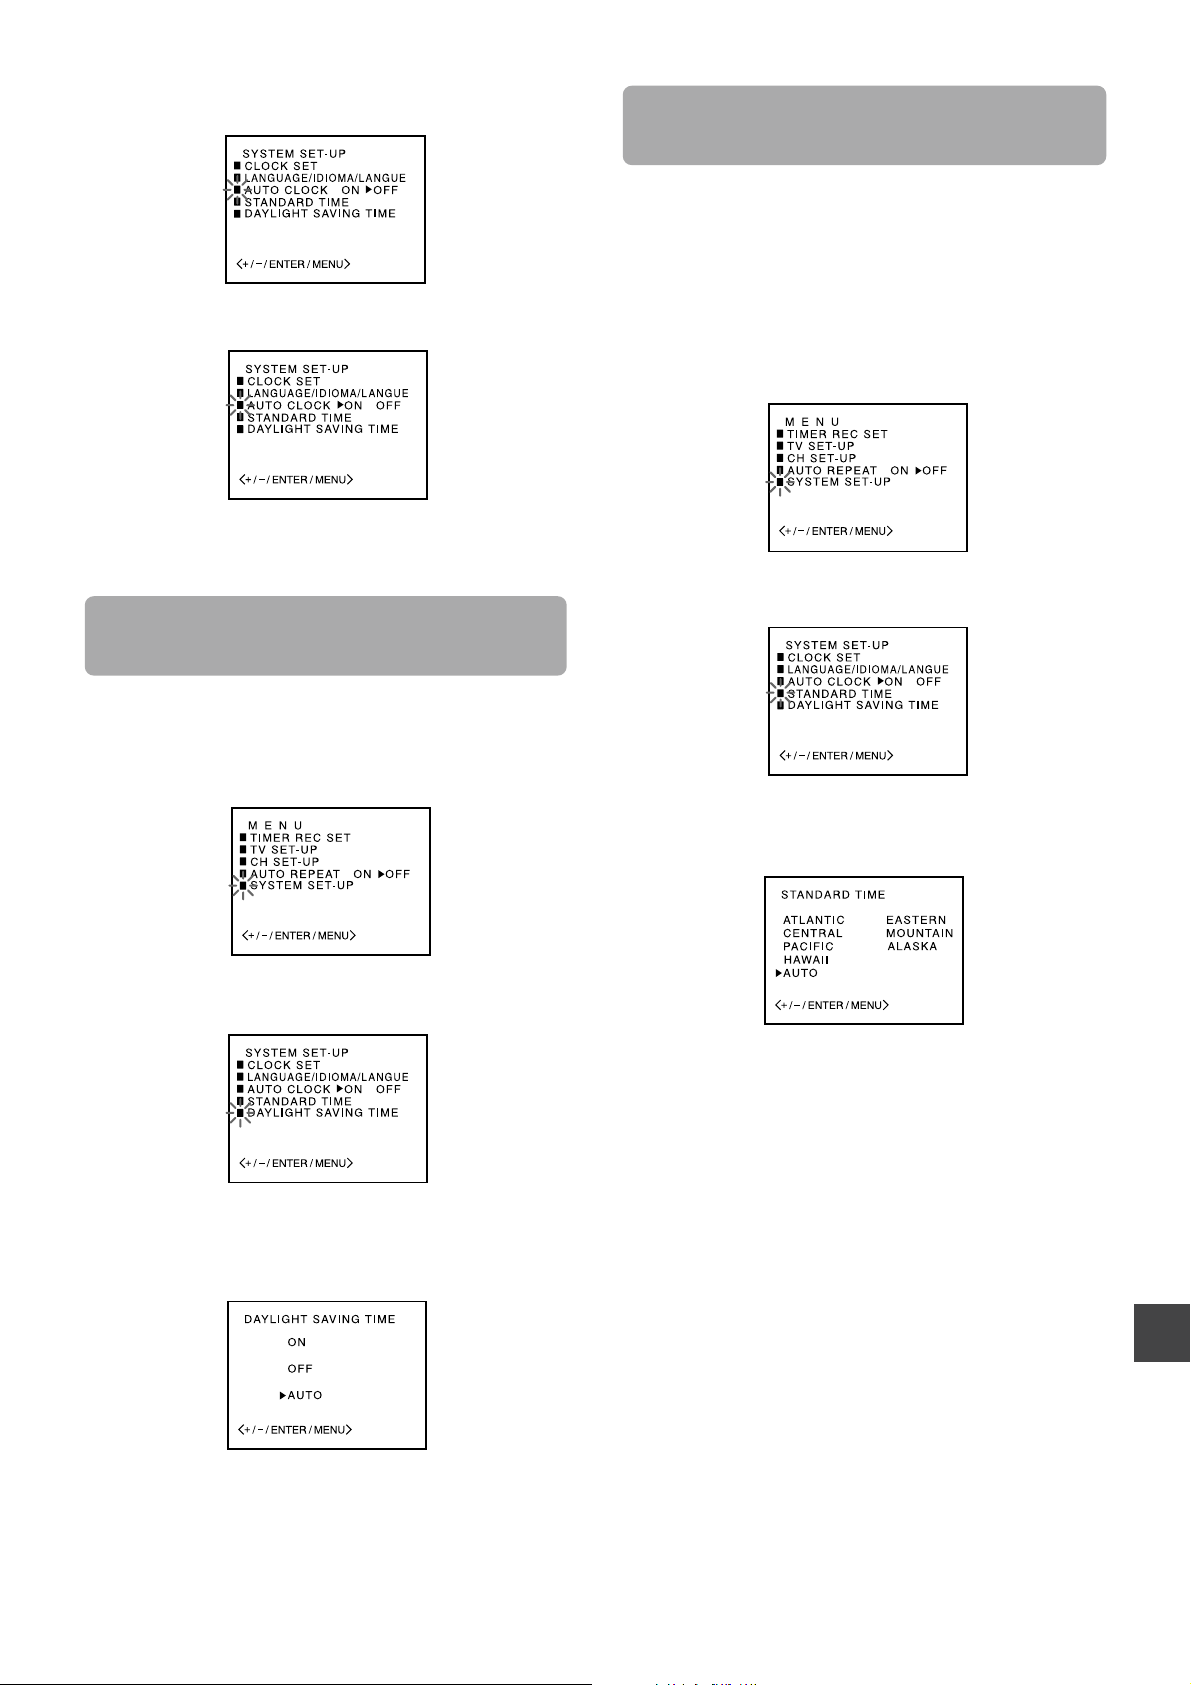
3
Press SET/TRACKING + or – to select AUTO CLOCK.
Setting the standard time according
to your area
When you move to a different area of the country, you can
adjust the clock only with selecting your new area.
This setting is only when connecting with the RF cable.
Set the channel correctly, before setting the standard time.
4
Press ENTER to select ON.
5
Press MENU twice to return to the normal screen.
Setting the time by the daylight
saving time
Press MENU.
1
2
Press SET/TRACKING + or – to select SYSTEM SETUP, then press ENTER.
Press MENU.
1
Press SET/TRACKING + or – to select SYSTEM SET-
2
UP, then press ENTER.
3
Press SET/TRACKING + or – to select STANDARD
TIME, then press ENTER.
4
Press SET/TRACKING + or – to select your area,
then press ENTER.
Normally the AUTO setting is sufficient.
3
Press SET/TRACKING + or – to select DAYLIGHT
SAVING TIME, then press ENTER.
4
Press SET/TRACKING + or – to select AUTO, then
press ENTER.
Normally the AUTO setting is sufficient. If you set it to
ON, you can advance the time by one hour manually .
5
Press MENU twice to return to the normal screen.
Press MENU twice to return to the normal screen.
5
ENGLISH
10
Page 12
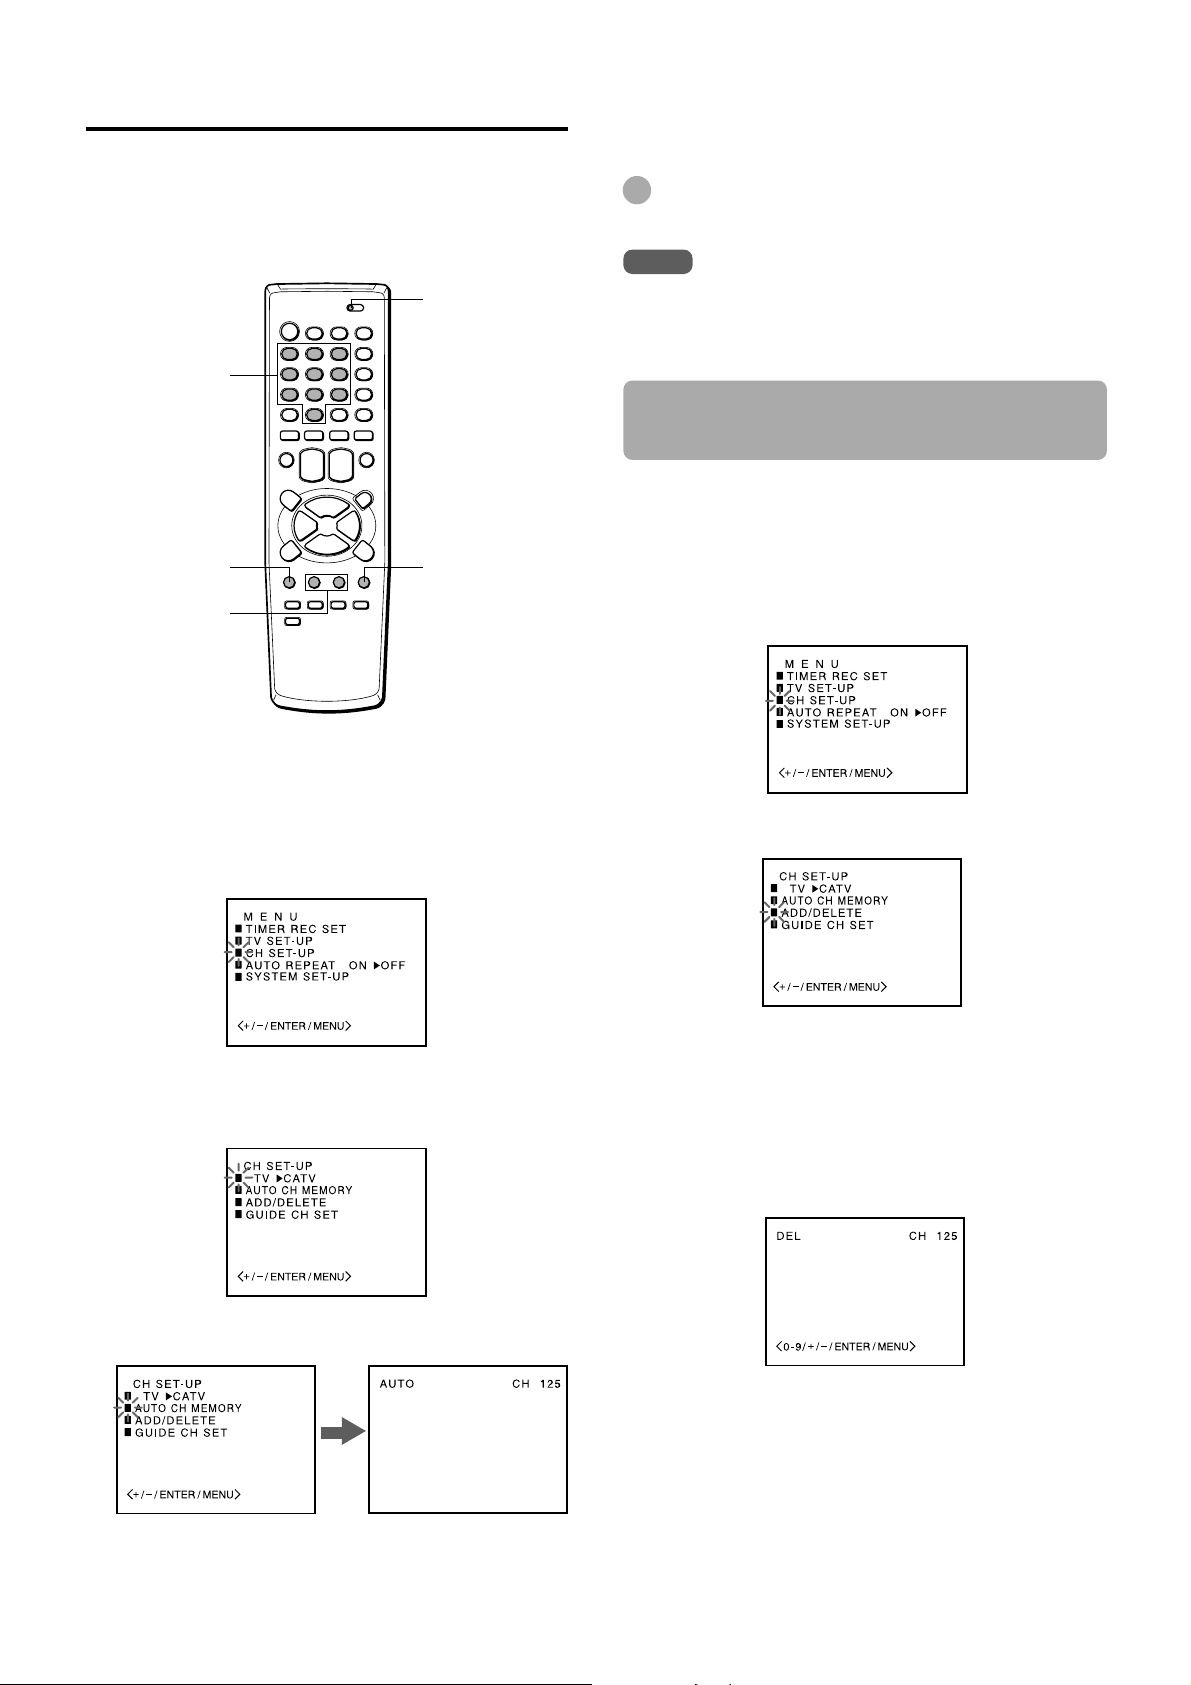
Setting the channels
Before Auto Channel Memory, this unit can receive all
channels in your area by pressing the CHANNEL N or
M button repeatedly. After Auto Channel Memory, you
can skip the channels which are not preset with the
CHANNEL N or M button.
TV VCR/CATV
Number
buttons
Press MENU twice to return to the normal
5
screen.
Tip
To interrupt the Auto Channel Memory, press MENU.
Note
Once you conduct the Auto Channel Memory, the previous
settings will be canceled.
Adding or erasing the channels
manually
If the Auto Channel Memory does not set the channels
correctly, add them manually for watching TV programs.
Also, you can erase the unnecessary channels.
MENU
SET/TRACKING
+/–
Before starting
• Make sure the unit is in TV mode.
• Set the TV VCR/CATV selector to TV VCR.
Press MENU.
1
2
Press SET/TRACKING + or – to select CH SETUP, then press ENTER.
3
Press ENTER to select TV or CATV.
TV : the program from VHF/UHF antenna
CATV : the CATV according to the connections to the
antenna connector
ENTER
Press MENU.
1
Press SET/TRACKING + or – to select CH SET-UP,
2
then press ENTER.
Press SET/TRACKING + or – to select ADD/DELETE,
3
then press ENTER.
Press SET/TRACKING + or – to select the channel
4
number to be erased or added.
• You can also select the channel using the number
buttons. When selecting the numbers less then 10,
press 0 to enter the tens digit, then press the button 1
through 9 to enter the ones digit.
• When the selected channel is already set, ADD
appears in green. When it is not set, DEL appears in
red.
Press SET/TRACKING + or – to select AUTO CH
4
MEMORY, then press ENTER.
All available channels in your area are scanned and
stored in the memory of the unit.
After scanning, CH SET-UP menu appears on the
screen.
ENGLISH
11
Press ENTER to erase or add a selected channel.
5
6
If you want to add or erase another channel, repeat
steps 4 and 5.
Press MENU 3 times to return to the normal screen.
7
Page 13

Checking the channel set-up
to use VCR Plus+® system
Before starting
Set the TV VCR/CATV selector to TV VCR.
Press MENU.
1
To set the timer using VCR Plus+® system, you have to
check whether the VCR channel numbers match the guide
channels which are assigned to the TV stations.
If they do not match, the VCR Plus+® system does not
function correctly. In this case, coordinate the number.
TV VCR/CATV
Number
buttons
MENU
SET/TRACKING
+/–
For example
For each channel your unit receives, use the channel line up
chart to check that the channel numbers match. For
example, SHOWTIME is listed in the channel line up chart
(under the VCR Plus+ Channel Number) as channel 38,
your unit receives SHOWTIME on channel 14, you need to
coordinate these numbers by locating guide channel 38
(under GUIDE CH). Next enter your SHOWTIME channel 14
(under VCR CH).
Continue this process until all channels match.
ENTER
CANCEL
Press SET/TRACKING + or – to select CH SET-
2
UP, then press ENTER.
Press SET/TRACKING + or – to select GUIDE
3
CH SET, then press ENTER.
Press SET/TRACKING +, – or the number
4
buttons to select GUIDE CH “38,” then press
ENTER.
When selecting the number between 10 and 19 using
the number buttons, press 0 once to enter the hundreds
digit, and then press the buttons 1 through 9 to enter
tens and ones digits.
When selecting the numbers less than 10 using the
number buttons, press 0 twice to enter the hundreds and
tens digits, and then press the buttons 1 through 9 to
enter the ones digit.
Sample Channel Line Up Chart
TV Station
WCBS New York CBS 02 02
WNBC New York NBC 04 04
WNYW New York NYW 05 05
WABC New York ABC 07 07
A&E
BET
CNBC
CSPAN
DSC Discovery Channel 37 63
DIS Disney Channel 53 27
MAX Cinemax 45 15
SHO Showtime 38 14
USA USA Network 44 40
• Channel Guide listings are available in your local TV Guide
and Newspaper.
Arts & Entertainment
Black Entertainment
Consumer News & Business
Government Business
VCR Plus+
Channel Number
Local Cable Company
Channel Number
39 44
57 23
23 16
28 54
Press SET/TRACKING+, – or the number
5
buttons to display VCR CH “14,” then press
ENTER.
When you use the number buttons, select the number in
the same way as in step 4.
Repeat steps 4 and 5 until all necessary
6
channel numbers are set.
7
Press MENU 3 times to return to the normal
screen.
Tip
To cancel the VCR CH setting, press CANCEL in step 5.
ENGLISH
12
Page 14
BASIC OPERATIONS
SLEEP
1
20
Watching a TV program
TV VCR/CATV
POWER
Number
buttons
MUTING
VOLUME +/–
SLEEP
PREV.CH
CHANNEL
N/M
VX-S207
To turn off the TV
Press POWER.
To mute the volume
Press MUTING. To restore the volume, press MUTING,
VOLUME + or –.
To recall a previous channel
Press PREV.CH to switch back and forth between the
current channel number and the previous one.
Tip
To listen through the headphones, insert headphones (not
supplied) with a stereo mini plug into the headphones jack on
the front. The sound from the TV speaker is muted.
Note
The power automatically turns off approximately 15 minutes
after a television station has stopped broadcasting.
Setting the sleep timer
Press SLEEP repeatedly to select the number of
minutes after which to turn off.
The minutes change in 10-minute intervals, down from 120
minutes. After the set amount of time has elapsed, the unit
turns the power off.
Headphones jack
POWER
indicator
1
Press POWER to turn on the unit.
The POWER indicator on the front lights.
Press CHANNEL N or M repeatedly, or the
2
+
/–
CHANNEL
N/M
POWERVOLUME
number buttons to select the channel number.
To select CATV broadcast using the number buttons
Set the TV VCR/CATV selector to CATV. When
selecting the number between 10 and 19, press 0 once
to enter the hundreds digit, and then press the buttons 1
through 9 to enter tens and ones digits. When selecting
the numbers less than 10, press 0 twice to enter the
hundreds and tens digits, and then press the buttons 1
through 9 to enter the ones digit.
To select VHF/UHF broadcast using the number buttons
When selecting the numbers less than 10, press 0 to
enter the tens digits, and then press the buttons 1
through 9 to enter the ones digit.
010••••• 100 110 120
To check the remaining sleep time
Press SLEEP once. The remaining time appears on the
screen.
To cancel the sleep timer
Press SLEEP repeatedly until “SLEEP 0” appears.
Press VOLUME + or – to adjust the volume.
3
ENGLISH
13
Page 15
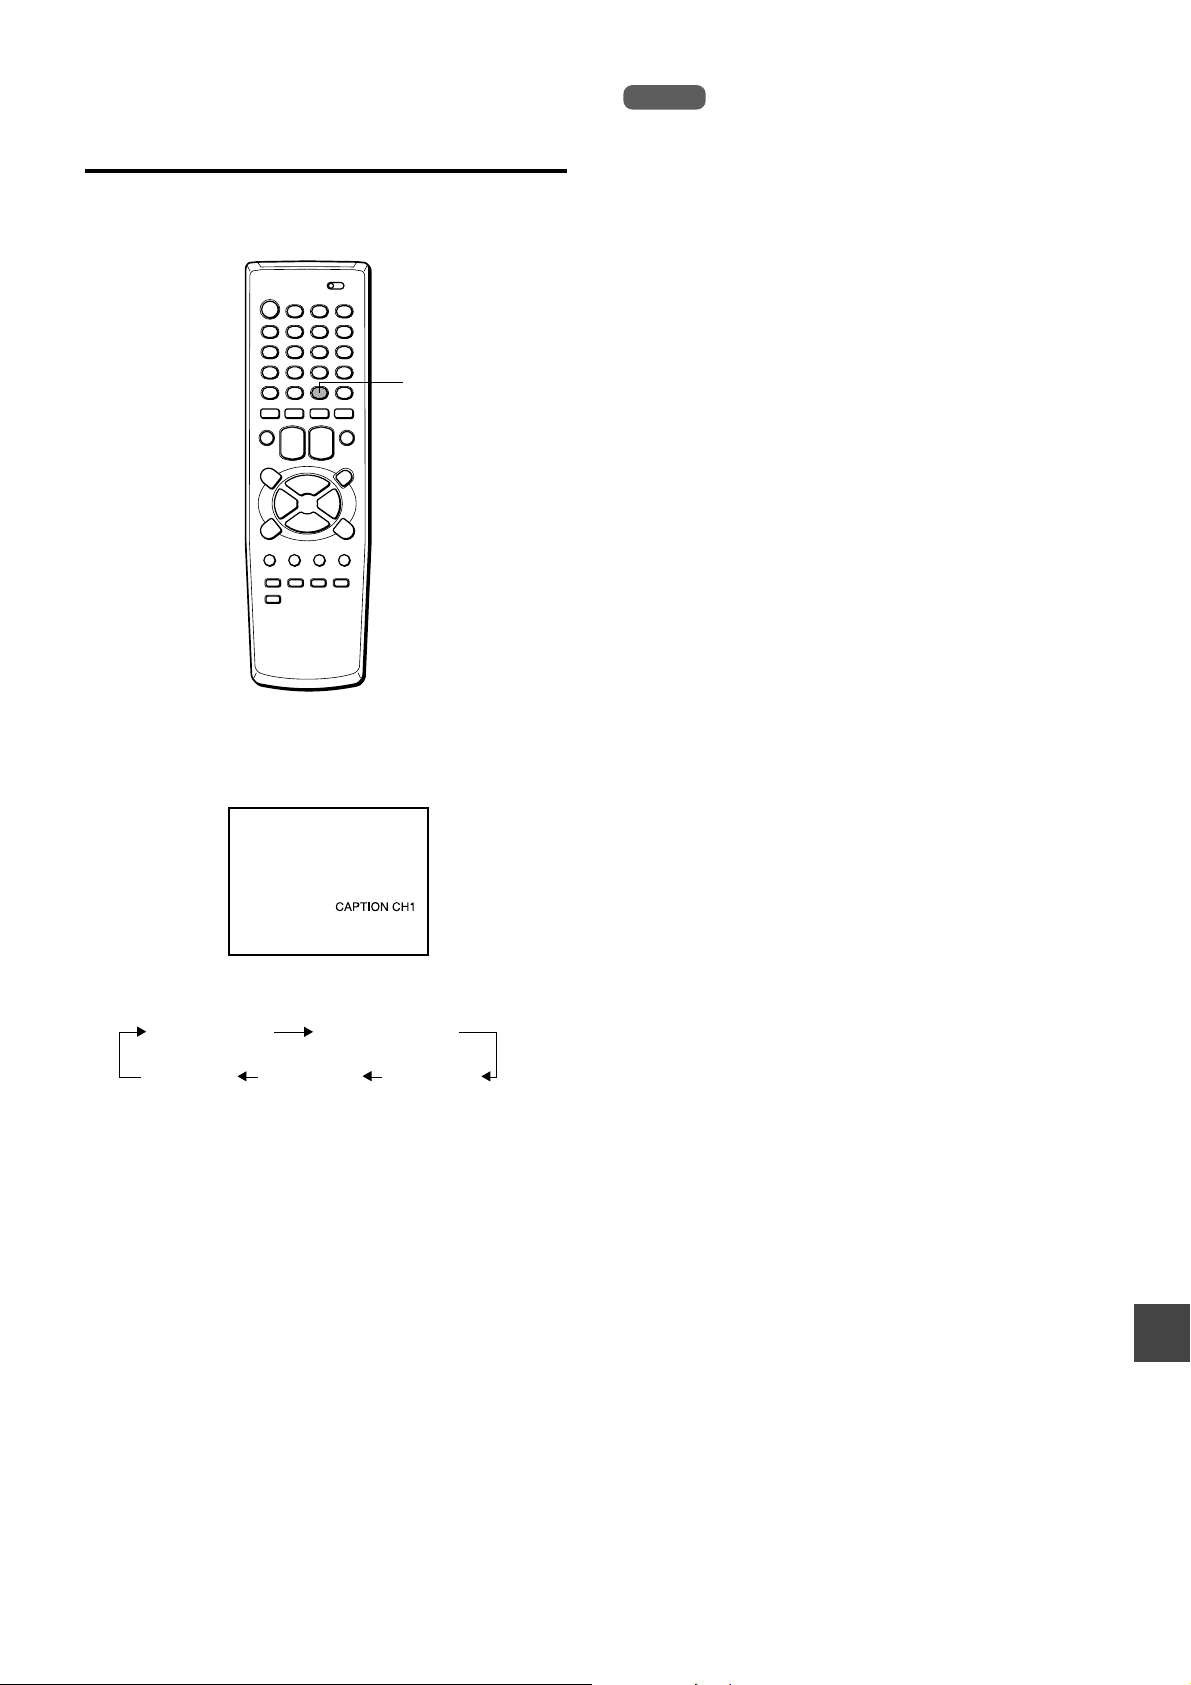
Selecting the closed captions
mode
This unit can decode and display closed captioned
television programs or tapes.
CAPTION
Press CAPTION repeatedly to select the caption
mode.
Notes
• After selecting a closed caption mode, it will stay in effect
until it is changed, even if the channel is changed.
• If the captions signal is lost due to a commercial or a break
in the signal, the captions will reappear when the signal is
received again.
• When selecting closed captions, the captioning might be
delayed momentarily.
• If the channels are changed, the captions might be delayed
momentarily.
• If using an indoor antenna or if TV reception is very poor, the
closed caption decoder text may not appear. In this case,
adjust the antenna for better reception or use an outdoor
antenna.
• When activating the closed captioned decoder, there will be
a short delay before the closed captioned text appears on
the screen.
• The captions will appear in places on the screen where they
will least interfere with the picture, usually on the bottom of
the screen. News programs will usually show three-line
closed captions which scroll onto the screen. Most other
shows provide two or three lined captions placed near the
character who is speaking so the viewer can follow the
dialogue.
• If no caption signal is received, no captions will appear, but
the television will remain in the caption mode.
• Misspellings or unusual characters may occasionally appear
during closed captioning. This is normal with closed
captioning, entered live. These transmissions do not allow
time for editing.
• Some cable systems and copy protection systems may
interfere with the closed captioned signal.
• Words in italics or underlined describe titles, words in foreign
languages or words requiring emphasis. Words that are sung
usually appear enclosed by musical notes.
• For television programs broadcasting with closed captions,
look in your TV guide for the closed captions symbol (CC).
The display changes as follows:
CAPTION CH1 CAPTION CH2
No display TEXT CH2 TEXT CH1
(Caption off)
Captions:
This closed caption mode displays text on the screen in
English or another language. Generally, closed captions in
English are transmitted on CAPTION CH1 and closed
captions in other languages are transmitted on CAPTION
CH2.
Full Screen Text:
The text closed caption mode TEXT CH1, TEXT CH2 will
usually fill the screen with a programming schedule or other
information.
ENGLISH
14
Page 16

Adjusting the picture
You can adjust the picture settings for brightness, contrast,
color, tint and sharpness.
TV VCR/CATV
Press SET/TRACKING + or – to adjust the
5
setting.
After several seconds from releasing the button, the
display returns to the normal screen.
Item
Increasing the
numbers
Decreasing the
numbers
MENU
SET/TRACKING
+/–
Before starting
Set the TV VCR/CATV selector to TV VCR.
1
Press MENU.
2
Press SET/TRACKING + or – to select TV SET-
ENTER
CANCEL
UP, then press ENTER.
BRIGHTNESS
CONTRAST
COLOR
TINT
SHARPNESS
6
To adjust the other item, complete steps 4
makes the picture
brighter
enhances the
contrast
enhances the
intensity and
brilliance of the color
makes lighter colors
greener
makes the picture
clearer
makes the picture
darker
lowers the contrast
lowers the intensity
and brilliance of the
color
makes lighter colors
redder
makes the picture
softer
through 5.
7
Press MENU 3 times to return to the normal
screen.
3
Press SET/TRACKING + or – to select
PICTURE, then press ENTER.
4
Press ENTER repeatedly to select the item to
adjust.
Each press changes the item as follows:
BRIGHTNESS CONTRAST COLOR
SHARPNESS TINT
Tip
To reset all the items to the initial setting, press CANCEL in
step 5.
15
ENGLISH
Page 17
Adjusting the sound
You can adjust the settings for bass sound, treble sound
and the balance of the sound.
TV VCR/CATV
5
Press SET/TRACKING + or – to adjust the
setting.
After several seconds from releasing the button, the
display returns to the normal screen.
Item
Increasing the
numbers
Decreasing the
numbers
MENU
SET/TRACKING
+/–
Before starting
Set the TV VCR/CATV selector to TV VCR.
1
Press MENU.
2
Press SET/TRACKING + or – to select TV SET-
ENTER
CANCEL
UP, then press ENTER.
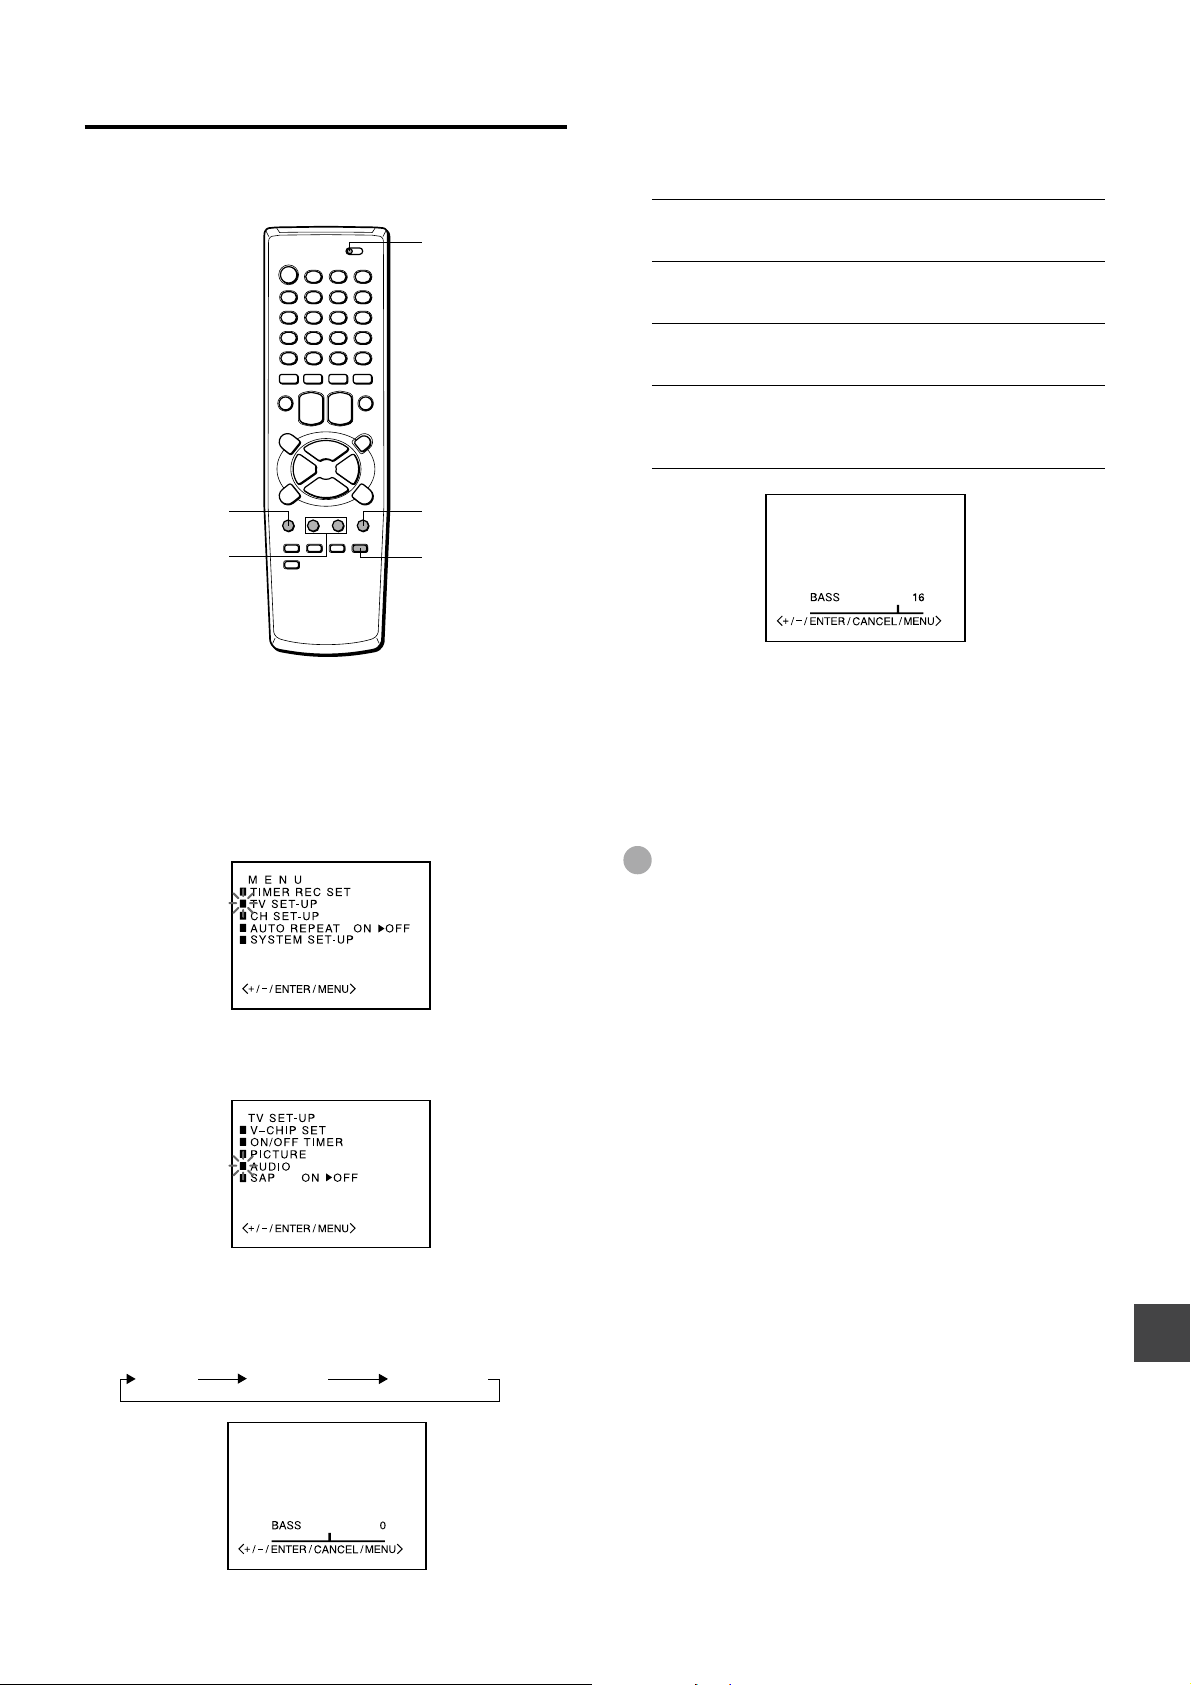
BASS
TREBLE
BALANCE
To adjust the other item, complete steps 4
6
makes the bass
sound stronger
makes the treble
sound stronger
makes the output
level of right speaker
stronger
makes the bass
sound weaker
makes the treble
sound weaker
makes the output
level of left speaker
stronger
through 5.
Press MENU 3 times to return to the normal
7
screen.
Tip
To reset all the items to the initial setting, press CANCEL in
step 5.
3
Press SET/TRACKING + or – to select AUDIO,
then press ENTER.
4
Press ENTER repeatedly to select the item to
adjust.
Each press changes the item as follows:
BASS TREBLE BALANCE
ENGLISH
16
Page 18
Setting the On-Timer
Once this timer is set, the unit turns on at the programmed
time to the programmed channel.
TV VCR/CATV
4
Press SET/TRACKING + or – to select ON
TIMER, then press ENTER.
Press
5
SET/TRACKING + or –
then press ENTER.
to set the hours,
MENU
SET/TRACKING
+/–
ON-TIMER
indicator
Before starting
• Check that the clock is set correctly.
• Set the TV VCR/CATV selector to TV VCR.
ENTER
VX-S207
Press SET/TRACKING + or – to set the minutes,
6
then press ENTER.
To change the minutes setting in ten minutes, press and
hold SET/TRACKING + or –.
Press SET/TRACKING + or – to set the channel
7
number, then press ENTER.
1
Press MENU.
2
Press SET/TRACKING + or – to select TV SETUP, then press ENTER.
3
Press SET/TRACKING + or – to select ON/OFF
TIMER, then press ENTER.
ENGLISH
17
Press SET/TRACKING + or – to select a kind of
8
timer, then press ENTER.
MON-FRI: Daily program from Monday to Friday.
MON-SAT: Daily program from Monday to Saturday.
SUN-SAT: Daily program on everyday.
WKL-day of the week:
Weekly program such as every Sunday.
Page 19
9
Press SET/TRACKING + or – to display SET,
then press ENTER.
The ON-TIMER indicator on the unit lights.
Press MENU 3 times to return to the normal
10
screen.
• At the programmed time, the channel is changed to a
programmed one.
• You can turn the unit off. The unit automatically turns
on to a programmed channel at the programmed time.
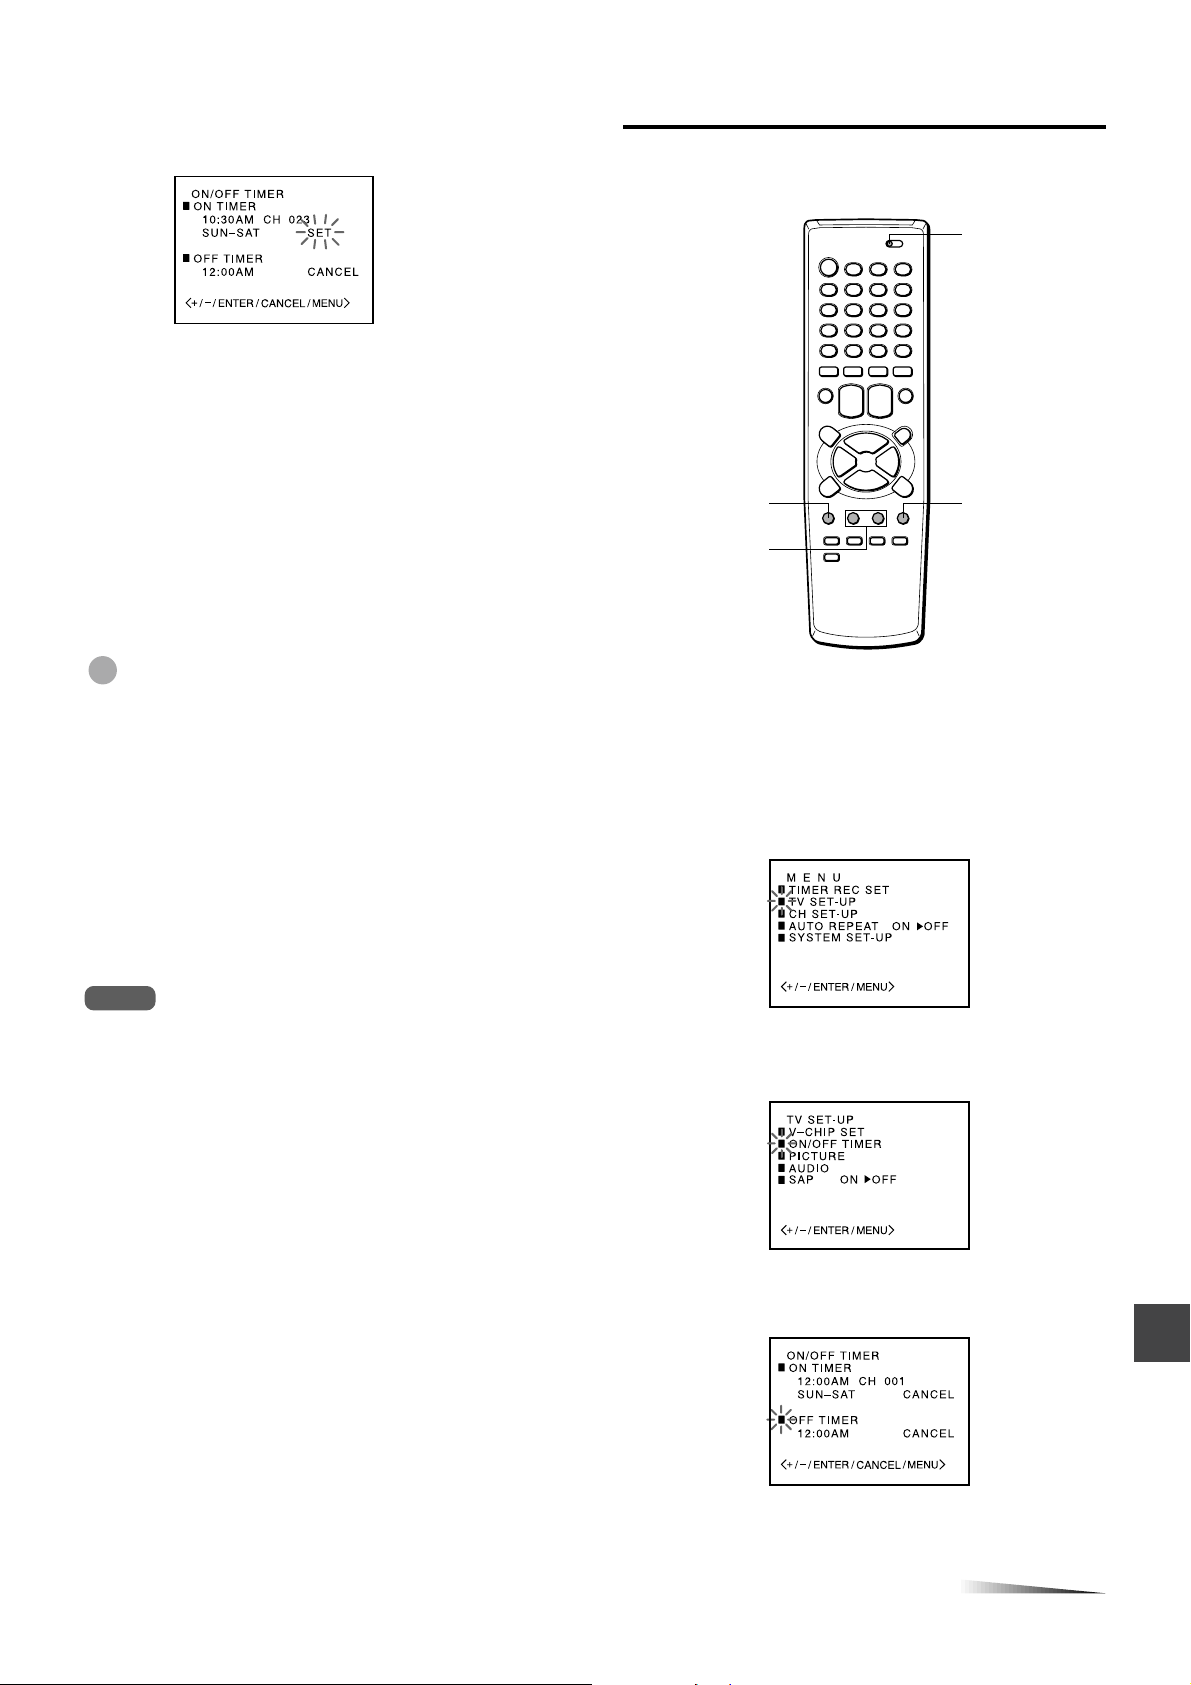
Setting the Off-Timer
Once this timer is set, the unit turns off everyday at the
programmed time.
TV VCR/CATV
MENU
ENTER
To correct the data while setting
Before pressing ENTER in step 9, press CANCEL
repeatedly until the item you want to correct flashes. Reset
the data using the SET/TRACKING + or – button.
Tips
• If you want to watch the program through the line input,
press SET/TRACKING + or – to display “LINE1” (from
AUDIO/VIDEO IN jacks on the rear) or “LINE2” (from
AUDIO/VIDEO IN jacks on the front) in step 7, instead of the
channel number.
• To cancel the On-Timer, follow the steps 1 through 4. Then
press ENTER repeatedly until SET flashes and press SET/
TRACKING + or – to display CANCEL.
• To confirm the setting, follow the steps 1 through 3.
Press MENU 3 times to return to the normal screen.
• The unit automatically turns off one hour after the On-Timer
turns on the unit if no Off-Timer has been set (one hour
automatic shut off). To continue watching the TV, press any
button to cancel this function.
Notes
• If the power has been turned on at a programmed time, the
one hour automatic shut off function does not work.
• Even though you have played back a tape at a programmed
time, the channel is changed as you set and the unit does
not stop playback at the time.
SET/TRACKING
+/–
Before starting
• Check that the clock is set correctly.
• Set the TV VCR/CATV selector to TV VCR.
1
Press MENU.
2
Press SET/TRACKING + or – to select TV SETUP, then press ENTER.
Press SET/TRACKING + or – to select ON/OFF
3
TIMER, then press ENTER.
4
Press SET/TRACKING + or – to select OFF
TIMER, then press ENTER.
CONTINUE
ENGLISH
18
Page 20
PLAYBACK
Setting the Off-Timer (continued)
Press SET/TRACKING + or – to set the hours,
5
then press ENTER.
Press SET/TRACKING + or – to set the minutes,
6
then press ENTER.
To change the minutes setting in ten minutes, press and
hold SET/TRACKING + or –.
Press SET/TRACKING + or – to display SET,
7
then press ENTER.
Playing back a tape
AD-SKIP
fREW/[
sSTOP
SET/TRACKING
+/–
SLOW
VX-S207
zEJECT
TV MONITOR
dPLAY
gF FWD/]
aPAUSE/STILL
ATR
Press MENU 3 times to return to the normal
8
screen.
The unit automatically turns off at the programmed time.
To correct the data while setting
Before pressing ENTER in step 7, press CANCEL
repeatedly until the item you want to correct flashes. Reset
the data using the SET/TRACKING + or – button.
Tips
• To cancel the Off-Timer, follow the steps 1 through 4. Then
press ENTER repeatedly until SET flashes and press
SET/TRACKING + or – to display CANCEL.
• To confirm the setting, follow the step 1 through 3.
Press MENU 3 times to return to the normal screen.
• Do not set the Off-Timer to the same time as the setting of
the On-Timer.
ENGLISH
19
DPLAY
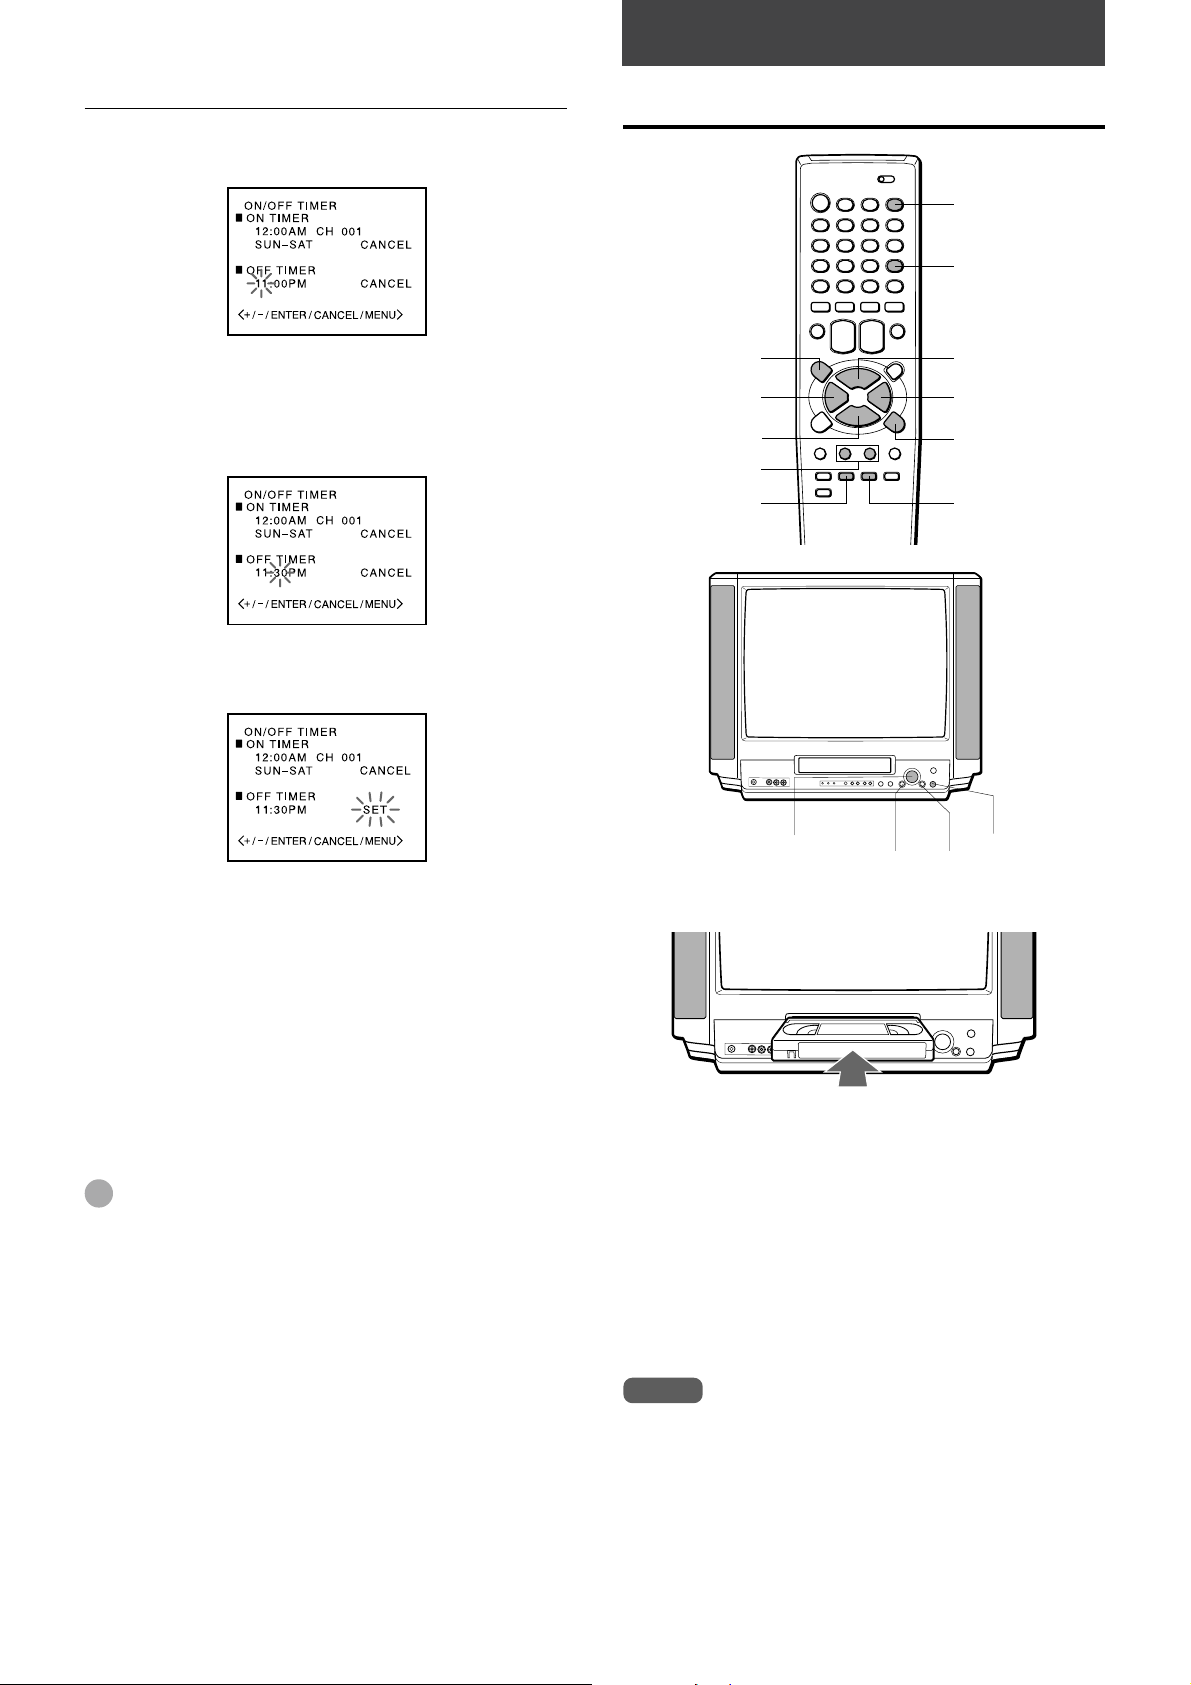
Insert a cassette.
1
• The power turns on automatically.
• Playback starts immediately if the erasure prevention
tab has been removed from the cassette.
2
Press d PLAY to start playback.
“D” of the button on the unit lights.
fREW/[
gF FWD/]
ZSTOP/EJECT
To stop playback
Press s STOP on the remote control or Z STOP/
EJECT on the unit.
“D” of the button on the unit lights off.
Notes
• When the tape reaches the end during playback, slow
playback, fast-forward or forward search, the unit
automatically rewinds the tape to the beginning and ejects
the cassette (Auto rewind function).
• The unit selects the tape speed, SP, LP or SLP (EP).
• The power is turned on and playback is started when
d PLAY is pressed during power off.
• Without high quality resolution on the picture, it is available
to use S-VHS cassette tape on this unit. The picture may
have noise with some tapes.
Page 21

If you cannot get a clear playback
picture
Although the unit adjusts the tracking automatically, you
may need to adjust the tracking manually if the tape quality
is too poor.
If the picture and the sound have noise, try manual tracking.
To adjust the tracking manually
During playback, press SET/TRACKING + or – repeatedly
until you get the best possible picture.
(Automatic Tracking is canceled and “MANUAL TR.” and
tracking bar appear.)
To watch a picture of the tape during fastforward or rewind — Skip Search
Press and hold g F FWD/] or f REW/[ during fastforward or rewind. The unit switches forward or reverse
search and “D” of the button on the unit flashes. Release
the button to return to the fast-forward or rewind mode.
To skip an advertisement
Press AD-SKIP during playback. The VCR searches forward
approximately 30 seconds of the recorded time.
Each press changes the recorded time of forward search in
30 seconds increments to a maximum of 3 minutes.
After forward search, VCR returns to the normal playback.
During AD-SKIP, the counter does not register blank
portions with no recorded signal and “D” of the button on
the unit flashes.
To monitor a TV program
Press TV MONITOR during playback. The cassette
continues to play while the picture switches to TV channel.
Press TV MONITOR again to return to playback picture.
To return to automatic tracking
Press ATR. “AUTO TR.” appears.
Additional functions
To
Make a picture
still
Fast-forward the
tape
Rewind the tape
Eject the
cassette
Search forward
at low speed
Search forward
at a higher
speed
Search reverse
at low speed
Search reverse
at a higher
speed
Play at slow
speed
Press
a PAUSE/STILL
during playback
g F FWD/]
during stop
f REW/[
during stop
z EJECT on the
remote control or
Z STOP/EJECT
on the unit during
stop
g F FWD/]
once during playback
g F FWD/]
twice during playback
f REW/[
once during playback
f REW/[
twice during playback
SLOW
To return to the
original mode
Press a PAUSE/
STILL or d PLAY.
The D PLAY
button falshes.
Press s STOP on
the remote control
or ZSTOP/
EJECT on the unit.
Press s STOP on
the remote control
or ZSTOP/
EJECT on the unit.
Press
The D PLAY button
falshes rapidly.
Press d PLAY.
The D PLAY button
falshes rapidly.
Press d PLAY.
The D PLAY button
falshes rapidly.
Press d PLAY.
The D PLAY button
falshes rapidly.
Press d PLAY.
The D PLAY button
falshes slowly.
—
d
Tips
• Even if you press z EJECT on the remote control or Z
STOP/EJECT on the unit while the power is off, the unit
ejects the cassette.
• Depending on the tape, noise lines may appear or color may
fade during forward and reverse searches, and still. You can
move the noise lines during forward and reverse searches by
pressing the SET/TRACKING + or – button repeatedly.
Notes
• If a still picture lasts for more than 5 minutes, the unit will
automatically enter playback mode to protect the tape.
• The sound will be muted during forward and reverse
searches, and still.
PLAY.
You can switch the speed of forward and reverse searches
by pressing g F FWD/] and f REW/[ repeatedly.
ENGLISH
20
Page 22

Playing back a tape repeatedly
Various search functions
POWER
ZERO-
RETURN
MENU
SET/TRACKING
+/–
Before starting
Set the TV VCR/CATV selector to TV VCR.
Press MENU.
1
Press SET/TRACKING + or – to select AUTO
2
REPEAT.
TV VCR/CATV
T-REC
dPLAY
wREC/OTR
ENTER
TV VCR/CATV
Number
INDEX
RESET
ZERORETURN
fREW/[
REC. END
SEARCH
buttons (1-9)
CALL
gF FWD/]
sSTOP
Rewinding or fast-forwarding to a
specific point – Zero Return
1
Press CALL to display the tape counter.
Press ENTER to select ON.
3
4
Press MENU to return to the normal screen.
Press d PLAY.
5
The unit plays back the tape to the end, rewinds to the
beginning, then repeats playback.
To cancel repeat playback
Press ENTER to select OFF in step 3. Repeat playback will
also be canceled by pressing POWER, T-REC or wREC/
OTR, using the Zero Return function or ejecting the
cassette.
Press RESET at the point you want to locate later.
2
The tape counter resets to “00:00:00.”
3
After playback or recording, press s STOP on the
remote control or s/z STOP/EJECT on the unit,
then press ZERO-RETURN.
The tape automatically stops when the tape counter
returns to about “00:00:00.”
Notes
• When you insert a cassette, the tape counter is reset to
“00:00:00.”
• The tape counter does not work while playing unrecorded
portions of tape.
21
ENGLISH
Page 23
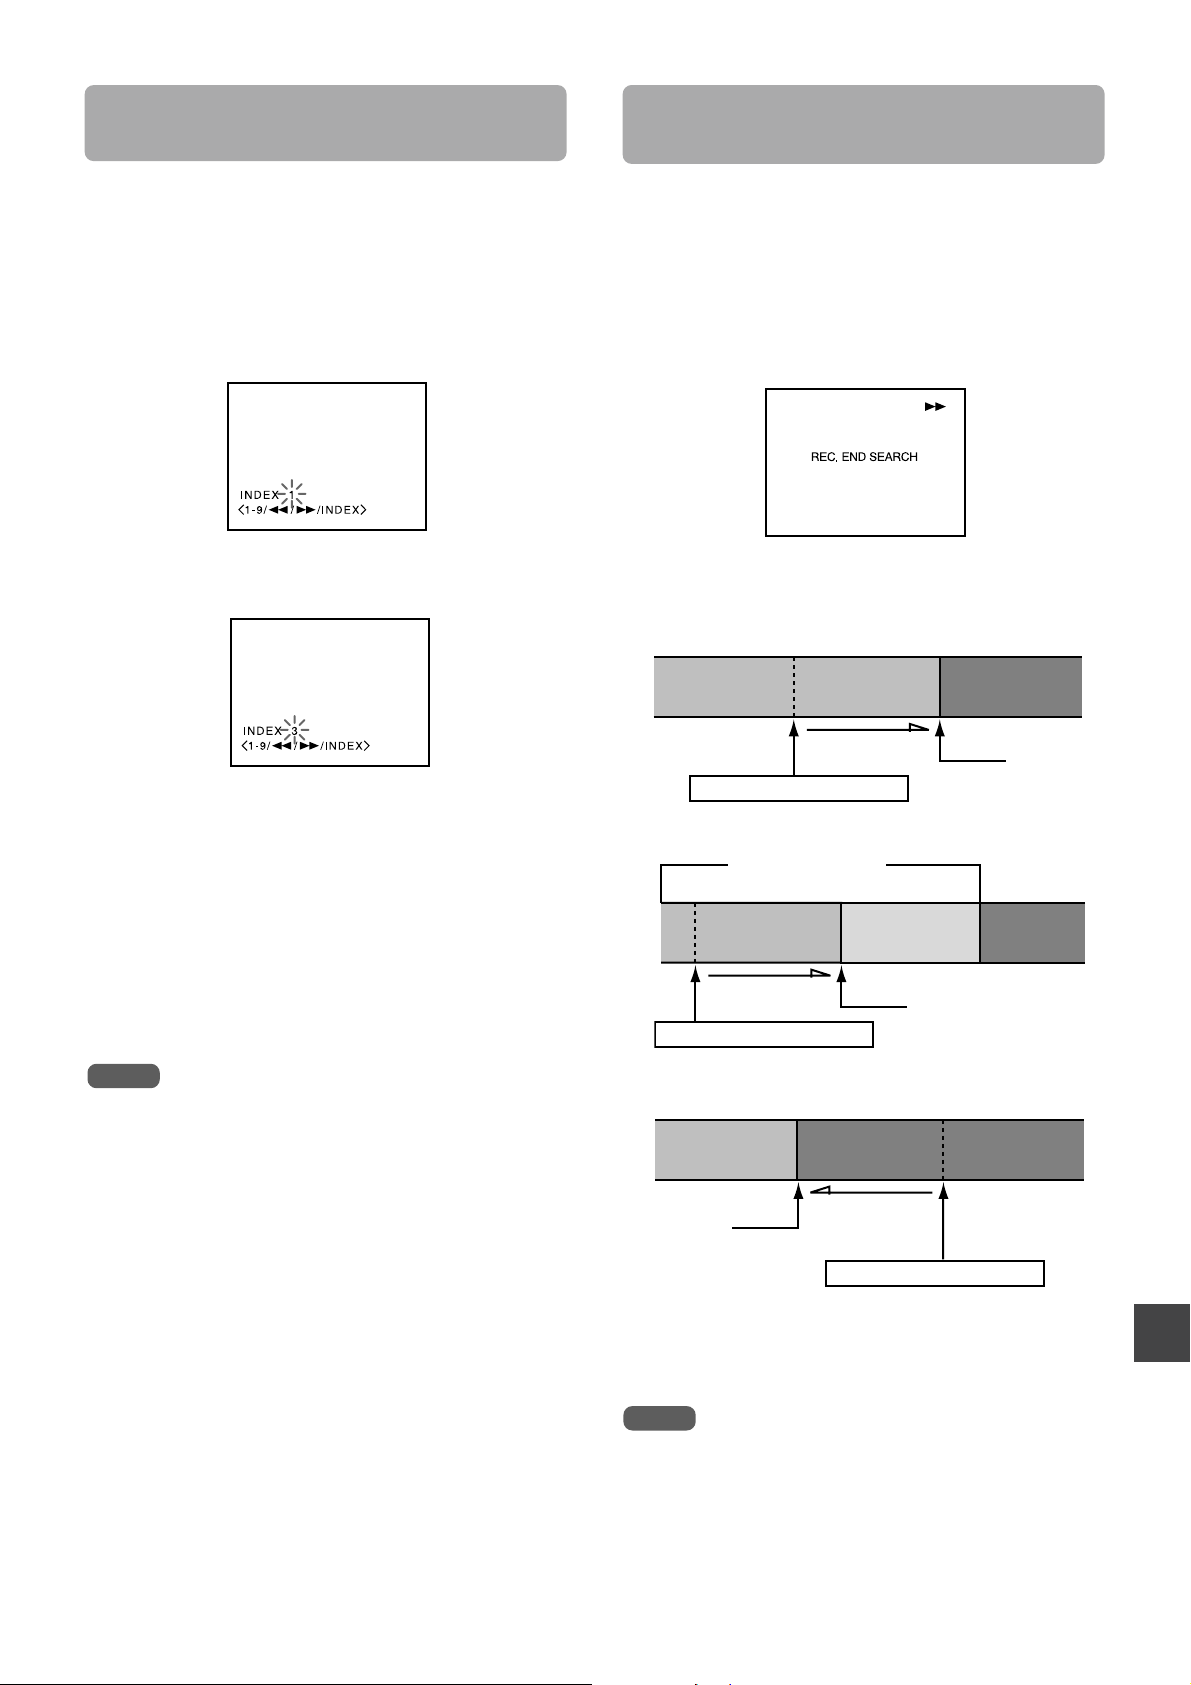
Searching with the index function
recorded
blank
recorded
blank
— Index Search
Searching the end of the recorded
program — End Search
The unit automatically marks an index signal on the tape
each time recording starts. You can use these signals to
find the beginning of any recording.
Before starting
Set the TV VCR/CATV selector to TV VCR.
1
Press INDEX during stop or playback.
Press the number buttons (1 - 9) to select the index
2
number (up to 9).
3
Press g F FWD/] (for succeeding programs) or
f REW/[ (for preceding programs).
The unit starts searching.
Playback starts automatically from the beginning of the
specified recording.
You can fast-forward/rewind the tape at the end of the
recorded program automatically.
Before starting
Set the TV VCR/CATV selector to TV VCR.
Press REC. END SEARCH during stop.
The unit starts searching.
Searching stops automatically after fast-forwarding or
rewinding as below;
Fast-forward
recorded
recorded blank
Fast-forward
Press REC.END SEARCH
Previous recorded
blank
Stop
To search the next index signal
Press INDEX during stop or playback, then press g
F FWD/] or f REW/[. When the next index signal is
found, playback starts automatically.
Notes
• Index signals should be at least 2 minutes apart. Otherwise,
the unit cannot detect them properly.
• Index signals may not be detected on damaged or worn out
tapes.
• Index signal at the beginning of a recorded tape may not be
detected.
• Index signal may not be detected if it is extremely close to
the point where the search began.
• When the tape reaches at the beginning, the unit plays back
automatically.
• During Index Search, when the tape reaches the end, Index
Search will be stopped and the tape is automatically
rewineded.
later recordedlater recorded
Fast-forward
Press REC.END SEARCH
Rewind
recorded
recorded blank
Rewind (after
Stop
fast-forwarding
for four seconds)
Press REC.END SEARCH
Stop
blank
blankblank
To stop End Search
Press s STOP on the remote control or s/z STOP/
EJECT on the unit.
Note
When the tape does not have blank space, searching stops at
the end of the tape.
ENGLISH
22
Page 24

RECORDING
Recording a TV program
TV VCR/CATV
Number
buttons
TV/LINE
CHANNELN/M
wREC/OTR
aPAUSE/STILL
TAPE SPEED
sSTOP
Press CHANNEL N or M repeatedly, or the
3
number buttons to select the channel number
to record.
To select CATV broadcast using the number buttons
Set the TV VCR/CATV selector to CATV. When
selecting the number between 10 and 19, press 0 once
to enter the hundreds digit, and then press the buttons 1
through 9 to enter tens and ones digits. When selecting
the numbers less than 10, press 0 twice to enter the
hundreds and tens digits, and then press the buttons 1
through 9 to enter the ones digit.
To select VHF/UHF broadcast using the number buttons
When selecting the numbers less than 10, press 0 to
enter the tens digits, and then press the buttons 1
through 9 to enter the ones digit.
4
Press w REC/OTR to start recording.
•“INDEX” flashes for a few seconds.
• The wREC/OTR button on the unit lights.
VX-S207
CHANNEL N/M
Before starting
Set the TV VCR/CATV selector to TV VCR.
1
Insert a cassette with its erasure prevention tab
ZSTOP/EJECT
wREC/OTR
in place.
The power turns on automatically.
To stop recording
Press s STOP on the remote control or Z STOP/
EJECT on the unit.
The wREC/OTR button on the unit lights off.
To pause recording
Press a PAUSE/STILL.
The wREC/OTR button on the unit flashes.
To resume recording, press a PAUSE/STILL or wREC/
OTR.
To prevent an accidental recording
Break off the erasure prevention tab on the back edge of the
cassette.
To record over the tape again, cover the gap with adhesive
tape.
Erasure prevention tab
Adhesive tape
2
Press TAPE SPEED to select the tape speed,
SP, LP or SLP.
SLP provides three as much recording time as SP, LP
provides twice as much recording time as SP, although
SP produces better picture and audio sounds.
23
ENGLISH
Tip
If you want to record the program through the line input, press
CHANNEL N or M, or TV/LINE to display “LINE1” (from the
AUDIO/VIDEO IN jacks on the rear) or “LINE2” (from the
AUDIO/VIDEO IN jacks on the front) in step 3.
Notes
• The channel cannot be changed during recording.
• If you try to record on a cassette without its erasure
prevention tab, the unit will eject the cassette.
• If recording pause lasts for more than 5 minutes, the unit will
automatically enter stop mode to protect the tape.
• If the power is turned off during recording, the TV turns off,
but the VCR continues to record.
Page 25

Playing back the portion you just
Recording with One-Touch
recorded – One-Touch Playback
Using One-Touch Playback after VCR Plus+® system (page
25) or manual timer recording (page 27) is convenient. You
can make timer recordings and play back only the portion
you just recorded with the timer by pressing a single button
later.
OTPB
VX-S207
Recording
You can immediately start recording the current channel for
a specified time with One-Touch Recording.
wREC/OTR
sSTOP
VX-S207
ONE-TOUCH PLAYBACK
1
Stop recording (when recording without timer).
The ONE-TOUCH PLAYBACK button on the unit lights.
If another operation button is pressed after you stop
recording, One-Touch Playback will be canceled and the
ONE-TOUCH PLAYBACK button on the unit lights off.
2
Press ONE-TOUCH PLAYBACK on the unit or OTPB
on the remote control.
The tape rewinds to the start of the recorded portion and
begins playback.
When you set the timer for more than two
timer programs
The unit starts playing back from the earliest one when you
use One-Touch Playback.
To find the beginning of the second (or later) program, use
Index Search.
Note
One-Touch Playback does not work for recordings of less than
1 minute.
TIMER REC indicator
Before starting
• Insert a cassette with its erasure prevention tab in place.
Make sure the tape is longer than the recording time.
• Select the channel to record and tape speed.
Press w REC/OTR.
1
The unit starts recording.
•“INDEX” flashes for a few seconds.
• The w REC/OTR button on the unit lights.
Press w REC/OTR repeatedly to set the
2
wREC/OTR
Z
STOP/EJECT
recording duration.
Each press changes the recording duration on the
screen in the following way:
0:30 1:00 1:30 2:00 3:00
normal recording 5:00 4:00
After the set amount of time has elapsed, the recording
stops.
ENGLISH
24
Page 26

Playing back a tape (continued)
To stop recording
Press s STOP on the remote control or Z STOP/
EJECT on the unit.
The w REC/OTR button on the unit lights off.
To extend the recording duration while
recording
Press w REC/OTR until the new duration you want appears
on the screen.
Tip
To confirm the remaining time of recording, press CALL during
One-Touch Recording.
Setting the timer with
VCR Plus+® system
You can greatly simplify timer recordings with VCR Plus+®
system. Just enter the PlusCode number, a number
assigned to each TV program, and the unit will set the timer
recording automatically. You can find PlusCode number in
most TV guide magazines.
You can set up to 8 programs.
VCR PLUS+
TV VCR/CATV
Notes
• If the power is turned off during One-Touch Recording, the
TV turns off, but the VCR continues to record.
• During One-Touch Recording, when the tape reaches the
end, the TIMER REC indicator on the unit flashes.
Number buttons
T-REC
MENU
SET/TRACKING
+/–
TIMER REC
indicator
Before starting
• Check that the clock is set correctly.
• Check that the channel numbers match the guide channels
which assigned to the TV stations.
• Insert a cassette with its erasure prevention tab in place.
• Set the TV VCR/CATV selector to TV VCR.
• If the CATV converter is used for the timer recording,
check that the CATV converter is turned on and the
channel you want to record is selected.
ENTER
CANCEL
VX-S207
25
ENGLISH
1
Press VCR PLUS+ button.
2
Enter the PlusCode number of the TV program
you want to record using the number buttons.
If you make a mistake, press CANCEL.
“PROGRAM” in this menu stands for the VCR PLUS+
button.
Page 27

3
Press SET/TRACKING + or – to select ONCE,
DAILY or WEEKLY.
To record
a single program
daily program
weekly program such as every
Monday (WKL-MON)
4
Press ENTER.
• The following timer information appears on the
screen.
• If you want to change the setting here, see
“Changing the setting.”
Press ENTER repeatedly until the tape speed
5
Select
ONCE
DAILY
WEEKLY
flashes, then press SET/TRACKING + or – to
select SP, LP or SLP.
Press VCR PLUS+ button or ENTER.
6
The timer program list appears.
To cancel a program
Press MENU. And press SET/TRACKING + or – to select
TIMER REC SET in the menu. Then press
SET/TRACKING + or – to select the unnecessary program,
and press CANCEL.
If the program overlaps another
The overlapped portions will be deleted. The program listed
first on the timer program setting screen has priority over
the succeeding program as illustrated.
To cancel the On-Timer or Off-Timer
To avoid having the On-Timer or Off-Timer working during
the program time, press the VCR PLUS+ button after step
6. The ON/OFF TIMER menu will appear on the screen.
Then refer to “Setting the On-Timer” or “Setting the OffTimer.”
Tips
• If “PROGRAM FULL” flashes and the timer program list on
step 1, 8 programs are already set. Cancel an unnecessary
program.
• To confirm the setting, select TIMER REC SET in the menu
to display the timer program list. Press MENU twice to return
to the normal screen.
• When the power supply is interrupted for more than 5
seconds, the preset program is cleared. In this case, you
have to set the clock and the timer again.
Note
During timer recording, when the tape reaches the end, the
TIMER REC indicator on the unit flashes.
Press MENU twice to return to the normal
7
screen.
Press T-REC.
8
• The TIMER REC indicator on the unit lights, and the
unit stands by for timer recording.
• If the TIMER REC indicator does not light, a cassette is
not inserted.
• The cassette is ejected if the cassette’s erasure
prevention tab has been removed.
• You can turn the unit off. The unit automatically starts
recording at the programmed time.
Caution
When the TIMER REC indicator on the unit lights, the
tape functions are not operable. To operate the others,
press T-REC. However, remember to press it again to
activate timer recordings.
Changing the setting
To set the daily program
In step 4, press SET/TRACKING + or – repeatedly to
display the desired daily program as follow:
MON-FRI : Monday to Friday
MON-SAT : Monday to Saturday
SUN - SAT : Everyday
To extend the recording time
After step 4, press ENTER repeatedly until the end time
flashes, then press SET/TRACKING + or – to change the
setting.
ENGLISH
26
Page 28

Setting the timer manually
If you cannot use VCR Plus+® system, you can set the
timer manually.
You can set up to 8 programs within one month of the
current date.
TV VCR/CATV
T-REC
5
Set the start time (hours and minutes), the end
time (hours and minutes), the channel number
and the tape speed in the same way as in step 4.
• To change the minutes setting in ten minutes, press
and hold SET/TRACKING + or –.
• The timer program list appears.
6
If you want to set another program, repeat
steps 3 through 5.
7
Press MENU twice to return to the normal screen.
8
Press T-REC.
• The TIMER REC indicator on the unit lights, and the
unit stands by for timer recording.
• If the TIMER REC indicator does not light, a cassette is
not inserted.
• The cassette is ejected if the cassette’s erasure
prevention tab has been removed.
• You can turn the unit off. The unit automatically starts
recording at the programmed time.
MENU
SET/TRACKING
+/–
Before starting
• Check that the clock is set correctly.
• Insert a cassette with its erasure prevention tab in place.
• Set the TV VCR/CATV selector to TV VCR.
• If the CATV converter is used for the timer recording,
check that the CATV converter is turned on and the
channel you want to record is selected.
1
Press MENU.
Press SET/TRACKING + or – to select TIMER
2
ENTER
CANCEL
REC SET, then press ENTER.
3
Press SET/TRACKING + or – to select the line
on which no program has been set, then press
ENTER.
To set the daily/weekly timer
In step 4, press SET/TRACKING – repeatedly before
pressing ENTER.
The setting changes as follows:
Example
The current day (Sunday) SUN-SAT (Sunday to Saturday)
...
One month later
minus two days
One month later
minus one days
WKL-SUN (Every Sunday)
Press SET/TRACKING + to change the display in reverse order.
After setting, press ENTER.
MON-SAT (Monday to Saturday)
MON-FRI (Monday to Friday)
WKL-SAT (Every Saturday)
WKL-FRI (Every Friday)
.....
To cancel a program
Select TIMER REC SET in the menu. And press SET/
TRACKING + or – to select the unnecessary program, then
press CANCEL.
Tips
• If you want to record the program through the line input,
press SET/TRACKING + or – to display “L1” (from the
AUDIO/VIDEO IN jacks on the rear) or “L2” (from the
AUDIO/VIDEO IN jacks on the front) in step 5 instead of the
channel number.
• To confirm the setting, select TIMER REC SET in the menu
to display the timer program list. Press MENU twice to return
to the normal screen.
• When the power supply is interrupted for more than 5
seconds, the preset program is cleared. In this case, you
have to set the clock and timer again.
Press SET/TRACKING + or – to set the date,
4
then press ENTER.
If you want to set daily/weekly recordings, see “ To set
the daily/weekly timer.”
27
ENGLISH
Notes
• During the timer recording, when the tape reaches the end,
the TIMER REC indicator on the unit flashes.
• During watching the other program on the unit, when the
timer recording starts, the channel shown on the TV screen
is changed as you set on timers.
Caution
When the TIMER REC indicator on the unit lights, the tape
functions are not operable. To operate the others, press TREC. However, remember to press it again to activate timer
recordings.
Page 29

Dubbing
Connecting with another VCR
VX-S207 (Front) VX-S207 (Rear)
AUDIO VIDEO
R L
(MONO)
UHF/
LINE 1
VHF
Yellow
White
Red
Audio/Video cable
(not supplied)
Tips
• If the other VCR is monaural type,
connect one of the audio plugs only to
AUDIO IN L (MONO).
• If you use this unit for playback, connect
the AUDIO/VIDEO OUT jacks on this
unit and the audio/video input jacks on
the recording unit.
• Please refer to operating instruction of
the other VCR.
Operation
or
To audio/video output jacks
or
To audio/video output jacks
Red
White
Yellow
Another VCR (Player)
Video camera
(Player)
TV/LINE
w REC/OTR
Before starting
Select the tape speed.
Insert a pre-recorded source cassette into
1
another (playback) VCR.
2
Insert a blank cassette with its erasure
prevention tab in place into your VX-S207/S137
(recording).
Press TV/LINE repeatedly to display “LINE1”
3
(rear) or “LINE2” (front) on the screen.
4
Set the other VCR to play back.
Press w REC/OTR on the recording unit.
5
ENGLISH
28
Page 30

OTHER FUNCTIONS
Setting the V-chip
An age limitation can be set to prevent children from viewing
or listening to violent scenes or programs with adult content.
This unit corresponds to “TV-RATING” and “MOVIE
RATING.”
To use the V-chip function, register a password at first.
TV VCR/CATV
5
Enter the same password again for the safety, then
press ENTER.
V-CHIP SET menu appears.
Number
buttons
CALL
MENU ENTER
SET/TRACKING
+/–
Before starting
Set the TV VCR/CATV selector to TV VCR.
CANCEL
Registering the password
Caution
You cannot set the V-chip if you forget the password. We
recommend you write down the password and keep it in a
safe place in case you forget it.
Press MENU.
1
Setting the V-chip
1
In the V-CHIP SET menu, press SET/TRACKING + or
– to select TV RATING, then press ENTER.
2
Press SET/TRACKING + or – to display the desired
setting.
• When the following programs are received, they are
protected from display according to the selected
setting.
OFF: TV RATING is not set.
TV-Y: Programs except for ones for infants
TV-Y7: Programs for those older than 7
TV-G: Programs except for ones for children
TV-PG: Programs not proper for infants
TV-14: Programs not proper for children under 14
years old
TV-MA: Programs forbidden children under 17 years
old
Press SET/TRACKING + or – to select TV SET-UP,
2
then press ENTER.
Press SET/TRACKING + or – to select V-CHIP SET,
3
then press ENTER.
Enter the password (4 digits) using the number
4
buttons (0-9), then press ENTER.
•“*” appears instead of the number.
• If you make a mistake, press CANCEL.
• “CALL TO SET CONTENTS” may appear according to
the selected setting. If the message appears, press
CALL to display the TV RATING sub menu. If not, go to
step 5.
Press SET/TRACKING + or – to select the sub menu
3
item, then press ENTER to select ON or OFF.
• When TV-Y7 is selected, the item below appears.
FANTASY VIOLENCE
• When TV-PG or TV-14 is selected, the items below
appear.
eg.TV-PG
:TV-PG
VIOLENCE
SEXUAL SITUATIONS
ADULT LANGUAGE
SEXUAL DIALOG
ON
ON
ON
ON
ON
29
ENGLISH
Page 31

• When TV-MA is selected, the items below appear.
:TV-MA
VIOLENCE
SEXUAL SITUATIONS
ADULT LANGUAGE ON
Press MENU to return to the V-CHIP SET menu.
4
5
Press ENTER, and press SET/TRACKING + or – to
select MOVIE RATING, then press ENTER.
6
Press SET/TRACKING + or – to display the desired
setting, then press ENTER.
When the following movies are received, they are
protected from display according to the selected setting.
OFF: MOVIE RATING is not set.
G: Movies with no age limit
PG: Movies not proper for children
PG-13: Movies not proper for children of 13 years old
and younger
R: Movies those can be seen by children under
17 years old with their parents
NC-17: Movies forbidden children under 17 years old
X: Movies for adults
ON
ON
To use the TV after the TV is protected
When the program applied to the V-chip setting is received,
“PROTECT BY V-CHIP” is displayed.
PROTECTED BY V-CHIP
IF YOU CANCEL PROTECT,
INPUT PASSWORD.
PASSWORD :––––
Enter the password, then press ENTER. When the
password is right, the protect will be canceld.
Note
The V-CHIP function is activated only on programs and tapes
that have the rating signal.
Changing the password
1
Press MENU.
Press SET/TRACKING + or – to select TV SET-UP,
2
then press ENTER.
Press SET/TRACKING + or – to select V-CHIP SET,
3
then press ENTER.
Enter the password using the number buttons (0-9),
4
then press ENTER.
“*” appears instead of the number.
7
Press SET/TRACKING + or – to select V-CHIP.
Press ENTER to display ON.
8
Press MENU 3 times to return to the normal screen.
9
V-CHIP SET menu appears.
5
Press SET/TRACKING + or – to select CHANGE
PASSWORD, then press ENTER.
Enter the new password using the number buttons
6
(0-9), then press ENTER.
•“*” appears instead of the number.
• If you make a mistake, press CANCEL.
7
Enter the same password again for the safety, then
press ENTER.
Press MENU 3 times to return to the normal screen.
8
Note
When you enter the wrong password in step 4, “ERROR”
appears. Re-enter the correct password.
ENGLISH
30
Page 32

Multichannel TV Sound
Recording the sound of the SAP
(MTS) and Hi-Fi audio sound
system
TV VCR/CATV
Number
buttons
CHANNEL N/M
wREC/OTR
MENU
AUDIO
SET/TRACKING
+/–
Multichannel TV Sound (MTS)
This unit is equipped with the MTS (Multi-channel TV
Sound) system which decodes stereo and SAP (Second
Audio Program) broadcasting signals. It also decodes the
stereo TV sound of the local CATV system if it satisfies the
assigned cable frequencies and EIA-recommended MTS
stereo/bilingual TV sound system.
It can record and play back the audio signal in the VHS Hi-Fi
audio sound system.
ENTER
Broadcast
Before starting
• Insert a cassette and select the tape speed.
• Set the TV VCR/CATV selector to TV VCR.
1
Press MENU.
2
Press SET/TRACKING + or – to select TV SET-UP,
then press ENTER.
3
Press SET/TRACKING + or – to select SAP.
Press ENTER to select ON.
4
Second Audio Program (SAP)
This unit can record and play back a Second Audio Program
(SAP) for the second language or additional information.
Usually primary language is recorded on the primary sound
channel, and the second language or additional information
is recorded on the SAP channel.
Audio track system
This unit records a regular monaural audio signal on the
normal audio track, and stereo Hi-Fi audio signal on the HiFi audio track.
If you use the unit equipped with the VHS Hi-Fi audio sound
system to play back the tape recorded on this unit, you can
enjoy stereo Hi-Fi sound or bilingual program. If you use the
unit not equipped with the VHS Hi-Fi audio sound system,
only a regular audio sound recorded on a normal audio track
is played back.
<Tape structure>
Monaural sound
Normal audio track
Hi-Fi audio track
Hi-Fi sound and video signals
Press MENU twice to return to the normal screen.
5
6
Press CHANNEL N, M or the number buttons to
select the channel number to record.
When the selected channel is broadcasted in the SAP
sound, SAP appears on the TV screen. When it is not
theSAP sound, STEREO appears on the TV screen.
Press w REC/OTR.
7
Recording begins.
The w REC/OTR button on the unit lights.
To listen to the MTS sound on the TV
Follow the steps 1 through 5. The MTS sound will be heard.
To return to the primary sound, select OFF in step 4.
Recording the Hi-Fi audio
The regular audio signal and Hi-Fi audio signal are
automatically recorded. No special setting is required for Hi-
Fi audio recording.
ENGLISH
31
Page 33

Recorded and output signals of the MTS
broadcast
On-screen display
TV
screen
—
STEREO
SAP
STEREO/
SAP
Broadcast
Mono
Stereo
Mono+SAP
Stereo+SAP
SAP
OFF
OFF
OFF
ON
OFF
ON
Recorded signal
Hi-Fi
Normal
track
track
Mono
Mono
Left/
Mono
Right
(L+R)
channel
Mono
Mono
L:Mono
SAP
R:SAP
Left/
Mono
Right
(L+R)
channel
SAP
L:L+R
R:SAP
Signal output
from AUDIO
OUT
L
Mono
Left
channel
Mono
SAP
Left
channel
SAP
Playing back a MTS-program
recorded tape
Press AUDIO to select the sound you want.
Each press change the indicator on the TV screen as
follows:
Indicator on the
TV screen
STEREO
L ch
R ch
To listen to
Stereo program
Stereo
Left channel
Right channel
Bilingual program
Mixed (main and
sub) sound
Main sound
Sub sound
R
Mono
Right
channel
Mono
SAP
Right
channel
SAP
CALL
Identifying the on-screen display
items
Current time
and day of
the week
Hi-Fi indicator
10:30AM SUN CH 023
HI-FI
Tape operation mode indicators
d : Play
f : Rewind
g : Fast-forward
z : Cassette eject
w : Recording
a : Recording pause
s : Stop
OTR X:XX : Remaining time of One-Touch Recording
SP00:30:30
Tape operation
mode/OTR time
Channel number/
LINE indicator
Auto Repeat
Cassette-in
indicator
Tape speed
Tape counter
MONO
Mono
Standard sound
(usually the main
sound)
Tip
If AUDIO setting is set to STEREO while playing a prerecorded
SAP bilingual audio program, the primary language “L ch” and
the secondary language “R ch” will be heard simultaneously.
For SAP bilingual playback, do not use STEREO setting. Select
“R ch” setting.
Notes
• When you play a tape recorded in mono, the sound is always
played back in mono regardless of the AUDIO setting.
• The AUDIO setting automatically returns to STEREO when a
cassette is ejected.
To change the on-screen function display
Press CALL. Each press turns the display on/off.
ENGLISH
32
Page 34

ADDITIONAL INFORMATION
Troubleshooting
If the unit does not seem to operate properly, read the
instructions again, then check the following guide.
TV reception is noisy or there is no TV reception.
Connect the antenna correctly and securely.
There is no picture or sound
The unit is in LINE input mode.
There is no sound
Increase the volume level.
There is poor or no color
Adjust the color setting.
The playback picture is noisy.
• Adjust the tracking manually when the tape quality is poor.
• Although the unit cleans the video heads automatically, dirt
may be accumulated after a long period of use. Clean the
video heads with a commercially available video heads
cleaning tape.
Tape operation buttons do not work while the power is
on and the cassette is inserted.
Moisture condensation may have occurred. Wait for about
two hours until moisture evaporates completely before you
operate the unit.
Care and maintenance
To clean the cabinet
Wipe with a soft dry cloth.
If the surfaces are extremely dirty, use a soft cloth lightly
moistened with mild detergent solution. Do not use strong
solvents, such as alcohol, benzine or thinner as these could
damage the finish of the unit.
Do not stick a seal or an adhesive label
Do not stick a seal or an adhesive label on the surface for a
long time. The finish of the unit may be damaged or come
off.
When noises are heard from the radio or other audio/
video equipment
Separate the equipment from this unit.
Picture tube
If the surface is dirty, wipe with a soft dry cloth.
When you touch the Braun tube, sometimes you feel week
electricity. This is the static electricity, and it does not
damage you.
Abnormal operation has occurred.
External interference may have affected the internal
microprocessor.
Wait for about five minutes after disconnecting the AC cord
from the AC outlet. Then connect it again and turn the unit
on, and press the 1 button while holding down VOLUME –
on the unit.
The timer does not operate.
• Set the clock correctly.
• Check that the channel numbers match the guide channels
which assigned to the TV stations.
There is no sound and picture from an input source.
You may have selected the wrong input. Press TV/LINE
until you select the correct input source. (e.g.You must
select “LINE 2” when you connect an input source to the
AUDIO/VIDEO IN jacks on the front panel.)
The remote control does not operate
• Replace both batteries with new ones.
• Make sure the TV VCR/CATV selector is set to TV VCR.
Clicking noise sounds.
Unavoidable expansion or contraction of cabinet due to
temperature changes. This is not a problem.
33
ENGLISH
Page 35

Specifications
Tuner system Frequency synthesized tuner
TV system M
Channel coverage VHF: 2 to 13
UHF: 14 to 69
CATV: 5A, A-1 to A-5, A to W,
W+1 to W+84
Program memory 181
Antenna input 75 ohms, unbalanced
Picuture tube VX-S207
406(W) × 305(H) mm
(16 × 12
508 mm (diagonal) (20 in.)
VX-S137
208(W) × 211(H) mm
(8
335 mm (diagonal) (13 in.)
Video recording system
Rotary 2 head helical scanning system
Video head Azimuth 2 head
Video signal system
NTSC color system, 525 lines,
60 fields
Usable cassettes VHS video cassette
S-VHS video cassette (play back only)
Recording/Playback time
SP: 3 hours with T-180 tape
LP: 6 hours with T-180 tape
SLP:9 hours with T-180 tape
Tape speed SP: 33.35 mm/sec
LP: 16.67 mm/sec
SLP:11.12 mm/sec
Fast-forward time Approx. 2 minutes 15 seconds
Rewind time Approx. 1 minutes 48 seconds
Video input 1.0Vp-p, 75 ohm, unbalanced
Video output 1.0Vp-p, 75 ohm, unbalanced
1
/8 in.)
1
/4 × 8 3/8 in.)
with T-120 tape
with T-120 tape
Horizontal resolution
230 lines
Video S/N 53dB (nominal)
Audio track 3 tracks (Hi-Fi sound 2 tracks,
Normal sound 1 track)
Audio input –8dBs, 50K ohm
Audio output –8dBs, less than 1K ohm
Hi-Fi dynamic range
more than 90 dB
Hi-Fi frequency response
20Hz-20kHz
Hi-Fi Wow and flutter
less than 0.01%
Operating temperature
5°C to 40°C
Power requirements
120V AC, 60Hz
Power consumption
VX-S207 109 W
TYP 4W (power save mode)
VX-S137 80 W
TYP 4W (power save mode)
Dimensions VX-S207
Weight VX-S207 25.0 kg (55.2 lbs.)
Supplied accessories
Design and specifications are subject to change without
notice for the purpose of performance improvement.
575(W) × 480(D) × 502(H) mm
3
(22
/4 × 19 × 197/8 in.)
VX-S137
435(W) × 370.5(D) × 384.5(H) mm
1
(17
/4 × 145/8 × 151/4 in.)
VX-S137 13.5 kg (29.8 lbs.)
Batteries (R03, size AAA) (2)
Remote control (1)
Antenna adaptor (1) (VX-S207 only)
VHF/UHF telecopic antenna with
antenna adaptor (1) (VX-S137 only)
This equipment has been tested and found to comply with
the limits for a Class B digital device, pursuant to Part 15
of the FCC Rules. These limits are designed to provide
reasonable protection against harmful interference in a
residential installation.
This equipment generates, uses, and can radiate radio
frequency energy and, if not installed and used in
accordance with the instructions, may cause harmful
interference to radio communications. However, there is
no guarantee that interference will not occur in a
particular installation. If this equipment does cause
harmful interference to radio or television reception, which
can be determined by turning the equipment off and on,
the user is encouraged to try to correct the interference
by one or more of the following measures:
- Reorient or relocate the receiving antenna.
- Increase the separation between the equipment and
receiver.
- Connect the equipment into an outlet on a circuit
different from that to which the receiver is connected.
- Consult the dealer or an experienced radio/TV technical
for help.
Caution
Modifications or adjustment to this product, which are not
expressly approved by the manufacturer, may void the
user's right authority to operate this product.
ENGLISH
34
Page 36

Parts and controls
Front panel (VX-S207)
Television screen
Cassette compartment
=
ONE-TOUCH
PLAYBACK button
wREC (Recording)/OTR (OneTouch Recording) button
DPLAY button
POWER button
Headphones jack
LINE 2 IN VIDEO/AUDIO
L (MONO)/R jacks
Indicators (POWER, TIMER
REC, ON-TIMER)
Remote sensor
Front panel (VX-S137)
Television screen
Cassette compartment
ZSTOP/EJECT button
gF FWD (Fast-Forward)/
] button
fREW (Rewind)/ [ button
CHANNEL N/M buttons
VOLUME +/– buttons
=
ONE-TOUCH
PLAYBACK button
wREC (Recording)/OTR (OneTouch Recording) button
ZSTOP/EJECT button
Headphones jack
LINE 2 IN VIDEO/AUDIO
L (MONO)/R jacks
Indicators (POWER, TIMER
REC, ON-TIMER)
Remote sensor
ENGLISH
35
DPLAY button
POWER button
gF FWD (Fast-Forward)/
] button
fREW (Rewind)/ [ button
CHANNEL N/M buttons
VOLUME +/– buttons
Page 37

Rear panel
Antenna holder
UHF/VHF connector
VIDEO OUT/AUDIO
OUT L/R jacks
LINE 1 IN VIDEO/AUDIO
L (MONO)/R jacks
Remote control
Security hook
(VX-S207 only)
AC cord hook
AC cord
VCR PLUS+ button
POWER button
Number buttons (0-9)
INDEX button
RESET button
ZERO-RETURN button
MUTING button
VOLUME +/– button
AD-SKIP (Advertisement
skip) button
fREW (Rewind)/ [ button
REC. END SEARCH button
sSTOP button
MENU button
SET/TRACKING +/– button
TAPE SPEED button
AUDIO button
TV VCR/CATV selector
OTPB (One-Touch Play Back) button
zEJECT button
SLEEP button
PREV. CH (Previous channel) button
TV MONITOR button
CAPTION button
CALL button
T-REC (Timer Recording) button
PRESET button
TV/LINE button
CHANNEL N/M button
dPLAY button
wREC (Recording)/OTR(One-
Touch Recording) button
g F FWD (Fast-Forward)/ ] button
aPAUSE/STILL button
ENTER button
CANCEL button
ATR (Auto Tracking) button
SLOW button
ENGLISH
36
Page 38

FRANÇAIS
Avertissement
Pour réduire le risque d’incendie ou d’électrocution, ne
pas exposer cet appareil à la pluie ou à l’humidité.
CAUTION
RISK OF ELECTRIC SHOCK
DO NOT OPEN
WARNING: SHOCK HAZARD - DO NOT OPEN.
AVIS: RISQUE DE CHOC ELECTRIQUE
- NE PAS OUVRIR.
Explication des symboles graphiques :
Un éclair fléché inscrit dans un triangle équilatéral
est destiné à alerter l’utilisateur de la présence à
l’intérieur de l’appareil d’une “tension dangereuse”
non isolée d’une puissance suffisante pour constituer
un risque d’électrocution pour les personnes.
Un point d’exclamation inscrit dans un triangle
équilatéral est destiné à avertir l’utilisateur de la
présence d’instructions d’utilisation (et d’entretien)
importantes dans la documentation fournie avec
l’appareil.
INSTRUCTIONS DE
SECURITE
IMPORTANTES
Veuillez lire attentivement le présent mode d’emploi dans son
intégralité avant de faire fonctionner l’appareil. Conservez-le
ensuite soigneusement pour toute référence ultérieure. Vous
devez vous conformer strictement à toutes les mises en garde
et à tous les avertissements figurant sur l’appareil et dans le
mode d’emploi ainsi qu’aux précautions de sécurité précisées
ci-dessous.
Avertissement
Pour prévenir toute décharge électrique ou autre blessure,
conformez-vous aux présentes instructions de sécurité pendant
l’installation, l’utilisation et l’entretien de cet appareil.
Installation
Fixations - N’utilisez pas de fixations qui ne sont pas
recommandées par le fabricant de l’appareil, car cela peut résulter
en un risque d’incendie, de décharge électrique ou de blessures.
Eau et humidité - Ne pas utiliser cet appareil près d’une source
d’eau, par exemple, une baignoire, une cuvette, un évier ou une
bassine, ni dans un sous-sol humide, près d’une piscine, etc.
Chaleur - N’utilisez pas cet appareil à proximité de sources de
chaleur et notamment de conduits d’air chaud, de cuisinières ou
de tout autre appareil générant de la chaleur. Il ne peut pas non
plus être exposé à des températures inférieures à 5°C (41°F)
ou supérieures à 40°C (104°F).
Lieu d’installation - Placez l’appareil sur une surface plane et
de niveau.
Accessoires - Ne placez pas l’appareil sur un chariot, un
support, un trépied, un montant ou une table instable. L’appareil
risque de tomber et de causer de graves blessures, voire d’être
gravement endommagé. Utilisez uniquement les modèles de
chariot,de support, de trépied, de montant ou de table
préconisés par le fabricant ou vendus avec l’appareil. Le
montage de l’appareil doit être exécuté conformément aux
instructions du fabricant et aux moyens des accessoires
préconisés par celui-ci.
Chariot mobile - Lorsque l’appareil est placé ou installé sur un
support ou dans un chariot, déplacez l’appareil avec
précautions. Les arrêts brutaux, les forces excessives et les
surfaces irrégulières risquent en effet de le faire basculer ou
tomber.
AVERTISSEMENT POUR LES CHARIOTS MOBILES
S3126A
Ventilation - L’appareil doit être situé dans un environnement
approprié qui assure une ventilation périphérique correcte.
Laissez un espace dégagé d’environ 10 cm à l’arrière et audessus de l’appareil et de 5 cm sur les côtés.
Les fentes et les ouvertures pratiquées dans le châssis ainsi qu’à
l’arrière et sur le dessous servent à la ventilation de l’appareil et à
en garantir un fonctionnement irréprochable en le protégeant
contre toute surchauffe interne. Veillez par conséquent à ne pas
obstruer ni à recouvrir ces ouvertures. Les ouvertures ne peuvent
en aucun cas être obstruées en plaçant l’appareil sur un lit, un
sofa, une couverture ou sur toute autre surface similaire qui
risquerait d’obstruer les ouïes de ventilation. (Cet appareil ne peut
jamais être placé à côté ou sur un radiateur ou un appareil de
chauffage.) Cet appareil ne peut être installé dans un meuble
encastré comme une bibliothèque, à moins qu’une bonne
ventilation y soit assurée.
Contre-poids et objets lourds — Transporter l’appareil avec
précaution étant donné que le contre-poids d’équilibrage n’est
pas uniforme. Ne pas poser d’objets lourds sur l’appareil.
Pénétration d’objets et de liquides - N’introduisez aucun
objet à l’intérieur de l’appareil par les ouïes de ventilation parce
qu’il risque d’entrer en contact avec des composants sous
haute tension et de court-circuiter des composants, entraînant
ainsi un incendie ou une décharge électrique.
Ne jamais répandre de liquide sur l’appareil.
Alimentation
Sources d’alimentation - Faites uniquement fonctionner cet
appareil sur l’une des sources d’alimentation spécifiées sur
l’étiquette signalétique. Si vous n’êtes pas certain du type de la
source d’alimentation locale, consultez le revendeur de votre
appareil ou votre compagnie de distribution d’électricité. Pour
faire fonctionner l’appareil sur piles ou sur d’autres sources
d’alimentation, reportez-vous au mode d’emploi.
Mise à la terre ou polarisation - Cet appareil est équipé d’une
fiche d’alimentation à courant alternatif polarisée (dotée d’une
lame plus large que l’autre). Cette fiche ne peut être introduite
que dans un sens dans la prise murale (secteur). Il s’agit d’une
mesure de sécurité. S’il s’avère difficile d’introduire
complètement la fiche d’alimentation dans la prise secteur,
retournez la fiche et réessayez. Si vous ne parvenez toujours
pas à l’enficher correctement, demandez à votre électricien de
remplacer votre prise murale d’un modèle dépassé. Ne tentez
pas de contourner la sécurité de cette fiche polarisée.
1
FRANÇAIS
Page 39

Surcharge - Evitez de surcharger les prises murales et les
prolongateurs, car vous risquez de provoquer un incendie ou
une décharge électrique. Ne placez pas l’appareil dans un
endroit où son cordon risque d’être piétiné. Ne posez jamais
aucun objet sur le cordon d’alimentation.
Antenne externe
Lignes électriques - Un système d’antenne extérieure ne peut
être installé à proximité de lignes à haute tension, de luminaires
électriques ou de circuits d’alimentation, ou encore là où il
risque de tomber sur des lignes électriques ou des circuits
d’alimentation. Lorsque vous installez un système d’antenne
extérieure, veillez tout particulièrement à ne pas entrer en
contact avec de telles lignes électriques ou circuits
d’alimentation, ce qui présente un danger de mort.
Mise à la terre de l’antenne extérieure - Si un système
d’antenne ou un réseau câblé est raccordé à l’appareil, veillez à
ce que le système d’antenne ou le réseam câblé soit
correctement mis à la terre de façon à éviter tout dégât dû à
une crête de tension imprévisible ou à l’accumulation
d’électricité statique. L’article 810 du code national électrique,
ANSI/NFPA n° 70, fournit des informations sur la mise à la terre
adéquate du mât, de la structure portante et du fil de terre vers
une unité de décharge de l’antenne, la section des conducteurs
de mise à la terre, l’emplacement de l’unité de décharge de
l’antenne, le raccordement aux électrodes de mise à la terre et
les spécifications des bornes de mise à la terre. Reportez-vous
également à l’illustration.
Mise à la terre de l’antenne conformément au code national électrique
FIL D’ANTENNE
UNITE DE DECHARGE
CONNEXION DE
MISE A LA TERRE
D’ANTENNE
(SECTION 810-20 NEC)
En cas de panne
Débranchez l’appareil de la prise murale et faites-le
contrôler par un technicien d’entretien qualifié si:
1) Le cordon ou la fiche d’alimentation est endommagé
ou effiloché ;
2) Un liquide a été renversé sur l’appareil ;
3) L’appareil a été exposé à la pluie ou à l’humidité ;
4) L’appareil semble ne pas fonctionner normalement
lorsque vous appliquez les instructions d’utilisation.
Ajustez uniquement les commandes décrites dans le
mode d’emploi, car un réglage incorrect d’autres
commandes peut causer des dommages à l’appareil
qui nécessiteront généralement une intervention en
profondeur d’un technicien d’entretien qualifié pour
restaurer ses conditions de fonctionnement normales.
5) L’appareil est tombé ou si le châssis a été endommagé ;
6) Les performances de l’appareil se sont sensiblement
modifiées- indiquant par là la nécessité d’un entretien.
Ne tentez pas de réparer l’appareil vous-même, car une
ouverture du châssis ou la dépose des couvercles risque de
vous exposer à des tensions élevées ou à d’autres risques.
Pour toute réparation faites appel à un professionnel.
Pièces de rechange - Lorsque des pièces de rechange
sont indispensables, assurez-vous que le technicien utilise
effectivement les pièces de rechange spécifiées par le
fabricant ou présentant les mêmes spécifications que les
pièces d’origine. Toute substitution non autorisée peut
entraîner un risque d’incendie, de décharge électrique ou
tout autre danger.
Contrôle de sécurité - A l’issue de toute intervention
d’entretien ou de réparation de l’appareil, demandez au
technicien d’exécuter les contrôles de sécurité pour
déterminer si l’appareil présente les conditions d’utilisation
prescrites.
BOITIER DE
DISTRIBUTION
ELECTRIQUE
CODE NATIONAL ELECTRIQUE (NEC)
CONDUCTEURS DE
MISE A LA TERE
(SECTION 810-21 NEC)
CONNEXIONS DE MISE A LA
TERRE
ELECTRODES DE MISE A LA
TERRE
(ART. 250, SECTION H NEC)
Foudre
Par mesure de sécurité supplémentaire, durant les orages
accompagnés de foudre ou lorsque vous prévoyez de ne
pas utiliser l’appareil pendant une période prolongée,
débranchez-le de la prise murale et déconnectez l’antenne
ou le câble de télédistribution. L’appareil ne risquera pas
d’être endommagé par la foudre ou des pointes d’énergie.
Entretien
Nettoyage - Débranchez l’appareil de la prise murale avant
de procéder à son nettoyage. N’utilisez pas de nettoyants
liquides ou en aérosol. Utilisez un chiffon légèrement
humide.
Condensation
Si vous transportez l’appareil directement d’une pièce froide
dans une pièce chaude, de l’humidité peut apparaître par
condensation à l’intérieur de l’appareil et endommager les
têtes vidéo ainsi que les bandes magnétiques lues. La
première fois que vous installez l’appareil ou lorsque vous le
déplacez d’un endroit frais vers un endroit chaud, attendez
environ deux heures avant de le faire fonctionner.
Remarque pour l’installateur du système CATV :
La présente remarque est destinée à attirer l’attention des
installateurs des systèmes CATV sur l’article 820-40 du
NEC qui stipule les instructions relatives à une mise à la
terre adéquate. Il prévoit plus particulièrement que le câble
de mise à la terre doit être raccordé au circuit de terre du
bâtiment aussi près que possible de l’entrée du câble.
REFERENCES UTILISATEUR
Pour votre facilité, inscrivez la désignation du modèle et
le numéro de série de cet appareil (qui se trouvent à
l’arrière) dans les cases ci-dessous. Signalez ces
références lorsque vous prenez contact avec votre
revendeur Aiwa en cas de problème.
Numéro du modèle
Numéro de série
FRANÇAIS
2
Page 40

Félicitations !
Nous vous remercions d’avoir fait
l’acquisition de ce produit Aiwa. Pour
optimiser les performances de cet
appareil, nous vous invitons à lire
attentivement le présent mode d’emploi.
Table des matières
Principales
caractéristiques de
ce téléviseur
Système VCR Plus+ et
lecture monotouche
Le programmateur se règle simplement
à l’aide du système VCR Plus+.
Les émissions télévisées enregistrées
peuvent être reproduites rapidement
grâce à la fonction de lecture
monotouche.
Diffusion MTS (son télévisé
multicanal)
Vous pouvez recevoir, enregistrer et
reproduire des émissions télévisées
stéréo et bilingues.
MBR (télécommande
multimarque)
La télécommande vous permet de
commander des téléviseurs et des
convertisseurs CATV de nombreuses
autres marques.
Puce V
Vous pouvez programmer une limitation
suivant l’âge afin d’empêcher que des
enfants regardent ou entendent des
scènes de violence et des programmes
pour adultes. Cet appareil est conforme
à “CLASS. PROG. TV” et “CLASS.
FILM”.
Préparation
Raccordement de l’antenne ................................4
Préparation de la télécommande........................7
Sélection de la langue d’affichage ......................8
Réglage de l’horloge...........................................9
Sélection des chaînes.......................................11
Contrôle de la sélection des chaînes en vue de
l’utilisation du système VCR Plus+®....12
Opérations de base
Regarder une émission de télévision................13
Sélection du mode de sous-titres......................14
Réglage de l’image ...........................................15
Réglage du son.................................................16
Réglage du programmateur de mise sous
tension..................................................17
Réglage du programmateur de mise hors
tension..................................................18
Lecture
Lecture d’une cassette......................................19
Différentes fonctions de recherche ...................21
Enregistrement
Enregistrement d’une émission télévisée .........23
Enregistrement avec la fonction monotouche..24
Sous-titres
Les sous-titres peuvent être affichés sur
l’écran lorsque vous captez une
émission compatible.
SQPB (S-VHS Quasi Play
Back)
Vous pouvez lire des cassettes
enregistrées en S-VHS.
L’image ne peut pas avoir de résolution
de haute qualité pour le S-VHS.
VCR Plus+ et PlusCode sont des marques
de Gemstar Develoment Corporation.
Le système VCR Plus+ est fabriqué
sous licence de Gemstar Development
Corporation.
3
FRANÇAIS
Réglage du programmateur avec le système
VCR Plus+®.........................................25
Réglage manuel du programmateur .................27
Copie.................................................................28
Autres fonctions
Réglage de la puce V........................................29
Son télévisé multicanal (MTS) et système de son
Hi-Fi......................................................31
Affichage des indicateurs..................................32
Informations complémentaires
Dépannage .......................................................33
Spécifications....................................................34
Composants et commandes .............................35
Page 41

PREPARATION
Raccordement de l’antenne
Raccordements de base
VX-S207
UHF
UHF/
VHF
Câble coaxial
de 75 ohms
(non fourni)
1
Câble bifilaire de 300
ohms (non fourni)
Adaptateur d’antenne
(fourni)
Crochet du cordon
d’alimentation
2 Vers une prise secteur
Raccordez le câble d’antenne au connecteur UHF/VHF du téléviseur.
1
Si le câble est un câble coaxial rond de 75 ohms, raccordez-le directement au connecteur UHF/VHF.
Si le câble est un câble bifilaire plat de 300 ohms,raccordez-le à l’adaptateur d’antenne (fourni), et raccordez ensuite
l’adaptateur au connecteur UHF/VHF.
Si vous utilisez un téléviseur VX-S137U, l’adaptateur d’antenne peut être tiré de l’antenne télescopique fournie.
Raccordez le cordon d’alimentation à une prise murale (secteur) après l’avoir fait passer dans le crochet.
2
Utilisation du crochet de sécurité (VX-S207 uniquement)
Pour empêcher l’appareil de tomber, notamment en cas de tremblement de terre, fixez-le au mur ou à une colonne avec le
crochet de sécurité du panneau arrière et un câble torsadé ou un fil.
VX-S207
Crochet de sécurité
FRANÇAIS
4
Page 42

Raccordement de l’antenne (suite)
Pour installer l’antenne télescopique fournie (VX-S137 uniquement)
Support d’antenne
VX-S137
Adaptateur d’antenne
(fourni)
UHF/
VHF
Placez l’antenne fournie dans le porte-antenne
Etirez et déplacez les deux branches de l’antenne afin d’obtenir le meilleur signal de réception.
Remarque
Pour obtenir une meilleure réception, spécialement dans les zones isolées, ou si vous rencontrez des problèmes d’interférences
ou d’images fantôme, utilisez une antenne d’extérieur.
5
FRANÇAIS
Page 43

Raccordements CATV
Pour raccorder un système CATV sans utiliser de convertisseur CATV
VX-S207
Système CATV
1
UHF/
VHF
Crochet du cordon
d’alimentation
Vers une prise murale
2
Raccordez le câble du système CATV au connecteur UHF/VHF du téléviseur.
1
Câble coaxial de 75
ohms (non fourni)
Raccordez le cordon d’alimentation à une prise murale (secteur) après l’avoir fait passer dans le crochet.
2
Pour raccorder un système CATV avec un convertisseur CATV
VX-S207
Système CATV
Convertisseur CATV
(non fourni)
Câble coaxial
de 75 ohms
(non fourni)
1
2
VHF/
UHF
Crochet du cordon
d’alimentation
Vers une prise murale
3
Câble coaxial de 75
ohms (non fourni)
1
Raccordez le câble du système CATV au connecteur d’entrée du convertisseur CATV.
Raccordez le connecteur de sortie du convertisseur au connecteur UHF/VHF de l’appareil.
2
Raccordez le cordon d’alimentation à une prise murale (secteur) après l’avoir fait passer dans le
3
crochet.
FRANÇAIS
6
Page 44

Préparation de la télécommande
Introduction des piles
Attention
Pour prévenir tout dommage causé par une fuite ou une
explosion des piles, conformez-vous aux instructions
suivantes.
• Introduisez deux piles R03 (AAA) en faisant
correspondre les pôles 0 et 9 comme illustré.
• Ne mélangez pas une pile neuve et une pile usagée ou
des piles de types différents.
• Ne jetez pas les piles au feu, ne les soumettez pas à de
lachaleur et ne les démontez pas.
• Ne transportez pas les piles avec des clés ou d’autres
objets métalliques.
Remarque
Retirez les piles lorsqu’elles sont épuisées ou si vous prévoyez de
ne pas utiliser la télécommande pendant une période prolongée.
Commander un téléviseur et un
convertisseur CATV
La télécommande permet de commander un convertisseur
CATV pour la télédistribution. Pour commander un
convertisseur CATV, programmez le numéro de code de
fabricant spécifié dans le tableau de la page suivante.
TV/VCR/CATV
POWER
Touches
numériques
PRESET
CHANNEL
N/M
Utilisation de la télécommande
Dirigez la télécommande vers le capteur de télécommande.
VX-S207
Capteur de
télécommande
Remarques
• Il se peut que la télécommande soit inopérante lorsqu’il y a
un obstacle entre la télécommande et le capteur de
télécommande.
• De puissantes sources lumineuses comme une lampe
fluorescente ou le rayonnement direct du soleil peuvent
perturber le bon fonctionnement de la télécommande.
• L’utilisation d’un téléviseur employant le même type de
télécommande infrarouge et orienté dans la même direction
peut entraîner un fonctionnement incorrect.
• La portée de commande efficace maximale entre la
télécommande et le capteur de télécommande est de 7 mètres.
• Bien que vous puissiez utiliser la télécommande sous un angle
de 30 degrés dans quelque direction que ce soit de l’avant du
capteur de télécommande, nous conseillons un angle plus
réduit de manière à assurer un fonctionnement plus efficace.
7m
30˚ 30˚
1
Réglez le sélecteur TV VCR/CATV sur CATV.
TV
CATV
VCR
2
Tout en maintenant la touche PRESET
enfoncée, appuyez sur les touches numériques
pour introduire le numéro de code en vous
référant au tableau de la page suivante.
Certaines marques comportent plus d’un numéro de
code. Si la télécommande n’agit pas sur le convertisseur
CATV après avoir programmé le premier numéro de
code, essayez le numéro de code suivant.
Les touches numériques de la télécommande sont
activées pour le convertisseur CATV.
En cours d’utilisation, sauf pour changer de canal CATV,
mettez le sélecteur TV VCR/CATV sur TV VCR.
Remarques
• En raison de la diversité des codes utilisés par les fabricants,
AIWA ne peut garantir que la télécommande MBR
fonctionnera avec tous les modèles des marques
mentionnées.
• Les touches numériques peuvent exclusivement être
utilisées pour la sélection des chaînes, mais il se peut
qu’elles ne fonctionnent pas correctement avec certains
convertisseurs CATV.
7
FRANÇAIS
Page 45

Fabricant du convertisseur CATV Numéro de code
ALLEGRO 46
ARCHER 39
CABLEVIEW 39
CITIZEN 39
CURTIS MATHES 15
EAGLE 24, 25, 28
GEMINI 05, 22, 23
GENERAL ELECTRIC 43
GENERAL INSTRUMENT 05, 07, 09
GOBRAND 39
HAMLIN 33, 34, 35
JERROLD 04, 06, 07, 08, 09, 10, 17,
39
KALE VISION 29
MACOM 03, 40, 41
MAGNAVOX 24, 25, 28, 29, 36, 37
NSC 38
OAK 11, 12, 44
PANASONIC 13, 19, 21
PARAGON 01
PHILIPS 24, 25, 26, 27, 28
PIONEER 13, 14
PULSER 39
RCA 13, 15
REGAL 28
REGENCY 32
SAMSUNG 04, 13, 29
SCIENTIFIC ATLANTA 10, 15, 16, 45, 48
SLMARX 04, 13
SONY 49
SPRUCER 04, 13, 19
STANDARD COMPONENTS 29
STARGATE 04, 05, 13
TELEVIEW 04, 13, 39
TEXSCAN 31
TOCOM 12, 17, 18, 19, 38
UNIDEN 20
UNIKA 39
UNIVERSAL 46, 47
VID TECH 30
VIDEO WAY 01, 42
VIEWSTAR 24, 25, 28
ZENITH 01, 02, 03
ZENITH HT-2000 01
Remarque
Tous les fabricants de convertisseurs CATV ne sont pas
mentionnés dans la liste ci-dessus.
Sélection de la langue
d’affichage
Les écrans de menu peuvent être affichés dans l’une des
trois langues suivantes : Anglais, Français ou Espagnol.
TV VCR/CATV
POWER
MENU
SET/TRACKING
+
/–
Avant de commencer...
Réglez le sélecteur TV VCR/CATV sur TV VCR.
1
Appuyez sur POWER pour mettre le téléviseur
sous tension.
Appuyez sur MENU.
2
La première fois que vous appuyez sur la touche MENU
après avoir déballé l’appareil, le menu LANGUAGE/
IDIOMA/LANGUE de l’étape 5 apparaît.
Appuyez sur SET/TRACKING + ou – pour
3
sélectionner SYSTEM SET-UP, et appuyez
ensuite sur ENTER.
MENU
TIMER REC SET
TV SET-UP
CH SET-UP
AUTO REPEAT ON OFF
SYSTEM SET-UP
4
Appuyez sur SET/TRACKING + ou – pour
sélectionner LANGUAGE/IDIOMA/LANGUE, et
appuyez ensuite sur ENTER.
SYSTEM SET-UP
CLOCK SET
LANGUAGE/IDIOMA/LANGUE
AUTO CLOCK ON OFF
STANDARD TIME
DAYLIGHT SAVING TIME
5
Appuyez sur SET/TRACKING + ou – pour
sélectionner la langue de votre choix, et
appuyez ensuite sur ENTER.
LANGUAGE/IDIOMA/LANGUE
ENGLISH
ESPAÑOL
FRANCAIS
ENTER
Appuyez deux fois sur MENU pour revenir à
6
l’écran normal.
FRANÇAIS
8
Page 46

Réglage de l’horloge
Vous devez régler la date et l’heure manuellement pour
effectuer des enregistrements par programmateur.
Lorsque vous raccordez le cordon d’alimentation secteur à
la prise murale, la date et l’heure sont automatiquement
réglées si l’appareil reçoit un signal de réglage de l’horloge.
S’il ne peut pas recevoir un tel signal ou si ce signal est
faible, il est possible que l’horloge soit mal réglée. Vous
devez alors la régler manuellement.
TV VCR/CATV
Réglez JOUR, ANNEE et les heures de la même
5
manière qu’à l’étape 4.
Maintenez la touche SET/TRACKING + ou – enfoncée
pour changer les valeurs de réglage plus rapidement.
REGLAGE HORLOGE
MOIS
JOUR
ANNEE
HEURE
Appuyez sur SET/TRACKING + ou – pour régler
6
6
18(DIM)
2000
10:00AM
les minutes.
Pour changer les minutes par intervalles de dix minutes,
maintenez la touche SET/TRACKING + ou – enfoncée.
REGLAGE HORLOGE
MOIS
JOUR
ANNEE
HEURE
6
18(DIM)
2000
10:30AM
MENU
SET/TRACKING
+/–
ENTNER
CANCEL
Avant de commencer...
Réglez le sélecteur TV VCR/CATV sur TV VCR.
1
Appuyez sur MENU.
Si l’horloge n’est pas réglée, le menu SYSTEME DE
REGLAGE de l’étape 3 apparaît.
2
Appuyez sur SET/TRACKING + ou – pour
sélectionner SYSTEME DE REGLAGE, et
appuyez ensuite sur ENTER.
MENU
PROG. ENR.
PROG. FONC
PROG. CNL
AUTO REPEAT ON OFF
SYSTEME DE REGLAGE
3
Appuyez sur SET/TRACKING + ou – pour
sélectionner REGLAGE HORLOGE, et appuyez
ensuite sur ENTER.
SYSTEME DE REGLAGE
REGLAGE HORLOGE
LANGUAGE/IDIOMA/LANGUE
HOLOGE AUTO ON OFF
HEURE DE L'EST
HEURE AVANCEE
7
Appuyez sur ENTER pour faire démarrer
l’horloge.
L’écran normal réapparaît.
Pour corriger des chiffres en cours de
réglage
Avant d’appuyer sur ENTER à l’étape 7, appuyez plusieurs
fois sur CANCEL jusqu’à ce que le paramètre que vous
désirez corriger se mette à clignoter. Réinitialisez les
chiffres à l’aide de la touche SET/TRACKING + ou –.
Conseil
Si l’alimentation est interrompue pendant plus de 5 secondes
ou si le cordon d’alimentation est débranché de la prise murale,
le réglage de l’horloge est effacé. Dans ce cas, vous devez
recommencer la procédure de réglage de l’horloge.
Remarque
Vous pouvez régler la date entre 1990 et 2081.
Réglage automatique de l’horloge
L’appareil corrige automatiquement le réglage de l’horloge
si vous avez réglé HOLOGE AUTO sur ON. Au moment du
déballage de l’appareil, la fonction HOLOGE AUTO est
régléesur ON.
Si HOLOGE AUTO est réglée sur OFF, appliquez la
procédure ci-dessous.
Appuyez sur SET/TRACKING + ou – pour régler
4
MOIS, et appuyez ensuite sur ENTER.
Le jour de la semaine apparaît automatiquement.
REGLAGE HORLOGE
9
FRANÇAIS
MOIS
JOUR
ANNEE
HEURE
6
1(JEU)
2000
12:00AM
1
Appuyez sur MENU.
2
Appuyez sur SET/TRACKING + ou – pour
sélectionner SYSTEME DE REGLAGE, et appuyez
ensuite sur ENTER.
MENU
PROG. ENR.
PROG. FONC
PROG. CNL
AUTO REPEAT ON OFF
SYSTEME DE REGLAGE
Page 47

3
Appuyez sur SET/TRACKING + ou – pour
sélectionner HOLOGE AUTO.
SYSTEME DE REGLAGE
REGLAGE HORLOGE
LANGUAGE/IDIOMA/LANGUE
HOLOGE AUTO ON OFF
HEURE DE L'EST
HEURE AVANCEE
4
Appuyez sur ENTER pour sélectionner ON.
SYSTEME DE REGLAGE
REGLAGE HORLOGE
LANGUAGE/IDIOMA/LANGUE
HOLOGE AUTO ON OFF
HEURE DE L'EST
HEURE AVANCEE
5
Appuyez deux fois sur MENU pour revenir à l’écran
normal.
Réglage de l’heure de votre zone
géographique
Si vous déménagez dans une autre zone géographique de
votre pays, vous pouvez régler l’horloge en sélectionnant
simplement votre nouvelle zone géographique.
Ce réglage ne s’applique que lors du raccordement du
câble RF.
Réglez correctement la chaîne avant de régler l’heure standard.
1
Appuyez sur MENU.
2
Appuyez sur SET/TRACKING + ou – pour
sélectionner SYSTEME DE REGLAGE et appuyez
ensuite sur ENTER.
MENU
PROG. ENR.
PROG. FONC
PROG. CNL
AUTO REPEAT ON OFF
SYSTEME DE REGLAGE
Réglage de l’heure d’été
Appuyez sur MENU.
1
2
Appuyez sur SET/TRACKING + ou – pour
sélectionner SYSTEME DE REGLAGE, et appuyez
ensuite sur ENTER.
MENU
PROG. ENR.
PROG. FONC
PROG. CNL
AUTO REPEAT ON OFF
SYSTEME DE REGLAGE
3
Appuyez sur SET/TRACKING + ou – pour sélectionner
HEURE AVANCEE, et appuyez ensuite sur ENTER.
SYSTEME DE REGLAGE
REGLAGE HORLOGE
LANGUAGE/IDIOMA/LANGUE
HOLOGE AUTO ON OFF
HEURE DE L'EST
HEURE AVANCEE
4
Appuyez sur SET/TRACKING + ou – pour
sélectionner AUTO et appuyez ensuite sur ENTER.
Le réglage AUTO est normalement suffisant. Si vous
réglez cette fonction sur ON, vous pouvez avancer d’une
heure manuellement.
3
Appuyez sur SET/TRACKING + ou – pour sélectionner
HEURE DE L’EST, et appuyez ensuite sur ENTER.
SYSTEME DE REGLAGE
REGLAGE HORLOGE
LANGUAGE/IDIOMA/LANGUE
HOLOGE AUTO ON OFF
HEURE DE L'EST
HEURE AVANCEE
4
Appuyez sur SET/TRACKING + ou – pour
sélectionner votre zone géographique et appuyez
ensuite sur ENTER.
En principe, le réglage AUTO est suffisant.
HEURE DE L'EST
ATLANTIQUE
CENTRE
PACIFIQUE
HAWAI
AUTO
5
Appuyez deux fois sur MENU pour revenir à l’écran
EST
MONTAGNE
ALASKA
normal.
HEURE AVANCEE
ON
OFF
AUTO
5
Appuyez deux fois sur MENU pour revenir à l’écran
normal.
FRANÇAIS
10
Page 48

Sélection des chaînes
5
Appuyez deux fois sur MENU pour revenir à
l’écran normal.
Avant la mémoire de chaîne automatique, cet appareil peut
recevoir toutes les chaînes captables dans votre zone
géographique en appuyant plusieurs fois de suite sur la
touche CHANNEL N ou M. Après la mémoire de
chaîne automatique, vous pouvez omettre les chaînes qui
ne sont pas présélectionnées à l’aide des touches
CHANNEL N ou M.
TV VCR/CATV
Touches
numériques
MENU
SET/TRACKING
+/–
ENTER
Avant de commencer...
• Assurez-vous que cet appareil se trouve en mode TV.
• Réglez le sélecteur TV VCR/CATV sur TV VCR.
1
Appuyez sur MENU.
2
Appuyez sur SET/TRACKING + ou – pour
selectionner PROG. CNL, et appuyez ensuite
sur ENTER.
MENU
PROG. ENR.
PROG. FONC
PROG. CNL
AUTO REPEAT ON OFF
SYSTEME DE REGLAGE
Conseil
Pour interrompre la mémoire de chaînes automatique, appuyez
sur MENU.
Remarque
Si vous activez la fonction de recherche automatique, les
réglages précédents sont effacés.
Ajout ou suppression manuel de chaînes
Si la fonction de mémoire de chaînes automatique ne
programme pas correctement les chaînes, vous pouvez
ajouter des chaînes manuellement pour regarder des
émissions télévisées. Vous pouvez également supprimer les
chaînes jugées inutiles.
Appuyez sur MENU.
1
2
Appuyez sur SET/TRACKING + ou – pour sélectionner
PROG. CNL, et appuyez ensuite sur ENTER.
MENU
PROG. ENR.
PROG. FONC
PROG. CNL
AUTO REPEAT ON OFF
SYSTEME DE REGLAGE
3
Appuyez sur SET/TRACKING + ou – pour sélectionner
AJOUTER/ANNULATION, et appuyez ensuite sur ENTER.
PROG. CNL
TV CATV
AUTO CNL MEMO
AJOUTER/ANNULATION
GUIDE REGLE
Appuyez sur ENTER pour sélectionner TV ou
3
CATV.
TV : le programme transmis par l’antenne VHF/UHF
CATV : système CATV en fonction des connexions au
connecteur d’antenne
PROG. CNL
TV CATV
AUTO CNL MEMO
AJOUTER/ANNULATION
GUIDE REGLE
4
Appuyez sur SET/TRACKING + ou – pour
sélectionner AUTO CNL MEMO, et appuyez
ensuite sur ENTER.
PROG. CNL
TV CATV
AUTO CNL MEMO
AJOUTER/ANNULATION
GUIDE REGLE
Toutes les chaînes captables dans votre zone
géographique sont explorées et enregistrées dans la
mémoire du téléviseur.
Lorsque l’exploration des chaînes est terminée, le menu
de PROG. CNL apparaît à l’écran.
FRANÇAIS
11
AUTO CNL 125
4
Appuyez sur SET/TRACKING + ou – pour
sélectionner la chaîne à ajouter ou à supprimer.
Vous pouvez également sélectionner une chaîne en
•
utilisant les touches numérotées de la télécommande.
Lors de la sélection d’un numéro de chaîme inférieur à 10,
appuyez d’abord sur 0 puis sur l’une des touches 1 à 9.
•
Si la chaîne sélectionnée est déjà programmée,
l’indication AJOUTER s’allume en vert. Si elle ne l’est
pas encore, l’indication ANNULATION s’allume en
rouge.
ANNULATION CNL 125
Appuyez sur ENTER pour effacer ou ajouter une
5
chaîne sélectionnée.
6
Pour ajouter ou supprimer une autre chaîne, répétez
les étapes 4 et 5.
7
Appuyez trois fois sur MENU pour revenir à l’écran
normal.
Page 49

Contrôle de la sélection des
Avant de commencer.
Réglez le sélecteur TV VCR/CATV sur TV VCR.
chaînes en vue de l’utilisation
du système VCR Plus+®
Pour régler le programmateur à l’aide du système VCR
Plus+®, vous devez vérifier si le numéro des chaînes sur le
magnétoscope correspond aux canaux guides assignés aux
stations de télévision.
S’ils ne correspondent pas, le système VCR Plus+® ne
fonctionnera pas correctement. Dans ce cas, faites
correspondre les numéros.
TV VCR/CATV
Touches
numériques
ENTERMENU
SET/TRACKING
+/–
Par exemple
Pour chaque chaîne que reçoit votre magnétoscope, utilisez
le tableau de concordance des canaux pour vérifier que les
numéros correspondent. Par exemple, si SHOWTIME est
indiqué dans le tableau de concordance des canaux (sous le
numéro de canal VCR Plus+) comme la chaîne 38, et si
votre magnétoscope reçoit SHOWTIME sur le canal 14,
vous devez harmoniser ces numéros en localisant le canal
guide 38 (sous GUIDE CANAL). Introduisez ensuite votre
chaîne 14 SHOWTIME (sous VCR CANAL).
Répétez cette procédure jusqu’à ce que tous les canaux
correspondent.
Exemple tableau de concordance des canaux
Station de
télévision
Numéro de canal
VCR Plus+
WCBS New York CBS 02 02
WNBC New York NBC 04 04
WNYW New York NYW 05 05
WABC New York ABC 07 07
A&E
BET
CNBC
CSPAN
Arts & Entertainment
Black Entertainment
Consumer News & Business
Government Business
DSC Discovery Channel 37 63
DIS Disney Channel 53 27
MAX Cinemax 45 15
SHO Showtime 38 14
USA USA Network 44 40
• La liste des canaux guide est publiée dans vos magazines
de télévision ainsi que dans la presse quotidienne.
CANCEL
N° de canal du
réseau câble local
39 44
57 23
23 16
28 54
1
Appuyez sur MENU.
Appuyez sur SET/TRACKING + ou – pour
2
sélectionner PROG. CNL, et appuyez ensuite
sur ENTER.
MENU
PROG. ENR.
PROG. FONC
PROG. CNL
AUTO REPEAT ON OFF
SYSTEME DE REGLAGE
3
Appuyez sur SET/TRACKING + ou – pour
sélectionner GUIDE REGLE, et appuyez ensuite
sur ENTER.
PROG. CNL
TV CATV
AUTO CNL MEMO
AJOUTER/ANNULATION
GUIDE REGLE
Appuyez sur SET/TRACKING +, – ou sur les
4
touches numériques pour sélectionner GUIDE
CANAL “38”, puis appuyez sur ENTER.
Pour sélectionner un numéro entre 10 et 19 à l’aide des
touches numériques, appuyez sur 0 pour le chiffre des
centaines et appuyez ensuite sur les touches 1 à 9 pour
introduire le chiffre des dizaines et des unités.
Pour sélectionner un numéro inférieur à 10, à l’aide des
touches numériques, appuyez deux fois sur 0 pour les
chiffres des centaines et des dizaines et appuyez une fois
sur les touches 1 à 9 pour introduire le chiffre des unités.
GUIDE REGLE
GUIDE
CANAL
038
5
Appuyez sur SET/TRACKING +, – ou sur les
CANAL
–
VCR
038
touches numériques pour afficher VCR CANAL
“14”, puis appuyez sur ENTER.
Lorsque vous utilisez les touches numériques, sélectionnez
un numéro comme vous l’avez fait à l’étape 4.
GUIDE REGLE
GUIDE
CANAL
038
Répétez les étapes 4 et 5 jusqu’à ce que tous
6
CANAL
–
VCR
014
les numéros de chaîne voulus aient été
programmés.
Appuyez trois fois sur MENU pour revenir à
7
l’écran normal.
Conseil
Pour désactiver le réglage VCR CH, appuyez sur CANCEL à
l’étape 5.
FRANÇAIS
12
Page 50

OPERATIONS DE BASE
Regarder une émission de
télévision
TV VCR/CATV
POWER
Touches
numériques
MUTING
VOLUME +/–
SLEEP
PREV.CH
CHANNEL
N/M
VX-S207
Pour mettre le téléviseur hors tension
Appuyez sur POWER.
Pour couper le son
Appuyez sur MUTING. Pour restaurer le son, appuyez sur
MUTING, VOLUME + ou –.
Pour rappeler une chaîne précédente
Appuyez sur PREV.CH pour commuter la chaîne en cours
et la chaîne précédente.
Conseil
Pour écouter à l’aide du casque d’écoute, branchez un casque
d’écoute (non fourni) doté d’une minifiche stéréo sur la prise casque
à l’avant. Le son des haut-parleurs du téléviseur est coupé.
Remarque
Le téléviseur se met automatiquement hors tension environ 15
minutes après qu’une station de télévision a cessé ses
retransmissions.
Réglage du programmateur
d’extinction
Prise casque
Indicateur POWER
Appuyez sur POWER pour mettre le téléviseur
1
+
/–
POWERVOLUME
CHANNEL
N/M
sous tension.
L’indicateur POWER à l’avant s’allume.
Appuyez plusieurs fois de suite sur CHANNEL
2
N ou M, ou sur les touches numériques
pour sélectionner le numéro de chaîne.
Pour sélectionner une émission CATV à l’aide des
touches numériques
Mettez le sélecteur TV VCR/CATV sur CATV. Pour
sélectionner un numéro entre 10 et 19, appuyez sur 0 pour
le chiffre des centaines et appuyez ensuite sur les touches
1 à 9 pour introduire le chiffre des dizaines puis des unités.
Pour sélectionner un numéro inférieur à 10, appuyez deux
fois sur 0 pour les chiffres des centaines et des dizaines et
appuyez une fois sur les touches 1 à 9 pour introduire le
chiffre des unités.
Appuyez plusieurs fois de suite sur SLEEP pour
sélectionner le nombre de minutes au bout duquel le
téléviseur se mettra hors tension.
Le délai d’extinction décroît par intervalles de 10 minutes à
partir d’un total de 120 minutes. Lorsque la durée
programmée s’est écoulée, le téléviseur se met hors
tension.
010••••• 100 110 120
ARRET D I F .
120
Pour vérifier la durée restante
Appuyez une fois sur SLEEP. La durée restante apparaît à
l’écran.
Pour désactiver le programmateur
d’extinction
Appuyez plusieurs fois de suite sur SLEEP jusqu’à ce que
l’indication “ARRET DIF. 0” apparaisse.
Pour sélectionner une émission VHF/UHF à l’aide
des touches numériques
Pour sélectionner un numéro inférieur à 10, appuyez sur
0 pour introduire le chiffre des dizaines et appuyez
ensuite sur les touches 1 à 9 pour introduire le chiffre
des unités.
3
Appuyez sur VOLUME + ou – pour régler le
volume.
FRANÇAIS
13
Page 51

Sélection du mode de soustitres
Cet appareil peut décoder et afficher les sous-titres de
télévision ou des cassettes vidéo.
CAPTION
Appuyez plusieurs fois de suite sur CAPTION
pour sélectionner le mode de sous-titres.
SS-TITRE CNL1
Remarques
• Après avoir été sélectionné, le mode de sous-titres reste
activé jusqu’à ce qu’il soit modifié, même si vous changez de
chaîne.
• Si le signal de sous-titres est perdu à cause d’une publicité
ou d’une interruption du signal, les sous-titres réapparaissent
dès que le signal est rétabli.
• Lorsque vous sélectionnez les sous-titres, il se peut que leur
affichage soit brièvement décalé dans le temps.
• Lorsque vous changez de chaîne, il se peut que l’affichage
des sous-titres soit brièvement décalé.
• Si vous utilisez une antenne intérieure ou si la réception
télévisée est de qualité médiocre, il se peut que le texte du
décodeur de sous-titres n’apparaisse pas. Dans ce cas,
ajustez l’antenne pour optimiser la qualité de réception ou
utilisez une antenne extérieure.
• Lorsque vous activez le décodeur de sous-titres, il y a un
léger décalage avant que les sous-titres apparaissent à
l’écran.
• Les sous-titres apparaissent à l’écran là où ils interfèrent le
moins avec l’image, généralement dans le bas de l’écran.
Les émissions d’information affichent généralement trois
lignes de sous-titres qui défilent sur l’écran. La plupart des
autres émissions affichent deux ou trois lignes de sous-titres
situés près de la personne en train de parler afin que le
téléspectateur puisse suivre la conversation.
• Si aucun signal de sous-titres n’est reçu, aucun sous-titre
n’apparaît, mais le téléviseur reste malgré tout en mode de
sous-titres.
• Des fautes de frappe ou des caractères anormaux peuvent
occasionnellement apparaître dans les sous-titres. C’est
normal dans le cas des sous-titres dactylographiés au vol.
Ces retransmissions ne laissent pas suffisamment de temps
pour les corrections.
• Certains systèmes de télédistribution et de protection contre
la copie peuvent interférer avec le signal de sous-titres.
• Les mots en italiques ou soulignés indiquent des titres, des
mots en langues étrangères ou encore des mots requérant
une certaine emphase. Les mots chantés apparaissent
généralement accompagnés de notes de musique.
• Les émissions de télévision diffusées avec des sous-titres
sont signalées par le symbole CC dans votre guide des
programmes de télévision.
L’affichage change selon la séquence suivante:
SS-TITRE CNL1 SS-TITRE CNL2
Pas d’affichage TEXTE CNL2 TEXTE CNL1
(Sous-titres désactivé)
Sous-titres:
Le mode de sous-titres affiche à l’écran un texte en Anglais
ou dans une autre langue. En général, les sous-titres en
Anglais sont transmis via SS-TITRE CNL1 et les sous-titres
dans les autres langues via SS-TITRE CNL2.
Texte plein écran:
Le mode de sous-titres TEXTE CNL1, TEXTE CNL2 remplit
en général l’écran avec un menu de programmation ou
d’autres informations.
FRANÇAIS
14
Page 52

Réglage de l’image
Vous pouvez ajuster le réglage de la luminosité, du
contraste, de la couleur, de la teinte et de la netteté de
l’image.
TV VCR/CATV
5
Appuyez sur SET/TRACKING + ou – pour régler
le paramètre sélectionné.
Quelques secondes après avoir relâché la touche,
l’affichage revient à l’écran normal.
Paramètre
LUMINOSITE
Une augmentation
du réglage
rend l’image plus
lumineuse
Une diminution du
réglage
rend l’image plus
sombre
MENU
SET/TRACKING
+/–
Avant de commencer...
Réglez le sélecteur TV VCR/CATV sur TV VCR.
Appuyez sur MENU.
1
Appuyez sur SET/TRACKING + ou – pour
2
ENTER
CANCEL
sélectionner PROG. FONC et appuyez ensuite
sur ENTER.
MENU
PROG. ENR.
PROG. FONC
PROG. CNL
AUTO REPEAT ON OFF
SYSTEME DE REGLAGE
CONTRASTE
COULEUR
TEINTE
NETTETE
Pour régler un autre paramètre, exécutez les
6
renforce le contraste
renforce l’intensité et
l’éclat des couleurs
rend les couleurs
claires plus vertes
rend l’image plus
nette
LUMINOSITE 16
atténue le contraste
réduit l’intensité et
l’éclat des couleurs
rend les couleurs
claires plus rouges
rend l’image plus
douce
étapes 4 à 5.
7
Appuyez trois fois sur MENU pour revenir à
l’écran normal.
Conseil
Pour restaurer tous les paramètres aux valeurs de réglage par
défaut, appuyez sur CANCEL à l’étape 5.
3
Appuyez sur SET/TRACKING + ou – pour
sélectionner IMAGE et appuyez ensuite sur
ENTER.
PROG. FONC
REGLAGE PUCE V
MINU MAR/ARR
IMAGE
AUDIO
SAP ON OFF
Appuyez plusieurs fois de suite sur ENTER
4
pour sélectionner le paramètre que vous voulez
régler.
Chaque fois que vous appuyez sur la touche, les
paramètres changent selon la séquence suivante:
LUMINOSITE CONTRASTE COULEUR
NETTETE TEINTE
LUMINOSITE 0
15
FRANÇAIS
Page 53

Réglage du son
Vous pouvez ajuster les graves, les aiguës et la balance du
son.
TV VCR/CATV
Appuyez sur SET/TRACKING + ou – pour régler
5
le paramètre sélectionné.
Quelques secondes après avoir relâché la touche,
l’affichage revient à l’écran normal.
Paramètre
Une augmentation
du réglage
Une diminution du
réglage
MENU
SET/TRACKING
+/–
Avant de commencer...
Réglez le sélecteur TV VCR/CATV sur TV VCR.
Appuyez sur MENU.
1
2
Appuyez sur SET/TRACKING + ou – pour
ENTER
CANCEL
sélectionner PROG. FONC et appuyez ensuite
sur ENTER.
MENU
PROG. ENR.
PROG. FONC
PROG. CNL
AUTO REPEAT ON OFF
SYSTEME DE REGLAGE
GRAVES
AIGUES
EQUILIBRE
Pour régler un autre paramètre, exécutez les
6
renforce les graves
renforce les aiguës
renforce le niveau de
sortie du haut-parleur
droit
GRAVES 16
atténue les graves
atténue les aiguës
renforce le niveau de
sortie du haut-parleur
gauche
étapes 4 à 5.
Appuyez trois fois sur MENU pour revenir à
7
l’écran normal.
Conseil
Pour restaurer tous les paramètres aux valeurs de réglage par
défaut, appuyez sur CANCEL à l’étape 5.
Appuyez sur SET/TRACKING + ou – pour
3
sélectionner AUDIO et appuyez ensuite sur
ENTER.
PROG. FONC
REGLAGE PUCE V
MINU MAR/ARR
IMAGE
AUDIO
SAP ON OFF
Appuyez plusieurs fois de suite sur ENTER
4
pour sélectionner le paramètre que vous voulez
régler.
Chaque fois que vous appuyez sur la touche, les
paramètres changent selon la séquence suivante:
GRAVES AIGUES EQUILIBRE
GRAVES 0
FRANÇAIS
16
Page 54

Réglage du programmateur
de mise sous tension
Lorsque vous avez réglé ce programmateur, l’appareil se
met sous tension à l’heure programmée et syntonise la
chaîne programmée.
TV VCR/CATV
Appuyez sur SET/TRACKING + ou – pour
4
sélectionner MINU. MARCHE et appuyez
ensuite sur ENTER.
MINU MAR/ARR
MINU. MARCHE
12:00AM CNL 001
DIM–SAM ANNULER
MINU. ARRET
12:00AM
5
Appuyez sur SET/TRACKING + ou – pour régler
ANNULER
l’heure et appuyez ensuite sur ENTER.
MINU MAR/ARR
MINU. MARCHE
10:00AM CNL 001
DIM–SAM ANNULER
MINU. ARRET
12:00AM
ANNULER
MENU
SET/TRACKING
+/–
Indicateur ON-TIMER
ENTER
VX-S207
Avant de commencer...
• Vérifiez si l’horloge est réglée correctement.
• Réglez le sélecteur TV VCR/CATV sur TV VCR.
Appuyez sur MENU.
1
Appuyez sur SET/TRACKING + ou – pour
2
sélectionner PROG. FONC et appuyez ensuite
sur ENTER.
MENU
PROG. ENR.
PROG. FONC
PROG. CNL
AUTO REPEAT ON OFF
SYSTEME DE REGLAGE
Appuyez sur SET/TRACKING + ou – pour
3
sélectionner MINU MAR/ARR et appuyez
ensuite sur ENTER.
6
Appuyez sur SET/TRACKING + ou – pour régler
les minutes et appuyez ensuite sur ENTER.
Pour changer les minutes par intervalles de dix minutes,
maintenez la touche SET/TRACKING + ou – enfoncée.
MINU MAR/ARR
MINU. MARCHE
10:30AM CNL 001
DIM–SAM ANNULER
MINU. ARRET
12:00AM
Appuyez sur SET/TRACKING + ou – pour
7
ANNULER
sélectionner le numéro de la chaîne et appuyez
ensuite sur ENTER.
MINU MAR/ARR
MINU. MARCHE
10:30AM CNL 023
DIM–SAM ANNULER
MINU. ARRET
12:00AM
Appuyez sur SET/TRACKING + ou – pour
8
ANNULER
sélectionner le type de programmateur et
appuyez ensuite sur ENTER.
LUN-VEN: Emission journalière du lundi au vendredi.
LUN-SAM: Emission journalière du lundi au samedi.
DIM-SAM: Programme quotidien chaque jour.
HEB- jour de la semaine:
Emission hebdomadaire, par ex. tous les
dimanches
MINU MAR/ARR
MINU. MARCHE
10:30AM CNL 023
DIM–SAM ANNULER
MINU. ARRET
12:00AM
ANNULER
17
PROG. FONC
FRANÇAIS
REGLAGE PUCE V
MINU MAR/ARR
IMAGE
AUDIO
SAP ON OFF
Page 55

Appuyez sur SET/TRACKING + ou – pour afficher
9
MARCHE et appuyez ensuite sur ENTER.
L’indicateur ON-TIMER de l’appareil s’allume.
MINU MAR/ARR
MINU. MARCHE
10:30AM CNL
DIM–SAM MARCHE
MINU. ARRET
12:00AM
Appuyez trois fois sur MENU pour revenir à
10
023
ANNULER
l’écran normal.
• A l’heure programmée, la chaîne passe à une chaîne
programmée.
• Vous pouvez mettre l’appareil hors tension.
A l’heure programmée, l’appareil se mettra
automatiquement sous tension sur une chaîne
programmée.
Pour corriger les données en cours de
réglage.
Avant d’appuyer sur ENTER à l’étape 9, appuyez de
manière répétée sur CANCEL jusqu’à ce que l’élément que
vous souhaitez corriger clignote. Réinitialisez les données
en appuyant sur SET/TRACKING + ou –.
Réglage du programmateur
de mise hors tension
Lorsque vous avez réglé ce programmateur, l’appareil se
met chaque jour hors tension à l’heure programmée.
TV VCR/CATV
MENU
SET/TRACKING
+/–
ENTER
Conseil
• Pour visualiser le programme via l’entrée de ligne, appuyez
sur SET/TRACKING + ou – pour afficher “LINE1” (via les
prises AUDIO/VIDEO IN à l’arrière) ou “LINE2” (via les
prises AUDIO/VIDEO IN à l’avant) à l’étape 7, au lieu du
numéro de chaîne.
• Pour désactiver le programmateur de mise sous tension,
appliquez les étapes 1 à 4. Ensuite, appuyez plusieurs fois
de suite sur ENTER jusqu’à ce que l’indication SET se mette
à clignoter et appuyez ensuite sur SET/TRACKING + ou –
pour afficher ANNULER.
• Pour confirmer le réglage, exécutez les étapes 1 à 3.
Appuyez trois fois sur MENU pour revenir à l’écran normal.
• L’appareil se met automatiquement hors tension une heure
après que le programmateur de mise sous tension a mis
l’appareil sous tension si vous n’avez pas réglé le
programmateur de mise hors tension (coupure automatique
au bout d’une heure). Pour continuer à regarder la télévision,
appuyez sur une touche quelconque pour annuler cette
fonction.
Remarques
• Si l’appareil est sous tension à l’heure programmée, la
fonction de coupure automatique au bout d’une heure est
inopérante.
• Bien que vous ayez lu une cassette à une heure
programmée, la chaîne est changée lors de votre réglage et
l’appareil n’arrête pas la lecture à l’heure.
Avant de commencer...
• Vérifiez si l’horloge est réglée correctement.
• Réglez le sélecteur TV VCR/CATV sur TV VCR.
Appuyez sur MENU.
1
Appuyez sur SET/TRACKING + ou – pour
2
sélectionner PROG. FONC et appuyez ensuite
sur ENTER.
MENU
PROG. ENR.
PROG. FONC
PROG. CNL
AUTO REPEAT ON OFF
SYSTEME DE REGLAGE
Appuyez sur SET/TRACKING + ou – pour
3
sélectionner MINU MAR/ARR et appuyez
ensuite sur ENTER.
PROG. FONC
REGLAGE PUCE V
MINU MAR/ARR
IMAGE
AUDIO
SAP ON OFF
Appuyez sur SET/TRACKING + ou – pour
4
sélectionner MINU. ARRET et appuyez ensuite
sur ENTER.
MINU MAR/ARR
MINU. MARCHE
12:00AM CNL
DIM–SAM ANNULER
MINU. ARRET
12:00AM
001
ANNULER
FRANÇAIS
18
Page 56

LECTURE
Réglage du programmateur de mise hors tension (suite)
Appuyez sur SET/TRACKING + ou – pour régler
5
l’heure et appuyez ensuite sur ENTER.
MINU MAR/ARR
MINU. MARCHE
12:00AM CNL 001
DIM–SAM ANNULER
MINU. ARRET
11:00PM
Appuyez sur SET/TRACKING + ou – pour régler
6
ANNULER
les minutes et appuyez ensuite sur ENTER.
Pour changer les minutes par intervalles de dix minutes,
maintenez la touche SET/TRACKING + ou – enfoncée.
MINU MAR/ARR
MINU. MARCHE
12:00AM CNL 001
DIM–SAM ANNULER
MINU. ARRET
11:30PM
Appuyez sur SET/TRACKING + ou – pour afficher
7
ANNULER
MARCHE et appuyez ensuite sur ENTER.
Lecture d’une cassette
zEJECT
TV MONITOR
AD-SKIP
fREW/[
sSTOP
SET/TRACKING
+/–
SLOW
dPLAY
gF FWD/]
aPAUSE/STILL
ATR
VX-S207
MINU MAR/ARR
MINU. MARCHE
12:00AM CNL 001
DIM–SAM ANNULER
MINU. ARRET
11:30PM
8
Appuyez trois fois sur MENU pour revenir à
MARCHE
l’écran normal.
A l’heure programmée, l’appareil se met
automatiquement hors tension.
Pour corriger les données en cours de
réglage.
Avant d’appuyer sur ENTER à l’étape 7, appuyez de
manière répétée sur CANCEL jusqu’à ce que l’élément que
vous souhaitez corriger clignote. Réinitialisez les données
en appuyant sur SET/TRACKING + ou –.
Conseil
• Pour désactiver le programmateur de mise hors tension,
appliquez les étapes 1 à 4. Ensuite, appuyez plusieurs fois
de suite sur ENTER jusqu’à ce que l’indication MARCHE se
mette à clignoter et appuyez ensuite sur SET/TRACKING +
ou – pour afficher ANNULER.
• Pour confirmer le réglage, exécutez les étapes 1 à 3.
Appuyez trois fois sur MENU pour revenir à l’écran normal.
• Ne réglez pas le programmateur de mise hors tension à la
même heure que le programmateur de mise sous tension.
DPLAY
Introduisez une cassette.
1
fREW/[
ZSTOP/EJECT
gF FWD/]
• L’appareil se met automatiquement sous tension.
• La lecture démarre immédiatement si l’onglet de
protection contre l’effacement de la cassette a été brisé.
Appuyez sur d PLAY pour démarrer la
2
lecture.
Le bouton “D” de l’appareil s’allume.
Pour arrêter la lecture
Appuyez sur la touche s STOP de la télécommande ou
Z STOP/EJECT de l’appareil.
Le bouton “D” de l’appareil s’éteint.
19
Remarques
• Lorsque la cassette arrive en fin de bande en cours de
lecture, de lecture lente, d’avance ou de recherche rapide,
l’appareil rembobine automatiquement la cassette jusqu’à
son début et l’éjecte (fonction de rembobinage automatique).
• L’appareil sélectionne la vitesse de la bande : SP, LP ou
SLP (EP).
• L’appareil est sous tension et la lecture démarre si vous appuyez
sur la touche d PLAY alors que l’appareil est hors tension.
• Sans résolution de haute qualité d’image, il est possible
d’utiliser la cassette S-VHS sur cet appareil.
Il se peut que l’image comporte des parasites sur certaines
bandes.
FRANÇAIS
Page 57

Si vous ne parvenez pas à obtenir
ALGN MAN
une image de lecture claire
Bien que le magnétoscope ajuste automatiquement
l’alignement, il se peut que vous deviez le régler
manuellement si la cassette est de qualité médiocre.
Si l’image et le son comportent des parasites, réglez
l’alignement manuellement.
Pour ajuster l’alignement manuellement
En cours de lecture, appuyez plusieurs fois de suite sur
SET/TRACKING + ou – jusqu’à ce que vous obteniez la
meilleure qualité d’image possible.
(La fonction d’alignement automatique est désactivée et
l’indication “ALGN MAN” et la barre d’alignement apparaissent.)
ALGN MAN
ALGN MAN
Pour restaurer l’alignement automatique
Appuyez sur ATR. L’indication “ALGN AUTO” apparaît.
Fonctions complémentaires
Pour
Activer un arrêt
sur image
Avancer
rapidement la
cassette
Rembobiner la
cassette
Ejecter la
cassette
Rechercher
vers l’avant à
faible vitesse
Rechercher
vers l’avant à
grande vitesse
Rechercher
vers l’arrière à
faible vitesse
Rechercher
vers l’arrière à
grande vitesse
Lecture à faible
vitesse
Appuyez sur
a PAUSE/STILL en
cours de lecture
g F FWD/] en
mode d’arrêt
f REW/[ en
mode d’arrêt
z EJECT sur la
télécommande ou
Z STOP/EJECT
sur l’appareil en mode
d’arrêt
g F FWD/] une
fois en cours de
lecture
g F FWD/] deux
fois en cours de
lecture
f REW/[ une fois
en cours de lecture
f REW/[ deux
fois en cours de
lecture
SLOW
Pour revenir au mode
original
Appuyez sur a PAUSE/
STILL ou d PLAY.
Le bouton d PLAY
clignote.
Appuyez sur s STOP
de la télécommande
ou sur Z STOP/
EJECT de l’appareil.
Appuyez sur s STOP
de la télécommande
ou sur Z STOP/
EJECT de l’appareil.
—
Appuyez sur d PLAY.
Le bouton d PLAY
clignote rapidement.
Appuyez sur d PLAY.
Le bouton d PLAY
clignote rapidement.
Appuyez sur d PLAY.
Le bouton d PLAY
clignote rapidement.
Appuyez sur d PLAY.
Le bouton d PLAY
clignote rapidement.
Appuyez sur d PLAY.
Le bouton d PLAY
clignote lentement.
Pour visualiser l’image de la cassette en
cours d’avance rapide ou de rembobinage
— Recherche visuelle
Appuyez sur la touche g F FWD/] ou f REW/[ et
maintenez-la enfoncée pendant le bobinage ou le
rembobinage. L’appareil commute la recherche avant ou
arrière et “D” de la touche de l’appareil clignote.
Relâchez la touche pour revenir en mode d’avance rapide
ou de rembobinage.
Pour éviter une publicité
Appuyez sur AD-SKIP en cours de lecture. Le
magnétoscope avance la bande d’environ 30 secondes de
la durée enregistrée.
Chaque fois que vous appuyez sur cette touche, le
magnétoscope avance la bande par incréments d’environ
30 secondes de la durée enregistrée jusqu’à un maximum
de 3 minutes.
Après la recherche vers l’avant, le magnétoscope revient en
mode de lecture normale.
En mode AD-SKIP, le compteur n’enregistre pas les
passages blancs sans signaux enregistrés et “D” de la
touche de l’appareil clignote.
Pour suivre une émission de télévision
Appuyez sur TV MONITOR en cours de lecture. La lecture
de la cassette continue pendant que l’image de la chaîne
de télévision est commutée.
Appuyez à nouveau sur TV MONITOR pour revenir à
l’image de lecture de la cassette.
Conseils
• Si vous appuyez sur la touche z EJECT de la
télécommande ou Z STOP/EJECT de l’appareil alors
qu’il se trouve hors tension, l’appareil éjecte la cassette.
• Suivant les cassettes, des lignes parasites peuvent
apparaître ou les couleurs s’altérer durant les recherches
avant et arrière et les arrêts sur image. Vous pouvez
déplacer les lignes parasites en cours de recherche avant et
arrière en appuyant plusieurs fois de suite sur SET/
TRACKING + ou –.
Remarques
• Si vous maintenez un arrêt sur image pendant plus de 5
minutes, l’appareil passe automatiquement en mode de
lecture pour protéger la bande magnétique de la cassette.
• Le son est coupé durant les opérations de recherche avant
et arrière ainsi que pendant les arrêts sur image.
Vous pouvez commuter la vitesse de recherche avant et
arrière en appuyant plusieurs fois de suite sur g F FWD/
] ou f REW/[.
FRANÇAIS
20
Page 58

Lecture répétée d’une cassette
10:30AM DIM CNL 023
SP01:23:45
10:30AM DIM CNL 023
SP00:00:00
TV VCR/CATV
POWER
dPLAY
wREC/OTR
Différentes fonctions de
recherche
TV VCR/CATV
Touches
numériques (1 à 9)
INDEX
RESET
ZERORETURN
CALL
MENU
SET/TRACKING
+/–
Avant de commencer...
Réglez le sélecteur TV VCR/CATV sur TV VCR.
1
Appuyez sur MENU.
2
Appuyez sur SET/TRACKING + ou – pour
sélectionner AUTO REPEAT.
MENU
PROG. ENR.
PROG. FONC
PROG. CNL
AUTO REPEAT ON OFF
SYSTEME DE REGLAGE
Appuyez sur ENTER pour sélectionner ON.
3
MENU
PROG. ENR.
PROG. FONC
PROG. CNL
AUTO REPEAT ON OFF
SYSTEME DE REGLAGE
ENTER
fREW/[
REC. END
SEARCH
gF FWD/]
sSTOP
Rembobinage ou avance rapide jusqu’
à un point donné.
1
Appuyez sur CALL pour afficher le compteur de
bande.
Appuyez sur RESET à l’endroit que vous voulez
2
retrouver ultérieurement.
Le compteur revient à “00:00:00”.
—
Retour à Zéro
Appuyez sur MENU pour revenir à l’écran normal.
4
Appuyez sur d PLAY.
5
L’appareil reproduit la cassette jusqu’à la fin, la
rembobine jusqu’au début et répète ensuite la lecture.
Pour annuler la lecture répétée
Appuyez sur ENTER pour sélectionner OFF à l’étape 3. La
fonction de lecture répétée est également annulée par une
pression sur POWER, T-REC ou wREC/OTR, en utilisant la
fonction de remise à zéro du compteur ou en éjectant la
cassette.
21
FRANÇAIS
Après la lecture ou l’enregistrement, appuyez
3
sur sSTOP de la télécommande ou sur
ZSTOP/EJECT de l’appareil, puis appuyez
sur ZERO-RETURN.
La cassette s’arrête automatiquement lorsque le
compteur est revenu à environ “00:00:00”.
Remarques
• Lorsque vous introduisez une cassette, le compteur de
bande revient à “00:00:00.”
• Le compteur de bande ne fonctionne pas lors de la lecture
de passages non enregistrés d’une cassette.
Page 59

Recherche avec la fonction
d’indexation — Recherche d’index
Recherche de la fin d’un programme
enregistré — Recherche de fin
Le magnétoscope insère automatiquement un signal d’index
sur la cassette chaque fois qu’un enregistrement démarre.
Vous pouvez utiliser ces signaux pour localiser le début de
chaquee nregistrement.
Avant de commencer...
Réglez le sélecteur TV VCR/CATV sur TV VCR.
Appuyez sur INDEX en mode d’arrêt ou de lecture.
1
Appuyez sur les touches numériques (1-9) pour
2
sélectionner le numéro d’index (jusqu’à 9).
Appuyez sur g F FWD/] (pour les
3
enregistrements suivants) ou f REW/[ (pour les
enregistrements précédents).
Le magnétoscope entame la recherche.
La lecture démarre automatiquement à partir du début
de l’enregistrement spécifié.
Vous pouvez faire avancer/rembobiner automatiquement la
cassette jusqu’à la fin du programme enregistré.
Avant de commencer...
Réglez le sélecteur TV VCR/CATV sur TV VCR.
Appuyez sur REC. END SEARCH en mode d’arrêt.
Le magnétoscope entame la recherche.
La recherche s’arrête automatiquement après l’avance
rapide ou le rembobinage comme ci-dessous.
Avance rapide
enregistré vierge
Avance rapide
Arrêt
Appuyez sur REC.END SEARCH
enregistré précédemment
enregistré suivant vierge
Pour rechercher le signal d’index suivant
Appuyez sur INDEX en mode d’arrêt ou de lecture et
appuyez ensuite sur g F FWD/] ou f REW/[. Dès
que le magnétoscope a trouvé le signal d’index suivant, la
lecture démarre automatiquement.
Remarques
• Les signaux d’index doivent se situer à des intervalles d’au
moins 2 minutes. Sinon, l’appareil ne peut les détecter
correctement.
• Il se peut que les signaux d’index ne soient pas détectés sur
les cassettes endommagées ou usées.
• Il se peut qu’un signal d’index au début d’une cassette
enregistrée ne soit pas détecté.
• Il se peut qu’un signal d’index ne soit pas détecté s’il est
extrêmement proche de l’endroit où la recherche a
commencé.
• Lorsque la cassette est rembobinée jusqu’à son début, la
lecture commence automatiquement.
• En cours de recherche d’index, si la cassette atteint la fin, la
recherche d’index sera interrompue et la cassette sera
automatiquement rembobinée.
Avance
rapide
Appuyez sur REC.END SEARCH
Rembobinage
enregistré
Arrêt
Rembobinage (après
l’avance rapide pendant
quatre secondes) .
Appuyez sur REC.END SEARCH
Arrêt
vierge
Pour arrêter la recherche rapide
Appuyez sur la touche s STOP de la télécommande ou
s/z STOP/EJECT de l’appareil.
Remarque
Si la cassette ne comporte pas d’espace vierge, la recherche
s’arrête à la fin de la bande.
FRANÇAIS
22
Page 60

ENREGISTREMENT
Enregistrement d’une
émission télévisée
Touches
numériques
TAPE SPEED
VX-S207
TV VCR/CATV
TV/LINE
CHANNELN/M
wREC/OTR
aPAUSE/STILL
sSTOP
3
Appuyez plusieurs fois de suite sur CHANNEL
N ou M, ou sur les touches numériques
pour sélectionner sur le magnétoscope la
chaîne que vous voulez enregistrer.
Pour sélectionner une émission CATV à l’aide des
touches numériques
Mettez le sélecteur TV VCR/CATV sur CATV. Pour
sélectionner un numéro entre 10 et 19, appuyez sur 0 pour
le chiffre des centaines et appuyez ensuite sur les touches
1 à 9 pour introduire le chiffre des dizaines puis des unités.
Pour sélectionner un numéro inférieur à 10, appuyez deux
fois sur 0 pour les chiffres des centaines et des dizaines et
appuyez une fois sur les touches 1 à 9 pour introduire le
chiffre des unités.
Pour sélectionner une émission VHF/UHF à l’aide
des touches numériques
Pour sélectionner un numéro inférieur à 10, appuyez sur
0 pour introduire le chiffre des dizaines et appuyez
ensuite sur les touches 1 à 9 pour introduire le chiffre
des unités.
Appuyez sur w REC/OTR pour démarrer
4
l’enregistrement.
• L’indication “INDEX” clignote pendant quelques
secondes.
• L’indicateur wREC/OTR sur l’appareil s’allume.
CHANNEL N/M
wREC/OTR
Avant de commencer...
Réglez le sélecteur TV VCR/CATV sur TV VCR.
Introduisez une cassette dont l’onglet de
1
ZSTOP/EJECT
protection contre l’effacement est intact.
La mise sous tension est automatique.
Appuyez sur TAPE SPEED pour sélectionner la
2
vitesse de défilement de la bande, SP, LP ou
SLP.
Pour arrêter l’enregistrement
Appuyez sur la touche s STOP de la télécommande ou
Z STOP/EJECT de l’appareil.
Le bouton wREC/OTR de l’appareil s’éteint.
Pour activer une pause d’enregistrement
Appuyez sur a PAUSE/STILL.
L’indicateur wREC/OTR sur l’appareil clignote.
Pour reprendre l’enregistrement, appuyez à nouveau sur
a PAUSE/STILL ou wREC/OTR.
Pour éviter un enregistrement accidentel
Brisez l’onglet de protection contre l’effacement sur la
tranche arrière de la cassette.
Pour réenregistrer sur cette cassette, recouvrez l’orifice de
l’onglet au moyen de bande adhésive.
Bande adhésive
Onglet de protection contre
l’effacement
Conseil
Pour enregistrer une émission via l’entrée ligne, appuyez sur
CHANNEL N ou M, ou TV/LINE pour afficher “LINE1” (via
les prises AUDIO/VIDEO IN à l’arrière) ou “LINE2” (via les
prises AUDIO/VIDEO IN à l’avant) à l’étape 3.
SP
00:00:00
Le mode SLP assure une capacité d’enregistrement
triple du mode SP. Le mode LP assure une capacité
d’enregistrement double du mode SP, mais le mode SP
produit une image et un son de meilleure qualité.
FRANÇAIS
23
Remarques
• Vous ne pouvez pas changer de chaîne en cours
d’enregistrement.
• Si vous essayez d’enregistrer sur une cassette dont l’onglet
de protection contre l’effacement a été brisé, le
magnétoscope l’éjecte automatiquement.
• Si vous maintenez une pause d’enregistrement pendant plus
de 5 minutes, le magnétoscope passe automatiquement en
mode d’arrêt pour protéger la bande magnétique de la cassette.
• Si la source d’alimentation est coupée en cours
d’enregistrement, le téléviseur se met hors tension, mais le
magnétoscope poursuit l’enregistrement.
Page 61

Lecture du passage que vous venez
d’enregistrer — Lecture monotouche
Enregistrement avec la
fonction monotouche
La fonction de lecture monotouche s’avère très pratique
après un enregistrement suivant le système VCR Plus+®
(page 25) ou un enregistrement programmé manuellement
(page 27). Vous pouvez réaliser des enregistrements par
programmateur et ne reproduire ultérieurement que le
passage que vous venez d’enregistrer à l’aide du
programmateur en appuyant sur une seule touche.
OTPB
VX-S207
La fonction d’enregistrement monotouche vous permet de
démarrer instantanément l’enregistrement de la chaîne en
cours pour une durée spécifiée.
wREC/OTR
sSTOP
VX-S207
ONE-TOUCH PLAYBACK
1
Arrêtez l’enregistrement (si vous enregistrez sans le
programmateur).
La touche ONE-TOUCH PLAYBACK de l’appareil s’allume.
Si vous appuyez sur une autre touche de commande
après avoir arrêté l’enregistrement, la lecture
monotouche est désactivée et la touche ONE-TOUCH
PLAYBACK de l’appareil s’éteint.
2
Appuyez sur la touche ONE-TOUCH PLAYBACK du
magnétoscope ou sur la touche OTPB de la
télécommande.
La cassette est rembobinée au début du passage
enregistré et la lecture démarre.
Si vous avez programmé plus de deux
enregistrements
L’appareil démarre la lecture du premier enregistrement
quand vous actionnez la fonction de lecture monotouche.
Pour localiser le début du deuxième enregistrement (ou de
l’un des suivants), utilisez la fonction de recherche d’index.
Indicateur TIMER REC
Avant de commencer...
• Introduisez une cassette dont l’onglet de protection contre
l’effacement est intact. Assurez-vous que la durée de la
cassette est supérieure à la durée d’enregistrement.
• Sélectionnez la chaîne à enregistrer ainsi que la vitesse de
défilement de la bande.
Appuyez sur w REC/OTR.
1
Le magnétoscope démarre l’enregistrement.
• L’indication “INDEX” clignote pendant quelques
secondes.
• L’indicateur wREC/OTR sur l’appareil s’allume.
2
Appuyez plusieurs fois de suite sur w REC/
wREC/OTR
Z
STOP/EJECT
OTR pour régler la durée d’enregistrement.
Chaque fois que vous appuyez sur cette touche, la
durée d’enregistrement dans la fenêtre d’affichage
change comme suit:
Une fois la durée programmée écoulée, l’enregistrement
s’arrête.
0:30 1:00 1:30 2:00 3:00
Enregistrement 5:00 4:00
normal
CNL
Remarque
La fonction de lecture monotouche est inopérante avec les
enregistrements de moins de une minute.
FRANÇAIS
24
Page 62

Enregistrement avec la fonction monotouche (suite)
Réglage du programmateur
Pour arrêter l’enregistrement
Appuyez sur la touche s STOP de la télécommande ou
Z STOP/EJECT de l’appareil.
Le bouton wREC/OTR de l’appareil s’éteint.
Pour allonger la durée d’enregistrement
pendant un enregistrement
Appuyez sur w REC/OTR jusqu’à ce que la durée voulue
apparaisse dans la fenêtre d’affichage.
Conseil
Pour vérifier la durée restante d’enregistrement, appuyez une
seule fois sur CALL en cours d’enregistrement instantané.
Remarques
• Si la source d’alimentation est coupée en cours
d’enregistrement, le téléviseur se met hors tension, mais le
magnétoscope poursuit l’enregistrement.
• Lorsque la cassette arrive en fin de bande pendant un
enregistrement instantané, l’indicateur TIMER REC de
l’appareil se met à clignoter.
avec le système VCR Plus+®
Vous pouvez simplifier considérablement vos enregistrements
par programmateur avec le système VCR Plus+®. Il vous
suffit d’enter un numéro PlusCode, un numéro assigné à
chaque émission télévisée, et l’appareil programmera
automatiquement l’enregistrement. Vous trouverez les
numéros PlusCode dans la plupart des magazines télé.
Vous pouvez programmer jusqu’à 8 émissions.
VCR PLUS+
MENU
SET/TRACKING +/–
TV VCR/CATV
Touches
numériques
T-REC
ENTER
CANCEL
VX-S207
Indicateur TIMER REC
Avant de commencer...
• Vérifiez si l’horloge du magnétoscope est correctement
réglée.
• Vérifiez si les numéros de chaînes correspondent aux
chaînes guides assignées aux stations de télévision.
• Introduisez une cassette dont l’onglet de protection contre
l’effacement est intact.
• Réglez le sélecteur TV VCR/CATV sur TV VCR.
• Si le convertisseur CATV est employé pour
l’enregistrement par programmateur, vérifiez si le
convertisseur CATV est sous tension et si la chaîne que
vous voulez enregistrer est sélectionnée.
1
Appuyez sur la touche VCR PLUS+.
Entrez le numéro PlusCode du programme
2
télévisé à enregistrer à l’aide des touches
numériques.
Si vous faites une erreur, appuyez sur CANCEL.
25
PLUSCODE NO. 12 3 ––––––
1 FOIS
QUOT
HEBDO
“PROGRAM” dans ce menu correspond au bouton VCR
PLUS+.
FRANÇAIS
Page 63

3
Appuyez sur SET/TRACKING + ou – pour
sélectionner 1 FOIS, QUOT ou HEBDO.
Pour
Une seule émission
Une émission journalière
Une émission hebdomadaire, par ex.
tous les lundis (HEB-LUN)
Appuyez sur ENTER.
4
• Les informations du programmateur suivantes
apparaissent sur l’écran.
• Si vous désirez modifier le réglage ici, voir
“Changement des réglages”.
PLUSCODE NO. 12 3 ––––––
DATE
DEBUT
FIN
CANAL
VITESSE
Appuyez plusieurs fois de suite sur ENTER
5
17(LUN)
6:30PM
7:00PM
003
SP
Sélectionnez
1 FOIS
QUOT
HEBDO
jusqu’à ce que lavitesse de défilement de la
bande se mette à clignoter et appuyezensuite
sur SET/TRACKING + ou – pour sélectionner
SP, LP ou SLP.
PLUSCODE NO. 12 3 ––––––
DATE
DEBUT
FIN
CANAL
VITESSE
Appuyez sur la touche VCR PLUS+ ou ENTER.
6
La liste des enregistrements programmés apparaît.
17(LUN)
6:30PM
7:00PM
003
SP
Pour annuler un enregistrement programmé
Appuyez sur MENU, et appuyez sur SET/TRACKING + ou –
pour sélectionner TIMER REC SET. Appuyez ensuite sur
SET/TRACKING + ou – pour sélectionner le programme
inutile, puis appuyez sur CANCEL.
Si des enregistrements programmés se
chevauchent
Les parties d’émissions qui se chevauchent ne seront pas
enregistrées. Les premiers enregistrements programmés
dans l’écran de programmation ont la priorité sur les
suivants comme illustré ci-dessous.
Emission 1
Emission 2
Parties effacées
Emission 3
Parties effectivement
enregistrées
Emis. 1 Emis. 2 Emis. 3
Pour annuler les fonctions d’allumage et
d’extinction automatique
Pour éviter l’exécution de ces fonctions au cours d’un
programme, appuyez sur VCR PLUS+ après l’étape 6. Le
menu ON/OFF TIMER s’affiche alors à l’écran. Reportezvous ensuite aux sections “Réglage du programmateur de
mise sous tension” et “Réglage du programmateur de mise
hors tension”.
Conseils
• Si “PROGRAMME PLEIN” clignote et si la liste des
enregistrements programmés sáffiche, cela signifie que 8
émissions ont déjà été programmées. Annulez l’émission
soperflue.
• Pour confirmer le réglage, sélectionnez PROG. ENR. dans le
menu de manière à afficher la liste des enregistrements
programmés. Appuyez deux fois sur MENU pour revenir à
l’écran normal.
• Si l’alimentation est interrompue pendant plus de 5 secondes, les
émissions programmées sont effacées. Dans ce cas, vous devez
recommencer les réglages de l’horloge et du programmateur.
Appuyez deux fois sur MENU pour revenir à
7
l’écran normal.
Appuyez sur T-REC.
8
• L’indication TIMER REC de l’appareil s’allume et le
magnétoscope passe en mode de veille
d’enregistrement programmé.
• Si l’indication TIMER REC ne s’allume pas, c’est que
vous n’avez pas introduit de cassette.
• La cassette est éjectée si son onglet de protection
contre l’effacement a été brisé.
• Vous pouvez mettre l’appareil hors tension. L’appareil
démarrera automatiquement l’enregistrement à l’heure
programmée.
Attention
Lorsque l’indicateur TIMER REC de l’appareil est
allumé, les fonctions de cassette sont inopérantes. Pour
pouvoir les utiliser, appuyez sur T-REC. Mais n’oubliez
pas d’appuyer à nouveau sur T-REC pour activer les
enregistrements par programmateur.
Remarque
Si la cassette arrive en fin de bande pendant un enregistrement
programmé, l’indication TIMER REC de l’appareil se met à clignoter.
Changement des réglages
Pour programmer un enregistrement
journalier
A l’étape 4, appuyez plusieurs fois de suite sur SET/
TRACKING + ou – pour afficher le type d’enregistrement
journalier que vous souhaitez:
LUN-VEN : du Lundi au Vendredi
LUN-SAM : du Lundi au Samedi
DIM-SAM : tous les jours
PLUSCODE NO. 12 3 ––––––
LUN-VEN
DATE
DEBUT
FIN
CANAL
VITESSE
Pour allonger la durée d’enregistrement
Après l’étape 4, appuyez plusieurs fois de suite sur ENTER
jusqu’à ce que l’heure de fin se mette à clignoter et appuyez
ensuite sur SET/TRACKING + ou – pour changer la valeur
de réglage.
6:30PM
7:00PM
003
SP
FRANÇAIS
26
Page 64

Réglage manuel du programmateur
Si vous ne pouvez pas utiliser le système VCR Plus+®, vous
pouvez programmer manuellement des enregistrements.
Vous pouvez programmer jusqu’à 8 enregistrements dans
un délai d’un mois à partir de la date d’aujourd’hui.
TV VCR/CATV
5 Introduisez l’heure de début (heure et minutes),
6
7
8
T-REC
MENU
SET/TRACKING
+/–
Avant de régler le programmateur...
Vérifiez si l’horloge du magnétoscope est correctement réglée.
•
• Introduisez une cassette dont l’onglet de protection contre
l’effacement est intact.
• Réglez le sélecteur TV VCR/CATV sur TV VCR.
•
Si le convertisseur CATV est employé pour l’enregistrement par
programmateur, vérifiez si le convertisseur CATV est sous tension et
si la chaîne que vous voulez enregistrer est sélectionnée.
1
Appuyez sur MENU.
2
Appuyez sur SET/TRACKING + ou – pour
sélectionner PROG. ENR. et appuyez ensuite
sur ENTER.
MENU
PROG. ENR.
PROG. FONC
PROG. CNL
AUTO REPEAT ON OFF
SYSTEME DE REGLAGE
ENTER
CANCEL
Pour programmer un enregistrement
journalier/hebdomadaire
A l’étape 4, appuyez plusieurs fois de suite sur SET/
TRACKING – avant d’appuyer sur ENTER.
Le réglage change selon la séquence suivante:
Exemple
Le jour actuel (Dimanche) DIM-SAM (Dimanche à samedi)
HEB-DIM (Chaque dimanche)
Appuyez sur SET/TRACKING + pour changer l’affichage
dans l’ordre inverse.
Une fois le réglage terminé, appuyez sur ENTER.
l’heure de fin (heure et minutes), le numéro de
chaîne et la vitesse de défilement de la bande
de la même façon qu’à l’étape 4.
• Pour changer les minutes par intervalles de 10 minutes,
maintenez la touche SET/TRACKING + ou – enfoncée.
• La liste des enregistrements programmés apparaît.
Pour programmer un autre enregistrement,
répétez les étapes 3 à 5.
Appuyez deux fois sur MENU pour revenir à
l’écran normal.
Appuyez sur T-REC.
• L’indication TIMER REC de l’appareil s’allume et le
magnétoscope passe en mode de veille
d’enregistrement programmé.
• Si l’indication TIMER REC ne s’allume pas, c’est que
vous n’avez pas introduit de cassette.
• La cassette est éjectée si son onglet de protection
contre l’effacement a été brisé.
• Vous pouvez mettre l’appareil hors tension. L’appareil
démarrera automatiquement l’enregistrement à l’heure
programmée.
...
Un mois plus tard
moins deux jours
Un mois plus tard
moins un jour
LUN-SAM (Lundi à samedi)
LUN-VEN (Lundi à vendredi)
HEB-SAM (Chaque samedi)
HEB-VEN (Chaque vendredi)
.....
3
Appuyez sur SET/TRACKING + ou – pour
sélectionner une ligne sur laquelle aucun
enregistrement n’a encore été programmé et
appuyez ensuite sur ENTER.
Appuyez sur SET/TRACKING + ou – pour régler
4
la date et appuyez ensuite sur ENTER.
Pour programmer des enregistrements journaliers/
hebdomadaires, voir “Pour programmer un
enregistrement journalier/hebdomadaire”.
PROG. ENR.
27
FRANÇAIS
DATE
DEBUT
FIN
CANAL
VITESSE
19(LUN)
10:30AM
011
SP
Pour annuler un programme
Sélectionnez PROG. ENR. dans le menu. Appuyez sur
SET/TRACKING + ou – pour sélectionner le programme
jugé inutile et appuyez ensuite sur CANCEL.
Conseils
•
Si vous voulez enregistrer une émission via l’entrée de ligne,
appuyez sur la touche SET/TRACKING + ou – pour afficher “L1” (via
les prises AUDIO/VIDEO IN à l’arrière) ou “L2” (via les prises AUDIO/
VIDEO IN à l’avant) à l’étape 5 au lieu du numéro de chaîne.
• Pour confirmer le réglage, sélectionnez PROG. ENR. dans le
menu pour afficher la liste des enregistrements programmés.
Appuyer deux fois sur MENU pour revenir à l’écran normal.
•
Si l’alimentation est interrompue pendant plus de 5 secondes, les
émissions programmées sont effacées. Dans ce cas, vous devez
recommencer les réglages de l’horloge et du programmateur.
Remarques
•
Au cours de l’enregistrement programmé, lorsque la cassette arrive
en fin de bande, l’indicateur TIMER REC de l’appareil clignote.
•
Pendant que vous visualisez une autre émission sur cet appareil, si
l’enregistrement programmé démarre, la chaîne apparaissant sur
l’écran du téléviseur change lorsque vous réglez le programmateur.
Attention
Lorsque l’indicateur TIMER REC de l’appareil s’allume, les
fonctions de la cassette ne sont pas disponibles. Pour
pouvoir utiliser les autres fonctions, appuyez sur T-REC.
Mais n’oubliez pas d’appuyer de nouveau pour activer les
enregistrements par programmateur.
Page 65

Copie
Raccordement d’un autre magnétoscope
VX-S207 (Avant)
Jaune
Blanc
Rouge
Câble audio/vidéo
(non fourni)
VX-S207 (Arrière)
Rouge
Blanc
ou
Vers les prises de sortie audio/vidéo
AUDIO VIDEO
R L
(MONO)
OUT
LINE 1
Jaune
Autre magnétoscope (lecteur)
Conseils
• Si l’autre magnétoscope est un modèle mono, ne
raccordez qu’une fiche audio à la prise AUDIO IN
L (MONO).
• Si vous utilisez ce magnétoscope pour la lecture,
raccordez ses prises AUDIO/VIDEO OUT aux
prises d’entrée audio/vidéo du magnétoscope
assurant l’enregistrement.
• Veuillez consulter le mode d’emploi de l’autre
magnétoscope.
Fonctionnement
TV/LINE
w REC/OTR
ou
Vers les prises de sortie audio/vidéo
Avant de commencer...
Sélectionnez la vitesse de la bande.
Introduisez une cassette source préenregistrée
1
dans l’autre magnétoscope (lecteur).
Introduisez une cassette vierge dont l’onglet
2
de protection contre l’effacement est intact
dans votre VX-S207/S137 (enregistreur).
Appuyez plusieurs fois de suite sur TV/LINE
3
pour afficher “LINE1” (arrière) ou “LINE2”
(avant) sur l’écran.
Caméscope (lecteur)
Démarrez la lecture sur l’autre magnétoscope.
4
5
Appuyez sur w REC/OTR sur le magnétoscope
enregistreur.
FRANÇAIS
28
Page 66

AUTRES FONCTIONS
Réglage de la puce V
5
Réintroduisez le même mot de passe par mesure de
sécurité et appuyez ensuite sur ENTER.
Vous pouvez programmer une limitation suivant l’âge afin
d’empêcher les enfants de regarder ou d’écouter des scènes
violentes ou des programmes pour adultes. Cet appareil est
conforme à “CLASS. PROG. TV” et “CLASS. FILM”.
Pour pouvoir utiliser la fonction de puce V, vous devez
d’abord enregistrer un mot de passe.
TV VCR/CATV
Touches
numériques
MENU
SET/TRACKING
+/–
CALL
ENTER
CANCEL
Avant de commencer...
Réglez le sélecteur TV VCR/CATV sur TV VCR.
Enregistrement du mot de passe
Attention
Vous ne pouvez pas activer la puce V si vous
oubliez votre mot de passe. Nous vous
conseillons de l’écrire à un endroit sûr pour le cas
où vous l’oublieriez.
REGLAGE PUCE V
CONFIRMER
MOT DE PASSE:
Le menu REGLAGE PUCE V apparaît.
Activation de la puce V
Dans le menu REGLAGE PUCE V, appuyez sur SET/
1
TRACKING + ou – pour sélectionner CLASS. PROG.
TV et appuyez ensuite sur ENTER.
REGLAGE PUCE V
V–CHIP
CLASS. PROG. TV
CLASS. FILM
CHANGE. MOT DE PASSE
Appuyez sur SET/TRACKING + ou – pour afficher le
2
réglage voulu.
Les émissions captées par la suite sont protégées
contre l’affichage suivant le réglage sélectionné.
OFF: CLASS. PROG. TV non activé
TV-Y: Emissions excepté pour enfants en bas âge
TV-Y7: Emissions pour enfants de plus de 7 ans
TV-G: Emissions excepté pour enfants
TV-PG:Emissions inappropriées pour les enfants en bas âge
TV-14: Emissions inappropriées pour les enfants de moins de
14 ans
TV-MA:Emissions interdites aux enfants de moins de 17 ans
REGLAGE PUCE V
V–CHIP
CLASS. PROG. TV
CLASS. FILM
CHANGE. MOT DE PASSE
:OFF
:OFF
:OFF
:OFF
:TV–Y
:OFF
Appuyez sur MENU.
1
Appuyez sur SET/TRACKING + ou – pour sélectionner
2
PROG.FONC et appuyez ensuite sur ENTER.
3
Appuyez sur SET/TRACKING + ou – pour sélectionner
REGLAGE PUCE V et appuyez ensuite sur ENTER.
PROG. FONC
REGLAGE PUCE V
MINU MAR/ARR
IMAGE
AUDIO
SAP ON OFF
4
Introduisez le mot de passe (4 chiffres) à l’aide des
touches numériques (0-9) et appuyez ensuite sur
ENTER.
” apparaît au lieu des chiffres.
•“
*
• Si vous commettez une erreur, appuyez sur CANCEL.
REGLAGE PUCE V
NOUVEAU
MOT DE PASSE:
•“APPEL-CHANGE.CONTENU” peut apparaître en
fonction du réglage sélectionné. Si le message
s’affiche, appuyez sur CALL pour afficher le sous-menu
CLASS. PROG. TV. Sinon, passez à l’étape 5.
Appuyez sur SET/TRACKING + ou – pour
3
sélectionner l’élément du sous-menu, puis appuyez
sur ENTER pour sélectionner ON ou OFF.
• Si TV-Y7 est sélectionné, l’élément suivant apparaît.
REGLAGE CLASS
VIOLENCE/FANTASTI
ON
• Si TV-PG ou TV-14 est sélectionné, les éléments
suivants apparaissent.
par exemple TV-PG
REGLAGE CLASS
VIOLENCE
CONTEXTE SEXUEL
LANGUE ADULTE
DIALOGUE SEXUEL
:TV-PG
ON
ON
ON
ON
29
FRANÇAIS
Page 67

• Si TV-MA est sélectionné, les éléments suivants apparaissent.
V–CHIP
CLASS. PROG. TV
CLASS. FILM
:ON
CHANGE. MOT DE PASSE
REGLAGE PUCE V
:TV–Y
:PG
REGLAGE CLASS.
VIOLENCE
CONTEXTE SEXUEL
LANGUE ADULTE ON
4
Appuyez sur MENU pour revenir au menu V-CHIP SET.
Appuyez sur ENTER et appuyez ensuite sur SET/
5
:TV-MA
ON
ON
TRACKING + ou – pour sélectionner CLASS. FILM et
appuyez ensuite sur ENTER.
Pour utiliser le téléviseur après avoir
activé la protection
Lors de la réception d’une émission protégée à l’aide de la fonction
de puce V, le message “PROTECTION-PUCE V” apparaît.
PROTECTION-PUCE V
SI VOUS ANNULER
LA PROTECTION ENTRER
MOT DE PASSE.
MOT DE PASSE:––––
Introduisez le mot de passe et appuyez ensuite sur ENTER.
Si le mot de passe est correct, la protection est désactivée.
REGLAGE PUCE V
V–CHIP
CLASS. PROG. TV
CLASS. FILM
CHANGE. MOT DE PASSE
Appuyez sur SET/TRACKING + ou – pour afficher le
6
:OFF
:TV–Y
:PG
réglage voulu et appuyez ensuite sur ENTER.
Les films suivants sont protégés contre l’affichage en
fonction du réglage sélectionné.
OFF: CLASS. FILM non activé
G: Tout âge (pour le grand public)
PG: Films inadaptés aux enfants
PG-13: Films inadaptés aux enfants de 13 ans ou
moins
R: Films adaptés aux enfants de moins de 17
ans accompagnés de leurs parents
NC-17: Films interdits aux enfants de moins de 17
ans
X: Films pour adultes
REGLAGE PUCE V
V–CHIP
CLASS. PROG. TV
CLASS. FILM
CHANGE. MOT DE PASSE
:OFF
:TV–Y
:PG
Remarque
La fonction de puce V n’est activée que pour les programmes
et les cassettes qui possèdent le signal d’évaluation.
Modification du mot de passe
1
Appuyez sur MENU.
Appuyez sur SET/TRACKING + ou – pour sélectionner
2
PROG. FONC et appuyez ensuite sur ENTER.
Appuyez sur SET/TRACKING + ou – pour sélectionner
3
REGLAGE PUCE V et appuyez ensuite sur ENTER.
Introduisez le mot de passe à l’aide des touches
4
numériques (0-9) et appuyez ensuite sur ENTER.
“*” apparaît au lieu des chiffres.
REGLAGE PUCE V
MOT DE PASSE:
Le menu REGLAGE PUCE V apparaît.
Appuyez sur SET/TRACKING + ou – pour
5
sélectionner CHANGE. MOT DE PASSE et appuyez
ensuite sur ENTER.
Appuyez sur SET/TRACKING + ou – pour
7
sélectionner V-CHIP.
Appuyez sur ENTER pour afficher ON.
8
Appuyez trois fois sur MENU pour revenir à l’écran
9
normal.
REGLAGE PUCE V
V–CHIP
CLASS. PROG. TV
CLASS. FILM
CHANGE. MOT DE PASSE
REGLAGE PUCE V
V–CHIP
CLASS. PROG. TV
CLASS. FILM
CHANGE. MOT DE PASSE
:OFF
:TV–Y
:PG
:ON
:TV-Y
:PG
6
Introduisez le nouveau mot de passe à l’aide des
touches numériques (0-9) et appuyez ensuite sur
ENTER.
•“
” apparaît au lieu des chiffres.
*
• Si vous commettez une erreur, appuyez sur CANCEL.
REGLAGE PUCE V
V–CHIP
CLASS. PROG. TV
CLASS. FILM
CHANGE. MOT DE PASSE
NOUVEAU
MOT DE PASSE:
Réintroduisez le même mot de passe par mesure de
7
:ON
:TV–Y
:PG
sécurité et appuyez ensuite sur ENTER.
Appuyez trois fois sur MENU pour revenir à l’écran
8
normal.
Remarque
Si vous entrez un mot de passe erroné à l’étape 4, “ERROR”
apparaît.
Entrez de nouveau le mot de passe correct.
FRANÇAIS
30
Page 68

Son télévisé multicanal (MTS)
Enregistrement du son d’une
et système de son Hi-Fi
TV VCR/CATV
Touches
numériques
CHANNEL N/M
wREC/OTR
MENU
AUDIO
SET/TRACKING
+/–
Son télévisé multicanal (MTS)
Cet appareil est équipé du système MTS de son télévisé
multicanal qui décode les signaux de retransmission stéréo
et SAP (émission audio secondaire). Il décode également le
son télévisé stéréo du système CATV local s’il satisfait aux
fréquences de câble assignées et au système audio télévisé
stéréo/bilingueMTS recommandé EIA.
Il peut enregistrer et reproduire le signal audio suivant le
système audio Hi-Fi VHS.
Emission audio secondaire (SAP)
Cet appareil peut enregistrer et reproduire une émission
audio secondaire (SAP) pour la seconde langue ou des
informations complémentaires. En général, la langue
primaire est enregistrée sur le canal audio primaire et la
langue secondaire ou les informations complémentaires sur
le canal SAP.
Système de piste audio
Cet appareil enregistre les signaux audio monoraux
ordinaires sur la piste audio normale et les signaux audio
Hi-Fi sur la piste audio Hi-Fi.
Si vous utilisez un appareil équipé du système Hi-Fi VHS
pour reproduire une cassette enregistrée sur cet appareil,
vous pouvez exploiter le son hi-fi stéréo ou bilingue. Si
vous utilisez un appareil qui n’est pas équipé du système
audio Hi-Fi VHS, seul le signal ordinaire enregistré sur la
piste audio normale sera reproduit.
<Structure de la bande magnétique>
Son monaural
ENTER
Piste audio normale
Piste audio Hi-Fi
émission SAP
Avant de commencer...
• Introduisez une cassette et sélectionnez la vitesse de
défilement de la bande.
• Réglez le sélecteur TV VCR/CATV sur TV VCR.
1
Appuyez sur MENU.
2
Appuyez sur SET/TRACKING + ou – pour sélectionner
PROG. FONC et appuyez ensuite sur ENTER.
MENU
PROG. ENR.
PROG. FONC
PROG. CNL
AUTO REPEAT ON OFF
SYSTEME DE REGLAGE
3
Appuyez sur SET/TRACKING + ou – pour
sélectionner SAP.
PROG. FONC
REGLAGE PUCE V
MINU MAR/ARR
IMAGE
AUDIO
SAP ON OFF
4
Appuyez sur ENTER pour sélectionner ON.
PROG. FONC
REGLAGE PUCE V
MINU MAR/ARR
IMAGE
AUDIO
SAP ON OFF
5
Appuyez deux fois sur MENU pour revenir à l’écran
normal.
Appuyez sur CHANNEL N, M ou sur les touches
6
numériques pour sélectionner le numéro de la
chaîne à enregistrer.
Si la chaîne sélectionnée est diffusée en son SAP,
l’indication SAP apparaît sur l’écran du téléviseur; sinon,
c’est l’indication STEREO qui apparaît sur l’écran du
téléviseur.
7
Appuyez sur w REC/OTR.
L’enregistrement démarre.
L’indicateur wREC/OTR sur l’appareil s’allume.
Pour écouter le son MTS sur le téléviseur
Suivez les étapes 1 à 5. Le son MTS est diffusé.
Pour revenir au son normal, sélectionnez OFF à l’étape 4.
Signaux audio et vidéo hi-fi
Enregistrement du son Hi-Fi
Le signal audio ordinaire et le signal audio Hi-Fi sont
automatiquement enregistrés. Aucun réglage particulier
n’est requis pour l’enregistrement audio Hi-Fi.
FRANÇAIS
31
Page 69

Signal enregistré et signal transmis de
l’émission MTS
Affichage des indicateurs
Ecran
du
téléviseur
—
STEREO
SAP
STEREO/
SAP
Emission
Mono
Stéréo
Mono+SAP
Stéréo+SAP
SAP
OFF
OFF
OFF
ON
OFF
ON
Signal enregistré
Piste
hi-fi
Mono
Canal
Gauche/
Droit
Mono
Gauche:
Mono
Droit:SAP
Canal
Gauche/
Droit
Gauche:
Gauche + droit
Droit:SAP
Piste
normale
Mono
Mono
Gauche
+ droit
Mono
SAP
Mono
Gauche
+ droit
SAP
Signal transmis
via AUDIO OUT
L
Mono
Canal
gauche
Mono
SAP
Canal
gauche
SAP
R
Mono
Canal
droit
Mono
SAP
Canal
droit
SAP
Lecture d’une émission MTS
enregistrée sur une cassette
Appuyez sur AUDIO pour sélectionner le son de votre choix.
Chaque fois que vous appuyez sur cette touche, l’indicateur
sur l’écran du téléviseur change comme suit:
Indicateur sur
l’écran du
téléviseur
STEREO
L ch
R ch
MONO
Emission stéréo
Stéréo
Canal gauche
Canal droit
Mono
Conseil
Si AUDIO est réglé sur STEREO pendant la lecture d’une
émission audio SAP bilingue préenregistrée, la langue primaire
“L ch.” et la langue secondaire “R ch” sont simultanément
audibles. Pour la lecture SAP bilingue, n’utilisez pas le réglage
STEREO. Sélectionnez le réglage “R ch”.
Pour écouter
Emission bilingue
Son mixé (principal
et secondaire)
Son principal
Son secondaire
Son standard
(normalement, le
son principal)
CALL
Identification des indicateurs
affichés
Heure et
jour de la
semaine
Indicateur
hi-fi
10:30AM DIM CNL 023
HI-FI
SP00:30:30
Indicateurs du mode de fonctionnement
du magnétoscope
d :Lecture
f :Rembobinage
g :Avance rapide
z :Ejection de la cassette
w :Enregistrement
a : Pause d’enregistrement
s :Arrêt
OTR X:XX : Temps restant pour l’enregistrement
monotouche
Pour changer les indicateurs affichés
Appuyez sur CALL. Chaque pression change les
indicateurs.
Mode de
fonctionnement/OTR
Numéro de chaîne/
Indicateur LINE
Compteur de bande
Indicateur de cossette
Vitesse de
défilement de la
bande
Remarques
• Lorsque vous reproduisez une cassette en mono, le son est
toujours reproduit en mono quel que soit le réglage de
AUDIO.
• Le réglage de AUDIO revient automatiquement à STEREO
lorsque la cassette est éjectée.
FRANÇAIS
32
Page 70

INFORMATIONS COMPLEMENTAIRES
Dépannage
Si l’appareil semble ne pas fonctionner correctement, relisez
les instructions d’utilisation et consultez ensuite le guide
dedépannage suivant.
La réception télévisée est parasitée ou il n’y a pas de
réception télévisée.
Raccordez correctement l’antenne.
Absence d’image ou de son
L’appareil est en mode d’entrée LINE.
Absence de son
Augmentez le niveau du volume.
Absence ou mauvaise qualité des couleurs
Ajustez le réglage des couleurs.
L’image de lecture comporte des parasites.
• Ajustez l’alignement manuellement si la cassette est de
qualité médiocre.
• Bien que l’appareil nettoie automatiquement les têtes
vidéo, il se peut que des souillures se soient accumulées
au bout d’une longue période d’utilisation. Nettoyez les
têtes vidéo au moyen d’une cassette de nettoyage de têtes
vidéo disponible dans le commerce.
Les touches de commande de cassette sont
inopérantes alors que le magnétoscope est sous
tension et qu’une cassette a été introduite.
Il se peut que de l’humidité se soit condensée. Attendez
environ deux heures que l’humidité se soit complètement
évaporée avant d’utiliser l’appareil.
Soin et entretien
Pour nettoyer le châssis
Utilisez un chiffon doux et sec pour frotter.
Si les surfaces sont extrêmement sales, utilisez un chiffon
doux humecté d’une solution détergente douce. N’utilisez
pas de solvants agressifs, tels que l’alcool, le benzène ou
du diluant, car ils risquent ne ternir le fini du châssis.
Ne collez pas d’autocollant ou d’étiquette adhésive
Ne collez pas d’autocollant ou d’étiquette adhésive sur la
surface pendant une période prolongée.
Le fini du châssis risque d’être abîmé ou de se ternir.
Lorsque vous entendez des bruits provenant de la radio
ou d’un autre équipement audio/vidéo
Eloignez cet équipement de l’appareil
Tube image
Si la surface est sale, nettoyez-la avec un chiffon sec et
doux.
Si vous touchez le tube Braun, il peut arriver que vous
sentiez un faible courant électrique. Il s’agit d’électricité
statique et il n’y a aucun risque pour vous.
Une opération anormale s’est produite.
Des interférences externes peuvent avoir affecté le
microprocesseur interne.
Attendez environ cinq minutes après avoir débranché le
câble d’alimentation de la prise murale. Rebranchez ensuite
le câble d’alimentation dans la prise murale et appuyez sur
la touche 1 tout en maintenant le bouton VOLUMEM
enfoncé sur l’appareil.
Le programmateur ne fonctionne pas.
• Réglez correctement l’horloge.
• Vérifiez si les numéros de chaîne correspondent aux
chaînes guides assignées aux stations de télévision.
Il n’y a pas de son ni d’image d’une source d’entrée.
Il se peut que vous ayez sélectionné la mauvaise entrée.
Appuyez sur TV/LINE jusqu’à ce que vous ayez
sélectionné la source d’entrée correcte. (Par ex., vous
devez sélectionner “LINE 2” lorsque vous raccordez une
source d’entrée aux prises AUDIO/VIDEO IN sur le
panneau frontal.)
La télécommande est inopérante.
• Remplacez les piles de la télécommande.
• Assurez-vous que le sélecteur TV VCR/CATV est réglé sur
TV VCR.
Des déclics sont audibles.
Il s’agit des phénomènes inévitables de dilatation et de
contraction du châssis sous l’effet des variations de la
température ambiante. Il ne s’agit pas d’un
dysfonctionnement.
33
FRANÇAIS
Page 71

Spécifications
Tyntoniseur Syntoniseur à fréquence synthétisée
Système de télévision
M
Couverture des chaînes
VHF: 2 à 13
UHF: 14 à 69
CATV:5A, A-1 à A-5, A à W,
W+1 à W+84
Mémoire de programmes
181
Entrée d’antenne 75 ohms, asymétrique
Tube image VX-S207
406(L) × 305(H) mm
(16 × 12
508 mm (en diagonal e) (20 po)
VX-S137
208(L) × 211(H) mm
(8
335 mm (en diagonal e) (13 po)
Système d’enregistrement vidéo
Système de balayage hélicoïdal à 2
têtes rotatives
Têtes vidéo2 têtes double azimut
Système de signal vidéo
Signal couleur NTSC, 525 lignes,
60 champs
Cassettes utilisables
Cassettes vidéo VHS
Cassette vidéo S-VHS (lecture uniquement)
Durée d’enregistrement /lecture
SP: 3 heures max. avec une cassette
LP: 6 heures max. avec une cassette
SLP:9 heures max. avec une cassette
Vitesse de défilement de la bande
SP: 33,35 mm/s.
LP: 16,67 mm/s.
SLP:11,12 mm/s.
Durée d’avance rapide
Approx. 2 min. 15 secondes avec une
cassette T-120
Durée de rembobinage
Approx. 1 min. 48 secondes avec une
cassette T-120
Entrée vidéo 1,0Vp-p, 75 ohm, asymétrique
Sortie vidéo 1,0Vp-p, 75 ohm, asymétrique
1
/8 po)
1
/4 × 8 3/8 po)
T-180
T-180
T-180
Résolution horizontale
230 lignes
Rapport signal/bruit53dB (nominal)
Piste audio 3 pistes (son hi-fi 2 pistes, son normal 1
piste)
Entrée audio –8dBs, 50 kohms
Sortie audio –8dBs, moins de 1 kohms
Plage dynamique Hi-Fi
supérieure à 90 dB
Réponse en fréquence Hi-Fi
20 Hz -20 kHz
Pleurage et scintillement Hi-Fi
Inférieur à 0,01%
Température de service
5°C à 40°C
Puissance de raccordement
120V AC, 60Hz
Consommation électrique
VX-S207 109W
TYP 4 W (mode d’économie d’énergie)
VX-S137 80W
TYP 4 W (mode d’économie d’énergie)
Dimensions VX-S207
575(L) × 480(P) × 502(H) mm
(22 3/4× 19 × 19 7/8 po)
VX-S137
435(L) × 370,5(P) × 384,5(H) mm
1
(17
/4 × 14 5/8 × 15 1/4 po)
Poids VX-S207 25,0 kg (55,2 lbs.)
VX-S137 13,5 kg (29,8 lbs.)
Accessoires fournis
Piles (R03, size AAA) (2)
Télécommande (1)
Adaptateur d’antenne (1) (VX-S207
uniquement)
Antenne Télescopique VHF-UHF (1)
(VX-S137 uniquement)
Dans le cadre de l’amélioration des performances de nos
produits, la conception et les spécifications sont sujettes à
modifications sans préavis.
Cet appareil a été testé et jugé conforme aux limites des
appareils numériques de Classe B, conformément au
chapitre 15 du règlement FCC. Ces limites sont conçues
pour assurer une protection raisonnable contre les
interférences néfastes lorsque l’appareil est utilisé dans un
environnement résidentiel.
Cet appareil génère, utilise et peut émettre des
radiofréquences et, s’il n’est pas installé et utilisé
conformément au mode d’emploi, il peut provoquer des
interférences dans les communications radio. Il n’est
cependant pas possible de garantir que des interférences
ne se produiront pas dans une installation privée. Si cet
appareil génère des interférences néfastes dans la
réception des ondes radio ou télévisées, ce que l’on peut
facilement contrôler en mettant l’appareil successivement
sous et hors tension, l’utilisateur est invité à tenter de
remédier aux interférences en appliquant l’une des
mesures suivantes:
-Réorientez ou installez l’antenne de réception à un
autre endroit.
-Eloignez davantage l’appareil du récepteur.
-Branchez l’appareil sur une prise secteur raccordée à
un circuit d’alimentation différent de la prise sur laquelle
le récepteur est branché.
-Consultez votre revendeur ou faites appel à un
technicien radio/télévision.
Attention
Toute modification ou tout réglage de cet appareil non
expressément approuvé par le fabricant peut invalider le
droit de l’utilisateur à employer cet appareil.
FRANÇAIS
34
Page 72

Composants et commandes
Panneau frontal (VX-S207)
Ecran du téléviseur
Touche =ONE-TOUCH PLAYBACK
Compartiment de la
cassette
Prise pour casque d’écoute
Prises LINE 2 IN VIDEO/
AUDIO L (MONO)/R
Indicateurs (POWER, TIMER,
REC, ON-TIMER)
Capteur de télécommande
Panneau frontal (VX-S137)
Touche wREC (Enregistrement)/
OTR (One-Touch Recording)
Touche DPLAY
Touche POWER
Touche ZSTOP/EJECT
Touche gF FWD (avance
rapide)/ ]
Touche fREW
(rembobinage)/ [
Touches CHANNEL M/N
Touches VOLUME +/–
Ecran du téléviseur
Compartiment de la cassette
Prise pour casque d’écoute
Prises LINE 2 IN VIDEO/
AUDIO L (MONO)/R
Indicateurs (POWER, TIMER,
REC, ON-TIMER)
Capteur de télécommande
FRANÇAIS
35
Touche =ONE-TOUCH
PLAYBACK
Touche wREC (Enregistrement)/
OTR (One-Touch Recording)
Touche ZSTOP/EJECT
Touche DPLAY
Touche POWER
Touche gF FWD (avance
rapide)/ ]
Touche fREW
(rembobinage)/ [
Touches CHANNEL M/N
Touches VOLUME +/–
Page 73

Panneau arrière
Support d’antenne
Connecteur UHF/VHF
Crochet de sécurité (VX-S207
uniquement)
Prises VIDEO OUT/AUDIO
OUT L/R
Prises LINE 1 IN VIDEO/
AUDIO L (MONO)/R
Télécommande
Touche VCR PLUS+
Touches numériques (0-9)
Touche ZERO-RETURN
Touche VOLUME +/–
Touche AD-SKIP
(omission publicités)
Touche fREW
(Rembobinage)/ [
Touche REC. END SEARCH
Touche POWER
Touche INDEX
Touche RESET
Touche MUTING
Touche sSTOP
Crochet du cordon
d’alimentation
Cordon
d’alimentation
Sélecteur TV VCR/CATV
Touche OTPB (lecture monotouche)
Touche zEJECT
Touche SLEEP
Touche PREV. CH (chaîne précédente)
Touche TV MONITOR
Touche CAPTION
Touche CALL
Touche T-REC (enregistrement
par programmateur)
Touche PRESET
Touche TV/LINE
Touche CHANNEL N/M
Touche dPLAY
Touche wREC (Enregistrement)/OTR
(Lecture monotouche)
Touche gFWD (avance rapide)/ ]
Touche aPAUSE/STILL
Touche MENU
Touche SET/TRACKING +/–
Touche TAPE SPEED
Touche AUDIO
Touche ENTER
Touche CANCEL
Touche ATR (l’alignement automatique)
Touche SLOW
FRANÇAIS
36
Page 74

For Assistance and Information,
Call Toll Free 1-800-BUY-AIWA
(United States and Puerto Rico)
8A-JTD-901-31
000620DTN-YX
Printed in Thailand
 Loading...