Total Harmonic Distortion at 1k Hz 6 ohms : 0.1 % (2.6 W).
Frequently Asked Questions
Q: For the LCX-300/301 what are the available options for the power source?
A: AC voltage could be either 120V or 220-240V or alternatively the DC option can be used which allows the LCX-300/301 to be powered by a car battery.
Q: Is it possible to attach a microphone and use it with the unit?
A: It is possible to attach units with a 3.5mm mini plug microphone.
Q: What is the maximum amount of preset radio stations the unit is able to save?
A: There exists a limit of 32 stations that can be saved within the unit.
Q: What types of tapes are supported by the tape deck?
A: The Tape Deck supports normal (I), CrO2 (II) and Metal (IV) Tapes in playback mode.
Q: How should I go about cleaning the tape heads?
A: After every 10 hours of use, make sure to use a cleaning tape or Q-tip that has been soaked in cleaning fluid or even denatured alcohol.
User Manual
Page 1
COMPACT DISC STEREO SYSTEM
SISTEMA ESTEREOFONICODE DISCO COMPACTO
CHAINE STEREO AVEC LECTEUR DE DISGWES COMPACTS
LCX=300
LCX-301
For Assistance And Information
Call Toll Free I-800-BUFAIWA
LCX-300~m~
LCX-301~
(United States and Puerto Rico)
Page 2
OWNER’S RECORD
WARNING
For your convenience,record the model number and serial
number (you will find them on the rear of your set) in the space
provided below. Please refer to them when you contact yourAIWA
dealer in case of difficulty.
LCX-300U, K, LH,
LCX-301 U
1
CAUTION (K model)
Use of controls or adjustmentsor performanceof procedures
other than those specifiedherein may result in hazardous
radiation exposure.
ATTENTION
I_’utilisation de commandes,reglages ou procedures autres que
ceux specifiespeut entralner une dangereuseexpositionaux
radiations.
This compactdisc player is classifiedas a CLASS 1 LASER
product.
The CLASS 1 LASER PRODUCT label is located on the exterior.
TO REDUCETHERISKOF FIREOR ELECTRIC
SHOCK,DO NOTEXPOSETHISAPPLIANCETO
RAIN OR MOISTURE,
I
“CAUTION:TO REDUCE THE RISK OF
ELECTRICSHOCK,
DO NOT REMOVE COVER (OR BACK).
NO USER-SERVICEABLEPARTS INSIDE.
REFER SERVICINGTO QUALIFIED
SERVICEPERSONNEL.”
Explanation of Graphical Symbols:
The lightning flash with arrowhead symbol, within an
equilateral triangle, is intended to alert the user to
A
.
A
the presence of uninsulated“dangerousvoltage”
within the product’s enclosure that may be of suffi-.
cient magnitude to constitute a risk of electric shock
to persons.
The exclamation point within an equilateral triangle
is intended to alert the user to the presenceof
importantoperatingand maintenance(servicing) instructionsin the literatureaccompanying
the appliance,
CAUTION!
Invisible laser radiation when open and inter
locks defeated.Avoid exposure to beam.
ADVARSEL!
Usynlig laserst~ling ved abning, nar sikkerhedsafbrydereerude
af funktion. Undg~ udsaattelse for straling.
VAROITUS!
Laitteen kayttaminen muulla kuin tassa kayttoohjeessamainitulla
tavalla saattaa altistaa kayttajan turvallisuusluokan1 ylittavalle
nakymattomalleIasersateiylle.
VARNING!
Om apparaten anvands PA annat satt an i denna bruksanvisning
specificerats,kan anvandarenutsatta for osynlig Iaser-stralning,
som overskridergransen for Iaserklass 1.
OBSERVERA
SA Iange som apparaten ar ansluten till natet flyter en svag strom
genom densamma, aven da den ar avstangd. Om man under en
Iangre tid ej har for avsikt att anvanda den, drag da ur natkabeln.
BEMtERK
Apparatet er stadig forbundet med Iysnettet, S5 kenge stikket er
tilsluttet til stikkontakten,selv om afbryterener slaetfra.Hvis
apparatet ikke bruges i Isangere tid, skal netledningentrakkes
ud.
2
Page 3
WARNING
FOR USE IN THE UNI’TED KINGDOM (K model only)
This appliance is supplied with a fitted three pin mains plug. A 3
amp fuse IS fitted In the plug
Should the fuse need tc be replaced, use a 3 amp fuse approved
by ASTA or BSI to BS1362, When replacing the fuse, you must
ensure that any removable fuse covers are correctly refitted
If you should lose the fuse cover, please contact your nearest
AIWA dealer.
DO NOT CUT OFF THI: PLUG FROM THIS APPLIANCE. If the
plug fitted is not suitable for the power points in your home, or
the cable is too short to reach a power point, obtain an appropriate
safety approved extension lead or adaptor. If In any doubt please
consult a qualified electrician.
If the plug is cut off, remove the fuse and dispose of the plug
Immediately.
THERE ISA DANGER OF SEVERE ELECTRICAL
SHOCK IF THE CUT OFF PLUG IS INSERTED INTO ANY 13
AMP SOCKET.
If a new plug IS to be fitted please ensure it contains a 3 amp
fuse, otherwise the circuit should be protected by a 5 amp fuse
at the distribution boarcl.
IMPORTANT
The wires in this mains lead are coloured In accordance with the
following code:
BLUE— NEUTRAL
BROWN— LIVE
As the colours of the wires in the mains lead of this appliance may
not correspond with the colour markings identifying the terminals
In your plug, proceed as follows:
The wire which is colouredBLUE must be connectedto the
terminal which is marked by the letter N or coloured BLACK,
The wire which is coloured BROWN must be connectedto the
terminal which is marked by the letter L or coloured RED.
DO NOT connect ekher the BLUE or BROWN wires in the mains
lead to the earth terminal (marked with the letter E or by the earth
symbol 4 or coloured GREEN or GREEN/YELLOW)of a 3 pin
plug.
COPYRIGHT
Please check the laws on copyright relating to recordings from
discs, radio or external tape for the country in which the machine
is being used.
DERECHOS DE AUTOR
Compruebe Ias Ieye.s sobre derechos de autor, del pais en el que
se utilice el sistema, que esten relacionadas con la grabacion de
discos, programas de radio o cintas.
DROITS D’AUTEUR
Prlere de verifier Ies Iois sur la propriete artistiquerelatives a
I’enreglstrementde disques, de la radio ou de cassettes clans Ie
pays d’utlllsation de I’apparell.
NOTE
FOR USE IN THE U.S.A. (U model only)
This equipment has been tested and found to comply w!th the
limits for a Class B digital device, pursuant to Part 15 of the FCC
Rules, These Ilmks are designed to provide reasonable protection
against harmful interference in a residential installation.
This equipment generates, uses, and can radiate radio frequency
energy and, if not installed and used in accordancewith the
instructions,may causeharmfulinterferenceto radio
communications.However, there IS no guarantee that interference
will not occur in a particular installation.If this equipment does
cause harmful interference to radio or television reception, which
can be determined by turning the equipment off and on, the user
is encouraged to try to correct the Interference by one or more of
the following measures
Reorient or relocate the receiving antenna.
Increase the separationbetween the equipmentand
receiver.
Connect the equipment into an outlet on circuit different
from that to which the receiver is connected.
Consult the dealer or an experienced radioflV technician
for help.
CAUTION
Modificationsor adjustmentsto this product,which are not
expressly approved by the manufacturer, may void the user’s right
or authority to operate this product.
3
Page 4
@
To optimize the performance of this system, please take the time
to read through these Operating Instructions and become familiar
with the operating procedures,
About your system
Your systemLCX-300/301is composedof the units @l and
supplied with the accessories@-@l as follows. +
@) Compact disc stereo cassette receiver LCX-300/301
@ Speakers
@ Remote control
(@FM antenna (U and LH only)
@FM antenna (K only)
@AM (MW/LW) antenna
@ Operating Instructions,etc.
❑
About this manual + E
This manual contains illustrations@ and instructionsin three
languages @-@.
@ Illustration
@ English
@ Spanish
@ French
About the illustrations
Capital letters, bold face numbers, smaller numbers and lower
case letters in the instructionscorrespondto the letters and
numbers in the illustration column.
For example, the”+❑“ following “About this manual” above
is a reference to illustration
❑.
Model number suffix
The model number is marked on the rear panel of the unit. It
has a suffix that denotes the model type.
Example:MODEL NO. LCX-300 !Jj
Units with different suffixes differ in some details.
If suffixes are mentionedin the instructions,read the section
following the suffix for your unit.
~suffix(LH)
4
Page 5
d&w&#a#udt%&za+wdid
s
#
&@?#zad@-3oo/’o?A2tXa
Para optimizar Ias preslacionesde este sistema, tome el tiempo
necesario para leer este manual de Instrucclones y familiarizarse
con Ios procedimientosde funcionamlento.
Acerca de su sistema
EL sistema LCX-300/301 se compone de Ias unidades @l , y se
suministra con 10s accesonos @ a @ sigun se muestra.+
@) Sintorwzador, amplificaclor, platina de cassette y reproductor
de discos compactos estereo LCX-3001301
@ Altavoces
@ Control remoto
@ Antena interior de FM (U y LH solamente)
@ Antena interior de FM (K solamente)
(@JAntena de cuadro de AM (MW/LW)
@ Manual de mstrucclones,etc.
Acerca de este manual + M
Este manual tiene ilustraciones @ e mstrucclones en tres idiomas
@-@.
@ Ilustracion
@ Ingles
@ Espai701
@ Frances
Acerca de Ias ilustraciones
Las Ietras mayusculas,Ios ntimeros en negrvta, Ios numeros
pequeiiosy Ias Ietras mintisculasde Ias instrucclones
correspondeda Ias Ietras y numerosde Ias columnasde
ilustraclones.
Por eJempl O, “-+
manual”,
Sufijo del numero del modelo
El numero de modelo se indica en el panel posteriorde la
unldad.Y tiene un sufijo que indica el tlpo del modelo.
Ejemplo:MODEL NO. LCX-300 LH
Los aparatos con distintos sufijos difieren en cuanto a algunos
detalles.
Si Ios sufijos estan indicados en Ias instrucciones,sirvase leer
la seccion correspondienteal sufijo de su aparato.
que aparece mas arriba, se refiere a la ilustracion ❑ .
❑ “ a continuationde “Acerca de este
zSufijo (LH)
❑
La lecture de ce mode d’emploivous permettrade maNriser
I’utilisation et d’optimiserIes performancesde cette cha~ne.
Au sujet de la chaine
Votre systeme LCX-300/301se compose des appareils@ et
est fourni avec Ies accessoires@ a @ comme suit. -+
@ Radio magnetocassetteIecteur de disques compacts stereo
LCX-300/301
@ Enceintes
@ Telecommande
@ Antenne FM (U et LH uniquement)
@ Antenne FM (K uniquement)
@ Antenne AM(MW/LW)
@ Mode d’emploi, etc.
Au sujet de ce manuel + H
manuel comporte des tllustratlons@ et des Instructions en
Ce
trois Iangues @ a @
O Illustration
@ Anglais
@ Espagnol
@ Frangais
Au sujet des illustrations
Les Iettres majuscules,Ies numeros en gras, Ies numeros plus
petits et Ies Iettres minusculecorrespondentaux Iettres et
numeros de la colonne des illustrations.
Par exemple, Ie “+
dessus renvoie a la partie H de I’illustration.
Suffixe du numero de modele
Le numero de modele est indique a I’arriere de I’appareil.II
comparte un suffixe qui indique Ie type modele.
Exemple:MODEL NO, LCX-300 ~
Des appareils ne portant pas Ie m~me sufflxe different clans
certalns details.
Si des suffixes sent mentionnesclans Ies instructions,Iire la
Follow the advice below for safe and correct operation.
This system may be powered by an AC voltage or car battery
(DC 12 V) power source. (Car battery cord is not supplied.)
On AC voltage
Before connectingthe AC cord, check that the rated voltage
shown on the rear panel matches your local voltage.
For LH model
AC 120/220-240V, selectable.
To match your local voltage, switch the AC VOLTAGE selector
on the rear panel with a screwdriver or similar tool. +
For U model
AC 120 V, fixed,
For K model
AC 230 V, fixed.
On placement
● Do not use the system in places which are extremely hot, cold,
dusty or humid.
● Do not use the system in places which are subject to vibration.
● Place the system on a flat, even surface.
● The unit should be situated with adequate space around it so
that proper heat ventilationis assured. Allow 10 cm (4 in.)
clearance from the rear and the top of the unit, and 5 cm (2 in.)
from each side.
In particular, do not place the system in an airtight rack.
● If using the system near a televisionor radio, noise may be
heard from the television, radio or this system. Move this system
away from the affected television or radio.
❑
,/+~
,.
-..’...
..’,-..;.-,’
,:
,. ..,’,..
e~
. .
-%
d
@q
)
‘+!
/
On safety
● When disconnectingthe AC cord or car battery cord, pull out
by the plug. Do not pull the cord itself.
● When the system is not used for an extended period of time,
disconnectthe AC cord or car battery cord. When the cord is
plugged in, a small amount of current continues to flow to the
system, even when the power is turned off.
● If the AC cord is damaged,contact your dealer or an Aiwa
service center for immediate replacementor repair.
Should any trouble occur, disconnect the AC cord and car battery
cord and contact a qualified service representative.
CONNECTIONS
IMPORTANT
Make sure the AC voltage matches your local voltage. (LH
.
model only)
● Connectthe AC cord or car battery cord after connecting
speakers, antennas, and all optional equipment.
● There are no differences between the speakers. Both speakers
can be connected as L (left) or R (right).
To stand the AM antenna + H
the claw to the slot,
Fix
To position the antennas
FM feeder antenna: (For U and LH model only)
Extend this antenna horizontallyin a T-shape and fix its ends to
the wall with cellophane tape, etc.
FM unipolar antenna: (For K model only)
Extend fully and position for the best possible reception.
This antenna is of an instant type, so the use of an outdoor
antenna is recommended.
AM (MW/LW)
Position to find the best direction and position for radio reception.
loop antenna:
8
Page 9
PRECAUCIONESPRECAUTIONS
SigaIos consejosdadosa contlnuacionpara que el
funcionamientosea seguro y correcto.
Este sistema puede alirnentarse con CA o con una bateria para
automovil (CC 12 V), (No se proveen el cable de la bateria para
automovil. )
Acerca de la tension de CA
Antes de conectar el cable de alimentacionde CA, compruebe
si la tension nominal mostrada en el panel trasero concuerda
con la tension de su localldad.
Para el modelo LH
120/220-240V CA. selecclonables.
Para que se ajuste con et voltaje local, cambie el selector AC
VOLTAGE del panel pcsterlor con un destornilladoro con una
herramientasimilar. +
❑
Para el modelo U
120 V CA, fijo.
Para el modelo K
230 V CA, fijo.
Acerca del Iugar de instalacion
● No utilice el sistema en Iugares extremadamentecallentes,
frfos, polvorientoso humedos.
● No utilice el sistema en Iugares sometldos a vi braciones.
● Ponga el sistema sobre una superhcle plana y nwelada.
● La unidad debera situarse donde tenga suficiente espacio Iibre
a su alrededor,para que la ventilationapropiadaquede
asegurada. Deje un espacio hbre de 10 cm por la parte posterior
y superior de la unidad, y 5 cm por cada Iado,
En particular, no ponga el sistema en un mueble cerrado.
● Si utiliza el sistema cerca de un televisor o de una radio, tal
vez se olgan ruidos en el televisor, en la radio o en este sistema.
Separe este slstema de la radio o del televisor afectado.
Acerca de la seguridad
● Para desconectarel cable de alimentaclonde CA o el cable
de la bateria para automovil, tire del enchufe. No tire del propio
cable.
● Cuando no utilice el slstema durante mucho tiempo, desconecte
el cable de allmentaclonde CA o et cable de la bater(a para
automovil.Cuando el cable este conectado,una pequefia
cantidad de corriente fluira de forma continua hacia el slstema,
aunque la allmentaci6neste desconectada.
● Si el cable de alimentacionde CA esta estropeado,pongase
en contacto con su concesionarioo centro de reparaciones
Aiwa para que se 10cambien o reparen inmedlatamente.
Si se produce algtin fallo, desconecte el cable de CA y el cable
de la bateria para automovil y pongase en contacto con el serwclo
tecnico.
Pnere de respecter Ies consignes suwantes pour une utilisation
stire et correcte.
Co systemepeut 6tre alimente sur une prise CA ou sur une
prise d’allume-clgare(12 V CC), (Le cordon adaptadeurpour
automobile ne sent pas fournls.)
Tension du secteur
Avant de brancher Ie cordon secteur, s’assurer que la tension
nominale Indiquee sur Ie panneau arriere correspond a celle du
courant secteur local
Pour Ie modele LH
120/220-240 V CA, commutable.
Regler Ie selecteur AC VOLTAGE du panneau arriere avec un
tournevis ou un outil similaire en fonction de la tension locale.
+n
Pour Ie modele U
120 V CA, fixe.
Pour Ie modele K
230 V CA, fixe.
Emplacement
● Ne pas uhlwer la chaine clans des endroitsextr~mement
chauds, froids, pousslereuxou humldes.
● Ne pas utiliser la chaine clans des endroits qul sent soumis a
des vibrations,
● Installer la cha!ne sur une surface plate et Iisse,
● L’appareil doit 6tre positionne avec un espace suffwant autour
afin d’assurer une dissipation adequate de la chaleur. Lalsser
un espace de 10 cm derriere et dessus I’apparell, et un espace
de 5 cm de chaque cbte.
En partlculler,ne pas placer la chafneclans un meuble
completementferme.
● Si la chalne est utlllsee pres d’un poste de telewsionou de
radio, des parasites peuvent ~tre audibles par ce poste ou par
la chalne, Le cas echeant, elolgner cette chalne du poste de
television ou de radio affecte.
Securite
● Lorsquevous de branchezIe cordon secteurou Ie cordon
adaptadeur pour automobile, tirez sur la fiche, pas sur Ie cable.
Ne pas tirer sur Ie cordon proprement alit,
● Si la chahene dolt pas ~tre utillsee pendantIongtemps,
debrancherIe cordon secteur ou Ie cordon adaptadeurpour
automobile. Si on Iaisse ce cordon branche, un courant de falble
intensitecontinuede circulerclans la chalnem6me SI
I’alimentatlonest toupee.
● Si Ie cordon secteur est endommage, contacter immediatement
Ie revendeurou un centre de serviceAlwa pour Ie faire
remplacer ou reparer.
En cas de probleme, debranchezIe cordon secteur et Ie cordon
adaptateur pour automobile, puis contactez un techmclen agree.
CONEXIONES
IMPORTANTE
● Cercioresede que el selector AC VOLTAGE este ajustado de
acuerdo con la tension de su Iocalldad. (Modelo LH solamente)
● Conecte el cable de CA o el cable de la bateria para automovil
despues de conectar Ios altavoces,Ias antenas y todos Ios
equipos opcionales.
● No existen diferenc~asentre Ios altavoces.Ambos podran
conectarsecomo L (Izquierdo) o R (derecho),
Para colocar la antena de AM + E
Fije la pestafia en la ranura.
Para colocar Ias antenas
Antena interior
solamente)
Extienda horizontalmenteesta antena en forma de T y flje sus
extremes a la pared con”cinta adhesiva, etc.
Antenna unipolar de FM: (Para el modelo K solamente)
Extienda completamenteesta antena y pongala en la position
que ofrezca la mejor recepcion de la radio.
Se recomienda utlllzar una antena exterior, ya que esta antena
es de tipo instantaneo.
Antena de cuadro de AM (MW/LW):
Pongala en la direccidn y en la position que ofrezcan la mejor
recepcion de la radio.
de FM: (Para Ios modelosU y LH
CONNEXIONS
IMPORTANT
● S’assurer que Ie selecteur AC VOLTAGE est regle sur la tension
du courant secteur local, (modele LH uniquement)
● RaccordezIe cordon secteur ou Ie cordon adaptateurpour
automobile apres avoir Installe Ies haut-parleurs,antennes et
tous Ies equipmentsfacultalifs.
● II n’y a pas de differences entre Ies encelntesChacune d’elles
peut &tre connect6e comme encelnte gauche (L) ou droite (R).
Pour installer I’antenne verticalement + ❑
Inserer la pince du support clans la fente.
Pour positionerIes antennes
AntenneFM int6rieure:(Pour Ies modelesU et LH
uniquement)
Deployer cette antenne horlzontalementen forme de T et fixer
Ies extremities au mur avec du ruban adheslf ou autre matenau
adherent.
Antenne FM unipolaire: (Pour Ie modele K uniquement)
Deployer completementI’antenne et I’orienter pour obtenlr la
meilleure reception possible.
Cette antenne ne doit servir que provisolrement.II est conseille
d’utiliser une antenne exterieure.
Antenne cadre AM (MW/LW):
Orienter cette antenne de maniere a obtenir la meilleure recerilon
possible.
9
Page 10
CONNECTIONS
See the illustration below which correspondsto steps 1 to 3 to
complete connections.
f Connectthe speakercords with the main unit.
The cords with stripes should be connected to the @ terminals
and the other ones to the @ terminals,
2 Connect the supplied antennas.
U, LH models: AM antenna @), and FM antenna @,+ 2-n
K
model: MW/LW antenna @), and FM antenna @.+ 2-E
3 Connect the AC cord to an AC outlet.
10
m
* Do not leave objects generating magnetism near the speakers,
* Do not bring the FM antenna near metal objects or curtain rails,
* Do not bring the AM (MW/LW) loop antenna near other optional
equipment,the stereo system itself, the AC cord or speaker
cords, since noise will be picked up.
● Do not unwind the AM (MW/LW) loop ;antenna wire.
CONNECTING AN OUTDOOI? ANTENNA
For betterFM reception,use of an outdoorantennais
recommended.
U and LH models +
Connect the outdoor antenna to the FM 75 Q terminals.
K model +
Connect the outdoor antenna to the FM 75 Q (COAXIAL) terminal.
See
❑
page 34 on connectionof other optional equipment
❑
~
Page 11
CONEXIONESCONNEXIONS
Consulte la ilustracion siguiente que corresponda Ios pasos 1
a 3 a fin de realizar Ias conexiones.
1
ConecteIos cablesdel altavoza la unidad
principal.
Los cables rayados deben conectarsea Ios terminals@ y
Ios demas a Ios terminals~.
2
Conecte Ias antenassuministradas
Modelos U, LH:
Modelo K: antena de MW/LW @) y antena de FM @.+ 2-E
Conecte el cable de CA en un tomacorrientede
3
antena de AM @) y antena de FM @.+ 2-~
CA.
Voir I’illustrationci-dessousqui correspondaux etapes 1 a 3
pour faire Ies connexions.
RaccorderIes cordonsd’enceintes~
1
I’unite
principal.
Les cordons a bandes blanches doivent 6tre raccordes aux
bornes @ et Ies autres, aux bornes @.
2
Connecter Ies antennes fournies
Modeles
Modele K: antenne MW/LW @) et antenne FM @.+ 2-E
BrancherIe cordon secteur sur une prise de
3
U, LH: antenne AM o et antenne FM @.+ 2-~
courant secteur.
243K
(2
Ill
Ua
w
m
● No deje objetosque generenmagnetismcerca de Ios
aitavoces.
QNo ponga la antena de FM cerca de objetos metalicos o rieles
de cortinas.
● No ponga la antena de cuadro de AM (MW/LW) cerca de otros
equipos opcionales,el propio sistema estereo, el cable de
alimentacionde CA o Ios cables de Ios altavoces,porque se
captaran ruidos.
● No desbobineel cable de la antena de cuadro de AM (MW/
LW),
CONEXIONDE UNA ANTENA EXTERIOR
Para obtener la mejor recepcion de FM se recomiendautilizar
una antena exterior.
ModelosU y LH + ~!
Conecte la antena exterior a Ios terminalsFM 75 Q
Modelo K + ❑
Conecte la antena exterior al terminal FM 75 Q (COAXIAL),
Con respecto a la conexion de equipos opcionales,
consulte la paglna 35.
F
● Ne pas Iaisser d’objets produisant un champ magnetique pres
des enceintes.
● Ne pas mettre I’antenne FM pres d’objets metal liques ou de
tringles a rideaux.
● Ne pas mettre I’antenne cadre AM (MW/LW) pres d’un appareil
optionnel,de la cha;ne stereo proprementdite, du cordon
secteur ou des cordons d’enceinte;elle pourrait capter des
parasites.
● Ne pas derouler Ie fil de I’antenne cadre AM (MW/LW).
CONNEXIOND’UNE ANTENNE
EXTERIEURE
Pour obtenir une meilleure receptionFM, il est recommande
d’utiliser une antenne exterieure.
Modeles U et LPI+ ❑
Connecter I’antenne exterieure aux bornes FM 75 Q
Modele K + H
Raccordez I’antenne exterieure a la prise FM 75.0 (COAXIAL).
I Pour connecterun appareil optionnel,voirpage35,,I
11
Page 12
BEFOREOPERATION
To turn the unit on
Press one of the function buttons (TAPE, TUNER, AUX/VIDEO,
CD).
Playback of the inserted disc or tape begins, or the previously
tuned station is received (Direct Play Function).
The POWER button is also available.
● When using the battery cord while operatingon car battery
(DC 12 V), press the POWER button or one of the function
buttons (DIRECT PLAY function) a little longer to turn the unit
on.
After use
Press the POWER button to turn off the power.The display
changes to the clock.
Using the headphones
Connect headphonesto the PHONES jack with a stereo mini
plug
(0 3..5 t71M/ ‘/8 inch).
No sound is output from the speakers while the headphones are
plugged in.
REMOTE CONTROL
✎
D
❑
SHIFT
FUNCTION
,,--—-----
am
C2C2
a=
am
C3
Caao
:C3C2C2
GIG
Y
‘... ..__ ----
0
..1
>.:____
;
—0
Inserting batteries+ ❑
Detach the battery cover on the rear of the remote control and
insert two R6 (size AA) batteries.
When to replace the batteries
The maximum operational distance between the remote control
and the sensor in the display window should be approximately5
meters (16 feet). When this distance decreases,replace the
batteries with new ones.
m
● If the unit is not going to be used for an extended period of
time, remove the batteriesto prevent possibleelectrolyte
leakage.
● The remote control may not operate correctly when:
- the line of sight between the remote control and the remote
sensor is exposed to intense light, such as direct sunlight.
- other remote controls are used nearby (television, etc.).
To use the SHIFT button + H
Buttons @ have two different functions.One of these functions
is indicated on the button, and the other on the plate above the
button.
To use the function on the button, simply press the button.
To use the functionon the pIate above the button, press the
button while pressing the SHIFT button.
To use the FUNCTION button + El
The FUNCTION button substitutes for the function buttons (TAPE,
TUNER, AUXiVIDEO,CD) on the main unit.
Each time the FUNCTION button is pressed, the next function is
selected cyclically.
{
Page 13
ANTESDE LA OPERACIONAVANT L’UTILISATION
Para encender la unidad
Pulse uno de Ios botcmes de funcion(TAPE, TUNER, AUX/
VIDEO, CD).
La reproductiondel dl$co o de la cinta Insertada empezara o se
reciblrala emisorapreviamentesintonizada(funclonde
reproducclondirects).
Tambien podra utlhzarse el boton POWER
● SI utlllza el cable de la bateria para automovil (CC 12 V), pulse
el boton POWER o uno de Ios botones de control (funcion
DIRECT PLAY) durante unos instantes mas para activar la
unidad.
Despues de la utilization
Pulse el boton POWER para desconectarla alimentacion.La
visualizationpasara a ser la del reloj.
Utilizationde auriculares
Conecte10s aurlcularescon claw]a estereo (3,5 mm 0) a la
minitoma PHONES.
Mientras Ios auriculares esten conectadosno saldra sonido por
10s altavoces,
CONTROL REMOTO
Irrsercion de Ias pilas+ ❑
Quite la tapa de Ias pllas, ublcada en la parte trasera del control
remoto, e inserte dos pilas R6 (tamafio AA),
Cuando reemplazar Ias pilas
La distancia maxima de operationentre el control remoto y el
sensor de seiiales del control remoto en el visual izador debera
ser de 5 metros aproximadamente,Cuando dlsmlnuyaesta
dlstancia, reemplace Ias pllas por otras nuevas.
E??J
● Si la unidad no va a ser utilizada durante mucho tiempo, quite
Ias pilas para ewtar Ias posibles fugas de electrolito.
● El control remoto qulza no funcione correctamentecuando:
- la Iinea de vision entre e! control remoto y el sensor de sefiales
del control remoto esta expuesta a una Iuz intensa como, por
ejemplo, la Iuz del sol.
- otros controlesrernotos(telewsores,etc. ) esten siendo
utilizados cerca de esta unldad,
Para utilizar el boton SHIFT+❑
Los botones @) poseen dos funciones diferentes.Una de estas
funciones esta indicada en el boton, y la otra en la placa situada
sobre el boton.
Para utilizar la funcion del boton, pulse slmplementeel boton,
Para usar la funcion de la placa sltuada sobre el boton, pulse el
boton manteniendopresionado el boton SHIFT.
Para utilizar el boton FUNCTION + ❑
El boton FUNCTION substitutela funclon de Ios botones (TAPE,
TUNER, AUX/VIDEO,y CD) de la unidad pnnclpal.
Cada vez que presione et boton FUNCTION, la funcion siguiente
se selecclonaraciclicamente.
Pour mettre I’appareil sous tension
Appuyer sur une des touches de fonction (TAPE, TUNER, AUX/
VIDEO, CD).
La lecture du dlsque ou de la cassette en place commence, ou
la station ecouteeen dernier est regue (fonctionde lecture
directe).
On peut aussi appuyer sur la touche POWER.
● Lorsque I’appareil est allmente sur une prise d’allume-clgare
(12 V CC), appuyezun peu plus Iongtempssur la touche
POWER ou sur I’une des touches de fonction (fonction DIRECT
PLAY) pour allumer I’appareil
Apres I’utilisation
Appuyersur la touche POWERpour couper I’alimentation,
L’affichage passe a I’horloge.
Utilisation d’un casque
Brancher un casque muni d’une fiche stereo (3,5 mm a) sur la
miniprise PHONES.
Aucun son ne sort par Ies enceintesquand un casque est
branche.
TELECOMMANDE
Mise en place des piles+ ❑
Enlever Ie couvercle des piles du dos de la telecommandeet
mettre deux piles R6 (taille AA) en place.
Quand remplacer Ies piles
La distance maximale de fonctionnementde la telecommande
entre cette dernlere et Ie capteur situe sur la fen@tre d’afflchage
dolt ~tre d’environ cinq metres. Lorsque cette distance diminue,
remplacer Ies piles par des neuves.
● Si la telecommandene doit pas i%re utihsee pendant Iongtemps,
enlever Ies piles pour ewter tout risque de fuite d’electrolyte,
● La telecommanderisque de ne pas fonctionnercorrectement
quand:
- I’espace entre la telecommandeet Ie capteur est expose a
une Iumiere intense, comme Ie soleil,
- d’autres telecommandes(televiseur,etc. ) sent utllis~esa
proximlte.
Pour utiliser la touche SHIFT + ❑
Les touches@ont deux fonctlons dlfferentes. Une des fonchons
est indiquee sur la touche et I’autre sur la plaque au-dessus de
la touche.
Pour utillserla fonctionIndlqueesur la touche,appuyer
simplement sur la touche.
Pour utiliser la fonction indlquee sur la plaque au-dessus de la
touche, appuyer sur la touche tout en tenant la touche SHIFT
enfoncee.
Pour utiliser la touche FUNCTION + ❑
La touche FUNCTION remplace Ies touches de fonctlon (TAPE,
TUNER, AUX/VIDEO,CD) sur I’apparell pnnclpal.
A chaque pression sur la touche FUNCTION, la fonction suivante
est selectionneecycllquement.
13
Page 14
SETTINGTHE CLOCK
When the AC cord is just connected, the clock display flashes.
Set the time as follows while the power is off.
Press the II SET button.
1
The hour flashes.
Press the WDOWNor UP Mbuttonto
2
designate the hour.
Press the II SET button to set the hour.
3
The hour stops flashing and the minute starts flashing.
Press the WDOWNor UP Mbuttonto
4
designate the minute.
Press the II SET button to set the minute and
5
complete setting.
The minute stops flashing on the display and the clock starts
from 00 second.
To correct the current time
Press the POWER button to turn the unit off. Press the II SET
button, the clock display flashes and carry out steps 1 to 5 above.
2
144
DOWN UP W
144 DOWN UP-
w
b
To display the current time
Press the CLOCK button while pressing the SHIFT button on
the remote control. The clock is displayed for 4 seconds.
However, the time cannot be displayed during recording.
To switch to the 24-hour standard
Press the CLOCK button while pressing the SHIFT button on
the remote control and then press the
Repeat the same procedure to restore the 12-hour standard.
if the clock display flashes while the power is off
This is caused by a power interruption. The current time needs
to be reset.
If power is interrupted for more than approximately24 hours, all
settings stored in memory after purchase need to be reset.
■ button within 4 seconds.
14
Page 15
PUESTA EN HORADEL RELOJ
REGLAGEDE L’HORLOGE
Inmediatamentedesl~uesde conectarel cable de CA, la
visualizationdel relo] destella.
Ponga la hors como se indica a continuation,mientras
la alimentacion este desconectada.
1
Pulse el boton II SET.
La hors parpadeara.
2
Pulseel botonl++DOWNo UP Mpara
designar la hors.
Pulse el boton II SET para poner la hors.
3
La hors dejara de parpadeary empezaraa parpadearel
minute.
4
Pulseel botonl++DOWNo UP Hpara
designar el minute.
Pulse el boton II SET para poner el minuto y
5
terminar la puesta de la hors.
El minuto de}ara de parpadearen el visualizadory el reloj
empezara desde 00 segundos.
Para cambiar la hors actual
Pulse el boton POWER para apagar la unidad. Pulse el boton
II SET, cuando el wsor del reloj se encienda de forma intermitente
realice Ios pasos 1 a 5 antes explicados
Para visualizerla hcwa corrects
Pulse el boton CLOCK mantenlendopreslonado el boton SHIFT
del control remoto. El reloj se visualizaradurante 4 segundos.
.% embargo, la hors no se podra vlsuallzar durante la grabaclon.
Para cambiaral mocfo de 24 horas
Pulse el boton CLOCK manteniendopresionado el boton SHIFT
del control remoto y Iuego pulse el boton
4 segundos,
Replta el mismo procedlmlentopara reponer el modo de 12
horas.
Si la visualizationdel reloj parpadeamientrasla
alimentacion esta desconectada
Esto se debera a un Werrupcion en el summlstro de alimentaclon.
La hors tendra que ponerse de nuevo.
Si la alimentaclonse Interrumpe durante mas de 24 horas, todos
Ios ajustes almacenadosen la memoria despues de adquinr la
unidad tendran que ajustarse otra vez.
■ antes de que pasen
Au moment ou vous raccordezIe cordon secteur, I’affichage
d’horloge clignote.
L’alimentation etant toupee, regler I’heure comme decrit
ci-dessous.
Appuyer sur la touche II SET.
1
Les heures clignotent.
Appuyer sur la touche 14+ DOWN ou UP W
2
pour specifier Ies heures.
Appuyersur la touche II SET pour regler ies
3
heures.
Les heures arr6tent de clignoter et Ies minutes se metient a
clignoter.
Appuyer sur la touche MDOWN ou UP H
4
pour specifier Ies minutes.
Appuyer sur la touche II SET pour specifier Ies
5
minutes et terminer Ie reglage.
Les minutes cessent de clignoter sur I’affichage et I’horloge
demarre a 00 seconde,
Pour corriger I’heure courante
Appuyersur la touchePOWER pour mettre I’apparellhors
tension. Appuyerensuitesurla touche II SET. Lindicationde
I’heure clignote et executez Ies etapes 1 a 5 ci-dessus,
Pour afficherI’heurecourante
Tenir la touche SHIFT enfoncee et appuyer sur la touche CLOCK
de la telecommande.L’horlogeest afficheependant quatre
secondes.
Toutefois,I’heurene peutpas ~tre afficheependant
I’enregistrement.
Pour passer au format de 24 heures
Tenir la touche SHIFT enfoncee et appuyer sur la touche CLOCK
de la telecommande,pu]s appuyer sur la touche
quatre secondes qui suivent,
Pour revenir au format de 12 heures, procederde la m~me
maniere.
Si I’affichage
est toupee
est dti a une interruptiond’alimentation.L’heure courante
Ceci
doit 6tre reglee de nouveau.
Si I’allmentationest interrompuependant plus de 24 heures
environ, tous Ies reglages memorises apres I’achat dowent 6tre
fats de nouveau
de I’horloge clignote quand I’alimentation
■ clans Ies
15
Page 16
SIMPLE AUDIOADJUSTMENT
VOLUME CONTROL + E!
Press the VOLUME control on the main unit or on the remote
control.
Selected volume level (O-1
SUPER T-BASS SYSTEM -+ El
The T-BASS system enhancesthe realism of low-frequency
sound.
Press the T-BASS button on the main unit, T-BASS indicator
(I!W) will light up on the display.
To cancel it, press the button again.
6) will be displayed for 2 seconds.
A
Es
VOLUME
SOUND ADJUSTMENTDURING
RECORDING
The output volume and tone of the speakers or headphones
may be freely varied without affecting the level of the recording.
EQUALIZER
This unit providesthe followingthree differentequalization
cunfes.
ROCK: Powerful sound emphasizing treble and bass.
POP:
JAZ2Accented lower frequencies for jazz-type music.
Press the selected button again. EQoFF is displayed.
To select with the remote control
Press the GEQ button repeatedly until the desired equalization
mode is displayed.
-ROCK+POP+JAZZ-+EQOFF —
❑ .
(Cancel)
Page 17
AJUSTESENCILLODEL SONIDOREGLAGEAUDIOSIMPLE
CONTROLDE VOLUMEN + ❑
Pulse el control VOLUME en la unldad principalo en el mando
a distancia.
El volumen seleccionado (0-16) se visual lzara durante 2
segundos.
SISTEMA SUPER T-BASS+El
El sistemaT-BASSrealza el realismodel sonidode baja
frecuencia.
Pulse el botonT-BASSbuttonen la unidad principal.El
indicadorT-BASS ( !!H!I) se encenderaen el visor.
Para cancelarlo, pulse de nuevo el boton.
AJUSTE DEL SONIDO DURANTELA
GRABACION
El volumende salida y el tono de Ios altavoceso de Ios
auriculares podra cambiarse Iibremente sin afectar en absoluto
al nivel de la grabacion.
COMMANDEDU VOLUME+E!
Appuyez sur la touche VOLUME de I’appareil ou de la
telecommande.
Le nweau
du volume regle (O-16) a’affiche pendant 2 secondes.
SYSTEME SUPER T-BASS -+ El
Le systeme T-BASS amelioreIe realisme du son des basses
frequencies.
Appuyez sur la touche T-BASS button de I’appareil
principal.L’indicateurT-BASS (!l~~$~)s’allumeclans la fen6tre
d’affichage.
Pour Ie desactiver,appuyeza nouveausur la m6me touche
REGLAGE DU SON PENDANT
L’ENREGISTREMENT
On peut faire varier Iibrement Ie volume de sortie et la tonalite
des enceintesou du casquesaris affecterIe niveau de
I’enreglstrement.
ECUALIZADOR
Esta unidad ofrece Ias tres curvas de ecuallzacionslguientes.
ROCK: Sonldo potente que realza Ios agudos y Ios graves.
POP:
JAZZ:Frecuencias acentuadas mas bajas, para el tlpo de
Pulse uno de Ios botones de ELECTRONIC GRAPHIC
EQUALIZER. +
Para cancelar la ecualizacion
Presione de nuevo el boton seleccionado.El indicador deja de
destellar, y se visualiza EQoFF.
Seleccion con el control remoto
Pulse el boton GEQ varias Veces hasta que se muestre el modo
de ecualizacionque desee.
Mas presencla en Ias votes y en Ias gama de
frecuencias medias.
mtisica jazz.
❑
ROCK -+ POP +JAZZ+EQoFF
r
(cancelacion)
1
EGALISEUR
Cet apparell possede Ies trols courbes d’egalisationsuivantes.
ROCK: Son puissant accentuant Ies aigus et Ies graves.
POP:Presence accrue des parties
moyenne.
JAZZ:Basses frequencies accentueespour musique de jazz.
Appuyer sur une des touches ELECTRONICGRAPHIC
EQUALIZER.+
Pour annuler I’egalisation
Appuyer a nouveau sur la touche selectionnee, Le temoin cesse
de clignoter
Selection par la telecommande
Appuyez plusleurs fois sur la touche GEQ jusqu’a ce que Ie mode
d’egalisationVOUIUs’affiche.
❑
et EQoFF est affiche.
ROCK+POP -+ JAZZ+EQoFF
r
vocales et de la gamme
(annulation)
1
17
Page 18
BAND
TU\ER
MANUALTUNING
12Press the TUNEF?IBAND button to select the band
repeatedly.
U and LH models:~M~AM
K model:
rFM~Mw
If the power was off, the previously tuned station will be played
(Direct Play Function).
When using the remote control
Press the BAND button.
Press the KDOWN or UP Wbutton to select
a station.
Each time the button is pressed, the frequency changes.
When a station is received, “TUNE is displayed for 2 seconds.
During FM stereo reception, “STEREO” is displayed.
1
To search for a station quickly (Auto Search)
Keep the WDOWN or UP Hbutton pressed until the tuner
starts searchingfor a station.After tuning in to a station, the
search stops.
To stop the Auto Search manually, press the WDOWN or UP
Wbutton.
● The Auto Search may not stop at stations with very weak
signals.
—--+LW1
When an FM stereo broadcast contains noise
Press the MODE TUNER button while pressing the SHIFT button
on the remote control to display “MONO.+
Noise is reduced, although reception is monaural.
To restore stereo reception,press the buttons so that “MONO
disappears,
❑
To change the AM (MW) tuning interval
The AM (MW) tuning interval can be set to 9 kHz/step or 10 kHz/
step. The default setting are shown below.
U and LH models:10 kHz
K model: 9 kHz
If you use this unit in an area where the frequencyallocation
system is different from the default one, change the tuning interval
as follows.
Press the POWER button while pressing the +-button.
To reset the interval, repeat this procedure.
● When the AM (MW) tuning intervalis changed,all preset
stations (see page 20) are cleared.The preset stations have
to be set again.
18
Page 19
SINTONIZACIONMANUAL
ACCORDMANUEL
1
Pulse repetidamente el boton TUNER/BANDpara
seleccionar la banda.
Modelos U y LH:
FM~AM
Modelo K:
~FM~Mw~Lw7
Si la alimentacionesta desconectadase recibira la emisora
previamentesintonizada(funcion de reproductiondirects).
Cuando utilice el control remoto
Preslone el boton BAND.
2
Pulseel botonl++DOWNo UP Wpara
seleccionar una emisora.
Cada vez que pulse el boton, la frecuencia cambiara.
Cuando se reciba una emisora, “TUNE se visualizara durante
2 segundos.
Durante la recepcion estereo por FM, tambien se visualizara
“STEREO.
Parabuscarrapidamenteuna emisora(busqueda
automatic)
MantengapulsadoWDOWNo UP Whasta que el
sintonizadoremplecea buscar una emisora.Despuesde
sintonizar una emisora, la btisqueda parara.
Para detener manualmentela btisqueda automatlca,pulse el
boton WDOWN o UP ~.
● !-a busquedaautomaticquiza no pare en emisorascuyas
sefiales scan muy debiles.
Cuandouna radiodifusionestereopor
Pulse el boton MODE TUNER manteniendo presionado el boton
SHIFT del control remoto para visualizer “MONO.+
El ruido se reducira, pero la recepclon sera mono.
Para reponer la recepcion estereo,pulse el boton para que
desaparezca“MONO.
Para cambiar el intervalo de sintonizacionde Ah! (MW)
El intervalo de sintonizacion de
kHz/paso 010 kHz/paso. A continuationse indica el ajuste Imcial.
Modelos U y LH: 10 kHz
Modelo K: 9 kHz
Cuando vaya a utiiizar esta unidad en una zona en la que el
sistema de asignacionde frecuenciassea dlferente al iniCial,
cambie el Intervalo de sintonia de la forma siguiente.
Pulse el boton POWER mientras pulsa el boton +E.
Para reponer el intervalo, repita este procedimiento.
AM (MW) puede ajustarse a 9
FM tenga ruido
❑
12Appuyer sur la touche TUNER/BANDa plusieurs
reprises pour selectionnerla gamme.
Modeles U et LH: ~
FM-----+AM~
Modele K:
rFM~MW~LW7
Si I’allmentationest toupee,la station ecoutee en dernier
sera re~ue (fonction de lecture directe)
Lors de I’utilisation de la telecommande
Appuyer sur la touche BAND.
Appuyer sur la touche WDOWN ou UP M
pour selectionnerune station.
A chaque pression sur la touche, la frequence change.
Quand une station est re~ue, “TUNE est affiche pendant deux
secondes.
Pendant la reception FM stereo, “STEREOest aussi alfiche.
Pour rechercherune station rapidement(Recherche
automatique)
Tenir la touche MDOWN ou UP ~enfoncee jusqu’a ce
que Ie tuner demarre la recherche d’une station. Apres I’accord
sur une station, la recherche s’arr6te.
Pour arr&er la recherche automatiquemanuellement,appuyer
sur la touche HDOWN ou UP H.
● La recherche automatlquerisque de ne pas s’arr6ter sur Ies
stations presentant des signaux tres faibles.
Quand la reception d’une emission FM stereo presente
des parasites
Tenir enfoncee la touche SHIFT de la telecommandeet appuyer
sur la touche MODE TUNER pour que “MONOapparaisse sur
I’affichage. +
Les parasites sent reduits, mais la reception est monophonique.
Pour retablir la reception stereophonique,appuyer de nouveau
sur la touche pour faire disparaltre “MONO.
Pour changer I’intervalle d’accord AM (MW)
L’intervalle d’accord AM (MW) peut &re regle sur 9 kHz ou 10
kHz. Le reglage implicite est indique ci-dessous.
Modeles U et LH: 10 kHz
Modele K: 9 kHz
Si I’appareil est utilise clans un endroit dent Ie systeme deallocation
de frequencies differe du reglage implicite, changer I’lntervalle
d’accord comme suit.
Appuyer sur la touche POWER tout en appuyant sur la touche
+F.
Pour retablir I’intervalle initial, proceder de la m6me maniere.
❑
● Cuando se cambie el intervalo de sintonlzacionde AM (MW),
todas Ias emisoraspreajustadas(consulte la pagina 21) se
borraran. Las emisoras preajustadastendran que ajustarse
de nuevo.
F?mglz
● Apres Ie changement de I’intervalle d’accord AM (MW), Ioutes
Ies stations memorisees(voir page 21) sent effacees.II faut
memoriser de nouveau ces stations.
19
Page 20
PRESETTINGSTATIONS+ EI
The unit can store a total of 32 preset stations. When a station
is stored, a preset number is assigned to the station.Use the
preset number to tune into a preset station directly.
Press the TUNEFUBAND button to select a band,
1
and press the WDOWN or UP Mbutton to
select a station.
2
Press the II SET button to store the station.
A station is assigned to a preset number, beginning from 1 in
consecutiveorder for each band.
DISPLAY
The frequency
@
@ The preset number
@ The preset numbers
The selected preset number flashes.
Repeat steps 1 and 2.
3
The next station will not be stored if a total of 32 preset stations
have already been stored for all the bands.
m
Each band can only store a maximum of 16 preset stations.
PRESETNUMBERTUNING+ EI
Use the remote control to select the preset number directly.
7 Press the BAND button to select a band.
2 Press the numeric buttons to select a preset
number.
Example:
To select preset number 10, press the +10 and O buttons.
Selecting a preset number on the main unit
Press the TUNER/BANDbutton to select a band. Then, press
the +*DIR/PRESETbutton repeatedly.
Each time the button is pressed,the next higher number is
selected.
To clear a preset station
Select the preset number of the station to be cleared.Then,
press the
seconds.
The preset numbers of all other stations in the band with higher
numbers are also decreased by one.
■ CLEAR button, and press the II SET button within 4
Page 21
P’REAJUSTE DE EMISORAS+ EI
MEMORISATIONDE STATIONS
+~
Esta unidad puede almacenar un total de 32 emisoras. Cuando
ahmacene una emlsora, a esa emlsora se Ie aslgnara un ntimero
de preajuste.Utlllce el numero de preajustepara sintonlzar
directamenteuna emisora preajustada.
Pulse el boton TUNER/BANDpara seleccionar
1
una banda, y pulse H+DOWN o UP FMpara
seleccionar una emisora.
Pulse el boton II SET para almacenar la emisora.
2
A Ias emisoras de cada banda se Ies asigna un numero de
preajuste en orden consecutiveempezandopor el 1,
VISUALIZATION
@ Frecuencia
@ Numero de preajuste
@ Numeros de preajuste
El numero seleccionado se enciende de forma intermitente.
Repita Ios pasos 1 y 2.
3
SI ya han sido almacenadas32 emisoras de preajustede
todas Ias bandas, la siguiente emisora no se almacenara.
m
Cada banda puede almacenarun maximo de 16 emisoras
programadas.
L’appareil peut memoriserun total de 32 stations. Quand une
station est memorisee,un numero de prereglage Iui est affect6,
Pour accorder I’appareil directement sur une station memorisee,
utillser Ie numero de prereglage correspondent.
1
Appuyersur la toucheTUNER/BANDpour
selectionnerune gamme, puis appuyer wr la
touche l++ DOWN ou UP FHpour s61ectionner
une station.
2
Appuyer sur la touche II SET pour memoriser la
station.
Un numero de prereglage est affecte a une station a partir de
1 clans I’ordre consecutlf pour chaque gamme.
AFFICHAGE
@ Frequence
@ Numero de prereglage
@ Numeros de prereglage
Le numero de prereglage selectionneclignote.
Repeter Ies etapes 1 et 2.
3
SI 32 stations sent deja memonsees pour toutes Ies gammes,
la station suivante ne sera pas memorisee.
Vous pouvez memoriserun maximum de 16 stations clans
chaque bande,
SINTONIZACIONMEDIANTE
NUMERODE PREAJUSTE+
Utllice el control remoto para seleccionar directamente el numero
de preajuste,
7 Pulse el boton BAND para seleccionar una banda.
2 Pulse Ios botones numericospara seleccionar
un numero de preajuste.
Ejemplo:
Para seleccionar el ntimero de preajuste 10, pulse Ios botones
+10, y o.
Seleccion de un numerode preajusteen la unidad
principal
Pulse el boton TUNER/BANDpara seleccionar una banda y
pulse repetidamenteel boton~>DIR/PRESET
Cada vez que pulse el boton se seleccionara el sigulente numero
rnas alto
Para borrar una ernisora preajustada
Seleccioneel nfimero de preajuste de la emrsora que vaya a
borrar y pulse el boton
de que pasen 4 segundos.
Los numerosde preajustesuperiorsde todas Ias demas
emisoras de la banda dismlnuirantambien en uno.
■ CLEAR, y pulse el boton II SET antes
❑
ACCORDSUR UNE STATION
MEMORISEE+
Utiliserla telecommandepour selectionnerIe numero de
prereglage directement.
1 Appuyersur la toucheBAND pour choisirla
gamme d’onde.
2 A I’aide des touches numeriques,selectionner
un numero de prer@glage.
Exemple:
Pour selectionnerIe numero de prereglage 10, appuyer sur
Ies touches +1 O et O.
Selectiond’un numerode prereglagesur I’appareil
principal
Appuyer sur la touche TUNER/BANDpour selectlonnerune
gamme.Ensuite, appuyer sur la touche +>DIR/PRESETa
plusieurs reprises,
A chaque pression sur la touche, Ie numero de prer~glage suivant
est selectionne.
Suppressiond’une station memorisee
SelectlonnerIe numero de prereglage de la station a supprimer.
Ensuite, appuyer sur la touche 9 CLEAR puis appuyer sur la
touche II SET clans Ies quatre secondes qui suivent,
Les numerosde prereglagede toutesIes autres stations
suivantes de la gamme sent aussi diminues d’une unite.
21
Page 22
BASIC OPERATIONS
LOADING DISC + El
Press the CD button, then press the OPEN button
to open the disc compartment.Load a disc with
the label side up and close the disc compartment.
DISPLAY
Total playing time of the disc
@
@ Total number of tracks on the disc
@ Music calendar (only the first 16 tracks are displayed)
PLAYING DISC + El
Load disc.
Press the +>button.
Play begins with the first track.
DISPLAY
@) Playing time of track
@ Number of track being played flashes.
@ Number of track being played
.
m
13
DIR/PRESET
u
(2I
To stop play, press the 9 button.
To pause play, press the II button. To resume play, press again.
To search for a particular point, keep the+or>button
pressed and release the button at the desired point.
To skip to the beginningof a track, press the -or button repeatedly.
To remove disc, press the OPEN button.
To start play when the power is
Press the CD button.The power is turned on and play of the
loaded disc begins.
Selectinga track with the remote control + E
Press the numeric buttons and the +1 O button to select a track.
Example:
To select the 25th track, press the +1 O, +1 O and 5 buttons.
To select the 10th track, press the +1 O and Obuttons.
The selected track starts to play and play continues to the end
of the disc.
off (Direct Play Function)
m
● When remove the disc, press the ■ button to stop play before
pressing the OPEN button.
● Do not place more than one compact disc on the disc tray.
● Do not tilt the unit with disc loaded.Doing so may cause
malfunctions.
22
mm
b
To be continued.
Page 23
OPERACIONESBASICASOPERATIONSDE BASE
HJTRODUCCIONDE DISCO+E!
Pulse el boton CD, y Iuego pulse el boton OPEN
para abrir e! compartimientodel disco. Cargue un
disco con la cara de la etiqueta hacia arriba y cierre
el compartimientode disco.
VKHJALIZACION
@ Tiempo de reproductiontotal del disco
@ Ntimero total de canciones del disco
@ Calendariomusical (solo se visual izaran Ias primeras16
canciones)
FIJEPRODUCCION DE DISCO -+ H
Introduzca primero el disco.
Pulse el boton +-.
Comienza a reproducirseel primer tema,
VI!; UALIZACION
@ Tiempo de reproductionde la cancionque este siendo
reproducida
numero de la cancionque este siendoreproducida
@El
parpadeara.
@ Numero de la cancion que este siendo reproducida
Para detener la reproduction,pulse el boton
Para hater una pausa en la reproduction,pulse el boton II.
Para reanudar la reproduction,pulse de nuevo este boton.
Para buscar un punto particular,mantenga pulsado el boton
~<o ~y deje de pulsarlo al Ilegar al punto deseado.
Para saltarhastaet principiode una cancion,pulse
repetidarnenteel boton +0>.
Para quitar el disco, pulse el boton OPEN.
Para iniciar la reproductioncuando la alimentacioneste
desconectada(funcionde reproductiondirects)
Pulse el botonCD. La alimentacionse conectaray la
reproductiondel disco introducido empezara.
Seleccionde una cancion con el control remoto +
Pulse Ios botones numericosy el boton +1 O para seleccionar
una cancion.
Ejernplo:
Para seleccionarla cancion numero 25, pulse Ios botones +10,
+loy5.
Para seleccionar la cancion numero 10, pulse Ios botones +1O y
o.
La cancionseleccionadaempezaraa reproducirsey la
reproductioncontinuara hasta que termine el disco.
■.
❑
MISE EN PLACE DE DISQUE + ❑
Appuyersur la touche CD, puis appuyersur la
touche OPEN pour ouvrir k compartmenta disque.
Chargez un disque, etiquette vers Ie haut, et fermez
Ie compartmenta disque.
AFFICHAGE
@) Temps de lecture total du disque
@ Nombre total de plages du disque
@ Indicateur de plages (seules Ies 16 premieres plages sent
affichees)
LECTURE DE DISQUE -+ El
Mettre de disque en place.
Appuyer sur la touche <B-.
La lecture commencera la premiere plage.
AFFICHAGE
@l Temps de lecture de la plage
@ Le numero de la plage en tours de lecture clignote.
@ Numero de la piage en tours de lecture
Pour arr6ter la lecture, appuyer sur la touche
Pour mettre la lecture en pause, appuyer sur la touche Il. Pour
reprendre la lecture, appuyer de nouveau sur cette touche.
Pour rechercherun point particulier, tenir la touche -ou
>enfoncee et la rel~cher quand Ie point souhaite est atteint.
Pour passer au debut d’une plage, appuyer sur la touche U
ou -a plusieurs reprises.
Pour enlever des disque, appuyer sur la touche OPEN.
Pour demarrerla lecture quand I’alimentationest toupee
(fonctionde lecture directe)
Appuyer sur la touche CD. L’appareil est mis sous tension et la
lecture du disque en place demarre.
Selection d’une piage avec la telecommande+ ❑
A I’aide des touches numeriques et de la touche +1 O,selectionner
une plage.
Exemple:
Pour selectionnerla vingt-cinquiemeplage, appuyer sur Ies
touches +10, +10 et 5:
Pour selectionner la dixieme plage, appuyer sur Ies touches +10
et O.
La lecture demarre a la plage selectionneeet continue jusqu’a
la fin du disque.
■.
● Guando desee retirar el disco, pulse el boton H para detener
la reproductionantes de pulsar OPEN.
● No ponga mas de un disco compacto en una misma bandeja
de disco compacto.
● No incline la unidad habiendo disco introducido.Hater esto
podria causar aver(as.
Continua.
c Lorsque vous retirez Ie disque, appuyez sur la touche
arr’3ter la lecture avant d’appuyer sur la touche OPEN.
● Ne pas mettre plus d’un disque compact sur un plateau.
● Ne pas incliner I’appareilavec des disque en place. Cela
pourrait provoquer des pannes.
❑ pour
A suivre
23
Page 24
SHIFTREPEAT
...
BASIC OPERATIONS
RANDOM PLAY -+ ❑
Use the remote control.
RANDOMplay
All the tracks on the disc can be played randomly.
Press the RANDOM button while pressingthe SHIFT button.
To cancel random play, repeat this procedure.
m
● Even if the <button is pressed, a previouslyplayed track
cannot be skipped during the random play. The unit returns to
the beginning of the current track only.
● Direct selection of tracks with the numeric buttons is not possible
during the random play.
● During RANDOM play, “REPEAT 1“ play cannot be performed.
REPEAT PLAY + ❑
One or all the tracks can be played repeatedly.
To repeat the entire disc, turn on “REPEATALL”.
To repeat the desired track, turn on “REPEAT1”.
8%
Press the REPEAT button while pressing the SHIFT button.
Each time they are pressed, the operationscan be selected
cyclically.
@ REPEAT ALL
@ REPEAT 1
@ Cancel
When usina the main unit
Press the REPEAT button.
m
. During “REPEATALL”play, RANDOM play can be performed.
s During “REPEAT1“ play, pressing the RANDOMbutton will
cancel the operation.
● To repeat only selected tracks, program the desired tracks (see
page 26) before choosing “REPEAT ALL” function.
To cancel it, press the buttons again.
24
Page 25
OPERAClONESBASICAS -
OPERATIONSDE BASE
RIEPRODUCCION ALEATORIA + ❑
Utilice el control remoto.
Reproductionaleatoria
Todas Ias pistas del disco pueden reproducirse aleatoriamente.
Pulse el boton RANDOM manteniendopresionadoel boton
SHIFT.
Para cancelarla reproductionaleatoria,repitaeste
prc)cedimiento.
am
● Aunque se pulse el boton +,una cancion previamente
reproducida no podra ser omitida durante la reproduction.La
unidad volvera solamente al principio de la cancion actual.
● La seleccion de Ias canciones con Ios botones numericos es
irnposible durante la reproduction.
. Durante la
funcion “REPEAT 1”.
RIEPRODUCCION REPETIDA+ m
Es posible repetir la reproductionde uno de Ios temas o todos
ellos.
Para repetir el disco completo, active “REPEAT ALL”.
Para repetir untema, active “REPEAT 1”.
Presione el boton REPEAT mientras presiona el boton SHIFT.
Ce.da vez que estan activadas,Ias operacionespueden
se eccionarse en forma de ciclo.
@ REPEAT ALL
@ REPEAT 1
@ Cancelacion
Qandoutilice la unidad txincipal
Pulse el boton REPEAT.
reproductionRANDOMno es posible realizar la
LECTURE ALEATOIRE + ❑
Utiliser la telecommande,
Lecture aleatoire
ToutesIes pistesdu disquepeuvant~tre reproduites
aleatoirement.
Tenir la touche SHIFT enfonc6eet appuyersur la touche
RANDOM.
Pour annuler la lecture aleatoire, repetez cette procedure.
● M6me si on appuie sur la touche +,la plage precedence ne
peut pas i%re sautee pendant la lecture aleatoire.L’appareil
revient au debut de la plage courante seulement.
● La selection directe des plages avec Ies touches numeriques
est impossible pendant la lecture aleatoire.
● En mode de lecture RANDOM, vous ne pouvez pas activer la
lecture “REPEAT l“.
LECTURE REPETEE+ g
Vous pouvez activer la lecture repetee d’une plage ou de toutes
[es plages,
Pour la lecture repetee du disque en entier, selectionnez
“REPEAT ALL”.
Pour la lecture repetee d’une plage determine,selectionnez
“REPEAT
Appuyer sur la touche REPEAT en maintenantenfoncee la
touche SHIFT de la telecommande.
Chaque fois que vous appuyezsur la touche, Ies modes de
lecture peuvent Stre selectionnes suivant une sequence cyclique.
@ REPEAT ALL
@ REPEAT 1
@ Annulation
l“.
. Durante la reproduction“REPEAT ALL”, es posible emplear
FIANDOM.
● [)urantela reproduction“REPEATl“, si se pulsa el boton
F{ANDOM se cancelara la operation.
● F’ara repetir solo Ios temas seleccionados,es necesario
programarlos(consulte la pagina 27) antes de elegir la funcion
WEPEAT ALL”.
F’ara cancelaria,pulse de nuevo el boton.
Lors de I’utilisation” de l’atmareil ~rincioal
Appuyer sur la touche REPEAT.
● En mode de lecture “REPEAT ALL”, vous pouvez activer la
lecture RANDOM.
● En mode de lecture “REPEAT l“, une pression sur la touche
RANDOM desactive I’operation.
● Pour repro duireunique merit des plagesdeterminers,
programmedIes plages voulues(voir page 27) avant de
selectionnerla fonction “REPEAT ALL”.
Pour desactiver la fonction, appuyez a nouveau sur Ies m~mes
touches.
25
Page 26
2
PROGRAMMEDPLAY
Up to 20 tracks can be programmedfrom the inserted disc.
Use the remote control.
Press the PRGM button while pressing the SHIFT
1
button in stop mode.
The PRGM indicator flashes in the display.
Pressthe numericbuttonsand the +1 O buttonto
2
programa track.
Example:
To select the 25th track, press the +1 O, +10 and 5 buttons.
To select the 10th track, press the +1 O and O buttons.
DISPLAY
@) Program number
@ Selected track number
@l Total playing time of the selected tracks
@ Total number of selected tracks
Repeatstep2 to programothertracks.
3
Press the 4>button to start play.
4
To check the program
Each time the +or -button is pressed before playing, a
track number, and program number will be displayed.
To clear the program
Press the
■ CLEAR button in stop mode.
4
To add tracksto the program
Before playing, repeat step 2. The track will be programmed after
the last track.
To changethe programmedtracks
Clear the program and repeat all the steps again.
. During programmedplay, the following operationscannot be
performed:
– Random play with the RANDOM button
–One-trackrepeat (REPEAT 1) with the REPEAT button
● [f programmedtime is more than 99:59 minutes, or the disc
track number 31 and above is programmed,total playing time
shows--:––in the display.
DIR/PRESET
4b
26
9
Page 27
RIEPRODUCC1ONPROGRAMADA
LECTUREPROGRAMMED
Se podra programar un maximo de 20 canciones de cualquiera
del disco introducidos.
Utilice el control remoto.
7 Pulse el boton PRGM manteniendopresionado
el boton SHIFT estando en el modo de parada.
El indicador PRGM parpadea en el visor.
2 lPulse Ios botonesnumericosy
el boton +1Opara
prograrnar una cancion.
lEjemplo:
!Para seleccionarla cancion numero 25, pulse Ios botones
.}10, +10 y 5.
‘=ara seleccionarla cancion ntimero 10, pulse Ios botones
+-lo y o.
WSUALIZACION
1~ Numero de programa
~~ Numero de la cancion seleccionada
l~Tiempode reproductiontotalde Ias canciones
seleccionadas
(~ Numero total de canciones seleccionadas
3 Repita el paso 2 para programar otras canciones.
4 Pulse el boton +-para iniciar la reproduction.
Palra comprobarel programa
Cada vez que se pulse et boton +0-antes de la
reproduction,un numero de cancion y numero de programa se
vi.sualizaran.
On peut programmerun maximum de 20 plages de n’importe
Iequel de disque en place.
Utiliser la telecommande.
1
Appuyersur la touchePRGM en maintenant
enfoncee la touche SHIFT en mode d’arr~t.
L’indicateur PRGM clignote clans I’afficheur.
A I’aide des touches numeriques et de la touche
2
+1O, programmer une plage.
Exemple:
Pour selectionnerla vingt-cinquiemeplage, appuyer sur Ies
touches +10, +10 et 5.
Pour selectionnerla dixieme plage, appuyer sur Ies touches
+10 et O.
AFFICHAGE
@ Numero de programme
@ Numero de la plage selectionnee
@ Temps de lecture total des plages selectionnees
@ Nombre total de plages selectionnees
RepeterI’etape 2 pour programmerd’autres
3
plages.
Appuyersur la touche +-pour demarrerla
4
lecture.
Pour contr61er Ie programme
A chaque pression sur la touche 4ou -avant la lecture,
un numero de plage et un numero de programme sent affiches.
Para borrar el programa
Pulse
■ CLEAR en el modo de parada.
Pa ra aiiadir cancionesal programa
Anies de reproducer, repita el paso 2. La cancion se programara
despues de la ultima cancion programada.
Pa ra cambiarIas cancionesprogramadas
Borre el programa y repita todos Ios pasos de programacion.
mm
c Durante la reproductionprogramada,no podra realizar Ias
operacionessiguientes:
- Reproductionaleatoria con el boton RANDOM
–Repetitionde un tema (REPEAT 1) con el boton REPEAT.
● Si el tiempo programado sobrepasa Ios 99:59 minutes, o si se
p “ograma la 31 ava piSta o posterior a esta, el tiempo total de
reproductionmuestra ––: –– en el visualizador.
Pour effacer Ie programme
Appuyer sur la touche
Pour ajouter des plages au programme
Avant la lecture, repeter I’etape 2. La plage sera programmed a
la suite de la derniere plage.
Pour changer Ies plages programmers
Effacer Ie programmepuis repeter toutes Ies etapes.
. Pendant la lecture programmed,Ies operations suivantes sent
impossible:
- Lecture aleatoire avec la touche RANDOM
–Lecture repetee d’une plage (REPEAT 1) a I’aide de la touche
REPEAT.
● Si la duree programmed clepasse 99:59 minutes ou si 31 plages
ou plus sent programmers,la duree totale de lecture est
indiquee par ––: –– sur I’affichage.
■ CLEAR clans Ie mode arr&.
27
Page 28
A
BASIC OPERATIONS
INSERTING TAPES
● You can select a reverse mode to play back one or both sides.
● Use normal (type I), Crop (type II) or metal (type IV) tapes for
playback.
Press the TAPE button and press the A EJECT mark
to open the cassette holder. -+
Insert a tape with the exposed side down and with the side to be
played first facing out from the unit. Push the cassette holder to
close.
To select a reverse mode + ❑
Each time the TAPE/REV MODE button is pressed, the reverse
mode changes.
To play one side only, turn on =.
To play from front side to back side once only, turn on 3.
To play both sides repeatedly, turn on (:).
PLAYING BACK A TAPE
Insert a tape,
Press the <-button to start play. -+ ❑
DISPLAY
Playback side of the tape
@
b: The side facing out from the unit (the front side) is being
played.
+: The side facing in toward the unit (the back side) is being
played.
@ Tape counter indicates the tape running length.
❑
H
To stop play, press the
To pause play, press the II button. To resume play, press again.
To change the playbackside, press the <bDIR/PRESET
button in play or pause mode.
To fast forward or rewind, press the 44or -button in stop
mode. Then press the
To start play when the power is off (Direct Play Function)
Press the TAPE button. The power is turned on and play of the
inserted tape begins.
To set the tape counterto 0000
Press the 9 CLEAR button in stop mode.
The counter is also set to 0000 when the cassetteholder is
opened.
■ button.
■ button to stop the tape.
About cassette tapes
To prevent accidentalerasure, break off the plastic tabs on
c
the cassette tape after recording with a screwdriver or other
pointed tool. +
@Side AJ @ Tab for side A
To record on the tape again, cover the tab openingswith
cellophane tape, etc.
● 120-minuteor longer tapes are extremelythin and easily
deformed or damaged. They are not recommended.
● Take up any slack in the tape with a pencil or similar tool before
use. Slack tape may break or jam in the mechanism. +
❑
❑
28
Page 29
OIPERACIONESBASICAS
OPERATIONSDE BASE
~SERCIC)NDE CINTAS
● Podra seleccionar el modo de inversion para reproducer una o
dos caras.
● U :illce cintas normales(tipo I), de CrOz (ttpo II) o de metal
(tipo IV) para la reproduction.
Pulse el boton TAPE y la marca A EJECT para abrir
el portacassette.+
Insm’te la cinta con el Iado expuesto hacla abajo y el Iado que
se va a tocar primero hacia afuera de la unidad. Empuje el
portacassettepara cerrarlo.
Pat-a seleccionarun modo de inversion+ ❑
Cacfa vez que pulse el boton TAPE/REVMODE, et modo de
inversion cambiara.
Pata reproducer una cara solamente, enclenda =.
Pata reproducer la cara delantera y la trasera una vez solamente,
encienda =1.
Pata reproducer repetidamenteambas caras, encienda c~>.
❑
&PRODUCCIONDE UNA CINTA
Ins:rte una cinta.
Pulse el boton 4>para iniciar la reproduction. + ❑
vl~;uAL[zAcloN
Cara de reproducclonde la cinta
@
➤ : Se esta tocando el Iado hacia afuera de la unidad (el
Iado frontal).
+: Se esta tocando el Iado hacia dentro de la unidad (et
Iado trasero).
@ =1contador de cinta indica el movlmiento de la cinta.
Para detener la reproduction,pulse el boton
Para hater una pausa en la reproduction,pulse el boton Il.
Pal a reanudar la reproducclon, pulselo otra vez.
Para cambiar la cara de reproduction,pulse el boton <E
DIFUPRESET en el modo de reproduction o en el de pausa.
Avarice rapido o rebobinado,pulse el boton +0-en el
modo de parada. Luego pulse el boton H para detener la cinta.
Pal-ainiciar la reproduction cuando la alimentacion este
de:sactivada(funcion de reproduction directs)
Pu se el boton TAPE. La alimentacionse conectaray la
reproductionde la cinta insertada empezara.
Pa/’a poner el contadorde cinta a 0000
Pulse el boton H CLEAR en el modo de parada.
El >ontador se pondra tambiena 0000 cuando se abra el
portacassette.
■.
MISE EN PLACE DE CASSETTES
On peut choisir un mode d’inversionpour Iire une face ou Ies
*
deux.
● Pour la lecture, utillser des cassettes normales (type I), CrOz
(type II) ou au m6tai (type IV).
Appuyer sur la touche TAPE puis appuyer sur la
marque A EJECT pour ouvrir Ie porte-cassette.
*M
Introduire une cassette avec la partie exposee de la bande vers
Ie bas et Ie cde a reproduireen premier face a I’exterieur.
Pousser Ie porte-cassettepour Ie fermer.
Pour seiectionnerun mode d’inversion+
A chaque pression sur la touche TAPE/REVMODE, Ie mode
d’inversion change.
Pour Iire une seule face, allumer ~.
Pour Ilre de la face avant a la face arriere une seule fois, allumer
-),
Pour Iire Ies deux faces a plusieurs reprises, allumer c=).
❑
LECTURE D’UNE CASSETTE
Mettre une cassette en place.
Appuyer sur la touche <9- pour demarrer la lecture.
*m
AFFICHAGE
Face Iue de la cassette
@
➤ : Le cde face a I’exterieur (Ie cbte avant) est reproduit.
4: Le cdte faisant face a I’unite (Ie c6te arriere) est reproduit.
@ Compteur indiquant la duree de defilement de la bande.
Pour arriXer la lecture, appuyer sur la touche
Pour mettre la lecture en pause, appuyer sur la touche II. Pour
reprendre la lecture, appuyer de nouveau sur cette touche.
Pour changer de face Iue, appuyer sur la touche +~DIR/
PRESET pendant la lecture ou Ie mode pause.
Pour obtenir une avarice rapide ou un rebobinage,appuyer
sur la touche +ou >en mode arr6t. Ensuite, appuyer sur
la touche
■ pour arr6ter Ie defilement.
Pour demarrer la lecture quand I’alimentation est toupee
(fonctionde lecture directe)
Appuyer sur la touche TAPE. L’appareil est mis sous tension et
la lecture de la cassette en place commence.
Pour mettre Ie compteura 0000
Appuyer sur la touche 9CLEAR clans Ie mode arr/?t.
Le compteur est aussl mls a 0000 quand [e porte-cassette est
ouvert.
❑.
Acerca de Ias cintas de cassette
● Para evitarla borraduraaccidental,rompscon un
des.tornillador u otra herramienta puntiaguda Ias Ienguetas de
plastico del cassette antes de grabar +
@ Cara A/ @ Lengueta para la cara A
P ara volver a grabar en una cinta, tape Ias aberturas con cinta
adhesiva, etc.
● Las cintas de 120 minutes o mas son extremadamentefinas
y se deforman o estropean facilmente.No son recomendadas.
● Tense Ias cintas con un Iapicero o herramienta similar antes
de utilizarlas. La cinta floja podria romperse o atascarse en el
rrecanismo.+
❑
❑apres I’enreglstrement. + ❑
Au sujet des cassettes
● Pour eviter un effacementaccidental,utiliser un tournevis
ou tout autre objet effile pour casser Ies ergots en plastique
@ Face Af @ Ergot pour la face A
Pour enregmtrer de nouveau sur une cassette, recouvrir Ies
cavites des ergots avec du ruban adhesif, etc
● Le ruban magnetique des cassettes de 120 minutes ou plus
est extri5mementfin et se deforme et s’endommagefacilement.
Ces cassettes ne sent pas recommandees.
● Avant d’utiliserune cassette,utiliser un crayon ou un ob}et
similairepour tendreIe rubanmagnetique.Un ruban
magnetiquedetendu peut se rompre ou s’emm~lerclans Ie
mecanisme.+
❑
29
Page 30
1
BASIC RECORDING
Preparation
● Wind up the tape to the point where recording will start.
● Only normal (type I) tapes can be recorded.
1
Insert the tape to be recorded on into the deck.
the tape with the side to be recorded first facing
Insert
out from the unit and the exposed side down.
Press the TAPE/REV MODE button to select the
2
reverse mode.
To record on one side only, turn on 1,
To record on both sides, turn on 3or (3.
Press one of the function buttons and prepare
3
the source to be recorded.
Torecordfrom a
To record from a radio broadcast, press the TUNER button
and tune in to a station.
To record from the connectedsource,press the AUX/
VIDEO button and play.
Press the ● REC button to start recording.
4
\
When the selected function is CD, playback and r;cording
start simultaneously.
When using the remote control, first press the.REC button
and then press the <bbutton within 2 seconds.
Il?l will be displayed during recording.
CD, press the CD button and load the disc.
3
4
u
BAND
TUNER
To stop recording, press the
To pause recording, press the II button. (Applicable when the
source is TUNER or AUX/VIDEO.)To resume recording, press
again.
To reduce the noise interferenceof an MW/LW broadcast
(for K model)
Press the BAND button while pressing the SHIFT button on the
remote control to reduce the noise interference when recording
n
VIDEO
AUX
I
n
CD
I
an MW/LW broadcast.Each time the buttons are pressed, the
dot light @ is turned on and off in the display window. +
m
Recording cannot be done when the TAPE button is selected.
■ button.
❑
b
REC
●
!?
m
30
Page 31
GIRABACION BASICA
ENREGISTREMENTDE BASE
Preparation
● Bobinela cinta hasta el punto donde vaya a empezarla
grabacion.
● S 510es posilcle grabar cintas normales (tipo I).
1
Inserte la cinta que vaya a grabar en la platina.
Inserte la cinta con el Iado que se va a grabar hacia afuera
de la unidad y el Iado expuesto hacia abajo.
Pulse el boton TAPE/REVMODE
2
para seleccionar
d modo de inversion.
Para grabar una cara solamente,encienda Z.
Para grabar en ambas caras, encienda => o c=>.
Pulse
3
uno de Ios botones de funcion y prepare
la fuente de sonido de grabacion.
Para grabar de un disco compacto,pulse el boton CD e
introduzca e! disco compacto.
Para grabar una radiodifusion,pulse el boton TUNER y
sintonice la emisora.
Para grabar de una fuente de sonido conectada,pulse el
boton AUX/VIDEOy active la reproduction,
Pulseel boton
4
Cuando la funcion seleccionada sea CD, la reproductiony la
grabacion empezaransimultaneamente.
Si utiliza el control remoto, pulse el boton . REC en primer
Iugar y, a continuation,pulse el boton +>en un intervalo
de 2 segundos.
~se visualizarandurante la grabacion.
Para detener la grabacion,pulse el boton H.
Para hateruna pausa en la grabacion,pulse el boton Il.
(Puede aplicarse cuando la fuente de sonido sea TUNER o AUX/
VI[)EO.) Para reanudar la grabacionj pulse de nuevo el boton.
Para reducir el ruido de interferenciasde una emision MW/
LYI’ (para el modelo K)
Pu se el boton BAND mientras pulsa el boton SHIFT en el mando
a clistancia para reducir el ruido de interferenciasdurante la
grabacionde una emisionMW/LW. Cada vez que pulse Ios
boones,la Iuz de puntos @) se enciende y apaga en el visor.
+m
am
No es posible grabar cuando el boton TAPE activado.
● REC para iniciarla grabacion.
Preparation
Bobiner la cassettejusqu’aI’endroitou on veut demarrer
*
I’enregistrement.
● Vous ne pouvez enregistrerque sur des cassettes normales
(type I).
1
Inserer la cassette a enregis!lrer clans la platine.
Introduire la cassette avec la c6te a enregistrer en premier
face a I’exterieur et la partie exposee de la bande vers Ie has.
Appuyer sur la touche TAPE/REVMODE pour
2
selectionner Ie mode d’inversion.
Pour enregistrer sur une face seulement, allumer ~.
Pour enregistrer sur Ies deux faces, allumer =) ou c=).
Appuyersur une des touchesde fonctionet
3
preparer la source a enregistrer.
Pour enregistrera partir d’un disque compact, appuyer
sur la touche CD et mettre Ie disque en place.
Pour enregistrerune emissionde radio, appuyer sur la
touche TUNER et accorder sur une station.
Pour enregistrer a partir de la source connectee,appuyer
sur la touche AUX/VIDEOet mettre la source en marche.
Appuyersur la touche ● REC pour demarrer
4
I’enregistrement.
Quandla fonctionselectionneeest CD, la lectureet
I’enregistrementdemarrent simultanement.
Avec la telecommande,appuyez d’abord sur la touche.REC,
puis sur 4>clans Ies deux secondes qui suivent.
~sent affiches pendant la enregistrement.
Pour arr~ter I’enregistrement,appuyer sur la touche
Pour mettre I’enregistrementen pause, appuyer sur la touche
Il. (Applicable quand la source est TUNER ou AUWVIDEO.)Pour
reprendre I’enregistrement,appuyer de nouveau sur cette touche.
Pour reduire [es interferencesen PO/GO (modele K)
Appuyez sur BAND tout en appuyant sur la touche SHIFT de la
telecommandeafin de reduireIes interferencesIors d’un
enregistrementen’PO/GO.Chaque fois que vous appuyez sur
la touche,Ie temoin @ s’allumeet s’eteint clans I’afficheur.
A microphone(not supplied)can be connectedto this unit,
allowing you to sing along to music sources.
Use a microphone with a mini plug (03.5 mm,l/8 inch).
Before connecting a microphone
Set the MIC VOL control to MIN.
1 Connect your microphone to the MIC jack.
2 Press one of the function buttons to select the
source to be mixed, and play the source.
3 Adjust the volume and tone of the source.
4 Adjust the microphone volume with the MIC VOL
control.
1
To record microphonesound mixed with source sound
Follow the procedure for recording from the source.
When not using the microphones
Set the MIC VOL control to MIN and remove the microphones
from the MIC jacks.
4
1
BAND
TUNER
VIDEO
AUX
I
b
MIC VOL
a
MIN -. MAX
m
● If the microphone is held too near the speakers, a howling sound
may be produced.In this case, hold the microphoneaway
from the speakers, or decrease the sound level using the MIC
VOL control.
CD
I
J
● If sound through the microphoneis extremely loud, it may be
distorted.In this case, turn the MIC VOL control toward MIN.
Recommendedmicrophone
Use of a unidirectionaltype microphoneis recommendedto
prevent howling. Contact your local Aiwa dealer for details.
.
32
Page 33
MEZCLAMICROFONICA
MIXAGE AVEC MICROPHONE
Es posible conectar un microfono (no suministrado)a la unidad;
esto Ie permitira cantar con pistas de musics.
Utilice un microfono con mini clavija (3,5 mm
Antes de conectarun microfono
Ponga el control MIC VOL en MIN.
(Conecte su microfono a la toma MIC.
1
Pulse
2
seleccionarla fuentede sonidoque vayaa ser
UIIO de Iosbotonesde funcionpara
0).
mezclada y Iuego reproduzcala.
Ajuste el volumen y el tono de la fuente de sonido.
3
4
Ajuste el volumen del microfono con el control
M-ICVOL.
Para grabar el sonidode microfonomezcladocon el
sonido de la fuente
Siga el procedimientode grabacion de la fuente de sonido.
Cuando no utilice Ios microfonos
Po’rga Ios controlesMIC VOL en MIN y desconecteIos
microfonos de Ias tomas MIC.
ma
● S el microfono se pone demasiado cerca de Ios altavoces quiza
se produzcaun ruido de aullido.En este case, separe el
microfonode Ios altavoceso disminuyael nivel del sonido
empleando el control MIC VOL.
● S el sonido del microfono se pone a un nivel demasiado alto
quiza se distorsione.En este case, gire el control MIC VOL
hacia MIN.
Microfonorecomendado
Se recomienclautilizar un microfonotipo unidirectionalpara
eviiar el aullido. Pongase en contacto con su concesionario Aiwa
para que Ie d6 Ios detalles.
Vous pouvezraccorderun microphone(non fournis)a cet
appareil de maniere a accompagneren chantant Ies sources
musicales de votre choix.
Utiliser un (ales) microphone(s)a mini-fiche (3,5 mm o).
Avant de brancherun microphone
Regler la commandeMIC VOL sur MIN.
Brancher Ie microphone sur une prise MIC.
1
Appuyer sur une des touches de fonction pour
2
selectionnerla source & mixer, et mettre cette
source en marche.
Regler Ie volume et la tonalite de la source.
3
ReglerIe volumedu microphoneavecla
4
commande MIC VOL.
Pour enregistrerIe son du microphonemixe avec la
source sonore
Suivre la procedure d’enregistrementa partir de la source.
Quand on n’utilise pas Ies microphones
Regler Ies commandesMIC VOL sur MIN et debrancherIes
microphonesdes prises MIC.
~
* Si un microphoneest place trop pres d’une enceinte, un bruit
de hurlement risque de se produire. Le cas echeant, eloigner
Ie microphone de I’enceinte ou baisser Ie niveau sonore a I’aide
de la commandeMIC VOL.
● Si Ie son d’un microphoneest extr~mementfort, il peut &re
deforme. Le cas echeant, tourner la commande MIC VOL vers
MIN.
Microphonerecommande
I_’utilisationd’un microphonede type unidirectionnelest
recommandeepour eviter Ie hurlement.Pour plus de details,
contacter Ie distributeur Aiwa local.
33
Page 34
CONNECTINGOPTIONAL
EQUIPMENT+
Refer to the operating instructionsof the connected equipment
for details.
. The connectingcords are not supplied,Obtain the necessary
connecting cords.
● Consult your local Aiwa dealer for recommendedequipment.
❑
VIDEO/AUXJACKS
Sound signals can be input to this unit through the jacks.
Use a cable with RCA phono plugs to connect audio equipment
A
DC= IN12V “--”
Q-G+
I
(turntables,LD players with analog output jacks, VCRs, etc.).
Connect the red plug to the R jack, and the white plug to the L
jack.
When connectinga turntable
Use an Aiwa turntable equipped with a built-in equalizer amplifier.
SUPER WOOFER JACK
Connect an optional powered sub woofer with a built-in-amplifier
to the jack.
DC JACK (12 V)
Connect the Aiwa DCW-50 car battery cord to the jack. Then
connect the other end to the cigarette lighter socket of the car.
● When the unit is used with the car battery cord, the clock does
not operate.
c After switching from DC voltage to AC voltage, the current time
must be set again.
● Use the Aiwa DCW-50 car battery cord only.
● When operating on car battery (DC 12 V), the POWER button
on the remote control does not operate.Press the POWER
button on the unit to turn the unit on. After the power is turned
on, the remote control is operational.
LISTENINGTO EXTERNAL
SOURCES+EI
To play equipment connected to the VI DEO/AUX jacks, proceed
as follows.
1
Press the AUX/VIDEO button.
“AUX is displayed.
34
2 Play the connected equipment.
Page 35
CONEXIONDE EQUIPOOPCIONAL
++ fl
CONNEXIOND’UN AP’PAREIL
OPTIONNEL+
❑
Consulte el manual de instruccionesdel equipo conectado para
terwr mas detalles.
* Lc,s cables de conexion no estan suministrados.Obtenga Ios
q~e scan necesarios.
* Con respectoa la informationsobre equiposadicionales
resomendados,consulte a su proveedor Aiwa.
TC)MASDE VI DEO/EQUIPOAUXILIAR
(VllDEO/AUX)
Las ser7ales de sonido se podran entrar en esta unidad a traves
de Ios enchufes.
Utilice un cable con clavijas fono RCA para conectar un equipo
de audio (giradiscos,reproductoresde discos laser con tomas
de salida ana16gica, vfdeos, etc.).
Conecte la clavija roja a la toma R, y la clavija blanca a la toma
L.
Cuando conecteun giradiscos
Utilice un giradiscos Aiwa equipado con amplificador ecualizador
incorporado.
TOMA DE SUBALTAVOZPARA GRAVES
(SUPER WOOFER)
Conecte un Subaltavoz para graves de alimentacionoptional
con amplificadorincorporado a esta toma.
TOMACC(12V)
Conecte el cable de bateria para automovil Aiwa DCW-50 a esta
toma, A continuation,conecte el otro extremo a la clavija del
encendedor de cigarrillos del automovil.
* Si la unidad se utiliza con el cable de bateria para automovil el
reloj no functionaran,
* Cada vez que cambie de voltaje CC a CA, debera volver a
programar la hors.
● I. Hilicesolo el cable de bateria para automovil Aiwa DCW-50.
* Si utili.za la baterra para automovil (CC 12 V), el boton POWER
del mando a distancia no functionary.Pulse el boton POWER
de la unidad para activarla. Despues de activar la unidad, podra
utilizar el mando a distancia.
Pour plus de details, se reporter au mode d’emploi de I’appareil
connecte.
● Les cordons de raccordement ne sent pas fournis. Se procurer
Ies cordons de raccordementnecessaires.
● Pour Ies appareilsoption nels recommandes,consulterIe
distributeur Aiwa local.
PRISES VIDEO/AUX
Le signal sonore peut 6tre fourni a cet appareil via Ies prises.
Utiliser un cable a fiches phono RCA pour connecter un appareil
audio (tourne-disque,Iecteur de disque laser avec prises de sortie
analogique,magnetoscope,etc).
Connecterla fiche rouge a la prise R et la fiche blanche a la
prise L,
Connexiond’un tourne-disque
Utiliser un tourne-disque Aiwa muni d’un amplificateur a egaliseur
integre,
PRISE SUPER WOOFER
Connecter un caisson de graves alimente optionnel muni d’un
amplificateurintegre a cette prise.
PRISE CC (12 V)
Raccordez Ie cordon adaptateur pour automobileDCW-50 a la
prise CC. Raccordezensuite I’autre extremitedu cordon a la
ptise d’allume-cigaredu vehicule,
● Lorsque I’appareil est alimente une prise d’allume-cigareIe
I’horloge ne fonctionnentpas.
● Apres avoir commute la tension CC pour la tension CA, vous
devez recommenceIe reglage de I’heure.
● Utilisez uniquement un cordon pour batterie Aiwa DCW-50.
● Lorsque I’apparell est aiimente sur une prise d’allume-cigare
(12 V CC), la touchePOWERde la telecommandene
fonctionnepas. Appuyez sur la touche POWER de I’appareil
pour I’allumer.Une fois I’alimentationCA retablie,la
telecommanderedevient operationnelle.
ESCUCHA DE FUENTESDE SONIDO
EXTERNAS-+
Para hater la reproductionen el equipo conectado a Ias tomas
VIDEO/AUX,siga el procedimientosiguiente.
f pul~e~[ l)~ton AIJ)(/vlDEo,
Se visualiza “AUX
2 Haga la reproductionen el equipoconectado.
❑
ECOUTEDE SOURCESEXTERNES
+ra
Pour utiliser I’appareil connecte aux prises VIDEO/AUX, proceder
de la maniere suivante.
1 Appuyer sur la touche AUX/VIDEO.
“AUX” est affiche.
2 Mettre I’appareil connecte en marche.
35
Page 36
CARE AND MAINTENANCE
Occasionalcare and maintenanceof the unit and the software
are needed to optimize the performanceof your unit.
To clean the cabinet
Use a soft cloth lightly moistened with mild detergent solution.
Do not use strong solvents, such as alcohol, benzine or thinner.
✎
m
❑
To clean the heads and tape paths+
After evety 10 hours of use, clean the heads and tape paths with
a head cleaning cassette or cotton swab moistened with cleaning
fluid or denatured alcohol. (These cleaning kits are commercially
available.)
When cleaningwith a cotton swab @, wipe the recording/
playback head @, erasure head@, capstans@,and pinchrollers
@.
After cleaning the heads and tape paths with a liquid head
cleaning cassette or a moistened swab, wait until the cleaned
parts are completely dried before inserting the tapes.
To demagnetizethe heads
The heads may become magnetized after long-term use. This
may narrow the output range of recorded tapes and increase
noise. After 20 to 30 hours use, demagnetizethe heads with
any commerciallyavailable demagnetizer.
Care of discs + E
● When a disc becomes dirty, wipe the disc from the center out
with a cleaning cloth.
● After playing a disc, store the disc in its case. Do not leave the
disc in places that are hot or humid.
❑
SPECIFICATIONS
MAIN UNIT
cFM tuner section>
Tuning range
Usable sensitivity(lH~)13.2 dBf
Antenna terminals
cAM/MWtuner section>
Tuning range
Usable sensitivity
Antenna
<LW tuner section>(for K model)
Tuning range
Usable sensitivity
Antenna
8 W + 8 W (1 kHz, T.H.D. 10%, 6 ohms)
LH:
8 W + 8 W (6 ohms, T.H.D. 10’Yo)
K:
Rated: 6 W+ 6 W (60hms, T.H.D. 17., 1
kHz/DIN 45500)
Reference: 8 W + 8 W (6 ohms, T.H. D,
10O/., 1 kHzlDIN 45324)
DIN MUSIC POWER 16W+ 16 W
36
To be continued.
Page 37
CUIDADOSY MANTENIMIENTO
SOINSET ENTRETIEN
El mantenimientoy el cuidado ocaslonalde la unidad y del
software resultan necesarios para optimizar Ias prestaciones de
su unidad.
Para Iimpiar la caja
Utlllce un paric} blando humedecido un poco en una solution de
detergence suave. No utilice nunca disolventes fuertes tales como
alcohol, benclna o diluyente.
Para Iimpiar Ias cabezas y Ios puntos por donde pasa la
cinta +
Despues de cada 10 horas de funclonamlento, Iimpie Ias cabezas
y Ios puntos pc,r donde pasa la cinta con un cassette de Iimpieza
de cabezas o un pedazo de algodon humedecido con Iiquido de
Iimpieza o alcohol desnaturalizado.(Estos juegos de Iimpleza
pueden adquirirse en Ios comercios del ramo.)
Cuando Iimpie con una pedazo de algodon @, Ilmple la cabeza
de grabacion/reproduction@, la cabeza de borrado @, Ios
cabrestantes@ y Ios rodlllos de presion @.
Despues de Iimpiar Ias cabezas y Ios puntos por donde pasa la
cinta con un cassette de Ilmpleza de cabezas que emplee Ifquldo
o un pedazo cie algodon humedecidoen Iiquldo de Iimpieza,
espere hasta que Ias partes Iimpiadasesten completamente
secas antes de Introducer Ias cintas.
Para desirnanarIas cabezas
Las cabezas pueden imanarse despues de un Iargo tiempo de
USO. Esto puede reducir la gama de salida de Ias cmtas grabadas
y aumentar el ruido. Despues de 20 a 30 horas de USO,desimane
Ias cabezas con cualquierdesimanadorque se venda en el
comercio del ramo.
Cuidadode Ios discos +
● Cuando un disco este SUCIO, I(mplelo desde el centro hacia
● Despues de reproducer un disco, guardelo en su caja. No deje
❑
❑
afuera con un parlo de Iimpieza
Ios discos en Iugares calientes o humedos.
Un entretien et des soins reguliers de I’appareil et des disques
et cassettes sent necessairespour assurer un fonctionnement
optimal.
Nettoyagedu coffret
Utlltserun chiffon doux IegerementImbibe d’une solution
detergence deuce. Ne pas utiliser de solvants forts, tels que de
I’alcool, de la benzine ou du diluant.
Nettoyagedes tiMes et des cheminsde bande + m
Toutes Ies dix heures d’utilisation,nettoyer Ies t&es et Ies
chemins de bande avec une cassette de nettoyage ou un coton-
tige imbibe d’un Iiquide de nettoyage ou d’alcool denature. (Des
kits de nettoyage sent disponibles clans Ie commerce.)
Lors du nettoyageavec un coton-tige@, essuyerla t~te
d’enregistrement/delecture @, la t~te d’effacement@, Ies
cabestans @ et Ies galets presseurs @).
Apres Ie nettoyage des t~tes et des chemins de bande avec une
cassette de nettoyage a Iiquide ou avec un coton-tige imbibe,
attendre que Ies parties nettoyees solent completementseches
avant de mettre des cassettes en place.
Pour demagnetiserIes t&es
A la Iongue, Ies tetes peuvent devenlr magnetisees.Ceci peut
restreindrela plage de sortie des cassettesenregistreeset
augmenterIe bruit A I’aide d’un dispositif de demagnetisation
disponible clans Ie commerce, demagnetiserIes t~tes toutes Ies
20 a 30 heures d’utilisation.
Soin des disques +
● Si un disque est sale, I’essuyer du centre vers I’exterieur a
I’aide d’un chiffon de nettoyage.
● Apres la lecture d’un dlsque, Ie ranger clans son etui. Ne pas
Iaisser Ie disque clans un endrolt chaud ou humlde.
❑
ESPECIIFICACIONES
UNIDAD PRINCIPAL
cSeccir5n
Gama de sintamizacion87,5 MHz a 108 MHz
Sensibilidad util (IHF)
Terminalsde antena
cSeccion
Gama de sinta,nizacion531 kHz a 1602 kHz (pasos de 9 kHz)
Sensibilidad util350 kV/m
Antena
cSecci6ndell sintonizadorde LW>
Gama de sintcmizacion144 kHz a 290 kHz
Sensibilidad util
Antena
cSecci6n
Potencia de salidau:
dell sintonizadorde FM>
13,2 dBf
75 ohmios (desequdlbrada)
dell sintonizadorde AM/MW>
530 kHz a 1710 kHz (pasos de 10 kHz)
Antena de cuadro
1400 pV/m
Antena de cuadro
dell amplificador>
8 W + 8 W (1 kHz, distortion armonica
total del 10YO,6 ohmlos)
LH:
8 W + 8 W (6 ohmlos,dlstorsion
armonica total del 107.)
K:
Nominal:6 W + 6 W (6 ohmlos,
dlstorsion armonica total del 1
DIN 45500)
Referencia8 W + 8 W (6 ohmios,
distorslon armomca total del 10YO,1 kHz/
Signal-to-noiseratio50 dB (CrOz tape peak level above
1 kHz)
Recording system
Heads
AC bias
Recording/playbackhead x 1
Erase head x 1
Compactdisc player section
Laser
D-A converter
S]gnal-to-noiseratio
Harmonic distortion
Wow and flutter
Semiconductor laser (k= 780 nm)
1 bit
linear
7,5
dB (1 kHz, O dB)
0.2 % (1 kHz, -20 dB)
Unmeasurable
SPEAKER SYSTEM
Cabinet type
2 way, bass reflex
Speaker
Woofer:
127 mm (5 in.) cone type
Tweeter:
25 mm (1 in.) ceramic type
Impedance
6 ohms
Output sound pressure level
88 dBIWlm
Dimensions(W x H x D) 155x 262x 246 mm
(6’/8 x 103/8x 93/, in.)
Weight
1,81 kg (4 Ibs)
GENERAL
Power requirementsAC
U: 120V, 60
iiz
K: 230 V, 50 tiz
LH: 120/220-240 V AC switchable,
50/60
tiz
DC: 12V
Power consumption
U, LH: 35 W
K: 65 W
Dimensions of main unit 163
(W XHXD)
Weight of main unit
x 263 x 265 mm
(6’/2
X 103/8x 101/2in.)
2.95 kg (6 Ibs 8 OZ.)
Specifications and external appearance are subject to change without
notice due to product improvement.
Page 39
ESPECIFICACIONES
SPECIFICATiONS
Distortion armonica total
Entradas
Salidas
Seccion de la platina
Formato de pistas
Respuesta de Ifrecuencia Clnta de Cr02 50 Hz – 16000 Hz
Relation sefial a ruido
Sistema de grabacionPolarlzaclon de CA
Cabezas
Secci&rdel reproductorde discos compactos
Laser
Convertidor D-A1 bit lineal
Relaci6n seilall a ruido
Distortionarmonica
Fluctuationy Itremolo
SISTEMADE ALTAVOCES
Tipo de caja
AitavocesAltavoz para graves,
lmpedancia
Nivel de presihn ackstica de salida
Dimensioned(An x Al
Peso
0,1 % (2,6 W, 1 kHz, 6 ohmios)
VIDEOIAUX: O 5 V
SUPER WOOFER: 1.1 V
SPEAKERS’acepta altavoces de 6
ohmios o mas
PHONES (minltoma estereo): acepta
auriculares de 32 ohmios o mas
4 pistas, 2 canales estereo
Clnta normal: 50 Hz -15000 Hz
50 dB (Nivel de crests a mas de 1 kHz
con cinta de Cr02)
1 cabeza de grabacion/reproduction
1 cabeza de borrado
Laser de semiconductor
(k= 780 nm)
75 dB (1 kHz, O dB)
0,2
Y. (1 kHz, -20 dB)
No se puede medir
2 v[as, reflejo de graves
127 mm, tipo conlco
Altavoz para agudos:
25 mm, tipo ceramico
6 ohmios
88 dB/W/m
x Prof)
155 x 262 x 246 mm
1,81 kg
Distortion harmonique totale
EntreesVIDEO/AUX: 0,5 V
Sorties
Partie magnetocassette
Format de piste
Reponse en frequence
Rapport signallbruit
Systeme d’enregistrement
T6tes
Partie Iecteur de disquescompacts
Laser
Conversion N/A1 blt Ilnealre
Rapport signal/bruit
Distortion harmonique0,2 % (1 kHz, -20 dB)
Pleurage et scintillement En dega du seuil mesurable
ENCEINTESACOUSTIQUES
Type de caisson
Haut-parleurs
Impedance
Niveau de pression
acoustique de sortie
Dimensions (L x H x P)155 x 262 x 246 mm
Poids
0,17. (2,6 W, 1 kHz, 6 ohms)
SUPER WOOFER: 1,1 V
SPEAKERS: accepte des enceintes de
6 ohms ou plus
PHONES (mimprise stereo): accepte un
casque de 32 ohms ou plus
La reception presente des parasites ou Ie son presente de
la distortion.
● Le systeme ne capte-t-il pas des bruits exterieurs ou des ondes
reflechies ?
+ Changer I’orientation de I’antenne. (+ page 9)
+ Eloigner la chatne d’autres appareils electriques,
PARTIE MAGNETOCASSETTE
La bande ne defile pas.
● La platine n’est-elle pas en mode pause ? (+ page 29)
Le son est desequilibreou trop faible.
● La t~te de lecture n’est-elle pas sale 7 (+ page 37)
L’enregistrementest impossible.
● Un ergot de securlte de la cassette n’est-il pas absent ?
(+ page 29)
● La t6te d’enregistrementn’est-elle pas sale ? (+ page 37)
II n’y a pas de sons aigus.
● La t~te d’enregistrement/delecture n’est-elle pas sale ?
(+ page 37)
PARTIE LECTEURDE DISQUESCOMPACTS
La lecture ne fonctionne pas,
● Le disque est-il correctementmis en place ? (+ page 23)
● Le disque n’est-il pas sale ? (+ page 37)
● N’y a-t-ii pas de la condensationsur la Ientille 7
+ Attendre environ une heure puis essayer de nouveau.
Para reajustarla unidad
Si se produce alguna condicion extraha en el visualizadoro en
Ias platinas, reajuste la unidad de la forma sigulente:
1 Pulse el boton POWER para desconectar la allmentacion.
2 Pulse el boton POWERpara conectarla alimentacion
mientras pulsa el boton H CLEAR. Todo 10que haya sido
almacenadoen la memorla despues de haber adquirido la
unldad se borrara.
Si no puede desconectarsela alimentacionen el paso 1 debldo
a algun mal funclonamiento,reajuste la umdad desconectando
el cable de alimentaclonde CA y repitiendo el paso 2.
Pour reinitialiser
Si une anomalie apparalt sur la fen6tre d’affichageou clans Ie
magnetocassette,relnltialiser I’appareil de la mamere suwante,
1 Appuyer sur la touche POWER pour couper I’allmentatlon.
2 Appuyer sur la touche POWER tout en appuyant sur la touche
H CLEAR pour remettre I’appareil sous tension. Toutes Ies
donnees memoriseesapres I’achat sent effacees.
SI a I’etape 1 I’alimentation ne peut pas &re toupee du fait d’une
anomalie,reinitialiseren debranchantIe cordon secteur puis
effectuer I’etape 2.
41
Page 42
PARTS INDEX
Main instructions about each part are indicated.
42
Page 43
INDICE DE LAS PARTES
NOMENCLATURE
Se indican Ias instruccionesprincipalsde cada parte.
Les principalsinstructionsconcernantchaque partie sent
indiquees.
*To use the function, press the button while pressing the SHIFT button.
* Para utilizar la funcion, pulse et boton manteniendopresionadoel boton SHIFT.
* Pour utiliser cette fonction, tenir la touche SHIFT enfoncee et appuyer sur la touche.
16-17
16-17
14-15
18-19
24-25
I
I
I
I
43
Page 44
Loading...
+ hidden pages
You need points to download manuals.
1 point = 1 manual.
You can buy points or you can get point for every manual you upload.


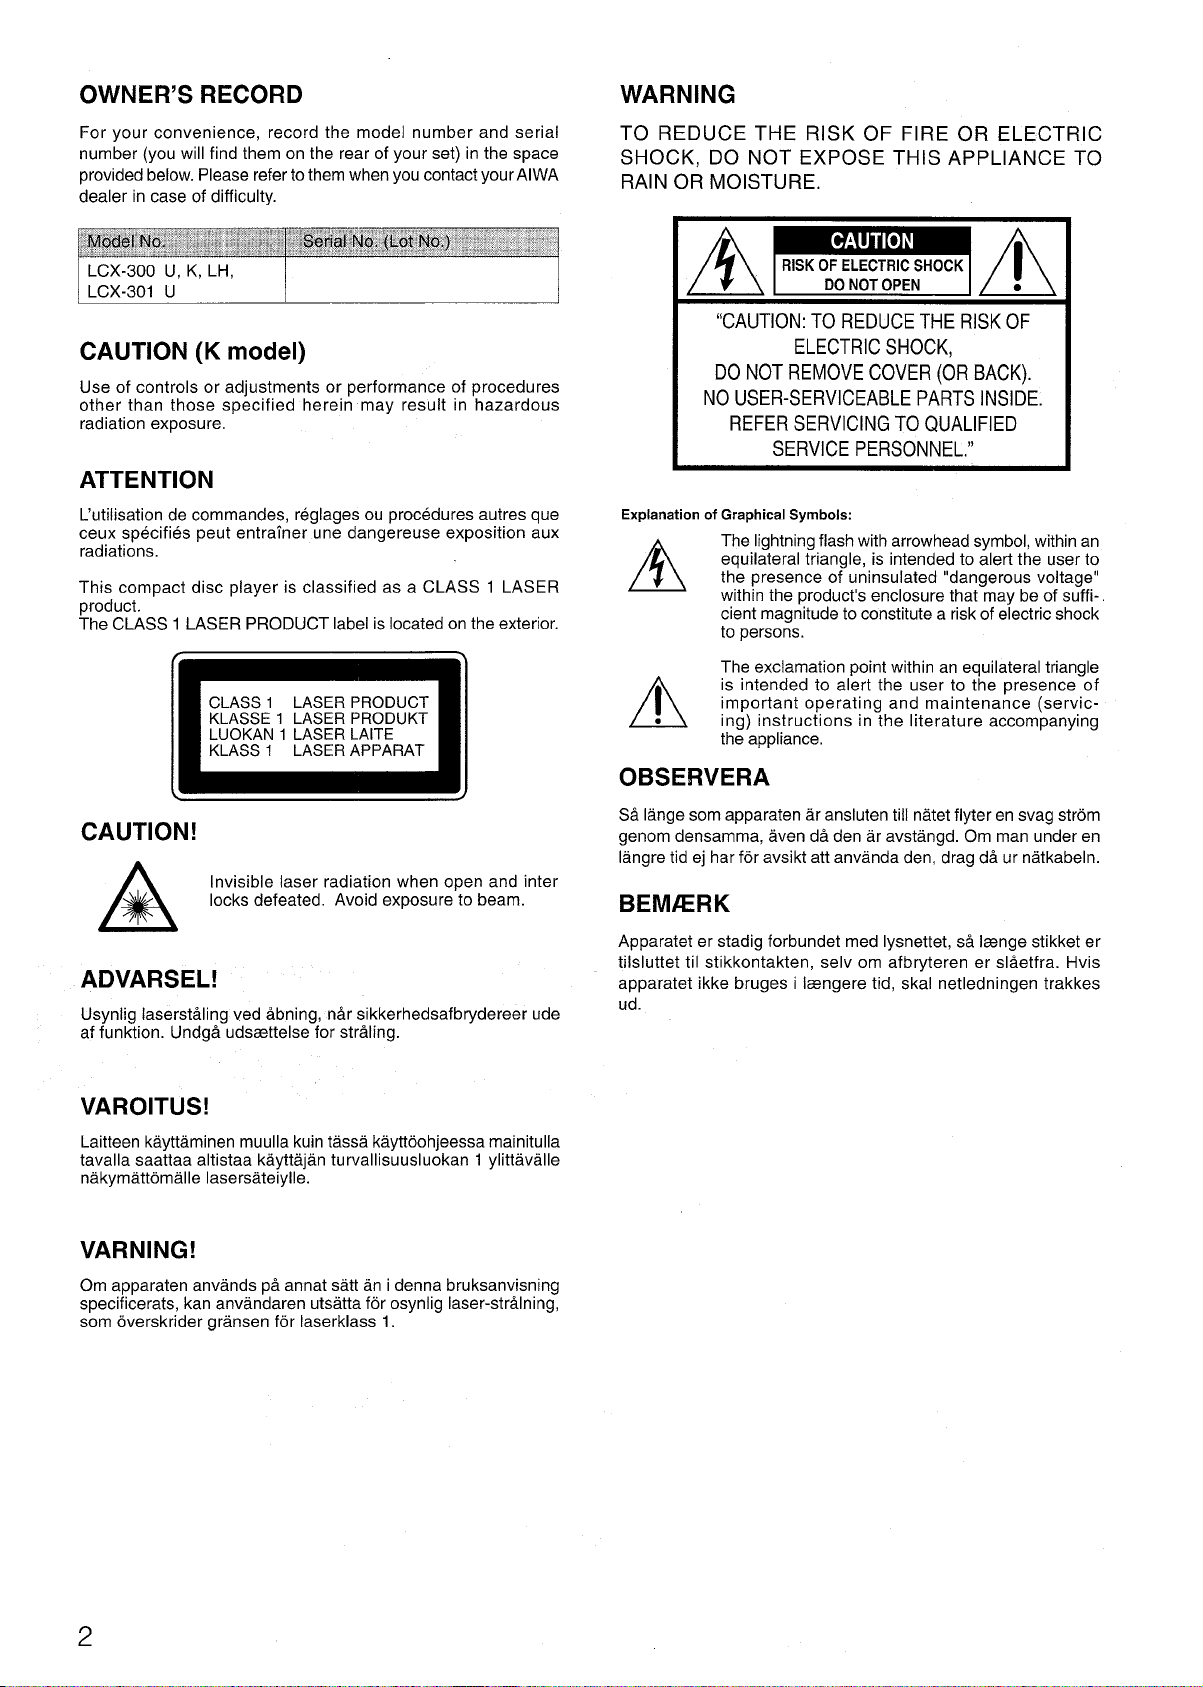
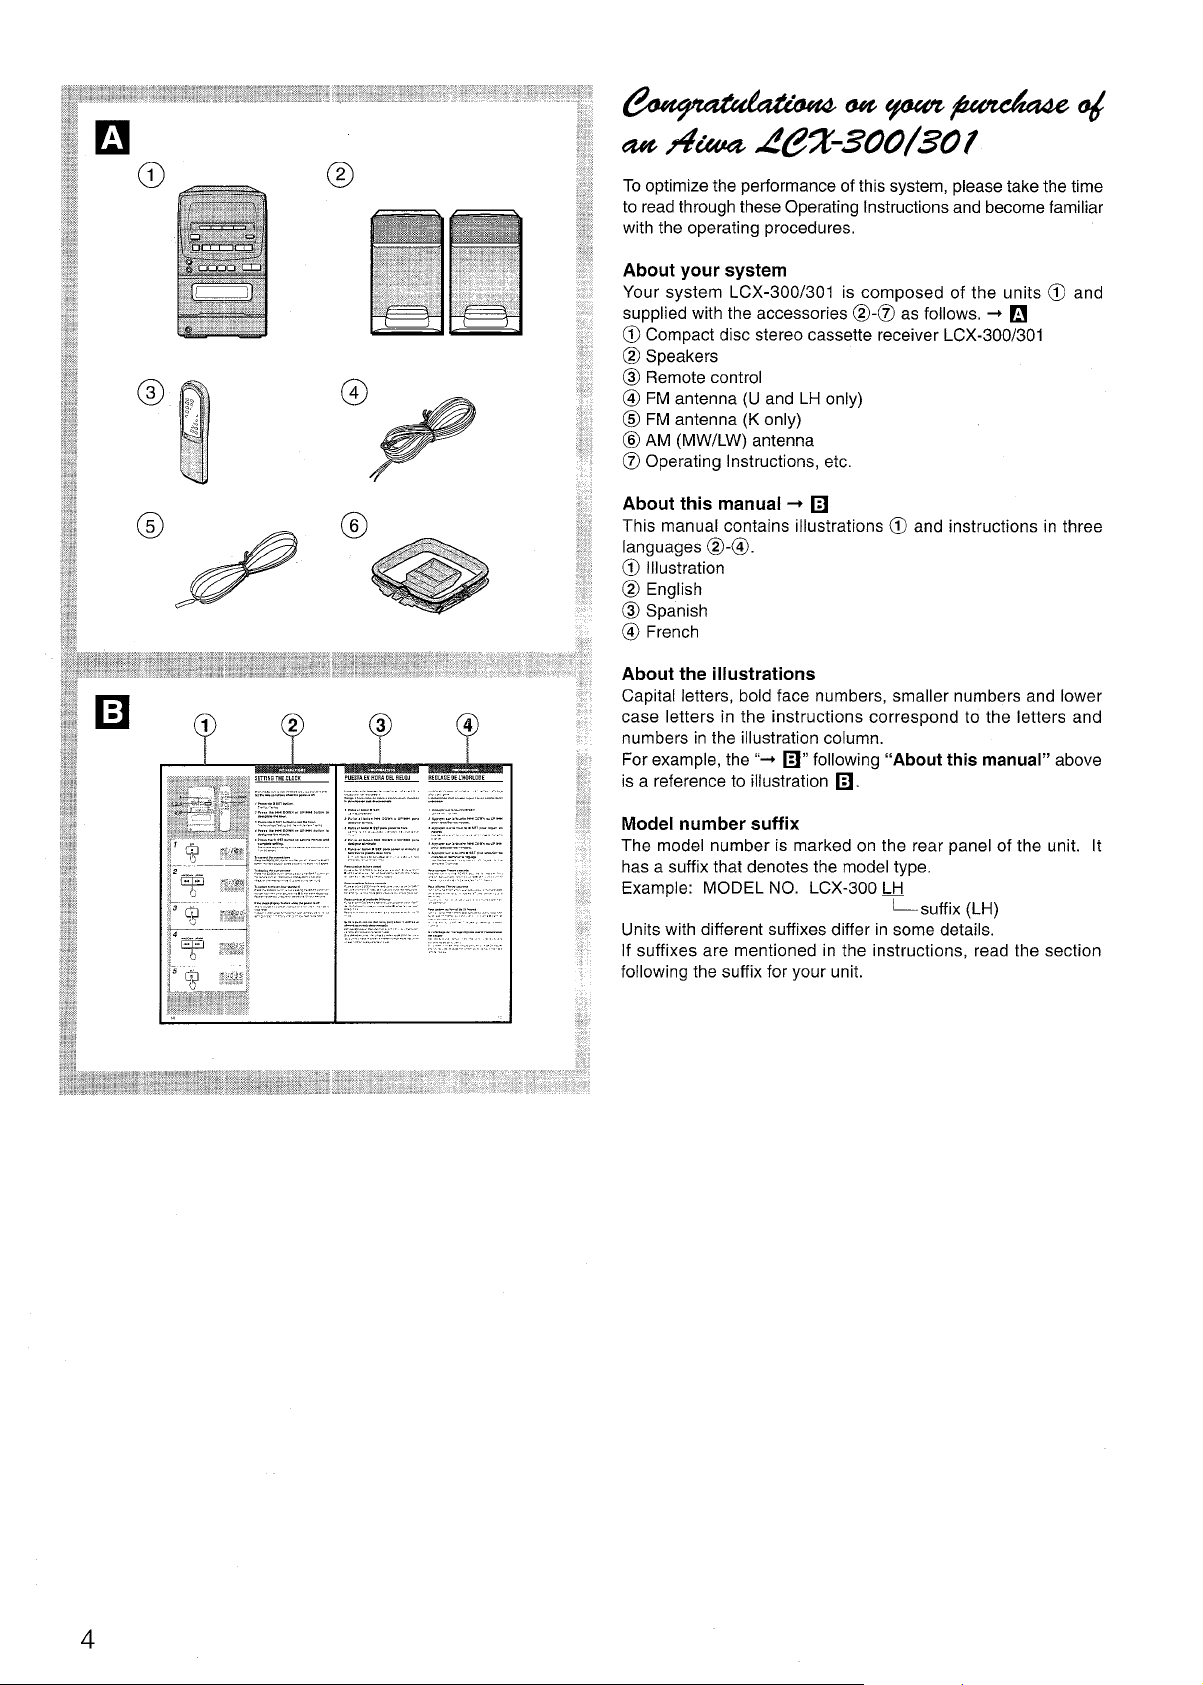
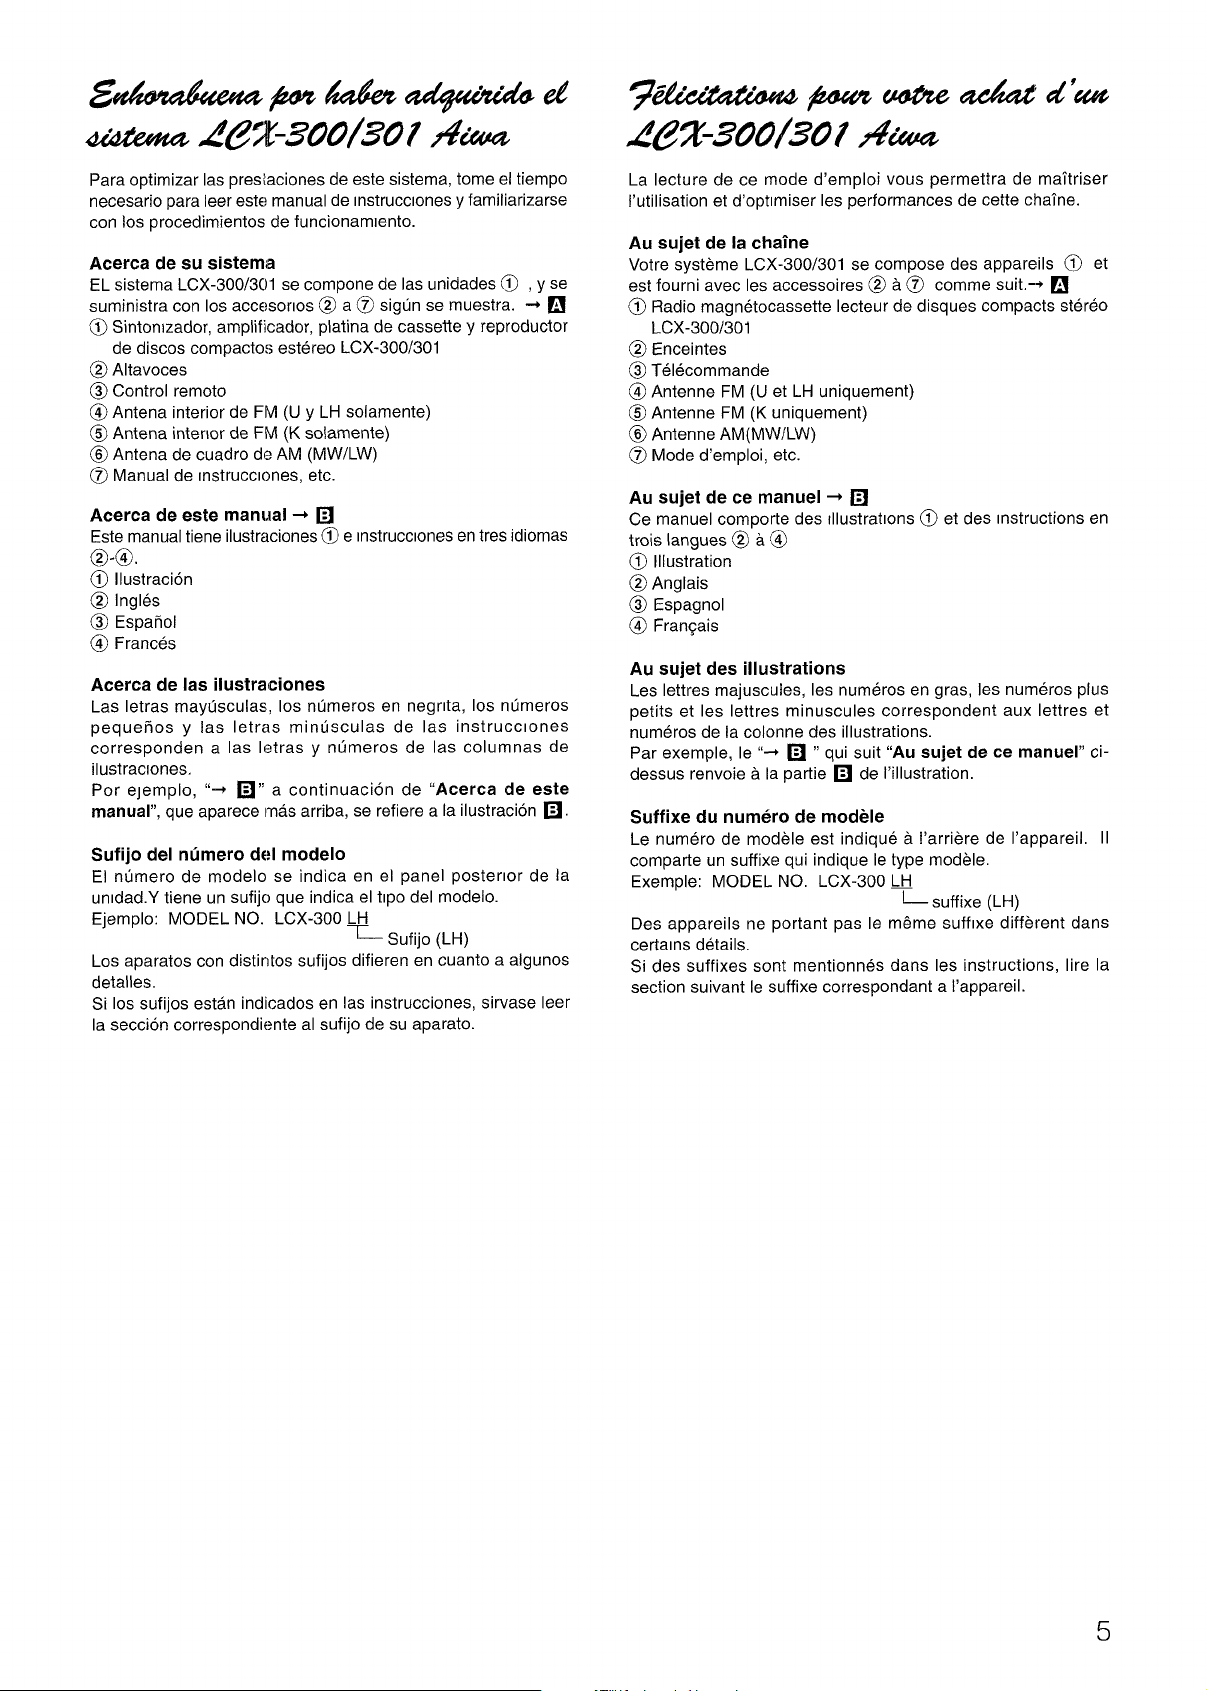
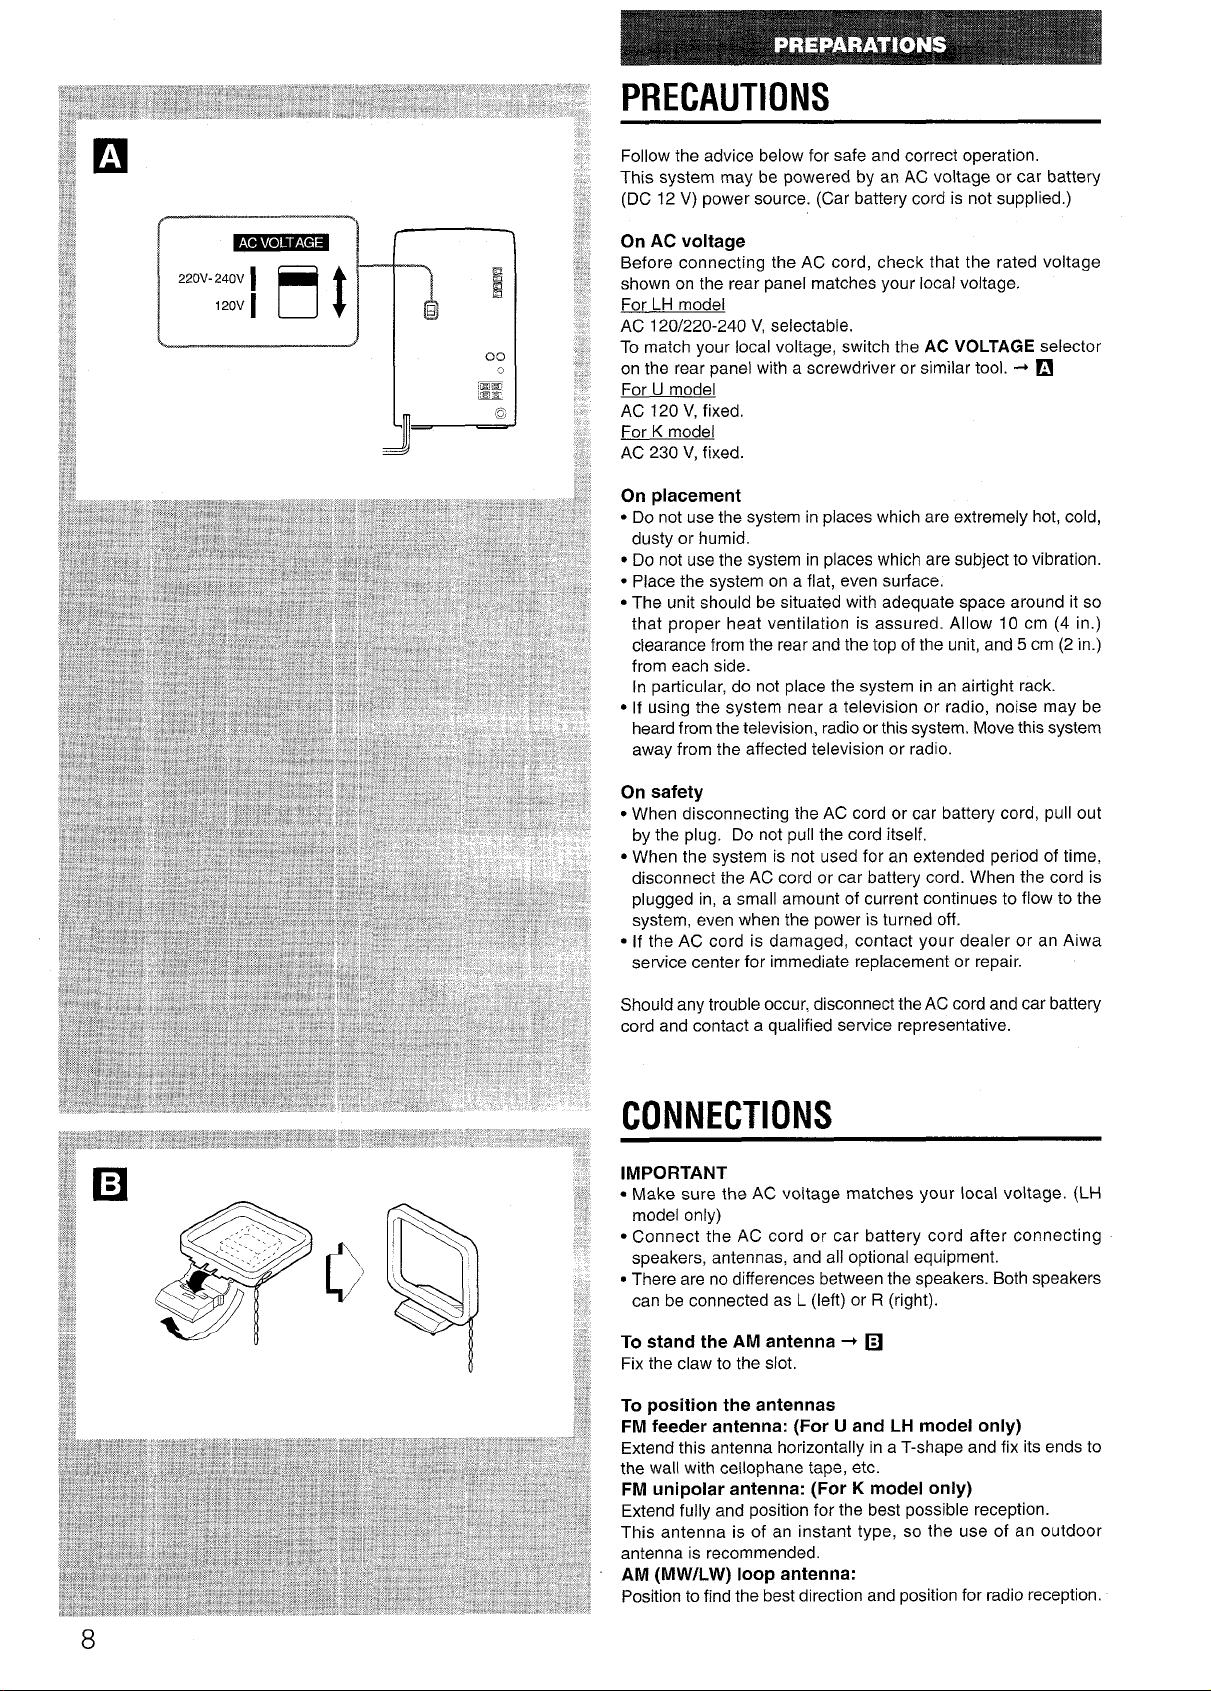
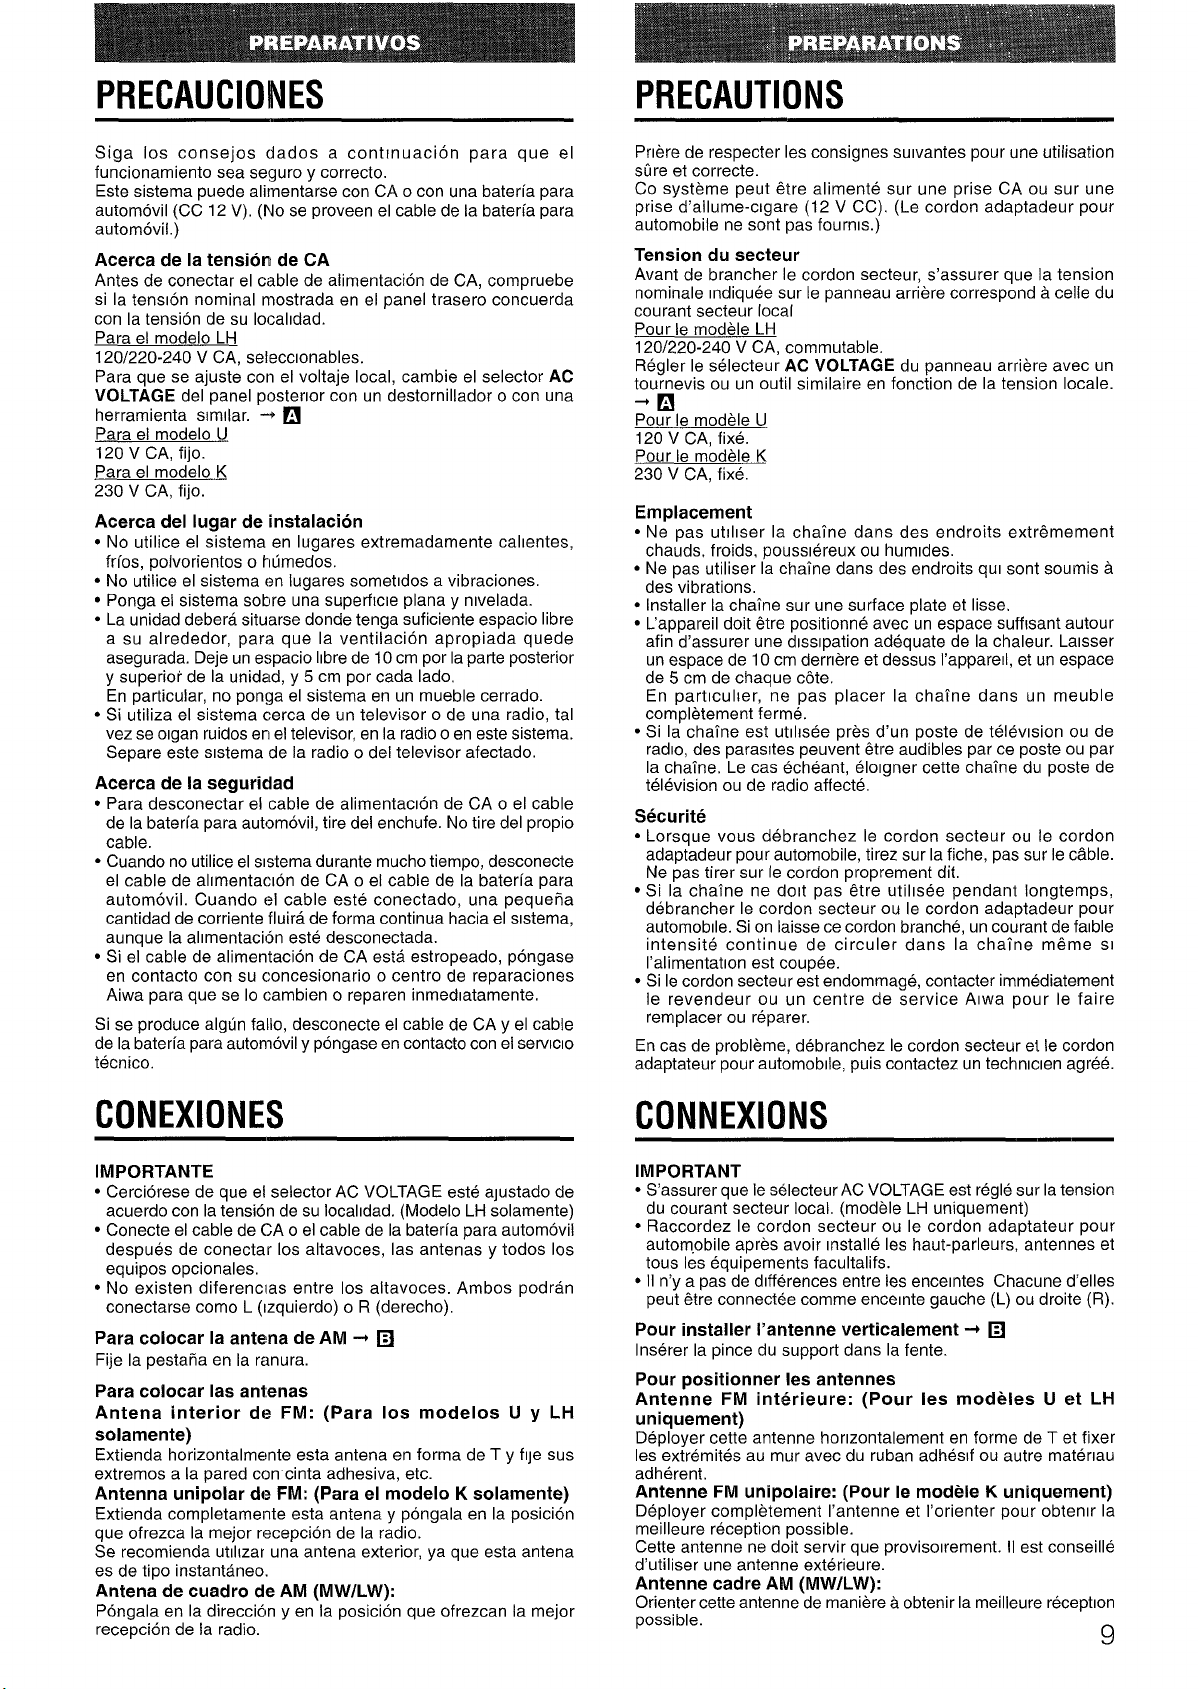
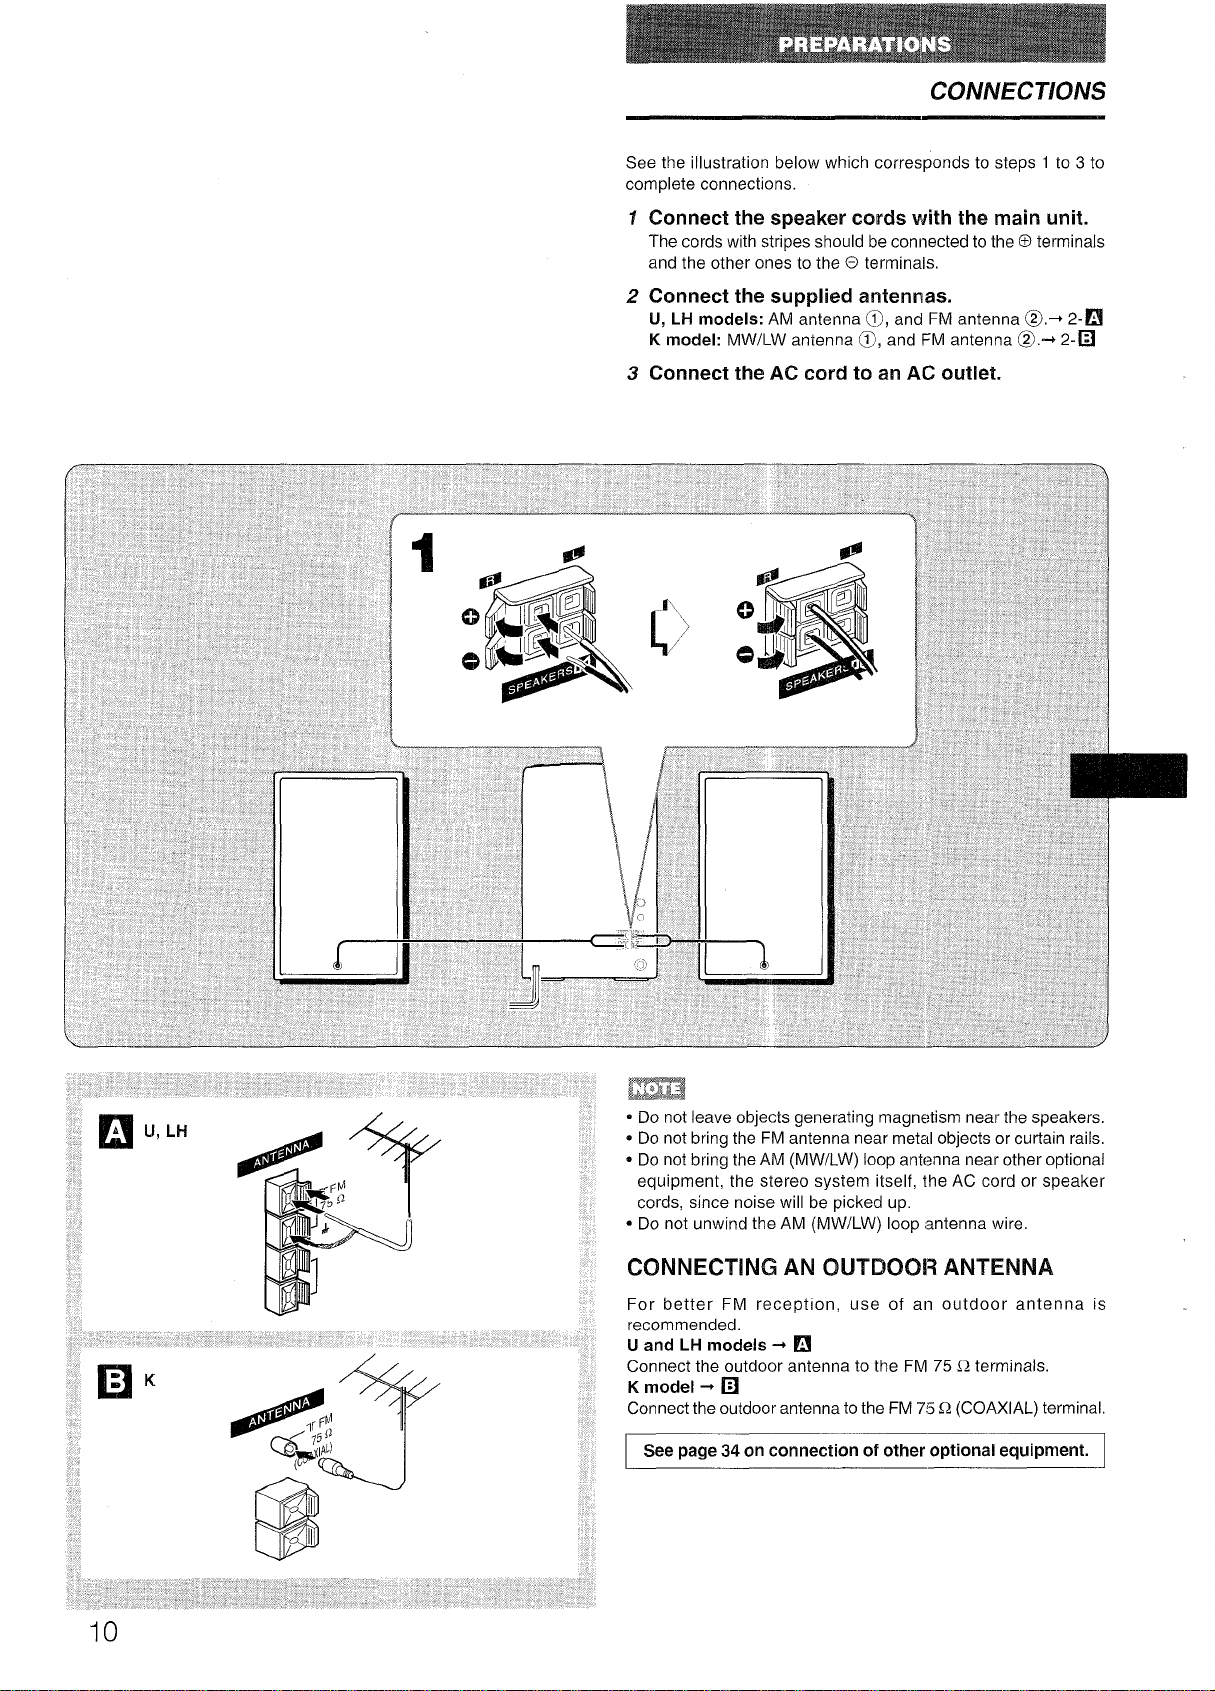
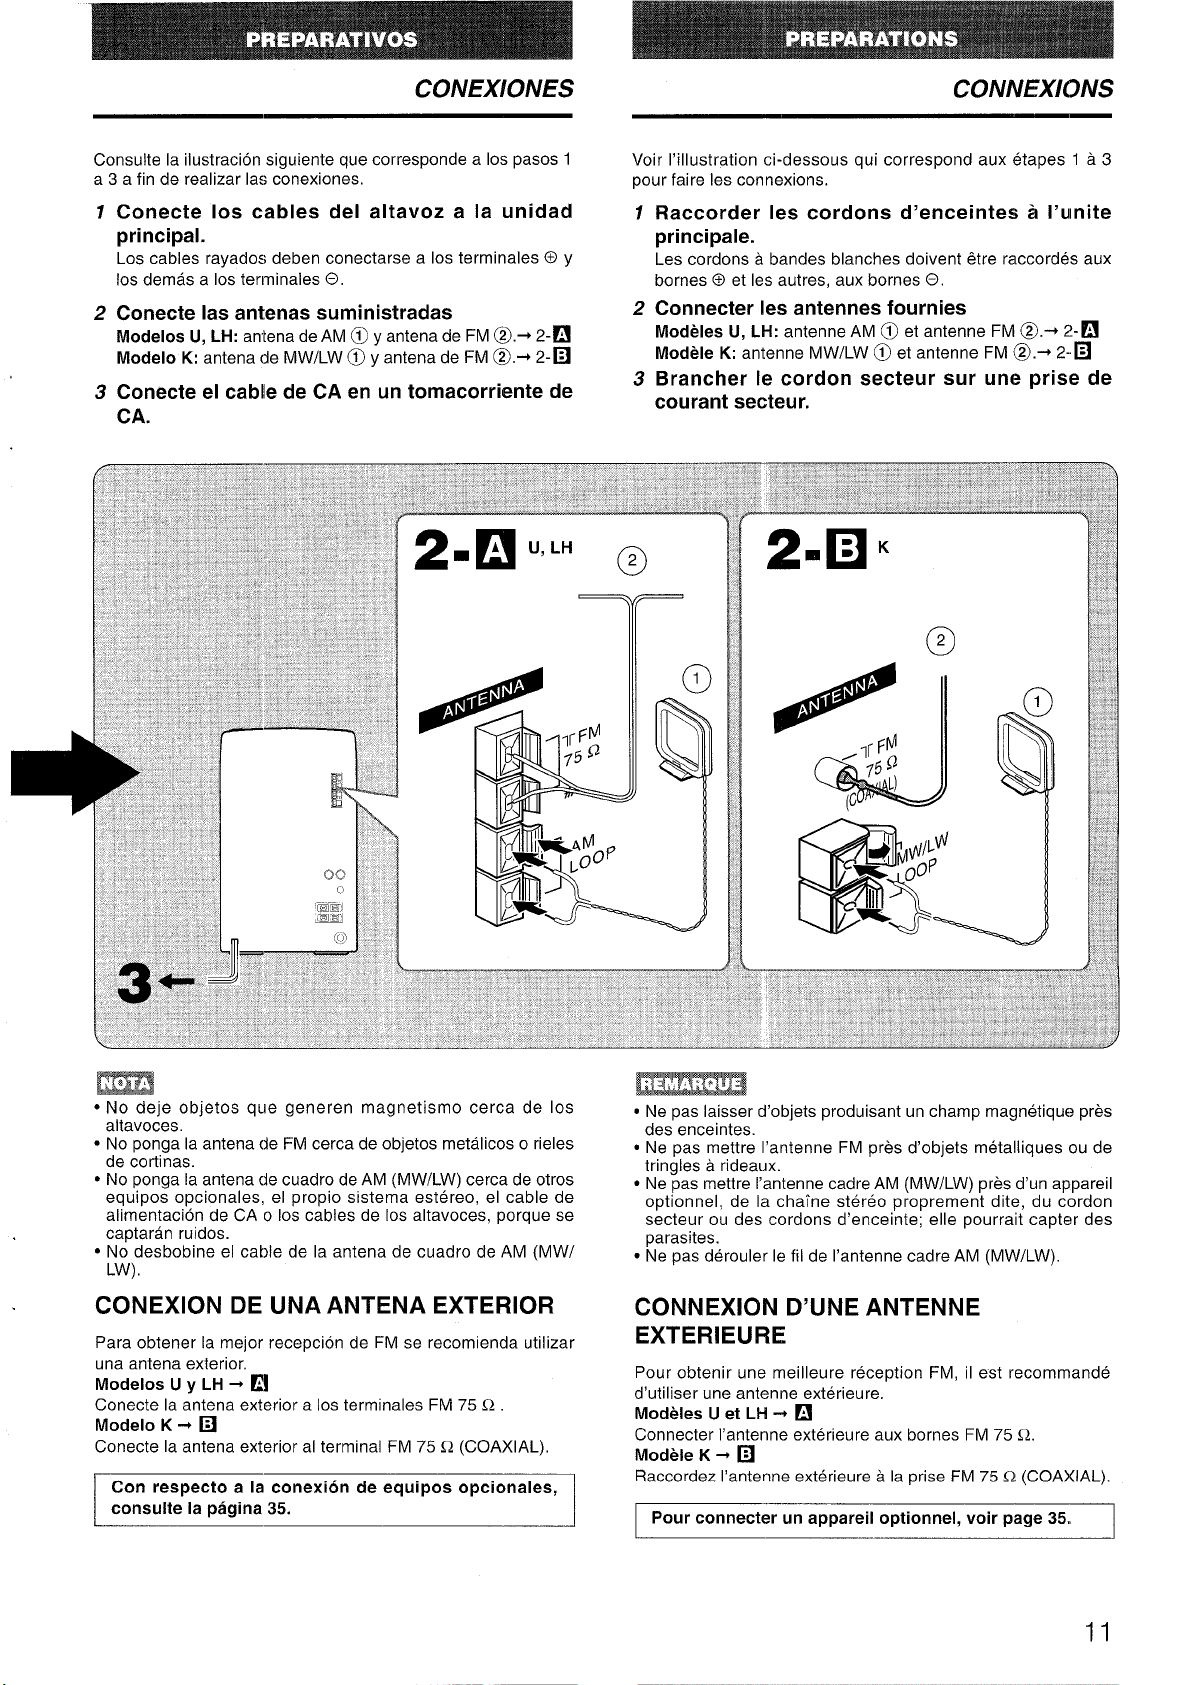

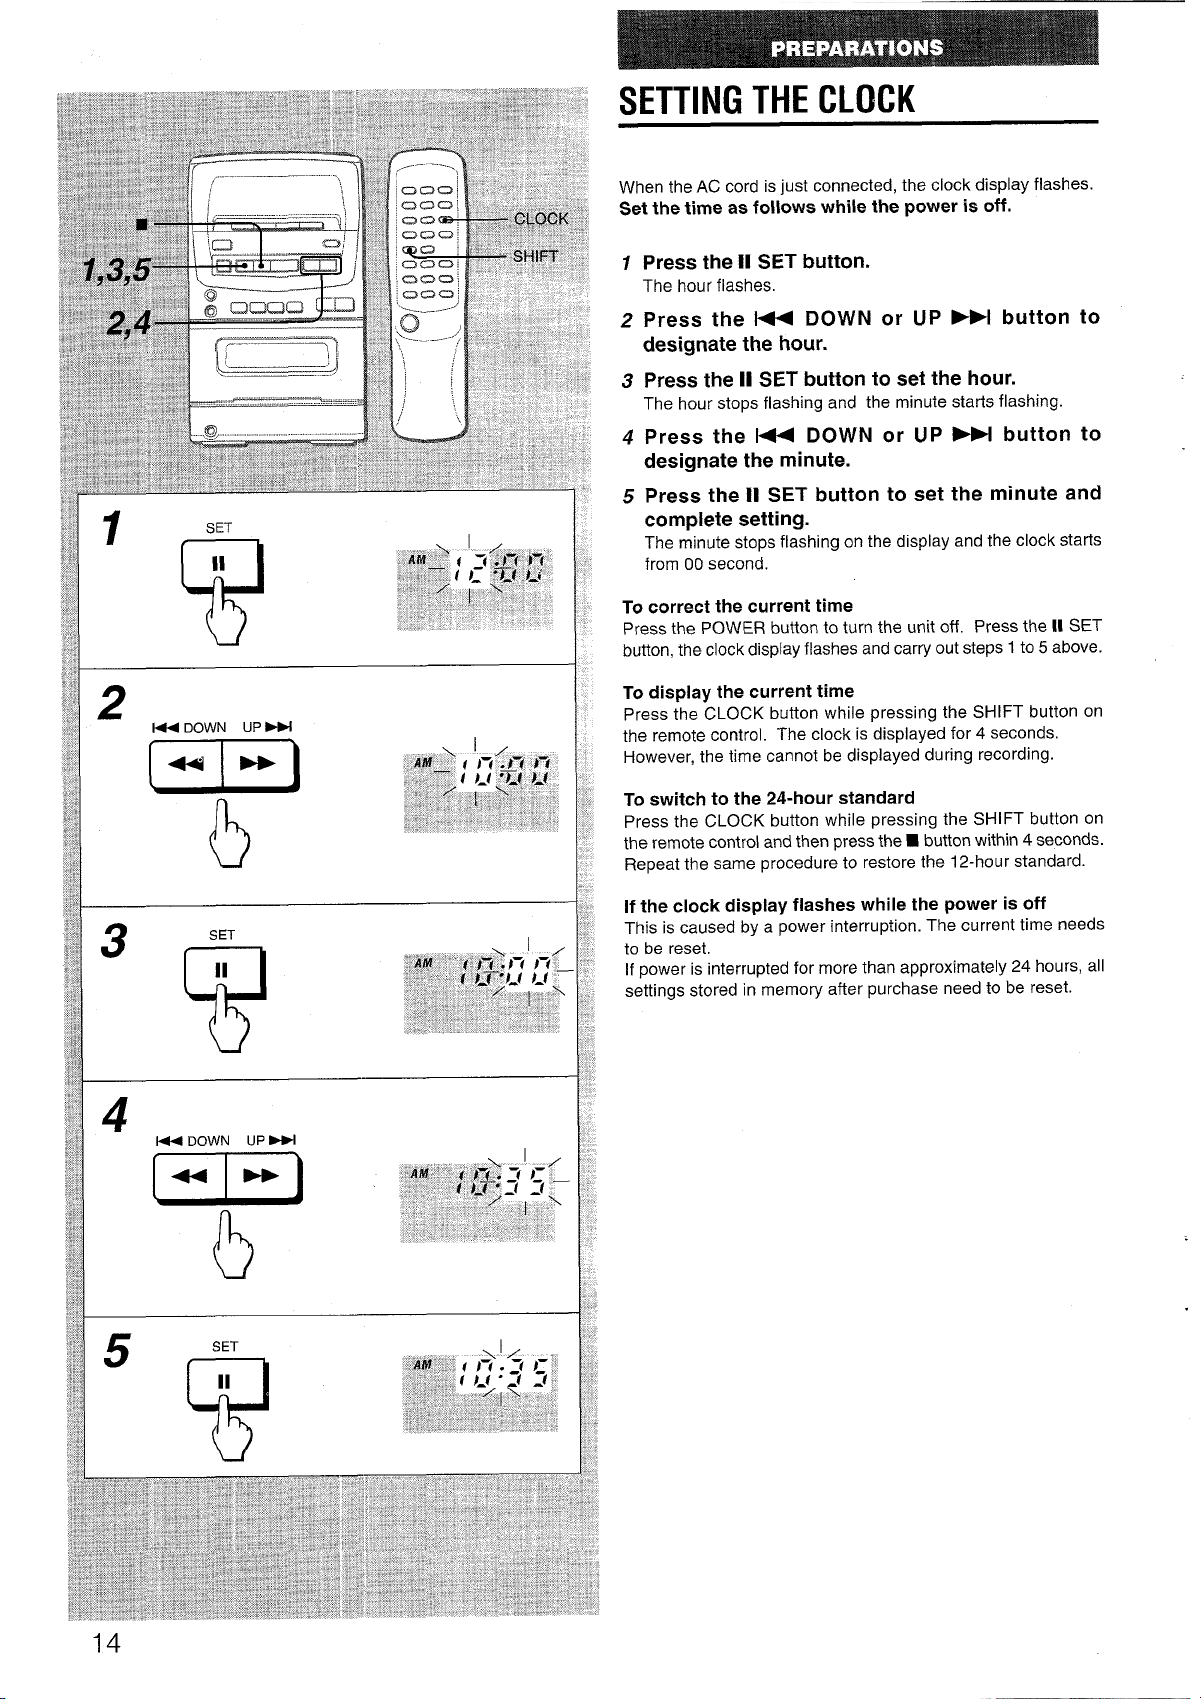


 Loading...