

Page 1
3-253-072-12(1)
FM/AM Compact Disc Player
AUTOESTEREO PARA DISCO COMPACTO
CDC-X30MP
© 2003 Sony Corporation
POR FAVOR LEA DETALLADAMENTE ESTE MANUAL DE
INSTRUCCIONES ANTES DE CONECTAR Y OPERAR ESTE
EQUIPO.
RECUERDE QUE UN MAL USO DE SU APARATO PODRÍA
ANULAR LA GARANTÍA.
Owner’s Record
For your convenience, record the serial number (you will find
them on the bottom side of your set) in the space provided
below. Please refer to them when you contact your AIWA dealer
in case of difficulty.
Model No. CDC-X30MP Serial No.
Page 2
PRECAUTIONS
• Use only in a 12-volt DC negative-ground electrical
system.
• Disconnect the vehicle’s negative battery terminal
while mounting and connecting the unit.
• When replacing the fuse, be sure to use one with an
identical amperage rating. Using a fuse with a higher
amperage rating may cause serious damage to the
unit.
• Do NOT attempt to disassemble the unit. Laser beams
from the optical pickup are dangerous to the eyes.
• Make sure that pins or other foreign objects do not get
inside the unit; they may cause malfunctions, or create
safety hazards such as electrical shock or laser beam
exposure.
• When your vehicle has been parked in direct sunlight
resulting in a considerable rise in the temperature
inside, allow the unit to cool off before operating it.
• Keep the volume at a level at which you can hear
outside warning sounds (horns, sirens, etc.).
NOTE
This equipment has been tested and found to comply
with the limits for a Class B digital device, pursuant to
Part 15 of the FCC Rules. These limits are designed to
provide reasonable protection against harmful
interference in a residential installation.
This equipment generates, uses, and can radiate radio
frequency energy and, if not installed and used in
accordance with the instructions, may cause harmful
interference to radio communications. However, there
is no guarantee that interference will not occur in a
particular installation. If this equipment does cause
harmful interference to radio or television reception,
which can be determined by turning the equipment off
and on, the user is encouraged to try to correct the
interference by one or more of the following measures:
– Reorient or relocate the receiving antenna.
– Increase the separation between the equipment and
receiver.
– Connect the equipment into an outlet on circuit
different from that to which the receiver is connected.
– Consult the dealer or an experienced radio/TV
technician for help.
Caution
The use of optical instruments with this product will
increase eye hazard.
CAUTION
Modifications or adjustments to this product, which are
not expressly approved by the manufacturer, may void
the user’s right or authority to operate this product.
Before operation
In addition to ordinary CDs, this unit can play back
any CD-R or CD-RW that contains audio titles or
MP3 files.
Notes
• NEVER use a CD-R or CD-RW that contains no
data or data in the wrong format.
• The unit cannot play back any CD-R or CD-RW that
contains no data or data in a format other than
MP3.
For more information about MP3, see page 6.
• You cannot play a CD-R or CD-RW that is not
finalized*.
*A process necessary for a recorded CD-R or CD-
RW disc to be played on the audio CD player.
Music discs encoded with copyright
protection
This product is designed to playback discs that conform
to the Compact Disc (CD) standard.
Recently, various music discs encoded with copyright
protection are marketed by some record companies.
Please be aware that among those discs, there are
some that do not conform to the CD standard and may
not be playable by this product.
For installation and connections, refer to the separate
“INSTALLATION AND CONNECTIONS”.
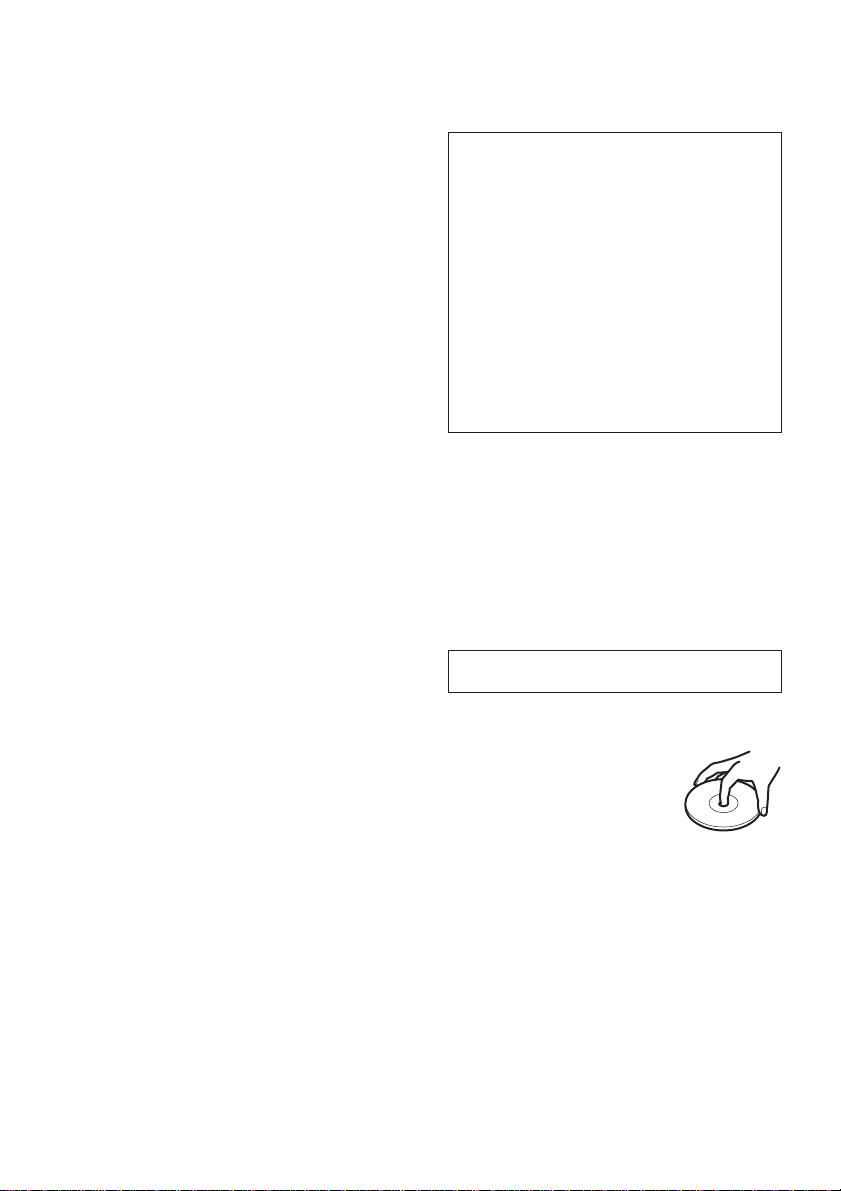
CD Notes
• Playing a defective or dusty CD can
cause dropouts in sound.
• Hold CDs as illustrated.
• Do NOT touch the unlabeled side.
• Do NOT attach any seal, label or
data protection sheet to either side of
CD.
• Do NOT expose a CD to direct sunlight or excessive
heat.
• Wipe a dirty CD from the center outward with a
cleaning cloth.
Never use solvents such as benzine or alcohol.
• This unit cannot play 3-inch (8 cm) CDs.
• NEVER insert a 3-inch CD contained in the adapter or
any irregularly shaped CD.
The unit may not be able to eject it, resulting in a
malfunction.
1
ENGLISH
Page 3
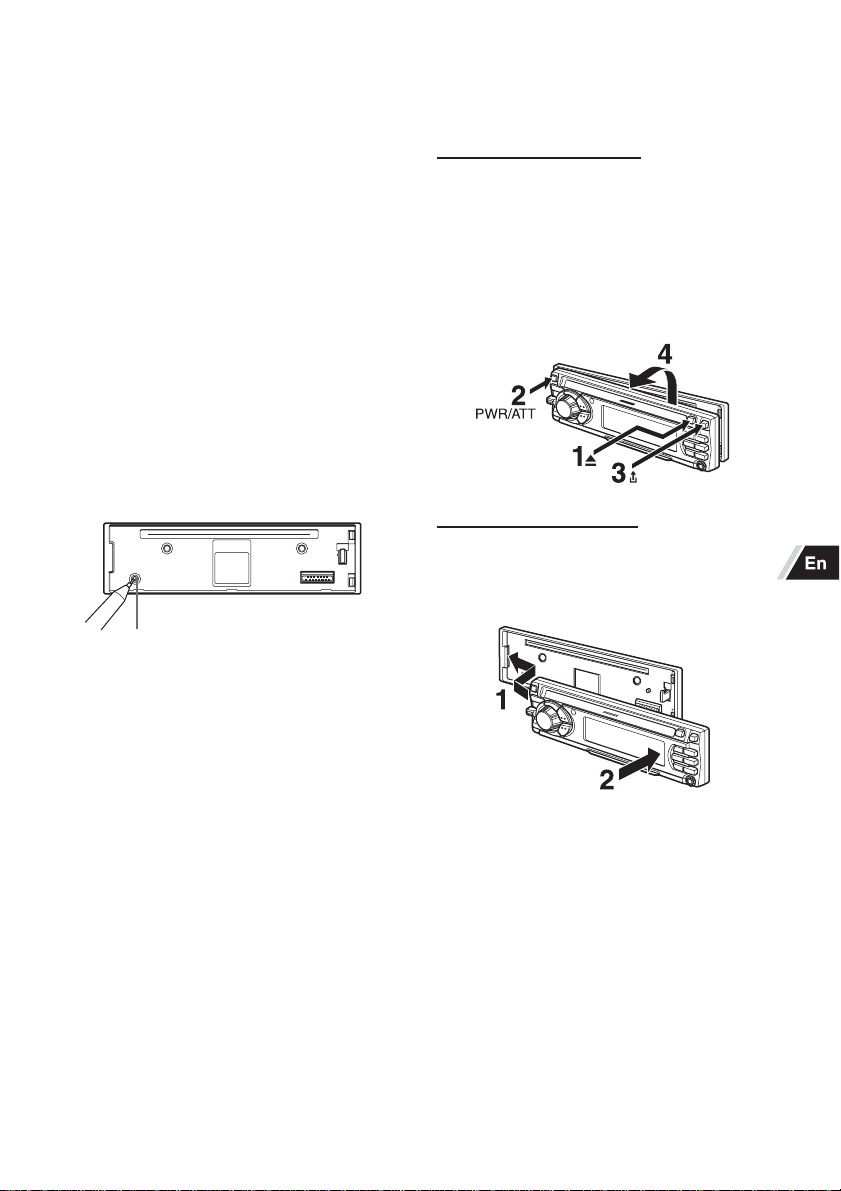
TABLE OF CONTENTS
THEFT PROTECTION .............................................. 2
BASIC OPERATION, AUDIO AND CLOCK
ADJUSTMENT ..................................................... 3
RADIO OPERATION ................................................. 4
CD PLAYER OPERATION ........................................ 5
AUXILIARY EQUIPMENT ......................................... 9
OTHER FUNCTIONS................................................ 9
CARD REMOTE CONTROL ................................... 10
TROUBLESHOOTING ............................................ 11
MAINTENANCE ...................................................... 11
SPECIFICATIONS .................................................. 11
Note
Some buttons are assigned two or more functions.
For detailed descriptions, refer to the related pages.
Resetting the unit
Before operating the unit for the first time or after
replacing the car battery, you must reset the unit.
Press the reset button with a pointed object such as a
pencil.
Front panel detached
THEFT PROTECTION
Take the front panel with you when leaving the car, and
keep it in the supplied carrying case.
Detaching the front panel
Before detaching the front panel, remove the CD to
prevent possible damage to the unit.
1 Press z to remove the CD.
2 Press and hold PWR/ATT until the unit turns off.
3 Press %. (Hold the panel with one hand to prevent
accidentally dropping it.)
4 Remove the panel.
Attaching the front panel
1 Engage the left side of the front panel to the left catch
on the unit.
2 Push the panel forward until it locks. Be sure not to
press any buttons while you are attaching the panel.
Reset button
Note
Pressing the reset button will erase the clock and some
memorized functions.
DEMO (Demonstration) mode
The unit has an extra display (DEMO) mode which
demonstrates the illumination modes of the unit. The
unit switches to DEMO mode automatically if you turn
the unit on and leave it as it is for 5 seconds after all the
connections have been completed.
To cancel DEMO mode
1 During DEMO mode, press and hold Jog dial (PUSH-
SOURCE) until “ILL” appears on the display.
2 Press + or - to select “DEMO”.
3 Turn Jog dial to select “OFF.”
To resume DEMO mode, select “ON” in step 3.
(See the illustration on page 3.)
Note
Do not touch the connector on the reverse side of the
front panel. This could cause a poor or faulty connection.
ENGLISH
2
Page 4
BASIC OPERATION,
AUDIO AND CLOCK
ADJUSTMENT
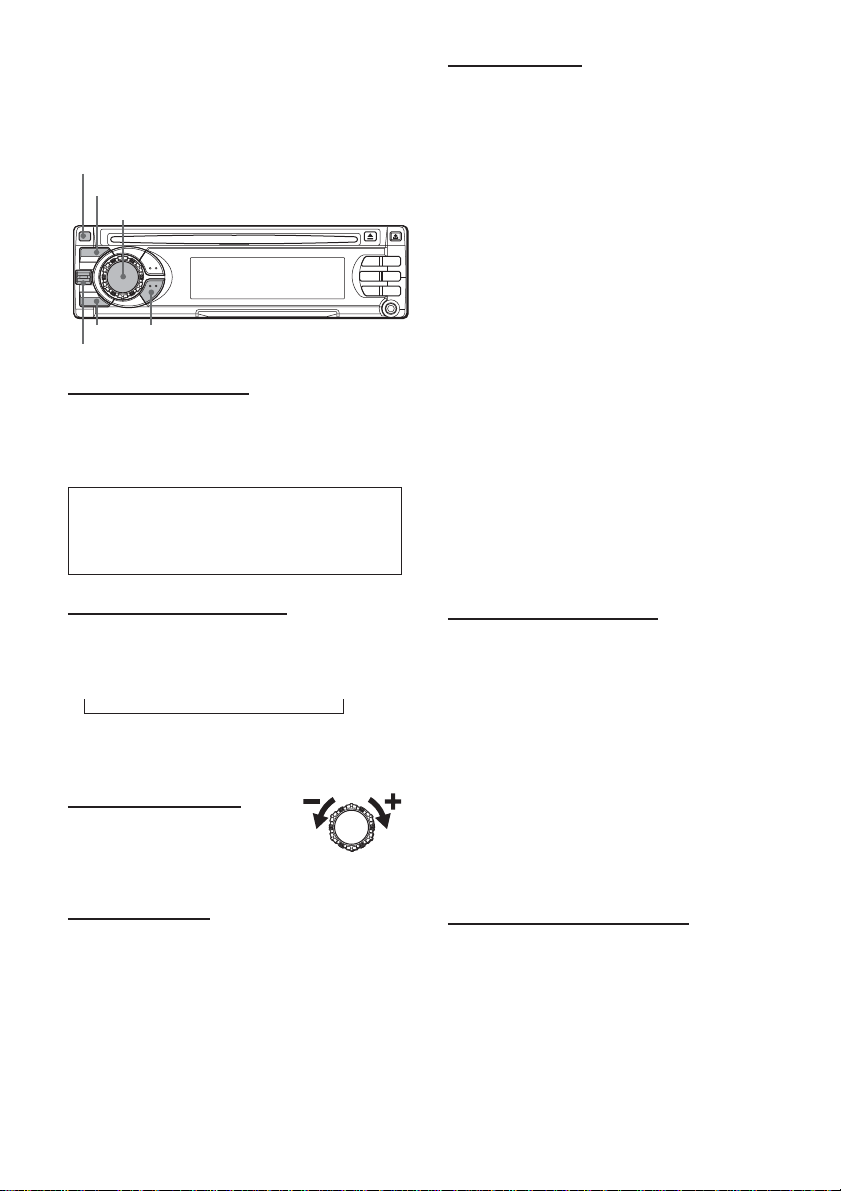
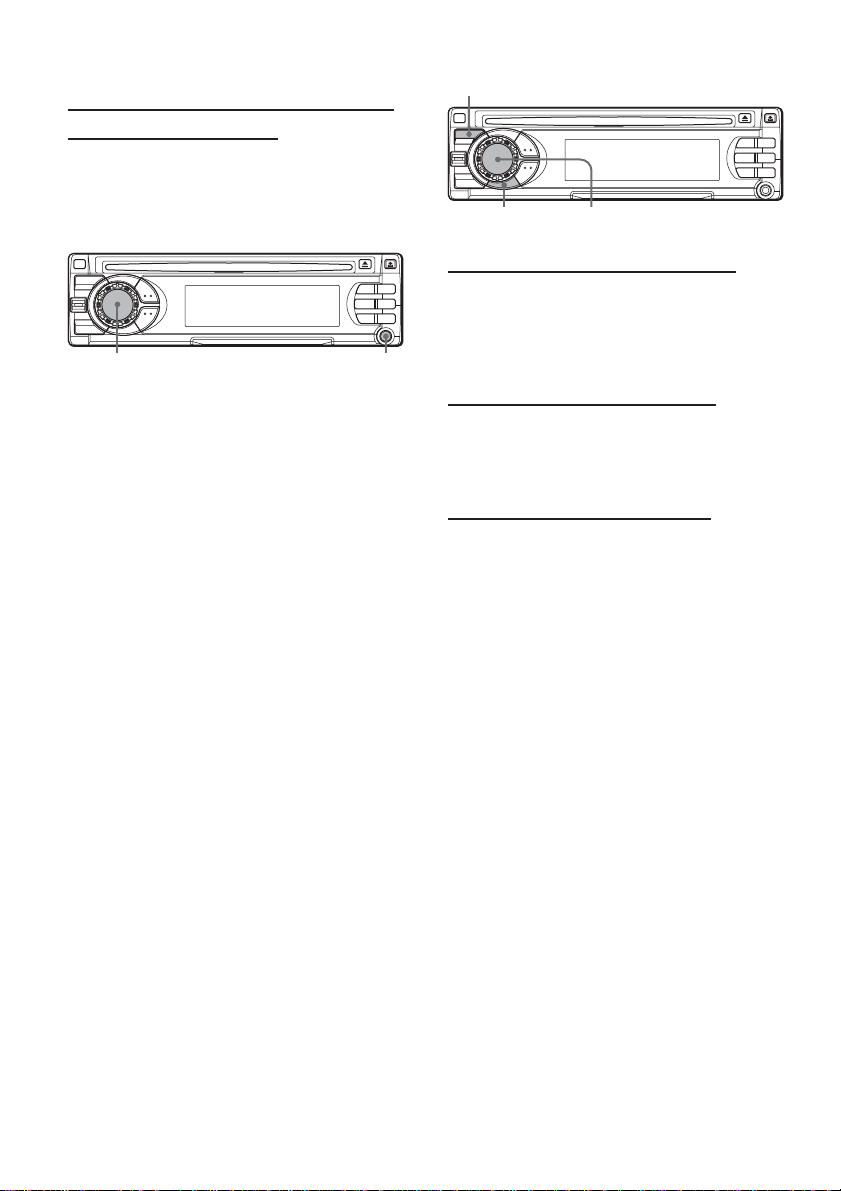
PWR/ATT
SEL
Jog dial (PUSH-SOURCE)
TU (TUNER)
DSPL
+/-
Turning the unit on/off
• You can turn the unit on by pressing any button on the
front panel except z and %. The unit also turns on
when you insert a CD.
• Press and hold PWR/ATT until the unit turns off.
Note
Most operations described in this manual require the
unit to be turned on before starting the operation,
unless explicitly stated otherwise.
Adjusting sound
You can select the following modes for adjusting sound
depending on the music you listen to: BASS (low
frequencies), TRE (high frequencies), BAL (left/right),
FAD (front/rear), H-BASS (high bass)*, DSSA (Drivers
Sound Stage Adjustment)** and BBE***.
* You can reinforce the bass sound.
** You can adjust sound stage and tone balance to best
serve a particular seat in the car.
*** You can enhance the clarity of high-frequency sound.
1 Press SEL repeatedly to select the mode to be
adjusted.
Pressing SEL cycles through the modes. The
selected mode appears on the display.
2 Turn Jog dial to increase or decrease the level for
the selected mode (except for H-BASS, DSSA and
BBE).
In H-BASS mode, turn Jog dial to select 1, 2, 3 or
OFF.
In DSSA mode, turn Jog dial to select L (for the front
left seat), R (for the front right seat) or OFF.
In BBE mode, turn Jog dial to select 1, 2 or OFF.
Notes
• Adjust the level or select an item within 5 seconds, or
the selected mode will return to previous state.
• When DSSA is activated, you cannot adjust BAL and
FAD.
Changing the source mode
1 Press Jog dial (PUSH-SOURCE).
Pressing Jog dial (PUSH-SOURCE) cycles through
source modes in the following order:
F1 (F2/F3/A1/A2) → DISC* → AUX IN
↑
* “DISC” does not appear on the display when there is
no CD in the unit.
Adjusting the volume
1 Turn Jog dial.
“VOL (volume)” appears on the
display.
Muting the sound
1 Press PWR/ATT briefly.
“ATT ON” appears on the display.
To restore volume, briefly press PWR/ATT again.
3
ENGLISH
Aligning the source levels
(Source Level Adjuster)
Volume may vary each time you change the source
mode. In this case, you can align each source mode’s
volume to almost the same level.
1 Press Jog dial (PUSH-SOURCE) or TU (TUNER)
repeatedly to select the desired mode.
2 Press DSPL while pressing SEL.
“LEVEL 0” appears on the display.
3 Turn Jog dial to adjust the level.
Note
Adjust the level within 5 seconds, or the selected mode
will be canceled.
Restoring the factory settings
1 Turn off the unit.
2 Press and hold DSPL until “LEVEL --” appears on
the display.
Note
You can restore the factory settings only for VOL, BASS,
TRE, BAL, FAD, H-BASS, DSSA and BBE, and aligned
source volume levels.
Page 5
Setting the beep tone
1 Turn off the unit.
2 Press and hold SEL until “BEEP” appears on the
display.
3 Turn Jog dial to select ON or OFF.
4 Press SEL.
Setting the clock
1 Press and hold DSPL until the clock indicator
flashes on the display.
2 Press + (to set hour) or - (to set minute), and
then turn Jog dial.
3 Press DSPL.
Displaying the clock
1 Press DSPL.
To return to the former display, press DSPL again.
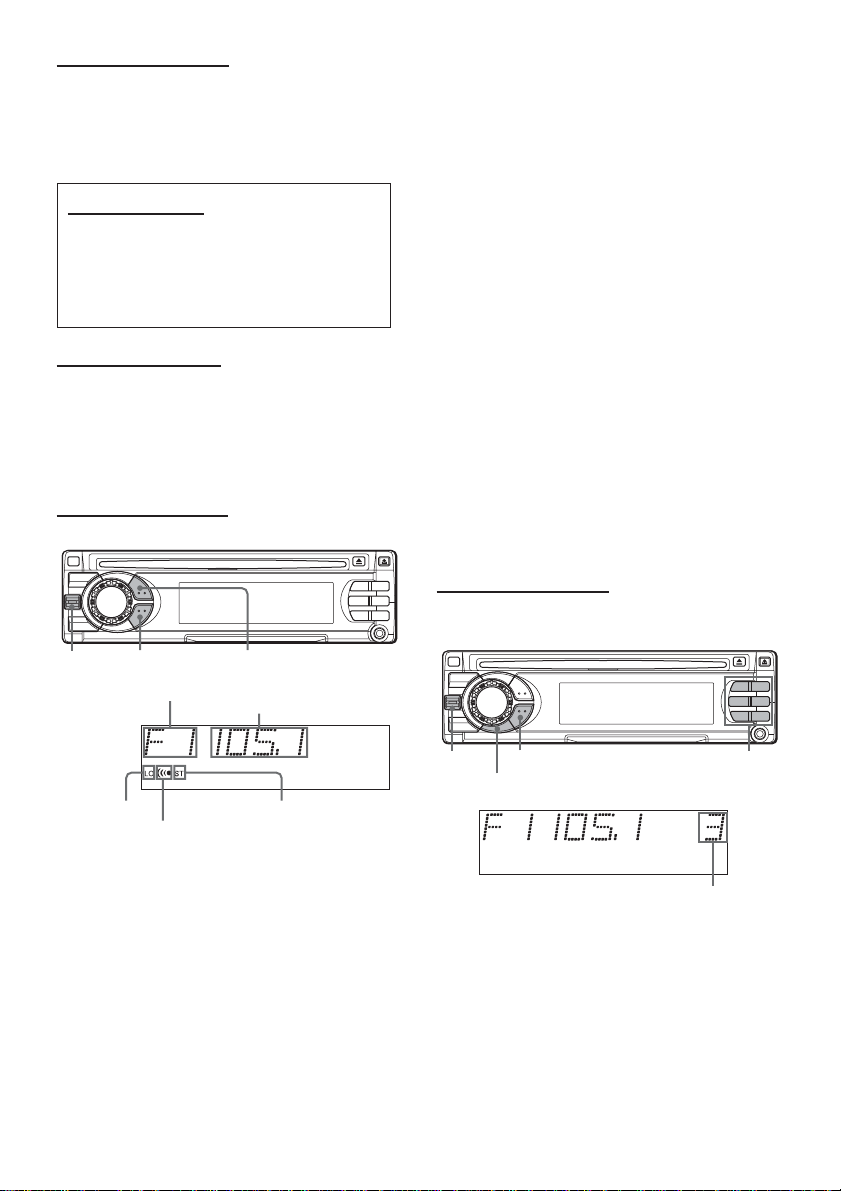
RADIO OPERATION
Tuning in to a station
(Seek/Manual Tuning)
+/-
Band indication*
LOTU (TUNER)
Frequency indication
1 Press TU (TUNER) repeatedly to select the desired
band (F1, F2, F3, A1, or A2).
2* Press + (to move to higher frequencies) or - (to
move to lower frequencies) to tune in to a station.
“ST” appears on the display when an FM station is
broadcasting in stereo, and receiving conditions are
good.
*Seek Tuning and Manual Tuning
• Press and hold + or - until Seek Tuning starts.
The unit locates a station automatically (Seek Tuning).
To stop Seek Tuning, press + or - again.
• Press + or - repeatedly to search for a desired station
while increasing or decreasing the frequency step by
step (Manual Tuning).
Monaural mode
When FM signals become weak, or FM reception
becomes poor, the unit automatically switches to
Monaural mode to reduce noise.
Local mode
Local mode allows you to tune in only to strong stations
during Seek Tuning.
1 Press LO before you start seek tuning.
“LO” appears on the display.
To return to Distant mode, press LO again.
“LO” disappears and the unit tunes in to all receivable
stations.
Using preset stations
You must preset stations before you can tune in to a
station using preset station number buttons.
Local indicator
* “F” means FM.
“A” means AM.
Tuner indicator
Stereo indicator
+/-
TU (TUNER)
PS/A.ME
Preset station buttons 1 to 6
Preset station number
ENGLISH
4
Page 6
Presetting stations automatically
(Auto Memory)
1 Press TU (TUNER) repeatedly to select the desired
band (F1, F2, F3, A1, or A2).
2 Press and hold PS/A.ME until automatic presetting
starts.
The unit automatically stores up to 6 stations for
each band.
After completion of automatic presetting, the unit
tunes in to all the stations stored on the preset
station buttons in order (Preset Scan).
To cancel automatic presetting, press PS/A.ME again.
Checking the preset stations (Preset Scan)
1 Press PS/A.ME briefly.
Each preset station will be tuned in for 5 seconds in
order.
To cancel Preset Scan, press PS/A.ME again or any
preset station button.
Presetting stations manually
(Manual Memory)
1 Press TU (TUNER) repeatedly to select the desired
band (F1, F2, F3, A1, or A2).
2 Press + or - to tune in to a desired station (see
“Tuning in to a station” as well for another tuning
method).
3 Press and hold the desired preset station button until
the unit beeps.
Note
A newly preset station replaces the station on the same
band that was previously stored on that preset station
button.
Tuning in to a preset station
1 Press TU (TUNER) repeatedly to select the desired
band (F1, F2, F3, A1, or A2).
2 Press the preset station button on which the desired
station is stored.
Active tuning reception control (ATRC)
The unit automatically suppresses FM noise caused by
vehicle movement, and maintains sound quality.
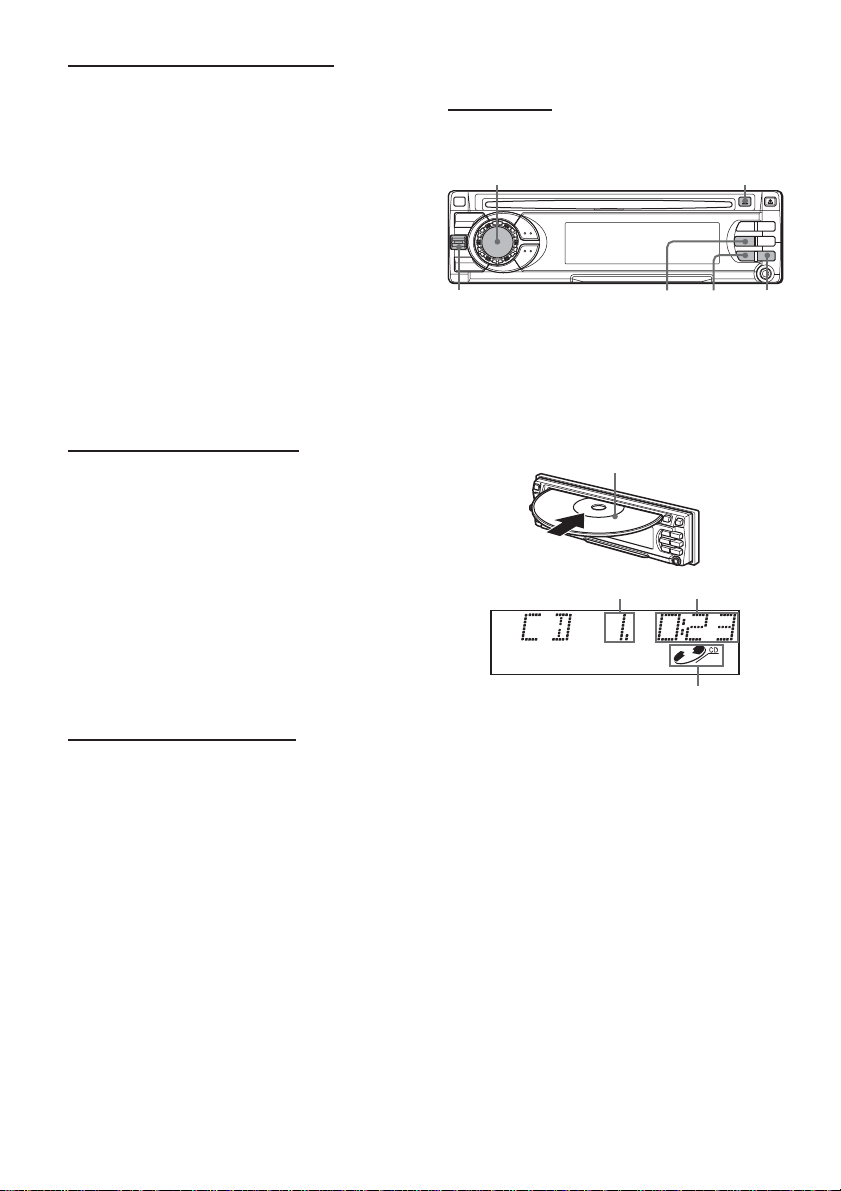
CD PLAYER OPERATION
Playing a CD
You can play CDs, CD-Rs and CD-RWs using the
procedure described below.
Jog dial (PUSH-SOURCE)
t/g, r/f
1 Insert a CD.
“DISC” appears on the display.
CD play starts.
If a CD is already inserted, press Jog dial (PUSH-
SOURCE) repeatedly to select CD play mode.
In normal play, when the last track finishes, the unit
returns to the first track and continues to play.
Labeled-side up
Track number Elapsed playing time
CD indicator
z
SHUFREP1INT
5
ENGLISH
Page 7

To
Eject a CD
Skip to the next track
Go back to the beginning
of the current track
Each extra press skips
backward one extra track
Locate a specific point in
a track
Press
z
t/g
r/f
Press and hold r/f
or t/g until you find
the point.
Notes
• When you play a CD that is already inserted, CD play
starts at the point where it stopped the previous time.
A newly inserted CD starts from the first track.
•A CD-R or CD-RW may take some time to start playing
back, but this is not a malfunction.
• If a CD-R or CD-RW with no data is inserted,
“ERROR03” will appear on the display. The unit cannot
play such discs.
Intro Play
You can locate a desired track by monitoring the first 10
seconds of all the tracks on a CD.
1 Press INT during CD play.
“INTRO” appears on the display.
2 Press INT again when the desired track is played.
The unit returns to normal CD play.
One Track Repeat Play
You can play a track repeatedly.
1 Press REP1 during CD play.
“REP1” appears on the display.
To cancel One Track Repeat Play, press REP1 again.
Shuffle Play
You can play all the tracks in random order.
1 Press SHUF during CD play.
“SHUF” appears on the display.
To cancel Shuffle Play, press SHUF again.
Note
During Shuffle Play, pressing r allows you to skip
only to the beginning of the current track, not to the
previous track.
Before playing an MP3
The unit can play back MP3* files recorded on CD-ROM
or CD-R or CD-RW. MP3 files are played in numerical
then alphabetical order. The unit starts playback from
the files with a digit at the beginning of the filename.
* An MP3 file (that has the “.mp3” extension) stores
audio data compressed using MPEG1, the audio
layer-3 file-coding scheme.
Within this section, we refer to what are called “MP3 file”
and “folder” in PC terminology as “track” and “album,”
respectively.
Notes on MP3
• MP3 tracks must be recorded on a disc in a format
compliant with ISO 9660. Note, however, that the
unit may not play such tracks in the order they were
recorded.
• The maximum number of playable tracks is 512 if
the disc was recorded in compliance with the ISO
9660 level -1 standard (all names of albums and
tracks must be within 12 characters).
The maximum number of playable tracks is 512 if
the disc was recorded in compliance with the ISO
9660 level -2 standard (all names of albums and
tracks must be within 31 characters).
• The maximum allowable depth of nested albums is
8, including the root album (directory).
• The unit can play only tracks having a file extension
“.mp3.”
• If a disc contains audio tracks plus MP3 tracks, the
unit only plays the audio tracks.
• With multisession discs, the unit can play up to 5
sessions. You cannot play an MP3 file having the
session that is not closed.
• The unit may not play tracks recorded with a
packet-writing utility.
• When playing a track converted with a bit rate of
8 kbps or VBR (variable bit rate), Intro playback
may not work properly.
•A non-MP3 track that has the “.mp3” file extension
is not played.
ENGLISH
6
Page 8
Notes on indications in the display
• The following characters are displayed:
- uppercase letters: A to Z
- numerals: 0 to 9
- symbols: space, ", %, ', ∗, +, comma, -, period, /, <, =,
>, @ and _.
• Lowercase letters (“a” to “z”) are displayed as uppercase
letters (“A” to “Z”).
• Symbols such as (, ), [, ], { and } are displayed as “<“ or
“>”.
• Characters which cannot be displayed are shown as
“∗”.
• Up to 32 characters are displayed for the name of an
album or a track.
• When playing MP3 files, the elapsed playing time
displayed may not be correct.
• To display up to 30 characters for a track name or an
artist name, ID3TAG version 1.x is required.
• Up to 64 characters of information created with ID3
TAG version 2.x can be displayed.
• When playing MP3 files that have tags created with ID3
TAG version 2.4, noise may be heard.
Notes on creating MP3 discs
• Create MP3 tracks with a sampling frequency of
44.1 kHz and a fixed bit rate of 128 kbps.
• Do not record non-MP3 files on discs for MP3.
To play tracks in the order they were
recorded
1 Use writing software capable of recording MP3
tracks in numerical and alphabetical order. For details
on using the software, refer to the operating
instructions supplied with the software.
2 Use only one album. (Do not create a subalbum
within an album.)
3 Include a two- or three- digit number at the beginning
of each track name so that the tracks will be played
in order.
Example of recommended name structure:
01XXXXX.mp3
02XXXXX.mp3
03XXXXX.mp3
04XXXXX.mp3
05XXXXX.mp3
Avoid using the following name structure:
1XXXXX.mp3
5XXXXX.mp3
10XXXXX.mp3
15XXXXX.mp3
20XXXXX.mp3
(The tracks shown above will be played in wrong
order, i.e., “1,” “10,” “15,” “20,” and “5.”)
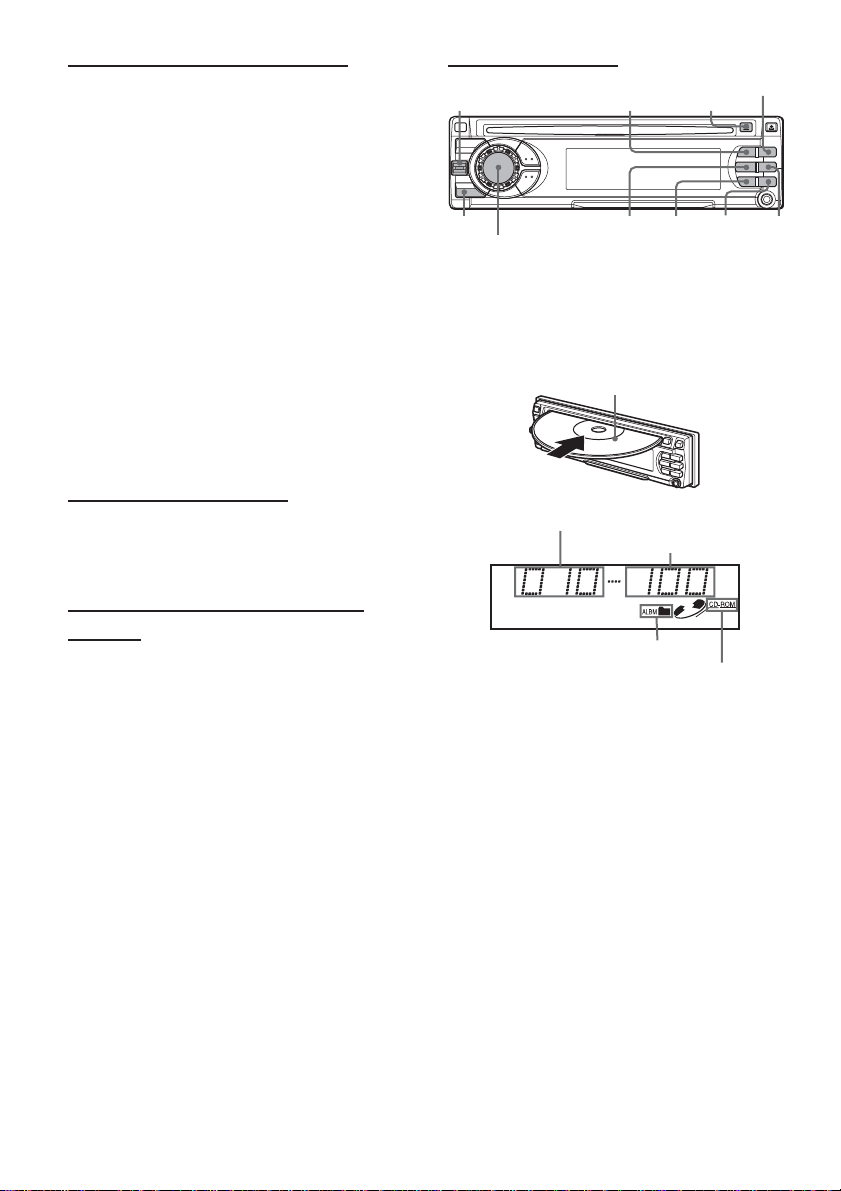
Playing an MP3 track
ALBUM
t/g, r/f
DSPL
Jog dial (PUSH-SOURCE)
M
EJECTzALBUM
N
SHUF REPREP1INT
1 Insert a CD-ROM, CD-R or CD-RW for MP3.
The unit starts scanning the disc. “DISC” appears on
the display.
During scanning of the disc, “NOW READING” scrolls
across the display.
Labeled-side up
Total number of albums
Total number of tracks
Album indicator
CD-ROM indicator
Notes
• If scanning of CD-ROM, CD-R and CD-RW does not
finish within 2 minutes, “CANCEL TO EJECT KEY” or
“NO MUSIC” appears depending on the complexity of
the folder tree.
• If there are no tracks on the disc, “NO MUSIC” appears.
• Some discs may not play if non-MP3 files are contained
in the disc.
7
ENGLISH
Page 9
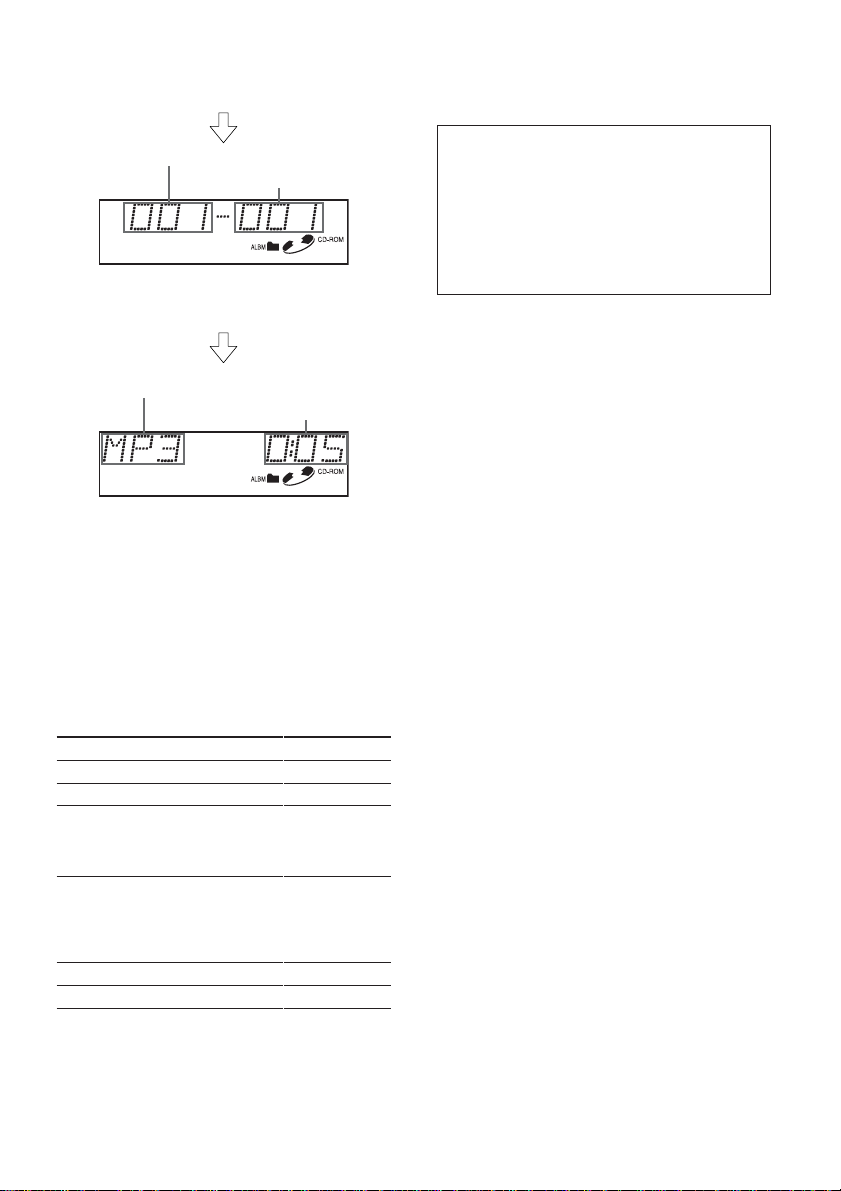
After scanning, the total number of albums and tracks
appears on the display, then the unit automatically starts
playing the disc from the first track of the first album.
Album number
Track number
Each time the track is changed, this display appears and
remains for about 5 seconds.
File format of the track
Elapsed playing time
After playing the track, the unit plays the next track of the
same album.
After playing all the tracks of the album, the unit plays the
first track of the next album.
Note
If a disc is already inserted, press Jog dial (PUSHSOURCE) repeatedly to select CD Play mode to start
MP3 track play.
To skip tracks and albums
To
Eject a disc
Skip to the next track
Go back to the beginning of the
current track
Each extra press skips backward
one extra track
Locate a specific point in a track
Skip to the next album
Skip to the previous album
Press
z
t/g
r/f
Press and hold
r/f or
t/g until
you find the
point.
ALBUMN
ALBUMM
To change the display mode
Press DSPL.
Pressing DSPL cycles through the displays in the
following order:
elapsed playing time
→ album name ("AL", album number and folder
name)
→ track name* ("TR", track number and file name)
→ ID3 tag information ("TG" and track name)
→ ID3 tag information ("TG" and artist name)
→ ID3 tag information ("TG" and album name)
→ clock
→ elapsed playing time
* If there is no name on the track, “NO TR. NAME”
appears.
Intro Play
You can locate a desired track by monitoring the first 10
seconds of all the tracks on the disc.
1 Press INT during MP3 track play.
“INTRO” appears on the display.
2 Press INT again when the desired track is played.
The unit returns to the normal MP3 track play.
Note
The unit scans all the tracks on the disc in order without
sorting by album.
Album Repeat Play
You can play an album repeatedly.
1 Press REP during MP3 track play.
“REP” appears on the display.
To cancel Album Repeat Play, press REP again.
One Track Repeat Play
You can play a track repeatedly.
1 Press REP1 during MP3 track play.
“REP 1” appears on the display.
To cancel One Track Repeat Play, press REP1 again.
Shuffle Play
You can play all the tracks in the current album in
random order.
1 Press SHUF during MP3 track play.
“SHUF” appears on the display.
To cancel Shuffle Play, press SHUF again.
Notes
• During Shuffle Play, pressing r allows you to skip
only to the beginning of the current track, not to the
previous track.
• If you select one of the play modes mentioned above
(Intro Play, Album Repeat Play, One Track Repeat
Play, or Shuffle Play mode), the mode indication
corresponding to the selected play mode (INTRO,
REP, REP1, or SHUF) appears.
ENGLISH
8
Page 10
AUXILIARY EQUIPMENT
Listening to a cassette/MD/MP3 portable
player or other equipment
You can listen to equipment connected to the unit. Refer
to the operating instructions for the corresponding
equipment for more detailed information.
Be sure to remove inserted CDs to prevent possible
damage to the unit before connecting the equipment.
AUX jackJog dial (PUSH-SOURCE)
1 Connect a cassette/MD/MP3 portable player or other
equipment to the unit’s AUX jack (3.5 mm dia.).
2 Press Jog dial (PUSH-SOURCE) repeatedly until
“AUX IN” appears on the display.
OTHER FUNCTIONS
SEL
Jog dial (PUSH-SOURCE)
PS
Changing the key illumination color
You can choose blue or red as the key illumination color.
1 Press and hold Jog dial (PUSH-SOURCE) until
“ILL” appears on the display.
2 Turn Jog dial to select “1 (for blue)” or “2 (for red)”.
Setting the dimmer of the display
1 Press and hold SEL until “DIMMER” appears on the
display.
2 Turn Jog dial to select “0 (bright)” or “1 (dimmed)”.
Displaying the VU level indicator
1 Turn off the unit.
2 Press and hold PS until “VU” appears in the display.
3 Turn Jog dial to select “ON” (level indicators appear)
or “OFF” (level indicators disappear).
4 Press PS.
9
ENGLISH
Page 11
CARD REMOTE
CONTROL
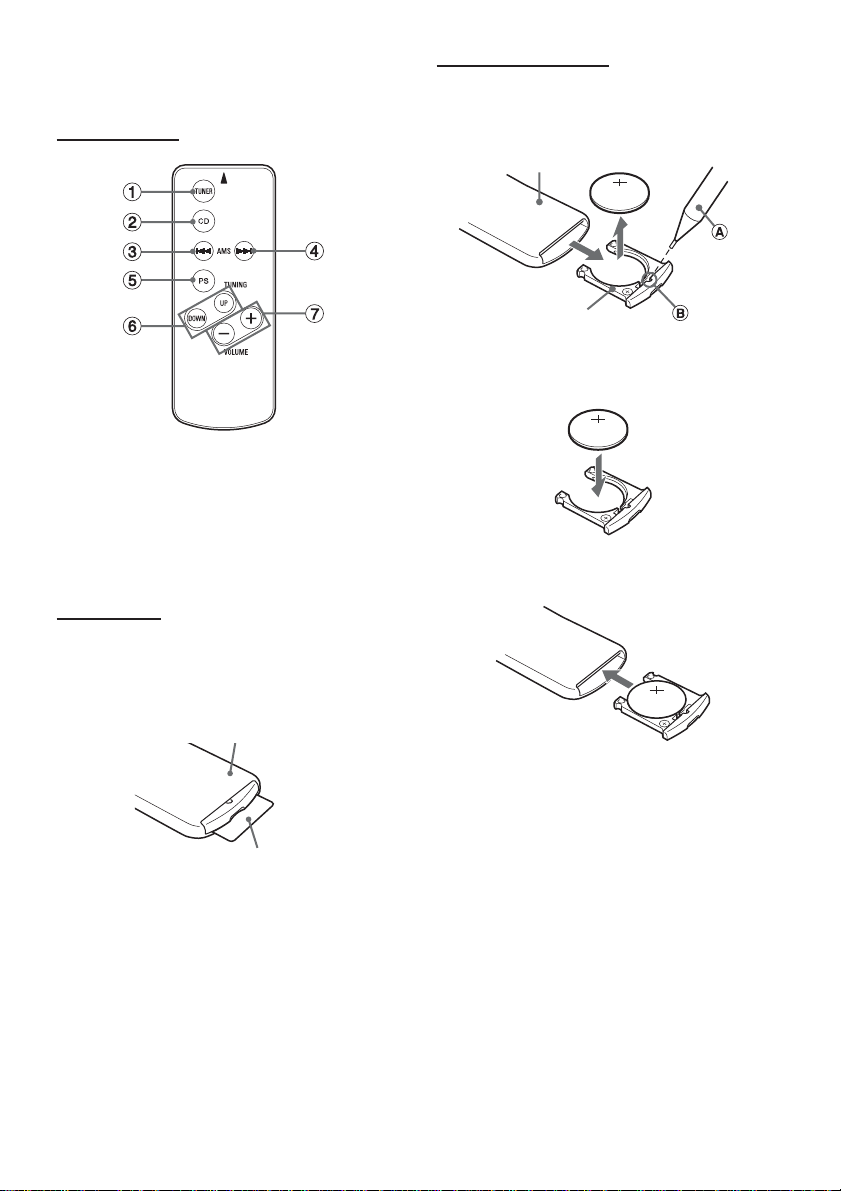
Names of parts
1 TUNER button
2 CD button
3 AMS (Auto music sensor) r button
4 AMS (Auto music sensor) t button
5 PS (preset) button
6 TUNING UP/DOWN buttons
7 VOLUME +/- buttons
Preparations
A lithium battery is installed in the remote control at the
factory.
Before you use the remote control, be sure to remove
the insulating sheet by simply pulling it out.
Replacing the battery
1 Insert the tip of a pointed object A into the hole B
and pull out the battery holder to remove the lithium
battery (CR2025).
Remote control (back)
Battery holder
2 Install a new lithium battery (CR2025) with the )
side facing up in the battery holder.
3 Push the battery holder into the unit until it clicks.
Remote control (back)
Insulating sheet
Note
When the infrared receptor on the main unit is exposed
to direct sunlight, it may not respond to signals from the
remote control.
CAUTION
• Lithium battery (CR2025) for the remote control
Replace the battery with Hitachi Maxell, Panasonic or
Sony Part No. CR2025 only. Use of another battery
may present a risk of fire or explosion.
The battery may explode if mistreated. Do not recharge,
disassemble or dispose of in fire.
• Keep the lithium battery out of the reach of children. If
swallowed, consult a doctor immediately.
• To prevent a short circuit, never pinch the battery with
pliers, etc.
ENGLISH
10
Page 12

TROUBLESHOOTING
Error code
In the following cases the corresponding error code
indication appears. Follow the suggestions below to
solve such problems.
ERROR03 Focus error. Check that the CD is loaded
properly (right side up, etc.), and the CD
contains valid data.
Reset button
If a CD does not operate properly, press the reset button
with a pointed object such as a pencil, etc. Note that all
your settings will be erased if this button is pressed.
Reset button
SPECIFICATIONS
RADIO SECTION
(FM)
Frequency Range: 87.5 MHz – 108 MHz
Usable Sensitivity: 12.7 dBf
50 dB Quieting Sensitivity: 17.2 dBf
IF Rejection: 100 dB
Frequency Response: 30 Hz – 15,000 Hz
S/N Ratio: 70 dB
Stereo Separation: 35 dB at 1 kHz
Alternate Channel Selectivity: 98 dB
Capture Ratio: 3 dB
(AM)
Frequency Range: 530 kHz – 1,710 kHz
Usable Sensitivity: 30 µV (30 dB)
CD SECTION
Frequency Response: 17 Hz – 20 kHz +0/–3 dB
Dynamic Range: More than 92 dB
Channel Separation: More than 60 dB
S/N Ratio: More than 90 dB
Wow/Flutter: Unmeasurable
MP3 Decoding: MPEG 1 Audio Layer 3
MAINTENANCE
Cleaning the front panel
Wipe the surface with a soft, dry cloth. Do not use liquid
cleaners or aerosol cleaners.
Cleaning the connector
The connector needs to be cleaned occasionally. Wipe
the surface of the connector with a cotton swab slightly
moistened with alcohol.
Back of the front panel
AUDIO SECTION
Max. Power Output: 45 W × 4 channels
AUX input
Input sensitivity (load impedance) AUX: 300 mV
(10 kΩ)
GENERAL
Power-Supply Voltage: 14.4 V (11 to 16 V
allowable), DC, negative ground
Load Impedance: 4 Ω
Tone Control:
Bass ± 10 dB at 100 Hz, Treble ± 10 dB at 10 kHz
Preamp Output Voltage (load impedance): 2.2 V
(10 kΩ)
Installed size: 182 (W) × 53 (H) × 155 (D) mm
1
(7
/4 (W) × 2 1/8 (H) × 6 1/8 (D) inches)
Supplied Accessory: Carrying case (1)
CARD REMOTE CONTROL
Dimensions: Approx. 33 (W) × 85 (H) × 7.5 (D) mm
5
(1
/16 (W) × 3 3/8 (H) × 5/16 (D) inches)
Weight: Approx. 20 g (0.7 oz.) (including battery)
• Specifications and external appearance are subject to
change without notice due to product improvement.
The word “BBE” and the “BBE symbol” are trademarks
of BBE Sound,Inc.
Under licence from BBE Sound,Inc.
11
ENGLISH
Page 13

PRECAUCIONES
• Utilice sólo el sistema eléctrico de cc de 12 voltios con
tierra negativa.
• Desconecte el terminal negativo de la batería cuando
monte y conecte la unidad.
• Cuando cambie el fusible, asegúrese de utilizar uno
con una capacidad de amperaje idéntica. El uso de un
fusible con una capacidad de amperaje mayor puede
provocar daños graves en la unidad.
• NO intente desmontar el aparato. Los rayos láser de la
captación óptica son peligrosos para los ojos.
• Tenga cuidado de que no se metan alfileres u otros
objetos dentro del aparato: podrían causar desperfectos
o generar peligros como descargas eléctricas o
exposiciones a rayos láser.
• Cuando se ha estacionado el vehículo en un lugar
expuesto a los rayos directos del sol, puede subir
mucho la temperatura del interior y es necesario
enfriar la unidad antes de utilizarla.
• Mantenga el volumen a un nivel en el que pueda
escuchar los sonidos de advertencia del exterior
(bocinas, sirenas, etc.).
NOTA
Este equipo ha sido probado y verificado para cumplir
con los límites para un equipo digital de Clase B, en
conformidad con la parte 15 de las reglas FCC. Estos
límites están diseñados para proveer protección
razonable en contra de interferencias perjudiciales en
una instalación residencial.
Este equipo genera, usa, y puede irradiar energía de
radiofrecuencia y, si no se instala ni usa de acuerdo con
las instrucciones, puede causar perjudicial interferencia
en radiocomunicaciones. Sin embargo, no hay ninguna
garantía que no se produzca interferencia en una
instalación particular. Si este equipo causa interferencia
perjudicial en la recepción de radio o televisión, la cuál
puede ser determinada apagando y encendiendo el
equipo, el usuario debe a tratar de corregir la interferencia
mediante una o más de las siguientes medidas:
– Reoriente o relocalice la antena receptora.
– Incremente la separación entre el equipo y el receptor.
– Conecte el equipo a una salida de un circuito distinto
del cual el receptor está conectado.
– Consulte por ayuda a su vendedor o a un técnico
especializado en radio/TV.
Precaución
El uso de instrumentos ópticos con este producto
aumentará el peligro de dañar los ojos.
CUIDADO
Las modificaciones y ajustes de este producto, no
autorizados a título expreso por el fabricante pueden
cancelar el derecho de uso o la autoridad para hacer
funcionar este producto.
Antes de la operación
Además de los CD ordinarios, este aparato puede
reproducir discos compactos grabables (CD-R) o
regrabables (CD-RW) que contienen títulos de audio
o archivos MP3.
Notas
• NUNCA utilice un disco compacto grabable (CDR) o regrabable (CD-RW) que no contenga datos
o que los contenga en formato incorrecto.
• El aparato no puede reproducir discos grabables
(CD-R) o regrabables (CD-RW) que no contengan
datos o cuando los datos están en otro formato que
no sea MP3.
Para más información sobre el MP3, consulte la
página 8.
• Usted no puede reproducir un disco compacto
grabable (CD-R) o regrabable (CD-RW) que no
esté finalizado*.
* Un proceso necesario para que un disco compacto
grabable (CD-R) o regrabable (CD-RW) grabado
sea reproducido en el reproductor de CD de audio.
Discos de música codificados mediante
tecnologías de protección de los
derechos de autor
Este producto se ha diseñado para reproducir discos
que cumplen con el estándar Compact Disc (CD).
Recientemente, algunas compañías discográficas
comercializan discos de música codificados mediante
tecnologías de protección de derechos de autor.
Tenga en cuenta que, entre estos discos, algunos no
cumplen con el estándar CD, por lo que no podrán
reproducirse mediante este producto.
Para conocer más detalles sobre la instalación y las
conexiones, consulte el documento separado
“INSTALACIÓN Y CONEXIONES”.
Notas acerca del CD
• La reproducción de un CD defectuoso
o con polvo puede ocasionar
interrupciones en el sonido.
• Sujete los CDs como se ilustra en la
imagen.
• NO toque la cara no etiquetada.
• NO pegue ningún sello, etiqueta u hoja de protección
de datos en ninguna de las dos caras del CD.
• NO deje que el CD sea expuesto a la luz directa del sol
o al calor excesivo.
• Para limpiar un CD sucio, hágalo con un trapo de
adentro hacia fuera.
Nunca utilice disolventes como benceno o alcohol.
• Este aparato no puede reproducir CDs de 8 cm.
• NUNCA inserte CDs de 8 cm recubiertos por el
adaptador, ni CDs de formas irregulares.
El aparato puede no ser capaz de expulsarlo, y puede
haber problemas.
1
ESPAÑOL
Page 14

INDICE
PROTECCIÓN ANTIRROBO.................................... 2
OPERACIÓN BÁSICA, AJUSTE DE
AUDIO Y DEL RELOJ........................................... 3
MANEJO DE LA RADIO ........................................... 4
MANEJO DEL REPRODUCTOR DE DISCOS
COMPACTOS....................................................... 5
EQUIPO ACCESORIO.............................................. 9
OTRAS FUNCIONES................................................ 9
TARJETA DE CONTROL REMOTO........................ 10
LOCALIZACIÓN DE A VERÍAS ............................... 11
MANTENIMIENTO.................................................. 11
ESPECIFICACIONES ............................................. 11
Nota
Algunos botones fueron asignados para dos o más
funciones. Para una descripción detallada, consulte las
correspondientes páginas.
Reposición de la unidad
Antes de utilizar la unidad por primera vez, o después de
haber reemplazado la batería del automóvil, tendrá que
reponer la unidad. Pulse el botón de reposición con un
objeto puntiagudo, como un lápiz.
Careta frontal desmontada
Botón de reposición
Nota
Si este botón se pulsa, se borrarán el reloj y algunas
funciones memorizadas.
PROTECCIÓN
ANTIRROBO
Lleve la careta frontal consigo cuando deje el coche y
guárdelo n la caja de transporte suministrada.
Desmontaje de la careta frontal
Antes de desmontar la careta frontal, saque el disco
compacto para evitar que se pueda dañar el aparato.
1 Pulse z para sacar el disco compacto.
2 Mantenga pulsado PWR/ATT hasta que se apague
el aparato.
3 Pulse %. (Sujete la careta con una mano para evitar
que se caiga accidentalmente.)
4 Desmonte la careta.
Instalación de la careta frontal
1 Enganche el lado izquierdo de la careta frontal en el
gancho izquierdo del aparato.
2 Empuje la careta frontal hasta que quede trabada.
No pulse ningún botón cuando está instalando la
careta.
Modo DEMO (Demostración)
La unidad tiene un modo de visualización extra (DEMO)
que demuestra los modos de iluminación del aparato. El
aparato cambia automáticamente al modo DEMO si se
enciende el aparato y se deja en ese estado durante
más de 5 segundos después de que todas las conexiones
se hayan completado.
Para cancelar el modo DEMO
1 Durante el modo DEMO, mantenga pulsado Dial de
lanzadera (PUSH-SOURCE) hasta que aparezca
“ILL” en la pantalla.
2 Pulse + o - para seleccionar “DEMO”.
3 Gire Dial de lanzadera para seleccionar “OFF”.
Para volver al modo DEMO, seleccione “ON” en el paso
3.
(Consulte la ilustración en la página 3.)
Nota
No toque el conector en el lado de adentro del careta
frontal. Puede provocar una conexión mala o en mal
estado.
ESPAÑOL
2
Page 15

OPERACIÓN BÁSICA,
AJUSTE DE AUDIO Y
DEL RELOJ
PWR/ATT
SEL
Dial de lanzadera (PUSH-SOURCE)
TU (TUNER)
DSPL
+/-
Encendido y apagado de la unidad
• Usted podrá encender la unidad pulsando cualquier
botón del panel frontal excepto z y %. El aparato
también pueden encenderse cuando coloque un disco
compacto.
• Mantenga pulsado PWR/ATT hasta que se apague el
aparato.
Nota
La mayoría de las operaciones descritas en este
manual requieren que el aparato esté encendido
antes de iniciar la operación, a no ser que se indique
expresamente lo contrario.
Para cambiar el modo de fuente
1 Pulse Dial de lanzadera (PUSH-SOURCE).
Pulse Dial de lanzadera (PUSH-SOURCE) para
avanzar en un ciclo por los modos de fuente en el
siguiente orden:
F1 (F2/F3/A1/A2) → DISC* → AUX IN
↑
* La expresión “DISC” no aparece en la pantalla cuando
no hay un disco compacto en el aparato.
Ajuste del volumen
1 Gire Dial de lanzadera.
Aparece “VOL (volumen)” en la
pantalla.
Silenciamiento del sonido
1 Pulse brevemente PWR/ATT.
Aparece “ATT ON” en la pantalla.
Para restablecer el volumen, vuelva a pulsar
brevemente PWR/ATT.
Ajuste del sonido
Se pueden seleccionar los siguientes modos para el
ajuste de sonido dependiendo de la música que se
escuche: BASS (bajas frecuencias), TRE (altas
frecuencias), BAL (izquierdo/derecho), FAD (frontal/
trasero), H-BASS (super graves)*, DSSA (Ajuste del
Estado de Sonido del Conductor)** y BBE***.
* Se pueden reforzar los graves.
** Se puede ajustar el estado del sonido y balance del
tono para servir de la mejor forma a un asiento
particular en el automóvil.
*** Es posible mejorar la claridad del sonido de alta
frecuencia.
1 Pulse SEL varias veces para seleccionar el modo
que desea ajustar.
Al pulsar
modos. Aparecerá el indicador del modo seleccionado.
SEL
se recorre un ciclo a través de los
2 Pulse Dial de lanzadera para aumentar o disminuir
el nivel del modo seleccionado (salvo en los modos
H-BASS, DSSA y BBE).
En el modo H-BASS, pulse Dial de lanzadera para
seleccionar 1, 2, 3, u OFF.
En el modo DSSA, pulse Dial de lanzadera para
seleccionar L (asiento delantero izquierdo), R
(asiento delantero derecho), u OFF.
En modo BBE, pulse Dial de lanzadera para
seleccionar 1, 2, u OFF.
Notas
• Ajuste el nivel o seleccione un artículo dentro de 5
segundos, o el modo seleccionado volverá a su estado
anterior.
• Cuando DSSA está activado, no se podrá ajustar BAL
ni FAD.
Alineación de los niveles de fuentes
(Ajustador del nivel de fuente)
El volumen puede cambiar cada vez que cambie el
modo de fuente. En este caso, puede alinear el volumen
del modo para cada fuente a casi el mismo nivel.
1 Pulse el Dial de lanzadera (PUSH-SOURCE) o TU
(TUNER) repetidamente para seleccionar el modo
deseado.
2 Pulse DSPL manteniendo presionado SEL.
Aparece “LEVEL 0” en la pantalla.
3 Gire el Dial de lanzadera para ajustar el nivel.
Nota
Ajuste el nivel antes de 5 segundos o se cancelará el
modo seleccionado.
3
ESPAÑOL
Page 16

Reestablecimiento de las
configuraciones de fábrica
1 Apague el aparato.
2 Mantenga pulsado DSPL hasta que aparezca
“LEVEL --” en la pantalla.
Nota
Se pueden restablecer las configuraciones de fábrica
sólo para VOL, BASS, TRE, BAL, FAD, H-BASS, DSSA
y BBE, y se alinean los niveles de volumen de las
fuentes.
Ajuste del tono del pitido
1 Apague el aparato.
2 Mantenga pulsado SEL hasta que aparezca “BEEP”
en la pantalla.
3 Gire Dial de lanzadera para seleccionar ON u OFF.
4 Pulse SEL.
Ajuste del reloj
1 Mantenga pulsado DSPL hasta que destelle el
indicador del reloj en la pantalla.
2 Pulse + (para poner la hora) o - (para poner los
minutos) y gire Dial de lanzadera.
3 Pulse DSPL.
Para mostrar la hora
1 Pulse DSPL.
Para regresar a la pantalla anterior, vuelva a pulsar
DSPL.
MANEJO DE LA RADIO
1 Pulse repetidamente TU (TUNER) para seleccionar
la banda deseada (F1, F2, F3, A1 o A2).
2* Pulse + (recepción de frecuencias más altas) o -
(recepción de frecuencias más bajas) para sintonizar
una estación.
Aparece “ST” en la pantalla cuando se transmite la
estación de FM en estéreo y las condiciones de la
recepción son buenas.
*Sintonización por búsqueda y sintonización manual
• Mantenga pulsado + o - hasta que empiece la
sintonización por búsqueda.
El aparato localiza automáticamente una estación
(Sintonización por búsqueda).
Para detener la sintonización por búsqueda, vuelva
a pulsar + o -.
• Pulse repetidamente + o - para buscar una estación
deseada mientras aumenta o reduce la frecuencia
paso a paso (Sintonización manual).
Modo monoaural
Cuando la señal de FM se debilita o la recepción FM es
mala, el aparato cambia automáticamente al modo
monoaural con el fin de reducir el ruido.
Uso de las estaciones preconfiguradas
Antes de poder sintonizar una estación, hay que
preconfigurarla usando los botones numerados.
+/-
TU (TUNER)
PS/A.ME
Botones 1 a 6 para la
preconfiguración de
estaciones
Sintonización de una estación
(Sintonización por búsqueda/manual)
+/-
Indicación de banda*
Indicador local
Indicador de sintonizador (TUNER)
* “F” significa FM.
“A” significa AM.
LOTU (TUNER)
Indicación de frecuencia
Indicador de estéreo
Número de estación
preconfigurada
ESPAÑOL
4
Page 17

Preconfiguración automática de estaciones
(Memoria automática)
1 Pulse repetidamente TU (TUNER) para seleccionar
la banda deseada (F1, F2, F3, A1 o A2).
2 Mantenga pulsado PS/A.ME hasta que se inicie la
preconfiguración automática.
El aparato memoriza automáticamente hasta 6
estaciones para cada banda.
Después de completar la programación automática,
el aparato sintoniza todas las estaciones
memorizadas en los botones de estación
preconfigurada en orden (exploración de
programados).
Para cancelar la preconfiguración automática, vuelva
a pulsar PS/A.ME.
Comprobación de las estaciones
preconfiguradas (Exploración preconfigurada)
1 Pulse brevemente PS/A.ME.
Cada estación preconfigurada se sintoniza durante
5 segundos en orden.
Para cancelar la exploración preconfigurada, vuelva
a pulsar PS/A.ME o el botón de cualquier estación
preconfigurada.
Preconfiguración manual de estaciones
(Memoria manual)
1 Pulse repetidamente TU (TUNER) para seleccionar
la banda deseada (F1, F2, F3, A1 o A2).
2 Pulse + o - para sintonizar una estación deseada
(vea también “Sintonización de una estación” para
otro método de sintonización).
3 Mantenga pulsado el botón de estación
preconfigurada deseada hasta que el aparato emita
un pitido.
Nota
Una nueva estación preconfigurada sustituye la estación
en la misma banda que la memorizada previamente en
ese botón de estación preconfigurada.
MANEJO DEL
REPRODUCTOR DE
DISCOS COMPACTOS
Reproducción de discos compactos
Se pueden reproducir discos compactos, CD-R y
CD-RW siguiendo el procedimiento descrito a
continuación.
Dial de lanzadera (PUSH-SOURCE)
t/g, r/f
1 Coloque un disco compacto.
Aparece “DISC” en la pantalla.
Empieza la reproducción del disco compacto.
Si ya hay un disco compacto colocado, pulse
repetidamente Dial de lanzadera (PUSH-SOURCE)
para seleccionar el modo de reproducción de disco
compacto.
En la reproducción normal, cuando termina la última
sección, el aparato vuelve a la primera sección y
continúa reproduciendo.
La etiqueta hacia arriba
Tiempo de reproducción
Número de sección
transcurrido
z
SHUFREP1INT
Sintonización de una estación
preconfigurada
1 Pulse repetidamente TU (TUNER) para seleccionar
la banda deseada (F1, F2, F3, A1 o A2).
2 Pulse el botón de estación preconfigurada donde
está memorizada la estación deseada.
Control activo de recepción de frecuencia
(ATRC)
El aparato suprime automáticamente el ruido FM
causado por el movimiento del vehículo y mantiene así
la calidad del sonido.
5
ESPAÑOL
Indicador de disco compacto
Page 18

Para
Expulsar un disco
compacto
Saltar a la sección
siguiente
Volver al principio de la
sección en curso
Cada pulsación añadida
salta hacia atrás una
sección
Localizar un punto
específico dentro de una
sección
Pulsar
z
t/g
r/f
Mantenga pulsado r/
f o t/g hasta
encontrar el punto.
Notas
• Cuando se reproduce un disco compacto ya colocado,
la reproducción del disco compacto comienza en le
punto donde se paró la última vez. Un disco compacto
recién colocado comienza por la primera sección.
• Un CD-R o CD-RW puede tardar un rato en empezar
la reproducción pero esto no implica un mal
funcionamiento.
• Si se coloca un CD-R o CD-RW sin datos, aparece
“ERROR03” en la pantalla. El aparato no puede
reproducir estos discos.
Reproducción de inicios
Se puede localizar una sección o canción determinada
escuchando los primeros 10 segundos de todas las
secciones del disco compacto.
1 Pulse INT durante la reproducción del disco
compacto.
Aparece “INTRO” en la pantalla.
2 Vuelva a pulsar INT cuando se reproduce la sección
deseada.
El aparato vuelve a la reproducción normal del disco
compacto.
Reproducción repetida de una sección
Se puede reproducir repetidamente una sección.
1 Presione REP1 durante la reproducción del disco
compacto.
Aparece “REP1” en la pantalla.
Para cancelar la reproducción repetida de una
sección, vuelva a pulsar REP1.
Reproducción aleatoria
Se pueden reproducir todas las secciones en orden
aleatorio.
1 Pulse SHUF durante la reproducción del disco
compacto.
Aparece “SHUF” en la pantalla.
Para cancelar la reproducción aleatoria, vuelva a
pulsar SHUF.
Nota
Durante la reproducción aleatoria, la pulsación r
permite saltar solamente hasta el principio de la sección
en curso, no a la sección anterior.
Antes de reproducir MP3
El aparato puede reproducir archivos MP3* grabados
en CD-ROM o discos grabables (CD-R) o regrabables
(CD-RW). Los archivos MP3 se reproducen en orden
numérico y después en orden alfabético. El aparato
empieza a reproducir desde los archivos con un número
al principio del nombre del archivo.
* Un archivo MP3 (con la extensión “.mp3”) almacena
datos de audio comprimidos por medio de MPEG1,
un sistema de codificación de archivos de audio en
capa 3.
En esta sección nos referimos a lo que se denomina
“archivo MP3” y “carpeta” en la terminología de PC
como “sección” y “álbum” respectivamente.
Notas acerca del MP3
• Las secciones MP3 deben grabarse en un disco
en un formato que cumpla con ISO 9660. Tenga
en cuenta que el aparato puede no reproducir las
secciones en el orden en el que fueron grabados.
• El máximo número de secciones que pueden
reproducirse es 512 si el disco se grabó de acuerdo
con la norma ISO 9660 de nivel 1 (todos los
nombres de álbumes y secciones deben ser de
menos de 12 caracteres).
El máximo número de secciones que pueden
reproducirse es de 512 si se grabó el disco de
acuerdo con la norma ISO 9660 de nivel 2 (todos
los nombres de álbumes y secciones deben ser de
menos de 31 caracteres).
• La máxima profundidad aceptable de álbumes en
niveles es 8, incluyendo el álbum raíz (directorio).
• El aparato puede reproducir sólo las secciones
que tengan una extensión de archivo “.mp3”.
• Si un disco contiene secciones de audio y
secciones MP3, el aparato sólo reproduce las
secciones de audio.
• Con discos de múltiples sesiones, el aparato puede
reproducir hasta 5 sesiones. Usted no puede
reproducir un archivo MP3 que tenga la sesión
que no está cerrada.
• El aparato puede no reproducir las secciones
grabadas con una utilidad de escritura de paquetes.
• Cuando se reproduce una sección convertida con
una velocidad de bit de 8 kbps o VBR (velocidad
de bit variable), la reproducción de inicios puede
no funcionar correctamente.
• Si se reproduce una sección que no sea MP3 pero
que tenga la extensión de archivo “.mp3”, puede
escuchar ruido.
ESPAÑOL
6
Page 19

Notas acerca de las indicaciones en la
pantalla indicadora
• Se visualizarán los caracteres siguientes:
- Mayúsculas: A a Z
- Números: 0 a 9
- Símbolos: espacio,",%, ', (,), *, +, coma, -, punto, /, <,
=, >, @, [, ], _, {, y }.
• Las minúsculas (“a” a “z”) se visualizarán como
mayúsculas (“A” a “Z”).
• Los símbolos tales como (, ), [, ], { y } se visualizarán
como “<” o “>”.
• Los caracteres que no puedan visualizarse se
mostrarán como “*”.
• Hasta 32 caracteres pueden ser visualizados para el
nombre de un álbum o una sección.
• Cuando se reproducen archivos MP3, el tiempo de
reproducción transcurrido que aparece puede no ser
correcto.
• Para visualizar hasta 30 caracteres para un nombre de
sección o un nombre de artista, se requiere del ID3TAG
versión 1.x.
• Podrá visualizarse información creada con ID3 TAG
version 2.x de hasta 64 caracteres.
• Cuando reproduzca archivos MP3 que contengan
etiquetas creadas con ID3 TAG version 2.4, es posible
que escuche ruido.
Notas acerca de la creación de discos MP3
• Cree secciones en MP3 con una frecuencia de
muestreo de 44,1 kHz y una velocidad de bit fija de
128 kbps.
• No grabe ficheros que no sean MP3 en discos para
MP3.
Para reproducir secciones en el orden en
el que fueron grabadas
1
Utilice un software de escritura capaz de grabar
secciones MP3 en orden numérico y alfabético. Para
más detalles sobre el uso del software, consulte el
manual de manejo que viene con el software.
2 Utilice sólo un álbum. (No cree un su[E|bum dentro
de un álbum.)
3 Incluya un número de dos o tres cifras al principio de
cada nombre de sección para que las secciones
puedan reproducirse en orden.
Ejemplo de estructura de nombre recomendada:
01XXXXX.mp3
02XXXXX.mp3
03XXXXX.mp3
04XXXXX.mp3
05XXXXX.mp3
Evite el uso de la siguiente estructura de nombre
1XXXXX.mp3
5XXXXX.mp3
10XXXXX.mp3
15XXXXX.mp3
20XXXXX.mp3
(Las secciones anteriores se reproducirán en el
orden equivocado, es decir, “1”, “10”, “15”, “20” y “5”.)
7
ESPAÑOL
Reproducción de una sección MP3
ALBUM
t/g, r/f
DSPL
Dial de lanzadela (PUSH-SOURCE)
M
EJECTzALBUM
N
SHUF REPREP1INT
1 Introduzca un CD-ROM, CD-R o CD-RW para MP3.
El aparato comienza la examinación del disco. El
indicador “DISC” aparece en la pantalla indicadora.
Durante la examinación del disco, “NOW READING”
(ahora leyendo) aparece desplazándose a través
de la pantalla indicadora.
La etiqueta hacia arriba
El total de números de álbumes
El total de números de secciones
Indicador de álbum
Indicador CD-ROM
Notas
• Si el escaneo de un CD-ROM, CD-R o CD-RW no
termina transcurridos 2 minutos, “CANCEL TO EJECT
KEY” o “NO MUSIC” aparecerá dependiendo de la
complejidad de la estructura de carpetas.
• Si no hay secciones en el disco, “NO MUSIC” aparece
en la pantalla indicadora.
• Puede que no se reproduzcan algunos discos si el
disco contiene ficheros que no son MP3.
Page 20

Luego de la examinación, el total de números de álbumes
y secciones aparece en la pantalla indicadora, luego el
aparato comienza automáticamente la reproducción
del disco desde la primera sección del primer álbum.
Número del álbum
Número de sección
Cada vez que la sección sea cambiada, esta visualización
aparece por 5 segundos en la pantalla indicadora.
Tiempo de reproducción transcurrido
Formato de archivo de la sección
Luego de la reproducción de la sección, el aparato
reproduce la sección siguiente del mismo álbum.
Luego de la reproducción de todas las secciones de un álbum,
el aparato reproduce la primera sección del álbum siguiente.
Nota
Si ya hay un disco colocado, pulse repetidamente
lanzadela (PUSH-SOURCE)
reproducción de CD para empezar la reproducción de la
sección MP3.
para seleccionar el modo de
Dial de
Para saltar secciones y álbumes
Para
Expulsar el disco.
Saltar a la sección siguiente.
Volver al principio de la sección en
curso.
Cada pulsación añadida salta
hacia atrás una sección.
Localizar un punto específico
dentro de una sección
Saltar al álbum siguiente.
Saltar al álbum anterior.
Pulsar
z
t/g
r/f
Mantenga pulsado
r/f o
t/g hasta
encontrar el punto.
ALBUMN
ALBUMM
Para cambiar el modo de visualización
Pulse DSPL.
Al pulsar DSPL se recorre un ciclo a través de las
visualizaciones en el siguiente orden:
Tiempo de reproducción transcurrido
→ nombre de álbum (“AL”, número de álbum, y
nombre de carpeta)
→ nombre de pista* (“TR”, número de pista, y
nombre de archivo)
→ información de etiqueta ID3 (“TG” y nombre de
pista)
→ información de etiqueta ID3 (“TG” y nombre de
artista)
→ información de etiqueta ID3 (“TG” y nombre de
álbum)
→ reloj
→ tiempo de reproducción transcurrido
* Si la sección no tiene nombre, “NO TR. NAME”
aparece en la pantalla indicadora.
Localización inicial
Se puede localizar una sección deseada escuchando los
10 primeros segundos de todas las secciones en el disco.
1 Pulse INT durante la reproducción de la sección
MP3.
La expresión “INTRO” aparecerá en la pantalla
indicadora.
2 Pulse INT nuevamente cuando la sección deseada
sea reproducida.
El aparato vuelve a la reproducción normal de la
sección MP3.
Nota
El aparato examina todas las secciones en el disco en
orden sin separar por álbum.
Repetición de la reproducción de un álbum
Se puede reproducir un álbum repetidamente.
1 Pulse REP durante la reproducción de la sección
MP3.
La expresión “REP” aparecerá en la pantalla
indicadora.
Para cancelar la repetición de la reproducción de un
álbum, pulse REP nuevamente.
Repetición de la reproducción de una sección
Se puede reproducir una sección repetidamente.
1 Pulse REP1 durante la reproducción de la sección
MP3.
La expresión “REP 1” aparecerá en la pantalla
indicadora.
ESPAÑOL
8
Page 21

Para cancelar la repetición de la reproducción de
una sección, pulse REP1 nuevamente.
Reproducción aleatoria
Podrá reproducir todas las secciones en el álbum actual
en orden aleatorio.
1 Pulse SHUF durante la reproducción de la sección
MP3.
La expresión “SHUF” aparecerá en la pantalla
indicadora.
Para cancelar la reproducción aleatoria, pulse SHUF
nuevamente.
Notas
• Durante la reproducción aleatoria, la pulsación de
r permite saltar solamente hasta el principio de la
sección en curso, no a la sección anterior.
• Si se selecciona uno de los modos de reproducción
mencionados arriba (modo de Localización Inicial,
Repetición de la Reproducción de un álbum, Repetición
de la Reproducción de una sección, o Reproducción
Aleatoria) mientras el tiempo de reproducción
transcurrido es visualizado, la indicación del modo
(INTRO, REP, REP1 o SHUF) brilla o es visualizada
continuamente.
EQUIPO ACCESORIO
Para escuchar reproductores portátiles de
cintas/minidiscos/MP3 y otros equipos
Se pueden escuchar equipos conectados al aparato.
Consulte las instrucciones de manejo de los equipos
respectivos para una información más detallada.
Asegúrese de sacar los discos compactos colocados
para evitar un posible daño al aparato antes de conectar
el equipo.
OTRAS FUNCIONES
SEL
Dial de lanzadera (PUSH-SOURCE)
PS
Cambio del color de iluminación de las teclas
Se pueden escoger los colores azul o rojo para
iluminación de las teclas.
1 Mantenga pulsado Dial de lanzadera (PUSH-
SOURCE) hasta que aparezca “ILL” en la pantalla.
2 Gire Dial de lanzadera para seleccionar “1 (azul)” o
“2 (rojo)”.
Ajuste del reductor de intensidad de la
pantalla
1 Mantenga pulsado SEL hasta que aparezca
“DIMMER” en la pantalla.
2 Gire Dial de lanzadera para seleccionar “0 (brillante)”
o “1 (oscuro)”.
Visualización del indicador de nivel VU
1 Desconecte la alimentación de la unidad.
2 Mantenga presionado PS hasta que en el visualizador
aparezca “VU”.
3 Gire el Dial de lanzadera para seleccionar “ON”
(aparecerán los indicadores de nivel) o “OFF” (los
indicadores desaparecerán).
4 Pulse PS.
Dial de lanzadera (PUSH-SOURCE)
Enchufe AUX
1 Conecte el reproductor portátil de cintas/minidiscos/
MP3 u otro equipo al enchufe AUX (diám. de 3,5 mm)
del aparato.
2 Pulse repetidamente Dial de lanzadera (PUSH-
SOURCE) hasta que aparezca “AUX IN” en la
pantalla.
9
ESPAÑOL
Page 22

TARJETA DE CONTROL
REMOTO
Nombre de las piezas
1 Botón TUNER
2 Botón CD
3 Botón AMS (Auto music sensor) r
4 Botón AMS (Auto music sensor) t
5 Botón PS (preconfigurado)
6 Botones TUNING UP/DOWN
7 Botones VOLUME +/-
Preparativos
Se ha instalado en fábrica una pila de litio en el control
remoto.
Antes de utilizar el control remoto, asegúrese de sacar
la hoja de aislación, tirando de ésta.
Cambio de la pila
1 Inserte la punta de un objeto puntiagudo A en el
orificio B y saque el portapila para sacar la pila de
litio (CR2025).
Control remoto (atrás)
Portapila
2 Instale una nueva pila de litio (CR2025) con el lado
) hacia arriba en el portapila.
3 Empuje el portapila en el aparato hasta que se
escuche un chasquido.
Control remoto (atrás)
Hoja de aislación
Nota
Cuando el receptor de rayos infrarrojos de la unidad
principal esté expuesto a la luz solar directa, es posible
que no responda a las señales procedentes del
controlador remoto.
PRECAUCIONES
• Pila de litio (CR2025) para el controlador remoto
Sustituya las pilas sólo por unas pilas Hitachi Maxell,
Panasonic o Sony Parte n°. CR2025. Si utiliza otras
pilas podría haber riesgo de incendio o explosión.
La pila podría explotar si no se maneja con cuidado. No
las recargue, desmonte o tire al fuego.
• Guarde la pila de litio lejos del alcance de los niños. Si
se traga, consulte inmediatamente con un médico.
• Para evitar un cortocircuito, no tome la pila con pinzas,
etc.
ESPAÑOL
10
Page 23

LOCALIZACIÓN DE AVERÍAS
Códigos de error
En los siguientes casos aparece la correspondiente
indicación del código de error. Siga las recomendaciones
presentadas abajo para resolver los problemas
mencionados.
ERROR03 Error de centrado. Compruebe que el CD
está bien metido (con la cara
correspondiente hacia arriba, etc.), y que
el CD contiene datos válidos.
Botón de reconfiguración
Si un CD no funciona bien, pulse el botón de
reconfiguración con un objeto puntiagudo, como por
ejemplo un lápiz, etc. Tenga en cuenta que si este botón
se pulsa, todas sus configuraciones quedarán borradas.
Botón de reconfiguración
MANTENIMIENTO
Limpieza del panel frontal
Limpie la superficie con un paño suave, seco. No utilice
limpiadores líquidos o limpiadores de rociado.
Limpieza del conector
El conector debe limpiarse algunas veces. Limpie la
superficie del conector con un algodón ligeramente
empapado en alcohol.
Parte posterior del panel frontal
ESPECIFICACIONES
SECCION DE LA RADIO
(FM)
Gama de frecuencias: 87,5 MHz – 108 MHz
Sensibilidad útil: 12,7 dBf
Sensibilidad de silenciamiento de 50 dB: 17,2 dBf
Rechazo de IF: 100 dB
Respuesta de frecuencia: 30 Hz – 15 000 Hz
Relación de señal a ruido: 70 dB
Separación estéreo: 35 dB a 1 kHz
Selectividad de canal alternado: 98 dB
Relación de captura: 3 dB
(AM)
Gama de frecuencias: 530 kHz – 1 710 kHz
Sensibilidad útil: 30 µV (30 dB)
SECCION DE CD
Respuesta de frecuencia: 17 Hz – 20 kHz +0/–3 dB
Intervalo dinámico: Más de 92 dB
Separación de canales: Más de 60 dB
Relación de señal a ruido: Más de 90 dB
Fluctuación y trémolo: Insignificante
Descodificación MP3: MPEG 1 Audio Capa 3
SECCION DE AUDIO
Máx. potencia de salida: 45 W × 4 canales
Entrada AUX
Sensibilidad de entrada (impedancia de carga)
AUX: 300 mV (10 kΩ)
GENERAL
Voltaje eléctrico: cc 14,4 V (tolerable entre 11 y 16
V), tierra negativa
Impedancia de carga: 4 Ω
Control de tono:
Graves ±10 dB a 100 Hz, Agudos ±10 dB a 10 kHz
Voltaje de salida de preamplificador (impedancia
de carga): 2,2 V (10 kΩ)
Tamaño al instalar: 182 (An.) × 53 (Al.) ×
155 (Prof.) mm
1
(7
/4 (An.) × 2 1/8 (Al.) × 6 1/8 (Prof.) pulg.)
Accesorio suministrado: Caja de transporte (1)
11
ESPAÑOL
TARJETA DE CONTROL REMOTO
Dimensiones: Aprox. 33 (An.) × 85 (Al.) ×
7,5 (Prof.) mm
5
(1
/16 (An.) × 3 3/8 (Al.) × 5/16 (Prof.) pulg.)
Peso: Aprox. 20g (0,7 oz.) (incluye bateria)
• Las especificaciones y aspecto exterior están sujetos
a cambios sin previo aviso por mejoras del producto.
La palabra “BBE” y el “símbolo BBE” son marcas
comerciales de BBE Sound,Inc.
Bajo licencia de BBE Sound,Inc.
Page 24

PRECAUTIONS
•A utiliser uniquement dans un système électrique à
masse négative 12 V CC.
• Déconnectez la prise de la batterie négative du véhicule
pour l’installation et le raccordement de l’appareil.
• Au remplacement du fusible, utilisez un fusible de
même ampérage. Un fusible à ampérage plus élevé
pourrait sérieusement endommager l’appareil.
•
N’essayez PAS de démonter l’appareil. Le rayon laser
émis par la lentille de lecture est dangereux pour les yeux.
• Vérifiez que des épingles ou d’autres objets étrangers
ne pénètrent pas à l’intérieur de l’appareil car ils sont
susceptibles de provoquer des dysfonctionnements
ou de vous exposer à des risques tels qu’une
électrocution ou une exposition au rayonnement laser.
• Si le véhicule est garé au soleil, ce qui se traduit par
une forte augmentation de la température à l’intérieur,
laissez l’appareil refroidir avant l’utilisation.
• Maintenez le volume à un niveau permettant d’entendre
les bruits extérieurs (claxons, sirènes etc.).
REMARQUE
Cet équipement a été testé et certifié comme respectant
les limites d’ un appareil numérique de Classe B,
conformément à la Partie 15 de la Réglementation FCC.
Ces limites sont conçues pour assurer une protection
raisonnable contre des interférences nuisibles dans
une installation résidentielle.
Cet équipement produit, utilise et peut émettre une
énergie de fréquence radio et, s’il n’est pas installé ou
utilisé conformément aux instructions, peut causer des
interférences nuisibles aux communications radio.
D’autre part, rien ne garantit qu’une interférence ne
surviendra pas dans une installation particulière. Si cet
équipement cause des interférences nuisible à la radio
ou la réception télévisée, ce qui peut se déterminer par
la mise à l’arrêt et la remise en marche de l’appareil,
l’utilisateur est encouragé à essayer de corriger
l’interférence par un ou plusieurs des moyens que les
suivants:
– Réorienter ou relocaliser l’antenne.
– Augmenter la séparation entre l’équipement et le
récepteur.
– Brancher l’équipement sur une prise de circuit différente
de celle sur laquelle est branché le récepteur.
– Consulter le vendeur ou un technicien radio/TV
expérimenté pour de l’aide.
Attention
L’utilisation d’instruments optiques avec ce produit
augmentera les risques d’accident pour les yeux.
ATTENTION
Les modifications ou ajustements à ce produit, non
expressément approuvés par le fabricant, peuvent
annuler le droit ou l’autorité de l’utilisateur à faire
fonctionner ce produit.
Avant utilisation
Outre les CD ordinaires, cet appareil peut lire les
CD-R ou CD-RW contenant des titres audio ou des
fichiers MP3.
Remarques
• NE JAMAIS utiliser de CD-R ou de CD-RW ne
contenant pas de données ou contenant des
données dans un format incorrect.
• L’appareil ne peut pas lire les CD-R ou CD-RW ne
contenant pas de données ou des données dans
un format autre que MP3.
Pour plus d’informations sur MP3, se reporter à la
page 8.
• Vous ne pouvez pas lire un CD-R ni CD-RW non
finalisé*.
* Une procédure requise pour permettre la lecture
d'un disque CD-R ou CR-RW sur un lecteur de CD
audio.
Disques audio encodés par des
technologies de protection des droits
d'auteur
Cet appareil est conçu pour la lecture de disques
conformes à la norme Compact Disc (CD).
Récemment, des disques audio encodés par des
technologies de protection des droits d'auteur ont été
mis en vente par certaines compagnies de disques.
Veuillez noter que, parmi ces disques, certains ne sont
pas conformes à la norme CD et qu'il est possible qu'ils
ne puissent pas être lus sur cet appareil.
Pour l’installation et les connexions, reportez-vous
au manuel séparé “INSTALLATION ET
CONNEXIONS”.
Remarques relatives aux CD
• L’utilisation de CD défectueux ou
poussiéreux peux provoquer des
“blancs” dans la lecture.
• Manipulez les CD comme indiqué
sur la figure.
• Ne touchez PAS le côté du CD opposé à l’étiquette.
• Ne fixez d’autocollant, label ou feuille de protection de
données sur aucune face du CD.
• N’exposez PAS le CD au rayonnement solaire direct
ou à une chaleur excessive.
• Nettoyez un CD sale du centre vers la périphérie à
l’aide d’un chiffon de nettoyage.
N’utilisez jamais de solvants et notamment la benzine
ou l’alcool.
• Cet appareil ne peut pas lire les CD de 8 cm.
• N’insérez JAMAIS un CD de 8 cm placé dans un
adaptateur ou des CD de forme irrégulière.
L’appareil pourrait être incapable de les éjecter et de
ce fait avoir un mauvais fonctionnement.
1
FRANÇAIS
Page 25

TABLE DES MATIERES
PROTECTION ANTIVOL .......................................... 2
FONCTIONNEMENT DE BASE,
REGLAGE DU SON ET DE L’HORLOGE............. 3
FONCTIONNEMENT DE LA RADIO ........................ 4
FONCTIONNEMENT DU LECTEUR CD .................. 5
MATERIEL AUXILIAIRE............................................ 9
AUTRES FONCTIONS ............................................. 9
CARTE TÉLÉCOMMANDE..................................... 10
DÉPANNAGE .......................................................... 11
ENTRETIEN............................................................ 11
SPECIFICATIONS .................................................. 11
Remarque
Deux fonctions ou plus sont affectées à certaines
touches. Voir les pages concernées pour les descriptions
détaillées.
Réinitialisation de l’appareil
Avant d’utiliser l’appareil pour la première fois ou après
le remplacement de la batterie automobile, l’appareil
doit être réinitialisé.
Appuyez sur le bouton de réinitialisation avec un objet
pointu, un crayon par exemple.
Panneau avant détaché
Bouton de réinitialisation
Remarque
La pression du bouton de réinitialisation efface l’horloge
et certaines fonctions mémorisées.
PROTECTION ANTIVOL
Emportez le panneau avant avec vous quand vous
quittez la voiture, et conservez-le dans la mallette de
transport fournie.
Retrait du panneau avant
Avant d’enlever le panneau avant, retirez le CD pour
éviter tout dommage éventuel à l’appareil.
1 Appuyez sur z pour retirer le CD.
2 Maintenez PWR/ATT pressé jusqu’à ce que
l’appareil soit hors tension.
3 Appuyez sur %. (Maintenez le panneau d’une main
pour éviter toute chute accidentelle.)
4 Retirez le panneau.
Fixation du panneau avant
1 Engagez le côté gauche du panneau avant dans la
griffe gauche sur l’appareil.
2 Poussez le panneau avant jusqu’au verrouillage.
Prenez garde de ne presser aucune touche pendant
la fixation du panneau.
Mode DEMO (Démonstration)
Cet appareil est pourvu d’un mode d’affichage spécial
(DEMO) qui présente les modes d’illumination de
l’appareil. Il commute automatiquement au mode DEMO
si vous le mettez sous tension et le laissez tel quel 5
secondes après l’achèvement de toutes les connexions.
Pour annuler le mode DEMO
1 En mode DEMO, maintenez la commande Jog
(PUSH-SOURCE) pressé jusqu’à ce que “ILL”
s’affiche.
2 Appuyez sur + ou - pour sélectionner “DEMO”.
3 Tournez la commande Jog pour sélectionner “OFF”.
Pour revenir au mode DEMO, sélectionnez “ON” à
l’étape 3.
(Voir l’illustration de la page 3.)
Remarque
Ne touchez pas le connecteur du dos panneau avant.
Cela pourrait causer une connexion faible ou
défectueuse.
FRANÇAIS
2
Page 26

FONCTIONNEMENT DE
BASE, REGLAGE DU
SON ET DE L’HORLOGE
PWR/ATT
SEL
Commande Jog (PUSH-SOURCE)
TU (TUNER)
DSPL
+/-
Mise sous/hors tension
• L'appareil peut être mis sous tension en appuyant sur
une touche quelconque du panneau avant, sauf z et
%. Il se met aussi sous tension à l’insertion d’un CD.
• Maintenez PWR/ATT pressé jusqu’à la mise hors
tension.
Remarque
Sauf indication explicite contraire, la plupart des
opérations décrites dans ce manuel exigent que
l’appareil soit mis sous tension avant leur démarrage.
Changement de mode source
1 Appuyez sur la commande Jog (PUSH-SOURCE).
La pression de la commande Jog (PUSH-SOURCE)
fait passer cycliquement entre les modes source
dans l’ordre suivant:
F1 (F2/F3/A1/A2) → DISC* → AUX IN
↑
* “DISC” ne s’affiche pas quand il n’y a pas de CD dans
l’appareil.
Réglage du volume
1 Tournez la commande Jog.
“VOL (volume)” s’affiche.
Mise en sourdine
1 Appuyez brièvement sur PWR/ATT.
“ATT ON” s’affiche.
Pour rétablir le volume, appuyez de nouveau
brièvement sur PWR/ATT.
3
FRANÇAIS
Réglage du son
Vous pouvez sélectionner les modes suivants pour
régler le son en fonction de la music que vous entendez:
BASS (basses fréquences), TRE (hautes fréquences),
BAL (gauche/droite), FAD (devant/arrière), H-BASS
(graves renforcés)*, DSSA (L’ajustement du conducteur
du stage du son “Drivers Sound Stage Adjustment”)** et
BBE***.
* Vous pouvez renforcer le son grave.
** Vous pouvez ajuster le stage du son et la balance
sonore pour mieux servir un siège particulier de votre
voiture.
*** Vous pouvez renforcer la netteté du son de hautes
fréquences.
1 Appuyez plusieurs fois sur SEL pour sélectionner le
mode à régler.
L’appui sur SEL vous fait basculer entre les différents
modes. L’indicateur du mode sélectionné apparaît.
2 Tournez la commande Jog pour augmenter ou
diminuer le niveau pour le mode sélectionné (sauf
pour H-BASS, DSSA et BBE).
En mode H-BASS, tournez la commande Jog pour
sélectionner 1, 2, 3 ou OFF.
En mode DSSA, tournez la commande Jog pour
sélectionner L (siège avant gauche), R (siège avant
droit) ou OFF.
En mode BBE, tournez la commande Jog pour
sélectionner 1, 2 ou OFF.
Remarques
• Le réglage d’un niveau ou la sélection d’un article
doivent être dans un laps de temps ne dépassant pas
les 5 secondes, faute de quoi le mode sélectionné
reviendra sur son état précédent.
• Quand le DSSA est activé, vous ne pouvez pas ajuster
les BAL et FAD.
Alignement des niveaux de source
(Réglage des niveaux de source)
Le volume peut varier chaque fois que vous changez de
mode source. Dans ce cas, vous pouvez aligner le
volume de chaque mode source pratiquement au même
niveau.
1 Appuyez plusieurs fois sur la commande Jog
(PUSH-SOURCE) ou TU (TUNER) pour sélectionner
le mode souhaité.
2 Appuyez sur DSPL en maintenant SEL pressé.
“LEVEL 0” s’affiche.
3 Tournez la commande Jog pour régler le niveau.
Remarque
Réglez le niveau dans les 5 secondes, sinon le mode
sélectionné sera annulé.
Rétablissement des réglages d’usine
1 Mettez l’appareil hors tension.
2 Maintenez DSPL pressé jusqu’à ce que “LEVEL --”
s’affiche.
Page 27

Remarque
Vous pouvez rétablir les réglages d’usine seulement
pour VOL, BASS, TRE, BAL, FAD, H-BASS, DSSA et
BBE, et les niveaux des volumes de source alignés.
Réglage de la tonalité bip
1 Mettez l’appareil hors tension.
2 Maintenez SEL pressé jusqu’à ce que “BEEP”
s’affiche.
3 Tournez la commande Jog pour sélectionner
l’activation (ON) ou la désactivation (OFF).
4 Appuyez sur SEL.
Réglage de l’horloge
1 Maintenez DSPL pressé jusqu’à ce que
l’indicateur de l’horloge clignote sur l’afficheur.
2 Appuyez sur + (pour régler les heures) ou -
(pour régler les minutes), puis tournez la
commande Jog.
3 Appuyez sur DSPL.
1 Appuyez plusieurs fois sur TU (TUNER) pour
sélectionner la bande souhaitée (F1, F2, F3, A1 ou
A2).
2* Appuyez sur + (fréquences plus élevées) ou -
(fréquences plus basses) pour accorder une station.
“ST” s’affiche quand une station FM diffuse en
stéréo et que la réception est bonne.
*Recherche d’accord et accord manuel
• Maintenez + ou - pressé jusqu’à ce que la recherche
d’accord démarre.
L’appareil localise automatiquement une station
(recherche d’accord).
Pour arrêter la recherche d’accord, appuyez de
nouveau sur + ou -.
• Appuyez plusieurs fois sur + ou - pour rechercher la
station souhaitée en augmentant ou diminuant la
fréquence pas à pas (accord manuel).
Mode monaural
Quand les signaux FM deviennent faibles, ou que la
réception FM est mauvaise, l’appareil commute
automatiquement au mode monaural pour réduire le
bruit.
Affichage de l’horloge
1 Appuyez sur DSPL.
Pour revenir à l’affichage précédent, appuyez de
nouveau sur DSPL.
FONCTIONNEMENT DE
LA RADIO
Accord d’une station
(Recherche d’accord/accord manuel)
+/-
Indicateur de bande*
Indicateur local
Indicateur TUNER
* “F” signifie FM.
“A” signifie AM.
LOTU (TUNER)
Indication de fréquence
Indicateur stéréo
Emploi de stations préréglées
Vous devez prérégler des stations avant de pouvoir
accorder une station à l’aide des touches numériques
de stations préréglées.
+/-
TU (TUNER)
PS/A.ME
Touches de stations
préréglées 1 à 6
Numéro de station
préréglée
FRANÇAIS
4
Page 28

Préréglage automatique des stations
(Mémorisation automatique)
1 Appuyez plusieurs fois sur TU (TUNER) pour
sélectionner la bande souhaitée (F1, F2, F3, A1 ou
A2).
2 Maintenez PS/A.ME pressé jusqu’à ce que le
préréglage automatique commence.
L’appareil mémorise automatiquement un maximum
de 6 stations sur chaque bande.
Après le préréglage automatique, l’appareil accorde
toutes les stations mémorisées sur les touches de
de stations préréglées dans l’ordre (Preset Scan).
Pour annuler le préréglage automatique, appuyez de
nouveau sur PS/A.ME.
Vérification des stations préréglées (Balayage
de préréglage)
1 Appuyez brièvement sur PS/A.ME.
Chaque station préréglée sera accordée pendant 5
secondes dans l’ordre.
Pour annuler le balayage de préréglage, appuyez de
nouveau sur PS/A.ME ou sur une touche de station
préréglée.
Préréglage manuel des stations
(Mémorisation manuelle)
1 Appuyez plusieurs fois sur TU (TUNER) pour
sélectionner la bande souhaitée (F1, F2, F3, A1 ou
A2).
2 Appuyez sur + ou - pour accorder la station
souhaitée (voir également “Accord d’une station”
pour une autre méthode d’accord).
3 Maintenez pressée la touche de station préréglée
souhaitée jusqu’à ce que l’appareil émette un bip.
Remarque
Une station nouvellement préréglée remplace la station
sur la même bande préalablement mémorisée sur cette
touche de station préréglée.
FONCTIONNEMENT DU
LECTEUR CD
Lecture d’un CD
Vous pouvez lire des CD, CD-R et CD-RW en suivant la
procédure ci-dessous.
Commande Jog (PUSH-SOURCE)
t/g, r/f
1 Insérez un CD.
“DISC” s’affiche.
La lecture du CD commence.
Si un CD est déjà inséré, appuyez plusieurs fois sur
la commande Jog (PUSH-SOURCE) pour
sélectionner le mode de lecture du CD.
En lecture normale, à la fin du dernier titre, l’appareil
revient au premier titre et reprend la lecture.
Côté étiqueté vers le haut
Temps de
Numéro de titre
lecture écoulé
Indicateur CD
z
SHUFREP1INT
Accord d’une station préréglée
1 Appuyez plusieurs fois sur TU (TUNER) pour
sélectionner la bande souhaitée (F1, F2, F3, A1 ou
A2).
2 Appuyez sur la touche de station préréglée sur
laquelle la station souhaitée a été mémorisée.
Contrôle de réception ATRC (Active tuning
reception control)
L’appareil supprime automatiquement le bruit FM causé
par le mouvement du véhicule, et maintient la qualité du
son.
5
FRANÇAIS
Page 29

Pour
Ejecter un CD
Sauter au titre suivant
Revenir au début du titre
courant
Chaque pression
additionnelle fera passer
au titre qui précède
Localiser un point
spécifique dans un titre
Appuyez sur
z
t/g
r/f
Maintenez r/f ou
t/g pressé jusqu’à
ce que le point soit atteint.
Remarques
• Si vous lisez un CD déjà inséré, la lecture du CD
commence au point où elle s’était arrêtée la dernière
fois. La lecture d’un CD nouvellement inséré commence
au premier titre.
• Un certain temps peut s’écouler avant le début de la
lecture d’un CD-R ou CD-RW. Il ne s’agit pas d’une
anomalie.
• Si un CD-R ou CD-RW vierge est inséré, “ERROR03”
s’affichera. L’appareil ne peut pas lire de tels disques.
Lecture des introductions
Vous pouvez localiser un titre particulier en écoutant les
10 premières secondes de tous les titres du CD.
1 Appuyez sur INT pendant la lecture d’un CD.
“INTRO” s’affiche.
2 Appuyez de nouveau sur INT lors de la lecture du
titre souhaité.
L’appareil revient à la lecture normale de CD.
Lecture répétée d’un titre
Vous pouvez lire un titre de manière répétitive.
1 Appuyez sur REP1 pendant la lecture du CD.
“REP1” s’affiche.
Pour annuler la lecture répétée d’un titre, appuyez de
nouveau sur REP1.
Lecture aléatoire
Vous pouvez lire tous les titres dans un ordre aléatoire.
1 Appuyez sur SHUF pendant la lecture de CD.
“SHUF” s’affiche.
Pour annuler la lecture aléatoire, appuyez de nouveau
sur SHUF.
Remarque
Pendant la lecture aléatoire, la pression de r vous
permet seulement de sauter au début du titre actuel, et
non du titre qui précède.
Avant la lecture d’un fichier MP3
L’appareil peut lire des fichiers MP3* enregistrés sur
CD-ROM, CD-R ou CD-RW. Les fichiers MP3 sont lus
en ordre numérique et alphabétique. L’appareil démarre
la lecture à partir des fichiers dont le nom de fichier
commence par un chiffre.
* Un élément MP3 (ayant l’extension “.mp3”) stocke
des données audio comprimées selon le modèle
MPEG1 (codage de élément de couche 3 audio).
Dans cette section, “fichier MP3” et “dossier” de la
terminologie PC sont appelés respectivement “titre” et
“album”.
Remarques sur MP3
• Les titres MP3 doivent être enregistrés sur un
disque dans un format conforme à ISO 9660. Il se
peut toutefois que l’appareil ne lise pas tels titres
dans leur ordre d’enregistrement.
• Le nombre maximum de titres lisibles est de 512 si
le disque a été enregistré conformément au niveau
1 standard ISO 9660 (tous les noms des titres et
albums doivent avoir 12 caractères maximum).
Le nombre maximum de titres lisibles est 512 si le
disque a été enregistré conformément au niveau 2
standard ISO 9660 (tous les noms des titres et
albums doivent avoir 31 caractères maximum).
• La profondeur tolérée pour les albums imbriqués
est 8, albums de base (répertoire) y compris.
• L’appareil peut lire seulement des titres avec
l’extension de fichier “.mp3”.
• Si un disque contient des titres audio plus des
titres MP3, l’appareil lit seulement les titres audio.
• Avec les disques multisession, l’appareil peut lire
jusqu’à 5 sessions. Vous ne pouvez pas lire un
fichier MP3 à session non fermée.
• L’appareil peut ne pas lire des titres enregistrés
avec un utilitaire inscrivant par paquets.
• La lecture des introductions peut ne pas fonctionner
correctement à la lecture d’un titre converti avec
un débit binaire de 8 kbps ou VBR (débit binaire
variable).
• Du bruit peut être audible à la lecture d’un titre nonMP3 avec l’extension de fichier “.mp3”.
FRANÇAIS
6
Page 30

Remarque sur les indications de
l’afficheur
• Les caractères suivants sont affichés:
- majuscules: A à Z
- chiffres: 0 à 9
- symboles: espace, ", %, *, +, virgule, -, point, /, <, =,
>, @, et _.
• Les lettres minuscules (“a” à “z”) sont affichées sous
forme de majuscules (“A” à “Z”).
• Les symboles tels que (, ), [, ], { et } sont affichés sous
la forme “<” ou “>”.
• Les caractères non affichables apparaissent sous la
forme “*”.
• Jusqu’à 32 caractères sont affichés pour le nom d’un
album ou d’un titre.
• Pendant la lecture de fichiers MP3, le temps de lecture
écoulé affiché peut ne pas être correct.
• Pour afficher jusqu’à 30 caractères pour le nom d’un
titre ou un nom d’artiste, la version 1.x du ID3TAG est
requise.
• 64 caractères maximum d'informations créées avec
ID3 TAG version 2.x sont affichables.
• Du bruit peut être audible à la lecture de fichiers MP3
à marques créés avec ID3 TAG version 2.4.
Remarques sur la création de disques
MP3
• Crée des titres MP3 à fréquence d’échantillonnage de
44,1 kHz et débit binaire fixe de 128 kbps.
• N’enregistrez pas des fichiers qui ne sont pas MP3 sur
des disques pour MP3.
Pour lire les titres dans leur ordre
d’enregistrement
1 Utilisez un logiciel d’écriture capable d’enregistrer
des titres MP3 par ordre numérique et alphabétique.
Voir le mode d’emploi fourni avec le logiciel pour les
détails sur le logiciel.
2 Utilisez un seul album. (Ne créez pas de sous-album
dans un album.)
3 Incluez deux ou trois chiffres au début de chaque
titre pour permettre la lecture des titres dans l’ordre.
Exemple de structure recommandée:
01XXXXX.mp3
02XXXXX.mp3
03XXXXX.mp3
04XXXXX.mp3
05XXXXX.mp3
Évitez d’utiliser la structure de dénomination suivante:
1XXXXX.mp3
5XXXXX.mp3
10XXXXX.mp3
15XXXXX.mp3
20XXXXX.mp3
(Les titres indiqués ci-dessus seront lus dans un
ordre incorrect, à savoir 1, 10, 15, 20 et 5.)
Lecture d’une titre MP3
ALBUM
t/g, r/f
DSPL
Commande Jog (PUSH-SOURCE)
M
EJECTzALBUM
N
SHUF REPREP1INT
1 Insérez un disque CD-ROM, CD-R ou CD-RW pour
MP3.
L’appareil commencera à scanner le disque.
L’indication “DISC” appraît sur l’afficheur.
Durant que le disque est scanné, l’indication “NOW
READING” (Lecture en cours) défile à travers
l’afficheur.
Le nombre total d’albums
Côté portant l’étiquette dessus
Le nombre total de titres
Indicateur d'album
Témoin du CD-ROM
Remarques
• Si l’opération de scanner un CD-ROM, CD-R et CDRW ne termine pas dans les 2 minutes, l’indication
“CANCEL TO EJECT KEY” ou “NO MUSIC” apparaît
en fonction de la complexité des dossiers contenus.
• S’il n’ y a pas de titres sur le disque, l’indication “NO
MUSIC” (Pas de fichiers) apparaît.
• Certains disques risquent de ne pas être lus si des
fichiers qui ne sont pas MP3 sont contenus dans le
disque.
7
FRANÇAIS
Page 31

Après avoir scanné le CD-ROM, le nombre total d’albums
et de titres apparaît sur l’afficheur, en suite l’appareil
commence automatiquement à lire à partir du premier
titre du premier album.
Album number
Track number
A chaque fois que le titre est changé, cet affichage
apparaît et reste pour 5 secondes.
File format of the track
Elapsed playing time
Après la lecture du titre, l’appareil se met à lire le titre
suivant du même album.
Après la lecture de tous les titres de l’album, l’appareil se
met à lire le premier titre de l’album suivant.
Remarque
Si un disque est déjà inséré, appuyez plusieurs fois sur
la commande Jog (PUSH-SOURCE) pour sélectionner
le mode de lecture de CD pour commencer à lire un titre
MP3.
Pour sauter des titres et des albums
Pour
Éjecter un disque.
Passer au titre suivant.
Revenir au début du titre courant.
Chaque appui
supplémentaire fait passer au
titre qui précède.
Localiser un point spécifique
dans un titre
Sauter l’album suivant.
Sauter l’album précédent.
Appuyez sur
z
t/g
r/f
Maintenez
r/f ou
t/g pressé
jusqu’à ce que le
point soit atteint.
ALBUMN
ALBUMM
Pour changer le mode d’affichage
Appuyez sur DSPL.
L’appui sur DSPL vous fait passer à travers les affichages
dans l’ordre suivant:
temps de lecture écoulé
→ nom de l’album (“AL”, numéro de l’album et nom
du dossier)
→ nom de la plage* (“TR”, numéro de la plage et
nom du fichier)
→ information de marque ID3 (“TG” et nom de la
plage)
→ information de marque ID3 (“TG” et nom de
l’artiste)
→ information de marque ID3 (“TG” et nom de
l’album)
→ horloge
→ temps de lecture écoulé
* S’il n’y a pas de nom sur le titre, l’indication “NO TR.
NAME” apparaît.
Lecture des introductions
Vous pouvez localiser un titre désiré en surveillant les 10
premières secondes de tous les titres contenus dans le disque.
1 Appuyez sur INT pendant la lecture d’un titre MP3.
L’indication “INTRO” apparaît sur l’afficheur.
2 Appuyez sur INT encore une fois quand le titre
désiré est lu.
L’appareil revient à la lecture normale de
titre
MP3.
Remarque
L’appareil scannera tous les titres sur le disque en ordre
sans trier par album.
Lecture répétée d’un album
Vous pouvez lire un album de façon répétée.
1 Appuyez sur REP pendant la lecture d’un titre MP3.
L’indication “REP” apparaît sur l’afficheur.
Pour annuler la lecture répétée d’un album, appuyez
sur REP encore une fois.
Lecture répétée d’un titre
Vous pouvez lire un titre de façon répétée.
1 Appuyez sur REP1 pendant la lecture d’un titre
MP3.
L’indication “REP 1” apparaît sur l’afficheur.
Pour annuler la lecture répétée d’un titre, appuyez
sur REP1 encore une fois.
Lecture aléatoire
Vous pouvez lire tous les titres de l’album en cours dans
un ordre aléatoire.
1 Appuyez sur SHUF pendant la lecture d’un titre
MP3.
L’indication “SHUF” (Aléatoire) apparaît sur
l’afficheur.
Pour annuler la lecture aléatoire, appuyez sur SHUF
encore une fois.
FRANÇAIS
8
Page 32

Remarques
• Pendant la lecture aléatoire, un appui sur r ne vous
permet que de revenir au début du titre en cours, et non
au début du titre qui précède.
• Si vous sélectionnez un des modes cités auparavant
(Lecture des introductions, Lecture répétée d’un album,
Lecture répétée d’un titre, ou Lecture aléatoire),
l’indication du mode correspondante au mode de
lecture sélectionné (INTRO, REP, REP1, ou SHUF)
émet des flashs ou est affichée fixe.
AUTRES FONCTIONS
SEL
PS
Commande Jog (PUSH-SOURCE)
MATERIEL AUXILIAIRE
Ecoute d’un lecteur de cassette/MD/MP3
portable ou d’un autre matériel
Vous pouvez écouter de la musique via un matériel
raccordé à cet appareil. Reportez-vous au mode d’emploi
du matériel concerné pour des informations plus
détaillées.
Retirez les CD insérés pour éviter tout dommage éventuel
de l’appareil avant de raccorder le matériel.
Commande Jog
(PUSH-SOURCE)
1 Raccordez un lecteur de cassette/MD/MP3 portable
ou un autre matériel à la prise AUX (dia. 3,5 mm) de
l’appareil.
2 Appuyez plusieurs fois sur la commande Jog
(PUSH-SOURCE) jusqu’à ce que “AUX IN” s’affiche.
Prise AUX
Changement de la couleur d’illumination
des touches
Vous avez le choix entre le bleu et le rouge pour la
couleur d’illumination des touches.
1 Maintenez la commande Jog (PUSH-SOURCE)
pressé jusqu’à ce que “ILL” s’affiche.
2 Tournez la commande Jog pour sélectionner “1 (le
bleu)” ou “2 (le rouge)”.
Réglage du gradateur de l’affichage
1 Maintenez SEL pressé jusqu’à ce que “DIMMER”
s’affiche.
2 Tournez la commande Jog pour sélectionner “0
(clair)” ou “1 (assombri)”.
Affichage de l’indicateur de niveau VU
1 Mettez l’appareil hors tension.
2 Maintenez PS pressé jusqu’à l’affichage de “VU”.
3 Tournez la commande Jog pour sélectionner “ON”
(l’indicateur de niveau apparaît) ou “OFF” (l'indicateur
de niveau n’apparaît pas).
4 Appuyez sur PS.
9
FRANÇAIS
Page 33

CARTE
TÉLÉCOMMANDE
Nomenclature
1 Touche TUNER
2 Touche CD
3 Touche AMS (Auto music sonsor) r
4 Touche AMS (Auto music sonsor) t
5 Touche PS (préréglage)
6 Touches TUNING UP/DOWN
7 Touches VOLUME +/-
Préparatifs
Une pile au lithium est installée dans la télécommande
à l’usine.
Avant d’utiliser la télécommande, retirez la feuille isolante
en tirant simplement dessus.
Remplacement de la pile
1 Insérez la pointe d’un objet pointu A dans le trou B
et sortez le logement de la pile pour retirer la pile au
lithium (CR2025).
Télécommande (dos)
Logement de la pile
2 Installez la nouvelle pile au lithium (CR2025) avec la
face ) dirigée vers le logement de la pile.
3 Poussez le logement de la pile dans l’appareil
jusqu’au déclic de mise en place.
Télécommande (dos)
Feuille isolante
Remarque
Quand le récepteur infrarouge de l'appareil est exposé
en plein soleil, il peut ne pas répondre aux signaux de la
télécommande.
ATTENTIONS
• Pile au lithium (CR2025) pour la télécommande
Remplacez la pile uniquement par une pile Hitachi
Maxell, Panasonic ou Sony No. Composant CR2025.
L’utilisation d’une autre pile peut présenter un risque
d’incendie ou d’éclatement.
La pile peut éclater si elle subit un mauvais traitement.
Ne la rechargez pas, ne la démontez pas ou ne la jetez
pas au feu.
• Conservez la pile au lithium hors de portée des enfants.
En cas d’avalement, consultez immédiatement un
médecin.
• Pour éviter tout court-circuit, ne saisissez jamais la pile
avec une pince etc.
FRANÇAIS
10
Page 34

DÉPANNAGE
Codes d’erreur
Un code d’erreur spécifique apparaît dans les cas
suivants. Suivez les suggestions indiquées ci-dessous
pour résoudre de tels problèmes.
ERROR03 Erreur de concentration. Vérifiez que le
CD est chargé correctement (le côté
approprié dessus etc.), et qu’il contient
des données valables.
Bouton de réinitialisation
Si un CD ne fonctionne pas correctement, appuyez sur
le bouton de réinitialisation à l’aide d’un objet pointu
comme un crayon etc. Notez que cette manipulation
efface tous vos réglages.
Bouton de réinitialisation
ENTRETIEN
Nettoyage du panneau avant
Essuyez la surface avec un chiffon doux et sec. N’utilisez
pas de nettoyants liquides ou en aérosol.
Nettoyage du connecteur
Le connecteur doit être nettoyé de temps à autre.
Essuyez sa surface avec une ouate de coton légèrement
humidifiée d’alcool.
Dos du panneau avant
SPECIFICATIONS
SECTION RADIO
(FM)
Plage de fréquences: 87,5 MHz à 108 MHz
Sensibilité utilisable: 12,7 dBf
Seuil de sensibilité 50 dB: 17,2 dBf
Rejet IF: 100 dB
Réponse en fréquence: 30 Hz à 15.000 Hz
Rapport signal/bruit: 70 dB
Séparation stéréo: 35 dB à 1 kHz
Sélectivité d’un canal de remplacement: 98 dB
Taux de capture: 3 dB
(AM)
Plage de fréquences: 530 kHz à 1.710 kHz
Sensibilité utilisable: 30 µV (30 dB)
SECTION CD
Réponse en fréquence: 17 Hz – 20 kHz +0/–3 dB
Plage dynamique: Supérieure à 92 dB
Séparation des canaux: Supérieure à 60 dB
Rapport S/B: Supérieur à 90 dB
Scintillation et pleurage: Non mesurable
Décodage MP3: MPEG 1, couche 3 audio
SECTION AUDIO
Puissance de sortie max.: 45 W × 4 canaux
Entrée AUX
Sensibilité d’entrée (impédance de charge) AUX:
300 mV (10 kΩ)
GENERALITES
Tension d’alimentation: 14,4 V (11 à 16 V tolérés),
CC, masse négative
Impédance de charge: 4 Ω
Contrôle de la tonalité:
Graves ±10 dB à 100 Hz, aigus ±10 dB à 10 kHz
Tension de sortie préampli (impédance de
charge): 2,2 V (10 kΩ)
Encombrement: 182 (L) × 53 (H) × 155 (P) mm
1
(7
/4 (L) × 2 1/8 (H) × 6 1/8 (P) po.)
Accessoire fourni: Sac de transport (1)
11
FRANÇAIS
CARTE TELECOMMANDE
Dimensions: Environ 33 (L) × 85 (H) × 7,5 (P) mm
5
(1
/16 (L) × 3 3/8 (H) × 5/16 (P) po.)
Poids: Environ 20 g (0,7 on.) (y compris la pile)
• Les spécifications et l’aspect extérieur sont sujets à
modification sans préavis pour amélioration du produit.
Le sigle “BBE” et le “symbole BBE” sont des marques de
fabrique de BBE Sound,Inc.
Sous licence de BBE Sound,Inc.
Page 35

LIMITED W ARRANTY
Aiwa Strategic Accounts Partnership Inc. (“Aiwa”) warrants to the original consumer purchaser that this product is free of defects in material and workmanship at the time of purchase.
WARRANTY PERIODS
During the applicable LABOR warranty period, Aiwa will pay labor and service charges for the repair of defects or, at its option, will replace a defective product with a new or remanufactured
equivalent product. During the applicable PARTS warranty period, Aiwa will supply at no charge new or rebuilt replacement parts in exchange for defective parts. However, after the LABOR
warranty period, all labor and service charges are your responsibility. Replacement parts are warranted for the remainder of the original PARTS warranty period.
The LABOR and PARTS warranty periods for your product are listed below. All warranty periods commence with the purchase date.
LABOR PARTS
Car Audio 1 year 1 year
WHO PERFORMS AIWA’S WARRANTY?
Aiwa’s warranty obligations must be performed by an Aiwa Authorized Service Center. For the name of the Aiwa Authorized Service Center nearest to you call toll free 1-800-289-2492
(1-800-BUY-AIWA).
WHAT YOU MUST DO
To obtain warranty performance, you must take the product, or deliver the product freight prepaid, to an Aiwa Authorized Service Center. If shipped, the product must be packaged so that it is
protected from possible shipping damage. You must pick up the product when warranty performance is completed or, if you choose, and the product was received by the Service Center during
the LABOR warranty period, the repaired product will be returned to you freight prepaid. You must present to the Service Center, or include with your shipment, a dealer’s bill of sale, or other
original evidence, showing the date and place of purchase and describing the product purchased. Be sure to include your return address and daytime telephone number where you can be reached
should the need arise.
WHAT THE WARRANTY DOES NOT COVER
This warranty does not cover (1) products purchased outside of the U.S.A.; (2) product set-up, adjustment of controls, repair of antenna systems outside the unit; (3) removal or reinstallation,
batteries, carrying case, AC adapters and other accessories packaged with the product; (4) defects occurring after purchase due to repair or service other than by an Aiwa Authorized Service
Center, product modification, accident, misuse, abuse, or negligence; or (5) reception problems caused by signal conditions, or cable or antenna systems outside the unit. This warranty will not
apply if the serial number of the unit has been altered or removed.
REPAIR OR REPLACEMENT AS PROVIDED IN THIS WARRANTY IS THE PURCHASER’S EXCLUSIVE WARRANTY REMEDY. IMPLIED WARRANTIES, INCLUDING THE WARRANTIES OF
MERCHANTABILITY AND OF FITNESS FOR A PARTICULAR PURPOSE, SHALL NOT EXTEND BEYOND THE DURATION OF THE APPLICABLE PARTS WARRANTY PERIOD. IN NO EVENT SHALL
AIWA BE LIABLE FOR INCIDENTAL OR CONSEQUENTIAL DAMAGES IN CONNECTION WITH THIS PRODUCT. Some states do not allow limitations o
n how long an implied warranty lasts or the
exclusion or limitation of incidental or consequential damages, so the above limitations or exclusion may not apply to you. This warranty gives you specific legal rights, and you may also have
other rights which may vary from state to state.
IF YOU NEED HELP: For the latest in Product Information, Parts, Service Center listings and F.A.Q. information visit us on the web at www.us.aiwa.com or call 1-800-BUY-AIWA.
For further Aiwa information, please call 1-800-BUY-AIWA.
Visit us on the Internet at www.us.aiwa.com
D 455724401
http://www.aiwa.com/
Sony Corporation Printed in Thailand
 Loading...