

Page 1

AV SURROUND RECEIVER
AV- N W 5 0
OPERATING INSTRUCTIONS
MANUAL DE INSTRUCCIONES
MODE D’EMPLOI
BEDIENUNGSANLEITUNG
ISTRUZIONI PER L’USO
GEBRUIKSAANWIJZING
NÁVOD K OBSLUZE
HASZNÁLATI UTASÍTÁS
En (English)
E (Español)
F (Français)
D (Deutsch)
I (Italiano)
NL
(Nederlands)
Cz (Česky)
M (Magyar)
8C-AR5-906-01
020520ACK-H-S
EZ
INSTRUKCJA OBSŁUGI
Po (Polski)
Page 2

ENGLISH
WARNING
TO REDUCE THE RISK OF FIRE OR
ELECTRIC SHOCK, DO NOT EXPOSE THIS
APPLIANCE TO RAIN OR MOISTURE.
RISK OF ELECTRIC SHOCK
DO NOT OPEN
“CAUTION: TO REDUCE THE RISK OF
ELECTRIC SHOCK,
DO NOT REMOVE COVER (OR BACK).
NO USER-SERVICEABLE PARTS INSIDE.
REFER SERVICING TO QUALIFIED
SERVICE PERSONNEL.”
OBSERVERA
Så länge som apparaten är ansluten till nätet flyter en
svag ström genom densamma, även då den är avstängd.
Om man under en längre tid ej har för avsikt att använda
den, drag då ur nätkabeln.
BEMÆRK
Apparatet er stadig forbundet med lysnettet, så længe
stikket er tilsluttet til stikkontakten, selv om afbryteren
er slået fra. Hvis
apparatet ikke bruges i længere tid, skal netledningen
trækkes ud.
PRECAUTIONS
Read the Operating Instructions carefully and completely before
operating the unit. Be sure to keep the Operating Instructions for
future reference. All warnings and cautions in the Operating
Instructions and on the unit should be strictly followed, as well
as the safety suggestions below.
Installation
1Water and moisture — Do not use this unit near water, such
as near a bath, sink, swimming pool, or the like.
2 Heat — Do not use this unit near sources of heat, including
heating vents, stoves, or other appliances that generate heat.
It also should not be placed in temperatures less than 5°C or
greater than 35°C.
3 Mounting surface — Place the unit on a flat, even surface.
4Ventilation — The unit should be situated with adequate space
around it so that proper heat ventilation is assured. Allow 10
cm clearance from the rear and the top of the unit, and 5 cm
from each side.
- Do not place the unit on a bed, rug, or similar surface that
may block the ventilation openings.
- Do not install the unit in a bookcase, cabinet, or airtight rack
where ventilation may be impeded.
5 Objects and liquid entry — Take care that objects or liquids
do not get inside the unit through the ventilation openings.
6 Carts and stands — When placed or mounted on a stand or
cart, the unit should be moved with care.
Quick stops, excessive force, and uneven surfaces may cause
the unit or cart to overturn or fall.
7Wall or ceiling mounting — The unit should not be mounted
on a wall or ceiling, unless specified in the Operating
Instructions.
Electric Power
1 Power sources — Connect this unit only to power sources
specified in the Operating Instructions, and as marked on the
unit.
2 AC power cord
- When disconnecting the AC power cord, pull it out by the AC
power plug. Do not pull the cord itself.
- Never handle the AC power plug with wet hands, as this could
result in fire or shock.
- Power cords should be firmly secured to avoid being severely
bent, pinched, or walked upon. Pay particular attention to the
cord from the unit to the power socket.
-Avoid overloading AC power sockets and extension cords
beyond their capacity, as this could result in fire or shock.
3 When not in use — Unplug the AC power plug from the AC
power socket if the unit will not be used for several months or
more. When the cord is plugged in, a small amount of current
continues to flow to the unit, even when the power is turned off.
Maintenance
Clean the unit only as recommended in the Operating
Instructions.
2
ENGLISH
Page 3

Damage Requiring Service
Have the unit serviced by a qualified service technician if:
- The AC power cord or plug has been damaged
- Foreign objects or liquid have got inside the unit
- The unit has been exposed to rain or water
- The unit does not seem to operate normally
- The unit exhibits a marked change in performance
- The unit has been dropped, or the cabinet has been damaged
DO NOT ATTEMPT TO SERVICE THE UNIT YOURSELF.
TABLE OF CONTENTS
PRECAUTIONS ................................................................... 2
PREPARATIONS
CONNECTIONS .................................................................. 4
BEFORE OPERA TION........................................................9
SOUND
CUSTOM AUDIO ADJUSTMENT ..................................... 10
DSP SURROUND.............................................................. 10
BASIC OPERA TIONS
SELECTION OF AUDIO/VIDEO SOURCE.......................11
RECORDING AN AUDIO SOURCE .................................12
RADIO RECEPTION
MANUAL TUNING ............................................................. 12
PRESET TUNING .............................................................. 13
RDS FEATURES ............................................................... 13
ADJUSTMENTS ................................................................ 14
DOLBY SURROUND AND DTS SURROUND
TURNING SURROUND ON AND OFF............................. 15
SETTING SPEAKER SIZE AND DISTANCE ................... 16
ADJUSTING SPEAKER LEVEL BALANCE .................... 17
OTHER SETTINGS ........................................................... 18
TIMER
SETTING THE SLEEP TIMER .......................................... 19
GENERAL
CARE AND MAINTENANCE ............................................ 19
TROUBLESHOOTING GUIDE .......................................... 19
SPECIFICATIONS............................................................. 20
PARTS INDEX ...................................................................21
APPENDIX
BRAND CODES .............................................................. A-1
Check your accessories
Remote control
FM antenna AM antenna
En
Operating Instructions, etc.
ENGLISH
3
Page 4
PREPARATIONS
CONNECTIONS
Before connecting the AC cord
The rated voltage of your unit shown on the rear panel is 230 V
AC. Check that the rated voltage matches your local voltage.
IMPORTANT
Plug in the AC power cord to the AC power socket after all other
connections are made.
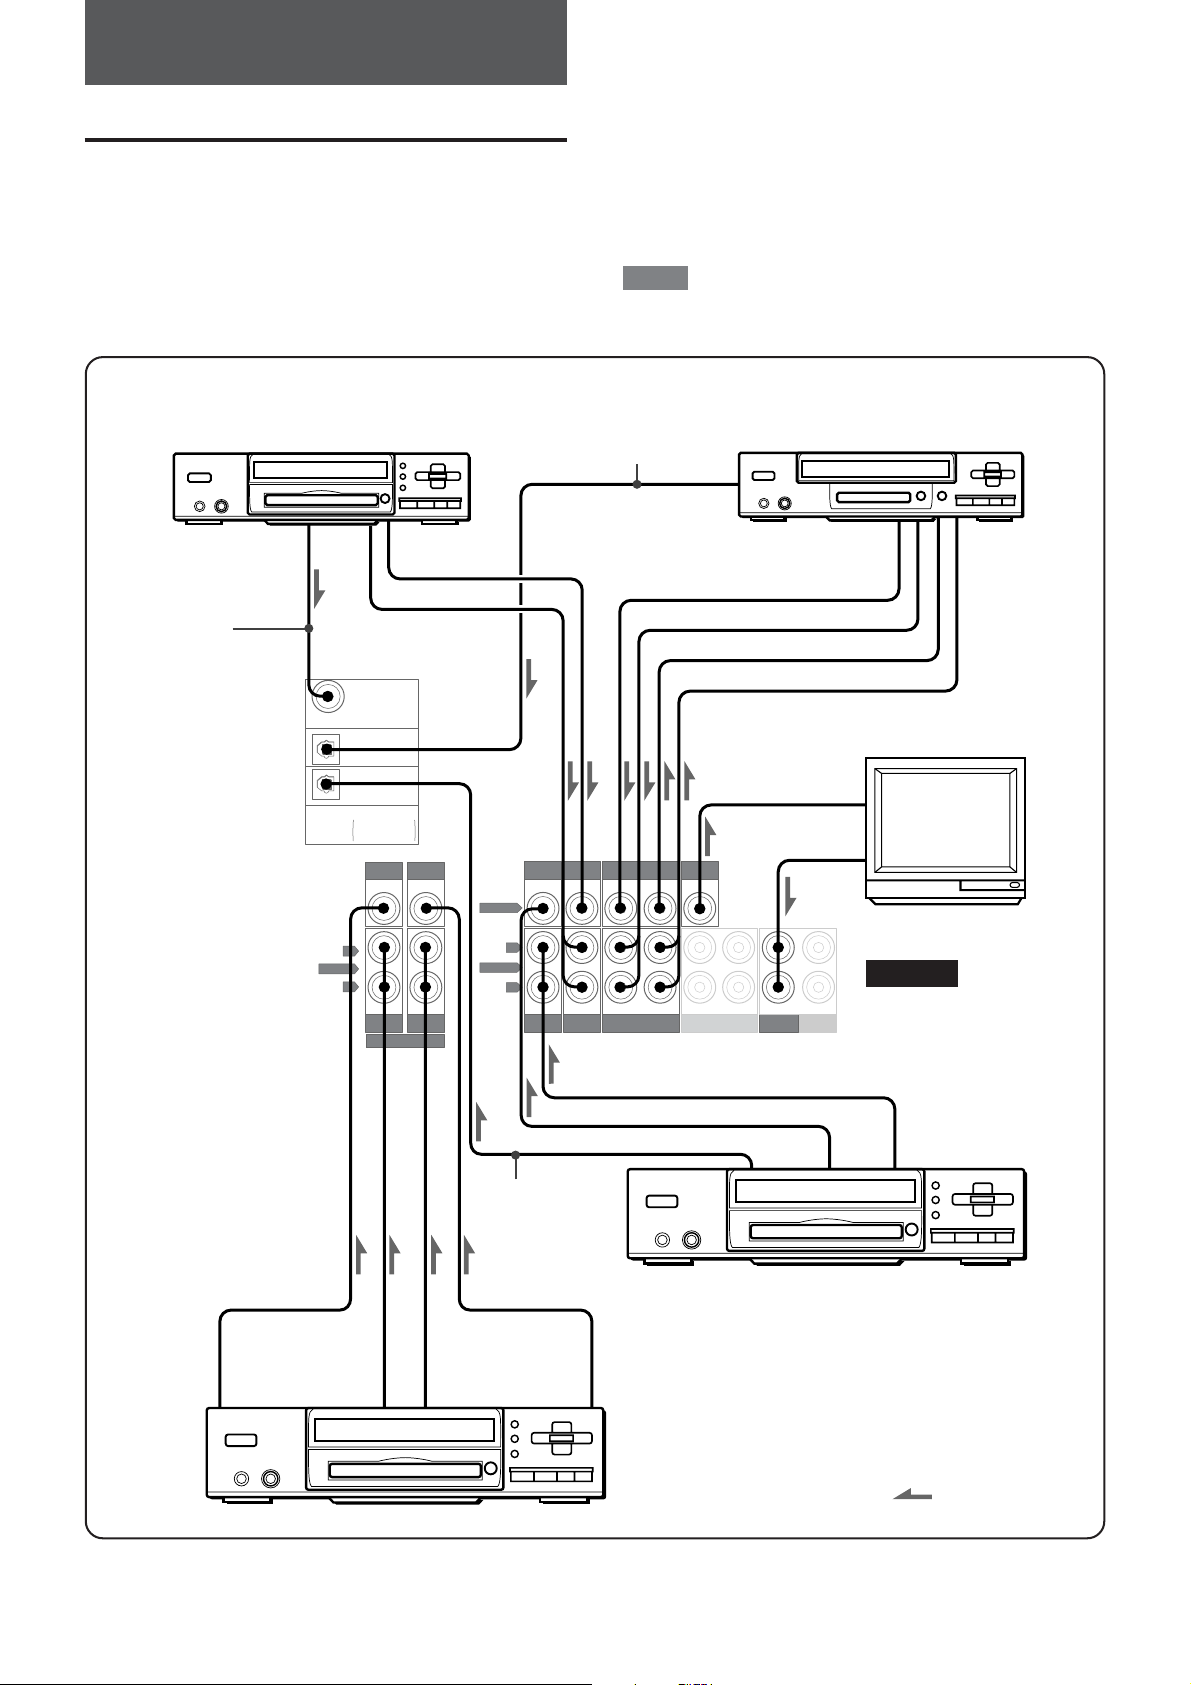
Video equipment connections
DVD, video 2*1, LD*2 or cable TV
to COAXIAL
DIGITAL OUT
Coaxial
connecting cord
COAXIAL
(VIDEO 2)
OPTICAL
(VIDEO 1)
OPTICAL
(DVD)
DIGITAL IN
PCM
/
DOLBY DIGITAL
DTS
SUB
WOOFER
IN IN
to VIDEO OUT*
to AUDIO OUT
3
*
3
*
3
*
/
CENTER
Optical connecting cord
to OPTICAL DIGITAL OUT
4
DVD
ININININININOUT
VIDEO
CONNECTING EQUIPMENT
Jacks and plugs of the connecting cord are colour-coded as
follows:
Red jacks and plugs: For the rigtht channel of audio signals
White jacks and plugs: For the left channel of audio signals
Yellow jacks and plugs: For video signals
NOTE
Insert the plugs fully into the jacks. Loose connections may
produce a humming sound or other noise interference.
Video 1*1 or MD player
to VIDEO OUT (Video 1)
to AUDIO OUT
to VIDEO IN (Video 1)
to AUDIO IN
TV
to VIDEO IN
VIDEO 2/
LD / TV
VIDEO 1 / MD
VIDEO OUT
to AUDIO OUT
MONITOR
AUDIO
L
R
FRONT
5.1CH INPUT
ININ
SURROUND
AUDIO
L
R
VIDEO 2
DVD
LD / TV
to OPTICAL DIGITAL OUT
Optical
connecting cord
to SUB WOOFER OUT to CENTER OUT
to FRONT OUT to SURROUND OUT
/
VIDEO 1 / MD
DVD player
OUT IN IN INOUT
TAPE AUX CD
to AUDIO OUT
to VIDEO OUT*
REAR
4
DVD player
Signal stream
4
ENGLISH
Page 5
Audio equipment connections
VIDEO 2/
DVD
LD / TV
ININININININOUT
L
R
VIDEO 2
DVD
LD / TV
VIDEO 1 / MD
/
VIDEO 1 / MD
AUDIO
WOOFER
L
R
FRONT
5.1CH INPUT
SUB
CENTER
IN IN
SURROUND
VIDEO
AUDIO
ININ
to LINE IN
to LINE OUT
Tape deck
*1When connecting a monaural video recorder, use a stereo-mono
connecting cord (not supplied).
*2When connecting an LD player equipped with the AC-3 RF OUT
terminal, use an RF demodulator unit. Also connect the analogue
AUDIO OUT terminals of the LD player to the receiver to play all
the sources. For further information, refer to the instructions of
the LD player.
*3Input sound through the 5.1CH INPUT or DIGITAL IN terminals
(COAXIAL (VIDEO 2), OPTICAL (VIDEO 1) and OPTICAL (DVD))
cannot be recorded. When recording the sound from the DVD,
CD, MD or LD player, connect the analogue AUDIO OUT terminals
of the player to the corresponding AUDIO IN terminals of the
receiver.
*4With this connection, the picture noise may appear when playing
copy protected DVDs. In this case, it is recommended to connect
the VIDEO OUT terminal of the DVD player directly to a TV set,
not through the receiver.
MONITOR
VIDEO OUT
OUT IN IN INOUT
TAPE AUX CD
to LINE OUT
CD player
Signal stream
u
DVD PLAYERS CONNECTIONS
To connect a DVD player without a decoder, connect the player
to the DIGITAL IN terminals of the unit.
To connect a DVD player with a decoder and 5.1 ch output
terminals, connect the player to the 5.1CH INPUT terminals of
the unit.
• The 5.1CH INPUT terminals can also be used when connecting
a digital TV with multi-audio output terminals.
PREPARATIONS
En
ENGLISH
5
Page 6

1, 2 and 3 in the illustration correspond to the following details.
3AM antenna
1Front speakers B
Right
Left
1Sub woofer
3FM antenna
1Surround speakers
Right Left
CONNECTING SPEAKERS 1
Speaker terminals
There are three types of speaker output terminals.
Screw type (FRONT SPEAKERS A)
The speaker terminal is opened by turning it counterclockwise.
After inserting the stripped wire into the terminal slot, tighten
down by turning it clockwise to secure the wire.
Flap type (FRONT SPEAKERS B, SURROUND SPEAKERS
and CENTER SPEAKER)
The speaker terminal is opened by lifting the terminal flap. After
inserting the stripped wire into the terminal slot, close the flap to
lock the wire in place.
2AC outlets
1Front speakers A
Right Left
1Centre speaker
Connect front speakers (system A and/or B), a centre speaker,
surround speakers and a sub woofer to the corresponding
speaker terminals on the unit:
- the front speaker cords to the FRONT SPEAKERS terminals
When connecting only one set of front speakers, connect
them to the FRONT SPEAKERS A terminals.
The FRONT SPEAKERS B terminals (speaker system B) are
for use of 2 channel stereo system only.
- the centre speaker cord to the CENTER SPEAKER terminals
- the surround speaker cords to the SURROUND SPEAKERS
terminals
- the sub woofer (with a built-in amplifier) cord to the SUB
WOOFER jack, for more powerful bass sounds
- When not connecting the sub woofer, be sure to select
"R,VNEE " (sub woofer off) mode (see the next page).
- When not connecting the centre speaker and/or surround
speakers, and regarding to the size of speakers (including
front speakers), speaker settings must be done. Before using
the unit, be sure to make speaker settings in accordance with
your speaker configuration (see page 16).
Speaker impedance
For all speakers, use speakers of 8 ohms or more.
Jack type (SUB WOOFER)
Simply plug in the sub woofer cord here.
R
B
E
U
F
S
O
O
T
W
U
O
6
ENGLISH
Connecting + to +, - to - terminals
To get the proper sound effect, the speaker terminals on the unit
and the speaker should be connected with proper polarity; the
+ terminal on the unit should be connected to the + terminal on
the speaker (and - to -).
NOTE
•Be sure to connect the speaker cords correctly. Improper
connections can cause short circuits in the SPEAKER(S)
terminals.
• Do not leave objects generating magnetism near the speakers.
Page 7
POSITIONING THE SPEAKERS
Position the speakers to make the most of Dolby, DTS or DSP
surround effect.
Front speaker (L/R)
Centre speaker (C)
Position in the centre of the two front speakers. In addition,
position on or below the TV set, if connecting a TV set to the
unit.
Surround speakers (LS/RS)
Place the surround speakers directly to the side of or slightly
behind the listening area. Align them horizontally, about 1 metre
above ear height.
Sub woofer (SW)
Place the sub woofer in any place near the two front speakers.
Before using the unit, be sure to make speaker settings in
accordance with your speaker configuration (see page 16).
CONNECTING THE SUPPLIED
ANTENNAS 3
Connect the FM antenna to the FM 75Ω terminal and the AM
antenna to the AM LOOP jack.
FM antenna
AM antenna
P
O
LO
NA
AM
TEN
AN
Ω
75
FM
AXIAL)
(CO
PREPARATIONS
When not connecting the sub woofer
Select the "R,VNEE " mode when the speaker system B is
turned off.
1 Press and hold FRONT SPEAKERS A until "EQK@QFD " is
displayed.
2Within 6 seconds, turn MULTI JOG so that "R,VNM " (initial
setting) is displayed.
3 Press ENTER.
4Within 6 seconds, turn MULTI JOG so that "R,VNEE " is
displayed, then press ENTER.
To stand the AM loop antenna on a surface
Fix the claw to the slot as shown in the illustration.
To position the antennas
Keep antennas away from metallic objects, electrical equipment
(including the unit itself) and cords.
FM antenna: Extend fully and position for the best reception. If
reception is poor, connect an optional outdoor antenna to the
FM 75Ω terminal.
AM antenna: Rotate to find best reception.
En
USING AC OUTLETS ON THE UNIT 2
The unit is equipped with AC outlets. You can use them once the
unit is connected to an AC power socket on a wall.
Do not connect equipment beyond their capacity (120 W, 1 A
MAX. and TOT AL).
ENGLISH
7
Page 8

ABOUT THE REMOTE CONTROL
Inserting batteries
Open the battery cover on the rear of the remote control and
insert two R6 (size AA) batteries.
Operating other equipment
Press the corresponding source button you want to operate. The
remote control goes into the corresponding source operation
mode.
Some brands have plural brand codes.
After setting a brand code, check whether the remote control
functions correctly or not by pressing basic operation buttons
such as POWER, c and s. If not, try to set other codes.
To operate this receiver after operating other equipment,
press TUNER to restore the normal mode.
• Replace the batteries with new ones when the operational
distance between the remote control and the main unit becomes
shorter.
• Remove the batteries if the unit is not going to be used for an
extended period of time.
• The remote control may not operate if it is used under intense
sunlight or if its line of sight is obstructed.
Important
ENTER on the remote control substitutes for ENTER on
the main unit when the function is FM or AM. In other
functions, this button is mainly for operating the DVD player.
To use the function printed above the button in orange
Hold down SHIFT and press the button.
To select the function with the remote control
Press FUNCTION repeatedly. The function changes cyclically.
OPERA TING OTHER EQUIPMENT
This remote control allows you to operate other equipment
besides this receiver by inputting the brand code.
FUNCTION
0-9
VIDEO1,
VIDEO2,
DVD,CD,
CABLE/SAT.,
TV
TUNER
NOTE
• The remote control may not correspond to all the models of the
brand shown at the end of the operating instructions.
• Some buttons on the remote control may not work exactly.
• When the batteries are removed, all the settings stored in
memory may be lost.
SHIFT
Setting the brand code
Before operation, check the brand code of your equipment. Brand
code is shown at the end of the operating instructions.
1Turn on the equipment to be operated with the
remote control.
2 Hold down the corresponding source button
(VIDEO 1, VIDEO 2, TV, DVD, CD or CABLE/SAT.)
and press the numbered buttons 0-9 to input the
three-digit brand code.
3 Release the corresponding source button.
8
ENGLISH
Page 9

BEFORE OPERATION
POWER
FRONT SPEAKERS A,B
6STANDBY/ON
INPUT MODE
DIMMER
PHONES
POWER
INPUT MODE
DISPLAY
SHIFT
Turning on the front speaker system A and/or B
To turn on the front speaker system A: press FRONT
SPEAKERS A so that "RO3A" is displayed. To turn it off, press it
again.
To turn on the front speaker system B: press FRONT
SPEAKERS B so that "RO3B" is displayed. T o turn it of f, press it
again.
Both systems can be turned on at the same time.
NOTE
• The front speaker system B is for use of 2 channel stereo system
only. When turning on the front speaker system B:
- surround mode or DSP mode is automatically canceled and
cannot be turned on.
-"R,VNEE (sub woofer off) " mode is selected automatically .
• The front speaker system A & B are connected in series.
So the sound cannot be heard if the both speaker systems are
turned on when only one speaker system is connected.
PREPARATIONS
To turn the unit on
Press POWER 6ST ANDBY/ON (POWER).
The STANDBY/ON indicator lights in green.
Operation is possible after four seconds. The volume level and
function name are displayed one after the other for the first eight
seconds.
To change the brightness level of the display
Press DIMMER (hold down SHIFT and press
DISPLA Y) repeatedly.
The dimmer mode changes as follows.
DIM-OFF
DIM-OFF: The normal display
DIMMER 1: The illumination of the display is dimmer than usual.
DIMMER 2: The illumination of the display is dimmer.
DIMMER 3 (no display): Everything on the display is cleared.
NOTE
While in the mode other than DIM-OFF , if you operate the receiver ,
the display illuminates at the DIM-OFF level, and after 6 seconds,
the display brightness returns to the level previously set.
Note that "DIMMER" is displayed for one second before
everything is cleared when the previously set level is "no display".
DIMMER 1 DIMMER 2
DIMMER 3 (No display)
SOURCE DIRECT FUNCTION
You can cancel all the sound adjustments (except the volume),
with their settings kept in memory, to listen to the original source
sound.
Press INPUT MODE once so that "R,CHQDBS " is
displayed.
To restore the sound adjustments, press it repeatedly to display
"@M@KNF " or "CHFHS@K ".
• This function is not activated with the TUNER (FM or AM) and
5.1ch IN functions or with the "EQRL@KK (front speaker small)"
mode.
• When the source direct function is activated:
- SURROUND, DSP, BASS and TREBLE do not function.
-"R,VNEE (sub woofer off) " mode is selected automatically .
See the next page for the sound adjustments.
En
Using the headphones
Connect headphones with a standard stereo plug (ø6.3 mm) to
the PHONES jack. Be sure to turn off the speakers by pressing
FRONT SPEAKERS A and/or B. Otherwise sound is output from
the speakers.
To turn the unit off, press POWER 6STANDBY/ON (POWER).
The STANDBY/ON indicator turns to red.
ENGLISH
9
Page 10

SOUND
DISCO 1 DISCO 2 HALL 1 HALL 2 LIVE 1
LIVE 2CHURCH 1CHURCH 2MOVIE 1MOVIE 2
CUSTOM AUDIO ADJUSTMENT
MASTER VOLUME
BALANCE MUTING
TONE
JOG
-,+
VOLUME
MULTI JOG
BASS
TREBLE
VOLUME CONTROL
Turn MASTER VOLUME (press VOLUME +,-).
Adjust from 0 (minimum) to 49 and MAX (maximum).
Volume level setting is retained during power-off standby. If the unit
is turned off with the volume set to 21 or higher, it is automatically
turned down to 20 the next time the unit is turned on.
Left and right balance of the front and surround speakers
(except in 5.1ch IN function)
1 Press BALANCE repeatedly.
"K.Q/cA " and "KR.QR/cA *" appear alternately.
"K.Q/cA " means that the left and right front speakers level is
the same.
"KR.QR/cA *" means that the left and right surround speakers
level is the same.
Select one of them to adjust it.
* This is not displayed in stereo mode (SURROUND off or
DSP off) or when the surround speakers are set to "MNMD ".
2Turn MULTI JOG (press JOG +,- repeatedly).
Example:
"K=Q4cA " means that the left front speaker level is 5 dB higher
than that of the right front speaker.
"KR;QR0/cA" means that the right surround speaker level is
10 dB higher than that of the left surround speaker.
NOTE
• The adjustable level ranges from 0 to 10 dB.
• The surround speaker balance can be adjusted only when
SURROUND or DSP is set to on and the surround speakers
are not set to "MNMD ".
Muting the sound temporarily
Press MUTING so that "LTSDNM " appears on the display . The
sound is muted.
To return to the previous volume level, press MUTING again.
"LTSDNEE " is displayed.
To reset the volume and balance to the default value, press and
hold BALANCE until "KUKQDRDS " is displayed.
All the speaker volume as well as the left and right balance of
the front and surround speakers are reset to the default value
(0 dB).
BASS AND TREBLE (except in 5.1ch IN
function)
+,BALANCE
MUTING
DSP SURROUND
MULTI JOG
DSP
The DSP (Digital Signal Processor) surround circuits can recreate
the effect of sounds reflected from walls or ceilings, to obtain the
sound presence of real environments. The unit provides 10 DSP
preset modes.
1 Press DSP.
2Within 6 seconds, turn MULTI JOG to select the
desired DSP mode.
The "CRO" and "R" (surround speakers) indicators light up.
When the music source is monaural
The DSP system may not work effectively depending on the
selected DSP mode.
To cancel the selected mode
Press DSP to display the DSP mode name, and press the button
again within 6 seconds. "CRONEE " appears on the display.
To select with the remote control
1 Press DSP.
2Within 6 seconds, press JOG + or - repeatedly until the
desired DSP mode is displayed.
NOTE
• DSP cannot be turned on when the surround speakers are set
to "MNMD ".
• DSP is automatically cancelled when SURROUND is turned
on, and vice versa.
• DSP is automatically cancelled and cannot be turned on:
–When the 5.1ch IN function is selected.
–When the source direct function is activated.
–When the front speaker system B is turned on.
–When the input signal is 96 kHz.
SOUND ADJUSTMENT DURING
RECORDING
The output volume and tone of the speakers or headphones may
be freely varied without affecting the level of the recording.
DSP
JOG
-,+
Turn BASS or TREBLE.
The adjustable level for the bass sound and the treble sound
ranges from –10 to +10 dB at 2 dB steps.
Adjusting bass and treble with the remote control
1 Press TONE repeatedly to select BASS or TREBLE.
2 Press JOG + or - to adjust the bass or treble level.
10
ENGLISH
Page 11

BASIC OPERATIONS
SELECTION OF AUDIO/VIDEO
SOURCE
TAPEVIDEO 15.1ch IN VIDEO 2
FUNCTION
INPUT
MODE
TV/VIDEO
JOG
-,+
FUNCTION
ENTER
TUNING
INPUT MODE
1Turn FUNCTION to select the program source.
The function changes in the following order.
FM AM DVD CD AUX
The actual source selected (except FM and AM) depends on
the equipment connected to the input terminals on the rear
panel of the unit.
For example, if an MD player is connected to the VIDEO 1/
MD terminals, select VIDEO 1 to listen to the MD playback
sound.
To select with the remote control
Press FUNCTION repeatedly.
2Start the selected program source.
3 Adjust the sound.
SELECTION OF VIDEO SOURCE
TO CHANGE A DISPLAYED NAME FOR
THE VIDEO 1 AND VIDEO 2 FUNCTION
When the VIDEO 1 function is selected, VIDEO 1 is displayed
initially. It can be changed to MD.
While pressing ENTER, press INPUT MODE.
The displayed name for the VIDEO 2 function can be changed to
VIDEO 2, LD or TV. Select VIDEO 2 function.
While pressing ENTER, press INPUT MODE.
TO SELECT "ANALOG" OR "DIGIT AL"
MODE OF THE DVD, VIDEO 1 OR VIDEO 2
FUNCTION
Select DVD, VIDEO 1 or VIDEO 2 function and press INPUT
MODE repeatedly so that the desired mode "@M@KNF " or
"CHFHS@K " is displayed.
In DIGITAL mode: Equipment connected to the DIGITAL IN
OPTICAL (DVD) terminal is selected as a source for the DVD
function, equipment connected to the DIGITAL IN OPTICAL
(VIDEO 1) terminal for the VIDEO 1 function, and equipment
connected to the DIGITAL IN COAXIAL (VIDEO 2) terminal for
the VIDEO 2 function.
In ANALOG mode: Equipment connected to the DVD terminals
is selected as a source for the DVD function, equipment
connected to the VIDEO 1/MD terminals for the VIDEO 1 function,
and equipment connected to the VIDEO 2/LD/TV terminals for
the VIDEO 2 function.
WHEN THE "OVER LEVEL" INDICA TOR
LIGHTS UP
When input analogue signals from the connected equipment are
too high to accept, the NUDQKDUDK indicator lights up. In this
case, adjust the input level so that the indicator disappears.
To adjust the sound level of the connected source
When the analogue sound level of the connected source is higher
or lower than that of the FM and AM functions, adjust it as follows.
BASIC OPERA TIONS
En
While selecting a program source which does not contain video
input (such as a CD player), you can select a video source
separately to be viewed on the TV.
1Press FUNCTION repeatedly to select FM, AM, CD,
AUX, T APE or 5.1ch IN.
2 Press TV/VIDEO.
3 Press JOG +, - repeatedly.
The video source to be output through the MONITOR VIDEO
OUT jack changes in the following order.
M-OUT V1 M-OUT V2 M-OUT DVD
L,NTSU0 : Video image of the equipment connected to the
VIDEO 1/MD terminals can be viewed on the TV.
L,NTSU1 : Video image of the equipment connected to the
VIDEO 2/LD/TV terminals can be viewed on the TV.
L,NTSCUC : Video image of the equipment connected to the
DVD terminals can be viewed on the TV.
1 Select the function to be adjusted.
Turn FUNCTION and play the source.
2 Press TUNING M or N repeatedly.
The level changes as follows.
–6 dB 0 dB +6 dB
ENGLISH
11
Page 12

MULTI JOG
0-9,+10
C
FUNCTION
ENTER
TUNING
AUTO PRESET
i,k,j,l
ENTER
FUNCTION
RADIO RECEPTION
RECORDING AN AUDIO SOURCE
FUNCTION
FUNCTION
1 Select the program source to be recorded.
Turn FUNCTION (or press FUNCTION repeatedly).
2 Set the tape deck or MD recorder to recording
mode.
3Start the selected program source.
NOTE
• Any sound control system has no effect on recording (see page
10).
• Input sound through the DIGITAL IN terminals cannot be
recorded. When recording the sound from the DVD, CD, MD or
LD player, connect the analogue AUDIO OUT terminals of the
player to the corresponding AUDIO IN terminals of the receiver .
The sound will be recorded in 2 ch stereo.
• Input sound from the tape deck connected to the TAPE IN
terminals cannot be recorded.
MANUAL TUNING
1Turn FUNCTION (or press FUNCTION repeatedly)
to select the desired band; FM or AM.
2 Press TUNING N or M to tune in a station.
Alternatively, press j or l on the remote control.
"STMD " is displayed when a station is tuned in.
"1" is displayed for FM stereo reception.
To search for a station automatically (Auto search)
Hold down TUNING N or M (or j or l).
The unit searches for a station and stops at reception.
To stop the search manually, press TUNING N or M (or j or
l).
• Auto search may not stop at stations with weak signals.
12
ENGLISH
Page 13

PRESET TUNING
TUNER
MODE
SHIFT
MULTI JOG
TUNING
INPUT MODE
POWER
6STANDBY/ON
RT
PTY
ENTER
You can preset up to 32 stations and tune them in directly.
MANUAL PRESETTING
1Tune in the desired station.
2 Press ENTER to store the station.
The preset number, beginning from "0" appears on the display .
3 Repeat steps 1 and 2 to store other stations.
The next station will not be stored if a total of 32 preset stations
have already been stored. ("ETKK " is displayed.)
AUTOMA TIC PRESETTING
RDS FEATURES
RADIO RECEPTION
Scans the receivable frequency range and stores tuned stations
automatically with the preset number.
1Turn FUNCTION to select FM or AM.
2 Hold down AUTO PRESET for about 2 seconds
until "AUTO PRESET" runs through the display.
Then release the button. Scanning begins with the FM band.
The frequency will be displayed when a tuned station is stored.
The display will return to the first stored station when scanning
is finished.
• The unit scans the AM band if preset numbers are still available.
• Automatic presetting clears all the previously stored preset
stations.
•If identical RDS stations with alternative frequencies are
detected, only the station with the stronger signal is stored.
TUNING IN PRESET STATIONS
1 Select a band.
2Turn MULTI JOG to select a preset number.
Alternatively, press i or k on the remote control.
You can tune in the desired preset station directly by pressing
the numbered buttons on the remote control.
-To select preset number 25, press 2 and 5.
-To select preset number 7, press 7.
To clear a preset station
1Tune in the station by preset tuning.
2 Press ENTER, and press ENTER again while the frequency
flashes on the display.
Alternatively, press ENTER or C on the remote control, and
press ENTER while the frequency flashes on the display.
RDS (Radio Data System) is a broadcasting service which allows
FM stations to send additional information along with the regular
radio signal.
The additional information is derived from the features of RDS
described below.
NOTE
The RDS features described below may not function correctly if
the RDS transmission data from the station contains too much
interference or the reception is too weak.
PROGRAM SERVICE STA TION NAME (PS)
The station name is displayed automaticallly when an RDS station
is tuned in.
RADIO TEXT (RT)
You can show text information such as the title of a song on the
display.
Press RT.
When the tuned station is transmitting RT codes, radio texts will
appear on the display.
If the tuned station is not transmitting RT codes, "MNQS " is
displayed.
To return to the regular display
Press RT again. The frequency display returns. Press RT once
again and the station name display returns.
PROGRAM TYPE (PTY)
This is an identification to specify the program being broadcast
currently.
En
Press PTY to display a program type when tuning
in an RDS station.
The program type will be displayed for 10 seconds.
If no PTY data or undefined PTY data is being transmitted, "MN
OSX " or "TMCDEHMD " is displayed.
ENGLISH
13
Page 14

The following PTYs can be received on the unit
*TRAFFIC, NEWS, AFFAIRS , INFO, SPORT, EDUCATE,
DRAMA, CULTURE, SCIENCE, VARIED, POP M, ROCK M,
EASY M (easy listening music), LIGHT M (light classical music),
CLASSICS, OTHER M (other music), WEATHER, FINANCE,
CHILDREN (children’s program), SOCIAL (social affairs),
RELIGION, PHONE IN, TRAVEL, LEISURE, JAZZ, COUNTRY
(country music), NATION M (national music), OLDIES, FOLK M,
DOCUMENT, TEST (alarm test), ALARM.
*The unit identifies TRAFFIC with one of the PTYs.
PTY SEARCH
The unit can search for a station broadcasting your desired PTY
easily. To do so,
advance since the unit searches only the preset stations.
you need to preset every available station in
1 Press PTY.
The program type of the currently tuned station is displayed.
2Within 4 seconds, press TUNING N/M or turn
MULTI JOG to select a program type.
3Within 4 seconds, press PTY again.
The search begins, stops when a suitable station is detected,
and the unit tunes it in.
"MNSENTMC " is displayed if a suitable station is not found,
and the unit returns to the previous station.
If TRAFFIC is selected
The unit searches for a station which regularly broadcasts traffic
announcements. Therefore, a detected station may not be
currently broadcasting traffic announcements. Y ou will, however ,
be able to hear the announcements in a while.
ENHANCED OTHER NETWORKS
INFORMATION SEARCH
NOTE
PTY and Enhanced Other Networks Information search do not
function under the following conditions:
- FM stations are not preset.
- The signals of the station broadcasting the desired PTY are
weak.
- FM RDS stations cannot be received.
ADJUSTMENTS
To switch to monaural FM reception
Hold down SHIFT and press TUNER MODE on the remote control
so that "LNMN " is displayed.
Noise is reduced, although reception is monaural.
To cancel, repeat the above so that "RSDQDN " is displayed.
When the reception contains noise interference
Move the unit away from other electrical appliances, especially
digital audio devices, or turn off the applicances that generate
noise signals.
To switch the AM tuning interval
The default setting of the AM tuning interval is 9 kHz/step. If you
use this unit in an area where the frequency allocation system is
10 kHz/step, change the tuning interval.
Hold down INPUT MODE and press POWER 6STANDBY/ON
on the unit.
To reset the interval, repeat this procedure.
NOTE
When the AM tuning interval is changed, all preset stations are
cleared.
The unit can leap to a station which has just started broadcasting
your desired PTY.
In Enhanced Other Networks Information search, the unit is in
standby mode until the desired PTY begins. As soon as it begins,
the unit "leaps to" another station with the PTY and returns to
the previously tuned station when it ends.
You need to preset every available station in advance since the
unit searches only the preset stations.
1 Press PTY.
The program type of the currently tuned station is displayed.
2Within 4 seconds, press TUNING N/M or turn
MULTI JOG to select a program type.
3Within 4 seconds, press ENTER.
"OSXNM " is displayed for 3 seconds and then the unit enters
the standby mode while "@TSN " flashes. When the unit leaps
to another station, "@TSN " flashes rapidly.
To cancel the standby mode
Hold down PTY . (Do not release PTY yet.) " OSXBGDBJ " and the
specified PTY are displayed alternately . At this time, press ENTER
with pressing PTY . "OSXNEE " is displayed and the standby mode
is cancelled.
14
ENGLISH
Page 15

DOLBY SURROUND AND DTS SURROUND
This unit is equipped with the Dolby Pro Logic decoder, Dolby
Digital decoder and DTS decoder.
The unit and the centre and surround speakers (standard) assure
full-scale home theatre sound. When playing back discs or video
software that have been recorded in Dolby Pro Logic, Dolby Digital
surround or DTS surround, astonishingly realistic sound
surrounds the listener to create a new level of audio/visual
entertainment.
Independent control of the five channels allows the listener to
enjoy the same type of sound reproduction experienced in movie
theatres. Voices are reproduced in the front and centre sound
field, while ambient sounds like cars and crowds are reproduced
on all sides of the listener for an incredibly lifelike audio/video
experience.
TURNING SURROUND ON AND
OFF
INPUT
MODE
SURROUND
FUNCTION
INPUT MODE
SURROUND
4 Press SURROUND.
Pressing the button changes the surround mode according to
the type of the input signal, as follows.
In case Dolby Digital or DTS multichannel source is input:
DOLBY D or DTS 2chSTEREO
In case Dolby Digital 2-channel source or other source is input:
Select Dolby Pro Logic or 2chSTEREO first by pressing
SURROUND. Then, turn MULTI JOG to select the desired
Pro Logic mode.
PLII CINEMA
PLII MUSIC
PRO LOGIC
The following indicators light according to the input signal and
other conditions.
hCHFHS@K : Dolby Digital signal is input.
csr : DTS source signal is input.
hOQNKNFHB' II( : 2-channel source is played with surround
set to on.
If you feel that the surround effect is not sufficient
Surround playback is affected by many factors. Check the
following points.
• Are settings made correctly according to the connected
speakers and their position?
• Is the DVD digital out signal correctly selected?
• In Dolby Digital and DTS, there are multi-sources other than
5.1ch. Confirm the type of the source being played.
•A disc may contain multiple audio tracks. Confirm the audio
track being played.
•Dolby Digital and DTS sources can be enjoyed only when
connections are made in digital.
2chSTEREO
SURROUND
DOLBY SURROUND AND DTS
En
Check the followings:
• Before enjoying Dolby surround or DTS surround, set the
speaker existance, size and distance (see page 16), and
adjust the speaker sound levels to the proper balance (see
page 17).
• Make sure the speakers are properly connected and positioned
(see pages 6 and 7).
• Make sure the TV set and video unit are properly connected
(see page 4).
• Make sure the disc and video tape, etc., support Dolby Pro
Logic, Dolby Digital surround or DTS surround.
• When connecting an LD player equipped with the AC-3 RF OUT
terminal, use an RF demodulator unit. Also connect the
analogue AUDIO OUT terminals of the LD player to the receiver
to play all the sources. For further information, refer to the
instructions of the LD player.
1Turn FUNCTION to select a function (except 5.1ch
IN).
2 Press INPUT MODE repeatedly to select "CHFHS@K "
or "@M@KNF ".
Select in accordance with the connected equipment and sound
source to be played.
3Play the surround source by the connected
equipment.
NOTE
• This unit supports input signals of the Dolby Digital surround
bit stream, DTS surround bit stream and linear PCM whose
sampling frequency is 32 kHz, 44.1 kHz, 48 kHz and 96 kHz.
• When connecting some DVD players to the receiver through
the digital in terminals, noise may be heard in the DVD operation:
e.g. searching a disc, skipping a chapter, entering a menu
screen.
ENGLISH
15
Page 16

SETTING SPEAKER SIZE AND
DISTANCE
4Within 6 seconds, turn MULTI JOG to adjust the
size (or distance, frequency), and press ENTER.
Selectable sizes, distances and frequencies
ENTER
MULTI JOG
FRONT SPEAKERS A,B
Set the speaker size (large or small) and the speaker distance
(distance between the speaker and the listening position), as
well as speaker existence, correctly as described below (except
in 5.1ch IN function).
Default settings
Default settings of the speaker size and distance are as follows:
"EQK@QFD " (Front speakers are large.)
"BK@QFD " (Centre speaker is large.)
"RK@QFD " (Surround speakers are large.)
"R,VNM " (Sub woofer is turned on.)
"EQ4-0L " (Distance between the left and right front speakers
and the listening position is 5.1 metres.)
"B4-0L " (Distance between the center speaker and the listening
position is 5.1 metres.)
"R2-5L" (Distance between the left and right surround speakers
and the listening position is 3.6 metres.)
"A@RRBQNRRNUDQEQDP0//GY " (Bass crossover frequency when
selecting "RL@KK " speaker is 100 Hz.)
[Front speakers]
"K@QFD " : larger size
"RL@KK " : smaller size
[Centre speaker]
"K@QFD " : larger size
"RL@KK " : smaller size
"MNMD " : no centre speaker
[Surround speakers]
"K@QFD " : larger size
"RL@KK " : smaller size
"MNMD " : no surround speakers
K@QFD : Frequencies (sounds) over all the band of the channel
is output.
RL@KK : Frequencies (sounds) under 100 Hz, 160 Hz or 220
Hz are not output. They are re-directed to the sub woofer or
other large speakers.
[Sub woofer]
"NM " : sub woofer activated
"NEE " : sub woofer deactivated or no sub woofer
[Distance between the front sepakers and the listening
position]
From "/-2" metre to "8-/" metres with 0.3 metre steps
[Distance between the centre speaker and the listening
position]
From "/-2" metre to "8-/" metres with 0.3 metre steps
NOTE
• When "EQ RL@KK " is selected, "R,V NM " is selected
automatically.
When the front speakers are small, be sure to connect the sub
woofer; otherwise the bass sound will not be emitted.
• When "R,V NEE " is selected, "EQ K@QFD " is selected
automatically.
• When "EQRL@KK " is selected, "BK@QFD " and "RK@QFD " cannot
be selected.
• If you use the AIWA speaker system (such as SX-A VR30), select
"EQRL@KK ", "BRL@KK " and "RRL@KK ".
First make sure that the headphones are not connected, Source
Direct function is not activated, and "AX,O@RRNM " is not set for
DTS.
1 Press and hold down FRONT SPEAKERS A until
"EQK@QFD " is displayed.
2Within 6 seconds, turn MULTI JOG.
The adjustable items are displayed cyclically as follows:
FR LARGE
BASS CROSSOVER FREQ 100Hz
C LARGE S LARGE
C 5.1MS 3.6M
FR 5.1M
S-W ON
3 When the item to be adjusted is displayed, press
ENTER.
The adjustable size (or distance, frequency) flashes.
[Distance between the surround speakers and the
listening position]
From "/-2" metre to "8-/" metres with 0.3 metre steps
[Bass crossover frequency when selecting "RL@KK "
speaker]
"0//GY ": Bass crossover frequency is 100 Hz (Woofer diameter:
16 cm or more).
"05/GY ": Bass crossover frequency is 160 Hz (Woofer diameter:
approximately 12 cm).
"11/GY ": Bass crossover frequency is 220 Hz (Woofer
diameter: 8 cm or less).
Select this mode when using AIWA SX-AVR30.
NOTE
• When setting all the speaker sizes to "K@QFD ", there may be a
case that no sound is output from the sub woofer even if "R,V
NM " is selected.
• When setting the speaker distance, first set the front speakers
distance. The centre speaker distance then can be set between
the distance equal to the front speaker distance and the distance
1.5 metres shorter than the front speaker distance. Also, the
surround speakers distance can be set between the distance
equal to the front speaker distance and the distance 4.5 metres
shorter than the front speaker distance.
• Adjust the centre speaker distance so that the voices are heard
from the centre position.
• When the front speakers distance is changed, the centre and
surround speakers distance may automatically be modified.
16
ENGLISH
Page 17

ADJUSTING SPEAKER LEVEL
BALANCE
BALANCE
MANUAL
SELECT
JOG -,+
SHIFT
BALANCE
+,(SUBWOOFER,
CENTER,
REAR)
4 Press MANUAL SELECT again to stop the noise
signal.
NOTE
• When the noise signal cycles through all the speakers for ten
times, the noise signal stops automatically.
• When the centre speaker and/or surround speakers are set to
"MNMD ", their level balance cannot be adjusted. ("B/cA " and
"R/cA " are not displayed.)
About the channels
The left and right front speakers create the stereo effect.
The centre speaker helps precise sound positioning over a broad
sound field.
The surround speakers enhance the "depth" of the sound field.
CHANGING SPEAKER VOLUME
TEMPORARILY
SURROUND
DOLBY SURROUND AND DTS
The unit is equipped with a built-in test signal generator called a
noise sequencer for easy balance adjustment of all five channels.
The sequencer outputs a noise signal that "travels" from channel
to channel, enabling the simple adjustment of sound level to
achieve the same apparent loudness, at your listening position,
from each channel.
Preparation
• Before adjusting the speaker level balance, be sure to set
the speaker size, distance and existance correctly.
• Before adjusting the speaker level balance, turn off the DSP
surround system.
• Operate the unit while playing the source recorded in Dolby
Digital surround or Dolby Pro Logic.
1Turn SURROUND on.
2Hold down SHIFT and hold down MANUAL
SELECT on the remote control until "K" of "K.Q
/cA" starts to flash.
A noise signal is sent to each channel in turn at the interval of
2 seconds as follows:
L/R 0dB
C 0dB
(Left front speaker)*
(Centre speaker)
According to the software played or your preference, you can
change the sub woofer, centre speaker and surround speakers
volume temporarily.
Press SUBWOOFER +/-, CENTER +/- or REAR +/-
on the remote control.
Each speaker level can be changed within the range from –10 dB
to +10 dB at 1 dB steps.
To restore the volume and balance to the default value
Press and hold BALANCE until "KUKQDRDS " is displayed.
All the speaker volume as well as the left and right balance of
the front and surround speakers are reset to the default value
(0 dB).
En
L/R 0dB
S 0dB
S 0dB
*L or R flashes to indicate one of the front speakers from
(Right front speaker)*
(Right surround speaker)
(Left surround speaker)
which the noise signal is output.
3 Adjust the sound level of the centre and surround
speakers.
While "B" or "R" flashes in the display, press JOG + or - on
the remote control so that the sound level of the centre or
surround speakers matches that of the front speakers.
The balance of the front speakers can be adjusted as well
while "K.Q " is displayed.
ENGLISH
17
Page 18

OTHER SETTINGS
ENTER
MULTI JOG
ADJUSTING LOW FREQUENCY SOUND
EFFECT (LFE)
MIDNIGHT
MANUAL
SELECT
JOG -,+
SHIFT
TO LISTEN TO THE ORIGINAL DTS
SOUND
When "csr" appears on the display, all the sound settings can be
cancelled.
Preparation
Play a disc recorded in DTS surround.
1 Press ENTER.
"AXO@RRNEE " is displayed.
2 Press ENTER again so that "AXO@RR NM " is
displayed.
To restore the sound settings
Repeat steps 1 and 2 so that "AXO@RRNEE " appears.
To operate with the remote control
Hold down SHIFT and press MIDNIGHT repeatedly.
The disc recorded in Dolby Digital surround contains special
signals called LFE to enhance low frequency sound effect.
The LFE signals are recorded in some particular parts on the
disc and output from the connected sub woofer to reproduce
astonishingly powerful low sound.
The sound level of the LFE signals can be adjusted according to
your speakers.
Preparation
Play a disc recorded in Dolby Digital surround.
1 Press MANUAL SELECT on the remote control.
"KED" is displayed.
2 Press JOG + or - to adjust the LFE level.
The unit is initially set to 0 dB (maximum) and can be adjusted
as follows:
OFF –10 dB –5 dB 0 dB
MULTI JOG on the unit is also available.
When selecting "R,VNEE ", the LFE signals are redistributed to
other speakers.
ADJUSTING DYNAMIC RANGE
Dynamic range of the sound can be adjusted. The unit is initially
set to "RSC " (standard) mode.
ADJUSTING THE SOUND OF DOLBY PRO
LOGIC II MUSIC MODE
In Dolby Pro Logic II Music mode, press MANUAL SELECT
repeatedly to select one of the adjusting modes (PANO, DMSN
or CTR W). Then press JOG + or - to turn the mode on or off,
or select the level.
Panorama mode (PANO): Expands stereo effect of the front
speakers toward the rear sound field and enhances "surrounded"
stereo effect.
Dimension mode (DMSN): Adjusts the level to move the broad
sound field to the front side (F) or rear side (R). The level changes
as follows:
R+3 R+2 R+1 F+1 F+2 F+3OFF(normal)
Centre width mode (CTR W): Redistributes centre speaker's
signals to the front speakers.
Preparation
Play a disc recorded in Dolby Digital surround.
1 Hold down ENTER (hold down SHIFT and press
MIDNIGHT).
"LHCMHFGSSGD@SDQ " runs through on the display .
2Turn MULTI JOG (press JOG + or -) to select
"LHM ", "L@W " or "RSC ".
LHM : You can enjoy the full dynamic range of sound like in the
movie theatre.
RSC : Original position, when playing back in home, that is
recommended by the software producers.
L@W : Select this mode when playing back at low volume.
18
ENGLISH
Page 19

TIMER GENERAL
SETTING THE SLEEP TIMER
MULTI JOG
The unit can be automatically turned off at a specified time.
1 Hold down SHIFT and press SLEEP on the remote
control.
"RKDDO" is displayed.
2Within 6 seconds, press JOG + or - repeatedly
to set the sleep timer duration.
With each press, the timer duration changes in 5-minute steps
between 5 to 240 minutes. If there is no button input for 6
seconds, the current setting is entered automatically.
The unit turns off after the selected time.
• MUL TI JOG on the unit is also available.
To check the remaining time until the unit turns off
Hold down SHIFT and press SLEEP on the remote control.
The remaining time is displayed for 6 seconds.
To cancel the sleep timer
Hold down SHIFT and press SLEEP on the remote control
repeatedly so that "RKDDOnEE " is displayed.
SLEEP
JOG -,+
SHIFT
CARE AND MAINTENANCE
Occasional care and maintenance of the unit is needed to
optimize the performance of your unit.
To clean the cabinet
Use a soft dry cloth.
If the surfaces are extremely dirty, use a soft cloth lightly
moistened with mild detergent solution. Do not use strong
solvents, such as alcohol, benzine or thinner as these could
damage the finish of the unit.
TROUBLESHOOTING GUIDE
If the unit fails to perform as described in these Operating
Instructions, check the following guide.
GENERAL
There is no sound.
• Is the AC cord connected properly?
• Is there an incorrect connection? (➞ pages 4-6)
• There may be a short circuit in the speaker terminals.
➞ Disconnect the AC cord, then correct the speaker
connections.
•Was an incorrect function selected?
• Is FRONT SPEAKERS A or B set correctly? (➞ page 9)
Sound is emitted from one speaker only.
• Is BALANCE set appropriately?
• Is the other speaker disconnected?
Sound is heard at a very low volume.
• Has MUTING been pressed?
An erroneous display or a malfunction occurs.
➞ Reset the unit as stated below.
TUNER SECTION
There is constant, wave-like static.
• Is the antenna connected properly? (➞ page 7)
• Is the FM signal weak?
➞ Connect an outdoor antenna.
The reception contains noise interference or the sound is
distorted.
• Is the system picking up external noise or multipath distortion?
➞ Change the orientation of the antenna.
➞ Move the unit away from other electrical appliances.
TIMER
GENERAL
En
To reset
If an unusual condition in the display window or malfunction
occurs, reset the unit as follows:
1 Press POWER 6STANDBY/ON to turn off the power.
2 Press POWER 6STANDBY/ON while pressing ENTER.
Everything stored in memory after purchase is cancelled.
If the power cannot be turned off in step 1 because of a
malfunction, disconnect the AC cord, and reconnect the AC cord
after several seconds. Then carry out step 2.
ENGLISH
19
Page 20

SPECIFICATIONS
FM tuner section
Tuning range 87.5 MHz to 108 MHz
Usable sensitivity (IHF) 16.8 dBf
Antenna terminal 75 ohms (unbalanced)
AM tuner section
Tuning range 531 kHz to 1602 kHz (9 kHz step)
530 kHz to 1710 kHz (10 kHz step)
Usable sensitivity 350 µV/m
Antenna Loop antenna
Amplifier section
Power output Front
Rated: 80 W + 80 W (8 ohms, T.H.D.
0.9%, 1 kHz/DIN 45500)
Reference: 100 W + 100 W (8 ohms,
T.H.D. 10%, 1 kHz/DIN 45324)
DIN MUSIC POWER
150 W + 150 W
Rear (surround)
Rated: 80 W + 80 W (8 ohms, T.H.D.
0.9%, 1 kHz/DIN 45500)
Reference: 100 W + 100 W (8 ohms,
T.H.D. 10%, 1 kHz/DIN 45324)
DIN MUSIC POWER
150 W + 150 W
Centre
Rated: 80 W (8 ohms, T.H.D. 0.9%, 1
kHz/DIN 45500)
Reference: 100 W (8 ohms, T.H.D.
10%, 1 kHz/DIN 45324)
DIN MUSIC POWER
150 W
Total harmonic distortion
0.05% (60 W, 1 kHz, 8 ohms, front)
Inputs AUDIO IN
DVD: 250 mV , adjustable (47
kohms)
VIDEO 2/LD/TV: 250 mV,
adjustable (47 kohms)
VIDEO 1/MD: 250 mV , adjustable
(47 kohms)
TAPE: 250 mV, adjustable
(47 kohms)
AUX: 250 mV , adjustable
(47 kohms)
CD: 250 mV , adjustable (47 kohms)
5.1CH INPUT
FRONT, CENTER, SURROUND,
SUB WOOFER:
250 mV (47 kohms)
DIGITAL IN
COAXIAL (VIDEO 2):
OPTICAL (VIDEO 1):
OPTICAL (DVD):
accept linear PCM signals and bit
stream of Dolby Digital and DTS
surround (32 kHz, 44.1 kHz, 48 kHz
and 96 kHz)
VIDEO IN
DVD: 1 Vp-p (75 ohms)
VIDEO 2/LD/TV: 1 Vp-p (75 ohms)
VIDEO 1/MD: 1 Vp-p (75 ohms)
Outputs AUDIO OUT
VIDEO 1/MD: 250 mV (1 kohm)
TAPE: 250 mV (1 kohm)
VIDEO OUT
VIDEO 1/MD: 1 Vp-p (75 ohm)
MONITOR: 1 Vp-p (75 ohm)
SUB WOOFER: 4.0 V
FRONT SPEAKERS: accept speakers
of 8 ohms or more.
SURROUND SPEAKERS: accept
speakers of 8 ohms or more.
CENTER SPEAKER: accept speaker
of 8 ohms or more.
PHONES (stereo jack): accepts
headphones of 32 ohms or more
Muting –20 dB
General
Power requirements 230 V AC, 50 Hz
Power consumption 165 W
Dimensions (W × H × D)
430 × 155.5 × 355 mm
Weight 7.8 kg
Specifications and external appearance are subject to change
without notice.
• Manufactured under license from Dolby Laboratories.
"Dolby", "Pro Logic" and the double-D symbol are trademarks
of Dolby Laboratories.
• Manufactured under license from Digital Theater Systems, Inc.
US Pat. No. 5,451,942 and other world-wide patents issued
and pending. "DTS" and "DTS Digital Surround" are trademarks
of Digital Theater Systems, Inc. ©1996 Digital Theater Systems,
Inc. All rights reserved.
NOTE
AIWA CO. LTD. - JAPAN - DECLARES UNDER ITS OWN
RESPONSIBILITY THA T THE PRODUCT DESCRIBED IN THIS
MANUAL IS IN COMPLIANCE WITH THE DIRECTIVES OF D.M
28.8.95 No. 548, ACCORDING TO THE STIPULATIONS OF
PARAGRAPH 3 OF ATTACHMENT A OF D.M. 25.6.85 AND
PARAGRAPH 3 OF ATTACHMENT 1 OF D.M. 27.8.87
(REGULATIONS REGARDING FREQUENCIES).
The above information is only for Italy.
20
ENGLISH
Page 21

PARTS INDEX
Instructions about each part on the unit or remote control (in
alphabetical order) are indicated on the pages listed below.
On the unit
AUTO PRESET 13
BALANCE 10, 17
BASS 10
DIMMER 9
DSP 10
ENTER 7, 8, 11, 13, 14, 16, 18, 19
FRONT SPEAKERS A, B 7, 9, 16
FUNCTION 11 , 12, 15
INPUT MODE 9, 11, 14
MASTER VOLUME 10
MULTI JOG 7, 10, 13-16, 18, 19
MUTING 10
PHONES 9
POWER 6STANDBY/ON 9, 14, 19
PTY 13, 14
RT 13
SURROUND 15
TREBLE 10
TUNING N,M 11-14
On the remote control
AUDIO/1 8, 12
ANGLE/3 8, 12
BALANCE 10, 17
CD 8
CENTER +,- 17
DISPLAY/6 9, 12
DSP 10
DVD 8
FUNCTION 8, 11-12
ENTER 8, 13, 14
INPUT MODE 9, 11
JOG +,- 10, 11, 17-19
MANUAL SELECT 17, 18
MENU 8
MID NIGHT/C 8, 13, 18
MUTING 10
ON SCREEN/4 8, 13
POWER 8, 9
PRESET TV CHN/i 8, 13
PRESET TV CHM/k 8, 13
PRGM/7 8, 13
RANDOM/8 8, 13
REAR +,- 17
REPEAT/9 8, 13
SET UP 8
SHIFT 8, 9, 14, 18, 19
SLEEP/+10 13, 19
SLOWG,F/r,t 8
SUB TITLE/2 8, 13
SUBWOOFER +,- 17
SURROUND 15
TONE 10
TOP MENU 8
TUNER 8
TUNER MODE/0 12, 14
TUNING/TV VOL+/l 8, 12
TUNING/TV VOL-/j 8, 12
TV 8
TV/VIDEO 8, 11
VIDEO 1 8
VIDEO 2 8
VOLUME +,- 10
ZOOM/5 8, 13
vRETURN 8
f,g 8
s 8
c 8
a 8
GENENRAL
En
ENGLISH
21
Page 22

2
ENGLISH
 Loading...