

Page 1
User Instruction Manual
PLEASE READ ALL INSTRUCTIONS AND WARNINGS
IN THIS MANUAL BEFORE USING.
PRE-CHARGED PNEUMATIC
PCP Air Rie
Ver 1, 1/20
Page 2

Rules of safe shooting ..........................................................3
CONTENTS
Warnings ..............................................................................4
Parts of your Avenger air rie ...............................................5
Operating the safety .............................................................6
Pressurizing with compressed air .........................................7
Depressurizing the air rie ....................................................8
Using a single-shot tray ........................................................8
Loading the rotary magazine ................................................9
Inserting the rotary magazine ...............................................9
Loading and shooting instructions ......................................10
Automatic overpressure relief valve ...................................10
Trigger adjustment ..............................................................11
Hammer Spring (Velocity) Adjustment ...............................12
Externally Adjustable Regulator..........................................13
Maintenance .......................................................................14
Warranty .............................................................................15
2
© Air Venturi® / www.airventuri.com / 216-292-2570
Page 3

RULES OF SAFE SHOOTING
● NEVER point the airgun at any person.
● NEVER point the airgun at anything you do not intend to shoot.
● ALWAYS treat the airgun as if it is loaded and handle it with the same respect you would a
rearm.
● ALWAYS aim in a SAFE DIRECTION. ALWAYS keep the muzzle pointed in a SAFE DIRECTION.
● NEVER put any part of your hand over the muzzle.
● ALWAYS keep the airgun ON “SAFE" until you are ready to shoot in a SAFE DIRECTION.
● Check behind and beyond your target to be certain you have a safe backstop and that no person or
property can be endangered.
● Place the backstop in a location that will be safe should the backstop fail.
● Replace the backstop if it becomes worn.
● ALWAYS be sure of your target and what lies beyond it in case you miss.
● NEVER shoot at hard surfaces, water or anything else that may cause a ricochet.
● This airgun may only be used where your local laws permit or at shooting ranges allowed by the
law, and only if the ammunition does not travel further than the shooting area. Keep in mind the
maximum range of the ammunition. ALWAYS abide by laws and regulations that apply to airguns.
● ALWAYS check to see if the airgun is ON “SAFE” and unloaded when getting it from another
person or from storage.
● ALWAYS keep your nger off the trigger and away from the trigger guard until ready to shoot.
● You and others with you should ALWAYS wear safety shooting glasses to protect your eyes.
● If your reading or prescription glasses are not certied safety glasses, make sure you wear shooting
glasses over your regular glasses.
● The shooter and everyone in the vicinity should wear hearing protection when shooting and lling
guns with high pressure air.
● NEVER load your gun until you’re ready to shoot and it’s safe to do so.
● ALWAYS use the correct caliber ammunition that is suitable for the airgun. Use ONLY ammunition
designed for this airgun.
● NEVER reuse ammunition.
● ALWAYS store the airgun with the safety ON “SAFE” , unloaded, uncocked, separated from the
ammunition, out of the reach of children, and in a secure location to prevent unauthorized people
from accessing it.
● DO NOT attempt to disassemble or tamper with the airgun.
● DO NOT put the airgun away loaded.
● ALWAYS store this airgun in a safe location.
● ALWAYS store ammunition separately from the gun.
● NEVER leave the airgun loaded if it is out of your reach.
● ALWAYS unload the airgun before giving it to someone else.
● ALWAYS read and follow the manufacturer’s manual and instructions.
● NEVER let a person who has not completely read this manual use this product.
© Air Venturi® / www.airventuri.com / 216-292-2570
3
Page 4
ALWAYS FOLLOW THESE SAFETY WARNINGS
!
WARNING:
NOT A TOY. THIS AIR RIFLE IS INTENDED FOR ADULT USE
ONLY. MISUSE OR CARELESS USE MAY CAUSE SERIOUS INJURY OR DEATH. MAY BE
DANGEROUS UP TO 1,000 YARDS (914 METERS).
!
WARNING:
DO NOT BRANDISH OR DISPLAY THIS AIRGUN IN PUBLIC; IT
MAY CONFUSE PEOPLE AND MAY BE A CRIME. POLICE AND OTHERS MAY THINK IT
IS A FIREARM. DO NOT CHANGE THE COLORATION OR MARKINGS TO MAKE IT LOOK
MORE LIKE A FIREARM. THAT IS DANGEROUS AND MAY BE A CRIME.
!
WARNING:
THIS IS A HIGH POWERED AIRGUN INTENDED FOR USE BY
THOSE 18 YEARS OF AGE OR OLDER. READ ALL INSTRUCTIONS BEFORE USING. BUYER AND USER HAVE THE DUTY TO OBEY ALL LAWS ABOUT THE USE AND OWNERSHIP
OF THIS AIRGUN.
!
WARNING:
BE SURE THE AIRGUN IS ALWAYS POINTED IN A SAFE DIRECTION. NEVER POINT THE AIRUGN AT ANYONE EVEN IF IT IS UNLOADED. ALWAYS ASSUME AND HANDLE THE AIRGUN AS IF IT WERE LOADED AND READY TO FIRE.
!
WARNING:
THIS PRODUCT CAN EXPOSE YOU TO CHEMICALS INCLUDING LEAD, WHICH IS KNOWN TO THE STATE OF CALIFORNIA TO CAUSE CANCER AND
BIRTH DEFECTS OR OTHER REPRODUCTIVE HARM. FOR MORE INFORMATION GO TO
WWW.P65WARNINGS.CA.GOV.
!
WARNING:
USE ONLY COMPRESSED AIR IN THIS RIFLE. DO NOT USE
OTHER GASSES, INCLUDING OXYGEN, WHICH CAN CAUSE A FIRE OR EXPLOSION
THAT MAY RESULT IN SERIOUS INJURIES OR DEATH.
!
WARNING:
TREAT YOUR AIR RIFLE AS IF IT IS ALWAYS LOADED AND
READY TO FIRE. ALWAYS KEEP THE MUZZLE POINTED IN A SAFE DIRECTION. BE
AWARE OF RICOCHET. NEVER SHOOT AT HARD SURFACES OR INTO WATER.
!
WARNING:
DO NOT DISASSEMBLE OR ALTER YOUR AIR RIFLE. REPAIR
SHOULD ONLY BE DONE BY AN AUTHORIZED REPAIR DEPARTMENT. OTHERWISE YOU
WILL VOID YOUR WARRANTY.
!
WARNING:
THIS AIR GUN IS DESIGNED FOR USE AT PRESSURES
BETWEEN 10MPa ~ 30MPa (100BAR ~ 300BAR / 1450PSI ~ 4350PSI). MAX PRESSURE OF
INTERNAL AIR RESERVOIR IS 30MPa (300BAR / 4350PSI). DO NOT FILL PAST THE MAX
PRESSURE.
!
IMPORTANT
YOU AND OTHERS WITH YOU SHOULD ALWAYS
WEAR SAFETY GLASSES TO PROTECT YOUR EYES. READ ALL INSTRUCTIONS
BEFORE USING.
4
© Air Venturi® / www.airventuri.com / 216-292-2570
Page 5
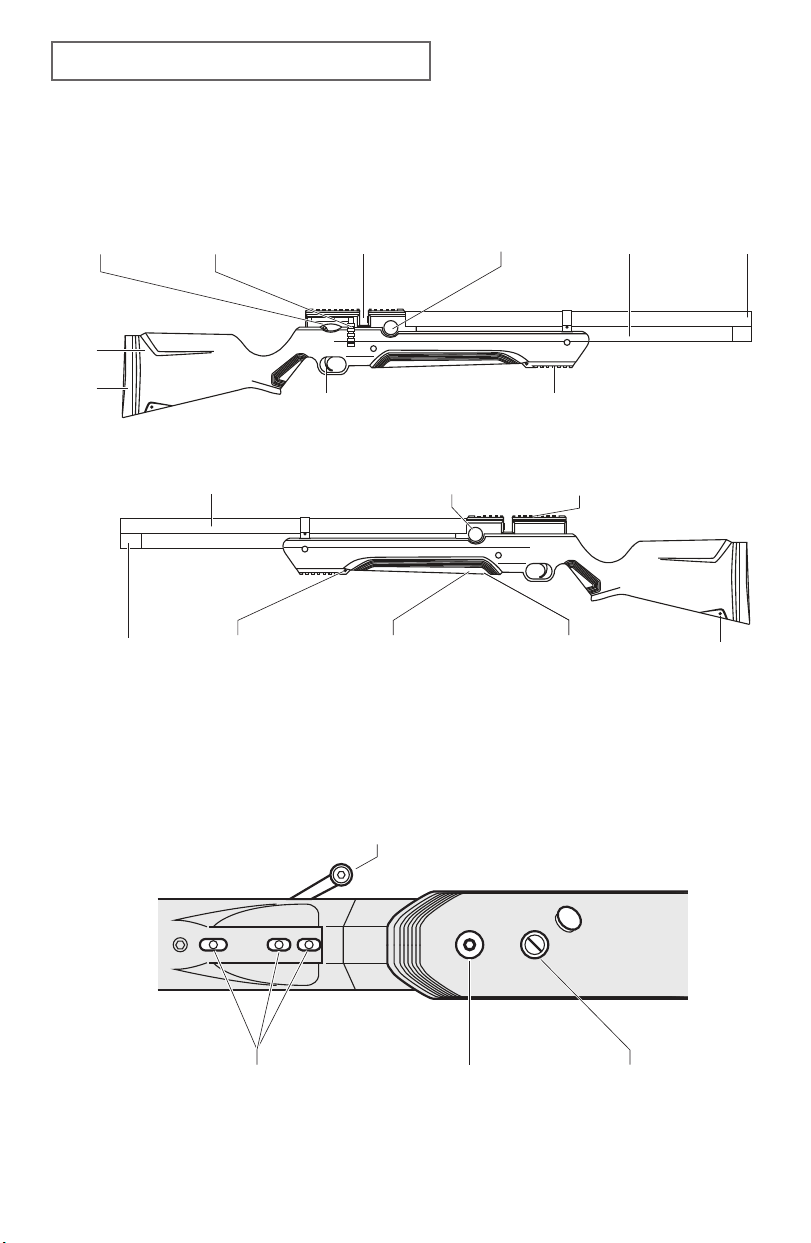
PARTS OF YOUR AVENGER AIR RIFLE
1. LEARNING THE PARTS OF YOUR AIR RIFLE
Familiarize yourself with name of parts to better understand this Operation Manual.
PS-R1 / PS-R2
Safety
Side Lever
Action
Receiver for
Rotary Magazine /
Single Pellet Tray
Regulator
Pressure Gauge
Stock
Butt Pad
Protective Cap
for Fill Nipple
Barrel
Front Sling
Point
Trigger
Fill Pressure
Gauge
Regulator
Adjustment
Screw
Forend Rail
Scope
Mounting Rail
Pressure Relief Valve
Air Reservoir
Muzzle
Rear Sling
Point
Side Lever
Pressure Relief ValveTrigger
Adjustment Screws
© Air Venturi® / www.airventuri.com / 216-292-2570
Regulator
Adjustment
Screw
5
Page 6
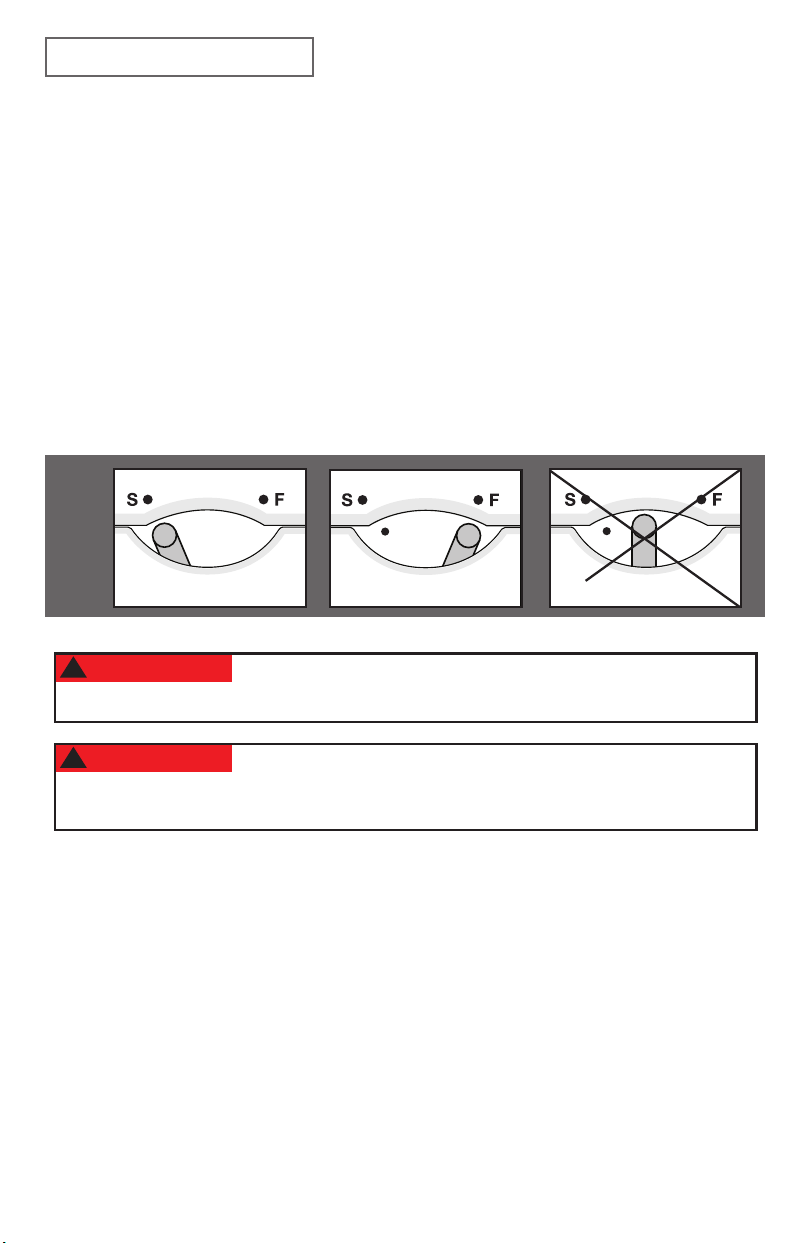
OPERATING THE SAFETY
Fig.2b Fig.2c
FIRE
Fig.2c
1) The safety is located above the trigger. It allows you to set this air rie to “S” (SAFE)
and “F” (FIRE) positions.
2) Setting “S” (SAFE) Position: Pull rearward and the safety should point to the “S”
indicator, and at the same time the safety should cover the red dot. (Fig. 2a)
3) Setting “F” (FIRE) Position: Push forward and the safety should point to the “F”
indicator, and at the same time show the red dot signifying it is ready for shooting.
(Fig. 2b)
4) The safety is only allowed to point at “S” or “F” position. Do not position in the middle
of “S” and “F”. (Fig. 2c)
FIG. 2
Fig.2a
!
WARNING:
ALWAYS MANUALLY AND VISUALLY KEEP AIR RIFLE IN THE “S”
(SAFE) POSITION UNTIL YOU ARE ACTUALLY READY TO SHOOT. FAILURE TO FOLLOW THESE
INSTRUCTIONS MAY RESULT IN SERIOUS INJURIES OR DEATH.
!
WARNING:
LIKE ALL MECHANICAL DEVICES, AN AIR RIFLE SAFETY CAN FAIL.
EVEN WHEN THE SAFETY IS SET TO “S” (SAFE) POSITION, CONTINUE HANDLING THE AIR
RIFLE SAFELY. NEVER POINT THE AIR RIFLE AT ANY PERSON AND ANYTHING YOU DO NOT
INTEND TO SHOOT.
SAFE
Fig.2b
FIRE
Fig.2c
6
© Air Venturi® / www.airventuri.com / 216-292-2570
Page 7
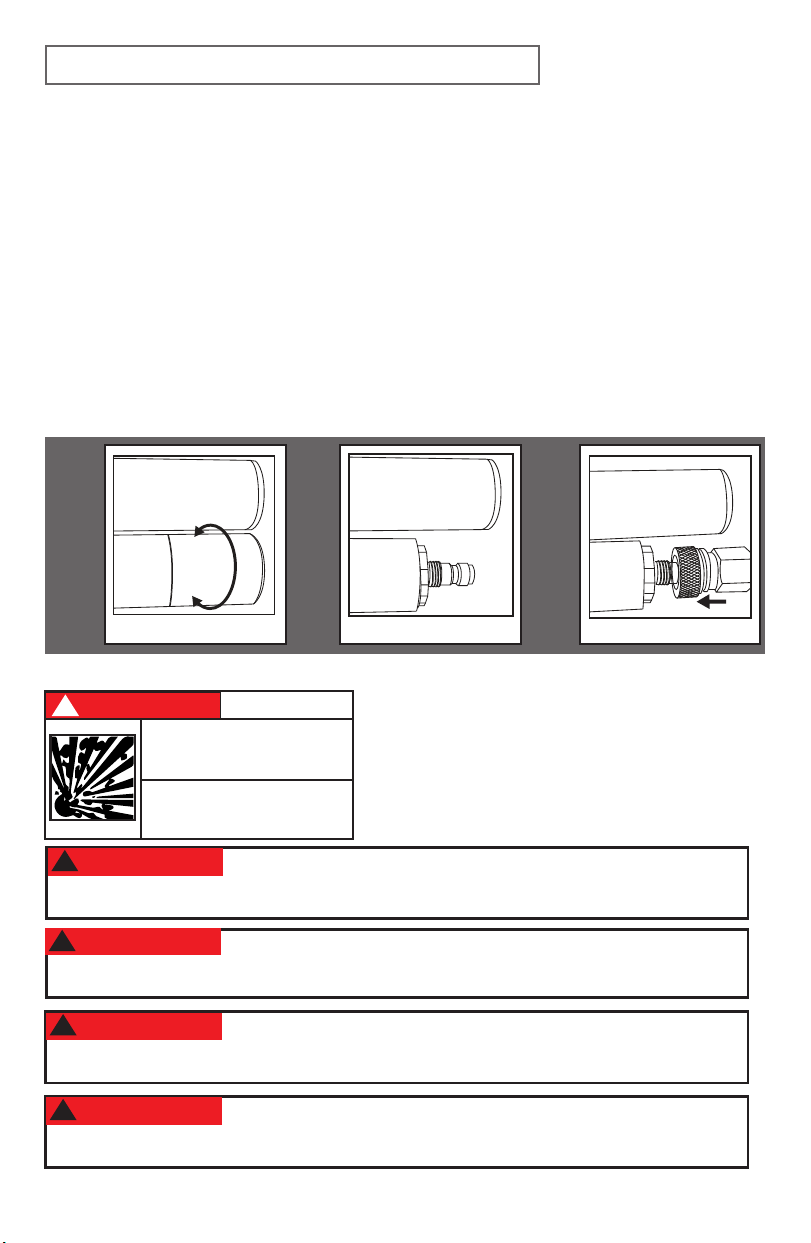
PRESSURIZING (FILLING) WITH COMPRESSED AIR
DANGER
!
DANGER OF EXPLOSION!
(Fig.2a)
(Fig.2b)
(Fig2.c)
Fig.2a
Fig.2b
Fig.2c
SAFE
FIRE
(Fig.3a). You will see the
(Fig.3b)
1) Make sure the air rie is unloaded, the Safety is on “S” (SAFE) position and keep the
muzzle pointed in a safe direction. Be sure to wear eye protection.
2) Locate the protective cap on the reservoir and unscrew the cap (Fig.3a). You will see
the male quick connector. (Fig.3b)
3) Connect the female quick connector from your ll device to the male quick connector
(Fig.3C). Make sure the collar on the female tting is in the forward, locked position
Check this by trying to pull the tting off of the gun to make sure it is locked in.
4) When lling is completed, bleed the pressure in your ll device and disconnect the
female quick connector from the male quick connector.
5) Screw on the protective cap to prevent oil and dirt from entering the male quick
connector.
FIG. 3
Fig.3a Fig.3b Fig.3c
DANGER OF
EXPLOSION!
Overlled compressed air cylinder
Do NOT exceed maximum
ll pressure of your cylinder
at room temperature!
!
WARNING:
THE AIR SHOULD BE PRESSURIZED SLOWLY. OTHERWISE, HEAT
IS GENERATED THAT AFFECTS THE ACCURACY OF THE PRESSURE. OVERPRESSURE CAN
CAUSE EXPLOSIONS, SERIOUS INJURIES OR DEATH.
!
WARNING:
USE ONLY COMPRESSED AIR IN THIS RIFLE. DO NOT USE OTHER
GASSES, INCLUDING OXYGEN, WHICH CAN CAUSE A FIRE OR EXPLOSION THAT MAY RESULT
IN SERIOUS INJURIES OR DEATH.
!
WARNING:
THIS AIR GUN IS DESIGNED FOR USE AT PRESSURES BETWEEN
10MPa ~ 30MPa (100BAR ~ 300BAR / 1450PSI ~ 4350PSI). MAX PRESSURE OF INTERNAL AIR
RESERVOIR IS 30MPa (300BAR / 4350PSI). DO NOT FILL PAST THE MAX PRESSURE.
!
WARNING:
BEFORE YOU DISCONNECT THE FEMALE QUICK CONNECTOR FROM
THE RIFLE, THE FILL ASSEMBLY MUST BE DEPRESSURIZED SO THAT THERE IS NO AIR IN
THE SYSTEM.
© Air Venturi® / www.airventuri.com / 216-292-2570
7
Page 8
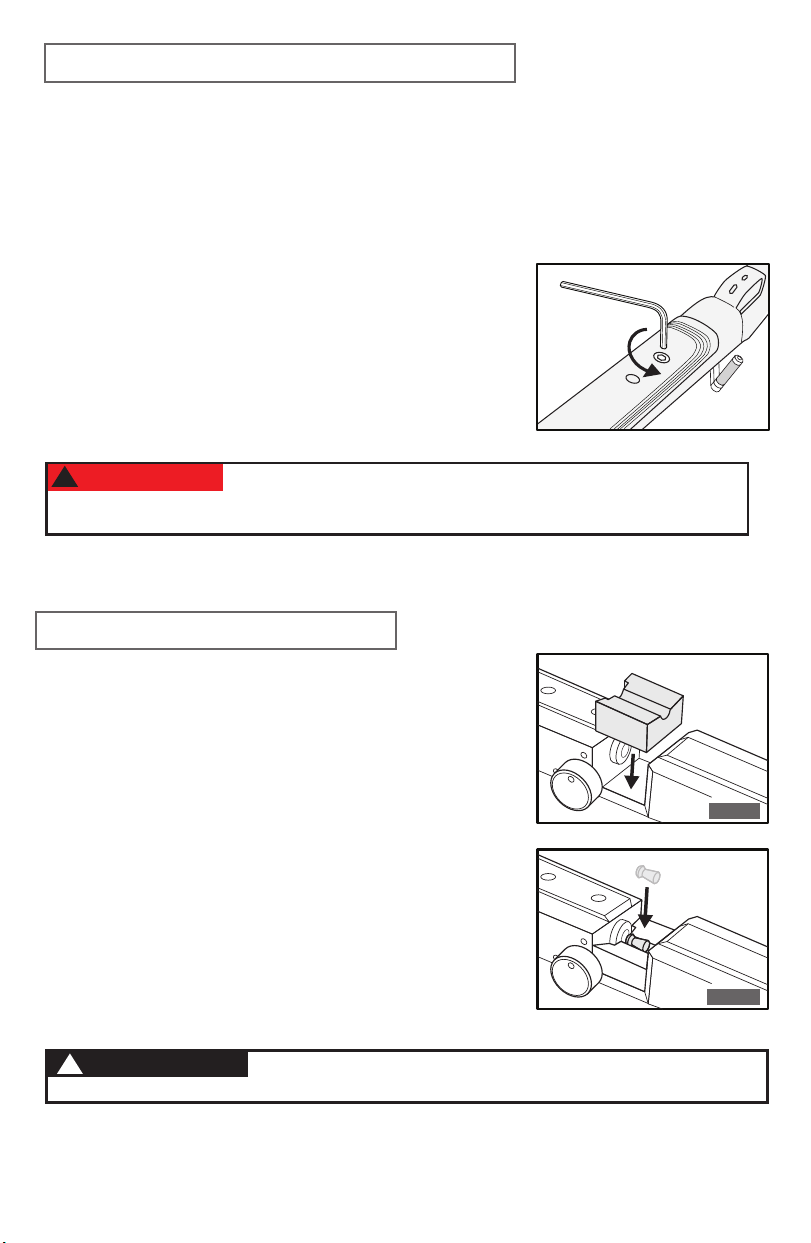
DEPRESSURIZING THE AIR RIFLE
7. LOADING THE ROTARY MAGAZINE
Lift the transparent cover along the
direction of the arrow (clockwise)
rotation until it stops.
(Fig.7a, Fig.7b)
Place a finger under the magazine
covering the hole.
Place the first pellet in the
magazine, the tip of the pellet will
be pointing out of the hole and
the back of the pellet should now
be seen thru the transparent cover.
Make certain the pellet does not
protrude out the back of the
magazine. In the event the pellet
does protrude simply push the
pellet inward. Be careful not to
squeeze or damage the pellet as
1.
2.
3.
Fig.7a
6
7
4
5
8
9
6
7
4
5
8
9
1. Like most PCP air ries, the Avenger is best stored with some pressure in the
reservoir. This keeps the seals forced against the sealing surfaces.
2. Make sure the air rie is unloaded, and the Safety is on “S” (SAFE) position.
Keep the muzzle pointed in a safe direction. Be sure to wear eye protection.
3. Slowly turn the air relief valve counter-clockwise, using the provided Allen
wrench. DO NOT rotate more than 2 revolutions. (Fig.4a)
4. DO NOT remove the relief valve screw completely
as the relief valve should remain with the stock.
5. After the rie is depressurized, use the Allen wrench
to tighten the relief valve by turning clockwise.
6.Check the pressure gauge to make certain all pressure
has been released from this air rie.
!
WARNING:
PERFORMING THE ABOVE PROCEDURE MAY EXHAUST AIR FROM
THE BARREL AT A HIGH RATE AND COULD DISCHARGE A PELLET THAT IS CHAMBERED.
ALWAYS MAKE CERTAIN THIS AIR RIFLE IS POINTED AT A SAFE DIRECTION.
THE USE OF SINGLE PELLET TRAY
Fig.4a
• Make sure the Safety is on “S” (SAFE) position and
keep the muzzle pointed in a safe direction.
Single Pellet
Tray
• Pull the bolt back to the cocked position.
• Insert the single pellet tray into the receiver. (Fig. 6a)
• Push and pull the bolt and make sure the receiver
locking pin moves forward and backward freely.
• Lay a pellet of appropriate caliber in the pellet tray.
(Fig. 6b)
• Push the bolt forward as far as possible. This chambers
a pellet into the barrel and the air rie is ready to re.
Be careful not to squeeze or damage the pellet as this
could affect accuracy.
!
ONLY ALLOW ONE PELLET EACH TIME. DO NOT LOAD MORE THAN
IMPORTANT
ONE PELLET INTO THE CHAMBER, OTHERWISE IT MAY CAUSE DAMAGE AND MAY NOT FIRE.
8
© Air Venturi® / www.airventuri.com / 216-292-2570
Pellet
Fig. 6a
Fig.7a
Fig. 6b
Fig.7b
Page 9
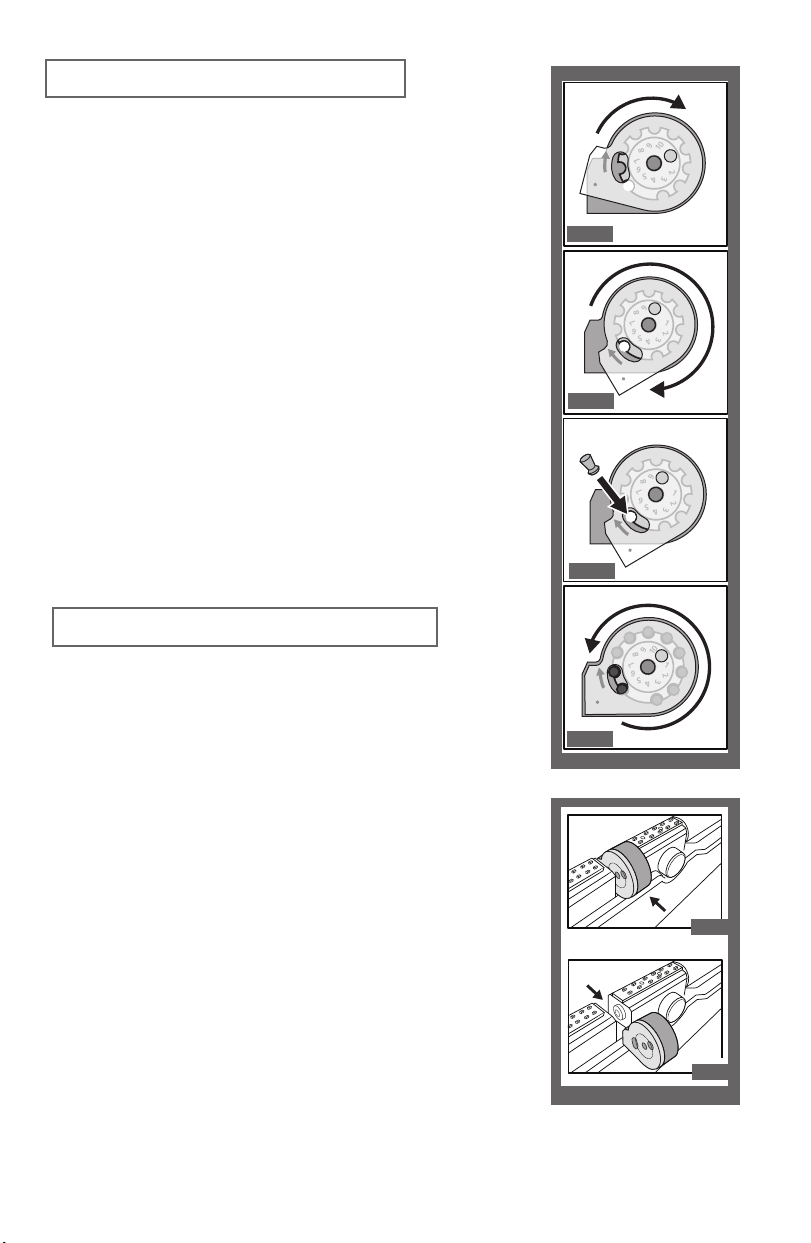
Fig.7b
Pellet
Single Pellet
Tray
Fig.7a
Fig.8b
6
7
1
0
2
3
4
5
8
9
10
LOADING THE ROTARY MAGAZINE
Fig.7b
Pellet
Single Pellet
Tray
Fig.7a
Fig.8b
6
7
1
0
2
3
4
5
8
9
10
Fig.7b
Pellet
Single Pellet
Tray
Fig.7a
Fig.7b
Pellet
Single Pellet
Tray
Fig.7a
Fig.8a
6
7
1
0
2
3
4
5
8
9
10
Fig.8b
6
7
1
0
2
3
4
5
8
9
10
Fig.8d
6
7
1
0
2
3
4
5
8
9
10
Fig.7b
6
7
1
0
2
3
4
5
8
9
10
Fig.7d
6
7
1
0
2
3
4
5
8
9
10
Fig.7b
6
7
1
0
2
3
4
5
8
9
10
Fig.7d
6
7
1
0
2
3
4
5
8
9
10
Fig.8a
• Lift the transparent cover and turn clockwise along the
direction of the arrow until it stops.
(Fig. 7a, Fig. 7b)
• Place a nger under the magazine covering the hole.
• Place the rst pellet in the magazine head rst. Make
certain the pellet does not protrude out the back of the
magazine. In the event the pellet does protrude simply
push the pellet inward. Be careful not to squeeze or
damage the pellet as this could affect accuracy. (Fig. 7c)
• Rotate the cover counter-clockwise and place the
remaining pellets into the magazine. Once full, lock the
cover at the starting position and the magazine is now
ready for use. (Fig. 7d)
Fig.8a
Fig. 7a
Fig. 7b
Fig.8b
9
10
8
0
7
1
6
2
5
3
4
9
10
8
0
7
1
6
2
5
3
4
9
10
8
0
7
1
6
2
5
3
4
INSERTING THE ROTARY MAGAZINE
1) Make sure the Safety is on “S” (SAFE) position and keep
the muzzle pointed in a safe direction.
2) Pull the bolt back to the cocked position.
3) With the transparent cover of the magazine facing to the
back of the air rie, insert the magazine from the right
side and push it left until it snaps into place. (Fig. 8a)
4) Push the bolt forward until it stops, to chamber a pellet.
5) This air rie is now ready to re.
6) Only one pellet should be pushed into the chamber each
time.
7) Do not repeat until you have red the loaded pellet, this
prevents more than one pellet feeding into the chamber.
8) This magazine is designed to stop automatically when
empty. Pull the bolt back, and push the magazine out of
the receiver from the left side. (Fig. 8b)
9) If you are done shooting and the magazine still has
pellets in it, remove the magazine by pulling the side
lever to the cocked position, and push the magazine out
of the receiver from the left side.
© Air Venturi® / www.airventuri.com / 216-292-2570
Fig.8c
Fig. 7c
Fig.8d
Fig. 7d
9
10
8
0
7
1
6
2
5
3
4
Fig.8a
Fig. 8a
Fig.8b
Fig. 8b
9
Page 10

LOADING AND SHOOTING INSTRUCTIONS
1) Make sure the safety is on “S” (SAFE) position and keep the muzzle pointed in a
safe direction.
2) Make sure the reservoir is lled with sufcient air.
3) Pull the side-lever action back to the cocked position.
4) Place the single pellet tray or rotary magazine into the receiver, and make sure it is
installed correctly.
5) Push the side-lever action forward fully to the closed position to chamber a pellet.
6) Push the safety to point to “F” (FIRE).
7) Aim at target, pull the trigger and shoot.
8) Repeat steps above in reverse manner when not in use.
9) When you are nished shooting, make sure there are no pellets remaining in the
chamber.
AUTOMATIC OVERPRESSURE RELIEF VALVE
1) This air rie is equipped with an automatic overpressure relief valve. It protects
the other parts of the air rie from damage.
2) If damaged or it loses function, please contact Air Venturi for replacement at:
216-220-1180.
10
© Air Venturi® / www.airventuri.com / 216-292-2570
Page 11
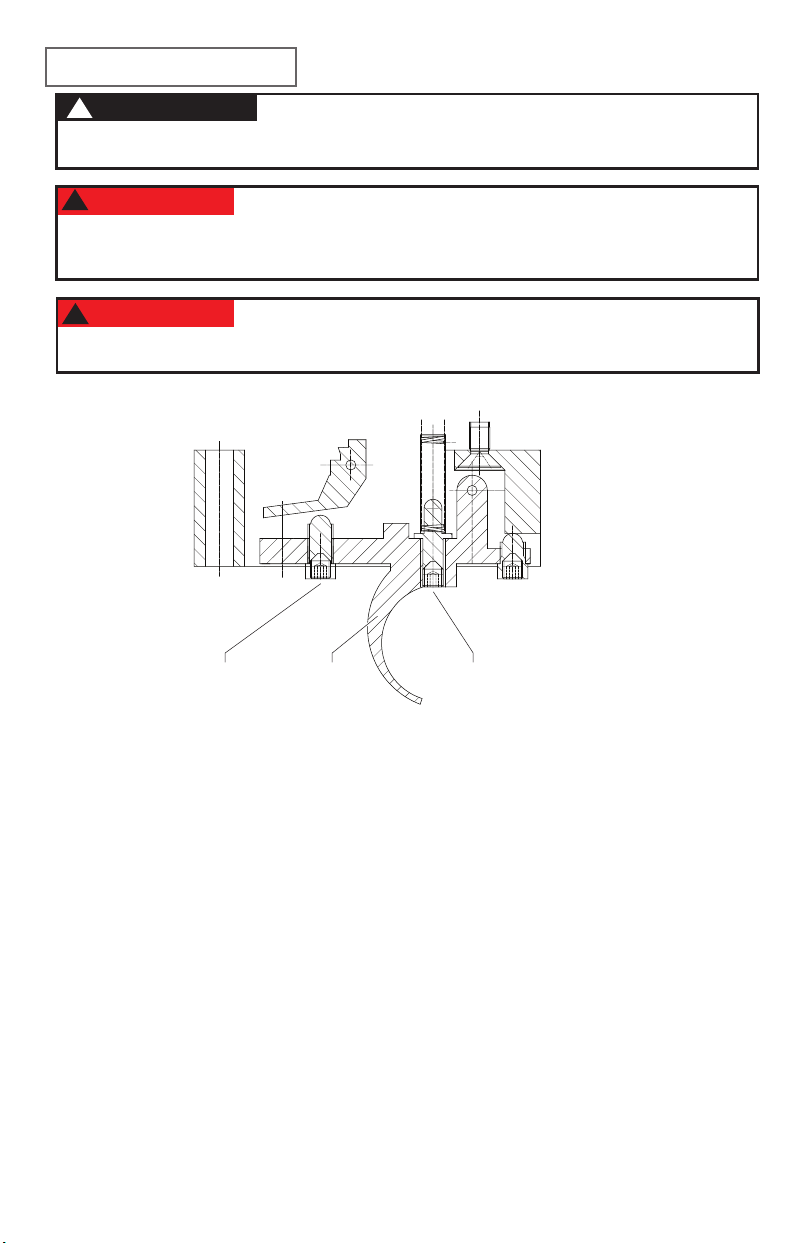
TRIGGER ADJUSTMENT
!
IMPORTANT
THIS AIR RIFLE IS FOR ADULTS. THE TRIGGER HAS BEEN
FACTORY SET TO A SETTING THAT WILL SUIT MOST HUNTING AND TARGET USES. THEREFORE, ADVANCE CALIBRATION IS NOT REQUIRED.
!
WARNING:
ADJUSTMENT OF THE TRIGGER SCREWS COULD INHIBIT PROPER
FUNCTION OF THE SAFETY. IT MAY CAUSE THE SAFETY TO NOT POINT AT “S” OR “F”
POSITION. ALWAYS CHECK FOR FULL ENGAGEMENT AND SMOOTH FUNCTION OF THE
SAFETY UPON COMPLETION OF ANY CHANGES TO THE ADJUSTMENT SCREWS.
WARNING:
!
ADJUSTMENT TO THE TRIGGER ASSEMBLY COULD ALLOW THIS AIR
RIFLE TO FIRE IF DROPPED OR JARRED EVEN WITH OR WITHOUT THE SAFETY ENGAGED.
THIS CAN CAUSE SERIOUS INJURIES OR DEATH.
(a) Trigger Sear
Screw
Trigger (b) Trigger Weight
Adjuster
(C) Travel Adjuster
1) Make sure the Safety is on “S” (SAFE) position and keep the muzzle pointed in a
safe direction.
2) Make sure the bolt is push forward and NOT in the cocked position.
3) Use Allen wrench provided in the packaging.
4) Trigger Sear Screw: This screw engages the lower sear as the trigger is compressed,
It should be seated tightly and not used for travel or trigger pull weight adjustment.
5) Trigger Weight Adjuster: Use the Allen wrench and turn the adjuster screw clockwise
to increase trigger pull weight and counter-clockwise to decrease trigger pull weight.
6) Travel Adjuster: Use the Allen wrench and turn the adjuster screw clockwise to
reduce the amount of travel, this will move the trigger back. Turning counter-clockwise
will increase the amount of travel and move the trigger forward.
11
© Air Venturi® / www.airventuri.com / 216-292-2570
Page 12
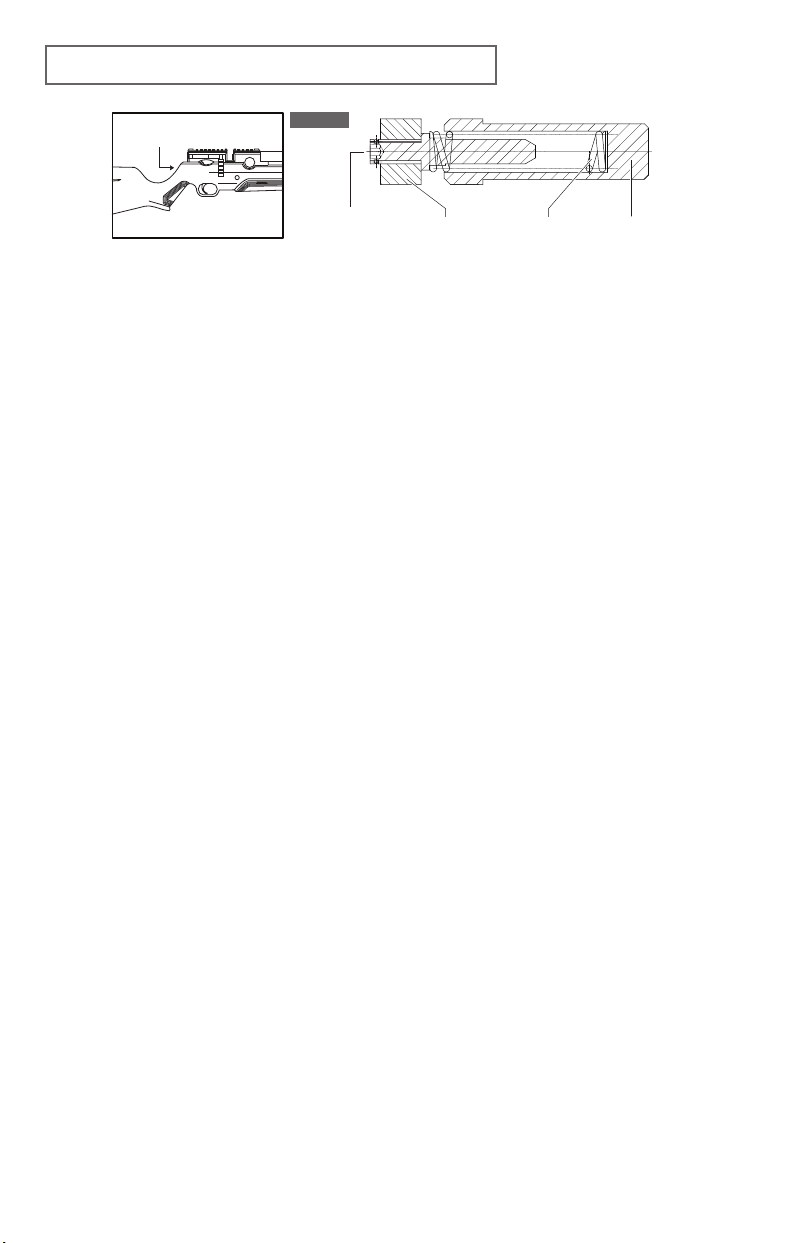
HAMMER SPRING (VELOCITY) ADJUSTMENT
12. HAMMER SPRING (VELOCITY) ADJUSTMENT
13. EXTERNAL ADJUSTABLE REGULATOR
Make sure the safety is on “S” (SAFE) position and keep the muzzle pointed in a safe direction.
Depressurize the air rifle (please follow the instruction on
Locate the external adjustable regulator at the bottom of the air rifle (Refer to
rubber cap.
Use screwdriver rotate the screw clockwise to the end (Fig.9a), then rotate counter-clockwise slightly
about quarter circles
If the regulator pressure is high, wish to reduce the pressure value as follows:
1.
2.
3.
4.
Fig.12a
Hammer Spring
Adjusting Screw
Fig. 13
Hammer Spring
Adjusting Screw
Bracket
Hammer Spring
Hammer
1) Image (Fig. 13) explains where the hammer spring adjusting screw is located.
2) Use the Allen wrench provided to tune the Hammer Spring Adjusting Screw.
3) To increase velocity and tension of the hammer spring, rotate the Hammer Spring
Adjusting Screw clockwise. To decrease velocity and hammer spring tension, rotate
the Hammer Spring Adjusting Screw counter-clockwise.
4) After approximately 3,000 shots, the hammer spring adjustment screw may need to
be turned clockwise one full turn to maintain factory velocity. One turn equals
approx.100fps.
12
© Air Venturi® / www.airventuri.com / 216-292-2570
Page 13
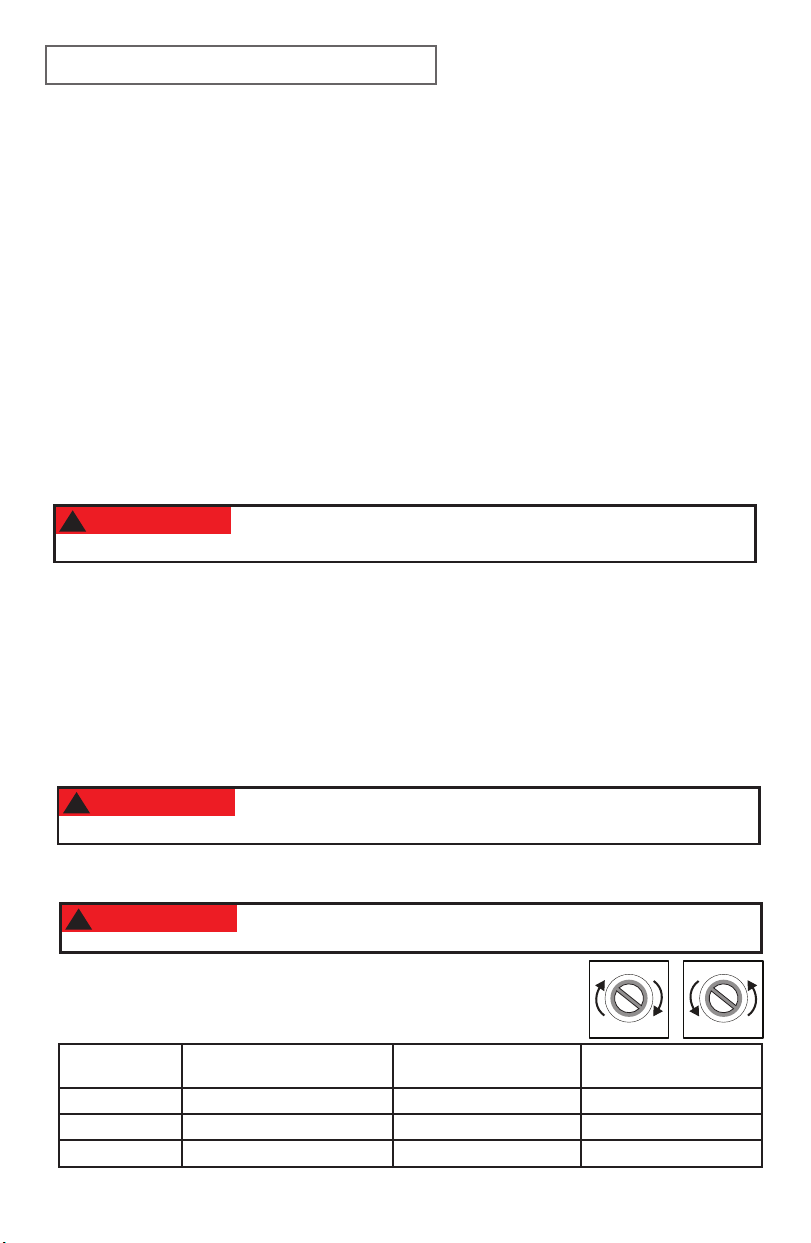
EXTERNALLY ADJUSTABLE REGULATOR
Sec.1
), and remove the
Sec.3.
Sec.12.
Sec.3.
Sec.1
), and remove the
Sec.12.
Velocity Adjustment
About 1000fps
About 950fps
About 900fps
To reduce the regulator pressure:
1) Move the safety to the “S” (SAFE) position and keep the muzzle pointed in a
safe direction.
2) Depressurize the rie following the procedure outlined on page 8.
3) Once the rie is empty, locate the regulator adjustment screw on the underside
of the air rie.
4) Using a athead screwdriver, rotate the adjustment screw clockwise until it stops
(Fig. 9a), then rotate one quarter turn counter-clockwise (Fig. 9b). This will reset
the regulator to a minimum setting.
5) Fill the rie to 300 BAR / 4,350 PSI, following the procedure on page 7.
6) Using a athead screwdriver, slowly rotate the adjustment screw counter-clockwise
(Fig. 9b), at the same time, observe the regulator gauge. The pressure will gradually
increase. Adjust to your ideal pressure.
7) To achieve best results, it is recommended that you adjust your hammer spring tension
in conjunction with regulator adjustments.
WARNING:
!
DO NOT ROTATE THE REGULATOR ADJUSTMENT SCREW CLOCK-
WISE WHILE THE RIFLE HAS PRESSURE IN IT. THIS CAN DAMAGE YOUR REGULATOR.
To increase the regulator pressure:
1) Move the safety to the “S” (SAFE) position and keep the muzzle pointed in a safe
direction.
2) Fill the rie to 300 BAR / 4,350 PSI, following the procedure on page 7.
3) Locate the regulator adjustment screw on the underside of the air rie.
4) Using a athead screwdriver, slowly rotate the adjustment screw counter-clockwise
(Fig. 9b), at the same time, observe the regulator gauge. The pressure will gradually
increase. Adjust to your ideal pressure.
WARNING:
!
NEVER ADJUST THE REGULATOR PRESSURE ABOVE 3000 PSI / 210
BAR. THIS CAN DAMAGE THE REGULATOR.
5) To achieve best results, it is recommended that you adjust your hammer spring tension
in conjunction with regulator adjustments.
DO NOT ROTATE THE REGULATOR ADJUSTMENT SCREW CLOCK-
WARNING:
!
WISE WHILE THE RIFLE HAS PRESSURE IN IT. THIS CAN DAMAGE YOUR REGULATOR.
The Adjustment Reference Chart can be used
to restore your rie to a normal setting.
CALIBER REGULATOR PRESSURE SPRING ADJUSTMENT
.177 (4.5 MM) ABOUT 140 BAR/2,000 PSI ABOUT 3 TURNS ABOUT 1,000 FPS
.22 (5.5 MM) ABOUT 180 BAR/2,600 PSI ABOUT 3 TURNS ABOUT 950 FPS
.25 (6.35 MM) ABOUT 200 BAR/2,900 PSI ABOUT 3 TURNS ABOUT 900 FPS
TURNS
Fig.9a Fig.9b
VELOCITY
ADJUSTMENT
13
© Air Venturi® / www.airventuri.com / 216-292-2570
Page 14
MAINTENANCE
1) Apply silicone lubricant to the breech o-ring on the bolt probe every 3 months
or every 500 shots.
2) Apply a thin layer of Moly paste to the bolt probe every 3 months.
3) Always store with pressure (at least 1,000 PSI/69 BAR) in the air rie. Store in
a place that is dark. Keep out of high humidity.
WARNING:
!
DO NOT INTRODUCE PETROLEUM-BASED LUBRICANTS INTO THE
HIGH-PRESSURED RESERVOIR, IT MAY CAUSE AN EXPLOSION. FAILURE TO
FOLLOW THESE INSTRUCTIONS MAY RESULT IN SERIOUS INJURIES OR DEATH.
WARNING:
!
DO NOT ATTEMPT TO DISASSEMBLE OR REPAIR THIS AIR RIFLE
WHILE IT IS FILLED WITH AIR PRESSURE. PARTS CAN FLY FROM THIS AIR RIFLE AT DANGEROUS SPEEDS AND MAY CAUSE SERIOUS INJURIES OR DEATH.
14
© Air Venturi® / www.airventuri.com / 216-292-2570
Page 15

WARRANTY
One-Year Limited Warranty
This product is warranted to the retail consumer for one year from date of retail purchase
against defects in material and workmanship. In the unlikely event there are any defects in
materials or workmanship in the rst twelve (12) months after retail purchase, we will repair
or replace the defective items under warranty.
What is covered:
Replacement parts and labor. Transportation charges to consumer for repaired product.
What is NOT covered:
- Transportation charges to Air Venturi for defective products.
- Any damage or faults caused by owner misuse, action or inaction.
- Damages caused by abuse or failure to perform normal maintenance.
- Any other expense.
- Parts subject to normal wear and tear.
- Consequential damages, incidental damages or incidental expenses including damage
to property.
This warranty is in addition to your statutory rights. Retain your sales receipt as proof
of purchase.
NOTE: Some states do not allow the exclusion or limitation of incidental or consequential
damages, so the above limitation or exclusion may not apply to you.
Warranty claims:
Call Air Venturi at 216-220-1180 before returning any product.
Implied warranties:
Any implied warranties, including the implied warranties of merchantability and tness for a
particular purpose, are limited in duration to one year from date of retail purchase.
NOTE: Some states do not allow limitations on how long an implied warranty lasts, so the
above limitation may not apply to you.
To the extent any provision of this warranty is prohibited by federal, state or municipal law
which cannot be preempted, it shall not be applicable. This warranty gives you specic
legal rights, and you may also have other rights which vary from state to state and country
to country. Illustrations and photographs are for information purposes only and may not
show the exact model purchased.
The warranty shall be invalid if the Airgun:
• Has been incorrectly disassembled, reassembled or maintained.
• Has been tted with non-Air Venturi parts.
• Has been abused, misused or improperly stored.
• Original purchase receipt cannot be presented.
15
© Air Venturi® / www.airventuri.com / 216-292-2570
Page 16

AIR VENTURI
®
5135 Naiman Parkway, Cleveland, OH 44139
Ph: 216-292-2570 • fax: 216-373-0086
 Loading...