Airthings Wave Plus User Manual

Airthings Wave Plus
Smart Radon Detector with Indoor Air Quality Sensors |
Operating manual |
|
Version 4, September 24, 2018 |
|
|
Set up your Airthings device in 3 simple steps:
1.Download the Airthings Wave App, available on iOS and Android
2.Create an account and insert Name, Email and Location*
3.Follow the simple instructions in the app to connect your device
*We encrypt and securely store your information in the Airthings Cloud. Providing your location is optional, however, sharing your radon information helps us understand how regional radon works and can ultimately save lives.
Many easy ways to contact Airthings
Have any questions or comments that we didn’t get to here? Let us know! support.airthings.com
Congratulations on taking this important step toward living a healthier life.
By keeping track of your Indoor Air Quality and radon levels, you can make healthier decisions in the spaces where you spend most of your time. Increased productivity and energy levels, better quality sleep, and resistance to illness are just a few of the benefits. Lessening your exposure to radon will reduce your risk of lung cancer.
The Airthings Wave Plus provides you with detailed information about Radon, VOCs, CO2, Temperature, Humidity and Air Pressure levels on your phone, Airthings Dashboard or simply wave in front of the device for a visual indication of your radon levels.
Breathe better, live better,
The Airthings team

Features and content
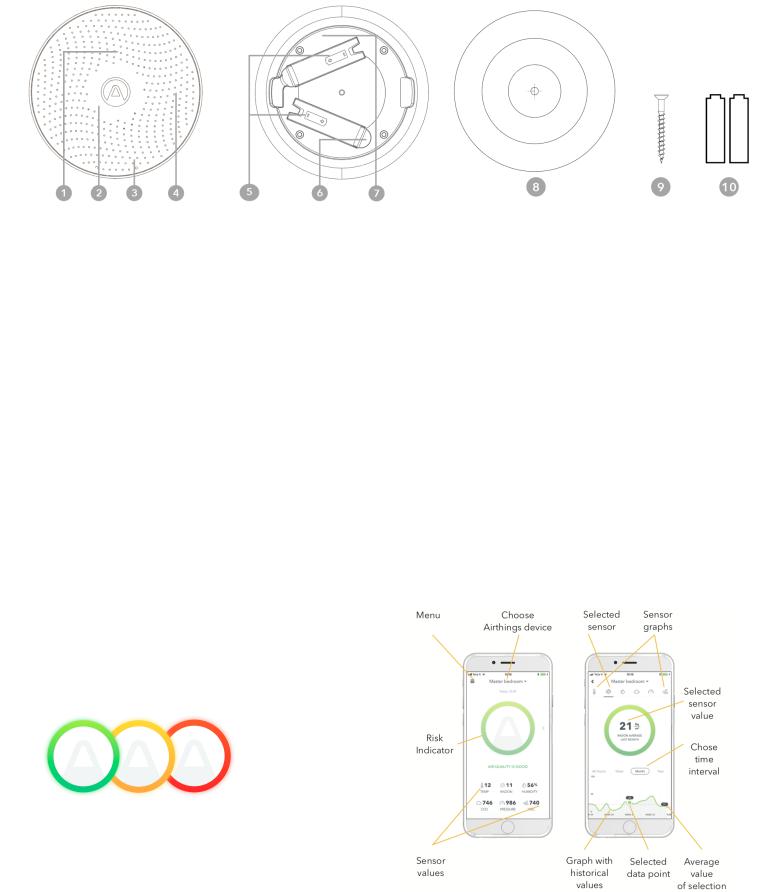
1.Power indicator
2.Light ring
3.Motion sensor
4.Air inlets
5.Battery compartments (observe polarity symbols)
6.One-time battery tab
7.Individual serial number
8.Mounting bracket
9.Screw
10.2 AA batteries, inserted
Power Indicator
Flashing dot every 20 seconds Green: battery level okay
Blue: App communication active Red: Replace batteries
Light Ring
Visual indication of your air quality levels.
Green: Good
Yellow: Warning
Red: Danger
(Go to airthings.com/thresholds for more information on your air quality action levels)
Air Inlets
This is where air comes into your detector.
Audio Alarm
The device can give you audio alerts if your air quality levels are violating the recommended amount. In case of audio alerts, simply wave in front of the device to snooze alerts.
Wave Sensor
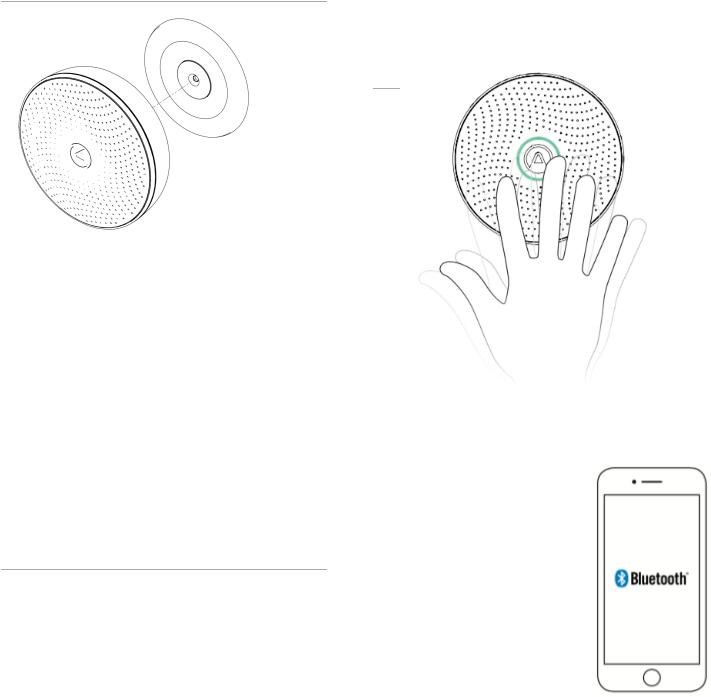
Simply wave in front of your detector to activate the light ring.
Basics of the App
*All sensor measurements are adjustable to your country’s unit system.

Easy to mount
Fix the mounting bracket to the ceiling or wall. Make sure you use appropriate screws for your wall type. The screws included are intended for wood or drywall. Do not place it close to vents or windows. Minimum 1 meter / 3 feet distance.
Thanks to the built-in magnet, simply snap the unit onto the mounted bracket. Then rotate it to the desired position.
Initial setup
You’ll receive your first radon reading in about an hour but we recommend leaving your Wave Plus uninterrupted for at least 1 week for an accurate radon reading. Radon levels fluctuate daily which is why continuous monitoring is necessary. The TVOC and CO2 sensors require at least 1 week for the initial internal calibration.
Daily use
Magnetic
Magnetic
Wave in front of your device to see a visual indication of your overall Indoor Air Quality.
Make sure you always have Bluetooth enabled on your phone and the app running in the background. Every time you are in range of your device, the latest data will be synced automatically. You will be notified if any actions are needed through the app. The Wave Plus will enter stand-alone mode if not
connected to a phone the last 7 days. Next time the Wave Plus is connected to a phone again, it will go back to regular connected mode
The Wave Plus also includes Airthings Smartlink which works with the Hub. Refer to the Hub manual for the Smartlink info. The Hub provides longer range as well as live updates using the Airthings Smartlink.
 Loading...