

Page 1

TI61H
TI61A
TI83H
Page 2

Chère cliente, cher client,
Nous vous remercions de la confiance que vous nous avez accordée en choisissant notre table
de cuisson vitrocéramique à induction.
Afin de bien connaître cet appareil, nous vous recommandons de lire attentivement cette notice
d’utilisation dans son intégralité et de la conserver pour une consultation ultérieure.
2
Page 3

SOMMAIRE
SECURITE...................................................................................................................................4
Précautions avant utilisation en cuisson..................................................................................4
Utilisation de l’appareil .............................................................................................................4
Précautions pour ne pas détériorer l’appareil ..........................................................................5
Précautions en cas de défaillance de l’appareil .......................................................................5
Autres protections....................................................................................................................5
DESCRIPTION DE L’APPAREIL ................................................................................................6
Caractéristiques techniques 230V~ 50Hz................................................................................6
Bandeau de commande...........................................................................................................6
UTILISATION DE L’APPAREIL ..................................................................................................7
Touches sensitives..................................................................................................................7
Affichage..................................................................................................................................7
Ventilation................................................................................................................................7
MISE EN ROUTE ET GESTION DE L’APPAREIL......................................................................7
Avant la première utilisation.....................................................................................................7
Principe de l’induction..............................................................................................................7
Mise en route...........................................................................................................................8
Détection de récipient..............................................................................................................8
Indicateur de chaleur résiduelle...............................................................................................8
Fonction minuterie...................................................................................................................8
Programmation d’automatisme de cuisson « go and stop » ....................................................9
Verrouillage du bandeau de commande ..................................................................................9
CONSEILS DE CUISSON .........................................................................................................10
Qualité des casseroles...........................................................................................................10
Dimension des casseroles.....................................................................................................10
Exemples de réglage des puissances de cuisson..................................................................10
ENTRETIEN ET NETTOYAGE..................................................................................................11
QUE FAIRE EN CAS DE PROBLÈME......................................................................................11
PROTECTION DE L’ENVIRONNEMENT ..................................................................................12
INSTRUCTIONS D’INSTALLATION.........................................................................................12
CONNEXION ÉLECTRIQUE .....................................................................................................13
3
Page 4

SECURITE
Précautions avant utilisation en cuisson
Retirez toutes les parties de l’emballage.
L’installation et le branchement électrique de l’appareil sont à confier à des spécialistes
agrées. Le fabricant ne saurait être tenu responsable des dommages résultant d’une
erreur d’encastrement ou de raccordement.
L’appareil ne doit être utilisé que s’il est monté et installé dans un meuble et un plan de
travail homologué et adapté.
Son utilisation est uniquement destinée à l’usage domestique habituel (préparation des
aliments), à l’exclusion de toute autre utilisation domestique, commerciale ou industrielle.
Enlevez toutes les étiquettes et autocollants du verre vitrocéramique.
Ne pas transformer ou modifier l’appareil.
La table de cuisson ne doit pas servir de support ou de plan de travail.
La sécurité n’est assurée que si l’appareil est raccordé à une terre de protection
conforme aux prescriptions en vigueur.
Pour le raccordement au réseau électrique n’utilisez pas de rallonge.
L’appareil ne doit pas être utilisé au-dessus d’un lave-vaisselle ou d’un sèche-linge : les
vapeurs d’eau dégagées pourraient détériorer l’électronique.
Utilisation de l’appareil
Coupez toujours les foyers après utilisation.
Surveillez constamment les cuissons qui utilisent des graisses et des huiles, car elles
sont susceptibles de s’enflammer rapidement.
Prenez garde aux risques de brûlures pendant et après l’utilisation de l’appareil.
Assurez-vous qu’aucun câble électrique d’appareil fixe ou mobile ne vienne en contact
avec la vitre ou la casserole chaude.
Les objets magnétisables (cartes de crédits, disquettes informatiques, calculatrices) ne
doivent pas se trouver à proximité immédiate de l’appareil en fonction.
Ne placez aucun objet métallique autre que les récipients de chauffe. En cas
d’enclenchement intempestif ou de chaleur résiduelle, celui-ci risquerait selon le
matériau de chauffer, de fondre ou de commencer à brûler.
Ne jamais couvrir l’appareil d’un chiffon ou d’une feuille de protection. Il pourrait devenir
très chaud et prendre feu.
Cet appareil n'est pas destiné à être utilisé par des personnes (enfants y compris) ayant
des facultés physiques, sensorielles ou mentales réduites, ou un manque d'expérience et
de connaissance, à moins qu'elles aient eu des explications concernant l'utilisation de
l'appareil par une personne chargée de leur sécurité.
Les enfants doivent être informés pour s'assurer qu'ils ne jouent pas avec l'appareil.
Les objets métalliques tels que des couteaux, des fourchettes, des cuillères et des
couvercles ne devraient pas être placés la surface vitrée puisqu'ils peuvent devenir
chauds.
4
Page 5

Précautions pour ne pas détériorer l’appareil
NE PAS UTILISER D’ACESSOIRES AMOVIBLES INTERMEDIAIRES POUR
Les casseroles à semelles brutes (fonte non émaillée,…) ou abîmées peuvent
endommager la vitrocéramique.
La présence de sable ou d’autres matériaux abrasifs peut endommager la
vitrocéramique.
Evitez de faire chuter des objets, mêmes petits, sur la vitrocéramique.
Ne heurtez pas les bords de la vitre avec les casseroles.
S’assurer que la ventilation de l’appareil se fasse suivant les instructions du constructeur.
Ne posez pas ou ne pas laisser de casseroles vides sur la table de cuisson.
Eviter que le sucre, les matières synthétiques ou une feuille d’aluminium ne touchent les
zones chaudes. Ces substances peuvent au refroidissement provoquer des cassures ou
d’autres modifications de la surface vitrocéramique: Etendre l’appareil et enlevez-les
immédiatement de la zone de cuisson encore chaude (attention : risque de brûlures).
Ne placez jamais de récipients chauds au dessus de la zone de commande.
Si un tiroir est situé sous l’appareil encastré, assurer un écart suffisant (2 cm) entre le
contenu de ce tiroir et la partie inférieure de l’appareil afin d’assurer une bonne
ventilation.
Ne déposez pas d’objets inflammables (ex. sprays) dans le tiroir placé sous la table de
cuisson. Les éventuels casiers à couverts doivent être en matériau résistant à la chaleur.
Précautions en cas de défaillance de l’appareil
Si un défaut est constaté, il faut déclencher l’appareil et couper le ligne d’alimentation
électrique.
En cas de fêlure ou de fissure de la vitrocéramique il faut impérativement débrancher
l’appareil du réseau électrique et prévenir le service après-vente.
Les réparations doivent être entreprises exclusivement par un personnel spécialisé.
N’ouvrez en aucun cas l’appareil vous-même.
ATTENTION : Si la surface vitrée est fissurée, coupez l’alimentation de l’appareil pour
éviter une éventuelle décharge électrique.
Autres protections
Assurez-vous que le récipient de cuisson soit toujours centré sur la zone de cuisson. Le
fond de la casserole doit autant que possible couvrir la zone de cuisson.
Pour les utilisateurs portant un régulateur de rythme cardiaque, le champ magnétique
pourrait influencer son fonctionnement. Nous recommandons de se renseigner auprès
du revendeur ou du médecin.
N’utilisez pas de récipients en matière synthétique ou en aluminium : i ls pourraient
fondre sur des foyers encore chauds.
FAIRE CHAUFFER DES CASSEROLES NON ADAPTEES A L’INDUCTION.
RISQUES DE BRULURES ET DE DETERIORATION DE LA TABLE.
5
Page 6
DESCRIPTION DE L’APPAREIL
Affichage
Voyant
Touche
Voyants de sélection
Affichage
Touche
Touche
Caractéristiques techniques 230V~ 50Hz
Type
TI61H
TI61A
TI83H
* la puissance peut varier en fonction des dimensions et des matériaux des casseroles.
Puissance
totale
6000W
6000W
Position
du foyer
Avant gauche
Arrière gauche
Arrière droit
Gauche
Centre
Droit
Puissance
Nominale *
2300W
1400W
2300W
2300W
1400W
2300W
Diamètre
190 mm
150 mm
260 mm
210 mm
145 mm
240 mm
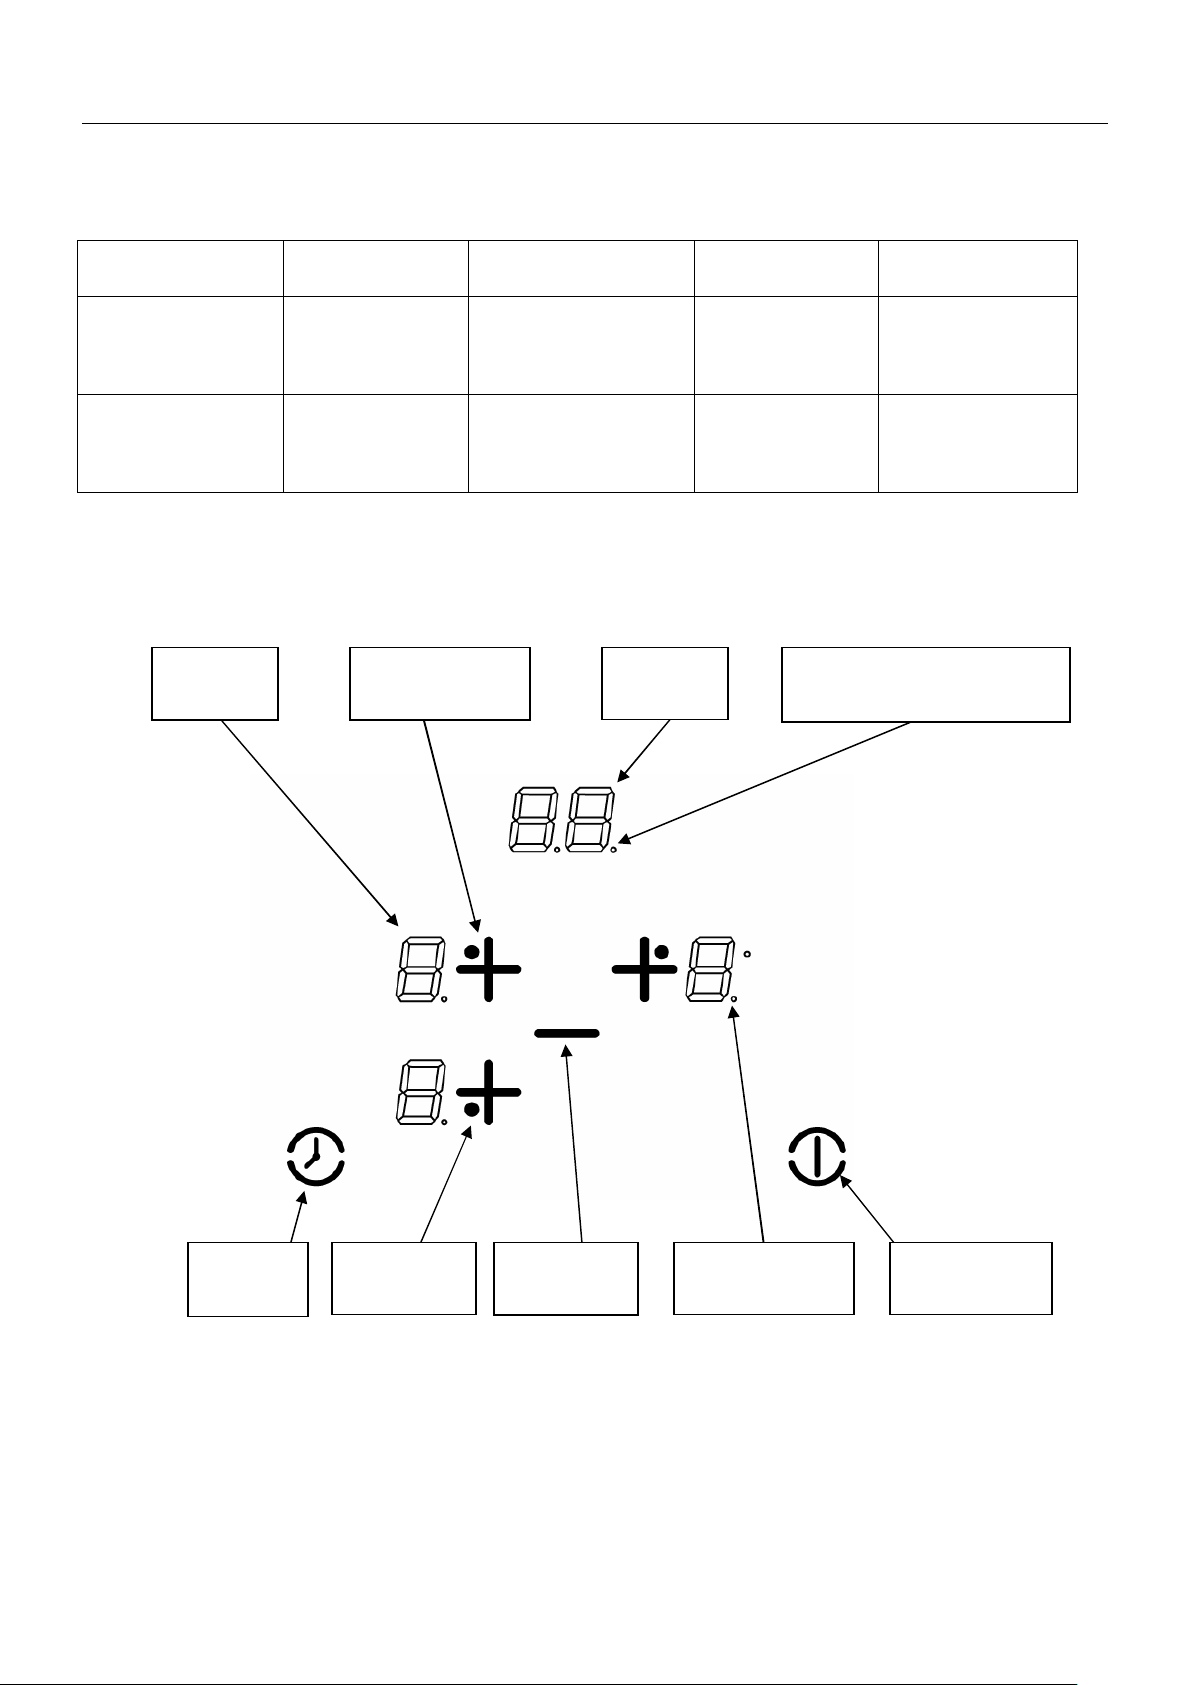
Bandeau de commande
puissance
Sélection foyer
minuterie
du foyer pour minuterie
Minuterie
Touche [ + ]
Touche [- ]
sélection foyer
Marche/Arrêt
6
Page 7

UTILISATION DE L’APPAREIL
Touches sensitives
Votre appareil est équipé de touches sensitives permettant de commander les différentes
fonctions. Un effleurage de la touche active leur fonctionnement. Cette activation est validée par
un voyant, un affichage et/ou par un signal sonore.
N’appuyez que sur une seule touche à la fois.
Affichage
Affichage Désignation Fonction
0 Zéro La zone de chauffe est activée
1…9 Niveau de puissance Choix du niveau de cuisson
U Détection de casserole Récipient manquant ou inapproprié
E Message d’erreur Défaut de circuit électronique
H Chaleur résiduelle La zone de cuisson est chaude
L Verrouillage La table est sécurisée
A Accélérateur de chauffe Cuisson automatique
Ventilation
Le ventilateur de refroidissement a un fonctionnement entièrement automatique. Il se met en
route à petite vitesse dès que les calories dégagées par l’électronique dépassent un certain
seuil. La ventilation enclenche sa seconde vitesse lorsque la table de cuisson est utilisée
intensivement. Le ventilateur réduit sa vitesse et s’arrête automatiquement dès que le circuit
électronique est suffisamment refroidi.
MISE EN ROUTE ET GESTION DE L’APPAREIL
Avant la première utilisation
Nettoyez votre appareil avec un chiffon humide, puis séchez le. N’utilisez pas de détergent qui
risquerait de provoquer une coloration bleutée sur les surfaces vitrées.
Principe de l’induction
Une bobine d’induction se trouve sous chaque foyer de cuisson. Lorsque celle-ci est
enclenchée, elle produit un champ électromagnétique variable qui, à son tour produit des
courants induits dans le fond ferro-magnétique du récipient. Il en résulte un échauffement du
récipient placé sur la zone de chauffe.
Bien entendu le récipient doit être adapté :
Sont recommandés tous les récipients métalliques ferro-magnétiques (à vérifier
éventuellement avec un petit aimant) tels que : cocotte en fon te, poêle en fer noir,
casseroles métalliques émaillées, en inox à semelle ferro-magnétique…
Sont exclus les récipients en cuivre, inox, aluminium, verre, bois, céramique, grès, terre
cuite, inox non ferro-magnétique…
La zone de cuisson à induction prend automatiquement en compte la taille du r écipient utilisé.
Avec un diamètre trop petit, le récipient ne fonctionne pas. Ce diamètre varie en fonction du
diamètre de la zone de cuisson.
Lorsque le récipient n’est pas adapté à la table de cuisson le symbole ( U
) reste affiché.
7
Page 8

Mise en route
Vous devez d’abord enclencher la table de cuisson , puis la zone de chauffe :
Enclencher / arrêter la table de cuisson :
Action
Bandeau de commande Afficheur Voyant
Enclencher appuyer sur [ I ] 3 x [ 0. ] clignotent
Arrêter appuyer sur [ I ] aucun ou [ H ] s’éteint
Enclencher / arrêter une zone de chauffe :
Action
Bandeau de commande Afficheur
Sélectionner appuyer sur la touche de la zone [ + ] [ 0. ]
Augmenter ré-appuyer sur [ + ] [ 1 ] jusqu’à [ 9 ]
Diminuer appuyer sur [ - ] [ 9 ] jusqu’à [ 1 ]
Arrêter appuyer simultanément sur [ + ] et [ - ] [ 0 ] ou [ H ]
ou appuyer sur [ - ] [ 0 ] ou [ H ]
Si aucun réglage n’est fait dans un délai de 20 secondes l’électronique revient en position
d’attente.
Détection de récipient
La détection de récipient assure une sécurité parfaite. L’induction ne fonctionne pas :
Lorsqu’il n’y a pas de récipient sur la zone de cuisson ou lorsque ce récipient est
inadapté à l’induction. Dans ce cas il est impossible d’augmenter la puissance et dans
l’afficheur le symbole [ U ] apparaît. Le [ U ] disparaît lorsqu’une casserole est posée
sur le foyer de cuisson.
Si en cours de cuisson le récipient est enlevé de la zone de cuisson, le fonctionnement
est interrompu. Dans l’afficheur le symbole [ U
récipient est remis sur le foyer de cuisson. La cuisson reprend au niveau de puissance
sélectionnée au préalable.
] apparaît. Le [ U ] disparaît lorsque le
Indicateur de chaleur résiduelle
Après l’arrêt des zones de cuisson ou l’arrêt complet de la table, les zones de cuissons sont
encore chaudes et sont signalées par le symbole [ H ]
Le symbole [ H ] s’éteint lorsque les zones de cuisson peuvent être touchées sans danger.
Tant que les témoins de chaleur résiduelle sont allumés, ne touchez pas les zones de cuisson
et ne posez aucun objet sensible à la chaleur. Risque de brûlure et d’incendie !
Fonction minuterie
La minuterie peut être affectée simultanément à tous les foyers de cuisson et ceci avec des
réglages de temps de minuterie différents (de 0 à 99 minutes) pour chacune des zones.
Réglage ou modification de la durée de cuisson :
Action Bandeau de commande Afficheur
Sélectionner la zone Appuyer sur la touche de la zone [ 0. ]
Sélectionner puissance Appuyer sur [ + ] ou [ - ] [ 1 ] …. [ 9 ]
Sélectionner « » Appuyer sur [ ] Minuterie [ 00 ] minutes
Diminuer la durée Appuyer sur [ - ] [60] passe à 59,58,57,..
Augmenter la durée Appuyer sur [ ] Le temps augmente…
Après quelques secondes le voyant de contrôle passe de « clignotement » à « fixe ».
La durée est sélectionnée et le décompte démarre.
8
Page 9

Arrêter la fonction minuterie cuisson :
Action Bandeau de commande Afficheur
Sélectionner la zone Appuyer sur la touche de la zone [ 0. ]
Sélectionner [ ] Appuyer sur[ ] Temps restant
Désactiver [ ] Appuyer simultanément sur [ - ] et [ ] Passe à [ 00 ]
puis s’éteint
Lorsque plusieurs minuteries sont activées il suffit de répéter l’opération.
Arrêt automatique en fin de cuisson :
Dès que le temps de cuisson sélectionné est écoulé la minuterie affiche en clignotant [ 00 ] et
un signal sonore retentit.
Pour stopper le son et le clignotement il suffit d’appuyer sur la touche [ ]
Minuterie utilisée hors cuisson :
Action
Bandeau de commande Afficheur
Activer la table de cuisson Appuyer sur [ I ] Voyants de zone allumes
Sélectionner « Minuterie » Appuyer sur [ ] Minuterie [ 00 ] minutes
Diminuer la durée Appuyer sur [ - ] [30] passe à 29,28,27,
Augmenter la durée Appuyer sur [ ] Le temps augmente…
Le voyant de contrôle clignote, puis s’éteint après quelques secondes.
Dès que le temps sélectionné est écoulé la minuterie affiche en clignotant [00] et un signal sonore
retentit.
Pour stopper le son et le clignotement il suffit d’appuyer sur la touche [ ]
Programmation d’automatisme de cuisson « go and stop »
Toutes les zones de cuisson sont équipées d’un dispositif de cuisson automatique. La zone de
cuisson se met en marche à pleine puissance pendant un certain temps, puis r éduit
automatiquement sa puissance sur le niveau présélectionné.
Mise en route de l’automatisme :
Action Bandeau de commande Afficheur
Sélectionner la zone Appuyer sur [ + ] [ 0 ] et voyant de zone allumé
Activer la pleine puissance Ré appuyer sur [ + ] Passe de [ 1 ] à [ 9 ]
Activer l’automatisme Ré appuyer sur [ + ] [ 9 ] clignote avec [ A ]
Sélectionner niveau Appuyer sur [ - ] [ 9 ] passe à [ 8 ] [ 7 ] ……
(par exemple « 7 ») [ 7 ] clignote avec [ A ]
Arrêt de l’automatisme :
Action Bandeau de commande Afficheur
Sélectionner la zone Appuyer sur [ - ] [ 9 ] passe à [ 8 ] [ 7 ]…
Sélectionner niveau Appuyer sur [ + ] Niveau sélectionné
Verrouillage du bandeau de commande
Pour éviter de modifier une sélection de la table de cuisson, notamment dans le cadre du
nettoyage de la vitre, le bandeau de commande (à l’exception de la touche marche/arrêt [ 0/I ])
peut être verrouillé.
Verrouillage :
Action Bandeau de commande Afficheur
Mise en route Appuyer sur [ I ] [0] ou [H] sur 3 afficheurs
Verrouiller la table Appuyer simultanément
de la zone avant gauche [0] ou [H] sur 3 afficheurs
Ré-appuyer sur [ + ] seul [ L ] sur 3 afficheurs
sur [ - ] et [ + ]
9
Page 10

Déverrouillage :
Action Bandeau de commande Afficheur
Mise en route Appuyer sur [ I ] [ L ] sur 3 afficheurs
Verrouiller la table Appuyer simultanément
sur [-] et [+]
de la zone avant gauche [0] ou [H] sur 3 afficheurs
Ré-appuyer sur [ - ] seul Afficheurs éteints
CONSEILS DE CUISSON
Qualité des casseroles
Matériaux adaptés : acier, acier émaillé, fonte, inox à fond ferro-magnétique,
aluminium à fond ferro-magnétique
Matériaux non adaptés : aluminium et inox à fond non ferro-magnétique, cuivre, laiton, verre,
Céramique, porcelaine
Les fabricants spécifient si leurs produits sont compatibles induction.
Pour vérifier si des casseroles sont compatibles :
Placez un peu d’eau dans une casserole placée sur une zone de cuisson induction
réglée au niveau [ 9 ]. Cette eau doit chauffer en quelques secondes.
Placez un aimant sur le fond externe de la casserole, il doit rester collé.
Certaines casseroles peuvent faire du bruit lorsqu’elles sont placées sur une zone de cuisson à
induction. Ces bruits ne traduisent en aucun cas un défaut de l’appareil et n’influent nullement
sur son fonctionnement.
Dimension des casseroles
Les zones de cuisson s’adaptent automatiquement à la dimension du fond de la casserole
jusqu’à une certaine limite. Le fond de cette casserole doit cependant avoir un diamètre
minimum en fonction du diamètre de la zone de cuisson correspondante.
Afin d’obtenir le rendement maximum de votre table de cuisson, veuillez placer la casserole
bien au centre de la zone de cuisson.
Exemples de réglage des puissances de cuisson
(les valeurs ci-dessous sont indicatives)
1 à 2 Faire fondre
Réchauffer
2 à 3 Gonfler
Décongélation
3 à 4 Vapeur Légumes, poissons, viande
4 à 5 Eau Pommes de terre à l’eau, soupes, pâtes
6 à 7 Cuire à feu doux Viandes, foie, œufs, saucisses
7 à 8 Cuire, Frire Pommes de terre, beignets, galettes
9 Frire,
Porter à ébullition
Sauces, beurre, chocolat, gélatine
Plats pré-cuisinés
Riz, pudding et plats cuisinés
Légumes, poisson, produits congelés
Légumes frais
Goulasch, roulades, tripes
Steaks, omelettes
eau
10
Page 11

ENTRETIEN ET NETTOYAGE
Pour nettoyer il faut mettre l’appareil hors fonctionnement.
Laissez refroidir l’appareil, car risques de brûlures.
Nettoyez les restes de cuisson avec de l’eau additionnée de produit vaisselle ou un produit du
commerce conseillé pour la vitrocéramique.
N’utilisez en aucun cas d’appareils « à vapeur » ou « à pression ».
Ne pas utiliser d’objets qui risqueraient de rayer la vitrocéramique (tel que tampon abrasifs ou
pointe de couteau…).
N’utilisez pas de produits de nettoyage abrasifs qui pourraient endommager l’appareil.
Séchez l’appareil avec un chiffon propre.
Enlevez immédiatement le sucre et les mets contenant du sucre.
QUE FAIRE EN CAS DE PROBLEME
La table de cuisson ou les zones de cuisson ne s’enclenchent pas :
la table est mal connectée au réseau électrique
le fusible de protection a sauté
vérifiez si le verrouillage n’est pas activé
les touches sensitives sont couvertes d’eau ou de graisse
un objet est posé sur les touches sensitives
Le symbole [ U ] s’affiche :
il n’y a pas de casserole sur la zone de cuisson
le récipient utilisé n’est pas compatible avec l’induction
le diamètre du fond de casserole est trop petit par rapport à la zone de cuisson
Le symbole [ C ] ou [ E ] s’affiche :
appelez le Service Après-ventes
L’une des zones ou l’ensemble du plan de cuisson se déclenche :
le déclenchement de sécurité a fonctionné
celui-ci s’actionne dans le cas ou vous avez oublié de couper une des zones de chauffe
il s’enclenche également lorsque une ou plusieurs touches sensitives sont couvertes
une des casseroles est vide et son fond a surchauffé
la table dispose également d’un dispositif de réduction automatique de niveau de
puissance et de coupure automatique en cas de surchauffe
La soufflerie de ventilation continue de tourner après l’arrêt de la table :
ce n’est pas un défaut, le ventilateur continue de protéger l’électronique de l’appareil
la soufflerie s’arrête automatiquement
La commande de cuisson automatique ne s’enclenche pas :
la zone de cuisson est encore chaude [ H ]
le niveau de cuisson maximum est enclenché [ 9 ]
le niveau de cuisson a été enclenché avec la touche [ - ]
La commande affiche 3 [ L ]:
se référer au chapitre verrouillage du bandeau de commande page 9.
11
Page 12

PROTECTION DE L’ENVIRONNEMENT
Coller le joint (2) sur le rebord de la
table à 2mm du bord externe, après
les matériaux d’emballage sont écologiques et recyclables
les appareils électroniques sont composés de matériaux recyclables et parfois de
matériaux nocifs pour l’environnement, mais nécessaires au bon fonctionnement et à la
sécurité de l’appareil
ne jetez en aucun cas votre appareil avec les déchets
ménagers
faites appel au service d’enlèvement ou aux sites de
dépôt mis en place par votre commune et adaptés au
recyclage des appareils électroménagers
INSTRUCTIONS D’INSTALLATION
Le montage relève de la compétence exclusive de spécialistes.
L’utilisateur est tenu de respecter la législation et les normes en vigueur dans son pays de
résidence.
Mise en place du joint d’étanchéité
Le joint adhésif fourni avec l’appareil permet d’éviter toute infiltration dans le meuble.
Sa mise en place doit être effectuée avec un grand soin suivant le croquis ci-dessous.
Encastrement :
La découpe du plan de travail sera suivant le modèle de table de :
- TI61H 560 x 490 mm
- TI61A 560 x 490 mm
- TI83H 760 x 340 mm
La distance entre la table de cuisson et le mur doit être au minimum de 50mm.
La table de cuisson est un appareil qui appartient à la classe de protection « Y ». Lors de
son encastrement, une paroi d’armoire haute ou un mur peut se trouver sur l’un des
côtés et sur la face arrière. Mais de l’autre côté, aucun meuble ni aucun appareil ne
doit être plus haut que le plan de cuisson
Les placages et revêtements des plans de travail doivent être réalisés en matériaux
résistant à la chaleur (100°C)
Les baguettes de bord murales doivent être thermo résistantes
Les matériaux des plans de travail peuvent gonfler au contact de l’humidité. Pour
protéger le chant de la découpe, appliquer un vernis ou une colle spéciale.
N’installer pas la table au dessus d’un four non ventilé ou d’un lave-vaisselle
Garantir entre le fond du caisson de l’appareil un espace de 20 mm pour assurer une
bonne circulation de l’air de refroidissement de l’électronique
12
avoir ôté la feuille de protection (3).
Page 13

Si un tiroir se trouve sous le plan de cuisson, éviter d’y ranger des objets inflammables
(par exemple : spray) et des objets non résistants à la chaleur
L’écart de sécurité entre la table de cuisson et la hotte aspirante placée au-dessus d’elle
doit respecter les indications du fabricant de hottes. En cas d’absence d’instructions
respecter une distance minimum de 760mm
Le câble de raccordement ne doit être soumis, après encastrement, à aucune contrainte
mécanique, comme par exemple du fait d’un tiroir
CONNEXION ELECTRIQUE
L’installation de cet appareil et son branchement au réseau électrique ne doit être
confiés qu’à un électricien parfaitement au fait des prescriptions normatives.
La protection contre les pièces sous tension doit être assurée après le montage.
Les données de raccordement nécessaires se trouvent sur la plaque signalétique et la
plaque de branchement placées sous l’appareil.
Cet appareil doit être séparé du secteur par un dispositif de sectionnement omnipôles.
Lorsque celui-ci est ouvert (déclenché), un écartement de 3mm doit être assuré.
Le circuit électrique doit être séparé du réseau par des dispositifs appropriés, par
exemple les disjoncteurs, les fusibles, les disjoncteurs différentiels et les contacteurs.
Attention !
Cet appareil n’est conçu que pour une alimentation en 230 V~ 50 Hz
Raccordez toujours le fil de terre de protection.
Respectez le schéma de raccordement.
Le boîtier de raccordement se situe sous la plaque de cuisson. Pour ouvrir le capot, servezvous d’un tournevis moyen. Placez le dans les 2 fentes situées à l’avant des 2 flèches.
Réseau Raccordement Diamètre câble Câble Calibre de protection
230V~1N 50Hz 1 Phase + N 3 x 2.5 mm² H 05 RR 25 A *
400V~2N 50Hz 2 Phases + N 4 x 1.5 mm² H 05 RR 16 A *
* calculé avec le coefficient de simultanéité suivant standard TN 60 335-2-6/1990
Branchement de la table:
Pour vous adapter au réseau électrique (230V~1P+N ou 400V~2P+N) , veuillez utiliser les
pontet en laiton situés dans le boitier de connection
Monophasé 230V~1P+N :
Mettre un pontet entre les plots 2 et 3, puis un pontet entre 4 et 5.
Visser le fil vert/jaune au plot prévu pour la mise à la terre.
Visser le neutre N au plot 4 ou 5.
Visser la phase L sur un des plots 2 ou 3.
Biphasé 400V~2P+N :
Mettre un pontet entre 4 et 5.
Visser le fil vert/jaune au plot prévu pour la mise à la terre.
Visser le neutre N au plot 4 ou 5.
Visser la phase L1 sur un le plot 2 et la phase L2 sur le plot 3.
Attention ! Veillez à bien engager les fils et à bien serrer les vis.
Notre responsabilité ne saurait être engagée pour tout incident résultant d’un mauvais
branchement, ou qui pourrait survenir à l’usage d’un appareil non relié à la terre ou
équipé d’une terre défectueuse.
13
Page 14

Dear clients,
Thank you for having chosen our induction ceramic hob.
In order to make the best use of your appliance, we would advise you to read carefully the
following notes and to keep them for a later consulting.
14
Page 15

SUMMARY
SAFETY.....................................................................................................................................16
Precautions before using.......................................................................................................16
Using the appliance...............................................................................................................16
Precautions not to damage the appliance..............................................................................17
Precautions in case of appliance failure.................................................................................17
Other protections...................................................................................................................17
DESCRIPTION OF THE APPLIANCE.......................................................................................18
Technical data 230V~ 50Hz..................................................................................................18
Control panel..........................................................................................................................18
USE............................................................................................................................................19
Sensitive touches...................................................................................................................19
Display...................................................................................................................................19
Ventilation.............................................................................................................................. 19
STARTING-UP AND APPLIANCE MANAGEMENT .................................................................19
Before the first use.................................................................................................................19
Induction principle..................................................................................................................19
Starting-up.............................................................................................................................20
Pan detection.........................................................................................................................20
Residual heat indication.........................................................................................................20
Timer......................................................................................................................................20
Automatic cooking “go and stop”............................................................................................21
Control panel locking .............................................................................................................21
COOKING ADVICES.................................................................................................................22
Pan quality............................................................................................................................. 22
Pan dimension.......................................................................................................................22
Examples of power setting.....................................................................................................22
MAINTENANCE AND CLEANING............................................................................................22
WHAT TO DO IN CASE OF A PROBLEM...............................................................................23
ENVIRONMENT PRESERVATION...........................................................................................23
INSTALLATION INSTRUCTIONS .............................................................................................24
ELECTRICAL CONNECTION ...................................................................................................25
15
Page 16

SAFETY
Precautions before using
Unpack all the materials.
The installation and connecting of the appliance have to be done by approved
specialists. The manufacturer can not be responsible for damage caused by building-in
or connecting errors.
To be used, the appliance must be well-equipped and installed in a kitchen unit and an
adapted and approved work surface.
This domestic appliance is exclusively for the cooking of food, to the exclusion of any
other domestic, commercial or industrial use.
Remove all labels and self-adhesives from the ceramic glass.
Do not change or alter the appliance.
The cooking plate can not be used as freestanding or as working surface.
The appliance must be grounded and connected conforming to local standards.
Do not use any extension cable to connect it.
The appliance can not be used above a dishwasher or a tumble-dryer: steam may
damage the electronic appliances.
Using the appliance
Switch the heating zones off after using.
Keep an eye on the cooking using grease or oils: that may quickly ignite.
Be careful not to burn yourself while or after using the appliance.
Make sure no cable of any fixed or moving appliance contacts with the glass or the hot
saucepan.
Magnetically objects (credit cards, floppy disks, calculators) should not be placed near to
the engaged appliance.
Do not place any metallic object except heating containers. In case of untimely engaging
or residual heat, this one may heat, melt or even burn.
Never cover the appliance with a cloth or a protection sheet. This is supposed to become
very hot and catch fire.
This appliance is not intended for use by persons (including children) with reduced
physical, sensory or mental capabilities, or lack of experience and knowledge, unless
they have been given supervision or instruction concerning use of the appliance by a
person responsible for their safety.
Children should be supervised to ensure that they do not play with the appliance.
Metallic objects such as knives, forks, spoons and lids should not be placed on the hob
surface since they can get hot.
16
Page 17

Precautions not to damage the appliance
DO NOT USE INTERMEDIATE REMOVABLE ACCESSORIES TO HEAT
Raw pan bottoms or damaged saucepans (not enamelled cast iron pots,) may damage
the ceramic glass.
Sand or other abrasive materials may damage ceramic glass.
Avoid dropping objects, even little ones, on the vitroceramic.
Do not hit the edges of the glass with saucepans.
Make sure that the ventilation of the appliance works according to the manufacturer’s
instructions.
Do not put or leave empty saucepans on the vitroceramic hobs.
Sugar, synthetic materials or aluminium sheets must not contact with the heating zones.
These may cause breaks or other alterations of the vitroceramic glass by cooling: switch
on the appliance and take them immediately out of the hot heating zone (be careful: do
not burn yourself).
Never place any hot container over the control panel.
If a drawer is situated under the embedded appliance, make sure the space between the
content of the drawer and the inferior part of the appliance is large enough (2cm). This is
essential to guaranty a correct ventilation.
Never put any inflammable object (ex. sprays) into the drawer situated under the
vitroceramic hob. The eventual cutlery drawers must be resistant to heat.
Precautions in case of appliance failure
If a defect is noticed, switch on the appliance and turn off the electrical supplying.
If the ceramic glass is cracked or fissured, you must unplug the appliance and contact
the after sales service.
Repairing has to be done by specialists. Do not open the appliance by yourself.
WARNING: If the surface is cracked, switch off the appliance to avoid the possibility of
electric shock.
Other protections
Note sure that the container pan is always centred on the cooking zone. The bottom of
the pan must have to cover as much as possible the cooking zone.
For the users of pacemaker, the magnetic field could influence its operating. We
recommend getting information to the retailer or of the doctor.
Do not to use aluminium or synthetic material containers: they could melt on still hot
cooking zones.
PANS WHICH ARE NOT ADAPTED TO INDUCTION.
RISKS OF BURNS AND DETERIORATION OF THE HOB.
17
Page 18

DESCRIPTION OF THE APPLIANCE
Power
Cooking zone
Control light
Timer
Control light
Technical data 230V~ 50Hz
Reference Total Power Heating zone Power * Diametre
TI61H
TI61A
TI83H
* The given power may change according to the dimensions and material of the pan.
6000W
6000W
Front left
Rear left
Rear Right
Left
Centre
Right
2300W
1400W
2300W
2300W
1400W
2300W
Control panel
display
selection key
display
Timer selection
190 mm
150 mm
260 mm
210 mm
145 mm
240 mm
Timer key
18
[ + ] key
On/Off key [ - ] key
cooking zone
Page 19

USE
Sensitive touches
Your ceramic hob is equipped with electronic controls with sensitive touch keys.When your
finger touches the key, the corresponding command is activated. This activation is validated by
a control light, a letter or a number in the display and/or a “beep” sound.
Touch only one key on the same time.
Display
Display Designation Function
0 Zero The heating zone is activated
1…9 Power level Selection of the cooking level
U Pan detection No pan or inadequate pan
E Error message Electronic failure
H Residual heat The heating zone is hot
L Locking Control panel locking
A Heat accelerator Automatic cooking
Ventilation
The cooling system is fully automatic. The cooling fan starts with a low speed when the calories
brought out by the electronic system reach a certain level. The ventilation starts his high speed
when the hob is intensively used. The cooling fan reduces his speed and stops automatically
when the electronic circuit is cooled enough.
STARTING-UP AND APPLIANCE MANAGEMENT
Before the first use
Clean your hob with a damp cloth, and then dry the surface thoroughly. Do not use detergent
which risks causing blue-tinted colour on the glass surface.
Induction principle
An induction coil is located under each heating zone. When it is engaged, it produces a variable
electromagnetic field which produces inductive currents in the ferromagnetic bottom plate of the
pan. The result is a heating-up of the pan located on the heating zone.
Of course the pan has to be adapted :
All ferromagnetics pans are recommended (please verify it thanks a little magnet): cast
iron and steel pans, enamelled pans, stainless-steel pans with ferromagnetic bottoms…
Are excluded : cupper, pure stainless-steel, aluminium, glass, wood, ceramic,
stoneware,…
The induction heating zone adapts automatically the size of the pan. With a too small diameter
the pans doesn’t work. This diameter is varying in function of the heating zone diameter.If the
pan is not adapted to the induction hob the display will show [ U ].
19
Page 20

Starting-up
To turn off the hob press first the [ I ] key, then the heating zone [ + ]:
Start-up/ switch off the hob :
Action Control panel Display Control light
To start : touch the key [ I ] [ 0 ] switch on blinking
To stop : touch the key [ I ] nothing or [ H ] switch off
Start-up/ switch off a heating zone :
Action Control panel Display
To choise the zone touch key [ + ] [ 0 ]
Increase power touch key [ + ] [ 1 ] to [ 9 ]
Decrease power touch key [ - ] [ 9 ] to [ 1 ]
Stop simultaneous [ + ] & [ - ] [ 0 ] or [ H ]
If no actiont is made within 20 second electronics returns in waiting position.
Pan detection
The pan detection ensures a perfect safety.The induction doesn’t work :
If there is no pan on the heating zone or if this pan is not adapted to the induction. In this
case it is impossible to increase the power and the display shows [ U ]. This symbol
disappears when a pan is put on the heating zone.
If the pan is removed from the heating zone the operation is stopped. The display shows
[ U ]. The symbol [ U ] disappears when the pan is put back to the heating zone. The
cooking continues with the power level setted before.
Residual heat indication
After the switch off of a heating zone or the complete stop of the hob, the heating zones are still
hot and indicates [ H ] on the display.
The symbol [ H ] disapears when the heating zones may be touched without danger.
As far as the residual heat indicators are on light, don’t touch the heating zones and don’t put
any heat sensitive object on them . There are risks of burn and fire.
Timer
The timer is able to be used simultaneous with all heating zones and this with different time
settings (from 0 to 99 minutes) for each heating zone.
Setting and modification of the cooking time
Action
To select a heating zone Press on key [ + ] The zone control light is on
To select the power level Press on key [ + ] or [ - ] [ 1 ] …. [ 9 ] [ P ]
To select « Timer » Press on key [
Decrease the time Press on key [ - ] [ 60 ] wents to 59,58,57,……
Increase the time Press on key [ ] The time increases…
After a few seconds the control light stops with blinking.
The time is confirmed and the cooking starts until the time reaches [ 00 ].
Action Control panel Display
To select a heating zone Press on key [ + ] The zone control light is on
To select « Timer » Press on key [ ] The remaining time
To stop the « Timer » Press on key [ - ] and [ ] Displays [ 00 ] then stops
simultaneously
If several timers are activated repeat the process.
Control panel Display
] The timer displays [ 00 ]
To stop the cooking time
20
Page 21

Automatic stop at the end of the cooking time
As soon as the selected cooking time is finished the timer displays blinking [00] and a sound rings.
To stop the sound and the blinking it is enough to press the key [ ].
Egg timer function
Action Control panel Display
Activate the hob Press on key [ I ] The zone control lights are on
Select« Timer » Press on key [ ] Time [ 00 ] minutes
Decrease the time Press on key [ - ] [ 60 ] wents to 59,58,57,……
Increase the time Press on key [
] The time increases…
After a few seconds the control light stops with blinking.
As soon as the selected cooking time is finished the timer displays blinking [00] and a sound rings.
To stop the sound and the blinking it is enough to press the key [ ].
Automatic cooking “go and stop”
All the cooking zones are equipped with an automatic “go and stop” cooking device. The
cooking zone starts at full power during a certain time, then reduces automatically its power on
the preselected level.
Start-up :
Action
Control panel Display
Zone selection Press on key [ + ] [ 0 ] and control light on
Full power setting Press on key [ + ] [ 1 ] …… to……. [ 9 ]
Automatic cooking Press on key [ + ] [ 9 ] is blinking with [ A ]
Power level selection Press on key [ - ] [ 9 ] [ 8 ] [ 7 ] …..….[ 1 ]
(for example « 7 ») [ 7 ] is blinking with [ A ]
Switching off the automatic cooking :
Action Control panel Display
Zone selection Press on key [ - ] [ 9 ] [ 8 ] [ 7 ]…….. [ 0 ]
Power level selection Press on key [ + ] Level selected
Control panel locking
To avoid modifying a setting of cooking zones , in particular with within the framework of
cleaning the control panel can be locked (with exception to the On/Off key [ 0/I ]).
Locking :
Action Control panel Display
Start Press on key [ I ] [ 0 ] or [ H ] on 3 displays
Hob locking Touch simultaneously [ - ]
and [ + ] at front left No modification
Press on key [ + ] [ L ] on 3 displays
Unlocking :
Action Control panel Display
Start Press on key [ I ] [ L ] on 3 displays
In the 5 seconds after start :
Unlocking the hob Touch simultaneously
[ - ] and [ + ] at front left [ 0 ] or [ H ] on 3 displays
Press on key [ - ] No light on the displays
21
Page 22

COOKING ADVICES
Pan quality
Adapted materials: steel, enamelled steel, cast iron, ferromagnetique stainless-steel,
aluminium with ferromagnetique bottom.
Not adapted materials: aluminium and stainless-steel without ferromagnetique bottom, cupper,
brass, glass, ceramic, porcelain.
The manufacturers specify if their products are compatible induction.
To check if pans are compatibles :
Put a little water in a pan placed on an induction heating zone set at level [ 9 ].This water
must heat in a few seconds.
A magnet stucks on the bottom of the pan.
Certain pans can make noise when they are placed on an induction cooking zone. These noise
doesn’t mean any failure on the appliance and doesn’t influence the cooking operating.
Pan dimension
The cooking zones are, until a certain limit, automatically adapted to the diameter of the pan.
However the bottom of this pan must have a minimum of diameter according to the
corresponding cooking zone.
To obtain the best efficiency of your hob, please place the pan well in the center of the cooking
zone.
Examples of power setting
(the values below are indicative)
1 to 2 Melting
Reheating
2 to 3 Simmering
Defrosting
3 to 4 Steam Vegetables, fish, meat
4 to 5 Water Steamed potatoes, soups, pasta,
6 to 7 Medium cooking
Simmering
7 to 8 Cooking Potatoes, fritters, wafers
9 Frying, roosting Boiling water Steaks, omelettes, fried dishes, Water
Sauces, butter, chocolate, gelatine
Dishes prepared beforehand
Rice, pudding, sugar syrup
Dried vegetables, fish, frozen products
fresh vegetables
Meat, lever, eggs, sausages
Goulash, roulade, tripe
MAINTENANCE AND CLEANING
Switch-of f the appliance before cleaning.
Do not clean the hob if the glass is too hot: risk of burn.
Remove light marks with a damp cloth with washing up liquid diluted in a little water. Then rinse
with cold water and dry the surface thoroughly.
Highly corrosive or abrasive detergents and cleaning equipment likely to cause scratches must
be absolutely avoided.
Do not ever use any steam-driven or pressure appliance.
Do not use any object that may scratch the ceramic glass.
Ensure that the pan is dry and clean. Ensure that there are no grains of dust on your ceramic hob
or on the pan. Sliding rough saucepans will scratch the surface.
Spillages of sugar, jam, jelly, etc. must be removed immediately. You will thus prevent the
surface being damaged.
22
Page 23

WHAT TO DO IN CASE OF A PROBLEM
The hob or the cooking zone doesn’t start-up :
The hob is badly connected on the electrical network.
The protection fuse cut-off
The looking function is activated
The sensitive keys are covered of grease or water.
An object is put on a key.
The symbol [ U ] displays :
There is no pan on the cooking zone.
The pan is not compatible with induction.
The bottom diameter of the pan is too small.
The symbol [ F ] & [ E ]displays :
You cannot use this cooking zone anymore.
Call the After-sales Service.
The electronic system is defective.
Disconnect and replug the hob.
Call the After-sales Service.
One or all cooking zones cut-off :
The safety system functioned
You forgot to cut-off the cooking zone for a long time.
One or more sensitive keys are covered.
The pan is empty and its bottom overheated.
Continuous ventilation after cutting-off the hob :
This is not a failure, the fan continuous to protect the electronic device.
The fan cooling stops automatically.
The automatic cooking system « go and stop » doesn’t start-up :
The cooking zone is still hot [ H ]
The highest power level is set [ 9 ]
The cooking level was engaged with [ - ]
The control panel displays 3 [ L ]:
Refer to the chapter control panel locking page 21.
ENVIRONMENT PRESERVATION
The materials of packing are ecological and recyclable.
The electronic appliances are composed of recyclable, and sometimes harmful
materials for the environment, but necessary to the good running and the safety of the
appliance
Don't throw your appliance with the household refuses
Get in touch with the waste collection center of your
commune that is adapted to the recycling of
the household appliances.
23
Page 24

INSTALLATION INSTRUCTIONS
from the external edge of the glass,
The installation comes under the exclusive responsibility of specialists.
The installer is held to respect the legislation and the standards enforce in his home country.
How to stick the gasket:
The gasket supplied with the hob avoids all infiltration of liquids in the cabinet.
His installation has to be done carelessly, in conformity of the following drawing.
Stick the gasket (2) two millimeters
after removing the protection sheet (3).
Fitting - installing:
The cut out sizes are:
- TI61H 560 x 490 mm
- TI61A 560 x 490 mm
- TI83H 760 x 340 mm
The piece of furniture or the support in which the hob is to be fitted, as well as the edges
of furniture, the laminate coatings and the glue used to fix them, must be able to resist
temperatures of up to 100 °C.
The mural rods of edge must be heat-resisting.
The hobs are classified as “Y” class for heat protection. Ideally the hob should be
installed with plenty of space on either side. There may be a wall at the rear and tall units
or a wall at one side. On the other side, however, no unit or divider must stand higher
than the hob.
Ensure that there is a distance of 50 mm between the hob and the wall or sides.
Materials which are often used to make worktops expand on contact with water. To
protect the cut out edge, apply a coat of varnish or special sealant. Particular care must
be given to applying the adhesive joint supplied with the hob to prevent any leakage into
the supporting furniture. This gasket guaranties a correct seal when used in conjunction
with smooth work top surfaces.
Not to install the hob to the top of a not ventilated oven or a dishwasher.
To guarantee under the bottom of the hob casing a space of 20 mm to ensure a good air
circulation of the electronic device.
To guarantee between the work top and the top of the drawer or oven a space of 5 mm
to allow the exit of the air flow.
If a drawer is placed under the work, avoid to put into this drawer flammable objects (for
example : sprays) or not heat-resistant objects.
The safety gap between the hob and the cooker hood placed above must respect the
indications of the hood manufacturer. In case of absence of instructions respect a
distance minimum of 760 mm.
The connection cord should be subjected, after builting, with no mechanical constraint,
such for example of the fact of the drawer.
The installation of the hob in non stationary sites ( for example : boat ) should be
undertaken by specialists.
24
Page 25

ELECTRICAL CONNECTION
The installation of this appliance and the connection to the electrical network should be
entrusted only to an electrician perfectly to the fact of the normative regulations and
which respects them scrupulously.
Protection against the parts under tension must be ensured after the builting-in.
The data of connection necessary are on the stickers place on the hob casing near the
connection box.
The connection to the main must be made using an earthed plug or via an omnipolar
circuit breaking device with a contact opening of at least 3 mm.
The electrical circuit must be separated from the network by adapted devices, for
example : circuit breakers, fuses or contactors.
Caution !
Connect always the earth wire .
Respect the connection diagram.
The connection box is located underneath at the back of the hob casing. To open the cover use
a medium screwdriver. Place it in the slits and open the cover.
Mains Connection Cable diameter Cable Protection calibre
230V~1N 50Hz 1 Phase + N 3 x 2.5 mm² H 05 RR 25 A *
400V~2N 50Hz 2 Phases + N 4 x 1.5 mm² H 05 RR 16 A *
( * ) calculated with the simultaneous factor following standard TN 60 335-2-6/1990
Connection of the hob
Setting up the configurations:
For the various kinds of connection, use the brass bridges which are in the box next the terminal
Monophase 230V~1P+N
Put the 1
st
bridge between terminal 2 and 3, the 2nd between 4 and 5.
Attach the earth to the terminat “earth”, the neutral N to terminal 5 (or 4), the Phase L to one of
the terminals 2 or 3.
Biphase 400V~2P+N
Put a bridge between terminal 4 and 5.
Attach the earth to the terminat “earth”, the neutral N to terminal 5 (or 4), the Phase L1 to the
terminals 2 and the Phase L2 to the terminal 3.
Caution ! ensure that you :
- correctly attach the wires and the bridges.
- tighten the screws properly.
Before making the connection, we strongly advise you to locate the phase(s), neutral and earth
on the mains. If you have any doubts, call your electrician.
Note: the bridges between terminals 4-5 and between terminals 2-3 were installed during
the factory check.
We cannot be held responsible for any incident resulting from incorrect connection or
which could arise from the use of an appliance which has not been earthed or has been
equipped with a faulty earth connection.
25
Page 26

Page 27

Page 28

SERVICE GARANTIE AIRLUX
080000 Charleville-Mézières
SERVICE APRES-VENTE
E-mail : sav@airlux.com
SIEGE SOCIAL
AIRLUX S.A.
ZAC du Moulin Leblanc
255 Avenue Carnot
Tel : 03.24.56.80.40
Fax : 03.24.56.19.54
Tel : 03.24.37.94.50
Fax : 03.24.56.80.20
www.airlux.com
Tel : 03.24.56.80.48
03.24.56.80.49
Fax : 03.24.56.80.38
11121/5
 Loading...