

Page 1
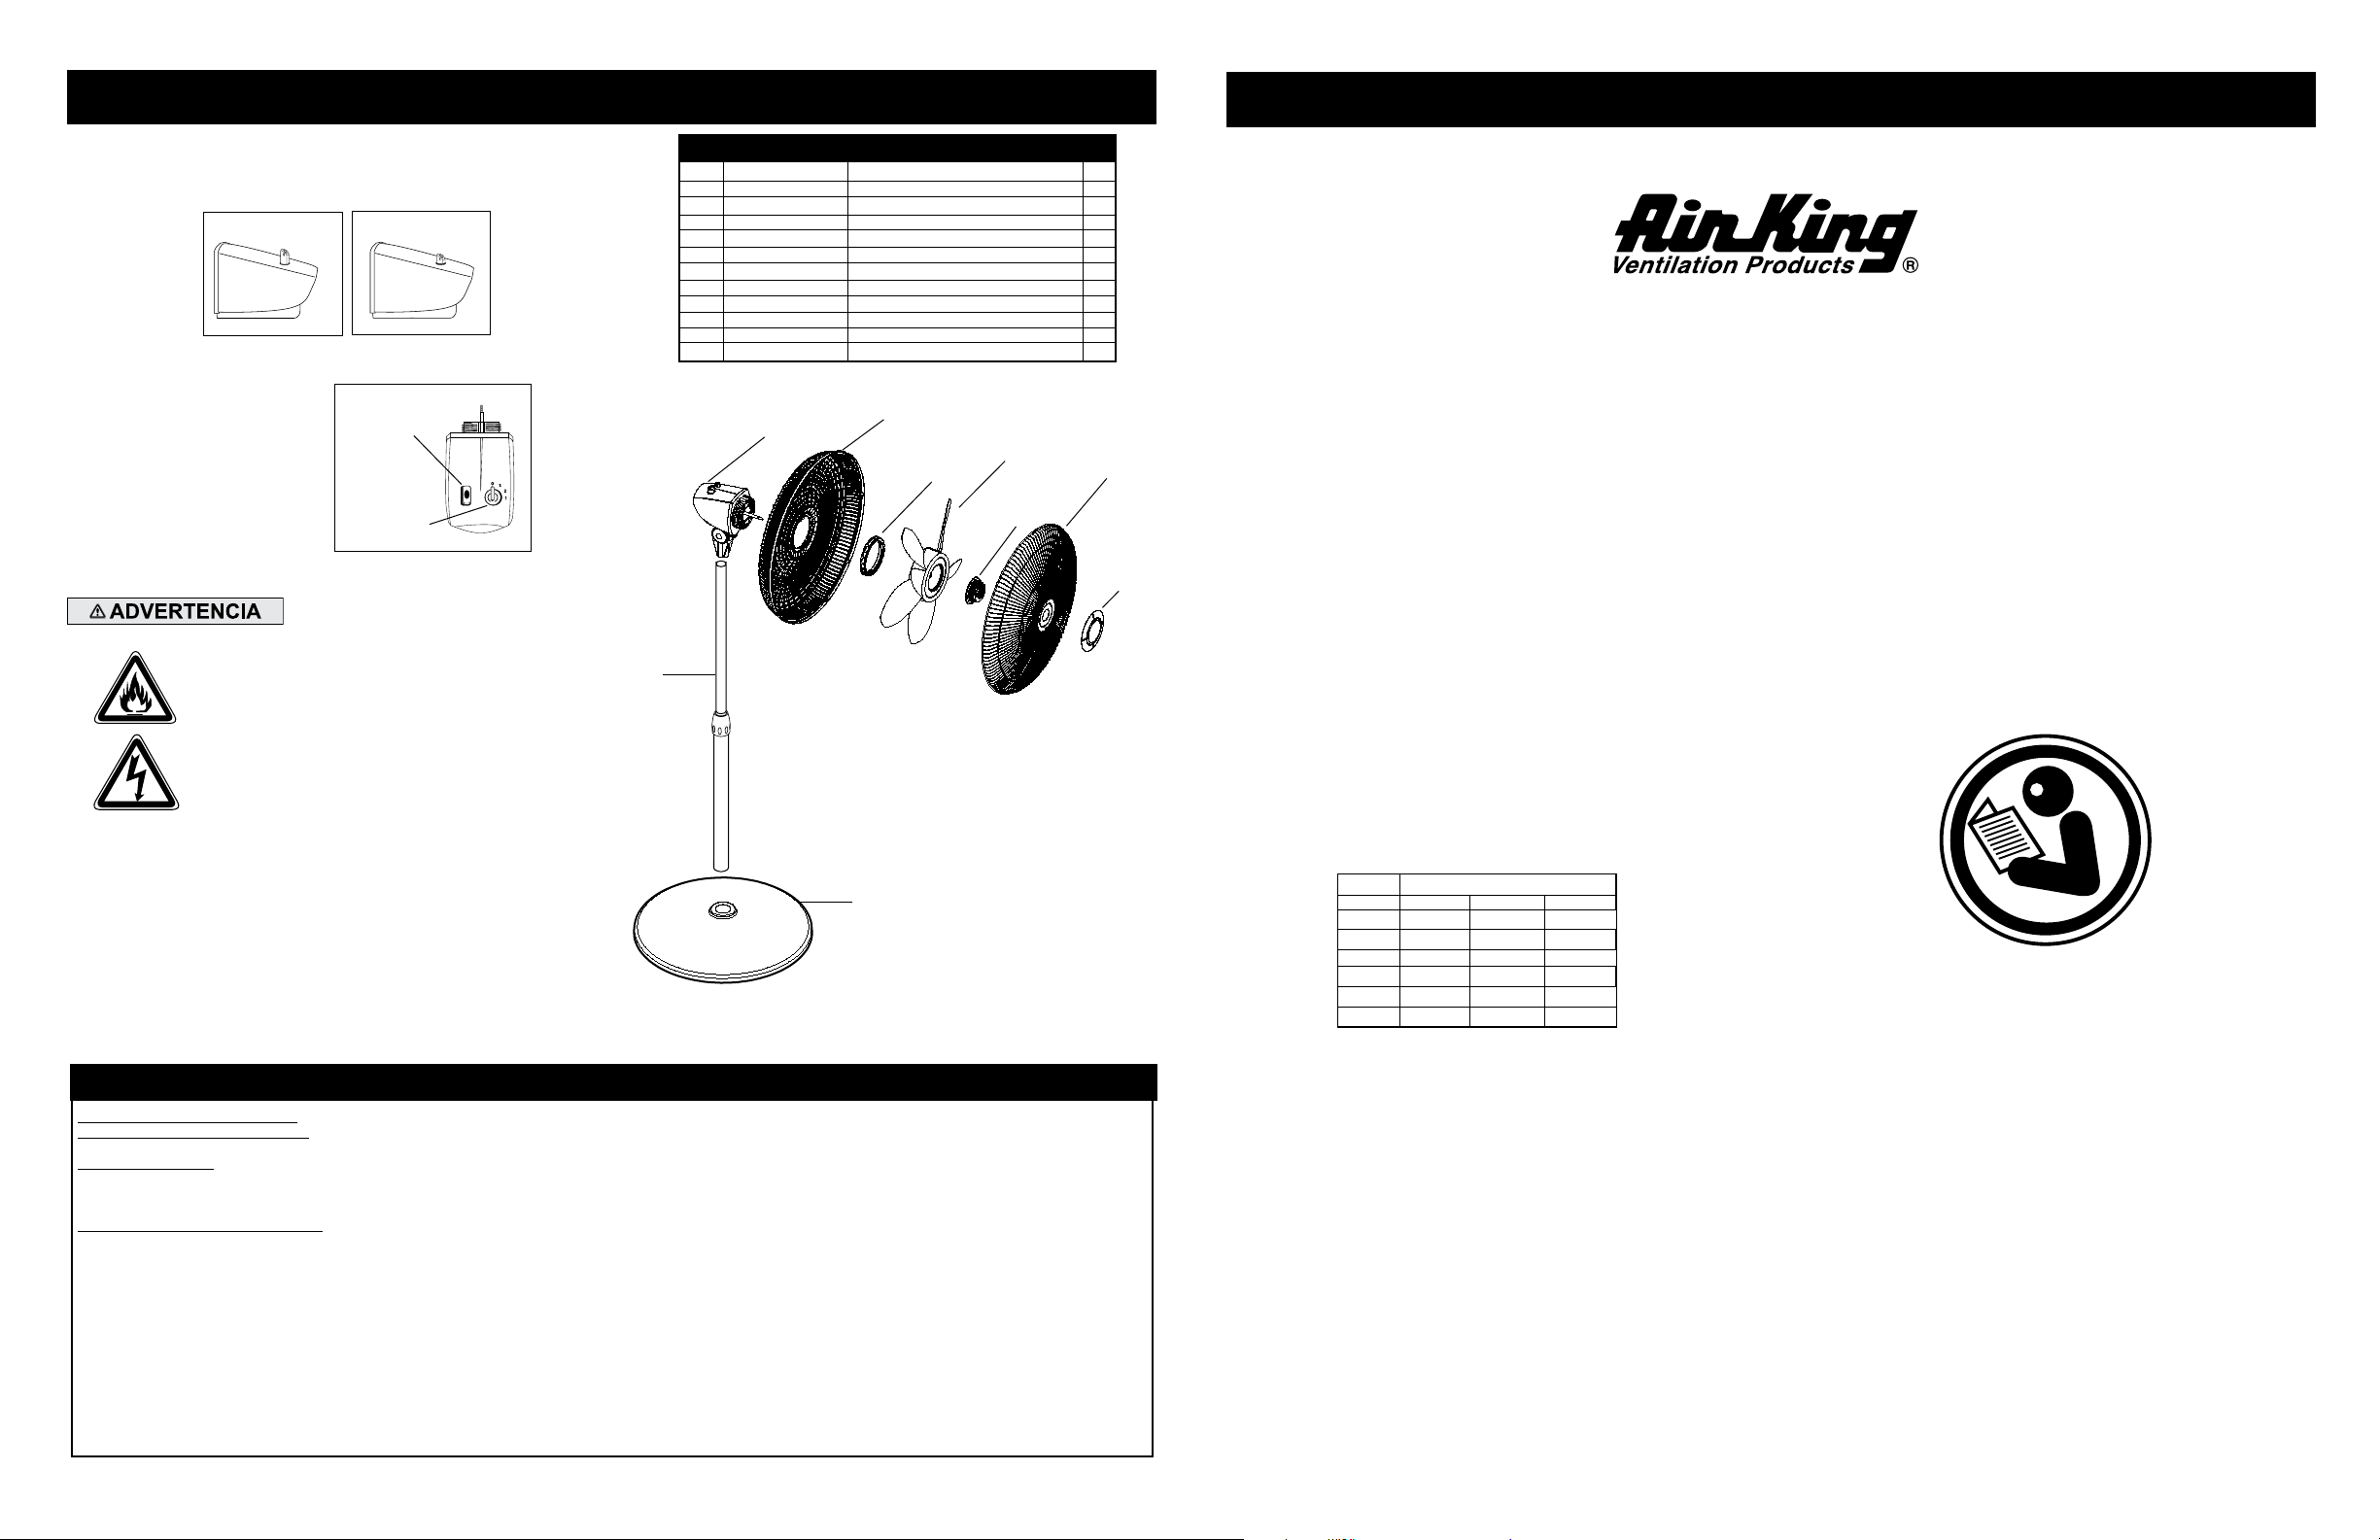
MODELO 4CH63F/9119F
OPERATING INSTRUCTIONS & PARTS MANUAL
FUNCIONAMIENTO
OSCILACIÓN: Empuje la perilla de oscilación hacia abajo sobre
el armazón del motor para que el cabezal del motor se mueva de
lado a lado.
Arriba: Inmóvil
Hacia abajo: Oscila
VELOCIDAD: Controle la velocidad del ventilador con el
Interruptor de Velocidad en la parte trasera del motor.
3 – Velocidad Alta
2 – Velocidad Mediana
1 – Velocidad Baja
0 – Apagado
Perilla de
Oscilación
Control de
Velocidad
MANTENIMIENTO
ADVERTENCIA: SIEMPRE
DESENCHUFE EL CABLE ANTES DE
MOVER O DAR SERVICIO AL VENTILADOR.
ADVERTENCIA: ¡NO SUMERJA EL
VENTILADOR EN AGUA!
LIMPIEZA: Utilice un paño suave humedecido con
una solución jabonosa liviana, tal como un detergente
líquido para lavar platos. Seque TODAS LAS PARTES
POR COMPLETO antes de rearmar. Después de dar
mantenimiento o servicio, REARME POR COMPLETO la
unidad en la forma descrita en este manual de instrucciones,
antes de volver a conectarla a la fuente de poder.
PRECAUCIÓN: No utilice gasolina, bencina, acetona,
limpiadores abrasivos, etc. puesto que dañarán el Ventilador.
NUNCA use ALCOHOL O SOLVENTES.
Key Part No. Description Qty.
1 2011876 Base 1
2 02069050QG Conduzca por tubería la Asamblea 1
3 02035086SWG Motor 1
4 2096112 Parrilla Trasera 1
5 2010361P Tuerca de Plástico 1
6 2010033 Hélice 1
7 2010093 Rotador 1
8 02096103 Parrilla Delantera 1
9 02010381A Ornamento 1
3
2
4
6
5
7
18” PEDESTAL STAND FAN
MODEL 4CH63F/9119F
8
9
This fan is not intended for industrial or agricultural applications. ALWAYS consult applicable electrical/fire codes, statutes and standards to determine if spe-
cific applications are appropriate and safe.
DESCRIPTION
The Air King® 18” (45,7 cm) Pedestal Stand Fan features 3-speed
rotary knob operation and variable height adjustments. The 18”
(45,7 cm) 3-paddle blade is driven by a permanent split capacitor
motor with a 6’ (1,8 m) 18/3 cordset.
SPECIFICATIONS
Motor ...................................... 120V, 60 Hz
Blade diameter ....................... 18” (45,7 cm)
Speeds .................................... 3
Control .................................... Rotary
Air flow distribution ................ 90° Variable
Approvals ................................ ETL Listed. Close mesh fan guard meets
OSHA requirements.
LUBRICACIÓN: Los cojinetes de precisión vienen sellados de por vida en
la fábrica y no precisarán ninguna lubricación adicional.
ALMACENAMIENTO: Guarde el Ventilador con estas instrucciones en un
lugar fresco y seco.
DISPOSICIÓN: Los materiales de empaque de cartón corrugado son
reciclables. Para desechar este producto de manera ecológicamente
responsable, comuníquese con su proveedor de servicio de desechos
local o visite www.1800recycling.com®
1
GARANTÍA LIMITADA
QUÉ CUBRE ESTA GARANTÍAS: Este producto está garantizado contra defectos de mano de obra y/o materiales.
CUÁNTO DURA ESTA GARANTÍA: Esta garantía se extiende únicamente al comprador original del producto y dura uno (1) año a partir de la fecha original
de compra o hasta que el comprador original del producto venda o transfiera el producto, cualesquiera de ambas que ocurriera en primer lugar.
QUÉ HARÁ Air King: Air King, a opción propia, reparará o reemplazará cualquier parte o partes que demuestren ser defectuosas o reemplazará el producto
completo por el mismo modelo u otro comparable. Para todas las reclamaciones de garantía, se debe devolver el producto a Air King America, LLC a cargo
del cliente con la prueba de compra dentro del período de garantía. Comuníquese con el departamento de atención al cliente de Air King para obtener una
Autorización de Devolución (“RA”, por sus siglas en inglés). NO devuelva los productos sin una RA o no se procesará la reclamación de la garantía.
QUÉ NO CUBRE ESTA GARANTÍA: Esta garantía no tiene validez si el producto fue dañado o falló debido a un accidente, manipulación u operación
inadecuadas, daño en el envío, abuso, mal uso, reparaciones no autorizadas hechas o el intento de hacerlas, o el uso del producto para servicio comercial o
no residencial. Esta garantía no cubre los costos de envío para la devolución de productos a Air King para su reparación o reemplazo. Air King abonará los
cargos de envío de devolución a Air King con posterioridad a las reparaciones o el reemplazo bajo garantía.
CUALESQUIERA Y TODAS LAS GARANTÍAS, EXPLÍCITAS O IMPLÍCITAS (INCLUYENDO, SIN LIMITACIÓN, CUALESQUIERA GARANTÍA IMPLÍCITA DE
COMERCIABILIDAD), DURAN UNO AÑO A PARTIR DE LA FECHA ORIGINAL DE COMPRA O HASTA QUE EL COMPRADOR ORIGINAL DEL PRODUCTO VENDA
O TRANSFIERA EL PRODUCTO, CUALESQUIERA DE AMBAS QUE OCURRIERA EN PRIMER LUGAR Y EN NINGÚN CASO LA RESPONSABILIDAD DE Air King
BAJO CUALQUIER GARANTÍA EXPLÍCITA O IMPLÍCITA INCLUIRÁ (I) DAÑOS INCIDENTALES O POR CONSECUENCIA POR CUALQUIER CAUSA QUE FUERE,
O (II) REEMPLAZO O REPARACIÓN DE CUALESQUIERA FUSIBLES HOGAREÑOS, CORTA-CIRCUITOS O TOMACORRIENTES. INDEPENDIENTEMENTE DE
CUALQUIER DECLARACIÓN CONTRARIA, EN NINGÚN CASO LA RESPONSABILIDAD DE Air King BAJO CUALQUIER GARANTÍA EXPLÍCITA O IMPLÍCITA
PODRÁ EXCEDER EL PRECIO DE COMPRA DEL PRODUCTO Y DICHA RESPONSABILIDAD TERMINARÁ AL VENCIMIENTO DEL PERÍODO DE GARANTÍA.
Algunos estados y provincias no permiten limitaciones sobre la duración de una garantía implícita, o sobre la exclusión o limitación de los daños incidentales
o por consecuencia, por lo tanto dichas exclusiones o limitaciones podrían no aplicarse en su caso. Esta garantía le otorga a usted derechos legales
específicos. Usted también podría tener otros derechos que varían de estado en estado y de provincia en provincia.
Se requiere prueba de compra antes que se acepte un reclamo bajo garantía.
MODEL
4CH63F/9119F
SPEED HIGH MED LOW
CFM* 1950 1680 1380
M3/s 0.92 0.79 0.65
RPM 1100 950 800
Amps 0.85 0.67 0.56
Watts 95 82 68
dB A 51 48 43
* Tested in accordance with AMCA standard 230-99
READ AND SAVE THESE INSTRUCTIONS
READ CAREFULLY BEFORE ATTEMPTING TO ASSEMBLE,
INSTALL, OPERATE OR MAINTAIN THE PRODUCT DESCRIBED.
PROTECT YOURSELF AND OTHERS BY OBSERVING ALL SAFETY
INFORMATION. FAILURE TO COMPLY WITH INSTRUCTIONS COULD
RESULT IN PERSONAL INJURY AND/OR PROPERTY DAMAGE!
Rev. Q 4/17 8 2081044
Rev. Q 4/17 1 2081044
Page 2
IMPORTANT SAFETY INFORMATION
CAUTION
When using electrical appliances, basic precautions should always be followed to reduce
the risk of fire, electrical shock and injury to persons, including the following:
Read all instructions before using this Fan.
TO REDUCE THE RISK OF FIRE, ELECTRICAL SHOCK OR PERSONAL INJURY, ALWAYS
FOLLOW THESE IMPORTANT SAFETY INSTRUCTIONS AND WARNINGS:
DO NOT use this fan to ventilate areas where flammable liquids or vapors are used, stored or are present, including paints,
gasoline, varnishes, floor refinishing products or solvents. ALWAYS read and follow all warnings and instructions on the containers for these products!
ALWAYS be sure the plug fits tightly into the outlet. When plugs fit loosely into outlets, they may slip partially out of the outlet
and create a poor connection. This may cause outlets to overheat and create a potential fire hazard. Outlets in this condition
should be replaced by a qualified electrician.
ALWAYS unplug the power cord when servicing, cleaning or moving the Fan. DO NOT use the ON/OFF switch as the sole means
of disconnecting power. NEVER leave children unattended when the Fan is on or plugged in. ALWAYS turn off and unplug the Fan
when not in use.
BE CERTAIN that the power source for the Fan is 120V AC. DO NOT plug the Fan into 240V or other power source.
The Blue Plug™ on your AirKing fan is a safety feature. It contains a non-replaceable safety device (fuse) that should not be removed
or tampered with. To reduce the risk of fire, electric shock and personal injury, DO NOT attempt to remove, replace, repair or tamper
with the originally supplied plug. If the Fan has stopped functioning, it may be due to the safety device incorporated in this plug.
The power cord is equipped with a three-prong grounded plug that must be inserted into a matching receptacle. Under no
circumstances should the grounding prong be cut off the plug. Where a two-prong wall receptacle is encountered, it must be
replaced with a properly grounded three-prong receptacle installed in accordance with the National Electrical Code (NEC) and
all applicable local codes and ordinances. This work must be done only by a qualified electrician, using copper wire only.
DO NOT USE A THREE-PRONG TO TWO-PRONG ADAPTER. IMPROPER CONNECTION MAY CREATE THE RISK OF ELECTRICAL SHOCK. USE OF SUCH ADAPTERS IS NOT PERMITTED IN CANADA.
• AVOID the use of extension cords, power strips, power taps, outlet style air fresheners or other cord connected device, as these
devices may overheat and cause a fire hazard.
•DO NOT route power cord under rugs, carpets, runners or furniture. This may damage the cord or cause it to overheat creating a fire hazard.
•ALWAYS place the Fan on a stable, flat, level surface while in operation to prevent the Fan from overturning.
•NEVER insert or allow fingers or objects to enter grill openings while Fan is in operation or injury and/or damage to the Fan may occur.
•DO NOT block, cover or obstruct air flow to or from the fan while in operation.
•DO NOT use this Fan outdoors or near water or wet locations such as a bath tub, pool or hot tub. Use of this Fan in a wet location
may create a shock hazard.
•DO NOT run cord under carpeting. Do not cover cord with throw rugs, runners, or similar coverings. Do not route cord under furniture
or appliances. Arrange cord away from traffic area and where it will not be tripped over.
•NEVER use a single extension cord to operate more than one Fan or other electrical device.
•DO NOT use this Fan if it has been damaged or is not functioning properly.
•THIS FAN DOES NOT MEET THE REQUIREMENTS OF NEC ARTICLE 547-7 (2008).This Fan is not suitable for use in agricultural
facilities including areas where livestock, poultry or other animals are confined. Please refer to National Electric Code (NEC) Article
547-7 (2008), or applicable state or local codes or standards relating to electrical requirements for agricultural buildings.
•THIS FAN DOES NOT MEET THE REQUIREMENTS OF NEC ARTICLE 500 (2008).This Fan is not suitable for use in hazardous
locations. Please refer to National Electric Code (NEC) Article 500 or applicable state or local codes or standards relating to electrical
requirements for hazardous locations.
SAVE THESE INSTRUCTIONS
Rev. Q 4/17 2 2081044
MODELO 4CH63F/9119F
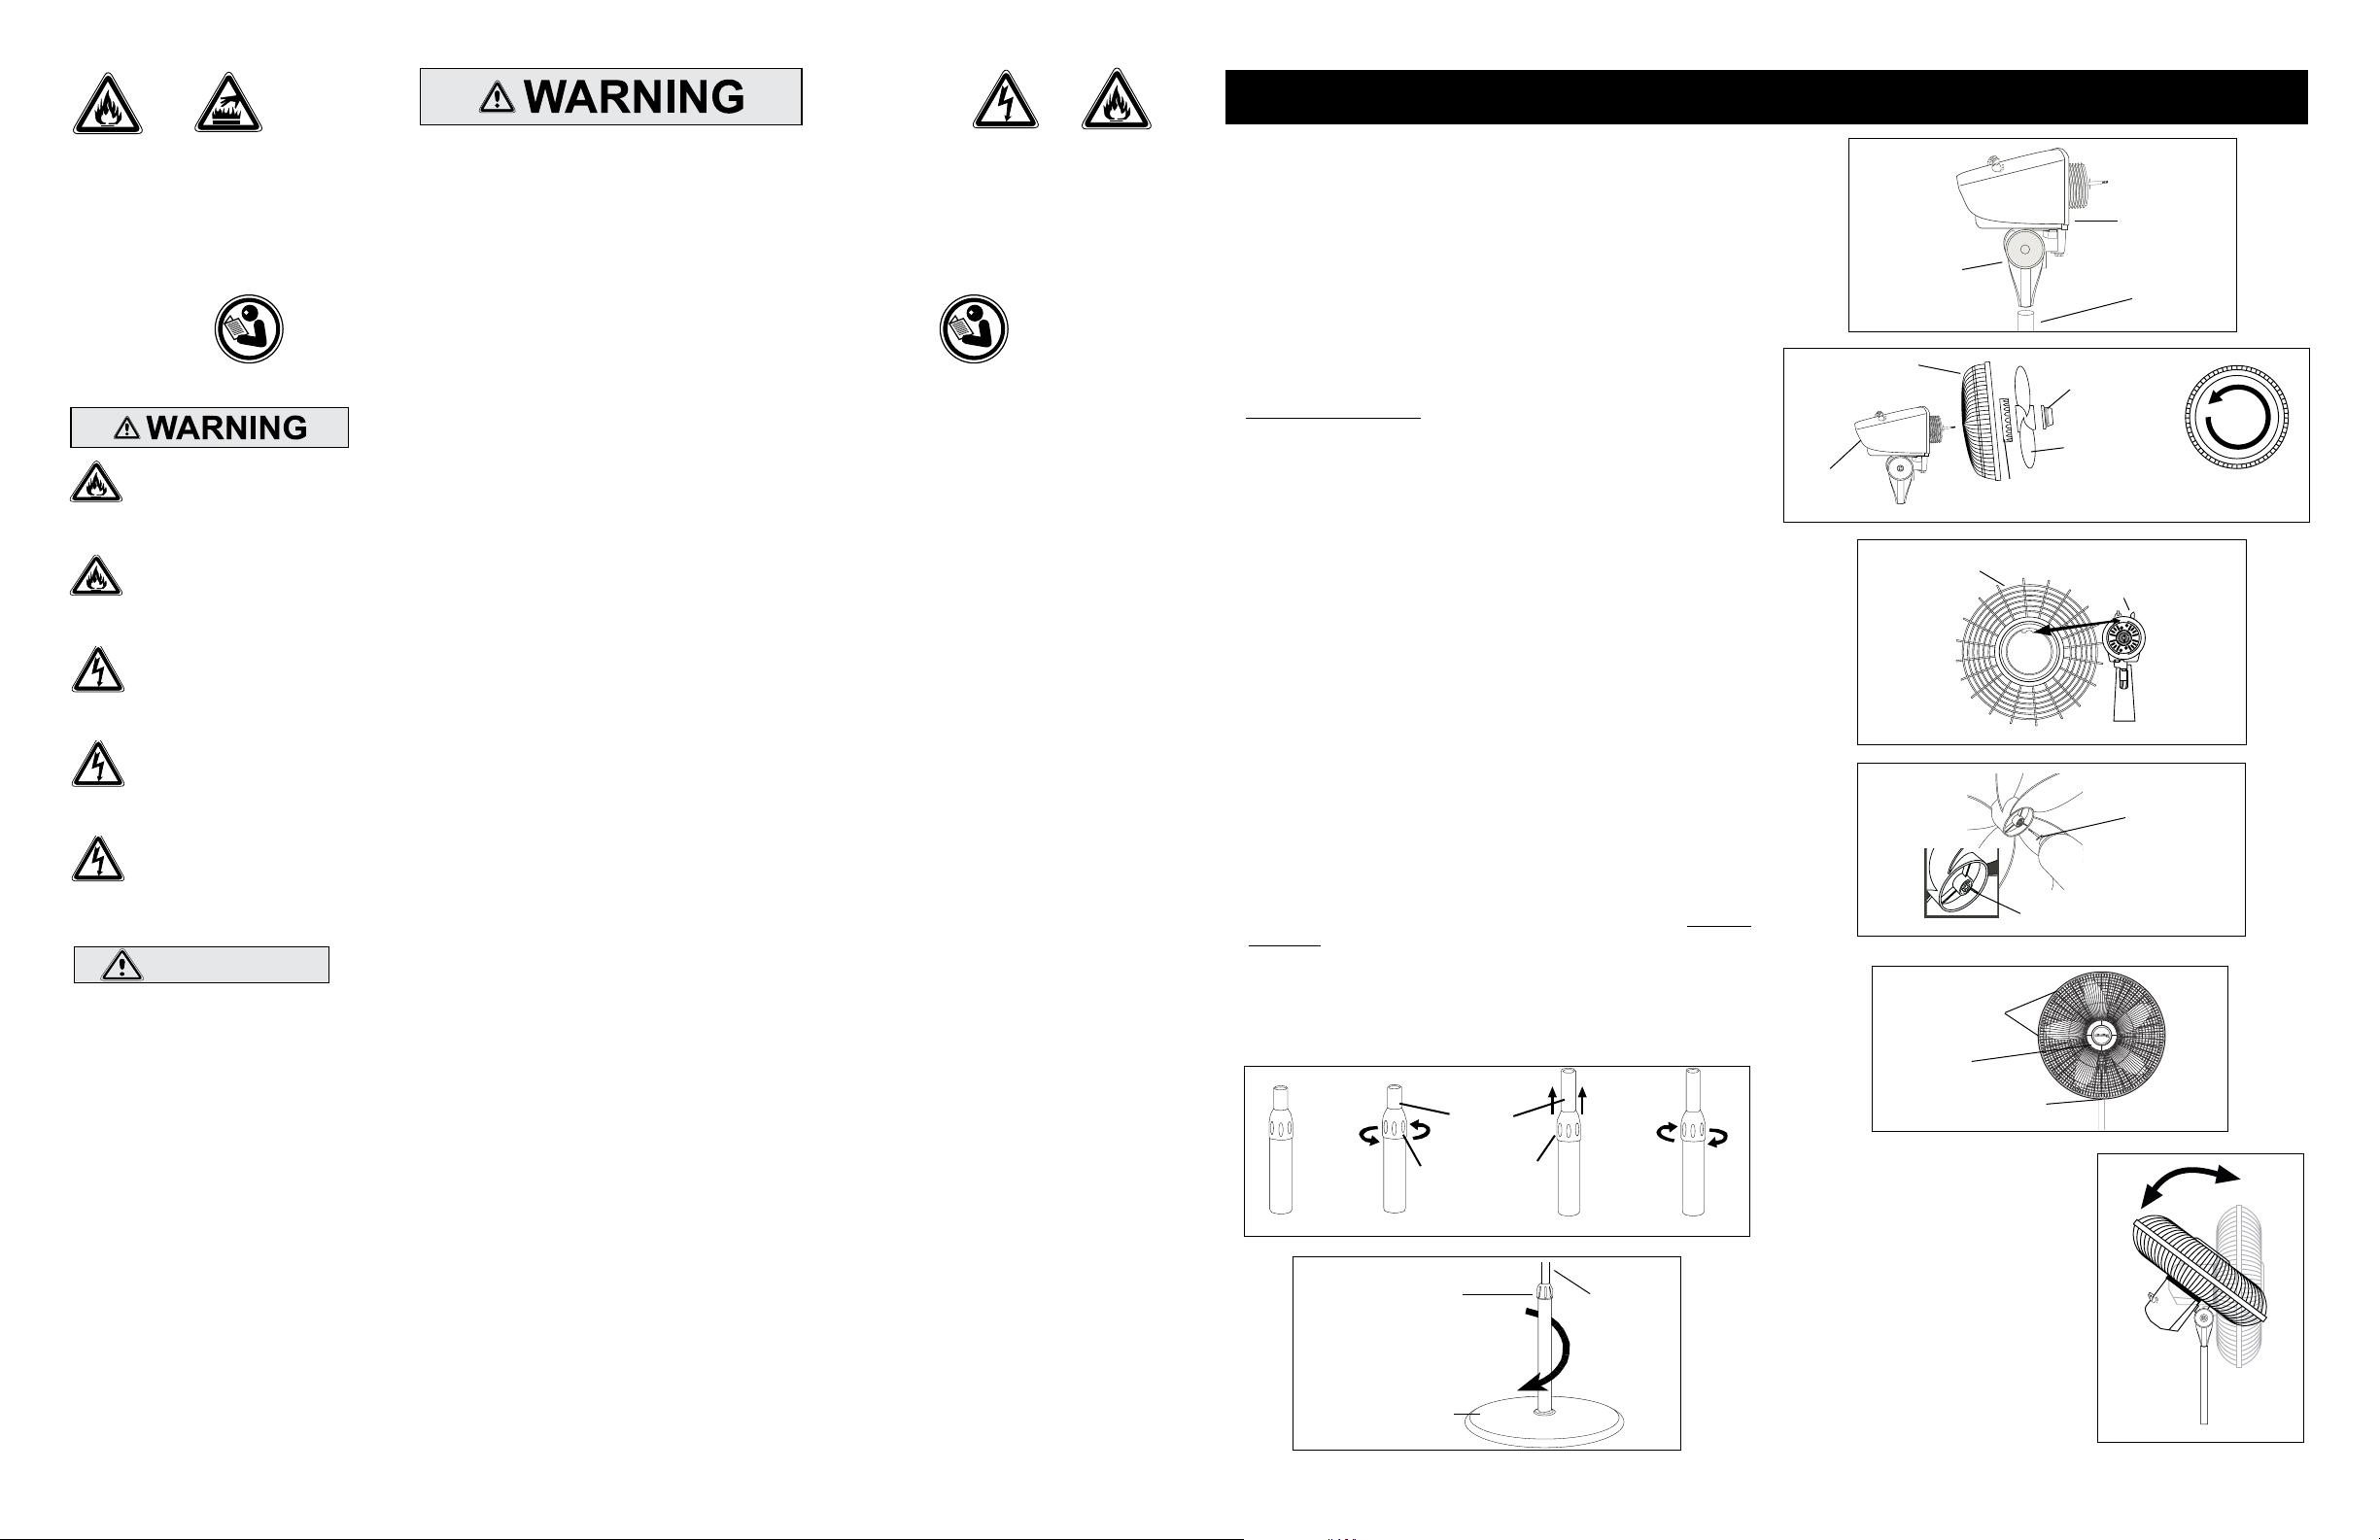
ARMADO DEL TUBO (Figura 1)
1. Saque el tubo de su caja en la forma indicada. (Paso 1)
2. Afloje la Tuerca de Ajuste de Altura haciéndola girar hacia la
izquierda. (Paso 2)
3. Levante el Tubo de Extensión. (Paso 3)
4. Apriete la Tuerca de Ajuste de Altura haciéndola girar hacia la
derecha. (Paso 4)
Collar
ARMADO DEL PEDESTAL (Figura 2)
COLOQUE LA BASE DE MANERA HORIZONTAL SOBRE
EL PISO
1. Con un movimiento rotatorio, introduzca el extremo del tubo de
diámetro grande dentro del orificio de la Base. El tubo quedará
totalmente asentado en la base su lo hace girar mientras lo empuja.
2. Para Ajustar la Altura:
a.)Afloje la Tuerca de Ajuste de Altura.
b.)Levante o baje el Tubo de Extensión hasta alcanzar
la altura deseada.
c.)Apriete la Tuerca de Ajuste de Altura.
ARMADO DEL CABEZAL (Figura 3)
1. Coloque el Conjunto del Cabezal con el Collar sobre el Conjunto
de Tubo.
2. Sosteniendo el Tubo de Extensión firmemente, gire el Conjunto
del Cabezal hacia abajo hasta que se asiente sobre el tubo.
PRECAUCIÓN:
Cuando realice el ajuste de la altura después de conectar el
ensamblaje superior, SIEMPRE sostenga el tubo de extensión
con una mano, pues al aflojar la tuerca de ajuste de la altura
puede causar la caída libre del tubo de extensión y el
ensamblaje superior.
Motor
Figura 3
Parrilla
Trasera
Tuerca de
Plástico
Parrilla
Trasera
ARMADO DE LA HÉLICE Y PARRILLA (Figura 4)
1. Incline el Cabezal del Ventilador hacia atrás. Coloque la Parrilla
Trasera en el Motor.
2. Alinee la lengüeta de la Parrilla Posterior de Plástico con la ranura
de la parte superior de la cubierta delantera del Motor. (Figura 4A)
3. Asiente totalmente la Parrilla Trasera y fíjela haciendo girar la
Tuerca Plástica hacia la derecha. Deslice la Hélice sobre el Eje
del Motor (Alinee la ranura del cubo de la hélice con la espiga
del eje del motor).(Figure 4B)
4. Para fijar la Hélice, atornille el Rotador sobre el Eje hacia la
izquierda hasta que quede fijo sobre el cubo de la Hélice.
5. Con el cabezal del motor en posición recta, alinee el Ornamento
de la Parrilla Delantera para que quede horizontal y mirando
hacia arriba. Comenzando con la parte superior de la parrilla y
avanzando hacia abajo, inserte las Trabas de la Parrilla Trasera
a través de las Ranuras de la Parrilla Delantera. (Figura 5).
Figura 1
Tubo de
Extensón
Tuerca de
Ajuste de
Altura
Paso 1
Figura 2
Rev. Q 4/17 7 2081044
Paso 2 Paso 4
Tuerca de
Ajuste de
Altura
Base
Paso 3
Tubo de
Extensión
INCLINACIÓN: Este Ventilador está
equipado con un Cabezal de Ventilador para ángulos múltiples que permite la Circulación del Aire en Toda la
Habitación. Siga los pasos indicados
a continuación para ajustar correctamente el “ángulo de inclinación” de
su Ventilador.
1. Coloque una mano en la barra justo
debajo del Cuello del Ventilador.
2. Coloque la otra mano sobre la parte
superior del Ventilador.
3. Empuje o jale suavemente el cabezal del Ventilador hasta que se
encuentre en la posición deseada.
Figura 5
Ranuras
Ornamento
Ranura
Trabas
Conjunto de
Cabezal
Tubo de
Extensión
Rotador
Hélice
Figura 4
Motor
Figura 4A
Espiga
Figura 4B
Page 3
MODEL 4CH63F/9119F
PRECAUCIÓN
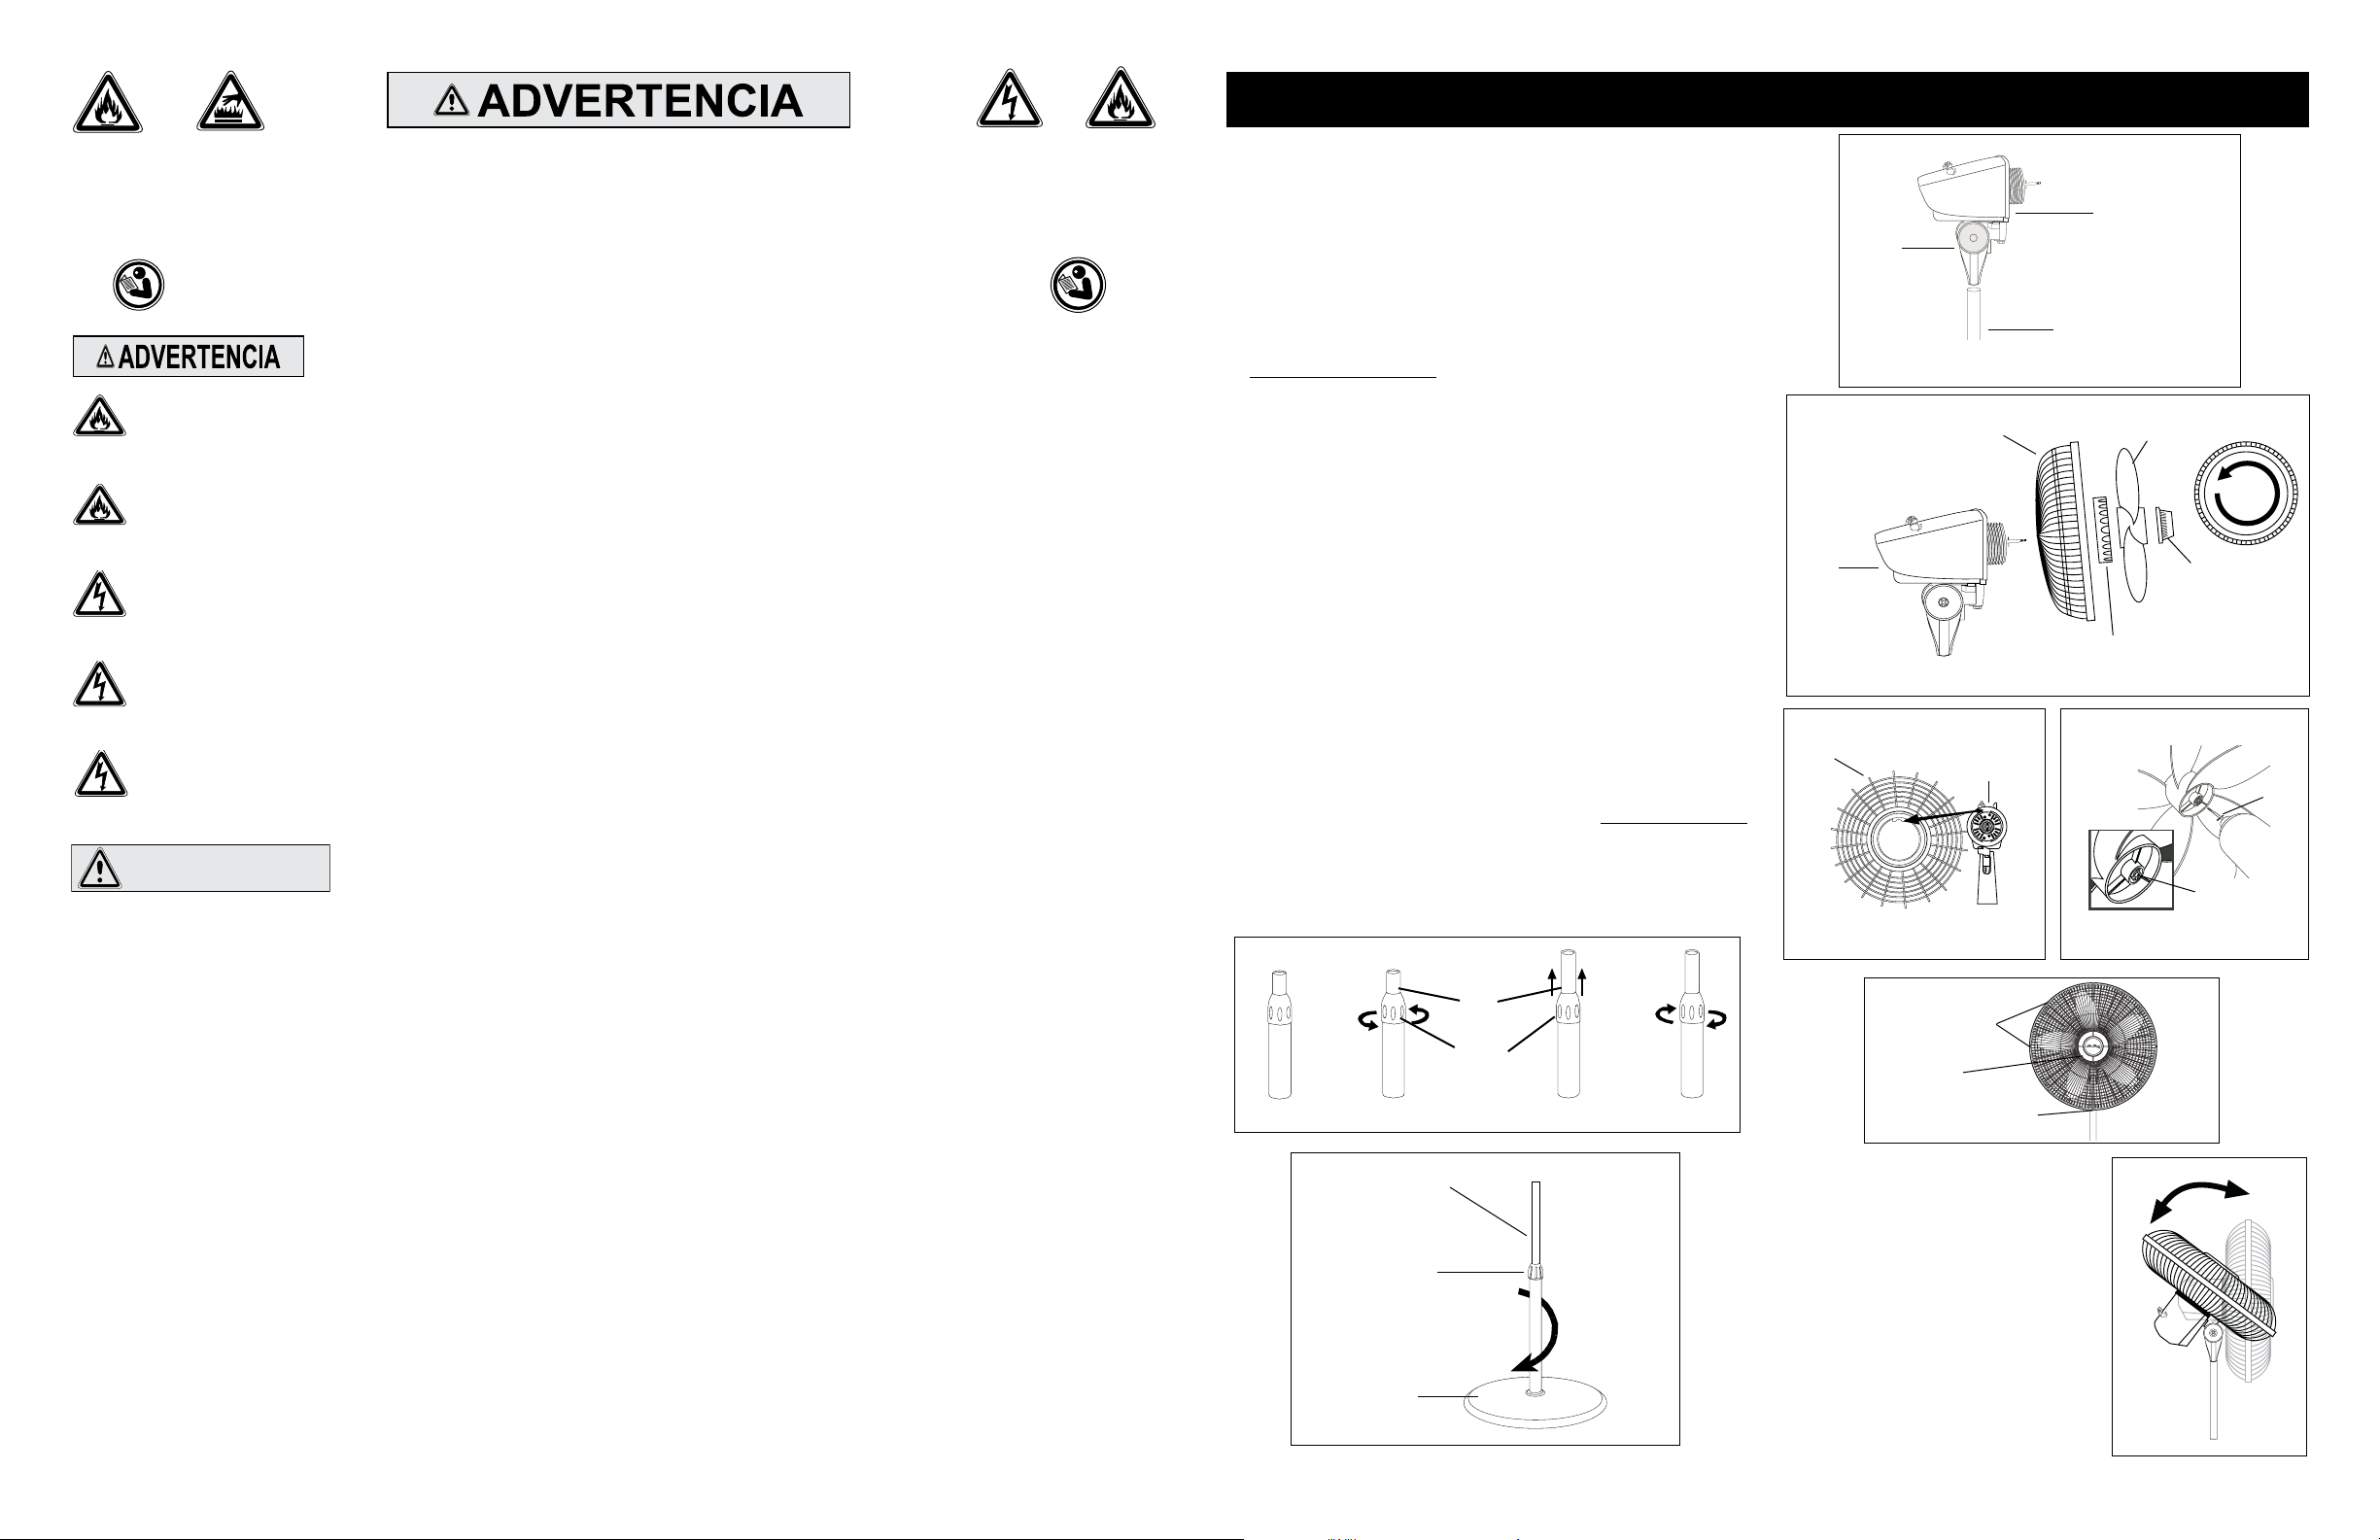
PIPE ASSEMBLY (Figure 1)
INSTRUCCIONES IMPORTANTES DE SEGURIDAD
Cuando use este ventilador, se deben de seguir las siguientes advertencias y
precauciones para reducir el riesgo de incendio, descargas eléctricas y lesiones:
1. Take pipe assembly out of carton as shown. (Step 1)
2. Loosen Height Adjustment Nut turning counter clockwise. (Step 2)
3. Raise Extension Pipe. (Step 3)
4. Tighten Height Adjustment Nut turning clockwise. (Step 4)
Head Assembly
Collar
STAND ASSEMBLY (Figure 2)
Lea todas las instrucciones antes de usar este Ventilador.
PARA REDUCIR EL RIESGO DE INCENDIOS, DESCARGAS ELÉCTRICAS SIEMPRE SIGA LAS
SIGUIENTES INSTRUCCIONES Y ADVERTENCIAS:
NO utilice este ventilador para ventilar las zonas donde se usen, almacenen o estén presentes líquidos o vapores inflamables, incluidos pinturas, gasolina, barnices, disolventes o productos de acabado para pisos. ¡SIEMPRE lea y siga todas las
advertencias e instrucciones descritas en los envases de estos productos!
SIEMPRE asegúrese de que el enchufe encaje bien en el tomacorriente. Cuando los enchufes no encajan bien en el tomacorriente,
pueden deslizarse un poco y crear una mala conexión. Esto puede causar que los tomacorrientes se sobrecalienten y crear un
riesgo de incendio potencial. Un electricista calificado debe cambiar los tomacorrientes que se encuentren en esta condición.
SIEMPRE desenchufe el cable de corriente cuando realice mantenimiento, limpieza o mueva el ventilador. NO use el interruptor
ENCENDIDO/APAGADO (ON/OFF) como el único medio para desconectar de la electricidad. NUNCA deje a los niños sin supervisión cuando el ventilador esté encendido o conectado.SIEMPRE apague y desenchufe el ventilador cuando no esté en uso.
ASEGURESE que la fuente de energía para el ventilador sea de 120 Vca . NO enchufe el ventilador en una fuente de energía
de 240 Vca ni en ninguna otra fuente de energía que no sea la indicada.
El Blue Plug™ en su ventilador AirKing es una característica de seguridad. Contiene un dispositivo de seguridad no remplazable (fusible) que no debe ser removido ni manipulado. Para reducir el riesgo de incendios, descargas eléctricas y lesiones,
NO remueva, remplace, repare ni manipule el enchufe suministrado originalmente. Si el ventilador no funciona adecuadamente, puede deberse al dispositivo de seguridad incorporado en este enchufe.
El cordón eléctrico está equipado con una clavija a tierra de tres espigas que tiene que ser enchufada a un receptáculo del
mismo diseño. Bajo ninguna circunstancia deberá cortarse la espiga a tierra de la clavija. De existir un receptáculo de pared
de dos espigas, deberá reemplazarse por uno de tres espigas debidamente puesto a tierra e instalado de conformidad con el
Código Nacional de Electricidad y todos los códigos y ordenanzas locales aplicables. El trabajo deberá hacerlo un electricista
calificado, utilizando exclusivamente alambre de cobre.
NO UTILICE UN ADAPTADOR DE TRES A DOS CLAVIJAS. LA CONEXIÓN INDEBIDA PODRÍA CREAR EL RIESGO DE SER
ELECTROCUTADO. EL USO DE TALES ADAPTADORES NO ESTÁ PERMITIDO EN CANADÁ.
•EVITE el uso de cables de extensión, enchufes múltiples, triples, ambientadores eléctricos u otro dispositivo conectado por cables,
ya que estos dispositivos pueden sobrecalentarse y causar un riesgo de incendio.
•NO coloque los cables de alimentación debajo de alfombras, tapetes o muebles. Esto puede dañar el cable o causar que se
sobrecaliente y originar un riesgo de incendio
•SIEMPRE colocar el ventilador en una superficie estable, plana y nivelada mientras esté funcionando para evitar que el ventilador se caiga.
•NUNCA inserte ni permita que introduzcan los dedos u objetos en las aberturas de la parrilla del ventilador mientras este esté en
funcionamiento, ya que el ventilador puede dañarse o malograrse.
•NO bloquee, cubra ni obstruya el flujo de aire hacia o desde el ventilador mientras esté en funcionamiento.
•NO utilice este ventilador al aire libre o cerca del agua o lugares húmedos como bañeras, piscinas o jacuzzis. El uso de este
ventilador en un lugar húmedo puede provocar una descarga eléctrica.
•NO cubra el cable de corriente con tapetes, alfombras estrechas o artículos de coberturas similares. No coloque el cable de corriente debajo de muebles o artefactos. Coloque el cable de corriente lejos del tráfico de la habitación, donde las personas no se tropiecen con éste.
•NUNCA use un solo cable de extensión para hacer funcionar más de un ventilador u otro aparato eléctrico.
•NO use este ventilador si es que se ha dañado o si no funcione adecuadamente.
•ESTE VENTILADOR NO CUMPLE CON LOS REQUERIMIENTOS DEL ARTÍCULO 547-7 (2008) DEL NEC.Este ventilador no es
adecuado para su uso en instalaciones agrícolas, incluyendo las áreas donde el ganado, aves de corral u otros animales están
encerrados. Consulte el Artículo 547-7 (2008) del Código Eléctrico Nacional (NEC) o los códigos o normas locales o
estatales aplicables, relacionados con los requerimientos eléctricos para las instalaciones de agricultura.
•ESTE ARTEFACTO NO CUMPLE CON LOS REQUISITOS DEL ARTÍCULO 500 DEL NATIONAL ELECTRICAL CODE (Código Eléc-
trico Nacional) 2008. Este ventilador no es adecuado para uso en lugares peligrosos. Consulte el Artículo 500 del Código Eléctrico
Nacional (NEC) o LOS CÓDIGOS O NORMAS LOCALES O ESTATALES APLICABLES, RELACIONADOS CON LOS REQUERIMIENTOS
ELÉCTRICOS PARA LOS SITIOS PELIGROSOS.
PLACE BASE FLAT ON FLOOR
1. With a twisting motion, insert the end of the large diameter
pipe into hole in Base.Turning tube while pushing will assure
tube is fully seated in base
For Height Adjustment:
a.)Loosen Height Adjustment Nut.
b.)Raise or lower Extension Pipe to desired height.
c.)Tighten Height Adjustment Nut.
HEAD ASSEMBLY (Figure 3)
1. Place Head Assembly with Collar onto Pipe Assembly.
2. Holding Extension Pipe firmly, twist Head Assembly downward
until seated on pipe.
CAUTION:
When making height adjustment after head assembly is
attached, ALWAYS support extension pipe with one hand, as
loosening height adjustment nut may otherwise cause rapid fall
of extension pipe and head assembly.
BLADE & GRILL ASSEMBLY (Figure 4)
1. Tilt Fan Head back. Put Rear Grill on Motor.
2. Align tab on Plastic Rear Grill with groove on top of front
Motor cover. (Figure 4A)
3. Fully seat Rear Grill and secure with Plastic Nut turning Clockwise. Slide Blade onto Motor Shaft (Align groove on blade hub
with pin on motor shaft). (Figure 4B)
4. To secure Blade, screw Spinner onto Shaft Counter Clockwise
until tight on Blade hub.
5. With fan head in upright position, align Ornament on Front
Grill so it is horizontal and right side up. By starting with the
top of the grill and working down, insert Snaps on Rear Grill
through Slots in Front Grill. (Figure 5)
Figure 1
Extension
Pipe
Height
Adjustment
Nut
Step 1
Step 2
Extension Pipe
Height
Adjustment
Nut
Base
Step 3
Step 4
Figure 2
Extension Pipe
Rear Grill
Motor
Plastic
Rear
Grill
Motor
Figure 4A
Slots
Ornament
Snap
TILTING: This Fan is equipped with a
multi-angle Fan Head for Whole-Room
Air Circulation. Follow the steps below
to properly adjust the “tilt angle” of your
Fan.
1. Place one hand on the pole just
under the Fan Neck.
2. Place your other hand on top of
Fan.
3. Gently push or pull the Fan Head
until it is in the desired position.
Nut
Figure 3
Blade
Spinner
Figure 4
Pin
Groove
Figure 4B
Figure 5
CONSERVE ESTAS INSTRUCCIONES
Rev. Q 4/17 6 2081044 Rev. Q 4/17 3 2081044
Page 4
MODEL 4CH63F/9119F
MANUAL DE INSTRUCCIONES DE OPERACIÓN Y PARTES
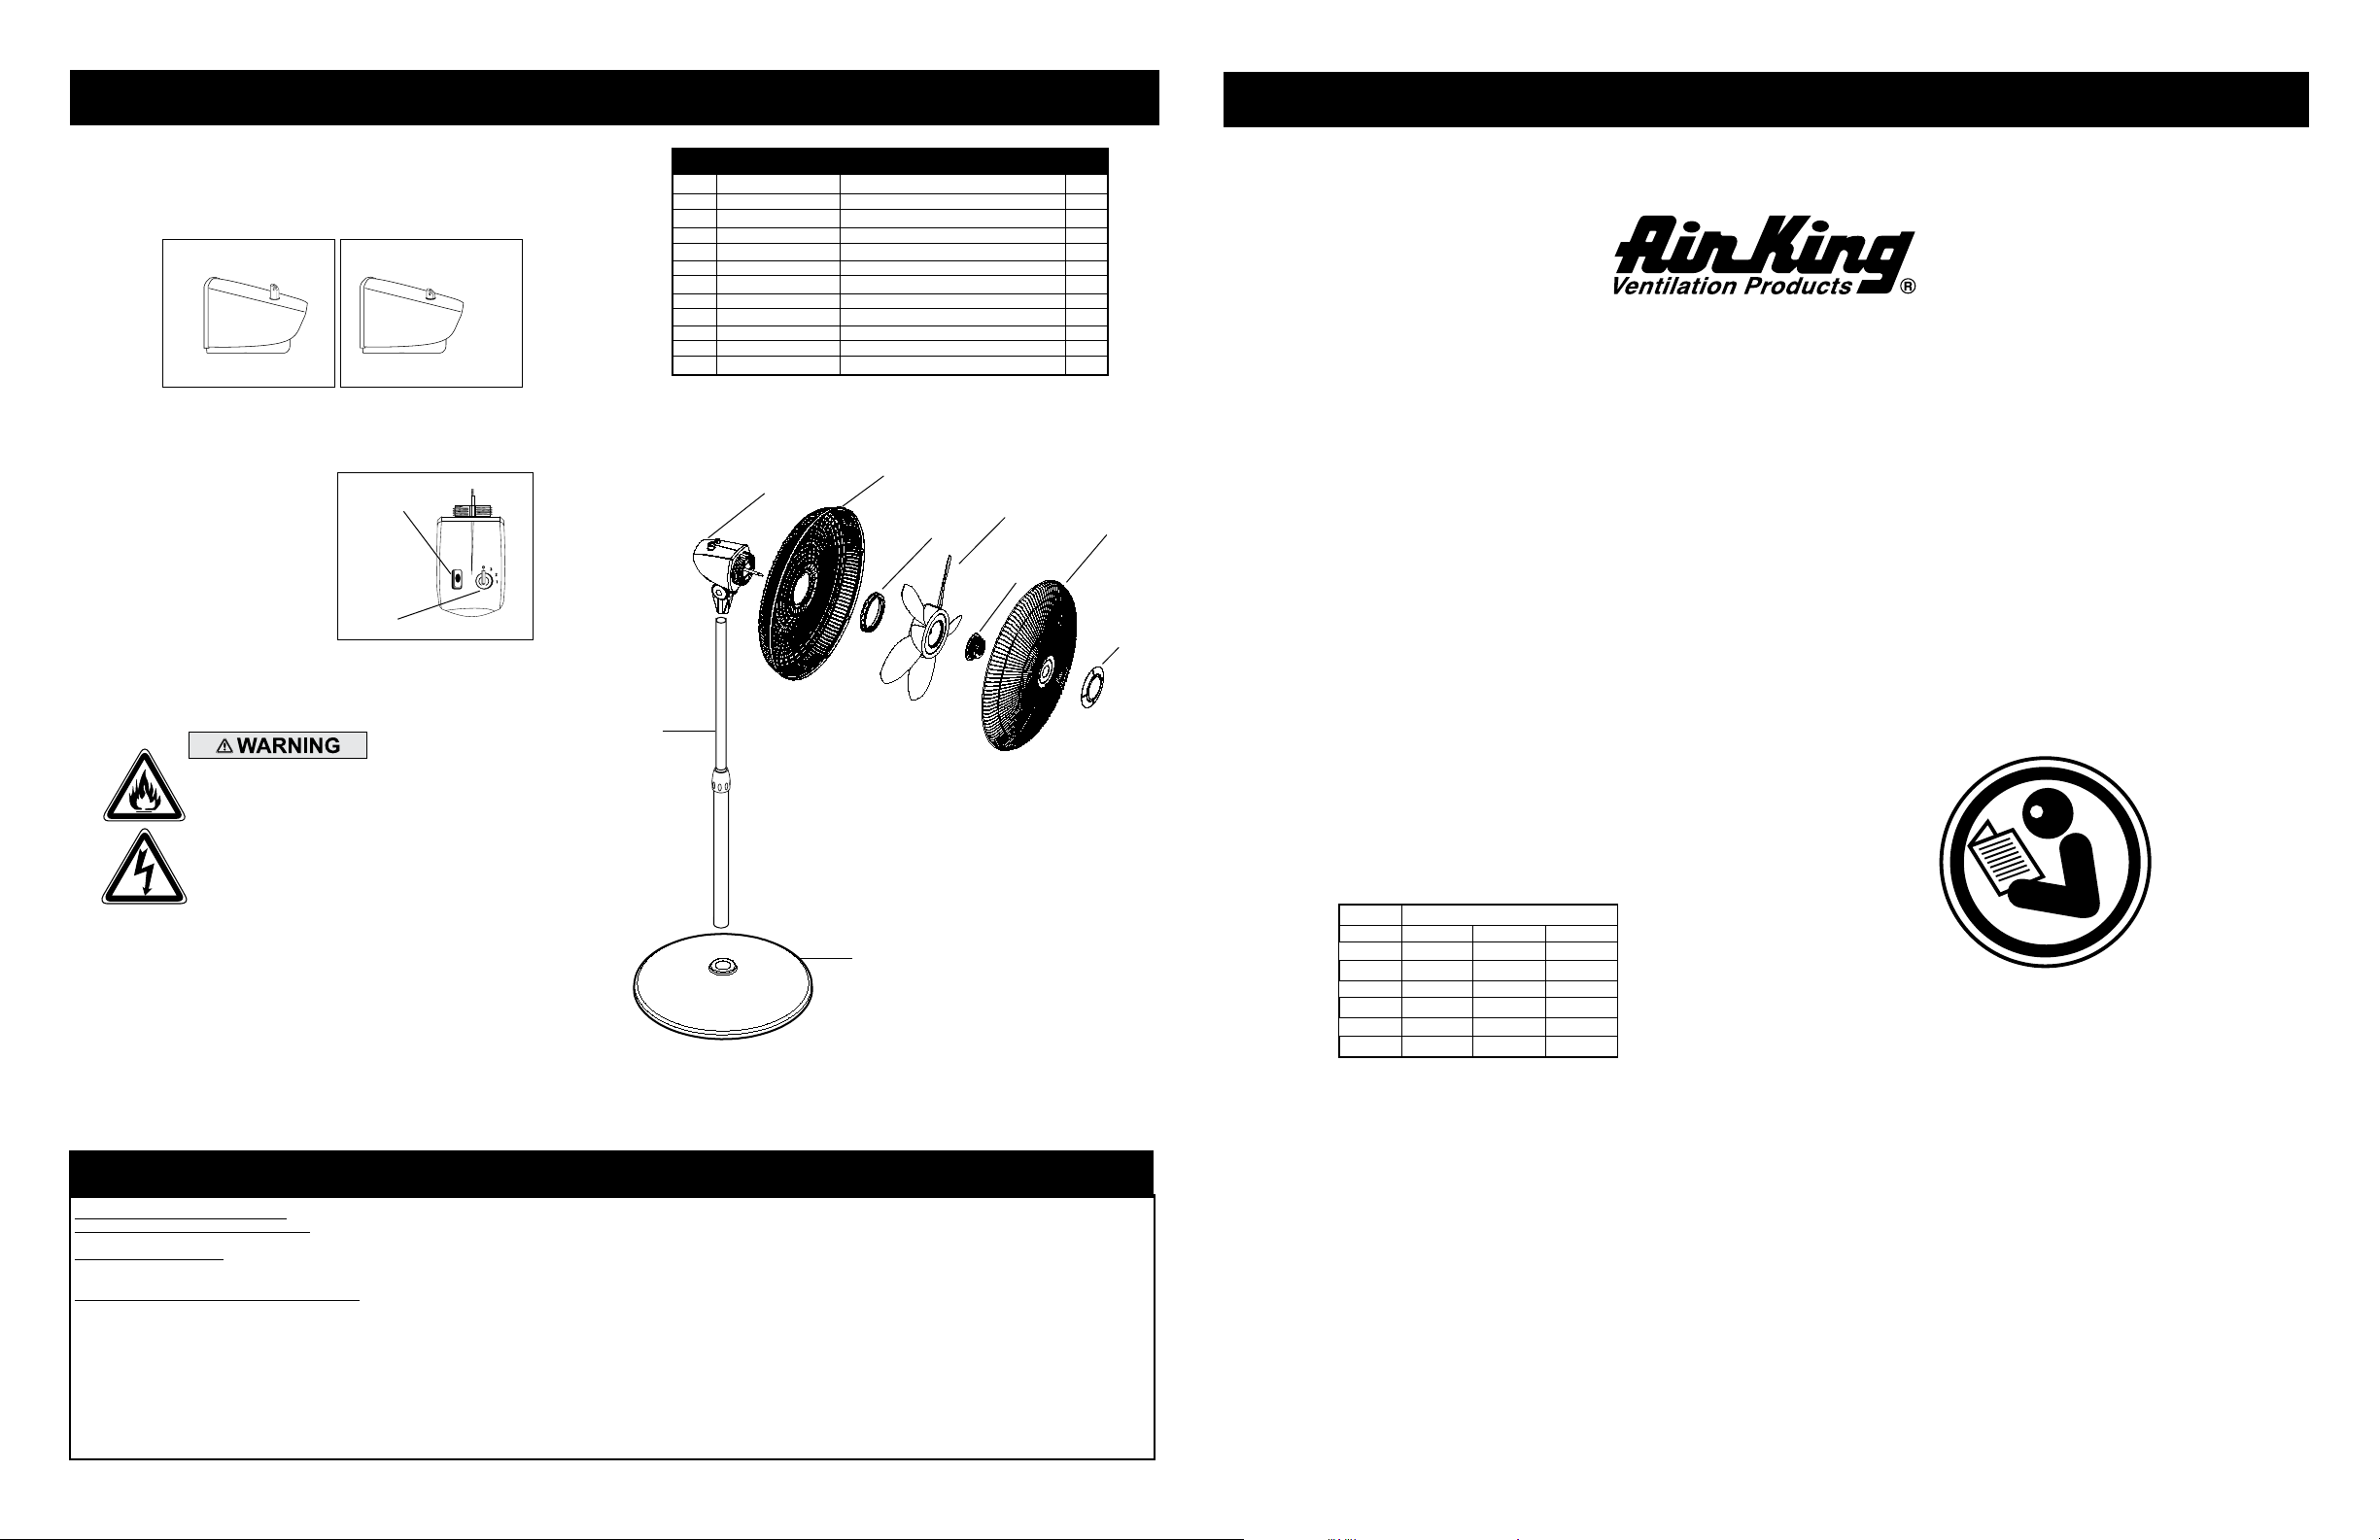
OPERATION
OSCILLATION: Push down oscillation knob on motor housing to
make fan head move from side to side.
Up: Stationary
Down: Oscillate
SPEED: Control fan speed with Speed Switch at rear of motor.
Oscillation
3 - High Speed
2 - Medium Speed
1 - Low Speed
0 - Off
Knob
Speed
Switch
MAINTENANCE
WARNING: ALWAYS UNPLUG THE CORD BEFORE
MOVING OR SERVICING THE FAN.
WARNING: DO NOT IMMERSE FAN IN WATER!
CLEANING: Use a soft cloth moistened with a mild soap
solution, such as liquid dish washing detergent. Dry
ALL PARTS COMPLETELY before reassembling. After
any maintenance or servicing, COMPLETELY REASSEMBLE unit as described in this instruction manual
before reconnecting to the power supply.
CAUTION: Do not use gasoline, benzine, thinner, harsh
cleaners, etc. as they will damage the Fan. NEVER
use ALCOHOL OR SOLVENTS.
LUBRICATION: Precision bearings are sealed at the factory for life and will
not require any further lubrication.
STORAGE: Store the Fan, with these instructions, in a cool, dry place.
DISPOSITION: Corrugated packaging materials are recyclable. For
environmentally responsible disposal of this product, contact your local
waste service provider or visit www.1800recycling.com®.
Key Part No. Description Qty.
1 2011876 Base 1
2 02069050QG Pipe Assembly 1
3 02035086SWG Motor 1
4 2096112 Rear Grill 1
5 2010361P Plastic Nut 1
6 2010033 Blade 1
7 2010093 Spinner 1
8 02096103 Front Grill 1
9 02010381A Grill Ornament 1
3
2
4
6
5
7
1
VENTILADOR DE
PEDESTAL DE 18” (45,7cm)
MODELO 4CH63F/9119F
Este Ventilador no está destinado para aplicaciones industriales o agrícolas. SIEMPRE
8
9
consulte los códigos, normas y leyes aplicables sobre electricidad e incendios para de-
terminar si las aplicaciones específicas son apropiadas y seguras.
DESCRIPCIÓN
El Ventilador de Pedestal Air King® de 18” (45,7 cm) viene equipado para
funcionar con una perilla rotatoria de 3 velocidades y puede ajustarse a
diversas alturas. La hélice de 3 aspas de 18” (45,7 cm) es impulsada por
un motor capacitador de hendidura permanente con un cable eléctrico de
6’ (1,8 m.) 18/3.
ESPECIFICACIONES
Motor ............................................ 120V, 60Hz
Tamaño de paletas ...................... 18” (47,5 cm)
Velocidades .................................3
Control ......................................... Rotario
Distribución del lujo de aire ........ 90° Variable
Aprobaciones...............................Catalogación ETL El protector de malla
cerrada del ventilador satisface las normas OSHA.
MODELO
VELO.
M3/s 0.92 0.79 0.65
RPM 1100 950 800
Amps 0.85 0.67 0.56
Watts 95 82 68
dB A 51 48 43
* Probó de acuerdo con el estándar de AMCA 230-99
4CH63F/9119F
ALTA MEDIA BAJA
CFM* 1950 1680 1380
LIMITED WARRANTY
WHAT THIS WARRANTY COVERS: This product is warranted against defects in workmanship and/or materials.
HOW LONG THIS WARRANTY LASTS: This warranty extends only to the original purchaser of the product and lasts for one (1) year from the date of original purchase or until
the original purchaser of the product sells or transfers the product, whichever first occurs.
WHAT Air King WILL DO: Air King will, at its sole option, repair or replace any part or parts that prove to be defective or replace the whole product with the same or comparable
model. For all warranty claims, the product must be returned to Air King America, LLC at customer expense with proof of purchase within the warranty period. Contact the
Air King customer service department to obtain a Return Authorization (“RA”). DO NOT return products without an RA or the warranty claim will not be processed.
WHAT THIS WARRANTY DOES NOT COVER: This warranty does not apply if the product was damaged or failed because of accident, improper handling or operation,
shipping damage, abuse, misuse, unauthorized repairs made or attempted. This warranty does not cover shipping costs for the return of products to Air King for repair or
replacement. Air King will pay return shipping charges from Air King following warranty repairs or replacement.
ANY AND ALL WARRANTIES, EXPRESSED OR IMPLIED (INCLUDING, WITHOUT LIMITATION, ANY IMPLIED WARRANTY OF MERCHANTABILITY), LAST ONE YEAR FROM
THE DATE OF ORIGINAL PURCHASE OR UNTIL THE ORIGINAL PURCHASER OF THE PRODUCT SELLS OR TRANSFERS THE PRODUCT, WHICHEVER FIRST OCCURS AND
IN NO EVENT SHALL Air King’S LIABILITY UNDER ANY EXPRESS OR IMPLIED WARRANTY INCLUDE (I) INCIDENTAL OR CONSEQUENTIAL DAMAGES FROM ANY CAUSE
WHATSOEVER, OR (II) REPLACMENT OR REPAIR OF ANY HOUSE FUSES, CIRCUIT BREAKERS OR RECEPTACLES. NOTWITHSTANDING ANYTHING TO THE CONTRARY,
IN NO EVENT SHALL Air King’S LIABILITY UNDER ANY EXPRESS OR IMPLIED WARRANTY EXCEED THE PURCHASE PRICE OF THE PRODUCT AND ANY SUCH LIABILITY
SHALL TERMINATE UPON THE EXPIRATION OF THE WARRANTY PERIOD.
Some states and provinces do not allow limitations on how long an implied warranty lasts, or the exclusion or limitation of incidental or consequential damages, so these exclusions
or limitations may not apply to you. This warranty gives you specific legal rights. You may also have other rights which vary from state to state and province to province.
Proof of purchase is required before a warranty claim will be accepted.
Rev. Q 4/17 4 2081044
LEA Y GUARDE ESTAS INSTRUCCIONES
LEA CUIDADOSAMENTE LAS INSTRUCCIONES ANTES DE INTENTAR
ARMAR, INSTALAR, USAR O DAR MANTENIMIENTO AL PRODUCTO
DESCRITO. PROTÉJASE A SÍ MISMO Y A LOS DEMÁS CUMPLIENDO
CON TODA LA INFORMACIÓN DE SEGURIDAD. EL NO SEGUIR LAS
INSTRUCCIONES PODRÍA RESULTAR EN LESIONES PERSONALES Y/O
DAÑOS A LA PROPIEDAD.
Rev. Q 4/17 5 2081044
 Loading...