

Page 1

IS SERIES
Commercial & Security IP Video Intercom system
IS-SOFT
PC Master Station
SETTING MANUAL
514426 A 0611YZ
GETTING STARTED
SETTING THE PC MASTER STATION
Thank you for selecting Aiphone for your communication and security needs. Please read this manual and the separate
“OPERATION MANUAL” carefully before setting and using this system.
IMPORTANT
Please read and understand the setting procedures before beginning the setup process.
Please note that images and illustrations depicted in this manual may differ from the actual ones.
Page 2

CONTENTS
INTRODUCTION .......................... 2
UNPACKING ................................ 2
GETTING STARTED
........................... 3
SYSTEM CONFIGURATION
EXAMPLE .................................... 3
CONNECTIONS ........................... 4
INSTALLING THE IS-SOFT ......... 5
System requirements for PC ....... 5
Installing ........................................ 6
Uninstalling ................................... 6
Starting up the IS-SOFT ............... 6
SETTING THE PC MASTER STATION
OUTLINE OF SETTINGS ............ 7
MAKING THE SETTINGS ........... 8
Setting procedure ......................... 8
Setting list ..................................... 9
Adjusting volumes ...................... 10
Making network settings ............ 10
Making preference settings ........11
Settings on [Preference 1] ................. 11
■
Setting on [Preference 2] ....................12
■
Setting speed dials ..................... 12
Searching for a station, zone or
■
remote site from the SEARCH LIST ...13
Making transfer settings ............ 16
Making privacy setting ............... 17
... 7
Maintenance ................................ 17
INTRODUCTION
The IS system is a commercial and security video intercom system especially designed for applications in facilities such as offi ce
buildings, factories, schools, hospitals, and prisons. This product is an application to be installed in a PC for using it as a master
station in the IS system. The PC master station can be used almost as the same as other color monitor IP master stations adding
some unique functions.
UNPACKING
After unpacking, check the following accessory is included.
DVD (IS-SOFT (this application), INSTALLATION MANUAL for IP stations, OPERATION MANUAL, SETTING MANUAL)
•
Information sheets (license key, China RoHS)
•
Please keep these items in a safe place for future use.
*
2
Page 3
GETTING STARTED
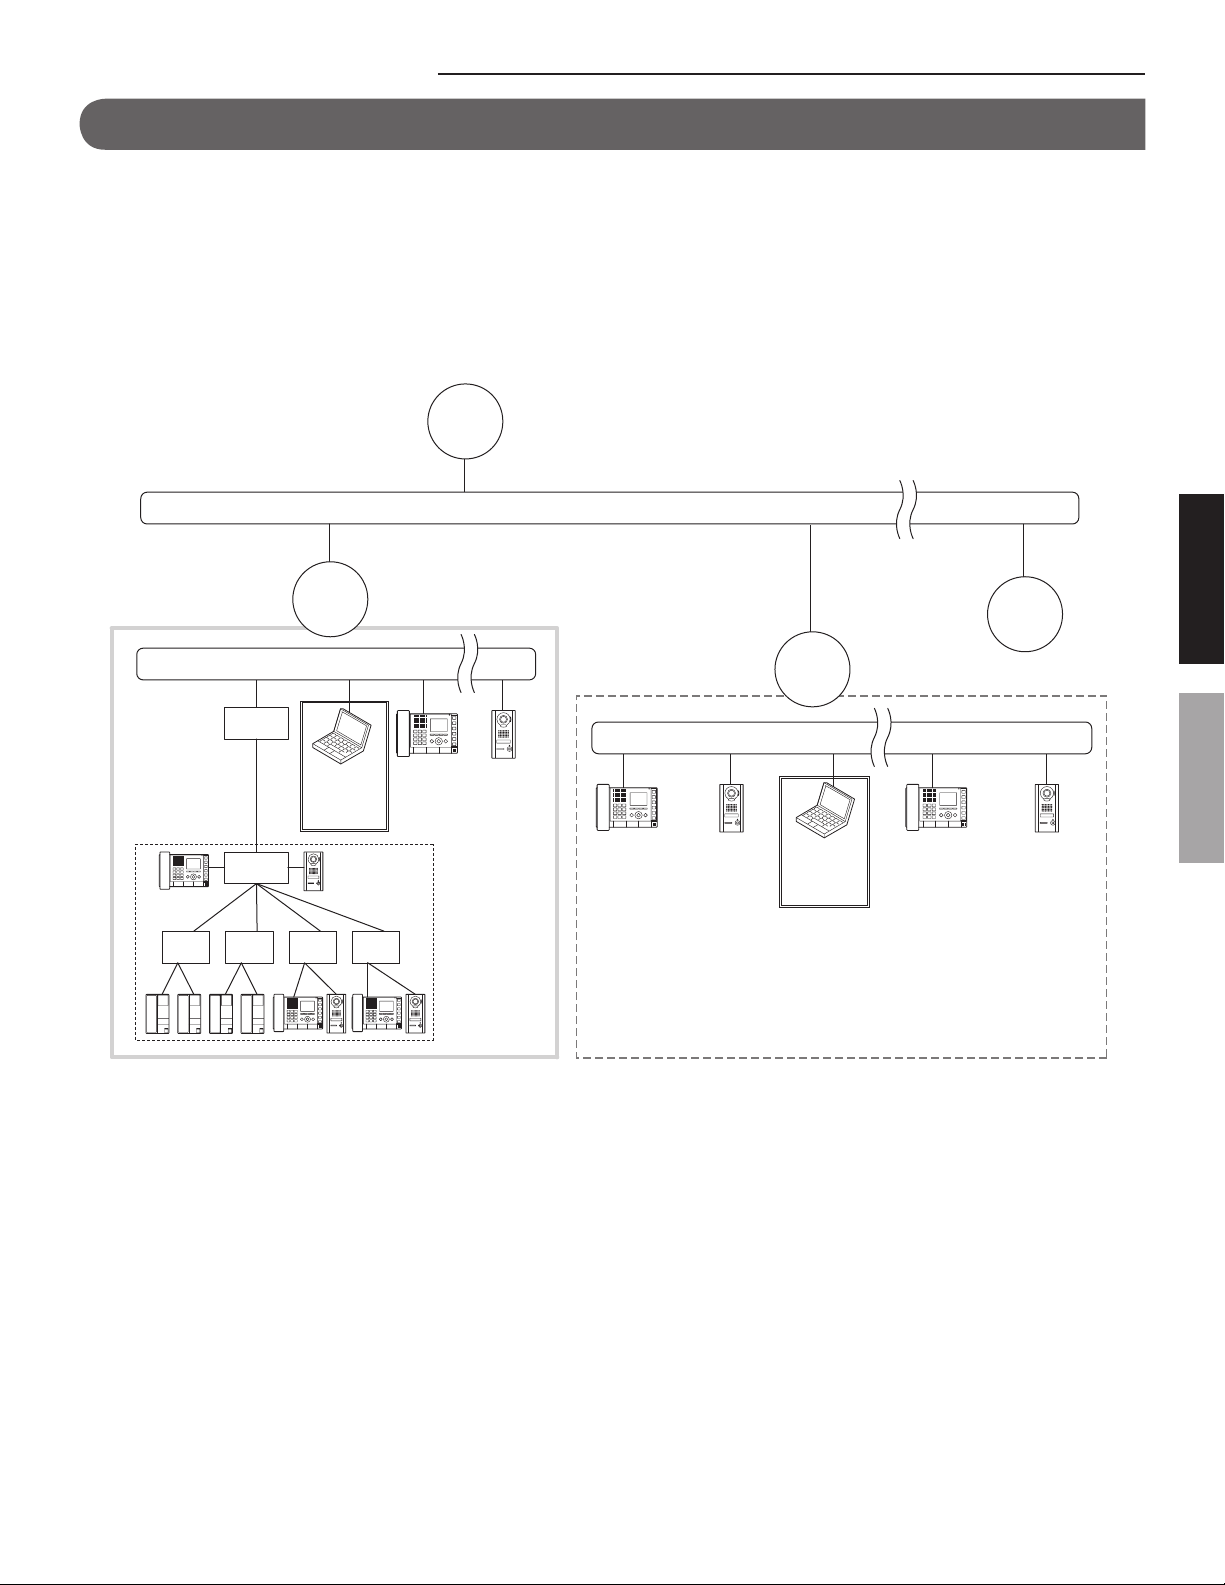
SYSTEM CONFIGURATION EXAMPLE
A PC master station can be used in either a standard (IP) system or a network direct system.
*
A standard (IP) system consists of IP control unit(s), IP stations and local system(s).
*
A network direct system consists of IP stations only. It includes no IP control unit, but needs at least one IP master station or IP door
station.
For details about the standard (IP) system or
MANUAL” and/or “OPERATION MANUAL”.
An example of network direct system
network direct
Site 1
system, refer to the respective “INSTALLATION MANUAL”, “SETTING
Standard (IP) system
LAN (IP network)
IS-IPC
Local system
IS-CCU
IS-RCU IS-RCU IS-SCU IS-SCU
Site 2
PC master
station
(IS-SOFT)
Internet/WAN
Network direct system
IP master
station
(IS-IPMV)
* Up to 32 IP units (31 for PC master stations) can be connected to a
system.
Site 3
LAN (IP network)
IP vandalresistant
video door
station
(IS-IPDV,
IS-IPDVF)
PC master
station
(IS-SOFT)
IP master
station
(IS-IPMV)
GETTING STARTED
Site 32
SETTING THE PC MASTER STATION
IP vandalresistant video
door station
(IS-IPDV,
IS-IPDVF)
3
Page 4
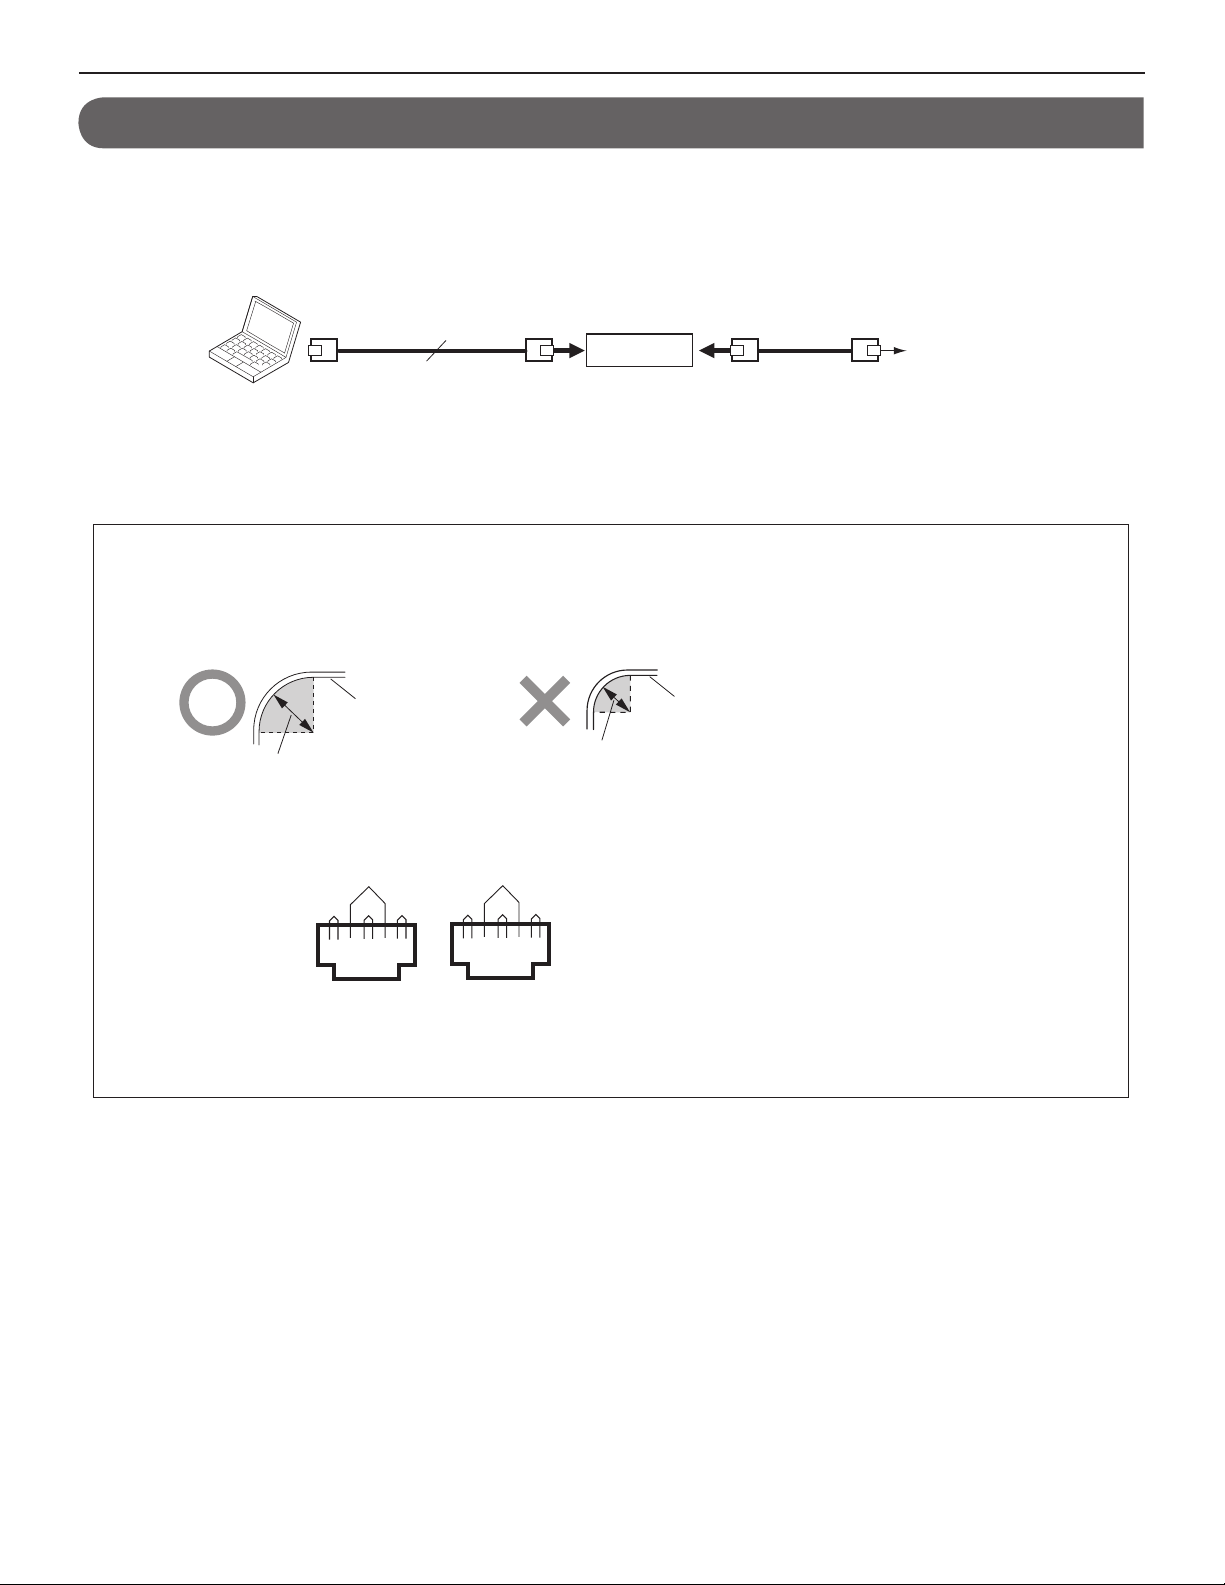
CONNECTIONS
Connect a PC on which you will install the IS-SOFT application to an IP network via a switch or hub.
RJ45
CAT5e/6
RJ45
Switch (Hub)
100m (330')
PC
10BASE-T/
100BASE-TX
Notes on CAT5e/6 cables
*
A CAT5e/6 cable is not included in this product.
Do not bend the cables to an extent where the radius is less than 25 mm (1”).
•
Communication failure could result.
CAT5e/6 cable
25mm (1") or more
Do not remove the CAT5e/6 cable jacket more than necessary.
•
Arrange the color code of the RJ45 connections in accordance with EIA/TIA-568A and 568B.
•
Pair3
Pair2
Pair1
Pair4
Pair2
Pair3
Pair1
Less than 25mm (1")
Pair4
CAT5e/6 cable
RJ45 RJ45
To IP network
12345678 12345678
T568A
Be sure to check the condition of cable connections with a LAN checker before connecting with a LAN cable.
•
Do not pull or put excess strain on CAT5e/6 cables.
•
T568B
4
Page 5
INSTALLING THE IS-SOFT
Install the IS-SOFT on your PC from the DVD supplied with this product.
*
You may need to log on to your PC as the Administrator to install the IS-SOFT.
System requirements for PC
Your PC must meet the following system requirements to use the IS-SOFT.
Also refer to the instruction manual supplied with your PC.
Windows XP Home/Professional (SP3) (32bit)
OS
Processor 2 GHz or higher
Windows Vista Ultimate/Home/Business/Enterprise (SP2) (32/64bit)
Windows 7 Home Premium/Professional/Enterprise/Ultimate (32/64bit)
System memory
(RAM)
1 GB RAM or higher
Hard disk 10 MB or more (additional space is needed for recording)
Sound card 8 bit full duplex, Direct Sound compatible
800 x 600 or higher (x 1)
Display
1024 x 768 or higher (x 2)
1920 x 1200 or higher (x 3)
PC system requirements
Run-time Microsoft (R).NET Framework 2.0 or later
Network 10BASE-T/100BASE-TX Ethernet
Protocol TCP/IPv4, UDP/IPv4, SIP, Others
Network bandwidth 320k to 8Mbps
•
The application may not run, or may not operate correctly (such as freezes occurring) on a PC with specifi cations below the
necessary requirements.
•
Serious damage could be caused if an error occurs during door release.
•
We recommend using a PC and DVD drive that exceed the basic system requirements.
GETTING STARTED
SETTING THE PC MASTER STATION
5
Page 6

Installing
Uninstalling
Insert the DVD into your PC.
1
Supplied DVD
Click "English" on the language selection screen.
2
Select "IS-SOFT"
3
"PcApplication", and then follow
the on-screen instructions to install.
NOTES:
•
If ".NET Framework" is not already installed, the .NET
Framework installation window is displayed. Follow the onscreen instructions to install.
•
When starting up the application, if a security or virus check
warning is displayed, please allow the application to continue.
•
Depending on the OS of a PC, different screens may be
displayed. Follow the on-screen instructions to install.
From the Windows "start" menu, select "Control Panel" "Add
or Remove Programs", and select "Aiphone_PCMS" to delete
it.
Starting up the IS-SOFT
Follow one of the methods [A], [B], [C] and [D] below.
[A] Double-click the "
[B] Click "Aiphone_PCMS" in the "start" menu.
[C] Select "start" menu
"Aiphone_PCMS."
[D] Select "My computer"
"Program fi les"
NOTE:
If another location is specifi ed for installing the IS-SOFT
during installation, run the fi le from the location where it is
installed.
The main window of the PC master station is displayed.
Aiphone_PCMS
"AIPHONE"
" icon on the desktop.
"All programs"
"Local disc (C:)"
"PCMasterStation.exe".
Read and/or follow the instructions, and then click
4
5
on each window.
Next
If necessary, change the folder in which the IS-SOFT is
•
to be installed, and then click
In the [Browse for Folder] window:
•
Select the folder where you want to save recorded fi les,
and then click
*
The selected folder becomes the storage location for
recorded fi les.
OK
.
Next
.
When the [Installation Complete] window appears,
fi nish the installation.
*
After the installation has fi nished, restart the PC.
After installation of the IS-SOFT on the PC has fi nished, make
the settings for the PC master station before using it.
*
When the settings have been correctly made, the color of
“
Aiphone_PCMS
” icon changes from gray to blue.
6
Page 7

SETTING THE PC MASTER STATION
OUTLINE OF SETTINGS
After installation of the IS-SOFT on the PC has fi nished, make the settings for the PC master station before using it.
Make the settings by following the steps below.
PRECAUTIONS:
•
Be sure to make the settings before using the PC master station. If the settings have not been made, you cannot use the PC master station.
•
Make the settings correctly. If the settings are not made correctly, the PC master station will not function as you planned.
•
To use a PC master station, it must be registered at
•
The specifi ed license key is needed for the settings. (Keep the provided license key sheet in a safe place.)
•
Be sure to follow the steps below in that order. If you fail to do so, the settings will not be made correctly.
Start up the PC master station and make the network setting for
Step 1
the PC master station. (→P. 10)
NOTE:
Be sure to make this before making the system settings with the IP host unit.
[IP unit registration]
on the IP host unit in advance.
GETTING STARTED
Step 2
Step 3
Acquire the system setting data
Make settings on the PC master station (→P. 10-17)
NOTE:
Be sure to make this after making the system settings with the IP host unit.
Some settings on the PC master station cannot be made if the system settings are
not completed.
SETTING THE PC MASTER STATION
7
Page 8

MAKING THE SETTINGS
The following describes the settings that can be made on the PC master station windows. First of all, start up the PC master station.
Setting procedure
The settings are made on the Volume control window and Setting window.
First open either window from the Main window, and then make the settings displayed on the window.
*
Furthermore, the Setting window has eight setting pages. They can be opened by clicking the respective tabs.
Main window
Click
Setting window
CANCEL button <
Cancels the set contents on the window that is currently open
and restores the previous contents.
CANCEL
>
Close button
Closes the Setting window.
Setting page switching tabs
Press a tab to open the
corresponding setting page.
SAVE button <
Saves the set contents on the window that
is currently open.
SAVE
>
*
The notation in < > is used for operational descriptions in this manual.
8
Page 9

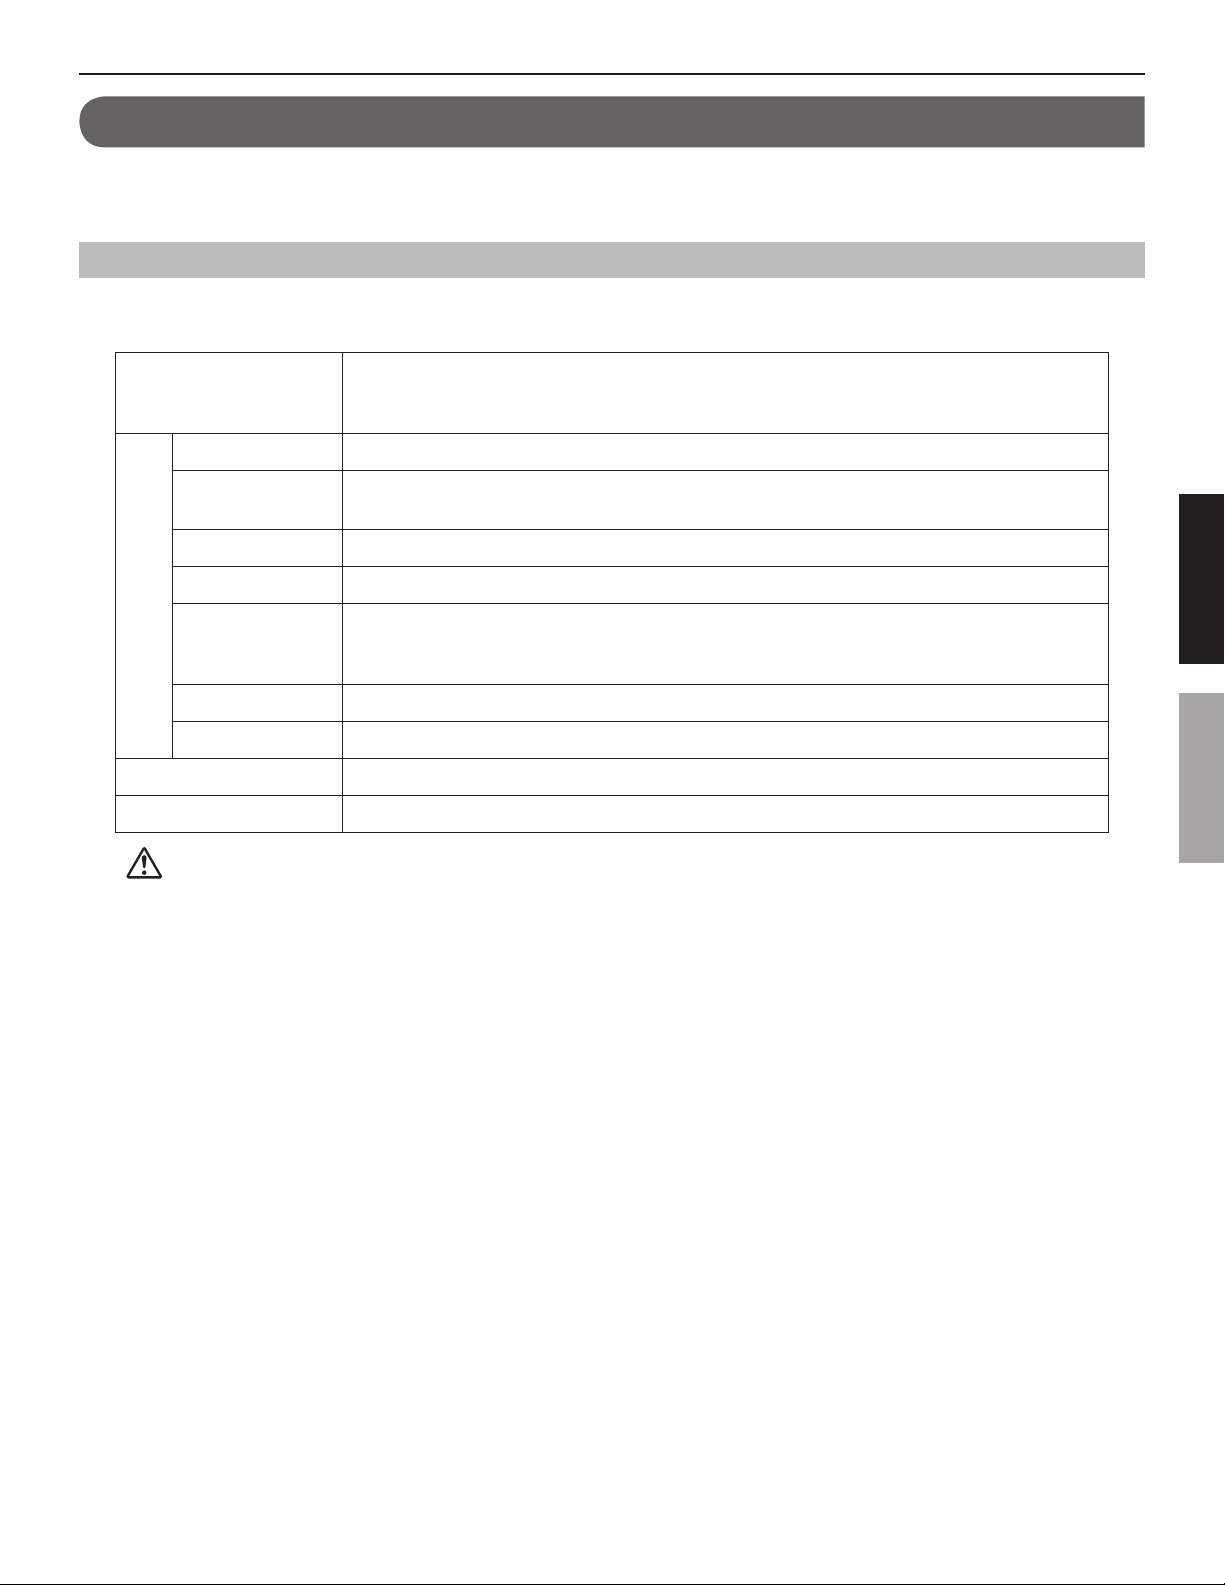
Setting list
NOTES:
•
The following list is a brief overview of the setting items available in the settings on the Setting window. The descriptions, and the style and
order of descriptions do not necessarily equate with the actual displays.
•
Make a note of the setting results you have made, and keep it in a safe place not to lose it.
Settings on the Setting window
Tab Title Item Setting range Default
Preference 1 Event Action Maximize Application ON (Checked)/OFF (Not checked) OFF
Balloon Notifi cation ON (Checked)/OFF (Not checked) ON
Call Tone ON (Checked)/OFF (Not checked) ON
Recording
Preference 2 Display Display language English/French/Spanish/Dutch/Italian/German/Japanese English
Call tone Door call: Normal 1/2/3/4/5/6 1
Communication Communication method Hands-free/Press to talk Hands-free
Speed dial 1 Speed dial Speed dial 1 to 12
Speed dial 2 Speed dial Speed dial 13 to 24
Transfer
Setting
Privacy Privacy Privacy Privacy 1/Privacy 2/OFF OFF
Network IP version - IPv4 IPv4
Maintenance Device Microphone - -
Transfer Transfer ON/OFF OFF
Schedule transfer Transfer ON/OFF OFF
Telephone transfer
Schedule tel transfer
Host unit IP Address 0 - 255 (for each fi eld) -
Network Interface
Card: NIC
PC Application IP Address (Acquire from the IP host unit automatically.) -
License key - (*
Initialization - - -
*1: Available when [Video] is selected at [Picture Recording Mode].
*2: Available when [Schedule transfer ON/OFF] is set to ON.
*3: Available when [Privacy 2] is selected.
*4: Use the unique license key written on the attached sheet.
Directory of recorded video and audio
Max Recording Space 00.01 to 10.00 GB 01.00 GB
Picture Recording Mode Snapshot/Video Snapshot
Auto Recording ON/OFF ON
Audio Recording*
Un-answered call display ON/OFF OFF
List order Name/123 123
Door call: Priority 1/2/3/4/5/6 2
Door call: Urgent 1/2/3/4/5/6 3
Room sub call: Normal 1/2/3/4/5/6 4
Room sub call: Priority 1/2/3/4/5/6 5
Room sub call: Urgent 1/2/3/4/5/6 6
Transfer destination (Select a master station or remote site.) -
Transfer delay 0 to 60 Seconds 0
Scheduled destination*
Transfer ON/OFF OFF
Transfer ON/OFF OFF
Call tone (Privacy 2)*
Connection Port 1024 to 64999 5060
Connection Password Up to 8 alphanumeric characters -
Multicast address (Acquire from the IP host unit automatically.) -
- (Select from the list.) -
MAC address (Depends on the PC.) -
Unit name Up to 24 alphanumeric characters -
Connection Port (Acquire from the IP host unit automatically.) -
Audio Port (Acquire from the IP host unit automatically.) -
Video Port (Acquire from the IP host unit automatically.) -
Speaker - -
Tone - -
1
2
3
(Designate the directory in which recorded fi les are stored.) -
ON/OFF OFF
(Register a station, zone or remote site to each speed dial.)
(Register a station, zone or remote site to each speed dial.)
(Select a master station or remote site.) -
1/2/3/4/5/6 4
4
)-
-
-
GETTING STARTED
SETTING THE PC MASTER STATION
9
Page 10

Adjusting volumes
Making network settings
NOTES ON VOLUME ADJUSTMENT
•
When talking, if you cannot hear audio from the target door station
or master station even after turning up the speaker volume, try
turning down the microphone volume gradually. (The PC master
station uses a hands-free system. If the microphone volume is too
high, the talking might not switch to the receiver's side.)
•
The microphone volume settings and the speaker volume settings
are synchronized with the PC's settings. Please note that the
communication volume is changed when you change the volume
in "Sounds and Audio Devices Properties" from the PC.
•
Depending on the PC's environment, the sound quality may be bad
or communication may not be possible.
CAUTION
Do not adjust the volume with your ear close to the speaker. A sudden
increase in volume could damage your eardrum.
Adjusting method
Adjust volumes on the Volume control window as shown below.
Main window
The Volume control window appears.
*1
Microphone volume
1
Adjust the microphone volume.
*
Drag the slider right to increase or left to decrease
the volume.
Tone volume
2
Adjust the tone volume.
Speaker volume
3
Adjust the speaker volume.
Close button
4
Click this to close the Volume control window (when the
adjustments have fi nished).
*1: The volume level of talking sound is shown here.
Click.
4
1
2
3
Be sure to register the IP host unit to the system and make the
required settings for the IP host unit before starting these settings.
Click the Setting window button on the main window.
1
Main window
Click.
The Setting window appears.
Select the [Network] tab on the Setting window.
2
Make the settings on this window.
3
Host unit:
Enter the data for the IP host unit in this system.
[IP Address]:
Enter the IP address of the IP host unit.
[Connection Port]:
Enter the connection port of the IP host unit.
[Connection Password]:
Enter the connection password of the IP host unit.
[Multicast address]:
(Unmodifi able)
*
This is the multicast address used when paging is
triggered by the PC. This is set in the System settings
on the IP host unit.
[Network Interface Card: NIC]:
Select the optional NIC (Network Interface Card) being used.
PC application:
Required data are entered to the following items
automatically when you have entered data to [IP Address],
[Connection Port] and [Connection Password], and then
clicked
and set with required settings.
[License key]:
Enter the license key of your IS-SOFT. (See the provided
sheet.)
Click
4
SAVE
with the IP host unit registered to the system
[IP Address]:
Displays the IP address of the PC.
[MAC address]:
(Unmodifi able: Your PC’s MAC address is automatically
displayed.)
[Connection Port]:
Displays the communication port number designated on
the PC.
[Audio Port]/[Video Port]:
Displays the audio and video port numbers set on the IP
host unit as to be used on this unit.
SAVE
to save the set contents and overwrite
the previous ones.
*
If you wish to cancel the set contents and restore the
previous ones, click
CANCEL
.
10
Page 11

Making preference settings
Make the preference settings on the Setting window as shown
below.
Select the [Preference 1] or [Preference 2] tab and make the
setting in the respective window. (See below for details about
the settings.)
Settings on [Preference 1]
■
Select the [Preference 1] tab in the Setting window.
1
[A]
[B]
Make the settings on this window.
2
[A] Event Action
Check the box for each item to activate the function
described below.
[Maximize Application]:
When there is a call from a station (even when
minimized), the PC master station is automatically
maximized.
[Balloon Notifi cation]:
When there is a call from a station etc., a Balloon
Notifi cation appears.
[Call Tone]:
When there is a call from a sub station, the call tone
sounds.
[B] Recording
Make the settings for the recording function.
[Directory of recorded video and audio]:
You can designate the directory in which recorded fi les
are stored.
[Max Recording Space]:
You can set the maximum recording space of the
application. Enter a value between "00.01" and "10.00"
GB as the Max Recording Space.
NOTE:
Recording cannot be done over the set Max Recording
Space. (No overwriting is performed.)
[Picture Recording Mode]:
You can select the image recording method from
"Snapshot" which only records one image from the
video door station, or "Video" which continuously
records images from the video door station.
NOTES:
•
You cannot make audio recordings when "Snapshot" is
selected.
•
When "Video" is selected and [Audio Recording] is set to
ON, sounds at the video door station are recorded while
communicating with the target station side during the auto
or manual recording.
[Auto Recording]:
Set whether or not to automatically record images of
the video door station when a call is received from the
video door station.
[Audio Recording]:
Set whether or not to make an audio recording.
*
To activate audio recording, be sure to set [Picture
Recording Mode] to "Video". You cannot make audio
recording when "Snapshot" is set.
*
When “Video” is selected at [Picture Recording
Mode] and [Audio Recording] is set ON, the sounds
from a sub station (door station or room sub station)
or master station can also be recorded while
communicating with the target station side during the
auto or manual recording.
SAVE
3
Click
to save the set contents and overwrite
the previous ones.
*
If you wish to cancel the set contents and restore the
previous ones, click
CANCEL
.
GETTING STARTED
SETTING THE PC MASTER STATION
11
Page 12

Setting on [Preference 2]
■
Setting speed dials
Select the [Preference 2] tab in the Setting window.
1
[C]
[D]
[E]
[C] Display
[Display language]:
Select the language for displaying on the PC master
station.
[Un-answered call display]:
Set whether or not to display the record of incoming
call(s) automatically.
[List order]:
Select either name or no. to sort the list.
[D] Call tone
Select the tone of calling from the door stations and room
sub stations from 6 types.
The setting can be made to "Normal", "Priority" and
"Urgent" individually.
[Door call]: Normal/Priority/Urgent
[Room sub call]: Normal/Priority/Urgent
You can register stations, zones or remote sites you call
frequently to the speed dials (1 to 24).
NOTE:
This setting is not available if stations, zones or remote sites are not
registered to the system in the System setting on a PC.
Setting method
Select the [Speed dial 1] tab on the Setting window.
1
Setting
Click
2
The search items are shown in the SEARCH LIST
displayed in the list area of the Main window.
Select the target station, zone or remote site by using
3
for [Speed dial 1].
the desired search item in the SEARCH LIST.
Refer to “Searching for a station, zone or remote site
from the SEARCH LIST” (→P. 13)
* Also refer to “OPERATION MANUAL” for details about
part names and their functions, etc.
The registered station, zone or remote site number and
name are displayed in the boxes on the right hand of the
[Speed dial 1] window.
Make the settings to [Speed dial 2] to [Speed dial 12]
4
in the same way.
To make the settings to [Speed dial 13] to [Speed dial 24],
select the [Speed dial 2] tab.
SAVE
5
Click
to save the set contents and overwrite
the previous ones.
*
If you wish to cancel the set contents and restore the
previous ones, click
CANCEL
.
* Click
Playback
to check the currently selected tones.
[E] Communication
[Communication method]:
Select the talking method of using the microphone from
either "Hands-free" (selectable between hands-free
or press-to-talk mode) or "Press to talk" (press-to-talk
mode only).
SAVE
2
Click
to save the set contents and overwrite
the previous ones.
*
If you wish to cancel the set contents and restore the
previous ones, click
CANCEL
.
12
Page 13

Searching for a station, zone or remote site from the SEARCH LIST
■
You can select a station, zone or remote site registered to the system by using one of the search items in the SEARCH
LIST.
1
Click
repeatedly to select the target search item
SEARCH LIST (page 1/2)
to
A
(so that it is highlighted).
F
SEARCH LIST
A
NAME SEARCH (→P. 14)
B
STATIONS BY AREA (→P. 15)
GETTING STARTED
SETTING THE PC MASTER STATION
SEARCH LIST (page 2/2)
Click 2 to decide on the selected one.
C
STATIONS BY TYPE (→P. 15)
D
PAGING ZONE (→P. 15)
(Click ◄ or ►.)(Click ◄ or ►.)
E
CHIME ZONE (→P. 15)
F
REMOTE SITE (→P. 15)
13
Page 14

A
Searching for a station or zone in your site by
entering the name [NAME SEARCH]
Select [NAME SEARCH] from the SEARCH LIST.
1
(→P. 13)
To delete the just entered character:
Click
.
Click 2 to display the Dial keys window.
Enter a name by using the dial keys.
3
e.g.)
When searching for "MASTER004";
Click the dial keys as follows.
(4 times) (3 times) (8 times) (8 times) (4 times)(twice)
M
AS4TER
00
To enter the same characters or characters on the
same dial key sequentially:
(e.g.: To enter “AB”)
1. Enter “A”. (Click the dial
2. Click
3. Enter “B”. (Click the dial key twice.)
Click
4
.
to select the target station or zone (so that
key once.)
it is highlighted) from the list, and then click .
The entered characters are displayed here.
All the station and/or zone names that include the entered
characters in your site are displayed in the list.
*
The search is narrowed down whenever a character is
added.
NOTE:
You can also select a station from the list by using
you select [NAME SEARCH] in step 1.
after
14
Page 15

B
Searching for a station in your site by
designating an area [STATIONS BY AREA]
D
Searching for a paging zone in your site from the
list [PAGING ZONE]
Select [STATIONS BY AREA] from the SEARCH
1
LIST. (→P. 13)
Click
2
the list (so that it is highlighted), and then click to
select.
All the stations in the area are displayed in the list.
Click
3
highlighted), and then click .
C
Searching for a station in your site by
designating a station type [STATIONS BY TYPE]
Select [STATIONS BY TYPE] from the SEARCH
1
LIST. (→P. 13)
All the station types are displayed in the list.
Click
2
list (so that it is highlighted), and then click to
select.
All the stations of the selected type are displayed in the list.
Click
3
that it is highlighted), and then click .
to select the target area in your site from
to select the target station (so that it is
to select the target station type from the
to select the target station in your site (so
Select [PAGING ZONE] from the SEARCH LIST.
1
(→P. 13)
All the registered paging zones are displayed in the list.
Click
2
highlighted), and then click .
E
Searching for a chime zone in your site from the
list [CHIME ZONE]
Select [CHIME ZONE] from the SEARCH LIST.
1
(→P. 13)
All the registered chime zones are displayed in the list.
Click
2
highlighted), and then click .
Click
3
the list (so that it is highlighted), and then click .
F
Searching for a remote site as the target of
calling, paging or chime paging from the list
[REMOTE SITE]
Select [REMOTE SITE] from the SEARCH LIST.
1
(→P. 13)
All the registered remote sites are displayed in the list.
to select the target zone (so that it is
to select the target zone (so that it is
to select the sound source of chime from
GETTING STARTED
SETTING THE PC MASTER STATION
Click
2
highlighted).
After clicking 3 , select the performance you want
to do from [CALL], [PAGING] and [CHIME] from the
list (so that it is highlighted).
to select the target site (so that it is
15
Page 16
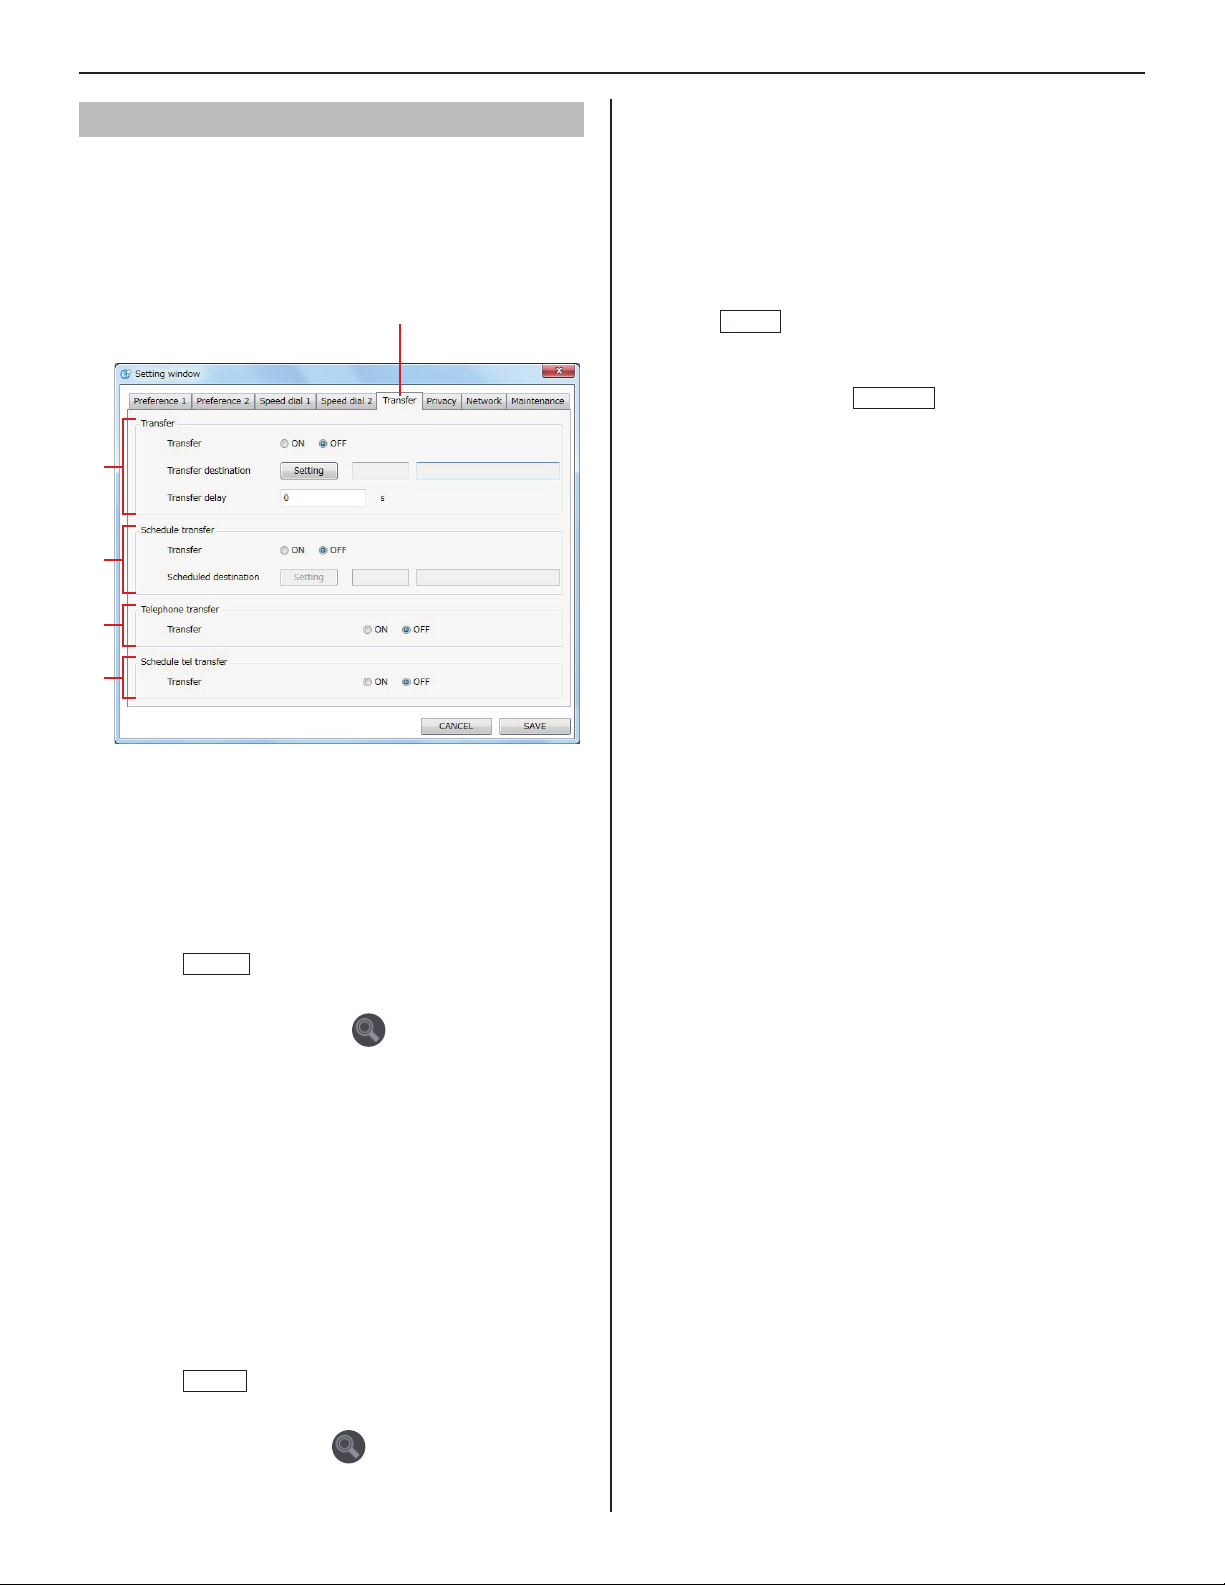
Making transfer settings
You can transfer a received call to another master station,
another site or a telephone number.
NOTE:
This setting can be made only when the System setting on a PC has
been completed.
Select the [Transfer] tab on the Setting window.
1
[F]
[G]
[H]
[I]
[H] Telephone transfer
[Transfer]:
Set whether to enable (ON) or disable (OFF) the
automatic transferring to telephone.
[I] Schedule tel transfer
[Transfer]:
Set whether to enable (ON) or disable (OFF) the
automatic transferring to telephone on schedule.
SAVE
3
Click
to save the set contents and overwrite
the previous ones.
*
If you wish to cancel the set contents and restore the
previous ones, click
CANCEL
.
Make the settings on this window.
2
[F] Transfer
[Transfer]:
Set whether to enable (ON) or disable (OFF) the
transferring function.
[Transfer destination] (Available when "Transfer" is
set to ON):
Setting
Click
and/or remote sites are displayed in the Main window.
Select the target station or remote site (so that it is
highlighted) and then click
The number and name of the selected target is
displayed in the boxes.
[Transfer delay] (Available when [Transfer] is
set to ON and the target is selected at [Transfer
destination]):
Set the delay time of starting transferring after a call is
received.
and the list of selectable master stations
.
[G] Schedule transfer
[Transfer]:
Set whether to enable (ON) or disable (OFF) the
transferring on schedule.
[Scheduled destination] (Available when [Schedule
transfer] is set to ON):
Setting
Click
and/or remote sites displayed in the Main window.
Select the target station or remote site(so that it is
highlited) and then click
and the list of selectable master stations
.
16
Page 17

Making privacy setting
Maintenance
Setting of the privacy function is available when called from
another master station.
When the privacy mode is activated, the microphone turns off
and you will not be heard by the caller.
Item Description Setting range
Privacy Sets whether or not
Call tone (Privacy 2)(Available when
Select the [Privacy] tab on the Setting window.
1
to activate the privacy
function. To activate the
privacy function, select
Privacy 1 or 2.
“Privacy 2” is selected.)
Selects the call tone
from 6 types.
Privacy 1:
The microphone is off
(mute).
Privacy 2:
The microphone is off
(mute) and the caller
and you are notifi ed by
a tone when you receive
the call that you are in
the privacy mode.
OFF:
The microphone is on.
1-6
Select the [Maintenance] tab on the Setting window.
1
Make the settings on this window.
2
Device
[Microphone], [Speaker], [Tone]:
Set the sound devices of the PC for microphone, speaker
and tone.
[Initialization]:
Initialization
Click
Yes
click
the Setting window to default.
Click
3
on the pop-up window to reset all the settings in
SAVE
to display a pop-up window, and then
to save the set contents and overwrite
the previous ones.
*
The license key on the [Network] tab will not be deleted
even if initialized.
*
If you wish to cancel the set contents and restore the
previous ones, click
CANCEL
.
GETTING STARTED
SETTING THE PC MASTER STATION
Make the settings on this window.
2
[Privacy]:
Select the Privacy 1 or 2, or select OFF if you will not use
the privacy function.
Privacy 1: The microphone is off (mute).
Privacy 2: The microphone is off (mute) and reception of a
call is notifi ed by a tone.
OFF: The microphone is on.
[Call tone (Privacy 2)] (Available when "Privacy 2" is
selected):
Select the call tone from 6 types.
Click
Playback
SAVE
to check the selected tone.
to save the set contents and overwrite
3
*
Click
the previous ones.
*
If you wish to cancel the set contents and restore the
previous ones, click
CANCEL
.
17
Page 18

http://www.aiphone.net/
AIPHONE CO., LTD., NAGOYA, JAPAN
AIPHONE CORPORATION, BELLEVUE, WA, USA
AIPHONE S.A.S., LISSES-EVRY, FRANCE
 Loading...