

Page 1

IS SERIES
Commercial & Security IP Video Intercom system
IS-SOFT
PC Master Station
OPERATION MANUAL
514426 A P0611YZ
GETTING STARTED APPENDIX
USING THE PC MASTER STATION
Thank you for selecting Aiphone for your communication and security needs. Please read this manual and the separate “SETTING
MANUAL” carefully before setting and using the PC master station.
Please note that images and illustrations depicted in this manual may differ from the actual ones.
Page 2

CONTENTS
INTRODUCTION .......................... 4
PRECAUTIONS ........................... 4
General precautions ..................... 4
Notes on using this product ........ 4
Notes on communication ............. 4
Notices ........................................... 4
GETTING STARTED ....................... 5
PART NAMES AND THEIR
Pan & Tilt ............................................15
■
Adjusting images ................................16
■
Transferring to another (PC)
master station ............................ 17
Communication transferring ...............17
■
Call transferring ..................................17
■
Door release ................................ 18
Using the PRIVACY function...... 18
While receiving a call ..........................18
■
To communicate with the caller ..........18
■
FUNCTIONS ................................ 5
Main window ................................. 5
Volume control window ................ 7
Dial keys window .......................... 7
Speed dial window ........................ 8
Play window .................................. 8
OUTLINE OF OPERATIONS ....... 9
Communication ............................. 9
Transferring ................................... 9
Paging .......................................... 10
Monitoring ................................... 10
Door release ................................ 10
USING THE PC MASTER STATION
RECEIVING AND ANSWERING
A CALL ON THE PC MASTER
STATION .................................... 12
... 12
PERFORMING CALLING,
MONITORING, PAGING AND
CHIME PAGING ON THE PC
MASTER STATION .................... 19
Searching for a station, zone or
remote site .................................. 19
Searching for a station, zone or remote
site from the list ......................................21
Searching for a station or zone by
number using the dial keys ....................23
Searching for a station, zone or
remote site from the placed call or
received call list ......................................24
Selecting a station, zone or remote
site by using the speed dial
buttons ...................................................24
Calling another station
(direct voice call) ........................ 25
Monitoring ................................... 26
Monitoring ...........................................26
■
Scan-monitoring .................................26
■
Receiving a call ........................... 12
Answering a call ......................... 13
Communication in the hands-free
■
mode ..................................................13
Communication in the press-to-talk
■
mode ..................................................13
Viewing video images at a
video door station ....................... 15
Switching Zoom/Wide .........................15
■
2
Viewing video images at the
target station ............................... 26
Paging ......................................... 27
Chime paging ............................. 27
RECORDING ............................. 28
Auto recording ............................ 29
Manual recording ........................ 29
How to perform manual recording .....29
■
Page 3
PLAY .......................................... 30
Playing recorded image
(and/or sound) ............................. 30
Deleting a recorded fi le .............. 31
APPENDIX ..................................... 32
TECHNICAL PRECAUTIONS ... 32
AVAILABLE CHARACTER
LIST ........................................... 32
SPECIFICATIONS ..................... 32
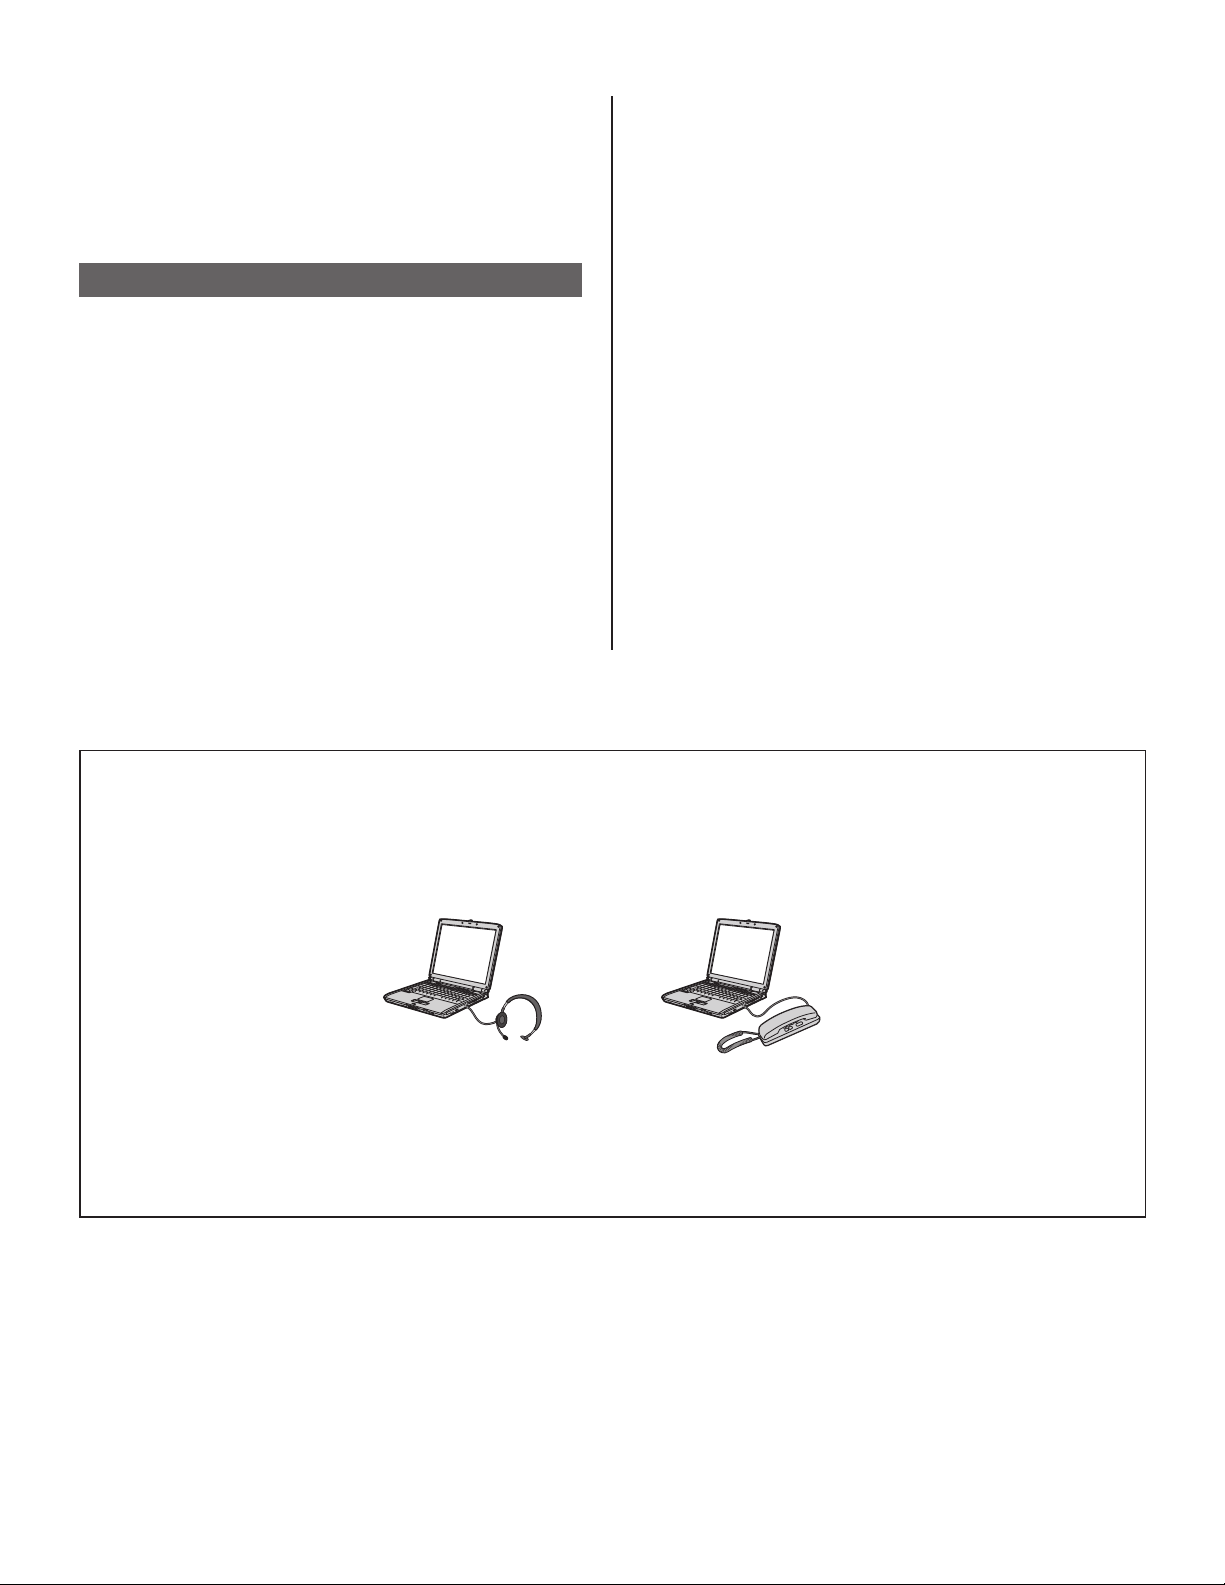
PREPARATION
Connecting a headset or handset to the PC
To talk, listen, etc. by using the PC master station, connect a commercially available headset or handset to the PC on which the PC
master station will run.
Headset
*
When a talk cannot be switched properly between you and the target side, adjust the microphone volume and/or speaker volume
on the PC master station. If the adjustment is insuffi cient, also adjust volume on the headset or handset.
Handset
3
Page 4

INTRODUCTION
The IS system is a video security communication system especially designed for applications in facilities such as offi ce buildings,
factories, schools, hospitals, and prisons. This product is an application to be installed in a PC to use it as a PC master station in the
IS system. The PC master station can be used almost as the same as other IP master stations adding some unique functions.
PRECAUTIONS
General precautions
1. For wiring, specify CAT5e straight cable.
2. Due to the environmental sound around the unit, it may hinder
smooth communication, but this is not a malfunction.
3. The outline of video images displayed by video door station may
differ from that of the actual person(s) or background, but this is
not a malfunction.
4. Aiphone assumes no responsibility for corruption of saved
information (such as changes to or deletion of saved information).
Please be aware of this in advance.
5. Warm-color lighting shining on the door station may change the
tint of the picture on the monitor.
Notes on using this product
Lip-sync is not performed for audio and video in the PC master
•
station.
Depending on the network environment and computer, it may not be
•
useable.
There are times when audio and video may be delayed in the PC
•
master station due to encoding, decoding, or the network.
Depending on the network environment or the computer's
•
performance, operations may not be carried out normally, such as
interrupted audio or video, and delayed frame rate decrease.
When operating PC master station in succession, the operation may
•
become invalid.
The times for the system and the PC master station are not
•
synchronized.
We recommend a 100BASE-TX wired LAN network.
•
Notes on communication
When communicating via the PC master station, use a commercially
•
available headset or commercially available handset to prevent
feedback. When using a headset or handset, the call tone does not
sound from the computer's speaker. Confi rm the call by the headset
(or handset) or the screen display.
During communication, if you speak before the other person
•
has fi nished talking, your voice may not come through clearly.
Communication will proceed smoothly if you wait until the other
person has fi nished before speaking.
If there are loud noises (such as children crying, music playing, or
•
strong winds) around the computer or the door station, the sound
may break up and be diffi cult to hear.
A hands-free (VOX) system has been implemented for
•
communication. Even if you use a headset or handset with the PC
master station, you cannot carry out simultaneous conversations.
(Communication is not full duplex.)
The talk and call tone volumes vary depending on the PC master
•
station settings, computer settings, and headset or handset volume.
Pay careful attention to the volume when monitoring or talking.
Notices
We will under no conditions be liable for damage that occurs due
•
to failures in network equipment; failures due to internet providers
and cell phone companies; failures such as disconnected lines and
other losses in communication, which render it impossible to provide
this service or in any way delay this service due to causes outside
of our responsibility; or if an error or missing data occurs during
transmission.
We will under no conditions be liable for damage caused if a
•
customer's password or transmitted information are leaked through
bugging or unlawful computer access over Internet communication.
We will under no conditions be liable for damage that occurs due
•
to the inability to communicate due to malfunctions, problems, or
operational errors in this product.
We will under no conditions be liable for any damages or losses
•
resulting from this product's contents or specifi cations.
This manual was created by Aiphone Co., Ltd., all rights reserved.
•
Copying a part of or this entire manual without prior permission from
Aiphone Co., Ltd. is strictly forbidden.
Please note that images depicted in this manual may differ from the
•
actual images.
Please note that this manual may be revised or changed without
•
prior notice.
Please note that product specifi cations may be changed for the sake
•
of improvement without prior notice.
Please be aware that it is the customer's responsibility to ensure that
•
their computer is secure. We will under no conditions be liable for
security failures.
This system is not intended for life support or crime prevention. It is
•
just a supplementary means of conveying information. Aiphone will
under no conditions be liable for loss of life or property which occurs
while the system is being operated.
When the PC master station is initialized, all the registrations are
•
returned to factory default settings. Follow the setup procedure for
the PC master station again.
4
Page 5
GETTING STARTED
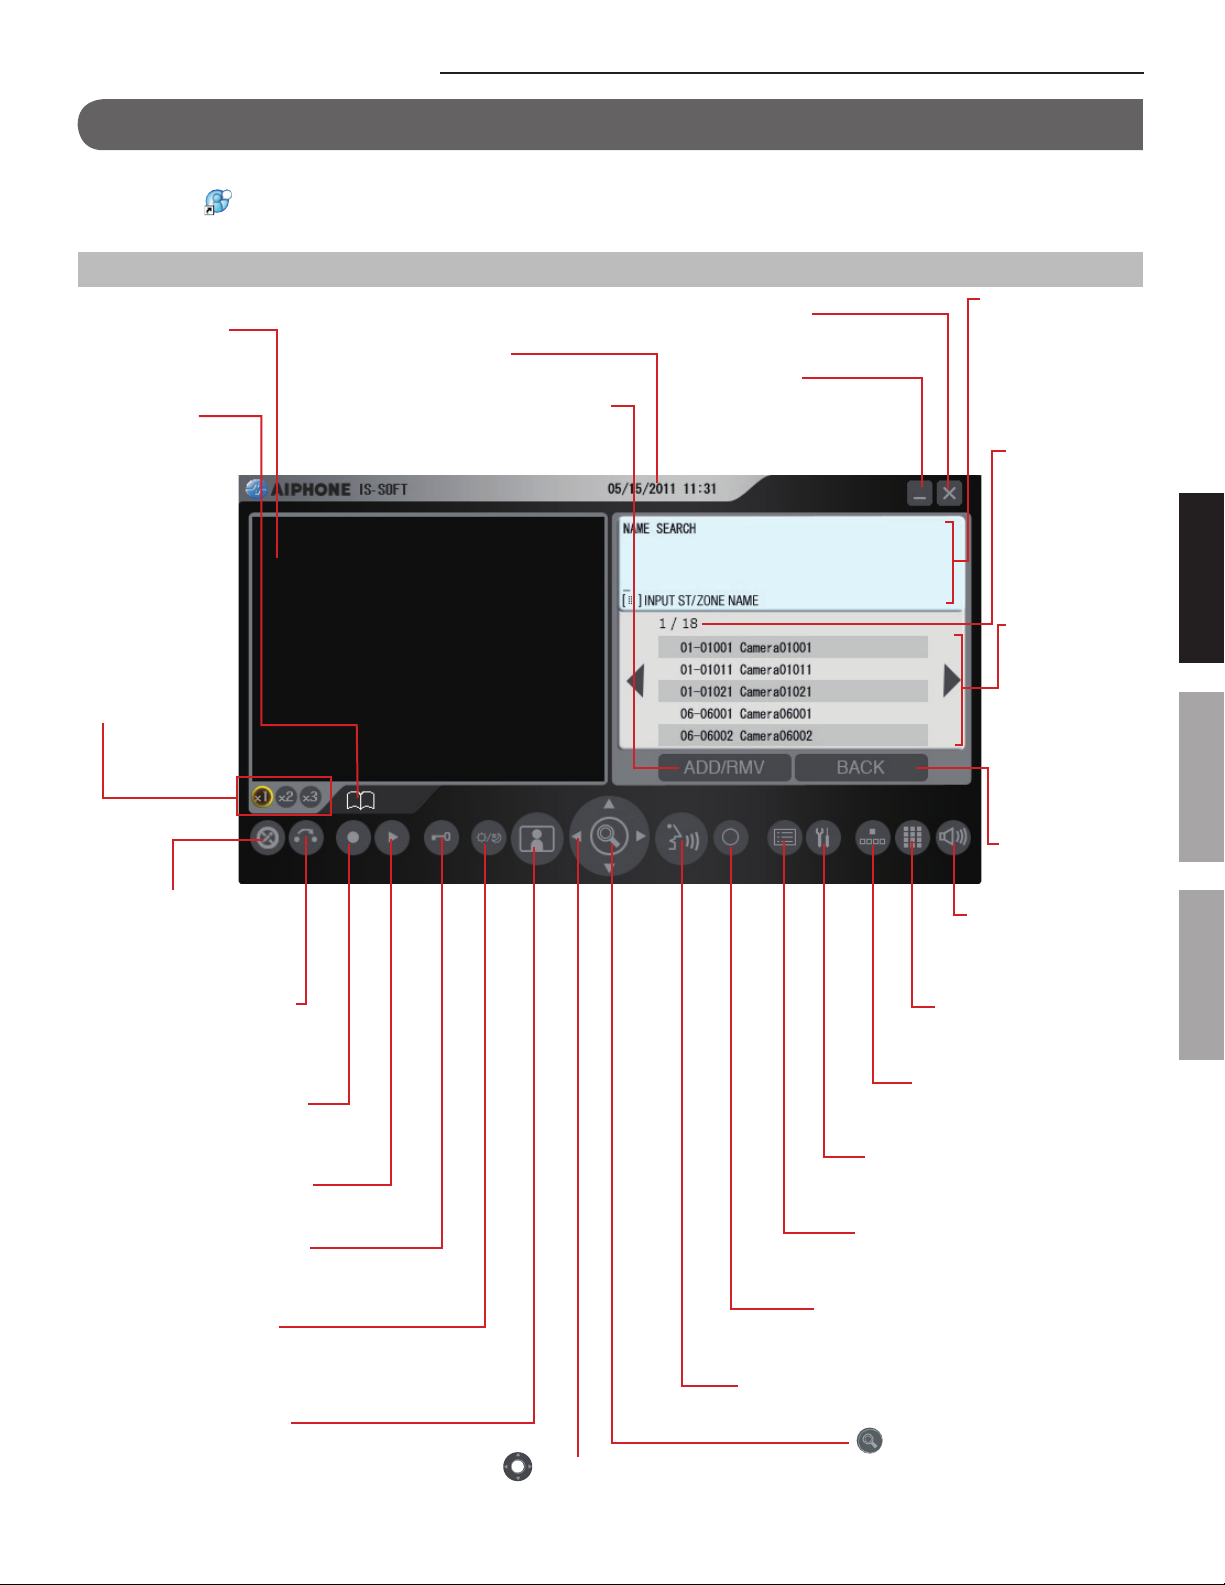
PART NAMES AND THEIR FUNCTIONS
NOTE:
Confi rm the icon
(→ “SETTING MANUAL”)
Main window
Video display area
Displays station type
images and images from
a video door station.
Status display
icons
(Refer to the next
page for details.)
Video x1, x2, x3
buttons
Change the size of
the main window.
* “x3” may not
appear depending
on the PC.
on the task bar at the bottom-right of the PC screen is blue. If the icon is gray, the settings have not been made correctly.
Time and date display
Displays the time and date.
ADD/RMV (Add/Remove) button (→P. 21)
Adds or removes stations and/or zones in
the list.
Minimize button
Minimizes the main window.
Close button
Closes the PC main window.
Message area
Displays the number(s)
(or name(s)) of the
selected station(s),
zone(s) or remote
site, and the station
number of this PC
master station.
List page no.
When the list of
stations, zones
and/or remote
sites, or setting
items consist of
two or more pages,
the current page
no. is shown here.
List area
The list of the
stations, zones and/
or remote sites you
searched for is shown
here. Stations, zones
and/or remote sites
are displayed either
by number and/or
name depending
on the setting in the
Setting window.
GETTING STARTED APPENDIX
USING THE PC MASTER STATION
PRIVACY button (→P. 18)
Click so that the button
lights up to turn on the
privacy function.
TRANSFER button (→P. 17)
Click so that the button
lights up to transfer a call to
another master station, etc.
Record/Stop button (→P. 29)
Records the displayed image
on the PC.
Play window button (→P. 30)
Opens the Play window.
Door release button (→P. 18)
Click so that the button lights up to unlock the
door connected to the received door station.
ADJUST button (→P. 16)
Click so that the button lights up to adjust the
image on the video display area when it is hard
to see in the daytime or darkness.
MONITOR button (→P. 26)
Click to monitor the selected
station or start scan-monitoring.
OFF button (→P. 13)
Click to fi nish communication,
monitoring or calling.
TALK button (→P. 13)
Click to answer a call or call the selected station.
(Pan & Tilt control button) (→P. 15)
Moves the images on the video display area from
right to left or up and down.
BACK button
Returns to the
previous status.
Volume control
window button (→P. 7)
Opens the Volume
control window.
Dial keys window button
(→P. 21)
Opens the Dial keys window.
Speed dial window button
(→P. 24)
Opens the Speed dial window.
SETTING button
Opens the Setting window. (Refer to
the SETTING MANUAL for details.)
LIST button (→P. 20)
Click to display the registered stations,
zones or remote sites in the list area.
(ZOOM/WIDE button) (→P. 15)
Switches the display mode between
zoom and wide. (This button is also
used for determining the selection.)
5
Page 6

Status display icons
The following icons are displayed here depending on the status of the
PC master station.
The color of an icon changes according to the priority level.*
Normal: green
Priority: yellow
Urgent: red
List of the mainly-used icons
Icons The status when the icon appears
Appears while talking to the target station, being called
from another (PC) master station, etc.
Appears while being called.
Appears when paging.
Appears when the microphone volume is set to OFF, or
the PRIVACY function is activated.
Appears while transferring is suspended.
Appears while receiving a call from a station transferred
by another one.
* This icon also appears on the station that performs
transferring.
Appears while searching for a station, zone or remote
site.
Appears while monitoring.
Appears during scan-monitoring.
Appears when an error message is displayed.
Appears while performing chime paging.
Shows it is a waiting time for shifting to the next
performance, etc.
Displaying call and/or (chime) paging record and
reception record
Call and/or (chime) paging record and reception record can be
displayed on the monitor for each up to 20 items.
*
When no answer was returned to an incoming call from this
PC master station, it is displayed in the reception record list.
In the records, unanswered incoming calls are marked with
(outlined in yellow) or
☆
: Unanswered calls that have not been confi rmed on the
.
list yet
: Unanswered calls that have already been confi rmed on
☆
the list
NOTES:
•
The calls that are not received at the PC master station are not
recorded. (A PC master station cannot receive two or more calls at
a time.)
•
The record of unanswered incoming calls can also be automatically
displayed by the setting in the Setting window. (→“SETTING
MANUAL”)
•
The reception of chime is not recorded.
•
A monitoring operation is not recorded. If monitoring is shifted to
talking, it will be recorded.
How to select items in the list area
1. Highlight the desired item by clicking repeatedly, or
pointing to it with the cursor.
2. Double-click the highlighted item with the cursor to go on to
the next selection list.
* If there is no additional selection list, perform the
corresponding action (calling, monitoring, paging, etc.).
This manual mainly describes operation methods by using
.
You can also use the cursor if you prefer.
6
Page 7

Volume control window
Minimize button
Minimizes the Volume control
window.
Close button
Closes the Volume control
window.
Microphone volume
adjusting slider
Audio transmit level indicator
Shows the volume level of talking
sound.
* Adjust the volume so that the level
does not reach the red zone of the
indicator.
Tone volume adjusting
slider
Speaker volume adjusting
slider
NOTE:
Sudden rise of the tone volume and speaker volume may damage your eardrum(s). Be sure to lower the volume fi rst, and then rise the volume little
by little to adjust it.
Dial keys window
Minimize button
Minimizes the Dial keys
window.
GETTING STARTED APPENDIX
USING THE PC MASTER STATION
Close button
Closes the Dial keys
window.
Dial keys (→P. 21)
Used to enter the number or
name of a station or zone you
want to search for.
7
Page 8

Speed dial window
Minimize button
Minimizes the Speed dial
window.
Play window
Close button
Closes the Speed dial
window.
Speed dial buttons (→P. 24)
Register stations, zones and/or
remote sites you call or select
frequently to each of these
buttons. You can select a station,
zone or remote site simply by
clicking the corresponding button.
(→P. 30-31)
Station Select tab
Selects the target station type
or remote site for searching for
recorded fi les.
Start Date selection tab (and calendar)
Designates the start date of the period
of time to search for fi les recorded in the
period.
Prior fi le button
Displays the previous fi les in the
fi le display area.
Stop button
Stops play.
End Date selection tab (and calendar)
Designates the end date of the period of time.
Minimize button
Minimizes the Play window.
Close button
Closes the Play window.
File display area
Displays the recorded fi les
here.
Delete button
Deletes the selected fi le.
Next fi le button
Displays the next fi les in the
fi le display area.
Fast forward button
Fast-forwards play.
Slow button
Makes play in slow motion.
Play button
Plays a selected fi le.
Pause button
Temporarily stops play.
8
Page 9

OUTLINE OF OPERATIONS
The following describes the outline of operations you can perform with a PC master station.
Communication
On a sub station (door station or room sub station), you can call up to 20 preset (PC) master stations in your site at the same time.
•
Or you can call up to19 (PC) master stations in your site and a remote site (up to 20 (PC) master stations at the remote site).
On a PC master station, the communication method can be selected from the hands-free mode or the press-to-talk mode.
•
(→P. 13)
You can also communicate with a remote site (a pilot station registered in the site).
•
Hands-free
Press-to-talk
Click and hold the
(TALK) button.
Door station
Room sub station
PC master station
Communication
or
Communication
or
Master stationPC master station
Transferring
When communicating with a received call on a PC master station, you can transfer it to another (PC) master station in your site.
(→P. 17)
GETTING STARTED APPENDIX
USING THE PC MASTER STATION
PC master station
Door station
*
You can also make a transfer setting for transferring calls to a designated (PC) master station automatically.
*
For a call from another (PC) master station, you can transfer it only when you are communicating with it (not to the remote site).
*
You can also transfer a call to a remote site. (However, you cannot transfer a call received from a remote site to another remote
Room sub station
or
Call
PC master station
Transfer
or
Master station
site.)
9
Page 10

Paging
On a PC master station, you can initiate paging or chime paging to the selected zone(s). All the stations previously registered to the
zone(s) receive the paging or chime. (→P. 27)
*
You can also call another (PC) master station or a sub station individually by direct voice call. The receiver can reply in the handsfree mode.
*
You can also make paging or chime paging to the registered external speaker(s).
*
You can also make paging or chime paging to a specifi ed zone in a remote site when the site has chime sources. (When the site
does not have a central control unit, the chime paging does not initiate.)
Room sub stations
Master stations
PC master station
Paging or chime paging
PC master stations
Door stations
Monitoring
On a (PC) master station, you can monitor a sub station in your site.
You can also initiate the scan-monitoring (monitoring multiple preset stations sequentially).
For an audio door station or room sub station, you can monitor sounds only.
(→P. 26)
*
You cannot monitor or scan-monitor a remote site.
PC master station
Monitoring
Door station (video) Door station (audio)
or
Room sub station
or
10
Page 11

Door release
On a PC master station, you can unlock the door associated with a sub station call in which a door release device is connected.
(→P. 18)
*
You can also unlock the door (door release device) connected to a sub station in a remote site depending on the setting.
Electric door strike
Door station
Room sub station
or
Door release
Call
PC master station
NOTE:
If the door station does not have a camera, you cannot view the image of the visitor. Confi rm the visitor securely.
GETTING STARTED APPENDIX
USING THE PC MASTER STATION
11
Page 12

USING THE PC MASTER STATION
RECEIVING AND ANSWERING A CALL ON THE PC MASTER STATION
The following describes the communication method using a PC master station.
*
When receiving a call from a remote site, the operation methods are the same as described below, however it may take a longer
time for some operations and their responses. For example, there may be a time difference between a call starting at a remote site
and the call tone ringing on the target (PC) master station in your site.
Receiving a call
(in your site or a remote site)
1
Door station
Press
The call tone rings, and the corresponding display appears.
*
The call tone from a sub station differs from the setting in the Setting window. (→"SETTING MANUAL")
e.g.) When called from a video door station
The video image at the calling station is
displayed following the symbol image.
* It may take long until a video image appears.
Room sub station
(in your site or a remote site)
or
Press
or
Lift the
handset.
Master station
(in your site or a remote site)
or or
(See the “OPERATION
MANUAL” for the standard
(IP) system or network
direct system.
The station no. and station name are displayed.
(For a remote site, the number and name of the site are displayed.
The station name will not be displayed.)
Another PC master station
(in your site or a remote site)
(See page 25 for
how to call from a
PC master station.)
*
When an audio door station, room sub station or another (PC) master station calls in, the station type image is displayed. (The
image differs from the calling station type.) When called from a remote site, the remote site symbol image is displayed.
*
An incoming call from a (PC) master station will be a direct voice call. (However, when the PRIVACY mode is set to “Privacy 2”,
you will be notifi ed of an incoming call by the display information and call tone.)
NOTES:
•
A PC master station cannot receive two or more calls at a time.
•
A call or talk may not be possible when the communication path is fully occupied.
•
Video images at the target video door station may not appear on the monitor when the video path is fully occupied even though a call or talk
is possible.
12
Page 13

Answering a call
The maximum duration of communication is preset in the
System setting. (It can be set to a maximum of 10 minutes.)
Answer the call in one of the following ways.
1
Communication in the hands-free mode
■
(Available when “Communication method” is set to
“Hands-free” in the Setting window.)
<When called in from a sub station>
Communication in the press-to-talk mode
■
(Available when “Communication method” is set to
“Press to talk” in the Setting window.)
<When called in from a sub station>
1)
Click
momentarily.
[TALK]
1)
Click
.
[TALK]*
1
[OFF]
After a beep, you can communicate in the hands-
free mode.
1
*
: When talking: Lit
When listening to the caller: Off
When you have fi nished the communication,
2)
click .
Communication will end.
*
You can communicate in the press-to-talk mode by the
following operation even when "Hands-free" is set (e.g.,
when it is noisy around you).
Click and hold• for more than one second while
communicating. (Beeps once.)
<When you received a direct voice call from
another (PC) master station>
You can talk back to it. If you click and hold for
more than one second, it changes to the press-to-talk
mode. (Beeps once.)
[OFF]
After a beep, you can communicate in the press-to-
talk mode.
Click and hold
2)
the caller.
(When talking) (When listening to the
Click and hold.
When you have fi nished the communication,
3)
click .
to talk and release to listen to
caller)
Release.
<When you received a direct voice call from
another (PC) master station>
Click and hold to talk with and release to listen to
the caller.
GETTING STARTED APPENDIX
USING THE PC MASTER STATION
13
Page 14

About the priority
The order of priority for actions (communication, calling,
paging, monitoring, etc.) is as follows, depending on the
priority setting.
Priority Setting Action
1 (high) [URGENT], [BROADCAST]*
2 [PRIORITY]
3 [NORMAL]
4 (low) - Monitoring, scan-
*
Earlier call has priority over later call if the priority setting
is the same.
*
Communication takes priority over calling.
However, when a call with higher priority comes in, the
communication will be forcibly stopped.
1
: [BROADCAST]:
*
This can be selected only when you perform paging.
When [BROADCAST] is selected, you can perform
paging while interrupting all the other communications of
lower priority. In that case, no receiver can answer you.
For IP units that are in communication, calling or being
called when paging with [BROADCAST] is performed,
they will turn into the standby mode after paging.
1
Communication,
calling, paging,
chime paging.
monitoring
14
Page 15

Viewing video images at a video door
station
You can view video images at the target station when receiving
a call from or communicating with a video door station, or
monitoring a video door station in your site. The video images
can be adjusted as necessary by using the following functions
on the PC master station.
Switching Zoom/Wide
■
The display mode on the monitor can be switched between
zoom and wide by each click of
.
Pan & Tilt
■
When a zoom image is displayed, clicking
image as shown below.
Up
Left
Down
Right
moves the
[ZOOM/WIDE]
Wide
Zoom
NOTES:
•
The image range of the zoom mode and wide mode differs. The
edge of wide image will not be displayed with the zoom mode.
•
At night, the object image may be blurred and less-visible when
moving the image from right to left or up and down because
illumination to the object is reduced. The same applies to a moving
object.
GETTING STARTED APPENDIX
USING THE PC MASTER STATION
NOTES:
•
The preset position of zoom image is set in the System setting on a
PC.
•
When the display mode switches from wide to zoom, the zoom
image from the preset position is displayed.
•
Depending on the properties of the video door station camera, the
wide image may appear more distorted than the zoom image but
this is not a malfunction.
•
In the zoom mode, the image can be moved from right to left or up
and down.
15
Page 16

Adjusting images
■
If the image on the monitor is diffi cult to see, you can adjust the
image.
Click 1 when the image is diffi cult to see.
Click.
The backlight or night sensitivity is automatically adjusted.
*
The button stays lit during adjustment.
*
The discrimination between day and night is performed
automatically by the door station.
*
The adjustment result may vary depending on the System
setting on a PC.
<Day> <Night>
To restore the image before adjustment
Click
The lighting of button turns off and the image before adjustment
is restored.
NOTE:
Clicking
also make moving objects more diffi cult to see.
again.
at night may make visitors' faces easier to see, but may
[Before adjustment]
[After adjustment] [After adjustment]
[Before adjustment]
16
Page 17

Transferring to another (PC) master station
You can transfer a call received from a sub station to another
(PC) master station while communicating with it (communication
transferring), as well as setting calls to be automatically
transferred in the “Setting window”.
*
For a call from another (PC) master station, you can transfer
it only when you are communicating with it. (However, you
cannot transfer the communication to a remote site.)
Communication transferring
■
Receive a call and communicate with it. (→P. 12)
1
Click 2 .
Click
3
site) to which you want to transfer the call (so that it
is highlighted) from the list.
Press 4 or
*
While transferring, a sound rings at the source station to
indicate a transfer.
to select the (PC) master station (in your
.
Call transferring
■
You can transfer a call to the designated (PC) master station
(in your site or a remote site) or the telephone registered to the
system automatically (without answering it) by the “Transfer”
setting in the Setting window.
*
This function is useful when you are absent or you cannot
receive and answer a call.
*
When transferring to a remote site, a (PC) master station in
the site should have been registered as the pilot station of
the site.
*
A call from a sub station (except IS-IPDV and IS-IPDVF) can
be transferred to telephone.
The following settings can be made in the Setting window.
(Refer to the SETTING MANUAL for details.)
Transferring a call to the designated (PC) master station or
1
remote site automatically ([Transfer], [Transfer destination])
Setting the delay time of triggering transferring after a call is
2
received ([Transfer delay])
Setting a schedule for call transferring in the System setting
3
on a PC ([Schedule transfer], [Scheduled destination])
Transferring a call to telephone automatically (when
4
[Telephone transfer] is set to ON)
Transferring a call to telephone automatically in the period
5
of time on the day of the week set in the System setting on a
PC (when [Schedule tel transfer] is set to ON)
GETTING STARTED APPENDIX
USING THE PC MASTER STATION
5
Click
to enable the communication between the
station that called you and the transfer target station.
* When both 1 and 3 are set, 1 takes priority.
NOTES:
•
You can also make a transfer setting for calls at when you are
absent. Make the setting in the Setting window. (→ “SETTING
MANUAL”)
•
A call from a remote site can be transferred to a (PC) master
station in your site, but not to another remote site.
•
A call can be transferred to a remote site, but not to two or more
remote sites.
17
Page 18

Door release
Using the PRIVACY function
You can release the door while being called from,
communicating with, or monitoring a sub station if a door
release device is connected to the station.
Click while being called from, communicating with, or
monitoring the sub station.
The door is released for the time set in the System setting on a
PC.
*
is lit while the door is released.
*
If the set release time is “0”, it can be released while the
button is clicked and held.
CAUTION:
Be sure to confi rm the visitor securely before releasing the door if the
sub station has no camera.
NOTE:
This function is disabled during scan-monitoring. (→P. 26)
The PRIVACY function of a PC master station prevents you from
being heard by other (PC) master stations in your site or remote
sites that call you.
To activate the PRIVACY function
Set “Privacy” to “Privacy 1” or “Privacy 2” in the Setting window.
If you will not use the PRIVACY function, set it to “OFF”.
(→“SETTING MANUAL”)
When set to “Privacy 1” or “Privacy 2”, the PRIVACY*
button lights up.
While receiving a call
■
When the PRIVACY function is activated•
The microphone of your PC master station is muted, so the
sounds at your side are not heard by the caller.
When the PRIVACY function is off•
The microphone of your PC master station is enabled, so the
sounds at your side are heard by the caller.
To communicate with the caller
■
When th• e PRIVACY function is activated
Click , and the microphone is enabled. Then you can
communicate with the caller.
When the PRIVACY function is off•
You can communicate with the caller without clicking .
*
To mute the microp
Click and hold
to enable the microphone.
hone temporarily:
, and the microphone is muted. Release
The status of PC master station depending on the
PRIVACY mode
PRIVACY
PRIVACY
mode
1
2 Lit
OFF Off
When receiving a call from
LED
another (PC) master station
in your site or remote site
The microphone is muted.
•
When you click•
Lit
to answer the call, the
microphone is enabled.
The microphone is muted.
•
When you receive a call from a
•
(PC) master station or remote
site, the caller and you are
notifi ed by a tone that you are
in the PRIVACY mode. When
you click
call, the microphone is enabled.
The microphone is enabled.
•
Communication starts when a
direct voice call arrives from a (PC)
master station or remote site.
The micr• ophone is muted
while clicking .
to answer the
NOTE:
When "Communication method" is set to "Press to talk" in the Setting
window, you do not have to activate the PRIVACY function.
When communicating
with a sub station
Microphone is enabled.
•
The microphone is
•
muted while clicking
.
18
Page 19

PERFORMING CALLING, MONITORING, PAGING AND
CHIME PAGING ON THE PC MASTER STATION
The following describes how to operate the PC master station to perform calling, monitoring, paging and chime paging.
Searching for a station, zone or remote site
Read this section before you perform calling, monitoring, paging or chime paging on a PC master station for the fi rst time to learn how
to search for stations, zones or remote sites. The search can be performed in the following search methods by using the search items,
dial keys or speed dial buttons to suit your needs.
Searching for a station, zone or remote site
from the list (→P. 21)
C
D
E
F
Search items: A, B,
,
,
F
,
(
for a remote site.)
is
Searching for a station or zone by number
using the dial keys (→P. 23)
Basic procedure for selecting the search items
■
The search items A – H can be selected from the standby mode or the SEARCH LIST.
* The items
* A remote site can be selected by using the search item
[In the standby mode]
Press the corresponding button on to select the target search item A, B, G or H shown below.
A
and B can be selected from both the standby mode and the SEARCH LIST.
F, G, H
Searching for a station, zone or remote site
from the placed call or received call list (→P. 24)
Search items: G,
H
Selecting a station, zone or remote site by
using the speed dial buttons (→P. 24)
, or the speeds dial buttons.
GETTING STARTED APPENDIX
USING THE PC MASTER STATION
Search items
B
STATIONS BY AREA (→P. 22)
G
Placed calls (→P. 24)
Press to display the SEARCH LIST.
A
NAME SEARCH (→P. 21)
H
Received calls (→P. 24)
19
Page 20

[In the SEARCH LIST]
The search items are shown in the SEARCH LIST.
Click
1
The search items are shown in the list area.
Click
2
in the standby mode.
repeatedly to select the target search item
SEARCH LIST (page 1/2)
to
A
(so that it is highlighted).
F
SEARCH LIST
A
NAME SEARCH (→P. 21)
SEARCH LIST (page 2/2)
B
STATIONS BY AREA (→P. 22)
C
STATIONS BY TYPE (→P. 22)
D
PAGING ZONE (→P. 22)
(Click ◄ or ►.)(Click ◄ or ►.)
E
CHIME ZONE (→P. 22)
F
REMOTE SITE (→P. 23)
Click 3 to decide on the selected one.
20
Page 21

Searching for a station, zone or remote site
from the list
A
Searching for a station or zone in your site by
entering the name [NAME SEARCH]
Select [NAME SEARCH] either in the standby mode
1
(→P. 19) or the SEARCH LIST. (→P. 20)
Click
2
Enter a name by using the dial keys.
3
to display the Dial keys window.
To delete the just entered character:
Click
To enter the same characters or characters on the
same dial key sequentially:
(e.g.: To enter “AB”)
1. Enter “A”. (Click the dial
2. Click
3. Enter “B”. (Click the dial key twice.)
.
key once.)
.
GETTING STARTED APPENDIX
e.g.)
When searching for "MASTER004";
Click the dial keys as follows.
(4 times) (3 times) (8 times) (8 times) (4 times)(twice)
M
AS4TER
The entered characters are displayed here.
00
4
Click
to select the target station or zone (so that
it is highlighted) from the list.
You * can select up to 5 stations and/or zones by clicking
. (See below.)
Start calling (talking), monitoring or paging by
5
following the procedure for the corresponding
performance. (→P. 25-27)
T
o select two or more stations and/or zones from the
list:
Click
1)
highlighted.
The station or zone is checked.
*
Click
Repeat step 1) to select more stations and/or zones.
2)
*
You can select up to 5 stations and/or zones.
To select 5 stations and/or zones, after checking 4
stations and/or zones, select the 5th one so that it is
highlighted. (The 5th station or zone is not checked.)
*
You cannot select two or more remote sites.
with the target station or zone
again to clear the check.
USING THE PC MASTER STATION
All the station and/or zone names that include the entered
characters in your site are displayed in the list.
*
The search is narrowed down whenever a character is
added.
NOTE:
You can also select a station from the list by using after
you select [NAME SEARCH] in step 1.
21
Page 22

B
Searching for a station in your site by
designating an area [STATIONS BY AREA]
D
Searching for a paging zone in your site from the
list [PAGING ZONE]
Select [STATIONS BY AREA] either in the standby
1
mode (→P. 19) or the SEARCH LIST. (→P. 20)
Click
2
the list (so that it is highlighted), and then click
select.
All the stations in the area are displayed in the list.
Click
3
highlighted).
You can select up to 5 stations. * (→P. 21)
Start calling (talking), monitoring or paging by
4
following the procedure for the corresponding
performance.
C
Searching for a station in your site by
designating a station type [STATIONS BY TYPE]
Select [STATIONS BY TYPE] from the SEARCH
1
LIST. (→P. 20)
to select the target area in your site from
to select the target station (so that it is
(→P. 25-27)
to
Select [PAGING ZONE] from the SEARCH LIST.
1
All the registered paging zones are displayed in the list.
Click
2
highlighted).
You can select up to 5 zones. * (→P. 21)
Start paging by following the procedure for paging.
3
(→P. 27)
E
Searching for a chime zone in your site from the
list [CHIME ZONE]
Select [CHIME ZONE] from the SEARCH LIST.
1
All the registered chime zones are displayed in the list.
Click
2
highlighted).
You can select up to 5 zones. * (→P. 21)
to select the target zone (so that it is
to select the target zone (so that it is
All the station types are displayed in the list.
Click
2
list (so that it is highlighted), and then click to
select.
All the stations of the selected type are displayed in the list.
Click
3
that it is highlighted).
You can select up to 5 stations. * (→P. 21)
Start calling (talking), monitoring or paging by
4
following the procedure for the corresponding
performance.
to select the target station type from the
to select the target station in your site (so
(→P. 25-27)
Start chime paging by following the procedure for
3
chime paging.
(→P. 27)
22
Page 23

F
Searching for a remote site as the target of
calling, paging or chime paging from the list
[REMOTE SITE]
Searching for a station or zone by number
using the dial keys
Select [REMOTE SITE] from the SEARCH LIST.
1
All the registered remote sites are displayed in the list.
Click
2
highlighted).
After this step, you can call the pilot station of the ta* rget
site with the “Normal” priority by clicking
For other calling operations such as selecting the priority,
refer to P. 25.
After clicking 3 , select the performance you want
to do from [CALL], [PAGING] and [CHIME] from the
list (so that it is highlighted).
Start calling, paging or chime paging by following the
4
procedure for the corresponding performance.
(→P. 25-27)
NOTES:
•
Before you perform calling, paging or chime paging to a
remote site, confi rm what unit(s) in the site will receive and/or
respond to your performance.
•
You cannot select two or more remote sites.
to select the target site (so that it is
.
Click 1 to display the Dial keys window.
Enter the number of the station or zone you want
2
to search for by using the dial keys in the standby
mode.
The entered numbers are displayed, and all the stations
and/or zones that include the entered number are
displayed in the list.
*
The search is narrowed down whenever a fi gure is
added.
GETTING STARTED APPENDIX
USING THE PC MASTER STATION
Click
3
that it is highlighted).
You can select up to 5 stations and/or zones. * (→P. 21)
Start calling (talking), monitoring or paging by
4
following the procedure for the corresponding
performance.
to select the target station and/or zone (so
(→P. 25-27)
23
Page 24

Searching for a station, zone or remote site
from the placed call or received call list
Selecting a station, zone or remote site by
using the speed dial buttons
You can search for a station, zone or remote site from the most
recent 20 items of the call and/or (chime) paging record or
reception record.
*
The items are displayed in the list in chronological order.
G
Searching for a station, zone or remote site from
the call and/or (chime) paging record list
Click
1
paging) record list in the list area. (→P. 19)
Up to 20 items (target stations, zones or remote sites) of
the most recent call and/or (chime) paging you performed
are displayed in the list.
Click
2
site (so that it is highlighted).
Start calling (talking), monitoring, paging or
3
chime paging by following the procedure for the
corresponding performance. (→P. 25-27)
to display the placed call (and/or (chime)
to select the target station, zone or remote
Select a station, zone or remote site registered to one of the
speed dials (1 to 24) clicking by clicking the corresponding
speed dial button.
Click 1 to display the Speed dial window.
Select a station, zone or remote site registered to one
2
of the speed dials (1 to 24).
Speed dial buttons
H
Searching for a station or remote site from the
reception record list
Click
1
record list in the list area. (→P. 19)
Up to 20 items (stations or remote sites) of the most recent
call and/or paging you received are displayed in the list.
Click
2
(so that it is highlighted).
Start calling (talking) or monitoring by following the
3
procedure for the corresponding performance.
(→P. 25, 26)
to display the received call (and/or paging)
to select the target station or remote site
Start calling (talking), monitoring, paging or
3
chime paging by following the procedure for the
corresponding performance. (→P. 25-27)
24
Page 25

Calling another station (direct voice call)
Follow the steps below to call a desired door station, room sub
station or master station in your site, or remote site.
Search for and select the station or remote site you
1
want to call (so that it is highlighted) in one of the
search methods. (→P. 21-24)
*
If you call (the pilot station in) a remote site by searching
for it from [REMOTE SITE] of SEARCH LIST, select
the target site, and then select [CALL] (so that it is
highlighted). (→P. 23)
Refer to the on-screen instructions:
Be sure to make operations by checking the information on the
upper part of the list area. The next operations you can perform
are displayed.
e.g.)
] TALK … You can start talking by clicking .
[
* If you will not set the priority, it is set to
“Normal”.
] MONI … You can start monitoring by clicking
[
[
] PR (or PRIORITY)
……… You can proceed to the priority setting
mode by clicking .
To set the priority, click 2 , and then click to
select the target priority (so that it is highlighted).
If yo* u will not set the priority, skip this step and click
. You can start calling (talking) with “Normal” priority.
.
3
Click
or to start calling (talking).
or
When a tone rings, your voice is heard at the target station
and you can also hear sounds at the target station. (Direct
voice call)
The receiver can answer the call without pressing any
button or lifting the handset. (Talk back)
*
If the target station is a (PC) master station, the
response of it differs from the PRIVACY mode setting on
the target station. (See the table below.)
PRIVACY mode
setting on the target
master station
OFF
1
2
Your voice is heard at the target
station and you can also hear sounds
at the target station.
Communication is enabled when
the receiver makes an answering
operation. Otherwise you can hear no
sound from the target station.
When the target station receives your
call, a tone notifi es you that the target
station is in the “Privacy 2” mode.
Communication is enabled when
the receiver makes an answering
operation. Otherwise you can hear no
sound from the target station.
* You can adjust the volume of call
tone by using the speaker volume
adjusting slider in the volume
control window.
Response
GETTING STARTED APPENDIX
USING THE PC MASTER STATION
Click4 to fi nish communicating.
25
Page 26

Monitoring
You can monitor a sub station or multiple sub stations in your
site sequentially (scan-monitoring) with a PC master station.
*
When monitoring a video door station, you can view the
image at the station and hear the sound. When monitoring an
audio door station or room sub station, you can only hear the
sound at the station.
Monitoring
■
Search for and select the sub station in your site you
1
want to monitor (so that it is highlighted) in one of the
search methods. (→P. 21-24)
NOTE:
You cannot monitor a (PC) master station and remote site.
Click2 (when "
[ ]
MONI" is displayed).
Scan-monitoring
■
You can monitor the preset stations in your site (up to 20 door
stations and/or room sub stations) sequentially, each for the set
duration.
*
The stations should be preset in the System setting on a PC.
Click 1 in the standby mode.
The stations set for scan-monitoring are monitored
sequentially, each for the set duration.
Click
2
* appears in the area for a status display icon during
scan-monitoring.
to stop scan-monitoring
.
To monitor only the desired station continuously:
Click when the target station is being monitored during
scan-monitoring.
*
Click
again to restart the scan-monitoring.
You can hear the sound and if the station has a camera,
you can also view the image.
appears in the area for a status display icon.
*
Click 3 to fi nish monitoring.
NOTES:
•
If the selected station is being used (calling, communicating, being
monitored, etc.), you cannot monitor the station.
•
If you click
with the station after a tone.
•
During video monitoring, you can switch Zoom/Wide, make Pan
& Tilt control and adjust images on the monitor. (→P. 15-16)
while monitoring, the communication mode starts
To shift to scan-monitoring
Clic
k duri
*
If the station being monitored is a preset one for scanmonitoring, the scan-monitoring starts from the subsequent
station in the scan-monitoring order.
*
If the station being monitored is not a preset one for scanmonitoring, the scan-monitoring starts from the fi rst station in
the scan-monitoring order.
ng monitoring.
NOTES:
•
Clicking
•
If the PC master station receives a call during scan-monitoring, the
scan-monitoring ends automatically.
•
If one of the preset stations is being used (calling, communicating,
being monitored, etc.) during the scan-monitoring, it will be
skipped.
•
During the scan-monitoring, the Zoom/Wide, Pan & Tilt, door
release and image adjusting functions are disabled. (The camera is
fi xed in the Wide mode.)
is invalid during scan-monitoring.
Viewing video images at the target station
When you are receiving a call from, communicating with a
video door station, or monitoring a video door station in your
site, you can view video images at the target station.
Use the following functions on the PC master station to control
video images as you prefer. (→P. 15-16)
Switching Zoom/Wide
•
Pan & Tilt
•
Adjusting images
•
26
NOTE:
Video images cannot be controlled during scan-monitoring.
Page 27

Paging
Chime paging
The system allows you to page (transmit an announcement)
the selected zone(s) and/or station(s) simultaneously.
*
For paging a remote site, you can page the zone registered
as the target in the site.
NOTE:
If you use zones, register zones in the System setting on a PC in
advance.
Search for and select the zone or a remote site you
1
want to page (so that it is highlighted) in one of the
search methods. (→P. 21-24)
*
You can select up to 5 zones and/or stations in your site
for paging. (→P. 21)
*
For paging a zone in a remote site, you cannot select
a zone. If you page (the pilot zone in) a remote site by
searching for it from [REMOTE SITE] of SEARCH LIST,
select the target site, and then select [PAGING] (so that
it is highlighted). (→P. 23)
To set the priority (when “[2 ] PRIORITY” is
displayed), click , and then click to select the
target priority (so that it is highlighted).
If you * will not set the priority, skip this step and click
. You can start paging after a tone with “Normal”
priority.
Click 3 or (when “[ ] [ ] PAGE” is
displayed).
The system allows you to make chime paging (transmit
a chime) to all the stations in the designated zone(s)
simultaneously.
*
For chime paging to a remote site, you can make chime
paging to the zone registered as the target in the site, and
cannot select a sound source.
NOTE:
If you use zones, register zones in the System setting on a PC in
advance.
Search for and select the zone you want to make
1
chime paging (so that it is highlighted) in one of the
search methods. (→P. 22, 24)
You can select up to 5 zones for chime paging. * (→P. 21)
*
If you have selected the target zone (so that it is
highlighted) by using a speed dial button, skip to step 4.
*
For chime paging to a zone in a remote site, you cannot
select a zone. If you make chime paging to (the pilot
zone in) a remote site by searching for it from [REMOTE
SITE] of SEARCH LIST, select the target site, and then
select [CHIME] (so that it is highlighted) (→P. 23) and
then skip to step 4.
Click 2 or (when “[ ] [ ] PLAY SOUND” is
displayed).
3
Click
to select the sound source of chime from
the list (so that it is highlighted).
GETTING STARTED APPENDIX
USING THE PC MASTER STATION
After a tone rings, start paging.
4
A receiver c5 an answer it and communicate with you
by clicking
, pressing
or pressing the external call button*
When the priority is set to "* BROADCAST", no receiver
can answer the paging.
The paging will be heard in priority to any other
performances (of lower priority) including ongoing
communications between stations. (→P. 14)
TALK
or lifting the handset,
1
.
When you have fi nished paging, click 6 .
*1: Connected to a room sub station and the necessary setting
should be made in the System setting on a PC. (Be careful
not to press the call button on a room sub station by
mistake.)
To set the priority (when “[4 ] CHIME [ ]
PRIORITY” is displayed), click , and then click
to select the target priority (so that it is
highlighted).
If * you will not set the priority, skip this step and click .
Chime paging begins with “Normal” priority.
Click 5 or (when “[ ] [ ] CHIME” is
displayed).
Chime paging begins.
Making chime paging automatically
You can also set chime page automatically in your site on a
preset schedule in the System setting on a PC.
27
Page 28

RECORDING
The PC master station can record images and/or sounds from other stations automatically or manually.
*
The recording operation differs from the settings in the Setting window as listed below. Refer to the SETTING MANUAL for the
recording settings, and change the settings as needed.
Setting
Picture Recording Mode Auto Recording Audio Recording
ON
(Auto Recording)
Snapshot
(Manual Recording)
Video
(Manual Recording)
NOTES:
•
When “Video” is selected at [Picture Recording Mode] and [Audio Recording] is set ON in the Setting window (
sounds from a sub station (door station or room sub station) or master station can also be recorded during the auto or manual recording.
•
Recording can no longer be made if the total amount of recorded fi les exceeds the “Max. Recording Space” set in the Setting window. A balloon
appears to show that “Max. Recording Space” is exceeded.
OFF
ON
(Auto Recording)
OFF
(Not available)
(Not available)
ON/OFF
ON/OFF
When there is a call from a video door station, only one
snapshot of the fi rst displayed image at the door is recorded
automatically.
When monitoring or talking with a video station during a call,
you can manually record only one snapshot of the image at
the door.
When there is a call from a video door station, video recording
at the door starts automatically. When [Audio Recording] is
set to ON, the sound at the door is also recorded.
* Audio recording begins after a talking begins. The call tone
is not recorded.
* Video recording stops when the call from or communication
with the door station ends, and the PC master station
returns to the standby mode.
When monitoring or talking with a video station during a call,
you can make a video recording at the door manually.
* You can continue recording even if you begin
communicating while the recording of the monitoring image
is in progress.
* When the communication or the monitoring ends, video
recording stops.
Description
“SETTING MANUAL”), the
→
28
Page 29

Auto recording
Manual recording
When the call button is pressed at a video door station,
a snapshot or video of the image at the door is recorded
automatically.
When [Audio Recording] is set to ON:
•
When called from a sub station, recording of the sounds at
the station automatically starts when a communication is
started.
•
When called from a master station, recording of the sounds
at the station starts immediately.
If you want to stop video recording, click .
* turns into .
NOTE:
During recording, the square part in
is illuminated.
You can record a snapshot or video of the image at the
door (and sounds depending on the setting) manually in the
following states.
When called from a video door station
•
When monitoring a video door station
•
When communicating with a video door station
•
How to perform manual recording
■
Snapshot recording
Click when called from, monitoring or communicating
with a video door station.
NOTE:
You cannot record sounds.
Video recording
*
You can also record sounds from a sub station or master
station by this method depending on the setting.
Click 1 when called from, monitoring or
communicating with a video door station.
*
turns into
during recording.
GETTING STARTED APPENDIX
USING THE PC MASTER STATION
Click 2 to stop video recording.
NOTES:
When you click
•
continues until the set communication time has elapsed or until
is clicked.
When communication starts while recording during monitoring,
•
you can continue the recording. When the communication or
monitoring ends, recording stops.
During recording, the square part in
•
while recording during monitoring, recording
is illuminated.
29
Page 30

PLAY
You can play the recorded images with the PC master station.
You can also delete any unnecessary recorded fi les.
Playing recorded image (and/or sound)
Click 1 on the Main window.
The Play window opens and the list of recorded fi les is
displayed.
When necessary, you can search for the target
2
fi le(s) by designating the period of time and/or the
target station type (by clicking ) to narrow down the
search result.
Select the target station type.
* Only the recorded fi les of the selected station type
are searched for.
Designate the start date of the period of time to search
for fi les recorded in the period.
Designate the end date of the
period of time.
Select the target fi le by clicking it (so that it is
3
highlighted.)
Click 4 on the Play window to start play.
[Play]
*
The snapshot or video is displayed on the Video display
area. If audio has been recorded with the video, the
audio is also played. (If the target station of the recorded
fi le has no camera, only sounds will be played.)
*
You can perform various play operation if desired. See
the next page for details.
NOTES:
•
If you click another recorded fi le during play, play stops.
•
If a call from another station is received during play, play
stops.
•
Under normal play conditions, a snapshot image is usually
displayed for 2 seconds.
•
There may be a fi le to which images and/or sound are not
recorded depending on the communication status at the
recorded time.
•
If a recording is made to an unanswered call and the recorded
fi le has not been played yet, on the Main window blinks.
30
A list of recorded fi les corresponding to the search
•
conditions is displayed. The fi les that have not been
played yet are shown in a different color.
Dates in the recorded fi le list are also displayed.
•
You can display the data in the recorded fi le list
•
in order of station type, station name or date by
clicking “Station number”, “Station name” or “Date”.
Page 31

Play operation list
These operations can also be performed while paused or stopped.
Operation Button Remarks
To play in normal speed (Play) -
To stop play
To stop play temporarily
To play in slow motion
To play at fast speed
To skip to the
beginning of
the desired
fi le (SKIP
SEARCH)
To play from the beginning of fi le
just below the current fi le
To play from the beginning of the
current fi le
When play has fi nished;
When play reaches the end of the recorded fi le, the fi le just below the recorded fi le is automatically played.
(Stop) -
(Pause)
(Slow)
(Fast Forward)
(Next File) -
(Prior File) -
•
While paused, clicking
by one frame whenever clicked.
•
When the play of the fi nal frame of a recorded fi le is
paused, and you click again, the fi rst frame of the
recorded fi le just below the current fi le is displayed.
•
The recorded fi le is played at about one quarter of the
normal speed.
•
If you click
speed. (No sound is output.)
•
The recorded fi le is played at about four times the
normal speed.
•
If you click
play speed. (No sound is output.)
during slow play, it returns to normal play
during fast forward, it returns to normal
moves the recorded images
GETTING STARTED APPENDIX
USING THE PC MASTER STATION
Deleting a recorded fi le
You can delete any unnecessary recorded fi les.
Open the Play window.
1
Select a recorded fi le (so that it is highlighted).
2
Click 3 .
The selected recorded fi le is deleted.
31
Page 32

APPENDIX
TECHNICAL PRECAUTIONS
If you are experiencing diffi culties in the use of the system, please check our web site at http://www.aiphone.net/.•
AVAILABLE CHARACTER LIST
The following are the characters that can be entered with each of the dial keys on the master station for station or zone
names and numbers.
Some characters are available with a key and they are switched whenever the key is pressed.
Dial key
Number Characters
1 1 . -?! '@_/1
2 (ABC) 2 A B C 2
3 (DEF) 3 D E F 3
4 (GHI) 4 G H I 4
5 (JKL) 5 J K L 5
6 (MNO) 6 M N O 6
7 (PQRS) 7 P Q R S 7
8 (TUV) 8 T U V 8
9 (WXYZ) 9 W X Y Z 9
00+$%&();0
#
Characters and number that can be entered with a key
SPECIFICATIONS
Your PC must meet the following system requirements to use the IS-SOFT.
Also refer to the instruction manual supplied with your PC.
Windows XP Home/Professional (SP3) (32bit)
OS
Processor 2 GHz or higher
System memory (RAM) 1 GB RAM or higher
Hard disk 10 MB or more (additional space is needed for recording)
Sound card 8 bit full duplex, Direct Sound compatible
Display
Run-time Microsoft (R).NET Framework 4.0 or later
PC system requirements
Network 10BASE-T/100BASE-TX Ethernet
Protocol TCP/IPv4, UDP/IPv4, SIP, Others
Network bandwidth 320k to 8Mbps
•
The application may not run, or may not operate correctly (such as freezes occurring) on a PC with specifi cations below the necessary
requirements.
•
Serious damage could be caused if an error occurs during door release.
•
We recommend using a PC and DVD drive that exceed the basic system requirements.
Windows Vista Ultimate/Home/Business/Enterprise (SP2) (32/64bit)
Windows 7 Home Premium/Professional/Enterprise/Ultimate (32/64bit)
800 x 600 or higher (x 1)
1024 x 768 or higher (x 2)
1920 x 1200 or higher (x 3)
32
Page 33

http://www.aiphone.net/
AIPHONE CO., LTD., NAGOYA, JAPAN
AIPHONE CORPORATION, BELLEVUE, WA, USA
AIPHONE S.A.S., LISSES-EVRY, FRANCE
 Loading...