

Page 1
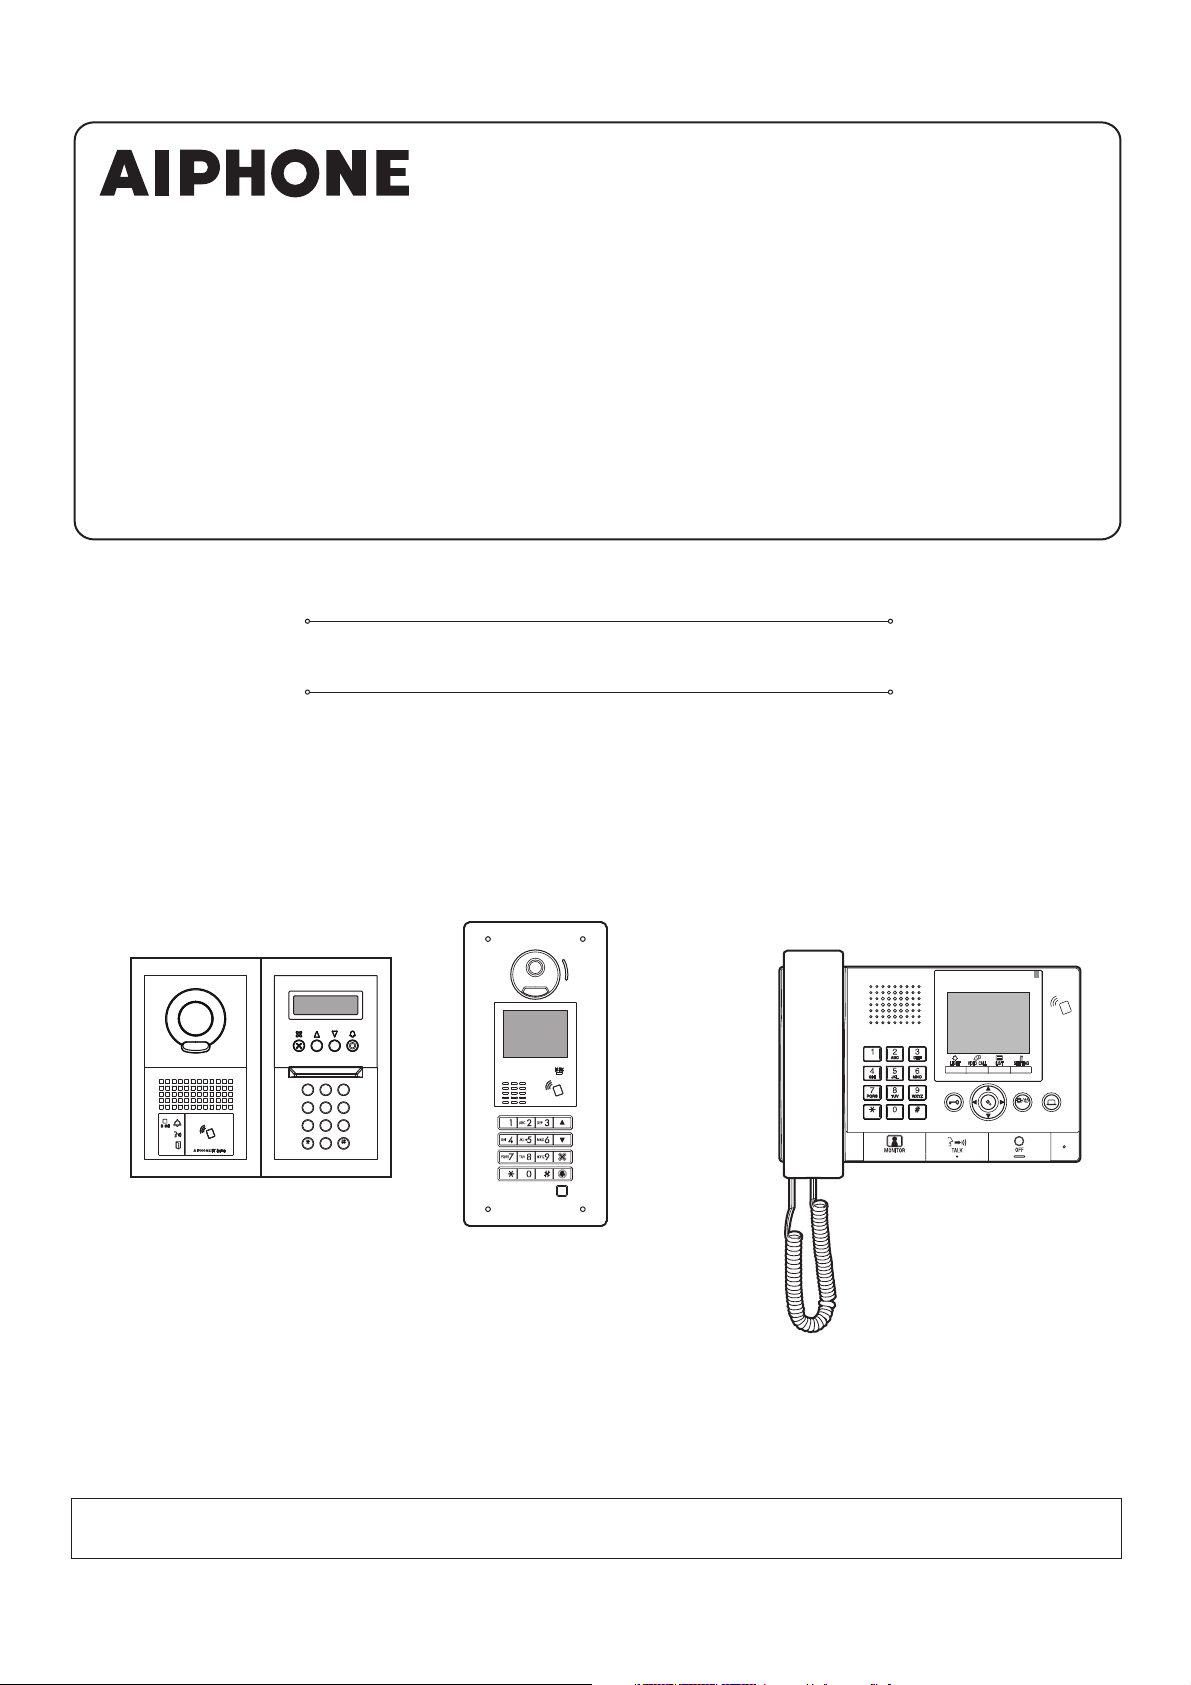
GT SYSTEM
Entrance station (modular type)
Entrance station (all-in-one type)
Guard station
OPERATION MANUAL
Entrance station
(modular type)
2
1
A
C
B
5
4
G
J
I
L
K
H
8
7
P
S
T
V
Q
U
R
0
Entrance station
(all-in-one type)
3
D
F
E
6
M
O
N
9
W
Z
X
Y
Guard station
ZOOM
ADJUST
WIDE
Thank you for selecting Aiphone for your communication needs. Please read this manual carefully before installation, and keep this in a safe
place for future reference.
Please note that images and illustrations depicted in this manual may differ from the actual product.
Page 2

PRECAUTIONS
Prohibited
Do not dismantle unit
WARNING
(Negligence could result in death or serious injury.)
1. Do not dismantle or alter the unit. Fire or electric shock could result.
2. Do not put any metal and fl ammable material into the unit through the
openings. Fire, electric shock, or unit trouble could result.
3. Keep the unit away from water or any other liquid. Fire or electric
shock could result.
4. During an electrical storm, do not touch the unit. Electric shock could
result.
5. If there is any smoke, unusual odor, or abnormal sound, or if you drop
or damage the unit, turn off the system power breaker immediately.
Fire or electric shock could result.
6. Do not use power supply with a voltage other than specifi ed. Fire or
electric shock could result
7. Do not use the unit in/under following locations/conditions. If not
observed, it may result in noises or malfunctions.
• Where use of the unit is prohibited, such as in a hospital
• Near an electric medical equipment (e.g. operating rooms, ICU, or
CCU)
• Near automatic control equipment such as auto doors or fi re-alarm
boxes
• In the area within 15cm from a cardiac pacemaker
CAUTION
(Negligence could result in injury to people or damage to
property.)
1. Do not put anything on or cover the unit with cloth, etc. Fire or unit
trouble could result.
2. Do not apply high pressure on the screen. If fractured, injury could
result.
3. If the LCD is punctured, do not touch the liquid crystal inside.
Infl ammation could result. If contact should occur, fl ush or rinse area
with water thoroughly and consult your doctor.
4. Be sure to perform a call test with the handset on the hook. If you
operate the hook switch with the handset on your ear, a sudden call etc.
may arrive causing damage to your ear.
5. Do not place your ear near the speaker during use. An unexpected loud
sound could cause hearing damage.
6. When cleaning the wall with a high-pressure water sprayer, be careful
not to spray on the entrance station. If not observed, it may result in fi re
or electric shock.
Keep unit away from water
Be sure to follow the instruction
Notice
• We will under no conditions be liable for any damages or losses resulting
from this product's contents or specifi cations.
• We will under no conditions be liable for damage occurring due to the
inability to communicate due to malfunctions, problems, or operational
errors in this product.
• The unit is inoperative during power failure.
• This system is not intended for life support or crime prevention. It is just a
supplementary means of conveying information. Aiphone will under no
conditions be liable for loss of life or property which occurs while the
system is being operated.
• In areas where broadcasting station antennas are close by, this system may
be affected by radio frequency interference.
• Please note the LCD panel, though manufactured with very high precision
techniques, inevitably will have a very small portion of its image elements
always lit or not lit at all. This is not considered a unit malfunction.
• The unit may get slightly warm, but this is not a malfunction.
• During communication, if you speak before the other person has fi nished
talking, your voice may not come through clearly. Conversation will
proceed smoothly if you speak when the other person has fi nished talking.
• The entrance station is intended to be mounted on a wall only. It cannot be
used on a desktop.
• Available functions and services are limited according to the specifi cations
of the installed system.
• If you speak in a fi xed tone, the noise-cut function may judge it to be a
noise and cut the transmission, but this is not a malfunction.
• Using a mobile phone or professional-use radio equipment such as walkietalkie close to the system may cause a malfunction.
• Warm-color lighting shining on the camera may change the tint of the
image on the screen.
• The outline of video images displayed may differ from that of the actual
person(s) or background, but this is not a malfunction.
• When the unit’s screen is illuminated with strong light, the image looks
white or silhouetted. But this is not a unit trouble.
• When outside temperature lowers sharply after rainfall, etc., the inside of
the camera may fog up slightly, causing a blurry images, but this is not a
malfunction. Normal operation will be restored when moisture evaporates.
• When using a fl uorescent light that shines around the camera, the screen
colors may variously change (color rolling), but it is not a malfunction.
• If the entrance station freezes during winter time, the picture may become
diffi cult to see or the buttons of the entrance station may not operate.
General Precautions
1. Keep the unit more than 1 m (3.3') away from radio or TV set.
2. Keep more than 20 cm (7-7/8") away from other radio equipment, for
example fl oor heating controller, wireless router or cordless telephone,
etc. It may cause unwanted noise and video distortion.
3. Talk within 30 cm (12'') from this unit. If you are too far away, it may be
diffi cult to hear audio.
4. When installing and using this unit, protect subject's privacy, portrait
rights, etc. on your own responsibility.
5. As to other manufacturer's devices (such as sensor, detectors, door
releases) used with this system, comply with the Specifi cations and
Warranty conditions that the manufacturers or venders present.
6. Avoid using this unit in places under direct sunlight. If it is unavoidable,
block out light during use.
7. When putting a hearing aid into T-mode and approaching the unit, the
intercom system may be affected by radio frequency interference etc.,
depending on the installation environment.
8. Please receive and retain all confi guration data from the supplier. If you
lose the confi guration data, there are cases where maintenance and
after-sales service calls may incur additional setup fees.
10. The area to be monitored by the sensor should be free of obstacles such as
ornamental plants.
- 2 -
Page 3

Table of Contents
PRECAUTIONS ...........................................................2
READ THIS BEFORE USING THE STATIONS
1 SYSTEM CONFIGURATION ........................................ 4
2 NOTES ABOUT USING THIS MANUAL .................... 5
ENTRANCE STATION
1 PART NAMES AND FUNCTIONS ............................... 6
1-1 Entrance station (modular type) ................................. 6
1-2 Entrance station (all-in-one type) ............................... 7
1-3 Indicators .................................................................... 8
2 OPERATIONS ................................................................. 9
2-1 Calling a resident/tenant or guard station .................. 9
Calling with the call switch module....................... 9
Calling with the name scrolling module ................ 9
Calling with the 10 key module ........................... 10
Calling with the all-in-one type entrance station
(GT-DMB-LVN/GT-DMB-N) .............................. 12
2-2 Door release ............................................................. 16
2-3 Other ........................................................................ 16
7 OTHER OPERATIONS ................................................ 45
7-1 Checking for missed calls and calling back .............45
7-2 Receiving an emergency call ................................... 46
8 SETTING........................................................................ 48
8-1 Adjusting display brightness and volumes ............... 48
8-2 Switching to reception mode ................................... 50
8-3 Switching to program mode ..................................... 51
9 UPDATING RESIDENT INFORMATION .................. 52
FOR PROPER USE OF THIS STATION
1 TECHNICAL PRECAUTIONS .................................... 53
2 SPECIFICATIONS ........................................................ 54
3 SOFTWARE LICENSE ................................................56
4 REGULATIONS ............................................................ 57
5 WARRANTY ..................................................................58
GUARD STATION
1 PART NAMES AND FUNCTIONS ............................. 17
1-1 Operation panel ........................................................17
1-2 Indicators .................................................................. 18
1-3 LCD (display) .......................................................... 19
1-4 Button operations ..................................................... 20
2 RECEIVING A CALL ................................................... 22
2-1 Receiving a call ........................................................ 22
3 CALLING (from a tenant building) ......................... 23
3-1 How to search for a unit to call
(from a tenant building) ........................................... 23
3-2 Calling a unit (residential/tenant station)
or guard station ........................................................ 24
3-3 Calling an entrance station ....................................... 29
4 CALLING (from a main building) ............................ 31
4-1 How to select a unit to call
(from a main building) ............................................. 31
4-2 Calling a room (residential/tenant station)
or guard station ........................................................ 32
4-3 Calling an entrance station ....................................... 37
5 OPERATIONS DURING COMMUNICATION .......... 39
5-1 Transferring a call .................................................... 39
5-2 Door release ............................................................. 39
5-3 Operating an optional device ................................... 40
5-4 Viewing and adjusting video at an entrance
station ....................................................................... 41
6 MONITORING ............................................................... 43
- 3 -
Page 4
READ THIS BEFORE USING THE STATIONS
1
SYSTEM CONFIGURATION
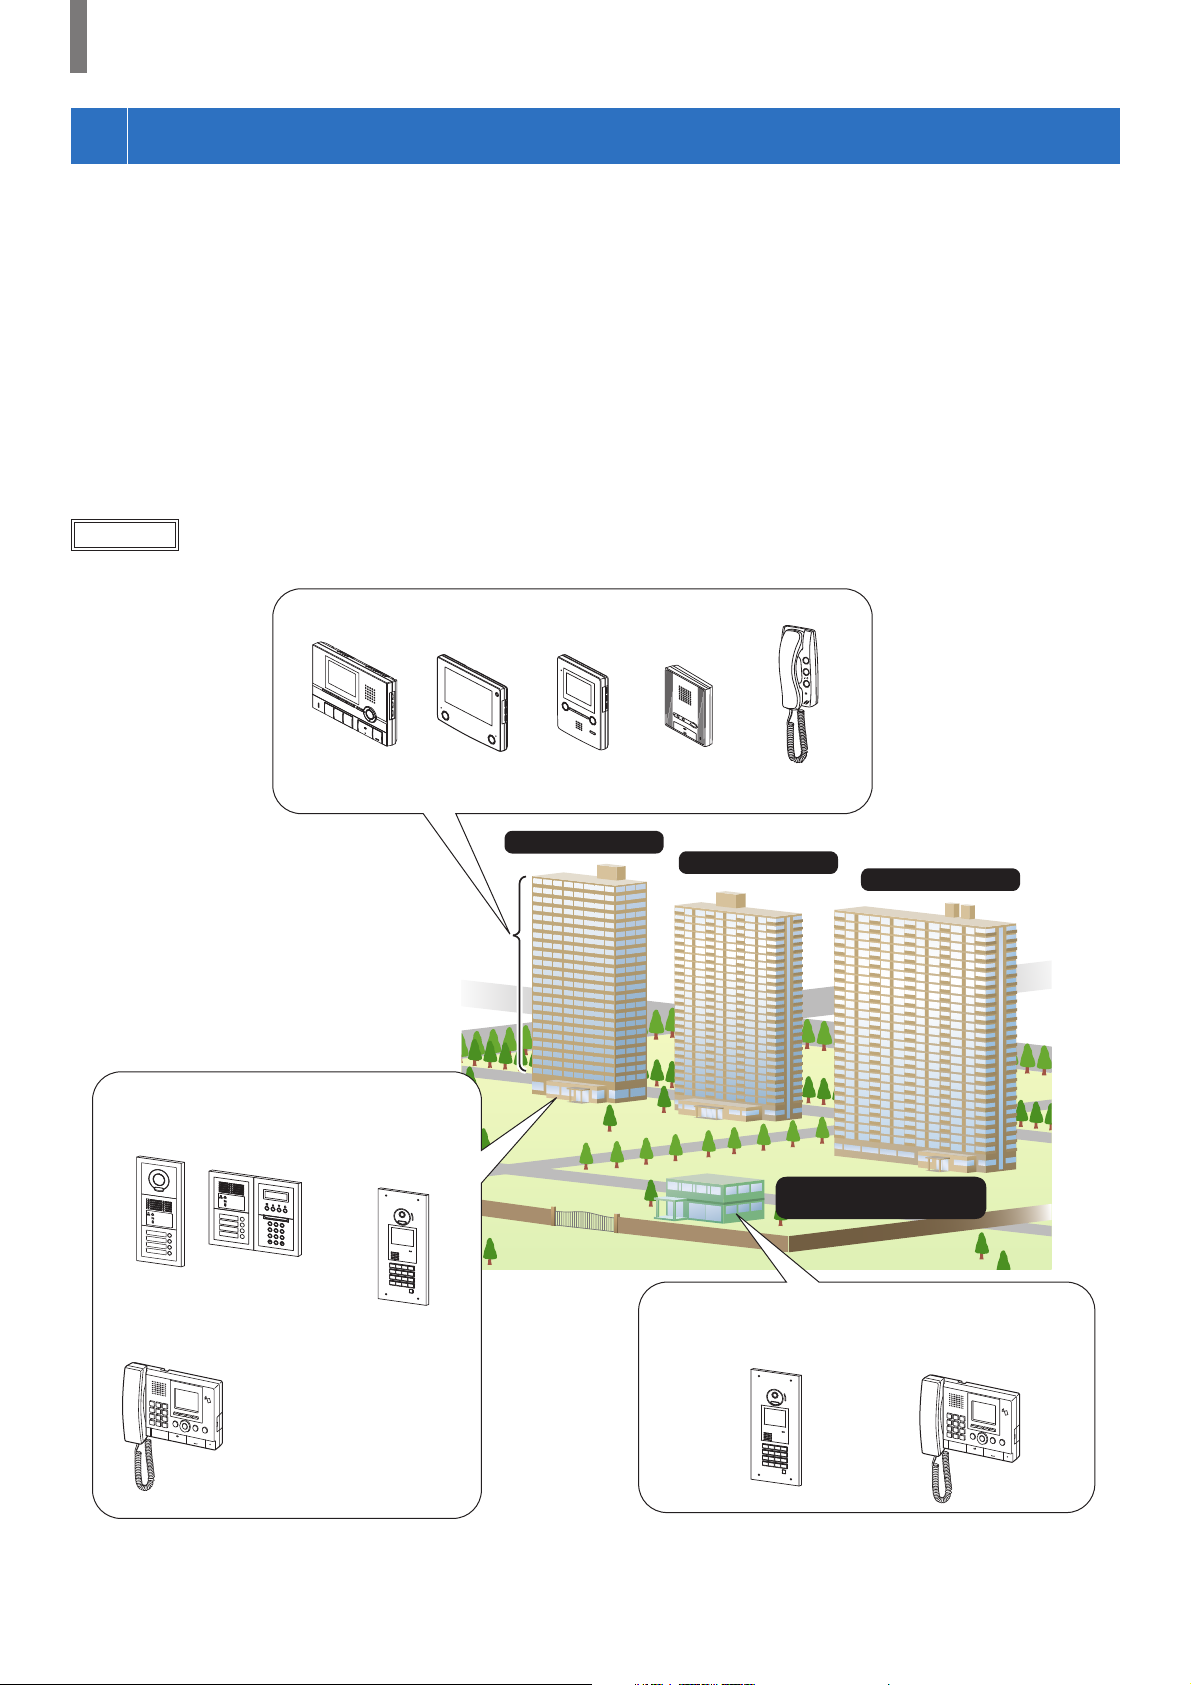
The GT system consists of up to 8 main buildings and 24 tenant buildings.
Main building:
A control section that functions as a main entrance, guard station, security center, administration offi ce, etc. A main building includes no
residential/tenant stations. You can call up all of the residential/tenant stations and guard stations from an entrance station or guard station in the
same system (site).
* A station that is not programmed cannot be called.
* Modular type entrance stations cannot be installed in a main building. Only all-in-one type can be used.
Tenant building:
A section of collective housing. A tenant building includes residential/tenant stations, entrance stations and guard stations. You can call up all of
the residential/tenant stations and guard stations from an entrance station in the same tenant building. However, you cannot call stations in
another tenant building.
Example
: A system (site) consisting of 1 main and 3 tenant buildings
Residential/tenant stations
Entrance station
(modular type)
GT-2C-L/GT-2C
(GT-2H-L/GT-2H)
1
2
A
3
C
D
B
F
E
4
G
5
I
J
H
6
L
M
K
O
N
P
7
8
S
T
W
Q
R
9
V
U
Z
X
Y
0
Guard station
GT-MKB-N
GT-1C7-L/
GT-1C7
Entrance station
(all-in-one type)
GT-DMB-LVN/
GT-DMB-N
GT-1M3-L/
GT-1M3
Tenant building
GT-1A
GT-1D
Tenant building
Entrance station
(all-in-one type only)
GT-DMB-LVN/
GT-DMB-N
Tenant building
Main building
(administration offi ce)
Guard station
GT-MKB-N
- 4 -
Page 5
READ THIS BEFORE USING THE STATIONS
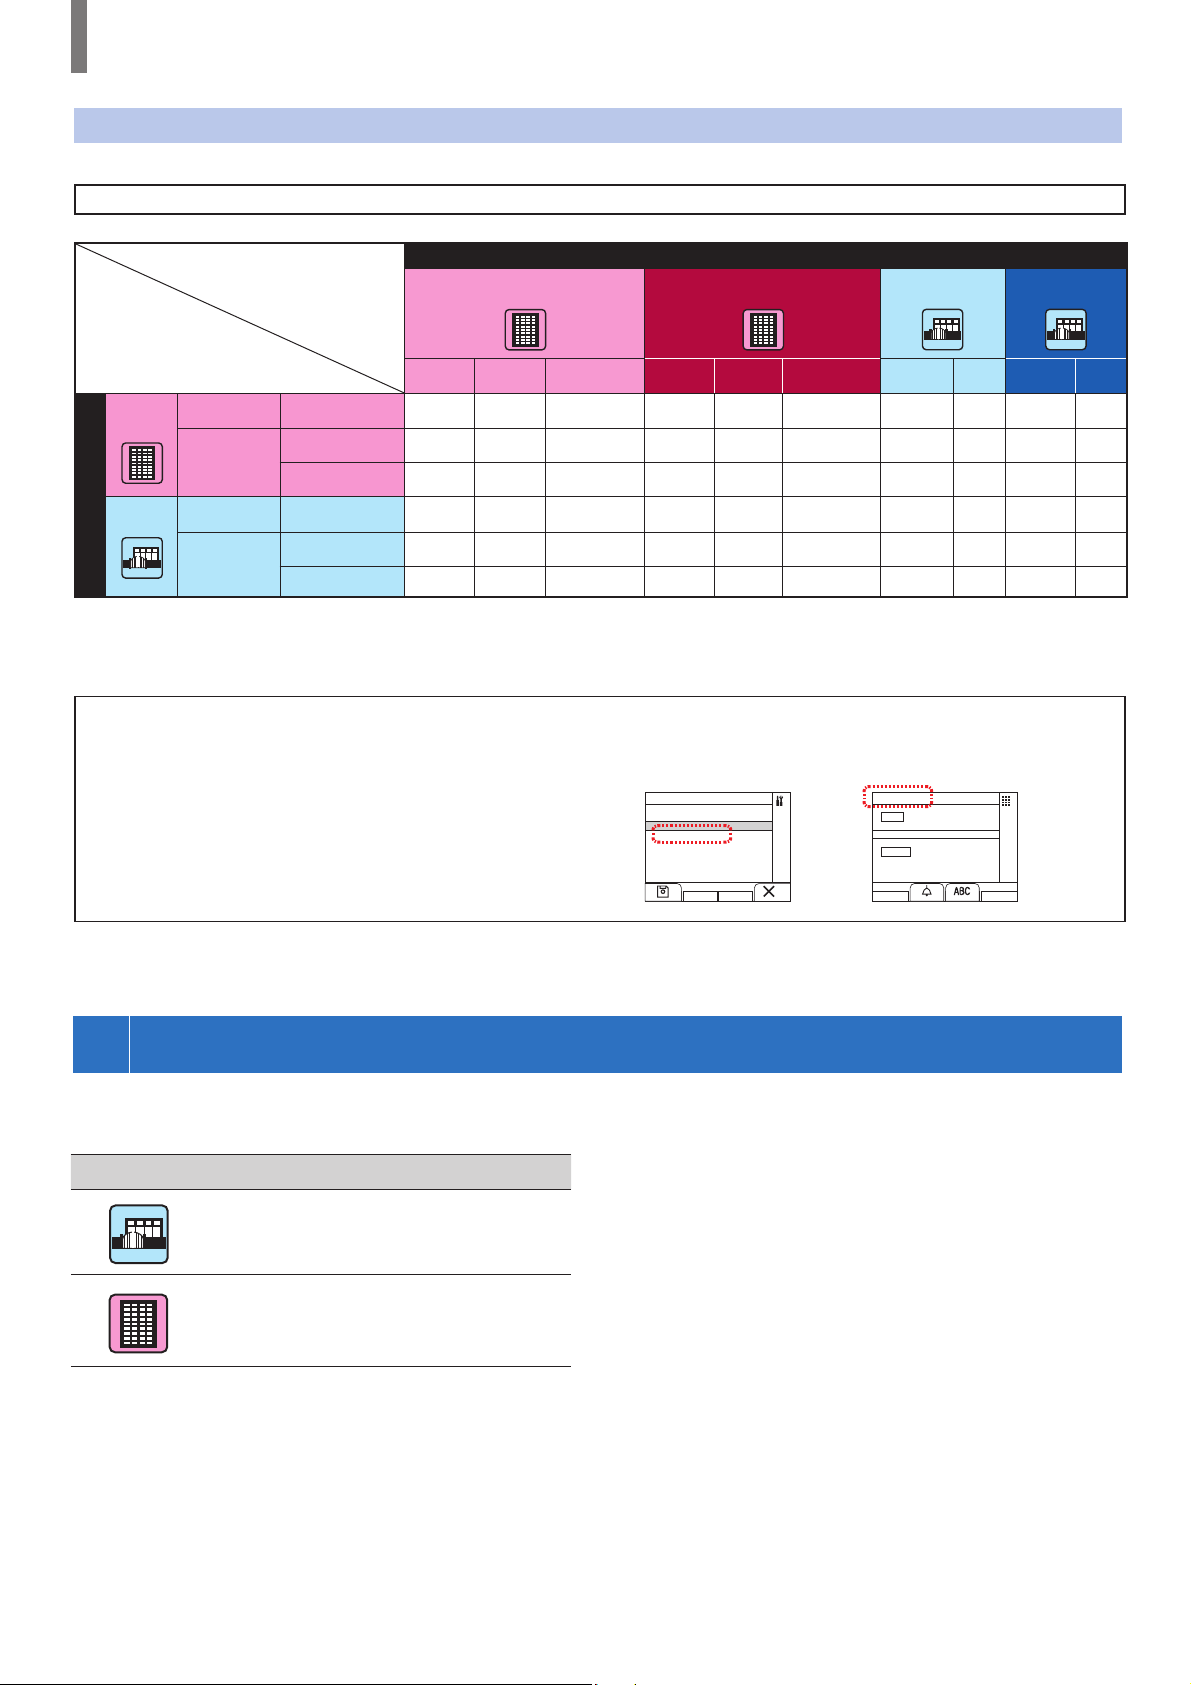
Coverage of calling, communication and monitoring
The following table shows the coverage of calling, communication, and monitoring from a tenant building and a main building.
NOTE: Performance depends on the settings. If you cannot call even when ✓ is indicated, its setting is not confi gured.
Incoming call
Same tenant building Other tenant buildings Same main
building
Other main
buildings
Tenant
building
Main
building
Outgoing call
✓ : Possible — : Impossible
Entrance st. Calling/
Guard st. Calling/
Entrance st. Calling/
Guard st. Calling/
communication
communication
Monitoring
communication
communication
Monitoring
Entrance
st.
Guard
st.
-
✓✓ ✓
✓
-
✓✓ ✓ ✓✓ ✓ ✓✓✓✓
✓
✓✓
---------
✓✓
--
About the term "building" and "section":
The term "section" is used on the setting screens of entrance
stations and guard stations instead of "building".
"Section" and "building" have the same meaning in this manual.
Residential/
tenant st.
e.g. e.g.
Entrance
st.
Guard
st.
Residential/
tenant st.
Entrance
st.
Guard
st.
Entrance
st.
-- - ----
-- -
-
✓
Setting screen of
guard station
CALLING METHOD
NAME / # SEARCH
SECT LIST+UNIT #
UNIT NUMBER
SECT # + UNIT #
✓✓
--
Standby screen of
guard station
✓✓✓✓
✓
-
✓
BUILDING #
01
UNIT #
1
✓
-
Guard
st.
✓
-
-
2
NOTES ABOUT USING THIS MANUAL
This manual describes how to use the entrance stations and guard stations. The use of them differs depending on the building/section (main or
tenant) where they belong. This manual uses the following icons to separate descriptions for the main and tenant buildings.
Icon Meaning
Main building/section
Tenant building/section
- 5 -
Page 6
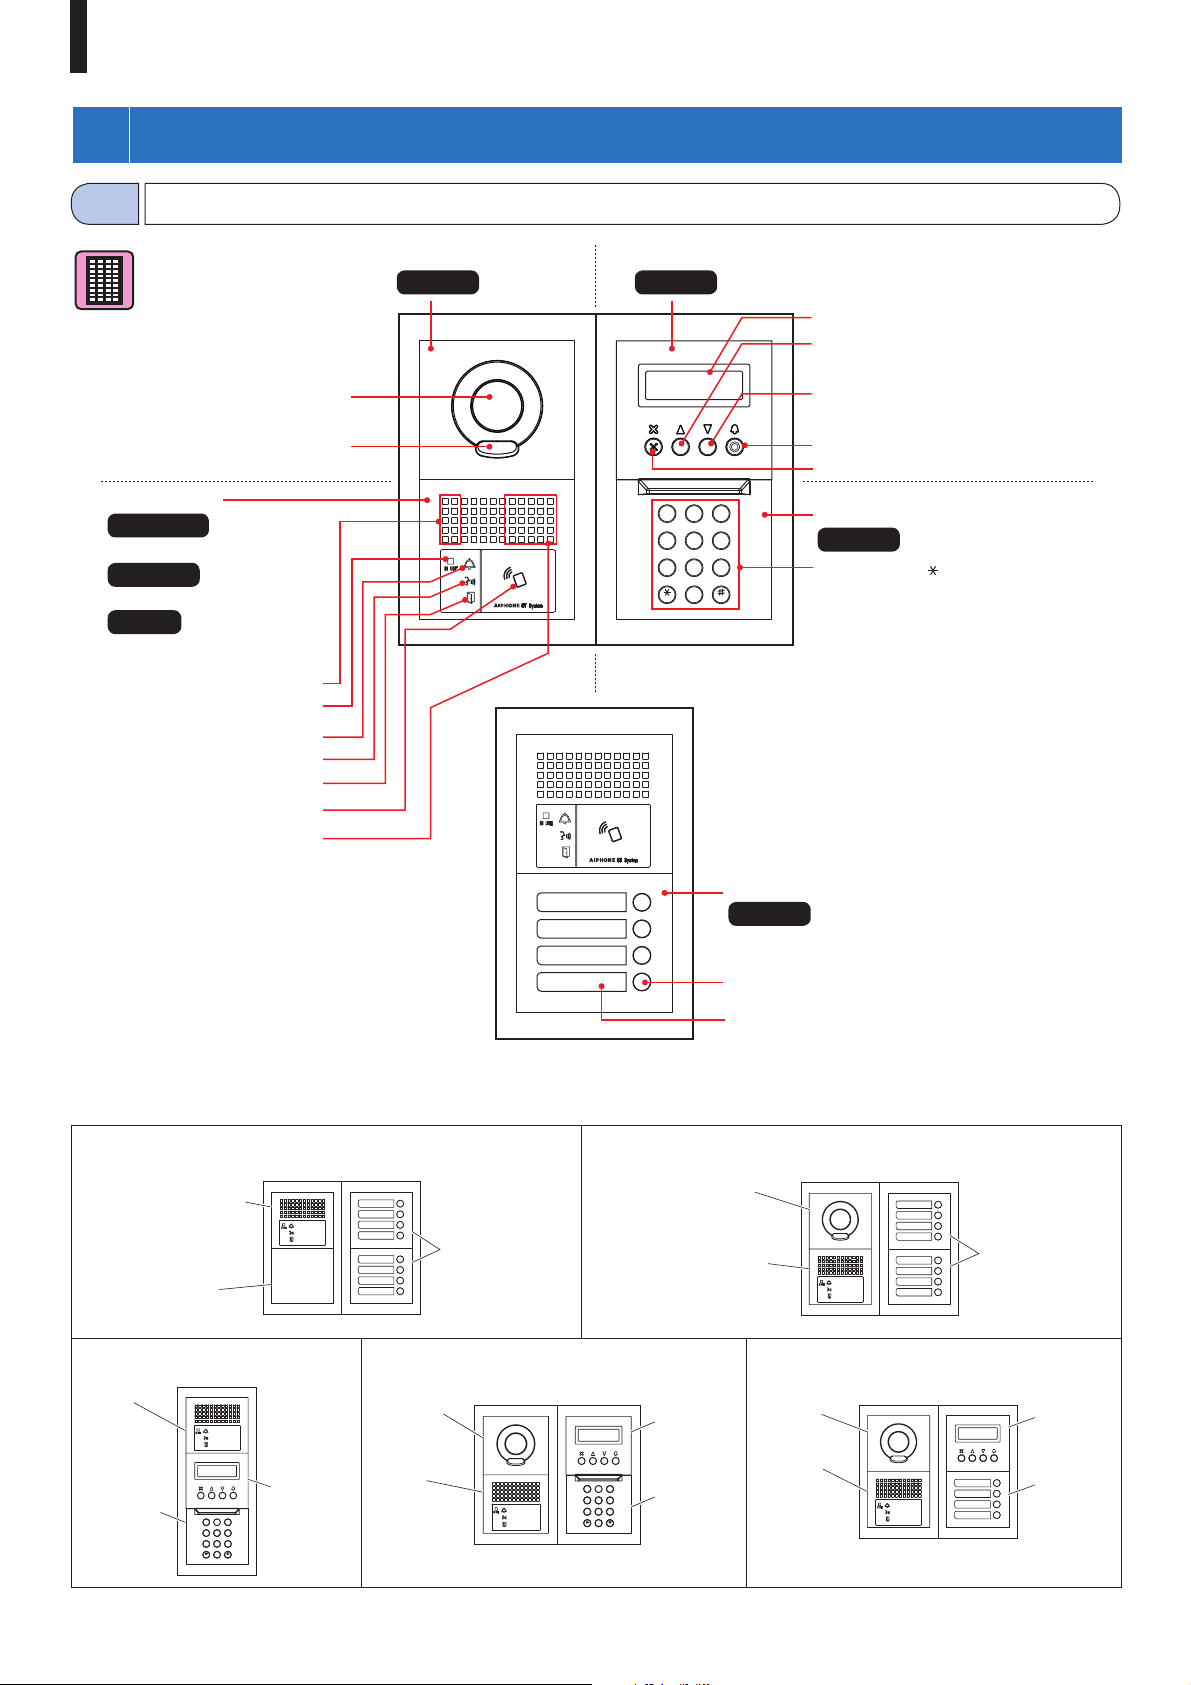
ENTRANCE STATION
1
1-1
PART NAMES AND FUNCTIONS
Entrance station (modular type)
Illuminator LED
Audio module
GT-DB-VN
(VIGIK and NFC capable)
GT-DB-V
(VIGIK capable)
GT-DB
Microphone
IN USE LED (orange)
Call indicator (orange)
Talk indicator (orange)
Door release indicator (green)
NFC reader
Camera
Speaker
Camera module
GT-VB
Name scrolling module
GT-NSB
2
3
1
D
A
F
C
B
E
5
4
6
M
G
J
I
L
O
K
H
N
W
8
9
7
P
Q
Z
S
T
V
X
U
Y
R
0
Display
Back search button
(or move the cursor to the left)
Forward search button
(or move the cursor to the right)
Call button (or set and move forward)
Cancel button (or back)
10 key module
GT-10K
10-key (0 to 9,
, #)
[Combination examples]
Audio only, Direct select type (8 stations)
GT-DB(-V, -VN) +
GT-DBP
GF-BP
Audio only, 10 key type
GT-DB
(-V, -VN) +
GT-DBP
GT-NSB +
GT-10K +
GF-10KP
1
A
4
G
J
I
H
7
P
S
T
Q
R
2
B
5
K
8
U
0
C
L
V
3
D
F
E
6
M
O
N
9
W
Z
X
Y
GT-NSP-L
GT-VB +
GT-VP
GT-DB
(-V,-VN) +
GT-DBP
GT-SW +
GF-4P
Audio/video, 10 key type
2
3
1
A
D
F
C
B
E
5
4
6
M
G
J
I
L
O
K
H
N
8
9
7
W
P
Z
S
T
Q
V
X
U
Y
R
0
Call switch module
GT-SW
Call button
Directory card
Audio/video, Direct select type (8 stations)
GT-VB +
GT-VP
GT-DB(-V, -VN) +
GT-DBP
GT-NSB +
GT-NSP-L
GT-10K +
GF-10KP
GT-VB +
GT-VP
GT-DB
(-V, -VN) +
GT-DBP
GT-SW +
GF-4P
Audio/video, Direct select type
GT-NSB +
GT-NSP-L
GT-SW +
GF-4P
- 6 -
Page 7
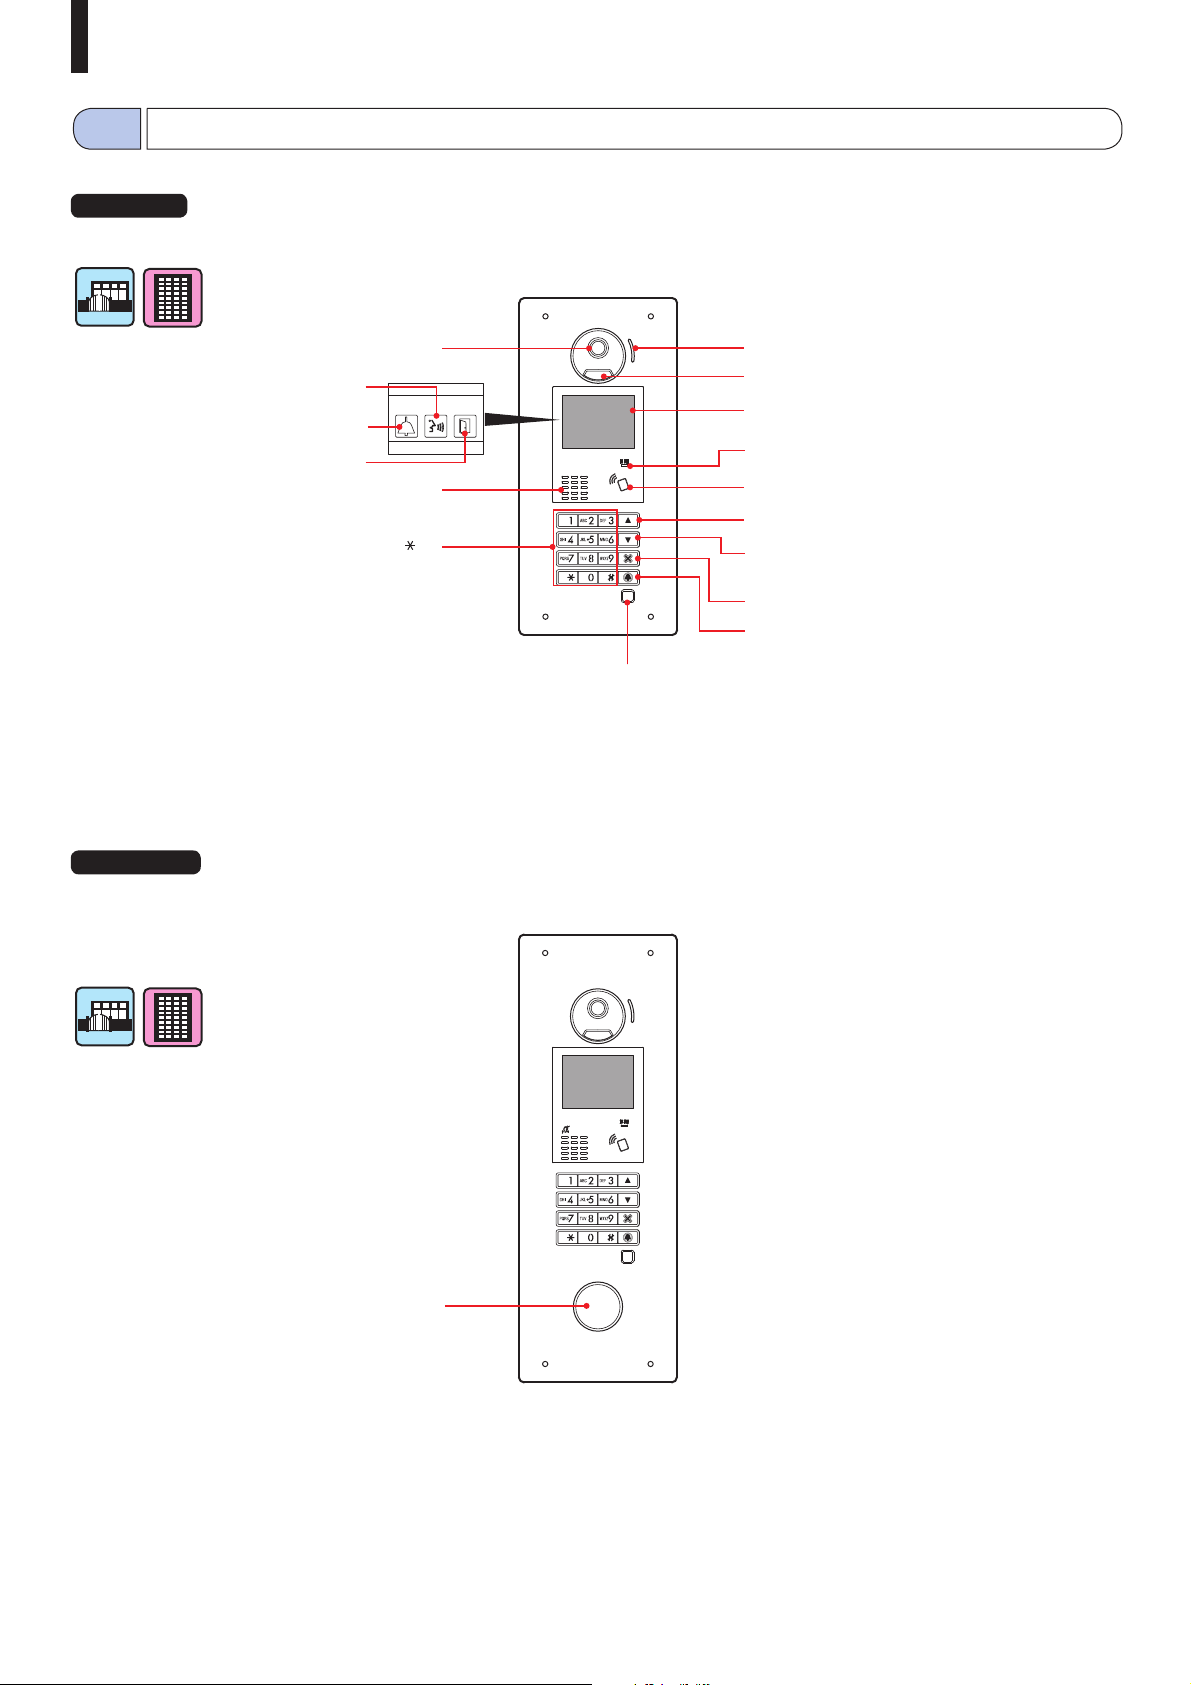
ENTRANCE STATION
1-2
Entrance station (all-in-one type)
All-in-one entrance station
GT-DMB-N
(NFC capable)
Talk indicator (orange)
Call indicator (orange)
Door release indicator (green)
Camera
Speaker
10-key (0 to 9, , #)
Microphone
Illuminator LED
Display
IN USE LED (orange)
NFC reader
Back search button (or move cursor to the left)
Forward search button
(or move cursor to the right)
Cancel button (or back)
Call button (or set and move forward)
Sensor
(If the sensor detects an object, the display will be illuminated.)
All-in-one entrance station
GT-DMB-LVN
(VIGIK and NFC capable, Hearing aid compatible)
Each part and indicator are the same as GT-DMB-N
except as shown below (VIGIK).
VIGIK (available in France)
- 7 -
Page 8
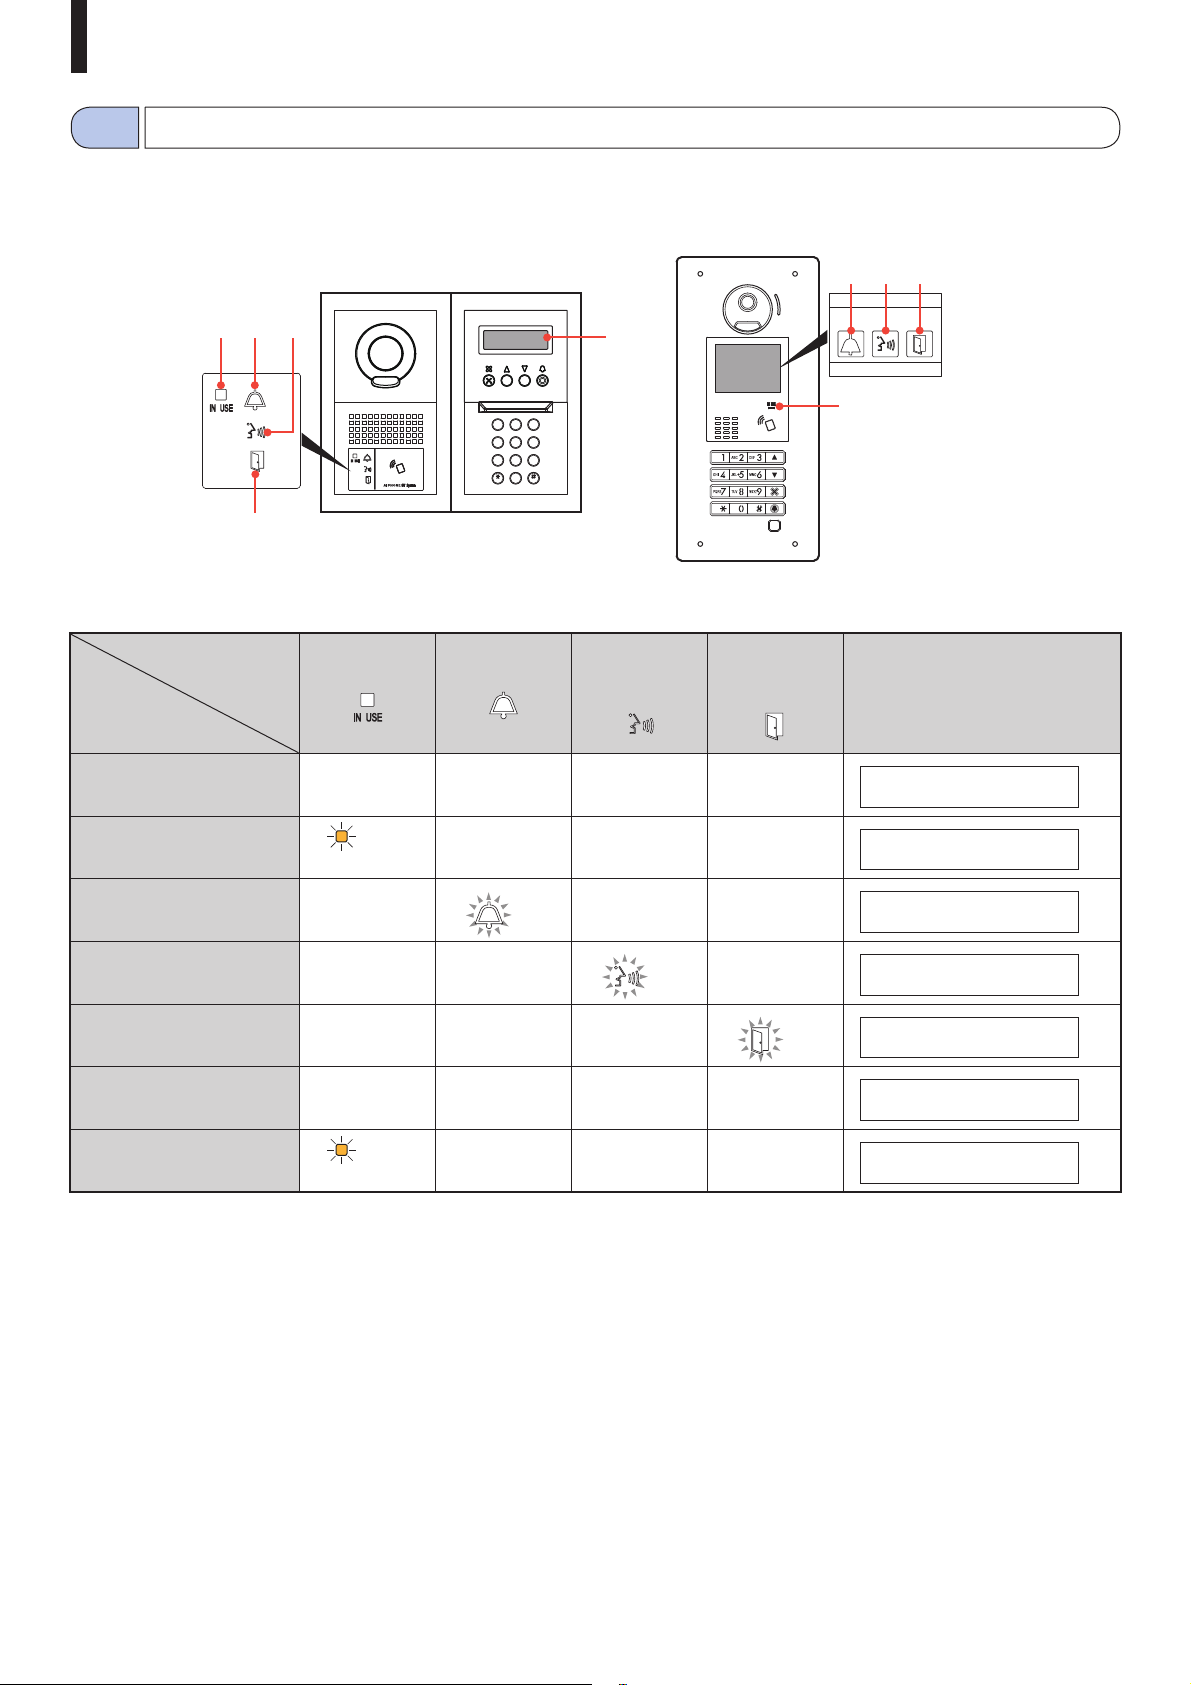
ENTRANCE STATION
1-3
Indicators
122
Indication patterns
Indicator
Status
3
4
Entrance station (modular type) Entrance station (all-in-one type)
34
5
1
5 Display
1 IN USE LED
(orange)
2 Call
indicator
2
3
1
A
D
F
C
B
E
5
4
6
M
G
J
I
L
O
K
H
N
8
9
7
W
P
Z
S
T
V
Q
X
U
Y
R
0
3 Talk
indicator
4 Door
release
indicator
Standby Off Off Off Off
System in use
Lit
Call Off
Communication Off Off
Releasing a door Off Off
Off Off Off
Lit
Off Off
Lit
(*1)
Off
(*2)
Monitoring Off Off Off Off
Communication is on hold
Lit
(*1): Lit when door release is activated during call.
(*2): Lit when door release is activated during communication.
(*3): The display differs depending on the settings.
Off Off Off
Off
Lit
(*1)
(*2)
W E L C O M E
I N U S E
C A L L I N G
S M I T H
I N C O M M U N I C A T I O N
D O O R O P E N
W E L C O M E
O N H O L D
(*3)
(*3)
- 8 -
Page 9
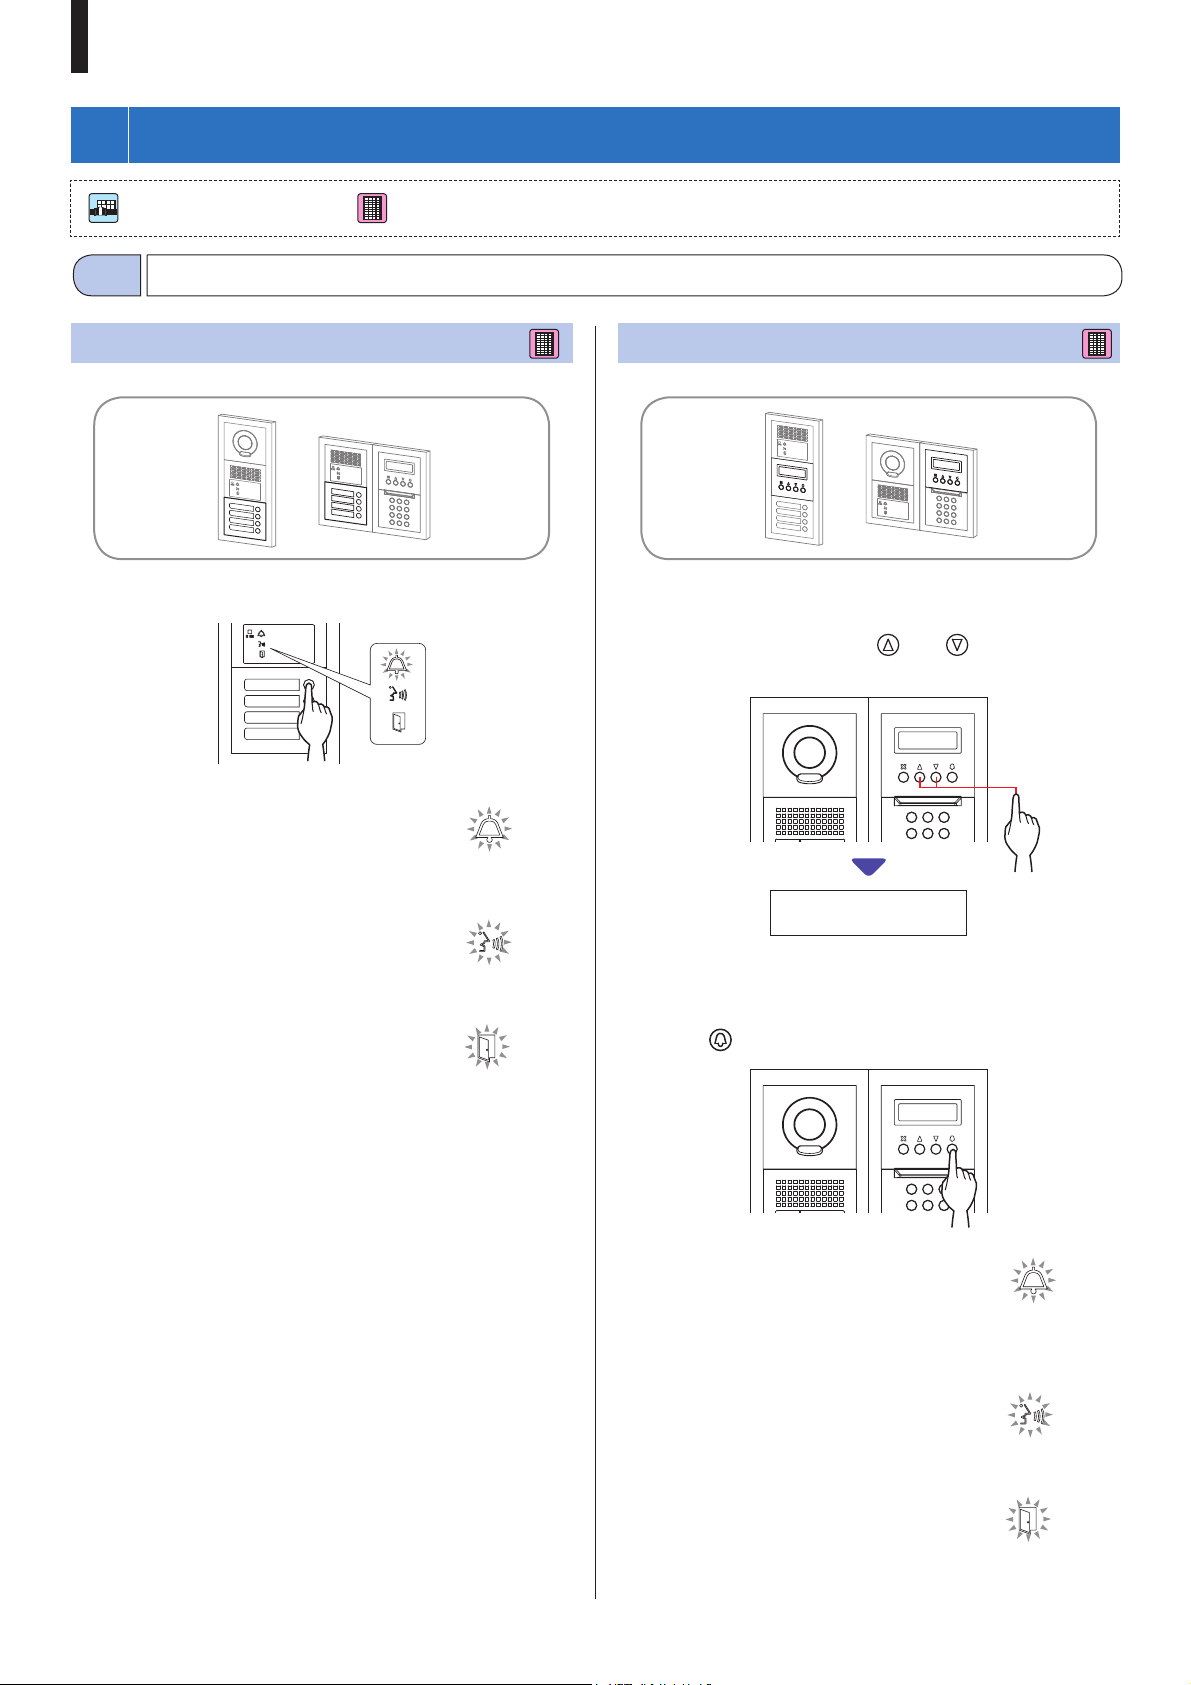
ENTRANCE STATION
2
OPERATIONS
: Main building/section : Tenant building/section
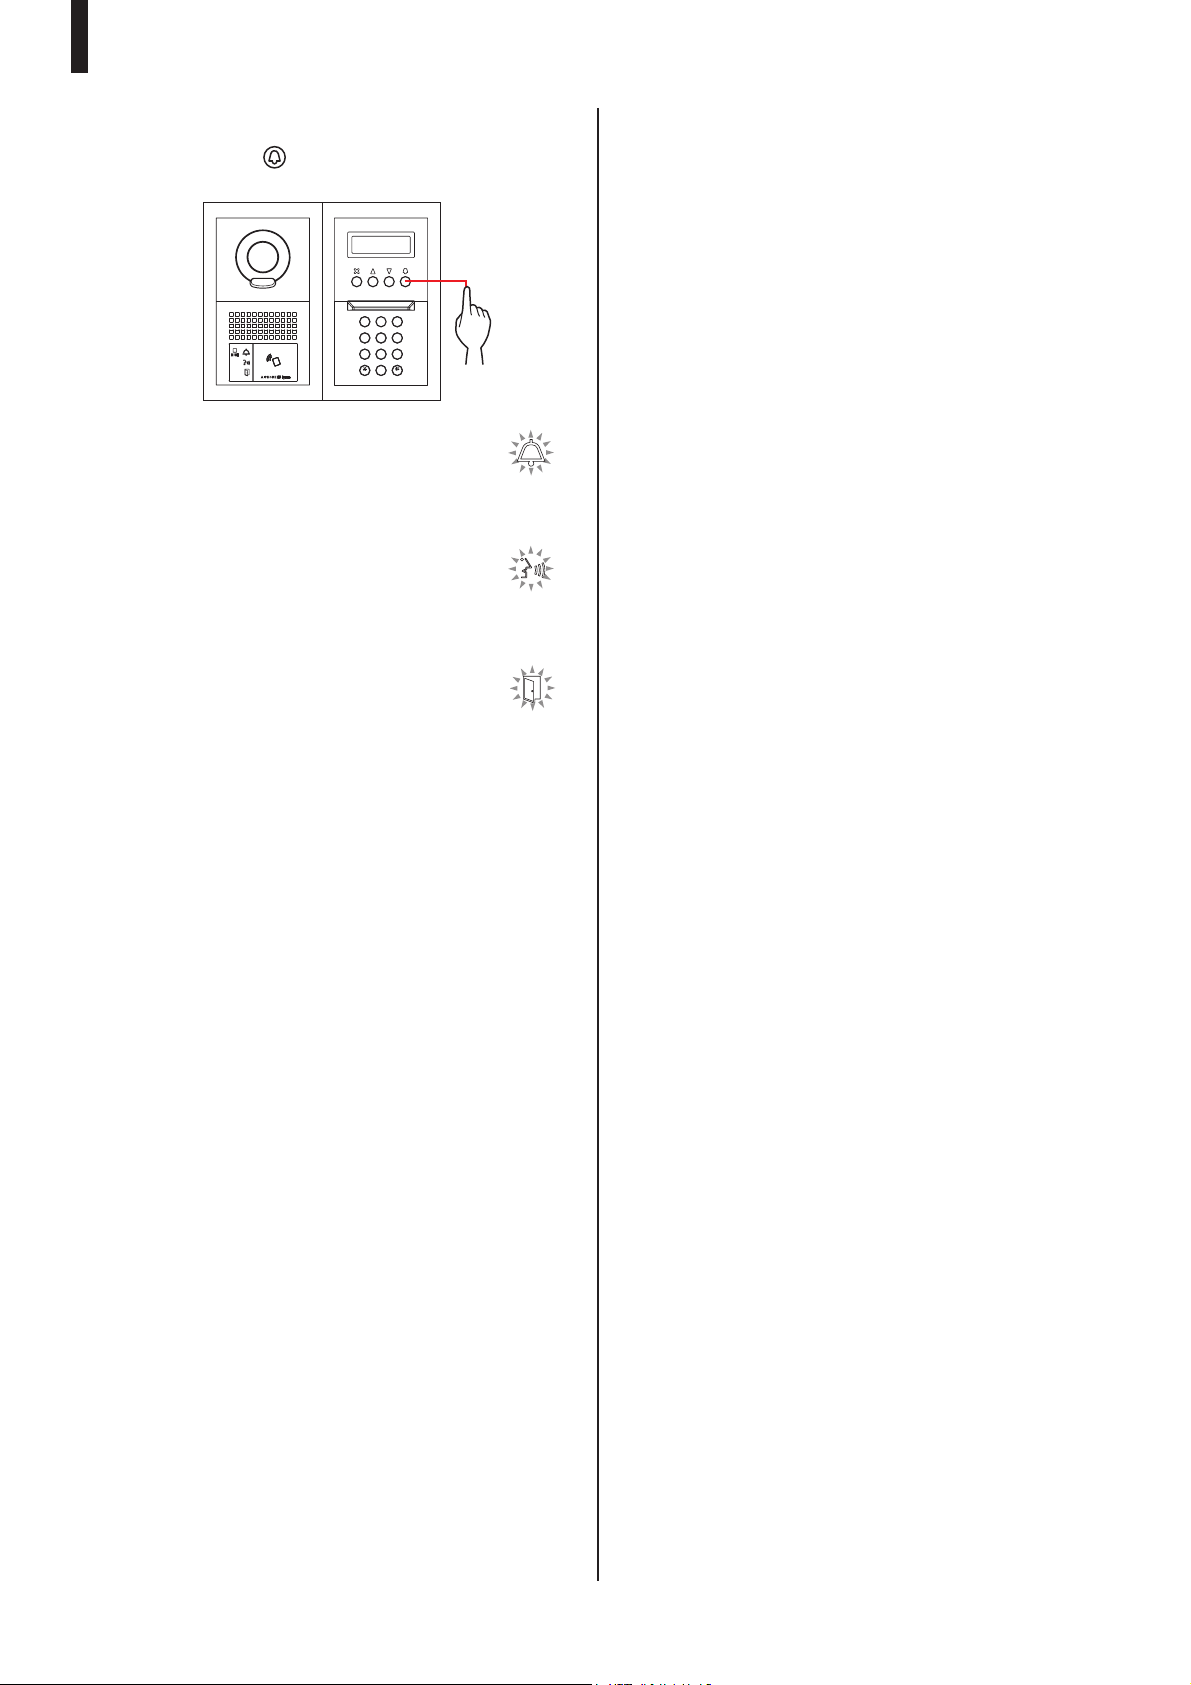
2-1
Calling a resident/tenant or guard station
Calling with the call switch module
1 Press the call button for the unit to be called.
Calling with the name scrolling module
■ Searching for a unit by scrolling the list
1 In standby mode, press and to display the
target unit # and resident name.
The call indicator will light up and you will hear
a call tone.
* Audio guidance will be heard depending on
the settings.
When the call is answered
Communication starts and the talk indicator
lights up.
* Audio guidance will be heard depending on the settings.
When the door is released
The door release indicator lights up.
* Audio guidance will be heard depending on the settings.
2
3
1
A
D
F
C
B
E
5
4
6
M
G
J
I
L
O
K
H
N
101
SMITH
* Depending on the settings, only the resident name may be
displayed.
* The list is displayed in order of either unit # or resident name.
2 Press .
2
3
1
A
D
F
C
B
E
5
4
6
M
G
J
I
L
O
K
H
N
The call indicator will light up and you will hear
a call tone.
* Audio guidance will be heard depending on
the settings.
When the call is answered
Communication starts and the talk indicator
lights up.
* Audio guidance will be heard depending on the settings.
- 9 -
When the door is released
The door release indicator lights up.
* Audio guidance will be heard depending on the settings.
Page 10
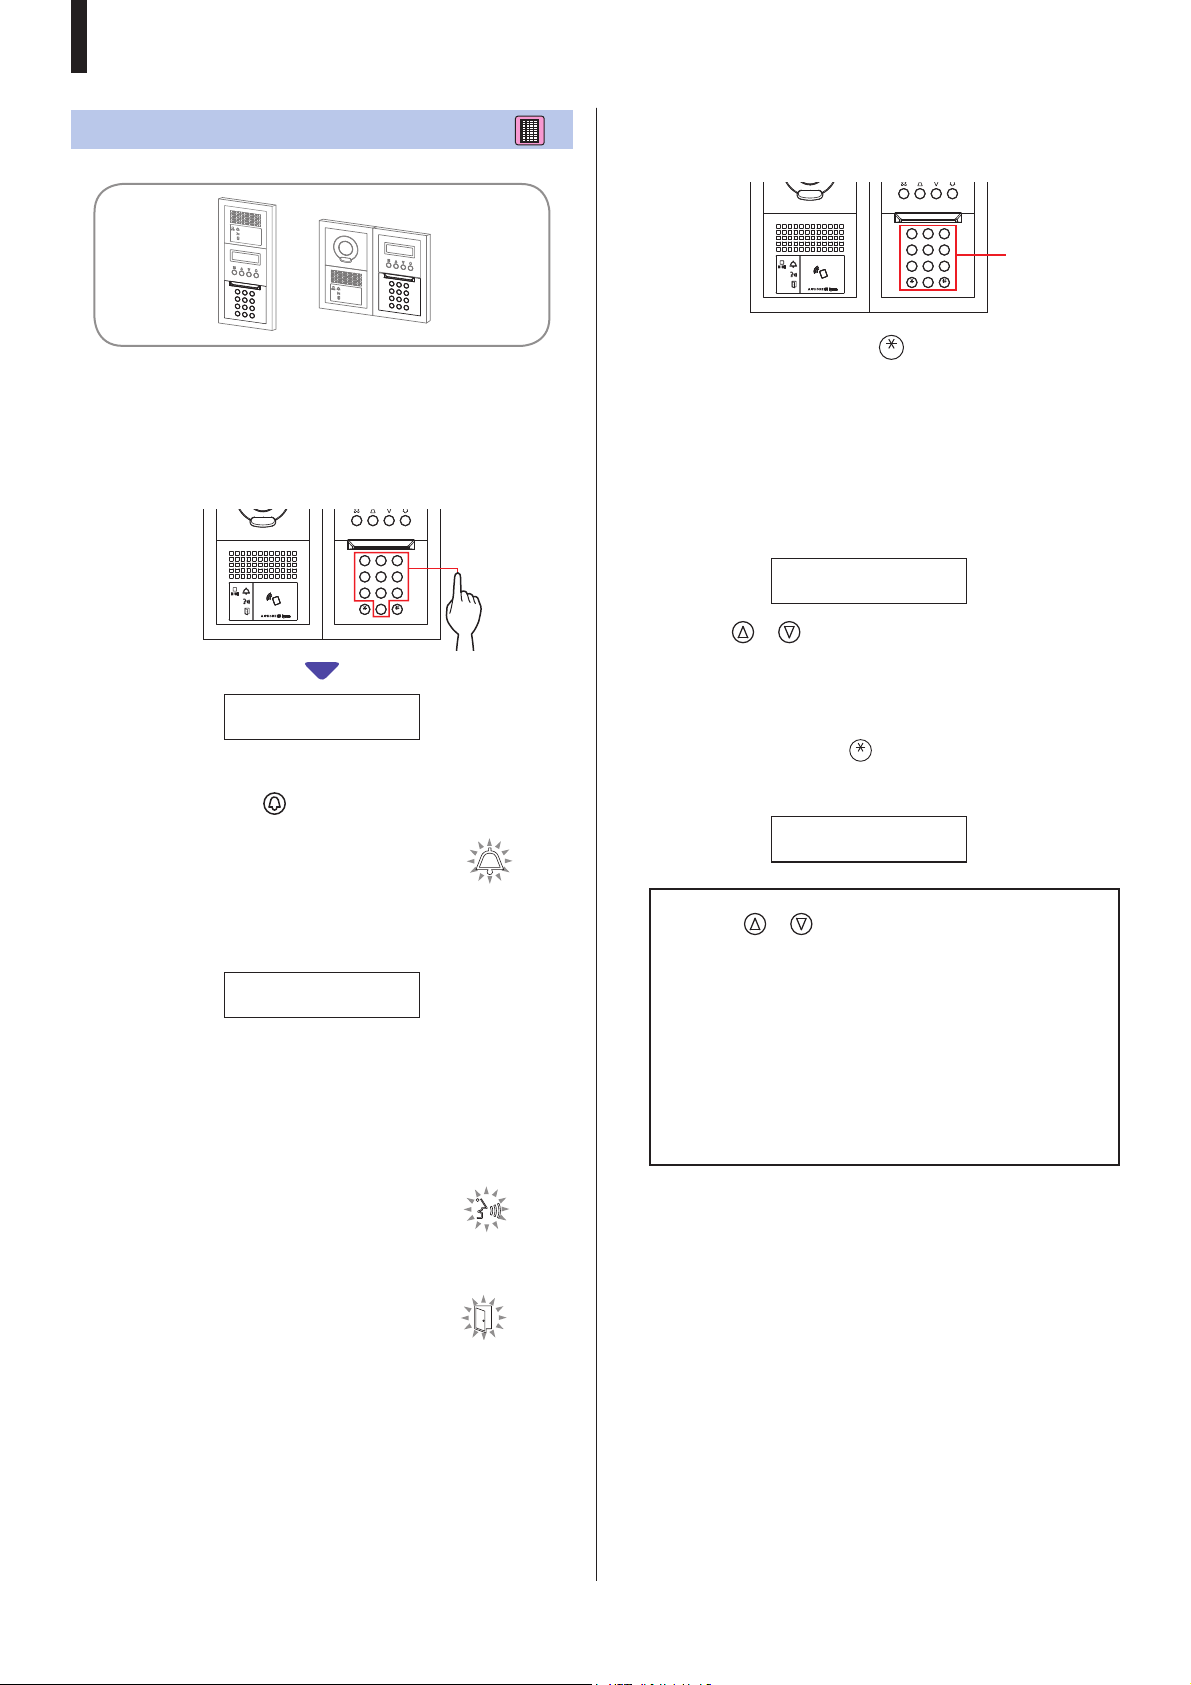
ENTRANCE STATION
Calling with the 10 key module
■ Searching for a unit by entering the unit #
1 In standby mode, enter the numbers using [0] to
[9] on the 10-key to display the target unit # and
resident name.
2
3
1
A
D
F
C
B
E
5
4
6
M
G
J
I
L
O
K
H
N
8
9
7
W
P
Z
S
T
Q
V
X
U
Y
R
0
101
SMITH
2 When the target unit # and resident name is
displayed, press .
The call indicator will light up and you will hear
a call tone.
* Audio guidance will be heard depending on
the settings.
* If there is no relevant unit #, "NO ENTRY" is displayed.
NO ENTRY
* When the residential/tenant station that has been called is in
use, the IN USE LED lights up to indicate that the residential/
tenant station cannot be called.
(In an expanded system, there may be a case that a residential/
tenant station cannot be called even if the IN USE LED is off.)
■ Searching for a unit by entering resident
name
2
3
1
A
D
F
C
B
E
5
4
6
M
G
J
I
L
O
K
H
N
8
9
7
W
P
Z
S
T
Q
V
X
U
Y
R
0
10-key
1 In standby mode, press on the 10-key.
2 When "ENTER A LETTER" is displayed, enter a
letter using the 10-key to display the target unit #
and resident name.
The number and resident name for the unit whose initial
corresponds to the entered letter will be displayed.
(e.g.) Enter "S".
101
SMITH
* Pressing or searches for the next unit # and resident
name.
* Depending on the settings, only the resident name may be
displayed.
* When the unit # is set to not be displayed, a letter can be
entered without pressing
* If there is no relevant resident name, "NO ENTRY" is
displayed.
NO ENTRY: S
NOTES:
• Pressing or for approximately 2 seconds will display
resident names in succession.
• If both unit # 111 and 1111 exist, the resident name for unit
111 will be displayed when 1, 1, 1 is entered, and the
resident name for unit 1111 will be displayed if 1 is entered
one more time.
• Stations can be set to display in order by unit #. (The order
starts with the lowest digit from 0 to 9 and then the order
goes by letter.) In cases where unit # such as A101, A201,
A901, A1001, and B101 exist, the order starts with the
lowest digit and goes in the order A101, A201, A901, B101,
A1001.
.
When the call is answered
Communication starts and the talk indicator
lights up.
* Audio guidance will be heard depending on the settings.
When the door is released
The door release indicator lights up.
* Audio guidance will be heard depending on the settings.
- 10 -
Page 11
ENTRANCE STATION
3 When the target unit # or resident name is
displayed, press
The call indicator will light up and you will hear a
call tone.
* Audio guidance will be heard depending on the
settings.
When the call is answered
Communication starts and the talk indicator
lights up.
* Audio guidance will be heard depending on the settings.
.
2
3
1
A
D
F
C
B
E
5
4
6
M
G
J
I
L
O
K
H
N
8
9
7
W
P
Z
S
T
Q
V
X
U
Y
R
0
When the door is released
The door release indicator lights up.
* Audio guidance will be heard depending on the settings.
- 11 -
Page 12

ENTRANCE STATION
Calling with the all-in-one type entrance station
GT-DMB-LVN/GT-DMB-N
The following diagram shows the screen transitions starting from the standby screen. One of the standby screens shown below is preset to this
station. Find the standby screen of this station from
to E below and confi rm the transition from it, and refer to the designated page for the
A
calling operation.
NOTE:
If "NO ENTRY" is displayed on the screen, press .
Standby screen
Display OFF
(black)
10-key/
Greeting message Picture
WELCOME
10-key/
* Depending on the setting,
the screen turns on
automatically when you
get closer to this station.
/ Turned on automatically
QUICK LIST
A
INFORMATION
101 SMITH
102 AIPHONE
103 DENTIST
201 LAINE
NUMBER
ALPHA
10-key/
Call operation screen
B
NAME / # SEARCH
HOW TO CALL
1. SELECT UNIT
2. CALL
NUMBER
UNIT LIST
101
SMITH
CALL CANCEL
ALPHA
10-key
UNIT NUMBER
C
HOW TO CALL
1. ENTER UNIT #
2. CALL
10-key 10-key
ENTER UNIT #
UNIT #
ALPHA
CALL CANCEL
SECT LIST +
D
UNIT#
HOW TO CALL
1. BUILDING LIST
2. SELECT
3. ENTER UNIT #
4. CALL
BUILDING LIST
01
CENTRAL TOWER
SELECT CANCEL
To the next page
( C is available in a tenant building/section only.)
or
B
C
SECT# + UNIT#
E
HOW TO CALL
1. ENTER
BLDG. #
2. SELECT
3. ENTER UNIT #
4. CALL
ENTER BUILDING #
BUILDING #
ALPHA
ENTER CANCEL
To the next page
B
To the next page
C
- 12 -
To the next page
D
To the next page
E
Page 13
ENTRANCE STATION
A
Confi rming the target unit in the quick list
Unit # and resident names frequently called are preset to be
displayed in the quick list.
* Up to 4 units can be displayed.
INFORMATION
Unit #
Resident name
101 SMITH
102 AIPHONE
103 DENTIST
201 LAINE
NUMBER
ALPHA
1 In standby mode, press and to display the
target unit, or 10-key to change the standby
screen.
or
The "UNIT LIST" screen B or "ENTER UNIT #" screen C is
displayed.
C
Entering unit #
NOTE: Entering unit # can only be performed on this screen.
Entering resident name is not possible.
HOW TO CALL
1. ENTER UNIT #
2. CALL
When the target unit number is numerals
only
1 In standby mode, enter numbers using [0] to [9]
on the 10-key to display the target unit #.
* The 10-key can be used even after pressing or .
ENTER UNIT #
UNIT #
ALPHA
CALL CANCEL
* Depending on the system, only the resident name may be
displayed.
* If you have entered a wrong number, press to return to
standby mode.
2 Follow the operating procedure of either
or C
B
depending on the displayed screen.
is available in a tenant building/section only.
C
*
B
Searching for a unit in the unit list
HOW TO CALL
1. SELECT UNIT
2. CALL
NUMBER
ALPHA
1 In standby mode, press and or 10-key to
display the target unit # and resident name.
UNIT LIST
101
SMITH
CALL CANCEL
or
The 10-key can be used to enter unit #, or by pressing , then
the 10-key can be used to enter letters (resident name).
* Depending on the settings, only the resident name may be
displayed.
* The list is displayed in order of either unit # or resident name.
* If you have entered a wrong number, press to return to
standby mode.
2 When the target unit is displayed, press .
The target unit is called.
* Refer to "When the target unit is successfully called"
at the end of
for details.
2-1
2 When the target unit # is displayed, press .
The target unit is called.
* Refer to "When the target unit is successfully called"
at the end of
for details.
2-1
When the target unit number is alphanumeric
1 In standby mode, press on the 10-key.
* The 10-key can be used even after pressing or .
ENTER UNIT #
UNIT #
NUMBER
ALPHA
CALL CANCEL
2 Enter letters using the 10-key to display the
target unit #.
* Refer to the next page for how to enter letters.
3 When the target unit # is displayed, press .
The target unit is called.
* Refer to "When the target unit is successfully called"
at the end of
- 13 -
for details.
2-1
Page 14
ENTRANCE STATION
How to enter letters
(e.g.) Entering "CATHY"
1. To enter "C", press
2. Press
once.
(*1)
three times.
3. To enter "A", press once.
4. To enter "T", press
5. To enter "H", press
6. To enter "Y", press
(*1): This step is needed for entering different letters with the same
key sequentially.
once.
twice.
three times.
To enter a special character
, : Press once.
- : Press
. : Press
/ : Press
Space : Press
Æ : Press
Ø : Press
Å : Press
* If you have entered a wrong letter, press to return to
standby mode.
twice.
three times.
four times.
fi ve times.
six times.
seven times.
eight times.
D
Searching for a building in the building list
and entering unit #
HOW TO CALL
1.
BUILDING LIST
2.SELECT
3.ENTER UNIT #
4.CALL
1 In standby mode, press and to display the
target building number and name.
BUILDING LIST
01
CENTRAL TOWER
SELECT CANCEL
2 When the target building is displayed, press .
3 Enter numbers or letters using the 10-key to
display the target unit #.
* For entering numbers or letters, follow steps 1 and 2 of
- "When the target unit number is numerals only"
C
"When the target unit number is alphanumeric".
or
ENTER UNIT #
01
CENTRAL TOWER
UNIT #
101
CALL
ALPHA
4 When the target unit # is displayed, press .
The target unit is called.
* Refer to "When the target unit is successfully called"
at the end of
for details.
2-1
- 14 -
Page 15
ENTRANCE STATION
E
Entering a building # and unit #
HOW TO CALL
1.
2.SELECT
3.ENTER UNIT #
4.CALL
ENTER BLDG#
When the target unit is successfully
called
The call indicator will light up and you will hear
a call tone.
* Audio guidance will be heard depending on the settings.
1 In standby mode, enter numbers or letters using
the 10-key to display the target building.
* For entering numbers or letters, follow steps 1 and 2 of
-
"When the target unit number is numerals only"
C
or
"When the target unit number is alphanumeric".
ENTER BUILDING #
BUILDING #
01
ALPHA
ENTER CANCEL
2 When the target building number is displayed,
press .
3 Enter numbers or letters using the 10-key to
display the target unit #.
* For entering numbers or letters, follow steps 1 and 2 of
-
"When the target unit number is numerals only"
C
"When the target unit number is alphanumeric".
or
ENTER UNIT #
BUILDING #
01
UNIT #
101
CALL
ALPHA
When the call is answered
Communication starts and the talk indicator
lights up.
* Audio guidance will be heard depending on the settings.
When the door is released
The door release indicator lights up.
* Audio guidance will be heard depending on the settings.
NOTES:
• If "DENIED" is displayed or returns to standby mode,
the entered unit #/resident name is not registered.
• Enter the target unit # exactly. Otherwise, "DENIED" is
displayed or returns to standby mode.
• If both unit # 111 and 1111 exist, the resident name for
unit 111 will be displayed when 1, 1, 1 is entered, and
the resident name for unit 1111 will be displayed if 1 is
entered one more time.
• Stations can be set to be displayed in order by unit #.
(The order starts with the lowest digit from 0 to 9 and
then the order goes by letter.) In cases where unit # such
as A101, A201, A901, A1001, and B101 exist, the order
starts with the lowest digit and goes in the order A101,
A201, A901, B101, A1001.
4 When the target unit # is displayed, press .
The target unit is called.
* Refer to "When the target unit is successfully called"
at the end of
for details.
2-1
- 15 -
Page 16
ENTRANCE STATION
2-2
Door release
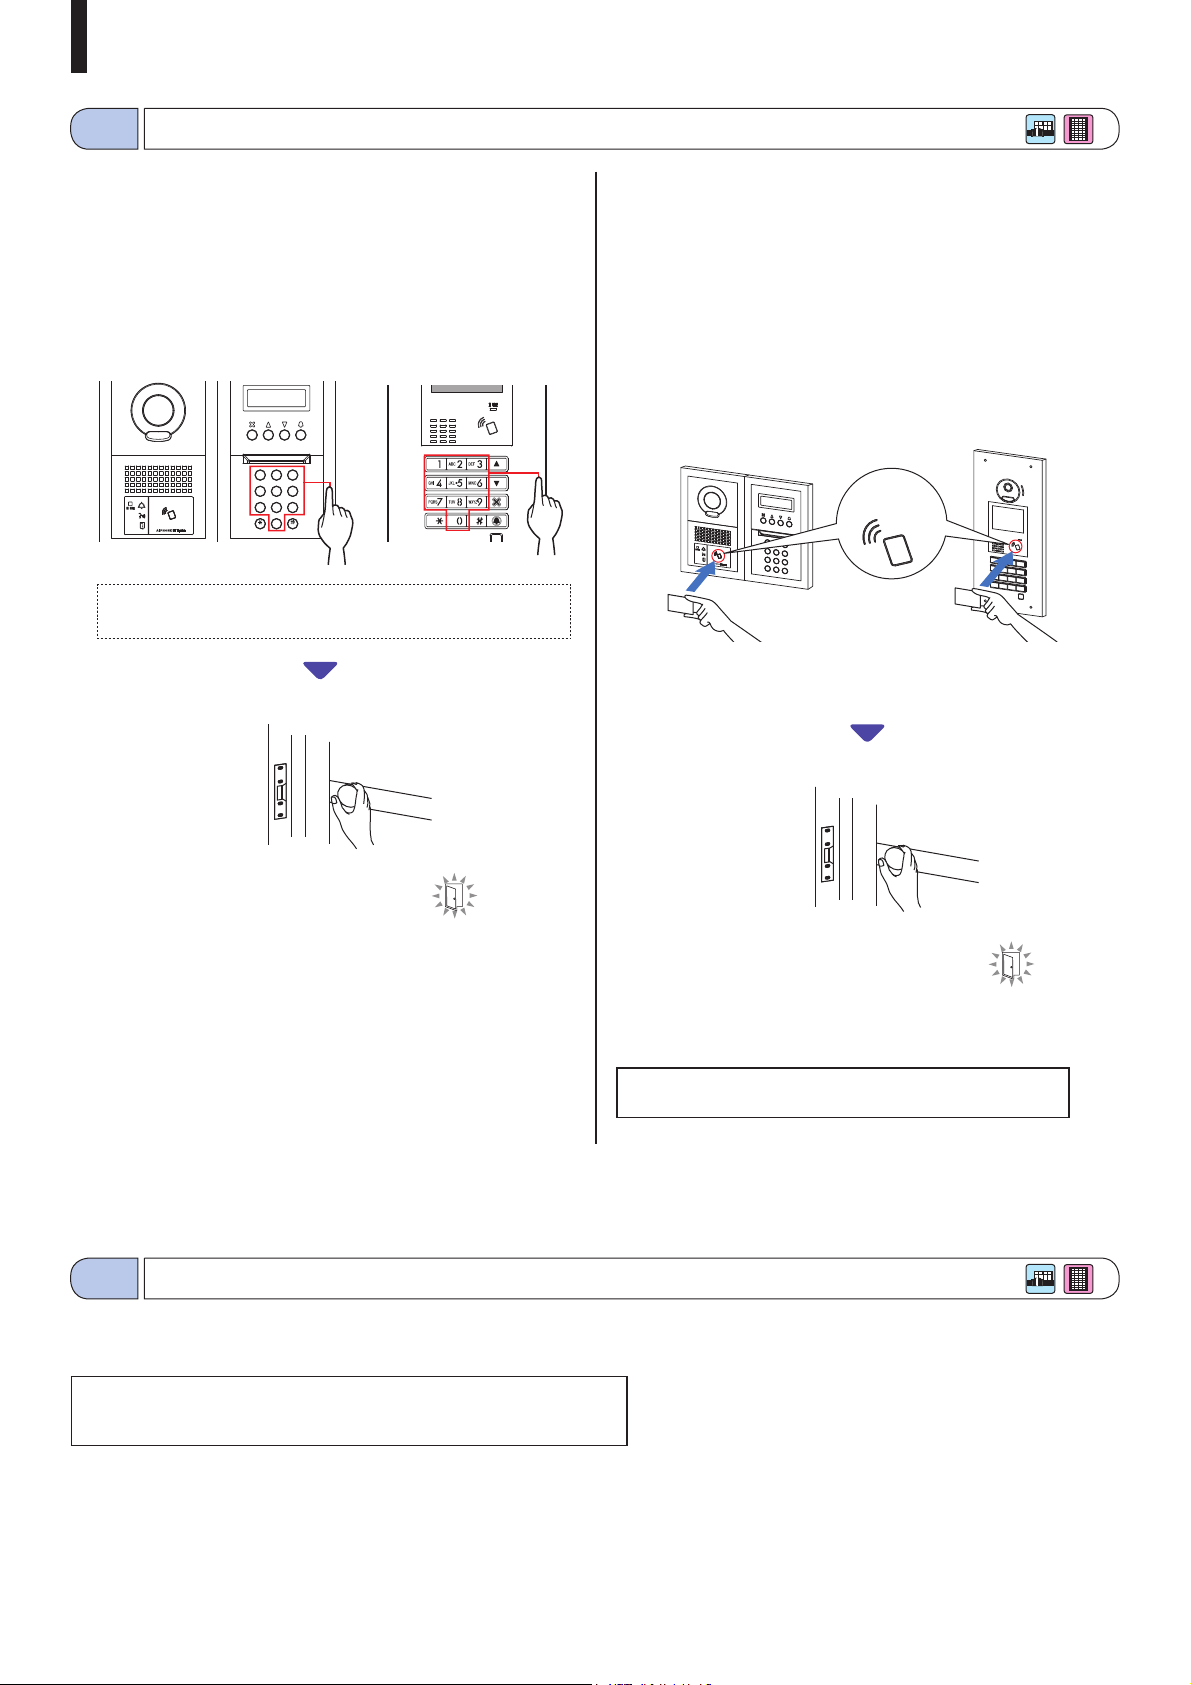
■ Door release by using the access code
* The access code is preset by the system installer or
administrator.
1 In standby mode, enter [#] and then the access
code (4 to 6 digits) using [0] to [9] on the 10-key.
[Modular type]
2
3
1
A
D
F
C
B
E
5
4
6
M
G
J
I
L
O
K
H
N
8
9
7
W
P
Z
S
T
Q
V
X
U
Y
R
0
(e.g.)
When the access code is "4567", enter "#", "4", "5", "6", "7".
The door is released.
[All-in-one-type]
■ Door release by an NFC-compliant IC card,
etc.
A card incorporated with an NFC tag can be used to release a door.
To use, the ID of the NFC tag must be registered as a door release
code.
1 Pass an NFC-compliant IC card over the NFC
reader.
[Modular type]
NFC reader
* Put the card within 10 mm of the NFC reader. Otherwise, the
code may not be read correctly.
[All-in-one-type]
• The door release indicator lights up.
• Audio guidance will be heard depending
on the settings.
* If there is no relevant number, "DENIED" is displayed.
* Door release is enabled even while the IN USE LED is lit.
2-3
* Calling from an entrance station is disabled while the IN USE LED is lit.
Wait until the IN USE LED turns off.
Other
The door is released.
• The door release indicator lights up.
• Audio guidance will be heard depending
on the settings.
* Door release is enabled even while the IN USE LED is lit.
NOTE: Do not overlap IC cards when passing them over the
NFC reader. The code may not be read correctly.
NOTE: For a multi building system with lift control, if you unlock from a
room and terminate call at the same time, the entrance station may
not unlock properly.
- 16 -
Page 17
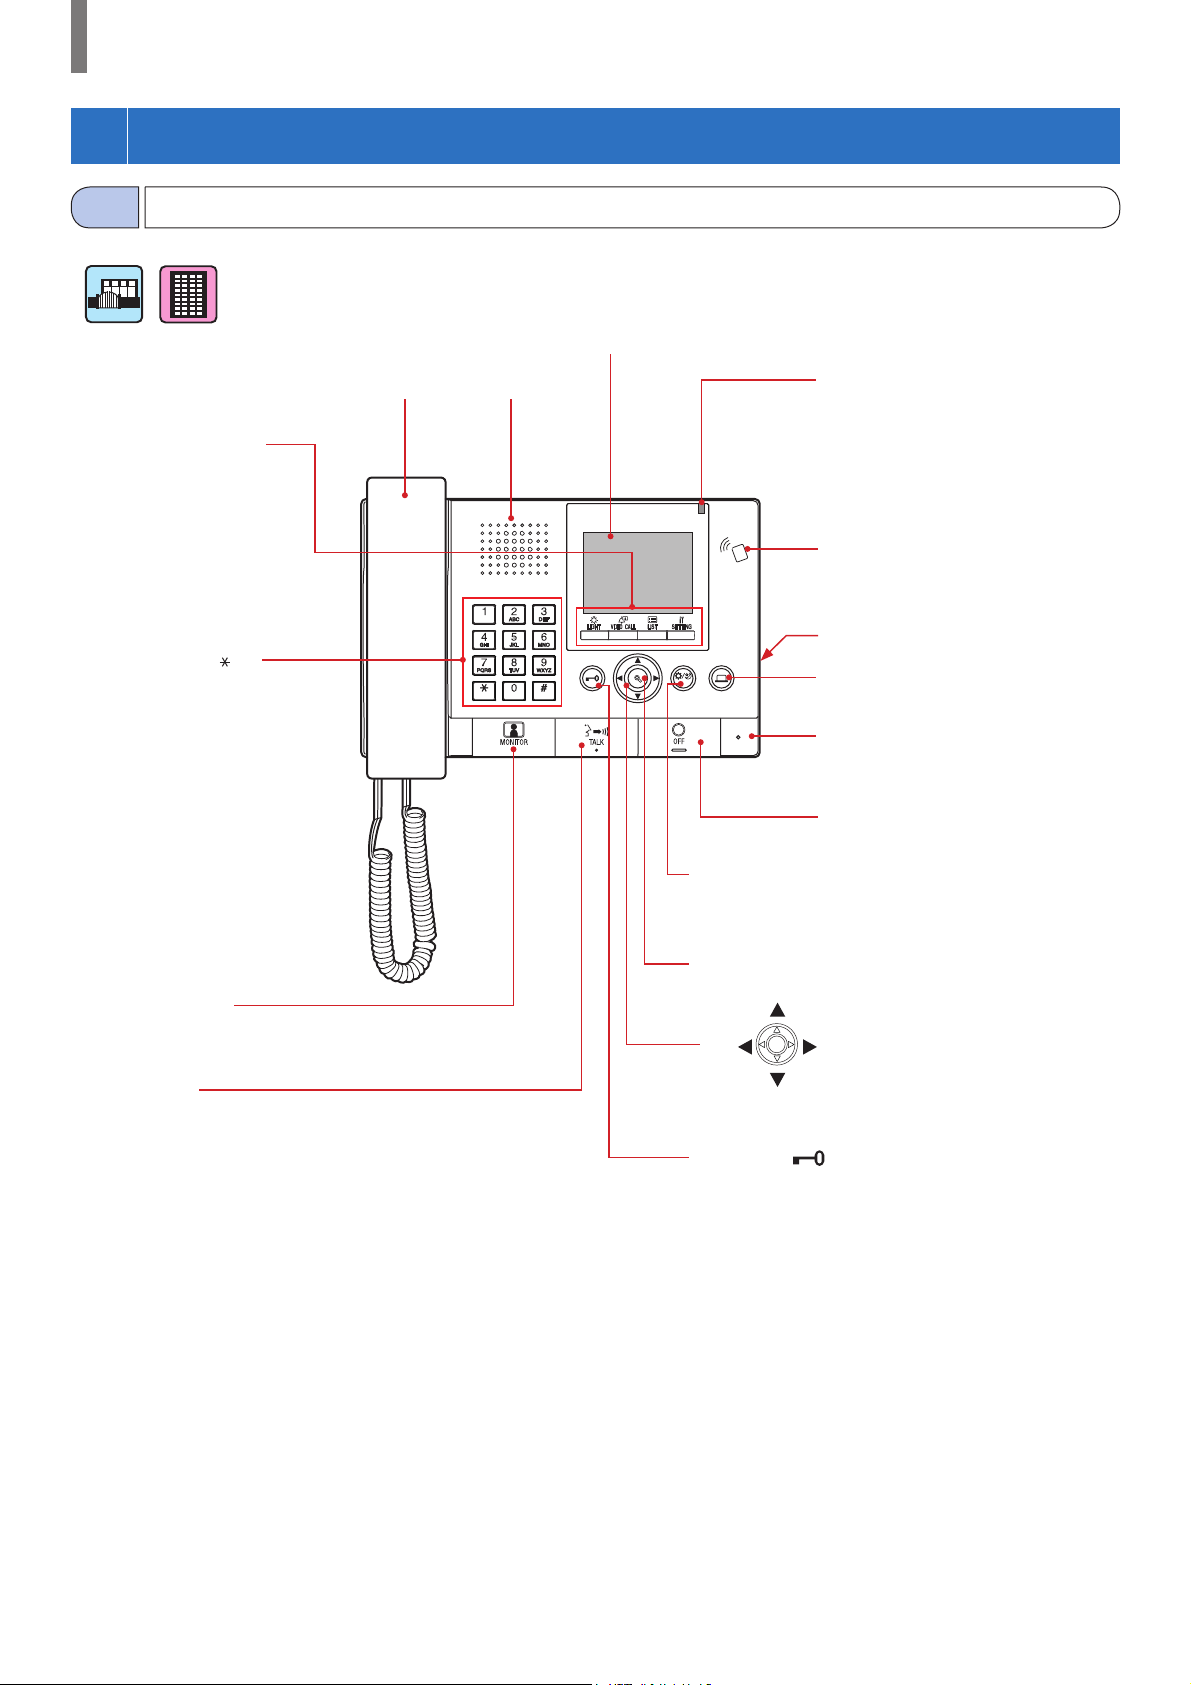
GUARD STATION
1
PART NAMES AND FUNCTIONS
1-1
Operation panel
Multi-function buttons
• LIGHT
• VIDEO CALL
• LIST
• SETTING
10-key (0 to 9, , #)
Handset
Color LCD monitor (Display)
Speaker
ZOOM
WIDE
ADJUST
Status LED (orange)
Indicates the current status of this
station by lighting up or fl ashing on/off
in orange (while initializing the system,
being called, communicating, etc.).
NFC reader
Reset button
Option button
MONITOR button
TALK button
ADJUST button
ZOOM/WIDE button
(up)
(right)(left)
(down)
Door release (
Microphone
OFF button
) button
- 17 -
Page 18
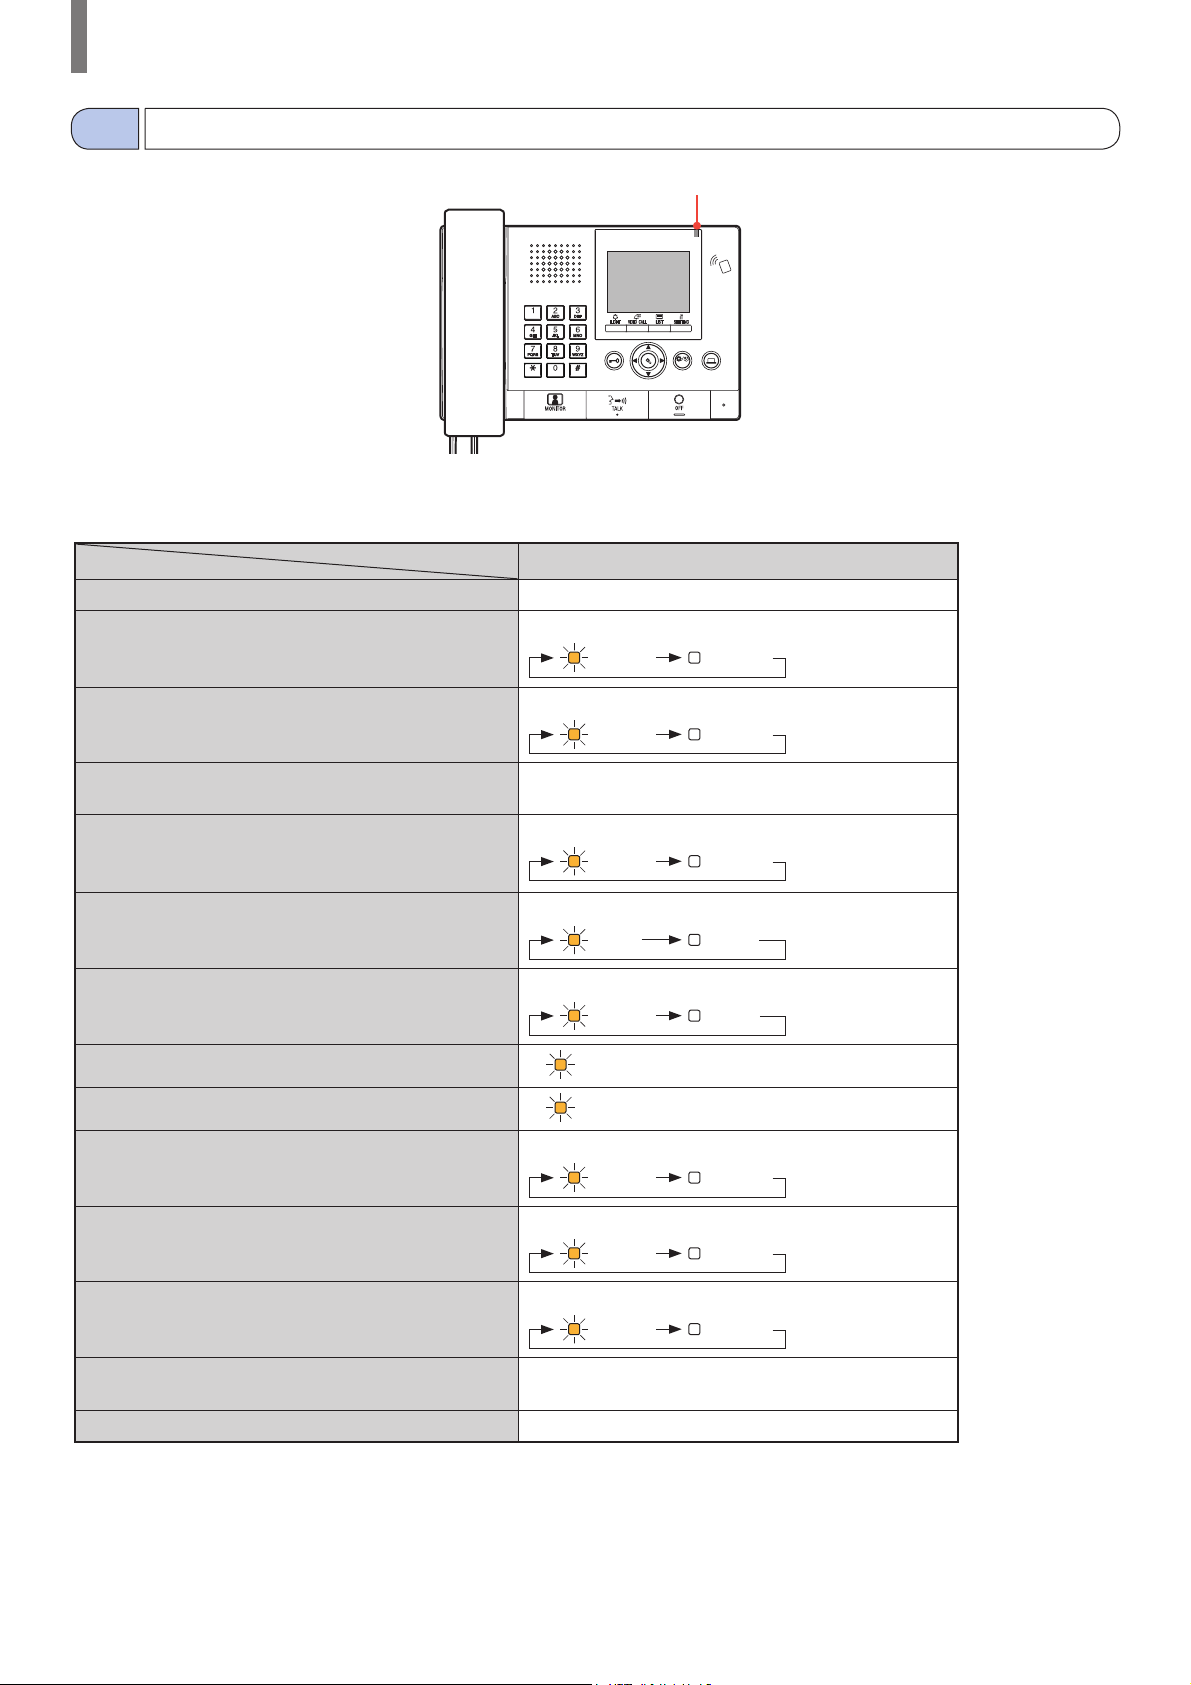
GUARD STATION
1-2
Indicators
Indication patterns
Status
Indicator
Standby Off
Standby
(Call tone volume: off)
Standby
(Reception mode: on)
This station is in use by another station
(this station is inoperable)
Being called by an entrance station Fast flashing
Being called by a door station Normal flashing
Being called by a door bell Fast flashing
Monitoring an entrance station
6 Status LED (orange)
Long interval flashing
Slow flashing
Off
Lit
(0.5 sec.)
(0.5 sec.)
(0.5 sec.)
(1 sec.)
(0.5 sec.)
6
ZOOM
ADJUST
WIDE
(5.5 sec.)
(2.5 sec.)
(0.5 sec.)
(1 sec.)
(1 sec.)
Communicating with an entrance station
Calling another guard station or residential/tenant station
(including in reception mode)
Lit
Fast flashing
(0.5 sec.)
Sounding an emergency alarm Fast flashing
(0.5 sec.)
(0.5 sec.)
A new list of missed calls from residential/tenant stations
has arrived
Slow flashing
Error indication Off
(An error message is displayed.)
Communication is on hold Off
- 18 -
(0.5 sec.)
(0.5 sec.)
(2.5 sec.)
Page 19

GUARD STATION
1-3
LCD (display)
The following are samples of typical screens and icons.
In standby mode
* When nothing is displayed (black) on the screen, the screen below can be displayed by pressing
any key other than
NAME SEARCH screen
The screen for searching for a unit by its name.
List page number
When the list of units or setting items consists of two
or more pages, the current page number is shown
here.
Information display
Displays the unit # or resident name of selected station,
operation method, etc.
,
ZOOM
WIDE
0-9,
NAME SEARCH
EMERGENCY
NAME SEARCH
MISSED CALLS
or lifting the handset.
,
Status display icons
The following icons are displayed here depending on the status of this
station.
Icon The status when the icon appears
Appears when this station is in reception mode.
Appears while searching for a unit.
Appears while the number or letter entry screen is
displayed.
Appears while receiving a call.
Appears when a record of missed calls is displayed.
Appears while in communication.
Appears while transferring.
Appears while this station is in communication with a
residential/tenant station after transferring a call from an
entrance station to the residential/tenant station.
Appears when a record of emergency calls is displayed.
Appears while monitoring.
Appears while a wide video at the entrance or a video at
the door station is displayed.
Appears while a zoom video at the entrance station is
displayed.
Appears when the setting screen is displayed.
NAME SEARCH
101
102
103
201
202
List of units
The list of units you searched for is shown here by
their unit # and resident names. Nothing appears in
the list when no corresponding unit is detected.
NOTE: The above display example may differ from the actual one.
1 /8
SMITH
AIPHONE
DENTIST
LAINE
MENIN
- 19 -
Page 20

GUARD STATION
1-4
Button operations
■ Multi-function buttons and icons
The functions to be performed by the multi-function buttons are displayed by icons just above the buttons.
Multi-function buttons
Functions shown by icons here can be performed by
pressing the buttons just below the icons. The icons vary
depending on the status of this station.
(e.g.)
Pressing
adjusts receive volume ( ).
(e.g.)
Pressing
restores the previous screen ( ).
When the same icon as the icon above a button is
displayed, the button performs the function shown by the
button name.
Turns on the light at an entrance station.
Starts communication with the preset
entrance station, or displays video from a
surveillance camera.
Displays the setting screen.
Displays the search item list.
Icons and their functions
Icons and their functions for each multi-function button are as follows.
1
Icon Function
1
2
Determines the choice.
Turns the entrance light on (when light is installed in
common area).
Adjusts brightness.
Turns off the emergency alarm.
Calls the selected unit.
Transfers a call from entrance station to residential/tenant
station.
Adjusts call tone volume.
Turns off overlay.
23
4
Icon Function
3
4
Changes the 10-key to the letter entry mode.
Changes the 10-key to the number entry mode.
Displays the search item list.
Adjusts receive volume.
Restores the previous screen.
Displays the setting screen.
Cancels the choice.
Calls the preset entrance station directly.
Deletes the selected item.
- 20 -
Page 21

GUARD STATION
■ How to enter numbers and letters by using the 10-key (0 to 9, , #)
Use the 10-key in the number or letter entry mode.
The number and letter entry modes can be switched by pressing
Entered numbers are displayed.
ZOOM
ADJUST
WIDE
( / ).
Number entry mode
UNIT #
1
Letter entry mode
UNIT #
1
How to enter letters
(e.g.) Entering "CATHY"
1. To enter "C", press
ZOOM
WIDE
2. Press
once.
3. To enter "A", press once.
4. To enter "T", press
5. To enter "H", press
6. To enter "Y", press
(*1): This step is needed for entering different letters with the same
key sequentially.
(*1)
three times.
once.
twice.
three times.
- 21 -
To enter a special character
, : Press once.
- : Press
. : Press
/ : Press
Space : Press
Æ : Press
Ø : Press
Å : Press
* If you have entered a wrong letter, press to return
to standby mode.
twice.
three times.
four times.
fi ve times.
six times.
seven times.
eight times.
Page 22

GUARD STATION
2
RECEIVING A CALL
: Main building/section : Tenant building/section
2-1
Receiving a call
Caller
The caller can be confi rmed on the display.
A call from a residential/
tenant station or another
guard station
The unit # and station name
101
DR.DOUIEB,PATRI
A call from an entrance
station with a camera
The number and
entrance name
1011
PARKING GATE
When receiving a call, the call tone
sounds and the number and name of
the caller (station) are displayed in the
screen.
ZOOM
ADJUST
WIDE
A call from an entrance
station without a camera
The number and entrance
name
10
ENTRANCE1
A call from a door station
DOOR STATION
The video at the entrance
When receiving a call from a door bell, nothing is displayed on the screen and answering is not possible.
NOTE:
Answering a call
To answer a call
1 Press or lift handset.
ZOOM
ADJUST
WIDE
or
2 Begin communication with the caller.
* Lift handset at any time for privacy.
The video at the door station
* While communicating with the caller, unlock the door or use
the other features by pressing the following buttons.
Door release
(→
)
5-2
Adjusting display brightness (→
1011
PARKING GATE
ZOOM
ADJUST
WIDE
Zoom/wide (→
5-4
)
8-1
Adjusting call tone
volume (→
Adjusting receive
volume (→
Operating an optional
device (→
Adjusting screen view
(→
5-4
Pan/tilt (→
)
)
To end communication
8-1
8-1
5-3
5-4
)
)
)
)
Press or hang up handset.
Communication ends automatically after 3 minutes.
* Communication with a residential/tenant station in hands-free
mode ends automatically after 1 minute in hands-free mode.
- 22 -
Page 23

GUARD STATION
3
CALLING (from a tenant building)
3-1
How to search for a unit to call (from a tenant building)
The following methods are available in standby mode to search for a unit (residential/tenant station) or guard station to call.
A
Searching by number
B
Searching by name
C
Using the search item list
* When nothing is displayed (black) on the screen, press any key other than
mode.
C
* An entrance station can be searched for by using method
only.
Standby mode
NAME SEARCH
EMERGENCY
ZOOM
WIDE
NAME SEARCH
MISSED CALLS
,
0-9,
or lift handset to enter standby
,
A
Searching by number
(→
NUMBER SEARCH
1
101
102
103
104
105
3-2
)
1 / 4
SMITH
AIPHONE
DENTIST
YOK OI
YABE
B
Searching by name
(→
101
SMITH
101
102
103
201
202
3-2
)
1 / 1
SMITH
AIPHONE
DENTIST
LAINE
MENIN
ZOOM
WIDE
ADJUST
C
Using the search item list
(→
UNIT BY NUMBER
UNIT BY NUMBER
UNIT BY NAME
GUARD STATION
ENTRANCE
3-2
)
• Searching by number (UNIT BY
NUMBER) (→
3-2
)
• Searching by name (UNIT BY NAME)
(→
3-2
)
• Searching a guard station from the
guard station list (GUARD STATION)
(→
3-2
)
• Searching an entrance station from the
entrance station list (ENTRANCE)
(→
3-3
)
- 23 -
Page 24

GUARD STATION
Coverage of calling from a guard station in a tenant building
NOTE: Performance depends on the settings. If you cannot call even when ✓ is indicated, its setting is not confi gured.
Incoming call
Same tenant building Other tenant buildings Main building
Tenant
building
Guard st. Calling/
communication
Entrance st. Guard
st.
✓✓ ✓
Outgoing call
✓ : Possible — : Impossible
3-2
A
Calling a unit (residential/tenant station) or guard station
Searching for a unit by number
1 In standby mode, enter numbers using [0] to [9]
on the 10-key to display the target unit # and
resident name.
Entered number(s)
NUMBER SEARCH
1
101
102
103
104
105
Unit # whose initial number matches the
entered number are displayed in the list.
1 / 4
SMITH
AIPHONE
DENTIST
YOK OI
YABE
Residential/
tenant st.
Entrance
st.
Guard
st.
Residential/
tenant st.
Entrance st. Guard
-- -
4 To end communication, press or hang
up handset.
NOTES:
• Communication will end automatically after approximately 3
minutes. Communication with a residential/tenant station in
hands-free mode ends automatically after 1 minute in hands-free
mode.
• If both unit # 111 and 1111 exist, the resident name for unit 111
will be displayed when 1, 1, 1 is entered, and the resident name
for unit 1111 will be displayed if 1 is entered one more time.
• Stations can be set to be displayed in order by unit #. (The order
starts with the lowest digit from 0 to 9 and then the order goes by
letter.) In cases where unit # such as A101, A201, A901, A1001,
and B101 exist, the order starts with the lowest digit and goes in
the order A101, A201, A901, B101, A1001.
st.
✓✓
* The list is displayed in order of unit #.
* This station is not displayed.
2 Select the target unit by pressing
ZOOM
WIDE
* Press
or
ZOOM
ZOOM
WIDE
WIDE
.
ZOOM
ADJUST
WIDE
or
ZOOM
WIDE
to turn the page of the list.
ZOOM
WIDE
3 Press ( ), or lift handset.
When the call is answered
Communication starts and " " is displayed.
- 24 -
Page 25

GUARD STATION
S
B
Searching for a unit by name
1 In standby mode, press
ZOOM
WIDE
or
The search screen is displayed.
2 Select the target unit by pressing
Selected unit # and resident name
101
SMITH
ZOOM
ADJU
WIDE
101
102
103
201
202
Unit # and resident names are displayed in
alphabetical or numerical order.
* The arranging method differs depending on
the setting.
* Press
ZOOM
WIDE
or
ZOOM
WIDE
to turn the page of the list.
* The list is displayed in order of either unit # or name.
* This station is not displayed.
1 / 1
SMITH
AIPHONE
DENTIST
LAINE
MENIN
ZOOM
ZOOM
WIDE
WIDE
.
ZOOM
WIDE
or
ZOOM
ZOOM
WIDE
WIDE
.
3 Press ( ), or lift handset.
When the call is answered
Communication starts and " " is displayed.
4 To end communication, press or hang
up handset.
NOTES:
• Communication will end automatically after approximately 3
minutes. Communication with a residential/tenant station in
hands-free mode ends automatically after 1 minute in hands-free
mode.
• Stations can be set to be displayed in order by unit #. (The order
starts with the lowest digit from 0 to 9 and then the order goes by
letter.) In cases where unit # such as A101, A201, A901, A1001,
and B101 exist, the order starts with the lowest digit and goes in
the order A101, A201, A901, B101, A1001.
- 25 -
Page 26

GUARD STATION
S
C
Searching for a unit by using the search item list
Press ( ).
The search item list is displayed.
UNIT BY NUMBER
UNIT BY NUMBER
UNIT BY NAME
GUARD STATION
ENTRANCE
Searching for a unit by unit #
ZOOM
1 Select "UNIT BY NUMBER" by pressing
ZOOM
ZOOM
WIDE
WIDE
.
UNIT BY NUMBER
WIDE
or
5 Press ( ), or lift handset.
When the call is answered
Communication starts and " " is displayed.
ZOOM
ADJU
WIDE
2 Press ( ) or
UNIT BY NUMBER
UNIT BY NAME
GUARD STATION
ENTRANCE
ZOOM
ZOOM
WIDE
WIDE
.
The "NUMBER SEARCH" screen is displayed.
3 Enter numbers using [0] to [9] on the 10-key to
display the target unit # and resident name.
Entered unit #
NUMBER SEARCH
1
101
102
103
104
105
Unit # whose initial number matches the
entered number are displayed in the list.
1 / 4
SMITH
AIPHONE
DENTIST
YOK OI
YABE
6 To end communication, press or hang
up handset.
* The list is displayed in order of unit #.
* This station is not displayed.
4 Select the target unit by pressing
ZOOM
WIDE
* Press
or
ZOOM
ZOOM
WIDE
WIDE
.
or
ZOOM
WIDE
to turn the page of the list.
ZOOM
WIDE
- 26 -
Page 27

GUARD STATION
S
S
Searching for a unit by resident name
1 Select "UNIT BY NAME" by pressing
UNIT BY NAME
ZOOM
ADJU
WIDE
2 Press ( ) or
UNIT BY NUMBER
UNIT BY NAME
GUARD STATION
ENTRANCE
ZOOM
ZOOM
WIDE
WIDE
.
ZOOM
WIDE
or
ZOOM
ZOOM
WIDE
WIDE
The "NAME SEARCH" screen is displayed.
3 Enter an alphabetical character using [0] to [9] on
the 10-key to display the target resident name.
Entered character
NAME SEARCH
A
102 AIPHONE
1 /1
5 Press ( ), or lift handset.
.
When the call is answered
Communication starts and " " is displayed.
6 To end communication, press or hang
up handset.
The unit # and resident names whose initial letter
matches the entered letter are displayed in the list.
(e.g.) When "A" is entered, 301A, 1003ABC,
ABC, etc. are displayed in the list.
* The arranging method differs depending on the
setting.
* The list is displayed in order of name.
* This station is not displayed.
4 Select the target unit
ZOOM
ADJU
WIDE
ZOOM
* Press
WIDE
or
by pressing
ZOOM
WIDE
to turn the page of the list.
ZOOM
WIDE
or
ZOOM
ZOOM
WIDE
WIDE
.
- 27 -
Page 28

GUARD STATION
S
S
Searching for a guard station from the guard
station list
ZOOM
1 Select "GUARD STATION" by pressing
ZOOM
ZOOM
WIDE
WIDE
.
GUARD STATION
ZOOM
ADJU
WIDE
2 Press ( ) or
The guard station list is displayed.
3 Select the target guard station
ZOOM
ZOOM
WIDE
WIDE
or
.
UNIT BY NUMBER
UNIT BY NAME
GUARD STATION
ENTRANCE
ZOOM
ZOOM
WIDE
WIDE
.
by pressing
WIDE
or
ZOOM
WIDE
Searching for an entrance station
(→
NOTES:
• Communication will end automatically after approximately 3
minutes. Communication with a residential/tenant station in
hands-free mode ends automatically after 1 minute in hands-free
mode.
• If both unit # 111 and 1111 exist, the resident name for unit 111
will be displayed when 1, 1, 1 is entered, and the resident name
for unit 1111 will be displayed if 1 is entered one more time.
• Stations can be set to be displayed in order by unit #. (The order
starts with the lowest digit from 0 to 9 and then the order goes by
letter.) In cases where unit # such as A101, A201, A901, A1001,
and B101 exist, the order starts with the lowest digit and goes in
the order A101, A201, A901, B101, A1001.
3-3
)
001
GUARD1
ZOOM
WIDE
ADJU
001
002
003
1 / 1
GUARD1
GUARD2
GUARD3
Guard station numbers and names are
displayed in alphabetical or numerical order.
* The arranging method differs depending on
the setting.
* Press
ZOOM
WIDE
or
ZOOM
WIDE
to turn the page of the list.
* The list is displayed in order of either station number or name.
* This station is not displayed.
4 Press ( ), or lift handset.
When the call is answered
Communication starts and " " is displayed.
5 To end communication, press or hang
up handset.
- 28 -
Page 29

GUARD STATION
S
T
3-3
Calling an entrance station
1 Press ( ).
The search item list is displayed.
2 Select "ENTRANCE"
ZOOM
ADJU
WIDE
ZOOM
WIDE
by pressing
ENTRANCE
UNIT BY NUMBER
UNIT BY NAME
GUARD STATION
ENTRANCE
ADJUST
Direct calling an entrance station
(only when
is displayed in standby
mode)
1 When is displayed, press ( ).
The preset entrance station is called, and then communication is
enabled.
ZOOM
WIDE
or
ZOOM
ZOOM
WIDE
WIDE
.
2 Talk hands-free or lift the handset.
3 To end communication, press or hang
up handset.
ZOOM
ZOOM
WIDE
3 Press ( ) or
WIDE
.
The entrance station list is displayed.
4 Select the target entrance station
ZOOM
WIDE
or
ZOOM
ZOOM
WIDE
WIDE
.
by pressing
Selected entrance station number and name
0001
ENTRANCE1
ZOOM
ADJUS
WIDE
0001
0002
0003
0004
0005
1 / 1
ENTRANCE1
ENTRANCE2
ENTRANCE3
ENTRANCE4
ENTRANCE5
Entrance station numbers and names are
displayed in alphabetical or numerical order.
* The arranging method differs depending on
the setting.
* Press
ZOOM
WIDE
or
ZOOM
WIDE
to turn the page of the list.
* The list is displayed in order of either station number or name.
5 Press ( ), or lift handset.
Communication starts and " " is displayed.
6 To end communication, press or hang
up handset.
NOTE: Communication will end automatically after approximately
3 minutes.
- 29 -
Page 30

GUARD STATION
Transferring video image taken by an
entrance station camera or surveillance
camera to a residential/tenant station
(only when
is displayed in standby
mode)
1 Press ( ).
2 Select a residential/tenant station by one of
A
the following methods
A
Press ( ) and then
select the target residential/tenant station.
B
1 Enter a number by using the 10-key to
display the list of residential/tenant
stations that include the number.
2 Press
ZOOM
WIDE
or
ZOOM
ZOOM
WIDE
WIDE
residential/tenant station.
3 Press ( ) or
C
-
.
ZOOM
WIDE
or
ZOOM
ZOOM
WIDE
WIDE
to
to select the target
ZOOM
ZOOM
WIDE
WIDE
.
C
1 Press and enter a letter by using the
10-key to display the list of residential/
tenant stations that include the letter.
2 Press
ZOOM
WIDE
or
ZOOM
ZOOM
WIDE
WIDE
to select the target
residential/tenant station.
ZOOM
ZOOM
WIDE
3 Press ( ) or
WIDE
.
3 Press ( ).
4 When the resident/tenant station answers and
accepts the visitor, press or hang up
handset.
* Step 2 differs depending on the settings.
- 30 -
Page 31

GUARD STATION
4
CALLING (from a main building)
4-1
How to select a unit to call (from a main building)
The following methods are available in standby mode to select a room (residential/tenant station) or guard station to call.
A
Searching by number
B
1 Searching for a unit in the list
2
Entering unit #
3
Searching for a building in the list + entering unit #
4
Entering a building # + unit #
C
Using the search item list
* When nothing is displayed (black) on the screen, press any key other than
mode.
1
.
C
only.
NAME SEARCH
EMERGENCY
ZOOM
WIDE
NAME SEARCH
MISSED CALLS
* To return to the standby screen, press
* An entrance station can be searched for by using the method
Standby mode
,
0-9,
2
3
4
* Any of 1 to 4 are available by default.
or lift handset to enter standby
,
UNIT #
EMERGENCY
ZOOM
WIDE
UNIT #
MISSED CALLS
BUILDING
EMERGENCY
ZOOM
WIDE
BUILDING
MISSED CALLS
A
Searching by number
(→
NUMBER SEARCH
1
101
102
103
104
105
4-2
)
1 / 4
SMITH
AIPHONE
DENTIST
YOK OI
YABE
B-
B-
B-
B-
ZOOM
WIDE
1
Searching for a unit in
the list (→
2
Entering unit #
(→
4-2
3
Searching for a
building in the list +
unit # (→
4
Entering a building # +
unit # (→
- 31 -
ADJUST
4-2
)
4-2
4-2
C
Using the search item list
)
)
)
(→
BUILDING
BUILDING
GUARD STATION
ENTRANCE
4-2
)
• Searching for a building in the list +
entering unit # or Entering a building #
+ unit # (→
4-2
)
• Searching a guard station from the
guard station list (GUARD STATION)
(→
4-2
)
• Searching an entrance station from the
entrance station list (ENTRANCE)
(→
4-3
)
Page 32

GUARD STATION
Coverage of calling from a guard station in a main building
NOTE: Performance depends on the settings. If you cannot call even when ✓ is indicated, its setting is not confi gured.
Incoming call
Tenant building Same main building Other main buildings
Main
building
Guard st. Calling/
communication
Entrance
st.
Guard
st.
✓✓ ✓ ✓ ✓ ✓ ✓
Outgoing call
✓ : Possible
4-2
A
Calling a room (residential/tenant station) or guard station
Searching for a unit by number
1 In standby mode, enter numbers using [0] to [9]
on the 10-key to display the target unit # and
name.
Entered number(s)
NUMBER SEARCH
1
101
102
103
104
105
Unit # whose initial number matches the
entered number are displayed in the list.
* The list is displayed in order of unit #.
* This station is not displayed.
2 Select the target unit by pressing
1 / 4
SMITH
AIPHONE
DENTIST
YOK OI
YABE
ZOOM
WIDE
or
ZOOM
ZOOM
WIDE
WIDE
Residential/
tenant st.
.
Entrance st. Guard st. Entrance st. Guard st.
3 Press ( ), or lift handset.
When the call is answered
Communication starts and " " is displayed.
4 To end communication, press or hang
up handset.
NOTES:
• Communication will end automatically after approximately 3
minutes. Communication with a residential/tenant station in
hands-free mode ends automatically after 1 minute in hands-free
mode.
• If both unit # 111 and 1111 exist, the resident name for unit 111
will be displayed when 1, 1, 1 is entered, and the resident name
for unit 1111 will be displayed if 1 is entered one more time.
• Stations can be set to display in order by unit #. (The order starts
with the lowest digit from 0 to 9 and then the order goes by
letter.) In cases where unit # such as A101, A201, A901, A1001,
and B101 exist, the order starts with the lowest digit and goes in
the order A101, A201, A901, B101, A1001.
* Press
ZOOM
ADJUST
WIDE
or
ZOOM
WIDE
to turn the page of the list.
- 32 -
ZOOM
WIDE
Page 33

GUARD STATION
S
1
Searching for a unit in the list
B-
ZOOM
1 In standby mode, press
WIDE
or
The unit list is displayed.
2 Select the target unit, by pressing
Selected unit # and name
101
SMITH
ZOOM
ADJU
WIDE
101
102
103
201
202
Unit # and names are displayed in alphabetical
or numerical order.
* The arranging method differs depending on
the setting.
* Press
ZOOM
WIDE
or
ZOOM
WIDE
to turn the page of the list.
* The list is displayed in order of either unit # or name.
* This station is not displayed.
1 / 1
SMITH
AIPHONE
DENTIST
LAINE
MENIN
ZOOM
ZOOM
WIDE
WIDE
.
2
Entering unit #
B-
1 In standby mode, press
ZOOM
WIDE
or
ZOOM
ZOOM
WIDE
WIDE
.
"UNIT #" screen is displayed.
ZOOM
WIDE
or
ZOOM
ZOOM
WIDE
WIDE
2 [When the target unit number is numerals only]
.
Enter the unit # using [0] to [9] on the 10-key.
[When the target unit number is alphanumeric]
1 Press ( ).
2 Enter the resident name using [0] to [9] on
the 10-key.
* How to enter letters (→P. 21).
Entered number is displayed.
UNIT #
10
3 Press ( ), or lift handset.
When the call is answered
Communication starts and " " is displayed.
* Audio guidance will be heard depending on the settings.
4 To end communication, press or hang
up handset.
NOTE: Communication will end automatically after approximately
3 minutes. Communication with a residential/tenant station
in hands-free mode ends automatically after 1 minute in
hands-free mode.
3 Press ( ), or lift handset.
When the call is answered
Communication starts and " " is displayed.
4 To end communication, press or hang
up handset.
NOTES:
• Communication will end automatically after approximately 3
minutes. Communication with a residential/tenant station in
hands-free mode ends automatically after 1 minute in hands-free
mode.
• If both unit # 111 and 1111 exist, the resident name for unit 111
will be displayed when 1, 1, 1 is entered, and the resident name
for unit 1111 will be displayed if 1 is entered one more time.
• Stations can be set to display in order by unit #. (The order starts
with the lowest digit from 0 to 9 and then the order goes by
letter.) In cases where unit # such as A101, A201, A901, A1001,
and B101 exist, the order starts with the lowest digit and goes in
the order A101, A201, A901, B101, A1001.
- 33 -
Page 34

GUARD STATION
S
3
B-
Searching for a building in the list +
entering unit #
1 In standby mode, press
The building list is displayed.
ZOOM
WIDE
or
ZOOM
ZOOM
WIDE
WIDE
2 Select the target building by pressing
ZOOM
ZOOM
WIDE
WIDE
.
Selected building number and name
01
CENTRAL TOWER
ZOOM
WIDE
ADJU
01
02
03
04
05
Building numbers and names are displayed in
alphabetical or numerical order.
* The arranging method differs depending on
the setting.
1 / 1
CENTRAL TOWER
EAST TOWER
WEST TOWER
NORTH TOWER
SOUTH TOWER
4
B-
Entering a building # + unit #
ZOOM
1 In standby mode, press
.
"BUILDING #" screen is displayed.
WIDE
or
ZOOM
ZOOM
WIDE
WIDE
.
2 [When the target building number is numerals
ZOOM
WIDE
or
only]
Enter the building number using [0] to [9] on the
10-key.
[When the target building number is
alphanumeric]
1 Press ( ).
2 Enter the building name using [0] to [9] on
the 10-key.
* How to enter letters (→P. 21).
Entered number is displayed.
BUILDING #
0
* Press
ZOOM
WIDE
or
ZOOM
WIDE
to turn the page of the list.
* The list is displayed in order of either building number or
name.
ZOOM
ZOOM
WIDE
3 Press ( ) or
WIDE
.
"UNIT #" is displayed.
4 [When the target unit number is numerals only]
Enter the unit # using [0] to [9] on the 10-key.
[When the target unit number is alphanumeric]
1 Press ( ).
2 Enter the resident name using [0] to [9] on
the 10-key.
* How to enter letters (→P. 21).
Selected building is displayed.
01
CENTRAL TOWER
UNIT #
1
ZOOM
ZOOM
WIDE
3 Press ( ) or
WIDE
.
"UNIT #" is displayed.
4 [When the target unit number is numerals only]
Enter the unit # using [0] to [9] on the 10-key.
[When the target unit number is alphanumeric]
1 Press ( ).
2 Enter the resident name using [0] to [9] on
the 10-key.
* How to enter letters (→P. 21).
BUILDING #
01
UNIT #
1
Entered number is displayed.
5 Press ( ), or lift handset.
When the call is answered
Communication starts and " " is displayed.
6 To end communication, press or hang
up handset.
Entered number is displayed.
5 Press ( ), or lift handset.
When the call is answered
Communication starts and " " is displayed.
6 To end communication, press or hang
up handset.
- 34 -
Page 35

GUARD STATION
S
S
Searching for a unit by using the search item
C
list
Searching for a building in the list + entering
unit #
1 Press ( ).
The search item list is displayed.
2 Select "BUILDING" by pressing
BUILDING
ZOOM
ADJU
WIDE
3 Press ( ) or
The building list is displayed.
4 Follow steps 2 to 6 of
BUILDING
GUARD STATION
ENTRANCE
ZOOM
ZOOM
WIDE
WIDE
.
3
B-
.
ZOOM
WIDE
or
ZOOM
ZOOM
WIDE
WIDE
Entering a building # + unit #
1 Press ( ).
The search item list is displayed.
ZOOM
2 Select "BUILDING" by pressing
BUILDING
ZOOM
ADJU
.
WIDE
3 Press ( ) or
BUILDING
GUARD STATION
ENTRANCE
ZOOM
ZOOM
WIDE
WIDE
.
WIDE
"BUILDING #" screen is displayed.
4
4 Follow steps 2 to 6 of
B-
.
NOTES:
• Communication will end automatically after approximately 3
minutes. Communication with a residential/tenant station in
hands-free mode ends automatically after 1 minute in hands-free
mode.
• If both unit # 111 and 1111 exist, the resident name for unit 111
will be displayed when 1, 1, 1 is entered, and the resident name
for unit 1111 will be displayed if 1 is entered one more time.
• Stations can be set to display in order by unit #. (The order starts
with the lowest digit from 0 to 9 and then the order goes by
letter.) In cases where unit # such as A101, A201, A901, A1001,
and B101 exist, the order starts with the lowest digit and goes in
the order A101, A201, A901, B101, A1001.
or
ZOOM
ZOOM
WIDE
WIDE
.
- 35 -
Page 36

GUARD STATION
S
S
S
Searching for a guard station from the guard
station list
1 Press ( ).
The search item list is displayed.
ZOOM
2 Select "GUARD STATION" by pressing
ZOOM
ZOOM
WIDE
WIDE
.
GUARD STATION
ZOOM
ADJU
WIDE
3 Press ( ) or
BUILDING
GUARD STATION
ENTRANCE
ZOOM
ZOOM
WIDE
WIDE
.
The building list is displayed.
4 Select the target building by pressing
ZOOM
ZOOM
WIDE
WIDE
.
WIDE
ZOOM
WIDE
or
or
6 Select the target guard station by pressing
ZOOM
ZOOM
WIDE
WIDE
or
ZOOM
.
01
CENTRAL TOWER
001
ADJU
WIDE
GUARD1
001
002
003
1 / 1
GUARD1
GUARD2
GUARD3
Guard station numbers and names are
displayed in alphabetical or numerical order.
* The arranging method differs depending on
the setting.
* Press
ZOOM
WIDE
or
ZOOM
WIDE
to turn the page of the list.
* The list is displayed in order of either station number or name.
* This station is not displayed.
7 Press ( ), or lift handset.
When the call is answered
Communication starts and " " is displayed.
ZOOM
WIDE
Selected building number and name
01
CENTRAL TOWER
ZOOM
WIDE
ADJU
01
02
03
04
05
1 / 1
CENTRAL TOWER
EAST TOWER
WEST TOWER
NORTH TOWER
SOUTH TOWER
Building numbers and names are displayed in
alphabetical or numerical order.
* The arranging method differs depending on
the setting.
* Press
ZOOM
WIDE
or
ZOOM
WIDE
to turn the page of the list.
* The list is displayed in order of either building number or
name.
ZOOM
ZOOM
WIDE
5 Press ( ) or
The guard station list is displayed.
WIDE
.
8 To end communication, press or hang
up handset.
NOTES:
• Communication will end automatically after approximately 3
minutes. Communication with a residential/tenant station in
hands-free mode ends automatically after 1 minute in hands-free
mode.
• If both unit # 111 and 1111 exist, the resident name for unit 111
will be displayed when 1, 1, 1 is entered, and the resident name
for unit 1111 will be displayed if 1 is entered one more time.
• Stations can be set to display in order by unit #. (The order starts
with the lowest digit from 0 to 9 and then the order goes by
letter.) In cases where unit # such as A101, A201, A901, A1001,
and B101 exist, the order starts with the lowest digit and goes in
the order A101, A201, A901, B101, A1001.
- 36 -
Page 37

GUARD STATION
S
S
S
4-3
Calling an entrance station
1 Press ( ).
The search item list is displayed.
ZOOM
ADJUST
WIDE
ZOOM
2 Select "ENTRANCE" by pressing
WIDE
ENTRANCE
ZOOM
ADJU
WIDE
3 Press ( ) or
BUILDING
GUARD STATION
ENTRANCE
ZOOM
ZOOM
WIDE
WIDE
.
The building list is displayed.
4 Select the target building by pressing
ZOOM
ZOOM
WIDE
WIDE
.
Selected building number and name
01
CENTRAL TOWER
ZOOM
WIDE
ADJU
01
02
03
04
05
1 / 1
CENTRAL TOWER
EAST TOWER
WEST TOWER
NORTH TOWER
SOUTH TOWER
or
ZOOM
WIDE
ZOOM
ZOOM
WIDE
WIDE
or
6 Select the target entrance station.
Selected entrance station number and name
0001
ENTRANCE1
ZOOM
ADJU
WIDE
0001
0002
0003
0004
0005
1 / 1
ENTRANCE1
ENTRANCE2
ENTRANCE3
ENTRANCE4
ENTRANCE5
.
Entrance station numbers and names are
displayed in alphabetical or numerical order.
* The arranging method differs depending on
the setting.
or
ZOOM
WIDE
to turn the page of the list.
ZOOM
* Press
WIDE
* The list is displayed in order of either station number or name.
7 Press ( ), or lift handset.
When the call is answered
Communication starts and " " is displayed.
* Audio guidance will be heard depending on the settings.
8 To end communication, press or hang
up handset.
NOTE: Communication will end automatically after approximately
3 minutes.
Building numbers and names are displayed in
alphabetical or numerical order.
* The arranging method differs depending on
the setting.
* Press
ZOOM
WIDE
or
ZOOM
WIDE
to turn the page of the list.
* The list is displayed in order of either building number or
name.
ZOOM
ZOOM
WIDE
5 Press ( ) or
The entrance station list is displayed.
WIDE
.
- 37 -
Page 38

GUARD STATION
Direct calling an entrance station
(only when
is displayed in standby
mode)
1 When is displayed, press ( ).
The preset entrance station is called, and then communication is
enabled.
2 Talk hands-free or lift the handset.
3 To end communication, press or hang
up handset.
Transferring video image taken by an
entrance station camera or surveillance
camera to a residential/tenant station
(only when
is displayed in standby
mode)
1 Press ( ).
2 Select a residential/tenant station by one of
A
the following methods
A
Press ( ) and then
select the target residential/tenant station.
B
1 Enter a number by using the 10-key to
display the list of residential/tenant
stations that include the number.
ZOOM
2 Press
WIDE
or
residential/tenant station.
3 Press ( ) or
C
-
.
ZOOM
WIDE
or
ZOOM
ZOOM
WIDE
WIDE
to select the target
ZOOM
ZOOM
WIDE
WIDE
.
ZOOM
ZOOM
WIDE
WIDE
to
C
1 Press and enter a letter by using the
10-key to display the list of residential/
tenant stations that include the letter.
2 Press
ZOOM
WIDE
or
ZOOM
ZOOM
WIDE
WIDE
to select the target
residential/tenant station.
ZOOM
ZOOM
WIDE
3 Press ( ) or
WIDE
.
3 Press ( ).
4 When the resident/tenant station answers and
accepts the visitor, press
handset.
* Step 2 differs depending on the settings.
or hang up
- 38 -
Page 39

GUARD STATION
5
A call from an entrance station can be transferred to a residential/
tenant station via a guard station
OPERATIONS DURING COMMUNICATION
1 After the guard station is called from an entrance
station, press or lift handset to answer
the call.
The number and name of
calling entrance station
ZOOM
WIDE
1011
PARKING GATE
5-25-1
Door releaseTransferring a call
1 While receiving a call or communicating with an
entrance station, press .
ZOOM
ADJUST
WIDE
Door release is activated at the entrance station.
* Audio guidance will be heard depending on the settings.
2 Press ( ) or enter the unit # by using [0] to
[9] on the 10-key.
The list of residential/tenant stations is displayed.
3 Select the target residential/tenant station, then
press ( ).
The call is transferred to the residential/tenant station.
*
"ON HOLD" is displayed on the entrance station and no
sound is heard at the entrance station.
4 When the residential/tenant station answers and
accepts the visitor, press or hang up
handset to establish communication between the
entrance station and the residential/tenant
station.
* When there is no answer from the residential/tenant station,
hang up handset and pick it up again, or press
then
* Step 2 differs depending on the settings.
to communicate with the entrance station.
and
NOTES:
• For an all-in-one type entrance station:
The door lock is released for the preset time. If the preset release
time is “0”, it can be released while the button is pressed and
held.
For a modular type entrance station:
If the VR1 dial (inside the cover) is set to “M (Momentary)”, it
can be released while the button is pressed and held.
• Depending on the electric door release system that you use, door
release may be active only while the door release button is pressed.
CAUTION:
Be sure to confi rm the visitor securely before releasing the door if the
entrance station has no camera.
Reference:
Reception mode (→
When there is a call from an entrance station to a residential/tenant
station, it is fi rst transferred to the guard station, so a call tone sounds
and the video at the entrance station is displayed on the guard station.
8-2
)
- 39 -
Page 40

GUARD STATION
5-3
Operating an optional
device
You can operate an optional device such as a light on this station.
1 Press .
ZOOM
ADJUST
WIDE
The optional device turns on.
NOTES:
• A signal is sent to the device installed in the site. Please refer to
the specifi cations of the device.
• If no optional device is installed, nothing happens when the
button is pressed.
- 40 -
Page 41

GUARD STATION
5-4
Viewing and adjusting video at an entrance station
You can view video at the target station when receiving a call from or
communicating with an entrance station with a camera, or monitoring
it. The video can be adjusted as desired by using the following
functions.
* These functions are not available for a door station.
Switching Zoom/Wide
The display mode can be switched between zoom and wide by each
ZOOM
ZOOM
WIDE
Wide
WIDE
.
ZOOM
ADJUST
WIDE
press of
Pan & Tilt
When a zoom image is displayed, pressing
ZOOM
ZOOM
WIDE
WIDE
, moves the image as shown below.
ZOOM
ADJUST
WIDE
ZOOM
ZOOM
WIDE
,
ZOOM
WIDE
WIDE
,
,
Zoom
NOTES:
• The preset position of zoom image depends on the setting.
• When the display mode switches from wide to zoom, the zoom
image is displayed at the preset position.
• Depending on the properties of the camera, the wide image may
appear more distorted than the zoom image but this is not a
malfunction.
• The image range of the zoom mode and wide mode differs. The
edge of wide image will not be displayed with the zoom mode.
NOTES:
• At night, the object image may be blurred and less-visible when
moving the image from right to left or up and down because
illumination to the object is reduced. The same applies to a
moving object.
• The pan & tilt function is not available for a video door station
(JO-DV) .
- 41 -
Page 42

GUARD STATION
Adjusting screen view
If the video on the screen is diffi cult to see, you can adjust the screen
view.
1 Press
ADJUST
when the video is diffi cult to see.
ZOOM
ADJUST
WIDE
The backlight or night sensitivity is automatically adjusted.
* The discrimination between day and night is performed
automatically by this station.
* The adjustment result may vary depending on the setting.
<Day> <Night>
[Before adjustment]
[Before adjustment]
[After adjustment] [After adjustment]
To restore the screen view before adjustment
Press
The icon is cleared and the screen view before adjustment is restored.
NOTES:
• Pressing
• The screen view adjusting function is not available for a video
ADJUST
again.
ADJUST
at night may make visitors' faces easier to see, but
may also make moving objects more diffi cult to see.
door station (JO-DV).
- 42 -
Page 43

GUARD STATION
S
T
6
MONITORING
You can monitor an entrance station or door station.
* When monitoring an entrance station or door station with a
camera, you can view the video at the station and hear the sound.
* The monitoring function is not available for an entrance station or
door station without a camera.
Monitoring from a tenant building
* For monitoring a door station, start from step 5.
1 In standby mode, press ( ).
ZOOM
ADJUST
WIDE
The search item list is displayed.
2 Select "ENTRANCE" by pressing
ZOOM
WIDE
or
ZOOM
ZOOM
WIDE
WIDE
.
5 Press .
The sound at the station is heard, and the video is displayed on the screen.
Selected station number and name
1011
PARKING GATE
* While monitoring, you can switch zoom/wide, pan & tilt, and
adjust the screen view. (→
5-4
)
6 [To communicate with the station]
Press
or lift handset.
ENTRANCE
ZOOM
ADJU
WIDE
3 Press ( ) or
UNIT BY NUMBER
UNIT BY NAME
GUARD STATION
ENTRANCE
ZOOM
ZOOM
WIDE
WIDE
.
The entrance station list is displayed.
4 Select the target entrance station by pressing
ZOOM
WIDE
or
ZOOM
WIDE
ZOOM
ZOOM
WIDE
WIDE
ADJUS
.
Selected entrance station number and name
0001
ENTRANCE1
0001
0002
0003
0004
0005
1 / 1
ENTRANCE1
ENTRANCE2
ENTRANCE3
ENTRANCE4
ENTRANCE5
ZOOM
ADJUST
WIDE
or
Communication with the station starts and " " is displayed.
* Until this step, the monitored stations cannot hear any sound
from the guard station.
7 To end monitoring or communication,
Press or hang up handset.
NOTES:
• Monitoring ends automatically after about 30 seconds.
• Only entrance stations that can be selected by the guard station
can be monitored.
• When no door station is installed, pressing
effect on the display.
has no
Entrance station numbers and names are
displayed in alphabetical or numerical order.
* The arranging method differs depending on
the setting.
* Press
ZOOM
WIDE
or
ZOOM
WIDE
to turn the page of the list.
* The list is displayed in order of either station number or name.
- 43 -
Page 44

GUARD STATION
S
S
S
Monitoring from a main building
* For monitoring a door station, start from step 7.
1 In standby mode, press ( ).
The search item list is displayed.
ZOOM
ADJUST
WIDE
ZOOM
2 Select "ENTRANCE" by pressing
ENTRANCE
ZOOM
WIDE
ADJU
BUILDING
GUARD STATION
ENTRANCE
WIDE
or
6 Select the target entrance station.
Selected entrance station number and name
0001
ENTRANCE1
ZOOM
ADJU
WIDE
0001
0002
0003
0004
0005
1 / 1
ENTRANCE1
ENTRANCE2
ENTRANCE3
ENTRANCE4
ENTRANCE5
Entrance station numbers and names are
displayed in alphabetical or numerical order.
* The arranging method differs depending on
the setting.
ZOOM
ZOOM
WIDE
WIDE
.
* Press
ZOOM
WIDE
or
ZOOM
WIDE
to turn the page of the list.
* The list is displayed in order of either station number or name.
7 Press .
The sound at the station is heard, and the video is displayed on the screen.
Selected station number and name
1011
PARKING GATE
ZOOM
ZOOM
WIDE
3 Press ( ) or
WIDE
.
The building list is displayed.
4 Select the target building.
Selected building number and name
01
CENTRAL TOWER
ZOOM
ADJU
WIDE
01
02
03
04
05
Building numbers and names are displayed in
alphabetical or numerical order.
* The arranging method differs depending on
the setting.
* Press
ZOOM
WIDE
or
ZOOM
WIDE
to turn the page of the list.
* The list is displayed in order of either building number or
name.
ZOOM
ZOOM
WIDE
5 Press ( ) or
The entrance station list is displayed.
WIDE
1 / 1
CENTRAL TOWER
EAST TOWER
WEST TOWER
NORTH TOWER
SOUTH TOWER
.
* While monitoring, you can switch zoom/wide, pan & tilt, and
adjust the screen view. (→
5-4
)
8 [To communicate with the station]
Press or lift handset.
ZOOM
ADJUST
WIDE
or
Communication with the entrance station side starts and " "
is displayed.
* Until this step, the monitored stations cannot hear any sound
from the guard station.
9 To end monitoring or communication,
Press or hang up handset.
NOTES:
• Monitoring ends automatically after about 30 seconds.
• Only entrance stations that can be selected by the guard station
can be monitored.
• When no door station is installed, pressing
has no
effect on the display.
- 44 -
Page 45

GUARD STATION
T
T
7
OTHER OPERATIONS
7-1
Checking for missed calls and calling back
If this station fails to respond to a call from a residential/tenant
station, "MISSED CALLS" fl ashes continuously on the display in
standby mode, and the status LED on the unit fl ashes. Check the
missed calls and call back if necessary.
Flashes.
NAME SEARCH
EMERGENCY
ZOOM
WIDE
NAME SEARCH
MISSED CALLS
Flashes.
ZOOM
1 To check for missed calls, press
WIDE
in standby
mode.
A record of missed calls is displayed.
MISSED CALLS
101
SMITH
ZOOM
ADJUS
WIDE
101
102
103
201
202
1 / 1
SMITH
AIPHONE
DENTIST
LAINE
MENIN
2 To call back, select the target unit by pressing
ZOOM
WIDE
* Press
* Depending on the settings, only the unit # may be displayed.
or
ZOOM
WIDE
ZOOM
ZOOM
WIDE
WIDE
.
Selected unit # and name
* On a guard station in a main section, the
building #, building name, and unit # of
the selected unit are displayed.
MISSED CALLS
102
AIPHONE
ADJUS
ZOOM
WIDE
or
101
102
103
201
202
ZOOM
WIDE
to turn the page of the list.
1 / 1
SMITH
AIPHONE
DENTIST
LAINE
MENIN
3 Press ( ), or lift handset.
When the call is answered
Communication starts and " " is displayed.
4 To end communication,
press or hang up handset.
NOTES:
When there are two or more missed calls, they
are listed in reverse chronological order.
* On a guard station in a main section, building
#, building names, and unit # are displayed.
• The guard station can hold up to 20 missed calls.
• A record of answered calls is not kept.
• While a record of missed calls are displayed, this station cannot
enter program mode.
- 45 -
Page 46

GUARD STATION
EMERGENCY
101
SMITH
101 SMITH
1 / 1
T
7-2
Receiving an emergency call
When an emergency alarm switch is locked (or when a wire
disconnection occurs), an alarm sounds and an "EMERGENCY"
screen is displayed on this station. Check for the unit that sent the
emergency call, and take the necessary action.
EMERGENCY
The unit # and name of
the unit that sent the
101
SMITH
emergency call
* On a guard station in
a main section, the
building #, building
name, and unit # are
displayed.
1 To stop the alarm sound, press ( ).
ZOOM
ADJU
WIDE
3 To end communication, press or hang
up handset.
To delete an emergency call from the list.
ZOOM
Select the target call by pressing
then press
( ).
WIDE
EMERGENCY
101
ZOOM
ADJUS
WIDE
SMITH
101
201
1 / 1
NOTE: While a record of emergency calls are displayed, this
station cannot enter program mode.
or
SMITH
LAINE
ZOOM
ZOOM
WIDE
WIDE
,
The alarm stops and a record of emergency calls is displayed.
* On a guard station in a main section, building #, building
names, and unit # are displayed.
* When linked with multiple guard stations, stopping the alarm
on any guard station will stop the alarm of all the guard
stations.
2 To communicate with the unit, press ( ),
or lift handset.
EMERGENCY
101
SMITH
ZOOM
ADJU
WIDE
101 SMITH
* When there are two or more emergency calls, select one by
pressing
ZOOM
WIDE
or
ZOOM
ZOOM
WIDE
WIDE
or lift handset.
or
ZOOM
WIDE
to turn the page of the list.
ZOOM
* Press
WIDE
* The list is displayed in chronological order.
1 / 1
, then press ( ),
When the call is answered
Communication starts and " " is displayed.
- 46 -
Page 47

GUARD STATION
To display a record of emergency calls
NAME SEARCH
EMERGENCY
ZOOM
WIDE
NAME SEARCH
MISSED CALLS
Flashes when there is one or more
unchecked emergency calls.
ZOOM
1 Press
A record of emergency calls is displayed.
To call a room that sent the emergency call
WIDE
In standby mode.
Select the target record by pressing
then press
( ), or lift handset.
ZOOM
WIDE
or
ZOOM
ZOOM
WIDE
WIDE
, and
NOTE: The emergency alarm keeps fl ashing until the target record
is deleted from the list. To delete it, select it on the list and
then press
( ).
The residential/tenant station keeps sounding the alarm until the
emergency alarm switch is restored at the room. In such case, the
record of emergency calls cannot be deleted with the guard
station. Unless the alarm is restored at the room, no call can be
made from the guard station to the room.
Please make sure the alarm is restored at the room.
NOTES:
• If an emergency call is already active on this station and this
station is in communication, another guard station cannot
interrupt. (An in-use tone will be heard from handset or speaker
of the guard station.)
• The emergency alarm is given priority even when the system is
in use. (Alarms can be activated at the same time for up to 5
units. This excludes GT-2C-L and GT-2C.)
• Emergency calls can be made while the system is in use.
• With the GT-2C-L and GT-2C, it is possible to transfer to a guard
station even when there is a security alarm, depending on the
settings.
• Even when the call tone volume is set to mute on the guard
station, an alarm goes off at the maximum volume.
- 47 -
Page 48

GUARD STATION
S
S
S
S
8
SETTING
8-1
Adjusting display brightness and volumes
Adjusting brightness of the display
1 In standby mode, press .
ZOOM
ADJUST
WIDE
The SETTINGS screen is displayed.
2 Select "BRIGHTNESS" by pressing
SETTINGS
BRIGHTNESS
ZOOM
WIDE
ADJU
TONE VOLUME
RECEIVE VOLUME
ADVANCED SETTINGS
Adjusting the call tone volume
You can adjust the call tone volume at this station.
1 In standby mode, press .
The SETTINGS screen is displayed.
ZOOM
2 Select "TONE VOLUME" by pressing
ZOOM
ZOOM
WIDE
WIDE
.
ZOOM
WIDE
or
ZOOM
ZOOM
WIDE
WIDE
.
ZOOM
ADJU
WIDE
SETTINGS
BRIGHTNESS
TONE VOLUME
RECEIVE VOLUME
ADVANCED SETTINGS
WIDE
or
ZOOM
3 Adjust the brightness by pressing
SETTINGS
BRIGHTNESS
ZOOM
WIDE
ADJU
TONE VOLUME
RECEIVE VOLUME
ADVANCED SETTINGS
WIDE
Adjustment can be made in 10 levels.
To return to the previous screen
Press ( ).
To adjust brightness of the display while
being called or in communication
1 While being called or in communication,
press
.
2 Press ( ).
ZOOM
3 Adjust the brightness by pressing
WIDE
or
or
or
ZOOM
WIDE
.
ZOOM
3 Adjust the volume by pressing
ZOOM
WIDE
.
ZOOM
ADJU
WIDE
SETTINGS
BRIGHTNESS
TONE VOLUME
RECEIVE VOLUME
ADVANCED SETTINGS
WIDE
Adjustment can be made in 4 levels.
("Mute" is available.)
* If set to "mute”, the status LED will fl ash with
long intervals. (→
1-2
)
To return to the previous screen
Press ( ).
To adjust the call tone volume while being
called or in communication
1 While being called or in communication,
press .
ZOOM
WIDE
.
2 Press .
3 Adjust the volume by pressing
or
ZOOM
WIDE
.
ZOOM
WIDE
- 48 -
Page 49

GUARD STATION
S
S
Adjusting the receive volume
You can adjust the speaker volume of this station.
1 In standby mode, press .
The SETTINGS screen is displayed.
2 Select "RECEIVE VOLUME" by pressing
ZOOM
ZOOM
WIDE
WIDE
.
SETTINGS
BRIGHTNESS
ZOOM
ADJU
WIDE
TONE VOLUME
RECEIVE VOLUME
ADVANCED SETTINGS
ZOOM
WIDE
or
ZOOM
3 Adjust the volume by pressing
SETTINGS
BRIGHTNESS
ZOOM
ADJU
WIDE
TONE VOLUME
RECEIVE VOLUME
ADVANCED SETTINGS
WIDE
or
Adjustment can be made in 3 levels.
To return to the previous screen
Press ( ).
To adjust the receive volume while being
called or in communication
1 While being called or in communication,
press
.
ZOOM
WIDE
.
2 Press ( ).
3 Adjust the volume by pressing
or
ZOOM
WIDE
.
ZOOM
WIDE
- 49 -
Page 50

GUARD STATION
S
S
S
8-2
Switching to reception mode
* This section describes the reception mode and how to confi gure it.
5-1
Refer to steps 2 to 3 of "
Transferring a call" for the
operating procedure.
What is reception mode?
In reception mode, all of the calls from entrance stations to
residential/tenant stations are fi rst transferred to guard stations.
You can transfer the calls to residential/tenant stations after
confi rming they are not unwanted calls to the target residents.
[Normal mode]
Call
Residential/tenant
Entrance station
Guard station (this station)
station
Switching this station between normal mode
and reception mode
1 In standby mode, press .
The SETTINGS screen is displayed.
2 Select "ADVANCED SETTINGS"
by pressing
ZOOM
WIDE
ZOOM
WIDE
ADJU
ZOOM
ZOOM
WIDE
WIDE
or
.
SETTINGS
BRIGHTNESS
TONE VOLUME
RECEIVE VOLUME
ADVANCED SETTINGS
3 Select "RECEPTION MODE"
by pressing
ZOOM
WIDE
or
ZOOM
ZOOM
WIDE
WIDE
.
[Reception mode]
Call Transfer
Residential/tenant
Entrance station
Guard station (this station)
NOTES:
• In a main building:
Calls from an entrance station are transferred to all guard stations
in the building. The call tone sounds on all guard stations at the
same time.
In a tenant building:
Calls from an entrance station are transferred to all guard stations
in the tenant building that are linked to the corresponding
residential/tenant station. The call tone sounds on all guard
stations at the same time.
• A call to a residential/tenant station that is not linked to a guard
station will result in a call to the residential/tenant station
directly.
station
ADVANCED SETTINGS
ZOOM
ADJU
WIDE
4 Press ( ) or
RECEPTION MODE
OFF
PROGRAM MODE
ZOOM
ZOOM
WIDE
WIDE
.
5 Change reception mode to "ON" or "OFF" by
ZOOM
ZOOM
WIDE
WIDE
ADJU
pressing
6 Press ( ) or
ZOOM
WIDE
or
.
ADVANCED SETTINGS
RECEPTION MODE
OFF
PROGRAM MODE
ON: Reception mode is active.
OFF: Normal mode is active.
ZOOM
ZOOM
WIDE
WIDE
.
* When this station is in reception mode, the status LED will
fl ash slowly. (→
1-2
)
To return to the previous screen
Press ( ).
- 50 -
Page 51

GUARD STATION
S
S
8-3
This operation is for Administrators and Managers only
*
Switching to program mode
Entering a passcord is needed to switch this station into program
mode. Ask the system installer for the passcord.
* A registered NFC-compliant IC card can be used instead of a
passcord.
1 In standby mode, press (or pass an
registered NFC-compliant IC card over the NFC
reader).
The SETTINGS screen is displayed.
2 Select "ADVANCED SETTINGS"
by pressing
ZOOM
WIDE
ZOOM
WIDE
ADJU
ZOOM
ZOOM
WIDE
WIDE
or
.
SETTINGS
BRIGHTNESS
TONE VOLUME
RECEIVE VOLUME
ADVANCED SETTINGS
3 Select "PROGRAM MODE"
ZOOM
by pressing
ZOOM
WIDE
WIDE
ADJU
4 Press ( ) or
The passcord entry screen is displayed.
ZOOM
ZOOM
WIDE
WIDE
or
.
ADVANCED SETTINGS
RECEPTION MODE
OFF
PROGRAM MODE
ZOOM
ZOOM
WIDE
WIDE
.
5 Enter the passcord.
* Refer to the GT SYSTEM SETTING MANUAL/Standard &
Expanded System for details about the settings.
NOTE: An NFC card can be used with either "Admin" or
"Manager" authority. (
→ GT SYSTEM SETTING
MANUAL/Standard & Expanded System)
- 51 -
Page 52

GUARD STATION
9
Refer to the GT SYSTEM/SETTING MANUAL.
• For single building system (→ GT SYSTEM SETTING
• For multi building system (→ GT SYSTEM SETTING
When using an Android device
(→ GT SYSTEM SETTING MANUAL/Aiphone GT Setup Tool
for Android)
Android is a trademark of Google Inc. in the United States and/or
other countries.
UPDATING RESIDENT INFORMATION
MANUAL/Standard & Expanded System)
MANUAL/Multi Building System)
- 52 -
Page 53

FOR PROPER USE OF THIS STATION
1
[For guard station only]
• The video image may distort when door release is activated. This
• If a zoom/wide, pan/tilt, door release operation or brightness
[General]
• If there is a system malfunction, contact a qualifi ed technician for
TECHNICAL PRECAUTIONS
is not a station malfunction.
adjustment is performed during communication with the entrance
station, noise will be produced at the entrance station. This is not a
malfunction.
service.
• Cleaning:
Clean the units with a soft cloth dampened with a neutral
household cleanser. Do not use any abrasive cleaner or cloth.
CAUTION: Do not use chemicals such as thinner or benzine. In
addition, do not use a scrub brush, sandpaper, etc. Otherwise the
unit surface could be damaged or discolored.
- 53 -
Page 54

FOR PROPER USE OF THIS STATION
2
SPECIFICATIONS
Entrance station (modular type)
Camera module (GT-VB)
Power source Supplied from GT-VBC
Ambient temperature - 10°C - +60°C (+14°F - +140°F)
Material Self-extinguishing PC+ABS resin
Dimensions
Mass Approx. 130g (0.29 lbs.)
Camera module panel (GT-VP)
Material Zinc die cast
Color Metallic beige
Dimensions
Mass Approx. 150g (0.34 lbs.)
Audio module (GT-DB/GT-DB-V/GT-DB-VN)
Power source Supplied from GT-BC
Ambient temperature - 10°C - +60°C (+14°F - +140°F)
Material Self-extinguishing ABS resin
Dimensions
Mass
Audio panel (GT-DBP)
Material Zinc die cast
Color Metallic beige
Dimensions
Mass Approx. 95g (0.21 lbs)
Name scrolling module (GT-NSB)
Power source
Ambient temperature - 10°C - +60°C (+14°F - +140°F)
Material Self-extinguishing ABS resin
Dimensions
Mass Approx. 140g (0.31 lbs)
Name scrolling module panel (GT-NSP-L)
Material
Color Metallic beige
Dimensions
Mass Approx. 200g (0.49 lbs.)
Call switch module (GT-SW)
Power source Supplied from GT-DB/GT-DB-V/GT-DB-VN
Ambient temperature - 10°C - +60°C (+14°F - +140°F)
Material Self-extinguishing ABS plastic
Dimensions
Mass Approx. 90g (0.199 lbs.)
108 (W) x 93 (H) x 55 (D) mm
4-1/4" (W) x 3-11/16" (H) x 2-3/16" (D)
110 (W) x 95 (H) x 8 (D) mm
4-5/16" (W) x 3-3/4" (H) x 5/16" (D)
108 (W) x 93 (H) x 53.4 (D) mm
4-1/4" (W) x 3-11/16" (H) x 2-1/8" (D)
GT-DB, GT-DB-V: Approx. 210g (0.47 lbs)
GT-DB-VN: Approx. 220g (0.49 lbs)
109.7 (W) x 94.9 (H) x 7.9 (D) mm
4-5/16" (W) x 3-3/4" (H) x 5/16" (D)
DC 24V supplied from a power supply unit
(PS-2420 etc.)
104.6 (W) x 88.3 (H) x 49.1 (D) mm
4-1/8" (W) x 3-1/2" (H) x 1-15/16" (D)
Panel: Zinc die cast
Window: Polycarbonate
Bottom: Chrome plated zinc die cast
110 (W) x 96 (H) x 31.2 (D) mm
4-5/16" (W) x 3-3/4" (H) x 1-3/4" (D)
90.5 (W) x 106 (H) x 42.5 (D) mm
3-9/16" (W) x 4-3/16" (H) x 1-11/16" (D)
1-call button panel (GF-1P)/2-call button panel (GF-2P)/
3-call button panel (GF-3P)/4-call button panel (GF-4P)
Material
Color Metallic beige
Dimensions
Mass
Panel: Zinc die cast
Window: Polycarbonate
Bottom: Chrome plated zinc die cast
110 (W) x 95.2 (H) x 15.8 (D) mm
4-5/16" (W) x 3-3/4" (H) x 5/8" (D)
GF-1P: Approx. 180g (0.40 lbs.)
GF-2P: Approx. 190g (0.42 lbs.)
GF-3P: Approx. 190g (0.42 lbs.)
GF-4P: Approx. 200g (0.45 lbs.)
10-key module panel (GF-10KP)
Material
Color Metallic beige
Dimensions
Mass Approx. 310g (0.69 lbs.)
Panel: Zinc die cast
Box: Chrome plated steel
110 (W) x 96.1 (H) x 38.2 (D) mm
4-5/16" (W) x 3-13/16" (H) x 15/16" (D)
Address module (GF-AD)
Power source Supplied from GT-DB/GT-DB-V/GT-DB-VN
Ambient temperature - 10°C - +60°C (+14°F - +140°F)
Material Self-extinguishing ABS plastic
Dimensions
Mass Approx. 90g (0.199 lbs.)
105.6 (W) x 88.3 (H) x 42.5 (D) mm
4-3/16" (W) x 3-1/2" (H) x1-11/16" (D)
Address module panel (GF-AP)
Material
Color Metallic beige
Dimensions
Mass Approx. 150g (0.34 lbs.)
Panel: Zinc die cast
Window: Polycarbonate
110 (W) x 95.2 (H) x 14.3 (D) mm
4-5/16" (W) x 3-3/4" (H) x 9/16" (D)
Blank panel (GF-BP)
Material Zinc die cast
Color Metallic beige
Dimensions
Mass Approx. 190g (0.42 lbs.)
110 (W) x 95.2 (H) x 14.3 (D) mm
4-5/16" (W) x 3-3/4" (H) x 9/16" (D)
4-module front frame (GF-4F)/3-module front frame
(GF-3F)/2-module front frame (GF-2F)
Material
Color Metallic beige
Dimensions
Mass
Front frame: Zinc die cast
Mounting bracket: Stainless steel
GF-2F: 135 (W) x 225 (H) x 16 (D) mm
5-5/16" (W) x 8-7/8" (H) x 5/8" (D)
GF-3F: 135 (W) x 320 (H) x 16 (D) mm
5-5/16" (W) x 12-5/8" (H) x 5/8" (D)
GF-4F: 135 (W) x 425 (H) x 16 (D) mm
5-5/16" (W) x 16-3/4" (H) x 5/8" (D)
GF-2F:
Front frame: Approx. 400g (0.89 lbs.)
Mounting bracket: Approx. 200g (0.45 lbs.)
GF-3F:
Front frame: Approx. 490g (1.09 lbs.)
Mounting bracket: Approx. 250g (0.56 lbs.)
GF-4F:
Front frame: Approx. 660g (1.46 lbs.)
Mounting bracket: Approx. 290g (0.64 lbs.)
- 54 -
Page 55

FOR PROPER USE OF THIS STATION
Entrance station (all-in-one type)
All-in-one entrance station (GT-DMB-N/GT-DMB-LVN)
Power source
Ambient temperature - 10°C - +60°C (+14°F - +140°F)
Material
Color
Dimensions
Mass
DC 24V supplied from a power supply unit (PS-2420
etc.)
Panel: Stainless steel
Case: Self-extinguishing ABS resin
Panel: Stainless steel with hairline fi nishing
Case: Black
GT-DMB-N: 150 (W) x 320 (H) x 38.5 (D) mm
5-7/8" (W) x 12-5/8" (H) x 1-1/2" (D)
GT-DMB-LVN: 150 (W) x 425 (H) x 38.5 (D) mm
5-7/8" (W) x 16-3/4" (H) x 1-1/2" (D)
GT-DMB-N: Approx. 1,200g (2.70 lbs)
GT-DMB-LVN: Approx. 1,500g (3.3 lbs)
Guard station
Guard station (GT-MKB-N)
Power source
Communication
Ambient temperature 0 - 40°C (+32°F - +104°F)
Monitor 3.5 inch TFT color LCD
Mounting
Material Self-extinguishing ABS resin
Color Black
Dimensions
Mass
DC 24V supplied from a power supply unit
(PS-2420 etc.)
Open voice: Voice-actuated
Handset: Voice-actuated/Full-duplex (only when
the other side is talking using the handset of
GT-MKB-N or GT-1D)
Desktop use (with desktop stand) or surface
wall-mount
250 (W) x 189 (H) x 59 (D) mm
9-13/16" (W) x 7-7/16" (H) x 2-5/16" (D)
Approx. 820g (1.81 lbs)
When used with desk stand:
Approx. 1,200g (2.70 lbs)
Door station
Vandal-resistant video door station (surface-mount)
(JO-DV)
Power source Supplied from guard station
Communication Open voice hands-free communication
Ambient temperature - 20°C - +60°C (- 4°F - +140°F)
Material
Color Front panel: Silver
Dimensions
Mass Approx. 650g (1.44 lbs.)
Remarks IP54, IK08
Front panel: Zinc die cast
Main unit: Self-extinguishing
98 (W) x 173 (H) x 27 (D) mm
3-7/8" (W) x 6-13/16" (H) x 1-1/16" (D)
- 55 -
Page 56

FOR PROPER USE OF THIS STATION
3
SOFTWARE LICENSE
Notice regarding software
Use of the software installed on this product has received direct or indirect authorization from third parties.
(1) GPL/LGPL
This product includes software components subject to the GPL/LGPL.
Customers can obtain, modify, and re-distribute the source code of the software components according to the GPL/LGPL.
Hereafter referred to as the link
Open source code
This product includes software components subject to the GPL/LGPL, and customers can obtain, modify, and re-distribute the
source code of the software components according to the GPL/LGPL. In addition, you can fi nd details on the GPL/LGPL through the
following links.
http://www.gnu.org/licenses/gpl.html
http://www.gnu.org/licenses/lgpl.html
Please confi rm the following contents when downloading.
<<Please confi rm>>
■ According to GPL/LGPL, the source code of the software components is not guaranteed, including warranty on
“merchantability” or “suitability for a particular purpose.”
■ The source code of the software components are according to the “status quo,” and are provided based on the GPL/LGPL.
■ Please understand that we cannot answer questions regarding the content of the source code of the software components.
BSD License
Copyright (c) 2017, AIPHONE CO.,LTD
All rights reserved.
Redistribution and use in source and binary forms, with or without modifi cation, are permitted provided that the following conditions
are met:
1. Redistributions of source code must retain the above copyright notice, this list of conditions and the following disclaimer.
2. Redistributions in binary form must reproduce the above copyright notice, this list of conditions and the following disclaimer in the
documentation and/or other materials provided with the distribution.
THIS SOFTWARE IS PROVIDED BY THE COPYRIGHT HOLDERS AND CONTRIBUTORS "AS IS" AND ANY EXPRESS OR
IMPLIED WARRANTIES, INCLUDING, BUT NOT LIMITED TO, THE IMPLIED WARRANTIES OF MERCHANTABILITY AND
FITNESS FOR A PARTICULAR PURPOSE ARE DISCLAIMED. IN NO EVENT SHALL THE COPYRIGHT OWNER OR
CONTRIBUTORS BE LIABLE FOR ANY DIRECT, INDIRECT, INCIDENTAL, SPECIAL, EXEMPLARY, OR CONSEQUENTIAL
DAMAGES (INCLUDING, BUT NOT LIMITED TO, PROCUREMENT OF SUBSTITUTE GOODS OR SERVICES; LOSS OF USE,
DATA, OR PROFITS; OR BUSINESS INTERRUPTION) HOWEVER CAUSED AND ON ANY THEORY OF LIABILITY, WHETHER
IN CONTRACT, STRICT LIABILITY, OR TORT (INCLUDING NEGLIGENCE OR OTHERWISE) ARISING IN ANY WAY OUT OF
THE USE OF THIS SOFTWARE, EVEN IF ADVISED OF THE POSSIBILITY OF SUCH DAMAGE.
The views and conclusions contained in the software and documentation are those of the authors and should not be interpreted as
representing offi cial policies, either expressed or implied, of the FreeBSD Project.
- 56 -
Page 57

FOR PROPER USE OF THIS STATION
4
FCC
This device complies with part 15 of the FCC Rules. Operation is
subject to the following two conditions: (1) This device may not
cause harmful interference, and (2) this device must accept any
interference received, including interference that may cause
undesired operation.
Changes or modifi cations not expressly approved by the party
responsible for compliance could void the user's authority to operate
the equipment.
NOTE: This equipment has been tested and found to comply with the
limits for a Class B digital device, pursuant to part 15 of the FCC
Rules. These limits are designed to provide reasonable protection
against harmful interference in a residential installation. This
equipment generates, uses and can radiate radio frequency energy
and, if not installed and used in accordance with the instructions,
may cause harmful interference to radio communications. However,
there is no guarantee that interference will not occur in a particular
installation. If this equipment does cause harmful interference to
radio or television reception, which can be determined by turning the
equipment off and on, the user is encouraged to try to correct the
interference by one or more of the following measures:
REGULATIONS
• Reorient or relocate the receiving antenna.
• Increase the separation between the equipment and receiver.
• Connect the equipment into an outlet on a circuit different
from that to which the receiver is connected.
• Consult the dealer or an experienced radio/TV technician
for help.
RED
Hereby, Aiphone Co., Ltd. declares that the radio equipment type
[GT-DB-VN, GT-DMB-N, GT-DMB-LVN, GT-MKB-N, GTBCXB-N] is in compliance with Directive 2014/53/EU.
The full text of the EU declaration of conformity is available at the
following internet address:
http://www.aiphone.net/
GT-MKB-N: 13.56MHz / Max. 20.0 dBm
GT-DMB-N: 13.56MHz / Max. 20.0 dBm
GT-DMB-LVN: 13.56MHz / Max. 20.0 dBm
GT-DB-VN: 13.56MHz / Max. 20.0 dBm
GT-BCXB-N: 13.56MHz / Max. 20.0 dBm
NCC
電信法第48條
低功率電波輻射性電機管理辦法
第十二條
經型式認證合格之低功率射頻電機,非經許可,公司、商號或
使用者均不得擅自變更頻率、加大功率或變更原設計之特性及
功能。
第十四條
INDUSTRY CANADA
CAN ICES-3 (B)/NMB-3(B)
This device complies with Industry Canada's licence-exempt
RSSs. Operation is subject to the following two conditions:
(1) This device may not cause interference; and (2) This
device must accept any interference, including interference
that may cause undesired operation of the device.
低功率射頻電機之使用不得影響飛航安全及干擾合法通信;經
發現有干擾現象時,應立即停用,並改善至無干擾時方得繼續
使用。
前項合法通信,指依電信法規定作業之無線電通信。
低功率射頻電機須忍受合法通信或工業、科學及醫療用電波輻
射性電機設備之干擾。
WEEE
The object area of is the EU.
- 57 -
Page 58

FOR PROPER USE OF THIS STATION
5
Aiphone warrants its products to be free from defects of material and workmanship under normal use and service for a period of 2
years after delivery to the ultimate user and will repair free of charge or replace at no charge, should it become defective upon
which examination shall disclose to be defective and under warranty. Aiphone reserves unto itself the sole right to make the fi nal
decision whether there is a defect in materials and/or workmanship; and whether or not the product is within the warranty. This
warranty shall not apply to any Aiphone product which has been subject to misuse, neglect, accident, power surge, or to use in
violation of instructions furnished, nor extended to units which have been repaired or altered outside of the factory. This warranty
does not cover batteries or damage caused by batteries used in connection with the unit. This warranty covers bench repairs only,
and any repairs must be made at the shop or place designated in writing by Aiphone. This warranty is limited to the standard
specifi cations listed in the operation manual. This warranty does not cover any supplementary function of a third party product that
is added by users or suppliers. Please note that any damage or other issues caused by failure of function or interconnection with
Aiphone products is also not covered by this warranty. Aiphone will not be responsible for any costs incurred involving on site
service calls. Aiphone will not provide compensation for any loss or damage incurred by the breakdown or malfunction of its
products during use, or for any consequent inconvenience or losses that may result.
WARRANTY
Issue Date: Jun. 2017
B P0617 SZ 59038
- 58 -
http://www.aiphone.net/
AIPHONE CO., LTD., NAGOYA, JAPAN
 Loading...