

Page 1
Made In China
0&$*6
Page 2
When using electrical appliances, basic safety precautions should always be
followed including the following.
·Blade is sharp. Handle carefully .
·To reduce the risk of injury, never place cutting blade on base without first putting bowl
properly in place.
Be sure cover is securely is locked securely in place before operating appliance.
Page 3
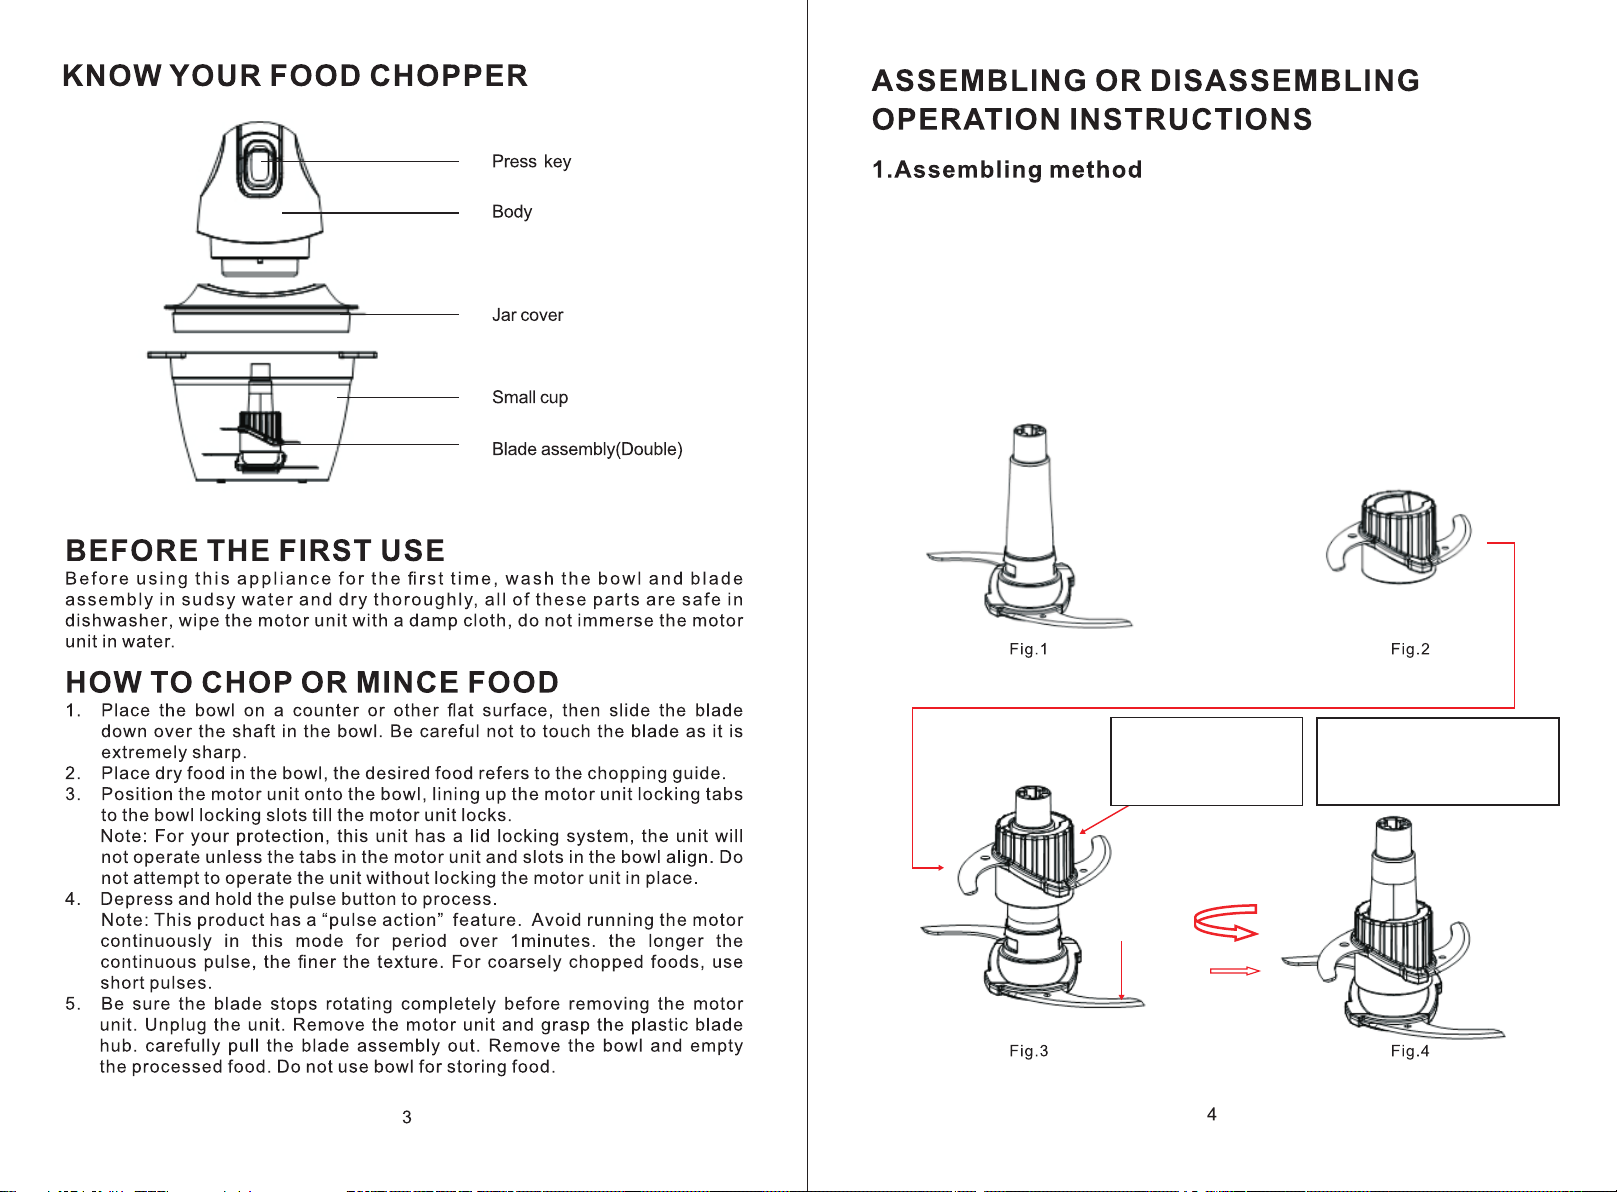
A. S-shape blade holder 1 (Fig.1)
B. S-shape blade holder 2 (Fig.2)
C. Assemble the S-shape blade holder 2 (Fig. 1) onto the S-shape blade holder 1 (Fig. 1):
Grasp the top part of S-shape blade holder 2 (Fig.1) with finger and then the position of hte
slot .(Fig. 3 ), after it, rotate it to the left to lock it well in position (Fig.4).
Note: Please follow the operating instruction to avoid the finger being hurt.
Note:Work for 15 seconds and then rest for 1 minute.
Grasp the top part with
your finger and then align
the position of hte slot .
Grasp the S-shape blade holder
2 with finger and rotate it to the
left to lock it well in position.
Page 4

A. Disassemble the S-shape blade holder 2 (Fig.1) from the component
shown in Fig.6:
Firstly, grasp the S-shape blade holder 1 with left finger and then grasp
the top part S-shape blade holder 2 and rotate it to the right to unlock,
after it, lift the S-shape blade holder 2 upwards to remove.
Note: Please follow the operating instruction to avoid the finger being hurt.
Grasp the S-shape blade holder
2 top part with finger and rotate
it to the right unlock.
Life can be removed.
NOTE:The main body and cup shall be placed separately to avoid unpleasant
odour enterring into the cup when there is food in the cup.
Page 5

A.Wenn Sie das Elektrogerät benutzen, sollen Sie die grundsätzliche
Vorsichtsmaßnahme unbedingt beachten, inkl. der folgenden.
Die Klinge ist scharf. Verwenden Sie das Messer sorgfältig.
Um das Risiko einer Verletzung zu verringern stellen Sie niemals das
Schneidmesser auf die Basis, ohne dass die Schüssel richtig eingesetzt ist.
Stellen Sie sicher, dass die Abdeckung vor der Operation des Gerätes fest
gesetzt wird.
Page 6

Hinweis: 15 Sekunden lang arbeiten und dann für 1 Minute ruhen.
Fassen Sie den oberen Teil des S-shape Klingenhalters 1 (Bild 1.) mit dem
Finger und dann die Position des Schlitzes (Bild 3.). Danach drehen sie
nach links, um sie gut zu positionieren (Bild 4.).
Fassen Sie das Oberteil mit dem Finger
an und richten Sie dann die Position
des Schlitzes aus
Fassen Sie den S-förmigen
Klingenhalter 2 mit dem Finger
an und drehen Sie ihn nach
links, um ihn gut zu positionieren.
Page 7

Fassen Sie den S-förmigen
Klingenhalter 2 mit dem Finger
nach oben und drehen Sie ihn
nach rechts.
Es kann entfernt werden.
HINWEIS: Der Hauptkörper und der Becher sollen separat platziert werden,
um unangenehme Gerüche zu vermeiden, die in die Tasse gelangen, wenn
die Nahrung schon in der Tasse vorhanden ist.
 Loading...