

Page 1
Single Cup Coffee Maker
CM-801
User Manual
- HOUSEHOLD USE ONLY -
Page 2
Aicok Coffee Maker User Manual
Thank you for purchasing the Aicok Coffee Maker Product that is designed
to provide consistent brewing results for a sasfying brewing experience
every me. The advanced brewing technology and sengs packed into
this durable and modern product will amaze and delight.
This user manual will provide you with the basic operaon and funcons
that will enable you to quickly understand how to use your Aicok Coffee
Maker Product. Please read these instrucons carefully before use.
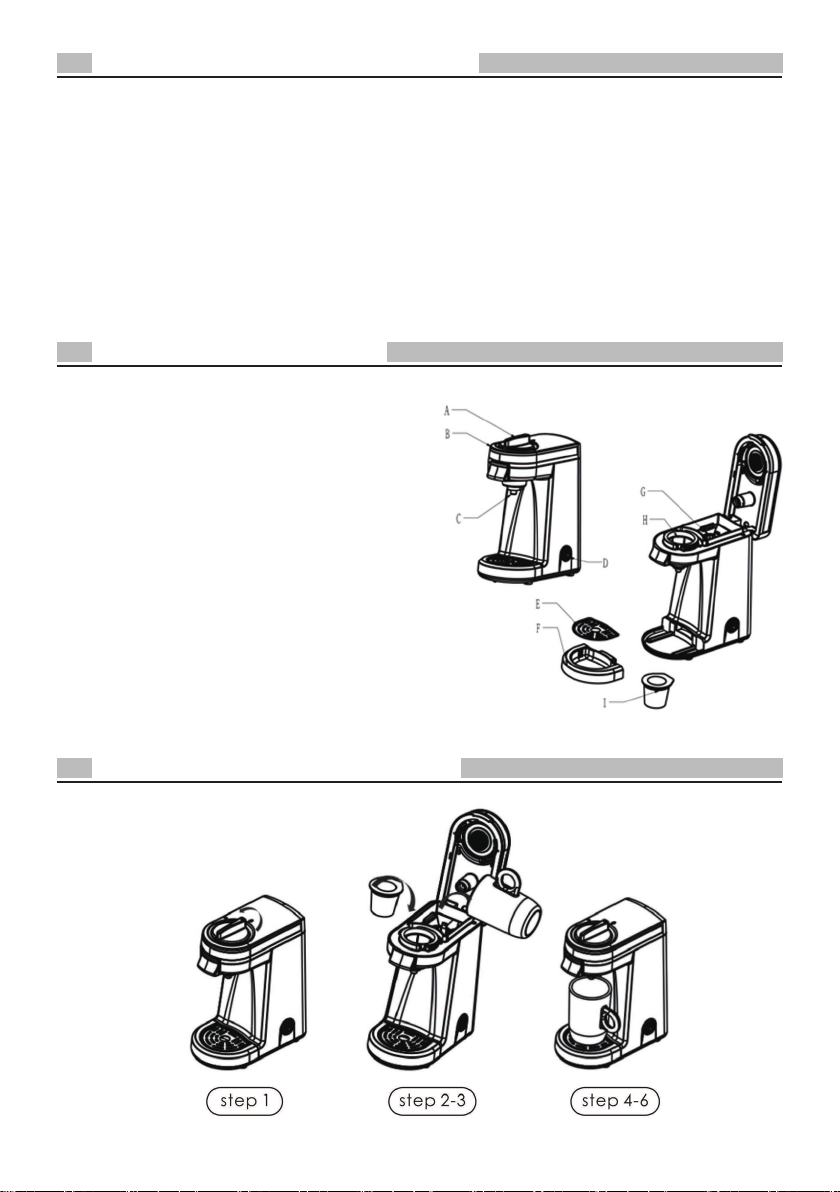
Know Your Coffee Maker
A.Locker Knob
B.Lid Assembly
C.Coffee Outlet
D.Power Buon
E.Drip Tray Cover
F.Drip Tray
G.Water Tank with Filter Basket (max: 12 oz.)
H.Capsule Chamber
I.Capsule for K-Cup®
How To Use Your Coffee Maker
- 1 -
Page 3

1.Turn the Locker Knob to unlocked posion; li up the Lid Assembly to
open. (step 1)
2.Pour the right amount of water into the water tank. The water should
not exceed max 12.7 oz. and no less than 3.5 oz.. (step 2-3)
NOTE: When pour water into the water tank, the Filter Basket must be fit
on the water tank to avoid the coffee powder or other dust fall into the
water tank.
3.Put a Capsule into the Capsule Chamber (step 2-3) and press it down.
4.Close the Lid Assembly and turn the Locker Knob to Locker posion.(step
4-6)
5.Place Cup on the Drip Tray Cover. Please make sure that the middle of
the cup is under the Coffee Outlet.(step 4-6)
NOTE: Remove drip tray to adjust the height of the Cup.
6.Plug into the power supply and press the power buon to turn on the
machine. The indicator light will flash as the boiler heats up. Aer heang,
the water is pumped out and the light will be on ll the end of brewing.
7.The machine will shut off automacally aer brewing.
8.Power buon has brew-interrupted feature, one push to stop, one to
re-start.
9.Please just brew water to clean the water tank for the first use or for use
aer a long period of me.
NOTE: Don’t try to open the Lid Assembly when the machine is working.
Cleaning and Maintenance
To clean the outside of the brewer:
1.Unplug the machine and let it cool down before cleaning.
2.Use a clean damp cloth to clean all outside surface. Do not use harsh
abrasives to clean.
3.When cleaning the Capsule Chamber, you can take out and rinse the
coffee outlet periodically, place cup on the Drip Tray Cover and then pour
some pure water to the Capsule Chamber to clean it.
NOTES: 1). Please pay aenon to the stainless steel Piercing p on the
boom of the K-cup Holder and a sharp Plasc Piercing p that
- 2 -
Page 4

punctures the K-cup on the underneath side of the lid assembly, to avoid
risk of injury.
2). Please pay aenon to the sealing around the coffee outlet, and
don’t forget to clean it.
4. Remove drip tray from the machine and li drip tray cover off the drip
tray. Wash all pieces with soap and water.
To Descale The Inside Of The Brewer Unit
Step 1 Fill the water tank with 12.7 oz. Water with household scale
remover(rao 4:1); you can also use citric acid with rao 3%, then close
the lid assembly, place a cup on the drip tray and press power buon to
descale the machine.
Step 2 Empty and rinse the cup aer finishing the Step 1, please pour
about 12 oz. Pure water into water tank, and hen press Power Buon to
implement rinsing process unl the light is off.
Step 3 Repeat Step 2 to remove any remaining descaling material if
necessary. Also you can take out the filter basket, and directly pour no
more than 12.7 oz. pure water into the water tank and shake the machine
some more mes to clean it, and then pour off the dirty water.
Step 4 Please descale for the water tank in a periodical me.
Maintenance is NOT provided in the following circumstance:
a.Improper use such as improper installaon or not using according to the
instrucon.
b.Appliance has been disassembled by unauthorized person.
c.Damage by natural caused.
Storage
1.Please store the appliance out of reach of children.
2.Storage space should be dry and clean, no direct sun exposure ans away
from heat sources.
Cauon
1.If the indicator light keeps flashing fast when the machine is powered
on, it means that the system temperature is too high, please wait for at
- 3 -
Page 5

least 1 minute or pour some cold water into water tank and restart the
machine.
2.When less than 3.5 oz. Of water is poured into the water tank, the
system may not detect it and remain in the high-temperature condion so
that the water may cannot be pumped out. Please pour at least 3.5 oz.
water for use.
3.Once you find the machine pumps water slowly, you need descale ans
clean the water tank.
4.At least one copy of this manual should be kept in some place safe
available all the me to maintenance and management staff.
Important safeguards
When using an electrical appliance, basic safety precauons should
always be followed including the following:
1.Read all instrucons.
2.Do not touch hot surface.
3.To protect against fire, electric shock and injury to persons, do not
immerse cord, plugs, or body in water or other liquid.
4.Close supervision is necessary when any appliance is used by or near
children.
5.Unplug from outlet when not in use and before cleaning. Allow to cool
before pung on or taking off parts and before cleaning the appliance.
6.Do not operate appliance with a damaged cord or plug.
7.Do not let cord hang over edge of table or counter or touch hot surface.
8.Do not place on or near a hot gas or electric burner or in a heated oven.
9.Scalding may occur if the lid is removed during the brewing cycles.
10.Do not use the appliance if socket, cord or unit is damaged.
11.Please keep these instrucons for reference.
Environment Friendly Disposal
You can help protect the environment!
Please remember to respect the local regulaons:
hand in the non-working electrical equipment to an
appropriate waste disposal center.
- 4 -
 Loading...